Bulk SaaS enablement lets eligible agencies convert multiple existing sub-accounts to SaaS Mode without configuring each account individually. You can select the sub-accounts, choose the appropriate billing setup, apply a SaaS plan, and monitor the results from one workflow. Reviewing the payment provider, plan details, and client payment readiness before confirming helps prevent billing or access issues across multiple accounts.
Unlock more value from your sub-accounts by identifying all clients who aren’t yet on SaaS and giving you a guided workflow to enable them all in bulk.
Conditions for Guided Bulk SaaS Activation:

- Agency on the $497/mo Pro plan
- Smart Prompts for SaaS Enablement enabled in Labs
- Have more than 10 sub-accounts
- At least 1 sub-account not on SaaS

Results of Bulk SaaS Activation:
- Specified sub-accounts will automatically be converted to SaaS
- If a sub-account has a card on file, there will be no interruption
- If a sub-account does not have a card on file, then the sub-account will be locked until the client adds a card
What Is Bulk SaaS Enablement?
Bulk SaaS enablement allows eligible agencies to apply SaaS Mode to multiple existing sub-accounts at the same time. Instead of converting each sub-account individually, you can select several accounts, choose the billing configuration and SaaS plan, and process them together as a Bulk Action.
The bulk workflow is useful when you already manage several existing sub-accounts and want to transition them to your SaaS offering efficiently.
The process generally includes:
- Selecting eligible sub-accounts
- Choosing the SaaS billing setup
- Selecting the SaaS plan
- Reviewing plan details
- Confirming the bulk action
- Monitoring successful and failed activations
Key Benefits of Bulk SaaS Enablement
Bulk activation reduces repetitive work while helping agencies apply a consistent SaaS configuration across multiple client accounts. It is especially useful when migrating an existing client base to SaaS Mode or standardizing subscriptions across a group of sub-accounts.
- Faster onboarding: Convert multiple existing sub-accounts to SaaS Mode without configuring each one individually.
- Consistent plan assignment: Apply the same SaaS plan across the selected accounts in one bulk action.
- Centralized billing setup: Choose the appropriate configured payment-provider setup before activation.
- Reduced manual work: Minimize repetitive SaaS configuration when managing a larger client base.
- Better visibility: Monitor successes, failures, and available failure reasons from Bulk Action History.
Eligibility Requirements
Bulk SaaS enablement is available only when the agency and selected sub-accounts meet the applicable requirements. Confirming eligibility first can help explain why the bulk activation option or guided prompt may not appear.
The guided bulk SaaS experience can depend on conditions such as:
- Your agency being on an eligible HighLevel plan, including the applicable Pro plan requirement.
- Smart Prompts for SaaS Enablement being enabled in Labs where that requirement still applies to your account.
- The agency having more than 10 sub-accounts for the guided prompt experience.
- At least one eligible sub-account not already being enabled for SaaS.
Sub-accounts that are already on SaaS do not need to be converted again.
If bulk activation is unavailable, an eligible existing sub-account can still be converted individually through the supported SaaS Mode conversion workflow.
Before You Enable SaaS in Bulk
Bulk activation can affect subscription billing, client entitlements, included services, and payment readiness across several accounts at once. Reviewing the setup before you begin helps ensure the selected plan and billing configuration are appropriate for every sub-account included in the action.
Before starting:
- Confirm that the intended sub-accounts should all use the same SaaS plan.
- Verify that the correct payment-provider setup is configured.
- Review the pricing and rebilling settings of the SaaS plan.
- Review any included add-ons, Marketplace apps, and custom menu links.
- Understand what will happen for clients who do not yet have a valid payment method.
- Confirm that the selected accounts are ready to move into SaaS Mode.
Important: Bulk activation applies changes across multiple sub-accounts. Review the selected accounts and plan carefully before confirming the action.
SaaS Billing Setup: SaaS V1 vs. SaaS V2
HighLevel supports different SaaS billing architectures, which can affect what you see during payment-provider selection. Understanding the difference helps explain why one agency may see a Stripe-based setup while another may be asked to choose an Agency Sub-Account and another supported provider.
At a high level:
- SaaS V1: Uses Stripe as the payment provider and system of record for the SaaS subscription.
- SaaS V2: Uses HighLevel as the system of record and supports payment providers configured through an Agency Sub-Account.
The options available during bulk activation depend on your agency's existing SaaS billing configuration.
For complete SaaS V1 and SaaS V2 setup information, see Getting Started with the SaaS Configurator in the Related Articles section.
Choose a Payment Provider
The payment-provider selection determines which configured billing setup will manage the SaaS subscriptions for the selected sub-accounts. The options shown depend on how your agency has configured SaaS Mode.
For supported Stripe-based setups:
HighLevel can use the connected agency Stripe account associated with the SaaS configuration.
For supported SaaS V2 or other payment-provider setups:
You may be prompted to select an Agency Sub-Account that manages the SaaS billing configuration.
The available payment provider depends on what has been configured for that Agency Sub-Account.
This step can also create or associate the required customer billing profiles for the selected sub-accounts as part of the SaaS activation process.
Select and Review a SaaS Plan
The SaaS plan determines what the selected sub-accounts receive and how their subscriptions are configured. Reviewing the full plan details before applying it in bulk helps prevent unexpected billing, feature, or entitlement differences.
Select the SaaS plan you want to apply.
Review the plan name and pricing.
Click Show Full Details when available.
Review the included configuration before proceeding.
Plan details can include:
Rebilling rates
Included add-ons
Marketplace apps
Custom menu links
Other plan-level entitlements
Important: Included add-ons and rebilling settings can affect agency costs and client billing. Verify the plan before applying it to multiple sub-accounts.
What Happens When a Client Does Not Have a Payment Method?
A sub-account can be moved into SaaS Mode even when the client still needs to provide payment information. Understanding the difference between SaaS activation and payment readiness helps prevent confusion after the bulk action completes.
When a client does not have the required payment method available, the SaaS subscription may remain On Hold until the client adds valid payment details.
This means:
- The bulk action may process the sub-account into SaaS Mode.
- The subscription may still require client payment information before normal SaaS billing proceeds.
- The client may need to complete the applicable payment step before receiving normal subscription access.
Review the affected sub-account after activation if its subscription is not fully active.
Monitor Bulk SaaS Activation Results
Bulk SaaS activation can produce mixed results when some sub-accounts process successfully and others encounter configuration or billing issues. Bulk Action History lets you review the outcome instead of assuming every selected account completed successfully.
To review the results:
Go to Agency View > Sub-Accounts.
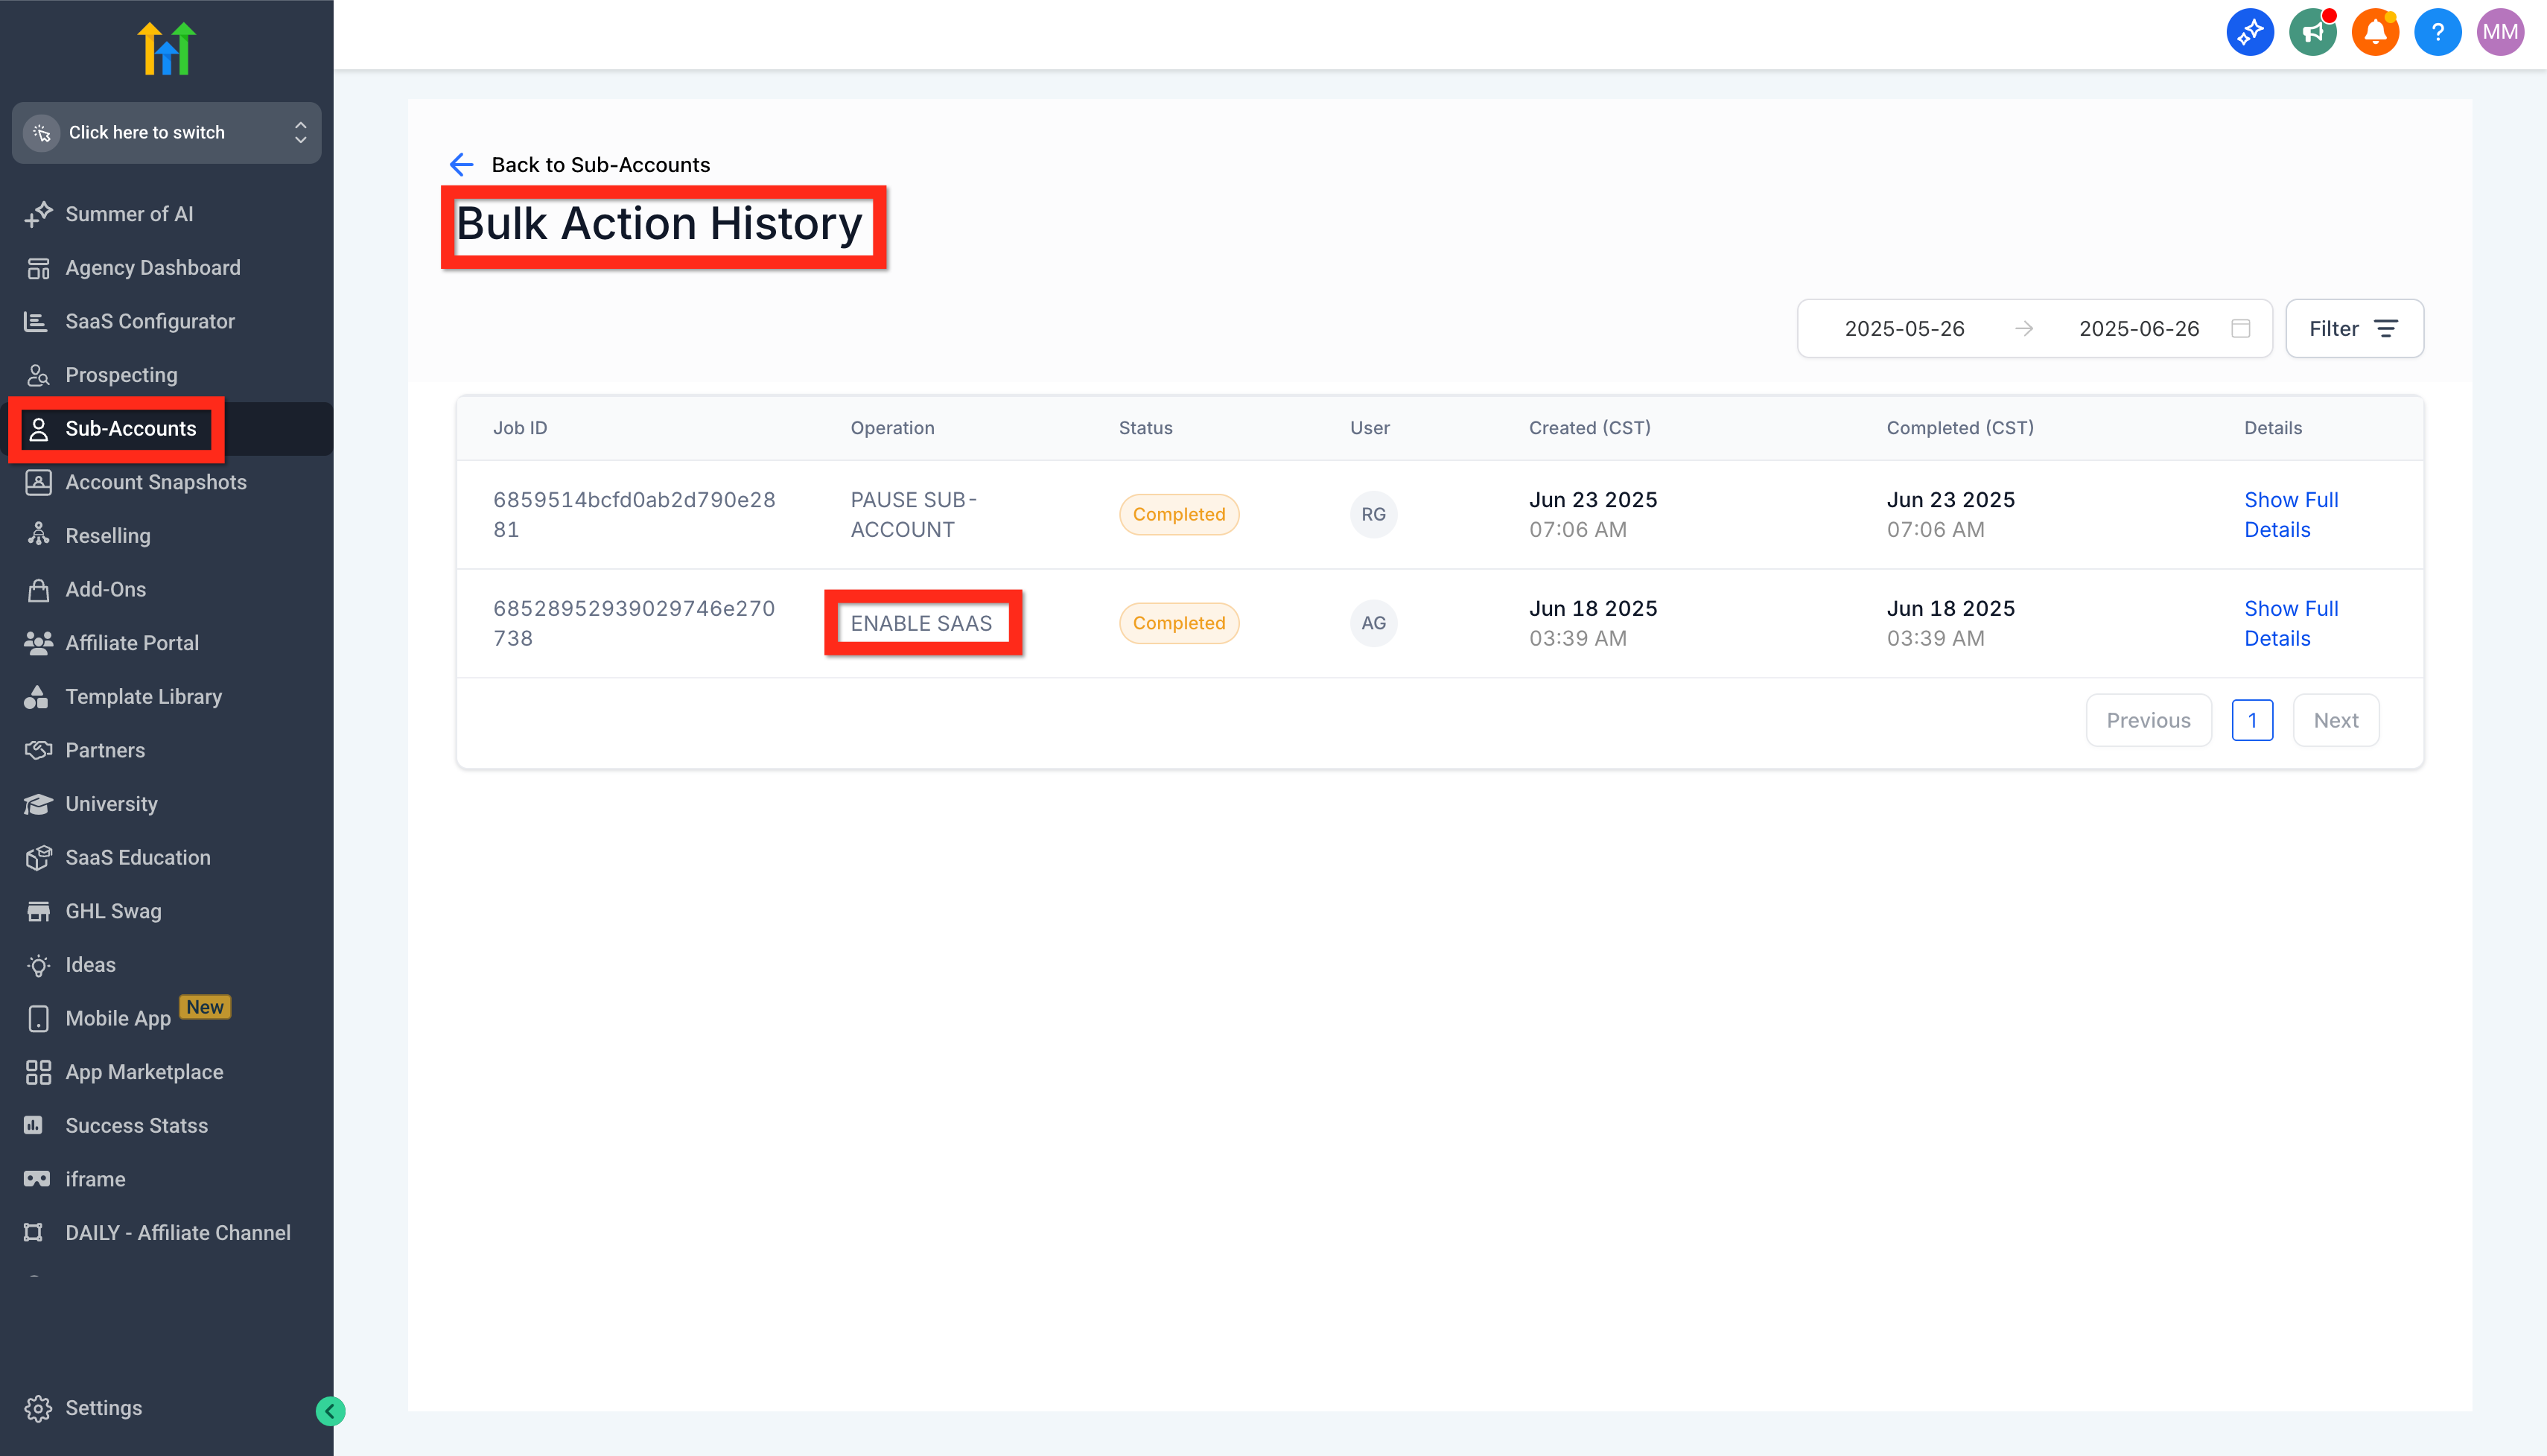
Open Bulk Action History using the available history/clock control.
Locate the SaaS enablement job.
Open the Bulk Action details.
Review which sub-accounts:
Completed successfully
Failed
Review the available failure reason for any sub-account that did not complete.
If a sub-account fails:
Review the failure reason.
Correct the underlying billing, account, plan, or configuration issue.
Retry the supported SaaS activation workflow after the issue has been resolved.
How To Use Guided Bulk SaaS Activation
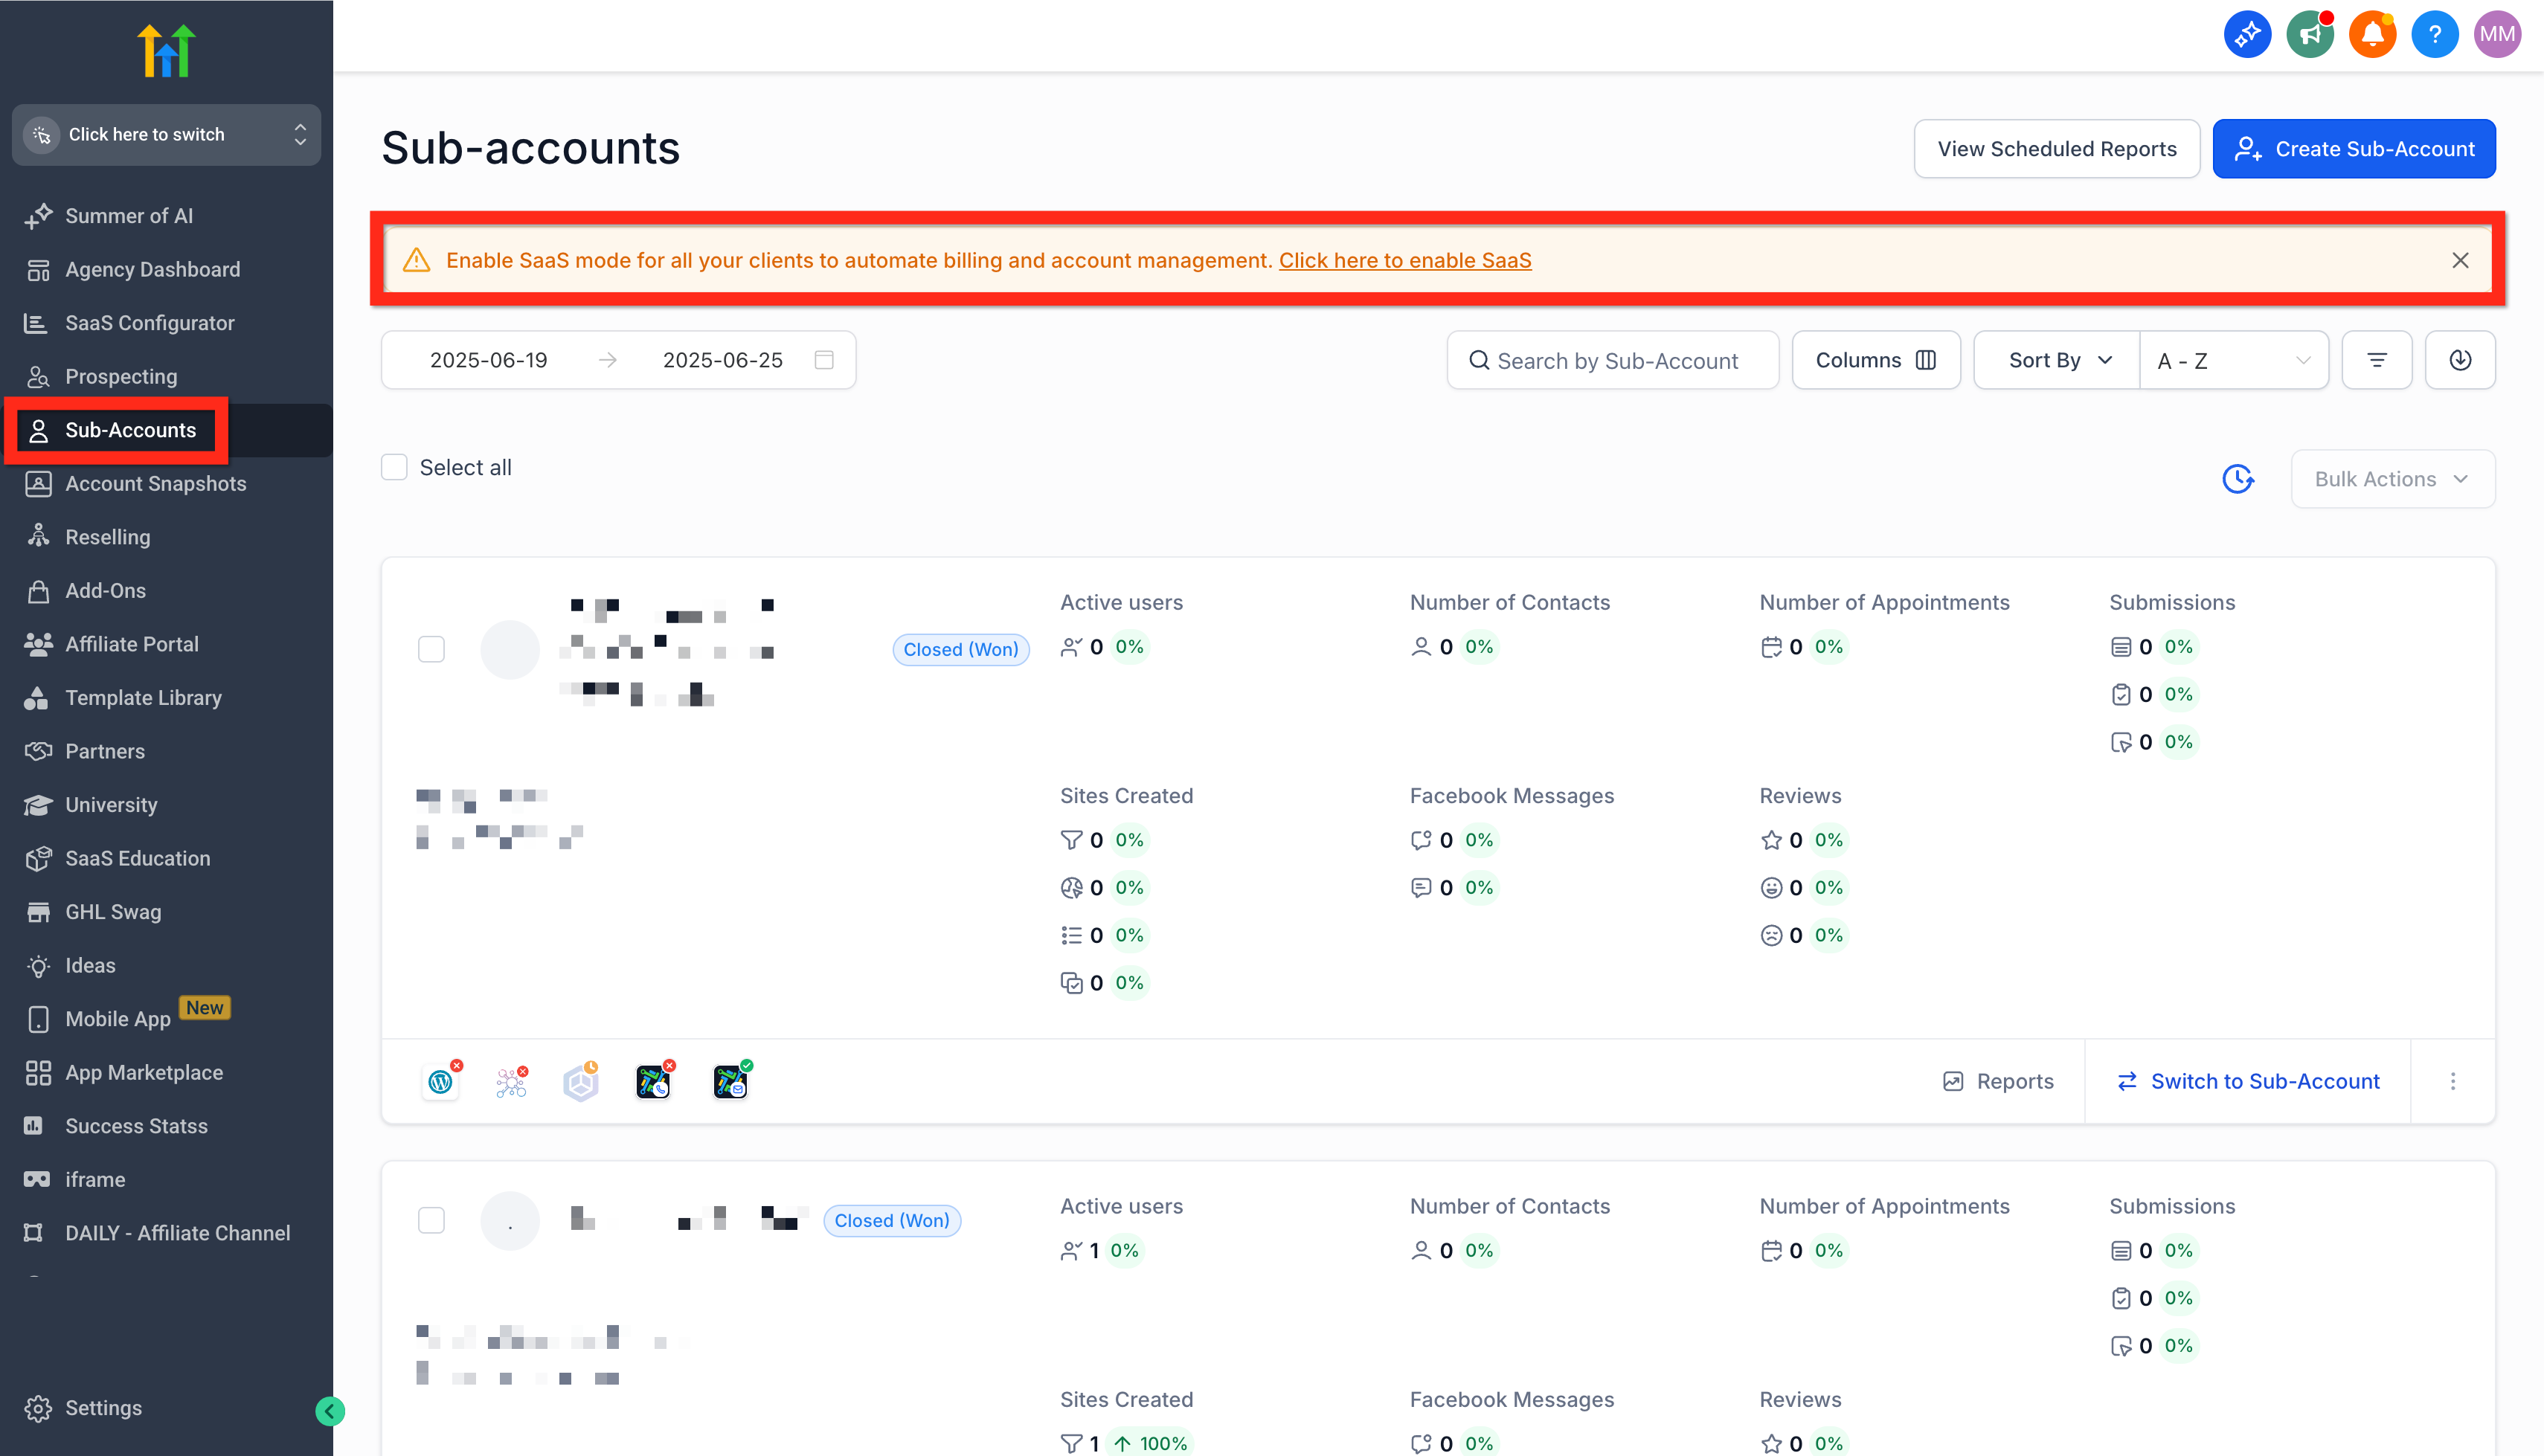
Step 1: Navigate to Sub-Accounts and click the Prompt
On your Agency Account > Sub-accounts page, if the conditions are met, you will see the prompt in yellow. Click the words "Click here to enable SaaS".
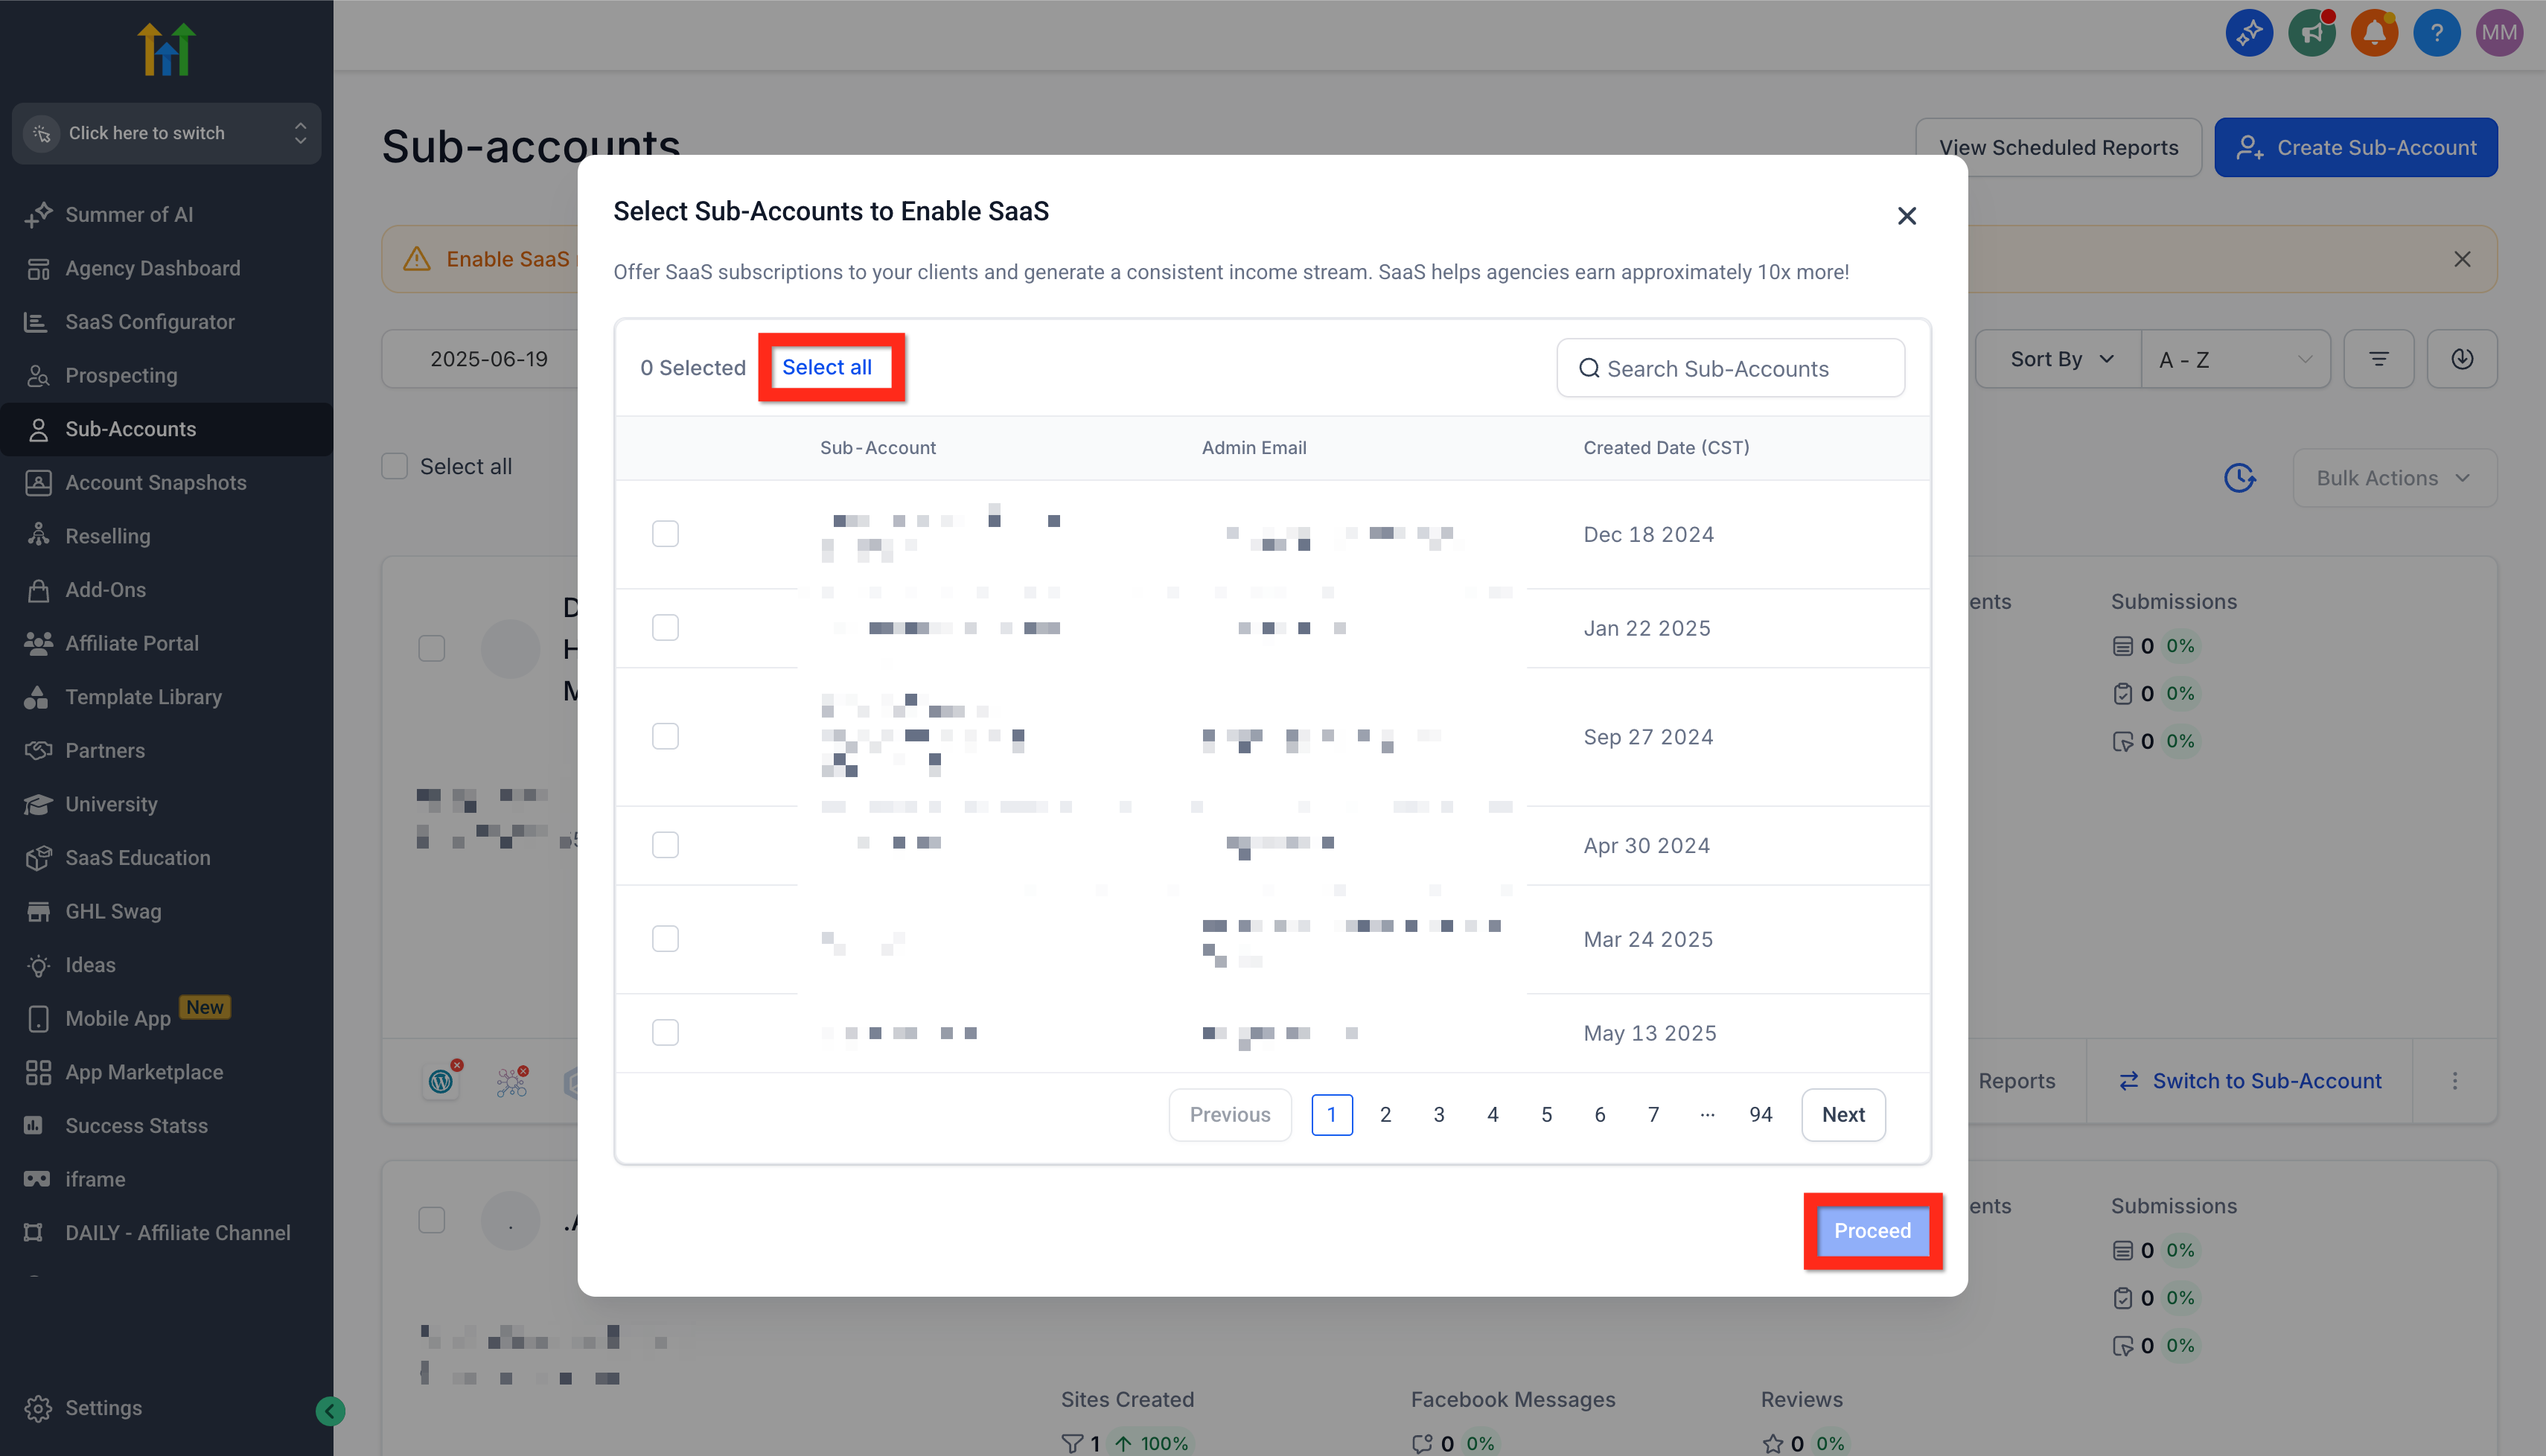
Step 2: Select Sub-accounts (All or Select Multiple) and Proceed
In the modal titled "Select Sub-Accounts to Enable SaaS" check the Sub-Accounts you want (or click Select All) and then click Proceed.
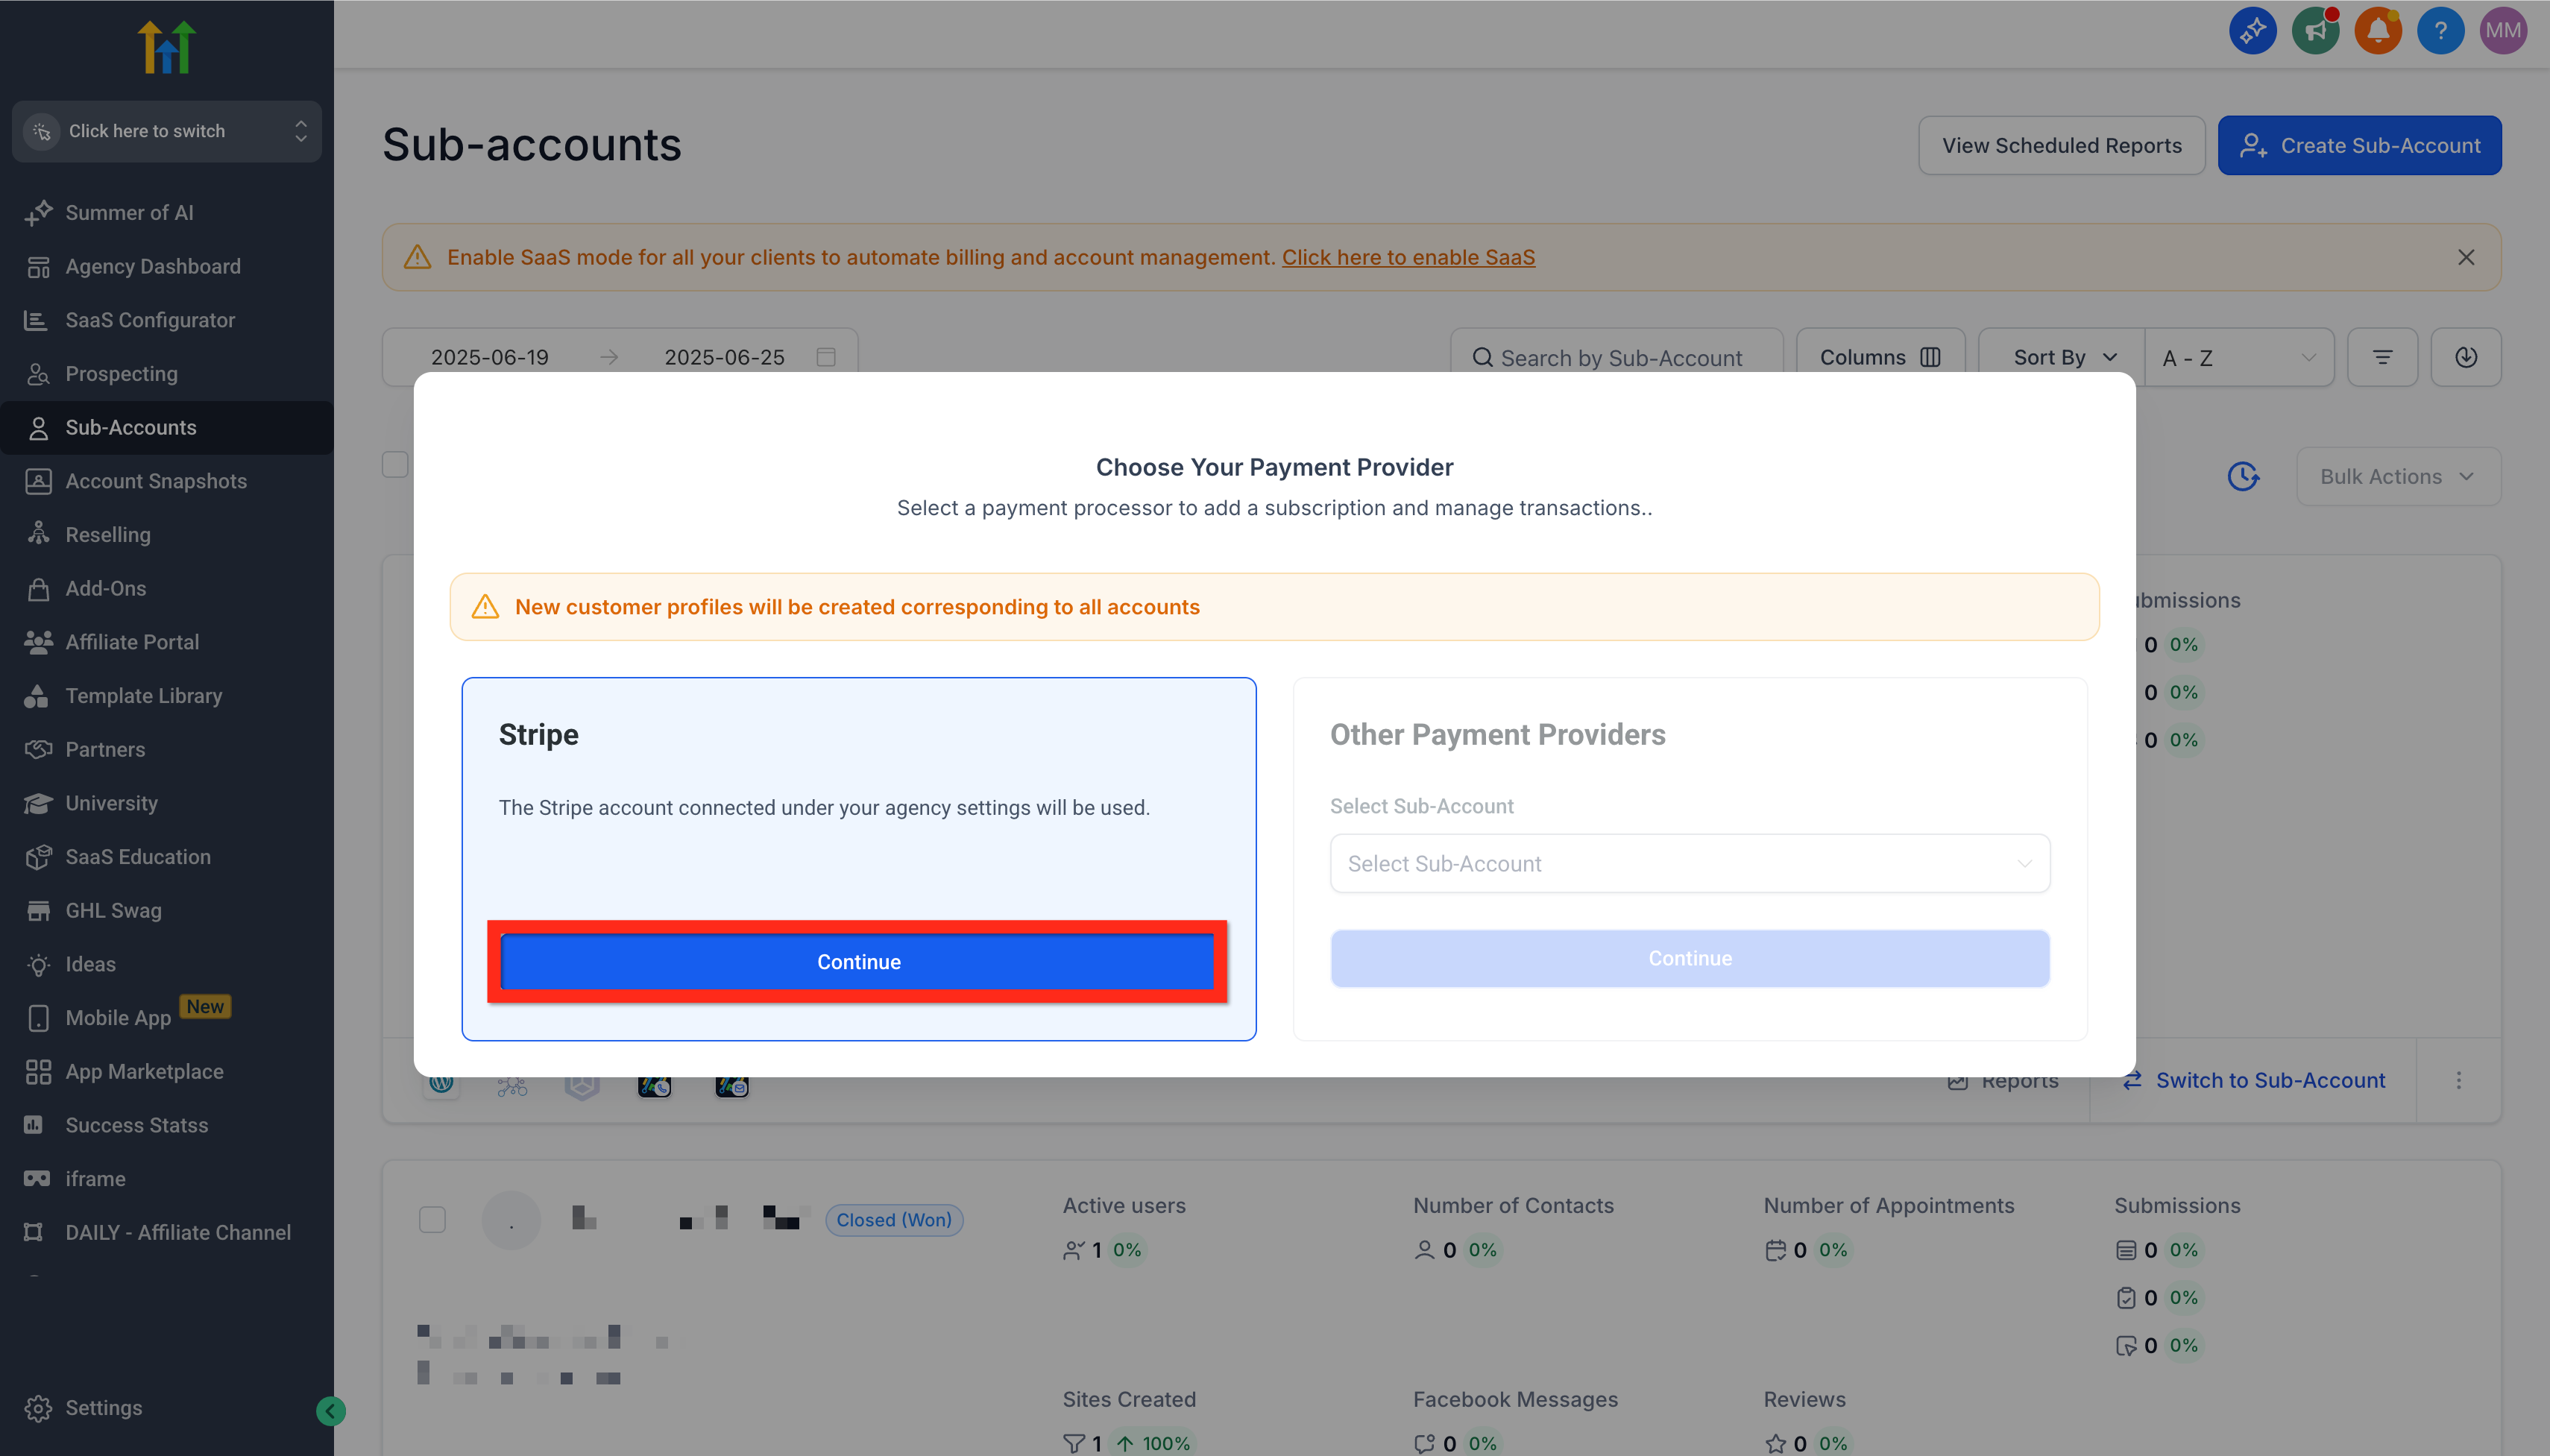
Step 3: Choose Payment Provider (Stripe)
On the new modal titled "Choose your payment provider" click Continue under Stripe, or choose a different payment provider.
Step 4: Choose the SaaS Plan
Review plan details before you continue. In the Select Subscription Plan modal, HighLevel now shows more information about each plan so you can confirm what you are enabling.
- Click on the Show Full Details option above the select Plan button.

- You can review: Rebilling rates, Add-ons included in the plan, Marketplace apps included with the plan, Custom menu links included with the plan.

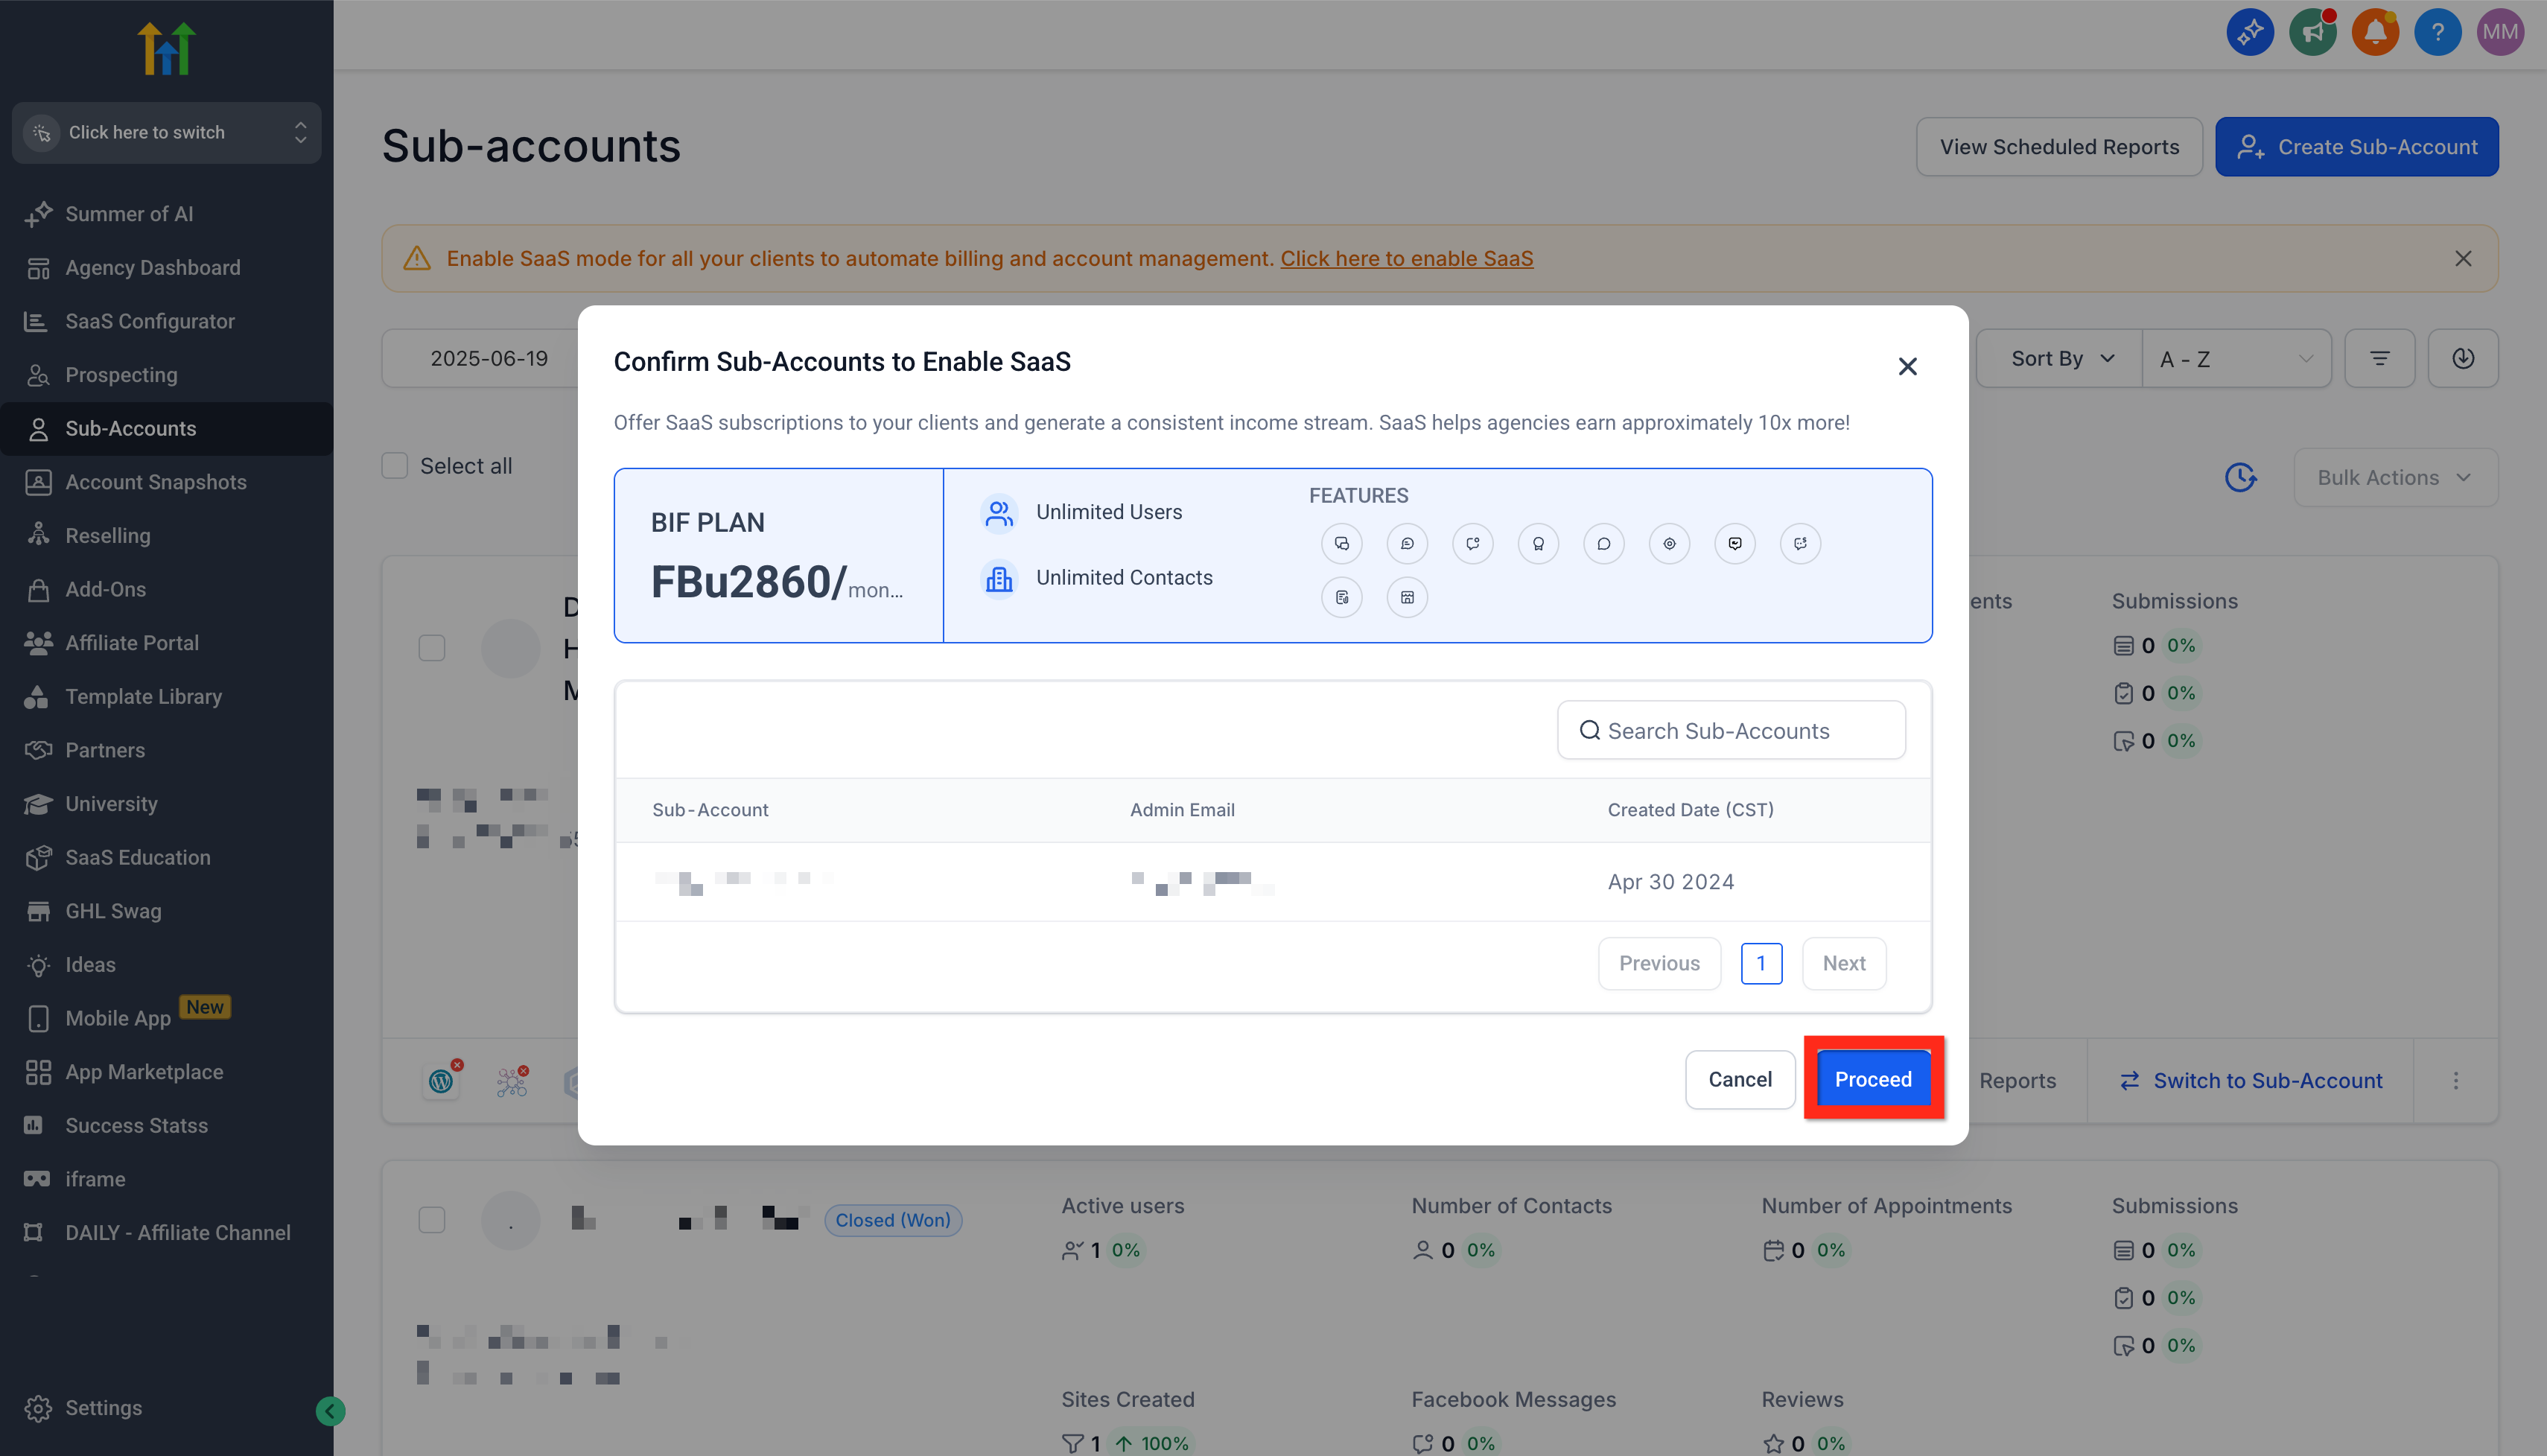
Step 5: Review and Confirm
On the new modal titled "Confirm Sub-Accounts to Enable SaaS" review your selection of SaaS plan and subaccounts. When you are satisfied, click Proceed. This will start the process.
Step 6: Monitor Bulk Actions History
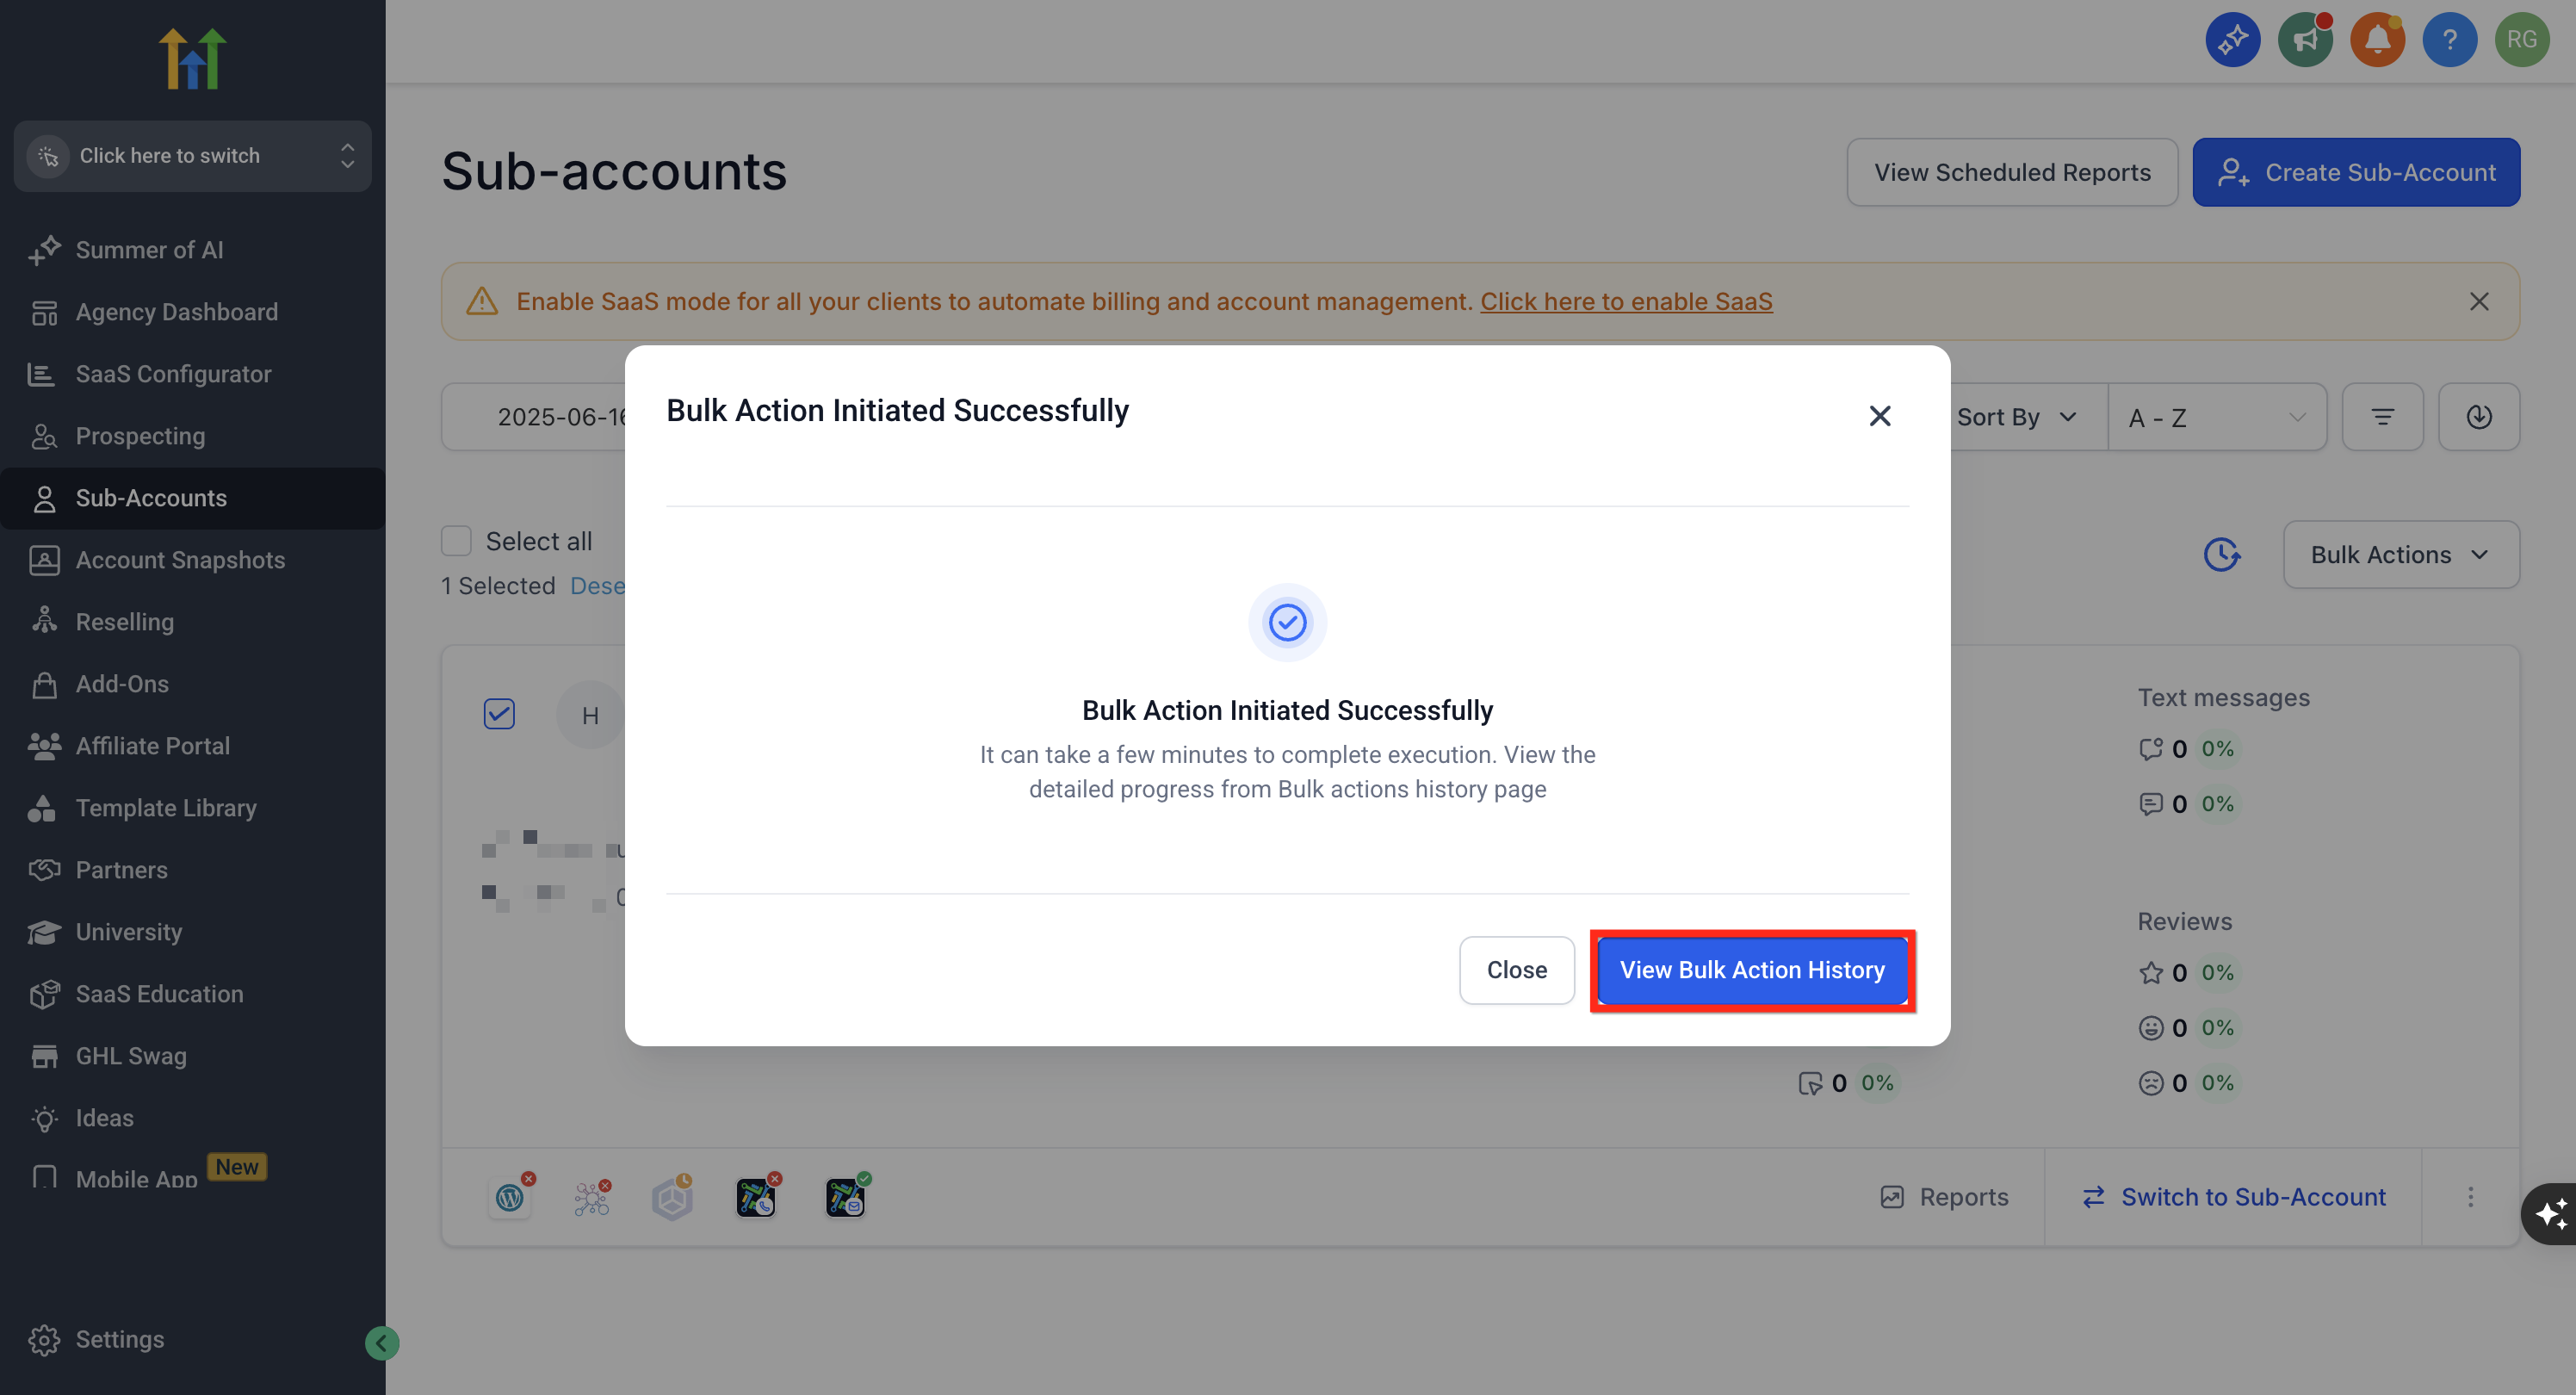
On the new modal titled "Bulk Action Initiated Successfully" you will see a note "it can take a few minutes to complete execution. View the detailed progress from Bulk Actions History page." Click on View Bulk Action History to monitor.
Step 7: Return to Bulk Action History
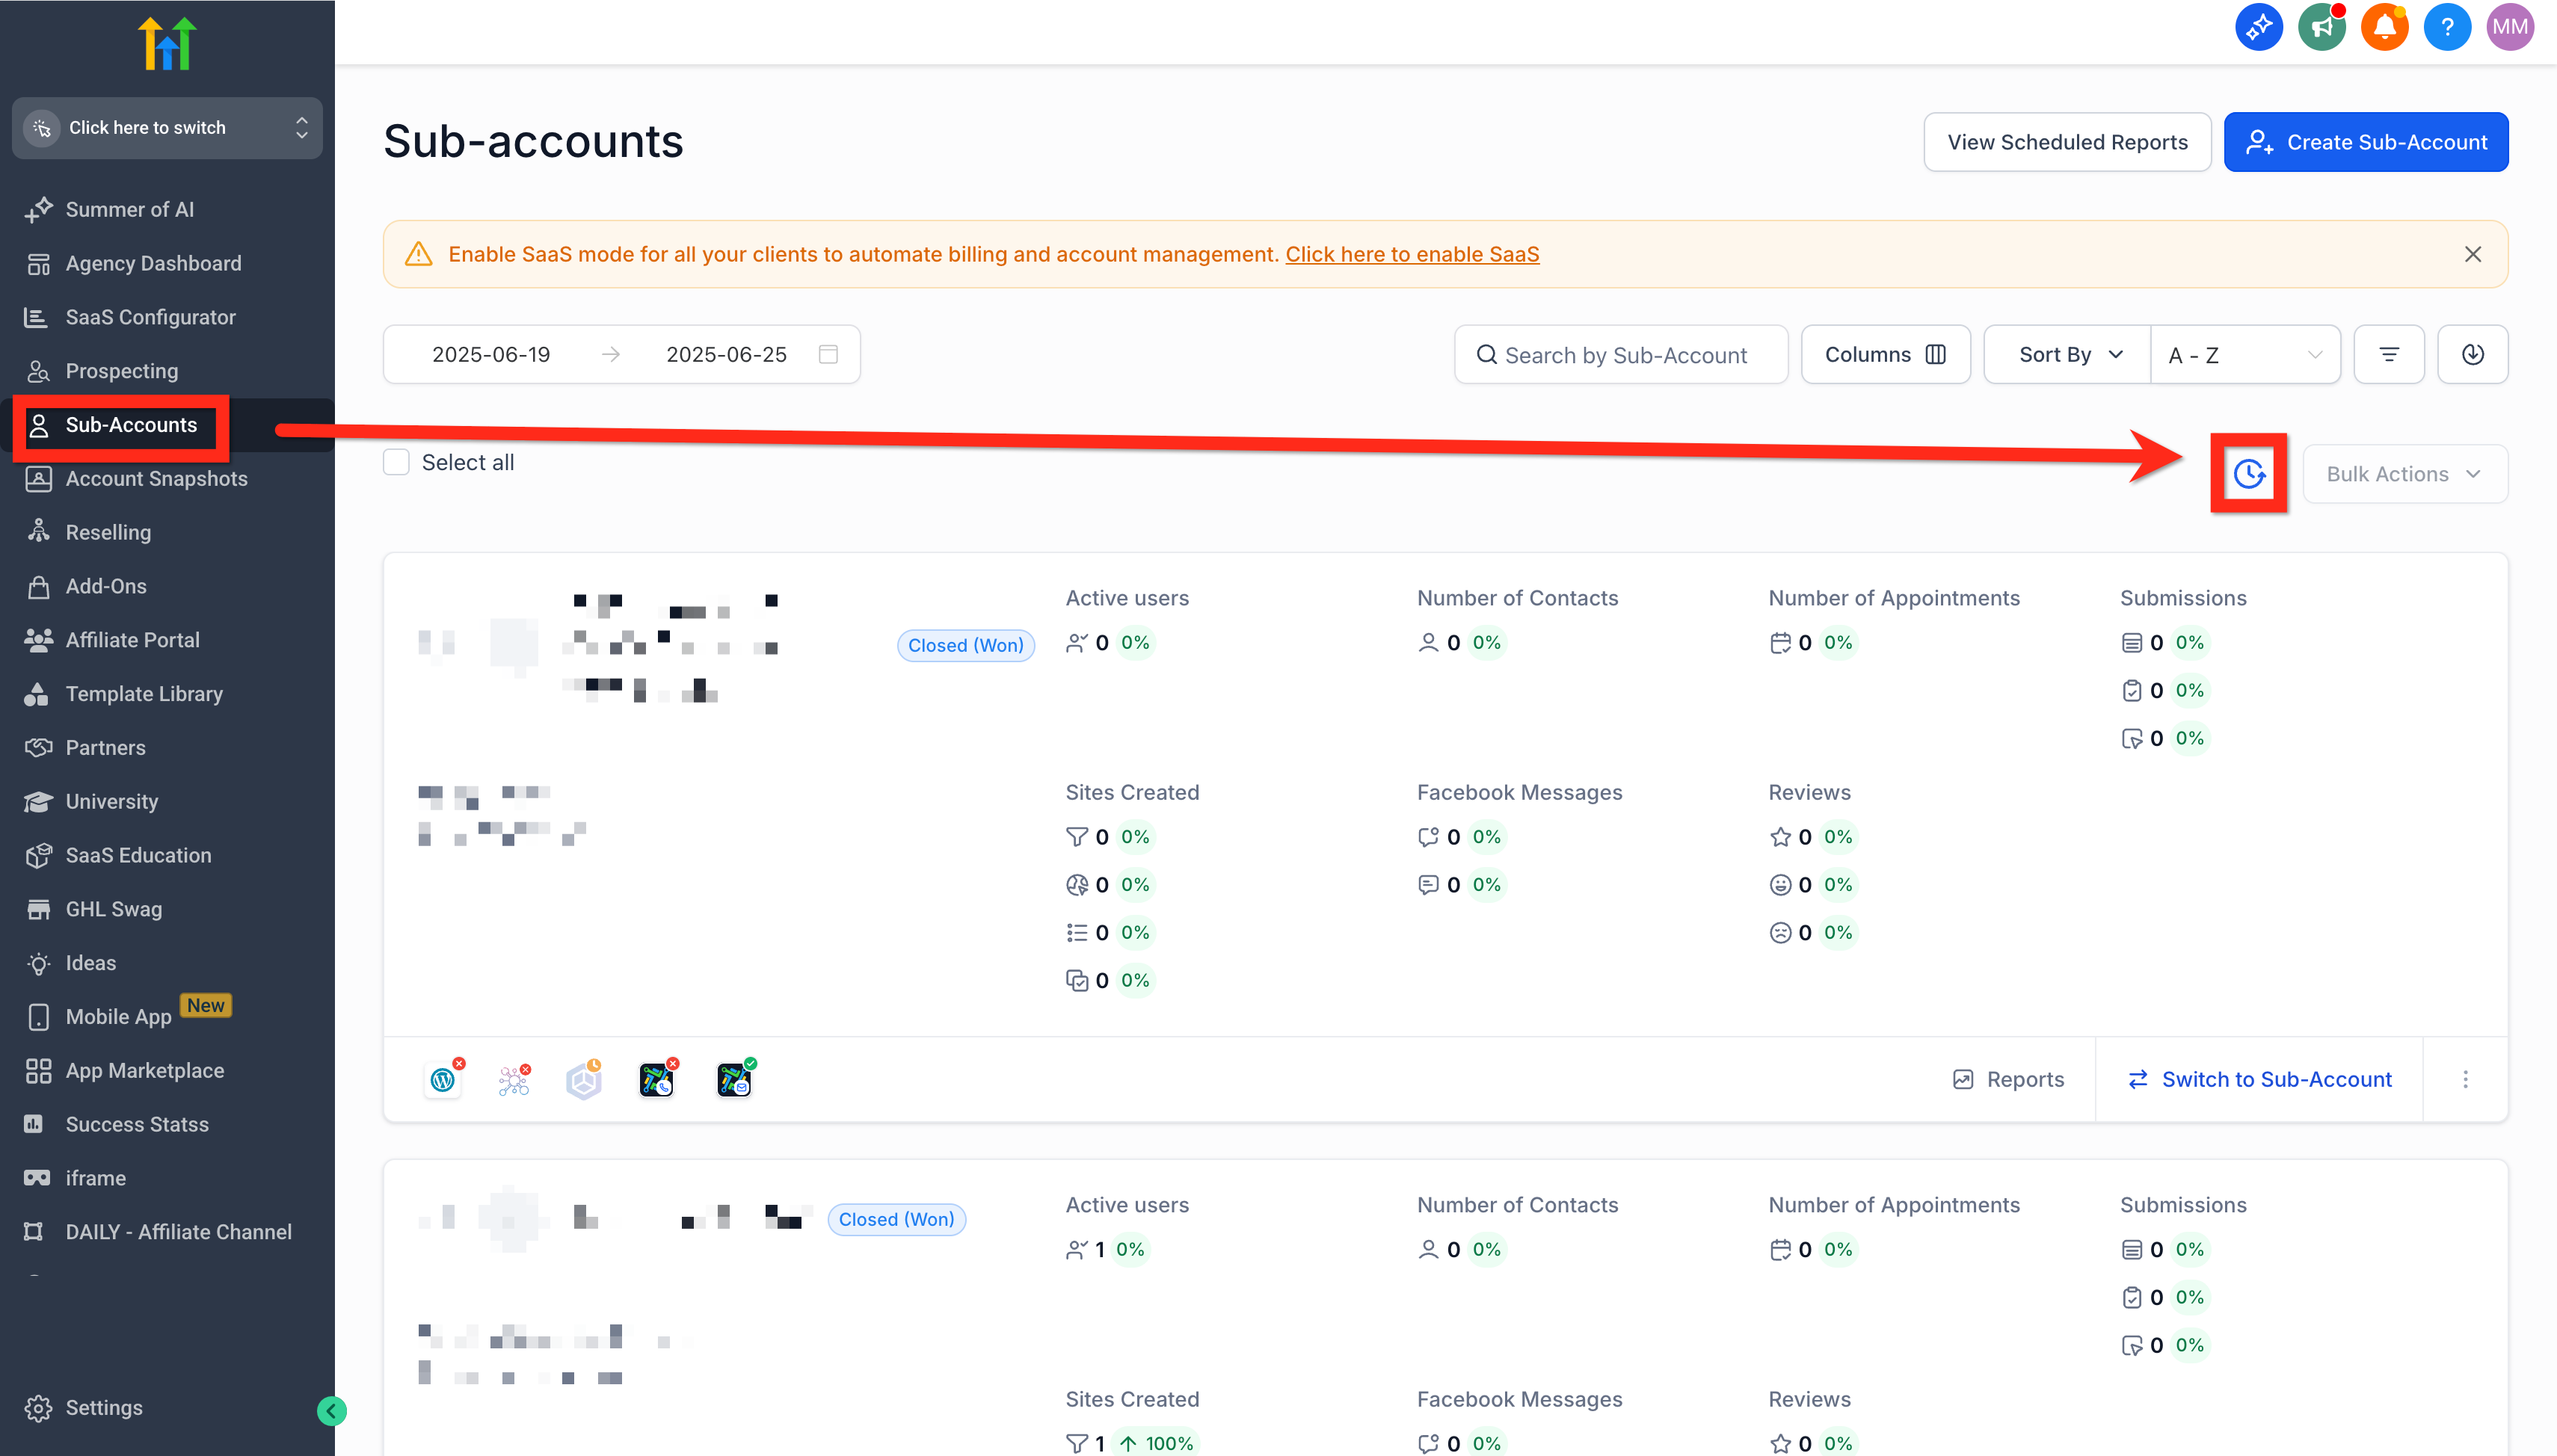
When the modal is closed, at any time, you can navigate to Agency Account > Sub-Accounts > Bulk Action History (clock icon).
Frequently Asked Questions
Q: Why don't I see the Enable SaaS bulk action?
Availability can depend on your agency plan, account configuration, SaaS setup, eligible sub-accounts, and applicable Labs requirements. If the bulk option is unavailable, check whether the selected sub-accounts are eligible and whether your agency meets the requirements for bulk SaaS enablement.
Q: Can I bulk-enable sub-accounts that are already on SaaS?
Sub-accounts that are already enabled for SaaS do not need to be converted again. Bulk enablement is intended for eligible existing sub-accounts that are not already operating in SaaS Mode.
Q: Can I apply different SaaS plans to different sub-accounts in the same bulk action?
The bulk workflow is designed to apply the selected SaaS plan to the accounts included in that action. If different groups of sub-accounts need different plans, process them in separate bulk actions.
Q: What happens if a client does not have a payment method?
The SaaS subscription may remain On Hold until the client provides the required payment information. Review the sub-account's subscription status after activation if billing has not become active.
Q: Why am I being asked to select an Agency Sub-Account?
In supported SaaS V2 configurations, an Agency Sub-Account can manage the payment-provider setup used for SaaS subscriptions. The Agency Sub-Account you select determines which configured billing environment is used.
Q: What is the difference between Stripe and Other Payment Providers during activation?
The available options depend on the agency's SaaS billing architecture. Stripe-based SaaS setups can use the connected Stripe configuration, while SaaS V2 can use supported payment providers configured through an Agency Sub-Account.
Q: Can some sub-accounts succeed while others fail?
Yes. A bulk job can contain both successful and failed sub-accounts. Open Bulk Action History and review the job details to see the result for each account.
Q: Where can I find the reason a sub-account failed?
Open Bulk Action History, select the SaaS activation job, and review the individual sub-account results. HighLevel displays available failure information for accounts that did not complete successfully.
Related Articles
Was this article helpful?
That’s Great!
Thank you for your feedback
Sorry! We couldn't be helpful
Thank you for your feedback
Feedback sent
We appreciate your effort and will try to fix the article