Tags for Sub-Accounts in HighLevel help agencies organize client accounts using custom labels. You can assign multiple tags to an account, filter or group accounts by tag, and save filtered views as Smart Lists. Tags are useful for tracking onboarding stages, industries, service levels, and internal account categories. This article explains how to create, apply, and manage tags from Agency View.
TABLE OF CONTENTS
- What Are Tags for Sub-Accounts?
- Key Benefits of Sub-Account Tags
- How to Create and Manage Tags for Sub-Accounts
- Creating and Assigning Tags
- Managing Tags
- Filtering and Grouping Sub-Accounts
- Saving Tag-Based Smart Lists
- Frequently Asked Questions
- Related Articles
What Are Tags for Sub-Accounts?
Sub-Account Tags are customizable labels that help agencies categorize the client accounts they manage.
For example, one sub-account can have Dental, Onboarding, and VIP tags. You can then use those labels to find and organize related accounts.
Sub-Account Tags are different from Contact tags. Sub-Account Tags organize accounts in Agency View, while Contact tags organize individual Contacts inside a sub-account.
Availability: Access to Tags for Sub-Accounts may depend on your agency plan and user permissions. The exact plan eligibility and tag-management permissions require confirmation.
Key Benefits of Sub-Account Tags
Tags provide a flexible way to organize client portfolios without relying on a single category.
Custom Organization: Categorize accounts by industry, service level, lifecycle stage, or team.
Multiple Tags: Apply several labels to the same account.
Quick Filtering: Find accounts that match selected tags.
Grouped Views: Review tag-based groups with account counts.
Reusable Smart Lists: Save filtered account views for future use.
Simpler Management: Edit, reassign, delete, or apply tags in bulk using supported controls.
How to Create and Manage Tags for Sub-Accounts
A consistent tagging workflow makes it easier to organize accounts and reuse filtered views. The following steps demonstrate the main operations.
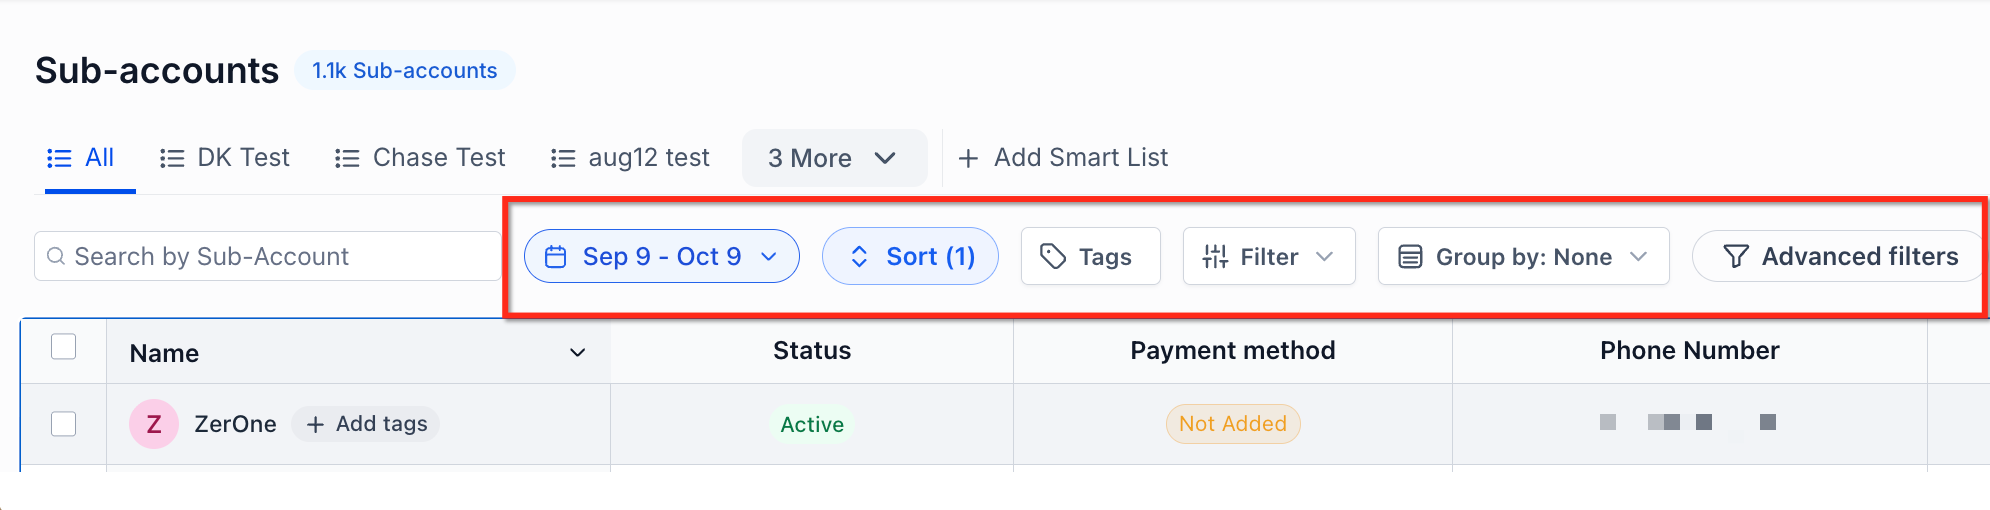
Step 1: Open Sub-Accounts
The Sub-Accounts list contains the controls used to organize and manage agency client accounts.
Switch to Agency View.
Open Sub-Accounts.
Locate Tags in the toolbar.
Step 2: Create a Tag
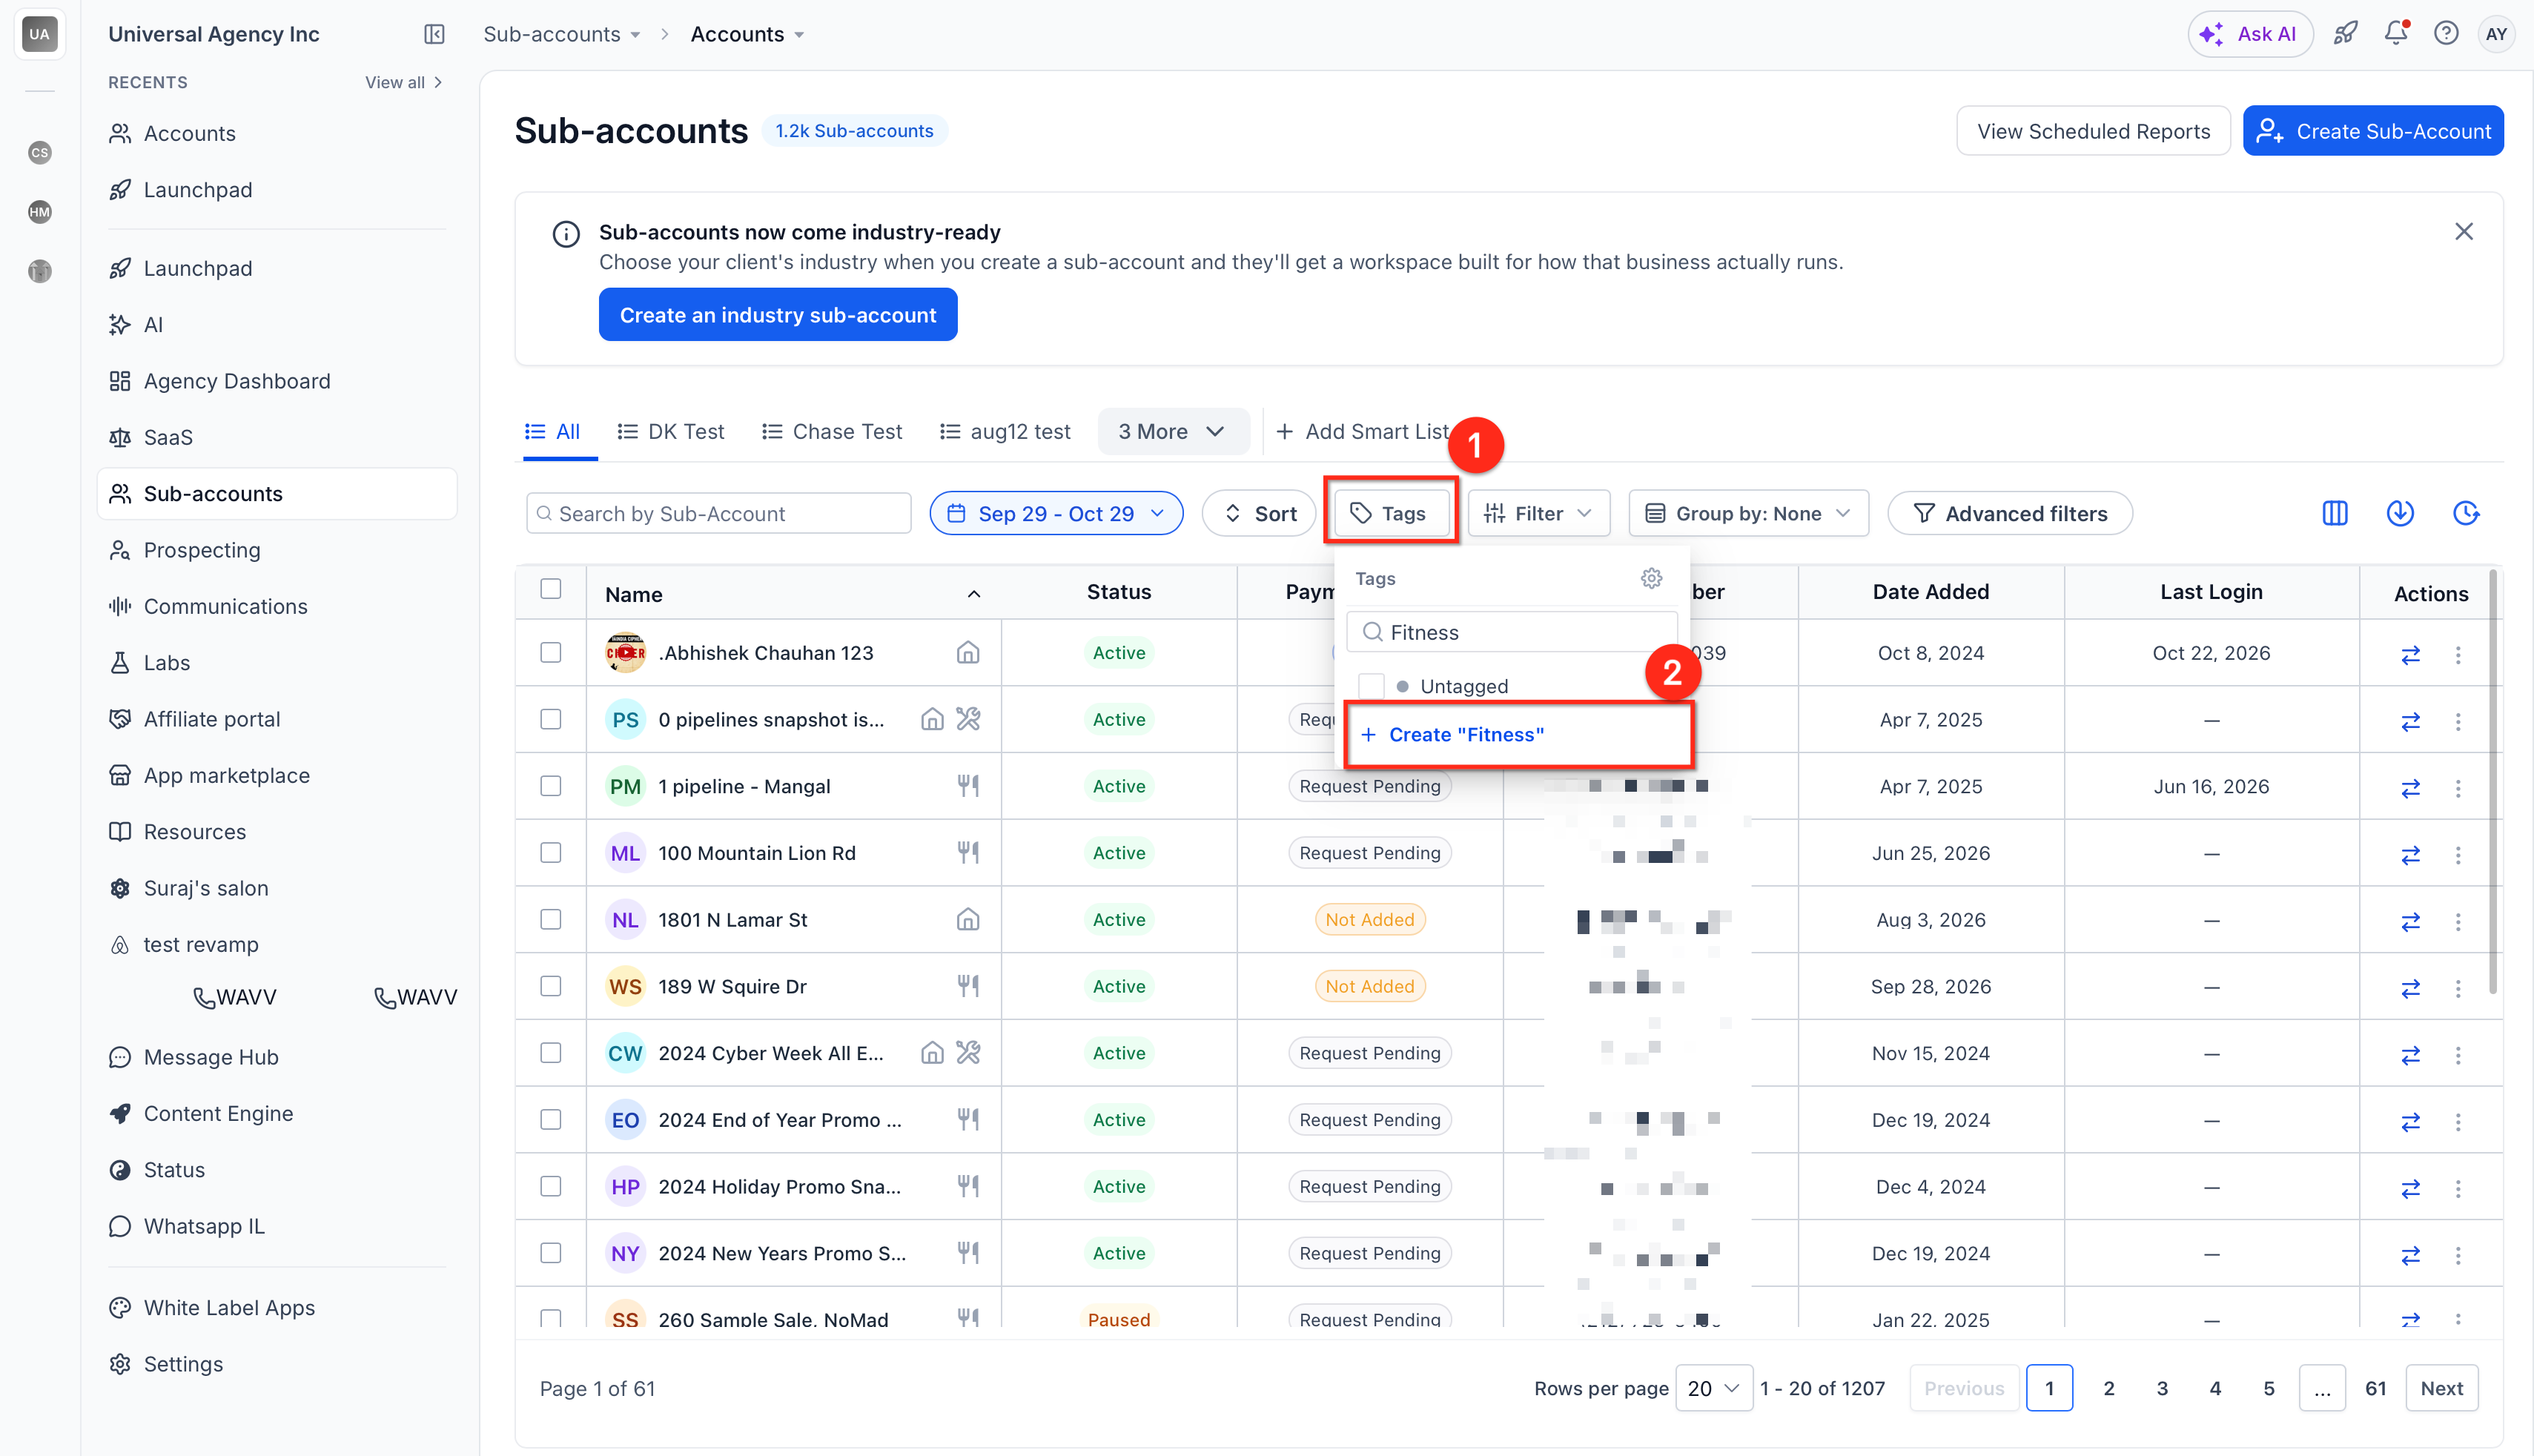
Creating a tag establishes a reusable label for your client accounts.
Click Tags.
Search for the tag name.
Select the available option to create a new tag.
Enter a name, such as Onboarding.
Choose a color if prompted.
Complete the creation action.
Step 3: Assign Tags to an Account
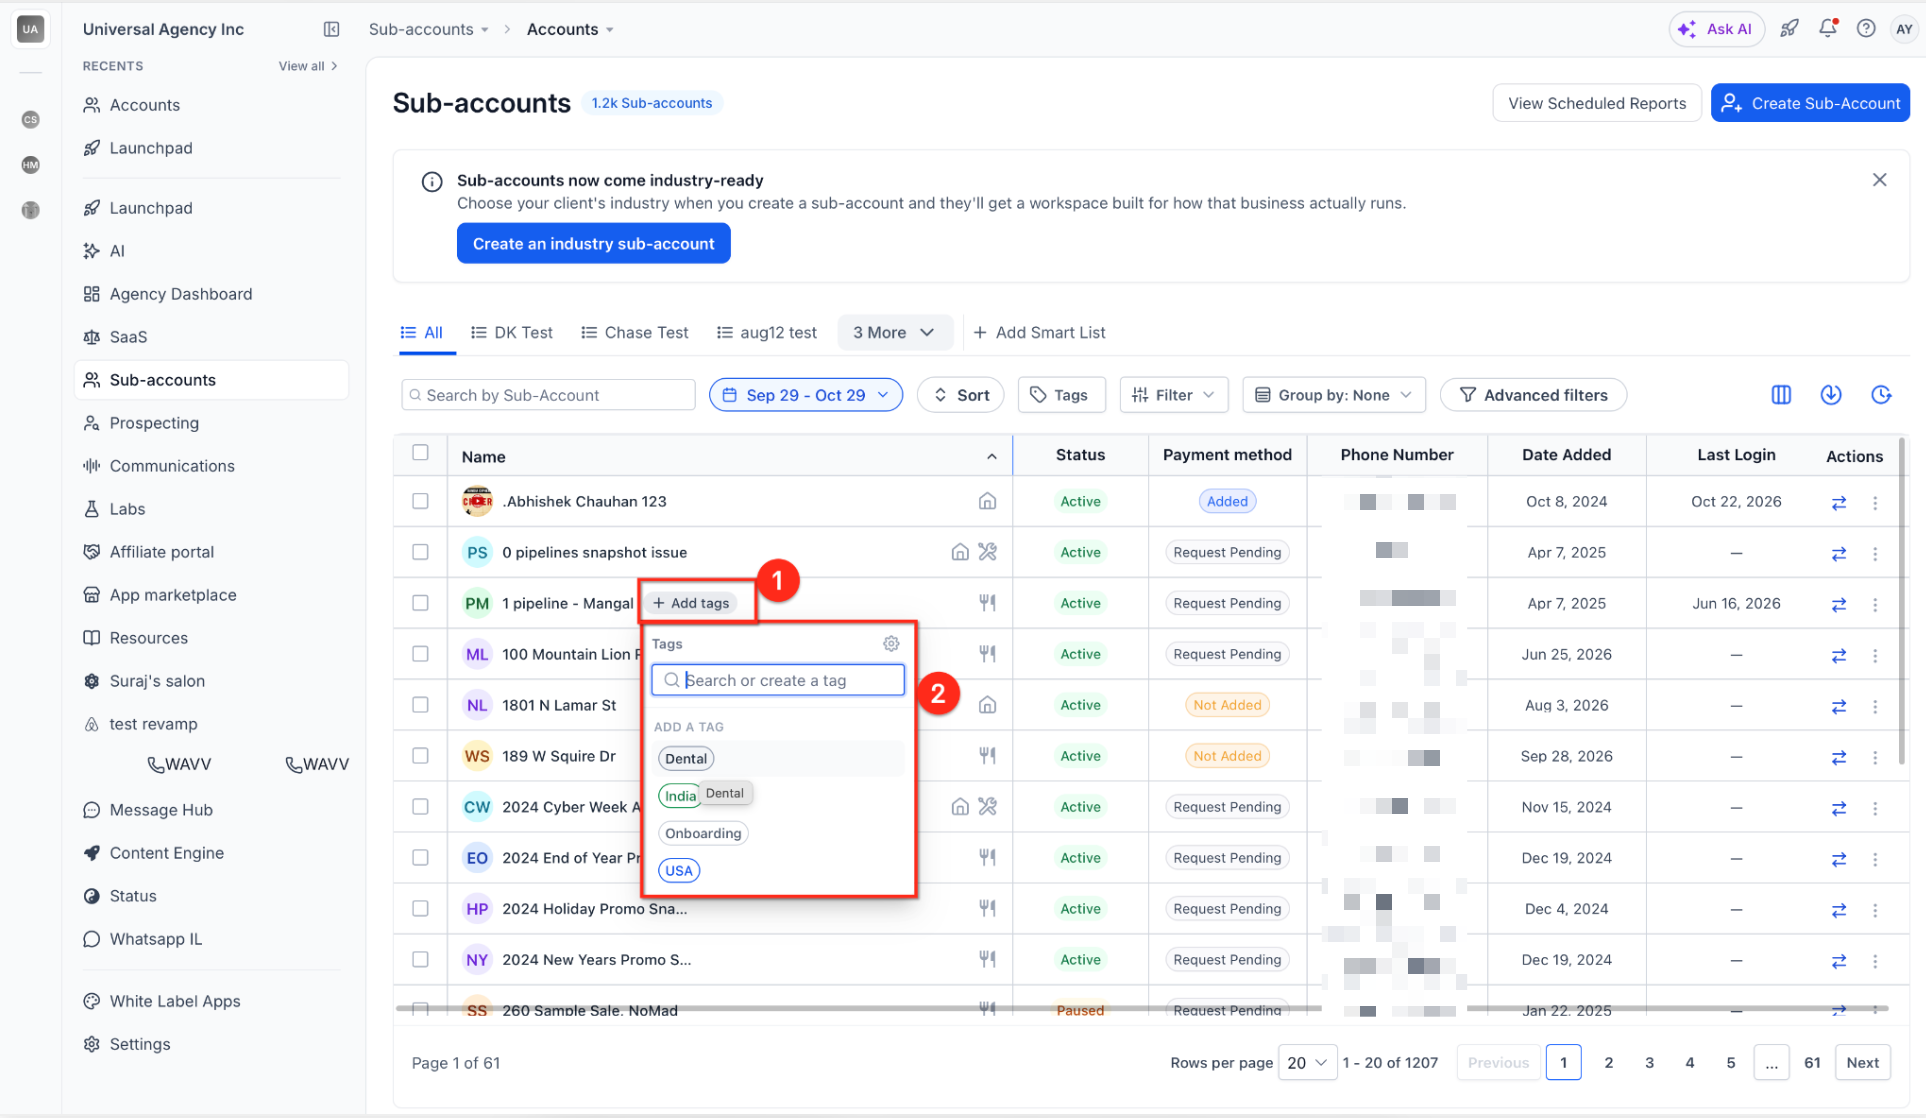
Assigning multiple tags lets you describe a client account using several categories.
Find the sub-account in the list.
Hover over its name and select Add tags, or use the applicable Tags control.
Select Onboarding.
Add another tag, such as Dental.
Confirm both tags appear beside the account.
Step 4: Apply Tags in Bulk
Bulk tagging helps when multiple accounts need the same label.
Select the checkboxes beside the relevant sub-accounts.
Open the available bulk-action controls.
Choose the tag-assignment option.
Select the tag.
Review and apply the change.
Note: The exact bulk controls, supported removal actions, and required permissions should be verified.
Step 5: Filter Sub-Accounts by Tag
Tag filters help you locate a specific group of client accounts.
Click Tags.
Select the tag you want to use, such as Onboarding.
Review the matching accounts.
Apply other supported filters if needed.
Step 6: Group Sub-Accounts by Tag
Grouping provides an organized view of account categories and their counts.
Click Group by.
Select Tags.
Review the resulting groups.
Expand or collapse groups as needed.
Step 7: Save a Smart List
Saving a filtered view makes it easier to return to the same account segment.
Apply the required tag and account filters.
Click Add Smart List or the applicable save control.
Enter a descriptive name.
Save the Smart List.
Reopen it from the Smart List tabs.
Step 8: Edit, Reassign, or Delete a Tag
Managing existing tags helps keep account categories accurate and consistent.
Open Tags.
Find the tag you want to manage.
Open its management options.
Change its name or color, or choose Reassign to... or Delete tag.
Review any confirmation before completing the action.
Important: Review reassignment and deletion carefully, particularly for tags used by many accounts.
Creating and Assigning Tags
Tags help you identify accounts according to the categories your agency uses.
Common examples include:
| Category | Example Tags |
|---|---|
| Lifecycle | Onboarding, Active, At-risk |
| Industry | Dental, Roofing, Real Estate |
| Service level | DIY, Done-for-you |
| Account type | VIP, Test, Internal |
| Account management | Sarah, Dev, Priya |
A sub-account can have multiple tags, and the same tag can be used across different sub-accounts.
Note: Tags are organizational labels. Adding an account manager's name as a tag does not assign the account to that user or grant access.
Managing Tags
Keeping tag names and categories consistent makes filtering and grouping more useful.
The Tags menu includes controls for searching for tags and managing existing labels.
Available management options shown in the release include:
Edit name: Update an existing tag's name.
Change color: Make categories easier to recognize.
Reassign to...: Reassign an existing tag to another tag.
Delete tag: Remove a tag that is no longer needed.
Important: Confirm how reassignment and deletion affect existing sub-account assignments before making changes. These actions may affect multiple accounts.
Filtering and Grouping Sub-Accounts
Filtering and grouping are two different ways to work with tagged accounts.
Filtering narrows the list to accounts matching selected criteria. Grouping organizes the displayed accounts into sections.
| Option | Purpose |
|---|---|
| Tags | Filter sub-accounts by selected tags |
| Filter / Advanced filters | Refine results using other supported account criteria |
| Group by → Tags | Organize accounts into collapsible tag-based groups |
| Untagged | Find accounts without tags, where available |
For example, filter by Onboarding to review clients in that stage, or group by Tags to compare different client categories.
Note: Multiple-tag matching rules and the way accounts with several tags appear in grouped results require verification.
Saving Tag-Based Smart Lists
Smart Lists let you save frequently used Sub-Account views so you can return to them without rebuilding the same filters.
For example, an agency could save a view named Dental Onboarding Clients to review that group regularly.
Use Add Smart List or the applicable save control in the Sub-Accounts interface.
Important: Agency-level Sub-Account Smart Lists are separate from Contact Smart Lists inside individual sub-accounts. The exact behavior of saved grouping, sorting, and updates when tag assignments change should be confirmed.
Frequently Asked Questions
Q: Can one sub-account have multiple tags?
A: Yes. You can assign several tags to the same account.
Q: Are Sub-Account Tags the same as Contact tags?
A: No. Sub-Account Tags organize agency client accounts. Contact tags organize Contacts within an individual sub-account.
Q: Can I change a tag's name or color?
A: Yes. The tag-management menu includes editing and color-selection options.
Q: Can I apply tags to multiple sub-accounts at once?
A: Yes. Bulk tag application is included in the release. The exact controls and permissions require confirmation.
Q: What is the difference between filtering and grouping?
A: Filtering narrows the account list. Grouping organizes visible accounts into tag-based sections.
Q: Can I find sub-accounts without tags?
A: The Tags menu includes an Untagged option to help identify accounts without tags.
Q: Can I save a tag-filtered view?
A: Yes. Tag-filtered Sub-Account views can be saved as agency-level Smart Lists.
Q: What happens when I reassign or delete a tag?
A: The interface provides both actions, but their exact effects on existing assignments should be verified before use.
Q: Does adding a team member's name as a tag assign them to the account?
A: No. Tags do not replace actual account assignments or user permissions.
Related Articles
Was this article helpful?
That’s Great!
Thank you for your feedback
Sorry! We couldn't be helpful
Thank you for your feedback
Feedback sent
We appreciate your effort and will try to fix the article