HighLevel Sub-Account Bulk Actions let agency admins select multiple sub-accounts and apply supported management changes without opening each account individually. Common workflows include enabling SaaS Mode, pausing sub-accounts, enabling rebilling, and managing supported account features, depending on plan, permissions, and configuration.
Bulk Action History provides a centralized record of submitted jobs so you can review the operation, status, user, completion details, and account-level successes or failures. This article explains how to select sub-accounts, use the available bulk actions, and verify results safely.
The exact actions shown under Bulk Actions can vary by agency plan, user permissions, SaaS configuration, feature availability, and the selected sub-accounts. Use the options displayed in your account as the source of truth for currently available workflows.
What is Sub-Account Bulk Actions & History?
Sub-Account Bulk Actions are agency-level management tools that apply one supported action to multiple selected sub-accounts. Instead of repeating the same process account by account, agency admins can filter or search the Sub-Accounts list, select the intended accounts, choose a bulk action, configure the required settings, and submit one job.
Bulk Action History complements this workflow by recording submitted jobs and exposing account-level results. This makes it easier to verify completion and investigate individual failures across a larger group of sub-accounts.
Key Benefits of Sub-Account Bulk Actions & History
Bulk management is most useful when several sub-accounts need the same operational change. Centralizing selection, configuration, and result tracking reduces repetitive work while giving administrators a clearer record of what was submitted and how each account processed.
- Faster Account Management: Apply supported changes to multiple sub-accounts without opening each account individually.
- Filtered Selection: Use search, filters, individual checkboxes, or Select all to target the intended accounts.
- Consistent SaaS Assignment: Apply a selected SaaS plan to eligible sub-accounts through a guided workflow.
- Safer Pause Decisions: Choose how SaaS subscriptions and applicable phone or A2P resources should be handled.
- Job-Level Visibility: Review the operation, status, submitting user, creation time, and completion time.
- Failure Diagnostics: Open job details to identify successful accounts, failed accounts, and available error information.
Before You Begin
Bulk actions can affect billing, access, subscriptions, and account-level resources across many sub-accounts at once. Confirm the selected accounts and understand the consequences of the chosen action before submitting the job.
- Use an Agency Admin account with the permissions required for the action.
- Use search or filters to narrow the Sub-Accounts list before choosing Select all.
- For SaaS activation, confirm the payment-provider configuration and SaaS plan you intend to assign.
- If different account groups need different SaaS plans, process them in separate jobs.
- For pausing, decide whether active SaaS subscriptions should stop billing or continue billing while access is paused.
- Review phone-number and A2P handling carefully because disconnecting and closing phone resources can permanently remove associated numbers and campaigns.
Supported Bulk Action Workflows
The Sub-Accounts page is the central entry point for agency-level bulk management. Available options depend on the account's plan and configuration, so the menu shown in your account determines which workflows can currently be used.
| Bulk Workflow | Purpose |
|---|---|
| Enable SaaS Mode | Apply an eligible SaaS billing configuration and selected SaaS plan to multiple existing sub-accounts. |
| Pause Sub-Account | Pause access for multiple sub-accounts while choosing how subscriptions and applicable phone or A2P resources should be handled. |
| Enable Rebilling | Configure supported rebilling or usage markup settings across multiple sub-accounts when available. |
| Other Supported Actions | Additional workflows may appear as HighLevel expands bulk management capabilities. |
How to Set Up and Use Sub-Account Bulk Actions
Every bulk workflow starts by selecting the correct sub-accounts. Use a focused selection whenever possible so the action applies only to the intended accounts, then review the action-specific confirmation before proceeding.
Step 1: Open and Select Sub-Accounts
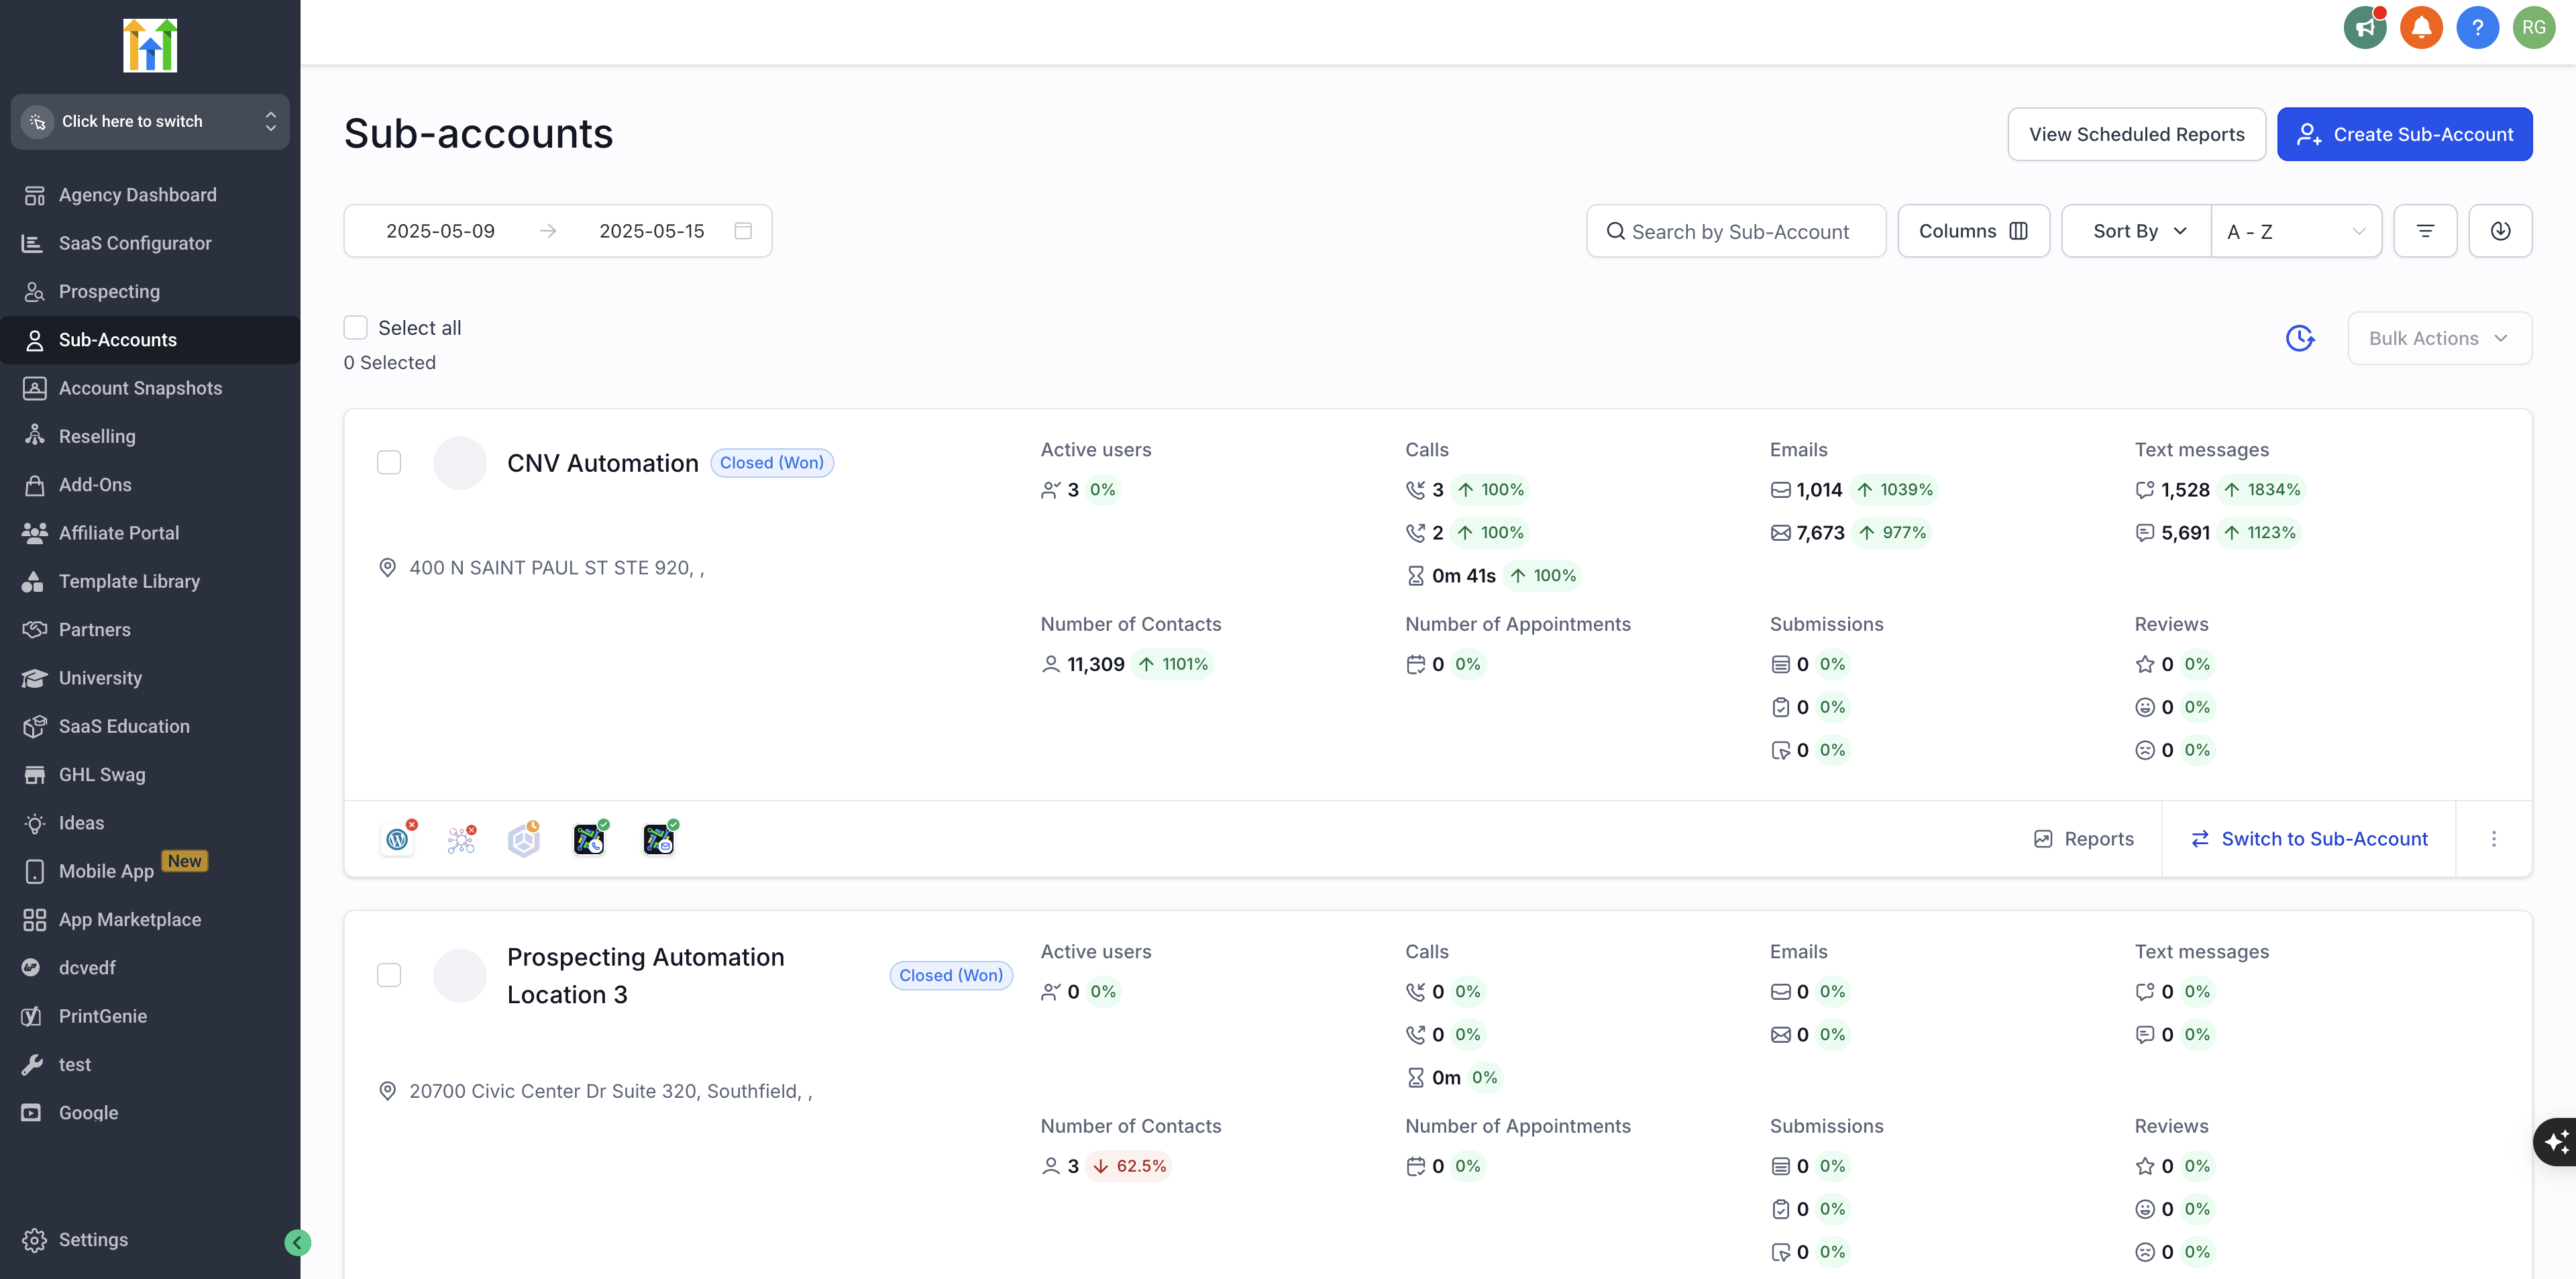
The Sub-Accounts list provides the search, filtering, selection, bulk-action, and history controls used throughout the workflow.
- From Agency View, go to Sub-Accounts.
- Use search, sort, date, column, or filter controls to narrow the list when needed.
- Select the checkbox beside each intended sub-account, or use Select all for the applicable selection scope.
Step 2: Choose a Bulk Action
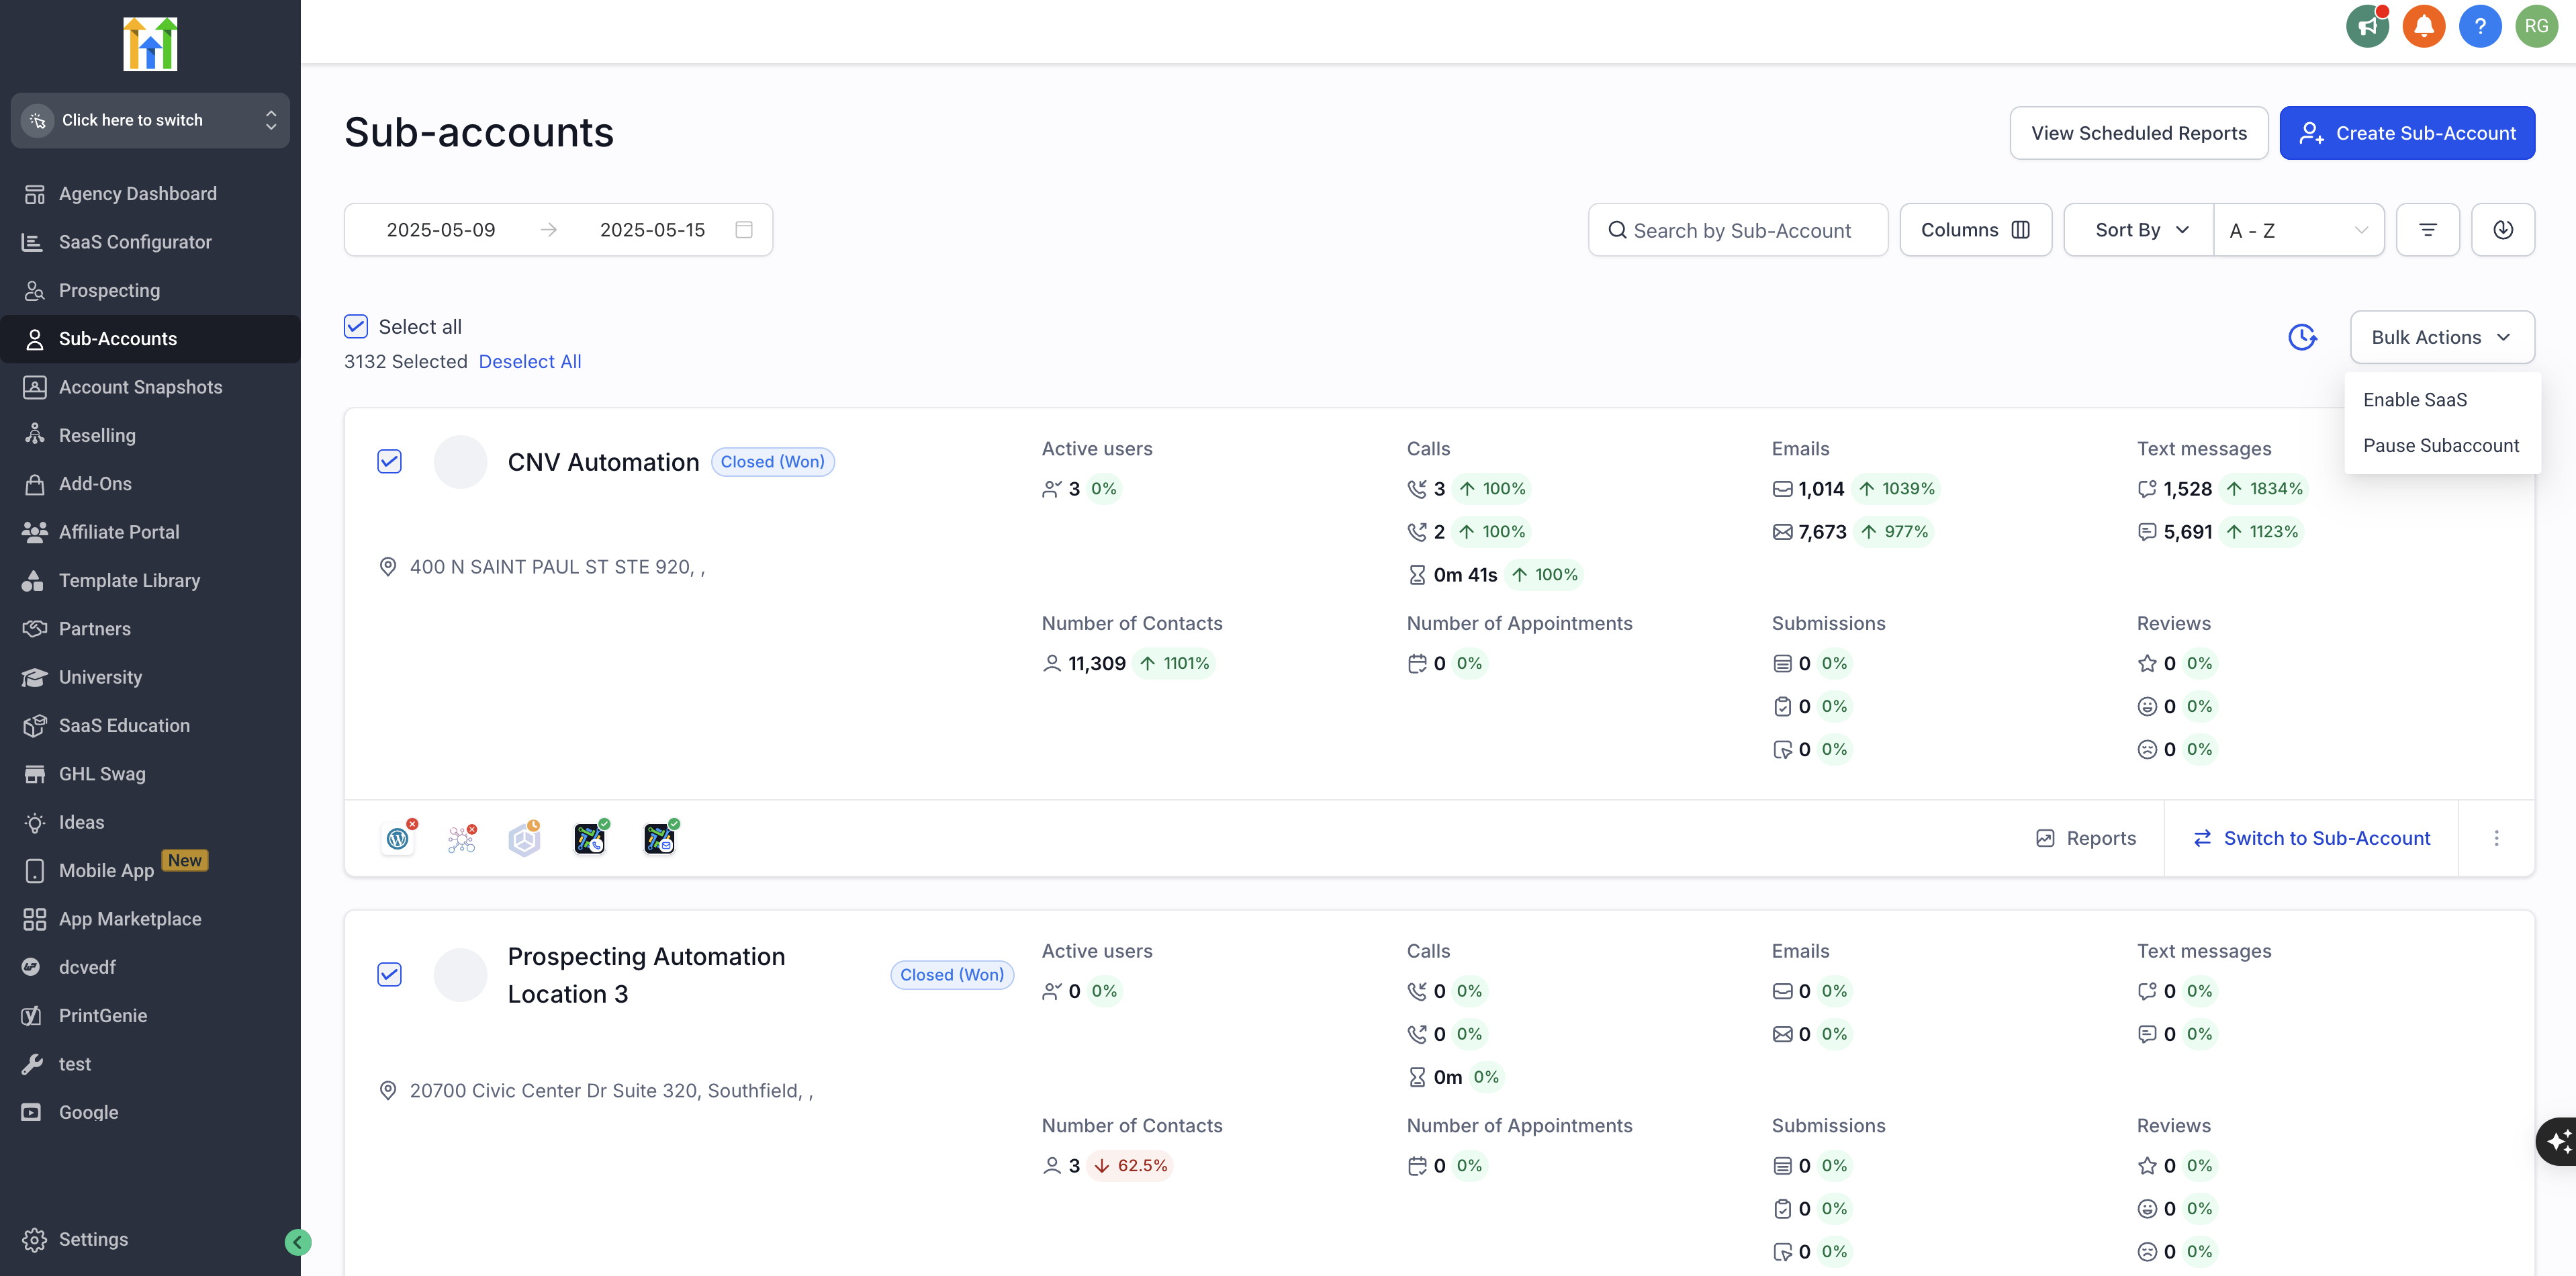
After one or more accounts are selected, the Bulk Actions menu becomes the starting point for the management workflows available to your account.
- Confirm the selected-account count.
- Click Bulk Actions.
- Choose the action you want to run.
Bulk Enable SaaS Mode
Bulk SaaS activation is useful when several existing sub-accounts should move to the same SaaS plan. The workflow asks you to choose the billing setup, select the plan, review the configuration, and confirm the accounts before the job is submitted.
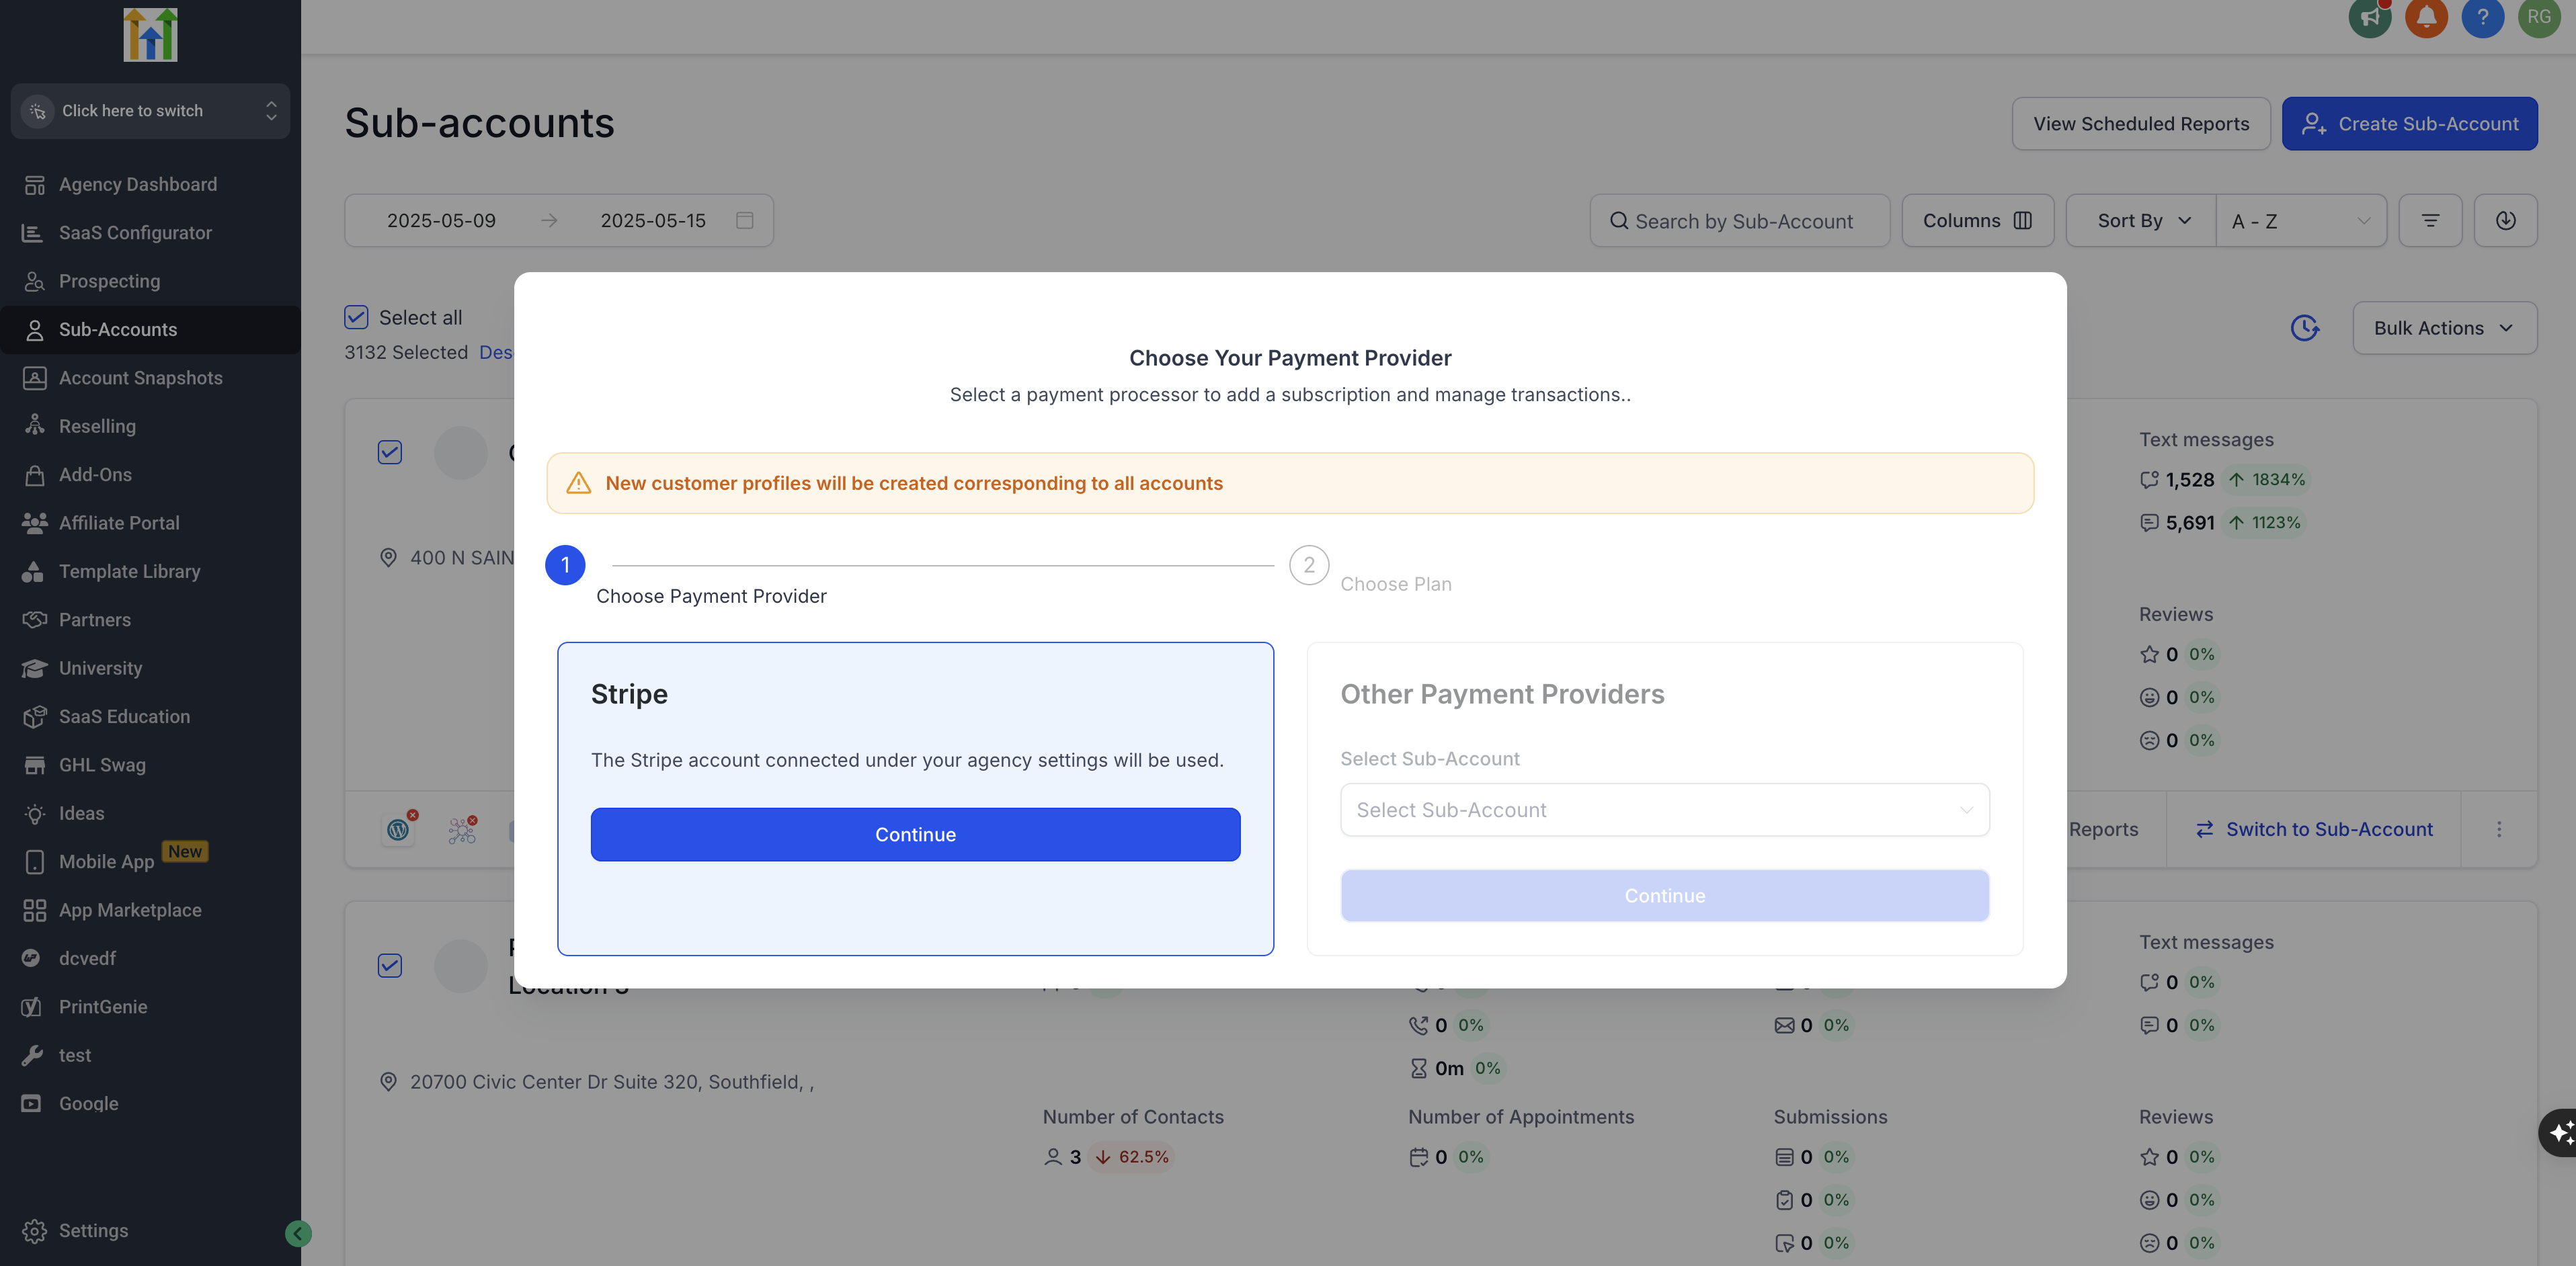
Choose the Payment Provider
Payment-provider options depend on the agency's SaaS billing configuration. Choose the applicable provider before selecting the SaaS plan.
- Choose Enable SaaS from Bulk Actions.
- Select the available payment-provider option.
- Click Continue.
Select the SaaS Plan
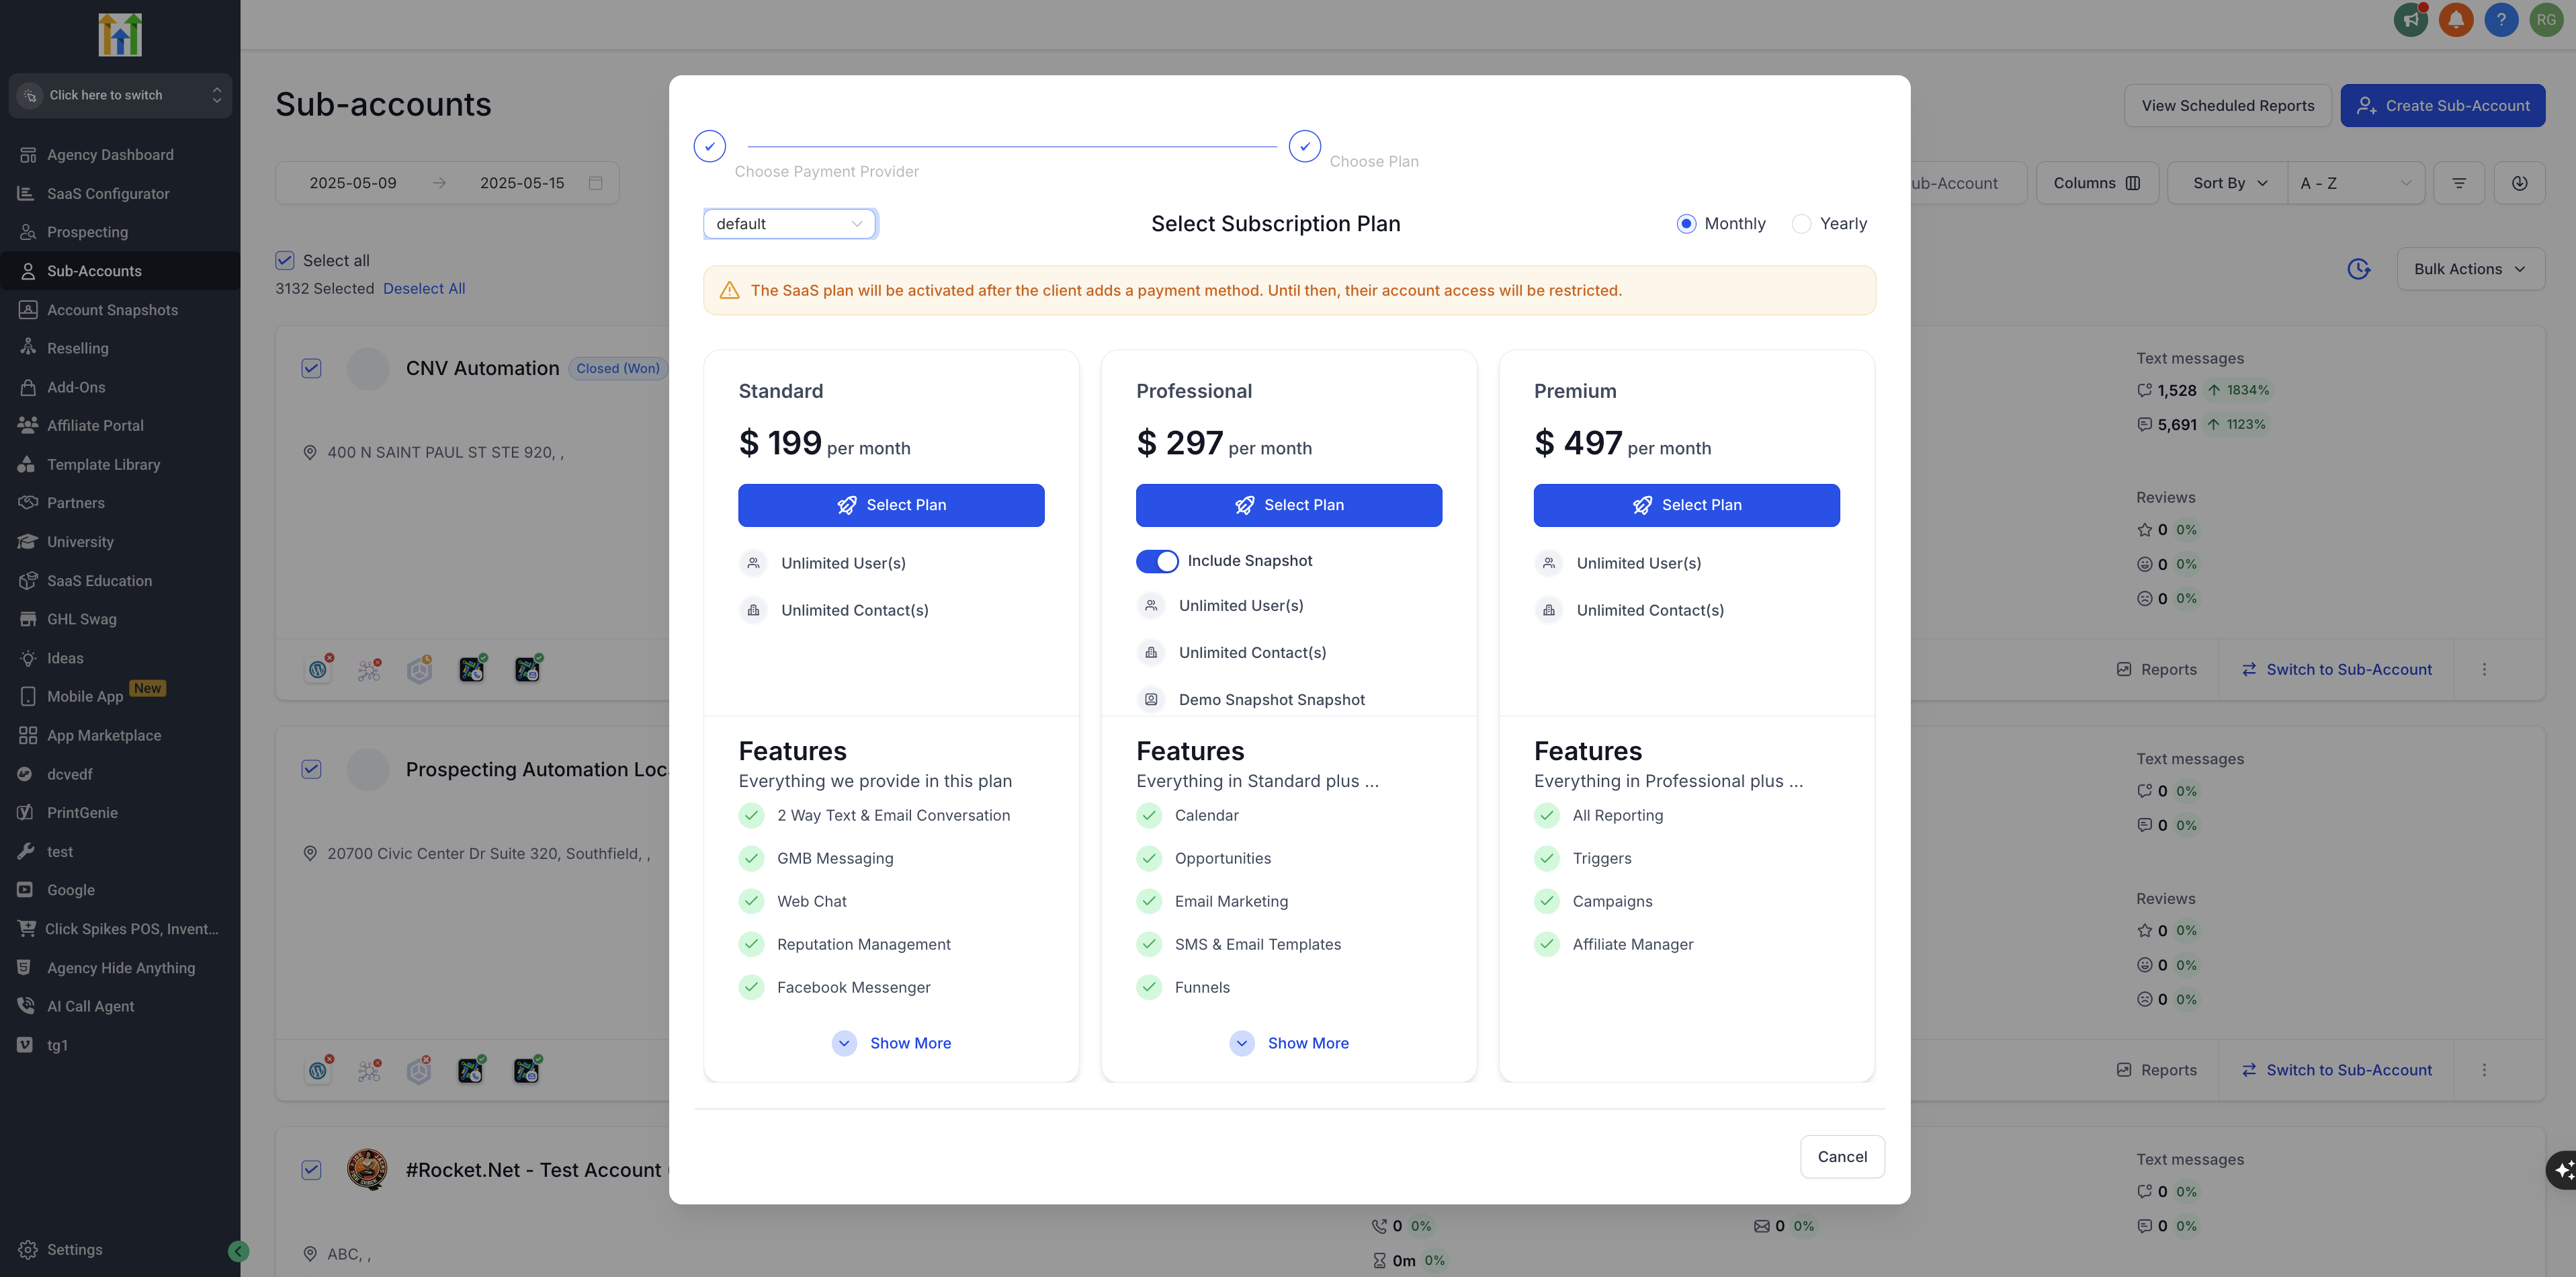
The selected plan applies to the sub-accounts included in the current bulk job. Review the billing interval, plan price, included features, and available options before selecting the plan.
Review and Confirm SaaS Activation
The confirmation modal is the final checkpoint before the batch is submitted. Confirm the selected-account count and SaaS plan before proceeding.
- Review the number of selected sub-accounts.
- Confirm the selected SaaS plan and displayed price.
- Click Proceed when the configuration is correct.
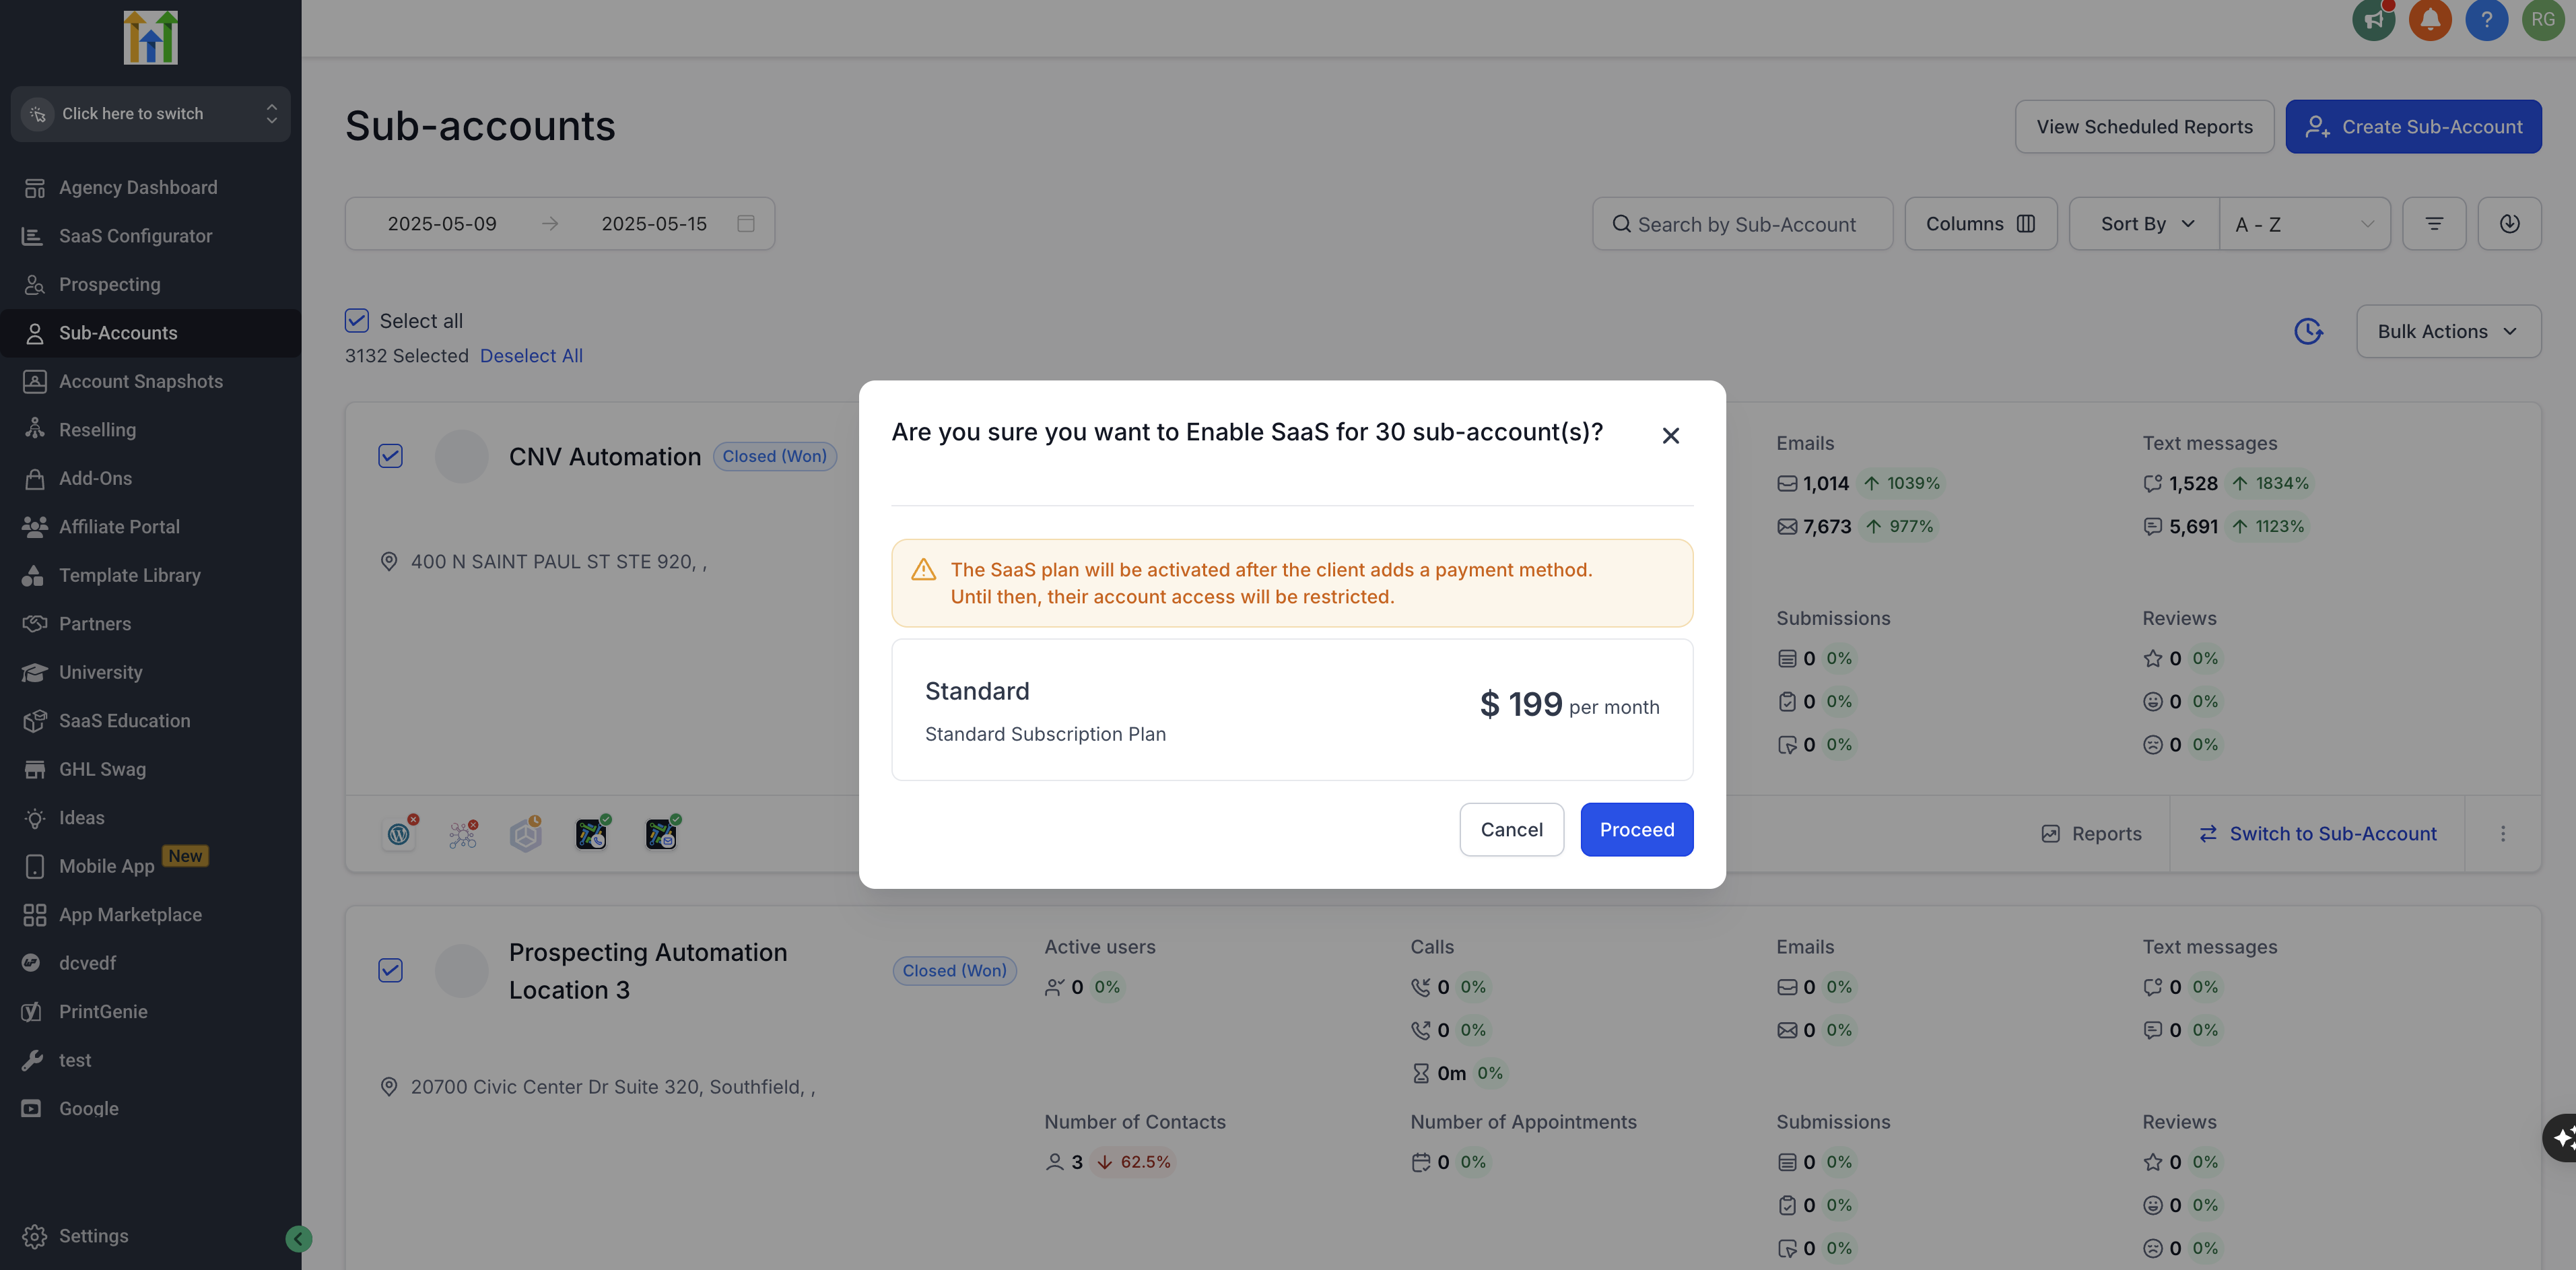
Payment-method requirement: A sub-account can be processed into SaaS Mode while the client still needs to provide payment information. If the required payment method is missing, the SaaS subscription may remain On Hold and access can remain restricted until valid payment details are added.
Bulk Pause Sub-Accounts
Bulk pausing lets you restrict access for several sub-accounts in one job while deciding how active SaaS subscriptions and applicable phone or A2P resources should be treated. Billing and resource choices should be reviewed separately because pausing account access does not automatically stop every associated charge.
- Select the intended sub-accounts.
- Open Bulk Actions and choose Pause Subaccount.
- Under Subscription Preferences, choose whether to pause active subscriptions or keep charging clients while access is paused.
- Review the option for phone numbers and A2P campaigns.
- Click Proceed only after verifying the consequences of each selected option.
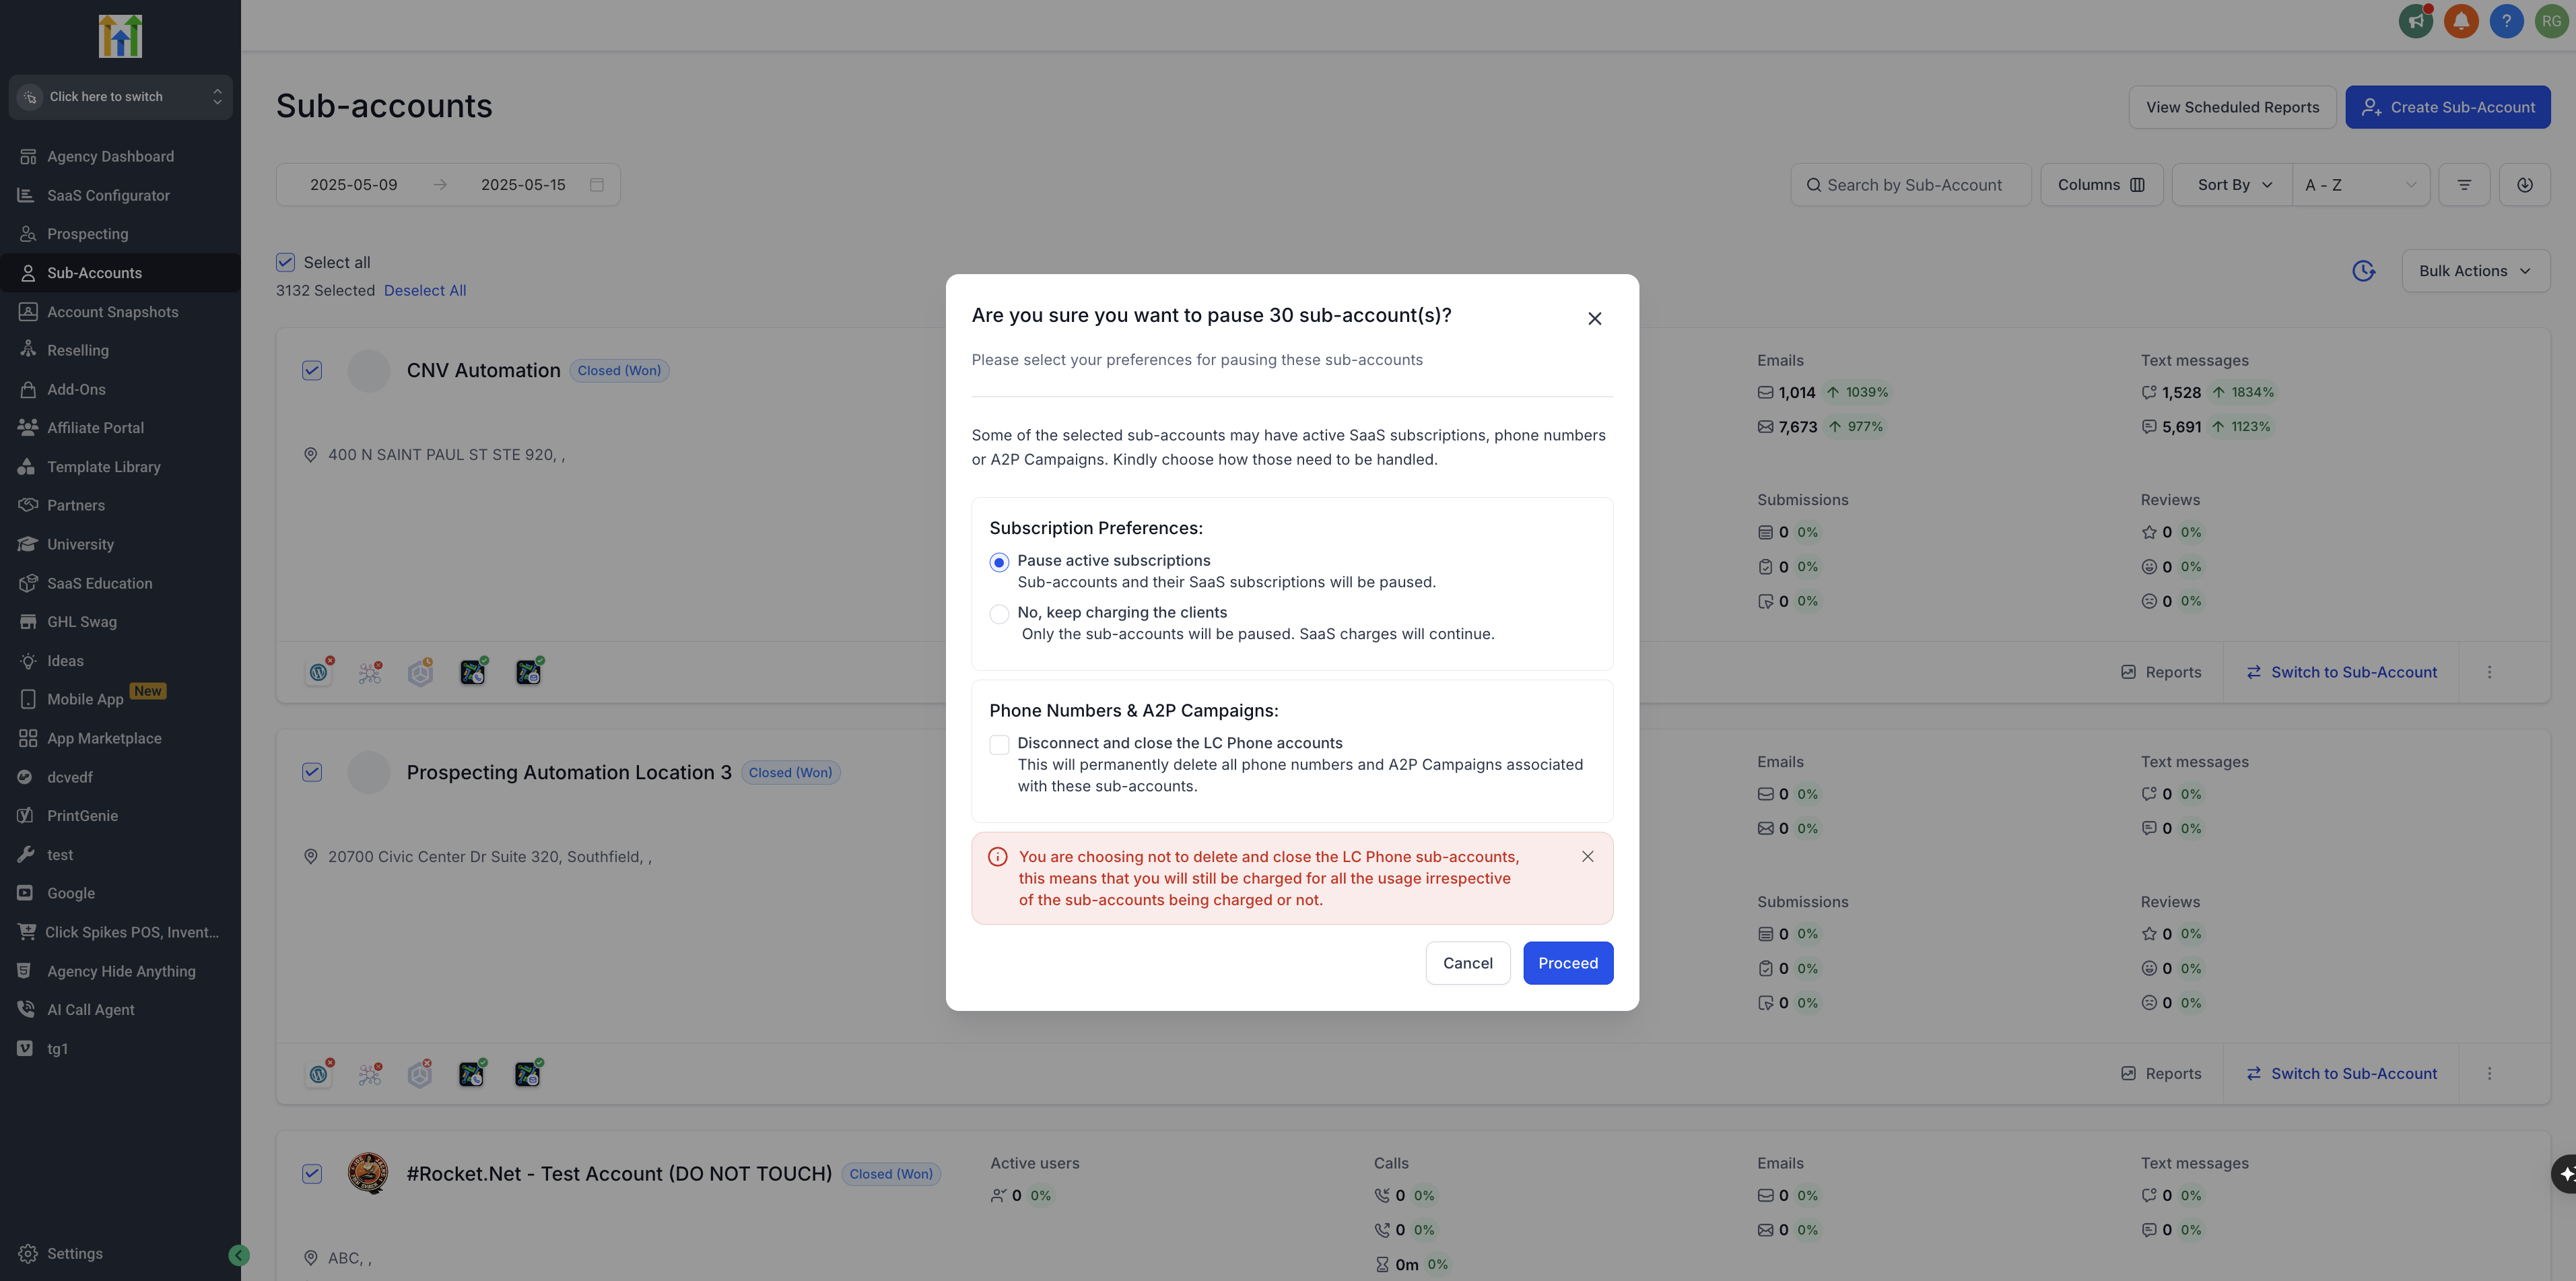
Important: Choosing to disconnect and close phone resources can permanently delete phone numbers and A2P campaigns associated with the selected sub-accounts. If the resources remain connected, applicable usage charges can continue while the sub-accounts are paused.
Review Bulk Action History
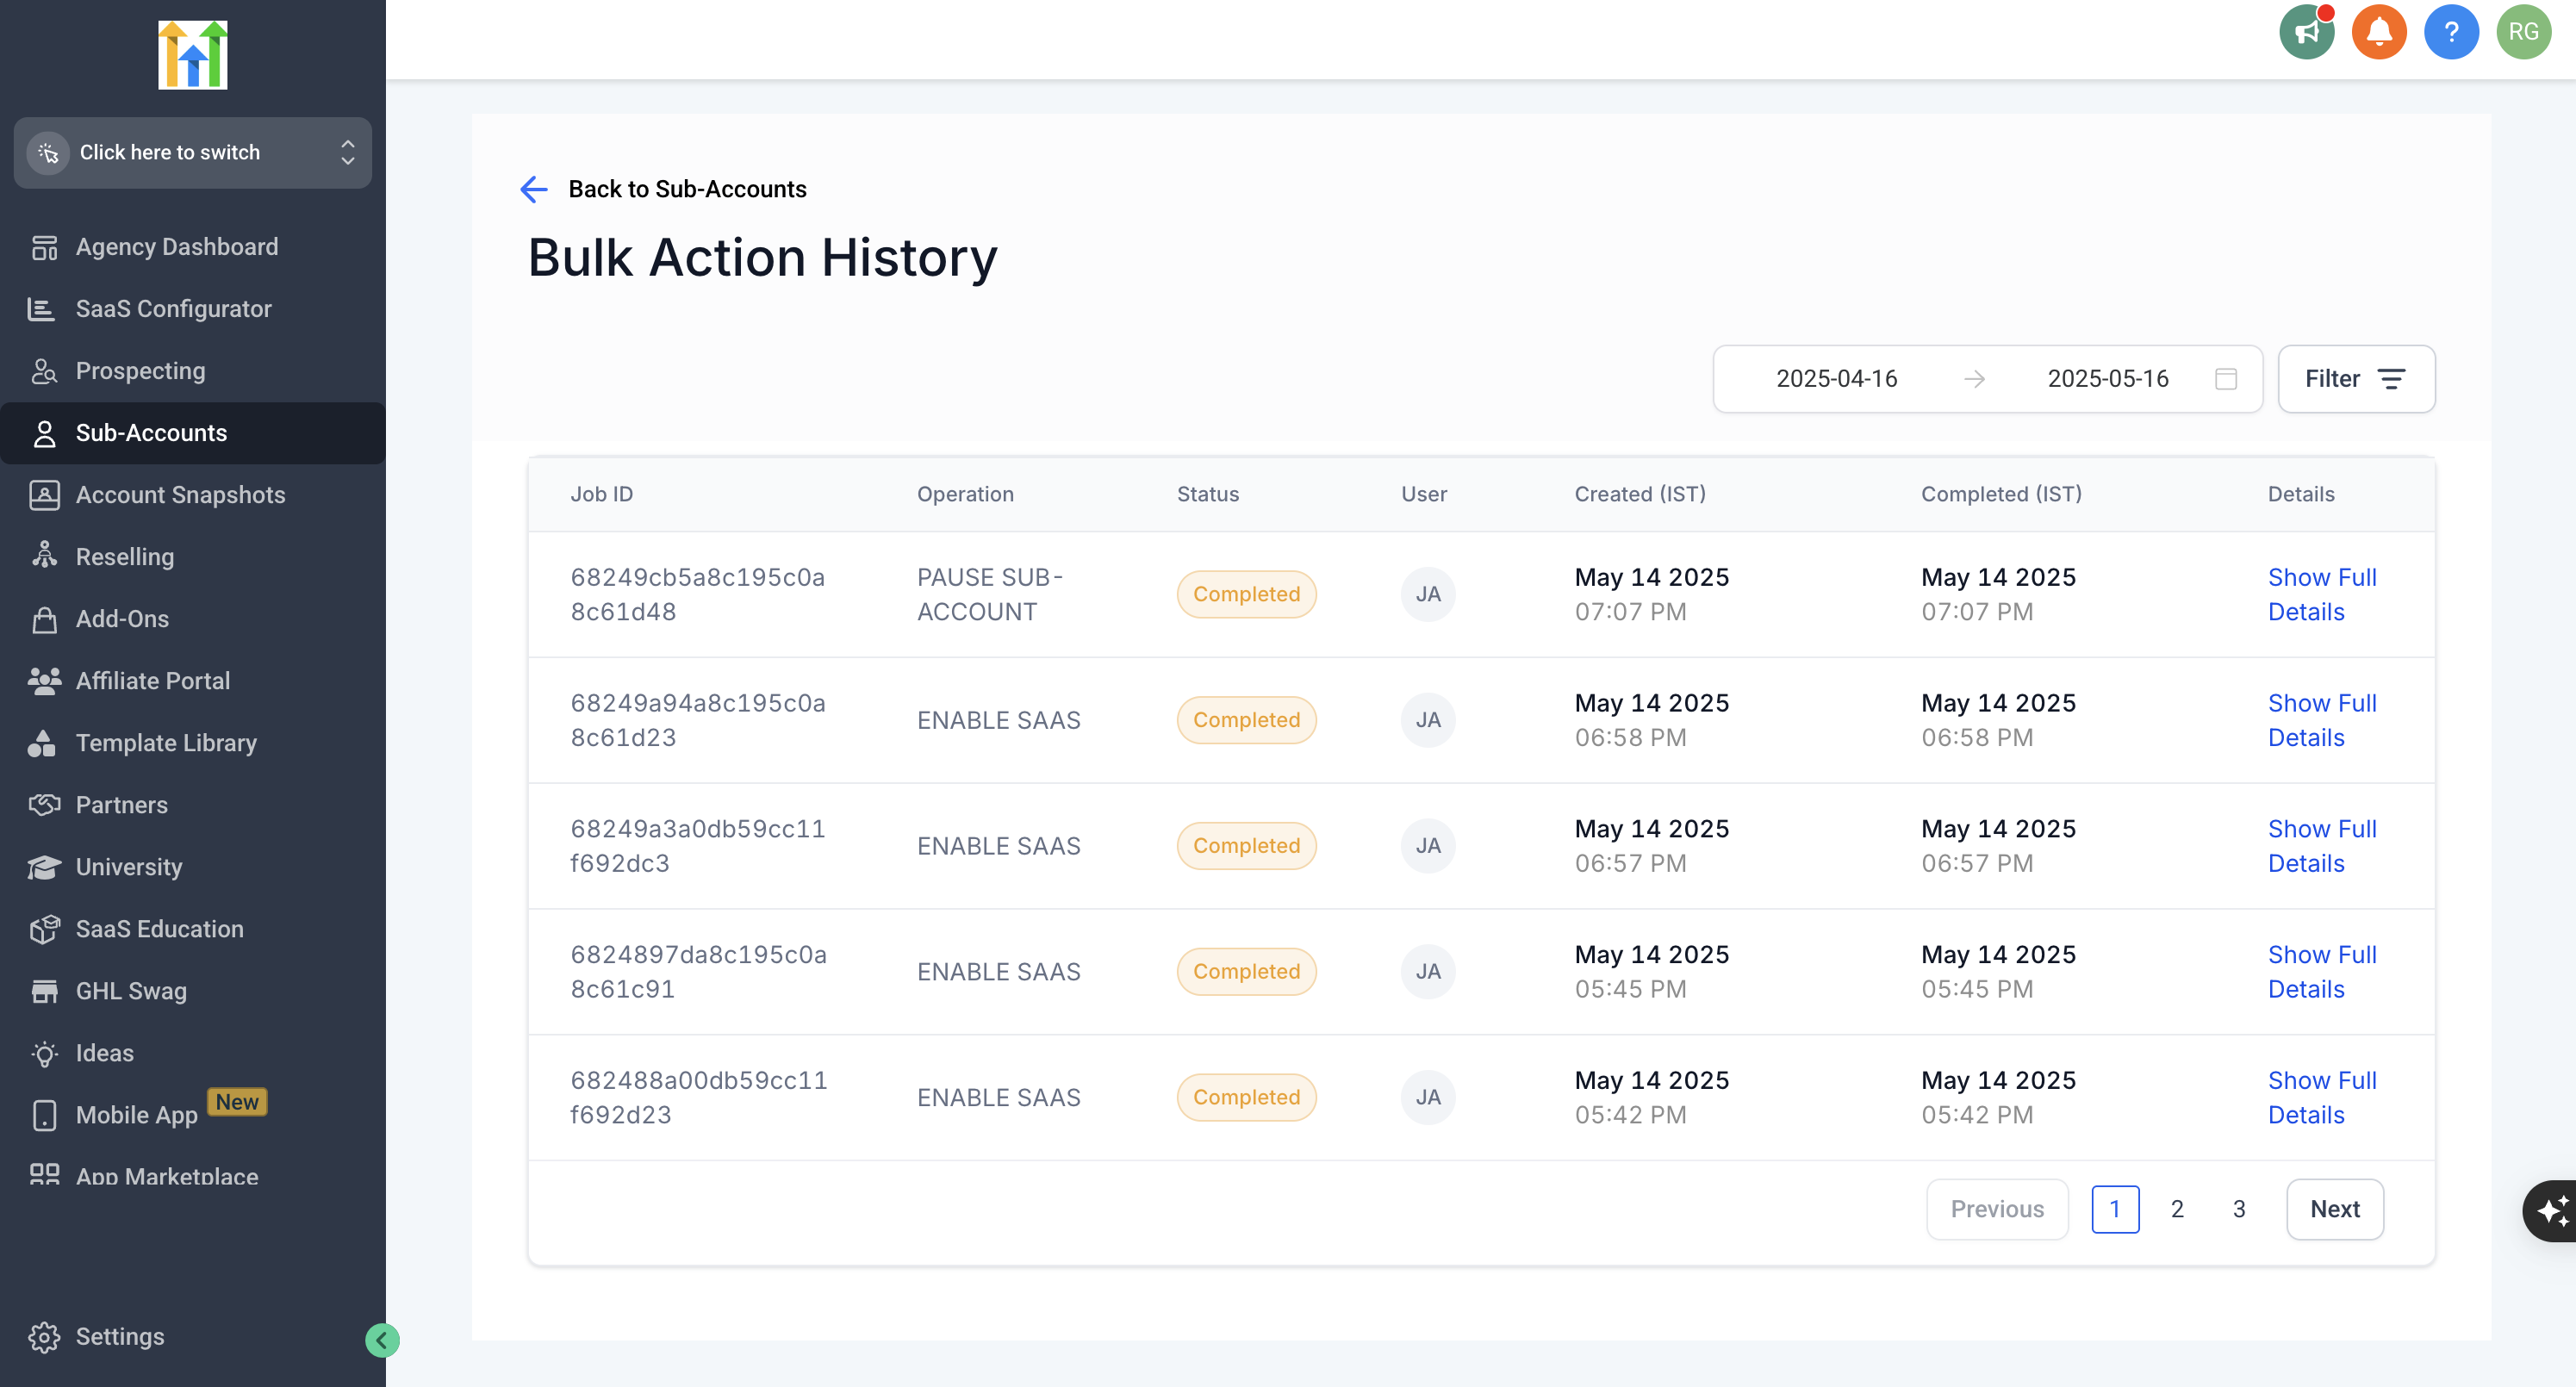
Bulk Action History provides the audit trail for submitted jobs and is the best place to verify whether a batch completed successfully. Review the job-level summary first, then open full details for any failures to isolate account-specific issues.
Open Bulk Action History
- Go to Agency View → Sub-Accounts.
- Click the Bulk Action History clock icon.
- Use the date range or available filters to locate the job.
- Review the Job ID, Operation, Status, User, Created, and Completed columns.
Review Account-Level Results
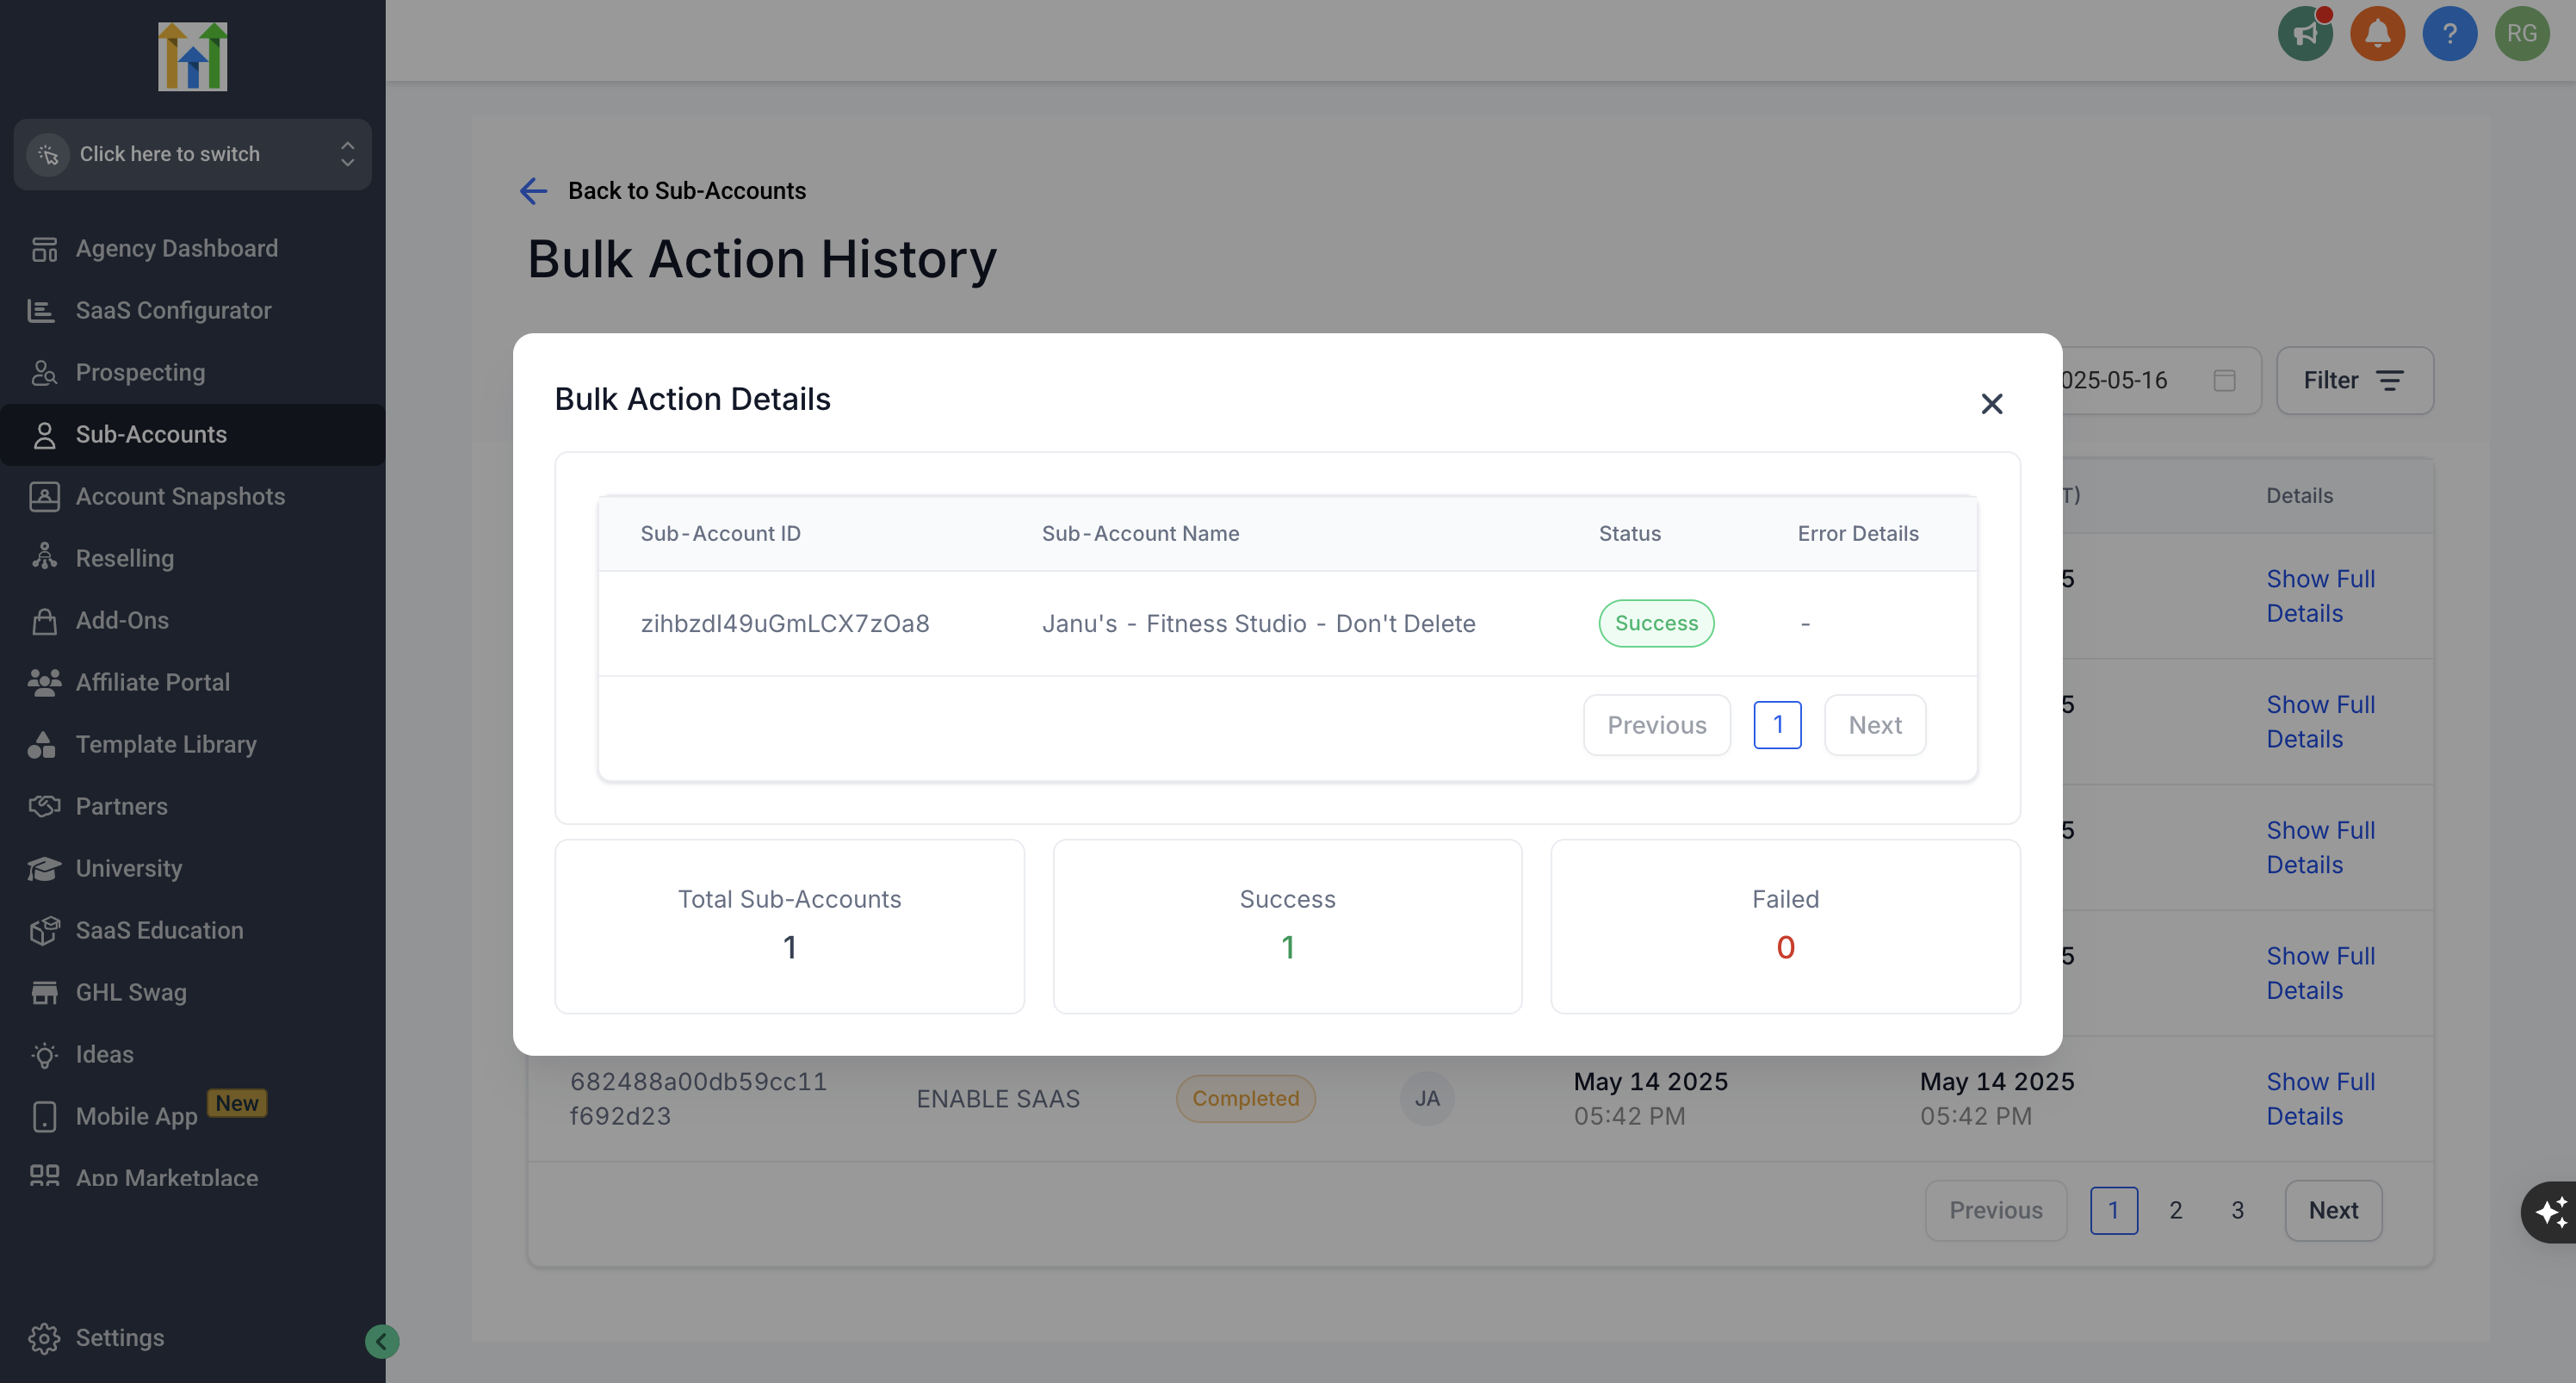
A completed bulk job can contain a mix of successful and failed sub-accounts. Open the job details to verify which accounts processed successfully and review available error information for accounts that did not complete.
- Click Show Full Details for the job.
- Review the sub-account ID, name, status, and Error Details.
- Compare the Total Sub-Accounts, Success, and Failed counts.
- Correct the underlying issue before retrying the supported action for failed accounts.
Troubleshooting Sub-Account Bulk Actions
When a bulk action is missing, fails, or produces mixed results, verify eligibility and configuration before immediately resubmitting the entire batch. Bulk Action History can help determine whether the issue affects the full job or only specific sub-accounts.
| Issue | What to Check |
|---|---|
| The expected Bulk Action is missing | Check the agency plan, user permissions, account configuration, feature availability, and eligibility of the selected sub-accounts. |
| Enable SaaS cannot continue | Verify the SaaS billing configuration, payment provider, selected plan, and account eligibility. |
| SaaS activation completes but access is restricted | Check whether the client still needs to add a valid payment method and whether the subscription remains On Hold. |
| A paused account is still generating phone usage charges | Review whether phone resources were left connected. Pausing access does not automatically close associated phone resources. |
| Some accounts succeeded and others failed | Open Bulk Action History, select Show Full Details, and review the available error information for each failed account. |
| The job is still processing | Allow the job time to process, then refresh Bulk Action History before submitting a duplicate action. |
Frequently Asked Questions
Was this article helpful?
That’s Great!
Thank you for your feedback
Sorry! We couldn't be helpful
Thank you for your feedback
Feedback sent
We appreciate your effort and will try to fix the article