Connect Jira with HighLevel Workflows to coordinate customer communication and issue management without relying on separate automation tools. Jira events can start workflows when issues are created or updated, while Jira actions can create, update, enrich, link, and manage issues from inside a workflow. A single authorized Atlassian account can access the appropriate Jira Cloud Site for each trigger or action.
TABLE OF CONTENTS
- What is the Jira Integration?
- Key Benefits of the Jira Integration
- Prerequisites
- Connecting Your Jira Account
- Jira Triggers
- Jira Actions
- How to Set Up a Workflow with Jira
- Use Cases & Patterns
- Frequently Asked Questions
- Related Articles
What is the Jira Integration?
The Jira integration connects HighLevel Workflows directly to Jira Cloud, allowing information to move between customer-facing automations and issue-management processes. Jira triggers start workflows when issues are created or updated, while Jira actions allow workflows to find, create, update, enrich, link, and organize Jira issues.
This two-way connection helps support, product, engineering, and operations teams keep customer communication aligned with work being completed in Jira.
Key Benefits of the Jira Integration
Two-way automation: Start HighLevel workflows from Jira issue events and send information back to Jira through workflow actions.
Faster customer communication: Notify customers when reported issues are resolved or reach an important status.
Reduced duplicate work: Find and link related Jira issues using a shared customer, ticket, or request reference.
Broader issue-lifecycle control: Create and update issues, add comments or attachments, manage watchers, log work, and move issues to sprints.
Multi-site flexibility: Select the appropriate Jira Cloud Site when an Atlassian account has access to more than one site.
Centralized workflow management: Coordinate CRM activity, customer messaging, and Jira issue updates from the HighLevel Workflow Builder.
Prerequisites
Confirming account access and identifying the correct Jira environment before setup helps prevent authorization, site-selection, and issue-permission errors.
Access to Automation → Workflows in the appropriate HighLevel sub-account.
An Atlassian account with access to the Jira Cloud Site you want to use.
The email address associated with the Atlassian account.
Access to the Jira projects, issues, users, and sprints required by the workflow.
A clear plan for connecting Jira issues to HighLevel contacts when customer communication is part of the automation.
Connecting Your Jira Account
Connecting Jira from a workflow trigger or action allows HighLevel to securely access the Jira Cloud Sites available through your Atlassian account. Once connected, the account can be used across workflows without repeating the authorization process.
In HighLevel, open Automation → Workflows and add any Jira action or trigger.
→ If Jira is not connected, click Connect your account.
→ In the External Authentication Configuration modal, enter a friendly Name, such as “Engineering Jira” or “Support Jira,” and the Email associated with the Atlassian account.
→ Click Continue, then approve the requested Jira access on Atlassian’s authorization screen.
→ If Jira is already connected, the account and available configuration fields load directly in the workflow step.
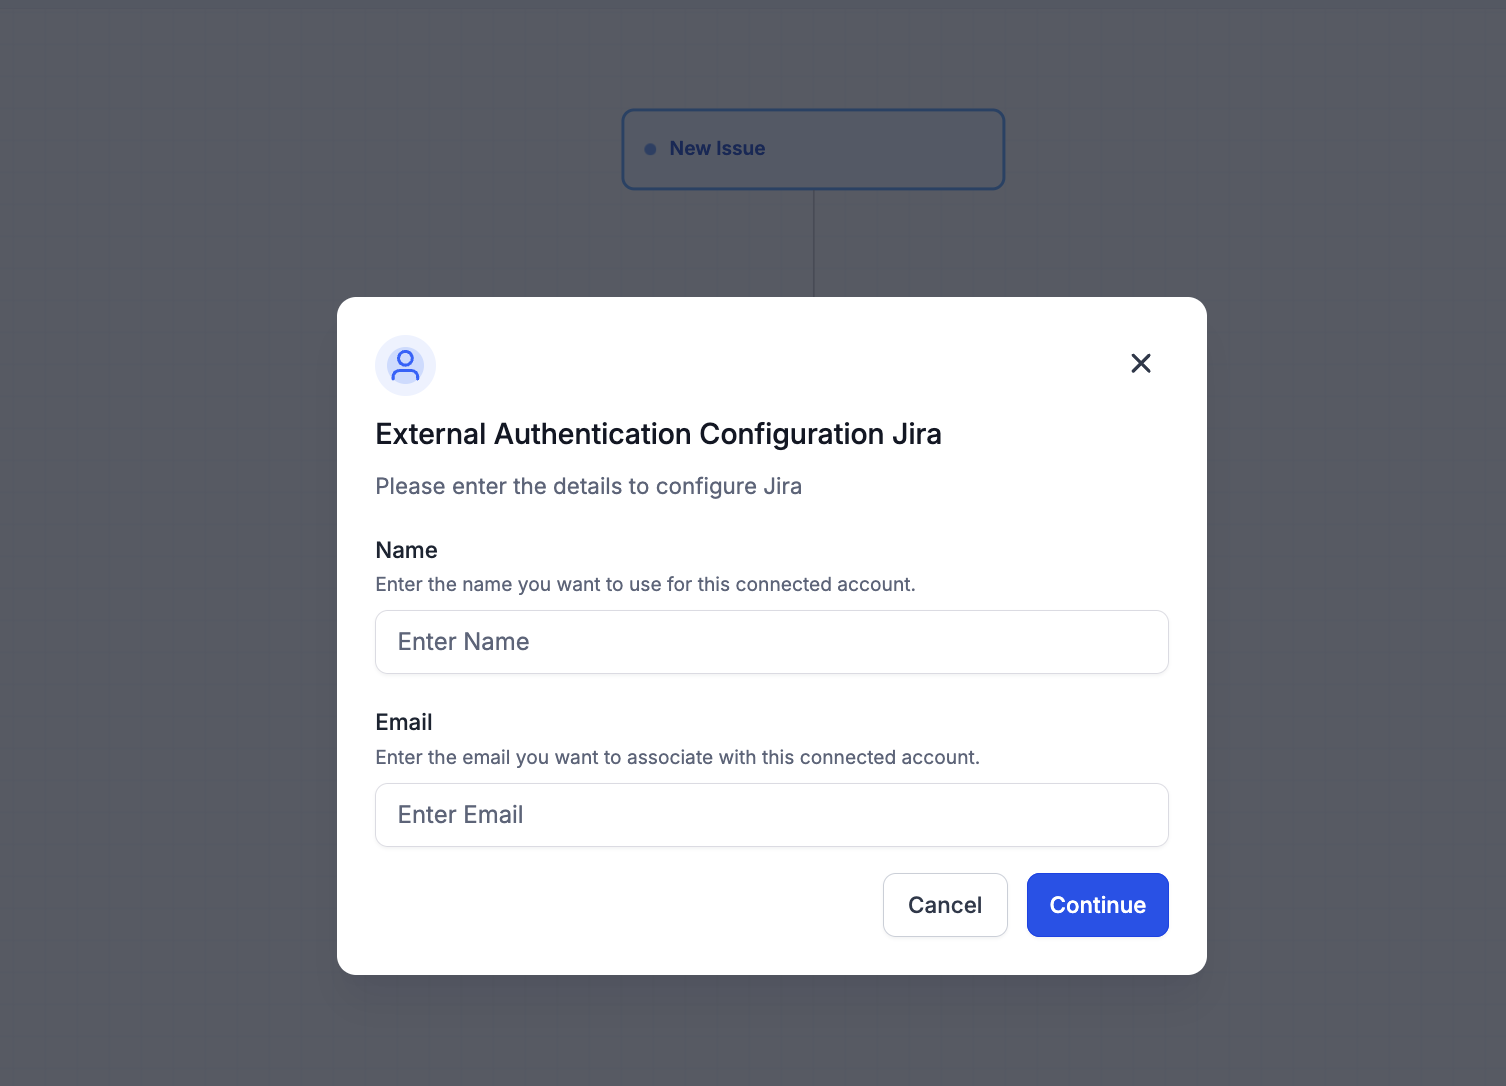
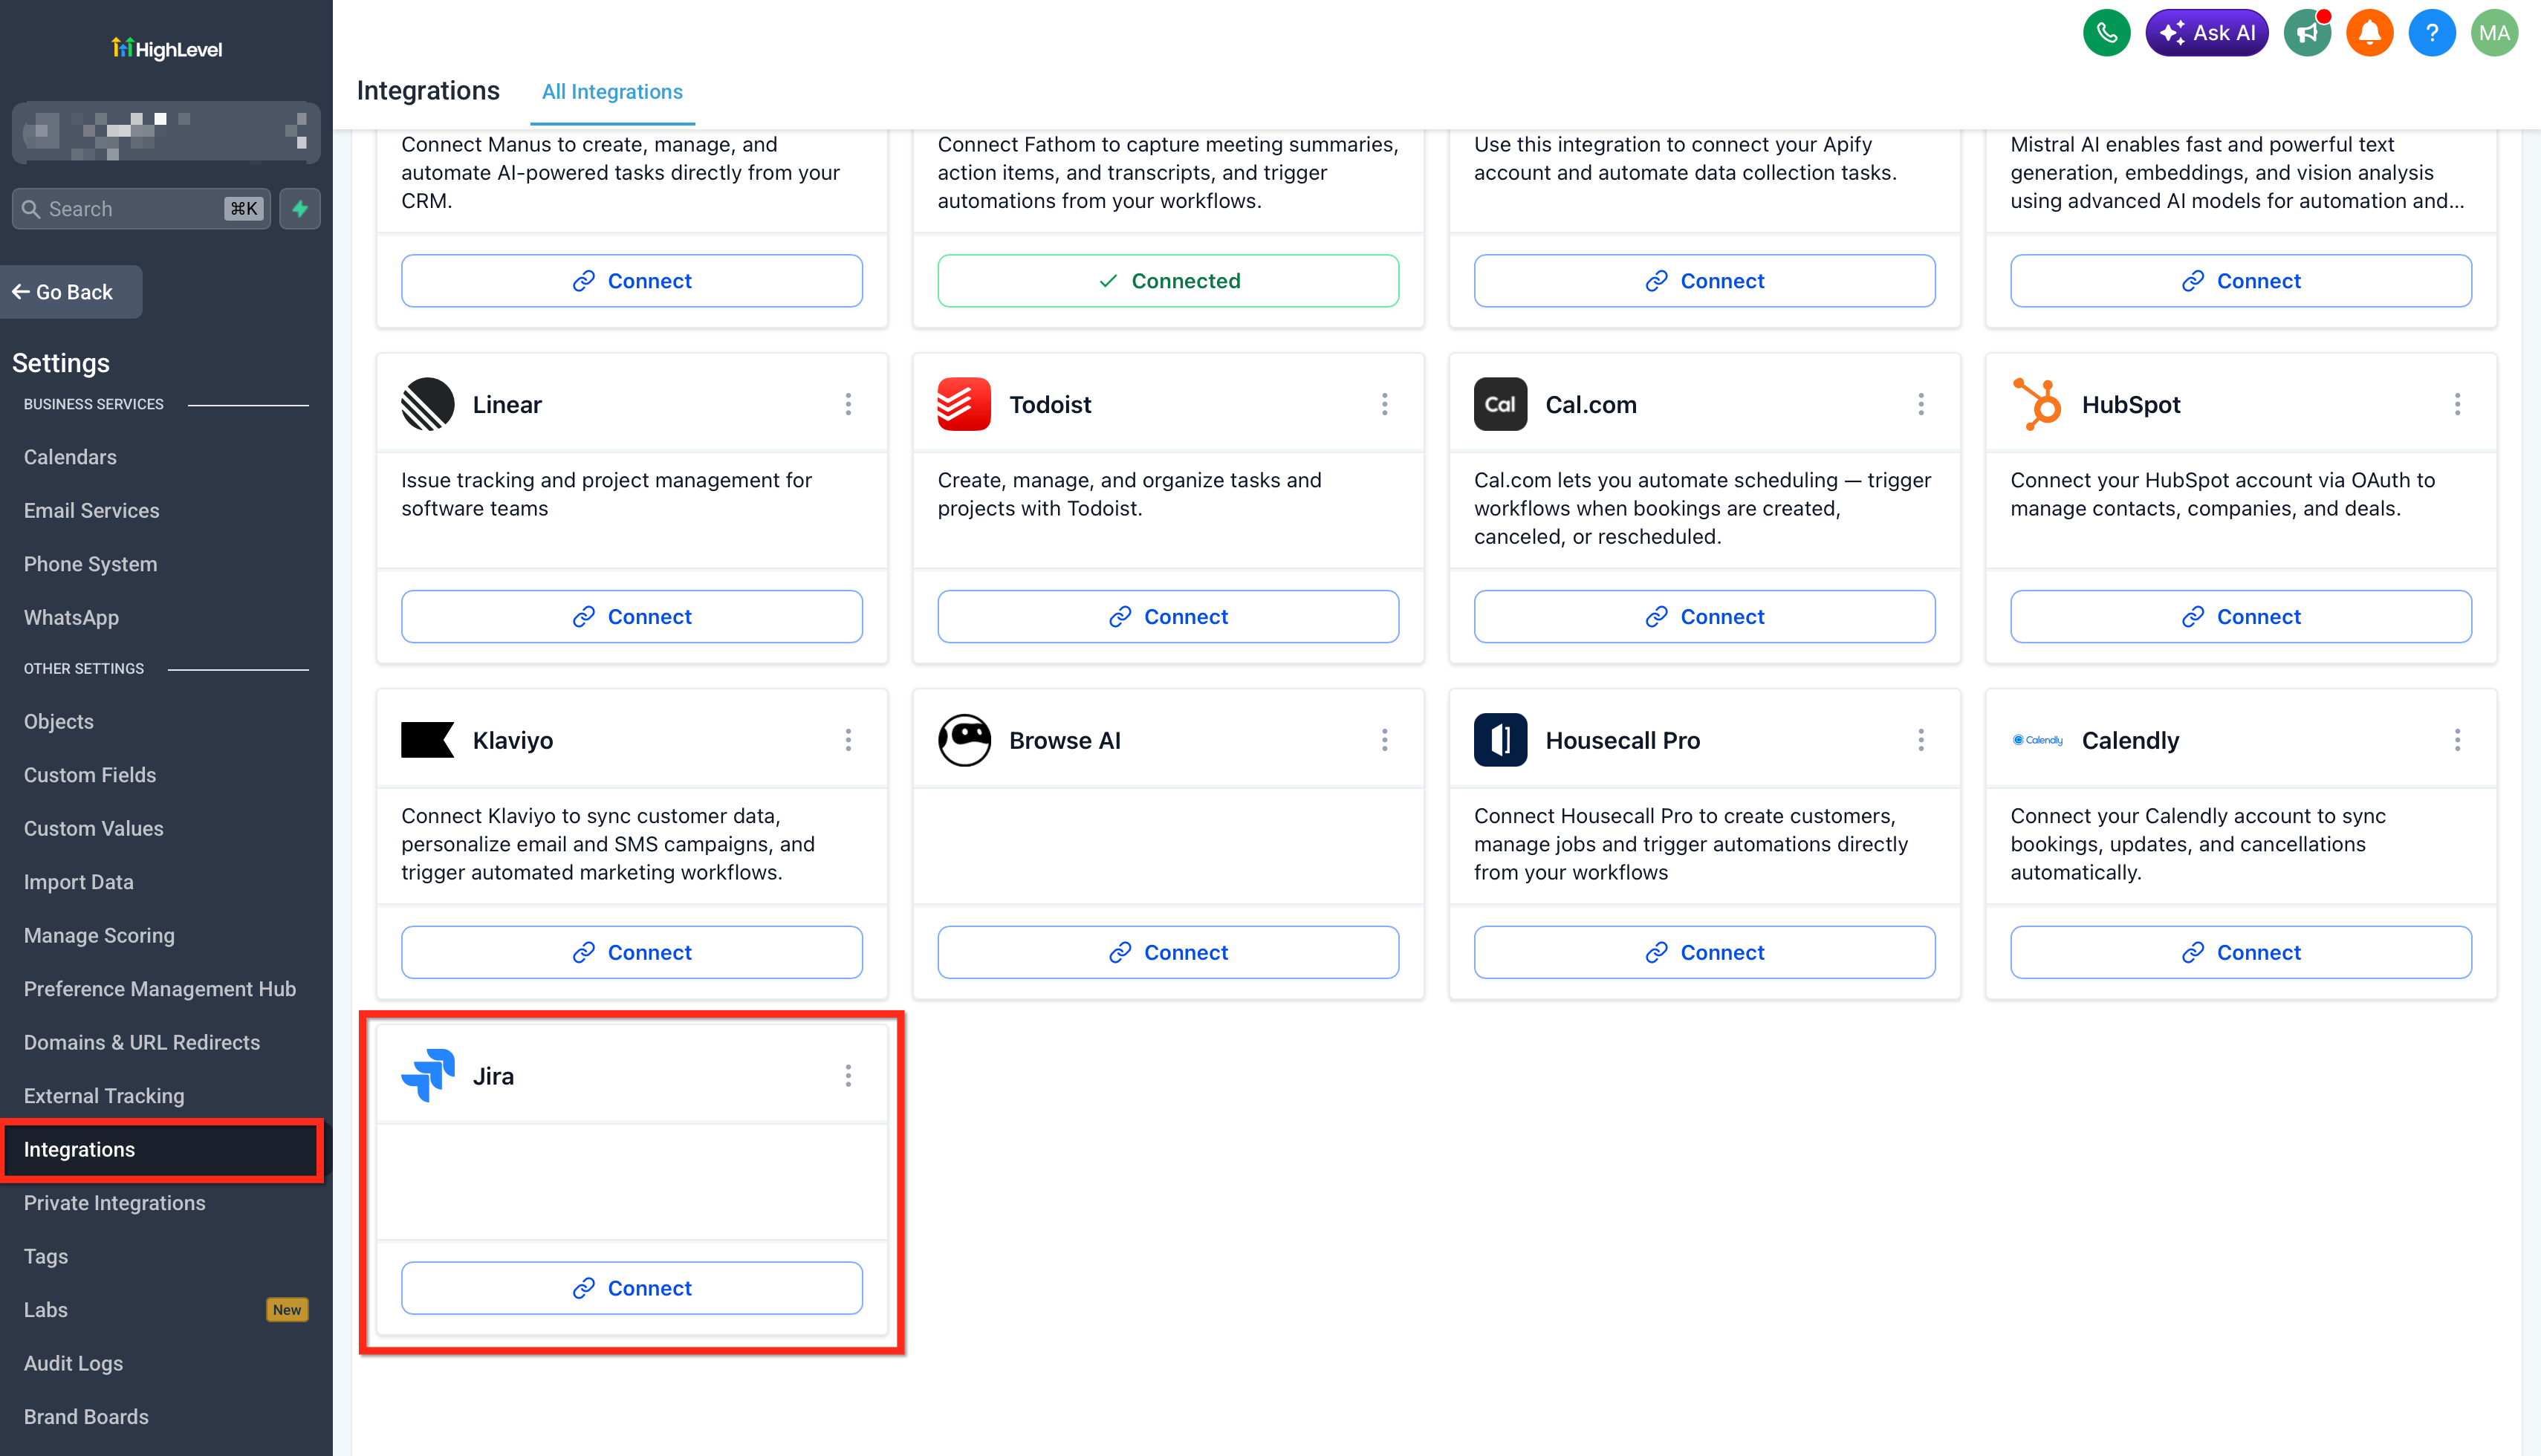
- Alternate path: Sub-Account settings → Integrations → Jira → Connect.
Jira Triggers
Jira triggers allow issue activity to begin a HighLevel workflow. Use the Cloud Site filter and available issue conditions to limit enrollment to the Jira activity relevant to the automation.
| Trigger | Direction | What It Does | Example Uses |
|---|---|---|---|
| New issue | Jira → HighLevel | Starts the workflow when a new issue is created in Jira. | Find the related HighLevel contact, search for similar Jira issues, link duplicate reports, or send an internal notification. |
| Updated issue | Jira → HighLevel | Starts the workflow when an existing Jira issue is updated. Use filters to narrow the automation to the required condition, such as an issue reaching the Done status. | Notify a customer when an issue is resolved, update a HighLevel record after a status change, or alert a team when an issue meets an escalation condition. |
Important: Store or pass a shared identifier when a Jira-triggered workflow must locate a specific HighLevel contact.
Examples include a contact ID, support ticket ID, request ID, or another external reference.
Jira Actions
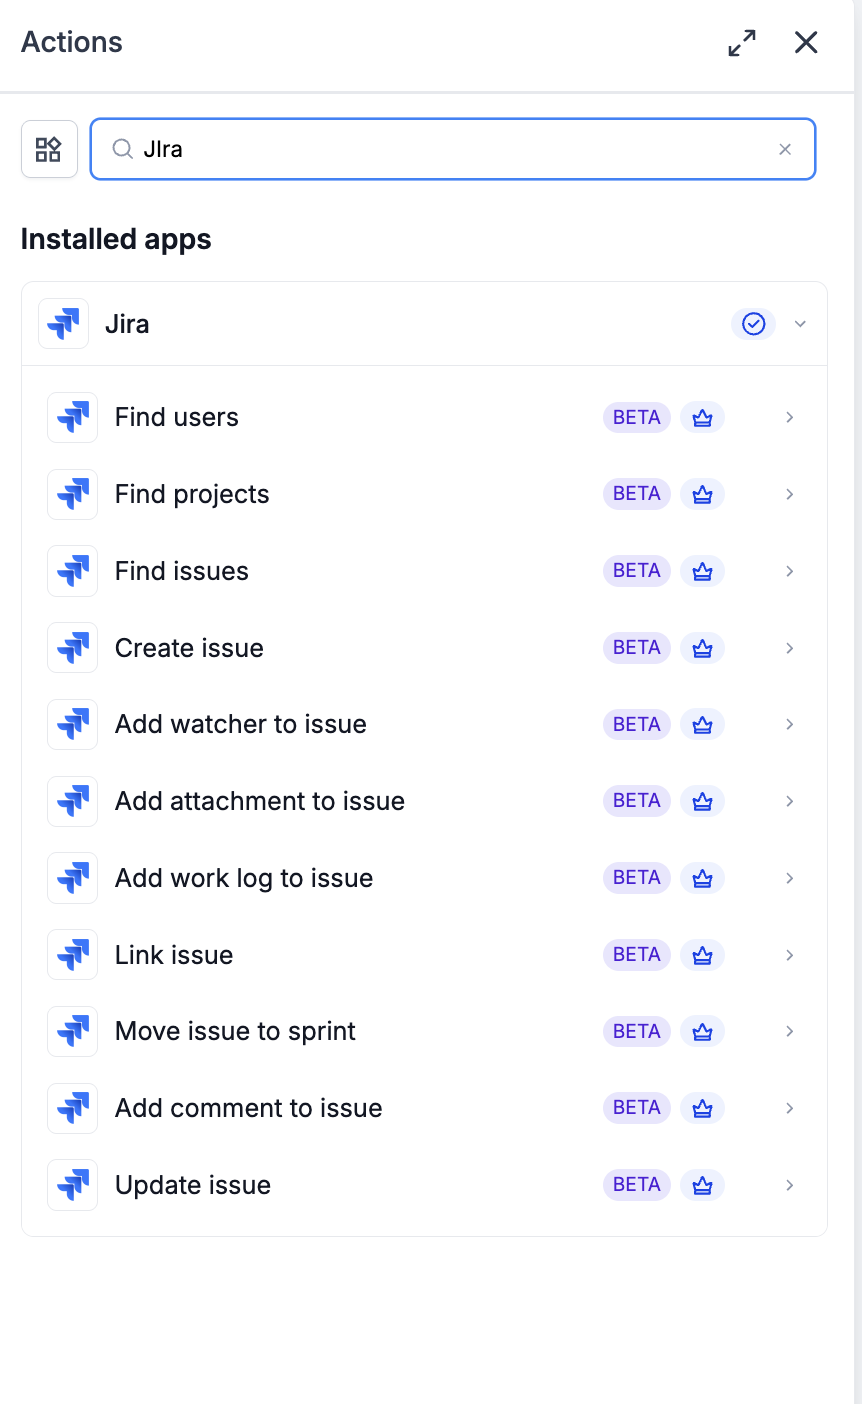
Jira actions allow HighLevel workflows to search Jira and manage issues throughout their lifecycle. Select the correct Cloud Site before choosing projects, issues, users, or sprints associated with that site.
| Category | Action | What It Does |
|---|---|---|
| Discovery | Find users | Searches for Jira users that can be referenced in later workflow steps. |
| Discovery | Find projects | Searches for Jira projects available to the connected Atlassian account. |
| Discovery | Find issues | Searches for Jira issues that match the provided criteria or shared reference. |
| Issue creation and updates | Create issue | Creates a Jira issue in the selected Cloud Site and project. |
| Issue creation and updates | Update issue | Updates an existing Jira issue using the information provided to the action. |
| Issue enrichment | Add comment to issue | Adds a comment to an existing Jira issue. |
| Issue enrichment | Add watcher to issue | Adds a user as a watcher on an existing Jira issue. |
| Issue enrichment | Add attachment to issue | Adds a file to an existing Jira issue. |
| Issue enrichment | Add work log to issue | Records work against an existing Jira issue. |
| Issue relationships | Link issue | Creates a relationship between Jira issues, such as “relates to” or “duplicates.” |
| Issue relationships | Move issue to sprint | Moves a Jira issue into the selected sprint. |
Important: Selecting a Cloud Site is required for the Create issue action. Confirm that the selected site contains the projects, issues, users, and sprints required by the workflow.
How to Set Up a Workflow with Jira
A reliable Jira workflow starts with the correct automation direction, Cloud Site, filters, and issue references. Build and test the workflow in small stages before publishing it for live customer or project activity.
Step 1: Create or open a workflow
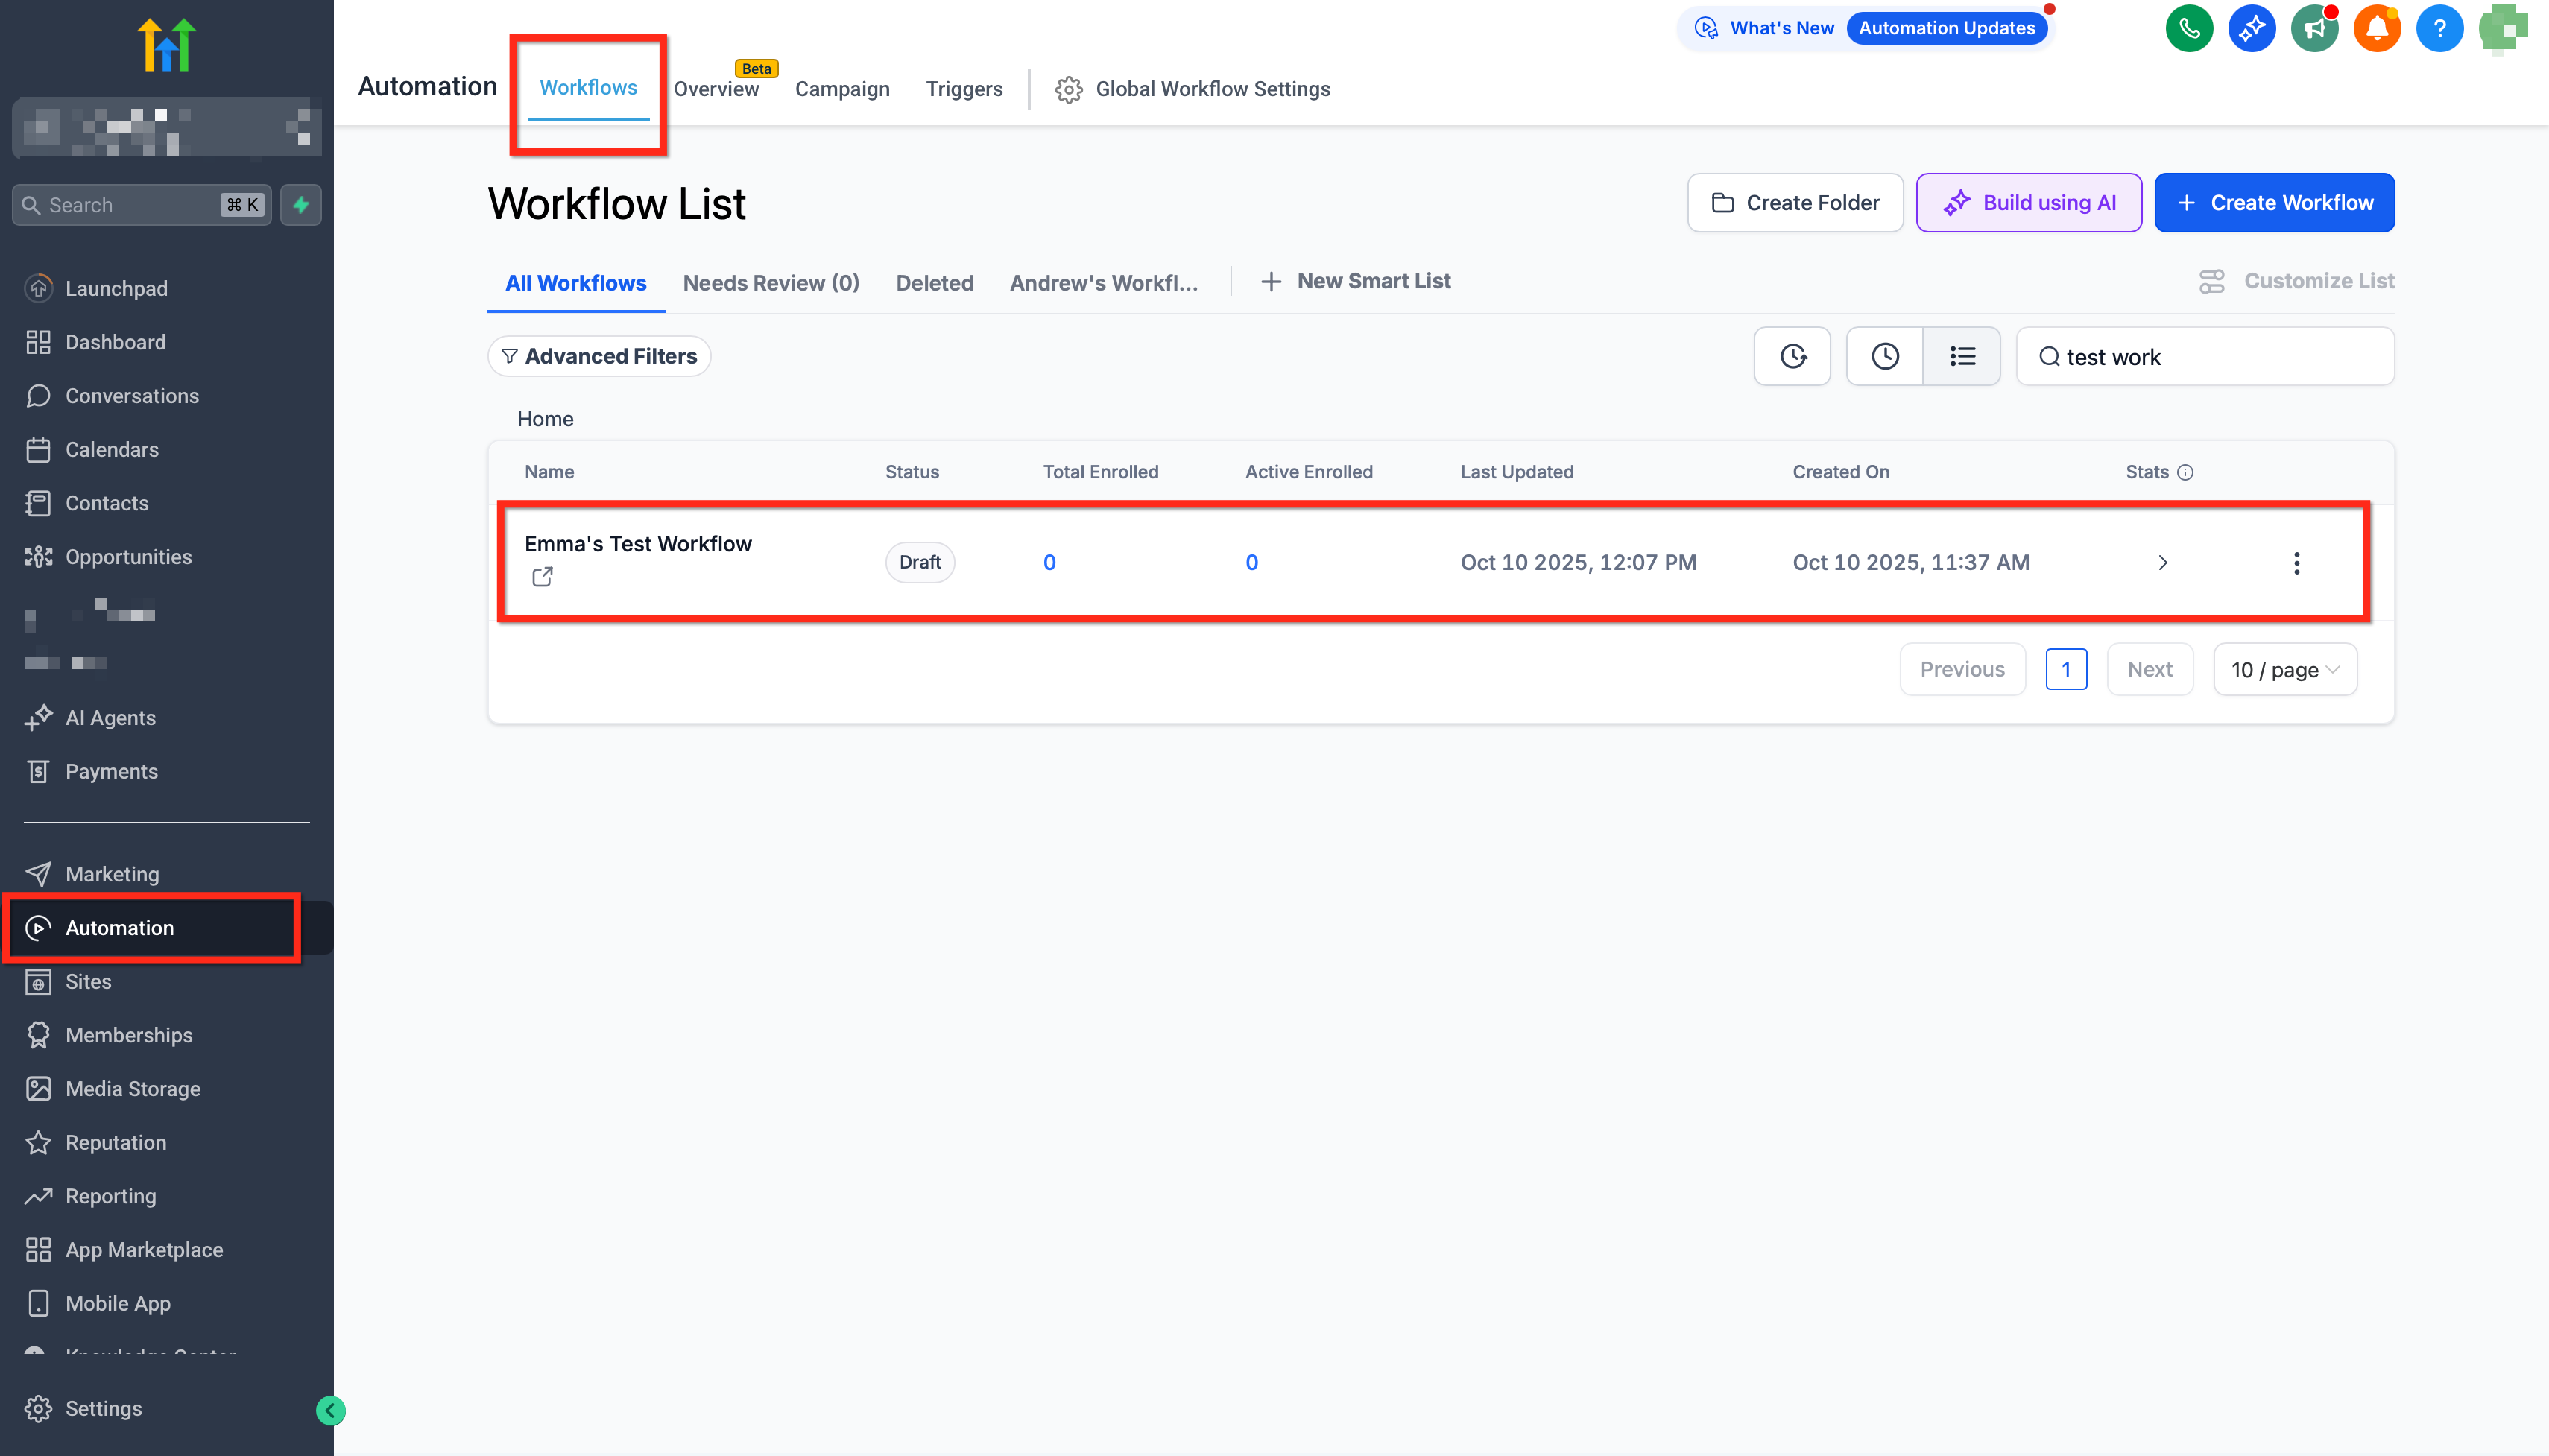
Go to Automation → Workflows, create a new workflow or open an existing workflow, and give it a descriptive name.
Step 2: Choose the workflow trigger
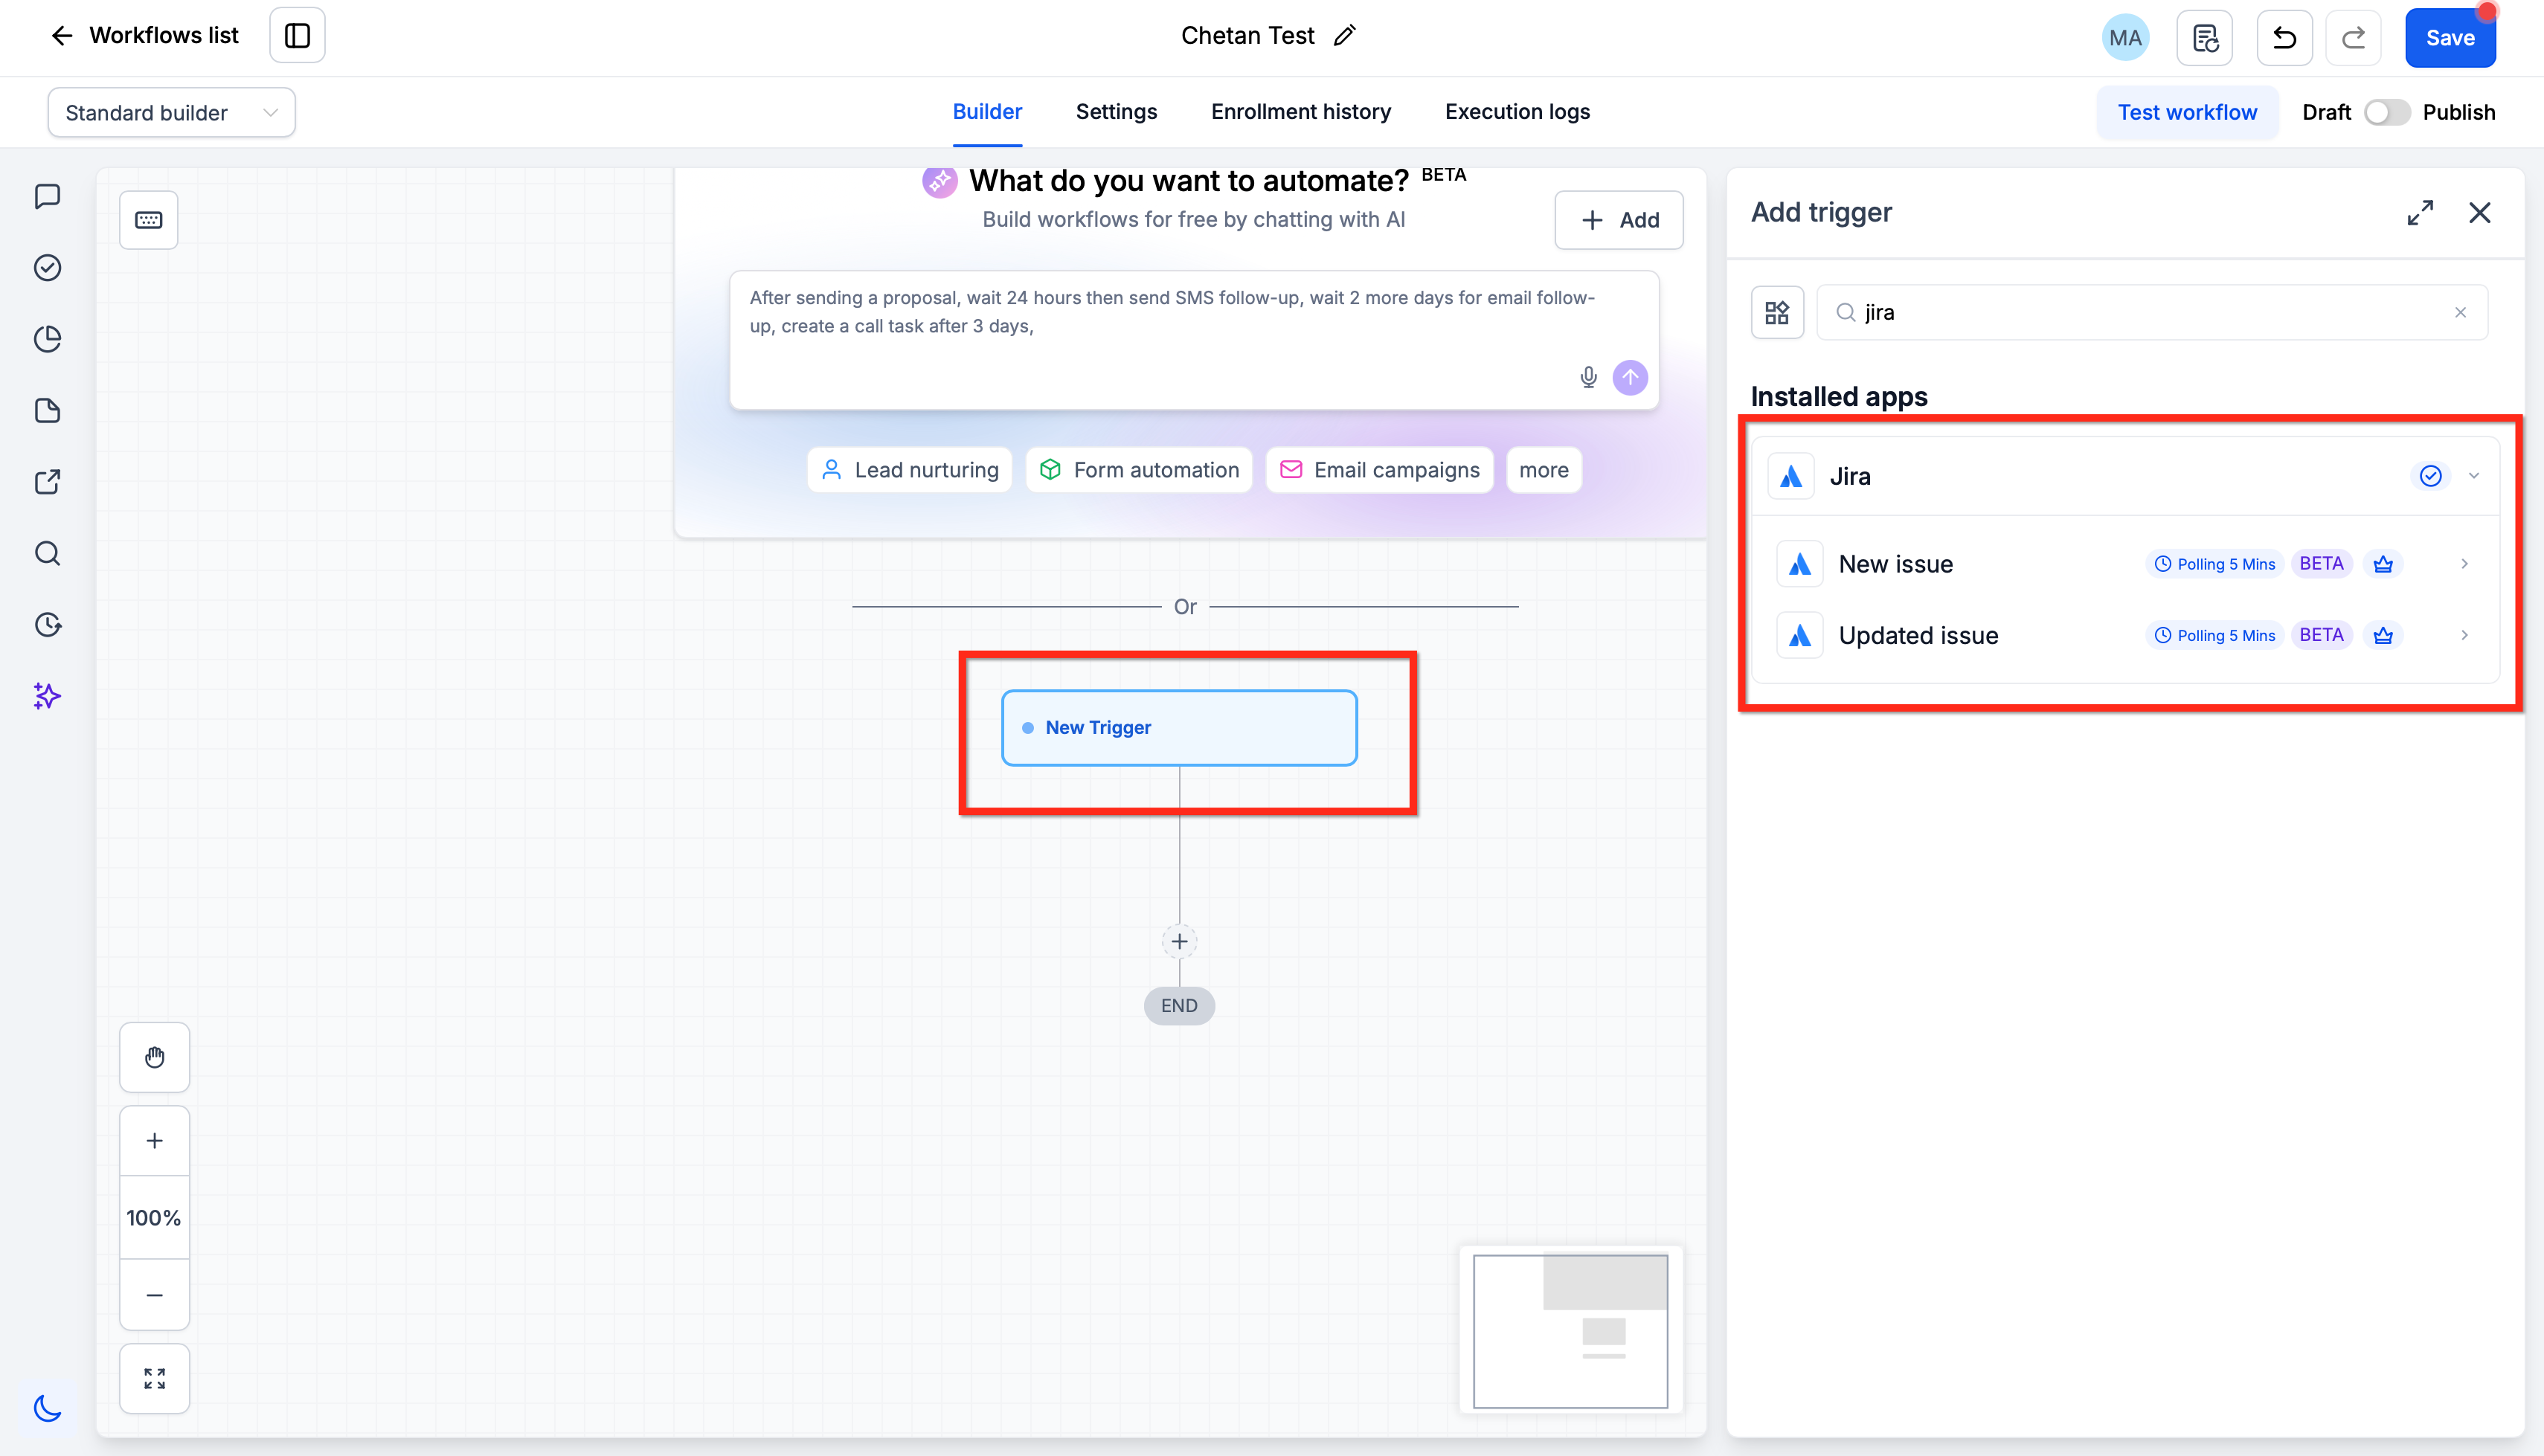
Choose the event that should start the automation.
For a Jira-to-HighLevel workflow, select:
New issue
Updated issue
For a HighLevel-to-Jira workflow, select the appropriate HighLevel trigger, such as a form submission, opportunity change, or another customer event
Step 3: Connect Jira
Add a Jira trigger or action and click Connect your account if Jira has not already been authorized.
Enter a friendly Name and the Email associated with the Atlassian account. Click Continue, then approve the requested Jira access on Atlassian’s authorization screen.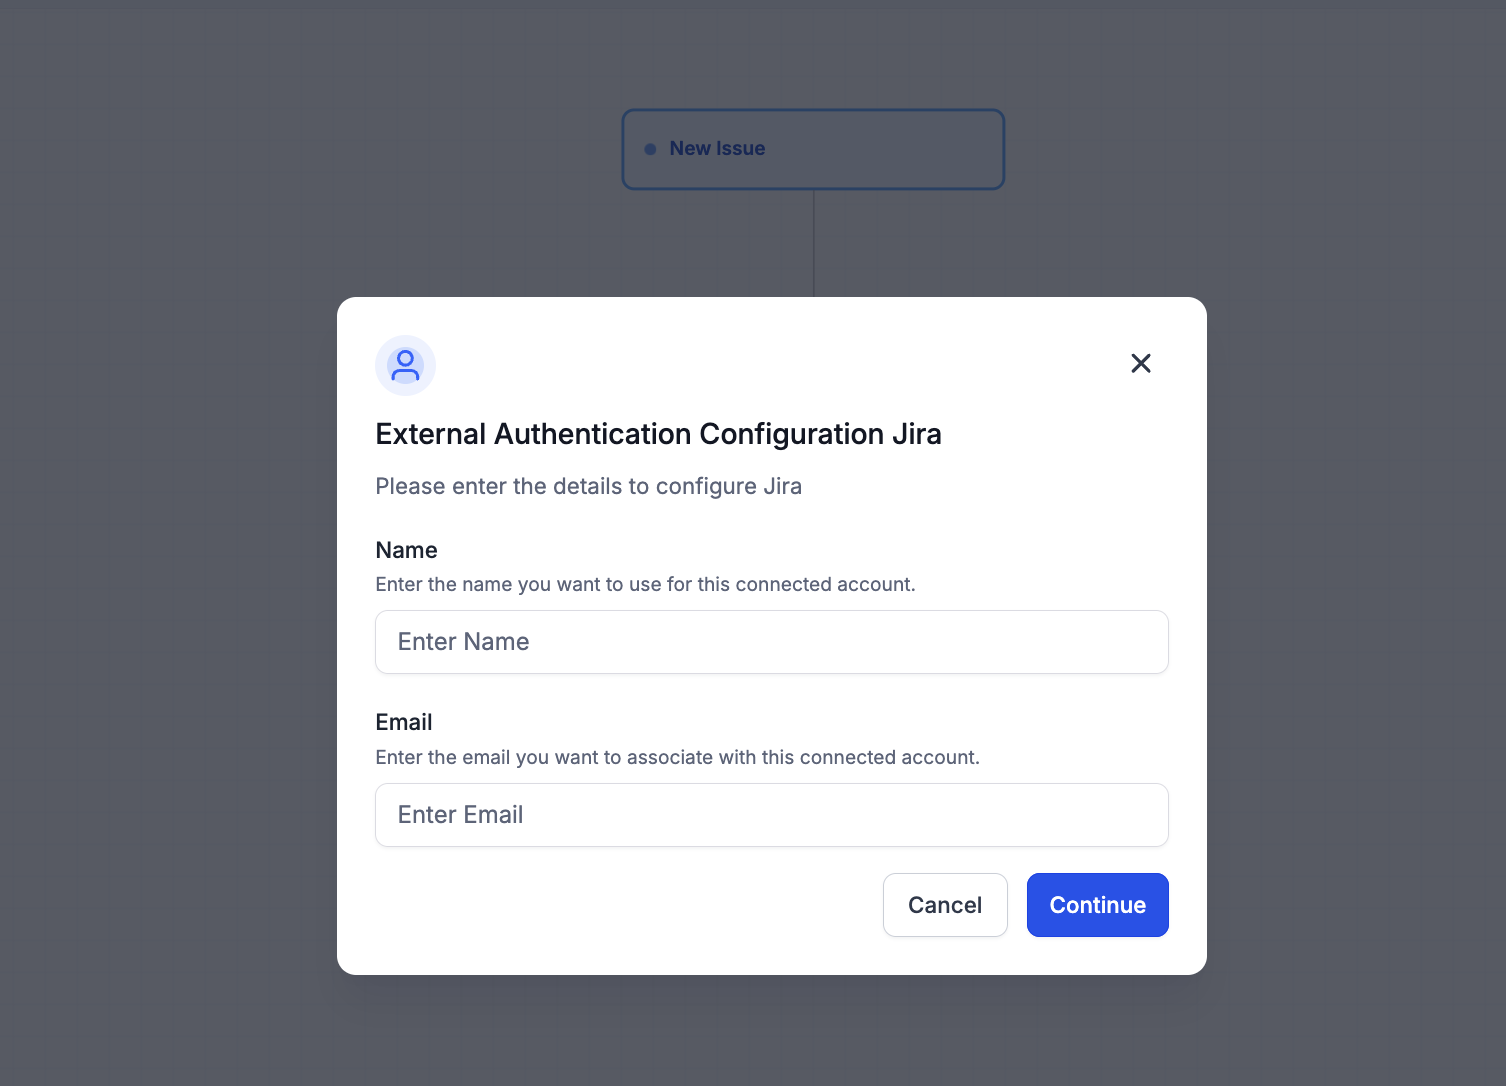
Step 4: Configure the Jira trigger or action
Complete the fields displayed for the selected step.
Depending on the action, this may include:
Jira project
Issue or issue key
User
Use custom values from the trigger or earlier workflow steps when Jira information needs to be populated dynamically.
Step 5: Add conditions and follow-up steps
Add the logic required to handle different results.
Examples include:
Use an If/Else branch when a related Jira issue may or may not be found.
Use Find Contact before sending a customer message from a Jira-triggered workflow.
Add an internal notification when a Jira action fails to find the expected record.
Add another Jira action to comment on or link an issue after it is created.
Step 6: Test, save, and publish
Run a controlled test and confirm that the workflow uses the correct Jira Cloud Site and issue.
Click Save, then publish the workflow when the test is successful. After a live execution, review Execution Logs to verify the workflow inputs, outputs, and status.
Use Cases & Patterns
These workflow patterns demonstrate how Jira and HighLevel can coordinate customer updates, issue discovery, and technical work. Add filters, shared identifiers, and error-handling branches according to your organization’s process.
Use Case 1: Customer-reported bug → Jira issue with full context
Goal: Turn a customer bug report into a well-annotated Jira issue automatically.
Workflow Setup:
- Trigger: Support conversation flagged as a bug
- Action: Find projects (resolve the engineering project key)
- Action: Find users (resolve the on-call engineer)
- Action: Create issue (project = engineering, issue type = Bug, assignee = on-call engineer, summary from support summary)
- Action: Add attachment to issue (screenshots, logs)
- Action: Add comment to issue (verbatim customer report)
Example: A customer reports a crash. Within seconds, an on-call engineer sees a Bug issue in Jira with the screenshot attached, the reproduction steps as a comment, and their name on Assignee — no manual copy-paste from the support conversation.
Use Case 2: Issue resolved → notify the customer
Goal: Close the loop when an engineer resolves an issue that started from a customer report.
Workflow Setup:
- Trigger: Updated issue (filter: status = Done)
- Branch: Was this status change from a non-Done state?
- Action: Find the originating contact (cross-reference via a custom field or issue label)
- Action: Send resolution message with the fix summary from the issue’s resolution comment
Example: An engineer flips ENG-4523 to Done and adds a resolution comment describing the fix. Within 5 minutes, the customer who originally reported the bug gets an SMS: ‘We’ve fixed the crash you reported. Details: [resolution excerpt].’
Use Case 3: Duplicate detection and cross-issue linking
Goal: Reduce duplicate work by linking related issues on creation.
Workflow Setup:
- Trigger: New issue
- Action: Find issues (search by shared reference — support ticket ID, error signature, feature request ID)
- Branch: If a matching issue exists → Link issue (‘duplicates’ or ‘relates to’)
Example: A new bug issue comes in from a customer report. The workflow searches for existing issues with the same error signature; if one exists, it links the new issue as ‘relates to’ so engineering can see the pattern rather than fixing the same bug twice.
Frequently Asked Questions
Q: What is a Cloud Site?
An Atlassian Cloud Site is a single Jira instance identified by a subdomain (e.g. istesting.atlassian.net, acme.atlassian.net). One Atlassian account can have access to many Cloud Sites. Every trigger and action in this integration exposes a Cloud Site selector — it’s required on Create issue and available as a filter on the triggers. Always set it explicitly if your account has access to more than one site.
Q: Do I need to connect Jira separately for every workflow?
No. Connect Jira once through OAuth, then select the connected account and appropriate Cloud Site when configuring Jira steps across workflows.
Q: Can one connected Atlassian account access more than one Jira Cloud Site?
Yes. When the connected Atlassian account has access to multiple Cloud Sites, use the Cloud Site selector to choose the environment for each Jira trigger or action.
Q: Is the Cloud Site required for every Jira step?
Jira triggers and actions include a Cloud Site selector. The Cloud Site is required for Create issue and acts as a filter for Jira triggers.
Q: Can different Jira steps in the same workflow use different Cloud Sites?
Each Jira trigger and action includes its own Cloud Site selector, allowing the step to target the appropriate site available through the connected Atlassian account.
Q: How do I associate a Jira-triggered workflow with a HighLevel contact?
Store a shared identifier in the Jira issue, such as a contact ID, email address, ticket ID, or request reference. Use that value in a Find Contact step before running contact-specific actions.
Q: Does Updated issue only run when the Jira status changes?
The trigger responds to an existing issue being updated. Use the available filters to narrow the workflow to the condition you need, such as Status = Done.
Q: Where can I troubleshoot a failed Jira action?
Open the workflow’s Execution Logs, locate the Jira action, and review its execution details. Confirm the connected account, Cloud Site, required fields, and Jira record references before testing again.
Related Articles
Was this article helpful?
That’s Great!
Thank you for your feedback
Sorry! We couldn't be helpful
Thank you for your feedback
Feedback sent
We appreciate your effort and will try to fix the article