Tasks are the unit of work in Project Management, and subtasks break a larger task into steps. This article covers the two ways to create a task, everything a task can hold, how to add subtasks, and how to share a link to a specific task.
Note: Project Management is currently in Private Beta and may not be visible to all customers. Access is being rolled out gradually to selected customers.
It will soon be available through Labs, allowing all customers to enable it and explore the new and enhanced experience
TABLE OF CONTENTS
- Two ways to create a task
- What a task contains and steps for creating a task
- Steps for creating a task quickly
- Steps for adding a subtask
- Commenting on a task
- Moving a Task to a Different List
- Adding a task to multiple lists
- How statuses behave
- What this means for someone working in the secondary list
- Steps for adding a task to another list
- Frequently Asked Questions
Two ways to create a task
Both routes create the same kind of task. The difference is only how much you fill in at the moment of creation.
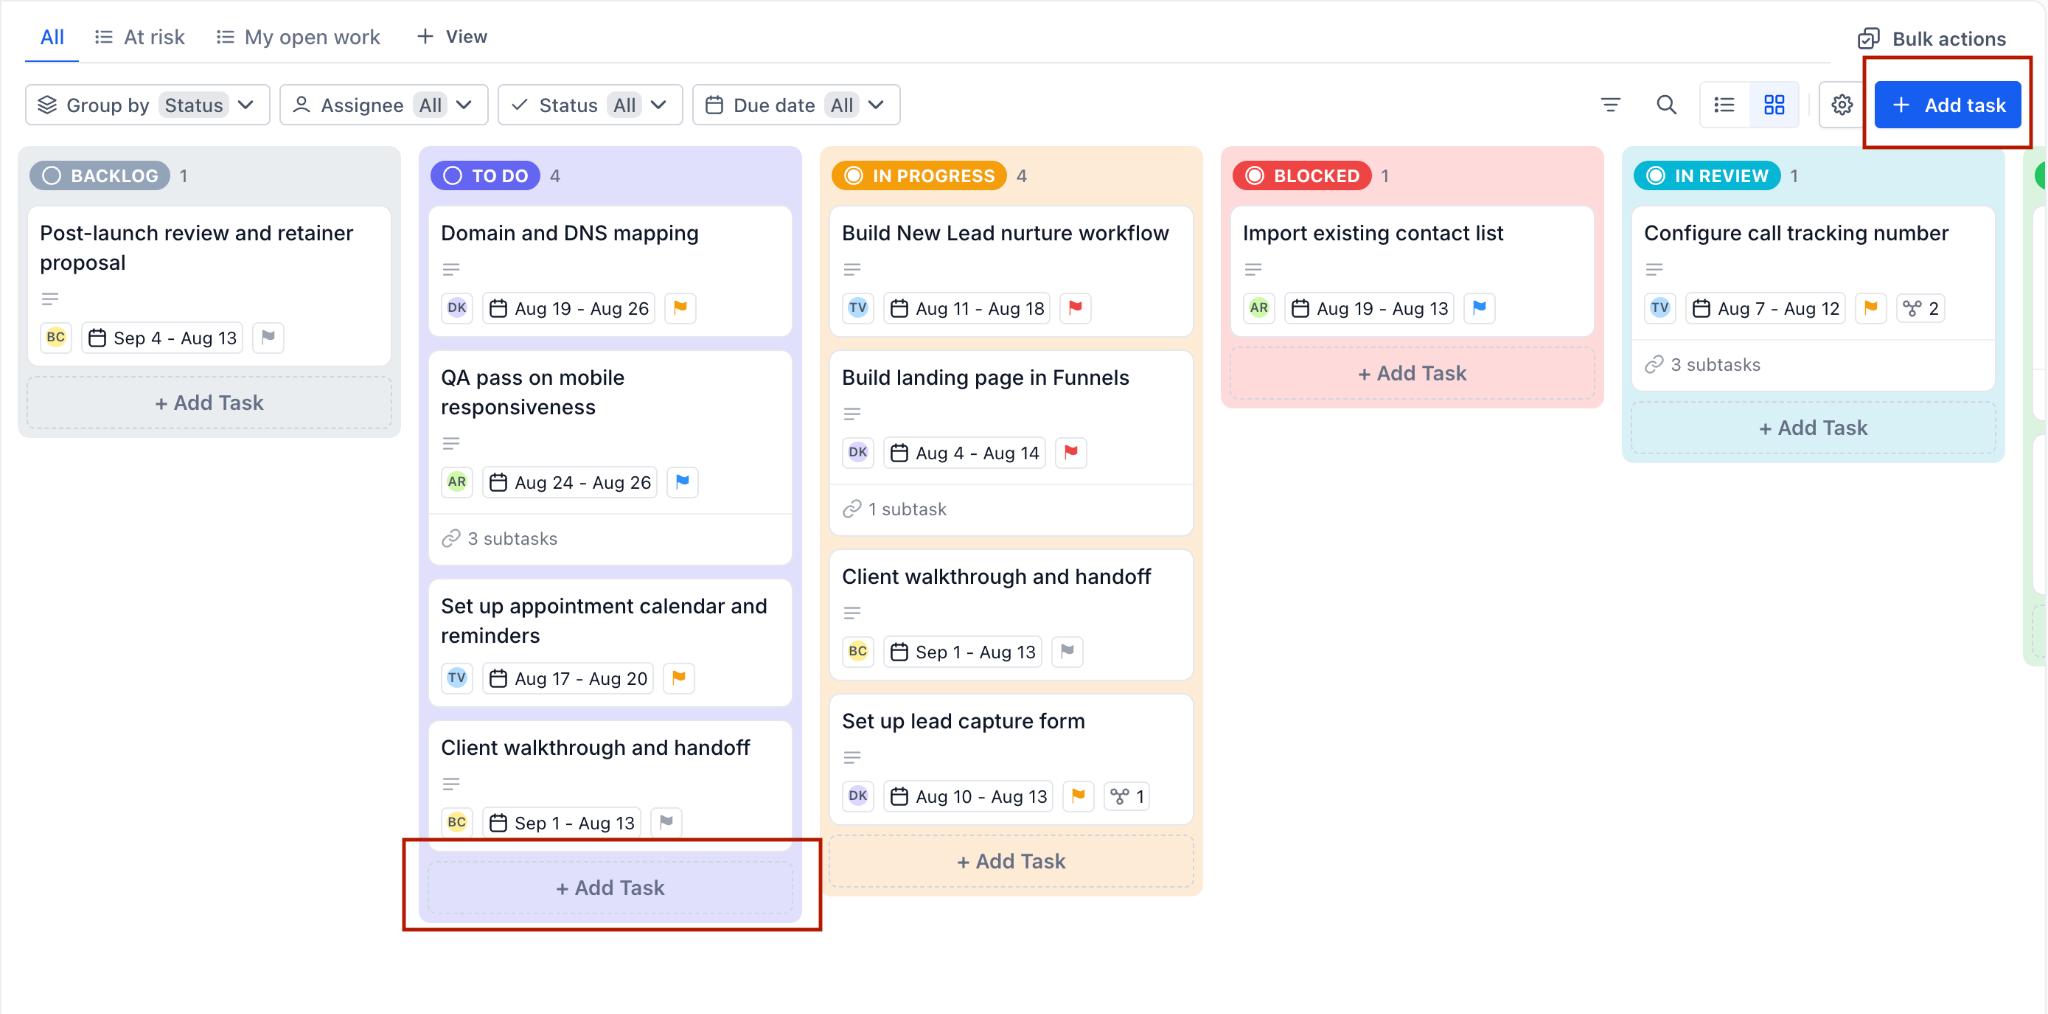
Add task in the toolbar: The button at the right of the toolbar above the board. Use this when you are not thinking about which status the task should start in.
+ Add Task at the foot of a column: Each status column in Kanban view has its own Add Task control. Use this when you already know the stage the task belongs to, because the task is created in that status.
What a task contains and steps for creating a task
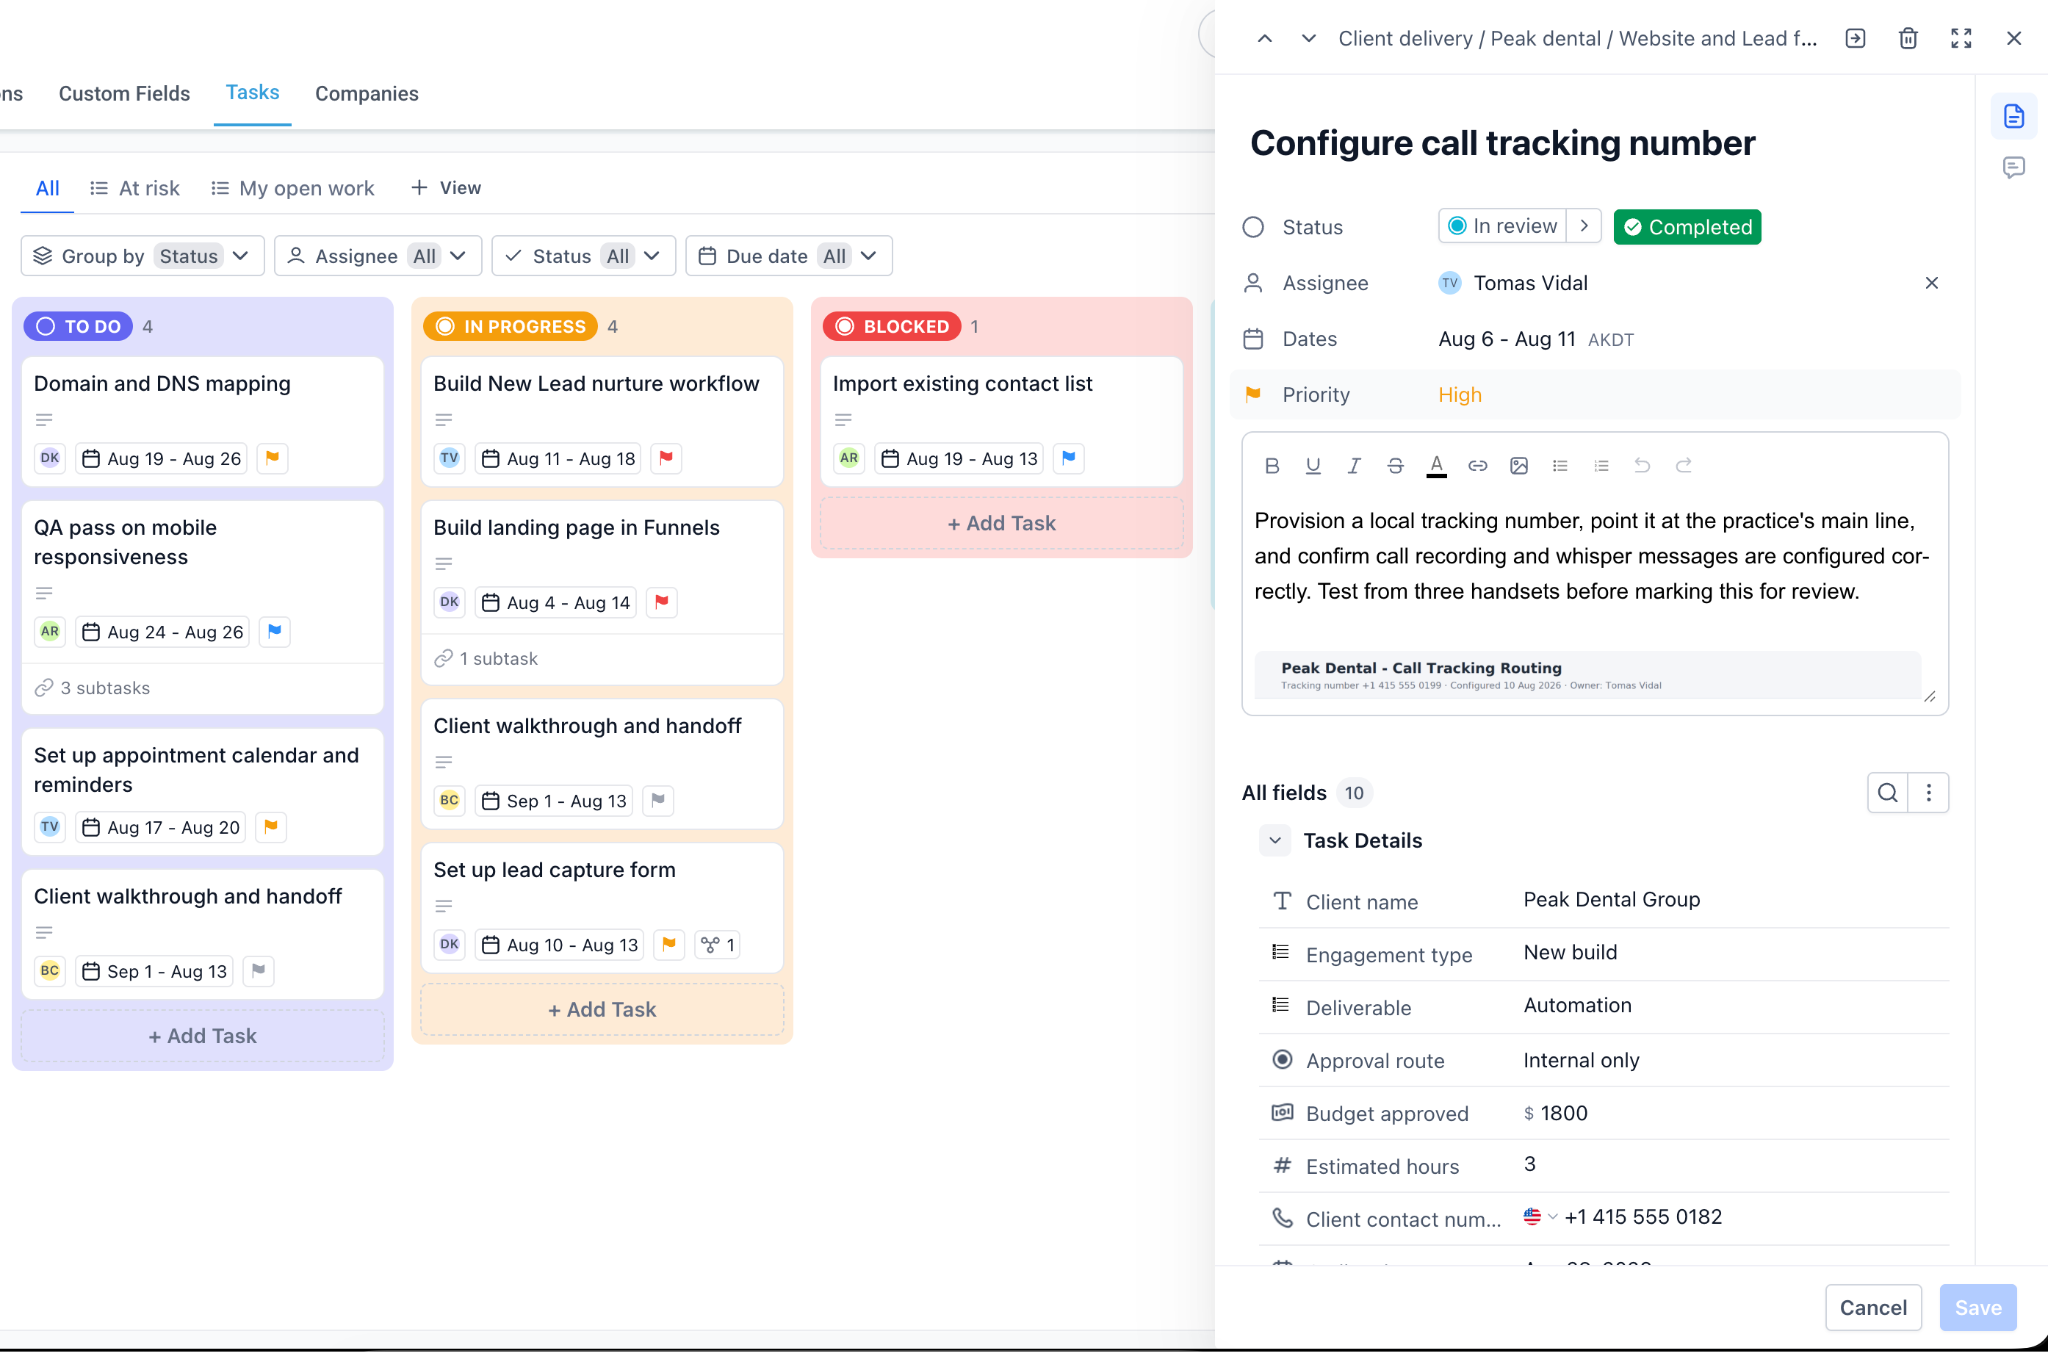
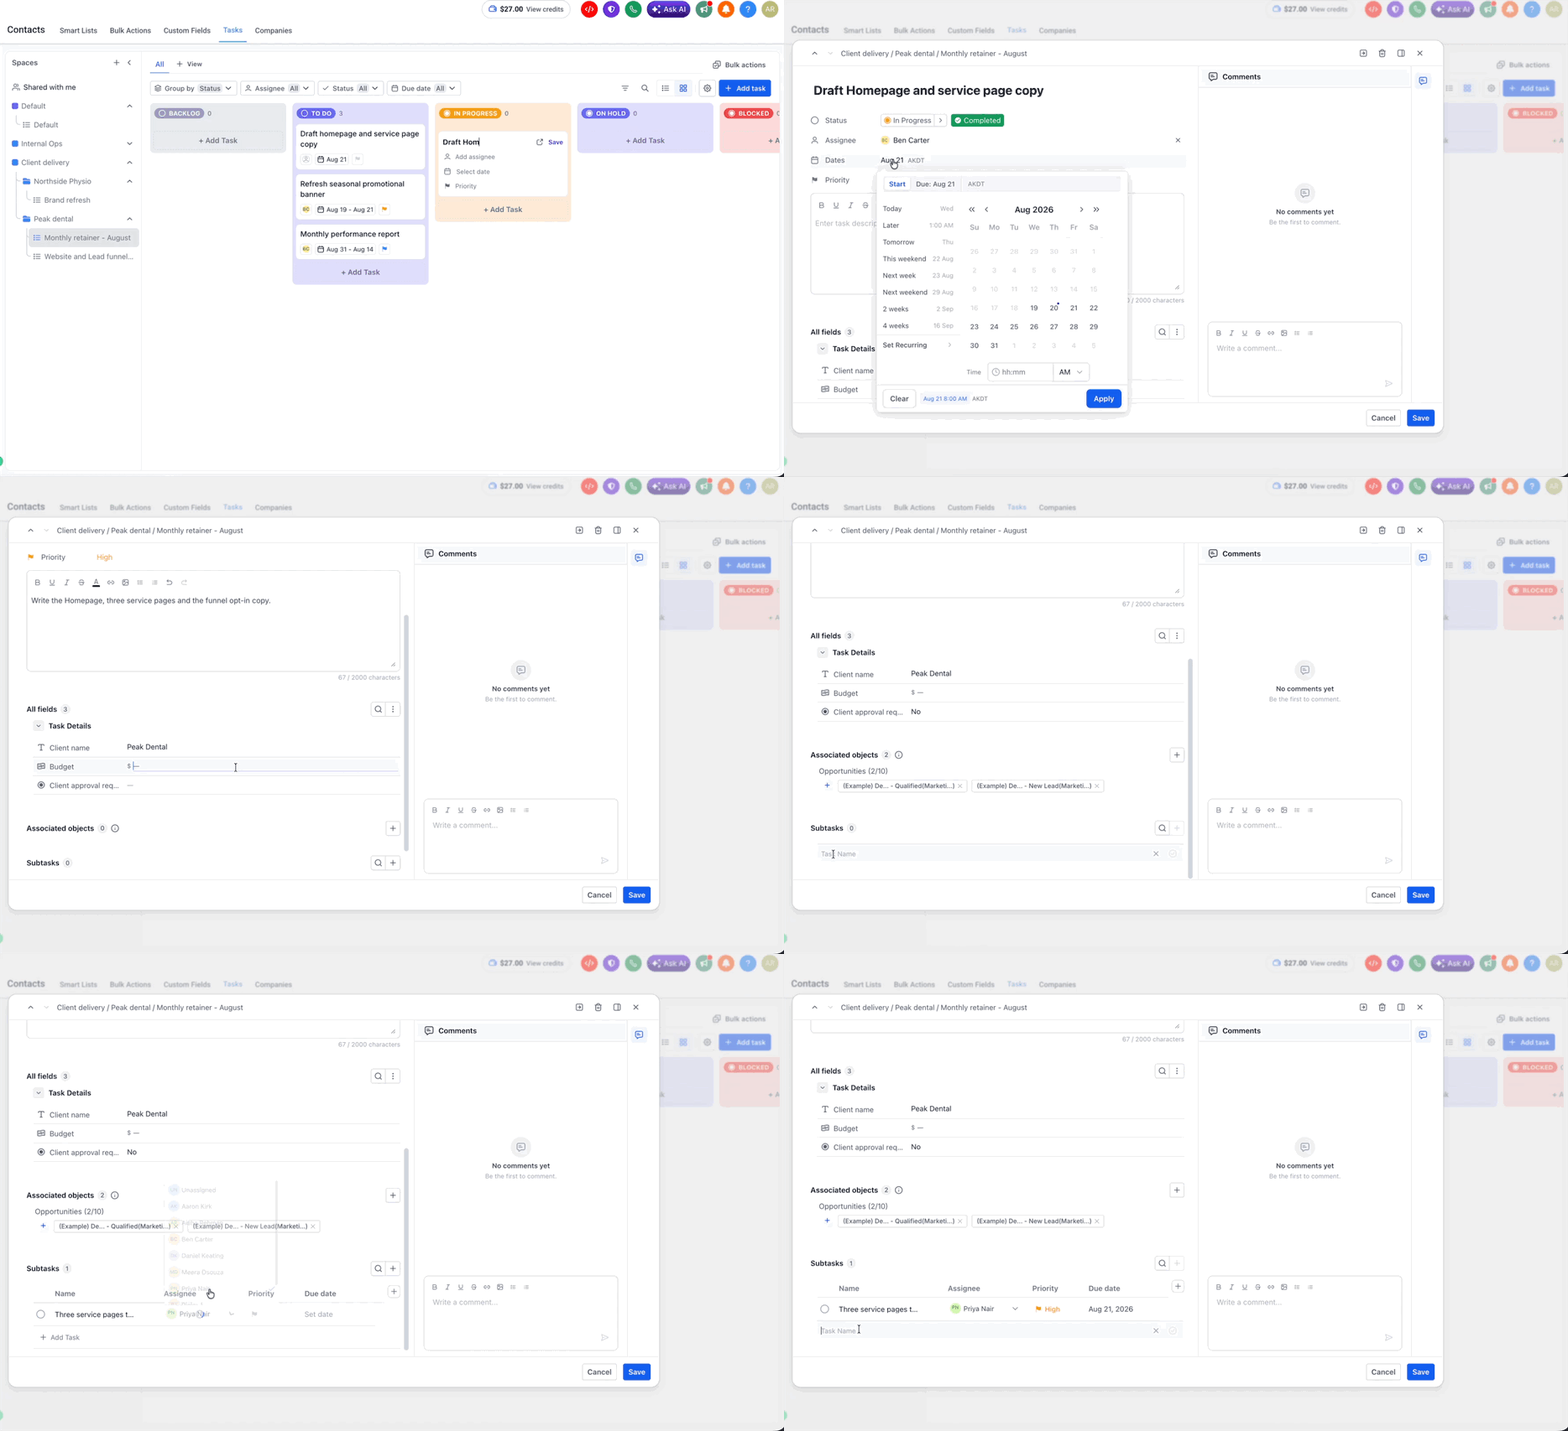
When you open a task, you can choose to view it in a right-side panel or as a modal. Your preferred view is saved, so the next time you open a task, it will automatically use your last selected configuration. A breadcrumb at the top shows where the task lives in the form Space/List.
Task name: Editable directly in the panel.
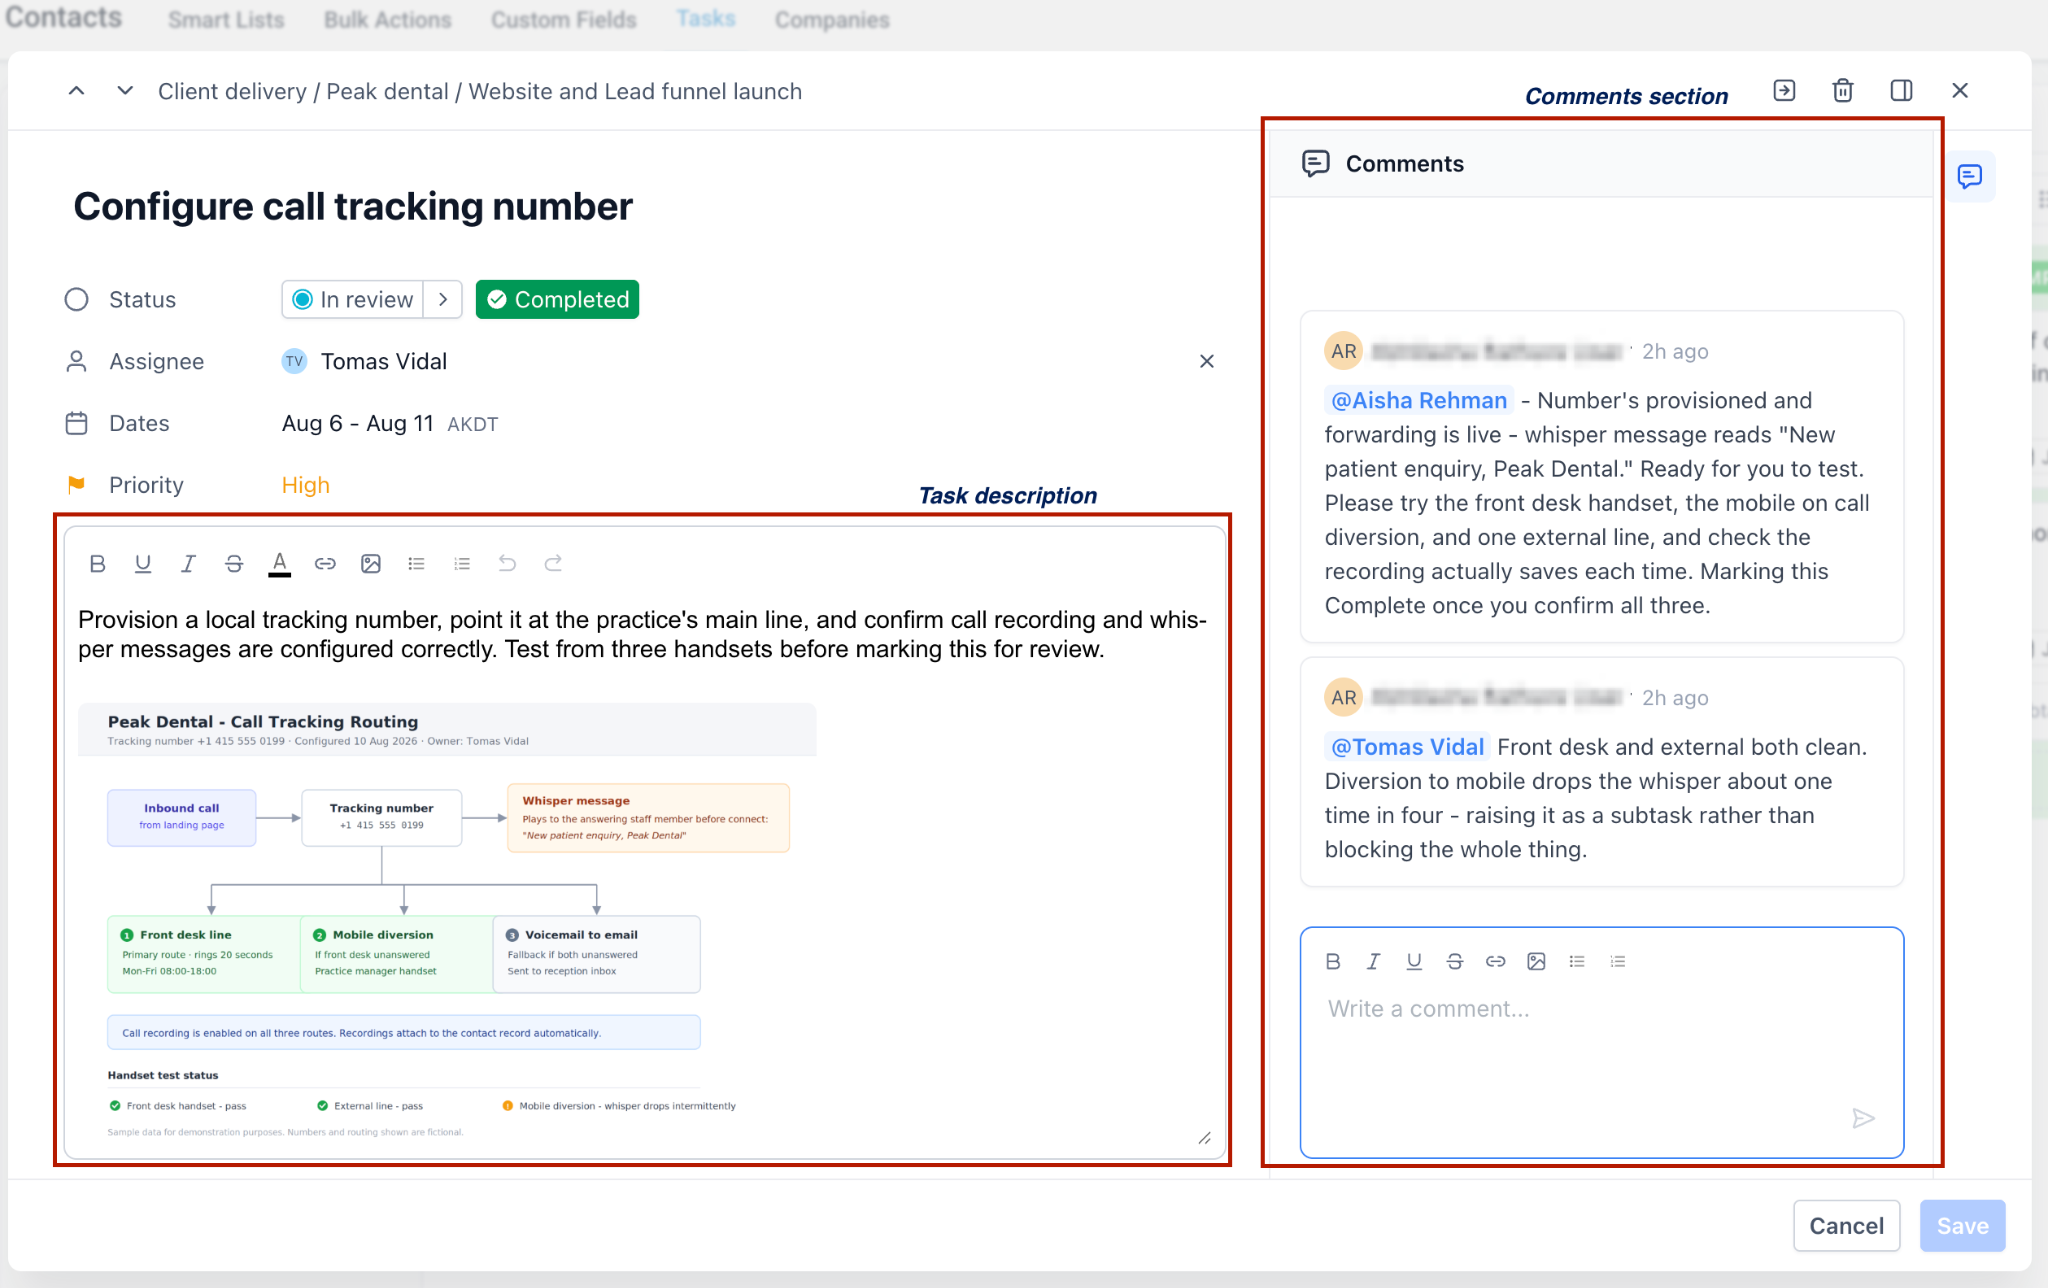
Description: A rich text editor for the detail of the work. It has a formatting toolbar and undo and redo controls, and shows the prompt "Enter task description" while empty.
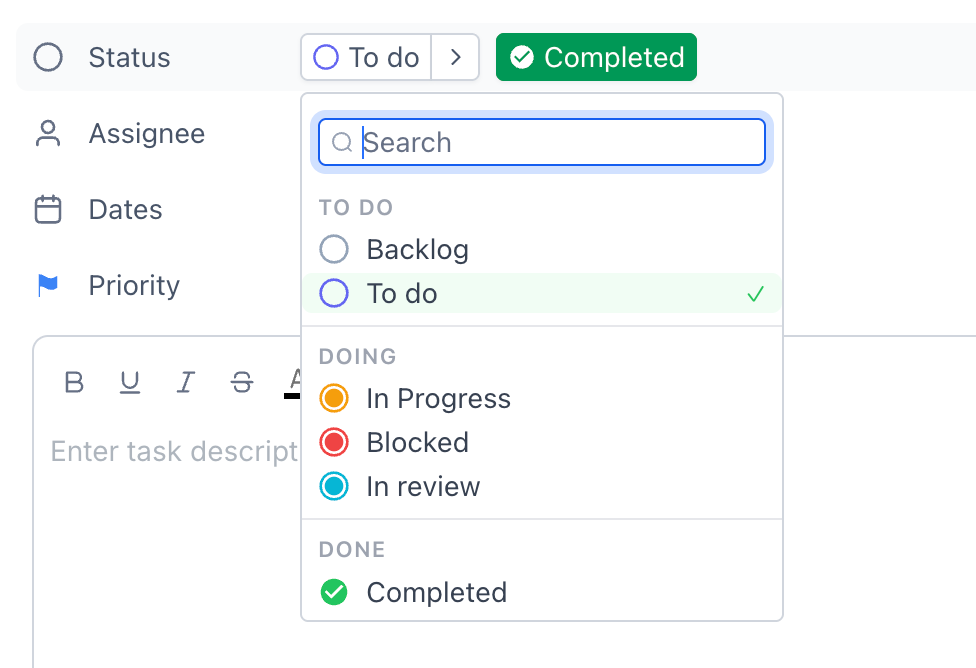
Status: The stage the task is at, drawn from the statuses configured on the Space.
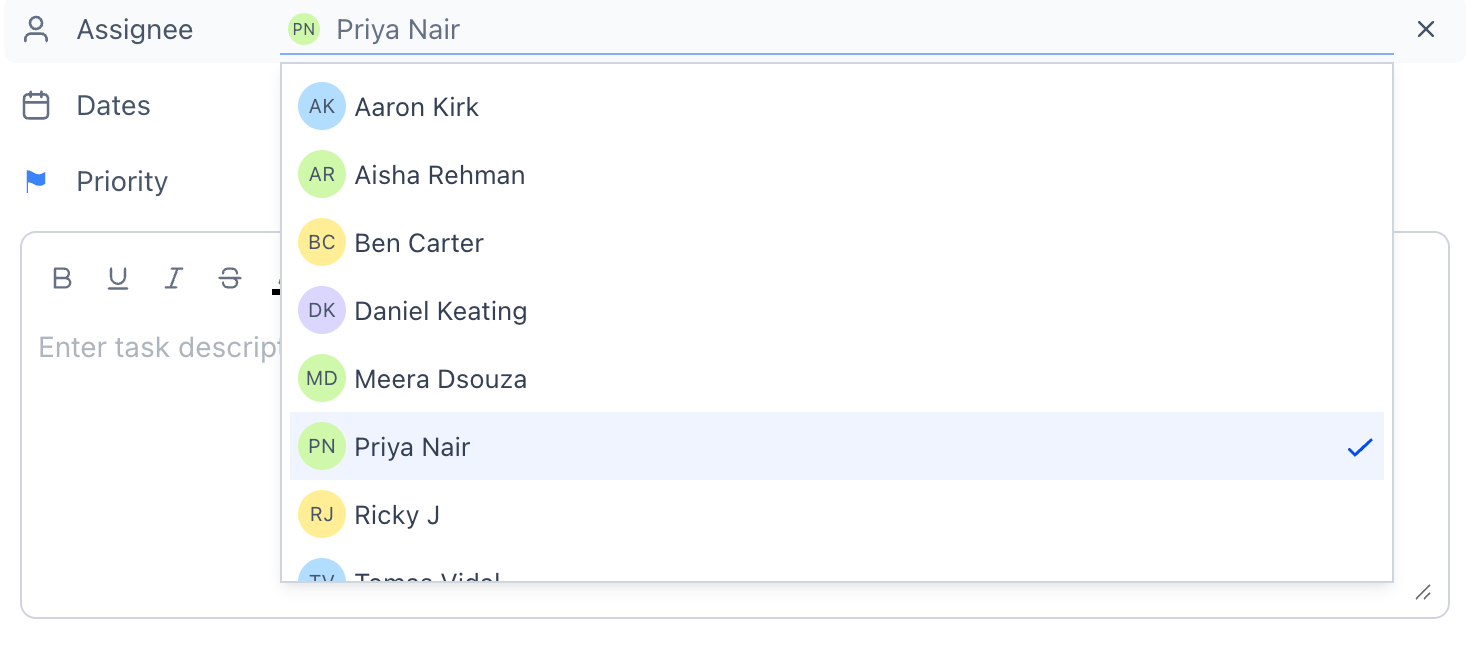
Assignee: The one person responsible. This is a single selection, not a list.
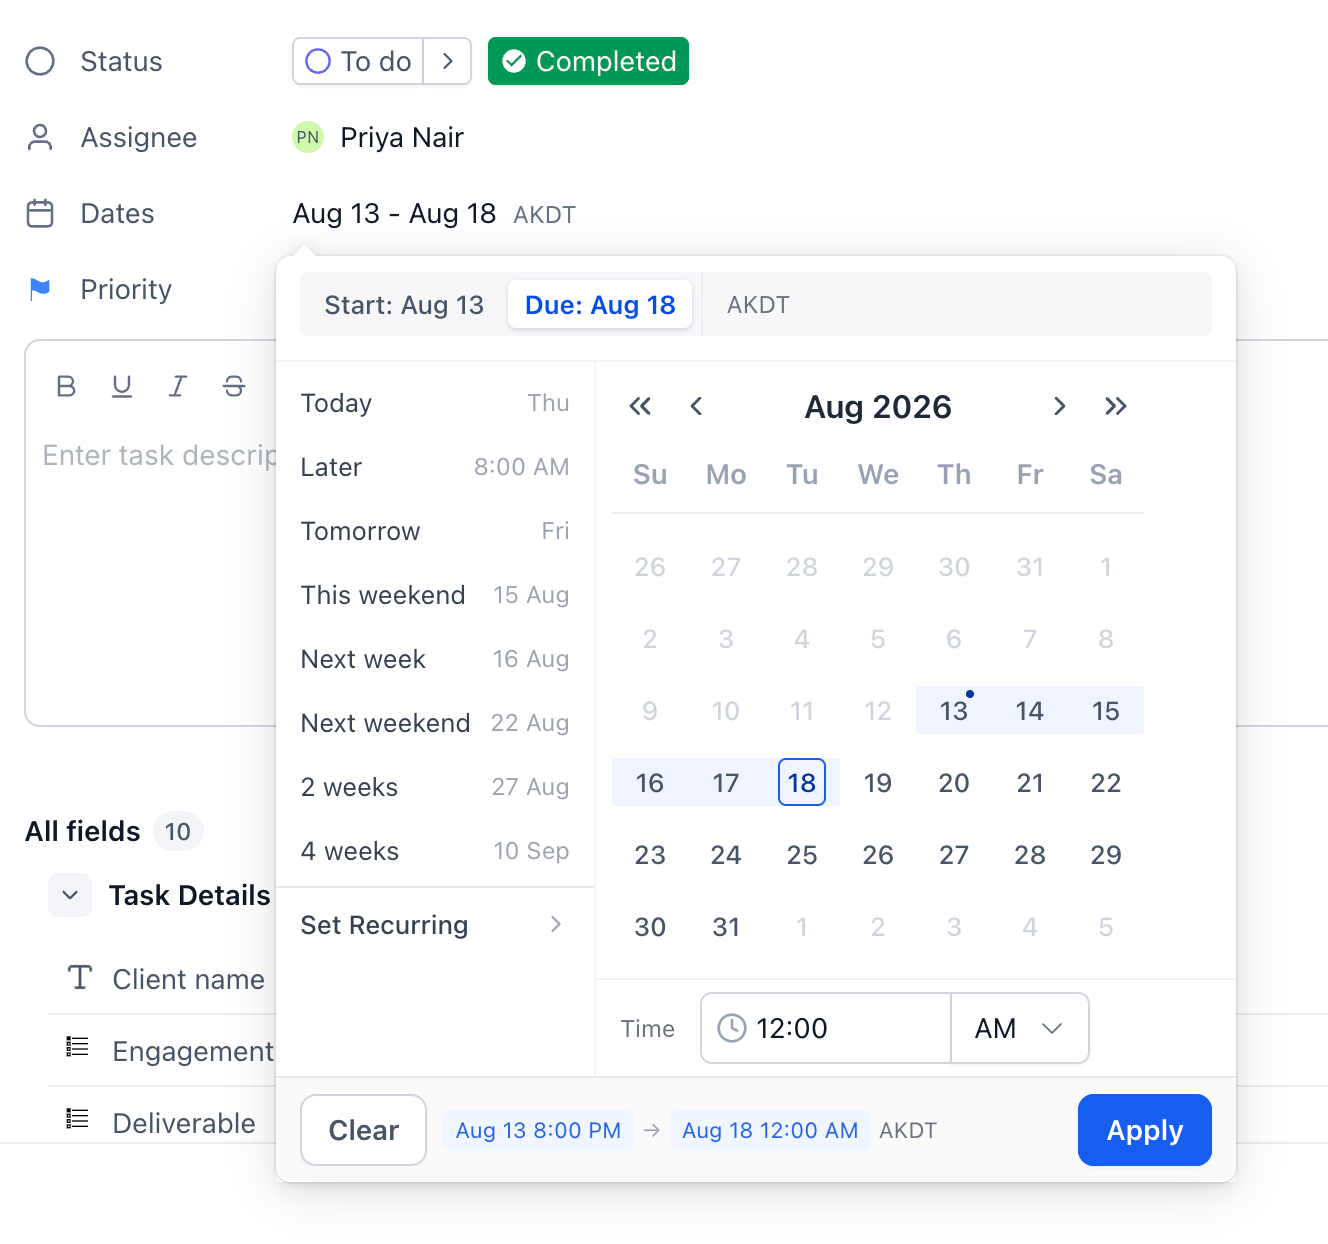
Dates: A single date or a date range, displayed with the timezone it is shown in.
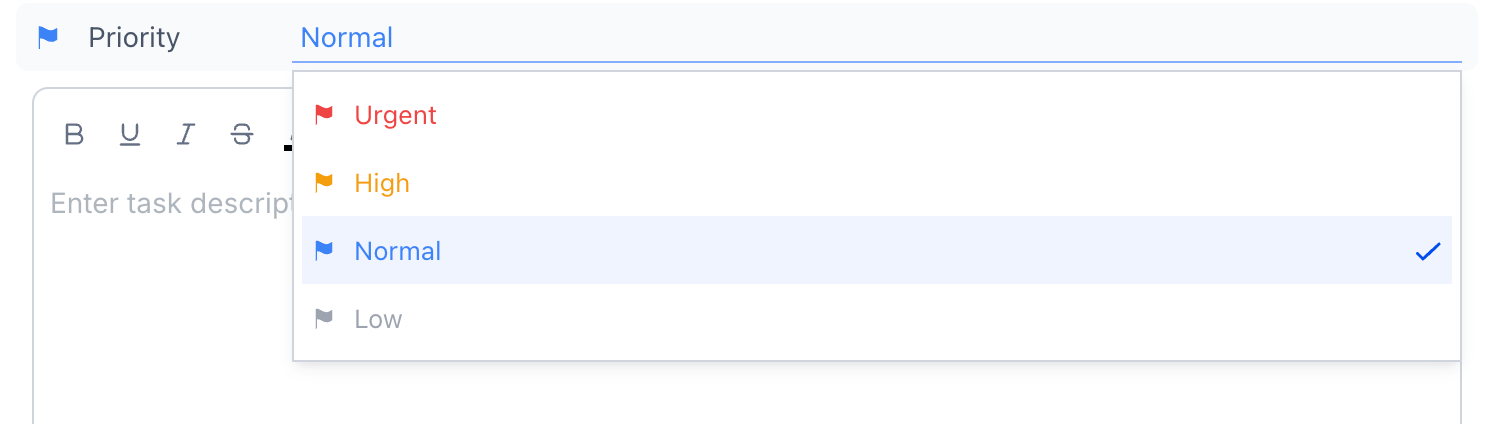
Priority: Low, Normal, High, or Urgent. A task can also be left with no priority set.
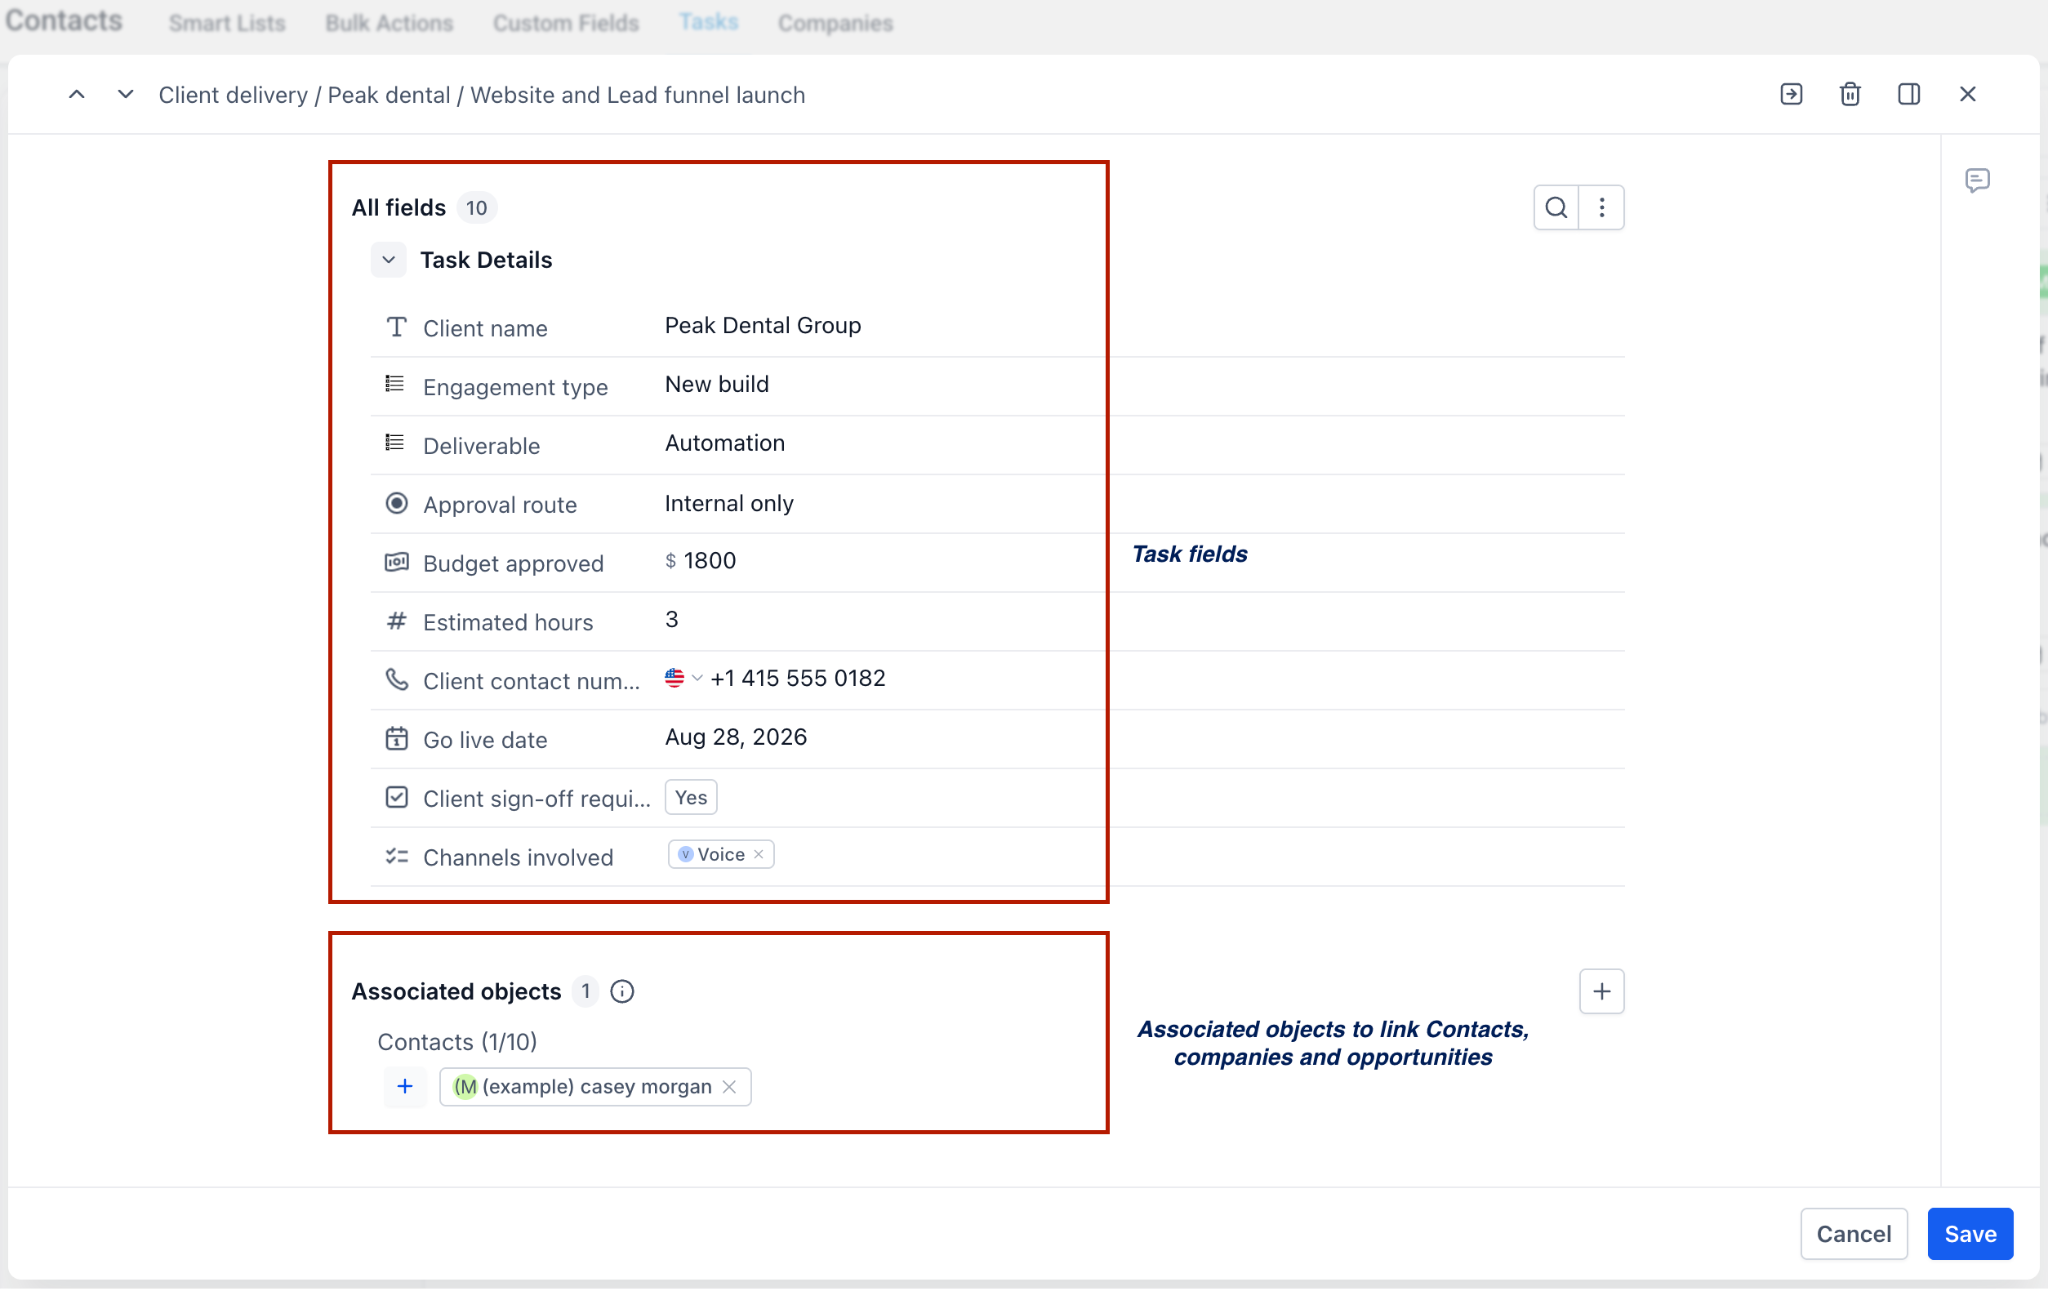
All fields: The custom fields configured for the Space, with a count of how many there are. Fields with no value show a dash.
Associated objects: CRM records linked to the task, with a count.
Subtasks: Tasks nested under this one, with a count and a control to add another.
Comments: A composer at the foot of the panel, prompting "Write a comment...".
Task detail page opened through the sidebar
Check the status
Confirm the status reflects where the work actually is.
Add assignee(s) to the task
Set the priority of the task
Set the dates
Choose a single date, or a range if the work spans a period. The timezone the dates are shown in appears beside them.
Write the description
Click into the description area and describe the work. Use the formatting toolbar for structure such as lists and emphasis. A useful habit is to state what "done" looks like, so whoever picks the task up knows when to stop. You can also add images under description.
Fill in the custom fields
Open the "All fields" section and complete the fields your Space uses. Empty fields display a dash.
Link any related CRM records
Use the "Associated objects" section to connect the task to the records the work relates to.
Save your changes
Use the "Save" control on the panel to commit your edits, or "Cancel" to discard them.
Steps for creating a task quickly
Open the List you want the task in
Click the List in the left panel.
Start a new task
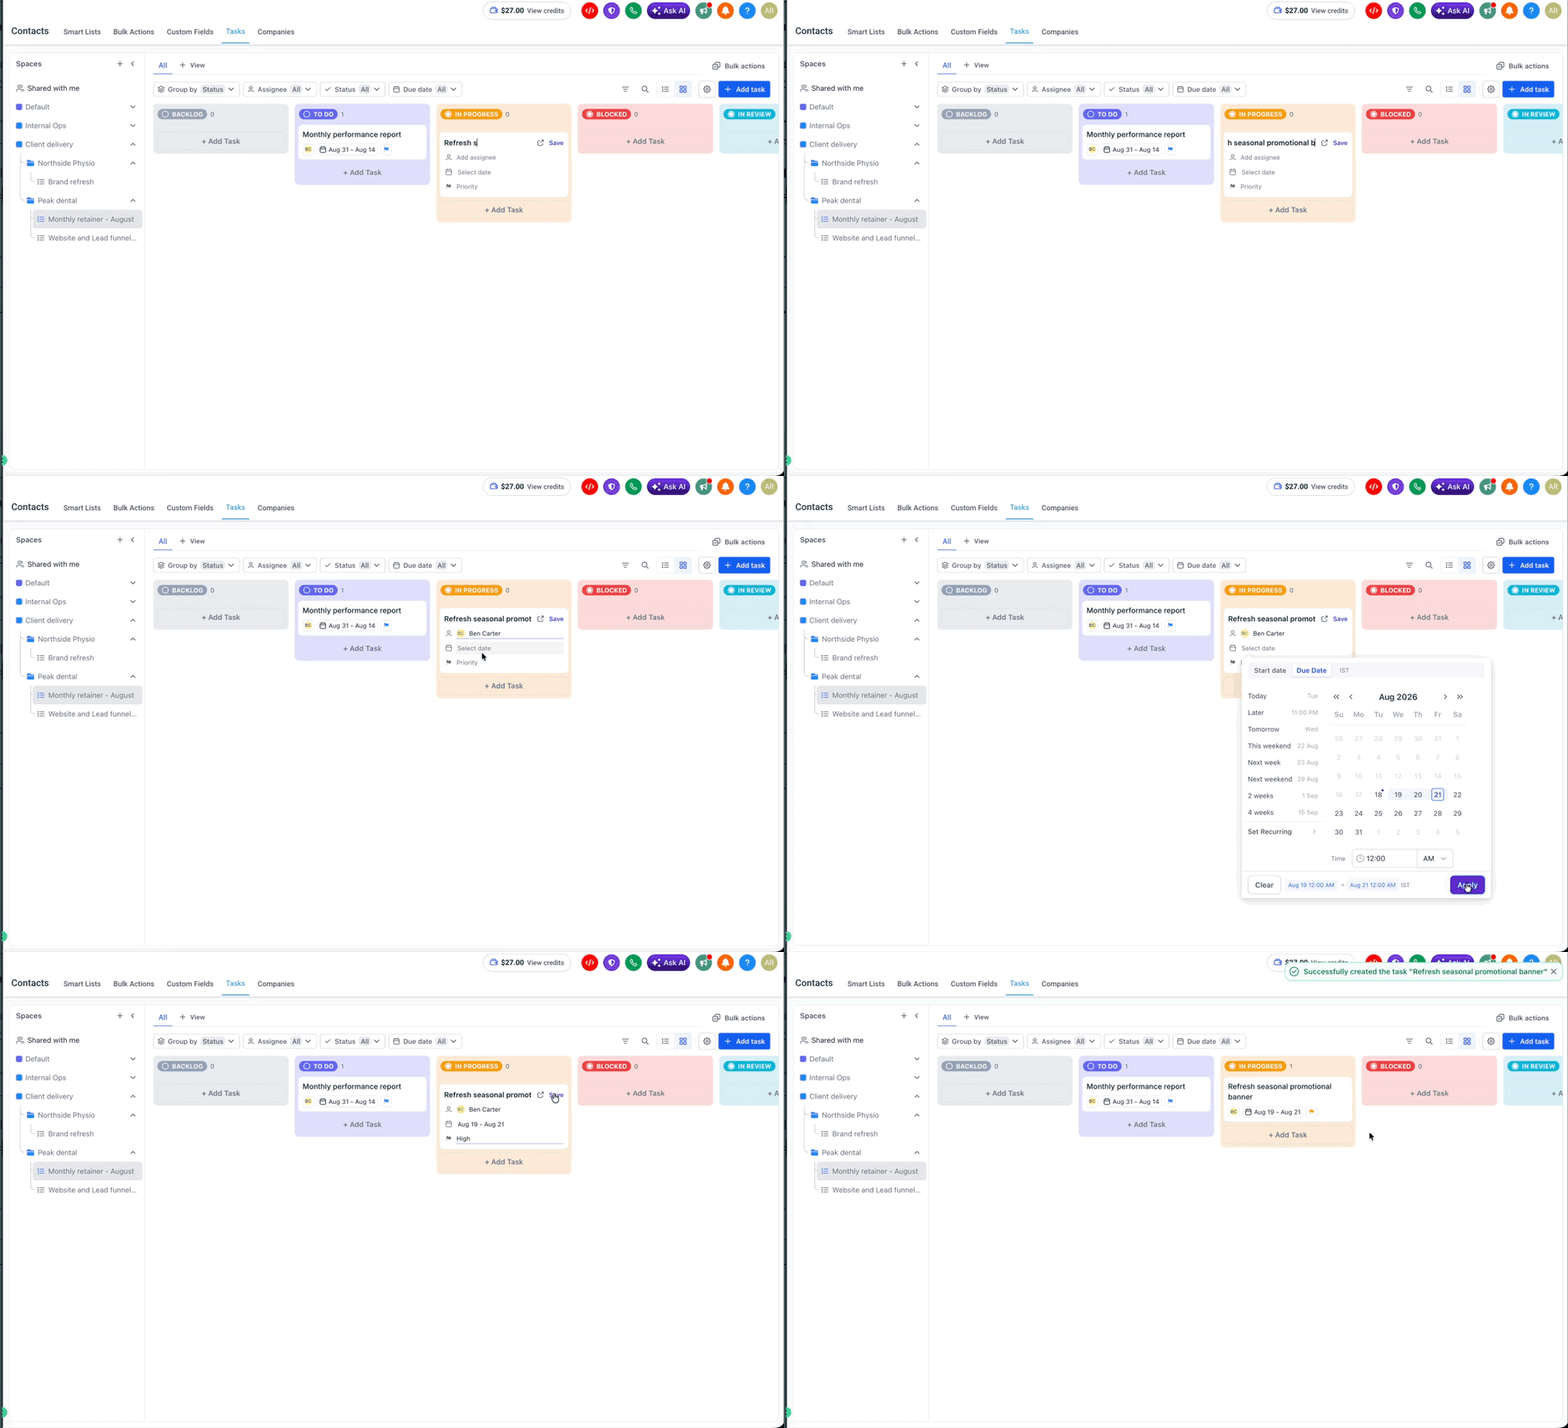
Click "Add task" in the toolbar, or "+ Add Task" at the foot of the status column you want the task to start in.
Enter the task name
Type a name that says what needs to happen. A name that describes an outcome is easier to work with than one that describes a topic.
Set the assignee, date, and priority
The composer offers "Add assignee", "Select date", and "Priority". Setting an assignee is worth doing straight away, because an unassigned task has no owner and is easy to lose.
Save
Click "Save". The task appears as a card in the column.
Steps for adding a subtask
Subtasks are useful when one task has several distinct steps, especially when different people own different steps. Because a task takes only one assignee, subtasks are also how you split a piece of work across more than one person.
Open the parent task
Click the task card to open its detail panel.
Find the Subtasks section
Scroll to the "Subtasks" section near the foot of the panel. Its heading shows how many subtasks the task currently has.
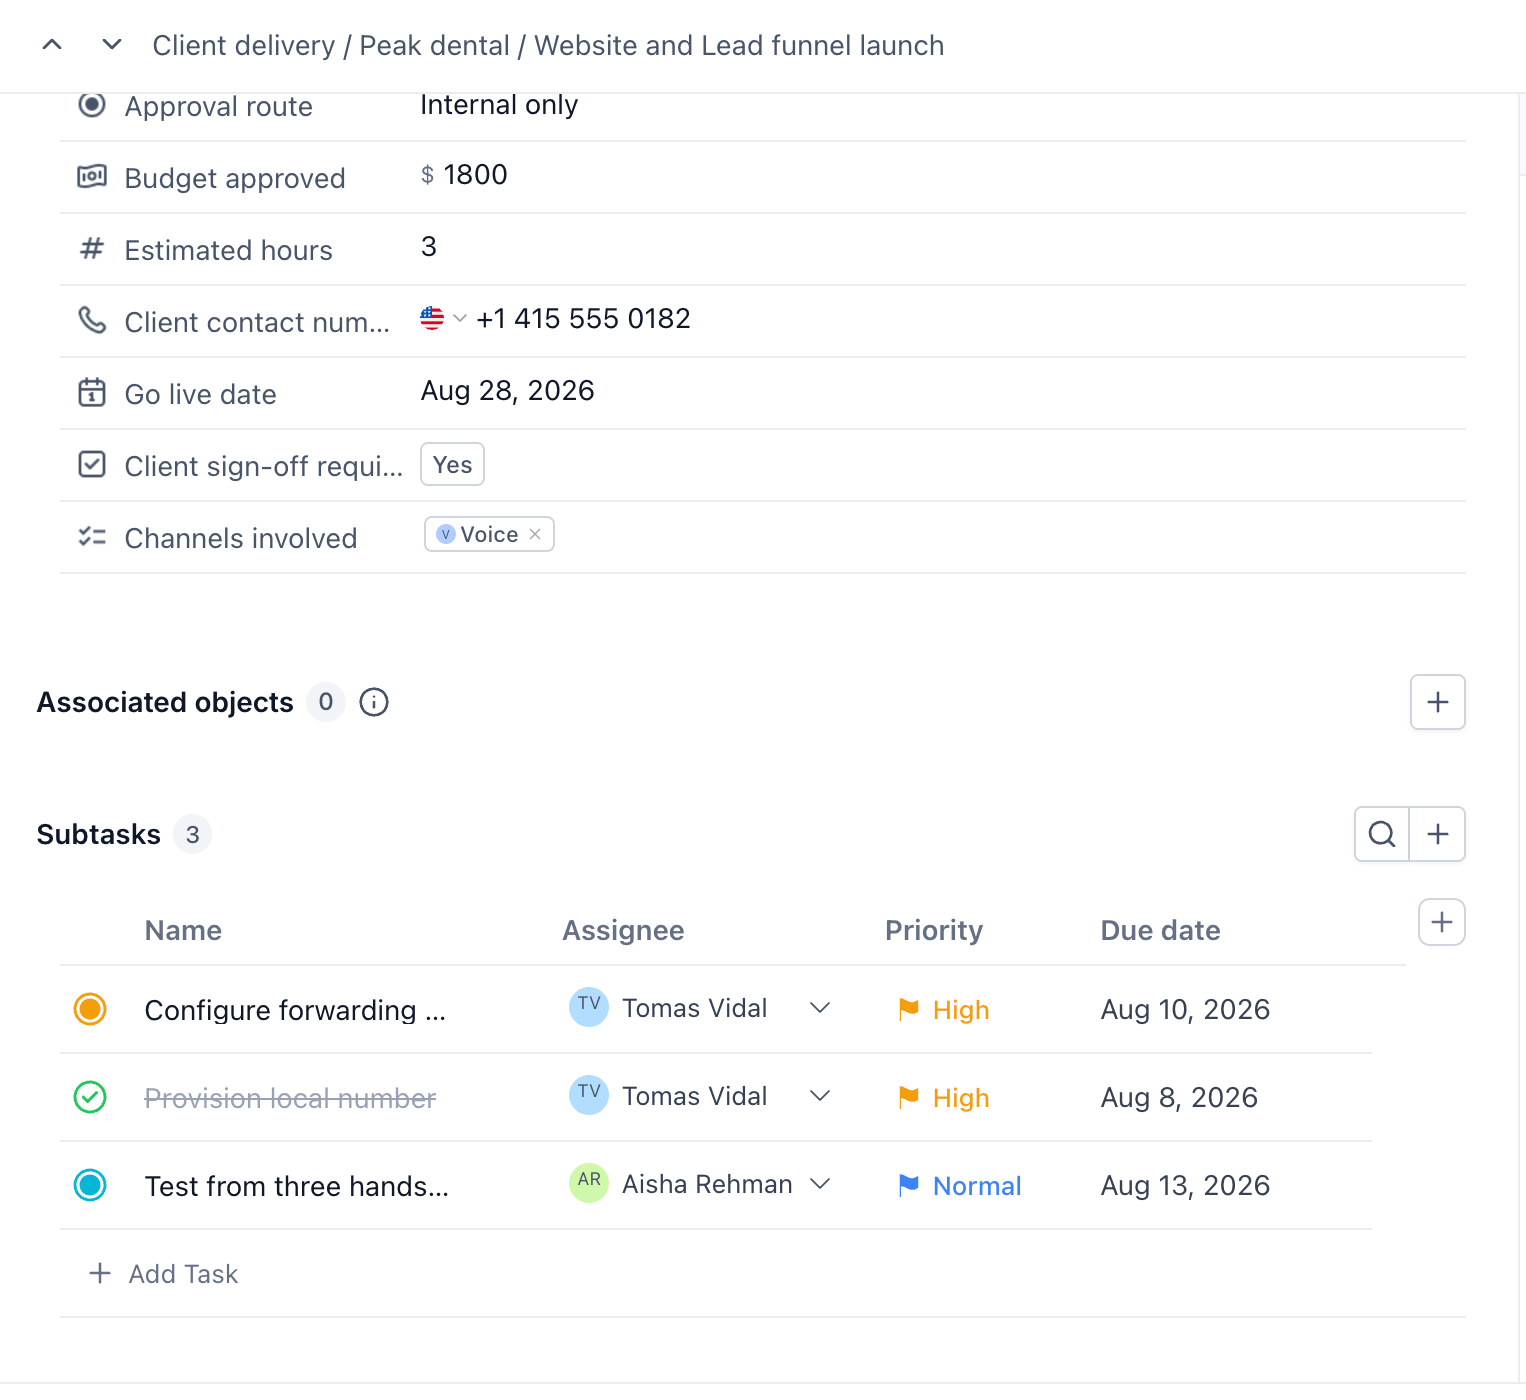
Click "Add Task"
Enter the subtask name and save it. It appears in the list under the parent.
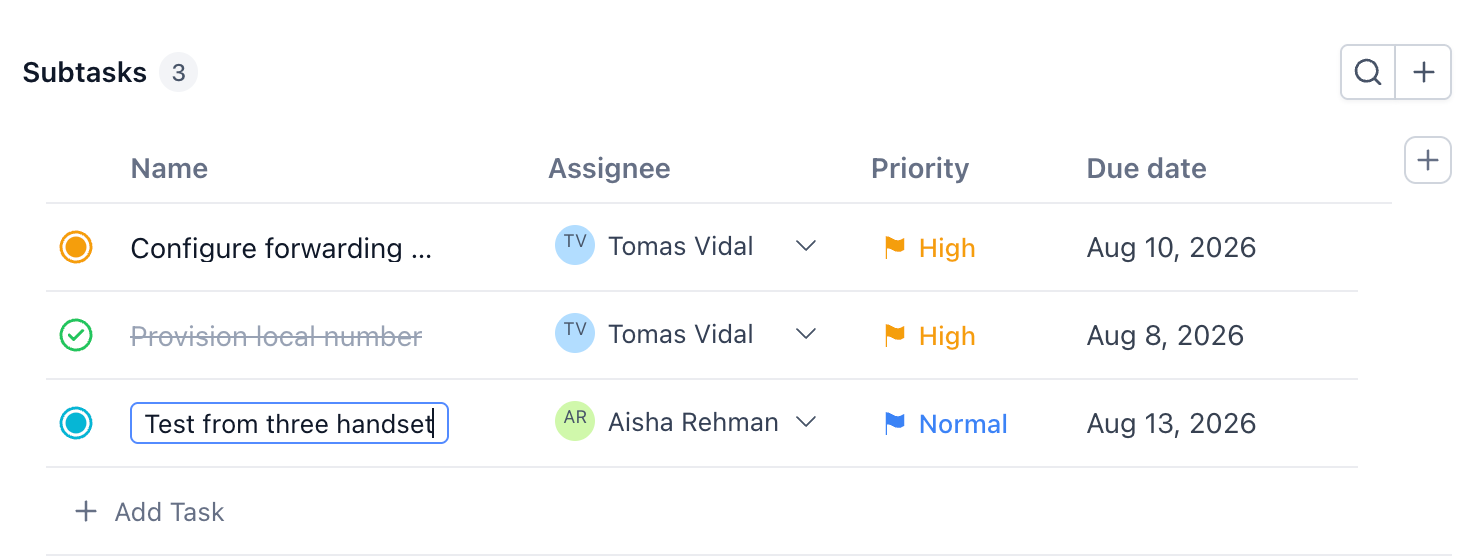
Repeat for each step
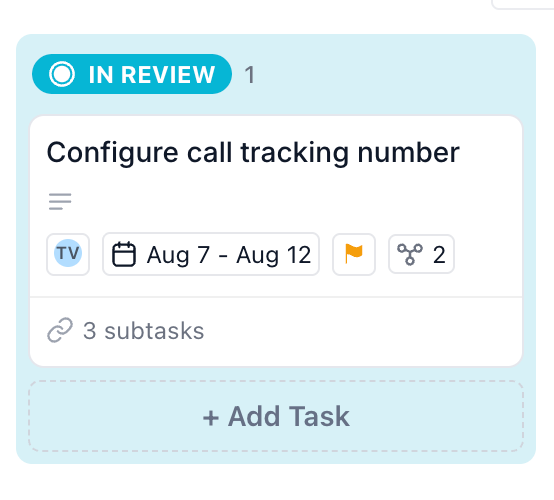
Add one subtask per step. Once a task has subtasks, its card on the board shows a subtask count, so you can see at a glance which tasks are broken down.
A Kanban card displaying its subtask count
Commenting on a task
Each task has a comment composer at the foot of its detail panel, prompting "Write a comment...". Use it to keep discussion about the work attached to the work itself rather than scattered across chat and email.
Comment composer at the foot of a task detail panel
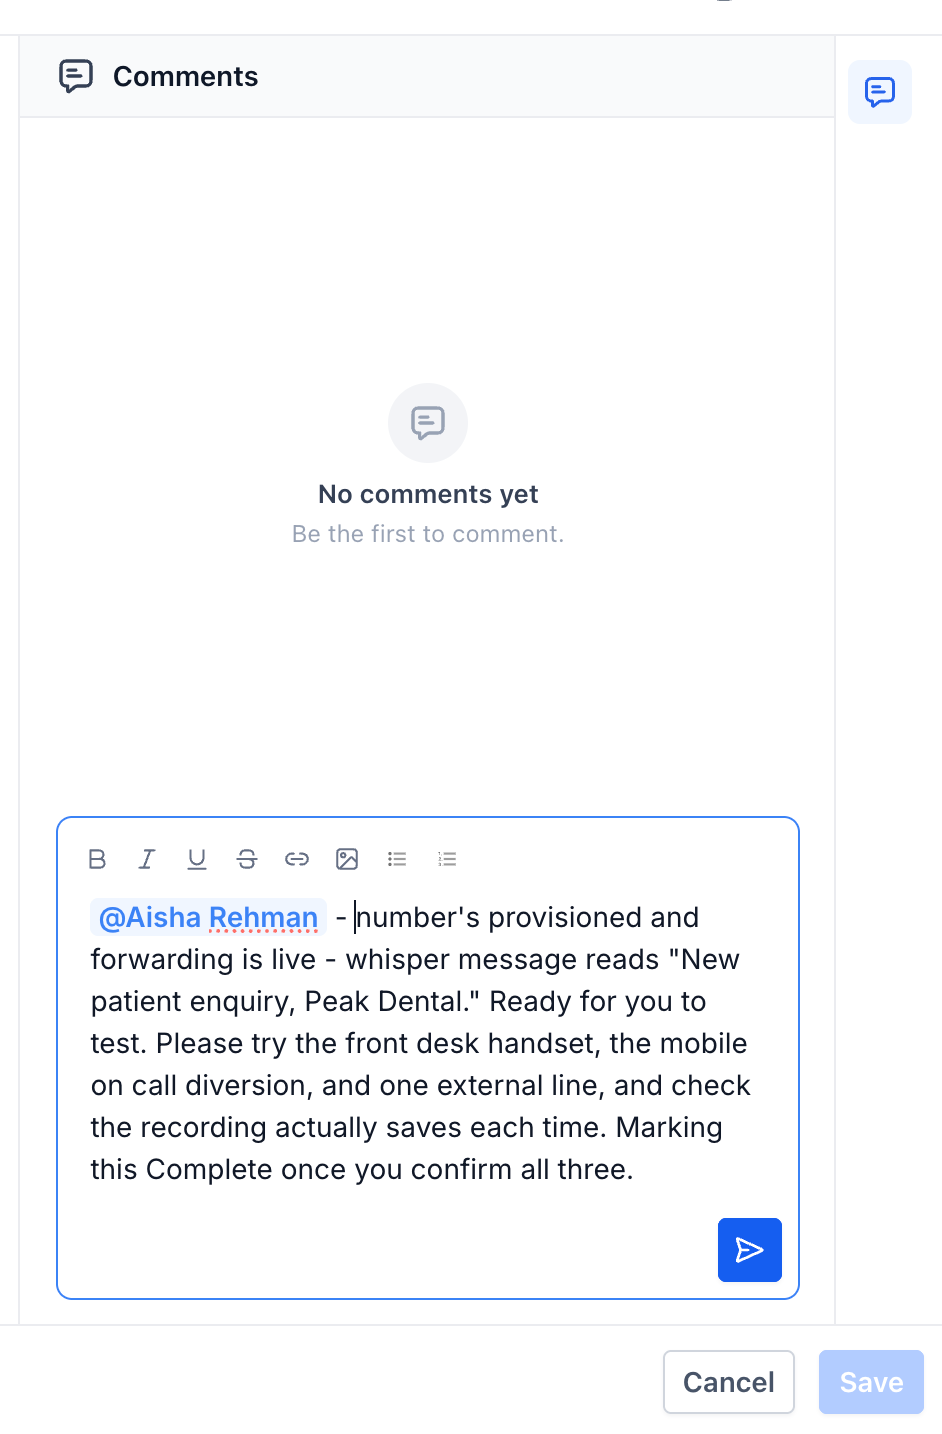
Comments support mentions, replies, image attachments, and editing after posting and deleting.
Linking to a Specific Task
When you open a task, your browser address gains a task identifier. Copy that address and anyone with access to the Space will land directly on that task when they open the link. This is quicker than describing where a task lives.
Moving a task to a different list
A task lives in one List, but it does not have to stay there. You can move a task to any other List, whether that List sits in the same Space or a different one.
Moving is a relocation, not a copy. Once the move completes, the task no longer appears in the List it came from - it has one home, and that home has changed.
Open the task you want to move
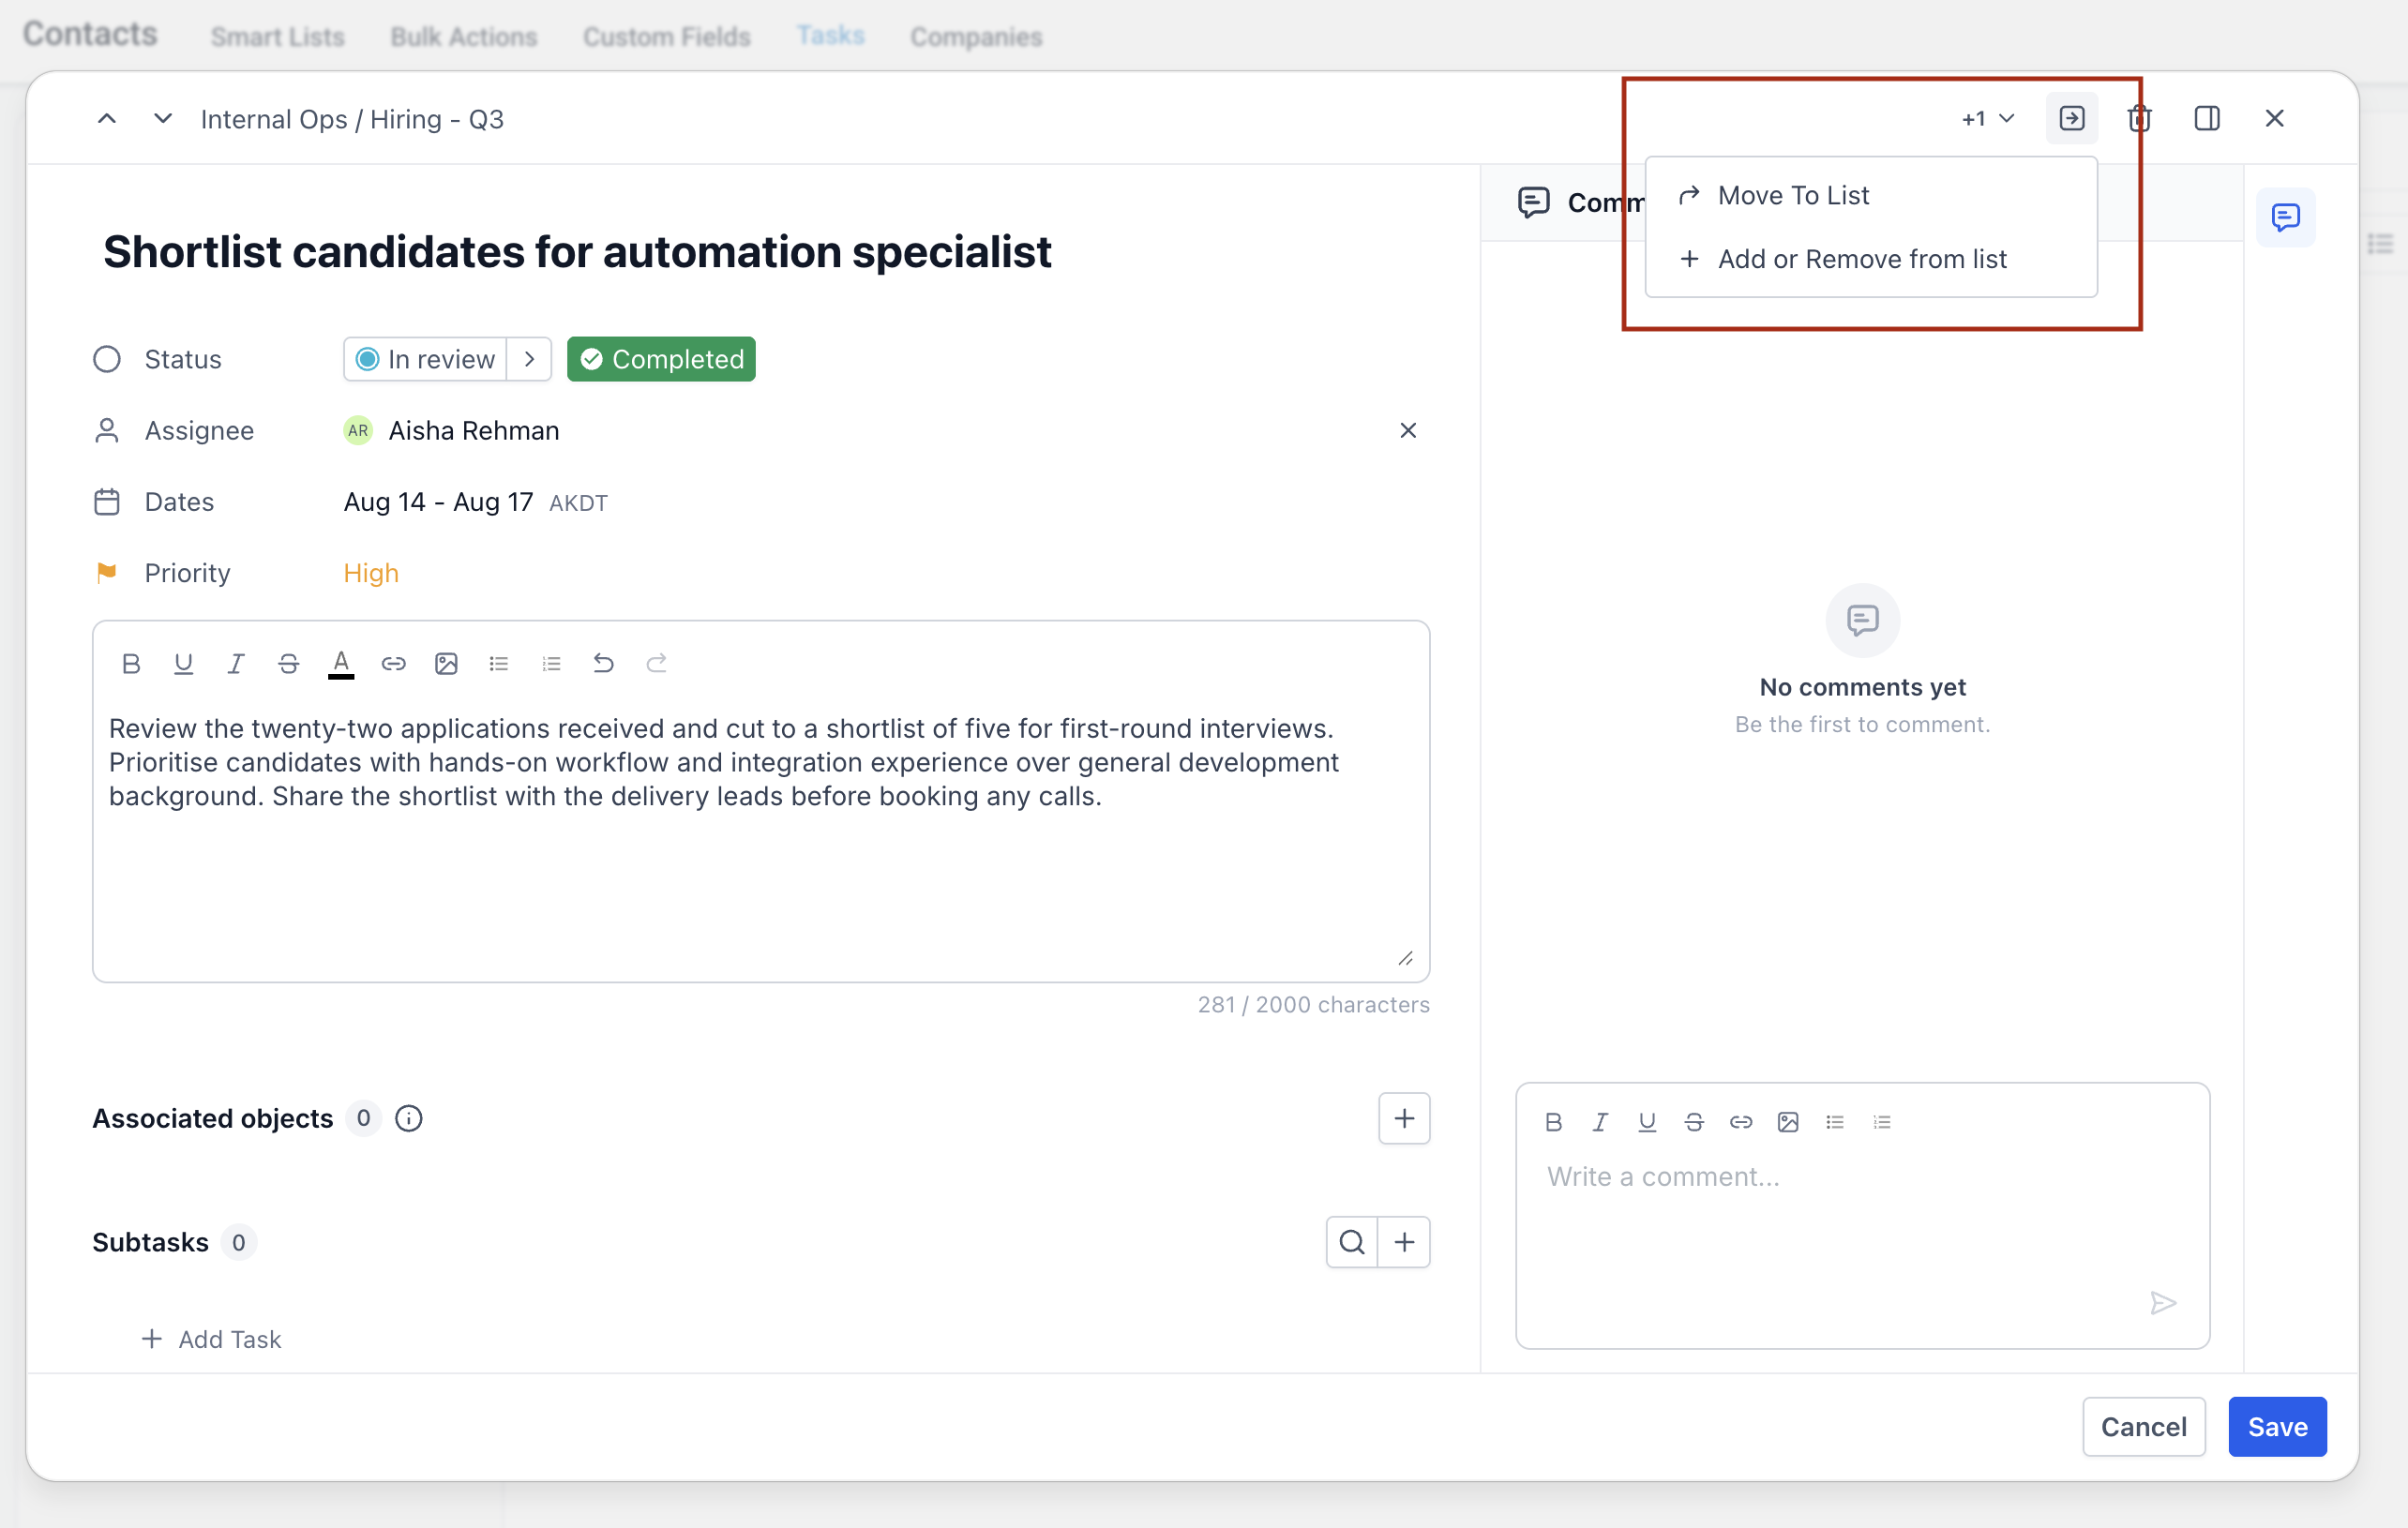
Choose the move option and pick the destination List
You can select a List anywhere in the workspace, including one inside a different Space.
Confirm the status mapping if you are asked to
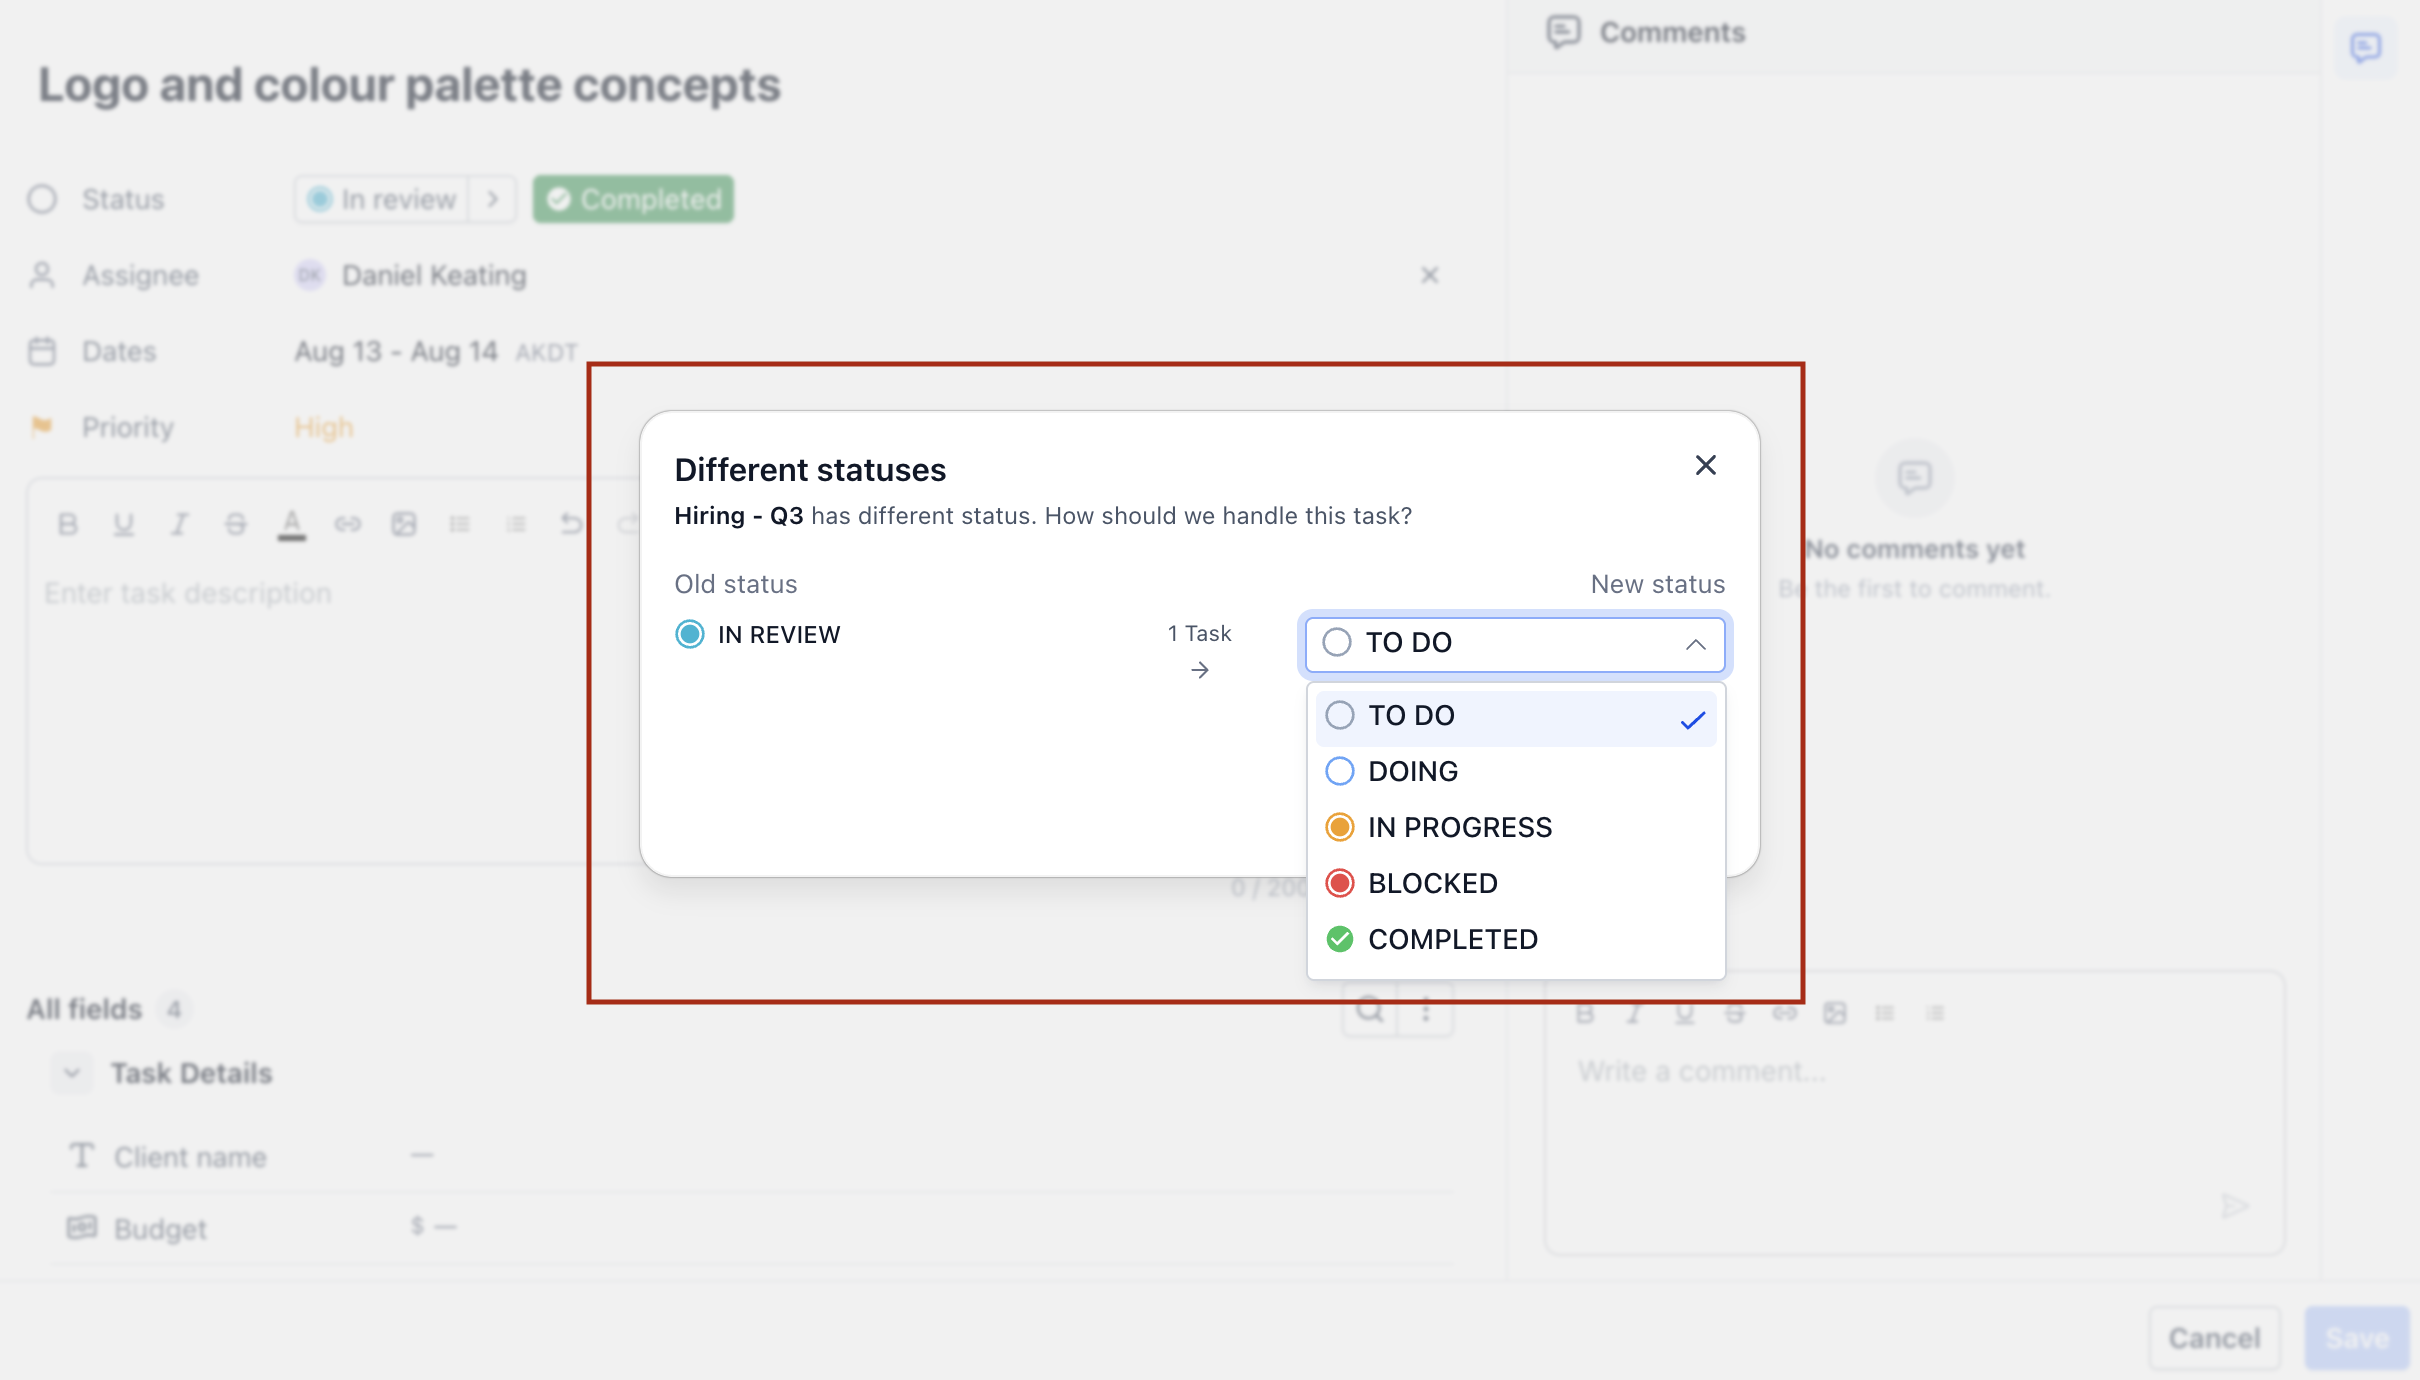
Statuses are configured per Space, so moving a task into a Space with a different status set means the task's current status may not exist at the destination. When that happens, you are asked to confirm which status the task should take once it arrives. Review this rather than accepting the default, because it decides which column the task lands in.
The status remapping confirmation shown when moving a task between Spaces with different status sets
Confirm the move
The task appears in the destination List and disappears from the original.
Moving between two Lists in the same Space is straightforward, because both share the same statuses and nothing needs remapping. The confirmation step only appears when the destination Space defines its statuses differently.Adding a task to multiple lists
Sometimes a single piece of work genuinely belongs in more than one place - a task that a delivery team and a client-facing team both need to see, for example. Rather than duplicating it and keeping two copies in sync, you can add one task to several Lists at once, within the same Space or across different ones.
This is different from moving. The task keeps its original home List and simply becomes visible in the others as well. There is still only one task, so an update made anywhere is the same update everywhere.
How statuses behave
This is the part worth understanding before you start.
A task added to a second List keeps the status workflow of its home List. It does not adopt the statuses of the List it has been added to, even when that List sits in a Space with a completely different set. The home Space's workflow governs the task wherever it appears.
To make that possible, the Space containing the secondary List has the task's status added to its own status workflow. So adding a task across Spaces can introduce a new status into the destination Space's configuration.
What this means for someone working in the secondary list
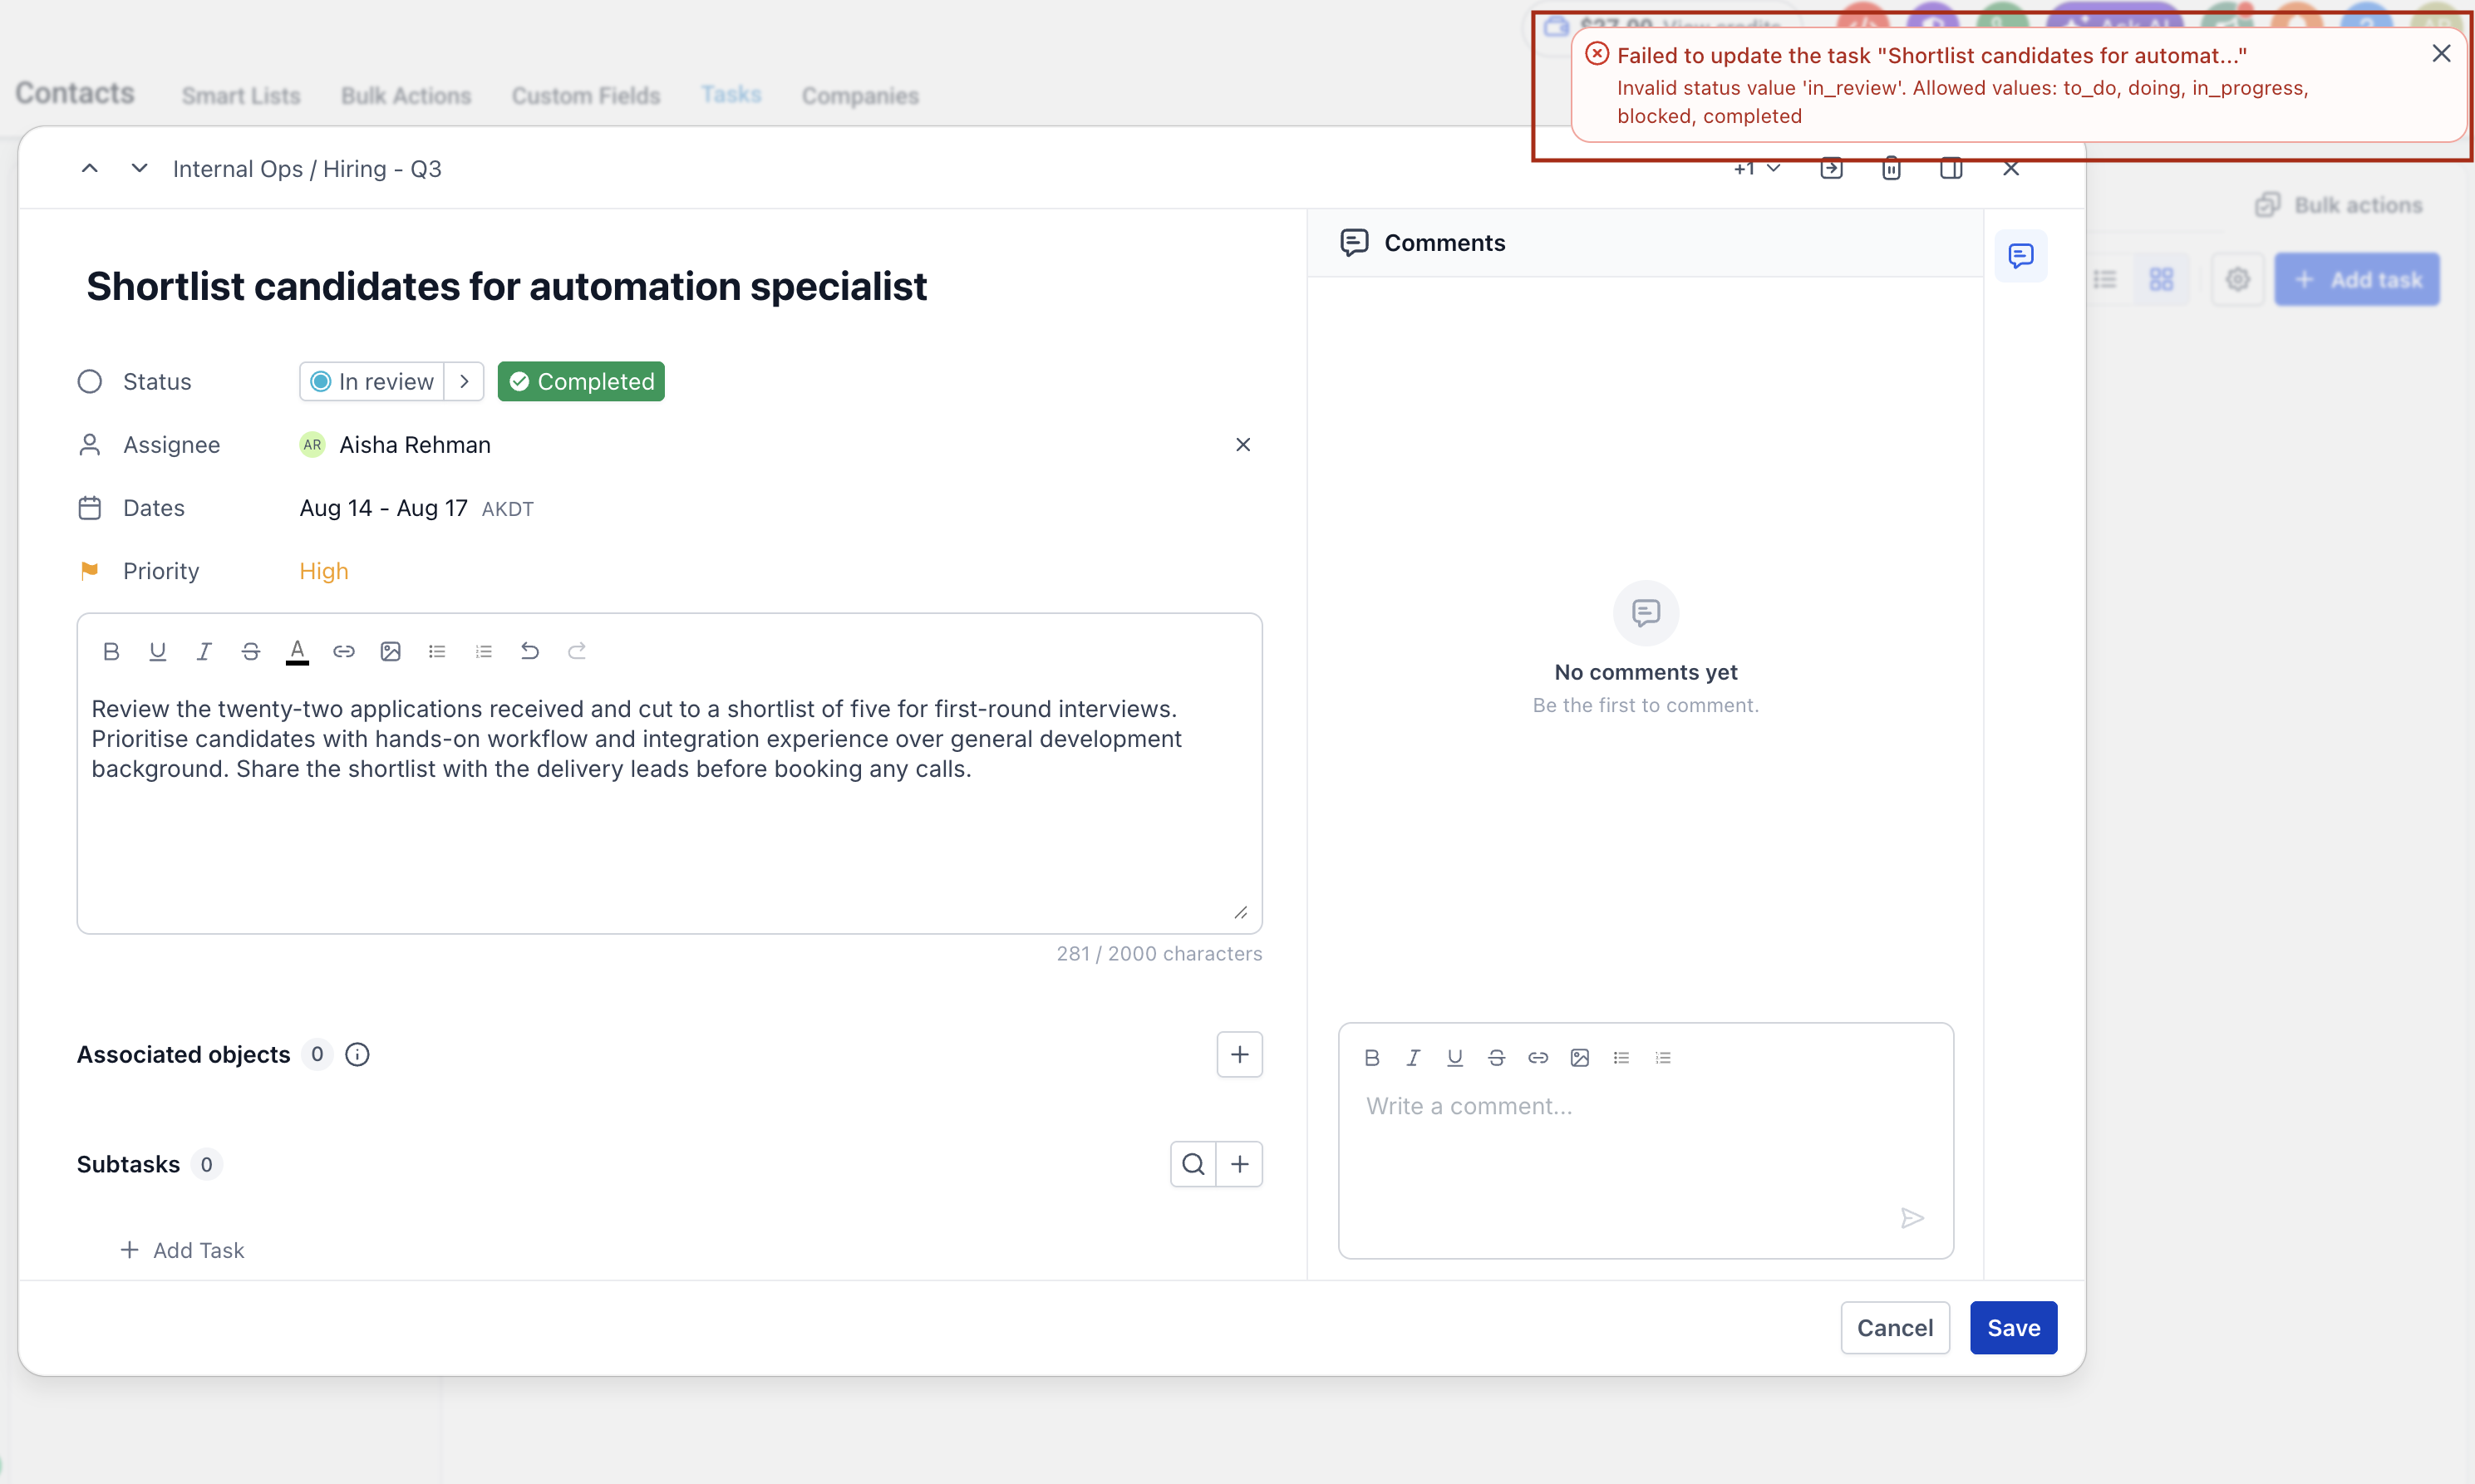
The consequence occurs when a colleague tries to change the task’s status to one of the statuses available in a secondary List. While the status can be selected, attempting to save the task will return an error. The task can only be moved between the statuses defined in its home List.
This is deliberate. A task has one workflow, and it is the workflow of the place it lives. Allowing it to be dragged into a status from a different Space would leave it in a stage its home team does not recognize.
The practical implication is worth telling your team in advance. If someone is working out of a List that a task was added to rather than one it lives in, they are seeing the task through a window, not holding it. They can update it, comment on it, and move it through its own stages, but the stages themselves are set elsewhere.
The error shown when attempting to set a secondary List's status on a task added from another Space
Steps for adding a task to another list
Open the task
Choose the option to add it to another List, and pick the destination
Repeat for any further Lists the task should appear in
The task now shows in every List it has been added to, while continuing to follow its home List's statuses.
If you want the task to genuinely leave where it started, move it instead. Adding to another List keeps the original.Frequently Asked Questions
Q: What is the minimum I need, to create a task?
A name and due date. Assignee and priority can all be added later, though setting an assignee early is a good habit.
Q: Can I set a start date as well as a due date?
Yes. The Dates control accepts either a single date or a range.
Q: Why do some of my task fields show a dash?
A dash means the custom field has no value yet. The fields available come from the Space the task belongs to.
Q: What is the difference between moving a task and adding it to another list?
Moving relocates the task, so it leaves the original List entirely. Adding to another List keeps the original home and makes the same task visible in more than one place.
Q: Why am I being asked to confirm a status when I move a task?
Statuses are configured per Space. If you move a task into a Space with a different status set, its current status may not exist there, so you are asked which status it should take on arrival.
Q: If I add a task to a list in another space, which statuses does it use?
Its home List's status workflows. The task ignores the secondary List's status set and continues to follow the workflow it started in.
Q: Why can I not change this task's status to one of my list's statuses?
The task lives in another List and follows that List's workflow. You can move it between its home statuses, but not into statuses belonging to the List you are viewing it from. If the task should genuinely adopt your workflow, it needs moving rather than adding.
Q: Why has a new status appeared in my space?
A task from another Space has been added to one of your Lists. Because the task keeps its home statuses, that status is added to your Space's workflow so it can be displayed correctly.
Q: If I update a task in one list, does it update in the others?
Yes. There is only one task, however many Lists it appears in.
Next: Board (Kanban) and list views
Was this article helpful?
That’s Great!
Thank you for your feedback
Sorry! We couldn't be helpful
Thank you for your feedback
Feedback sent
We appreciate your effort and will try to fix the article