Ignoring this guide can result in emails going to spam. Please read, learn, and apply these practices to your email sending before getting started.
Who Is This Guide For?
While this guide is for anyone sending emails through the platform, it is specifically designed for those using LC Email and LC Email Dedicated Domain features. Those using a Custom SMTP Provider that is not LC Email will need to consult their provider directly — support will be limited for email compliance and best practices not managed by the platform.
Learn more about the difference between LC Email and Custom SMTP Providers here.
Now that we know who this is for, let's hop into our guide together as we review Email Best Practices and Email Sending Recommendations below.
Email Best Practices
Now that your new sending domain is set up, follow these essential practices to ensure emails land in the inbox — not the spam folder.
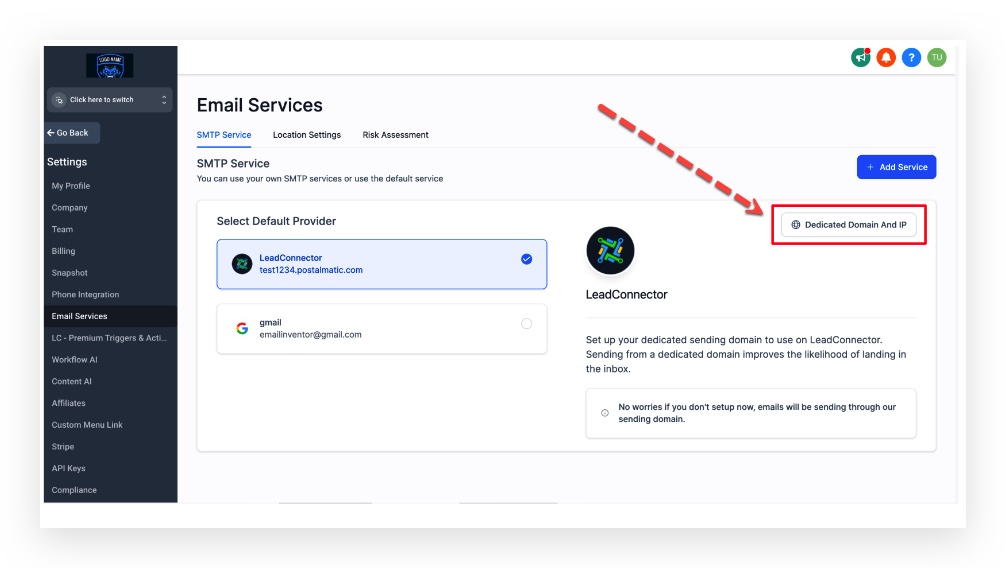
What is it? Rather than sharing an IP or domain with all other users, a dedicated email domain is a single private domain you use to send and receive emails. With LC Email, you have the ability to create your own dedicated domain in-app. Custom SMTP users do not have this option.
Why it matters: Not having a dedicated email sending domain often results in emails going to spam despite good practices. A dedicated domain gives you full control over your reputation and email deliverability.
How to set it up: Follow this step-by-step guide to set up your Dedicated Email Sending Domain.
Already have a dedicated domain but emails still go to spam? It is better to set up a new sub-domain than to try to repair a damaged one. See the FAQ section below for more details.
What is it? A dedicated IP address means your emails go out from a unique, exclusive IP — not shared with anyone else. Email service providers (ESPs) use IP reputation to judge deliverability, so exclusive ownership gives you full control.
Why it matters: With a shared LC Email dedicated domain, you still share the sending IP with all other platform users. A dedicated IP isolates your reputation — especially important when sending 200,000+ emails per week.
How to set it up: See the Dedicated Sending IP Address guide here.
Cost: $59 per month per IP, billed to the agency billing card on file. Agencies can configure rebilling to pass this cost to sub-accounts. See pricing details here.
Additional resource: Reverse DNS (rDNS) Set Up — Fixing "Reverse DNS does not match SMTP Banner"
What is it? Email Validation checks whether an email address is valid before you send to it. Sending to invalid addresses harms your domain reputation and deliverability.
Why it matters: Sending to invalid or non-existent addresses causes bounces, hurts your domain reputation, and can result in emails being rejected entirely or going to spam.
How to enable it:
- First-send validation: Sub-Account View → Business Profile → scroll to "Verify Email Address when the first email is sent to a new contact" → enable the checkbox.
- Re-validation every 90 days: Agency View → Sub-accounts → click on the sub-account name → scroll to "Enable Re-validation for 90 days."
Learn how to enable and rebill LC Email Validation here.
Cost: $2.50 per 1,000 email validations — significantly cheaper than most major providers. See rebilling options.
What is it? A DMARC record provides instructions to receiving servers on how to handle incoming mail. Messages must pass DKIM and SPF alignment checks per your DMARC policy — those that fail can be rejected, reported, or sent to spam.
Why add it? Missing or misconfigured DMARC records negatively impact your domain reputation. Mailbox providers count it against you, resulting in emails landing in spam.
How to add it: Log into your DNS provider and add the following TXT record:
| Field | Value |
|---|---|
| Type | TXT |
| Name | _dmarc |
| Content | v=DMARC1; p=reject |
Verify your DMARC record with the DMARC Checker tool. Additional resources:
What is it? The "From Email" is what recipients see when they receive your email. Your sending domain might be mail.yourdomain.com, but your From Email can be you@yourdomain.com or you@mail.yourdomain.com.
Why it matters: Using a From Email on a different organizational domain from your sending domain can result in poor deliverability and DMARC misalignment.
Rules: Use a From Email on the same organizational domain as your dedicated sending domain. If your sending domain is a subdomain (e.g., mail.company.com), you can use either name@company.com or name@mail.company.com — deliverability is the same when SPF, DKIM, and DMARC are set up correctly.
| Sending Domain | Valid From Email | Status |
|---|---|---|
| replies.company.com | sender@company.com | ✓ Valid |
| replies.company.com | sender@replies.company.com | ✓ Valid |
| mail.company.com | user@otherbrand.com | ✗ Invalid |
What is it? An unsubscribe link allows recipients to opt out of future emails from you.
Why it matters: Not including an unsubscribe link will severely harm your email deliverability rates — and can get you flagged as a spammer.
How to set it up: Use the "Footer" element in the email builder. You have two options:
- Default Unsubscribe Link — Quick and easy for LC Email users. Non-LC Email users should use the custom option instead.
- Custom Unsubscribe Link — Full control over the unsubscribe flow. Works for all email providers.
What is it? Double opt-in asks subscribers to confirm their intent twice — for example, filling out a form and then clicking a verification link in a confirmation email. Only after completing both steps will they receive further emails.
Why it matters: Double opt-ins significantly boost domain reputation and deliverability. Recipients who have confirmed twice are more likely to open, click, and engage — all positive signals for inbox providers.
How to set it up: How To Build A Double Opt-In Flow
What is it? Stop sending to contacts who take no action — no opens, no clicks — across multiple campaigns.
Why it matters: Sending to engaged recipients helps your emails land in the inbox. Low engagement signals (few opens or clicks) push emails toward spam.
How to do it: If someone hasn't taken action after weeks of emails, reduce your sending frequency or remove them from your list. Focus on recipients who are actively engaging.
It is better to stop sending to an unengaged recipient than to have them unsubscribe or mark your email as spam.
What is it? Sending frequency is a major factor in domain reputation. Sending too infrequently (once a month) or too frequently (multiple times a day) can both harm your deliverability — especially if the frequency changes suddenly.
Why it matters: Inbox providers use engagement signals and sending consistency to assess your reputation. Erratic patterns — or sudden volume spikes — look suspicious.
Recommended cadence:
- For newly opted-in contacts: send daily for a short initial window to drive conversion.
- If no engagement after 1–2 weeks: slow down to weekly sends.
- If no engagement after 2+ months of weekly sends: stop sending entirely.
- For promotional blasts: keep them spaced out and concise. It is always better to undersend than to oversend.
It is better to stop sending to an unengaged recipient than to have them unsubscribe or mark your email as spam.
Email Warm-Up
Mailbox providers will often send emails from new dedicated domains straight to spam — because anyone, including spammers, can register a new domain. Following the best practices above alongside the warm-up recommendations below will greatly improve your chances of landing in the inbox.

The schedule above shows how many emails you can send per hour and per day at each warm-up stage. Stage 1 allows up to 100 per hour and 1,000 per day. Stage 2 increases to 300 per hour and 2,500 per day. Remember: the stage is not just how long you have owned the domain — it reflects your current sending phase and the health of your domain at that moment.
How to Send Emails in Drip Mode (Daily and Hourly Sending)
- Follow all Email Best Practices above
- Stay within the recommended sending volume per stage
- Send fewer emails per day or hour than the maximum if you can
- Only send to opted-in contacts with a high likelihood of engagement — cold emailing during warm-up tends to harm deliverability
- Keep email content short and to the point; include an appropriate image where possible
- Do not use public link shorteners (bit.ly, tiny.url, etc.) — these are a common spam signal
Email Tools
Use these free tools to test, track, and monitor your email domain health.
Email content itself can impact deliverability. Too much text, spam-trigger words, or URL shorteners can cause inbox providers to flag your message. Use mail-tester.com to get a spam score before sending:
- Copy the test email address provided by Mail-Tester
- Create a new contact in the platform using that email address
- Send your email to that contact
- Return to Mail-Tester and click "Then check my score"
- Review the score and make adjustments based on the feedback
Paste your sending domain into the MX Toolbox Email Health Report to quickly check for common issues — blacklisting, missing DMARC records, MX errors, and more. This is a great starting point for any deliverability troubleshooting.
Using data from all Gmail users you send to, the Google Postmaster Tool monitors your ongoing email performance and provides detailed reporting on:
- Spam rate
- IP Reputation
- Domain Reputation
- Feedback Loop
- Authentication
- Encryption
- Delivery errors
Note: It can take up to two days for Google to populate data in your reports. If data is missing, refresh the page, clear your cache, or use an incognito window to rule out caching issues.
Troubleshooting
There are many reasons emails go to spam — URL shorteners, content issues, poor list health, and more. If emails are landing in spam, work through these steps in order:
A domain can take up to 4 weeks to warm up. If you are within that window, stay consistent with the Email Best Practices and Email Sending Recommendations above and use the Email Tools section to monitor progress.
Confirm your MX records are installed and resolving correctly. Use the Email Health Report from the Email Tools section above to verify.
Confirm your DMARC record is applied and valid. See the Best Practice 4 section above for setup instructions and verification tools.
If you've confirmed the three steps above and are still experiencing issues, contact support for further assistance. How to reach support.
Frequently Asked Questions
Was this article helpful?
That’s Great!
Thank you for your feedback
Sorry! We couldn't be helpful
Thank you for your feedback
Feedback sent
We appreciate your effort and will try to fix the article