The Move Numbers tool lets agency admins transfer eligible phone numbers between sub-accounts that belong to the same HighLevel agency. It supports LC Phone to LC Phone moves and Twilio to Twilio moves when both sub-accounts use the same Master Twilio account.
The in-app tool currently supports United States and Canada numbers. Other countries, provider conversions, and unsupported Twilio configurations require a different migration path.
This guide explains eligibility, prerequisites, how to complete the move, what does and does not transfer, and what to verify afterward.
Moving a phone number does not move the destination sub-account's A2P registration, contacts, conversations, analytics, or historical call assets. Review messaging compliance, number settings, routing, automations, and user assignments after the move.
What is the Move Numbers Tool?
Move Numbers is an agency-level HighLevel tool that reassigns eligible phone numbers from a source sub-account to a destination sub-account within the same agency. It eliminates the need to purchase a replacement number when the existing number simply needs to belong to another sub-account.
The tool is intended for compatible phone environments. LC Phone numbers can move between LC Phone sub-accounts in the same agency, while Twilio numbers can move between Twilio-connected sub-accounts when they belong to the same Master Twilio account.
Key Benefits of the Move Numbers Tool
Moving a number inside the same agency provides a faster way to reorganize phone ownership without replacing established business numbers. Understanding the eligibility rules before starting helps prevent failed transfers and unnecessary provider changes.
- Keep Existing Numbers: Preserve phone numbers customers already recognize while changing the sub-account that manages them.
- In-App Transfer: Complete eligible same-agency moves without submitting a manual migration request.
- Move Multiple Numbers: Transfer multiple eligible numbers in the same move.
- Clear Source and Destination Selection: Choose exactly which sub-account the numbers are leaving and where they should go.
- Post-Move Control: Review routing, messaging compliance, workflows, and assignments in the destination before resuming normal traffic.
Supported and Unsupported Move Scenarios
The Move Numbers tool works only when the source and destination meet specific phone-system and account requirements. Confirm the scenario below before attempting an in-app transfer.
| Scenario | In-App Move? | What to Do |
|---|---|---|
| LC Phone → LC Phone, same agency | Yes | Use Move Numbers. |
| Twilio → Twilio, same Master Twilio account | Yes | Use Move Numbers. |
| Twilio → Twilio, different Master Twilio accounts | No | The in-app tool cannot complete this move. Contact Twilio Support for assistance with the Twilio account transfer. |
| Twilio ↔ LC Phone | No | Use the appropriate phone-number migration process instead of Move Numbers. |
| US and Canada numbers | Yes, when otherwise eligible | Use Move Numbers. |
| Numbers outside the US and Canada | No | Contact HighLevel Support and follow the applicable international migration process. |
| Sub-accounts in different agencies | No | Use the cross-account phone-number migration process. |
Provider conversions are not same-account moves. If a number needs to change from Twilio to LC Phone or from LC Phone to Twilio, use the Moving Phone Numbers: Migration Guide.
What You Need Before Moving Numbers
Confirming account access, phone-system compatibility, and the correct destination before starting reduces the chance of moving a number to the wrong sub-account or encountering an unsupported configuration.
- Have the required admin access to the source and destination sub-accounts.
- Confirm both sub-accounts belong to the same HighLevel agency.
- Confirm the current phone system: LC Phone or Twilio connected at the agency level.
- If using Twilio, confirm both sub-accounts are under the same Master Twilio account.
- Confirm the phone numbers are in the United States or Canada for the in-app workflow.
- Identify the destination Location ID when needed to distinguish similar sub-account names.
Find the Destination Location ID
The Location ID uniquely identifies a sub-account and can be useful when selecting or confirming the destination. Open the destination sub-account and go to Settings → Business Profile.

The Location ID appears in Settings → Business Profile for the applicable sub-account.
How to Set Up and Move Numbers Between Sub-Accounts
The Move Numbers workflow requires you to select the source and destination sub-accounts first, then choose the eligible phone numbers to transfer. Review each selection carefully because the destination will become the new sub-account responsible for those numbers.
Step 1: Open the Move Numbers Tool
Move Numbers is available from the agency-level phone integration settings, where phone-system configuration for sub-accounts is managed.
- Open Agency Settings.
- Go to Phone Integration.
- Open the Sub Account Settings tab.
- Click Move Numbers.
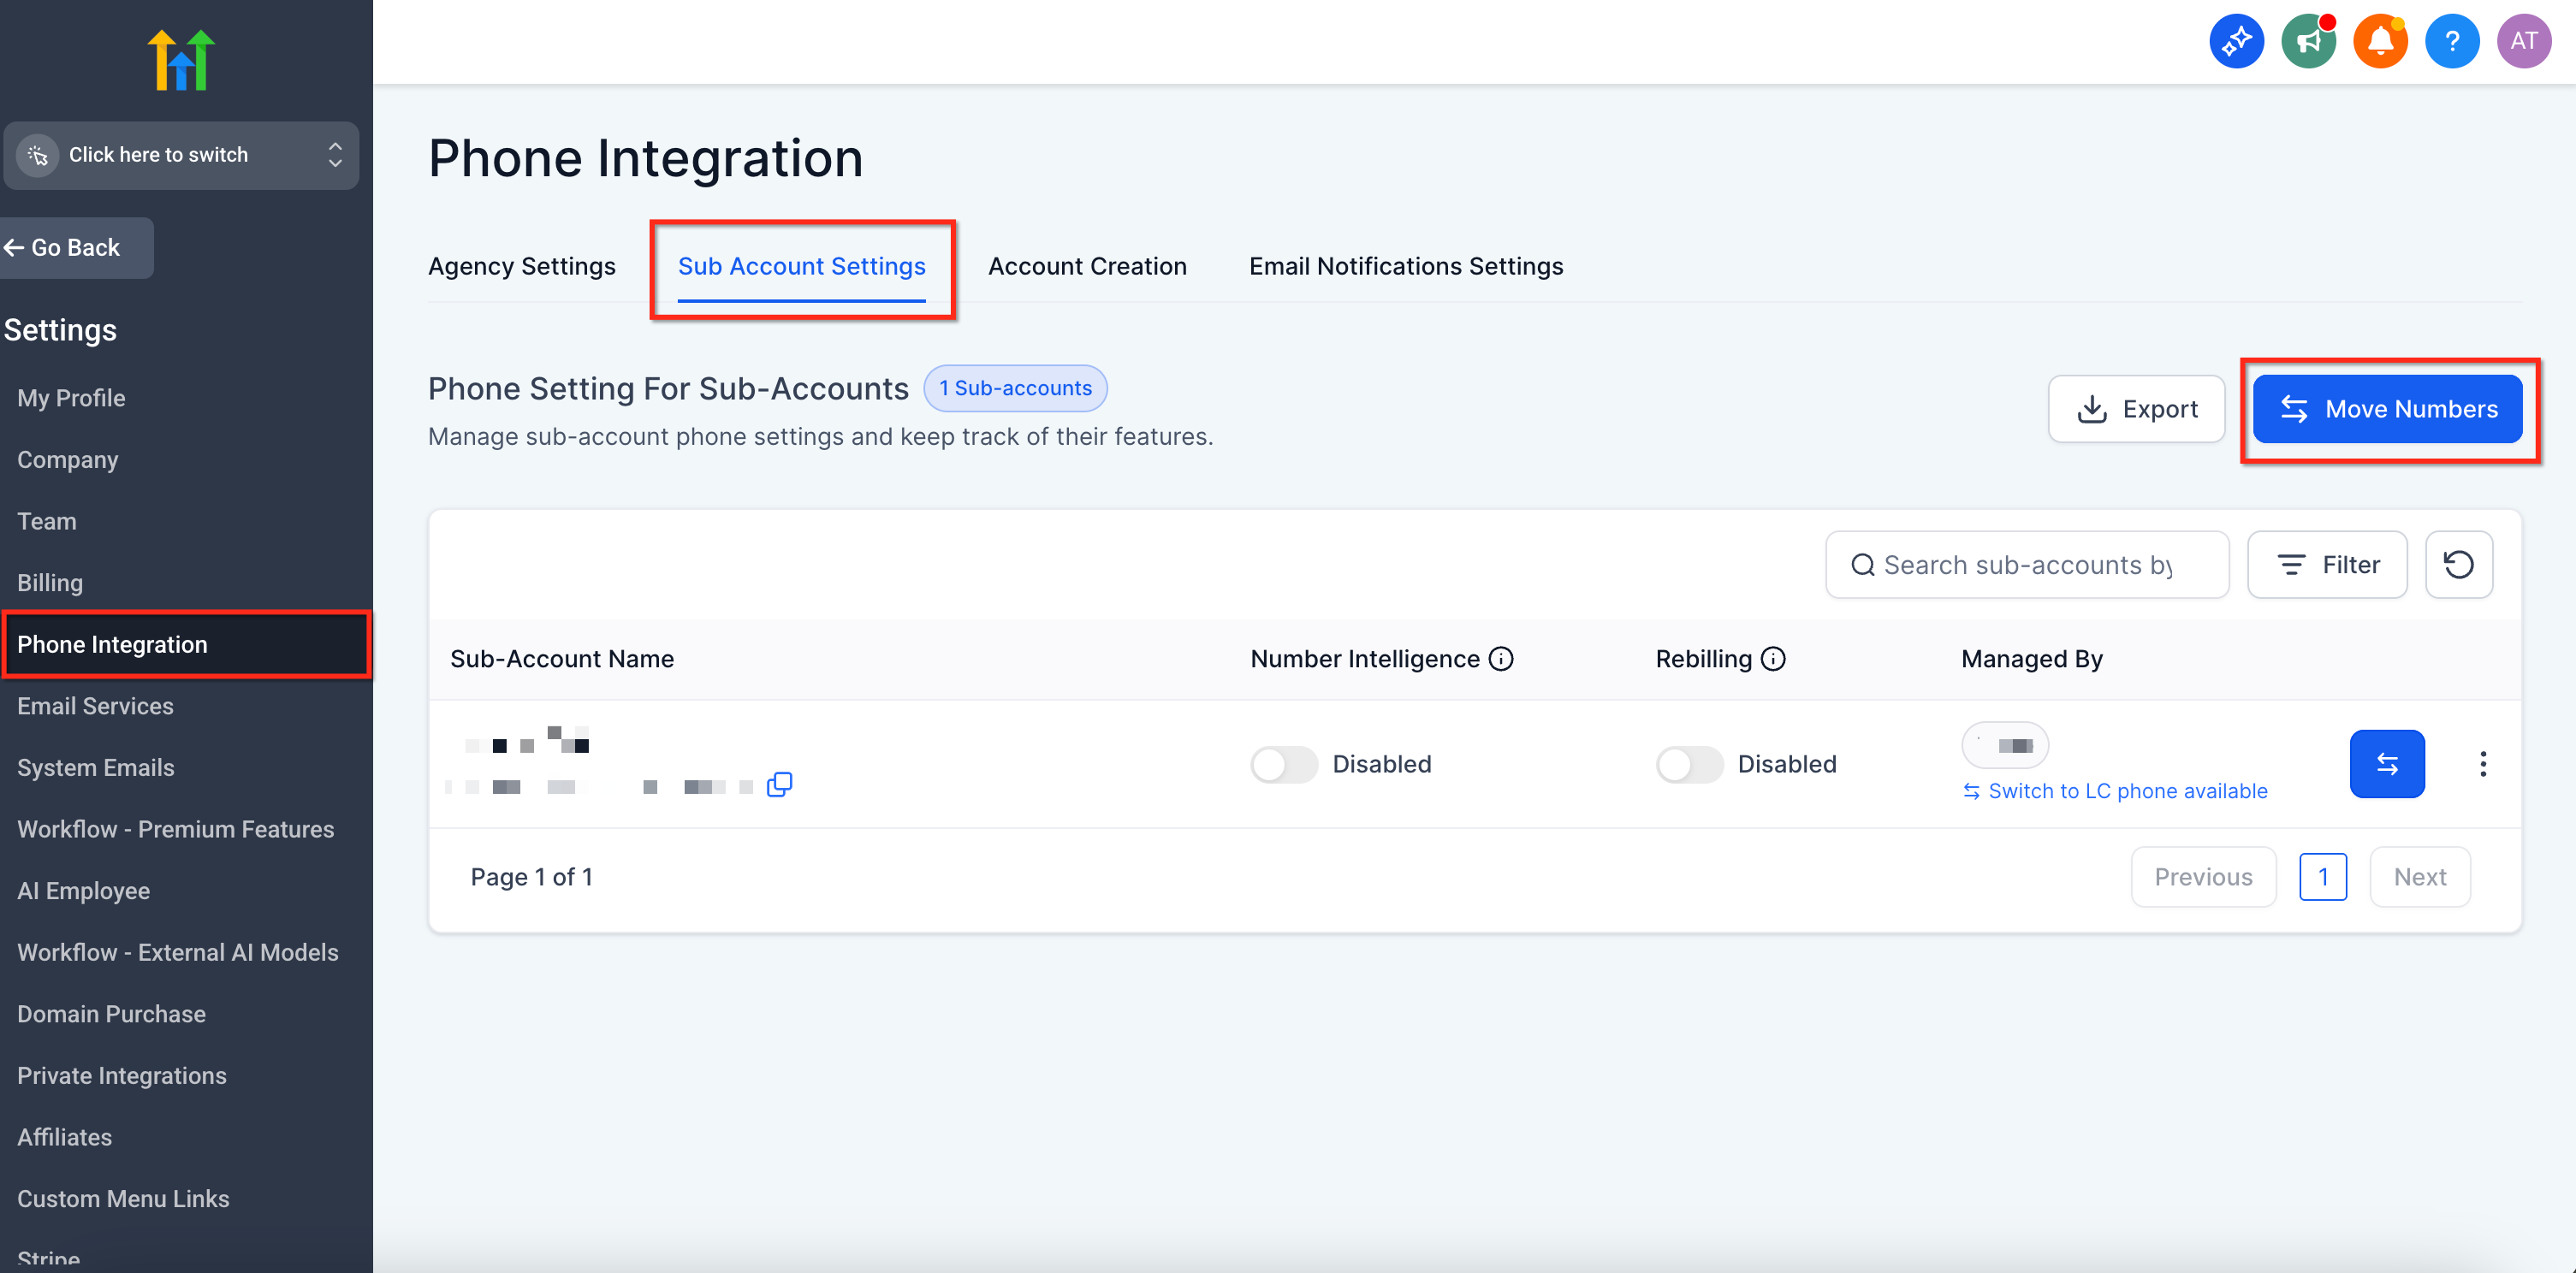
Go to Agency Settings → Phone Integration → Sub Account Settings and select Move Numbers.
Step 2: Select the Source and Destination Sub-Accounts
The source is the sub-account that currently owns the number, while the destination is the sub-account that should own the number after the transfer. Selecting the correct pair is essential because the phone number will be reassigned to the destination.
- Choose the Source sub-account.
- Choose the Destination sub-account.
- Confirm the source and destination are correct before selecting numbers.
Step 3: Select the Phone Numbers to Move
Only numbers eligible for the selected source and destination configuration are available for the move. The current interface allows up to 10 phone numbers per move.
- Select the checkbox beside each phone number you want to transfer.
- Select up to 10 numbers for the current move.
- Review the selected numbers and destination.
- Click Move Numbers.

Select the source, destination, and phone numbers, then click Move Numbers. The current interface allows a maximum of 10 selected numbers per move.
Step 4: Verify the Number in the Destination Sub-Account
A phone number appearing in the destination confirms the ownership change, but routing and messaging configuration should still be reviewed before normal traffic resumes.
- Open the destination sub-account.
- Confirm the phone number appears in the destination phone-number list.
- Review number-level settings.
- Complete the post-move validation checklist below.
What Happens After a Number Is Moved?
Moving the phone number changes which sub-account manages that number, but it does not automatically recreate every setting or compliance association in the destination. Reviewing the destination immediately after the move helps prevent missed calls or failed messages.
| Item | What to Expect | Action |
|---|---|---|
| Phone Number | Moves to the destination sub-account. | Confirm it appears in the destination. |
| A2P 10DLC | A2P status is tied to the sub-account and does not move with the number. | Verify the destination's A2P registration and attach the number to the appropriate approved campaign. |
| Toll-Free Verification | Do not assume verification automatically transfers with the number. | Confirm the number's Toll-Free Verification status after the move. |
| Contacts, Conversations & Analytics | These are not transferred simply because the phone number moves. | Keep or migrate business data separately when required. |
| Historical Recordings & Voicemails | Historical assets do not automatically move with the phone number. | Download anything that must be retained before access to the source environment is removed. |
Post-Move Validation Checklist
A quick validation confirms that the destination is ready to receive calls and messages from the moved number.
- Confirm the number appears in the destination sub-account.
- Review forwarding and inbound call routing.
- Review call recording, voicemail, call whisper, and related number settings.
- Review user assignments.
- Review workflows, automations, campaigns, and other areas that reference the number.
- Verify A2P 10DLC or Toll-Free Verification when messaging is used.
- Place an inbound and outbound test call.
- Send an inbound and outbound test SMS when messaging is enabled.
Troubleshooting and Known Limitations
If Move Numbers is unavailable, a number does not appear, or the transfer fails, first verify the phone provider, Master Twilio account, country, and source/destination configuration. These requirements determine whether the in-app tool can complete the move.
Twilio numbers under different Master Twilio accounts cannot be transferred using the in-app Move Numbers tool. Contact Twilio Support for assistance with that Twilio account-level move.
Do not use Move Numbers to convert Twilio ↔ LC Phone. Follow the appropriate migration process instead.
The in-app Move Numbers workflow currently supports US and Canada numbers. Contact HighLevel Support for numbers in other countries.
International migrations can require an approved Regulatory Bundle and Address SID in the destination. Complete the required regulatory setup before following the appropriate international migration path.
The current Move Numbers interface allows up to 10 numbers to be selected per move. Complete additional moves for the remaining eligible numbers.
If both sub-accounts are in the same agency, both use LC Phone, the numbers are otherwise eligible, and the in-app move still fails, contact HighLevel Support with the source Location ID, destination Location ID, and affected phone number(s).
Frequently Asked Questions
Was this article helpful?
That’s Great!
Thank you for your feedback
Sorry! We couldn't be helpful
Thank you for your feedback
Feedback sent
We appreciate your effort and will try to fix the article