The HighLevel Web Dialer, sometimes called the Softphone, lets users place and manage calls directly from a supported browser. Users can manually enter a phone number, search for a contact, select a recent call, choose an available Calling From number, and use in-call controls without leaving HighLevel.
A reliable calling experience depends on the user’s number assignment, permissions, microphone and audio-device access, browser configuration, network connection, and outbound call timeout.
This guide explains how the Web Dialer differs from the Power Dialer and mobile calling, how to make and transfer calls, how Calling From behavior works, and how to resolve common audio, caller ID, and connection issues.
Your browser must be allowed to use the microphone before the Web Dialer can transmit your voice. Headsets, speakers, VPNs, browser extensions, firewall rules, and security applications can also affect call audio or connection behavior.
When recording calls, review the consent and disclosure requirements that apply to the caller, recipient, and jurisdictions involved before changing or removing the recording announcement.
What is the Web Dialer (Softphone)?
The Web Dialer is HighLevel’s browser-based calling interface. It allows users to make and manage outbound calls without using a separate deskphone or the HighLevel mobile app.
The dialer is available from the green phone icon in the top navigation on most pages. Once opened, users can enter a number manually, search for an existing contact, review recent calls, use the dialpad during a live call, access configured call scripts, transfer calls, and record follow-up information.
The Web Dialer can be used from a desktop browser or supported mobile browser. For a dedicated mobile experience, use the HighLevel mobile app.
Key Benefits of the Web Dialer
The Web Dialer keeps calling tools close to the contact record so users can spend less time switching applications and more time managing customer conversations.
- Browser-Based Calling: Place calls without a separate physical phone or mobile application.
- Fast Contact Access: Search contacts, enter numbers manually, or return calls from the Recents view.
- Flexible Caller ID: Use the assigned number or select another permitted Calling From number when access allows.
- Live Call Controls: Mute, hold, use the keypad, and transfer connected calls.
- Consistent Call Handling: Access configured call scripts, notes, tags, and contact information during or after calls.
- Centralized Call Activity: Keep outbound call history and related contact activity inside HighLevel.
Web Dialer vs. Power Dialer vs. Mobile Calling
These calling options can use the same underlying phone system but serve different workflows. Choosing the correct option helps users understand where calls are started and how contacts enter the calling queue.
| Calling Option | How It Works | Best Used For |
|---|---|---|
| Web Dialer / Softphone | A user opens the dialer in a browser and manually selects a contact or enters a phone number. | Individual calls, callbacks, and contact-specific outreach. |
| Manual Actions / Power Dialer | A workflow creates manual call tasks that appear under Conversations → Manual Actions. The user works through the assigned queue using the dialer. | Structured sales, support, or follow-up calling queues. |
| HighLevel Mobile App | A user places calls from the dedicated mobile application. | Calling while away from a desktop or browser workspace. |
What You Need Before Making Outbound Calls
A short pre-call review helps prevent missing audio, incorrect caller ID, and calls ending before the recipient has enough time to answer.
- Available outbound number: Confirm the user has an assigned number or access to an eligible Calling From number.
- Correct user access: Review the user’s role, data visibility, contact access, and phone-number assignments.
- Microphone permission: Allow the browser to use the microphone.
- Audio devices: Select the intended microphone, speaker, or headset and test them before calling.
- Stable network: Use a reliable internet connection and avoid unnecessary VPN or security-routing interference.
- Outbound timeout: Set the phone number’s Outgoing Call Timeout to at least 20 seconds.
- Recording compliance: Confirm that call-recording and announcement settings meet applicable legal and business requirements.
Choosing the Calling From Number
The Calling From number determines which eligible HighLevel number is used as the outbound caller ID. User role, data visibility, number assignment, and account access determine whether the number is selected automatically or can be changed from the dialer.
| User Configuration | Calling From Behavior |
|---|---|
| User role with Only Assigned Data | Outbound calls automatically use the user’s assigned phone number when the applicable assignment is available. |
| User with All Records access | The user can open the Calling From dropdown and select from the phone numbers available to their account and permissions. |
Review User Role and Data Visibility
Data visibility affects whether a user is limited to assigned data or can access all records. Review this setting when a user cannot choose a different Calling From number or calls are using an assigned number automatically.
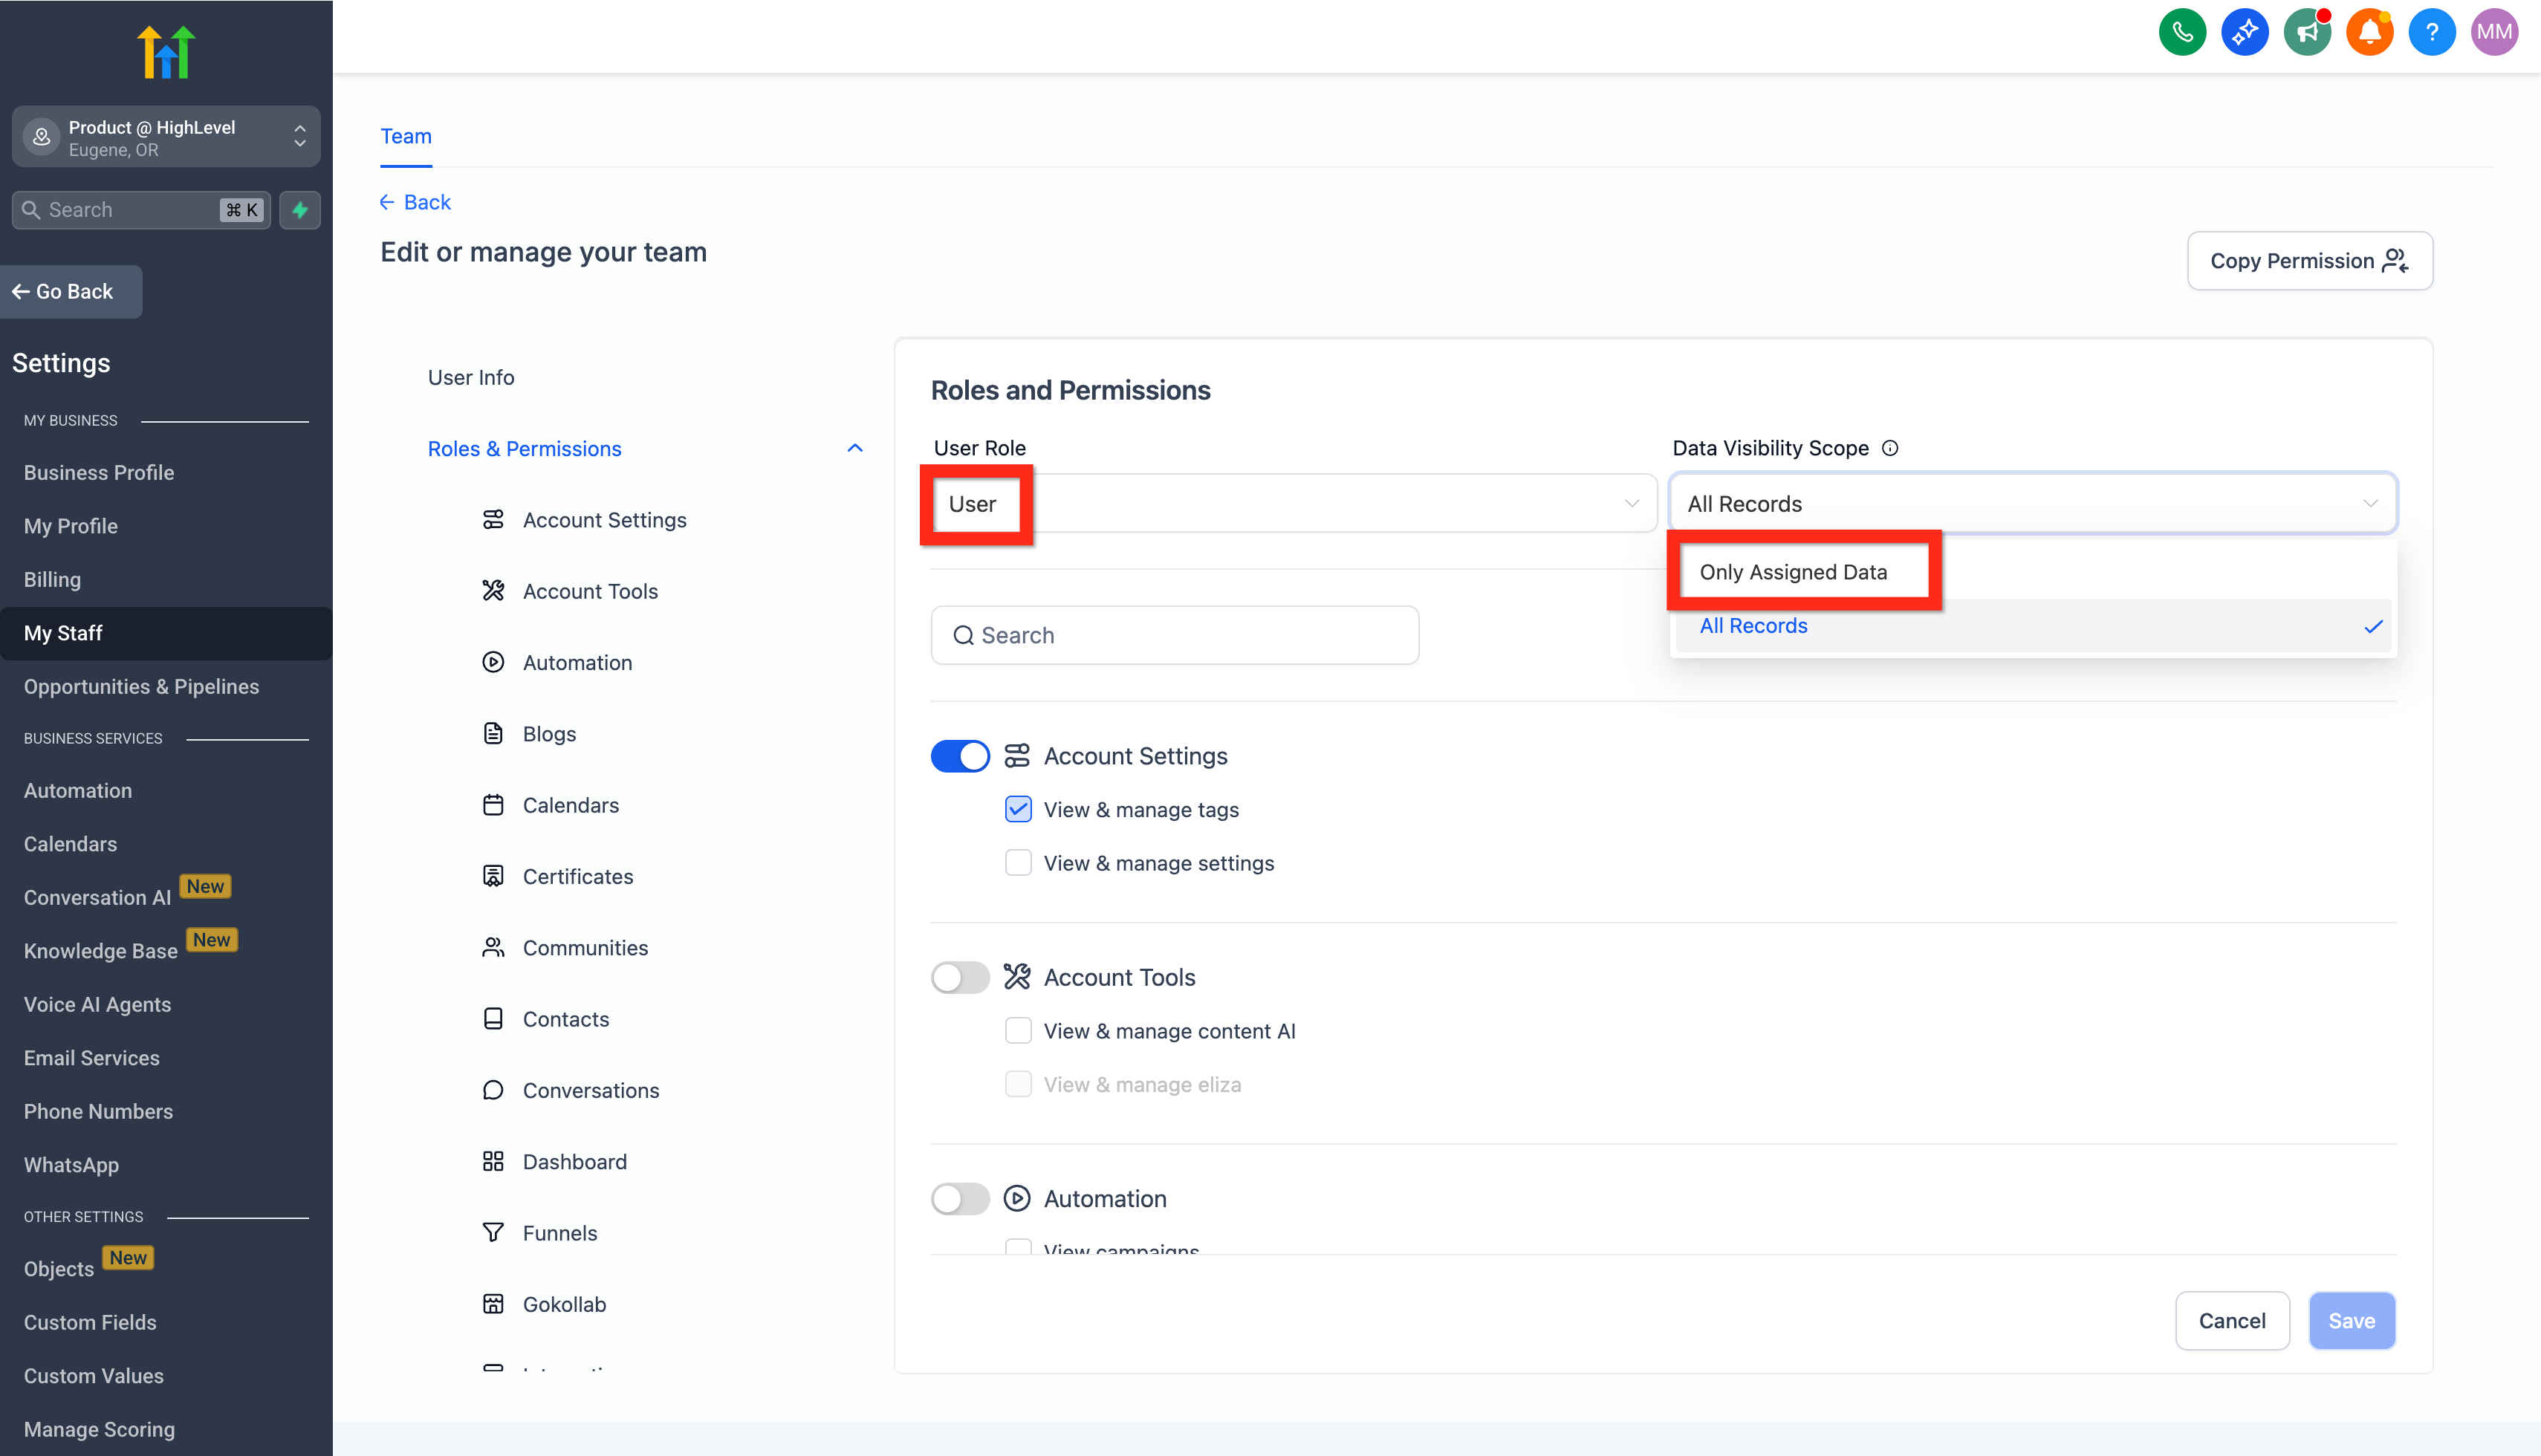
A user with the User role and Only Assigned Data is generally limited to the phone number assigned to that user.
Select a Number from the Calling From Dropdown
When the user has the appropriate access, open the Calling From dropdown and select the eligible number that should appear as the outbound caller ID.
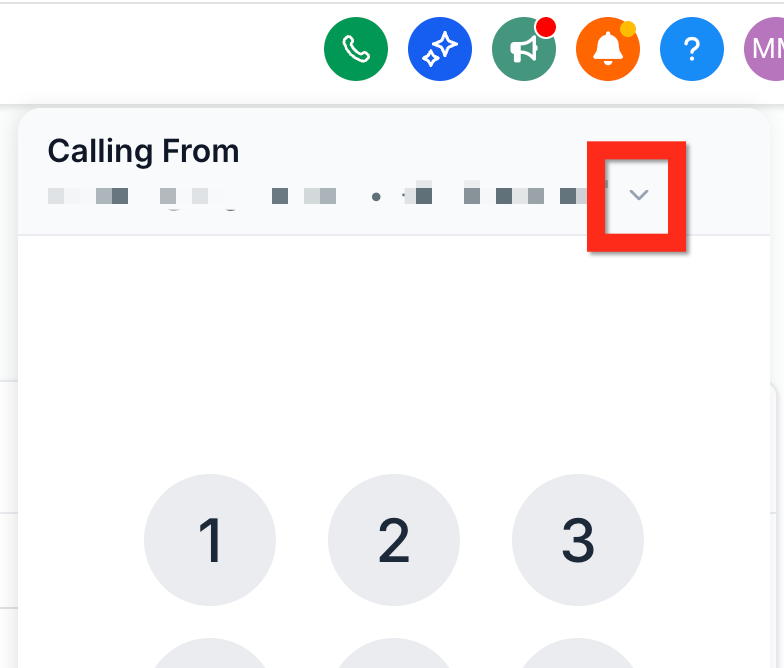
Select the appropriate outbound number from Calling From before placing the call.
How to Make Outbound Calls with the Web Dialer
The dialer can start a call from a manually entered number, an existing contact, or a recently used number. Confirm the Calling From selection before dialing so the intended business number is used.
- From the top navigation, click the green phone icon.
- Review the Calling From number and change it when your access permits.
- Choose one of the following:
- Keypad: Enter a phone number manually.
- Contacts: Search for and select an existing contact.
- Recents: Select a previously called or received number.
- Enter or select the destination phone number.
- Click the call button to begin dialing.
- After the call connects, use the dialpad when you need to send keypad input to an IVR or automated phone menu.
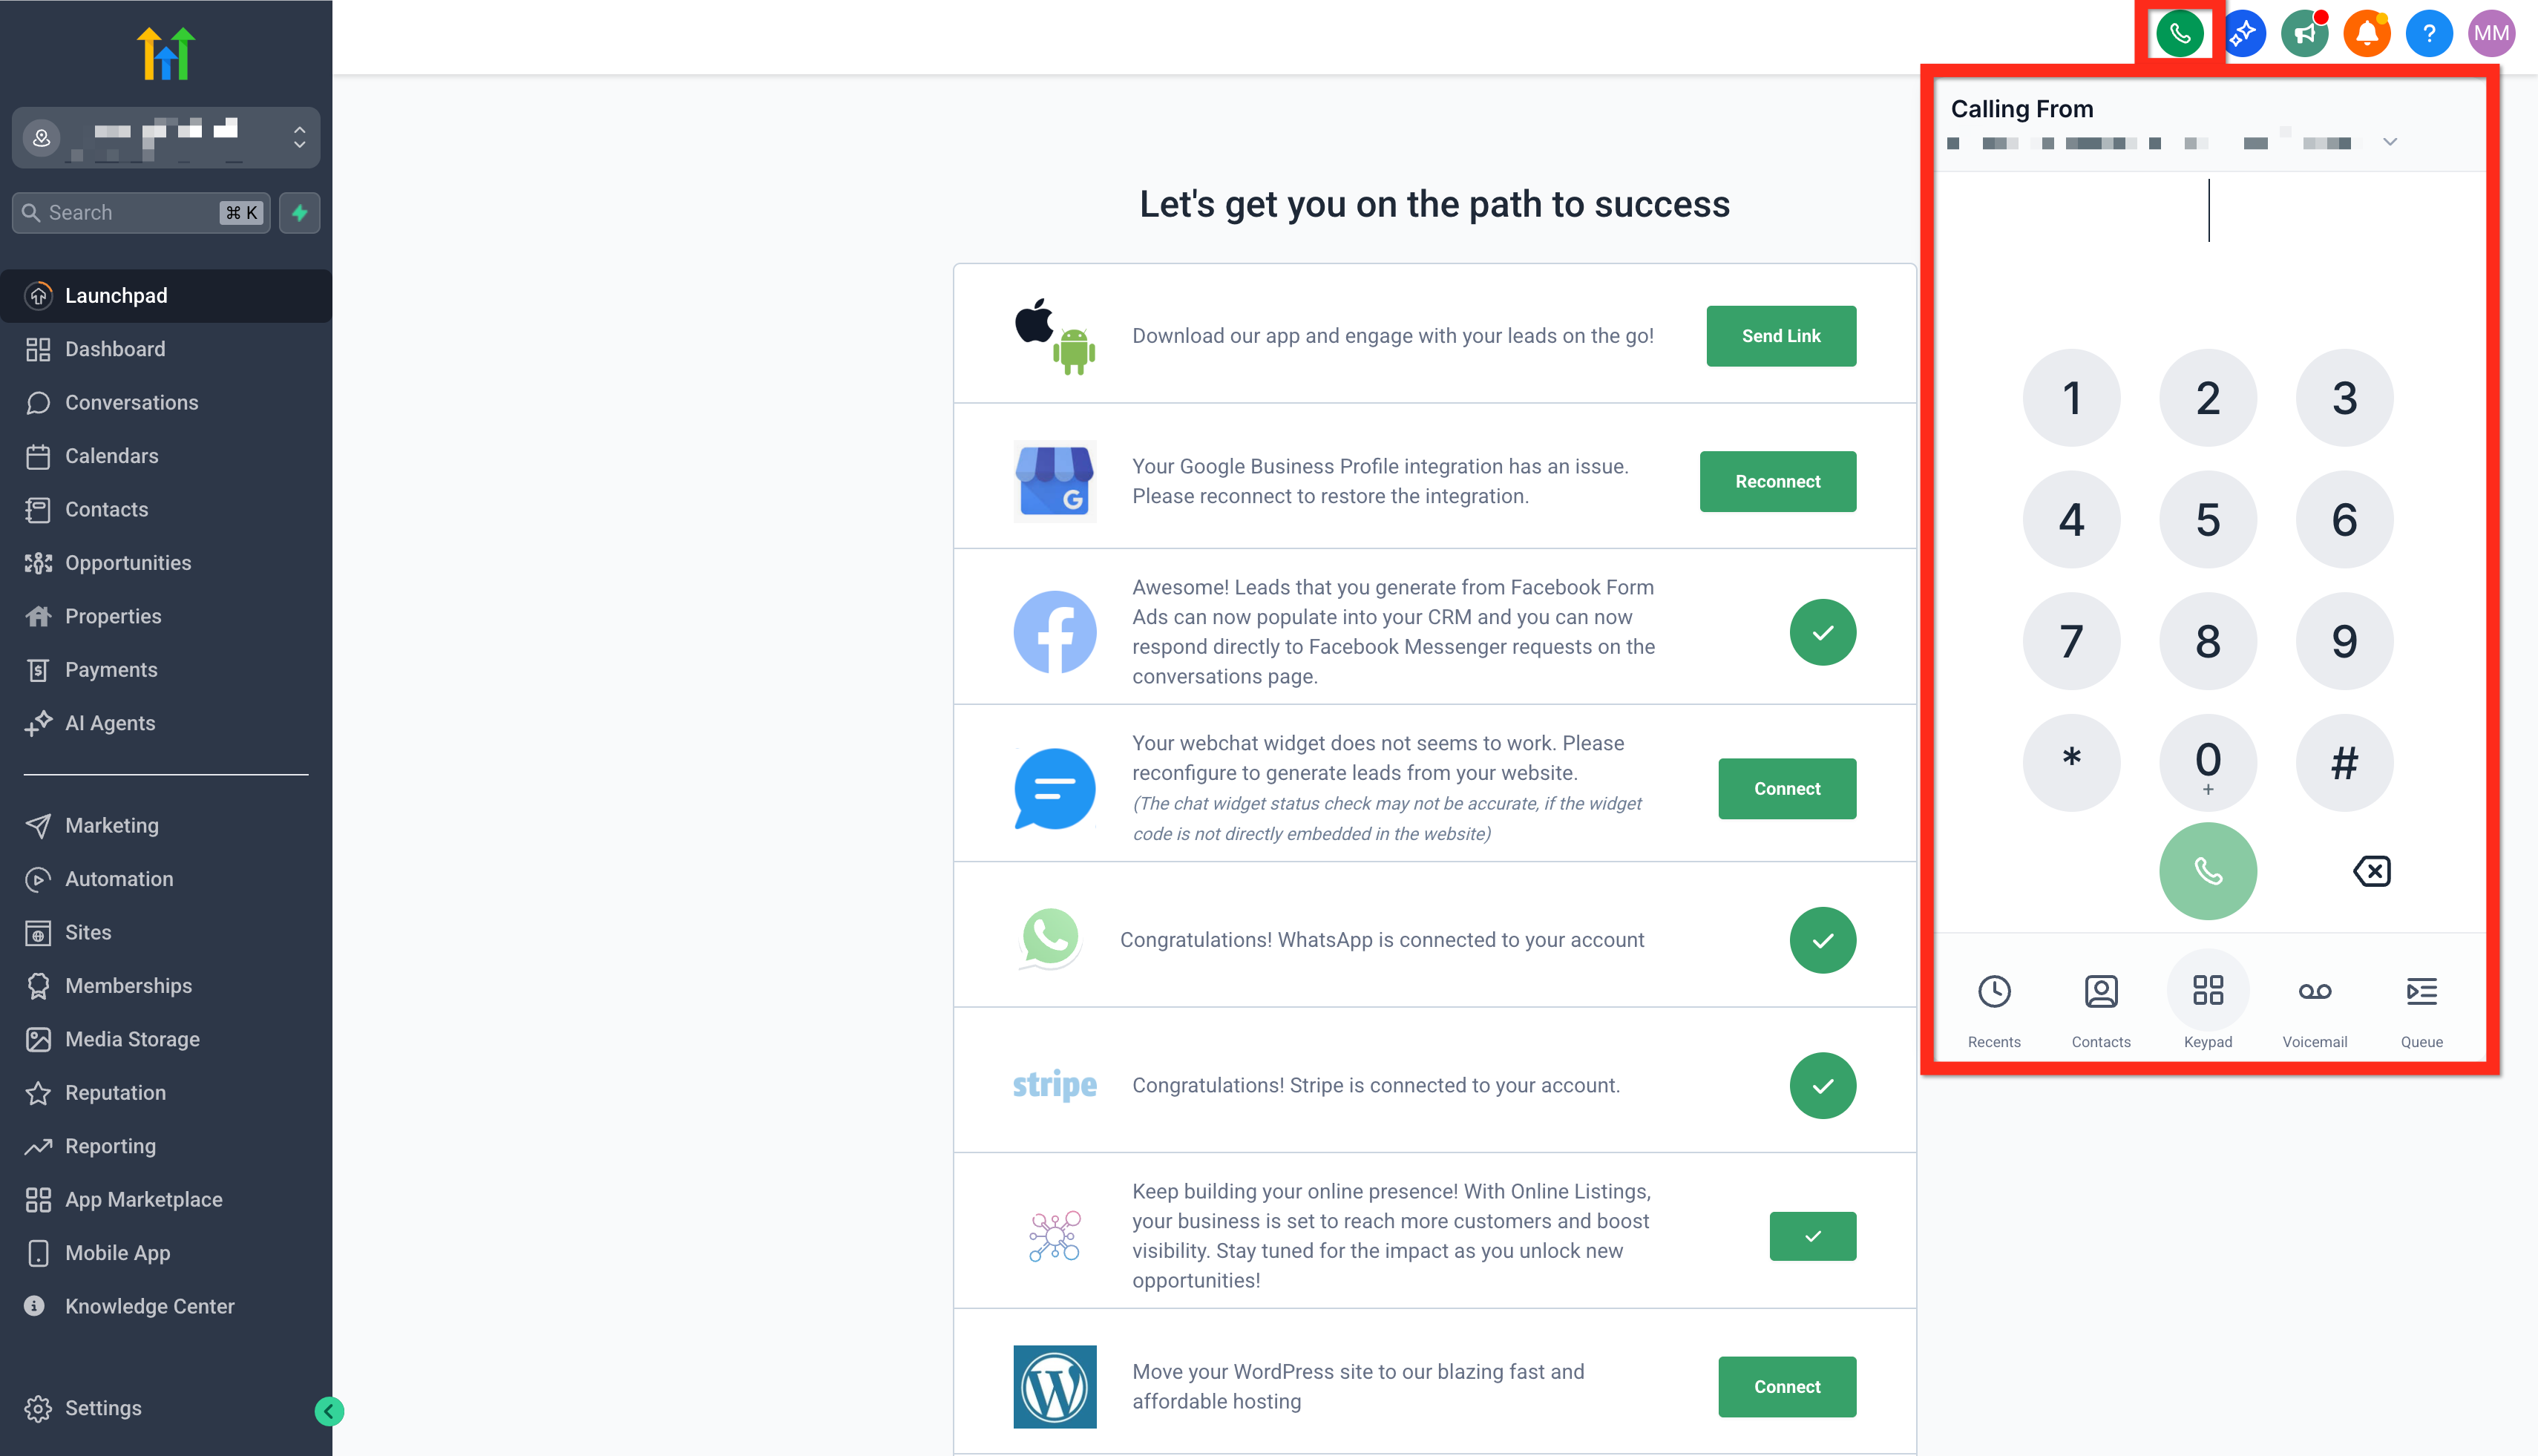
Open the Web Dialer from the green phone icon, select the Calling From number, and choose Keypad, Contacts, or Recents.
Dialer workspace: The Web Dialer can auto-minimize when you click elsewhere. Pin it when you want it to remain visible, or drag it to a different part of the screen while working in HighLevel.
Managing an Active Call
Once a call connects, the dialer provides controls for audio privacy, call handling, automated-menu navigation, and transferring the conversation to another user or phone number.
| Control | What It Does |
|---|---|
| Mute | Turns off your microphone so the other party cannot hear you. |
| Hold | Places the call on hold so neither party can hear the other until the call is resumed. |
| Keypad | Sends DTMF keypad tones for IVRs, extensions, conference codes, and automated menus. |
| Call Scripts | Displays a configured call script during the conversation when scripts are available. |
| Transfer | Moves the active caller to another user or phone number using a warm or blind transfer. |
Warm Transfer
A warm transfer lets you speak with the transfer recipient before connecting the original caller. This is useful when the next person needs context before taking over the conversation.
- From the connected call, open the transfer controls.
- Search for another user or manually enter a phone number.
- Select Call & Hold to place the original caller on hold and call the transfer recipient.
- Speak with the recipient and provide the necessary context.
- Select the final patch or transfer option shown in your dialer to connect both parties and leave the call.
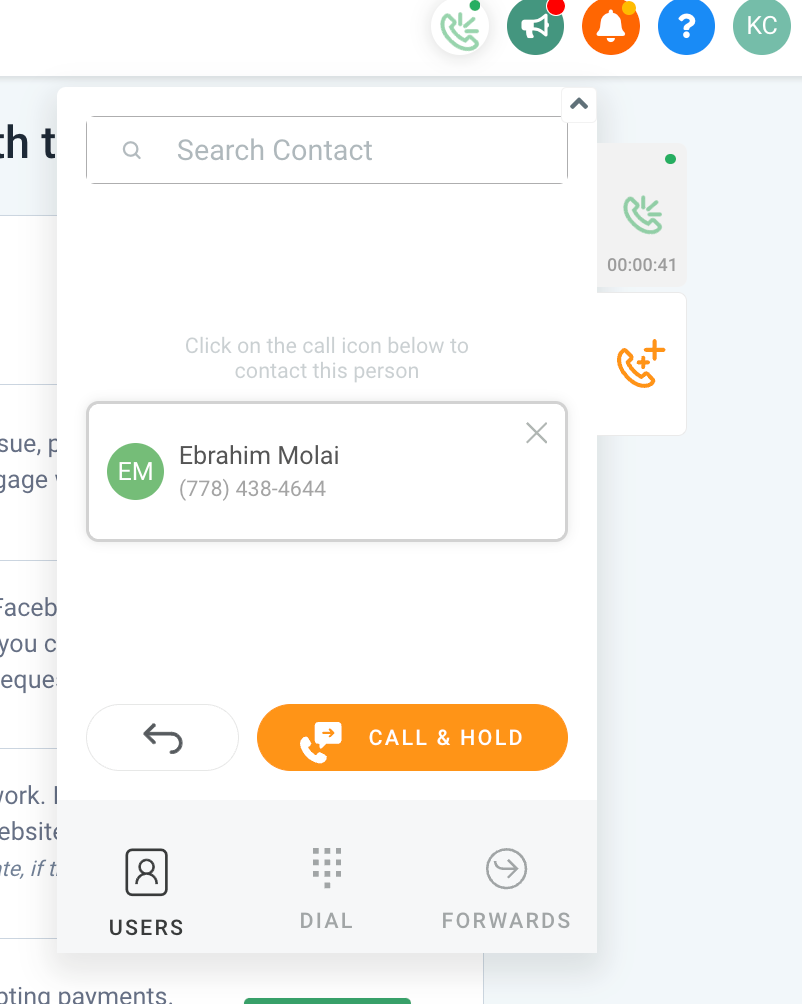
Call & Hold keeps the original caller on hold while you speak with the transfer recipient.
Blind Transfer
A blind transfer immediately sends the caller to another user or phone number without first speaking with the recipient. Your participation ends when the transfer is completed.
- Open the transfer controls during the connected call.
- Search for a user or enter the destination number.
- Click Transfer & End to send the caller to the destination and disconnect yourself.

Transfer & End sends the caller to the selected destination without a consultation call.
How to Set Up the Web Dialer for Outbound Calls
Proper browser and phone-number configuration prevents the most common dialer problems. Complete the steps below before relying on the Web Dialer for live customer calls.
Step 1: Allow Microphone Access in the Browser
The microphone must be allowed for the HighLevel site. In Chrome, click the site-information icon to the left of the address bar and confirm that Microphone is enabled.
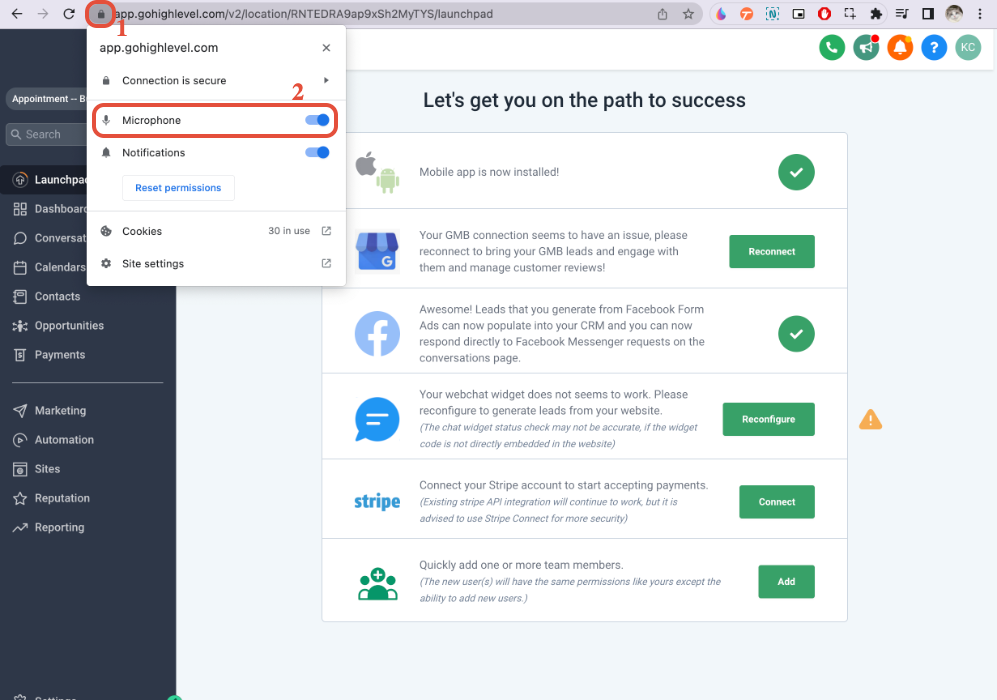
Allow microphone access from the browser’s site-information menu.
If the permission is not available from the address bar, open the browser’s site-permission settings and change Microphone from Block or Ask to Allow.

Browser site settings can be used to reset or allow microphone access.
Step 2: Select and Test Audio Devices
Open the Web Dialer’s audio-device settings and select the microphone and main speaker you want to use. When available, use the test controls and microphone-level indicator before placing a live call.
Step 3: Test Without VPNs or Browser Extensions
VPNs, privacy extensions, ad blockers, security tools, and traffic-routing applications can interfere with Web Dialer audio or connection requests. Temporarily test in an incognito or guest browser session where extensions are disabled.
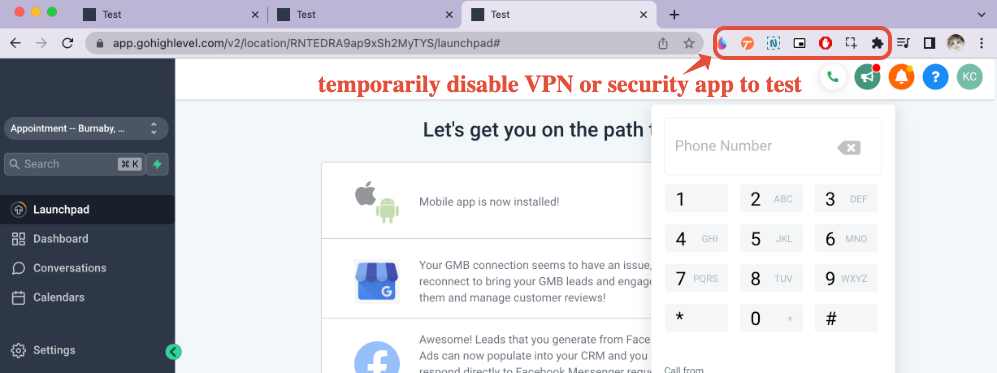
Temporarily disable VPN or security extensions for testing, or use an incognito or guest session.
Step 4: Set the Outgoing Call Timeout
Set the phone number’s Outgoing Call Timeout to at least 20 seconds. A timeout that is too short can end the call before the recipient’s carrier and device have enough time to ring.
- Go to Settings → Phone System → Phone Numbers.
- Open Edit Configuration for the applicable number.
- Enable Outgoing Call Timeout.
- Enter a value of at least 20 seconds and save the configuration.
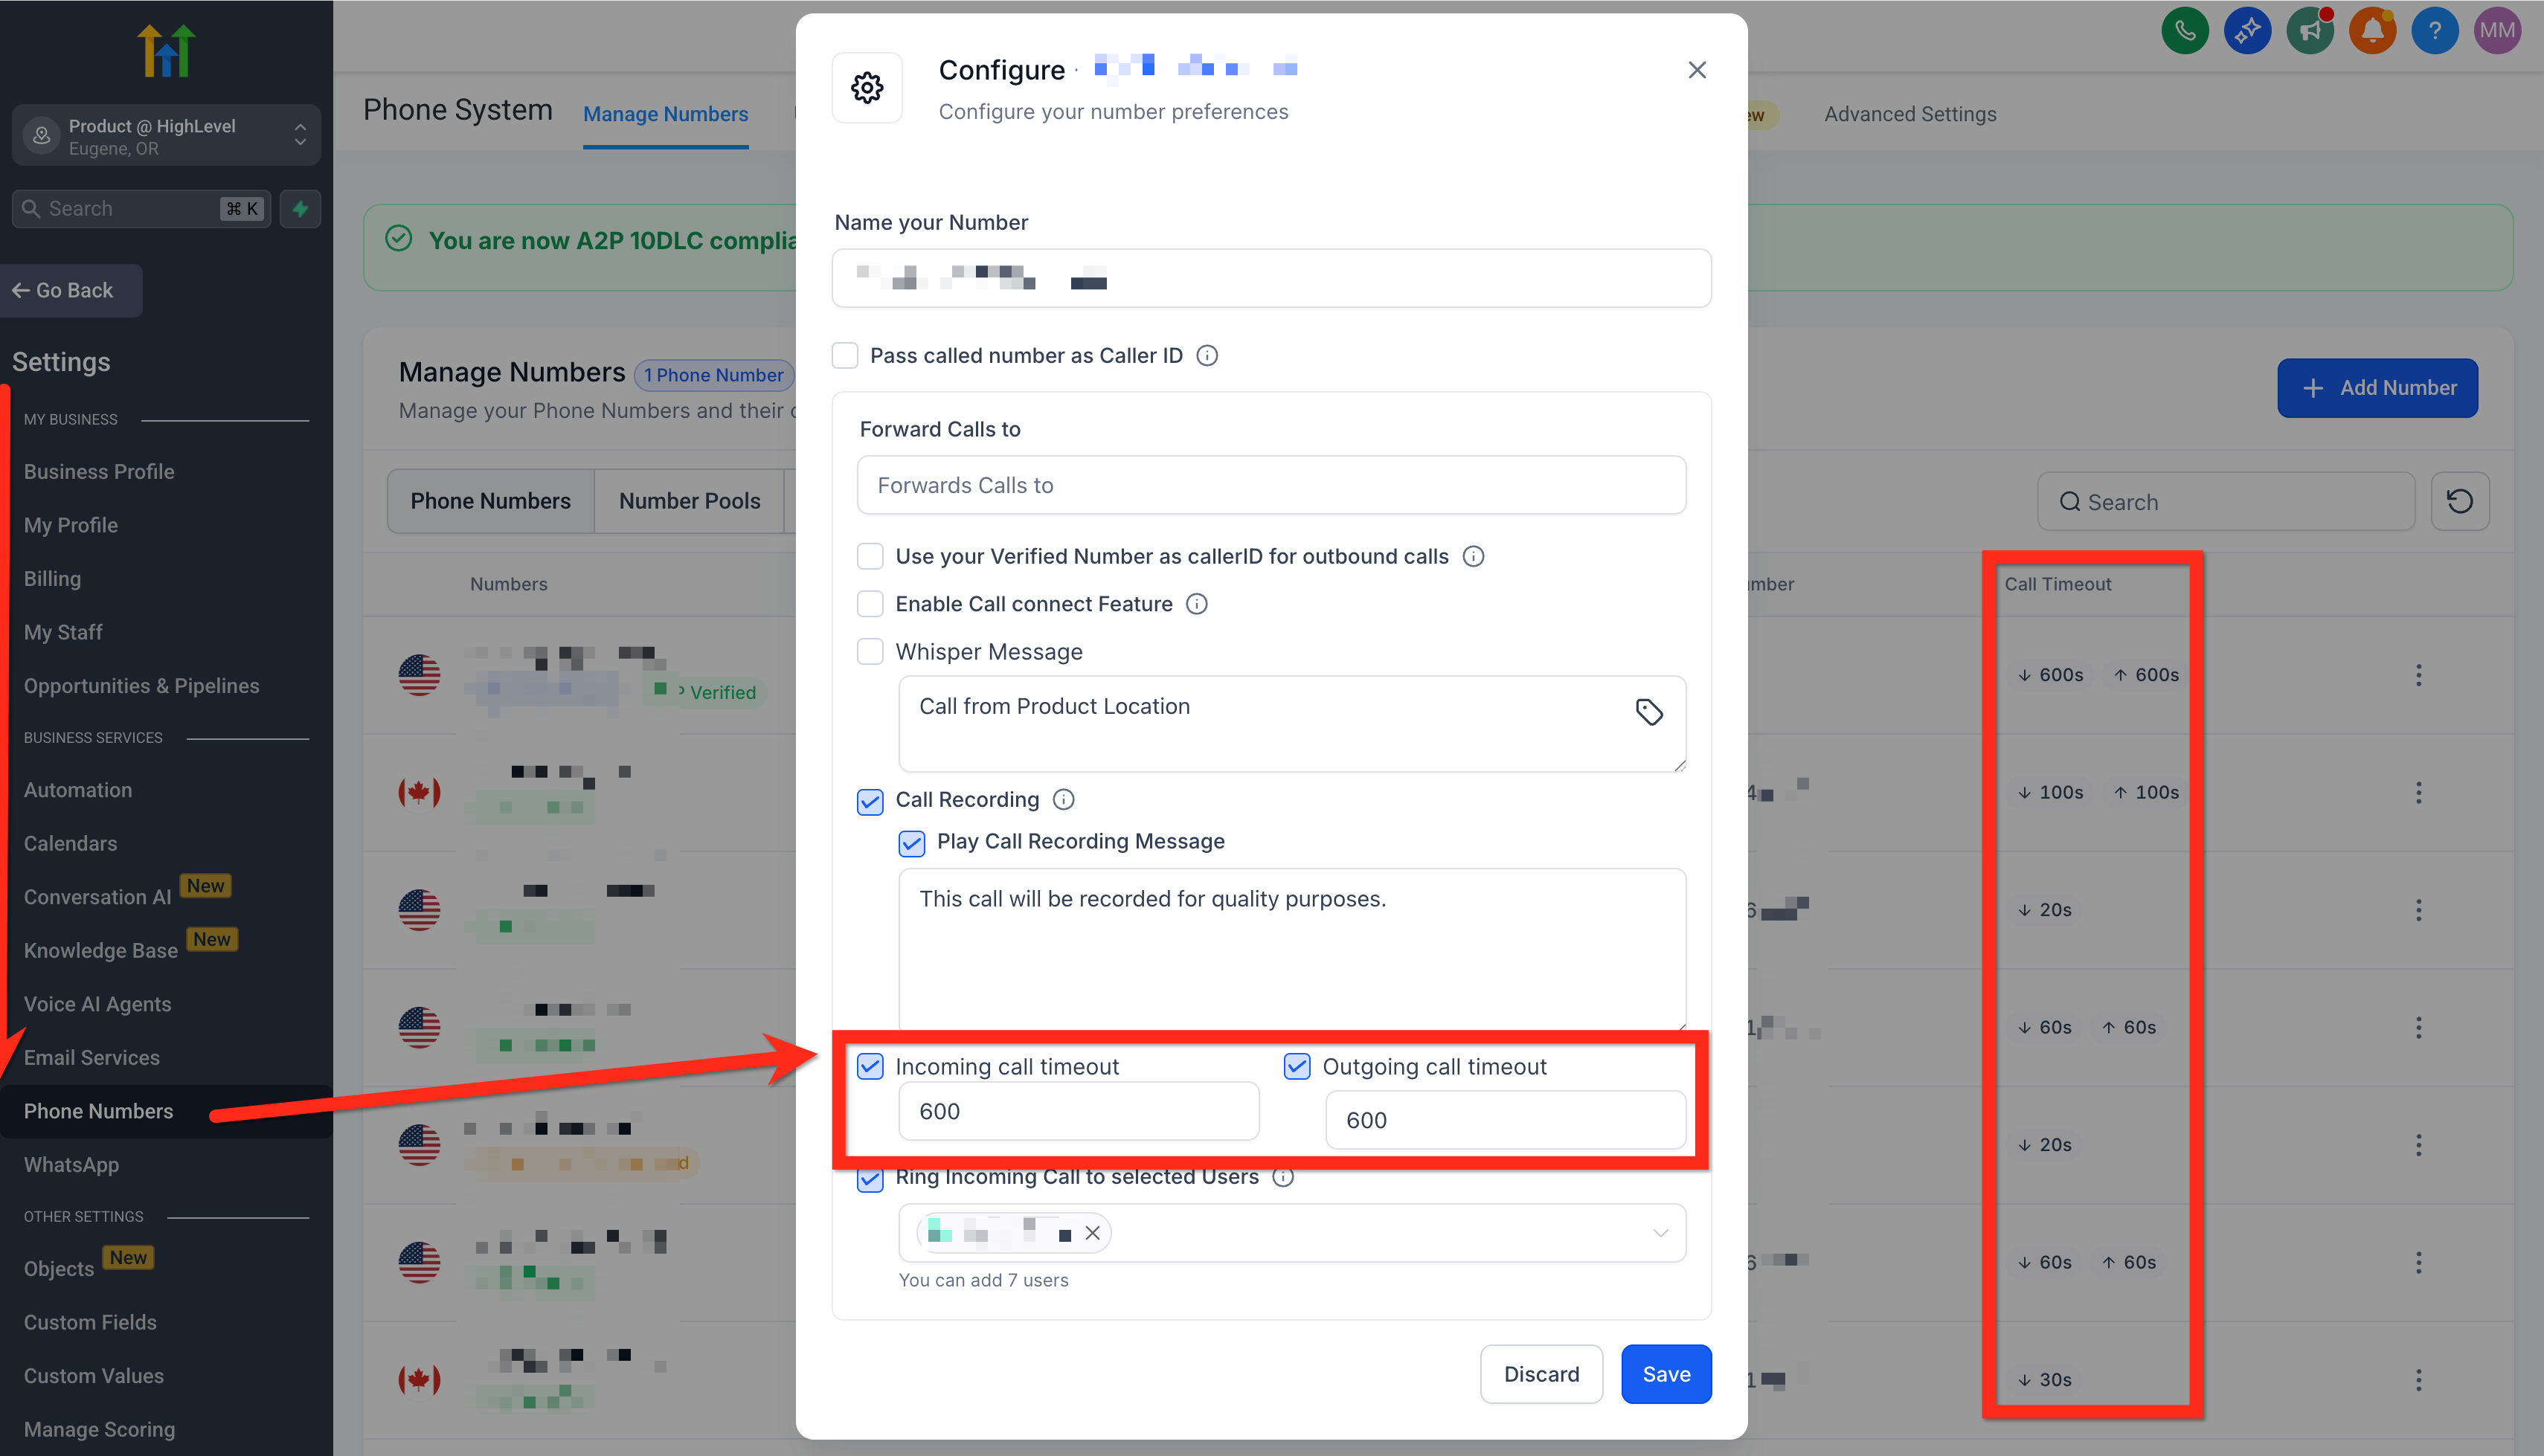
The screenshot shows where the call-timeout fields are configured. Choose a value appropriate for your calling workflow and keep the outgoing timeout at 20 seconds or more.
Step 5: Place a Controlled Test Call
Call a phone you can monitor. Confirm that the recipient’s device rings, the expected caller ID is used, both parties can hear each other, the keypad works, and the call can be placed on hold or transferred when needed.
Understanding Connecting and Ringback Tones
The sound heard immediately after starting a call reflects different stages of carrier connection. Understanding the difference can help distinguish normal setup time from a call that never reached the destination network.
- Connecting tone: HighLevel plays a brief connecting tone while attempting to reach the recipient’s carrier.
- Ringback tone: Ringback starts after the destination carrier confirms that the recipient’s device is ringing.
- Localized ringback: For supported countries, the tone can match the country associated with the phone number involved in the call.
- Carrier not reached: If the destination carrier cannot be reached, the call can end after the connecting tone instead of playing a ringback tone for a device that is not actually ringing.
Caller ID, Call Recording, and Number Reputation
The Calling From number identifies the outbound line, while CNAM, SHAKEN/STIR, and Voice Integrity help carriers and recipients interpret the identity and reputation of that number. These features serve different purposes and should not be treated as interchangeable.
| Feature | Purpose | Important Limitation |
|---|---|---|
| Calling From | Selects the HighLevel phone number used for the outbound call. | Available choices depend on number assignment, user permissions, and account configuration. |
| CNAM | Associates a business or personal name with a US phone number. | Display is not guaranteed and CNAM does not remove spam labels. |
| SHAKEN/STIR | Authenticates caller ID information and helps carriers evaluate whether a call is legitimate. | Authentication does not guarantee that a nuisance or spam label will be removed. |
| Voice Integrity | Registers eligible US numbers with major caller-ID analytics providers to improve number reputation and address spam labeling. | Provider reviews occur separately, and label changes can take time to appear across networks. |
Call Recording Announcement
The message “This call will be recorded for quality purposes” is controlled by the applicable phone number’s recording settings. To review it, go to Settings → Phone System → Phone Numbers → Edit Configuration.
The announcement can be edited or disabled when the interface allows, but removing it is not recommended unless you have confirmed that your recording process satisfies all applicable consent and disclosure requirements.
Learn more about Phone Number Configuration Options →
Voice Integrity Prompt After an Unanswered Call
After an outbound Web Dialer call is not answered, HighLevel may show a Voice Integrity recommendation. The prompt provides a shortcut to registration tools intended to improve the reputation and answer rates of eligible US phone numbers.
Troubleshooting Outbound Calls
Start troubleshooting with the user’s number access, browser permissions, audio devices, network path, and timeout configuration. Testing one layer at a time helps isolate whether the issue is caused by account configuration, the browser, or the destination carrier.
Refresh the page, confirm the user has access to the sub-account, and verify that an eligible phone number is assigned or available for outbound calling. Also review the user’s role and data visibility.
Confirm the browser is allowed to use the microphone, the correct microphone is selected in Audio Device Settings, the microphone is not muted, and another application is not exclusively controlling the device.
Confirm the correct main speaker or headset is selected, verify the device volume, and test another output device. Reconnect Bluetooth devices when the browser is using an older or disconnected audio route.
Confirm the destination number is valid, set the Outgoing Call Timeout to at least 20 seconds, and test without a VPN, privacy extension, or security application. If the call stops after the connecting tone, the destination carrier may not have been reached.
Review the user’s assigned number, role, Data Visibility Scope, and Calling From dropdown. Users limited to Only Assigned Data can be routed through their assigned number automatically.
Use a stable network, reduce competing bandwidth usage, test without a VPN, and use a reliable headset or wired connection when possible. Compare the result in another supported browser or device.
Review SHAKEN/STIR, CNAM, and Voice Integrity in the Trust Center. CNAM can associate a business name with the number but does not guarantee display or remove nuisance labels. Voice Integrity is the appropriate reputation-registration path for eligible US numbers.
Confirm the destination user or phone number is valid. For a warm transfer, wait for the consultation call to connect before patching the parties together. For a blind transfer, use Transfer & End only after confirming the intended destination.
Frequently Asked Questions
Was this article helpful?
That’s Great!
Thank you for your feedback
Sorry! We couldn't be helpful
Thank you for your feedback
Feedback sent
We appreciate your effort and will try to fix the article