Event Refunds & Cancellations make it easier to manage paid event registrations directly from the Events area in HighLevel. You can issue full or partial refunds, cancel registrations, combine both actions when needed, review refund history, and control QR code check-in based on payment status. These updates also improve event revenue reporting by reflecting the actual amount paid after discounts.
TABLE OF CONTENTS
- What are Event Refunds & Cancellations?
- Key Benefits of Event Refunds & Cancellations
- Refunds vs. Cancellations
- Initiating a Refund or Cancellation
- Full and Partial Refunds
- Refunding Without Canceling the Registration
- Refunding and Canceling at the Same Time
- Canceling a Registration Without Issuing a Refund
- What Happens When a Registration is Canceled?
- Viewing Refund Status and Refund History
- Accurate Event Revenue Reporting
- QR Code Check-In by Payment Status
- How To Manage Event Refunds and Cancellations
- Frequently Asked Questions
- Related Articles
What are Event Refunds & Cancellations?
Event Refunds & Cancellations let you manage attendee payment and registration changes from the event’s Registrations area. Instead of moving between separate payment and event screens, you can refund, cancel, or combine both actions from the attendee record.
A refund returns money to the attendee.
A cancellation removes the active event registration.
These actions are related, but they are not the same. You can:
refund without canceling,
cancel without refunding,
or refund and cancel at the same time.
Key Benefits of Event Refunds & Cancellations
Managing refunds and registration changes from one place reduces manual steps and makes it easier to understand what happened to an attendee’s payment and ticket.
Faster refund management: Issue refunds directly from the event registration.
Flexible refund options: Process full or partial refunds.
Separate payment from attendance: Refund an attendee without automatically canceling their registration.
Simpler cancellations: Cancel a registration directly from the attendee Actions menu.
Clear refund visibility: Review payment status and refund history from the registration record.
More accurate revenue: Event revenue now reflects the actual amount paid after discounts.
Better check-in control: Decide which payment statuses are allowed to check in by QR code.
Refunds vs. Cancellations
Refunding and canceling affect different parts of an event registration. Understanding the difference helps you avoid unintentionally removing an attendee when you only meant to return money, or leaving a registration active when you intended to cancel it.
Refunding a registration returns money to the original payment method.
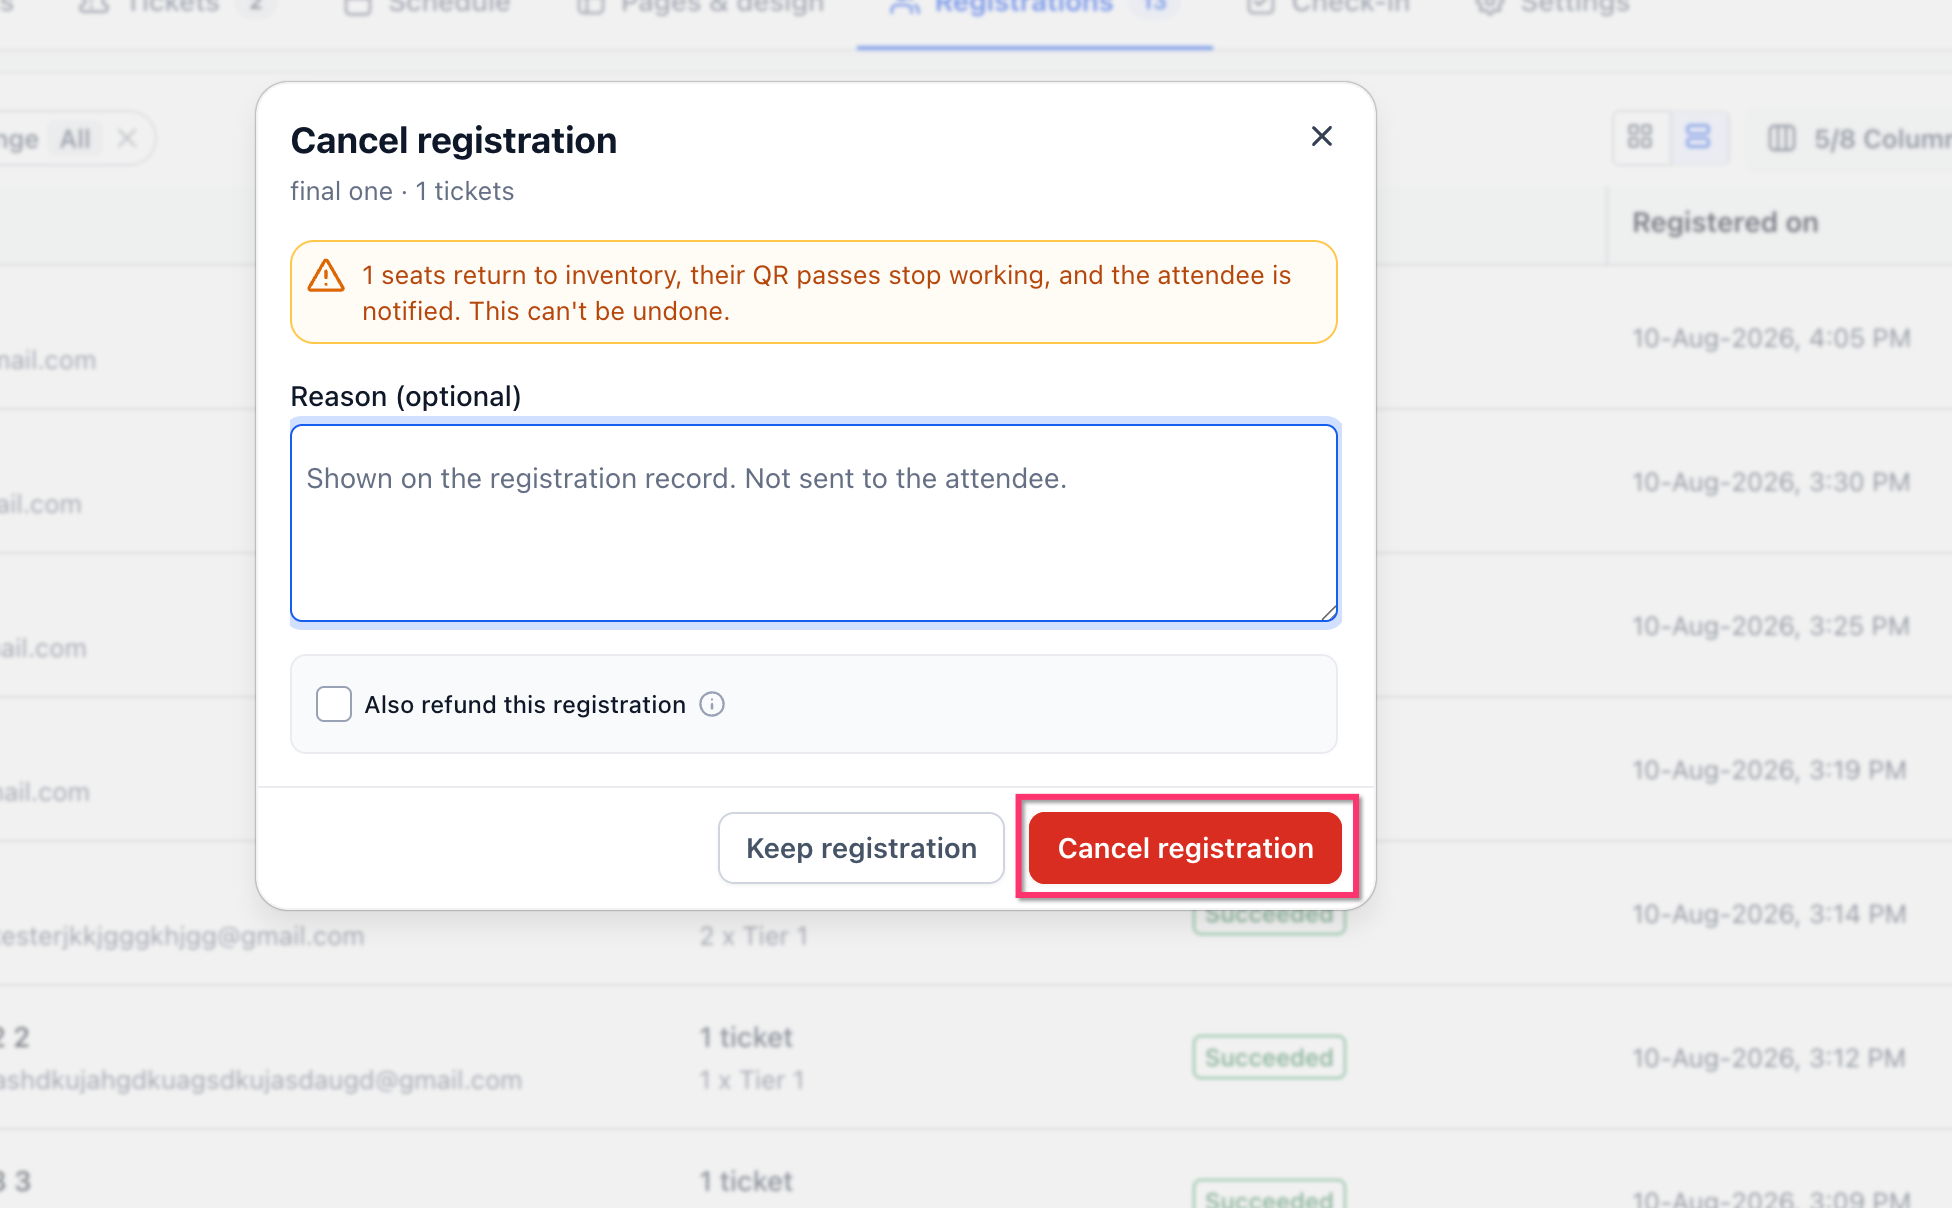
Canceling a registration affects the event registration itself. According to the cancellation warning shown in HighLevel:
ticket seats return to inventory,
QR passes stop working,
the attendee is notified,
the cancellation cannot be undone.
You can also choose to perform both actions together.
Initiating a Refund or Cancellation
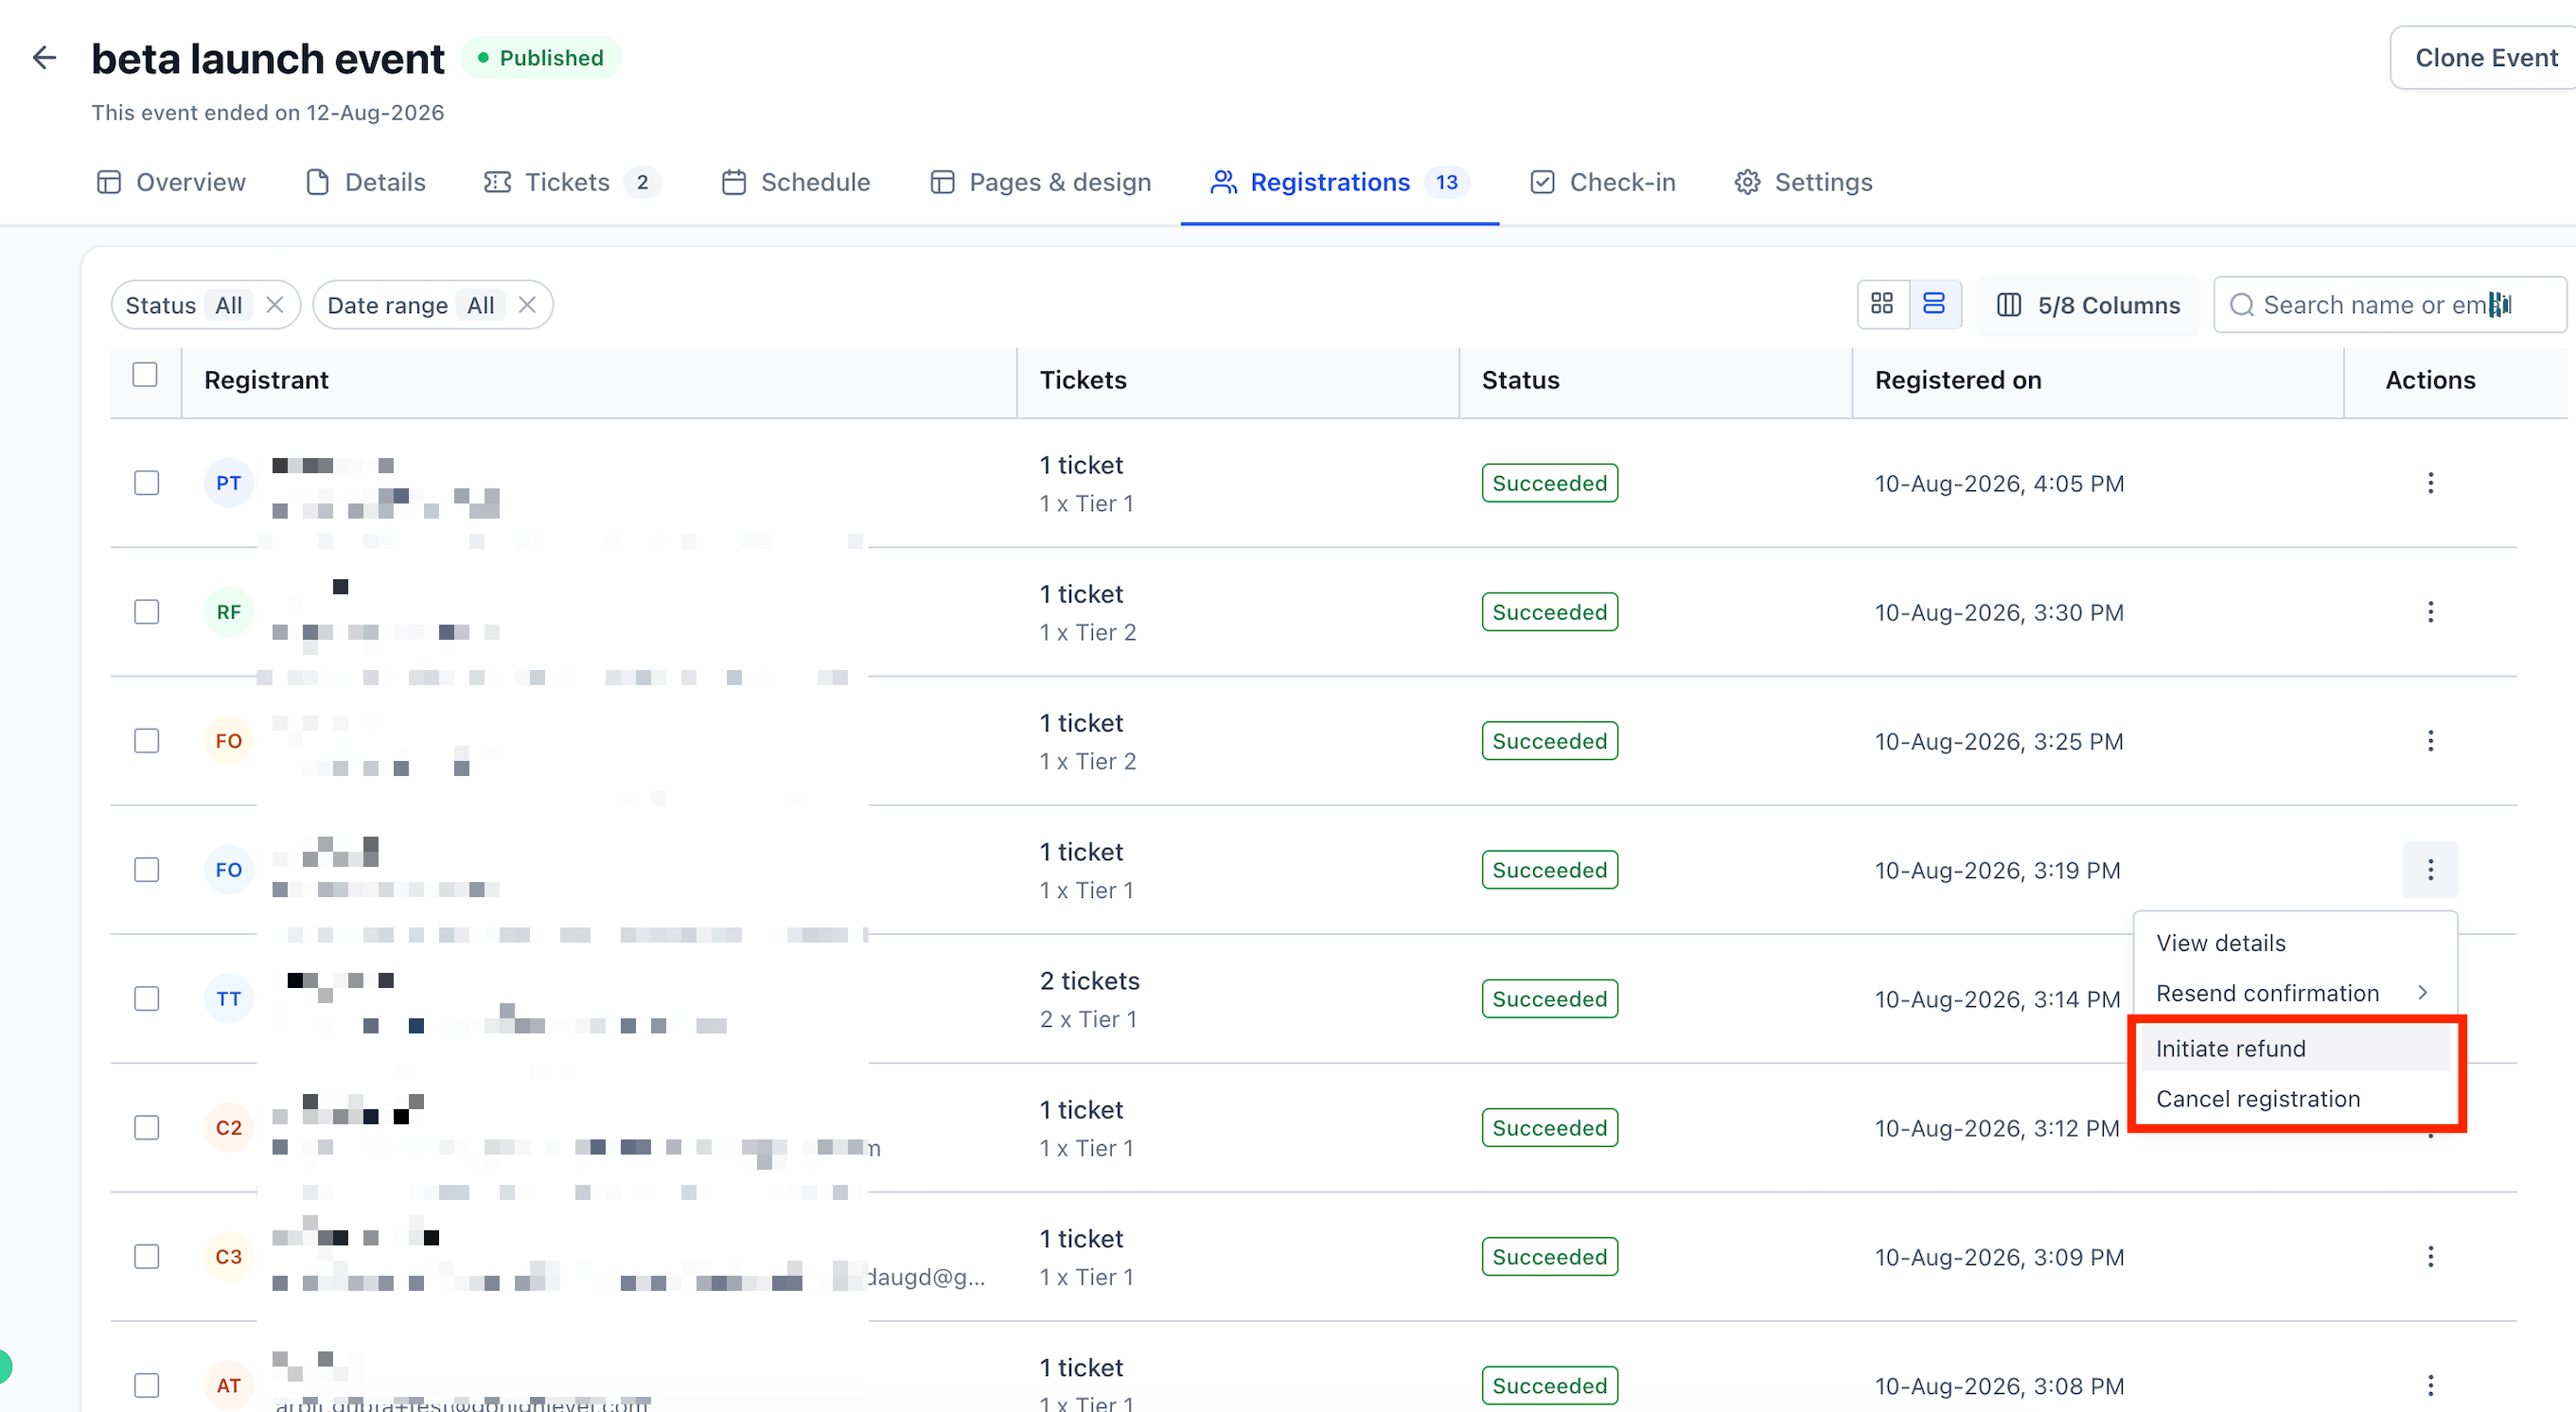
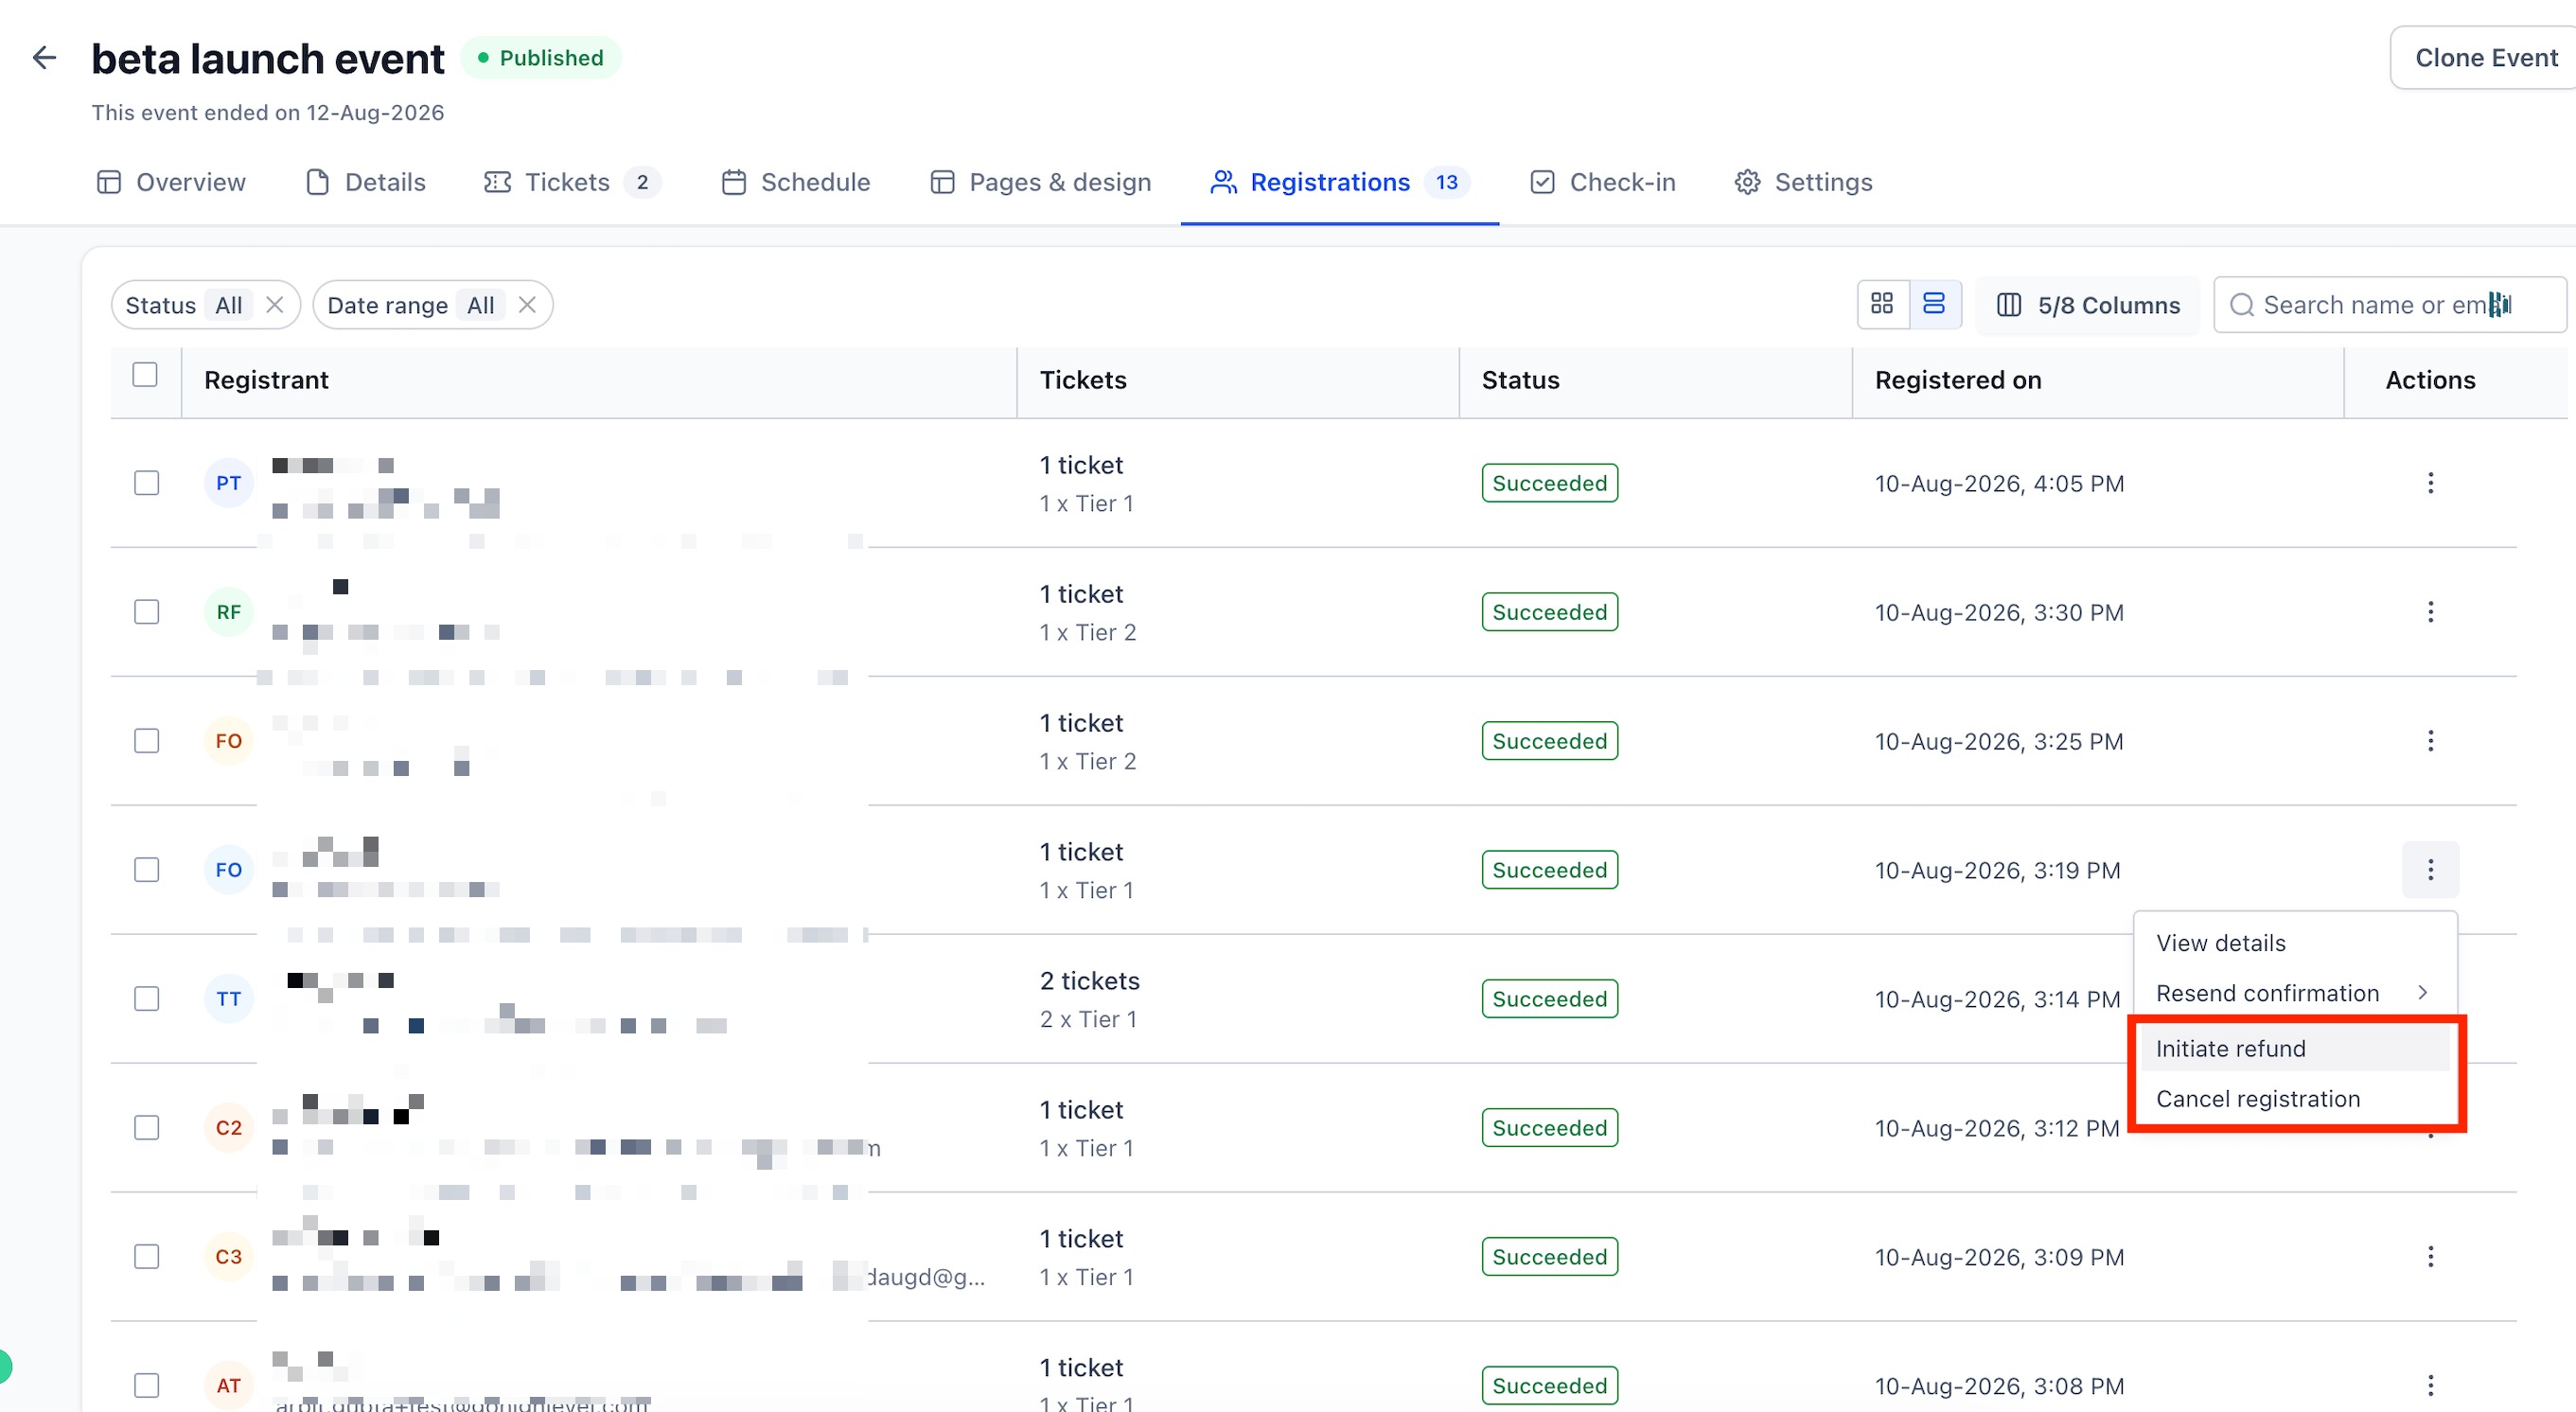
Refund and cancellation actions are available directly from the event’s Registrations tab. This keeps attendee management in the same place where you already review registrations and payment status.
From the attendee Actions menu, you can choose:
Initiate refund
Cancel registration
Full and Partial Refunds
HighLevel supports both full and partial refunds for eligible event payments. This gives you flexibility when an attendee should receive only part of the amount back.
A full refund returns the full refundable amount.
A partial refund returns less than the full amount.
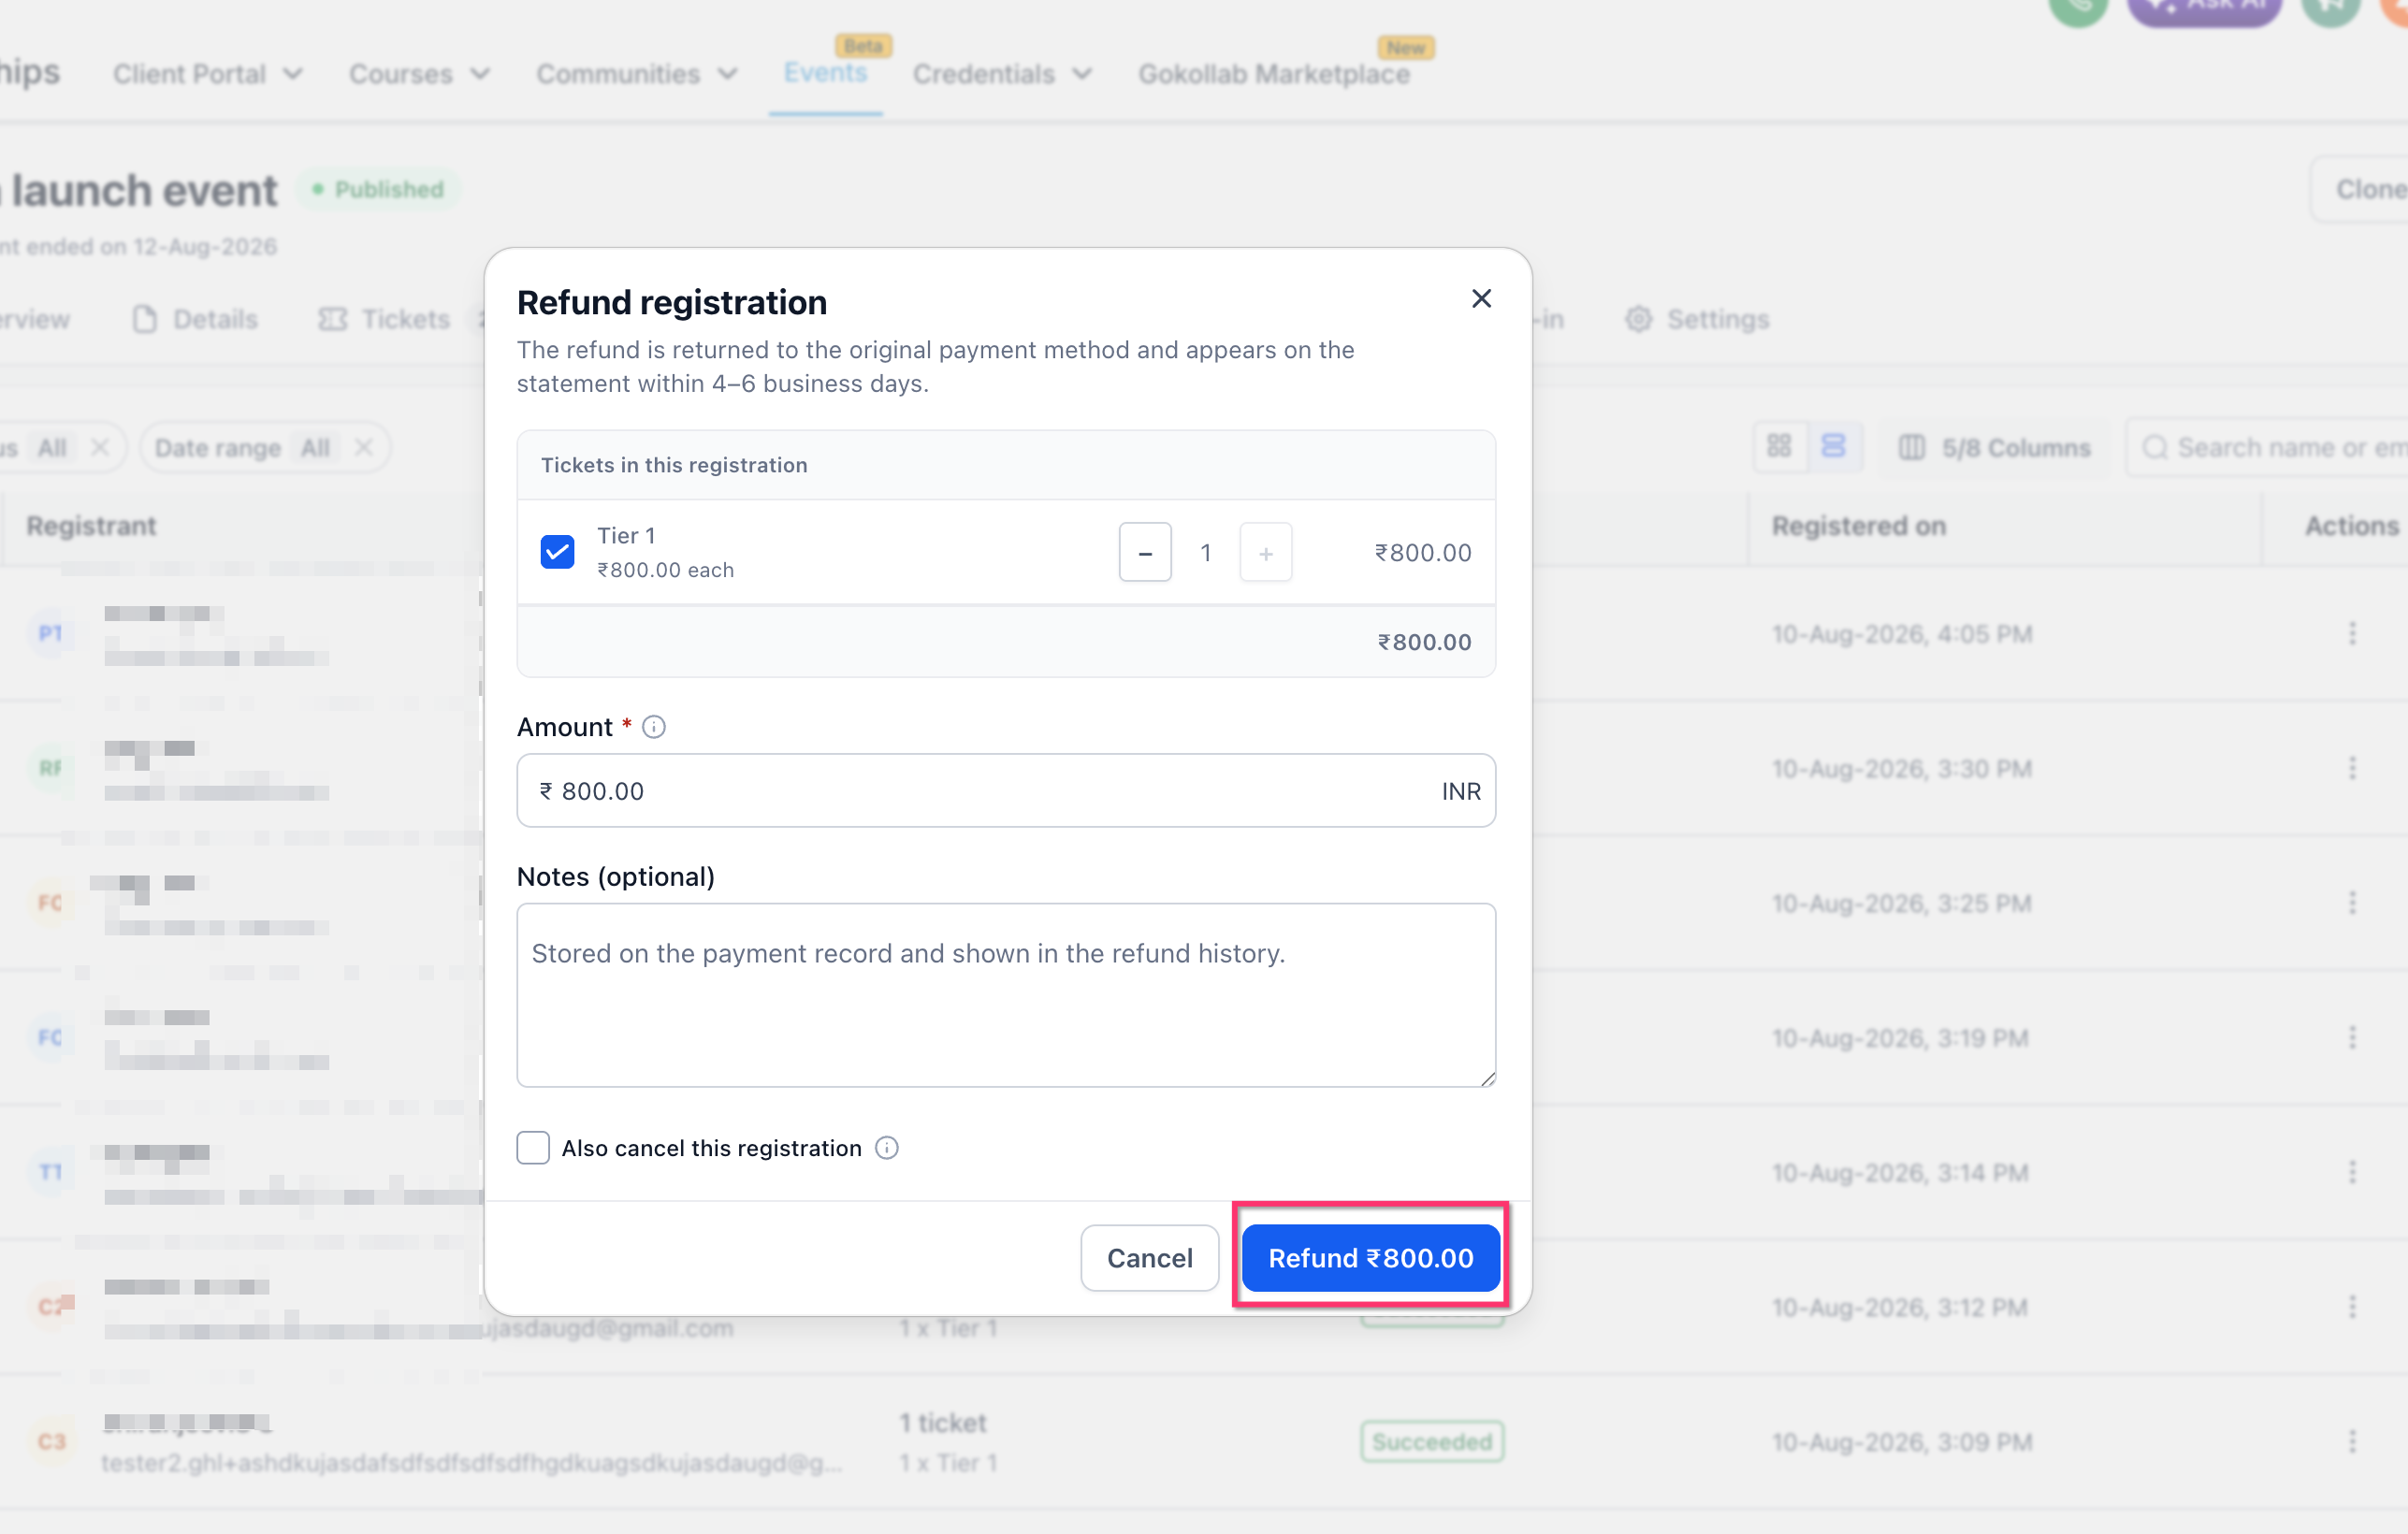
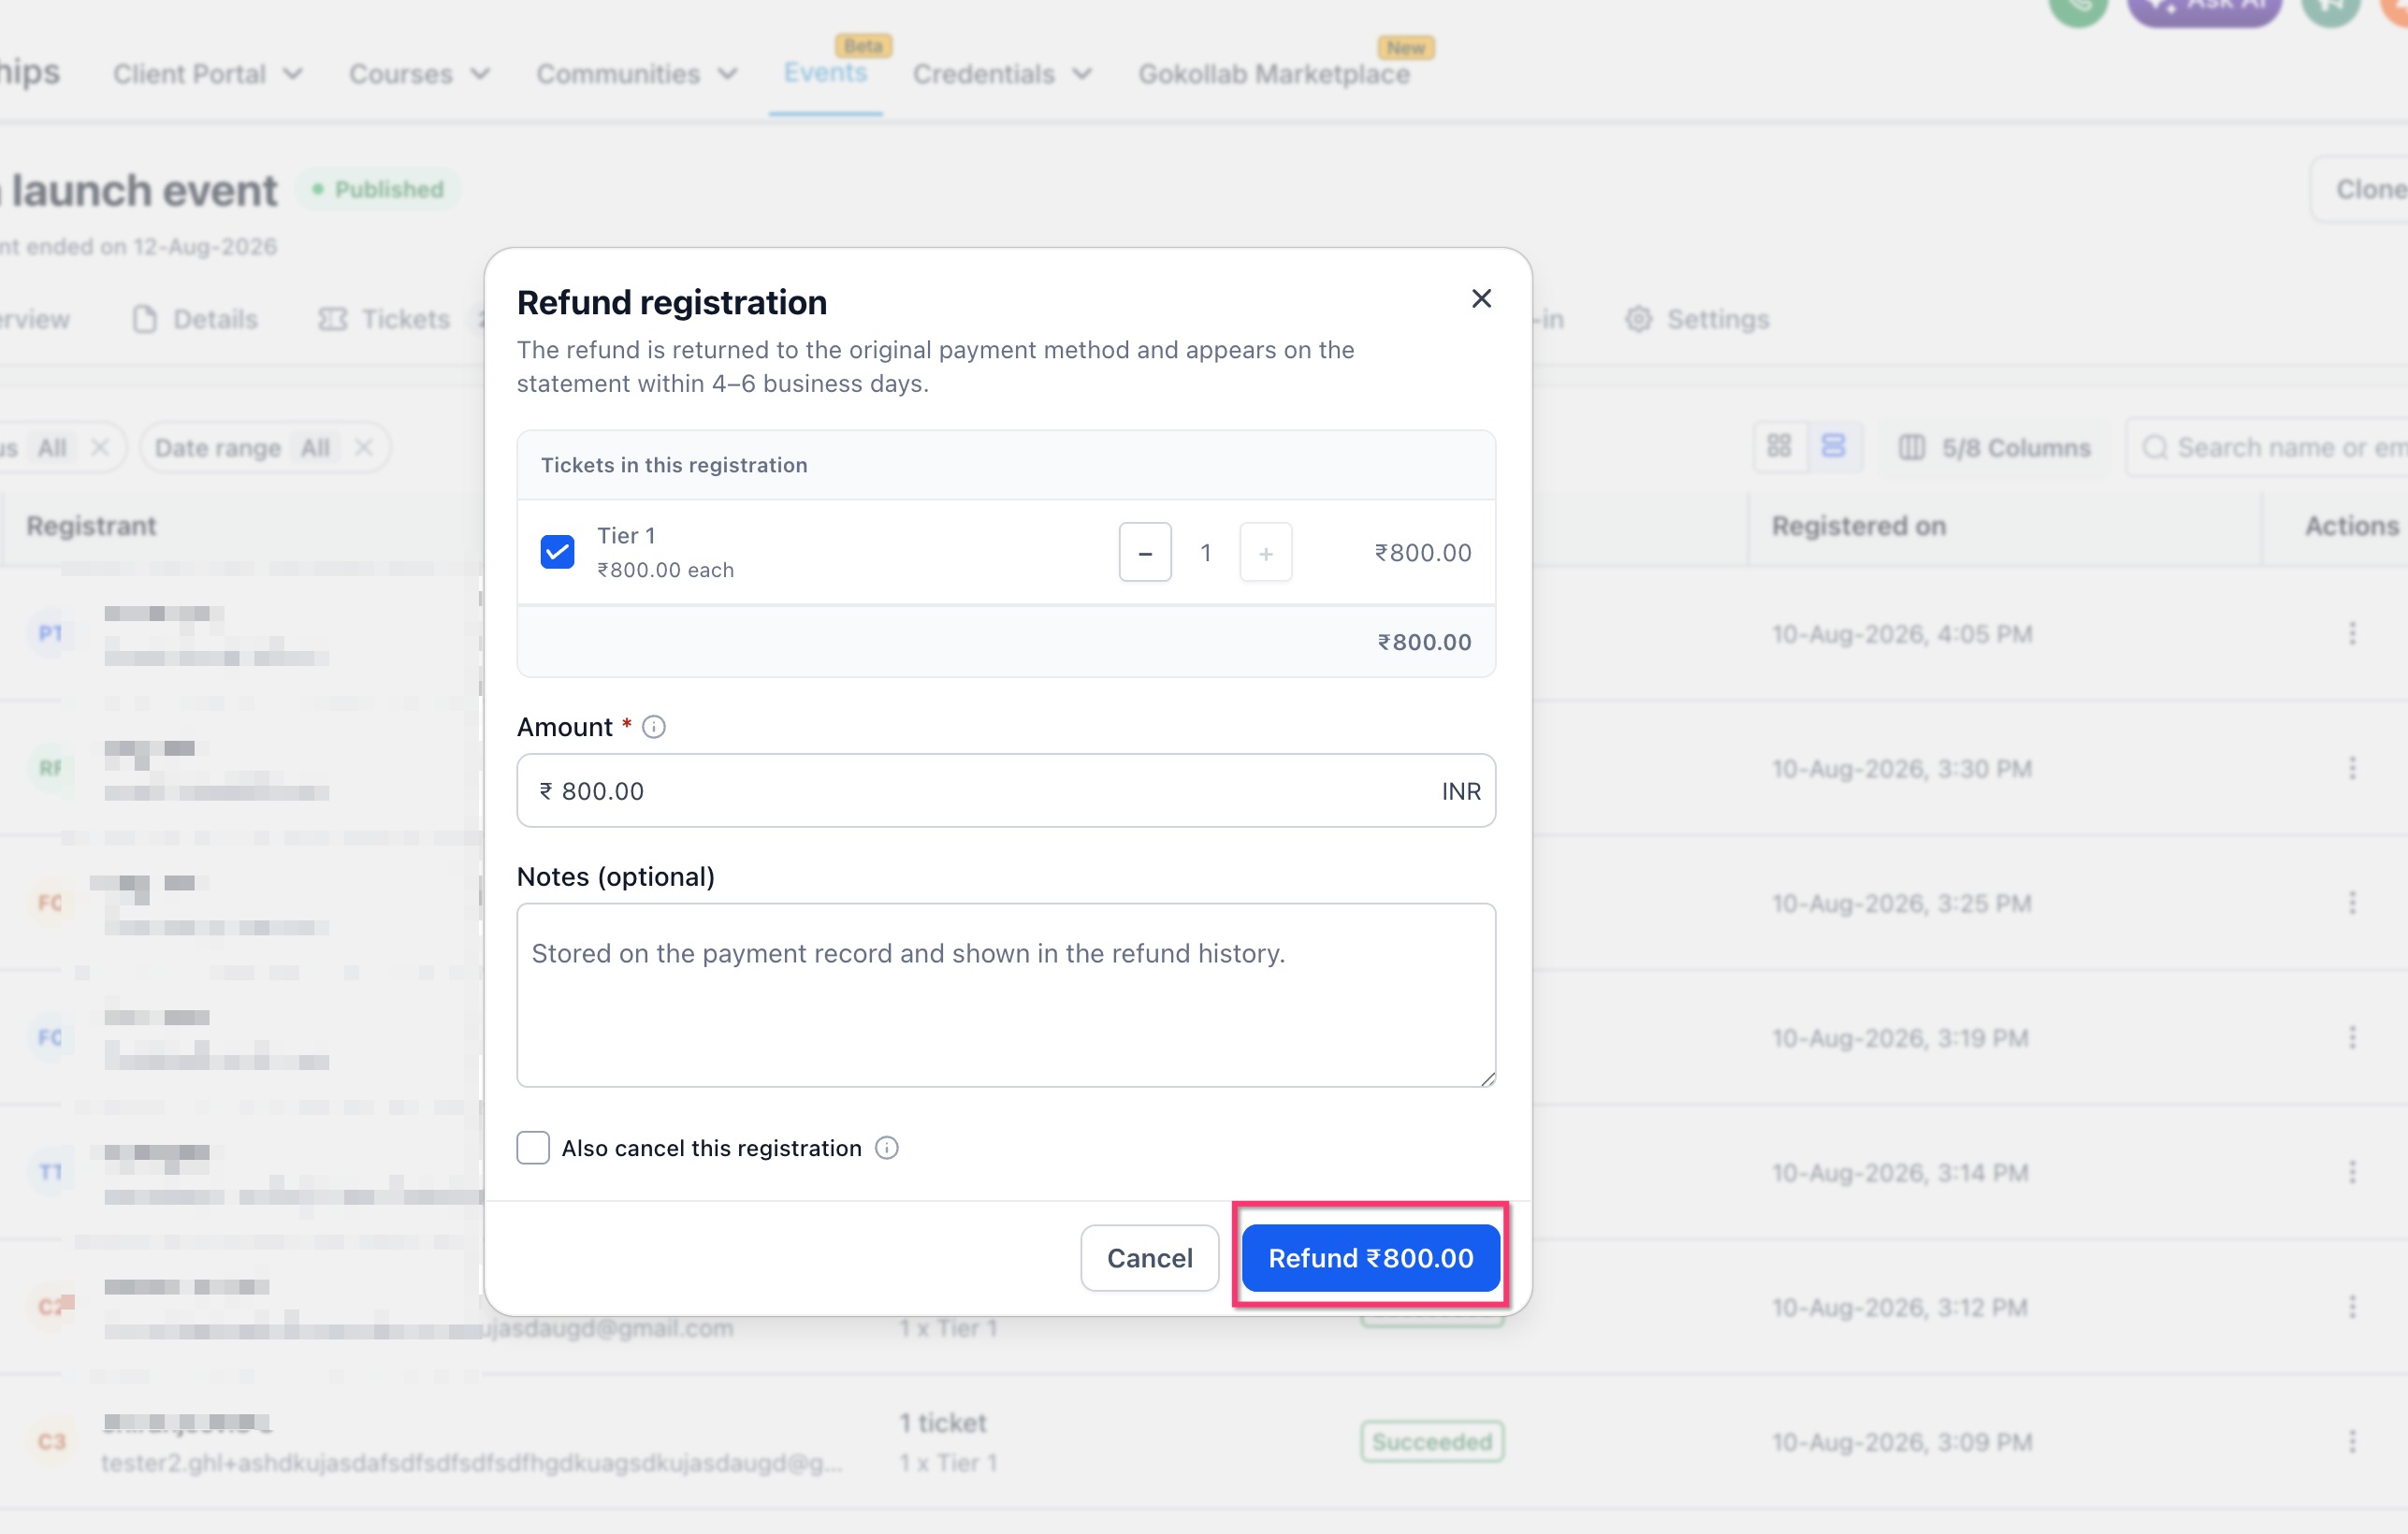
When you open the Refund registration window, you can:
select the applicable ticket,
adjust the amount,
add optional notes,
choose whether to also cancel the registration.
Refund notes are stored on the payment record and appear in refund history.
Refunding Without Canceling the Registration
Refunding without canceling is useful when you want to return money but still allow the attendee to remain registered. Because payment status and registration status are separate, a refunded attendee can remain active unless the registration is also canceled.
To refund without canceling:
Open the attendee Actions menu.
Select Initiate refund.
Choose the ticket or tickets to refund.
Enter the refund amount.
Add optional notes if needed.
Leave Also cancel this registration unchecked.
Click the refund button.
The refund is returned to the original payment method according to the connected payment processor’s timing.
The refund dialog may show an estimated arrival window, such as 4–6 business days, but actual timing can vary by provider.
Refunding and Canceling at the Same Time
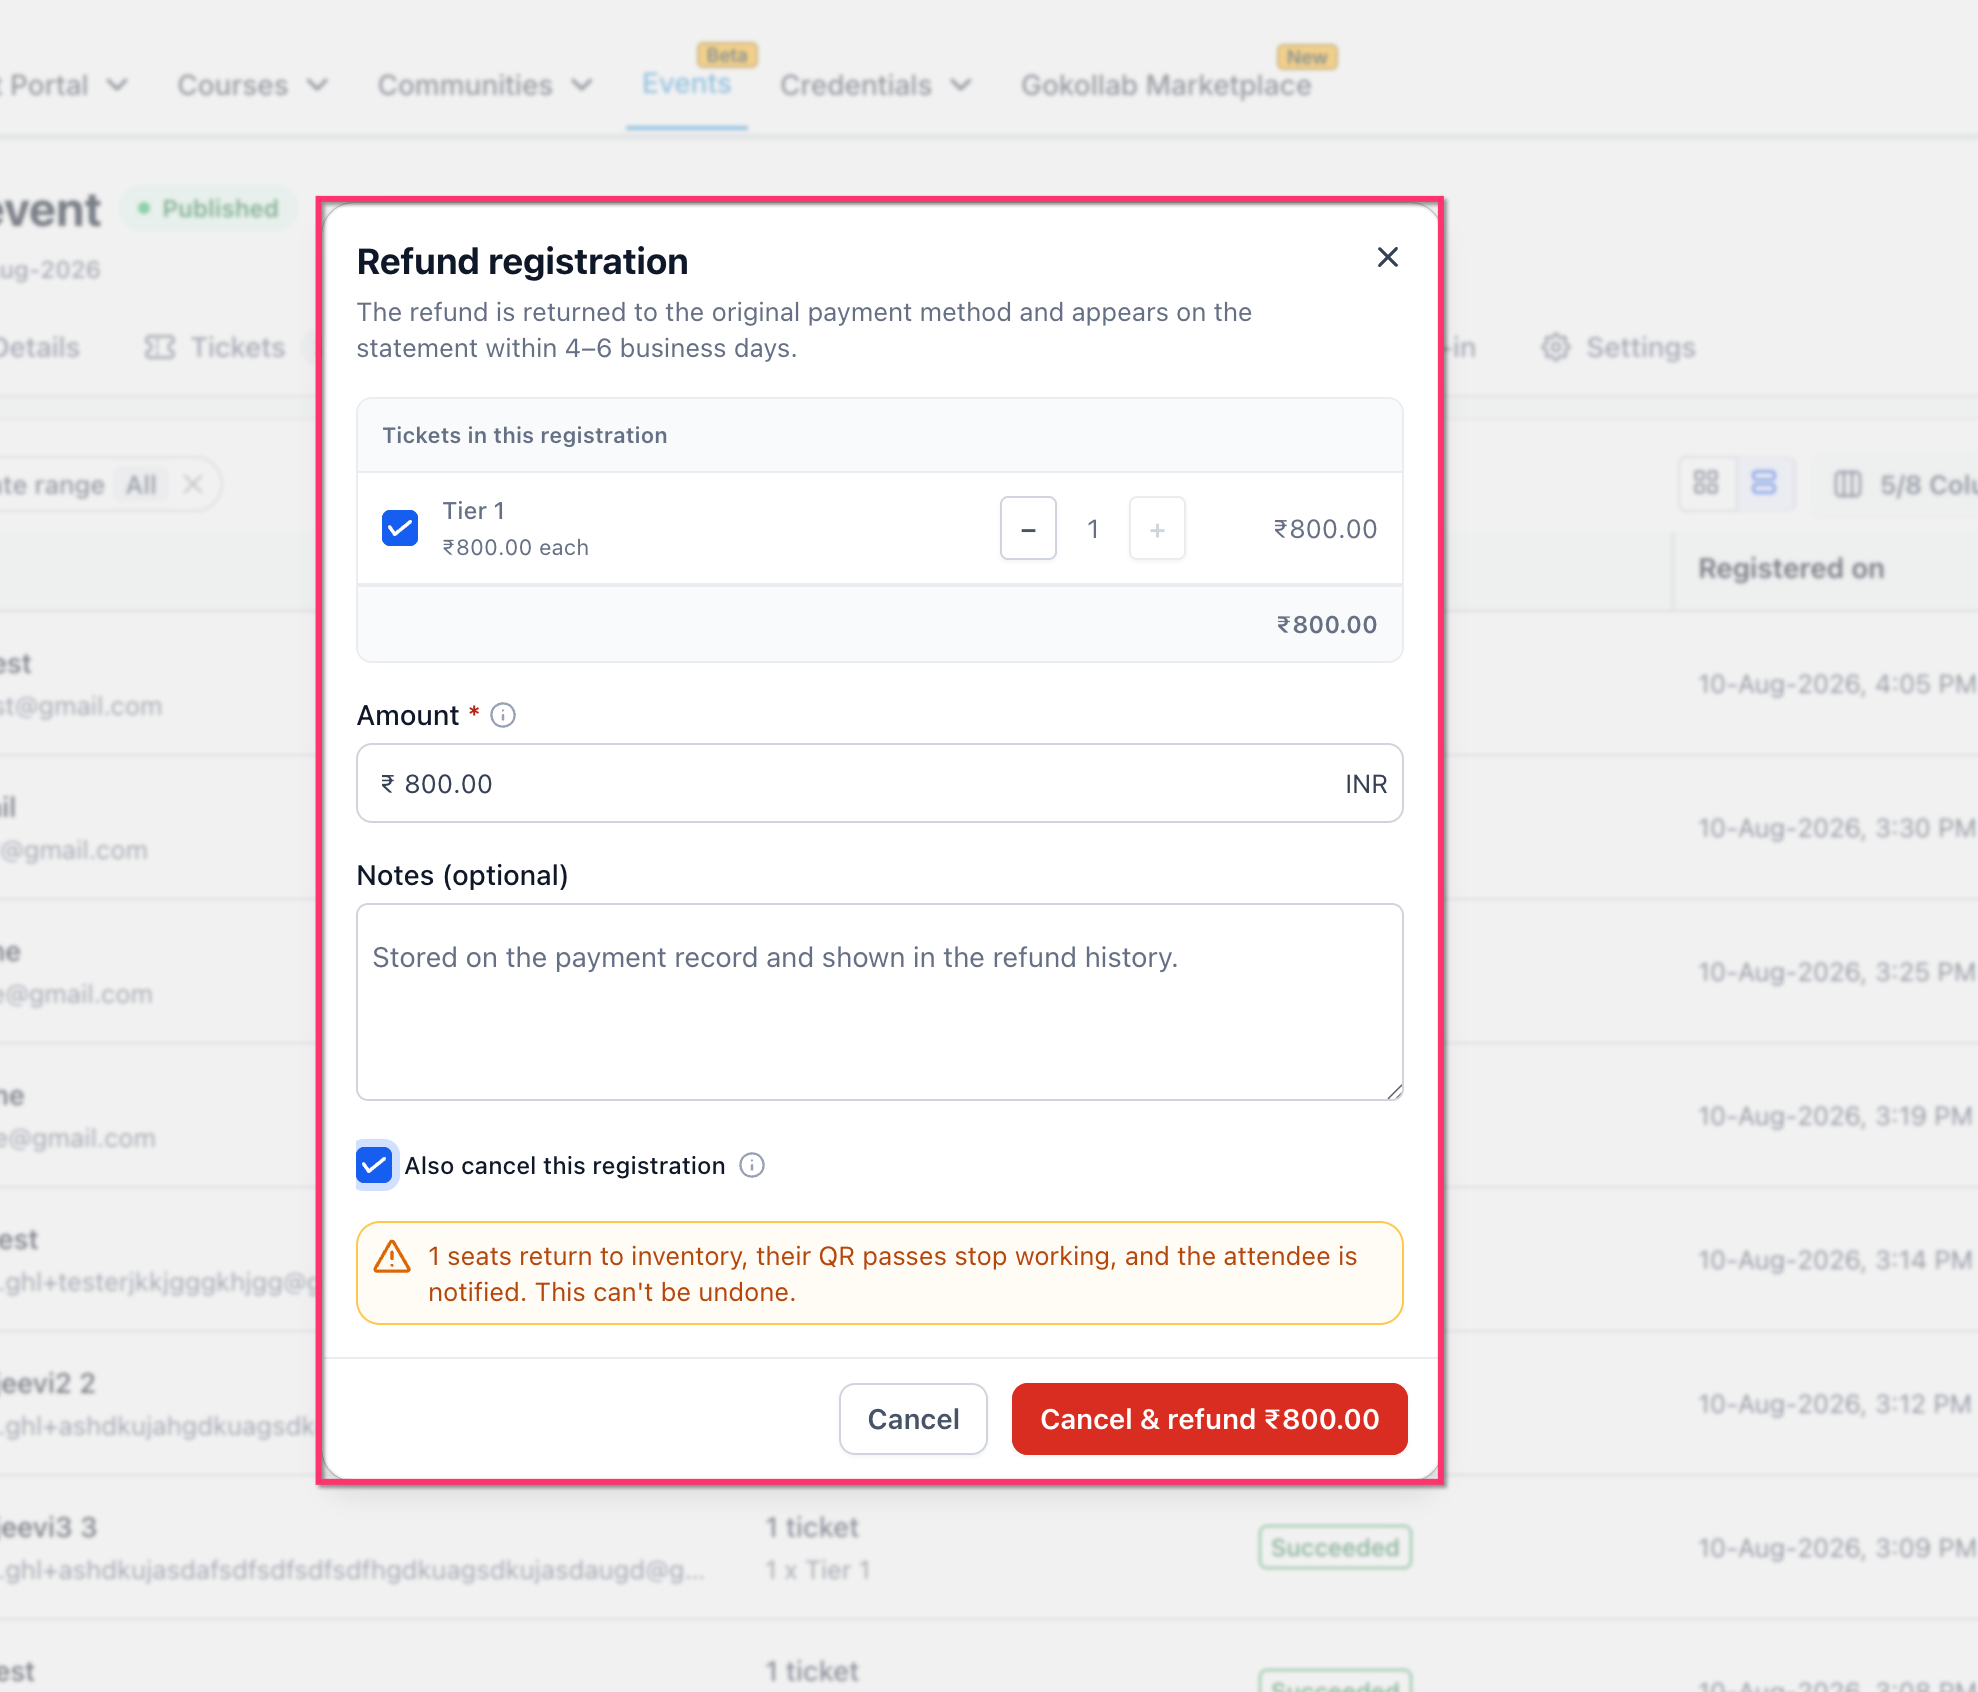
Refunding and canceling together is useful when the attendee should receive their money back and no longer remain registered for the event. HighLevel combines both actions into one confirmation flow.
To refund and cancel:
Select Initiate refund from the attendee’s Actions menu.
Enter the refund amount.
Select Also cancel this registration.
Review the cancellation warning.
Confirm the combined action.
When cancellation is included:
seats return to event inventory,
QR passes stop working,
the attendee is notified,
the cancellation cannot be undone.
Canceling a Registration Without Issuing a Refund
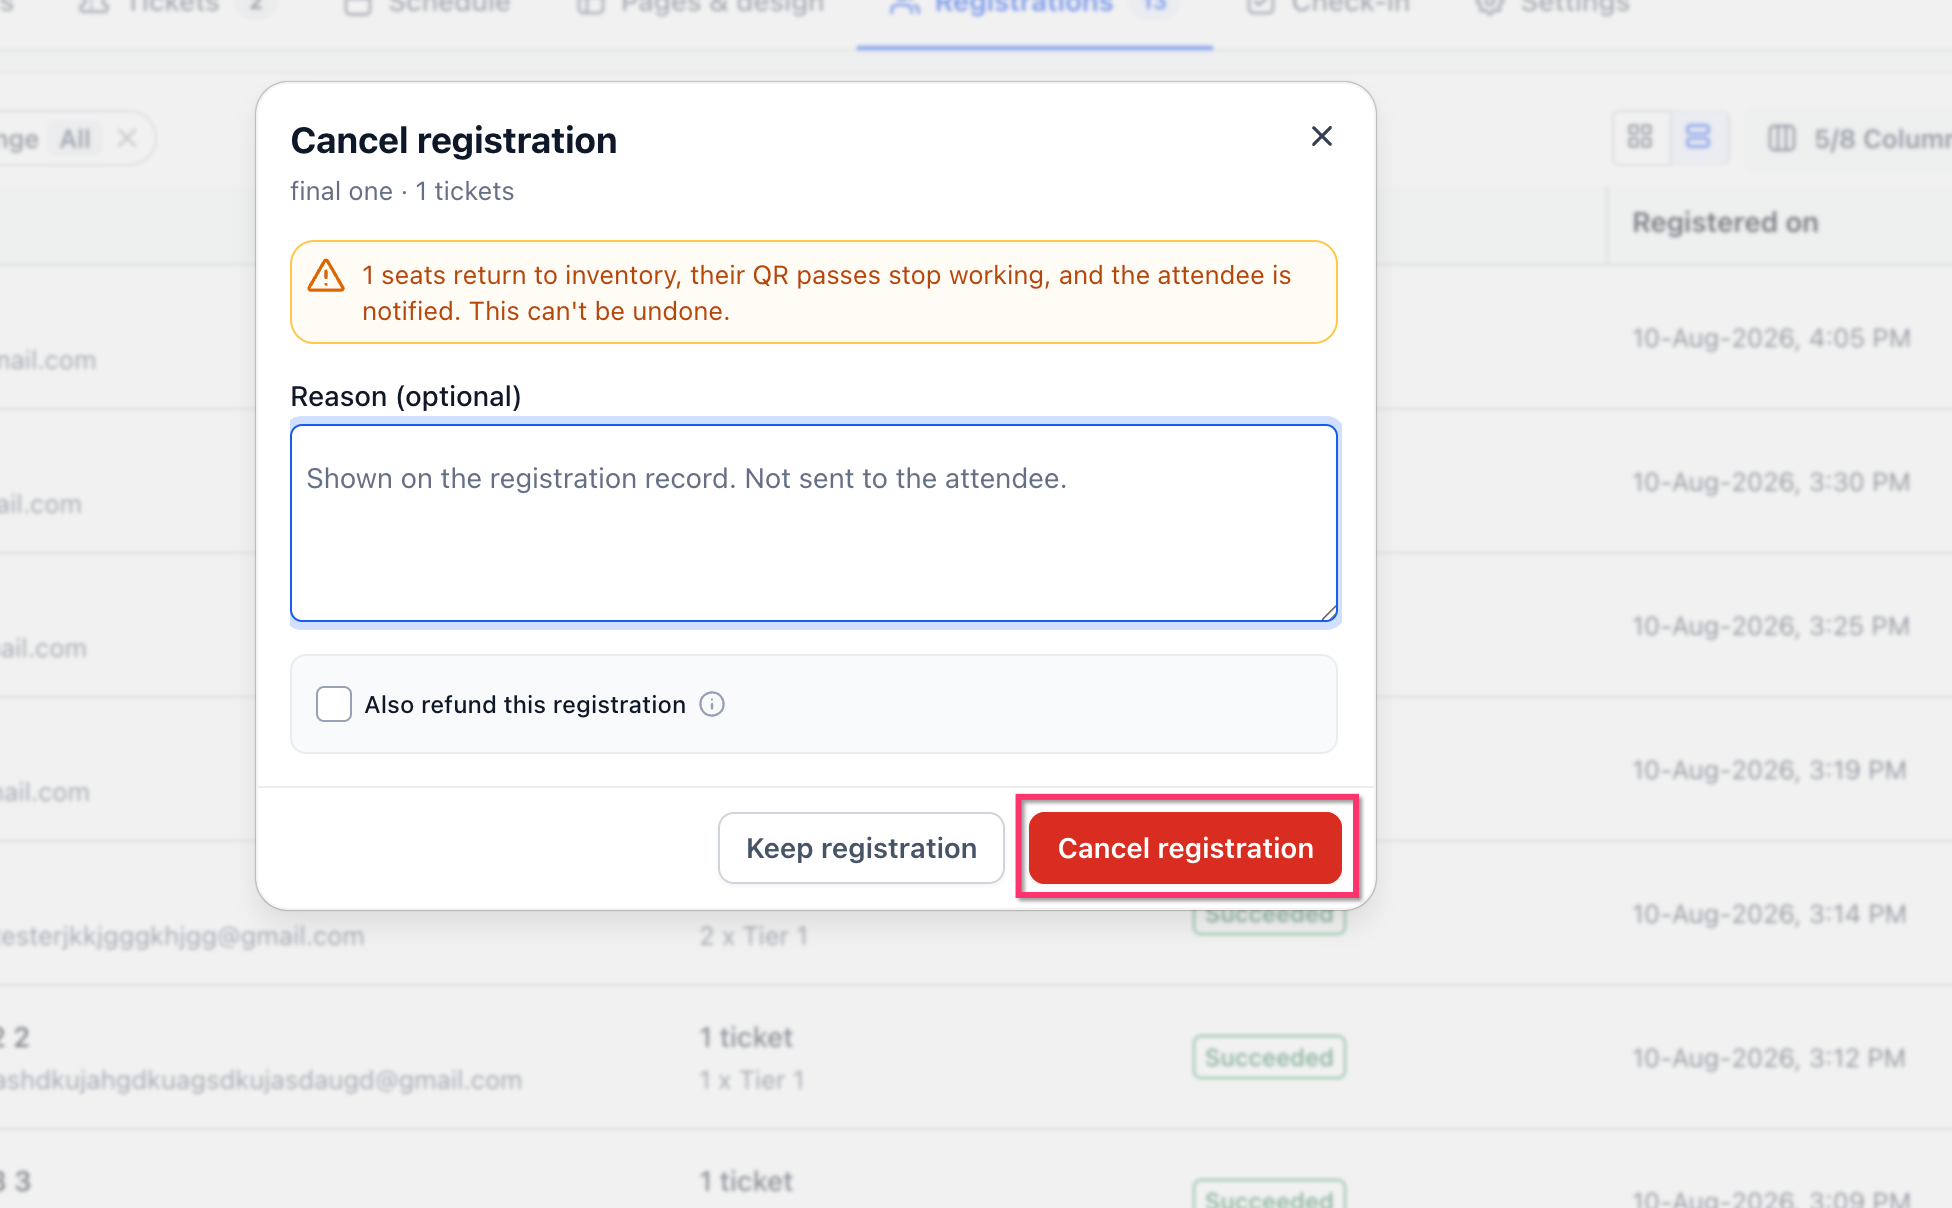
Cancellation can be handled separately when you need to remove an attendee from the event without returning payment. This keeps registration status separate from payment status.
To cancel without refunding:
Open the attendee Actions menu.
Select Cancel registration.
Review the cancellation warning.
Enter an optional reason.
Leave Also refund this registration unchecked.
Click Cancel registration.
The optional reason is stored on the registration record and is not sent to the attendee.
What Happens When a Registration is Canceled?
Cancellation changes the attendee’s event access rather than only their payment. This makes it important to confirm the action before completing it.
When a registration is canceled:
the ticket seat returns to inventory,
the attendee’s QR passes stop working,
the attendee is notified,
the cancellation cannot be undone.
If you only need to return money and still want the attendee to remain registered, use the refund workflow without selecting the cancellation option.
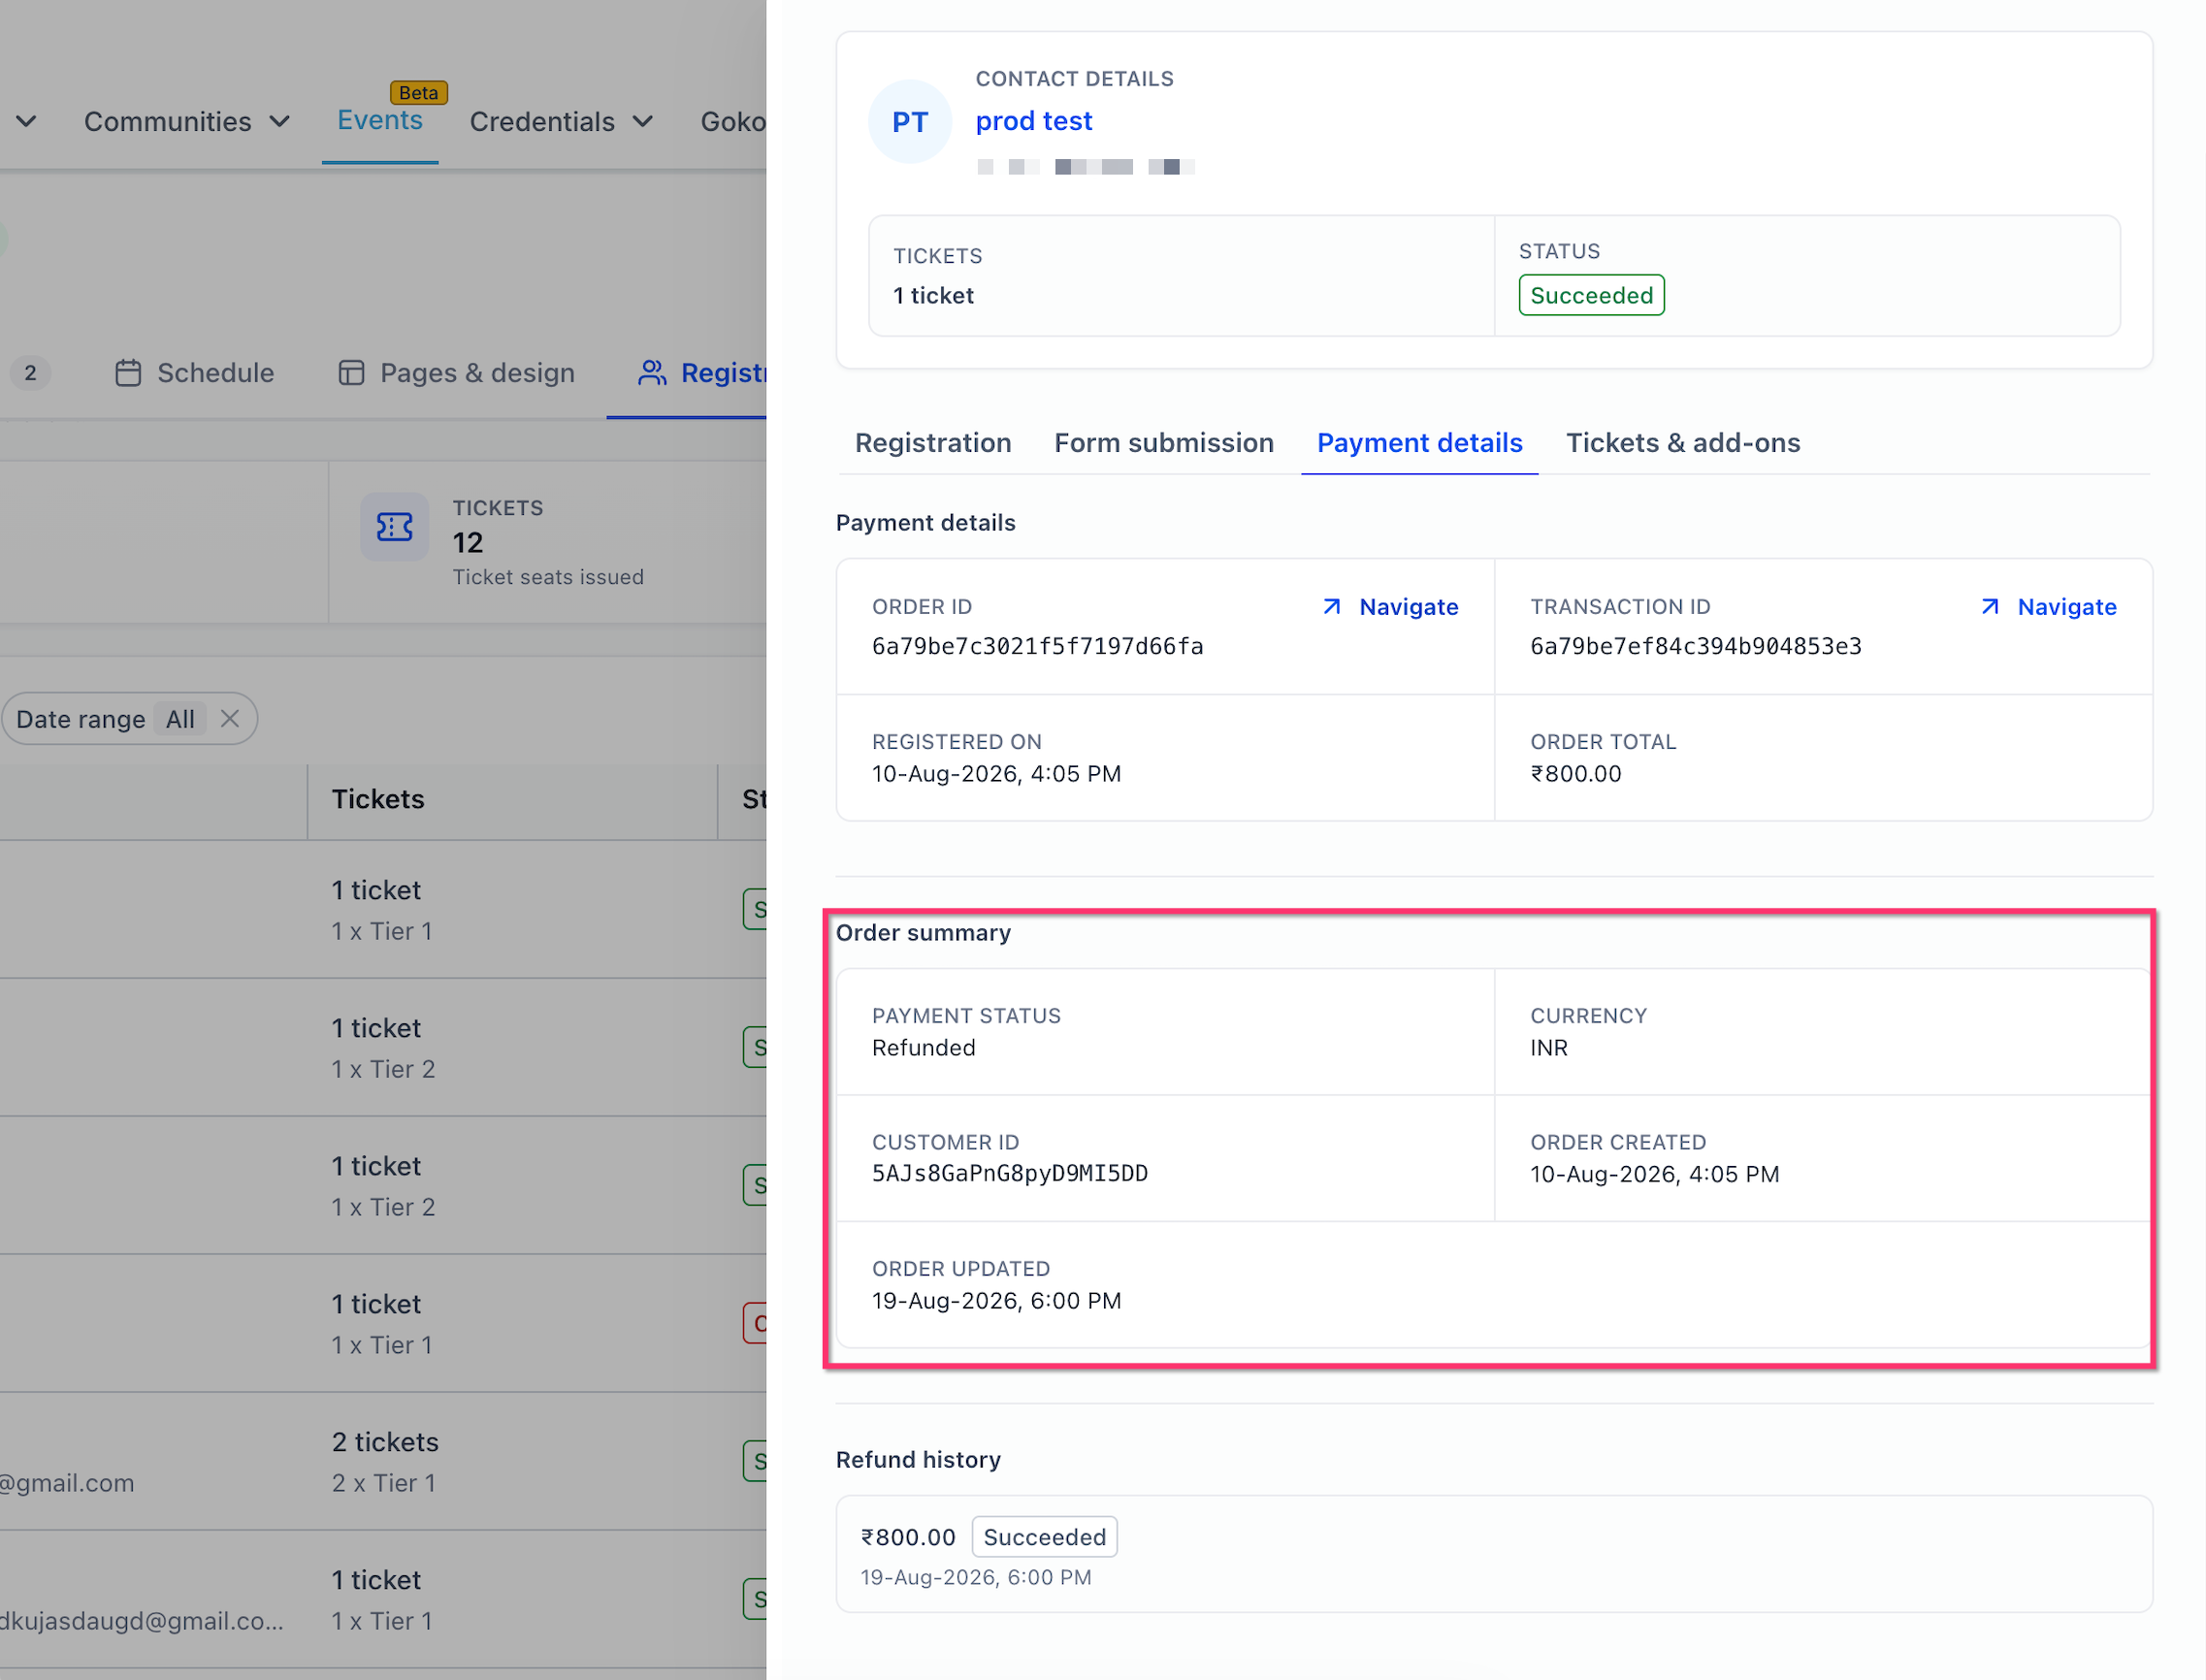
Viewing Refund Status and Refund History
Refund visibility makes it easier to confirm whether a refund was processed and understand the payment history for the registration. You can review this information from the attendee details instead of searching through a separate payment screen.
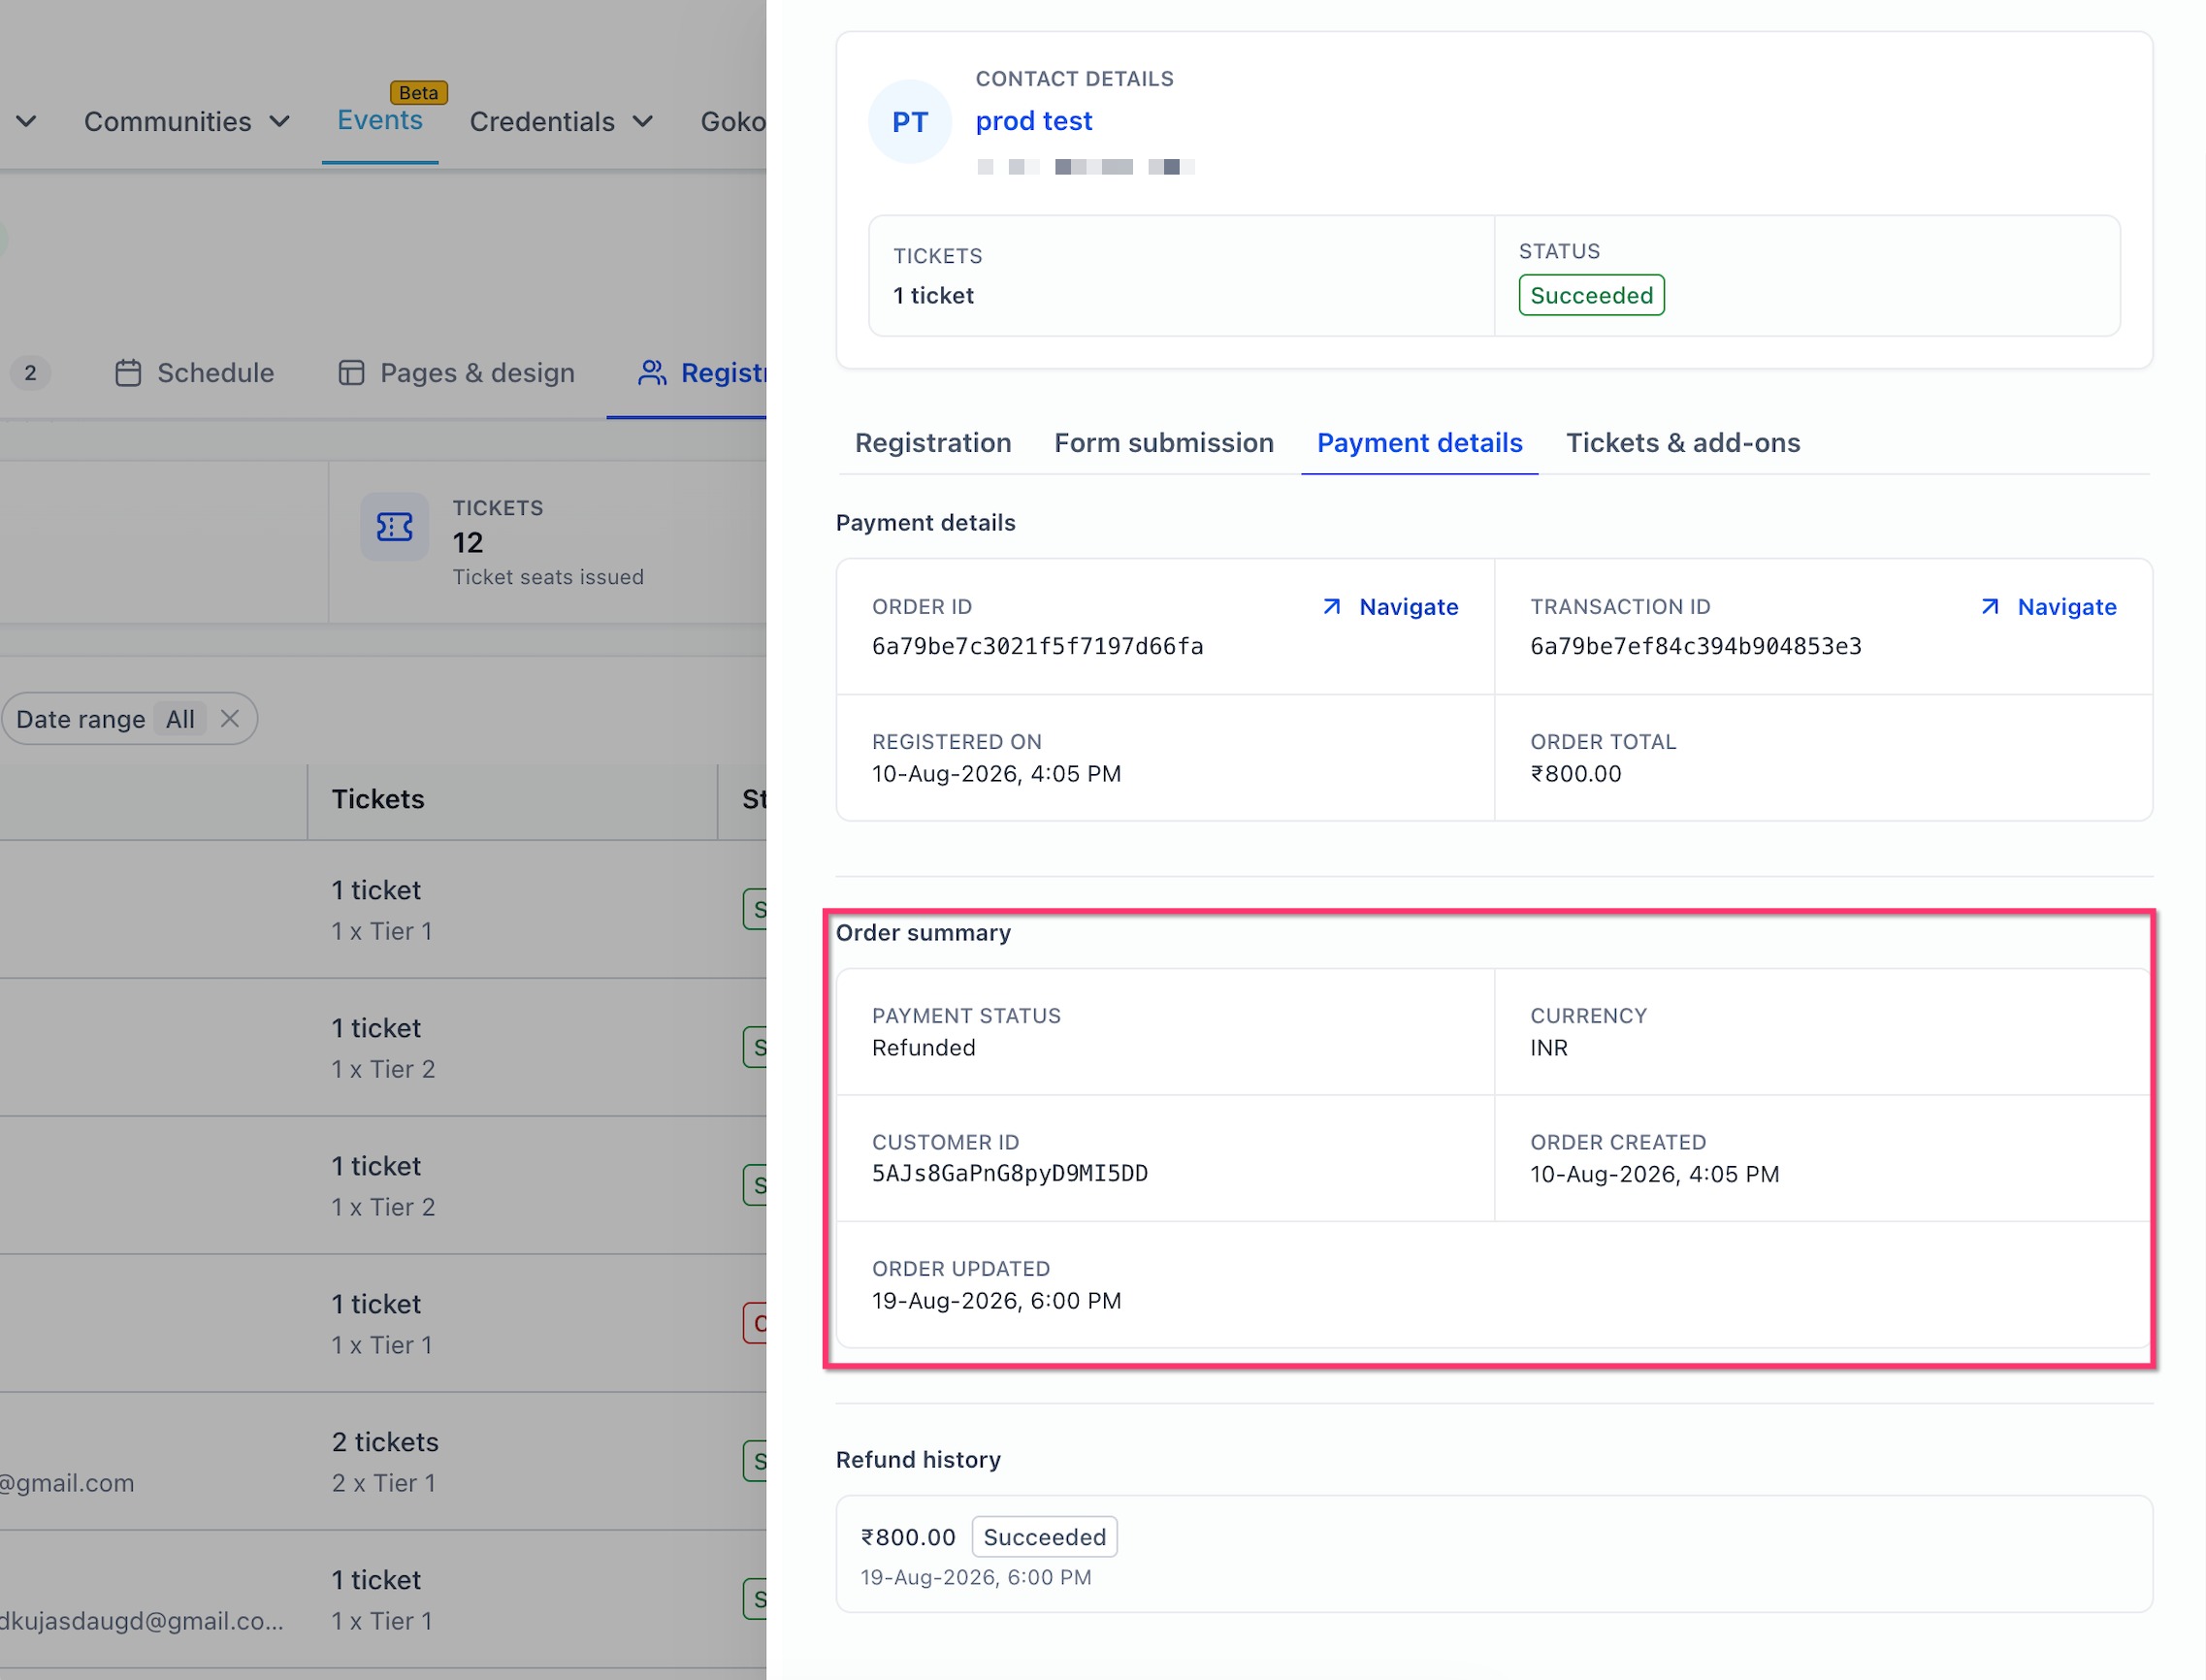
The Payment details area can show:
order details,
transaction details,
order total,
payment status,
refund history,
refund amount,
refund status,
refund date and time.
Accurate Event Revenue Reporting
Event revenue now reflects what attendees actually paid, including discounts. This gives organizers a more reliable view of event performance and avoids overstating revenue when discounted tickets are sold.
Previously, revenue could be calculated using:
ticket price × number of sales
That could overstate total earnings when discounts were applied.
The updated calculation reflects the actual sale amount after discounts, giving you a more accurate picture of event revenue.
QR Code Check-In by Payment Status
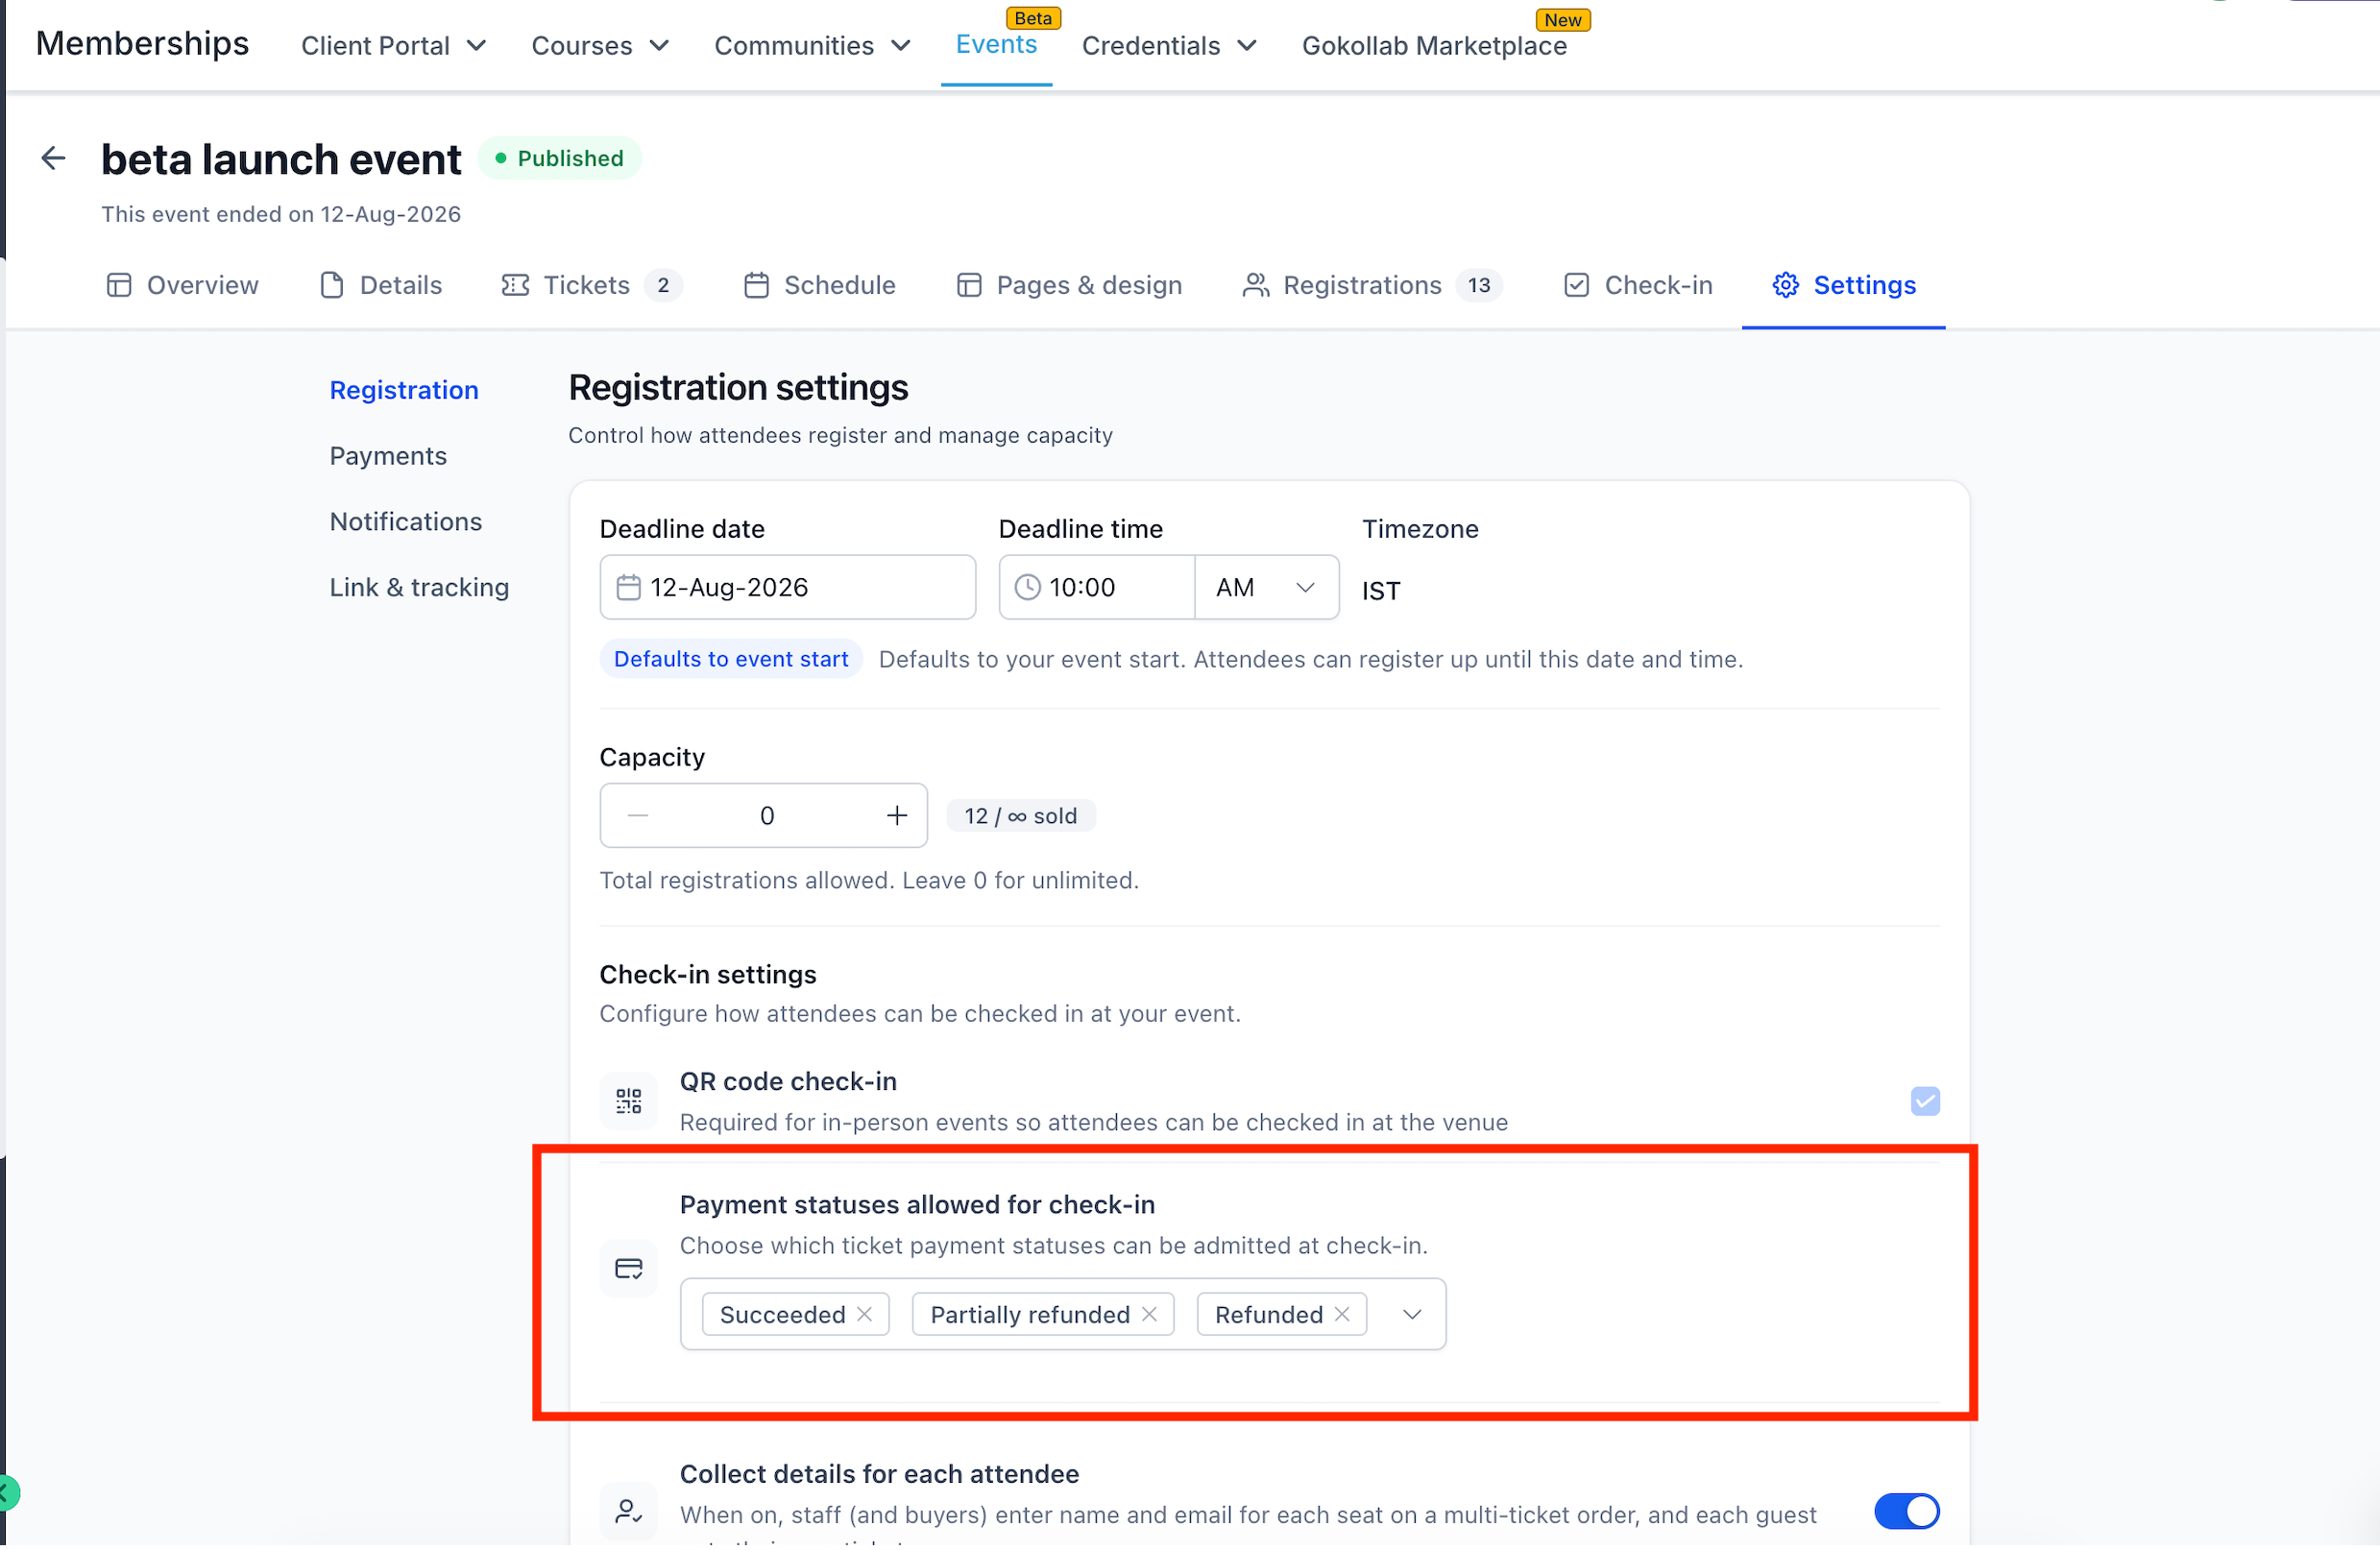
Payment-status check-in controls let you decide which attendees are allowed to check in by QR code. This is useful when refunded or partially refunded attendees should still be admitted in some cases.
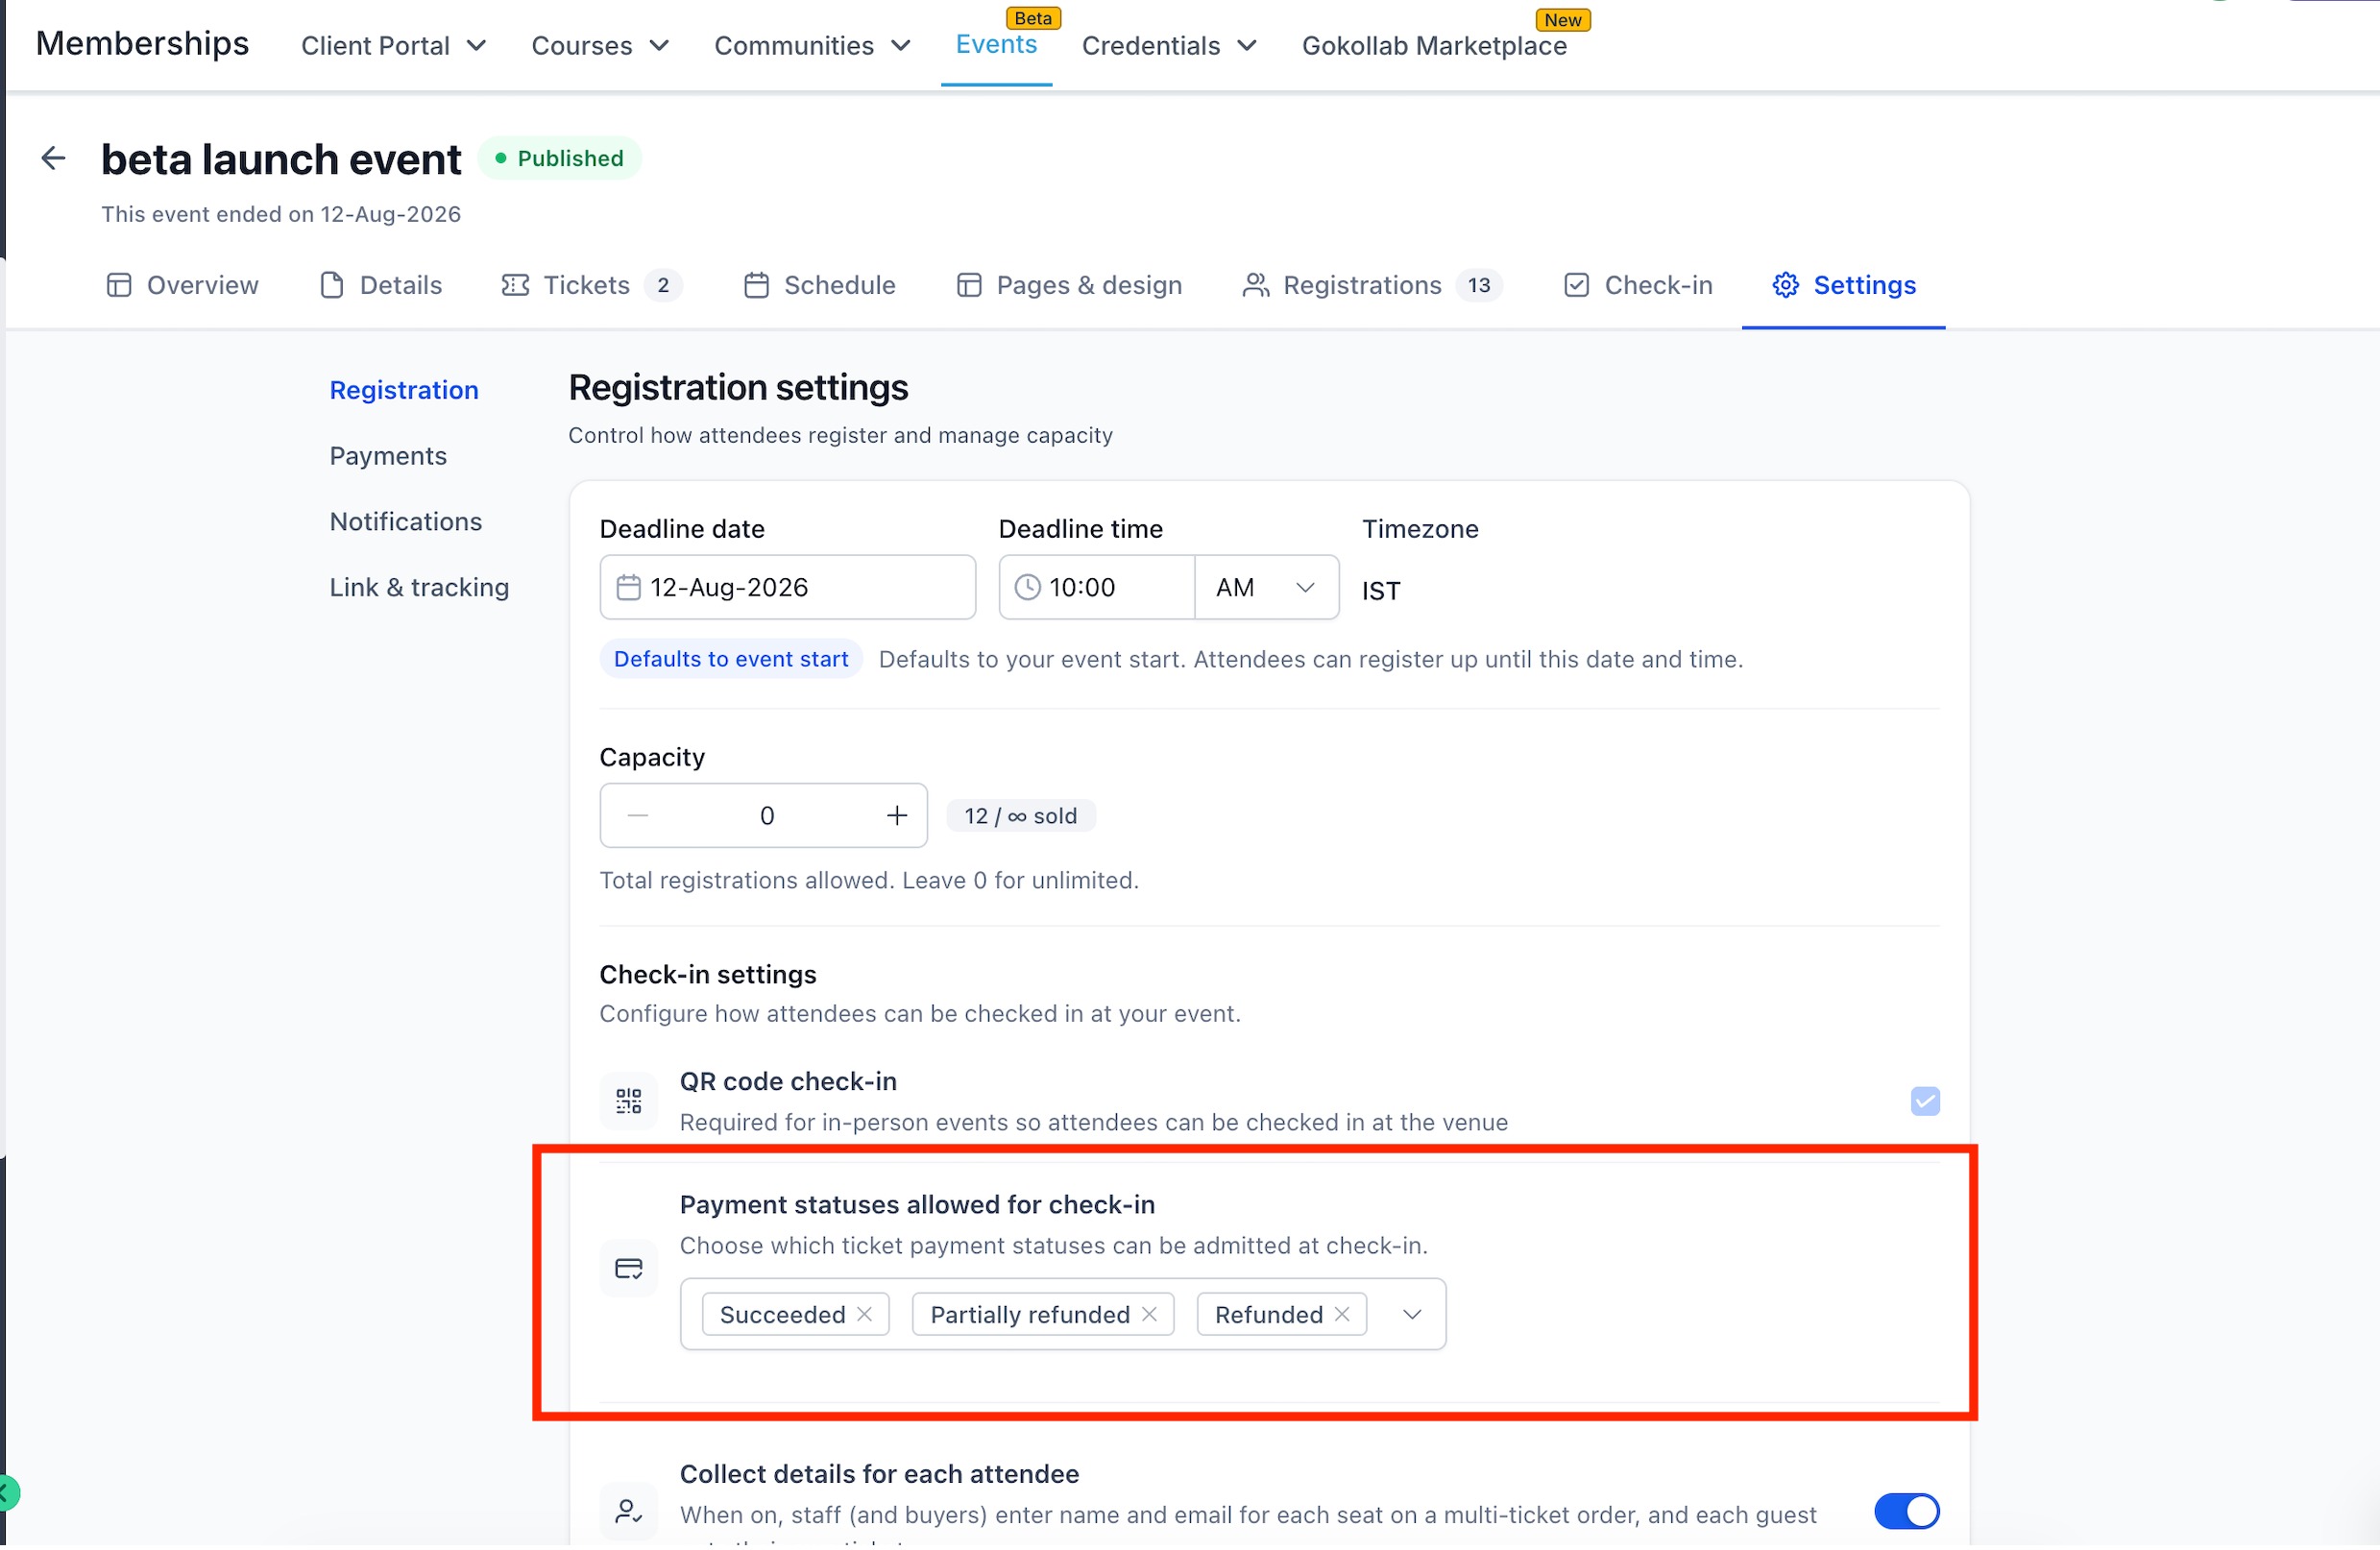
In Registration settings, use Payment statuses allowed for check-in to choose which payment statuses can enter through QR code check-in.
The available options shown in HighLevel include:
Succeeded
Partially refunded
Refunded
For example, if you select only Succeeded, attendees with refunded payments will not be allowed to check in by QR code.
If you also select Refunded or Partially refunded, those registrations can remain eligible for check-in based on the payment status settings.
How To Manage Event Refunds and Cancellations
Using the registration Actions menu keeps refund and cancellation tasks in one place. Choose the workflow based on whether you need to return money, remove the registration, or do both.
Step 1: Open Event Registrations
Go to Memberships > Events.
Open the event.
Select the Registrations tab.
Find the attendee you want to manage.
Step 2: Open the Actions Menu
Click the attendee’s Actions menu.
Choose either:
Initiate refund, or
Cancel registration.
Step 3: Issue a Refund
Select Initiate refund.
Choose the ticket or tickets.
Enter the refund amount.
Add optional notes.
Leave Also cancel this registration unchecked if the attendee should remain registered.
Click the refund button.
Step 4: Issue a Partial Refund
Open Initiate refund.
Select the applicable ticket.
Enter an amount lower than the full refundable amount.
Add optional notes if needed.
Confirm the refund.
The remaining registration stays active unless you also choose to cancel it.
Step 5: Refund and Cancel Together
Open Initiate refund.
Enter the refund amount.
Select Also cancel this registration.
Review the warning.
Confirm the action.
Step 6: Cancel Without a Refund
Open the attendee Actions menu.
Select Cancel registration.
Enter an optional reason.
Leave Also refund this registration unchecked.
Confirm the cancellation.
Step 7: Verify the Refund
Open the attendee registration details.
Go to Payment details.
Review Payment status.
Check the Refund history section for the refund amount and status.
Step 8: Configure QR Check-In Eligibility
Open the event.
Go to Settings.
Select Registration.
Find Payment statuses allowed for check-in.
Select the payment statuses that should be allowed to use QR code check-in.
Save your changes.
Frequently Asked Questions
Q: What is the difference between a refund and a cancellation?
A: A refund returns money to the attendee. A cancellation removes the active event registration.
Q: Can I refund an attendee without canceling their registration?
A: Yes. Leave Also cancel this registration unchecked when processing the refund.
Q: Can I cancel a registration without issuing a refund?
A: Yes. Use Cancel registration and leave Also refund this registration unchecked.
Q: Can I issue a partial refund?
A: Yes. Enter a refund amount lower than the full refundable amount.
Q: What happens to the ticket seat when I cancel a registration?
A: The seat returns to event inventory.
Q: What happens to the attendee’s QR pass after cancellation?
A: The QR pass stops working.
Q: Can I undo a canceled registration?
A: No. The cancellation warning states that the action cannot be undone.
Q: How long does a refund take?
A: Refund timing depends on the connected payment processor. The refund dialog may show an estimated timeframe, such as 4–6 business days.
Q: Can refunded attendees still check in?
A: Yes, if their payment status is included under Payment statuses allowed for check-in and the registration itself has not been canceled.
Q: Where can I see whether a refund succeeded?
A: Open the attendee’s Payment details and review the payment status and refund history.
Q: Does event revenue account for discounts?
A: Yes. The updated revenue calculation reflects the actual amount paid after discounts.
Related Articles
Was this article helpful?
That’s Great!
Thank you for your feedback
Sorry! We couldn't be helpful
Thank you for your feedback
Feedback sent
We appreciate your effort and will try to fix the article