Conversation AI Channel Management lets you decide which bot responds, where it responds, and which contacts it serves. Each bot can be assigned directly to supported channels without requiring a workflow simply to make the bot active. You can also route messages by connected page, number, widget, and contact tags for more precise multi-bot setups.
TABLE OF CONTENTS
- What Is Conversation AI Channel Management?
- Key Benefits of Conversation AI Channel Management
- Supported Conversation AI Channels
- The Updated Conversation AI Agents List
- How Bot Routing Works
- Direct Bot Assignment Priority
- Channel-Level Deployment Settings
- Tag-Based Routing
- Preventing Conflicting Bot Assignments
- Automatic Migration from the Primary Bot Model
- How To Enable Conversation AI Channel Management
- How To Configure a Bot’s Deploy Settings
- How To Route Regular and Premium Customers to Different Bots
- Configure the Regular Customers Bot
- Configure the Premium Customers Bot
- How To Verify Which Bot Responded
- Verify the Regular Customer Route
- Verify the Premium Customer Route
- Frequently Asked Questions
- Related Articles
What Is Conversation AI Channel Management?
Conversation AI Channel Management is a bot-level deployment system that controls where each Conversation AI bot can respond. Instead of relying on one Primary Bot, each bot can be configured independently through its Deploy tab.
Channel assignments can combine:
A supported messaging channel
A connected page, phone number, account, or widget
Tags the contact must have
Tags the contact must not have
This makes it possible to use several bots in the same subaccount while giving each bot a clear group of conversations to handle.
Key Benefits of Conversation AI Channel Management
Bot-level deployment makes it easier to build predictable multi-bot setups without creating unnecessary workflows.
Simpler bot deployment: Assign a bot directly to its channels from the Deploy tab.
More precise routing: Combine the channel, connected destination, and contact tags to control which bot responds.
Better customer segmentation: Route premium customers, new leads, support requests, or other groups to different bots.
Flexible multi-bot setups: Use separate bots for sales, support, locations, pages, widgets, or customer groups.
Fewer routing conflicts: HighLevel prevents two bots from using the same channel, destination, and tag setup.
Automatic migration: Existing Primary Bot channel assignments are moved into the new deployment experience.
Supported Conversation AI Channels
Each channel represents a place where customers can send messages to your business. Channel settings are managed separately so a bot can respond only through the destinations you choose.
Conversation AI Channel Management supports:
SMS
Email
Facebook
Instagram
WhatsApp
Live Chat
Chat Widget
The options available inside each channel depend on the type of connection. For example, one channel may allow you to select a phone number, while another may allow you to select a page or widget.
The Updated Conversation AI Agents List
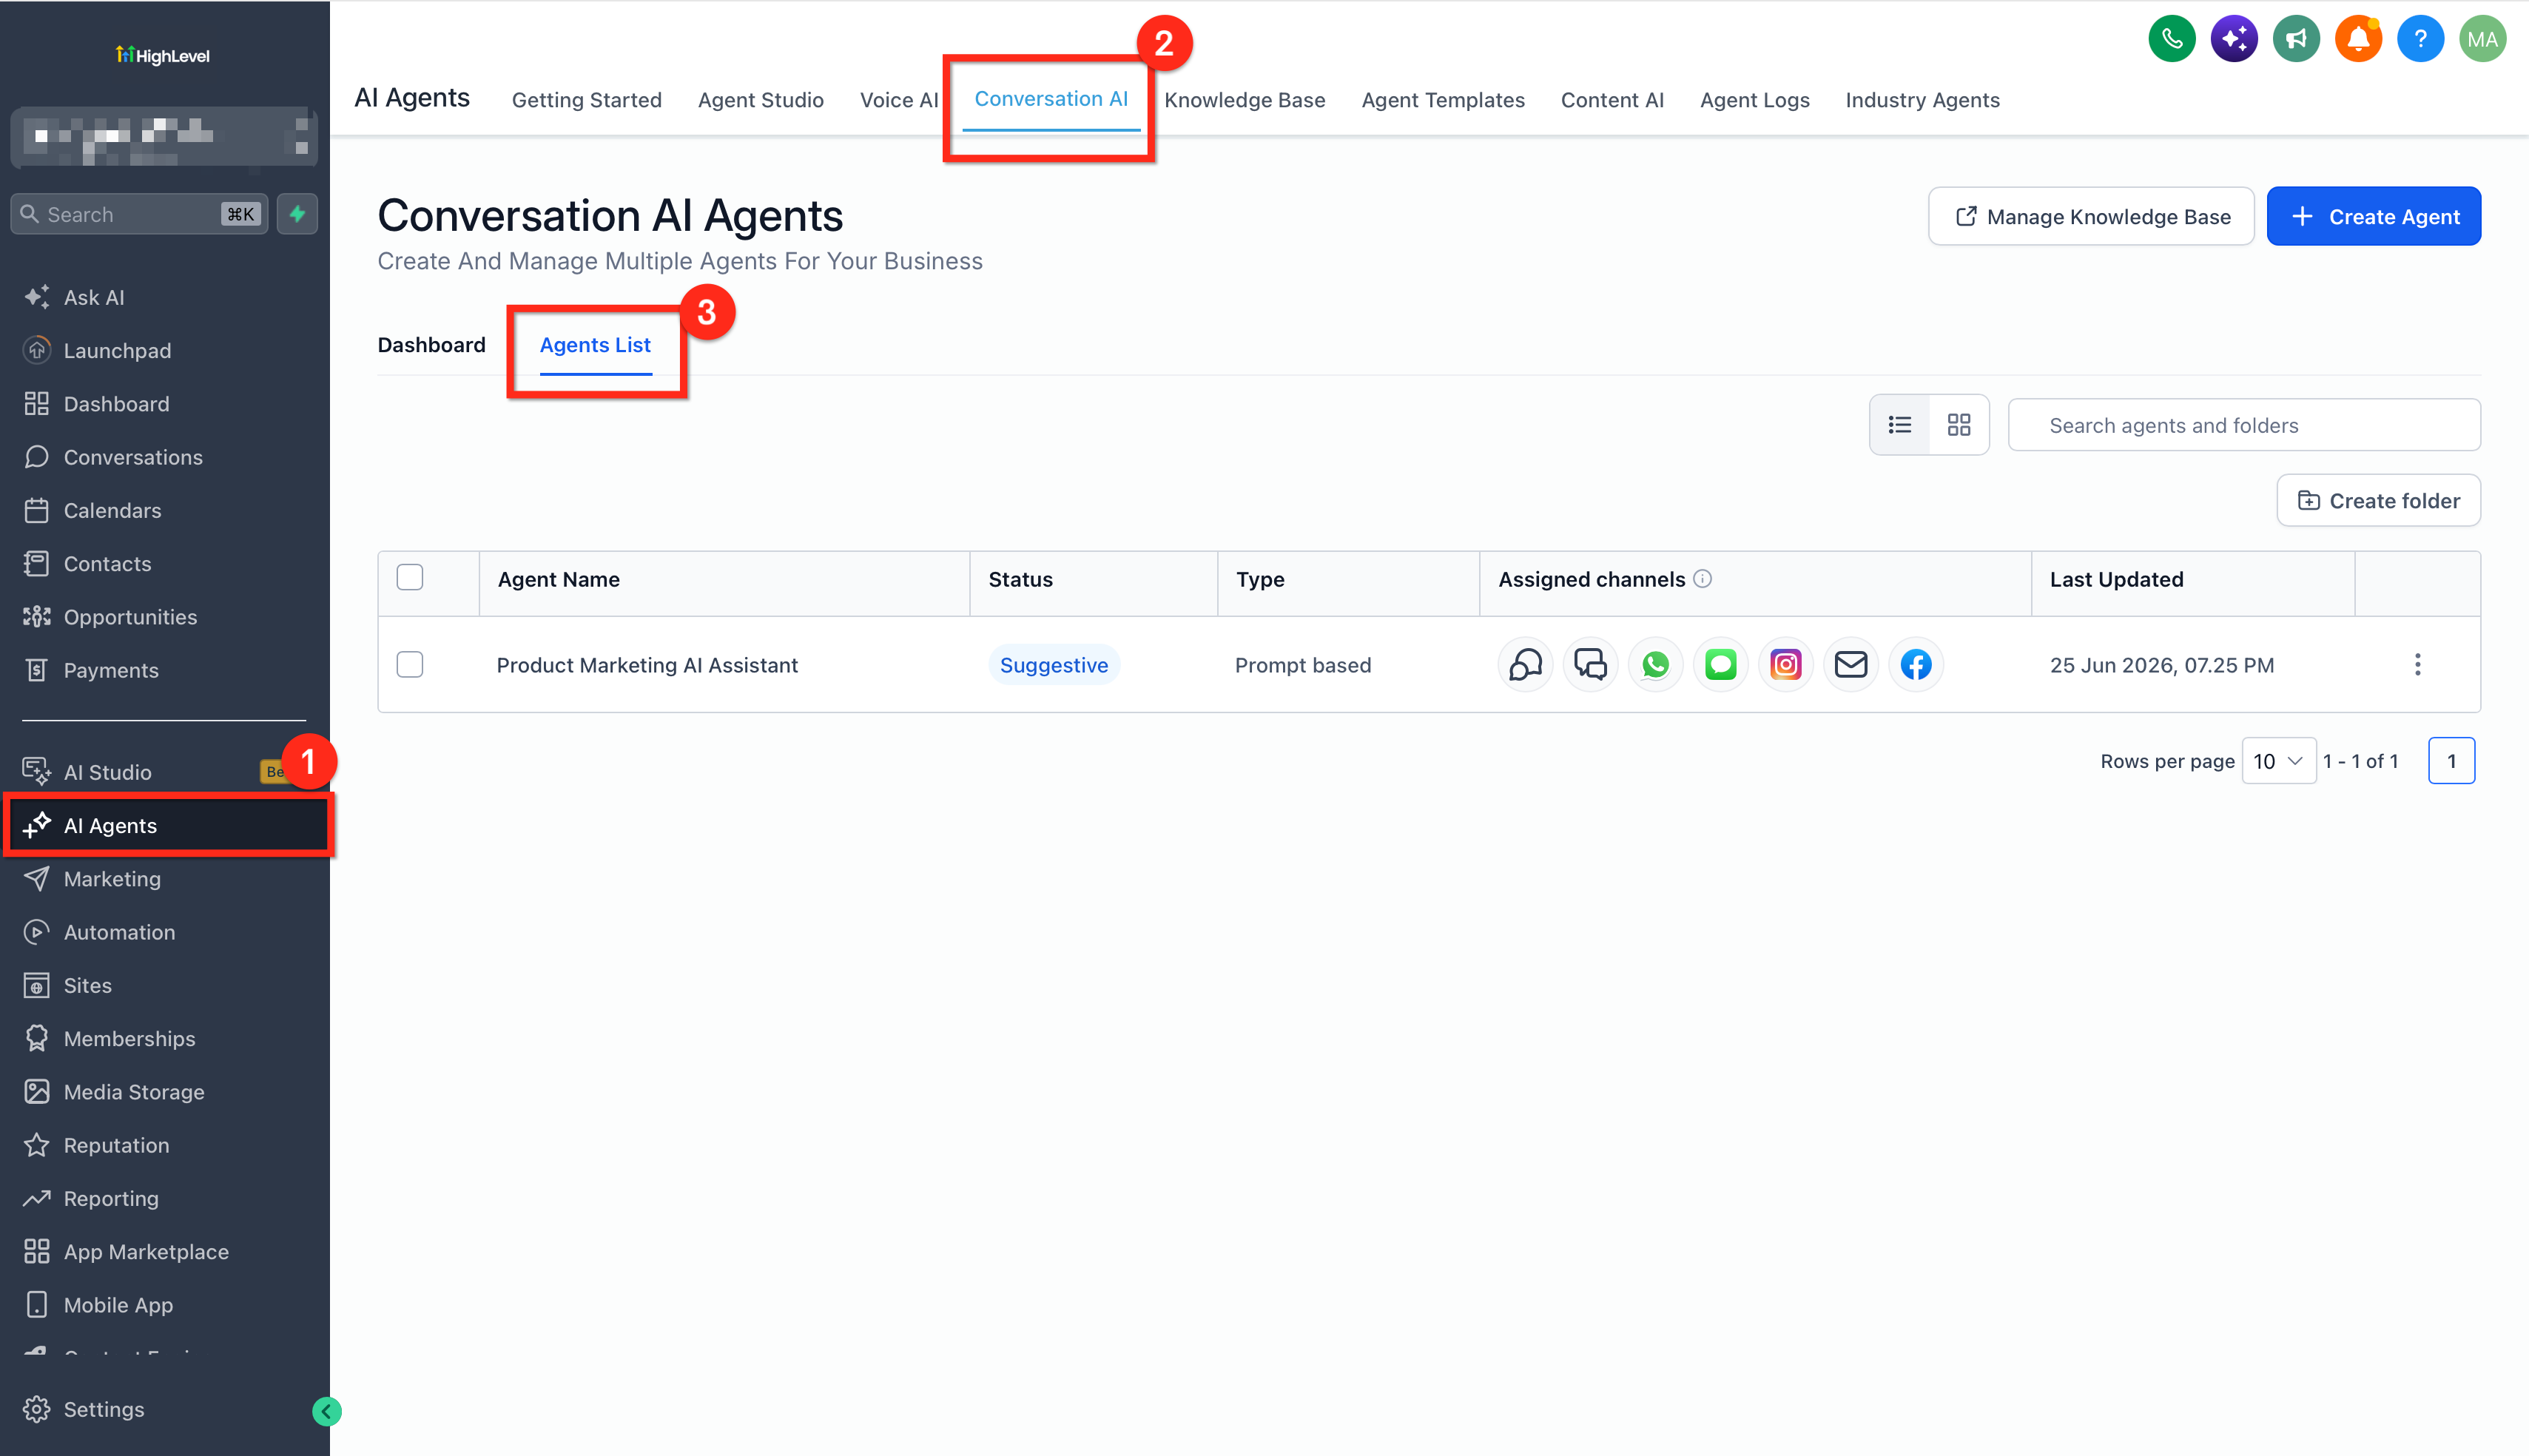
The updated Agents List focuses on the bot’s name, status, most recent update, and available actions. Channel assignments are no longer managed from the main list because each bot now has its own deployment settings.
The Agents List displays key information about each bot, including its status, type, and configured channels. If an agent does not have a channel configured, the list displays Not configured. You can view configured channels directly from the Agents List without opening each agent.
Channel assignments are not configured from the Agents List. To add or change channel assignments, open the agent and manage its deployment settings from the Deploy tab.
Open AI Agents > Conversation AI > Agents List to view and manage your bots.
How Bot Routing Works
Bot routing determines which Conversation AI bot is allowed to answer an incoming message. HighLevel reviews direct contact assignments first, then uses the bot’s channel and tag settings to find the matching deployment.
A deployment rule may include:
The messaging channel
The connected destination, such as a page, number, or widget
Tags the contact has
Tags the contact does not have
For example, two bots can use the same Chat Widget when one bot is assigned to contacts with a regular-customer tag and the other is assigned to contacts with a premium-customer tag.
Direct Bot Assignment Priority
A direct bot assignment keeps a specific contact with the selected bot, even when another bot would normally match the contact’s channel and tags. This priority helps preserve intentional handoffs and workflow-based assignments.
Direct assignments include:
Assigning a bot directly to a contact
Using the Update Conversation AI Bot and Status workflow action
Using Transfer Bot to hand the conversation to another bot
A directly assigned bot takes priority across supported channels. The contact remains with that bot until the assignment or bot status changes.
Channel-Level Deployment Settings
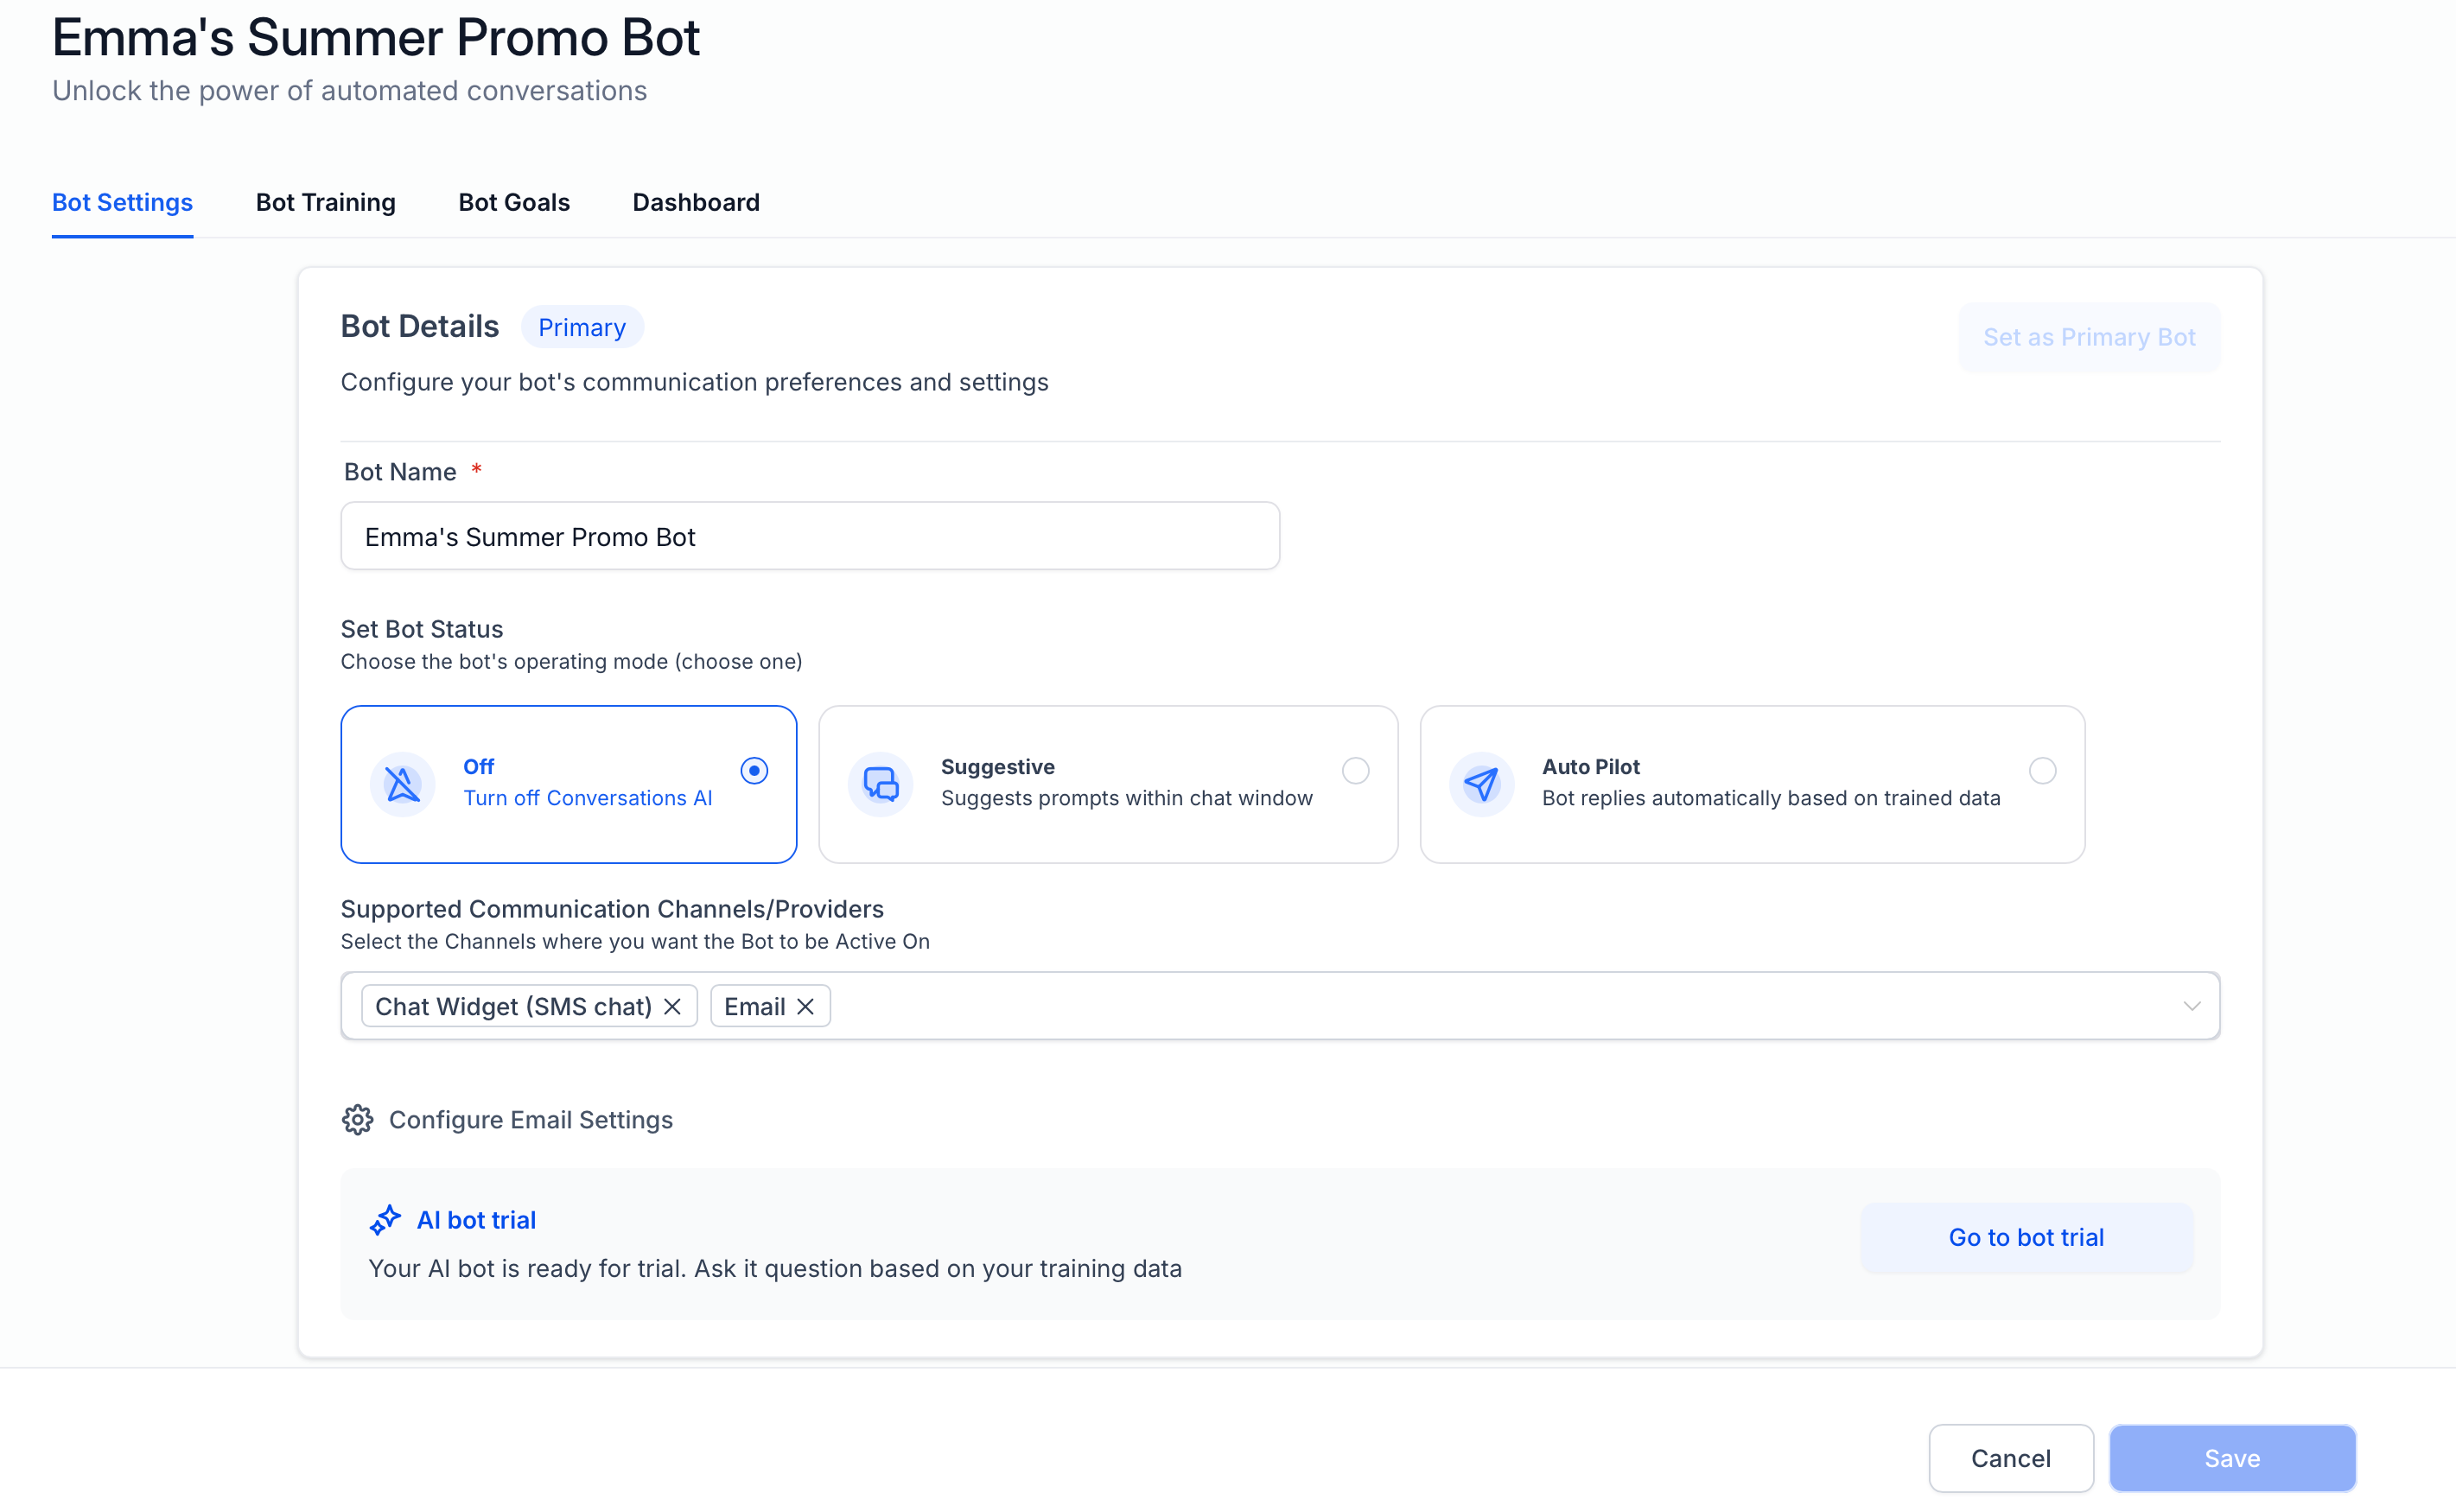
The Deploy tab controls the channels where a bot can respond. Each channel has its own switch and, where available, an edit control for selecting the destination and adding contact conditions.
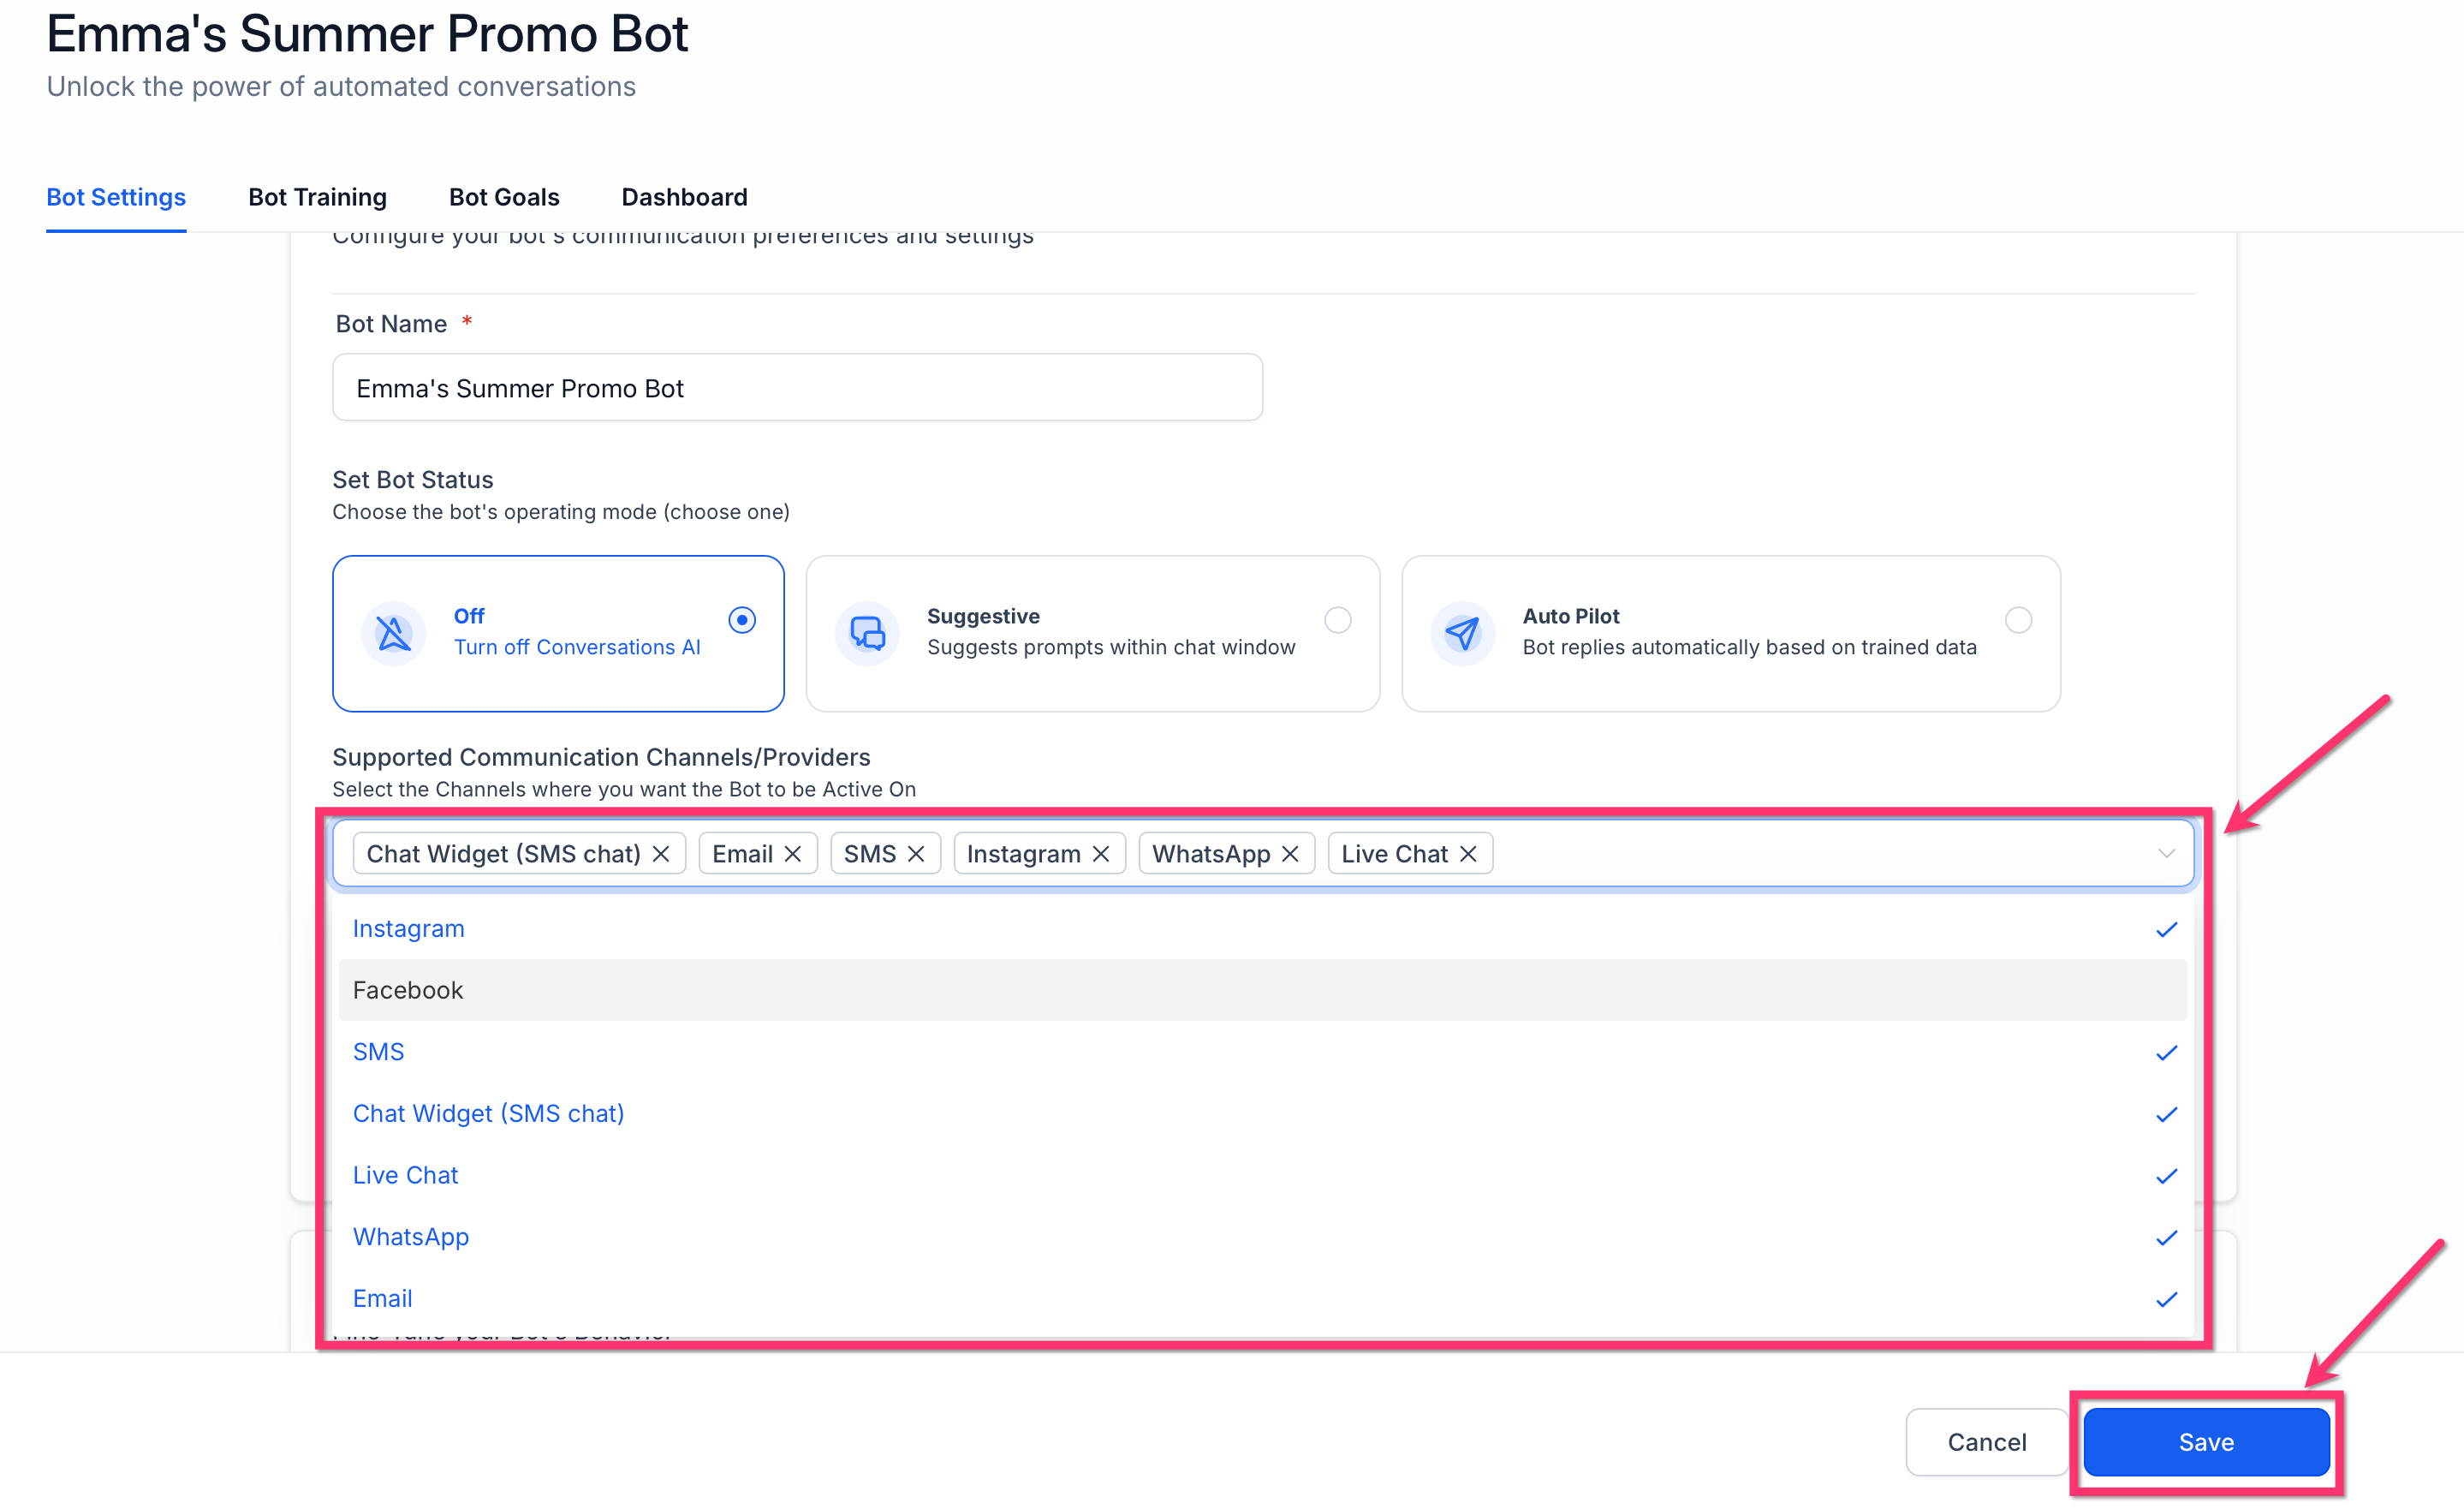
A channel card may show:
Whether the channel is enabled
The selected phone numbers, pages, accounts, or widgets
An edit icon for more detailed routing
A summary such as All phone numbers, All pages, or All widgets
Tag-Based Routing
Tag-based routing lets different bots serve different contact groups through the same channel. This is useful when customers need different responses based on their plan, location, lead type, service level, or stage in the customer journey.
The Edit Channel window includes two tag controls:
Has tags: The contact must match the selected tag condition.
Doesn’t have tags: The contact must not match the selected tag condition.
Tag fields also include:
AND: The contact must meet all selected tag conditions.
OR: The contact must meet at least one selected tag condition.
Avoid creating routing rules that can match the same contact unless the intended priority has been confirmed.
Preventing Conflicting Bot Assignments
Clear deployment rules ensure that one eligible bot handles each incoming message. HighLevel prevents identical routing setups so two bots cannot share the same channel, connected destination, and tag configuration.
A conflict may occur when two bots use the exact same combination of:
Channel
Connected page, number, account, or widget
Has tags conditions
Doesn’t have tags conditions
Adjust the destination or tag conditions when HighLevel prevents a duplicate assignment.
Automatic Migration from the Primary Bot Model
Automatic migration preserves existing bot behavior when Channel Management is enabled. The previous Primary Bot is assigned to the channels it already supported, allowing it to continue responding while you review the new deployment settings.
When the feature is enabled through Labs:
HighLevel begins migrating the existing channel setup.
Allow approximately five minutes for the migration to complete.
Open the previous Primary Bot.
Review its Deploy tab.
Confirm that the expected channels are enabled.
Split channels or customer groups across other bots as needed.
Use the Primary Bot term only when referring to the earlier setup. New deployments should be managed through each bot’s Deploy tab.
How To Enable Conversation AI Channel Management
Enabling the feature prepares the subaccount for bot-level channel assignments and migrates the existing Primary Bot settings. Complete this step before changing channel ownership so the current setup has time to move into the new deployment model.
Open the required subaccount.
Go to Settings.
Open Labs.
Find Conversations AI Channel Management.
Enable the feature.
Allow approximately five minutes for the existing setup to migrate.
Open AI Agents > Conversation AI > Agents List.
Review the Deploy settings for the existing bots.
Important: The Labs step applies while the feature remains available as an optional Labs feature. Remove this step when Channel Management becomes available by default.
How To Configure a Bot’s Deploy Settings
Proper deployment settings help the bot receive only the messages it is meant to handle. Configure one channel at a time, then test the result with contacts who match and do not match the routing conditions.
Go to AI Agents > Conversation AI.
Open the Agents List tab.
Select the bot you want to configure.
Click Deploy.
Turn on the required channel.
Click the channel’s edit icon when additional settings are available.
Turn on Assign channel.
Select the required page, phone number, account, or widget.
Add the required Has tags conditions.
Add any Doesn’t have tags conditions.
Choose AND or OR where needed.
Click Update.
Click Save to save the bot’s deployment settings.
Repeat the process for other channels as needed.
How To Connect a Conversation AI Bot to a Website Chat Widget
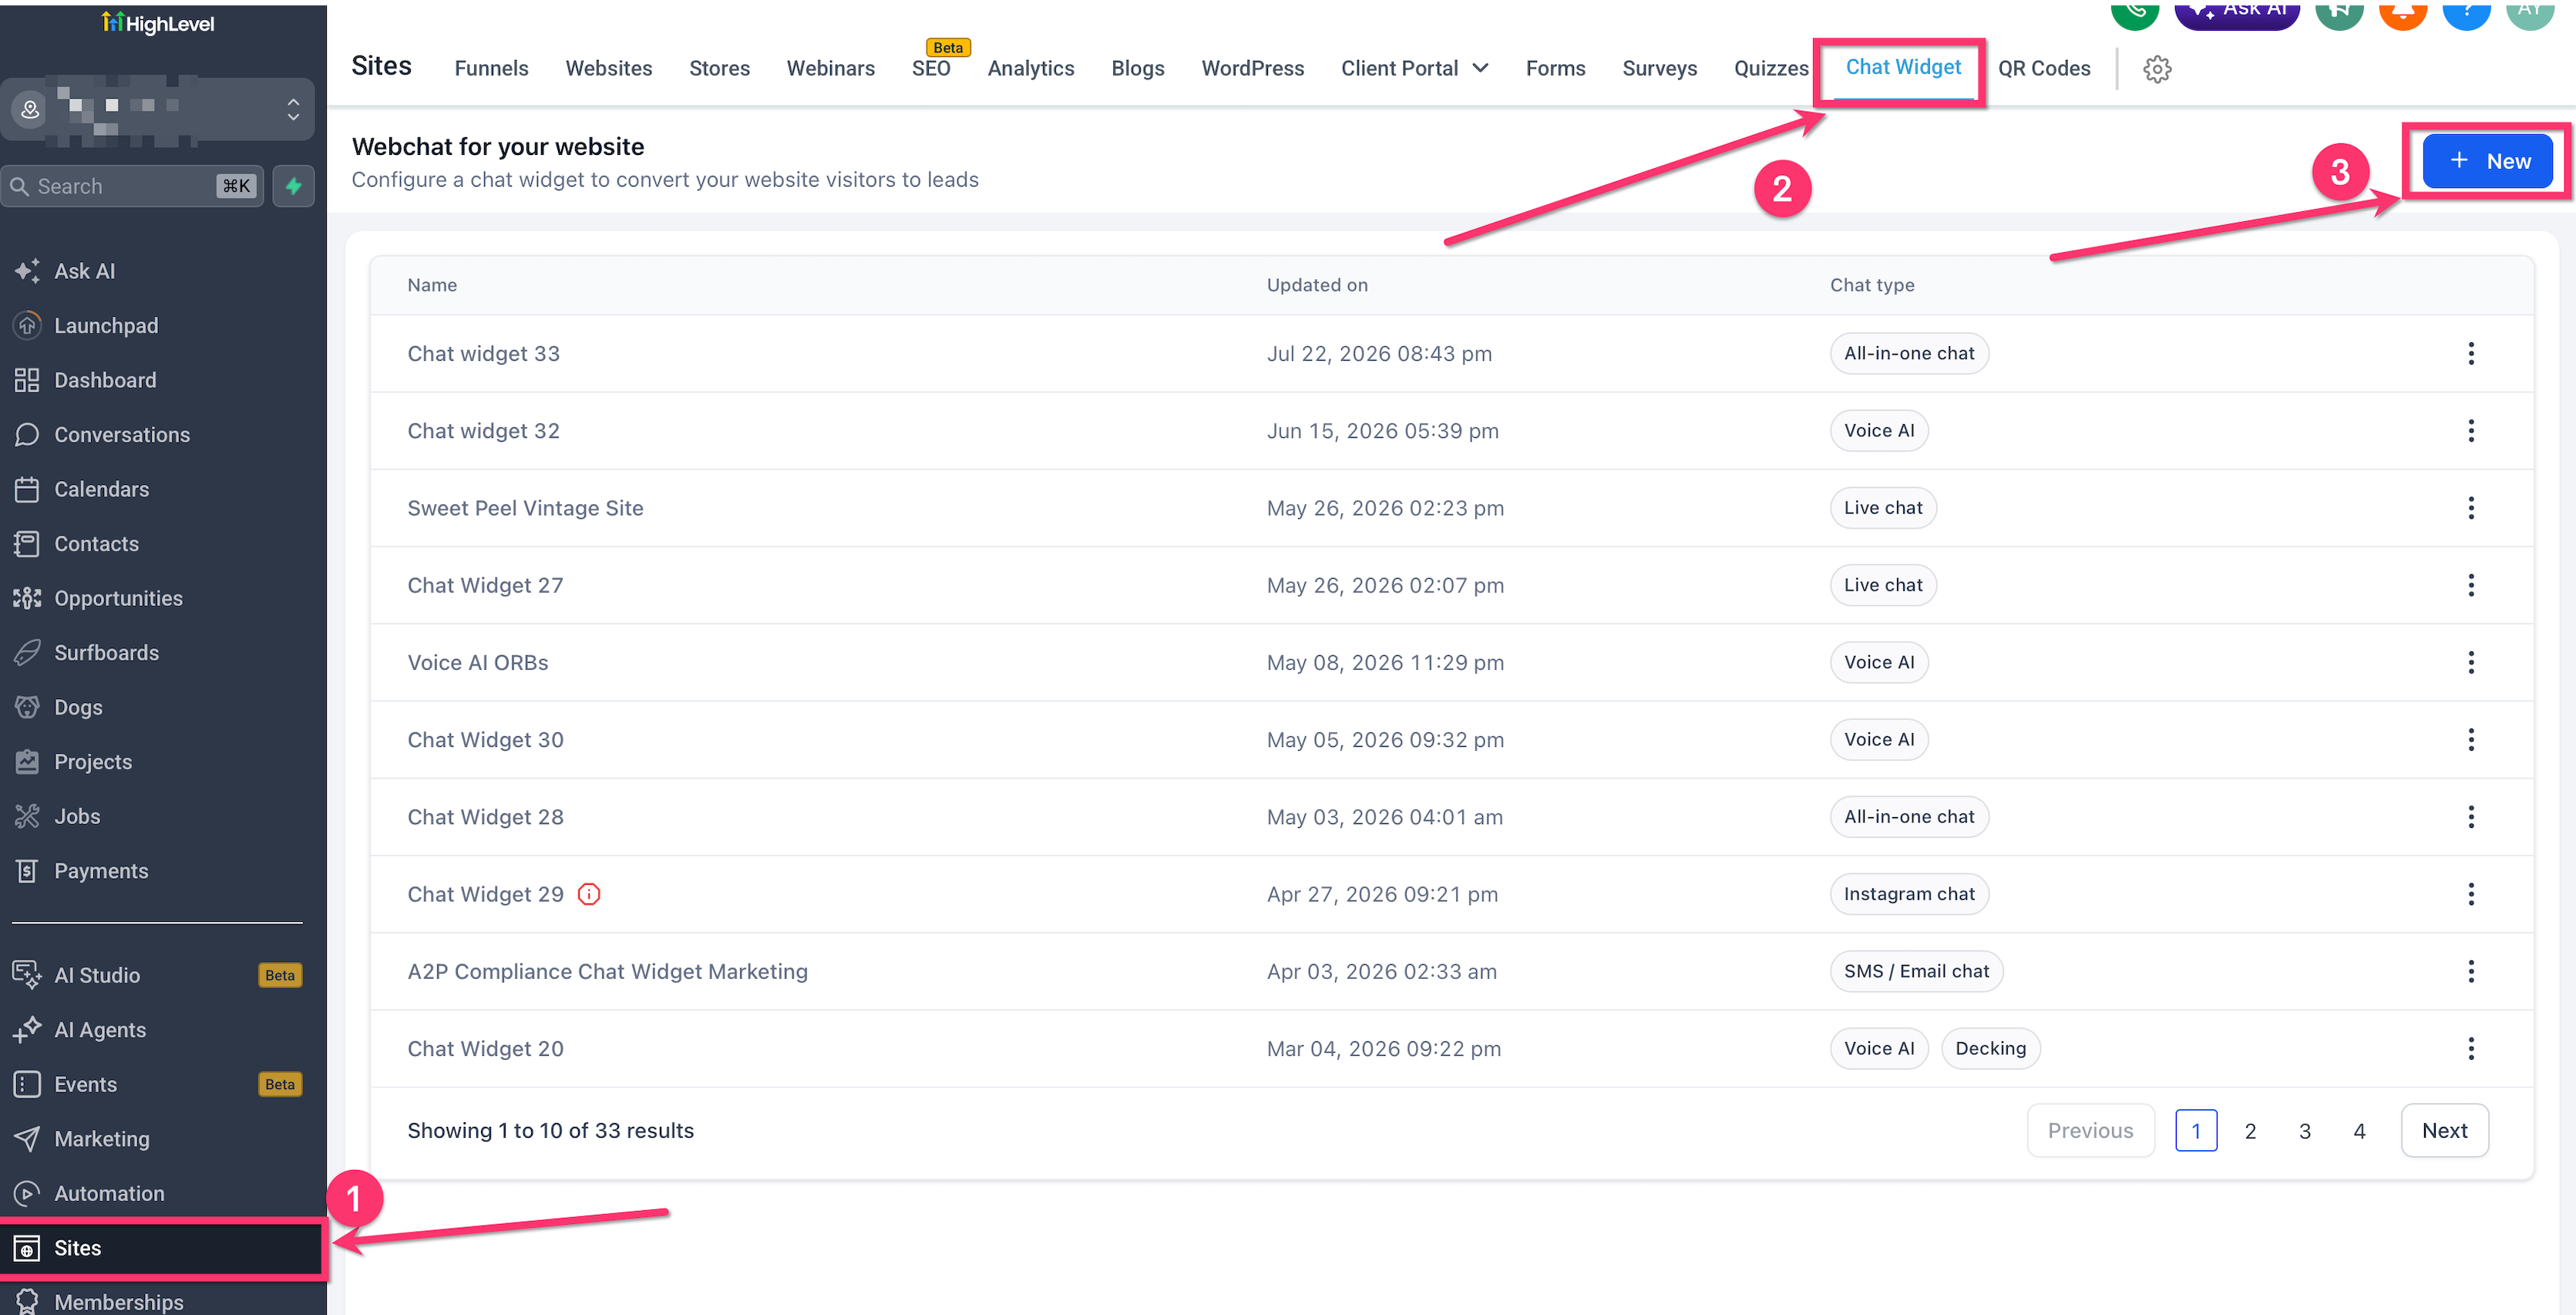
The website Chat Widget controls how chat appears on your site, while the bot assignment is managed from the Conversation AI bot’s Deploy tab. The bot is no longer selected from an Agent tab inside the Chat Widget builder.
- Go to Sites > Chat Widgets.
- Create a new widget or open an existing widget.
- Configure and save the widget.
- Go to AI Agents > Conversation AI.
- Open the bot you want to use.
- Select the Deploy tab.
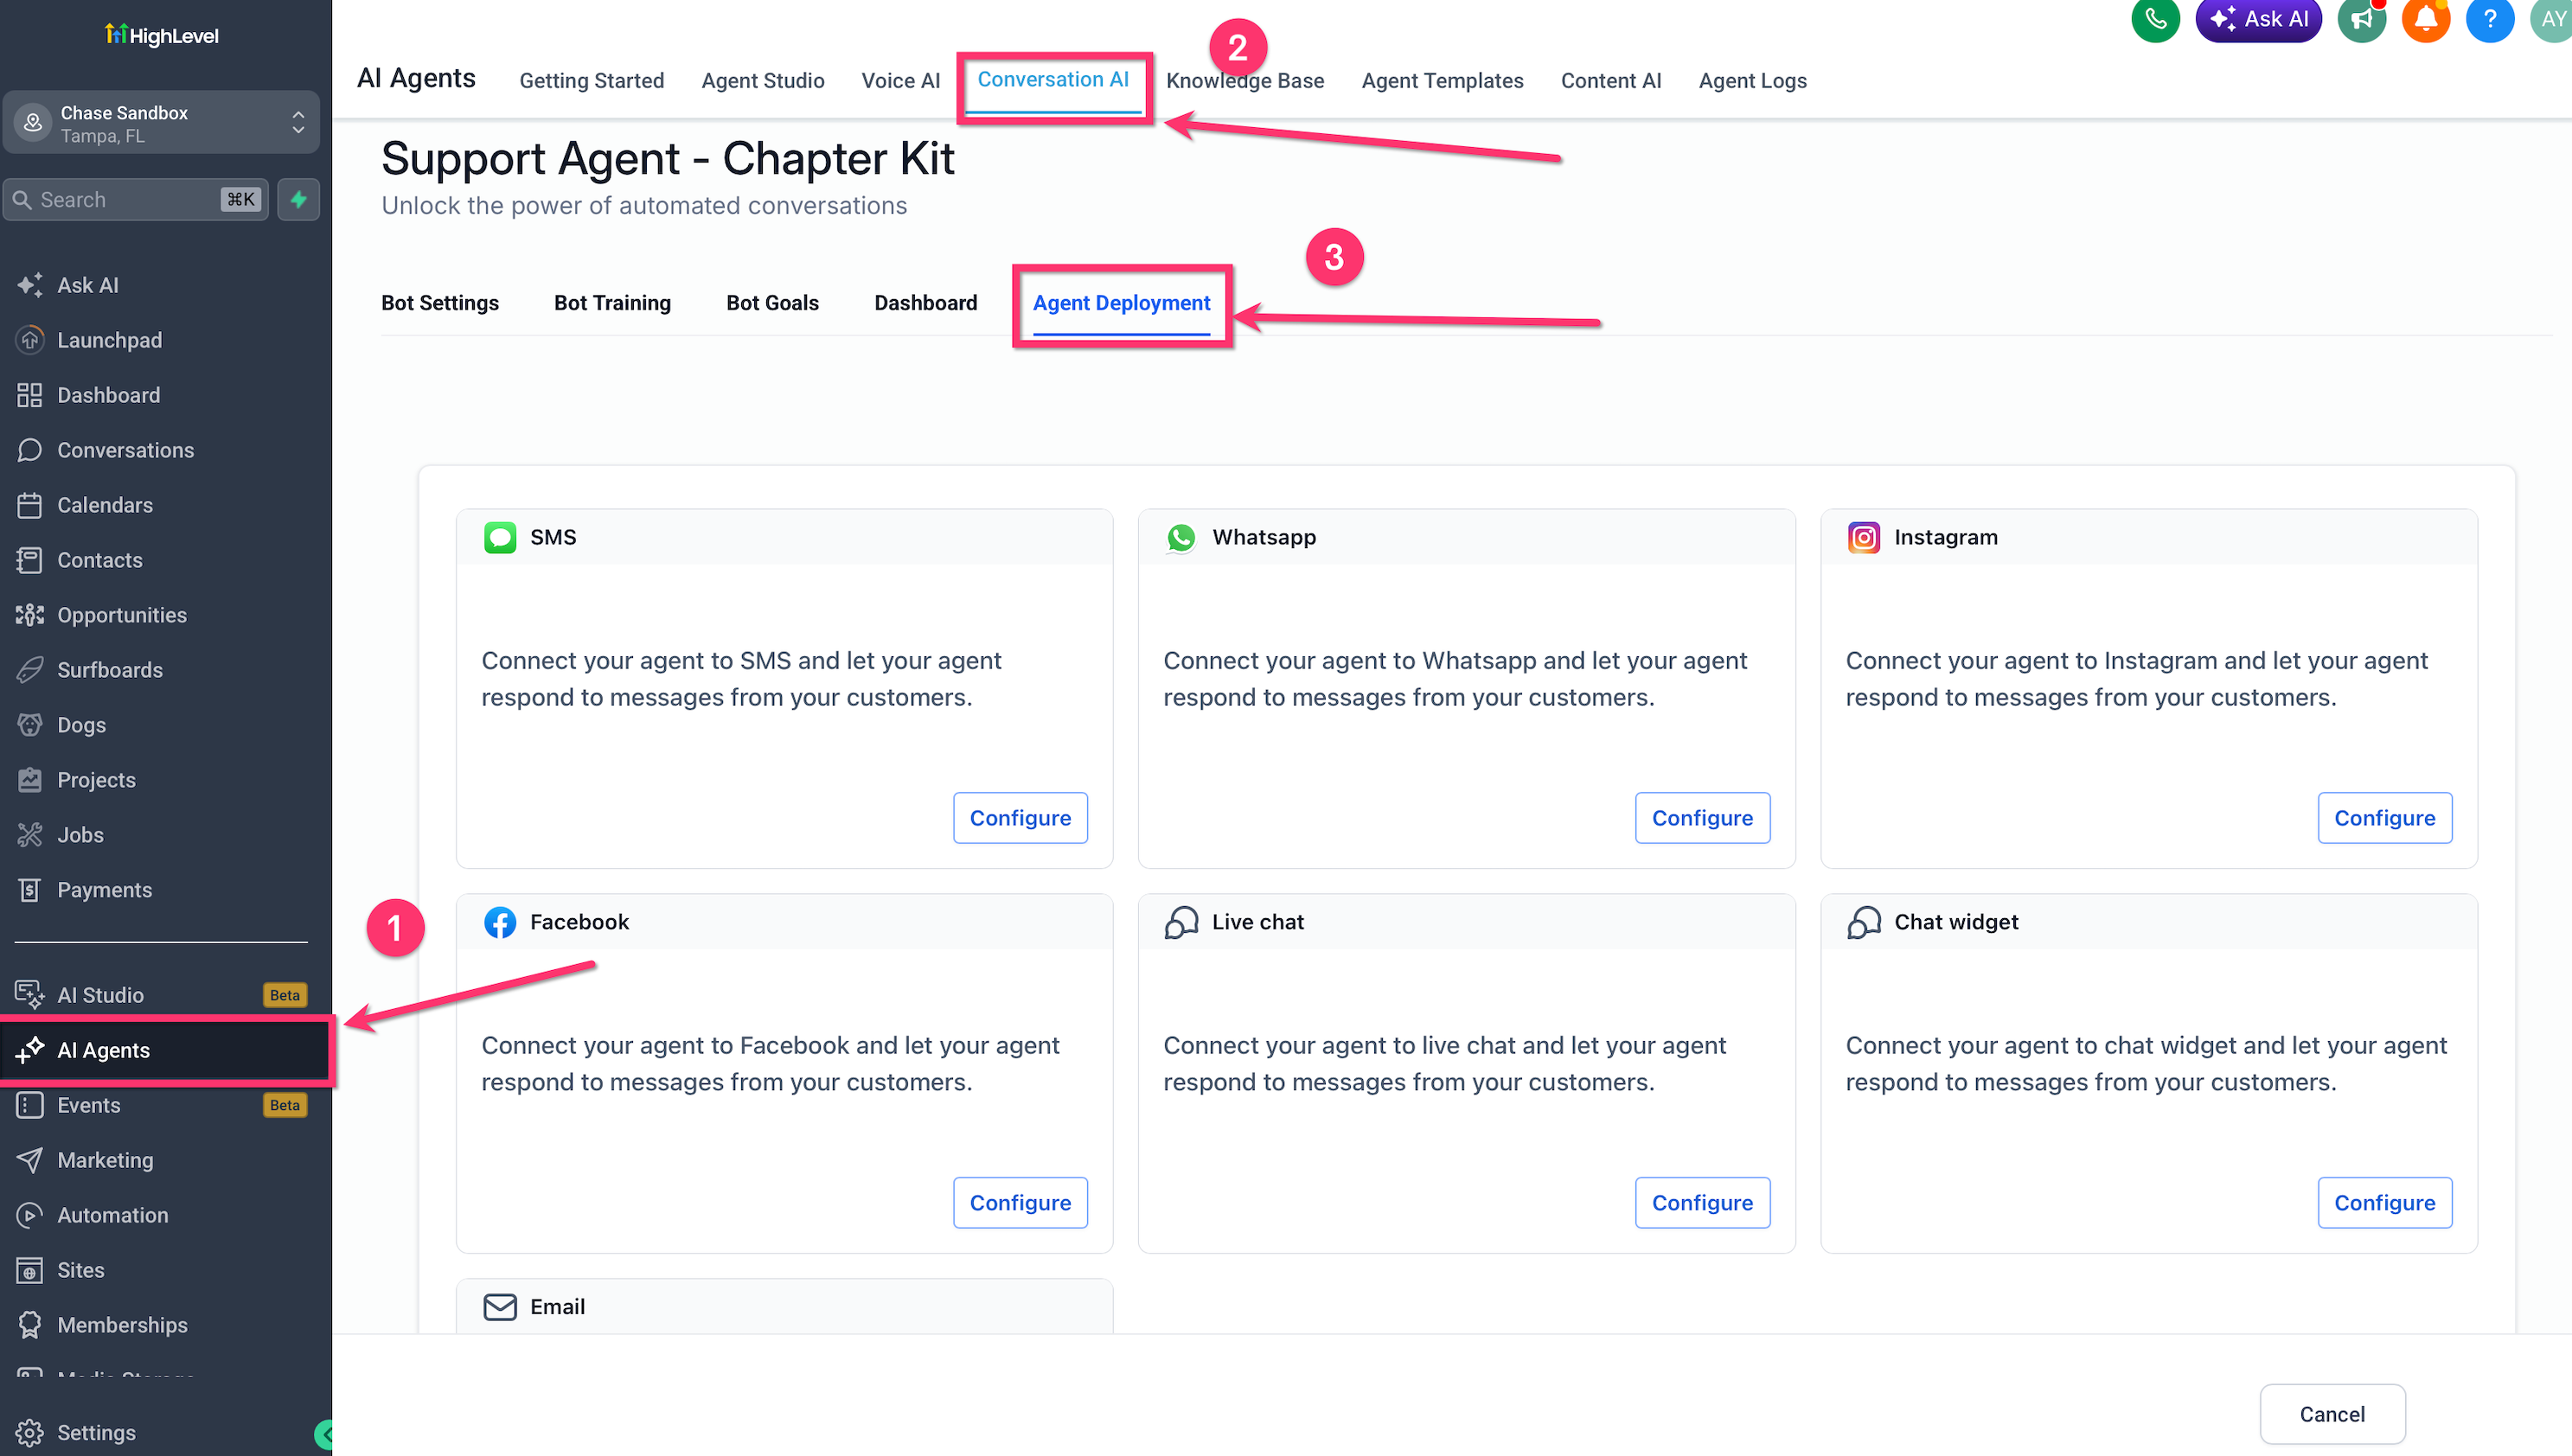
- Enable Chat Widget.
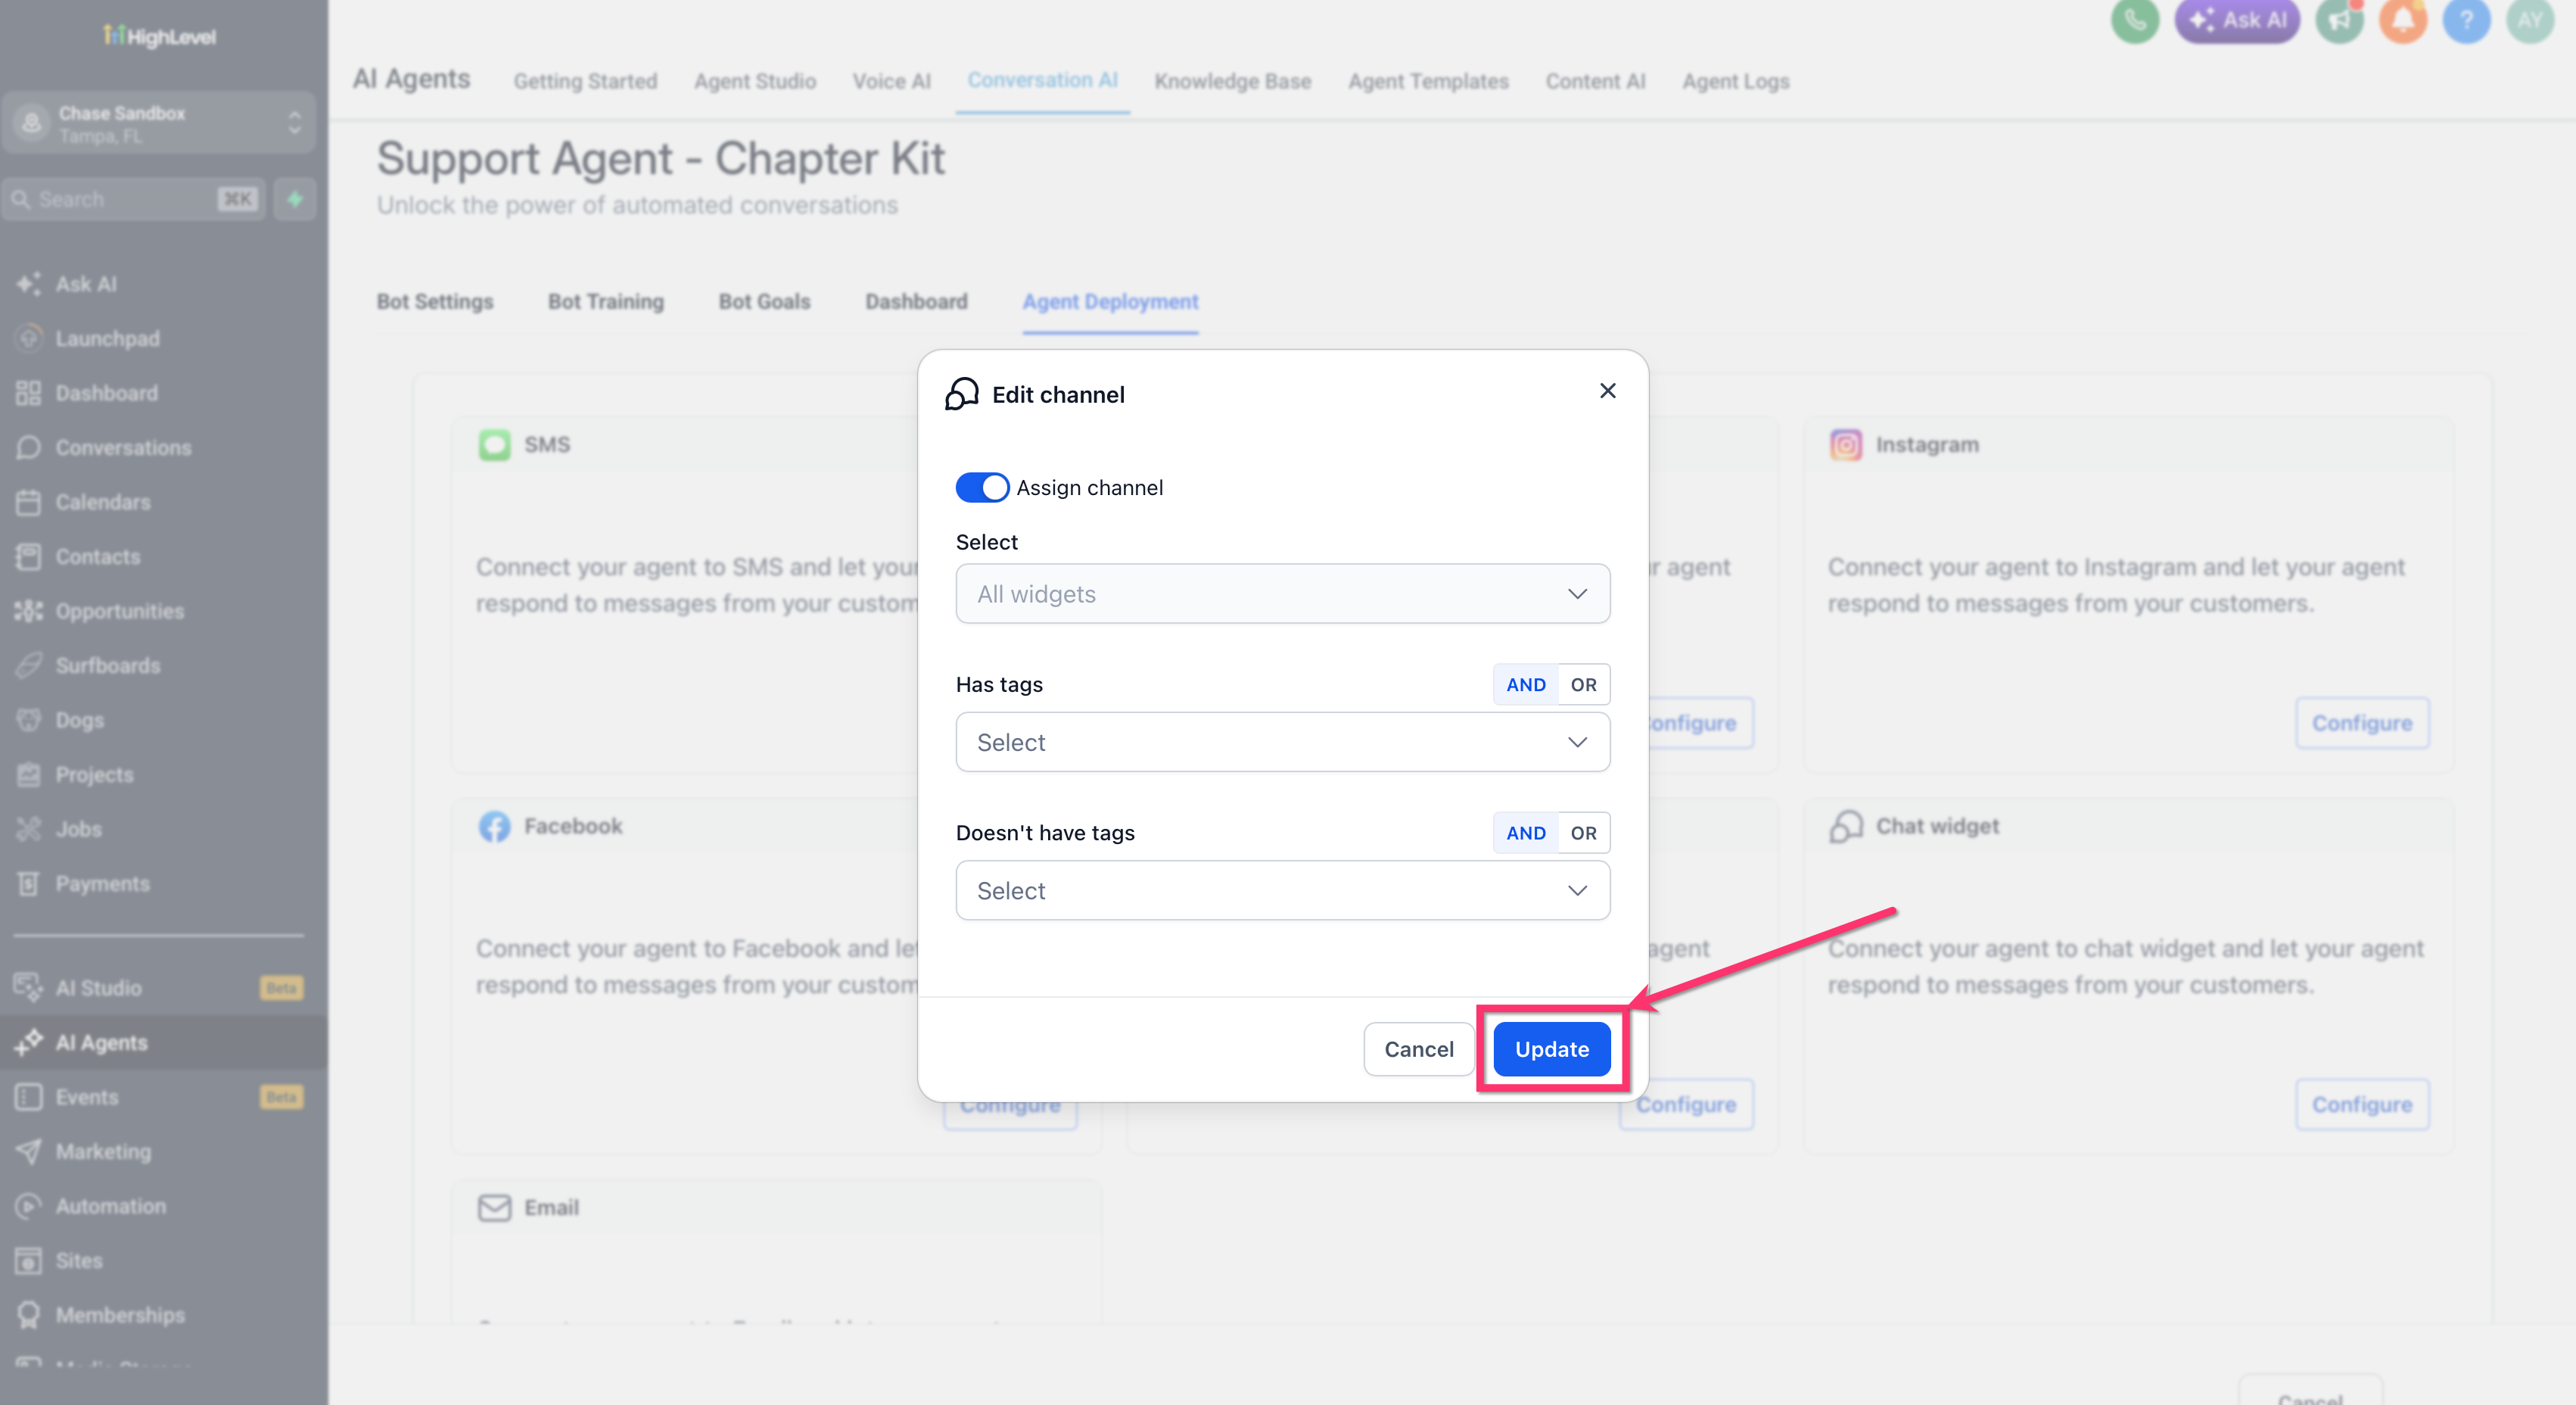
- Click the edit icon for the Chat Widget channel.
- Turn on Assign channel.
- Select the required widget.
- Add tag conditions when needed.
- Click Update.
- Save the bot.
- Test the widget on your website.
How To Route Regular and Premium Customers to Different Bots
A shared channel can support several bots when each bot has a different tag rule. This example routes contacts from one Chat Widget to either a Regular Customers Bot or a Premium Customers Bot.
Configure the Regular Customers Bot
Open the Regular Customers Bot.
Click Deploy.
Enable Chat Widget.
Open the channel settings.
Turn on Assign channel.
Select Chat Widget 1.
Under Has tags, select
regular-customer.Click Update.
Save the bot.
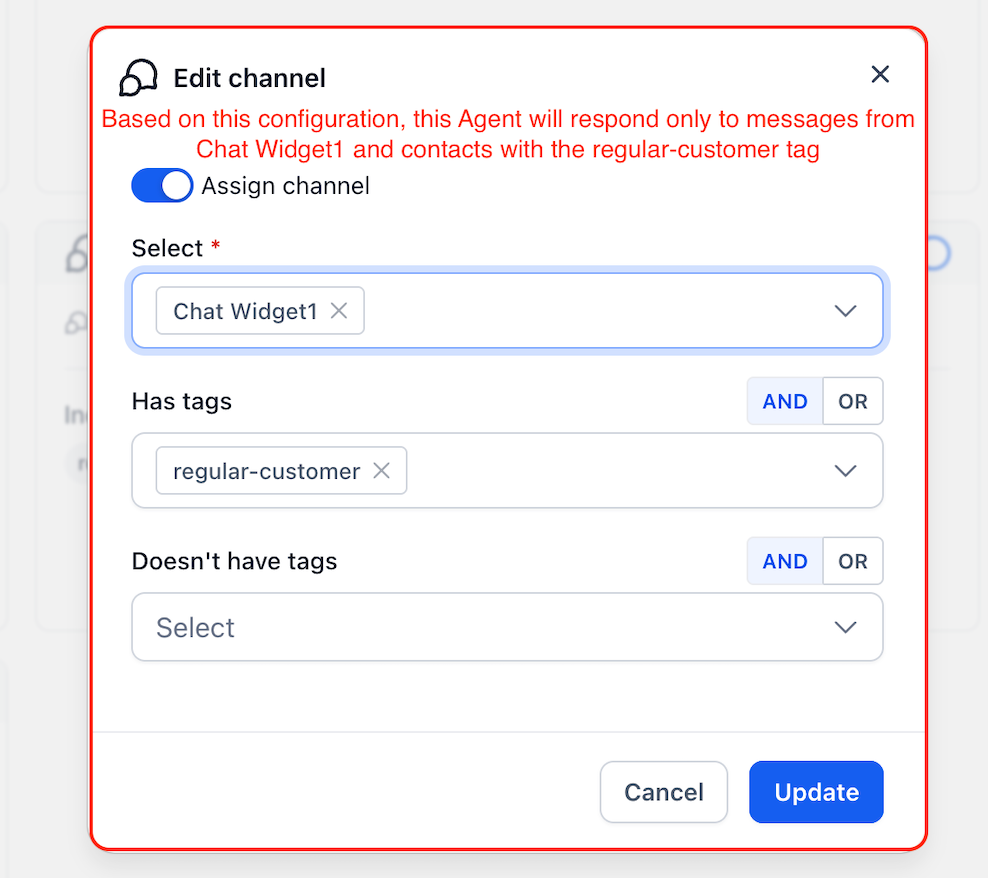
Configure the Premium Customers Bot
Open the Premium Customers Bot.
Click Deploy.
Enable Chat Widget.
Open the channel settings.
Turn on Assign channel.
Select Chat Widget 1.
Under Has tags, select
premium-customer.Click Update.
Save the bot.
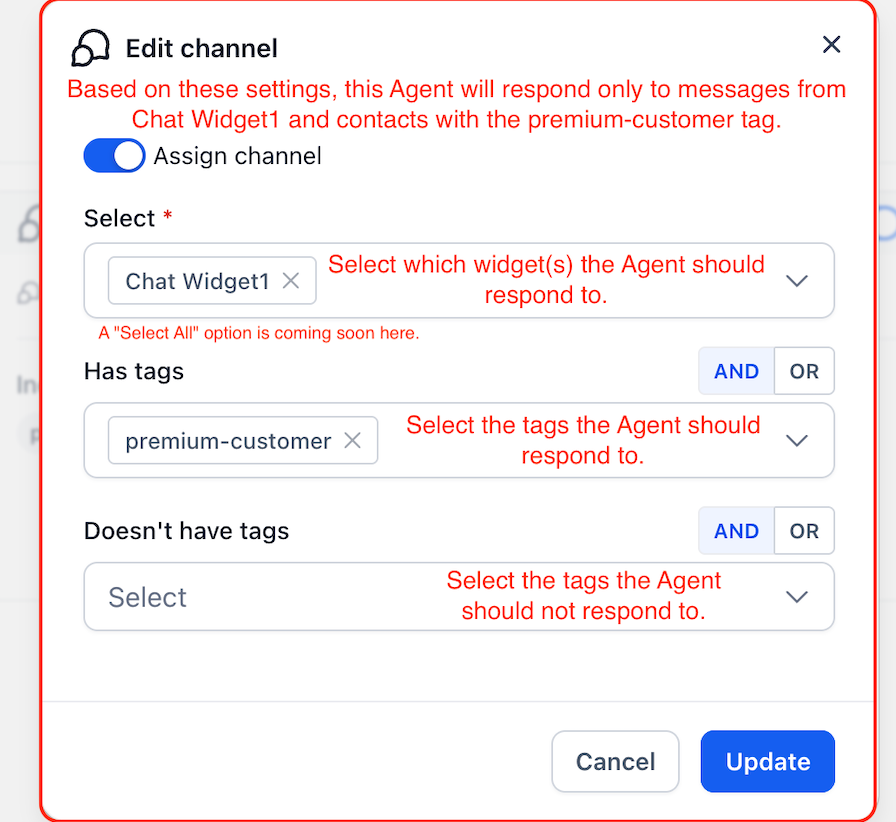
These two bots can share the same widget because their tag conditions are different.
How To Verify Which Bot Responded
Checking the bot assignment and AI Response Info confirms that the routing rules worked as expected. Test each route with a contact whose tags match the intended bot.
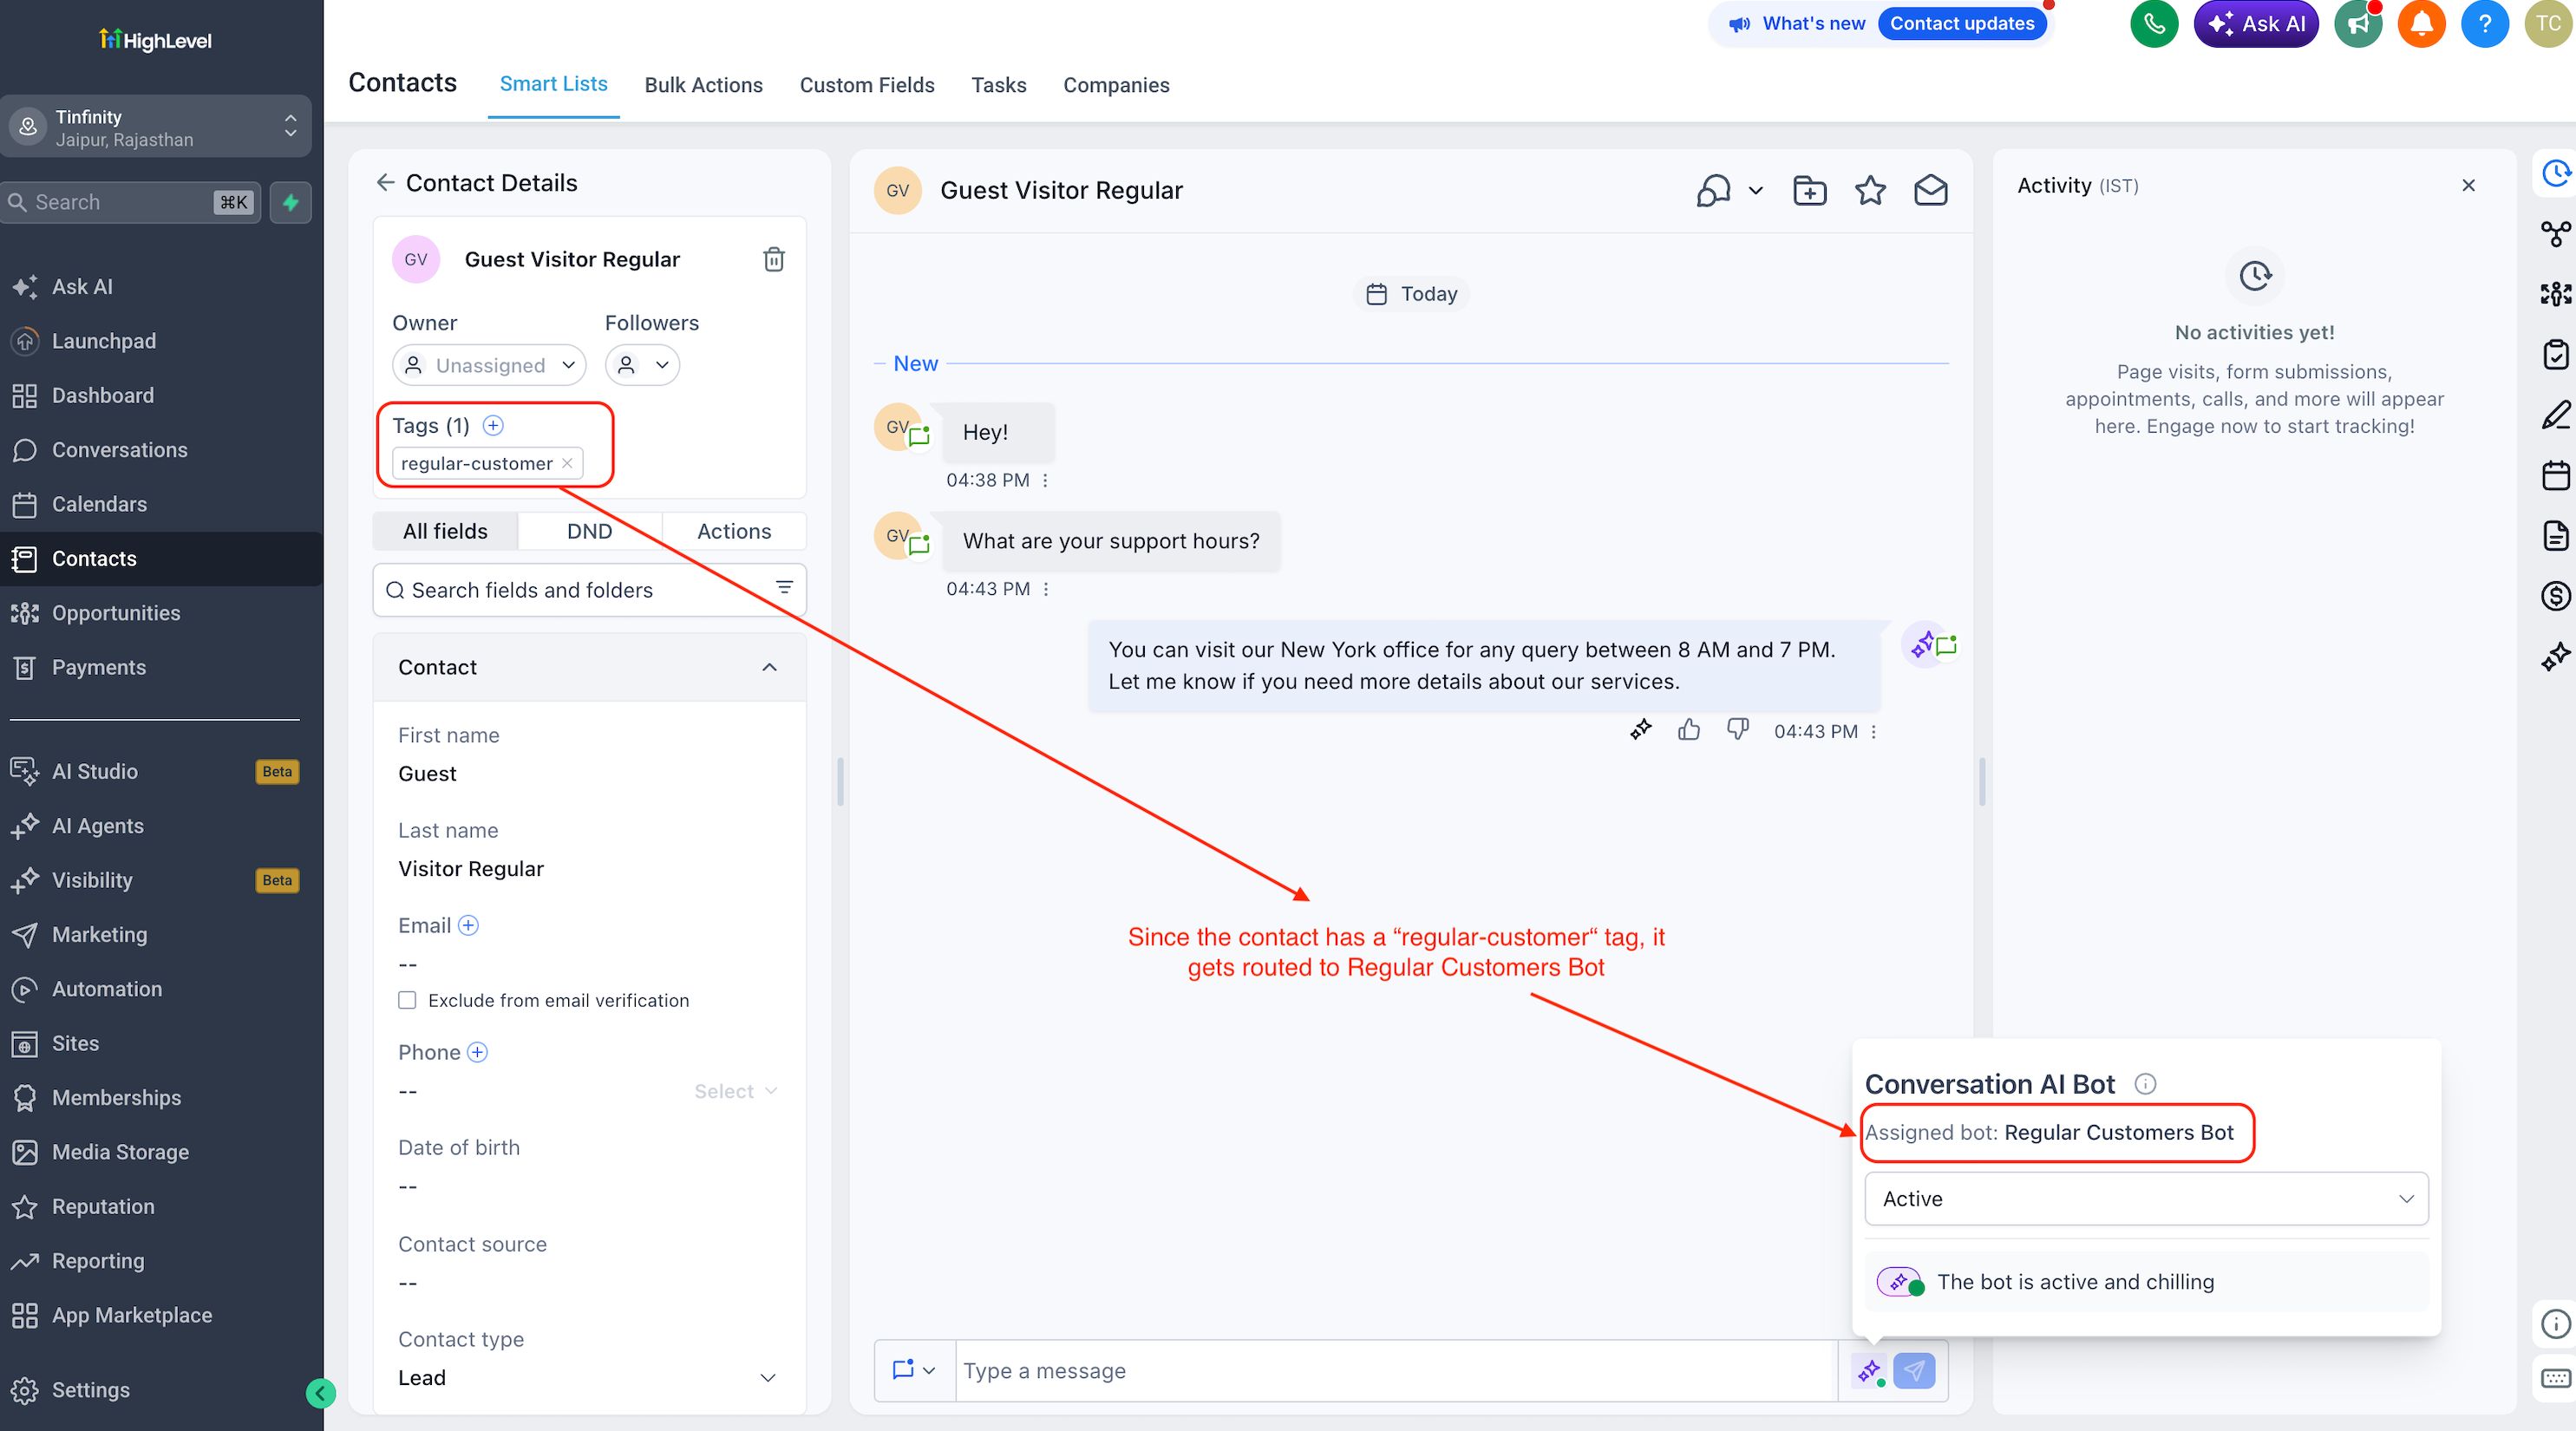
Verify the Regular Customer Route
Open a contact with the
regular-customertag.Send a message through the configured channel.
Review the Conversation AI Bot panel.
Confirm that Regular Customers Bot is assigned.
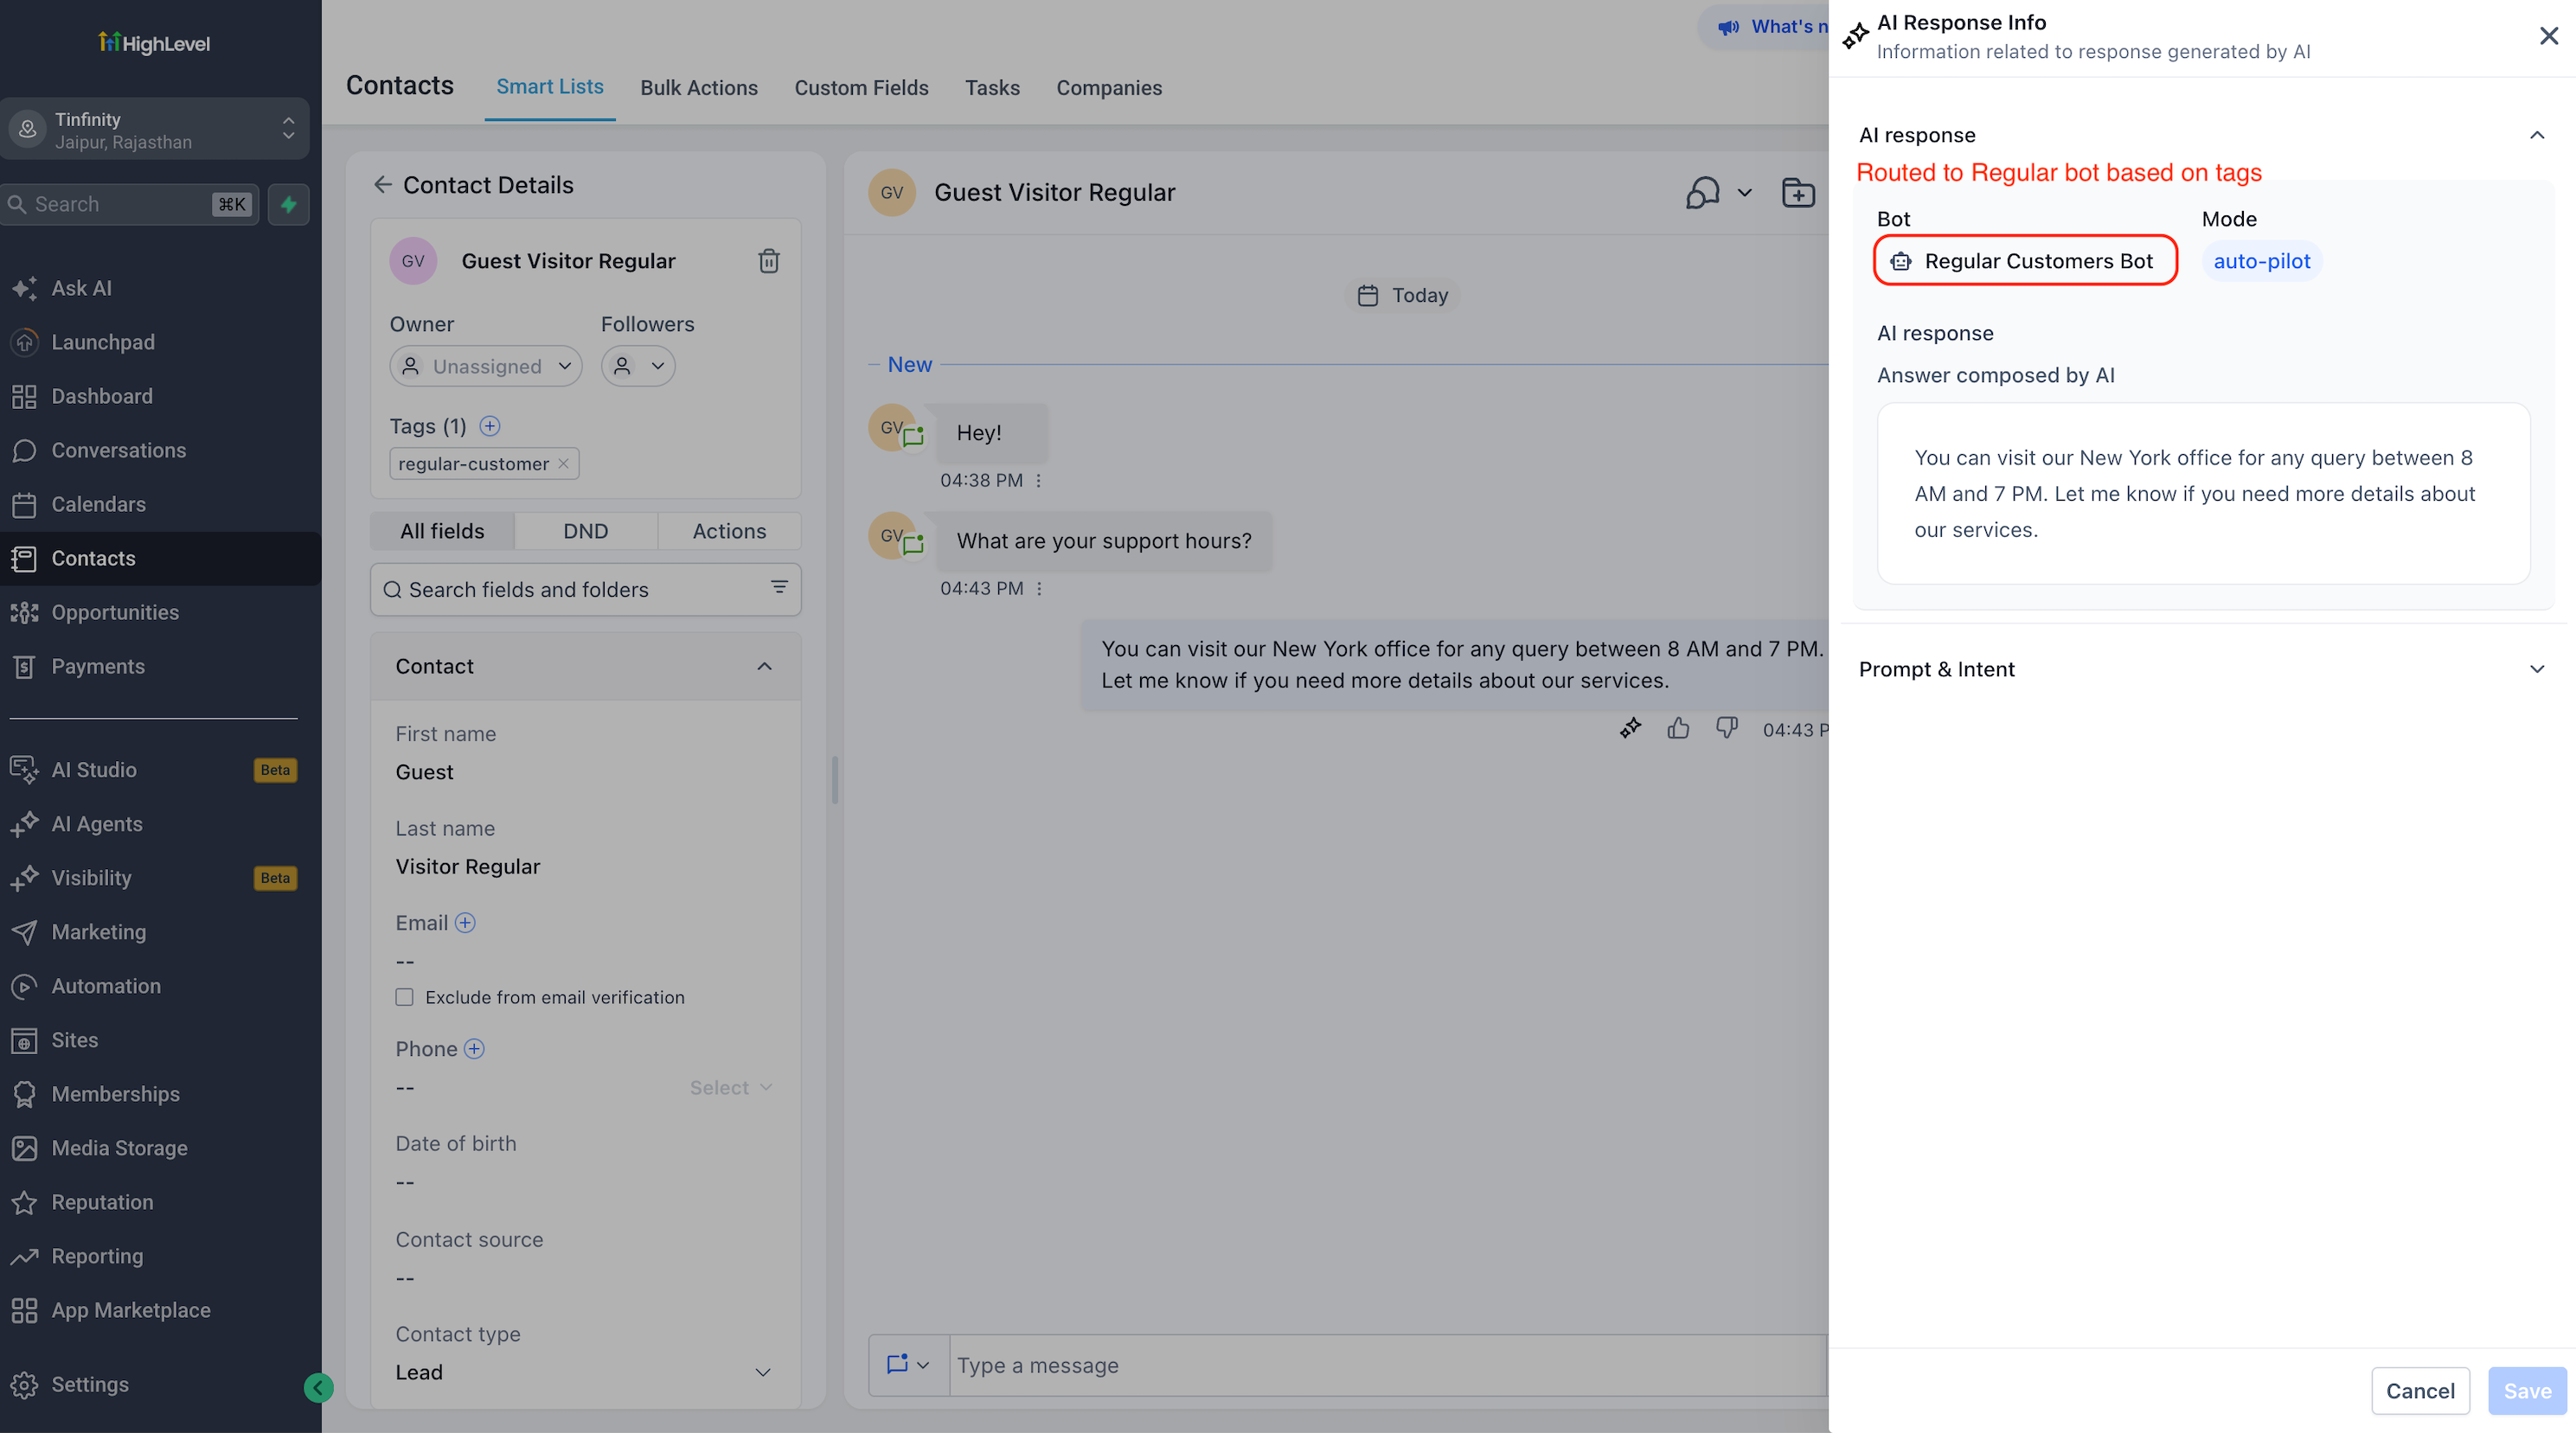
Open AI Response Info for the generated response.
Confirm the bot name and response mode.
Verify the Premium Customer Route
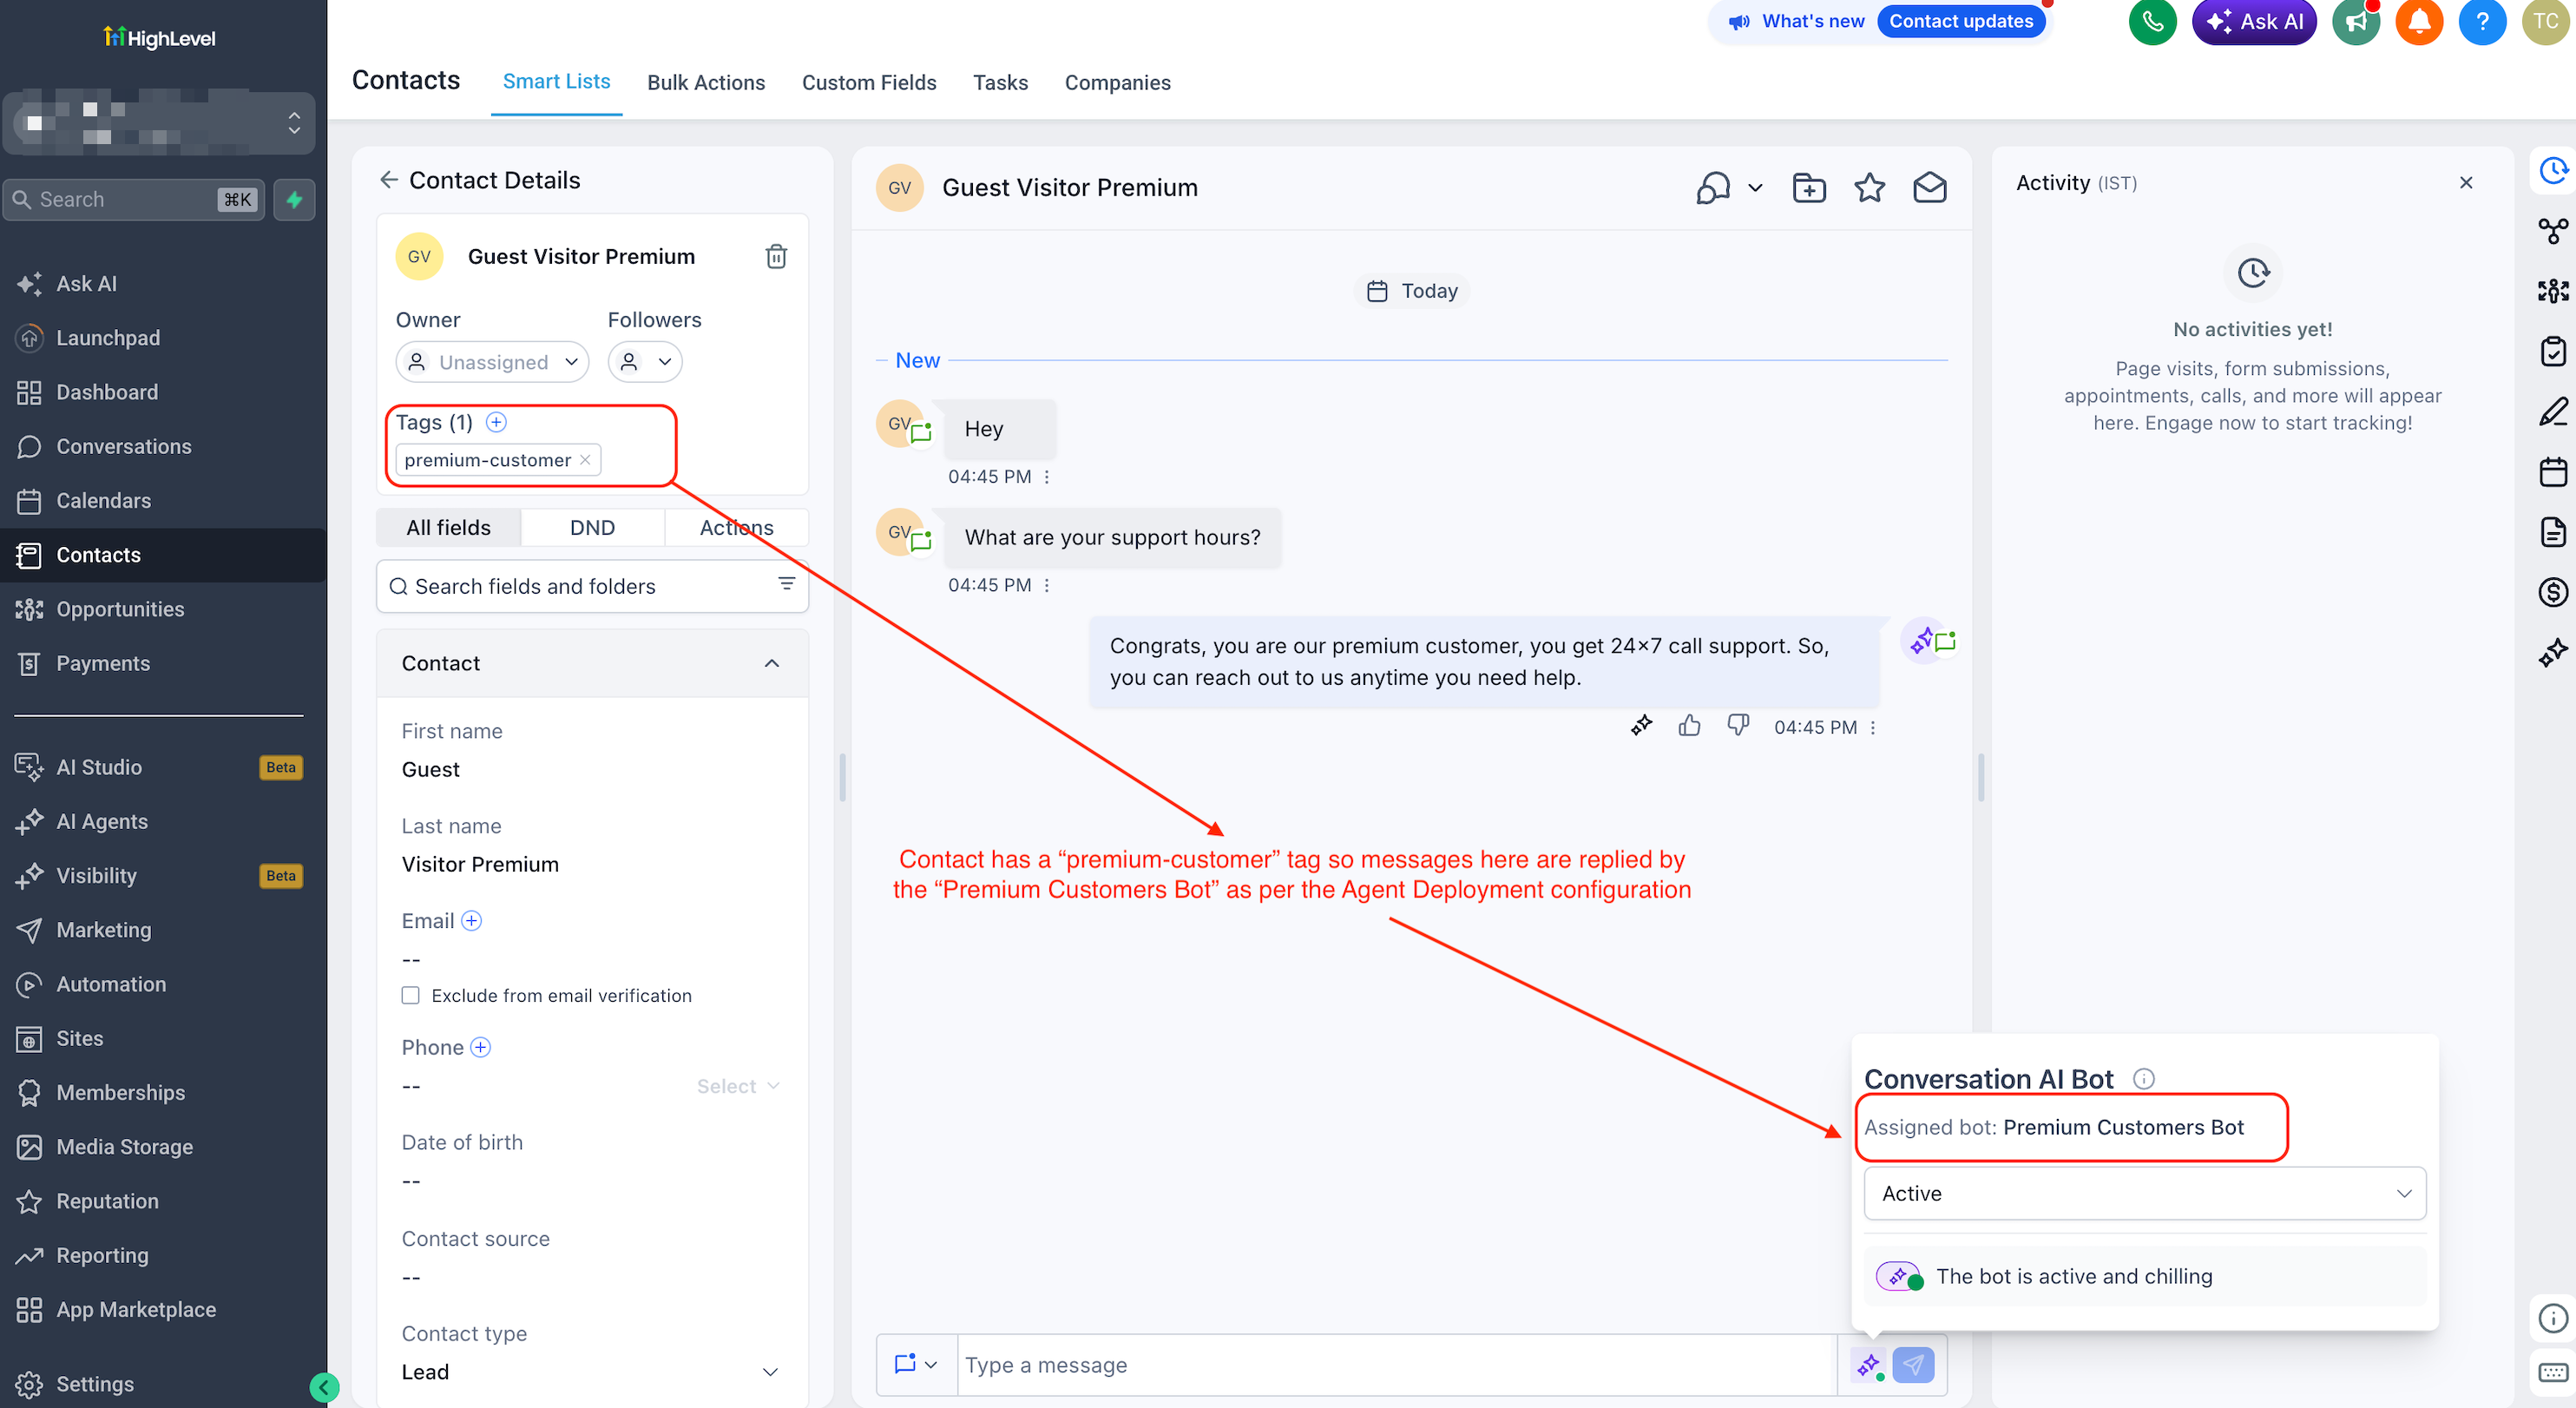
Open a contact with the
premium-customertag.Send a message through the configured channel.
Review the Conversation AI Bot panel.
Confirm that Premium Customers Bot is assigned.
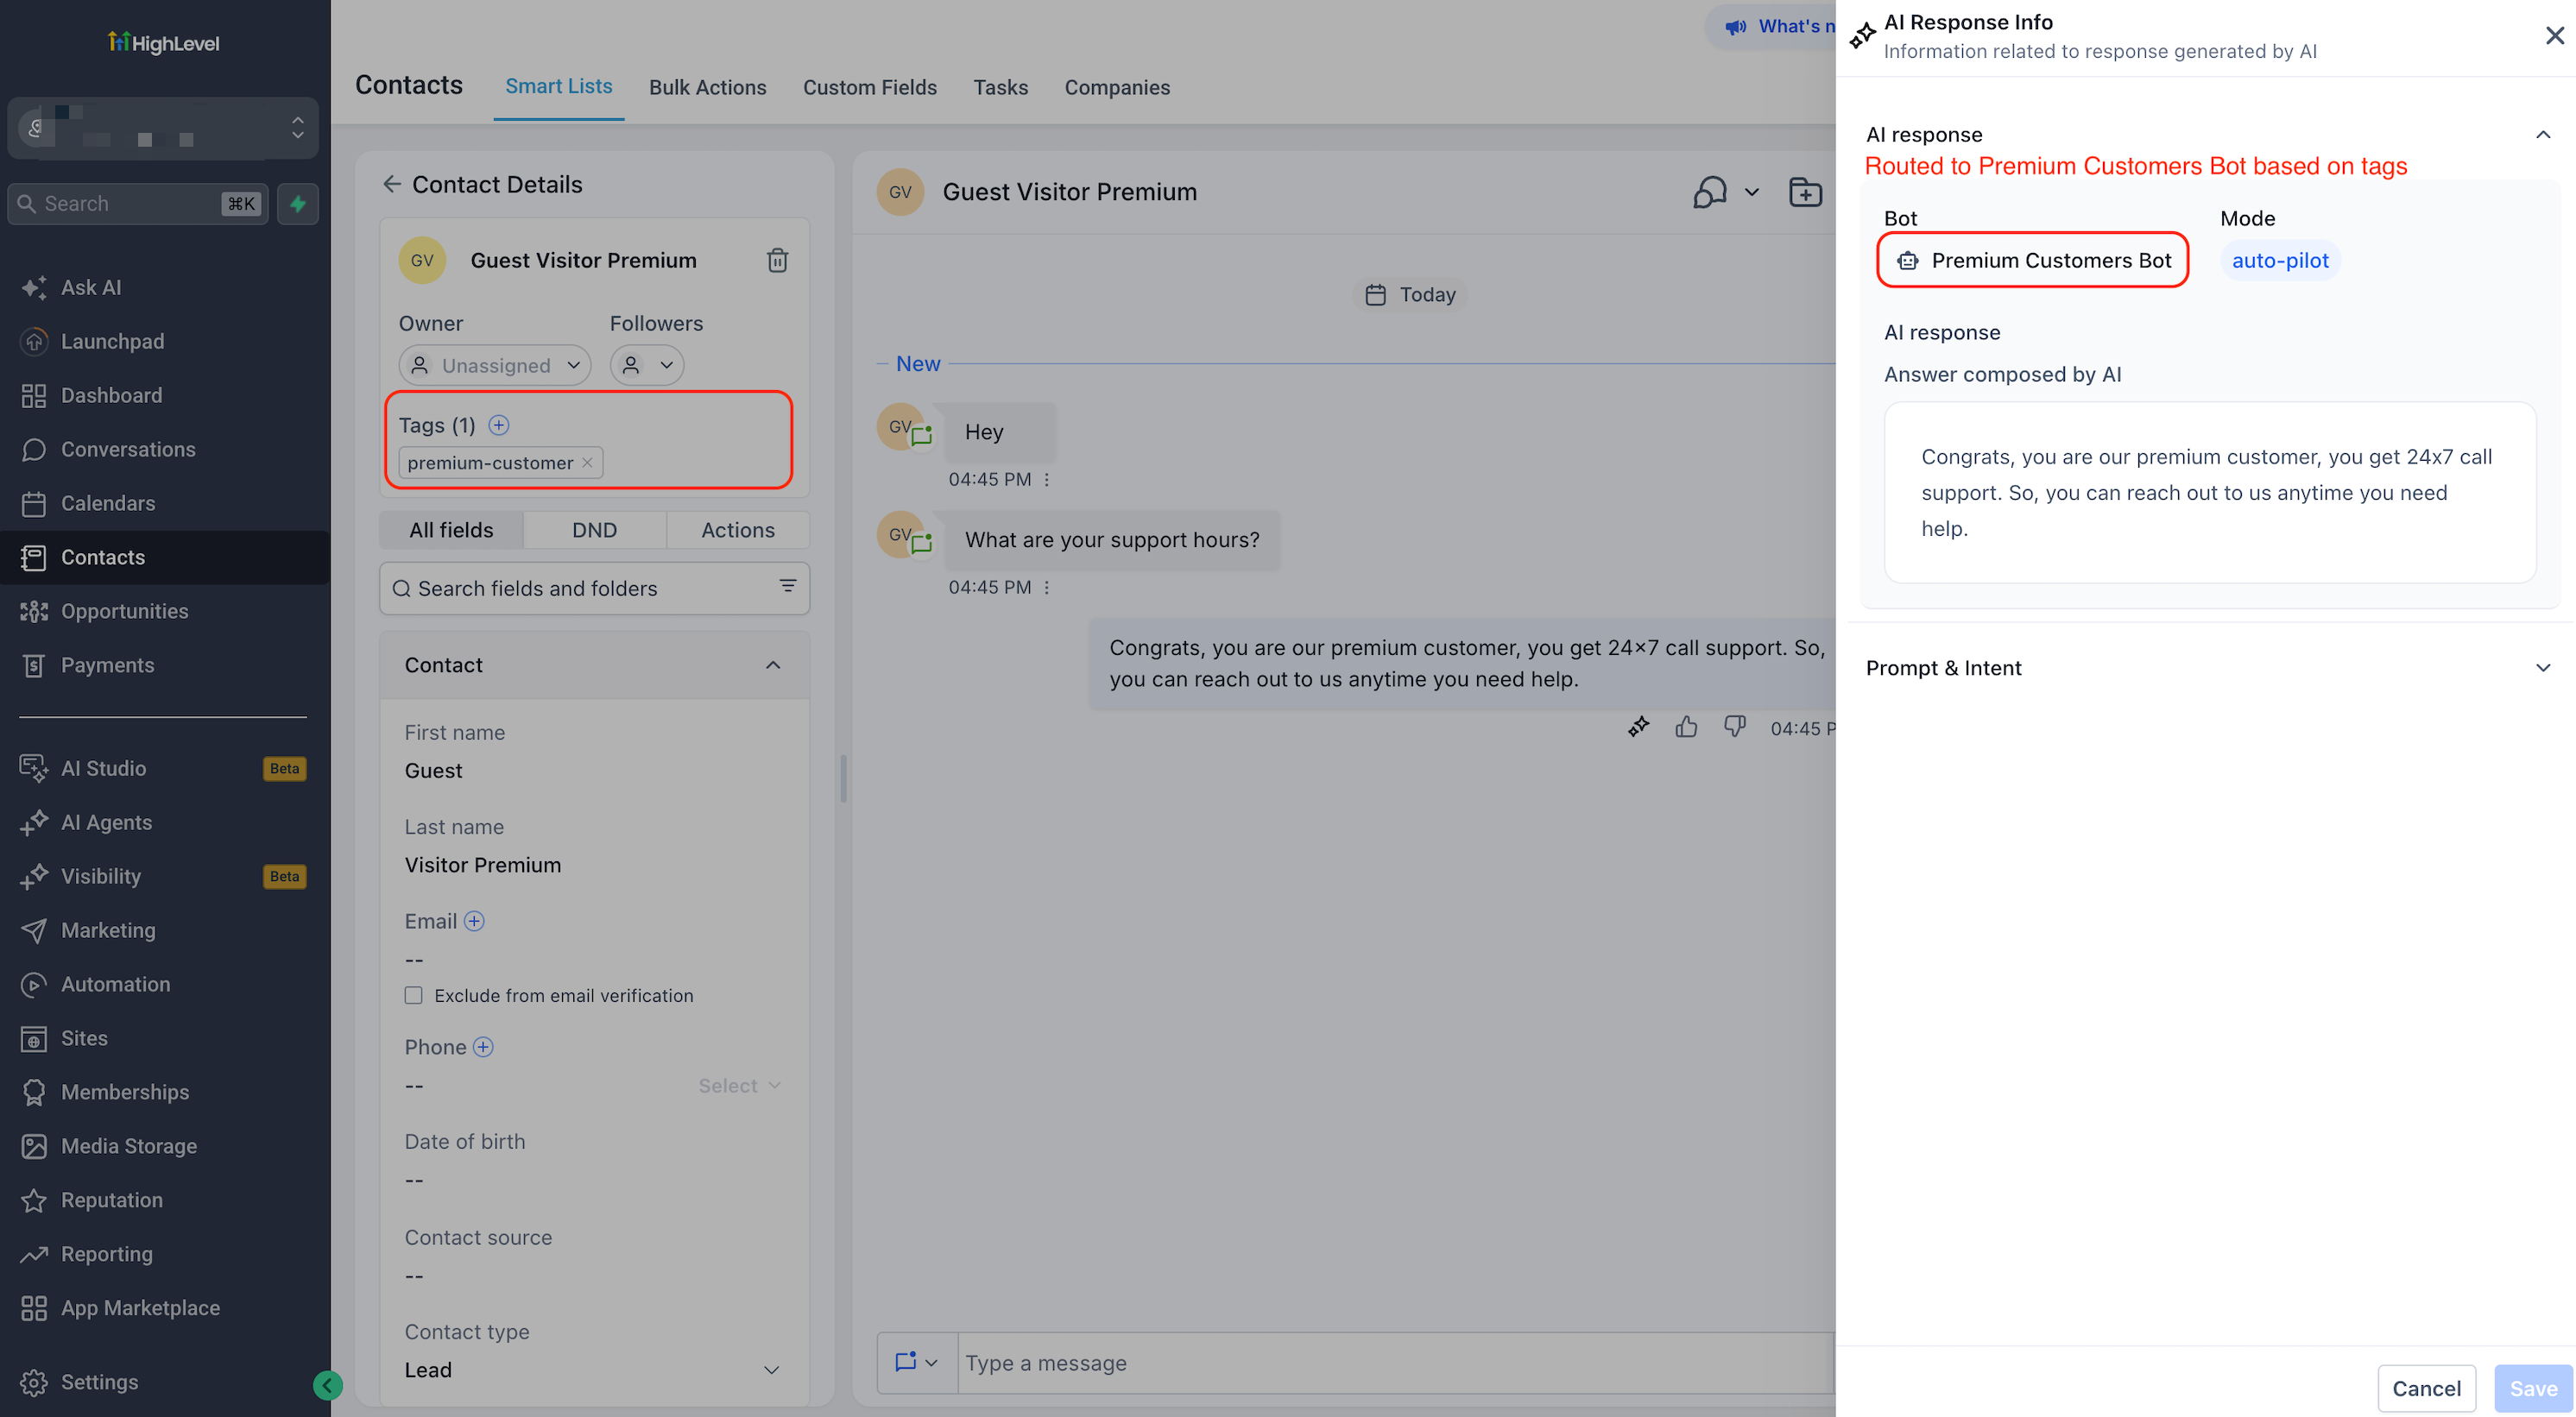
Open AI Response Info.
Confirm that the Premium Customers Bot generated the response.
Frequently Asked Questions
Q: The Agent tab is missing from my Chat Widget. How do I select a Conversation AI bot?
A: Conversation AI bots are no longer selected from the website Chat Widget builder. Create and install the widget under Sites > Chat Widgets, then open the required bot under AI Agents > Conversation AI > Deploy and assign it to the Chat Widget channel.
Q: Do I still need a workflow to make a second Conversation AI bot respond?
A: No. A bot can now be assigned directly to channels through its Deploy settings. Workflows remain useful when you need to assign a bot directly to a particular contact.
Q: Can two bots use the same channel?
A: Yes. They must use different destinations or tag conditions so HighLevel can determine which bot should respond.
Q: Can two bots use the same Chat Widget?
A: Yes. For example, one bot can serve contacts with a regular-customer tag while another serves contacts with a premium-customer tag.
Q: What happens when a bot is assigned directly to a contact?
A: The directly assigned bot takes priority over normal channel and tag routing.
Q: Does Transfer Bot override the Deploy settings?
A: A transferred bot is directly assigned to the contact and takes priority over the standard routing rules.
Q: What happens to the existing Primary Bot when I enable Channel Management?
A: HighLevel automatically assigns it to the channels it previously supported. Review its Deploy tab after migration to confirm the settings.
Q: Why can’t I save a channel configuration?
A: Another bot may already use the same channel, destination, and tag conditions. Change one or more routing settings to create a distinct rule.
Q: What happens when no bot matches the contact’s tags?
A: The bot will not qualify under that tag-based deployment. Review your broader channel assignments and fallback plan before enabling the setup.
Q: Does disabling a channel stop the bot from responding there?
A: Disabling the channel removes that bot’s normal deployment eligibility for the channel. A direct contact assignment may still affect which bot is attached to the conversation.
Q: How can I confirm which bot generated a response?
A: Open the conversation’s AI Response Info panel and review the bot name shown with the AI response.
Related Articles
Was this article helpful?
That’s Great!
Thank you for your feedback
Sorry! We couldn't be helpful
Thank you for your feedback
Feedback sent
We appreciate your effort and will try to fix the article