You can move an eligible domain purchased through HighLevel directly into another Cloudflare account using the self-service transfer workflow. This is a Cloudflare-to-Cloudflare account ownership move, so the registrar does not change. No EPP or authorization code is required, and you do not need to contact HighLevel Support to start the move.
TABLE OF CONTENTS
- Prerequisites and Limitations
- Prepare the Destination Cloudflare Account
- Start the Transfer in HighLevel
- Accept the Move in Cloudflare
- After the Transfer Completes
- Troubleshoot a Cloudflare Account Transfer
- Frequently Asked Questions
- Related Articles
Prerequisites and Limitations
Before starting the move, confirm that the domain and destination Cloudflare account meet these requirements:
- The domain was purchased through HighLevel.
- The destination is another Cloudflare account that you can access.
- The domain has already been added to the destination Cloudflare account.
- A Cloudflare plan has been selected. The Free plan is supported.
- The required DNS records are configured in the destination account.
- DNSSEC is disabled.
- Proxying is turned off for all DNS records in the destination account.
- The domain is not restricted by the 60-day ICANN transfer lock.
- There is no other pending Cloudflare account move for the domain.
Prepare the Destination Cloudflare Account
Prepare the destination Cloudflare account before initiating the transfer in HighLevel.
- Sign in to the destination Cloudflare account.
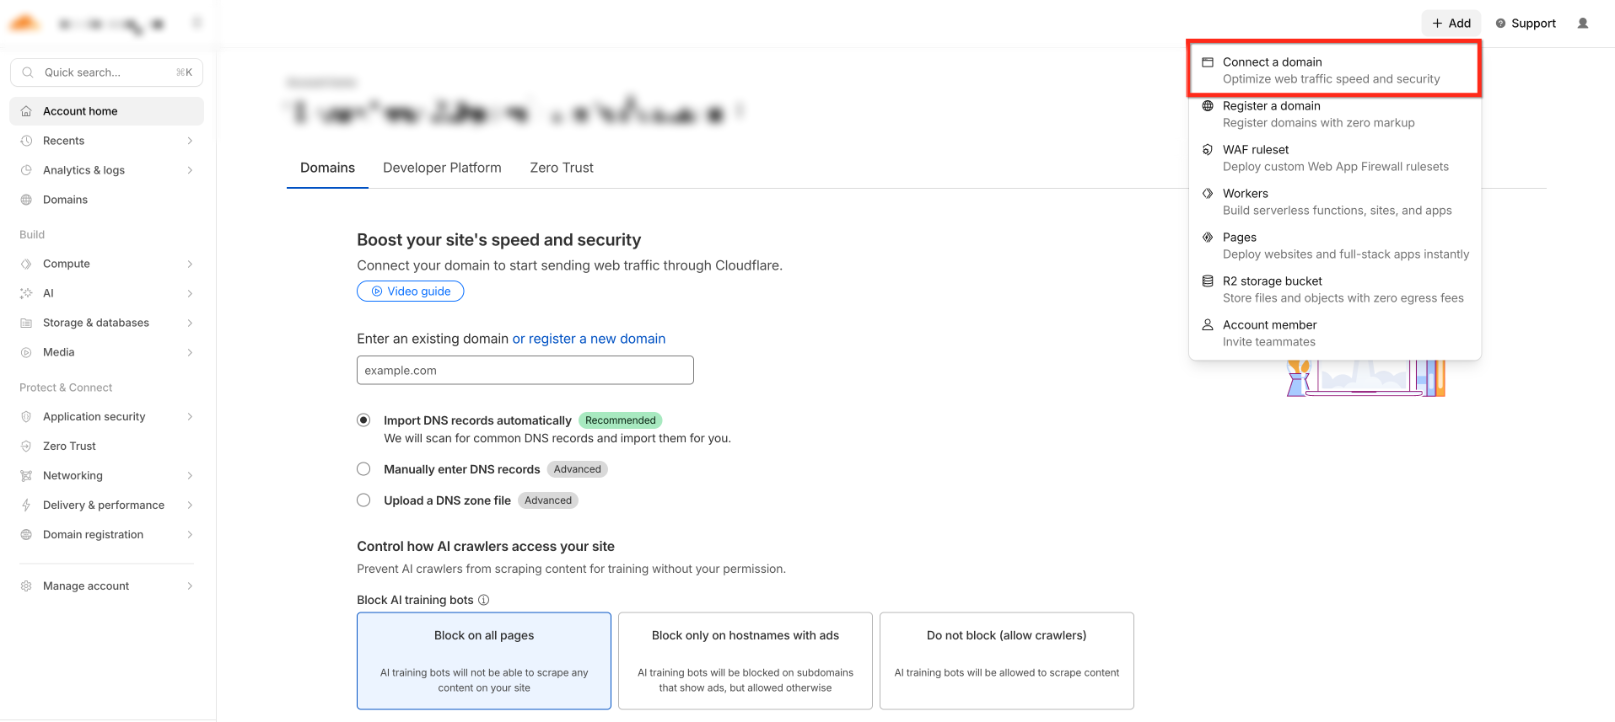
- Go to + Add → Connect a domain and add the domain.
- Select a Cloudflare plan. The Free plan is supported.
- Confirm that the required DNS records exist in the destination zone.
- Turn proxying off for all DNS records.
- Confirm that DNSSEC is disabled.
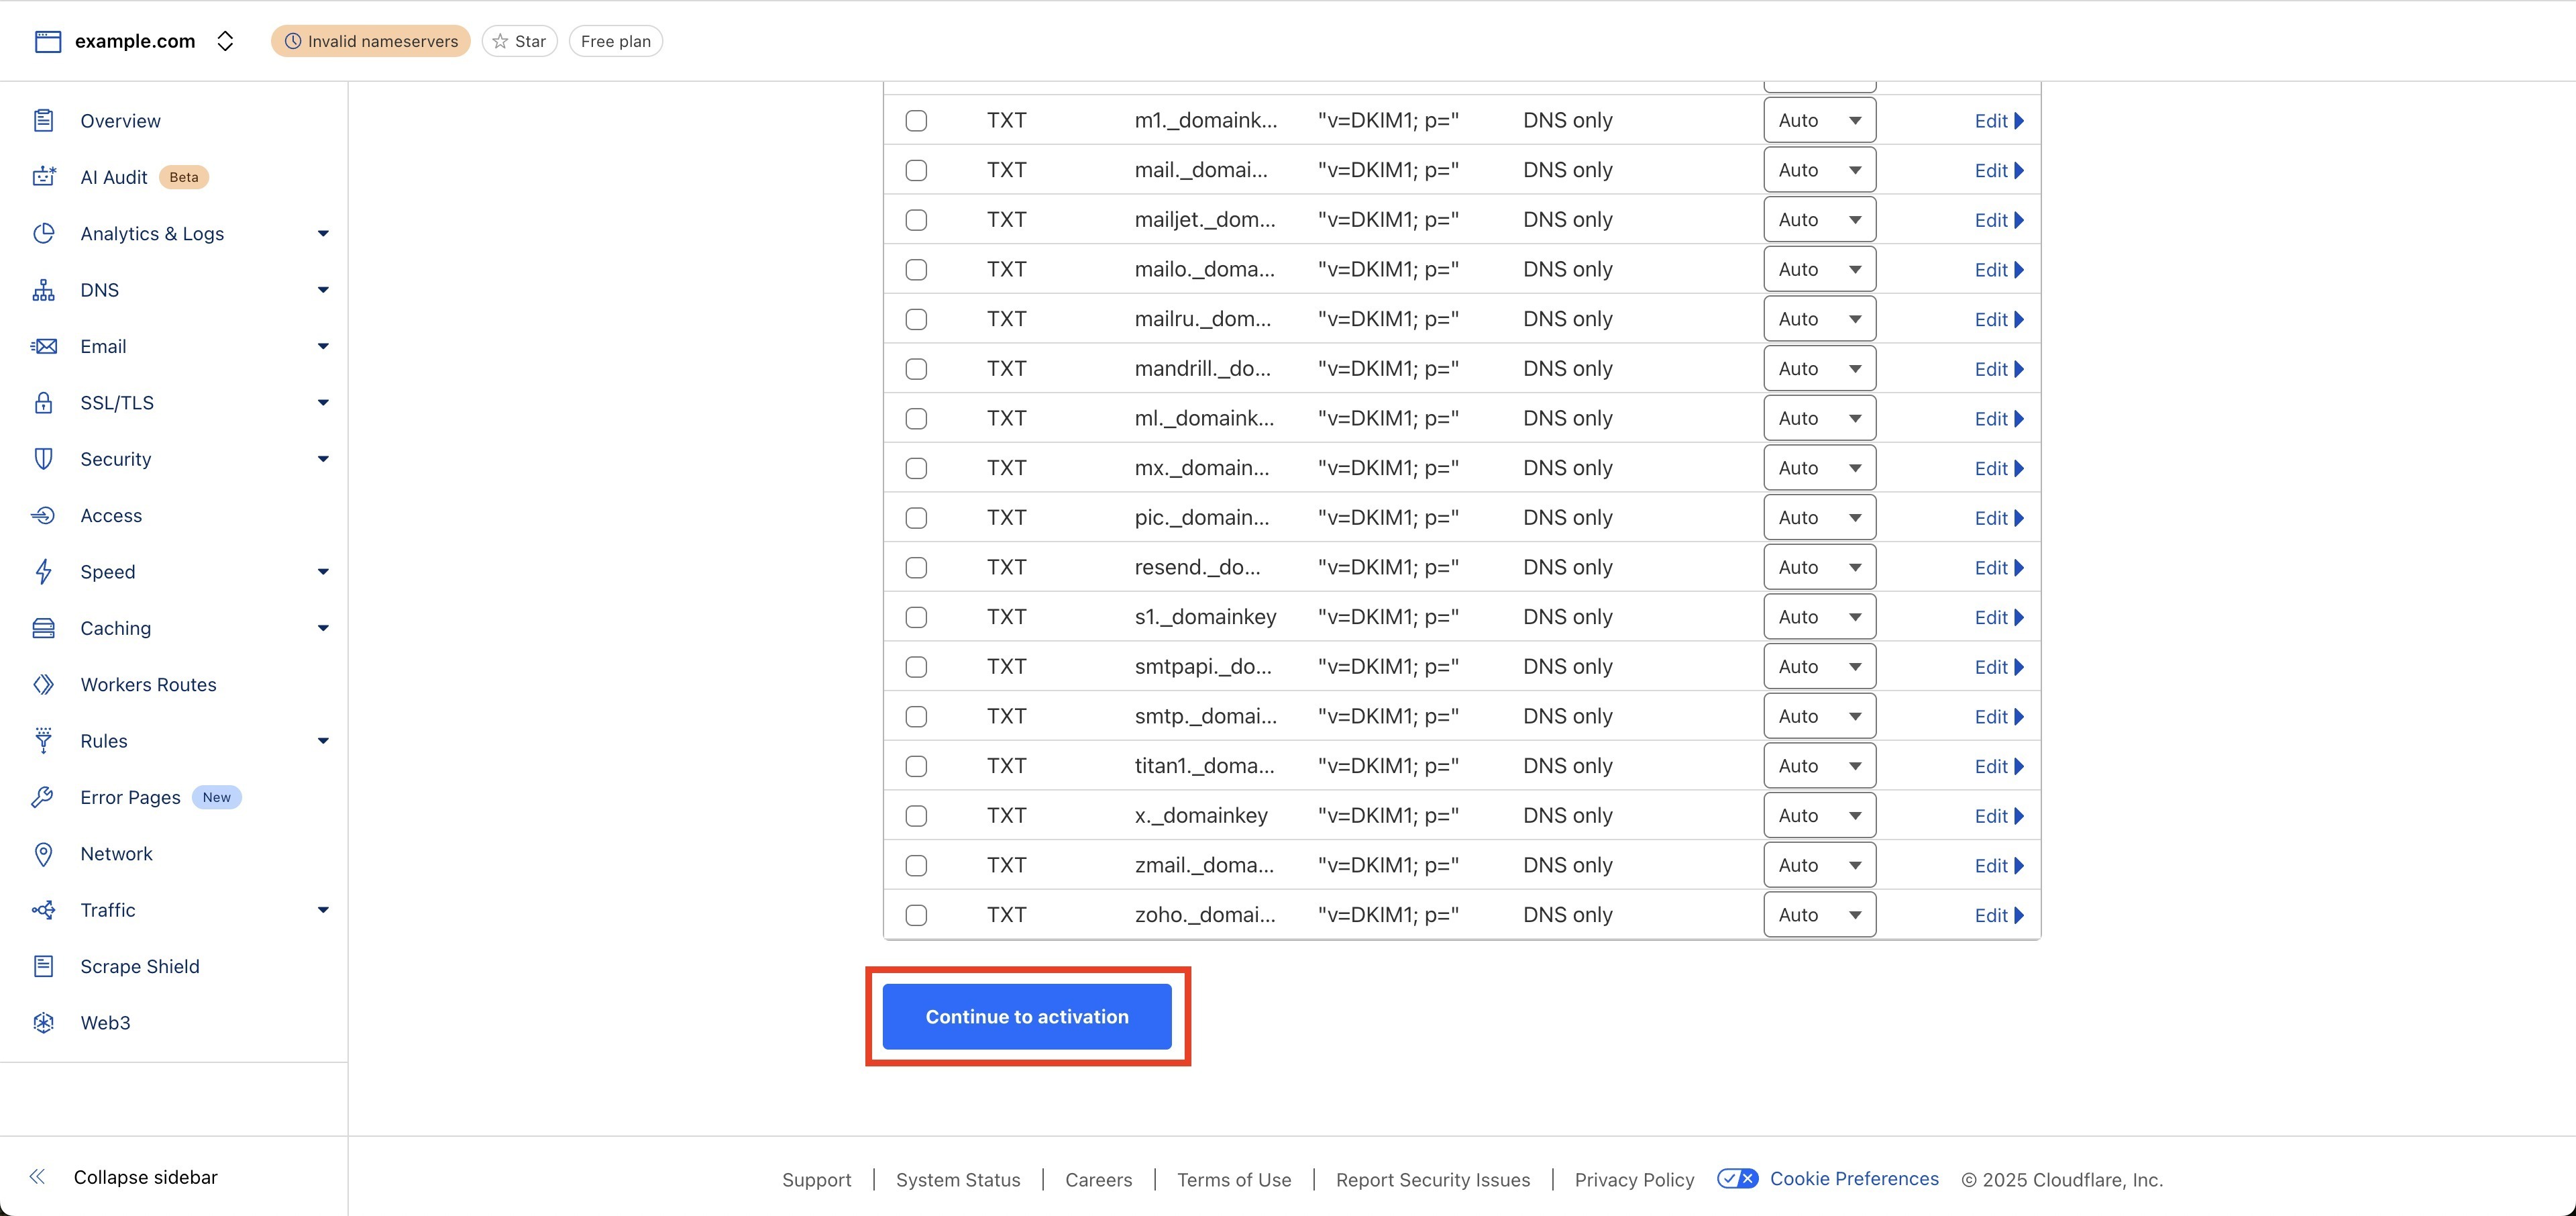
Important: Cloudflare does not copy DNS records during the move. The DNS records configured in the destination account are used after the transfer completes.
Start the Transfer in HighLevel
After the destination Cloudflare account is prepared, initiate the move directly from the domain's settings in HighLevel.
Step 1: Open the Transfer Settings
- From the applicable Sub-Account, go to Settings → Domains & URL Redirects.
- Locate the domain and click Manage.
- Open Advanced Settings → Configuration.
- Select Transfer to Another Registrar.
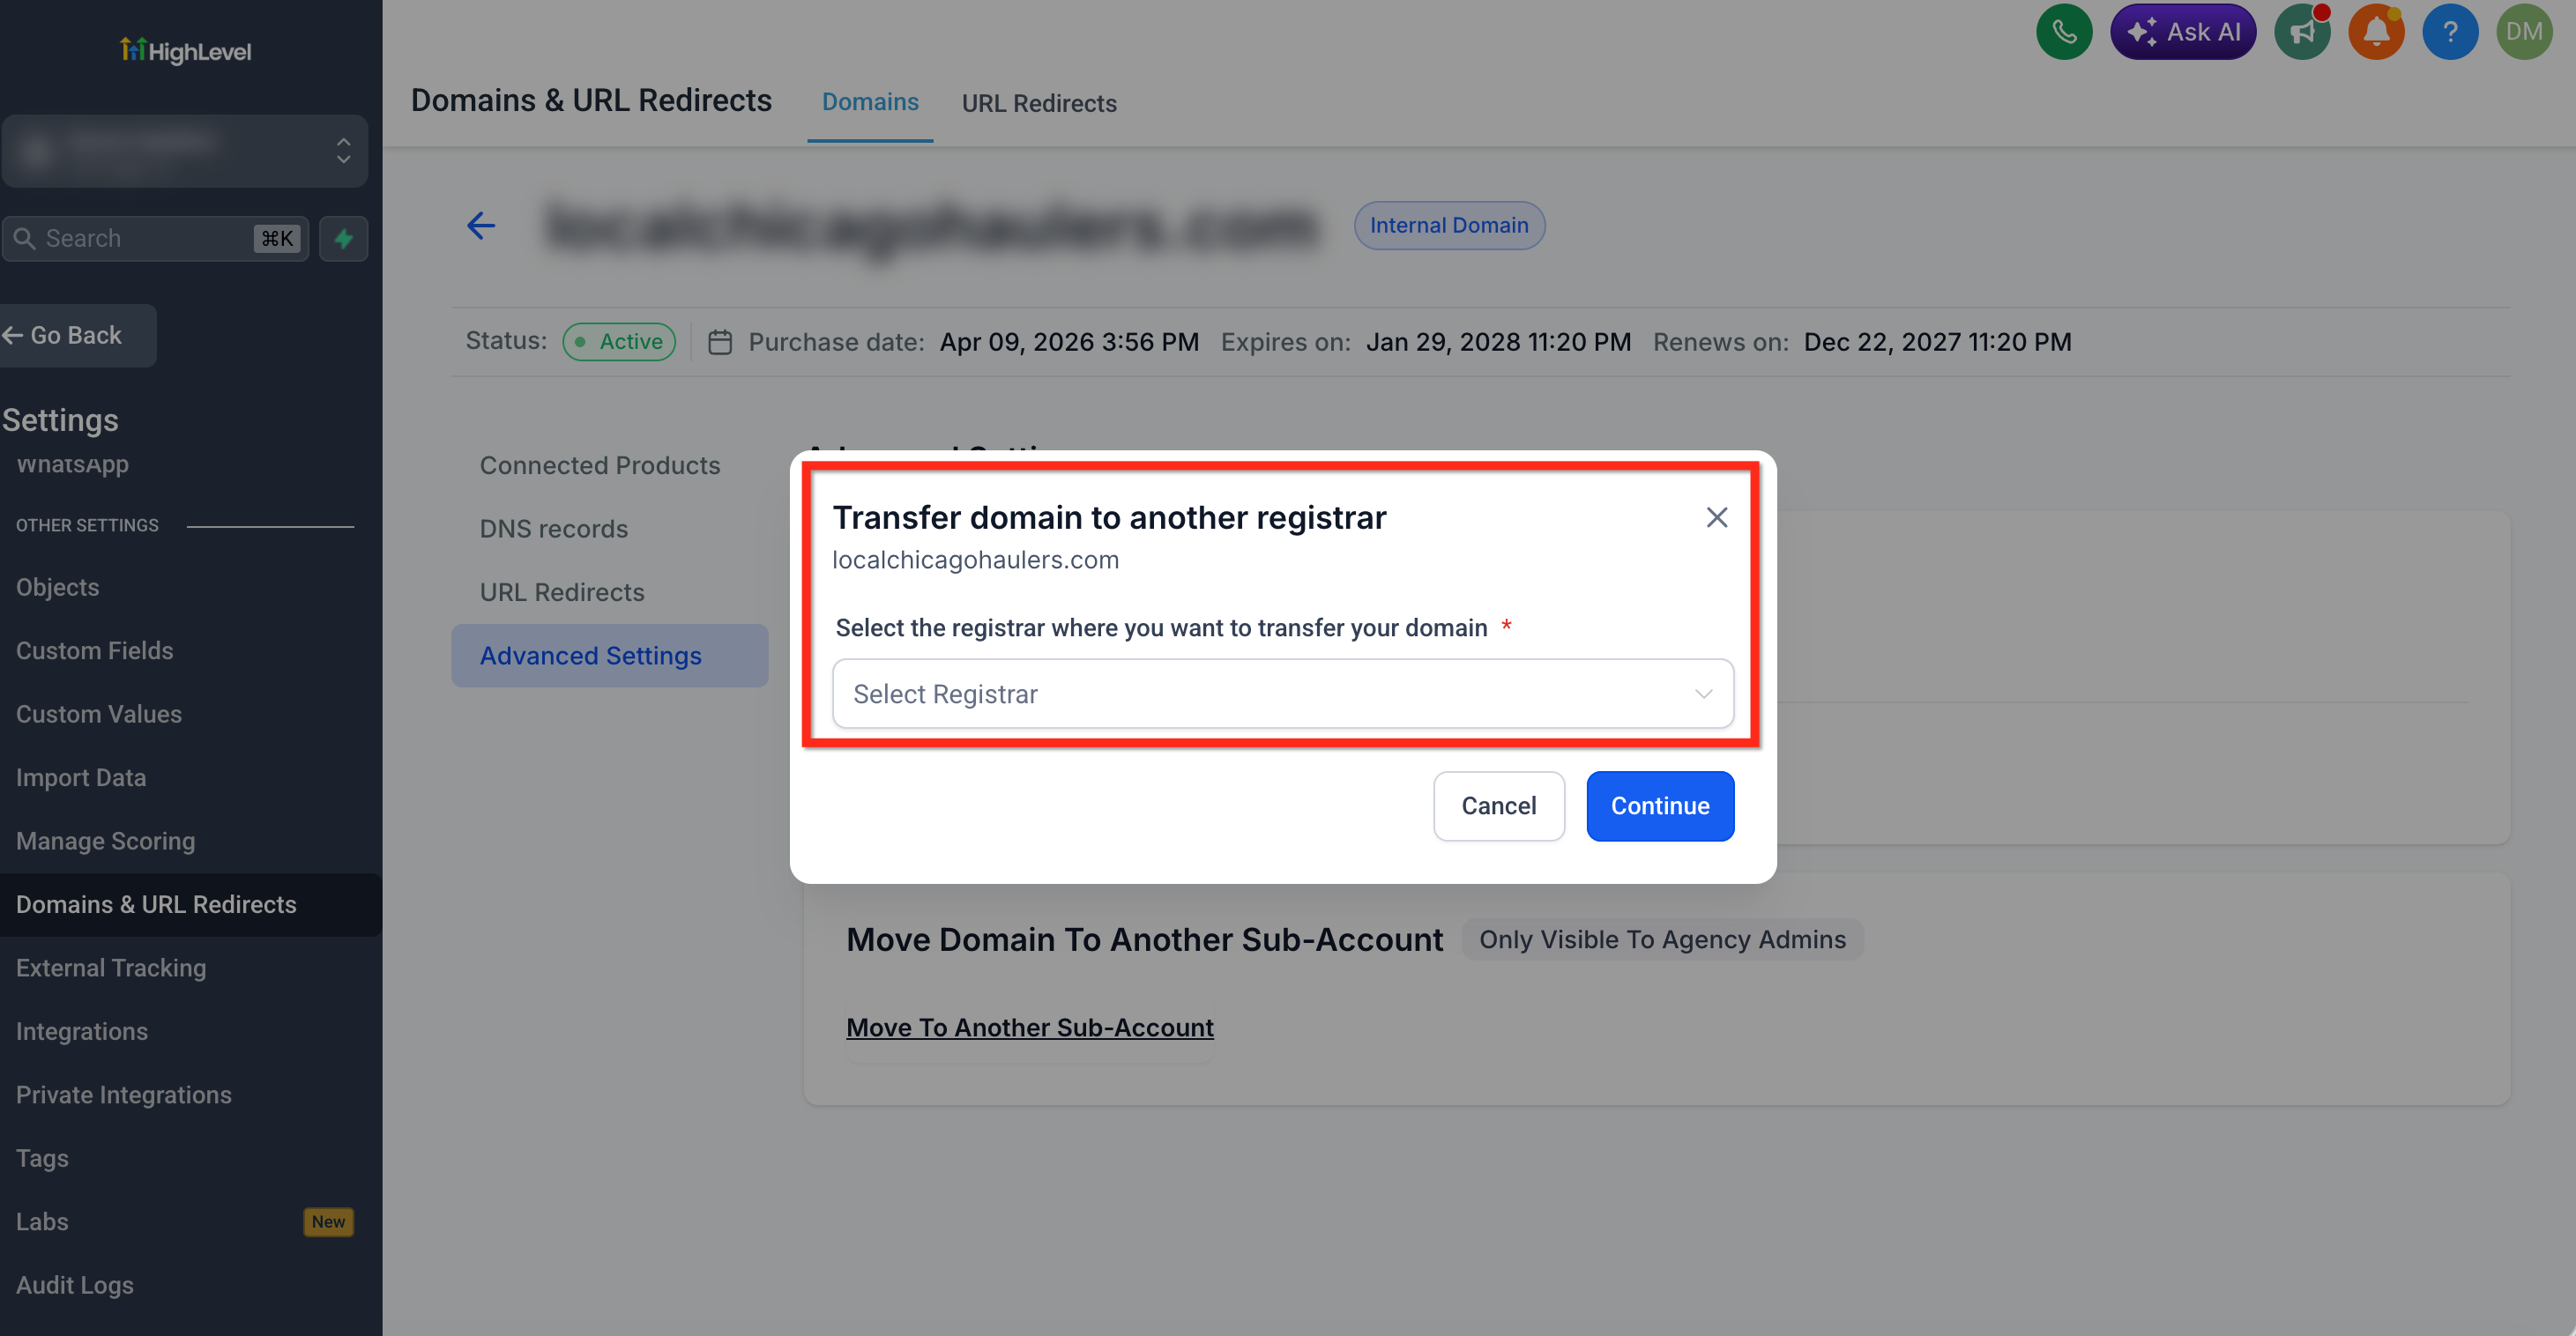
Note: Although the option is labeled Transfer to Another Registrar, choosing the Cloudflare account-move option does not change registrars. The domain remains registered with Cloudflare.
Step 2: Review Transfer Eligibility
Selecting Transfer to Another Registrar runs an eligibility check for the domain.
If the domain is still subject to the 60-day transfer restriction, the modal shows the date when the domain becomes eligible.
Step 3: Choose the Cloudflare Account Transfer
Choose the option to move the domain to another Cloudflare account.
Review the destination-account requirements before continuing.
Step 4: Enter the Cloudflare Account ID
Enter the Cloudflare Account ID for the destination account, then click Start transfer.
HighLevel submits the Cloudflare account-move request on your behalf.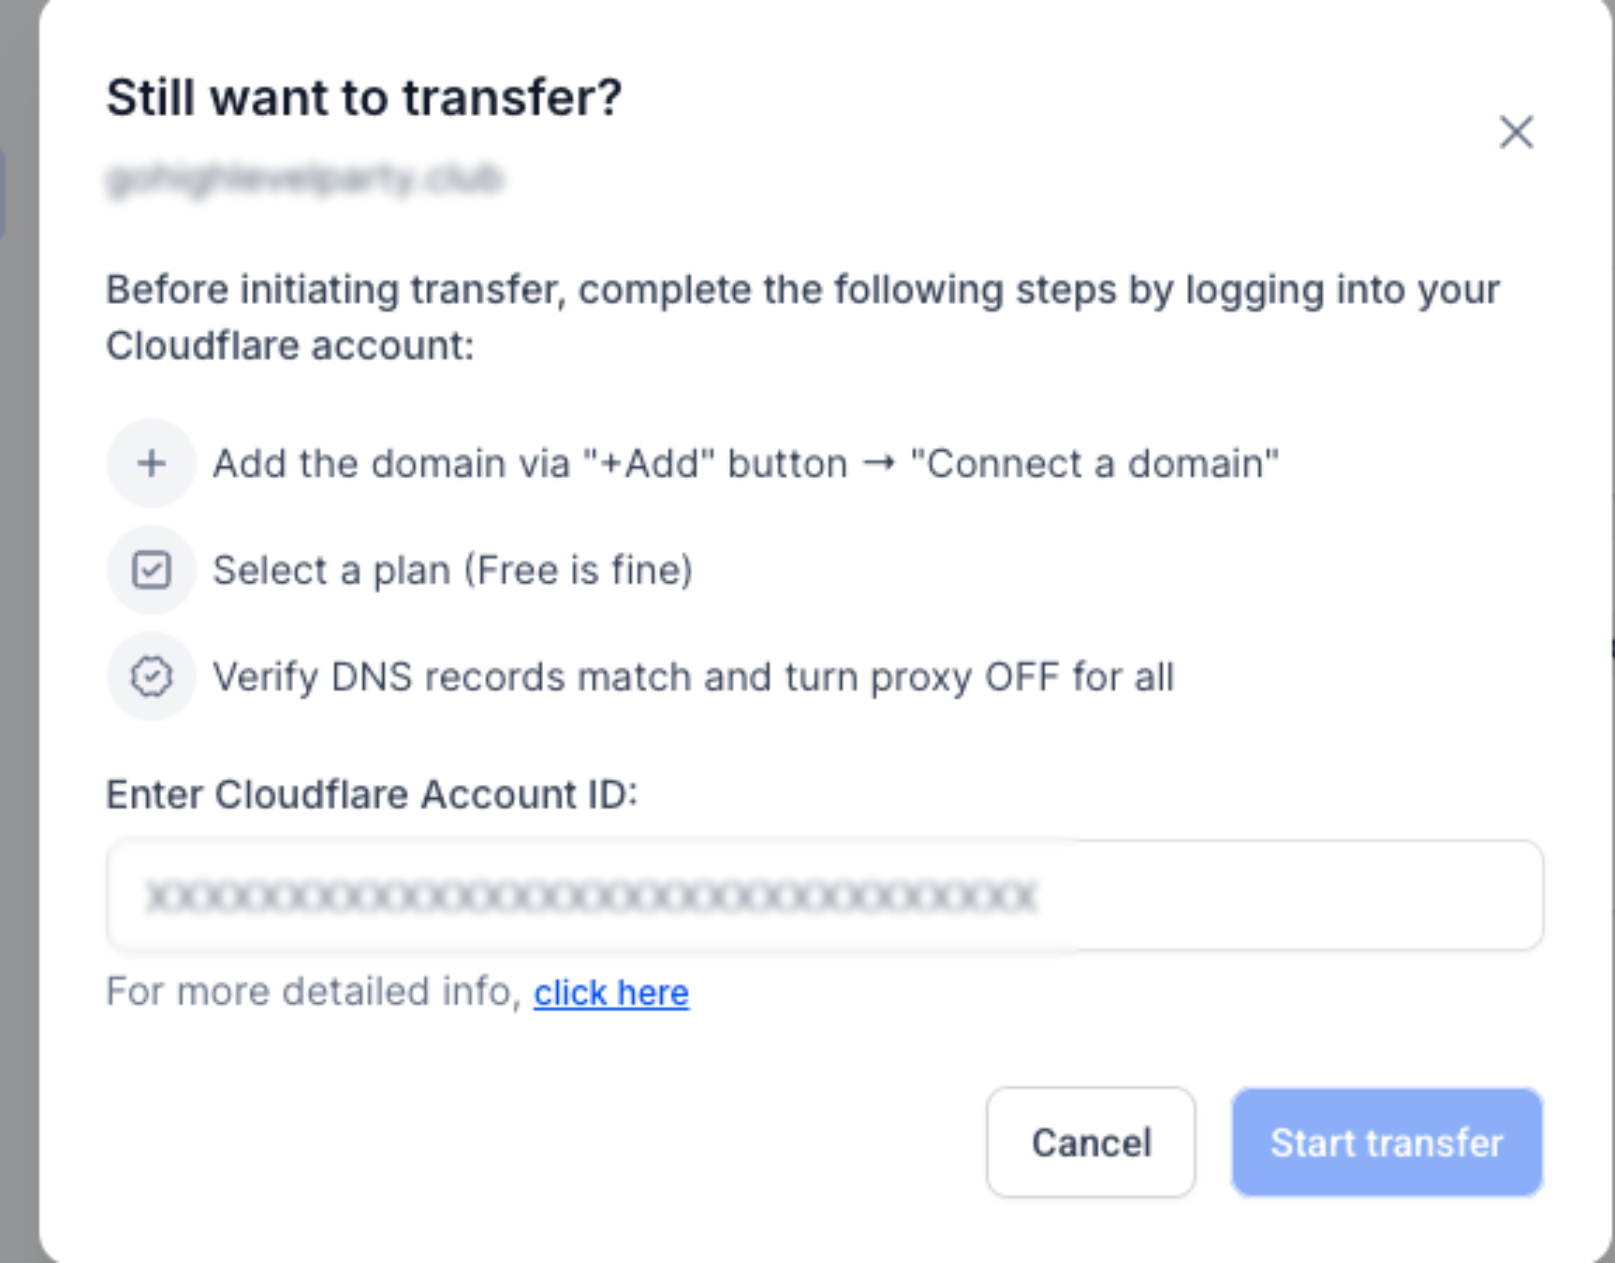
Step 5: Confirm the Transfer Was Initiated
After the request is submitted successfully, the transfer workflow displays Transfer has been initiated.
The move is not complete until it is accepted in the destination Cloudflare account.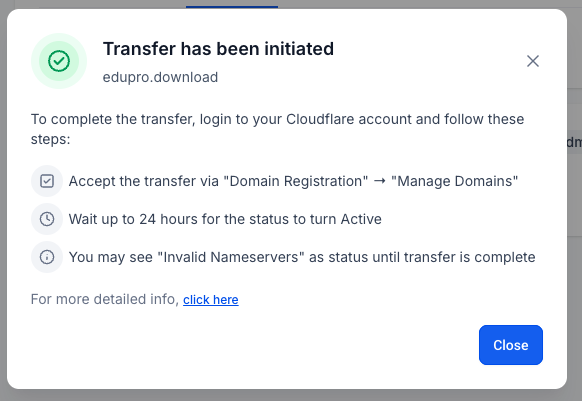
Accept the Move in Cloudflare
After HighLevel initiates the move, complete the process from the destination Cloudflare account.
- Sign in to the destination Cloudflare account.
- Go to Domain Registration → Manage Domains.
- Locate the applicable domain and open its management options.
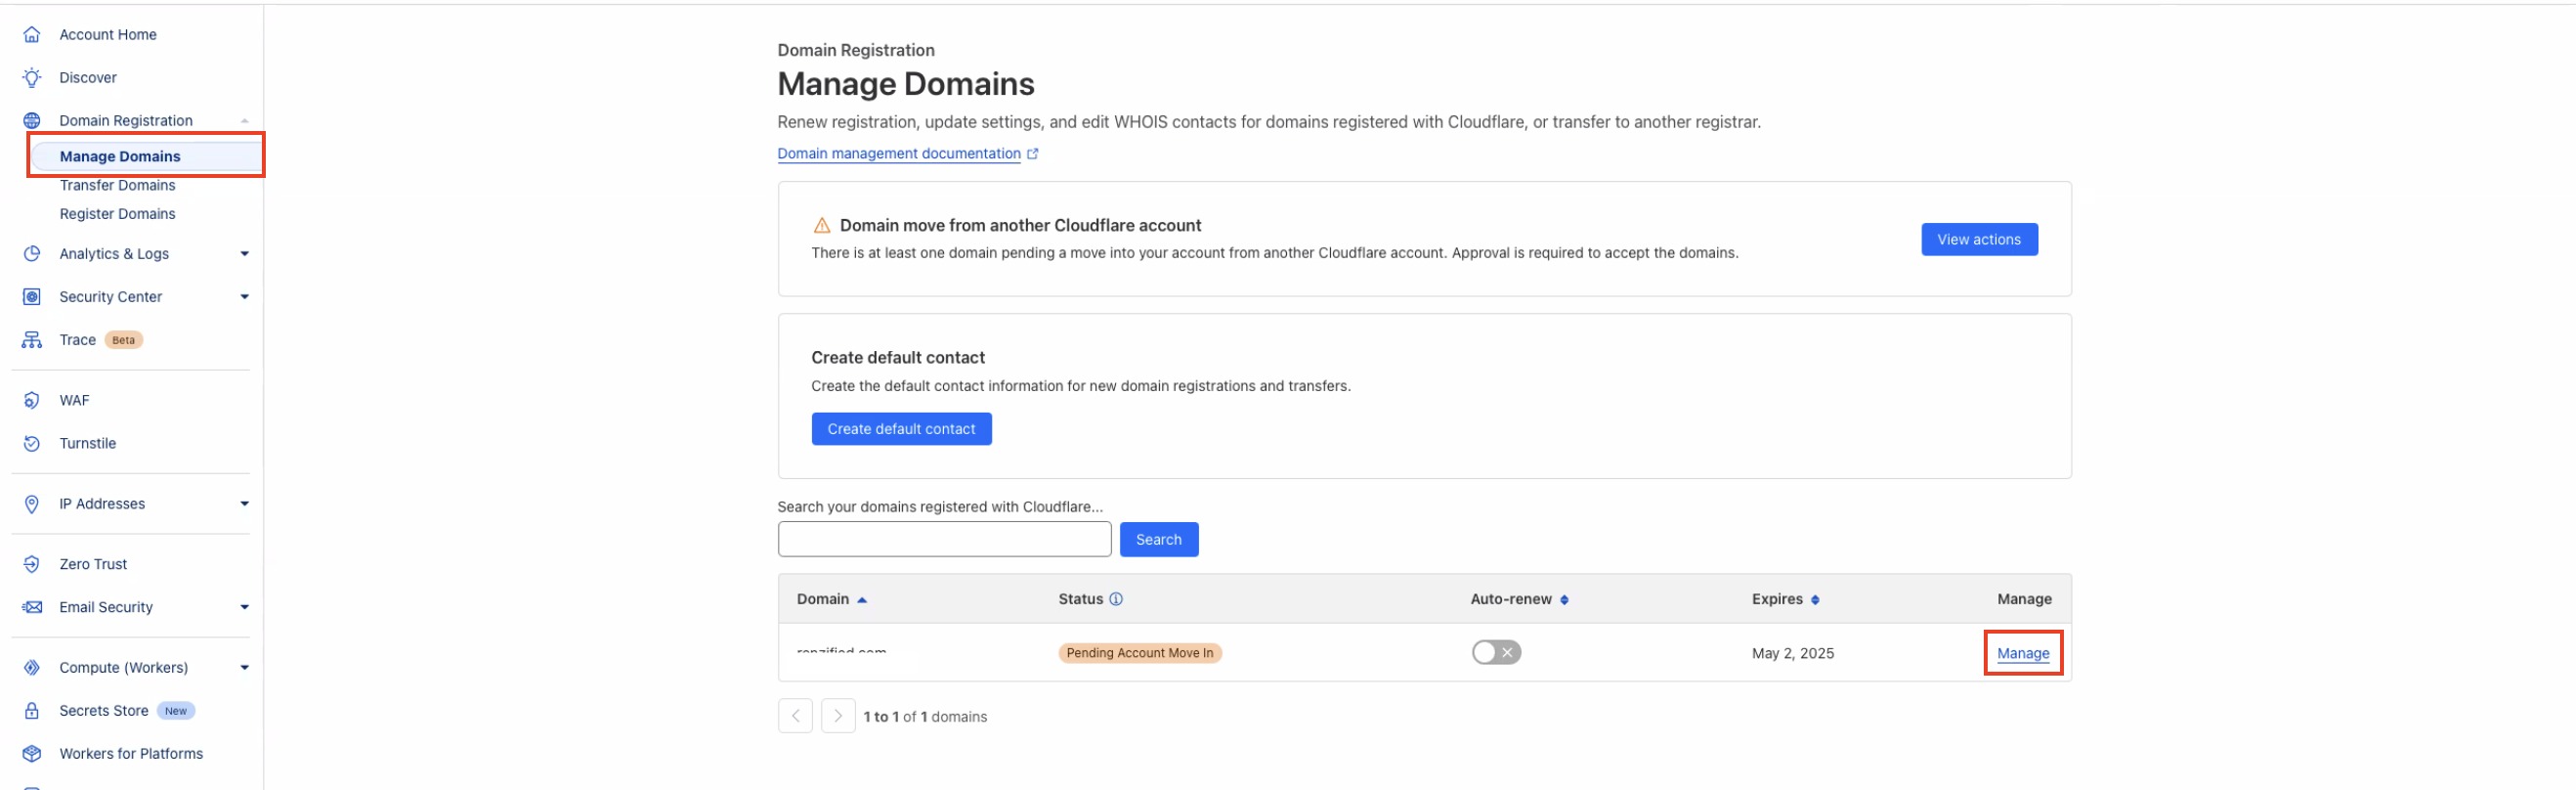
- Accept the pending move.
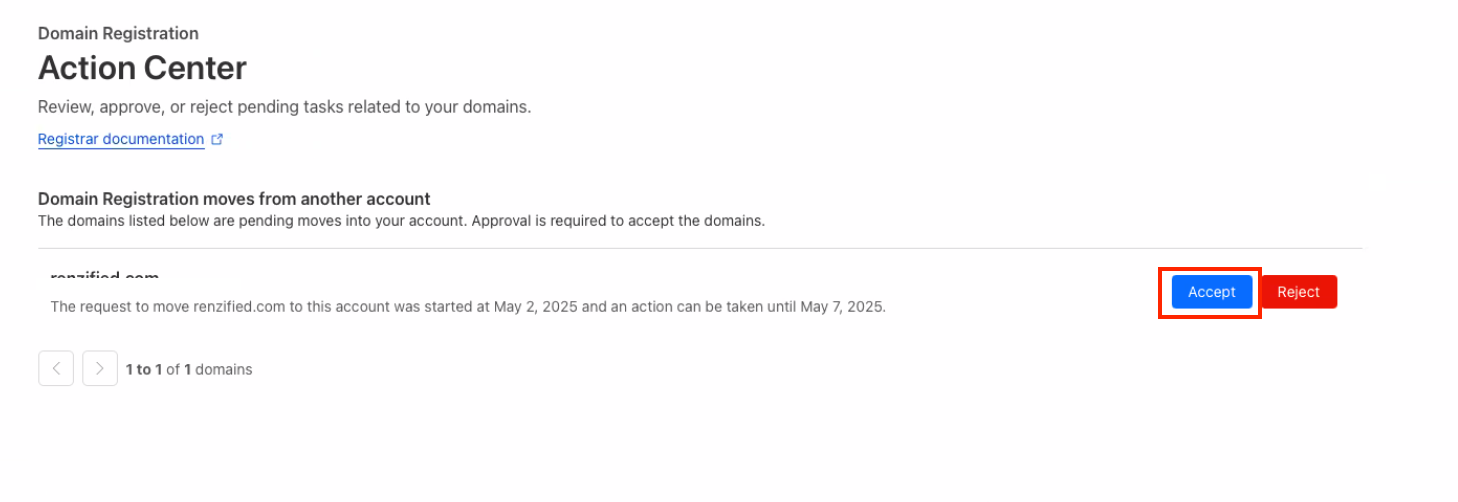
- Allow up to 24 hours for the move to complete.
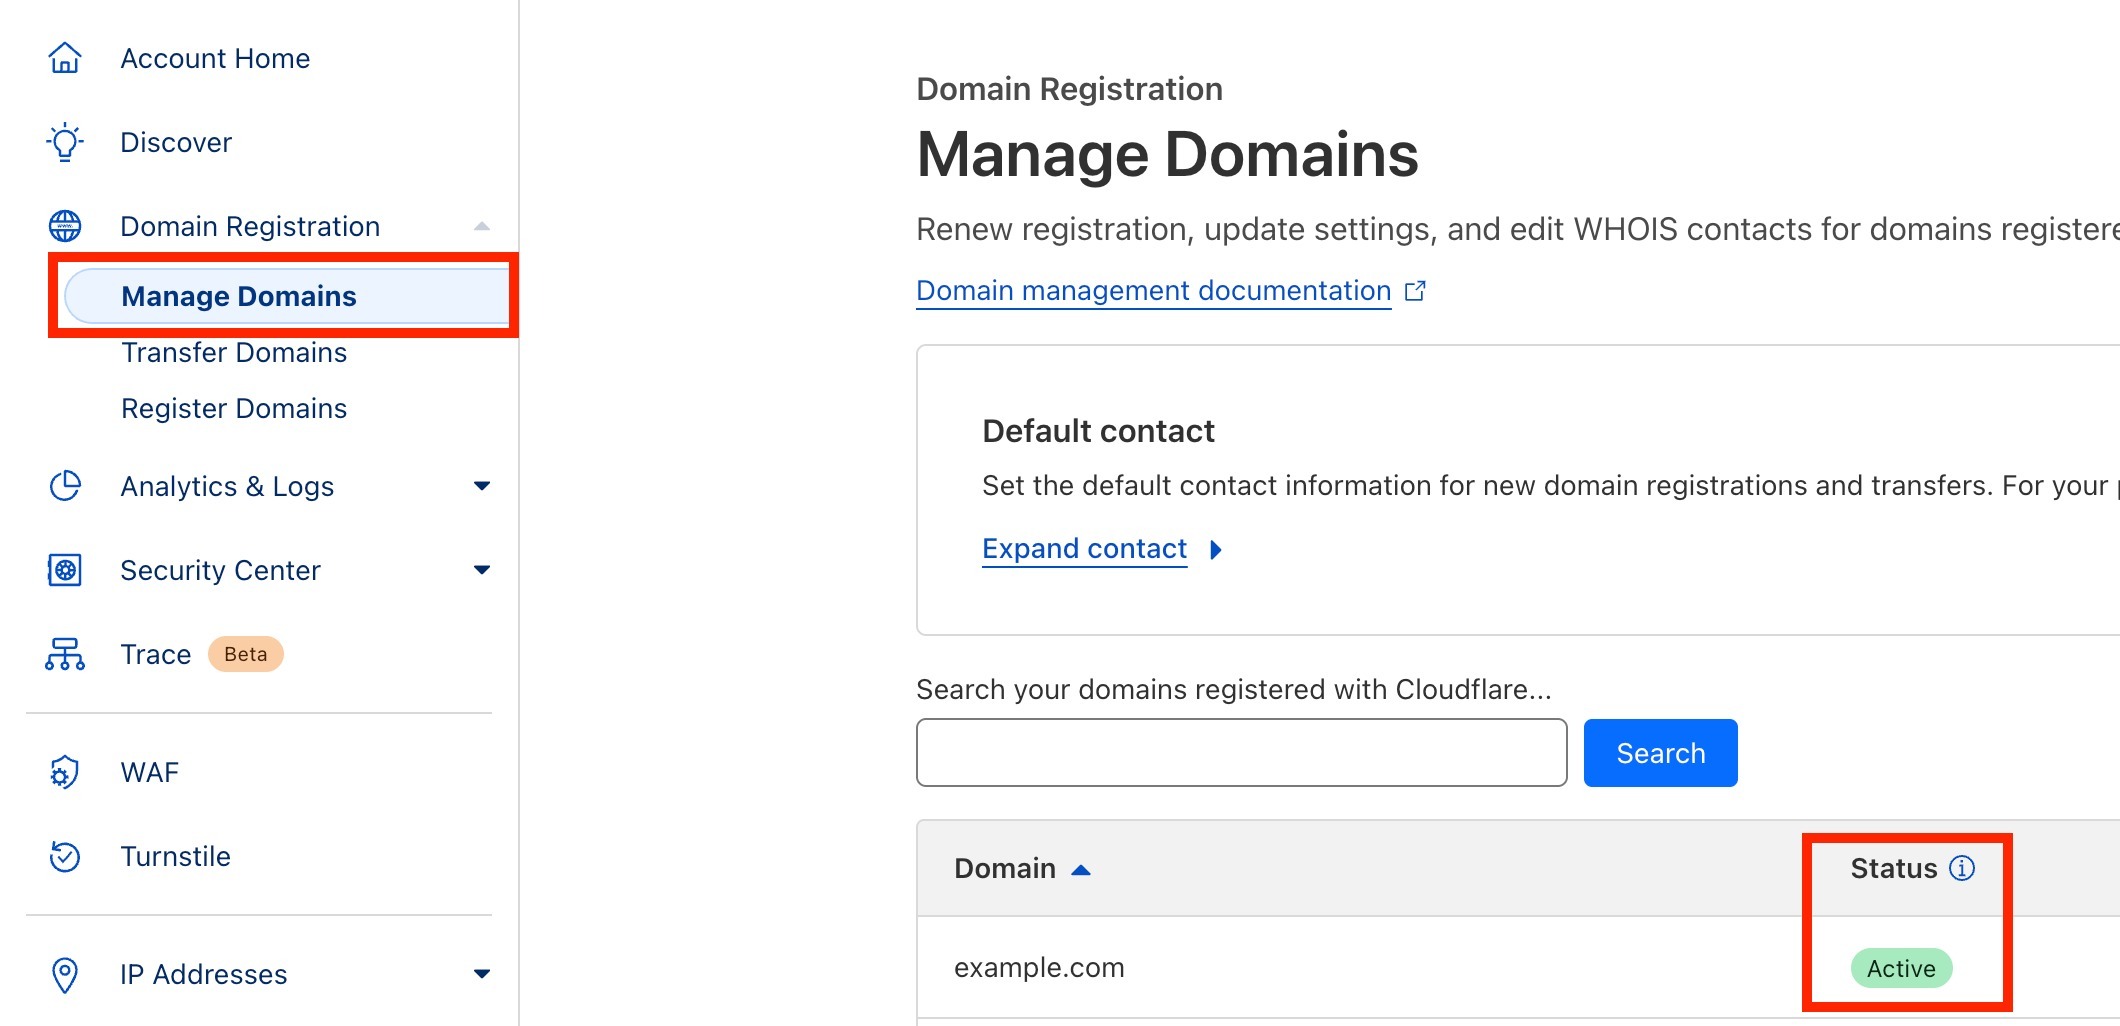
After completion, the domain should show as Active in the destination Cloudflare account.
After the Transfer Completes
Understanding what happens after the move helps you confirm ownership, renewal, billing, and DNS responsibility have successfully moved to the destination Cloudflare account.
After the Cloudflare account move completes:
- The domain is removed from the applicable HighLevel Sub-Account / Domain Hub.
- Scheduled HighLevel auto-renewal for the domain is canceled.
- The transfer-out request is marked complete.
- Future renewal and billing are managed directly in the destination Cloudflare account.
Confirm that the domain shows as active in Cloudflare and that the expected DNS records are serving correctly.
Troubleshoot a Cloudflare Account Transfer
Use the following guidance if the Cloudflare account move cannot be started or does not appear complete.
Transfer Already in Progress
Only one pending Cloudflare account move is allowed per domain.
If HighLevel shows Transfer already in progress, it does not submit another request. The existing move must first be accepted in Cloudflare or allowed to expire before another transfer can be started.
Invalid Cloudflare Account ID
Confirm that the Account ID was copied from the correct destination Cloudflare account. Correct the Account ID and retry the transfer.
Domain Not Added to the Destination Account
The domain must already be added to the destination Cloudflare account before the move can begin.
Go to + Add → Connect a domain in Cloudflare, add the domain, select a plan, prepare the DNS records, then retry the transfer in HighLevel.
Invalid Nameservers
After accepting the move, Cloudflare may temporarily show Invalid Nameservers while the transfer is completing.
This can be expected during the account move. Allow up to 24 hours and check the domain again. Once the move completes, the domain should show as Active.
Frequently Asked Questions
Q: Do I need an EPP or authorization code?
No. This is a Cloudflare-to-Cloudflare account move, so the registrar does not change and an EPP or authorization code is not required.
Q: Can I use this process for a domain purchased outside HighLevel?
No. This workflow applies to eligible domains purchased through HighLevel.
Q: Why is my domain not eligible for transfer yet?
The domain may still be subject to the 60-day transfer restriction. When this applies, the transfer modal shows the date when the domain becomes eligible.
Q: Do my DNS records automatically move to the destination Cloudflare account?
No. Cloudflare does not copy DNS records during the account move. Prepare the required DNS records in the destination account before starting the transfer.
Q: What happens to HighLevel renewal after the move completes?
Scheduled HighLevel auto-renewal is canceled. Future renewal and billing are managed directly through the destination Cloudflare account.
Related Articles
- Transfer a Domain Out of HighLevel
- Configure & Connect Purchased Domains
- How to Purchase a Domain in HighLevel
- Domains - Transfer-In Process
Was this article helpful?
That’s Great!
Thank you for your feedback
Sorry! We couldn't be helpful
Thank you for your feedback
Feedback sent
We appreciate your effort and will try to fix the article