With customizable calendar notifications, you can send In-App and tailored emails, SMS and WhatsApp messages when appointments are booked, canceled, rescheduled, or need reminders or follow-ups. Notifications can be configured for Contacts, Guests, Users, and any additional email addresses/phone numbers you specify. This feature allows you to streamline notifications to suit your business needs, ensuring effective communication with your customers
TABLE OF CONTENTS
- What are Customizable Calendar Notifications?
- Available Notification Options
- How to Set Up Appointment Notifications
- Email Appointment Notifications
- Using Custom Values in Notifications
- In-App Appointment Notifications
- SMS Appointment Notifications
- Whatsapp Appointment Notifications
- Important Notes
- Frequently Asked Questions
- Related Articles
What are Customizable Calendar Notifications?
With customizable calendar notifications, you can send In-App and tailored emails, SMS and WhatsApp messages when appointments are booked, canceled, rescheduled, or need reminders or follow-ups. Notifications can be configured for Contacts, Guests, Users, and any additional email addresses/phone numbers you specify. This feature allows you to streamline notifications to suit your business needs, ensuring effective communication with your
Available Notification Options
You now have the option to set up six different types of appointment notifications. These notifications can be either email notifications and/or in-app notifications.
- Appointment Booked (Unconfirmed Status): Sent immediately when an appointment is booked with the unconfirmed status.
- Appointment Booked (Confirmed Status): Sent immediately when an appointment is booked with the confirmed status confirmed or when an appointment's status is updated to confirmed.
- Cancellation Email: Sent when an appointment is canceled, marked as no-show, or deemed invalid.
- Reschedule Email: Sent when the appointment date or time is changed.
- Reminder Email: Sent before the appointment based on the timing you configure.
- Follow-Up Email: Sent after the appointment based on the timing you configure.
Note: To prevent missed meetings, staff can enable internal alerts/notifications for appointments booked without a meeting link/location. Configure it in Settings → My Staff → [Staff] → Notification Settings → Calendar Notifications → Notify when meeting link/location is missing.
How to Set Up Appointment Notifications
You can manage email notifications at the individual calendar level. Follow these steps to configure your settings.
Step 1: Navigate to the Notifications Tab
- Go to Calendar > Calendar Settings.
- Select the calendar you wish to configure.
- Click on the Notifications tab.


Step 2: Customize Your Notifications
You have several options to customize each notification type to give you, your team, and your customers the best experience possible!
- Customize Content for each receiver type: Contact, Guest, User, or Additional Emails/Phone Numbers.
- Disable Notifications for certain receiver types if you do not want them to receive a specific notification


Email Appointment Notifications
- You will see a list of all notification types. Click on the one you'd like to configure, then go to the Email tab. Ensure the toggle is turned on.
- Choose an existing email template or directly customize the subject line and email body. To remove the selected template, click on the first option (None) in the email dropdown list.
- Optionally, send a test email to see how the notification looks.
- For Reminders and Follow-Up Emails, configure when the email should be triggered:
- For Reminders, set how far in advance the email should be sent before the appointment.
- For Follow-Up Emails, set how long after the appointment the email should be sent. You can also add multiple trigger timings if needed.
- For Reminders, set how far in advance the email should be sent before the appointment.
- Save Your Settings once you’ve configured the email notifications for each type and receiver.


Using Custom Values in Notifications
You can use Custom Values to personalize your email, SMS, and WhatsApp notifications.
When editing a message, click the **{ } merge field icon** and select from the **Custom Values** section in the dropdown.
This allows you to insert your own data into notifications, such as custom links, internal notes, or personalized details, without manual edits.
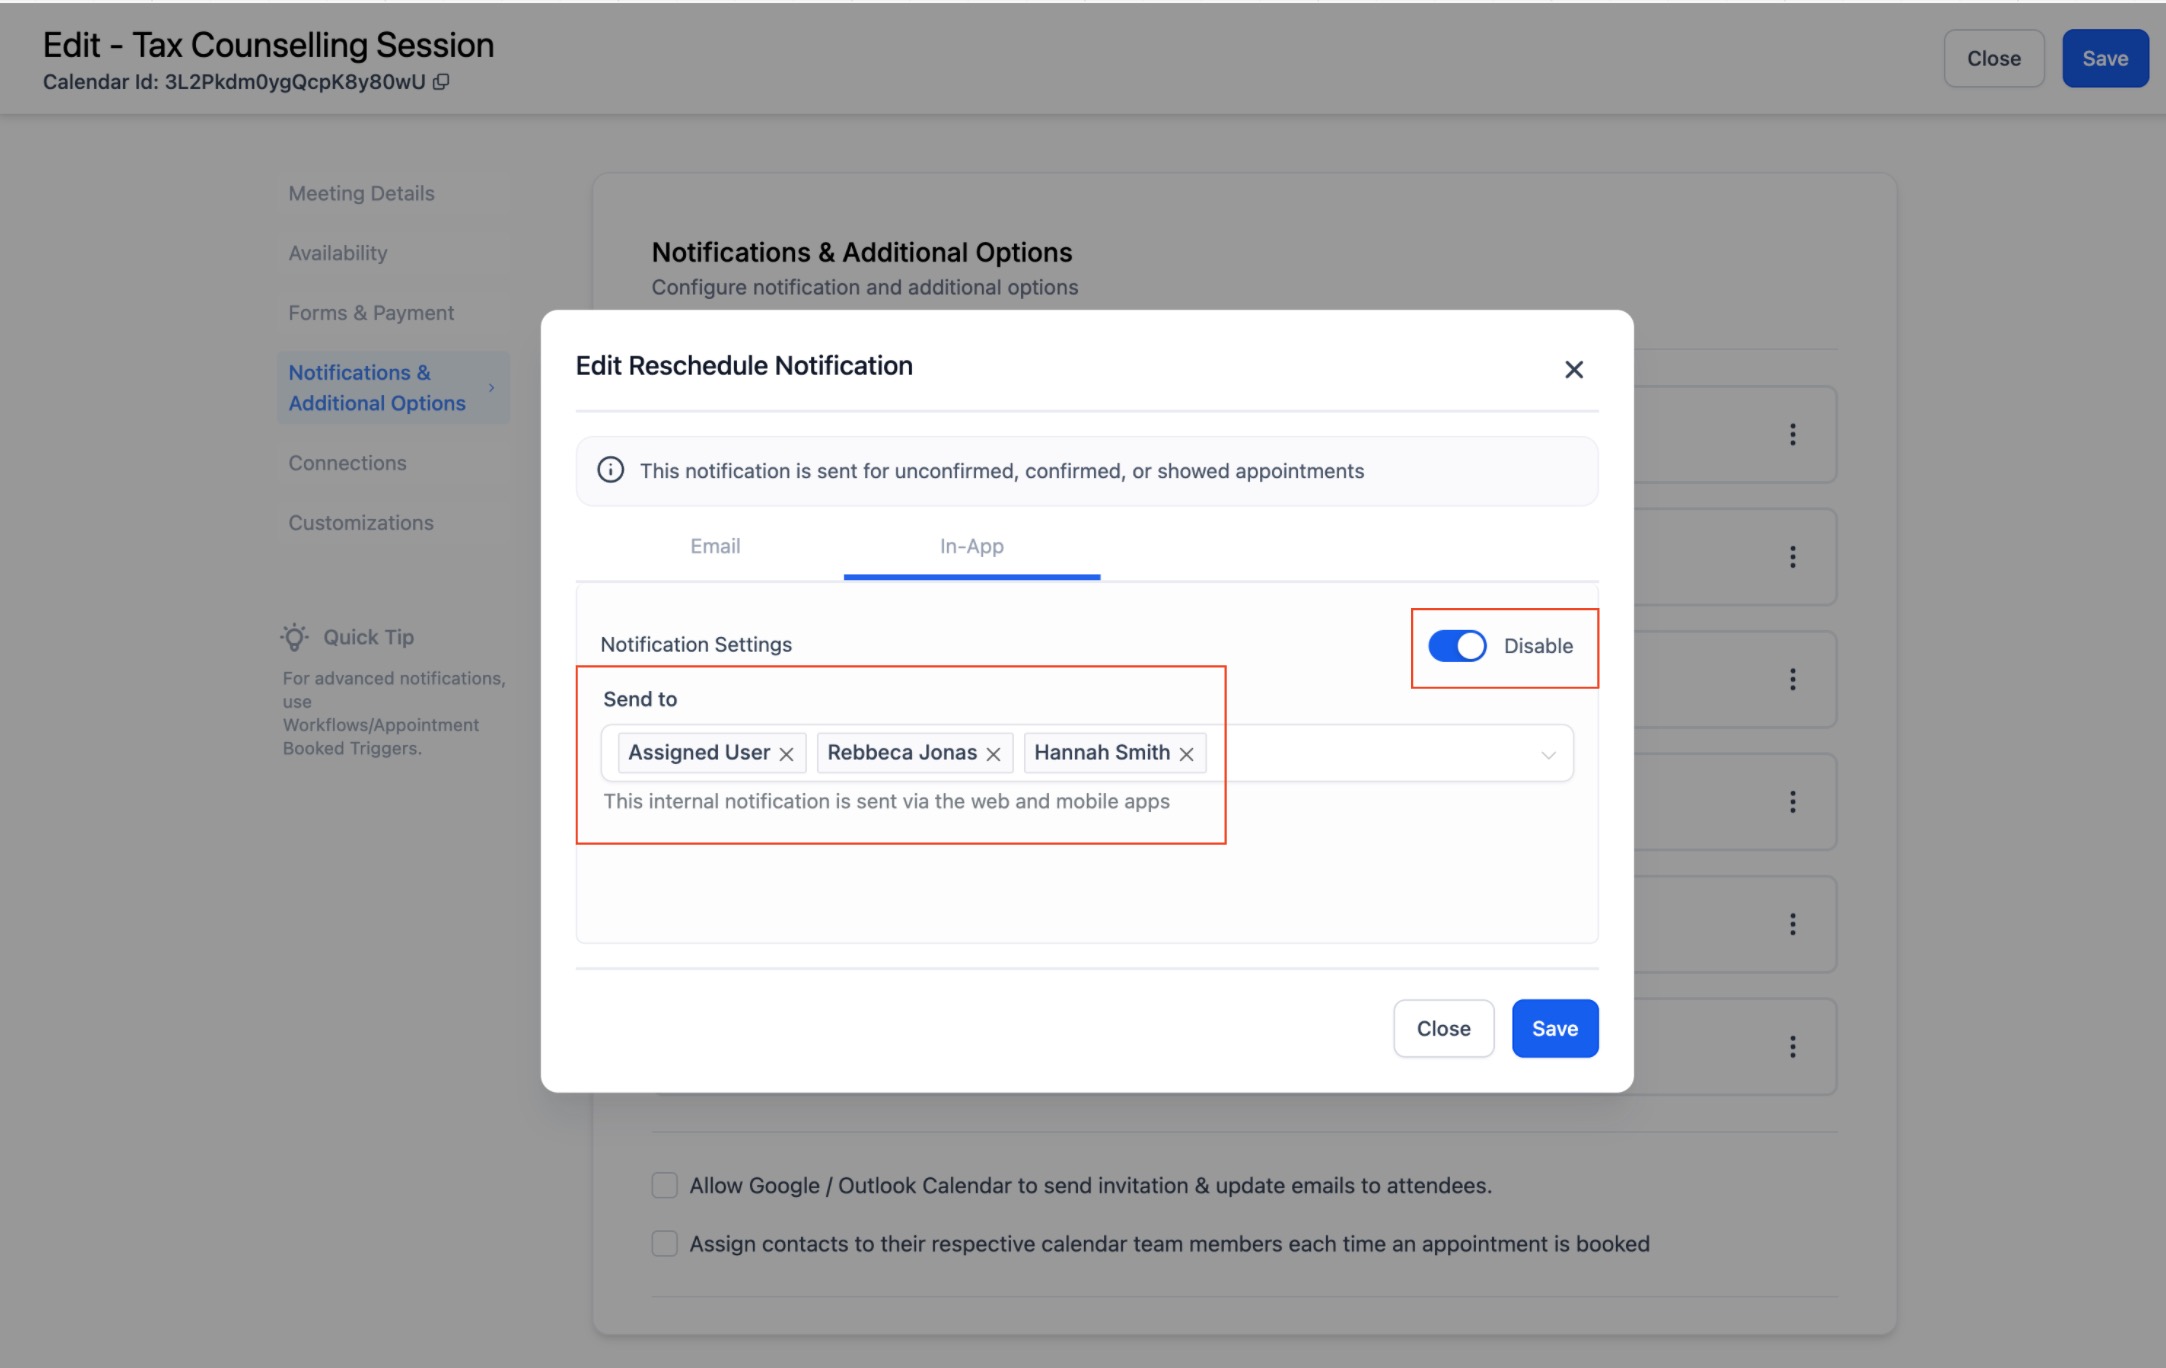
In-App Appointment Notifications
- From the list of notification types, Go to the In-App tab.
- Choose the Users to Notify
- Ensure that the toggle is turned on
- Here, you can choose which users should receive the notification.
- Ensure that the toggle is turned on
- Configure Time Triggers for Reminders and Follow-Up Notifications
- For Reminders and Follow-Up notifications, you can set when the notification should be triggered.
- Reminders: Specify how far in advance the notification should be sent before the appointment.
- Follow-Up: Specify how long after the appointment the notification should be sent.
- Reminders: Specify how far in advance the notification should be sent before the appointment.
- For Reminders and Follow-Up notifications, you can set when the notification should be triggered.


SMS Appointment Notifications
- From the list of notification types, Go to the SMS tab.
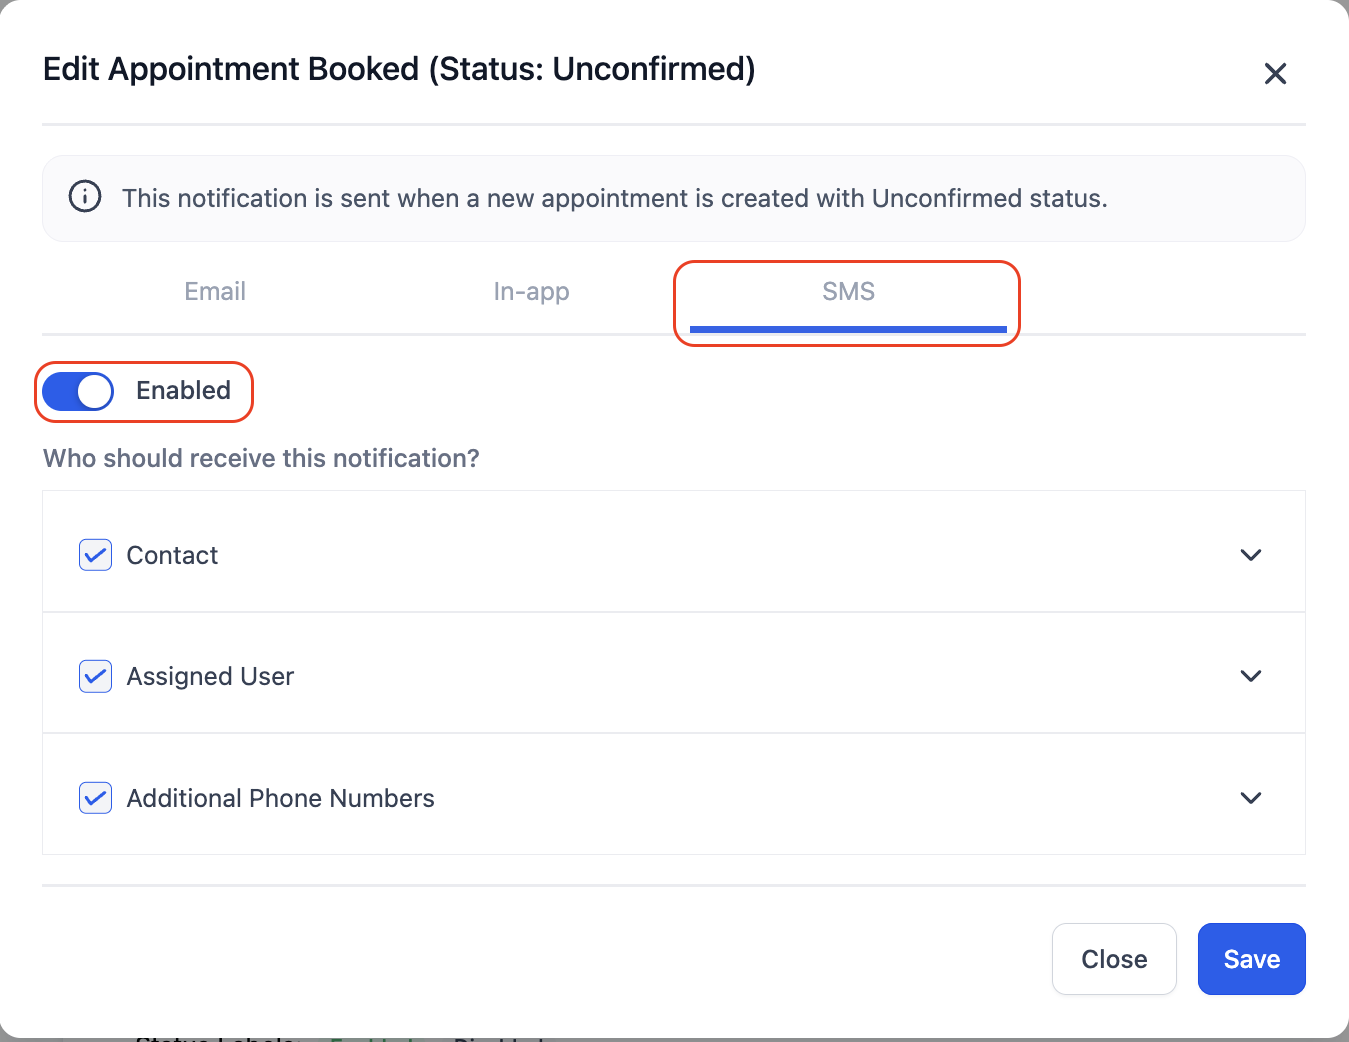
Choose recipients: Contact, Assigned User, or Additional Phone Numbers.
Choose an existing SMS template, edit the SMS template if needed or create a new one.
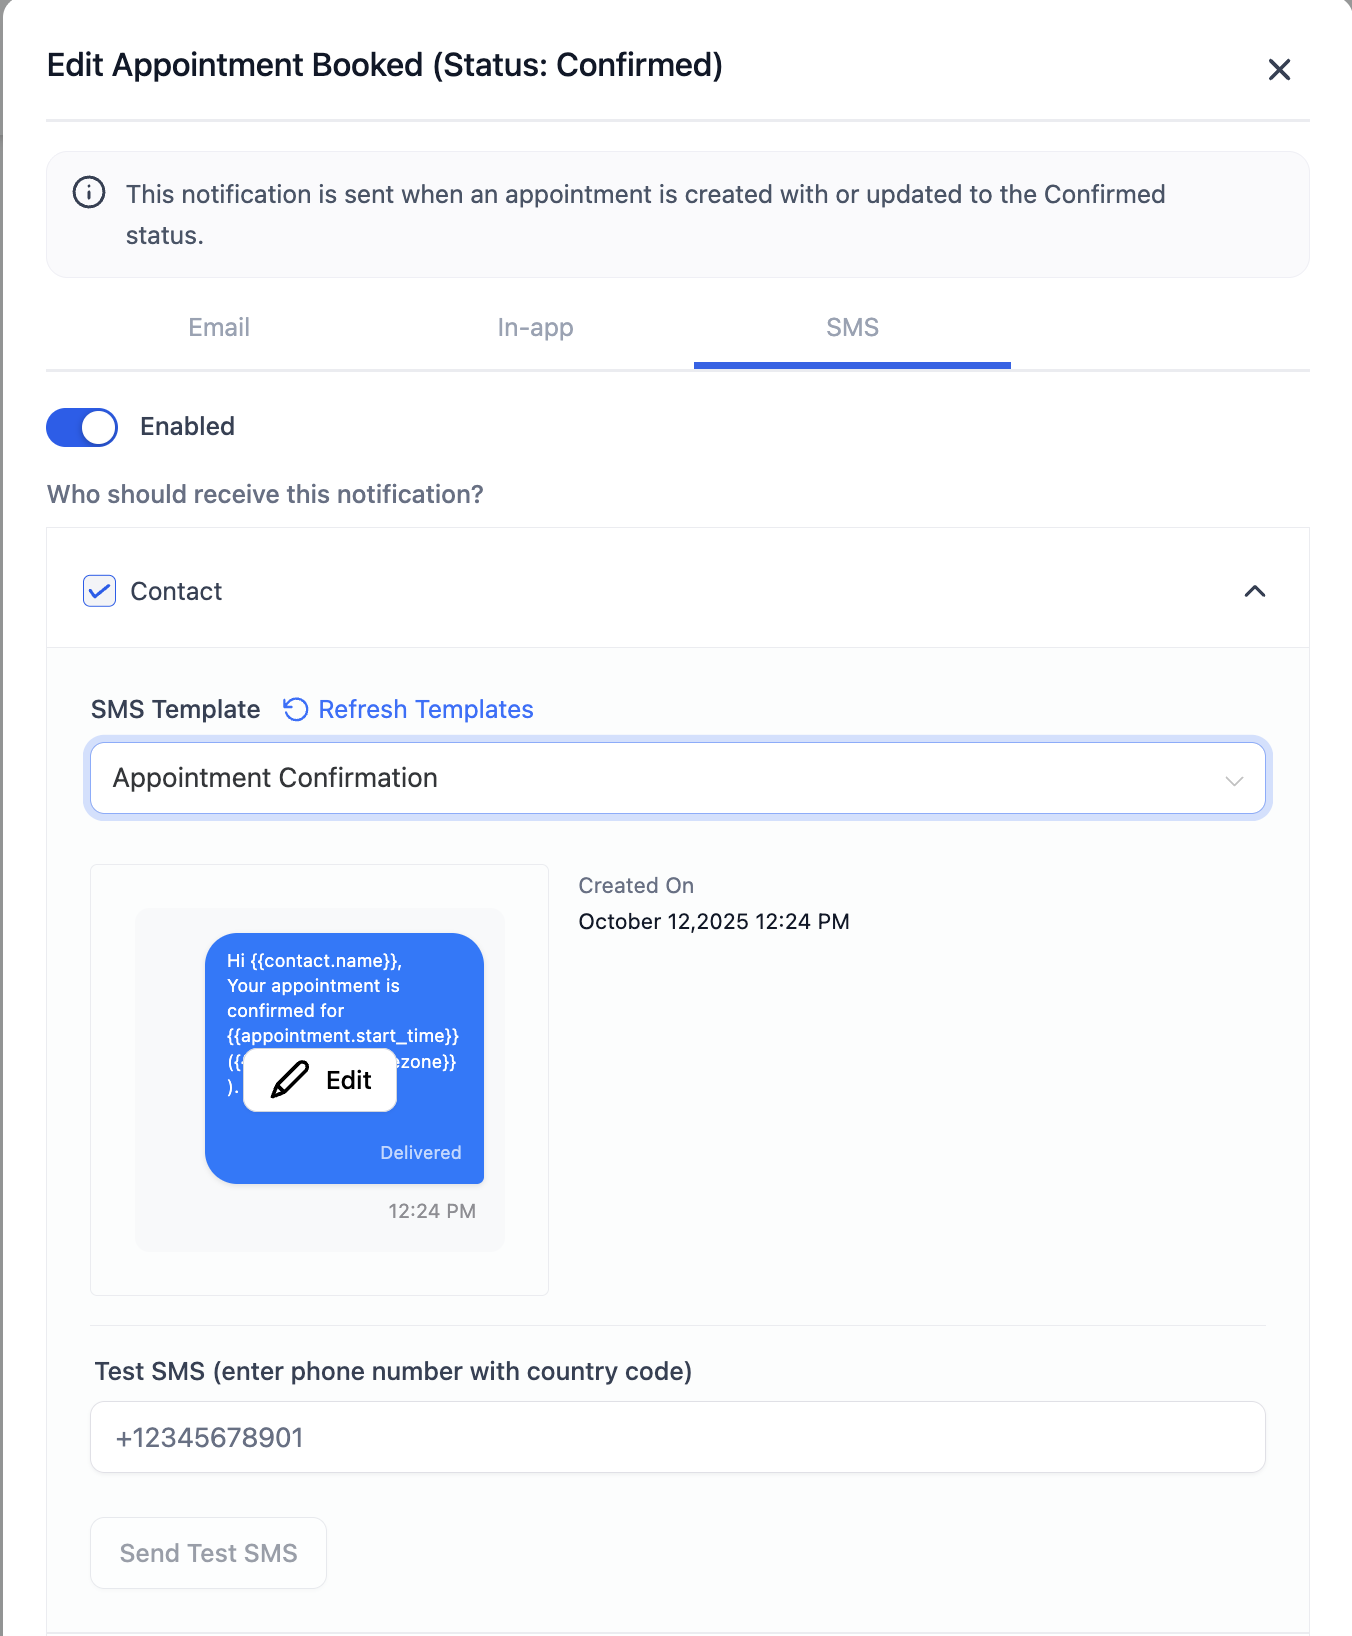
- Optionally, send a test SMS to see how the notification looks.
- For Reminders and Follow-Up SMS, configure when the SMS should be triggered:
- For Reminders, set how far in advance the SMS should be sent before the appointment.
- For Follow-Up Emails, set how long after the appointment the SMS should be sent. You can also add multiple trigger timings if needed.
- For Reminders, set how far in advance the SMS should be sent before the appointment.
- Save Your Settings once you’ve configured the SMS notifications for each type and receiver.
Whatsapp Appointment Notifications
Select a notification type and go to the WhatsApp tab. Turn the toggle on to enable it.
Choose recipients: Contact, Assigned User, or Additional Numbers.
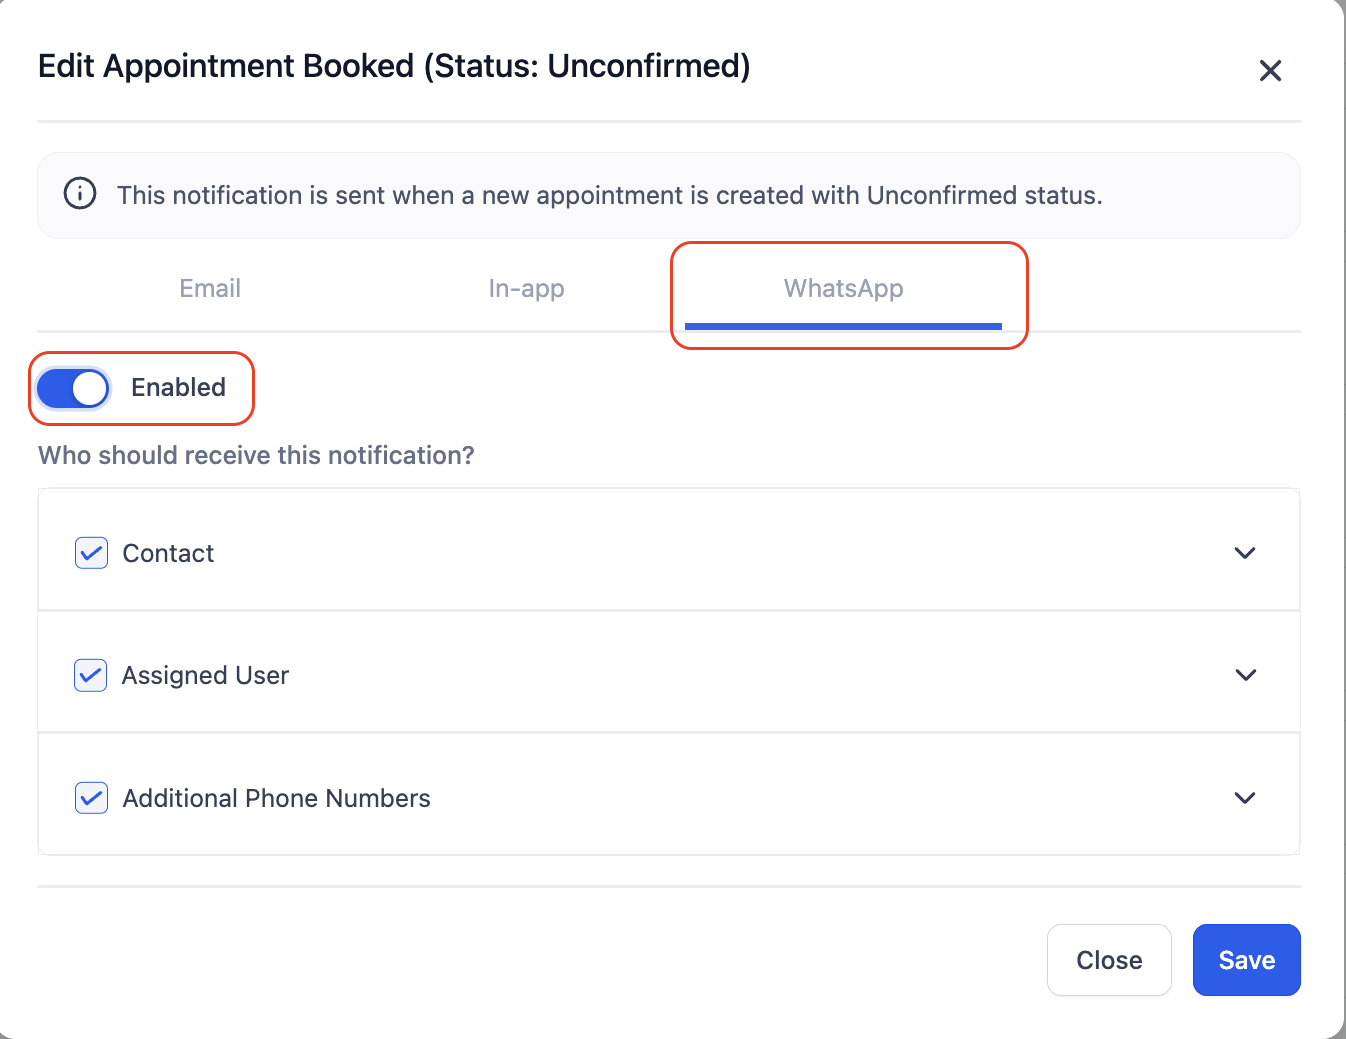
Choose or create an approved template for the desired notification type.
Use Send Test WhatsApp Notification to preview how the message will appear.
Click Save to activate WhatsApp notifications.
Troubleshooting Blank Reschedule or Cancellation Links
If {{appointment.reschedule_link}} or {{appointment.cancellation_link}} is blank, check the following:
- Confirm the message is connected to an appointment. Appointment merge fields need appointment data to populate.
- Check the workflow trigger. If the message is being sent from a workflow, use an appointment-based trigger.
- Use appointment triggers when needed. Examples include Appointment Status and Customer Booked Appointment.
- Test with a real appointment. Book a test appointment before checking whether appointment merge fields are working correctly.
Important Notes
In-App Notifications:
- The in-app notification configuration is customisable - for example, you can turn on the confirmation notification for the calendar but keep all other types turned off.
- For Event Calendars, the default setting is that account admins will receive the notifications.
- For other calendar types, the assigned user will be selected by default to receive notifications.
Email Notifications:
- Additional Emails refers to any extra recipients you want to notify. Simply add their email addresses, and they’ll receive the notifications as well.
- You can create your email templates through the Email Builder in Marketing module > Emails > Templates.
- Ensure you have added a subject line in your email template for successful delivery.
- If you have enabled the Add Guest function and have included a custom form, you can send that custom form to the guest as well. Enabling this option will send a system-generated email to guests with a link to the custom form once their appointment is confirmed. To prevent duplicate emails, ensure a separate confirmation email is not already set up for guests (verify this in the Notifications tab under Confirmation Notification).


SMS Notifications:
- Additional Phone Numbers refers to any extra recipients you want to notify. Simply add their phone number(s), and they’ll receive the notifications as well.
Phone numbers must include country codes for successful delivery.
SMS messages are billed per segments and are subject to charges. Keep them concise to manage costs.
Whatsapp Notifications:
Ensure your WhatsApp Business Account is connected and verified.
Only approved WhatsApp templates can be used.
Use Fetch New Templates to refresh available templates.
Always test templates for formatting and content before enabling.
Frequently Asked Questions
Q: Why is my reschedule link blank?
The reschedule link requires appointment data. If the message or workflow does not have access to an appointment record, the link may appear blank.
Q: Why is my cancellation link blank?
The cancellation link also requires appointment data. Confirm that the message is associated with an appointment and that any workflow sending the message uses an appointment-based trigger.
Q: Which workflow triggers can provide appointment context?
Common appointment-based triggers include Appointment Status and Customer Booked Appointment.
Q: Why does an appointment merge field work after a real booking but not during a test?
Some tests may not include appointment information. Booking a real test appointment gives HighLevel the appointment data needed to populate appointment merge fields.
Q: Can I use appointment details in SMS and email notifications?
Yes. You can add supported Custom Values and merge fields to appointment
Related Articles
Was this article helpful?
That’s Great!
Thank you for your feedback
Sorry! We couldn't be helpful
Thank you for your feedback
Feedback sent
We appreciate your effort and will try to fix the article