Import Custom Object records from a CSV and automatically associate them with existing Contacts, Companies, Opportunities, or other Custom Objects using the Associate Records workflow action.
TABLE OF CONTENTS
- Overview
- Prerequisites and Limitations
- How Import with Associations Works
- Steps to Import and Associate Records
Overview
You can use Custom Object Bulk Import and the Associate Records workflow action together to automatically create associations as Custom Object records are imported.
For example, when importing Pet records, include the owner's email address in the CSV. After each Pet record is created, a workflow can use that email address to find the matching Contact and associate the Pet with its owner.
This is useful when migrating data from another system because you can import records and create their CRM associations without manually associating each record afterward.
Important: Create and publish the workflow before starting the import.
Prerequisites and Limitations
Before starting the import, make sure:
- The Custom Object and required fields have been created
- An association exists between the Custom Object and the target object
- The CSV contains a value that can be used to identify the matching record
- The workflow is created and published before the import begins
Choose a Reliable Matching Field
The imported Custom Object should contain a field that can be compared with a field on the target record.
Recommended matching fields include:
- Phone
- Customer ID
- Account number
- External system ID
Where possible, use a unique or stable identifier. Avoid using names as the only matching condition because multiple records may share the same name.
Association Limits Still Apply
The Associate Records action follows the association limits configured between the two objects.
If you choose to associate all matching records, make sure the configured association limit supports the expected number of associations.
How Import with Associations Works
The process uses the import and workflow features together:
- A Custom Object record is created through the CSV import
- The new record enters the Custom Object workflow
- The Associate Records action uses an imported value to search for the matching record
- The workflow creates the association using the selected association label
Example
A Pet CSV contains:
- Pet Name: Milo
- Species: Dog
- Owner Email:alex@example.com
The workflow is configured to find a Contact where:
- Contact Email is equal to Pet Owner Email
The result is:
Milo → Pet Owner → Alex
Steps to Import and Associate Records
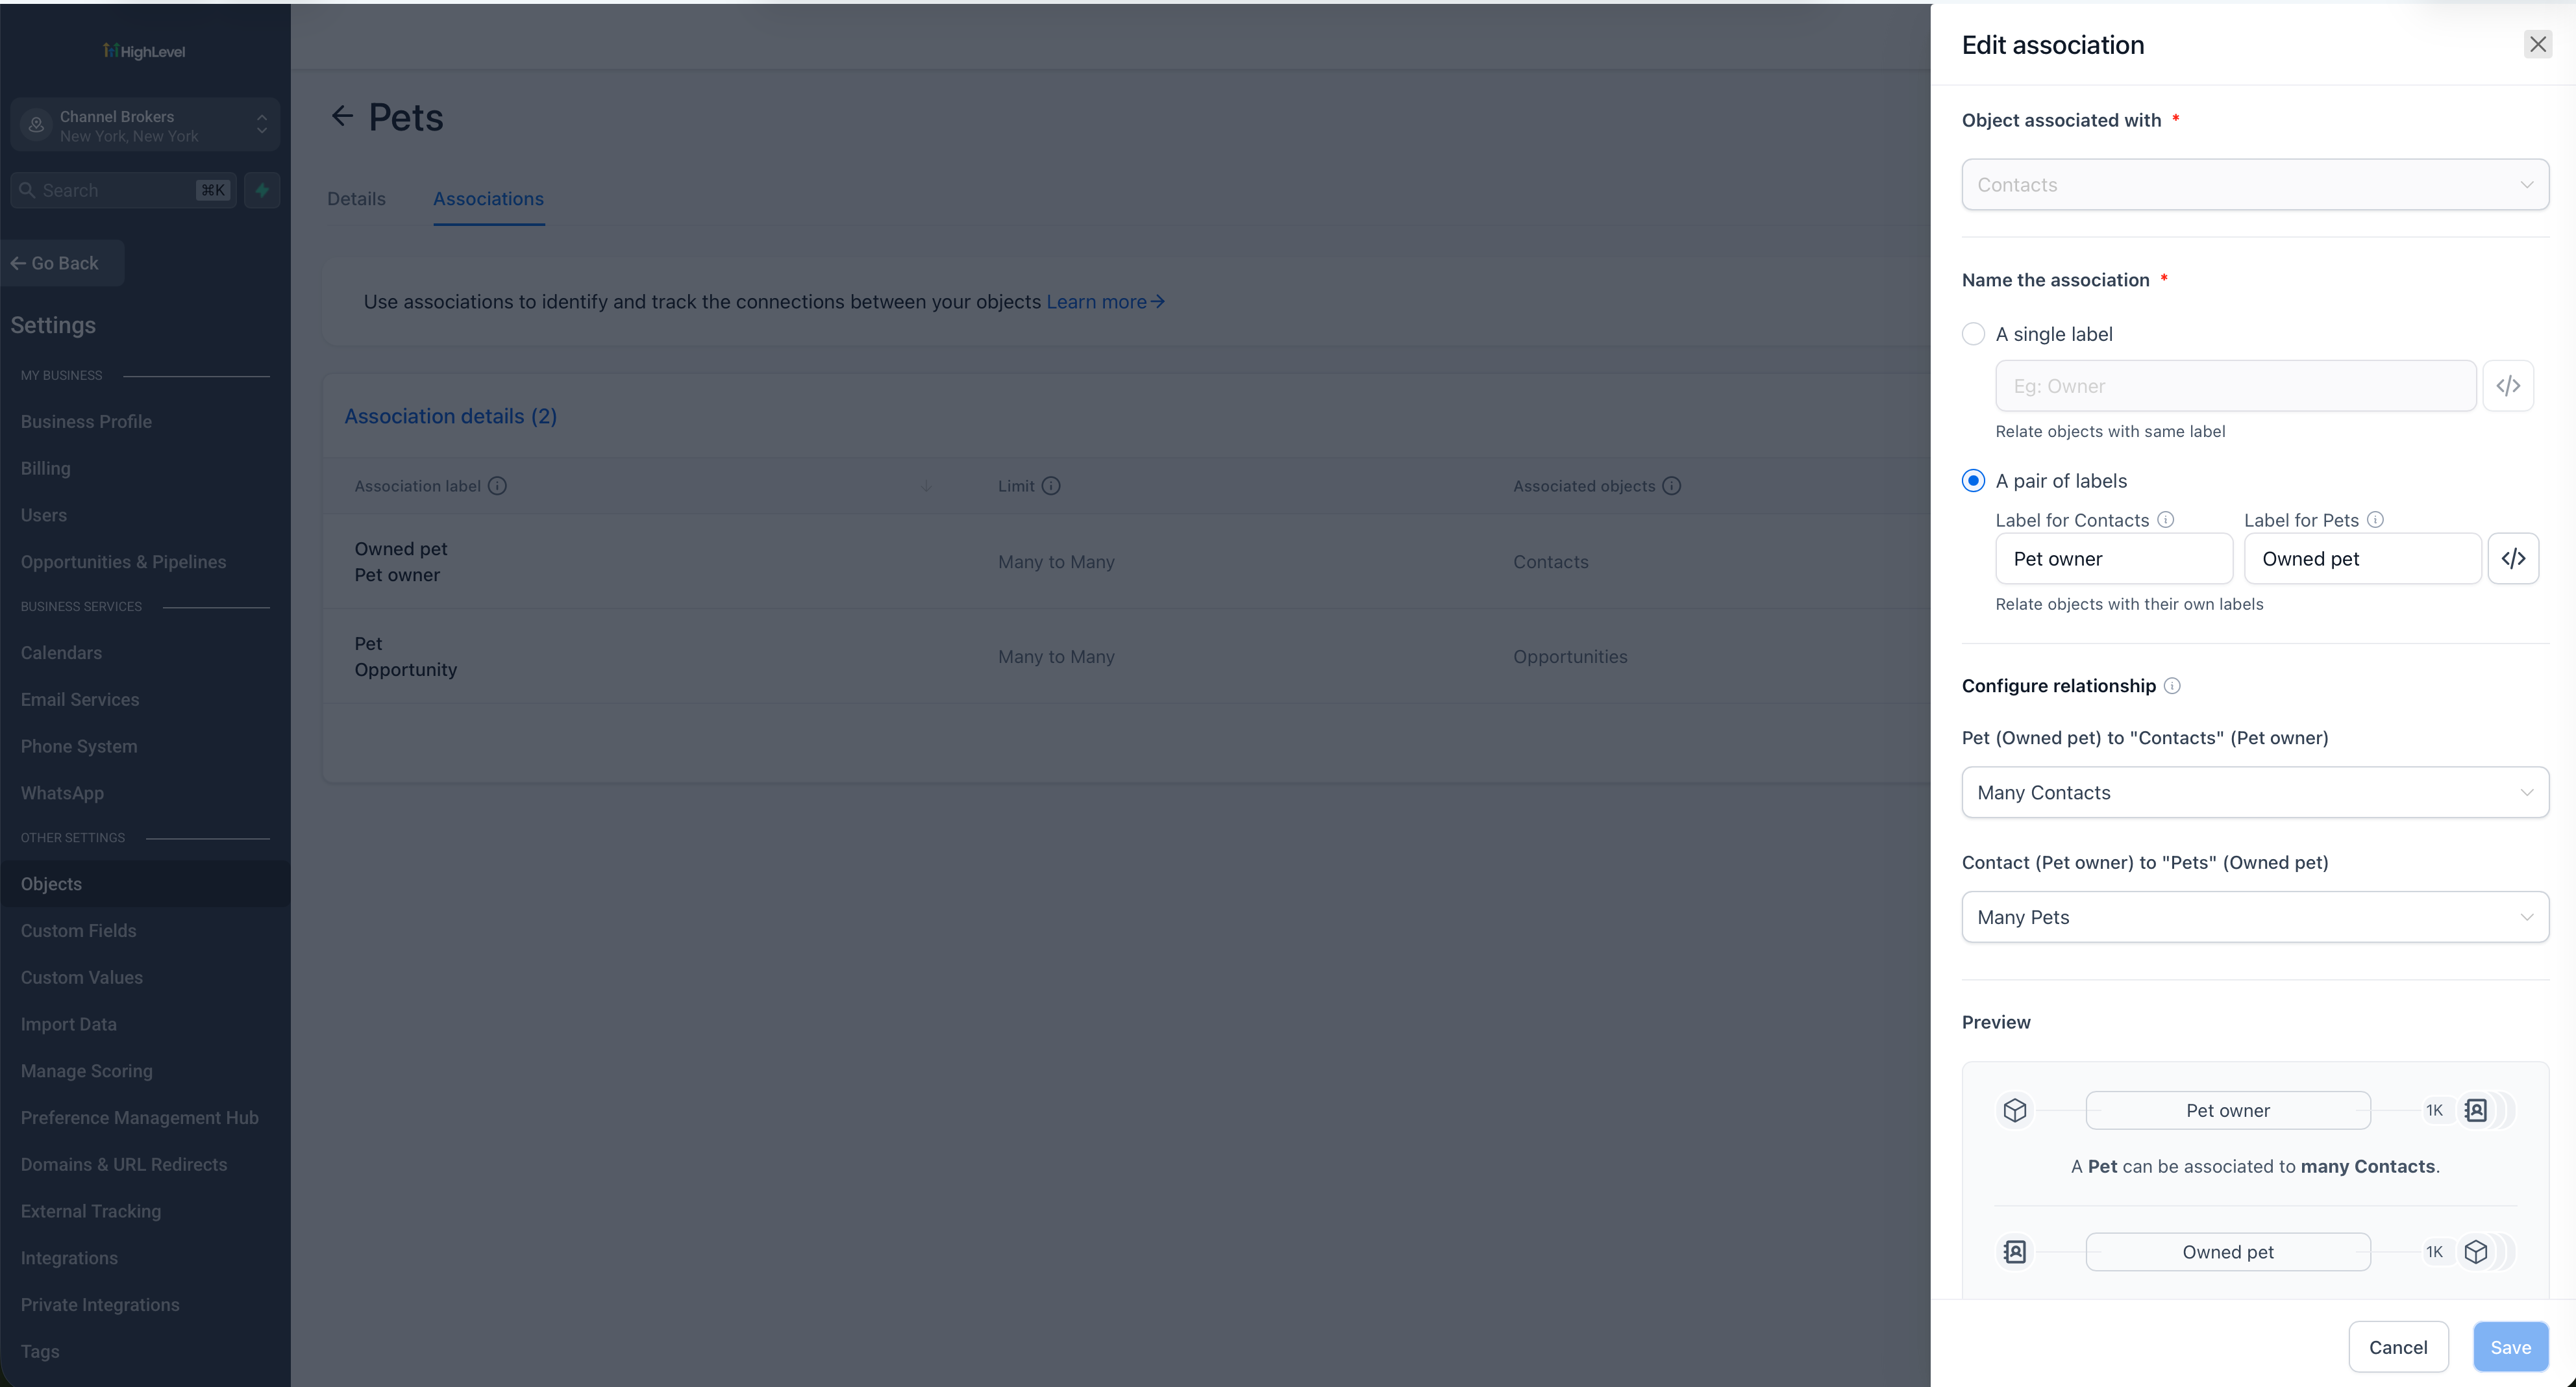
Step 1: Create the Required Association
Before creating the workflow, configure an association between the Custom Object and the target object.
Go to:
Settings → Objects → Select the Custom Object → Associations
For example:
- Object: Pet
- Associated Object: Contact
- Association Label: Pet Owner
 Step 2: Prepare the CSV
Include:
- The data required to create the Custom Object record
- The value the workflow will use to find the associated record
For a Pet import, the CSV could contain:
- Pet Name
- Species
- Breed
- Date of Birth
- Owner Email
Example record:
- Pet Name: Milo
- Species: Dog
- Owner Email:alex@example.com
Create an Owner Email field on the Pet Custom Object and map the CSV column to that field during import. The workflow can then use the imported value to find the matching Contact.
[Screenshot placeholder: Sample Pets CSV showing Owner Email]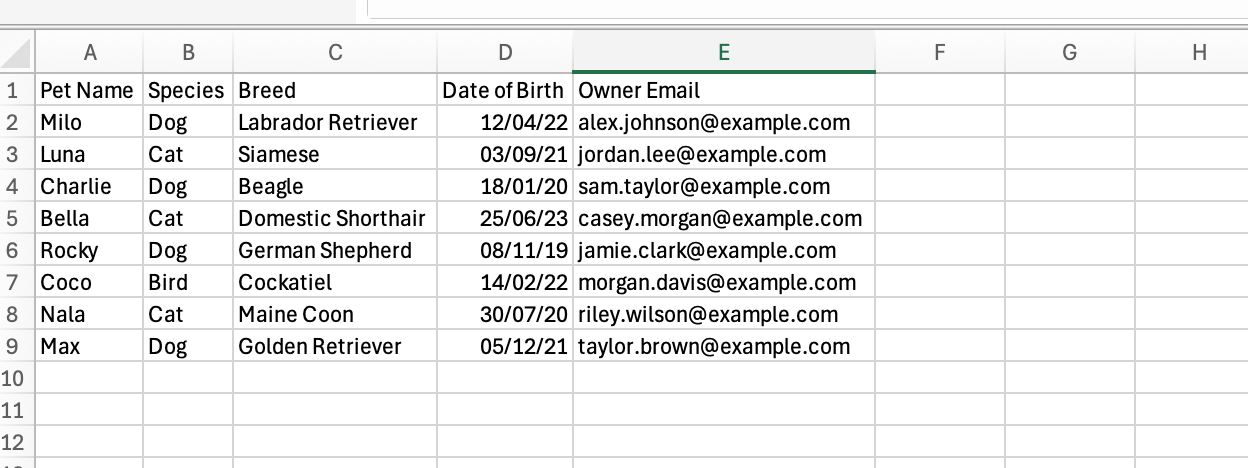
Step 3: Create the Workflow
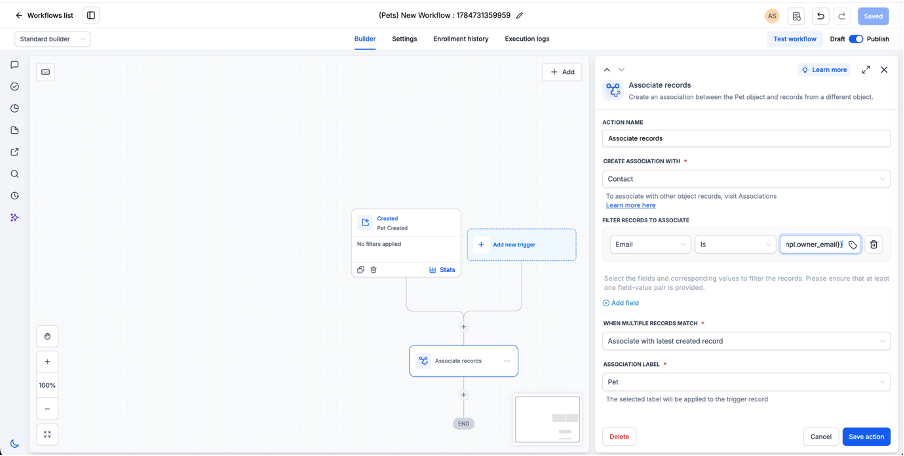
Go to Automation → Workflows and create a workflow for the Custom Object you are importing.
For the Pet example:
- Create a Pet workflow
- Add a Pet Record Created trigger
- Add the Associate Records action
- Under Create Association With, select Contact
- Add the matching filter
- Choose how multiple matching records should be handled
- Select the association label
- Publish the workflow
Example Configuration
- Workflow Object: Pet
- Trigger: Pet Record Created
- Create Association With: Contact
- Filter: Contact Email is Pet Owner Email
- Association Label: Pet Owner
Using Multiple Filters
You can use more than one filter when one value is not reliable enough.
For example:
- Contact Email is Pet Owner Email
- Contact Phone is Pet Owner Phone
When multiple filters are configured, the target record must meet all conditions.
Step 4: Import the Custom Object Records
Once the workflow is published:
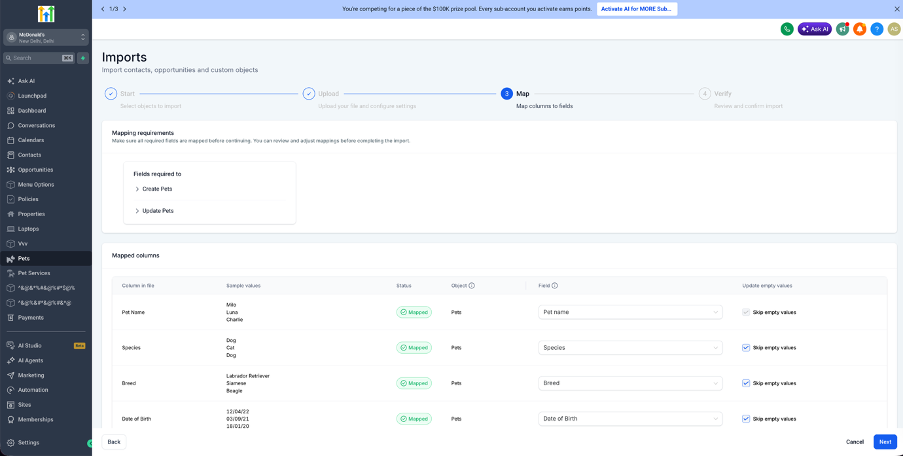
- Open the Custom Object
- Click Import
- Upload the CSV file
- Map the CSV columns to the appropriate Custom Object fields
- Review the mappings
- Start the import
- Track the import under Bulk Actions
As each Custom Object record is created, it enters the workflow. The workflow then searches for the matching record and creates the association.
Step 5: Verify the Associations
After the import completes:
- Open a few imported Custom Object records
- Review their associated records
- Confirm the expected association label was applied
- Review Workflow Execution Logs for records where no association was created
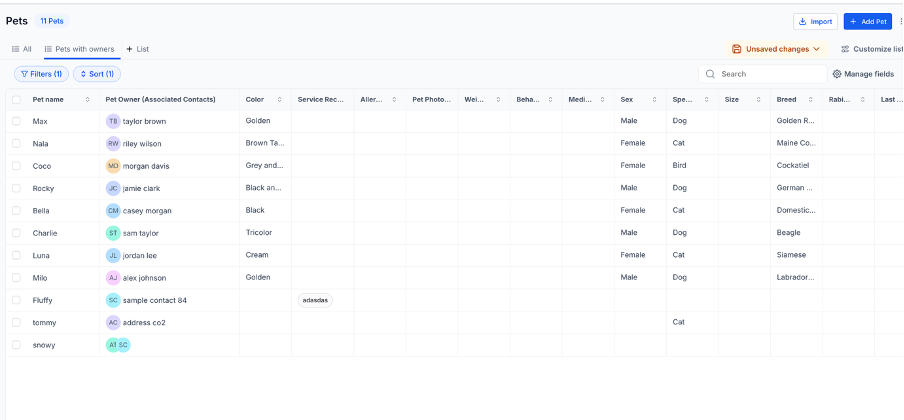
Example: Import Pets and Associate Them with Owners
A veterinary business is migrating Pet data from another system.
The owner Contacts already exist in the CRM.
The Pet CSV contains information such as:
- Pet Name
- Species
- Owner Email
For example:
- Milo
- Dog
- alex@example.com
After Milo is imported:
- A Pet record named Milo is created
- The workflow reads the Owner Email field
- It finds the Contact with the matching email address
- Milo is associated with that Contact using the Pet Owner association label
This removes the need to manually associate every imported Pet record.
Use Cases
Policies and Policyholders
Import Policy records with a policyholder email or customer ID, then associate each Policy with the correct Contact.
Example:
Policyholder Email → Contact Email
Properties and Owners
Import Property records containing an owner email or account number, then associate each Property with the matching Contact or Company.
Example:
Owner Account Number → Company Account Number
Vehicles and Customers
Import Vehicle records with a customer ID and associate each Vehicle with the matching Contact.
Event Registrations and Attendees
Import Registration records containing an attendee email, then associate each Registration with the matching Contact.
Assets and Companies
Import Asset records containing a Company account number, then associate each Asset with the correct Company.
Transactions and Contacts
Import Transaction records containing a customer email, phone number, or customer ID, then associate each Transaction with the correct Contact.
Best Practices
- Test with a small CSV first. Confirm that the workflow creates the expected associations before importing the complete dataset.
- Use stable identifiers. Prefer email, phone, customer ID, account number, or external IDs over names.
- Use multiple filters when needed. This can reduce incorrect matches when one field is not unique.
- Review association limits. Make sure the relationship supports the number of associations you plan to create.
- Review both import and workflow results. The CSV import and the association workflow are separate processes.
Important: An import can complete successfully even when the workflow does not find a matching record.
Related Articles
Was this article helpful?
That’s Great!
Thank you for your feedback
Sorry! We couldn't be helpful
Thank you for your feedback
Feedback sent
We appreciate your effort and will try to fix the article