This article explains how to use Certificate AI in HighLevel to generate a complete certificate design from a prompt, refine it in the Certificate Builder, and prepare it for use.
IMPORTANT: Certificate AI is currently in Beta, so the experience and generation quality may continue to evolve.
TABLE OF CONTENTS
- What is Certificate AI?
- Key Benefits of Certificate AI
- Certificate AI Prompts
- Quick Prompts
- Guided Certificate Creation
- Editing an AI-Generated Certificate
- Certificate AI and the Certificate Builder
- How To Set Up Certificate AI
- Frequently Asked Questions
What is Certificate AI?
Certificate AI is an AI-assisted certificate creation experience in HighLevel that turns a natural-language prompt into a complete, editable certificate design. Instead of starting from a blank canvas, you can describe the certificate you need, answer follow-up questions when additional details are required, and use the generated design as a starting point in the Certificate Builder.
Certificate AI can help assemble certificate content and visual elements such as text, frames, signatures, QR codes, and other supported Certificate Builder elements. After generation, you can continue refining the certificate before saving, previewing, or sending it.
Key Benefits of Certificate AI
Certificate AI reduces the amount of manual design work required to create a professional certificate while keeping the finished design editable in HighLevel.
- Faster certificate creation: Start with a complete AI-generated design instead of building every element from scratch.
- No design expertise required: Describe what you want in plain language and let Certificate AI create the first version.
- Guided creation: Certificate AI can ask follow-up questions, such as your preferred certificate orientation, when it needs more information.
- Editable output: Continue customizing the generated certificate directly in the Certificate Builder.
- Flexible design elements: AI can incorporate available Certificate Builder elements such as text, frames, signatures, and QR codes.
- Quick starting ideas: Use suggested prompts for common use cases such as course completion, milestone achievements, event participation, and training completion.
- Full control over the final result: Review and adjust the generated content, layout, branding, and certificate elements before using the certificate.
Certificate AI Prompts
A clear prompt gives Certificate AI more context about the certificate you want to create and can reduce the amount of editing needed afterward. Include the purpose of the certificate along with any visual, organizational, or recipient details that are important to the final design.
Your prompt can describe details such as:
- The certificate purpose or occasion
- Preferred style or theme
- Organization name
- Recipient information
- Signer requirements
- Orientation preferences
- Important wording
- QR verification requirements
- Other design or content preferences
For example, you could describe a certificate for completing a training program and specify the preferred colors, orientation, organization name, and signer requirements.
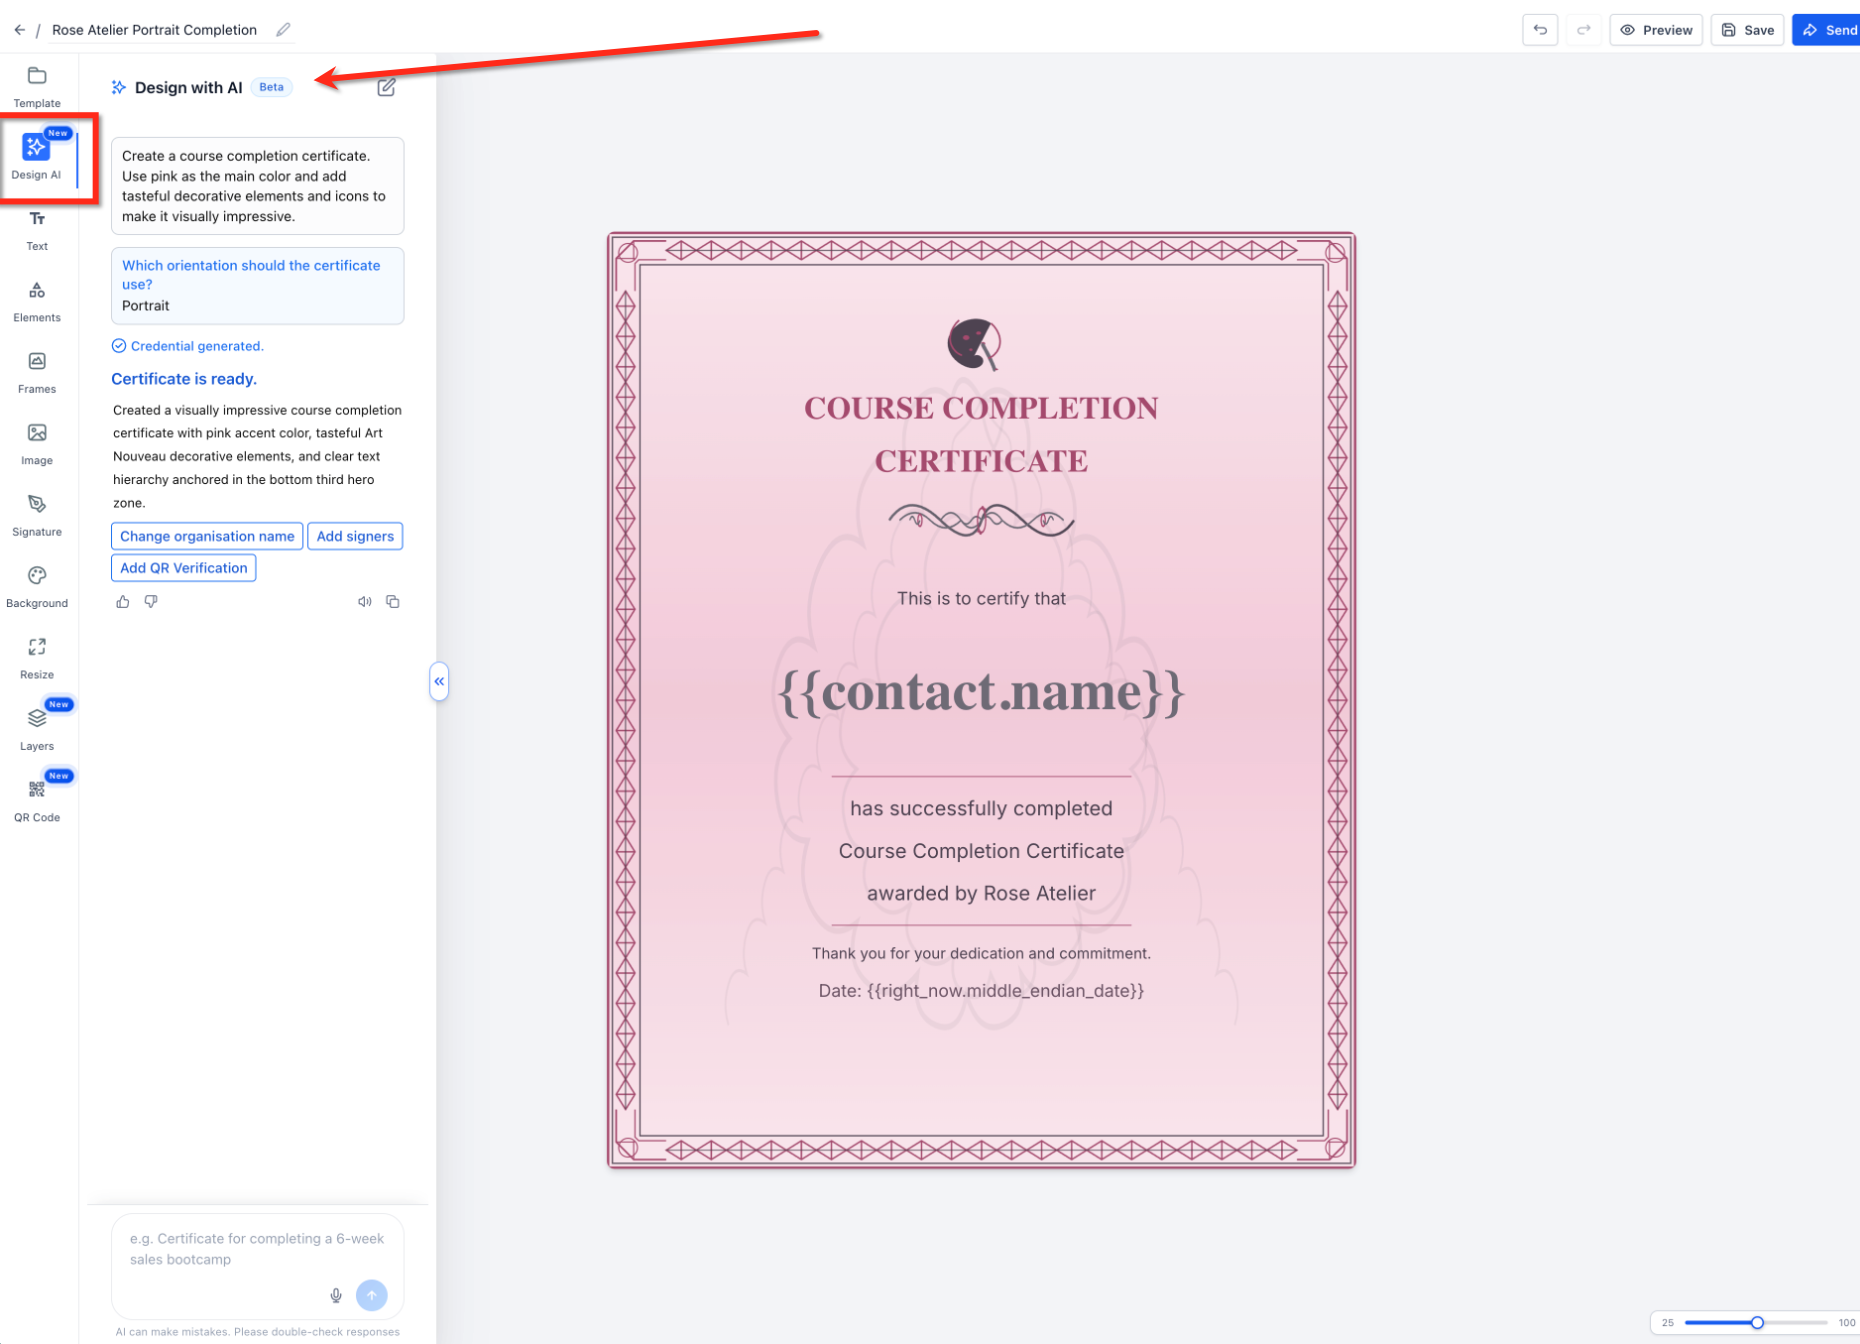
Certificate AI may ask a follow-up question when additional information would help it complete the design. The supplied release example shows Certificate AI asking whether the certificate should use portrait or landscape orientation.
Quick Prompts
Quick prompts provide ready-made starting points for common certificate use cases, making it easier to begin when you do not want to write a prompt from scratch.
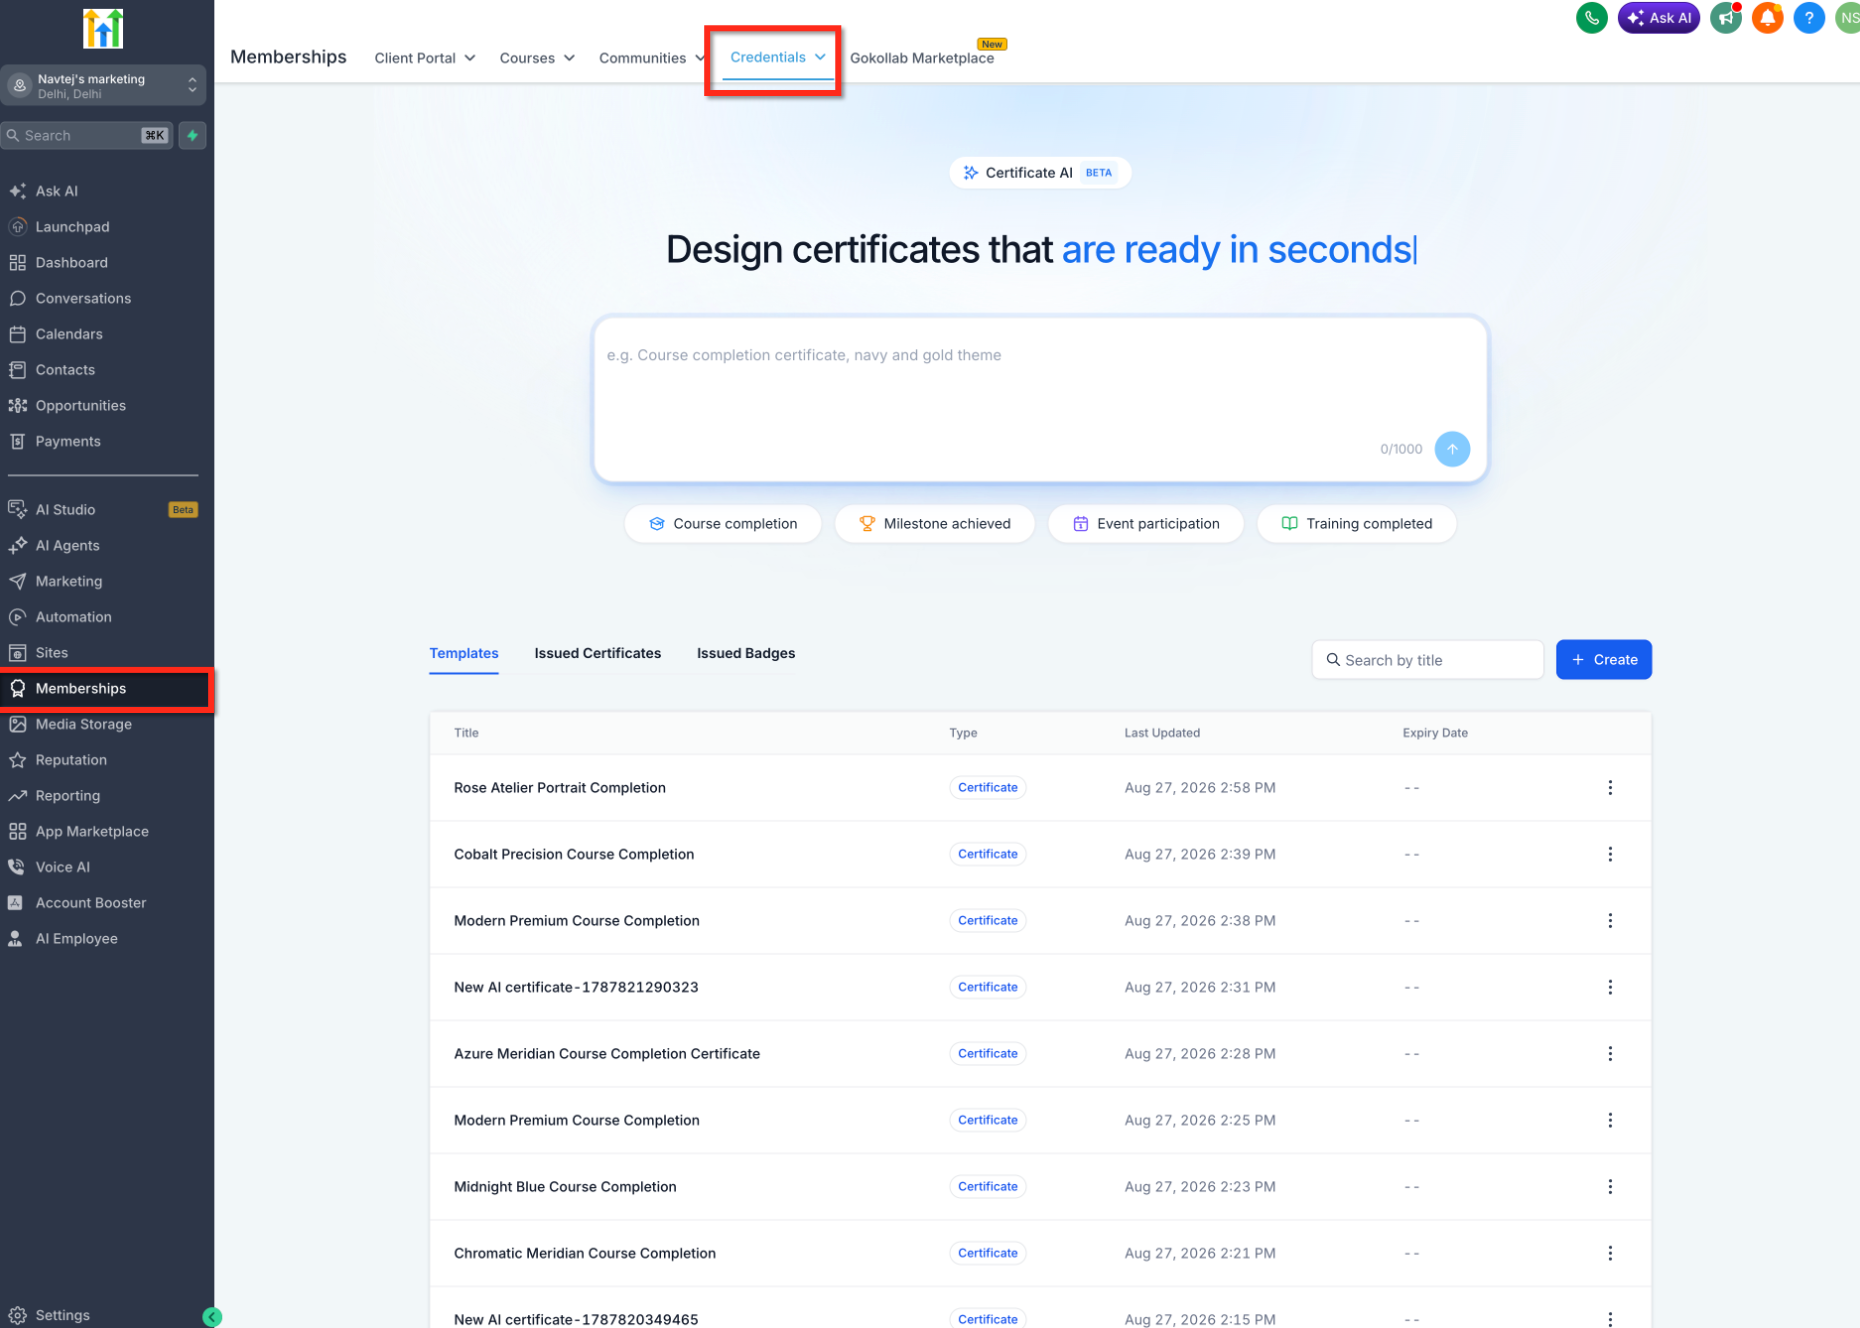
The Certificate AI starting screen includes quick-prompt options such as:
- Course completion
- Milestone achieved
- Event participation
- Training completed
Selecting a quick prompt gives you a starting point that you can expand with your own requirements.
Guided Certificate Creation
Certificate AI can ask clarifying questions when your original prompt does not contain enough information to complete the design. This guided approach helps the AI make important design decisions based on your preferences rather than relying entirely on assumptions.
For example, Certificate AI may ask which orientation you want to use before generating the certificate.
After receiving the information it needs, Certificate AI generates the credential and opens it in the Certificate Builder for additional customization.
Because AI-generated content can vary, review the generated certificate carefully before issuing it. Pay particular attention to:
- Certificate wording
- Recipient fields
- Organization name
- Dates
- Signer information
- QR verification
- Orientation
- Layout and visual elements
Editing an AI-Generated Certificate
AI generation provides the starting design, while the Certificate Builder gives you control over the finished certificate. You can continue editing the generated credential using the same builder tools available for manually created certificate templates.
The Certificate Builder supports design controls such as text, elements, frames, images, signatures, backgrounds, sizing, and other editable components. Existing HighLevel documentation also confirms that certificate templates can be previewed and saved from the builder.
Depending on the generated design, you may be able to adjust items such as:
- Text and certificate wording
- Frames and decorative elements
- Images
- Signatures
- Backgrounds
- Canvas size
- Layers
- QR codes
- Dynamic recipient information
The generated experience can also surface suggested follow-up actions, such as changing the organization name, adding signers, or adding QR verification.
Certificate AI and the Certificate Builder
Certificate AI and the Certificate Builder serve different but complementary purposes. Certificate AI helps generate the initial certificate from your description, while the Certificate Builder is the editing environment where you can refine and prepare the design for use.
HighLevel's existing Certificate Builder supports reusable templates, standard and custom canvas sizes, design elements, frames, signatures, backgrounds, previews, and saving.
This means you can use Certificate AI to avoid the blank-canvas starting point without giving up manual control over the finished certificate.
For more information about manually creating and editing certificate templates, see Create a Template.
How To Set Up Certificate AI
Starting with the correct prompt and reviewing the generated result carefully helps ensure your certificate contains the right wording, recipient information, branding, and verification elements before it is issued.
- In your HighLevel sub-account, go to Memberships → Credentials.
- Locate the Certificate AI Beta prompt area.
- Describe the certificate you want to create. Include as much useful context as needed, such as:
- Certificate purpose
- Style or theme
- Organization name
- Recipient details
- Signer requirements
- Orientation
- Verification requirements
- Alternatively, select one of the available quick prompts, such as:
- Course completion
- Milestone achieved
- Event participation
- Training completed
- Submit your prompt.
- If Certificate AI asks a follow-up question, provide the requested information. For example, you may be asked whether you want a portrait or landscape certificate.
- Allow Certificate AI to generate the certificate.
- Review the generated design in the Certificate Builder.
- Update any content or design elements that need adjustment. Check important details such as:
- Recipient fields
- Dates
- Organization name
- Signer information
- Certificate wording
- QR verification
- Layout
- Use Preview to review the finished certificate. HighLevel's existing Credentials documentation recommends confirming names, dates, and other mapped values before issuance.
- Click Save when the certificate is ready.
- Use Send when you are ready to issue the certificate through the available certificate workflow.
For certificates connected to course completion, HighLevel also supports attaching a certificate template to a course so eligible learners can receive it when they complete that course.
Frequently Asked Questions
Q: Is Certificate AI replacing the Certificate Builder?
No. Certificate AI creates an initial certificate design from your prompt. You can then continue editing that design in the Certificate Builder.
Q: What should I include in my Certificate AI prompt?
Include the certificate purpose and any important requirements such as style, organization name, recipient details, signer information, orientation, wording, or verification needs.
Q: What happens if Certificate AI needs more information?
Certificate AI can ask follow-up questions before completing the design. For example, it may ask whether you want portrait or landscape orientation.
Q: Can I edit the certificate after Certificate AI generates it?
Yes. AI-generated certificates open in the Certificate Builder so you can continue adjusting the content and design before using them.
Q: Can Certificate AI add QR verification?
The supplied release experience shows QR verification as an available Certificate Builder option and as a suggested follow-up action after generation. Review the generated certificate and add or adjust QR verification as needed before issuing it.
Q: Can I use Certificate AI for course-completion certificates?
Yes. Course completion is one of the quick-prompt options shown in Certificate AI. After creating the certificate, you can use HighLevel's existing course certificate workflow where applicable.
Q: Should I review dynamic fields before sending an AI-generated certificate?
Yes. Review recipient names, dates, IDs, organization details, and other dynamic information before issuing the certificate. Existing HighLevel guidance recommends previewing mapped fields before sending credentials.
Q: Is Certificate AI available for badges?
The release information provided for this feature specifically documents AI-assisted certificate creation. Do not assume the same AI-generation workflow applies to badges unless that capability is separately confirmed.
Q: What does Beta mean for Certificate AI?
Certificate AI is currently identified as a Beta feature. HighLevel states that generation quality and capabilities will continue to be improved based on usage and feedback.
Was this article helpful?
That’s Great!
Thank you for your feedback
Sorry! We couldn't be helpful
Thank you for your feedback
Feedback sent
We appreciate your effort and will try to fix the article