Building and optimizing workflows just became faster and more collaborative. The Advanced Builder UI/UX Upgrades introduce a cleaner Stats Mode, image-ready Sticky Notes, inline Workflow Comments, and a right-click Quick Actions menu—everything you need to plan, document, and iterate without leaving the canvas.
TABLE OF CONTENTS
- What is the Advanced Builder in Workflows?
- Access & Requirements
- The Canvas
- Go-To connections for Triggers & Delinked Nodes (Parallel branches)
- Delinked nodes (independent/parallel branches)
- Enable / Disable Nodes
- Sticky Notes & Color Coding
- Keyboard Shortcuts & Power Navigation
- Tidy Up (Auto-layout)
- Workflow Switcher
- Notes, Limits & Best Practices
What is the Advanced Builder in Workflows?
The Advanced Builder is a fully visual, freeform canvas for building automations. Drag, drop, and connect multiple trigger paths, parallel branches, and complex logic in one view—without changing how workflows execute. It’s designed for flexibility, performance, and collaboration.
Bulk Selection Tools add context-aware actions—Enable/Disable, Format Selection, and Add Sticky Note. By acting on many nodes at once you can refactor branches, declutter spacing, and annotate logic in seconds—ideal for very large workflows.
This upgrade comprises four enhancements within the HighLevel Workflow Builder: Stats Mode, Sticky Notes 2.0, Workflow Comments, and Right-Click Quick Actions. Together, they streamline performance reviews, team collaboration, and day-to-day editing, all while keeping your workspace visually organized.
Access & Requirements
Where: Open any workflow → toggle to Advanced Builder (top-left).
Switching views: You can toggle between Standard and Advanced on the same workflow. (See Additional Notes below for Advanced-only features.)
Workflow name display: Long workflow names in the builder header truncate with an ellipsis (…). Hover the name to view the full workflow title.
Stats View
Stats View helps you review trigger enrollment activity and communication-action performance without leaving the Workflow Builder.
To use Stats View:
1. Open a workflow in the Advanced Builder.
2. Open Stats Mode.
3. Select a trigger or one of its displayed statistics.
4. Review the attempted, matched, and unmatched enrollment results.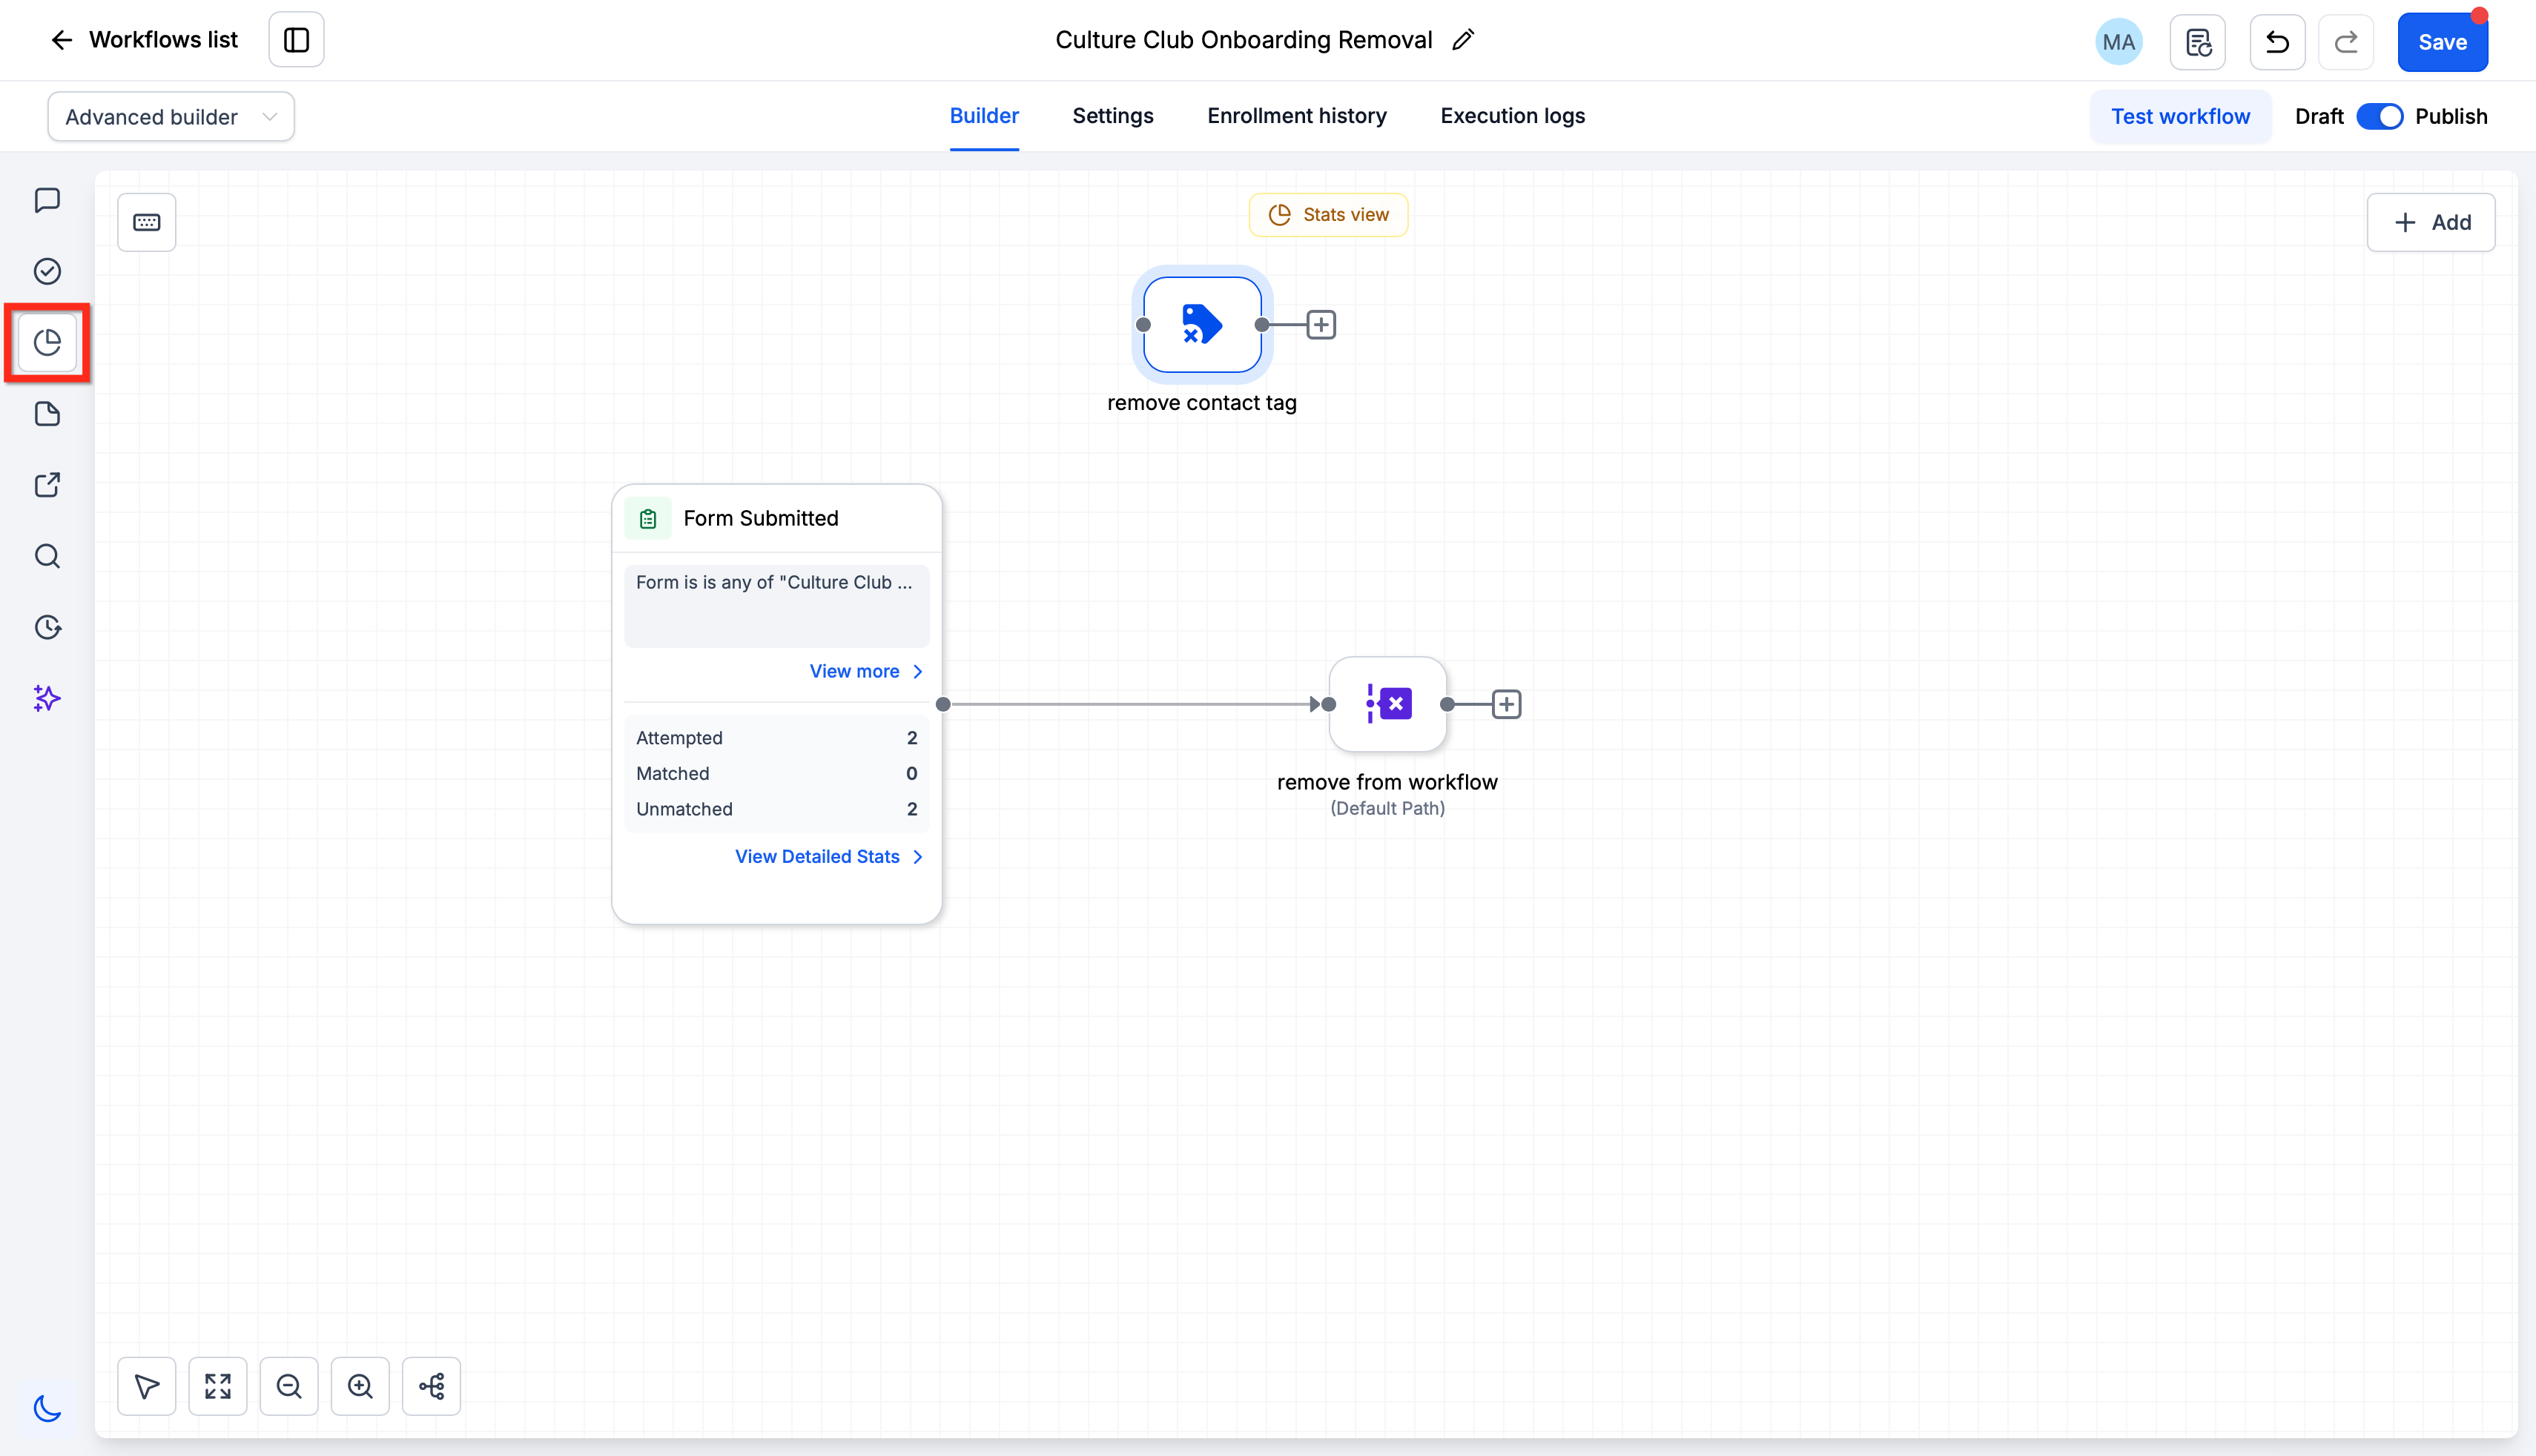
Attempted: Contacts evaluated by the trigger.
Matched: Contacts that met the trigger conditions.
Unmatched: Contacts that did not meet the trigger conditions.
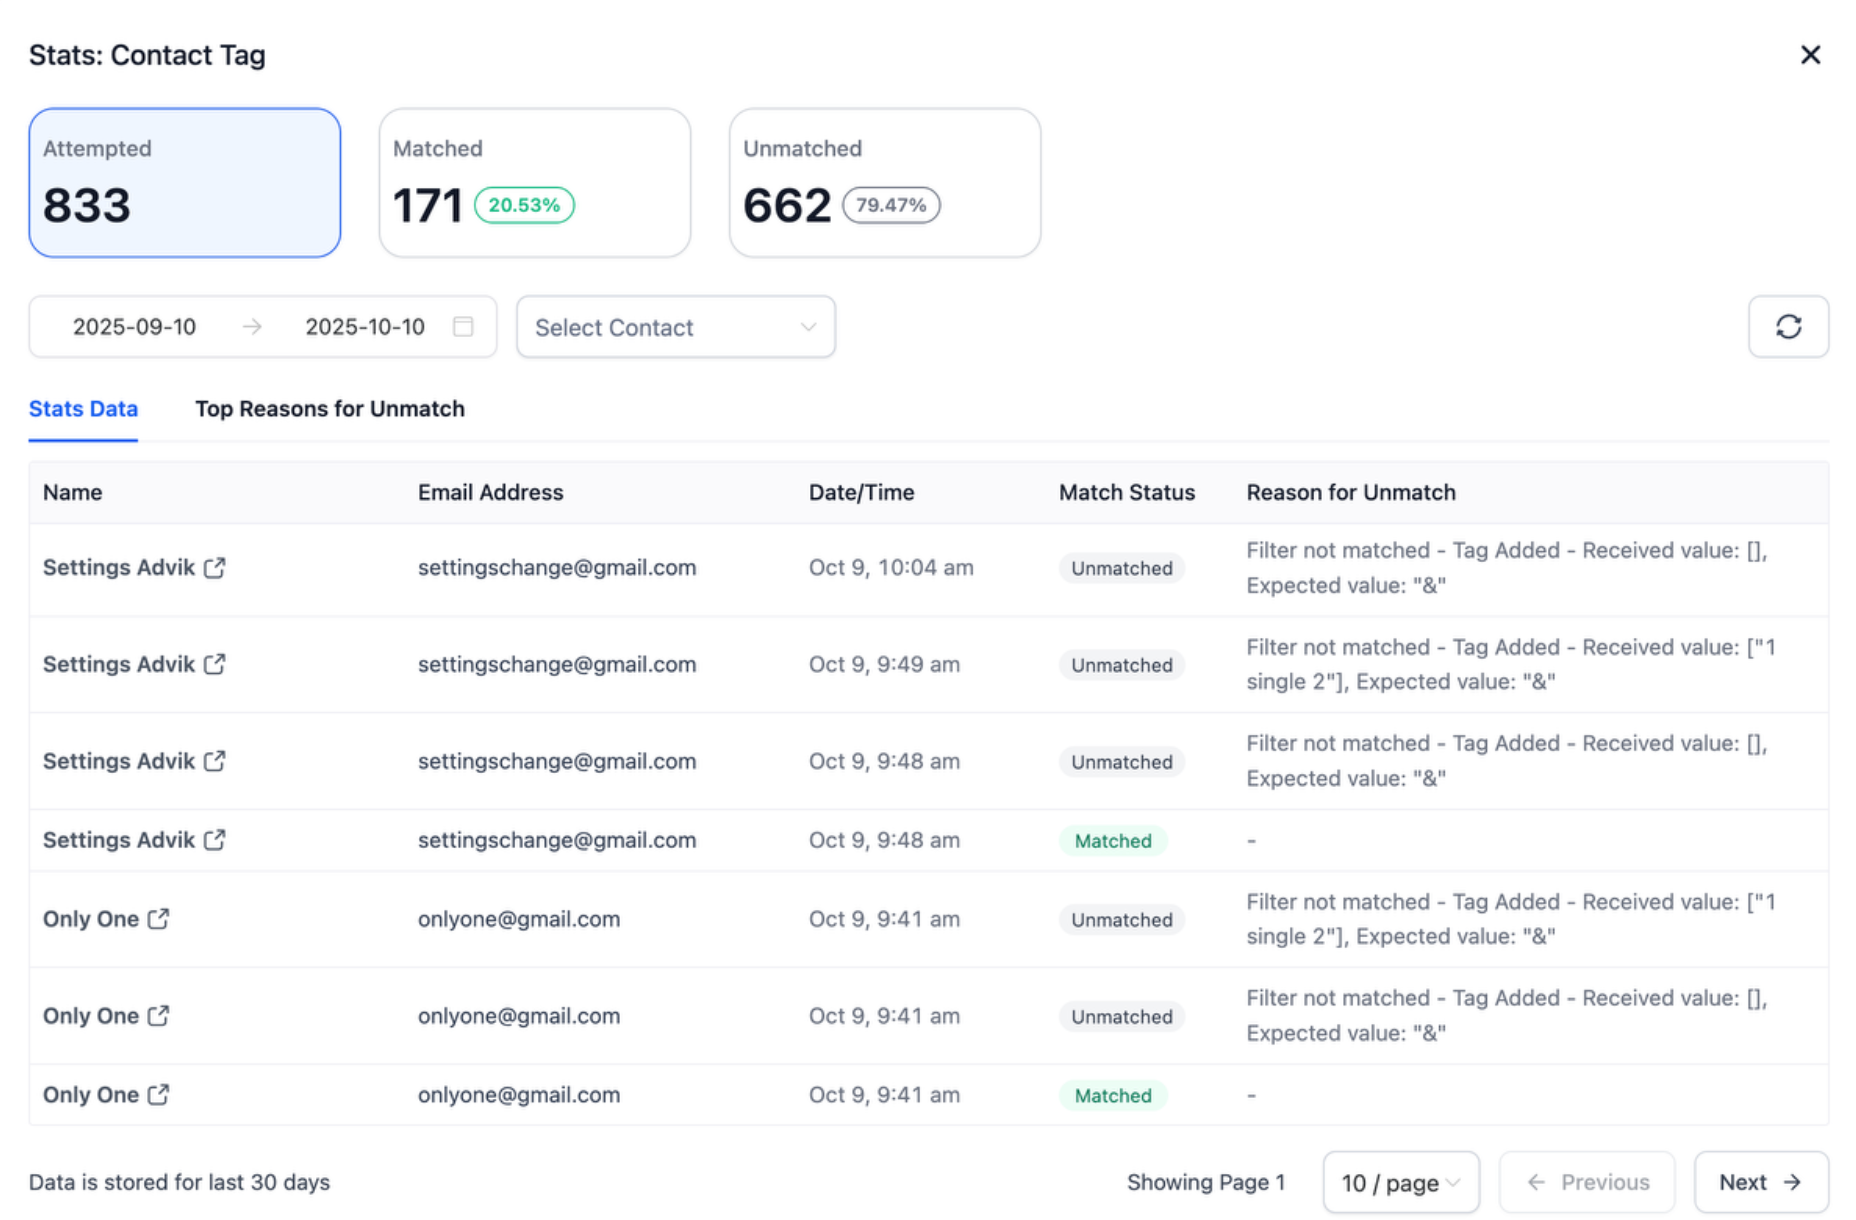
Click a trigger statistic to open its detailed view. You can review contact-level results, search for a specific contact, and investigate why contacts did not match.
For communication actions, Stats View displays the available delivery and engagement statistics for that action. Click a statistic to open its detailed report.
For tips on analyzing workflow performance, explore How to Analyze Workflow Campaigns. Stats are also available at the workflow level in the Workflow List Click the expand arrow under Stats.

Note that if a communication action was in the workflow, and used, and then deleted, the stats will still be saved in the workflow.

You cannot edit a workflow while Stats View is active. Trigger Stats includes data from the last 30 days.

For complete Trigger Stats instructions, see Workflow Trigger Narration and Statistics.
The Canvas
Add & connect steps
Open the Triggers & Actions panel.
Configure from the panel or drag items directly onto the canvas.
Connect nodes by dragging from the connector handle (or the +icon).

Auto-connect steps (drag and drop)
When you drag a trigger or action from the Triggers & Actions panel (sidebar) onto the canvas, it can auto-connect based on where you drop it:
- Extend a branch: Drop the step on the last node in a branch to add it to the end.
- Insert between steps: Drop the step between two connected nodes to insert it in the middle.

Important
Multi-select (marquee/Shift-drag) to move blocks of nodes.
Copy/paste branches across workflows to reuse patterns
Configure and save the new step after dropping it onto the canvas.
Unconfigured actions will not run. Workflows do not execute incomplete (unconfigured) actions.
Go-To connections for Triggers & Delinked Nodes (Parallel branches)
Trigger Go-To (set each trigger’s starting action)
Route a trigger to the exact action where it should start.
Connect it: Drag the trigger’s Go-To connector onto a target action.
How it looks: Trigger Go-To connections are shown as a dashed line with an arrowhead (normal sequential links remain solid).
Execution Behavior: When the trigger fires, the workflow jumps directly to the target action and continues from there.

Note: For more information do visit, Go-To Connections for Triggers: Advanced Builder Workflow
Delinked nodes (independent/parallel branches)
Create branches that don’t need to connect linearly—great for handling multiple triggers or outcomes in one canvas.
Build an independent cluster of actions anywhere.
Attach a trigger via Go-To connection to start on that branch.
Each branch runs independently within the same workflow context.

Visual cues (at a glance)
Solid connector → normal sequential path
Dashed connector with arrow → Trigger Go-To (jump to target action)
Isolated cluster → Delinked branch
Default Path for Parallel Branches (Advanced Builder)
In Advanced Builder workflows with multiple parallel branches, you can choose the Default Path. The Default Path controls which branch contacts enter when:
- you run a workflow test, or
- a contact enters this workflow from another workflow.
How it works
- The root node is labeled Default Path.
- On the first node/action in each branch, click the branch icon to set that branch as the Default Path.
- After you set a Default Path, workflow tests and contacts entering from another workflow follow that branch.
Visual indicators
- A solid trigger connector means the branch is the Default Path.
- A dashed trigger connector means the branch is reached through a Go To connector and is not the default path.
How to set the Default Path
1. Open a workflow with multiple parallel branches in Advanced Builder.
2. On the first action of the branch you want to use, click the branch icon.
3. Set that branch as the Default Path.
4. Run a workflow test or enroll a contact from another workflow to validate the path.
Example
If your workflow has multiple reminder branches, set one branch as the Default Path so your test contact enters that reminder branch first.
Enable / Disable Nodes
Turn any action/condition off for testing—without deleting or rewiring.
Disable: Hover a node → click pause.
Enable: Hover again → click play.
Execution: Disabled nodes are skipped; connections remain intact.

Sticky Notes & Color Coding
Use notes to explain logic for teammates and future you.
Add a note from the left sidebar.
Choose color/style, then enter text.
Notes support images and links.

Keyboard Shortcuts & Power Navigation
Open the keyboard icon (top-left) for the full list—Navigation, Tools, View, and Edit.

Examples
Arrow keys to move selection
Cmd/Ctrl + C / V for copy/paste
Next/Previous action buttons for fast traversa
Note: For more do visit, Keyboard Shortcuts in Workflow Builder
Tidy Up (Auto-layout)
One click to clean up cluttered canvases—great after heavy edits or imports.

Workflow Switcher
Navigate between workflows without leaving the builder.
Open the Workflow Switcher (left sidebar).
See recent workflows or search by name/tag.
Clicking a result opens it in a new tab—your current canvas stays open.


Notes, Limits & Best Practices
Single enrollment per contact. Even with parallel branches, the same contact won’t run concurrently through multiple branches of the same workflow.
Switching to Standard Builder: Remove Advanced-only features (Trigger Go-To, Delinked nodes, Disabled nodes) before switching back.
Organize early: Use color-coded notes and Tidy Up to keep complex maps readable.
Name clearly: Give triggers/actions descriptive names (this helps in both canvas and Version History).
Was this article helpful?
That’s Great!
Thank you for your feedback
Sorry! We couldn't be helpful
Thank you for your feedback
Feedback sent
We appreciate your effort and will try to fix the article