HighLevel can connect compatible physical VoIP deskphones using SIP so users can make and receive business calls from a traditional handset while keeping call activity connected to the CRM.
A successful setup requires more than entering SIP credentials. The deskphone must register correctly, the assigned HighLevel user must be configured to receive calls on the deskphone, inbound routing must point to that user when appropriate, and the network must permit the required SIP and RTP traffic.
This guide covers provisioning, supported network requirements, user routing, testing, extension dialing, blind transfers, device management, and dedicated troubleshooting for both inbound-only and outbound-only calling failures.
If inbound calls work but outbound calls fail, jump to Inbound Works but Outbound Fails. If outbound calls work but inbound calls do not ring the deskphone, jump to Outbound Works but Inbound Fails.
What is the Physical VoIP Deskphone (SIP) Integration?
The Physical VoIP Deskphone integration lets a compatible open-SIP handset register with HighLevel so users can make and receive calls from physical phone hardware while maintaining HighLevel call routing and CRM activity.
Each deskphone is provisioned with a SIP domain, SIP username or extension, password, and assigned HighLevel user. Once the phone registers successfully, HighLevel can route supported calls to the deskphone based on the user and phone-number configuration.
HighLevel features such as call recording and transcription can remain part of the call workflow when those features are enabled. Call transcription requires call recording and is a separately billed Voice Intelligence feature.
Key Benefits of Physical VoIP Deskphones
Physical SIP deskphones give teams a traditional handset experience without separating their voice activity from HighLevel. This is especially useful for office-based teams that prefer dedicated phone hardware while still relying on CRM-based routing and reporting.
- Physical Handset Calling: Make and receive supported HighLevel calls from a compatible SIP deskphone.
- CRM-Connected Calling: Keep call activity connected to the HighLevel phone system and contact records.
- User-Based Routing: Assign each SIP device to a HighLevel user and control which channel receives inbound, Ring All, and IVR-routed calls.
- Extension Dialing: Call another configured deskphone directly using its extension.
- Deskphone Transfers: Blind-transfer supported calls to another configured deskphone extension.
- Built-In Testing: Use HighLevel's Test Calls area to verify both outbound calling and inbound ringing before putting the device into production.
Permissions for VoIP Deskphones
Deskphone provisioning changes phone-system credentials and user routing, so setup access is limited according to the user's administrative role.
| Role | Access |
|---|---|
| Agency Admin | Can provision supported deskphones across agency locations. |
| Sub-Account Admin | Can provision devices inside the sub-account they administer. |
| Other Users | Read-only access; users may be prompted to ask an administrator to configure the device. |
Technical Requirements & Recommended Deskphones
Choosing open-SIP hardware and preparing the network correctly reduces registration, audio, and one-way calling problems. Confirm these requirements before provisioning production devices.
Network and Protocol Requirements
| Requirement | HighLevel Guidance |
|---|---|
| SIP Transport | SIP over UDP, TCP, or TLS. |
| SIP Signaling | Allow outbound ports 5060/5061. |
| RTP Audio | Allow UDP 10000–20000. |
| SIP ALG | Disable SIP ALG when it interferes with registration, audio, answering, or inbound calling. |
| Power | Use a PoE-capable network connection or the appropriate external power adapter for the phone. |
Do not confuse the documented outbound SIP requirement with public port forwarding. HighLevel's published deskphone requirements specify outbound SIP ports 5060/5061 and UDP 10000–20000 for RTP. Do not expose SIP ports to the public internet or add arbitrary inbound port-forwarding rules solely because a call is failing. First verify registration, HighLevel routing, Keep Alive, SIP ALG, and the device configuration.
What to Look for When Choosing a Deskphone
- Standard open-SIP support.
- PoE support when the office network uses Power over Ethernet.
- At least two programmable line keys when your workflow benefits from them.
- Avoid carrier-locked or proprietary-provisioning hardware that prevents manual SIP account configuration.
Commonly Used Models
- Yealink T54W / T58W
- Poly VVX 450
- Grandstream GXP 2170
- Snom D785
- Cisco 7841
Compatibility note: Model menus, labels, firmware behavior, and SIP-account fields vary by manufacturer. Most open-SIP devices can work when standard SIP registration is supported, but the list above should not be interpreted as an exhaustive certification list.
SIP Settings and Network Requirements
The terminology used by physical phones varies, but every device needs the HighLevel-generated SIP server information and credentials. Matching these values exactly is essential for registration and outbound calling.
| Deskphone Setting | What to Enter or Verify |
|---|---|
| Registrar / SIP Server / Server | Use the SIP Domain / SIP Endpoint generated in HighLevel. |
| Username / Extension / User ID | Use the exact SIP user or extension created in HighLevel. Credentials are case-sensitive where applicable. |
| Password | Use the SIP-user password created in HighLevel. Store it securely because HighLevel cannot display the saved password later. |
| Transport | HighLevel supports SIP over UDP, TCP, or TLS. The phone and network must permit the transport being used. |
| Keep Alive | When available on the handset, enable Keep Alive and set the type to Options, especially when outbound calls work but inbound calls do not. |
Vendor menus vary. Some deskphones use labels such as Registrar, Server, Proxy, SIP URI, User ID, or Authentication ID. Use the HighLevel-generated values for the device's SIP account and refer to the handset manufacturer's documentation when the device separates these fields.
How to Set Up a Physical VoIP Deskphone (SIP)
Complete the setup in order so the SIP credentials, user assignment, inbound routing, and physical handset all point to the same configuration. Test the device before relying on it for production calls.
Step 1: Open the VoIP Deskphone Setup
- Open the applicable HighLevel sub-account.
- Go to Settings → Phone Numbers.
- Open Advanced Settings.
- Select VoIP deskphone (SIP).
- Click Get Started.
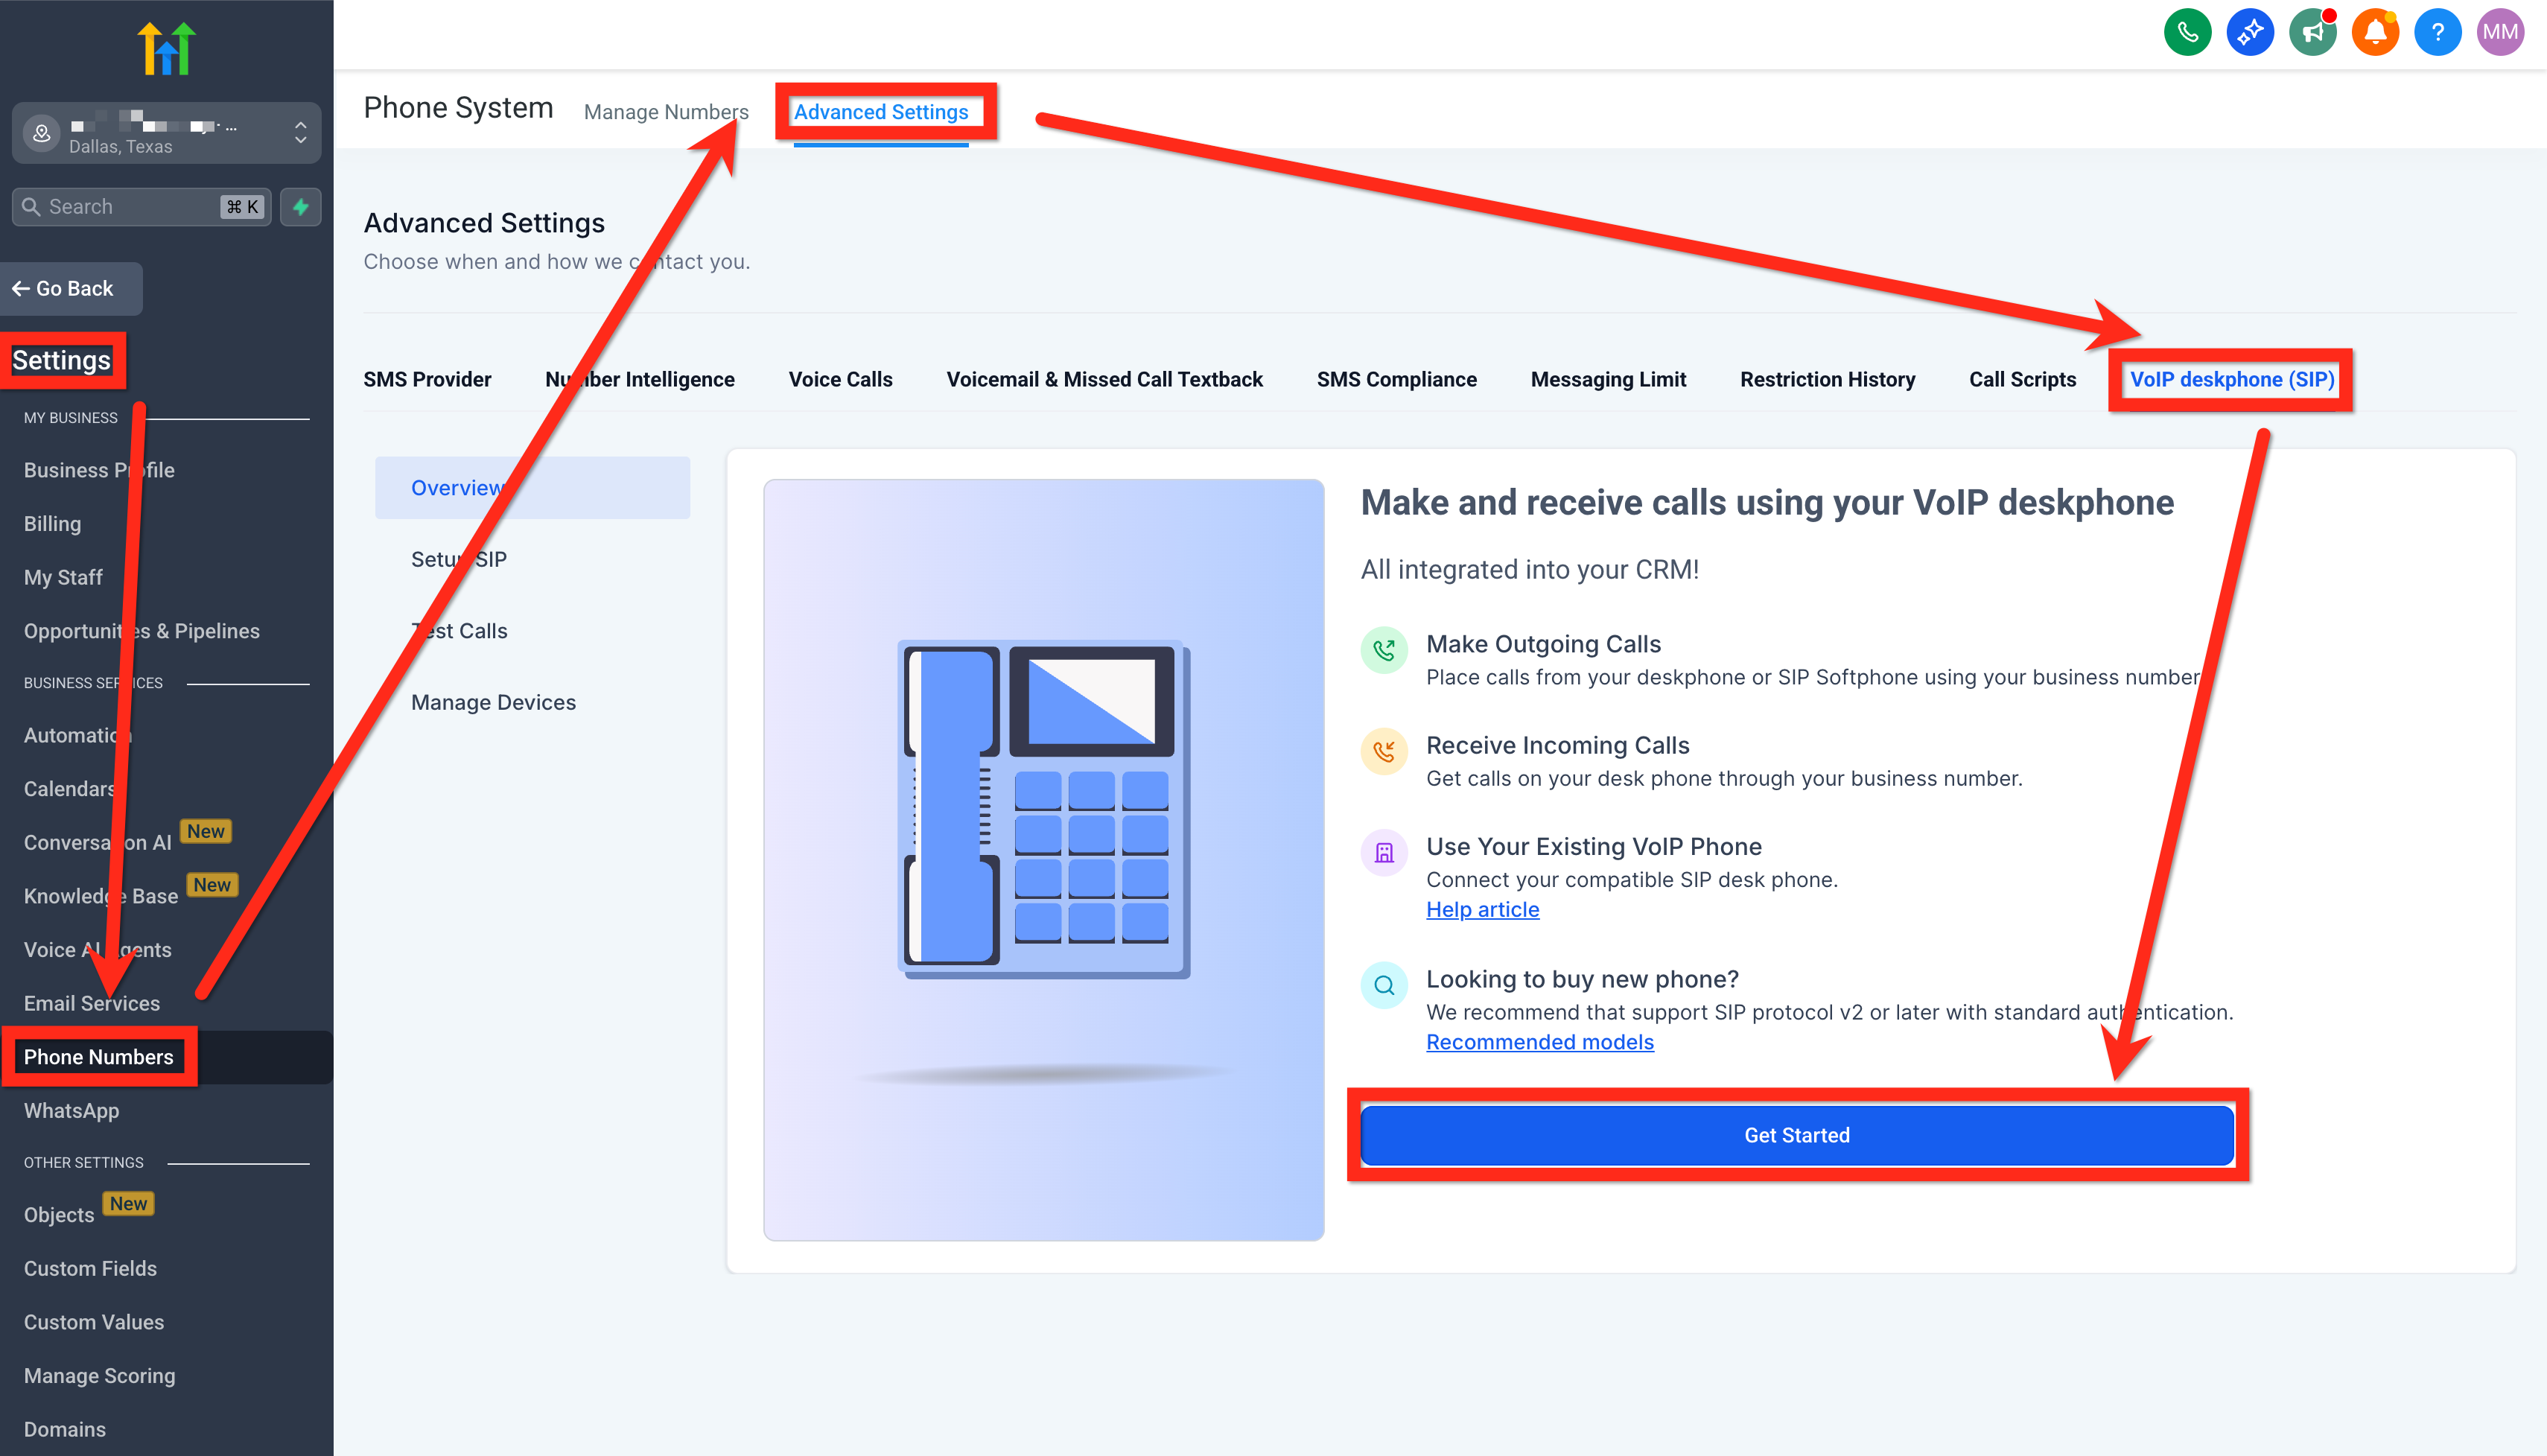
Open Settings → Phone Numbers → Advanced Settings → VoIP deskphone (SIP), then select Get Started.
Step 2: Configure the SIP Domain
Under Setup SIP, review the suggested SIP Domain / SIP Endpoint and choose the organization-specific prefix before saving.
Important: The SIP domain can be set only once. Review it carefully before saving the server configuration.
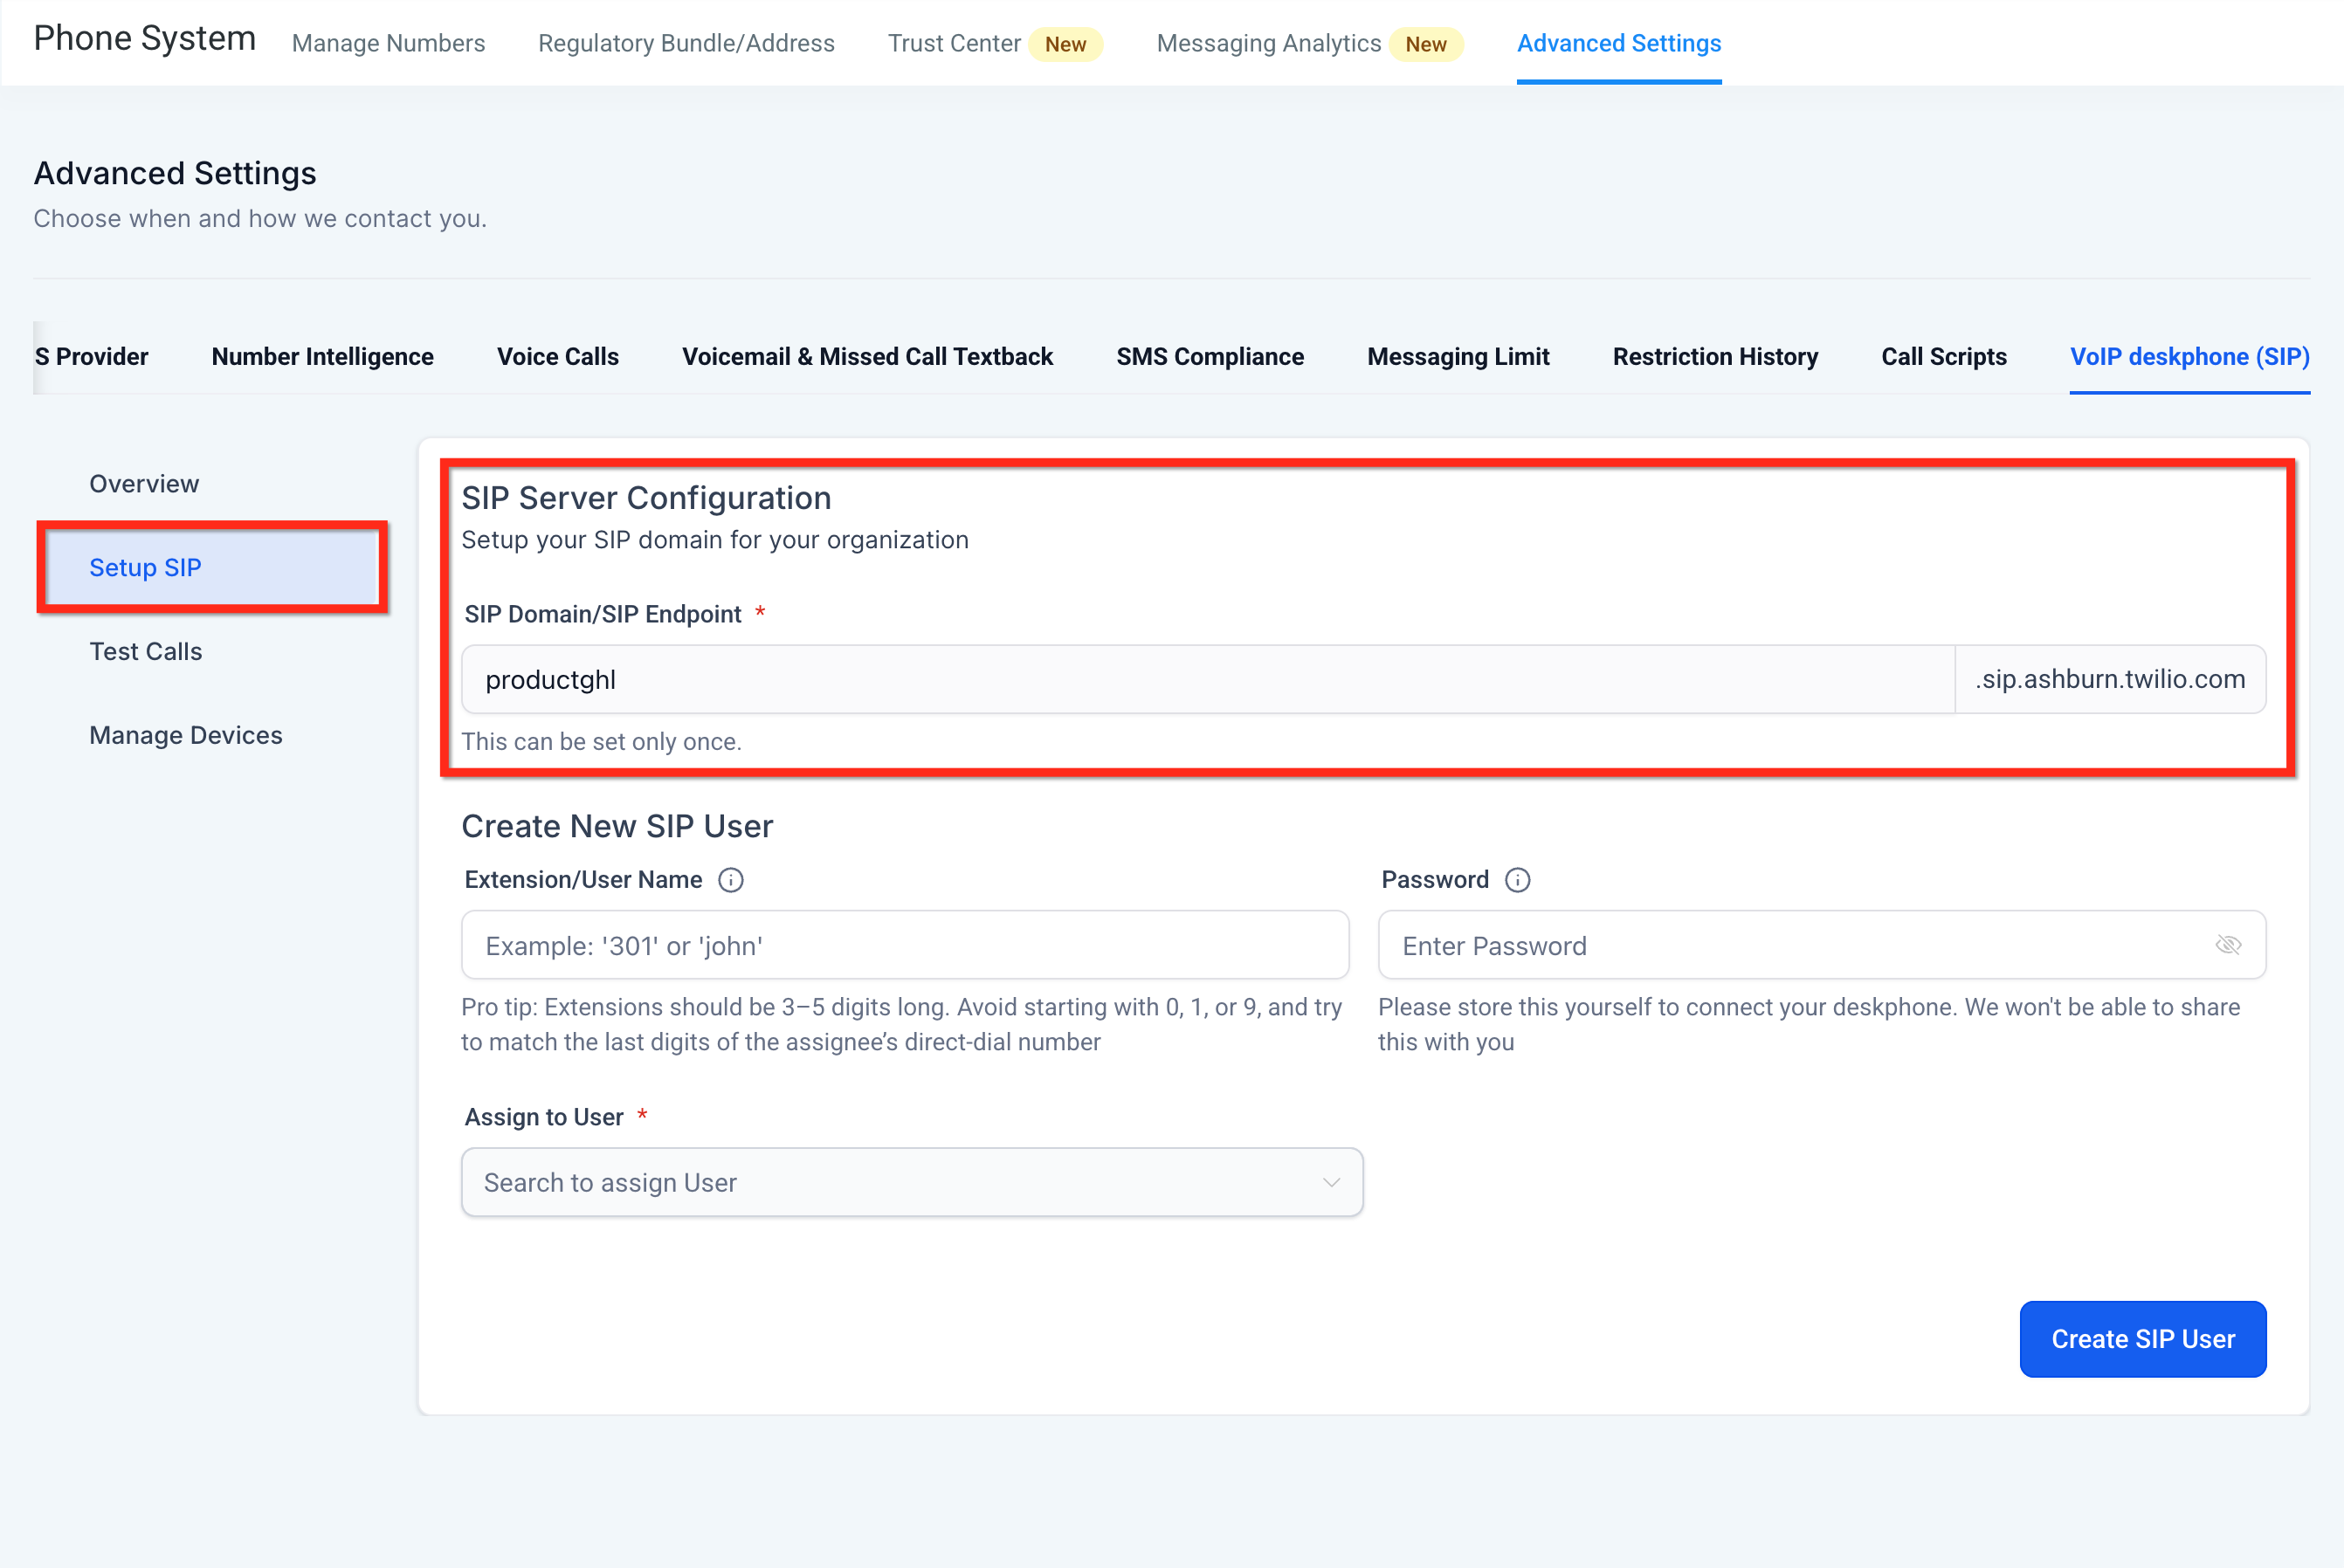
The SIP Server Configuration creates the SIP Domain / SIP Endpoint used when registering physical deskphones.
Step 3: Create the SIP User
Create the credentials the physical phone will use to register with HighLevel.
- Extension/User Name: Create the SIP username or extension for the device.
- Recommended extension format: Use 3–5 digits when creating a numeric extension.
- Extension guidance: Avoid starting with 0, 1, or 9, and consider matching the final digits of the assigned user's direct-dial number.
- Password: Create a strong SIP password and save it securely.
Save the SIP password now. HighLevel does not display the saved password later. If the password is lost, reset it from Manage Devices and update the physical handset with the new password.
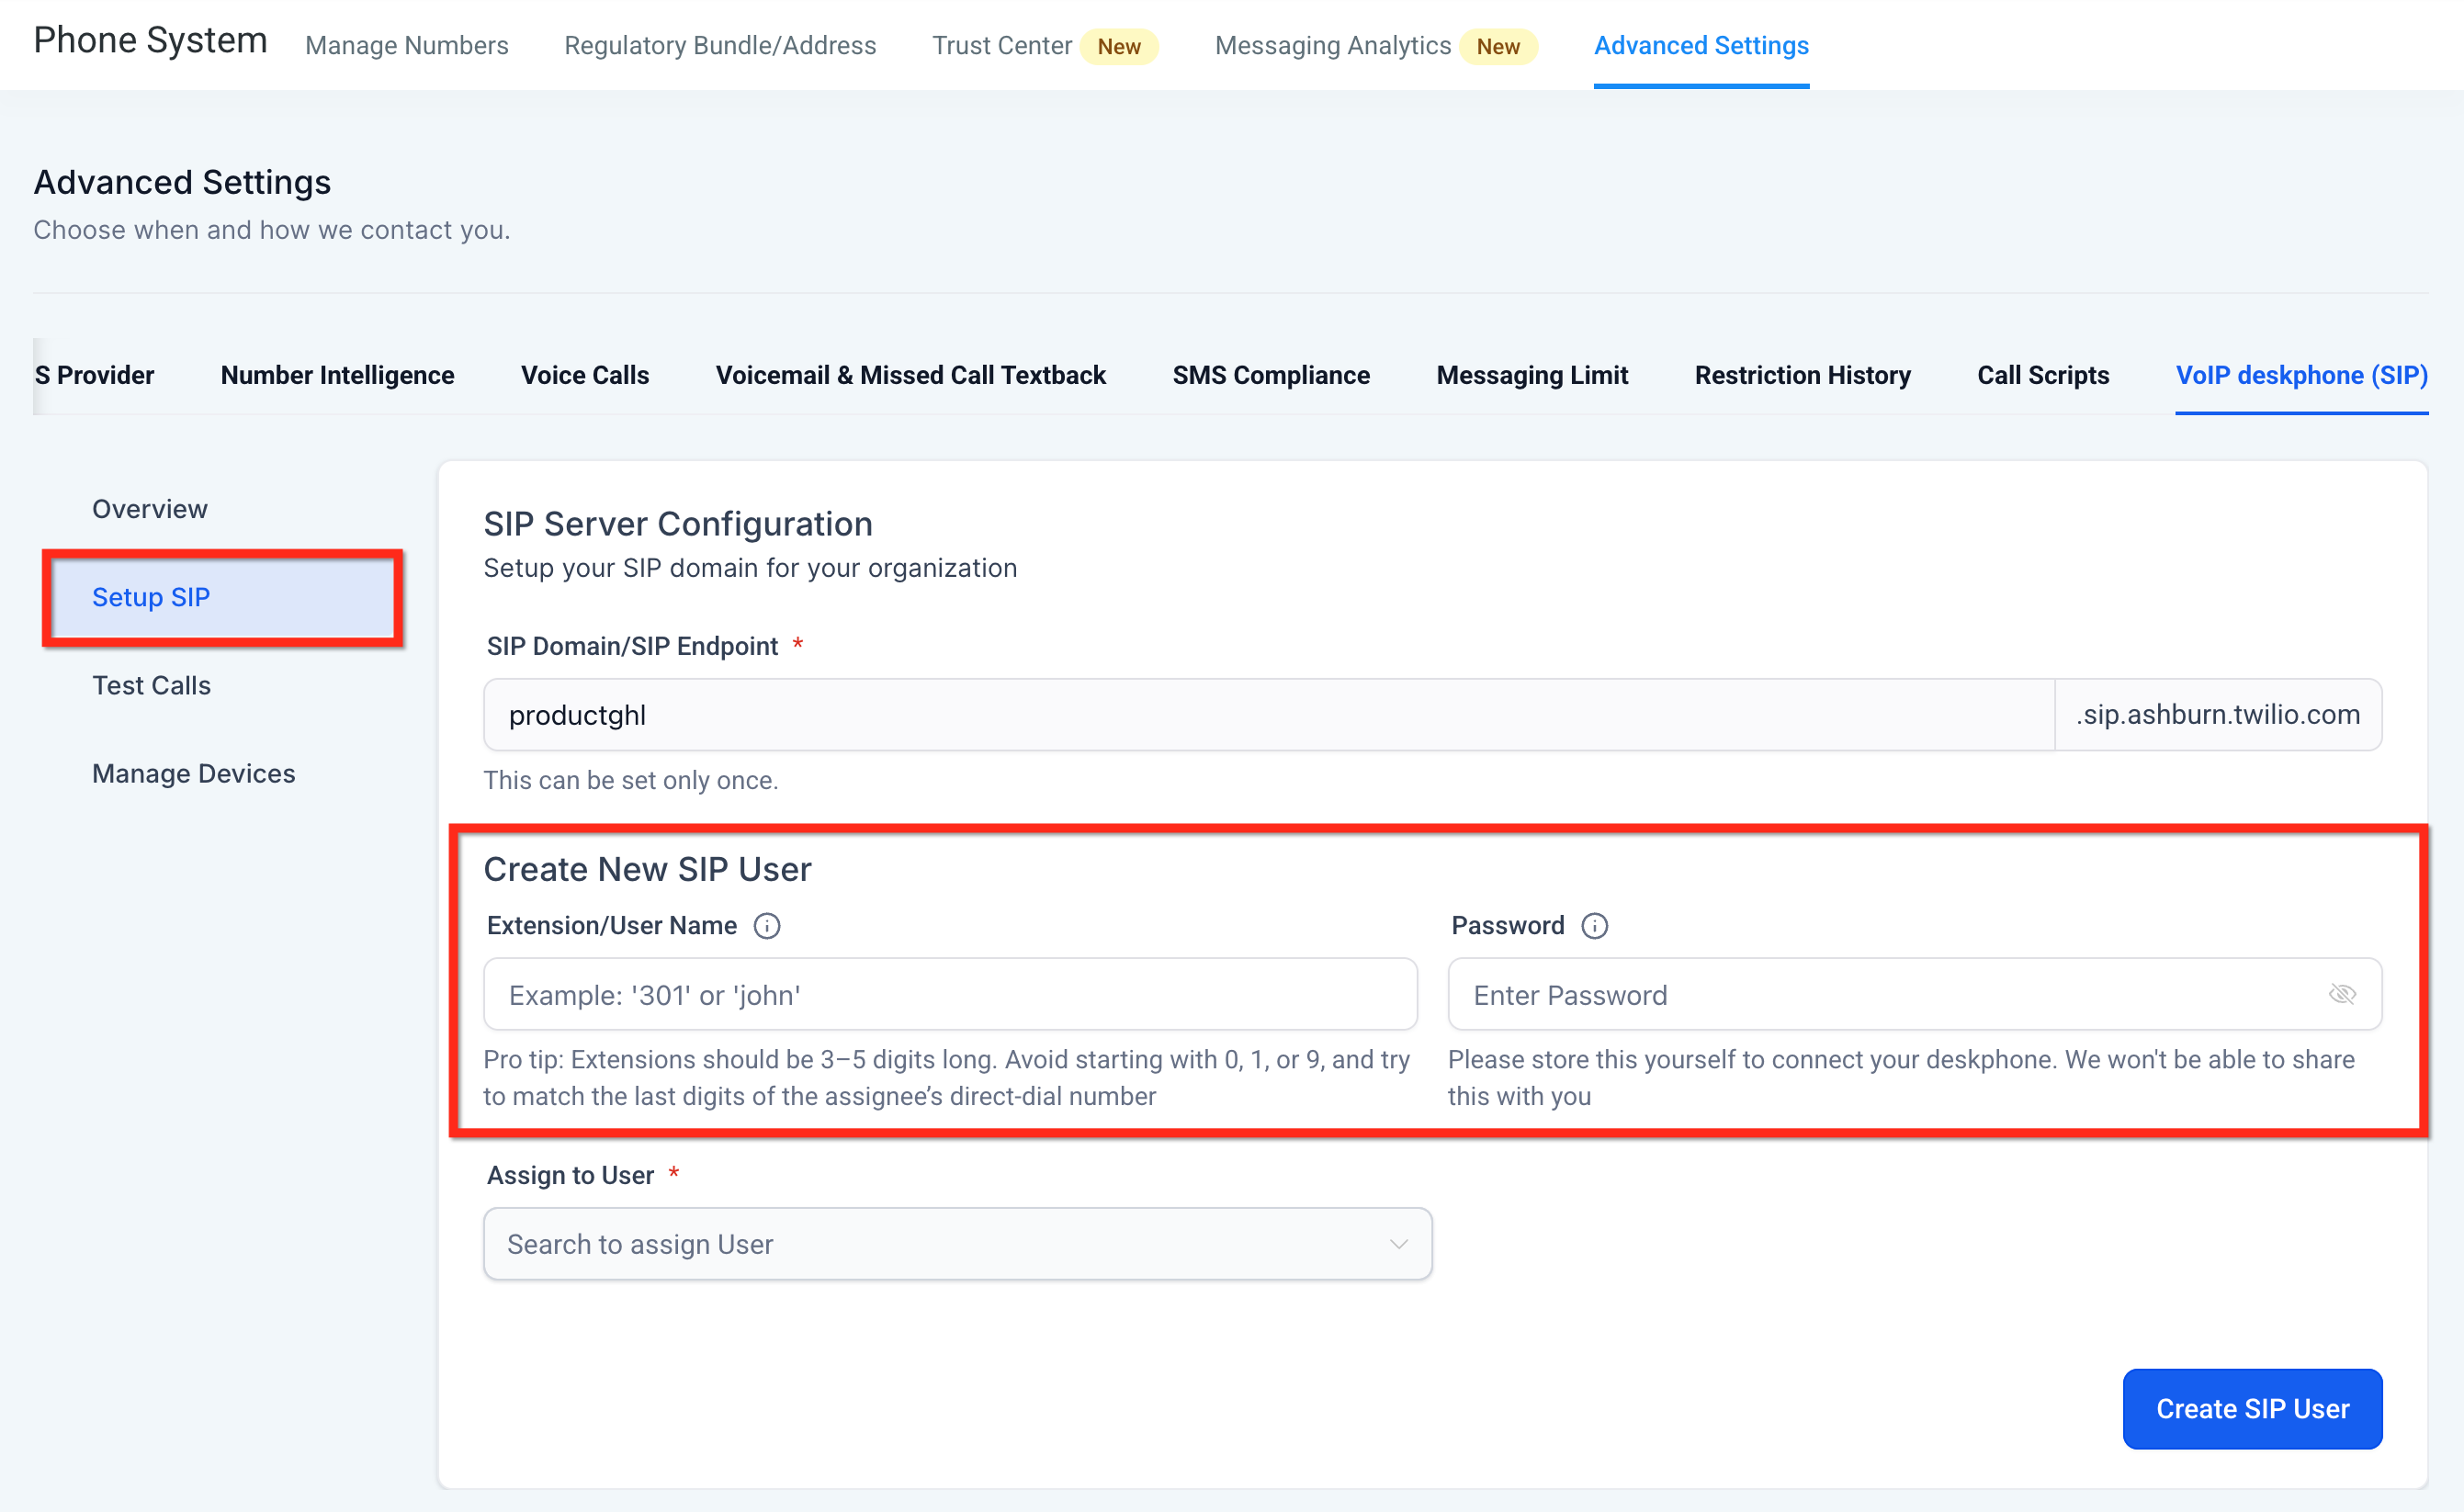
Create the SIP extension or username and a secure password that will be entered into the physical phone.
Step 4: Assign the SIP Device to a HighLevel User
Use Assign to User to connect the SIP device with the HighLevel team member who will use the deskphone.
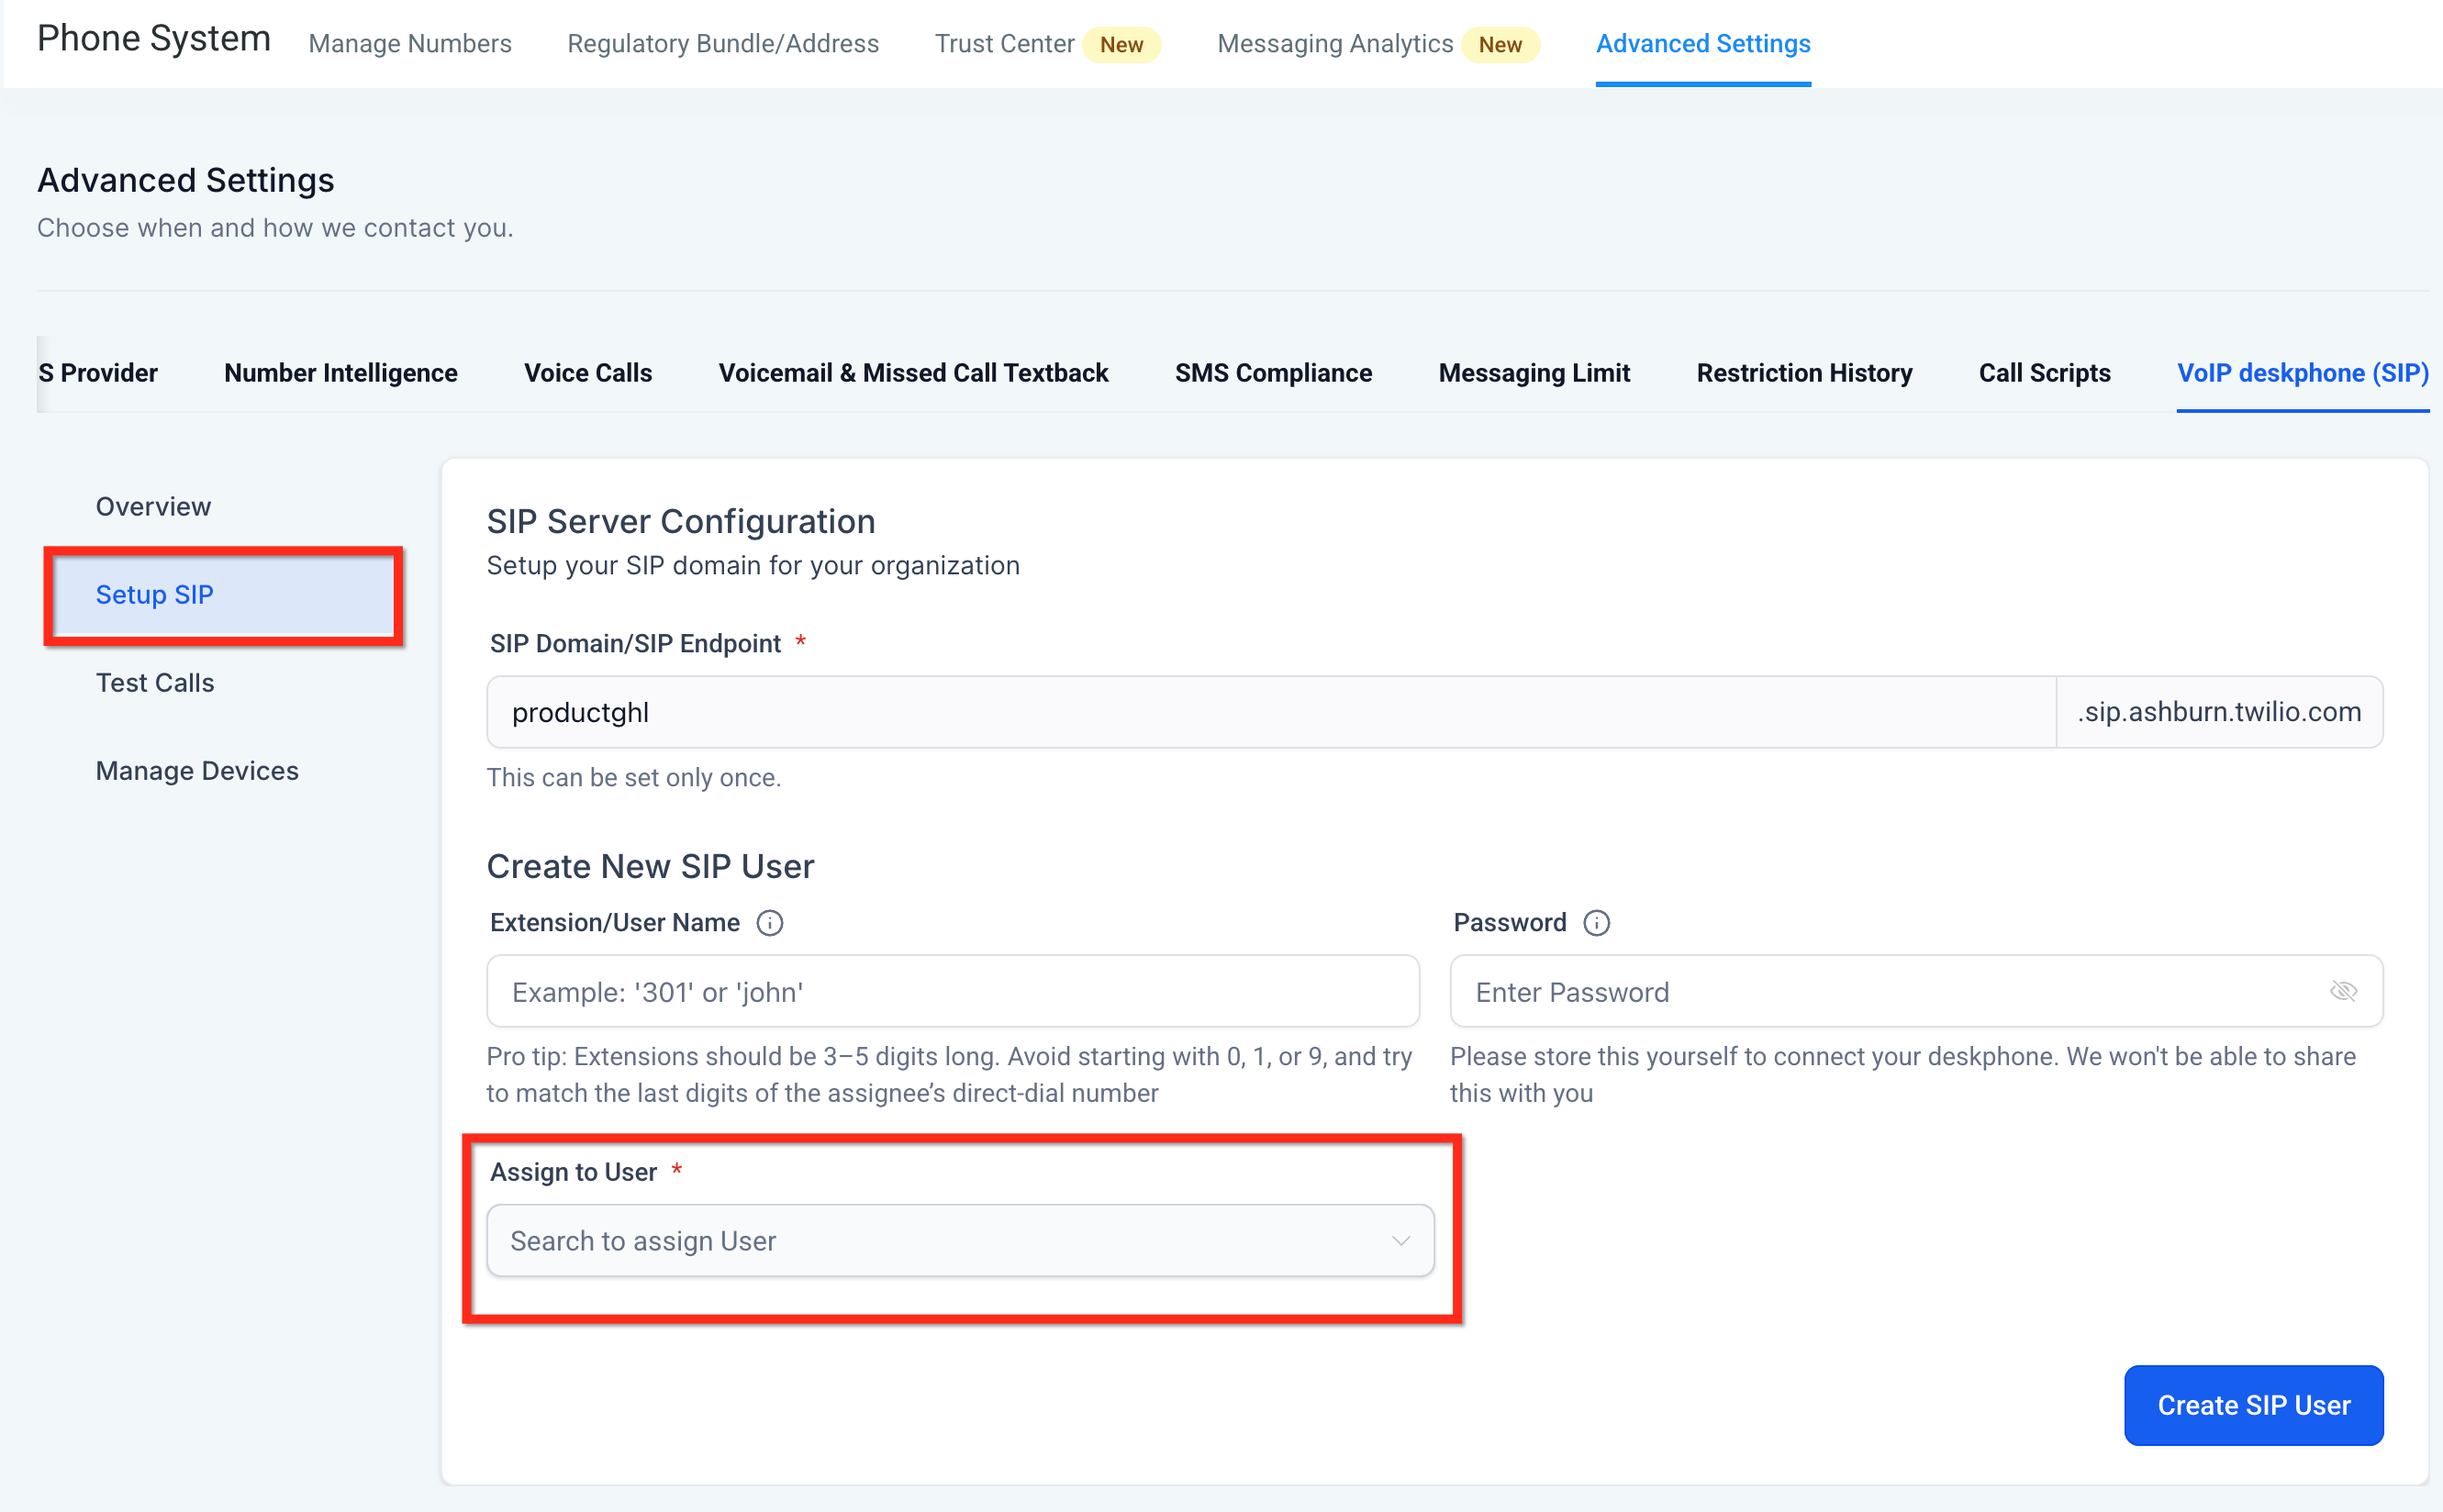
Assign the SIP device to the HighLevel user who should place and receive calls on the handset.
Step 5: Configure the User's Inbound Deskphone Routing
Creating the SIP user registers the device, but inbound calls still depend on the assigned user's call-routing settings.
- Go to Settings → My Staff.
- Edit the assigned user.
- Open Call & Voicemail Settings.
- Under Forward Calls to, enable Deskphone (SIP) when direct calls should ring the deskphone.
- For shared Ring All routing, select Deskphone (SIP) as the user's Default Channel for Ring All when appropriate.
- For IVR-routed calls, select Deskphone (SIP) as the user's Default Channel for IVR when the deskphone should receive the routed call.
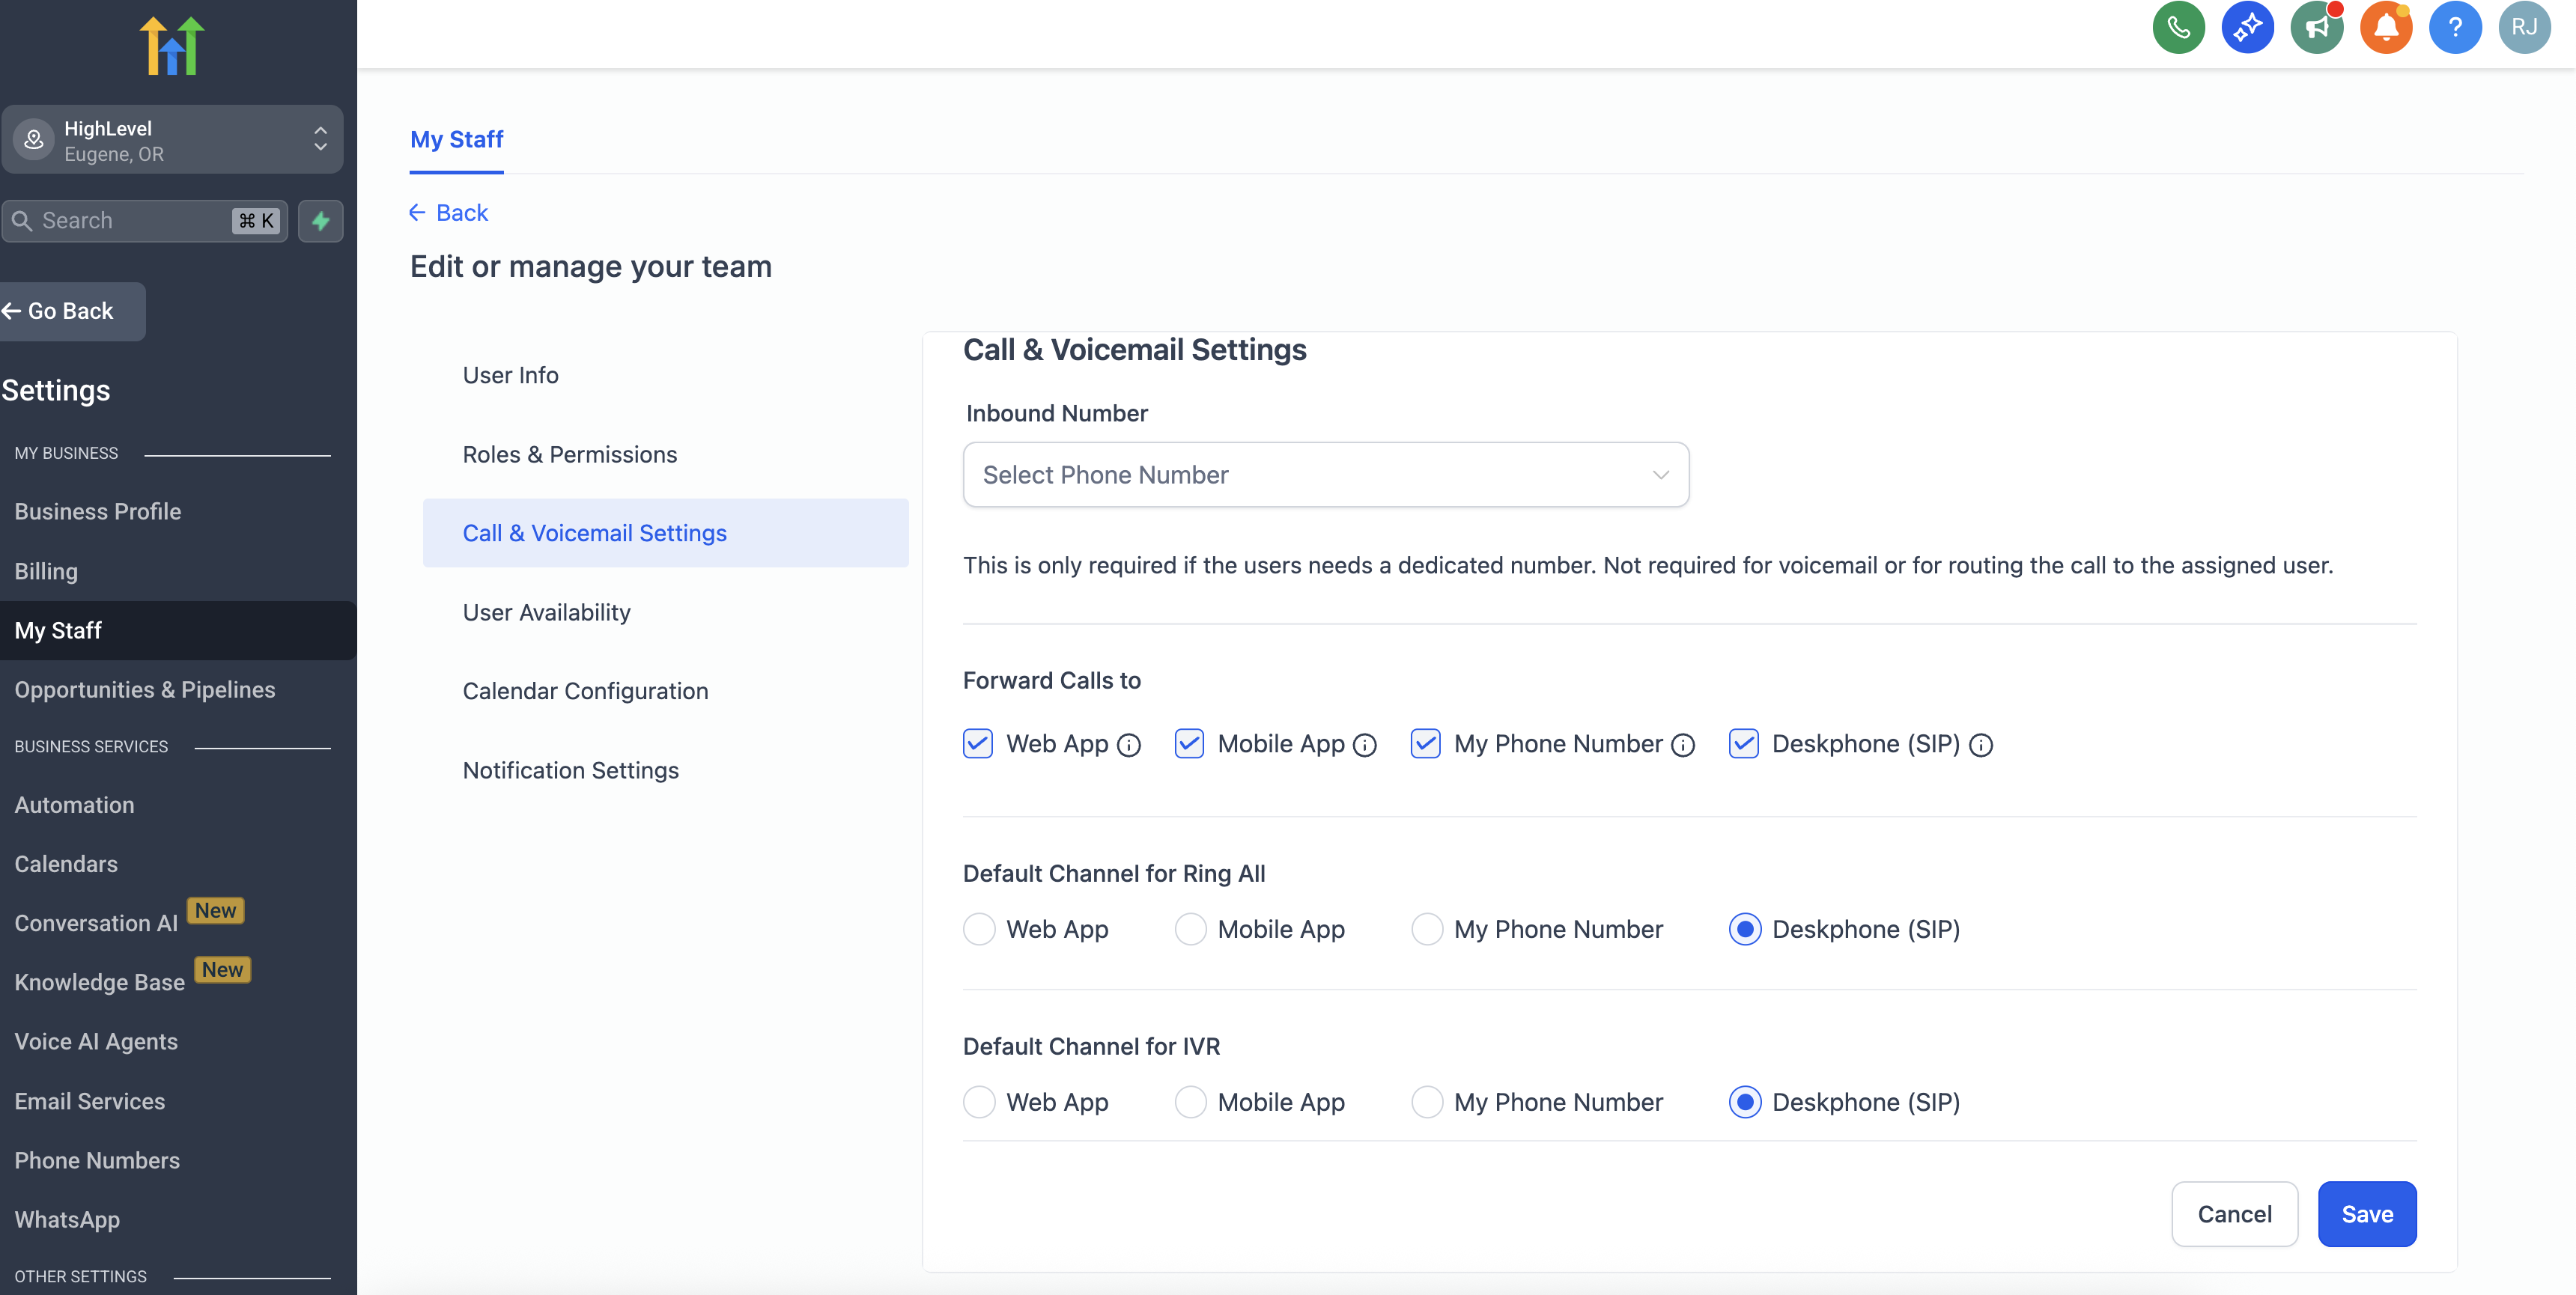
Enable Deskphone (SIP) for the inbound routes the user should receive, including direct forwarding, Ring All, or IVR.
Step 6: Configure the Physical Phone
Open the SIP account configuration on the physical handset and enter the SIP Domain, Username/Extension, and Password generated in HighLevel. Depending on the manufacturer, the server field may be labeled Registrar, SIP Server, Server, Proxy, or something similar.
After saving the phone's SIP account, confirm that the handset reports the account as Registered or shows an equivalent successful-registration indicator before testing calls.
Step 7: Run the Built-In Test Calls
Use the built-in tests to separate SIP registration or network problems from phone-number routing problems.
- Go to VoIP deskphone (SIP) → Test Calls.
- Select the SIP user you want to test.
- Outbound test: Use the physical deskphone to dial the displayed test number. A successful test plays the confirmation message.
- Inbound test: Use the inbound test / Test Ring control and confirm that the physical deskphone rings.
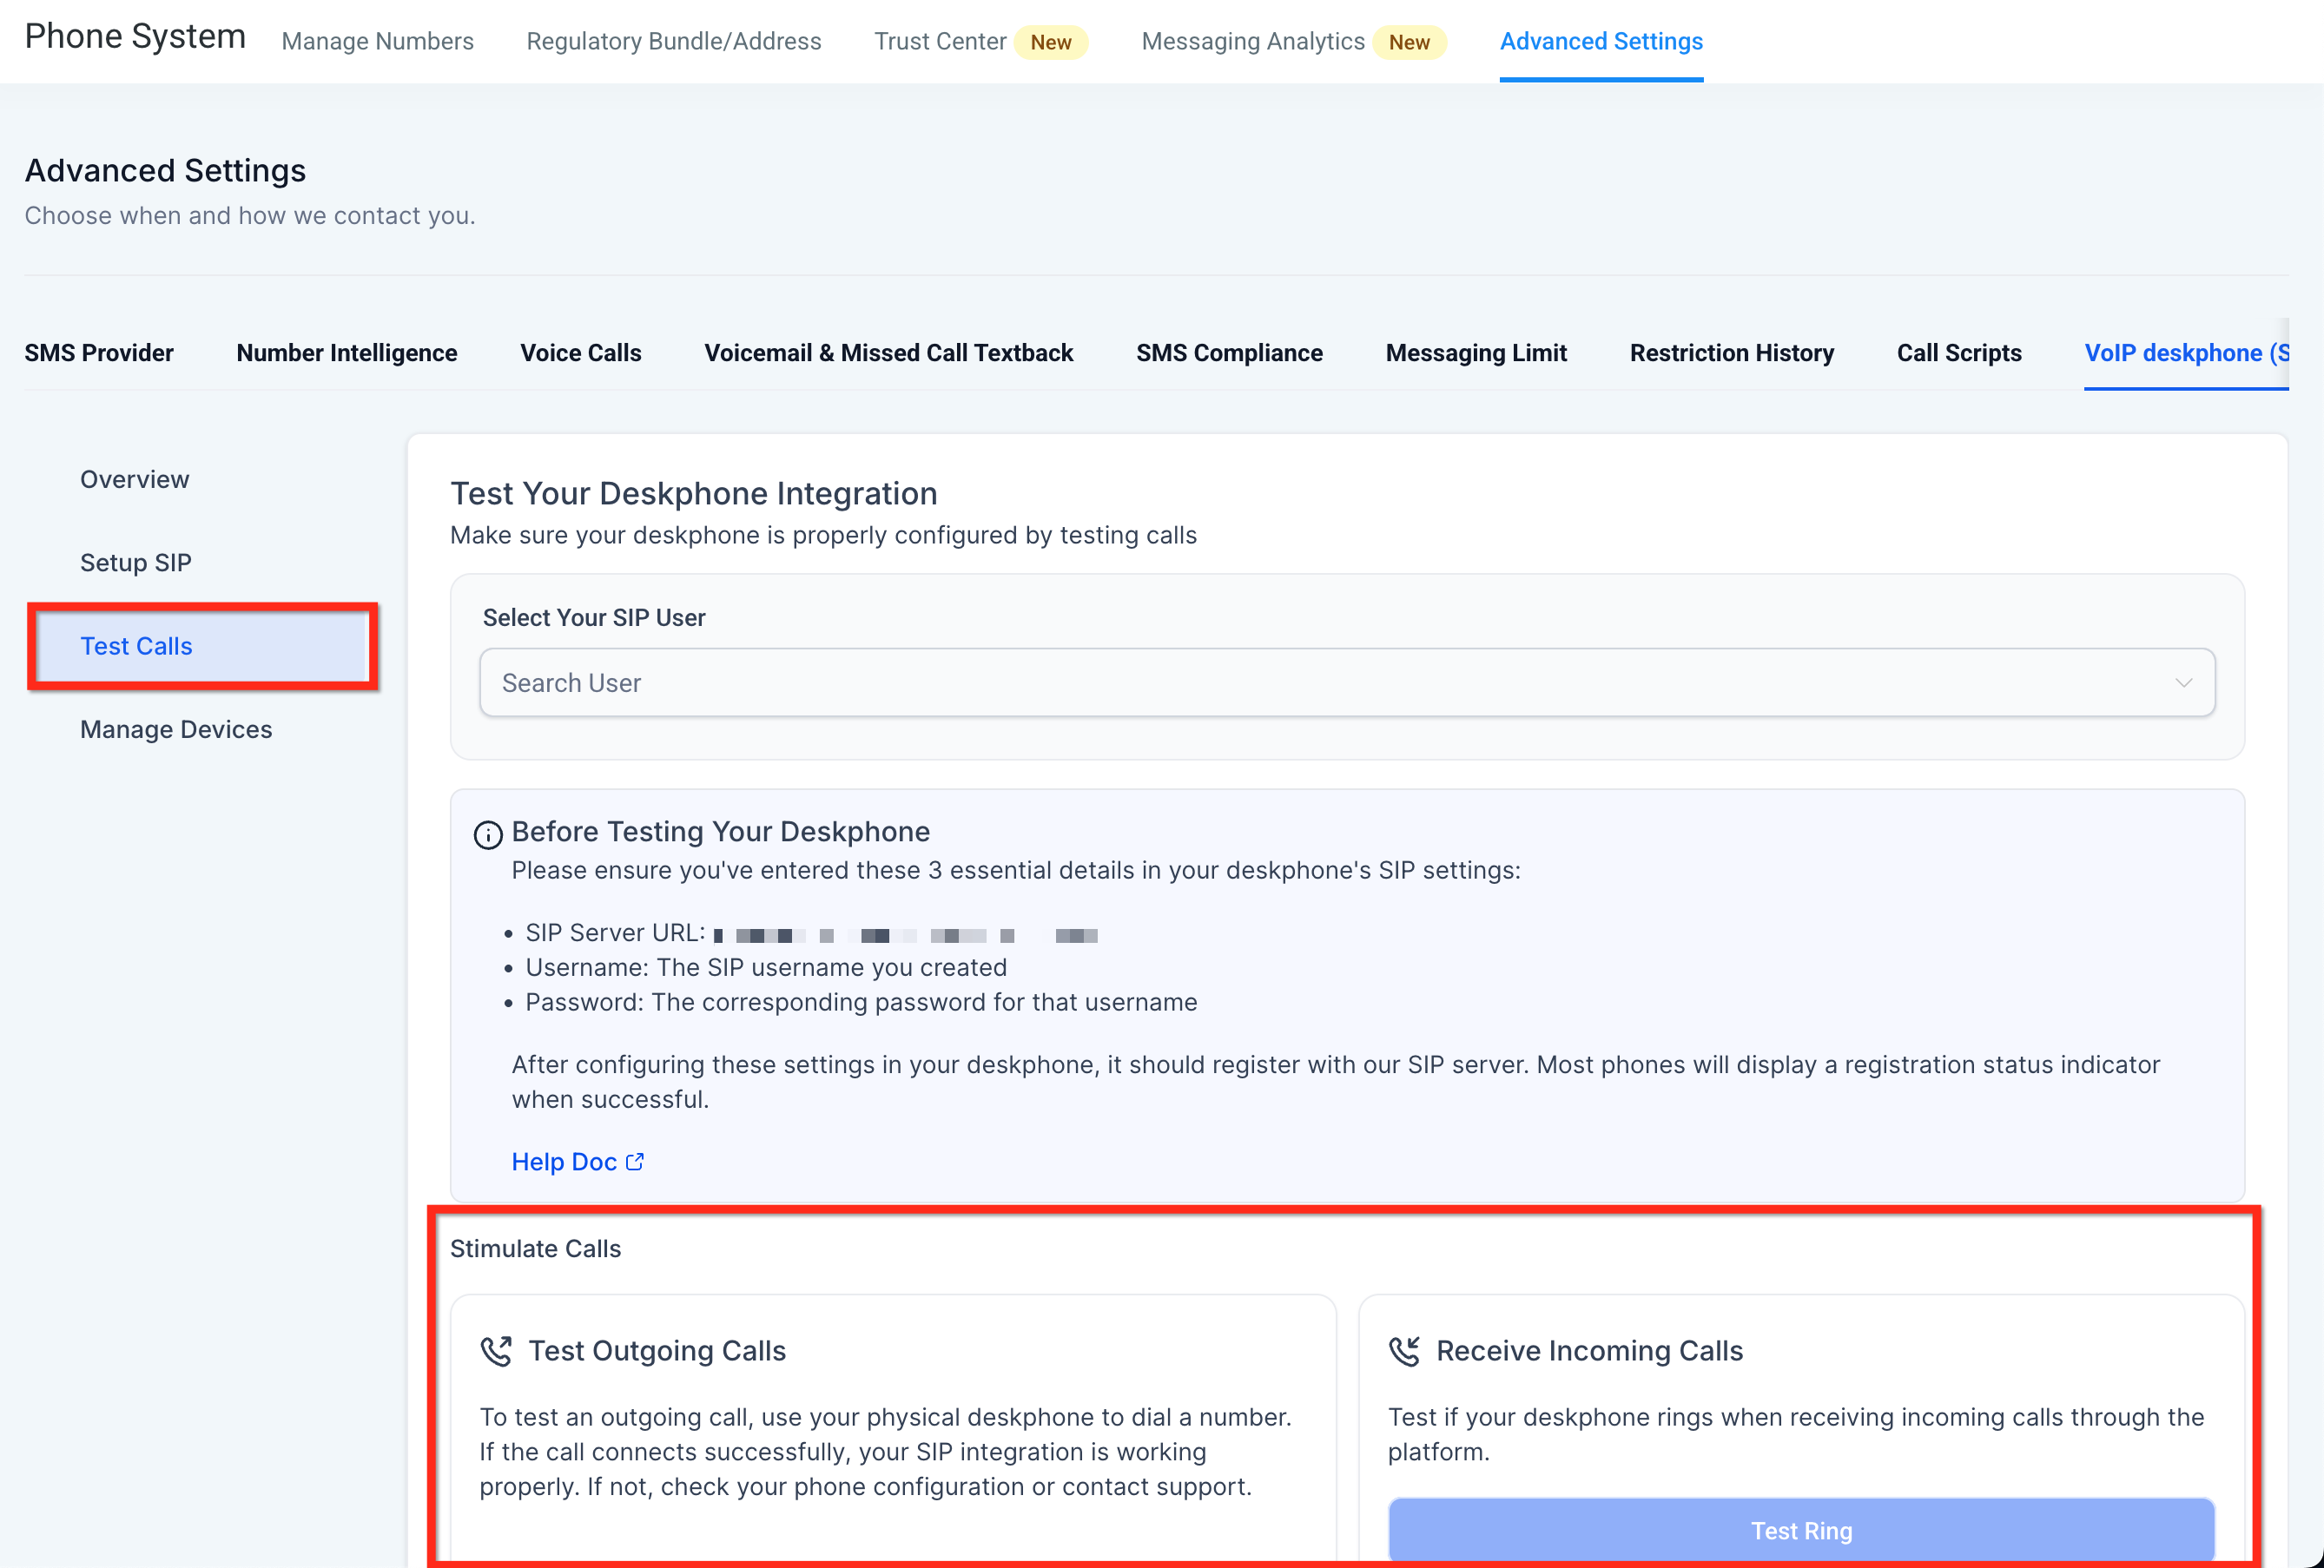
The Test Calls screen helps verify the SIP user's outbound calling and whether the deskphone can receive a test ring.
Manage SIP Devices
Manage Devices lets administrators update a SIP user's password or assignment and remove devices that are no longer authorized to register with the sub-account.
Reset a SIP User Password
Go to Settings → Phone Numbers → Advanced Settings → VoIP deskphone (SIP) → Manage Devices and click the pencil icon for the applicable SIP user. Enter a new password, save the change, and then update the physical handset with the same password.
Password changes affect registration. The physical phone must be updated with the new SIP password after a reset or it will fail authentication.
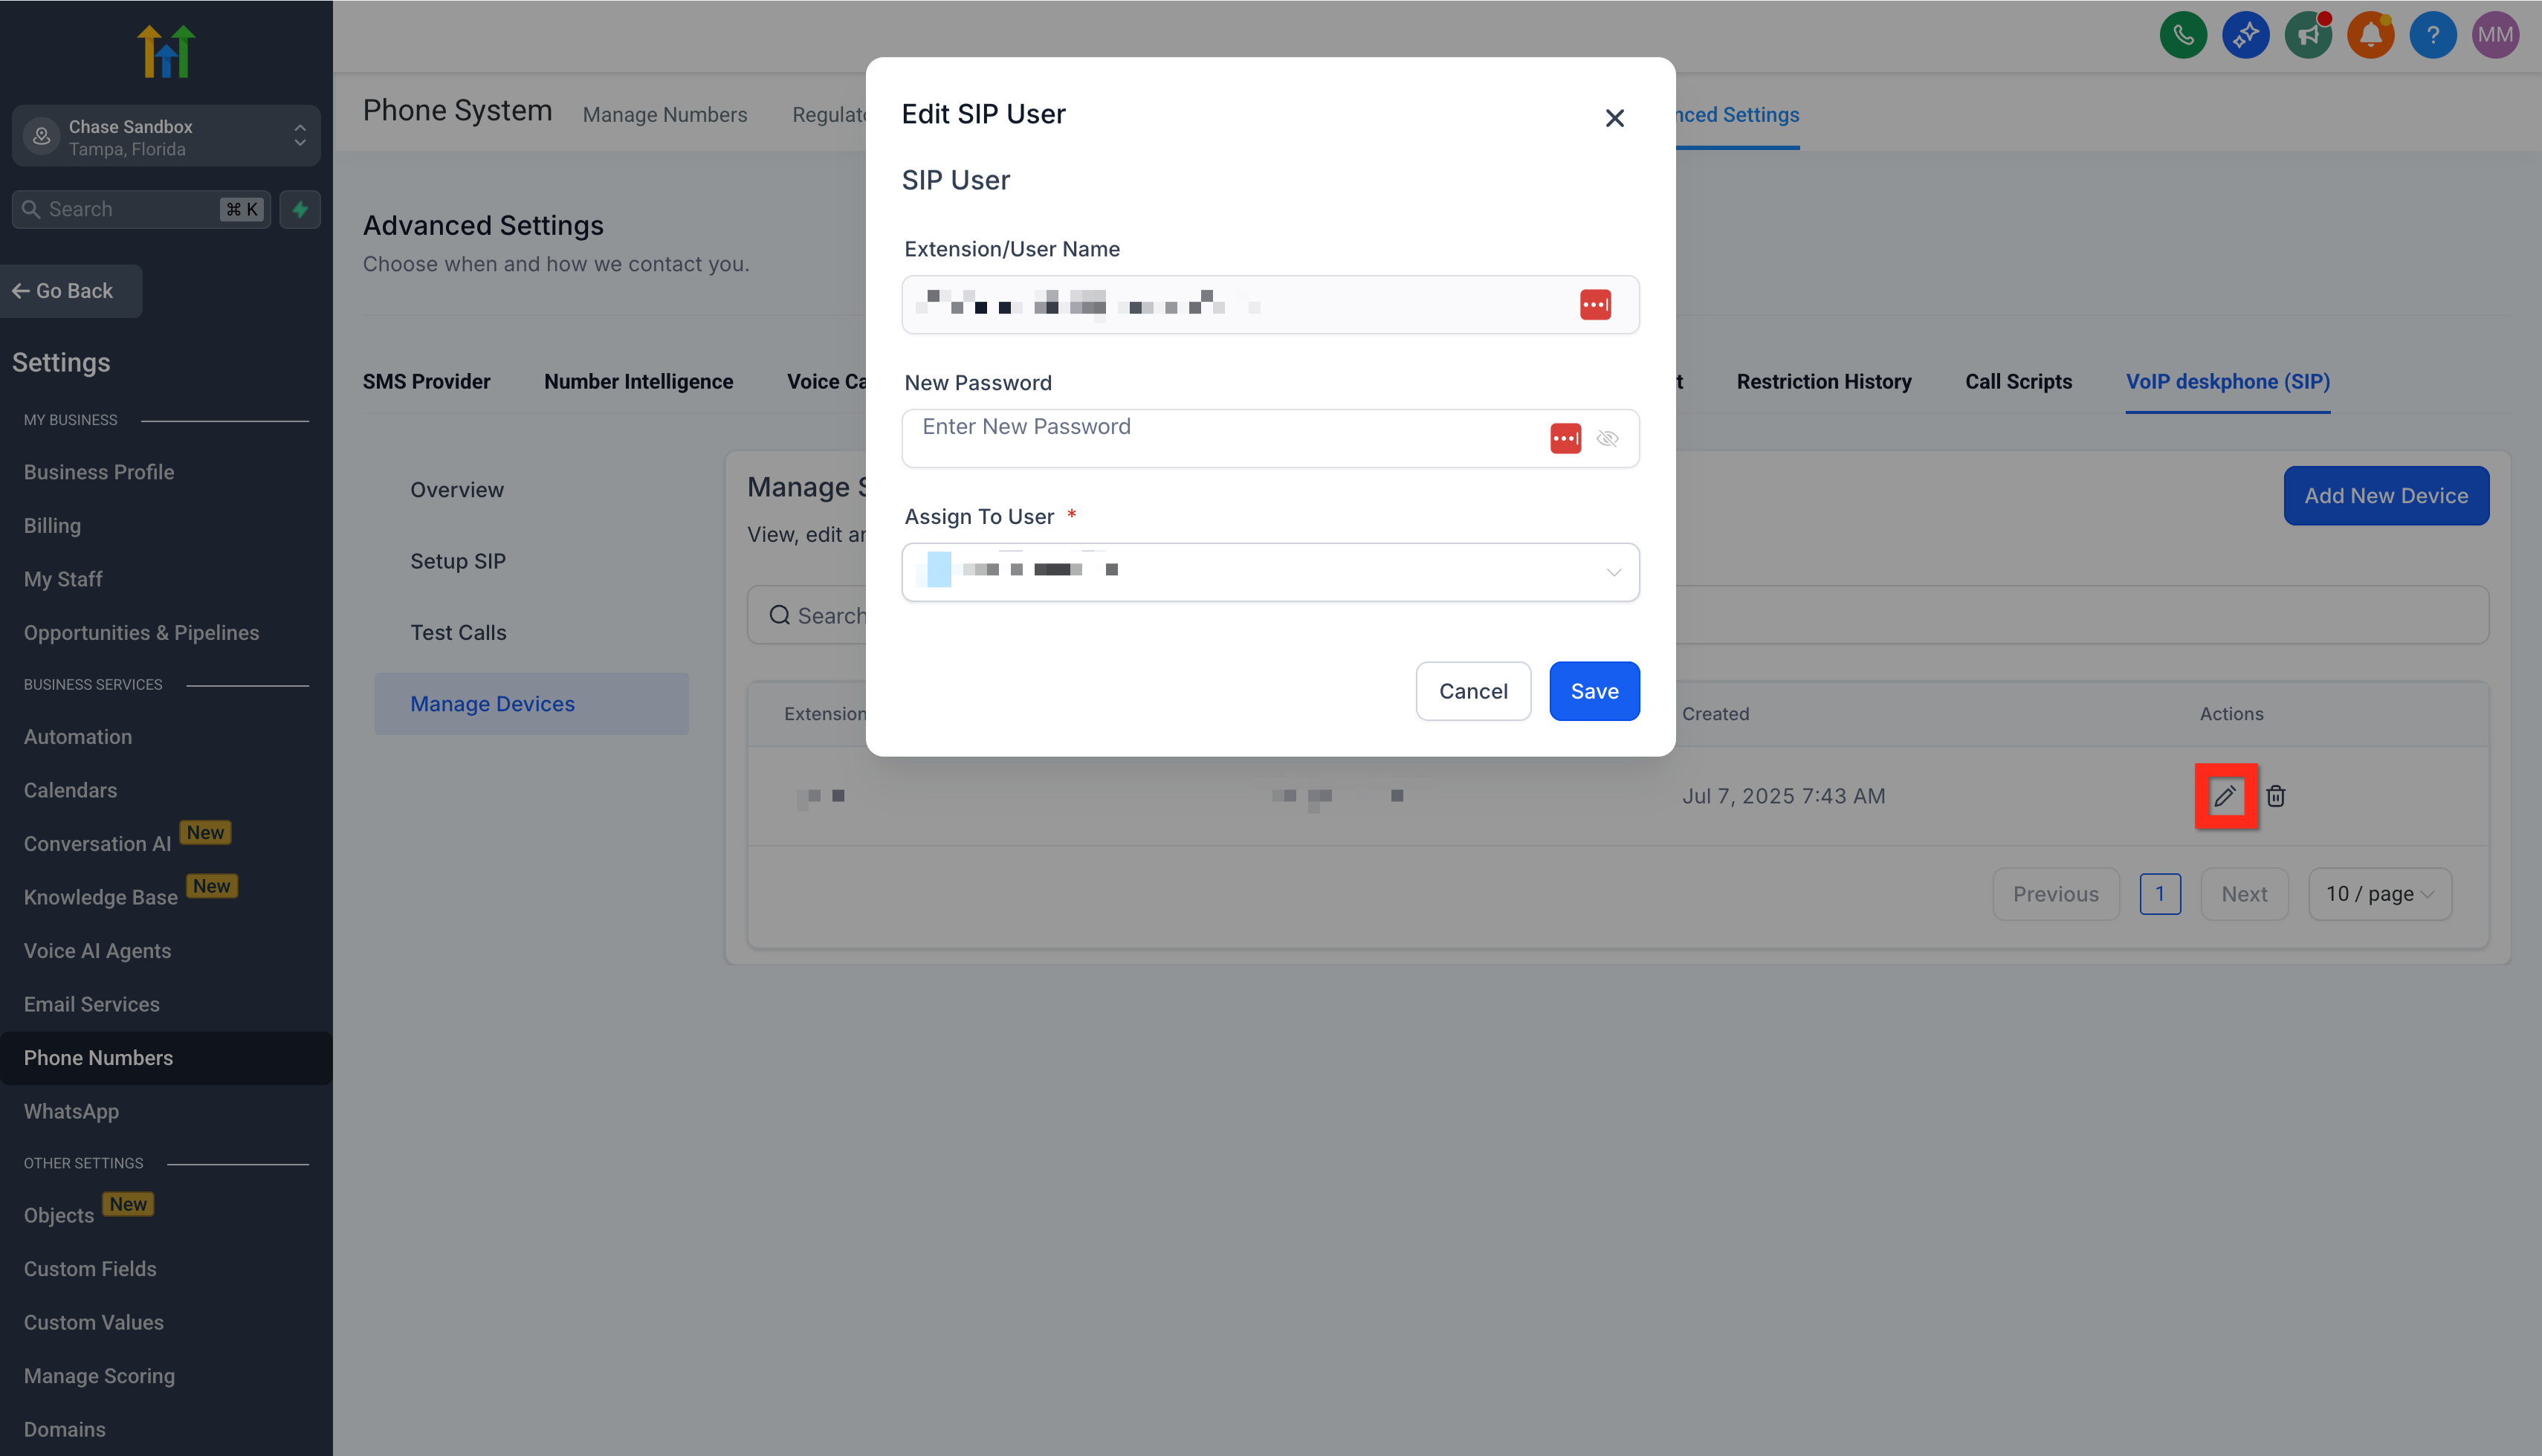
Use Edit SIP User to set a new password or review the HighLevel user assigned to the SIP device.
Delete a SIP Device
From Manage Devices, click the trash can icon next to the SIP user you want to remove.
Warning: Deleting the SIP device immediately removes its registration credentials. The handset will no longer be able to register using that SIP user.
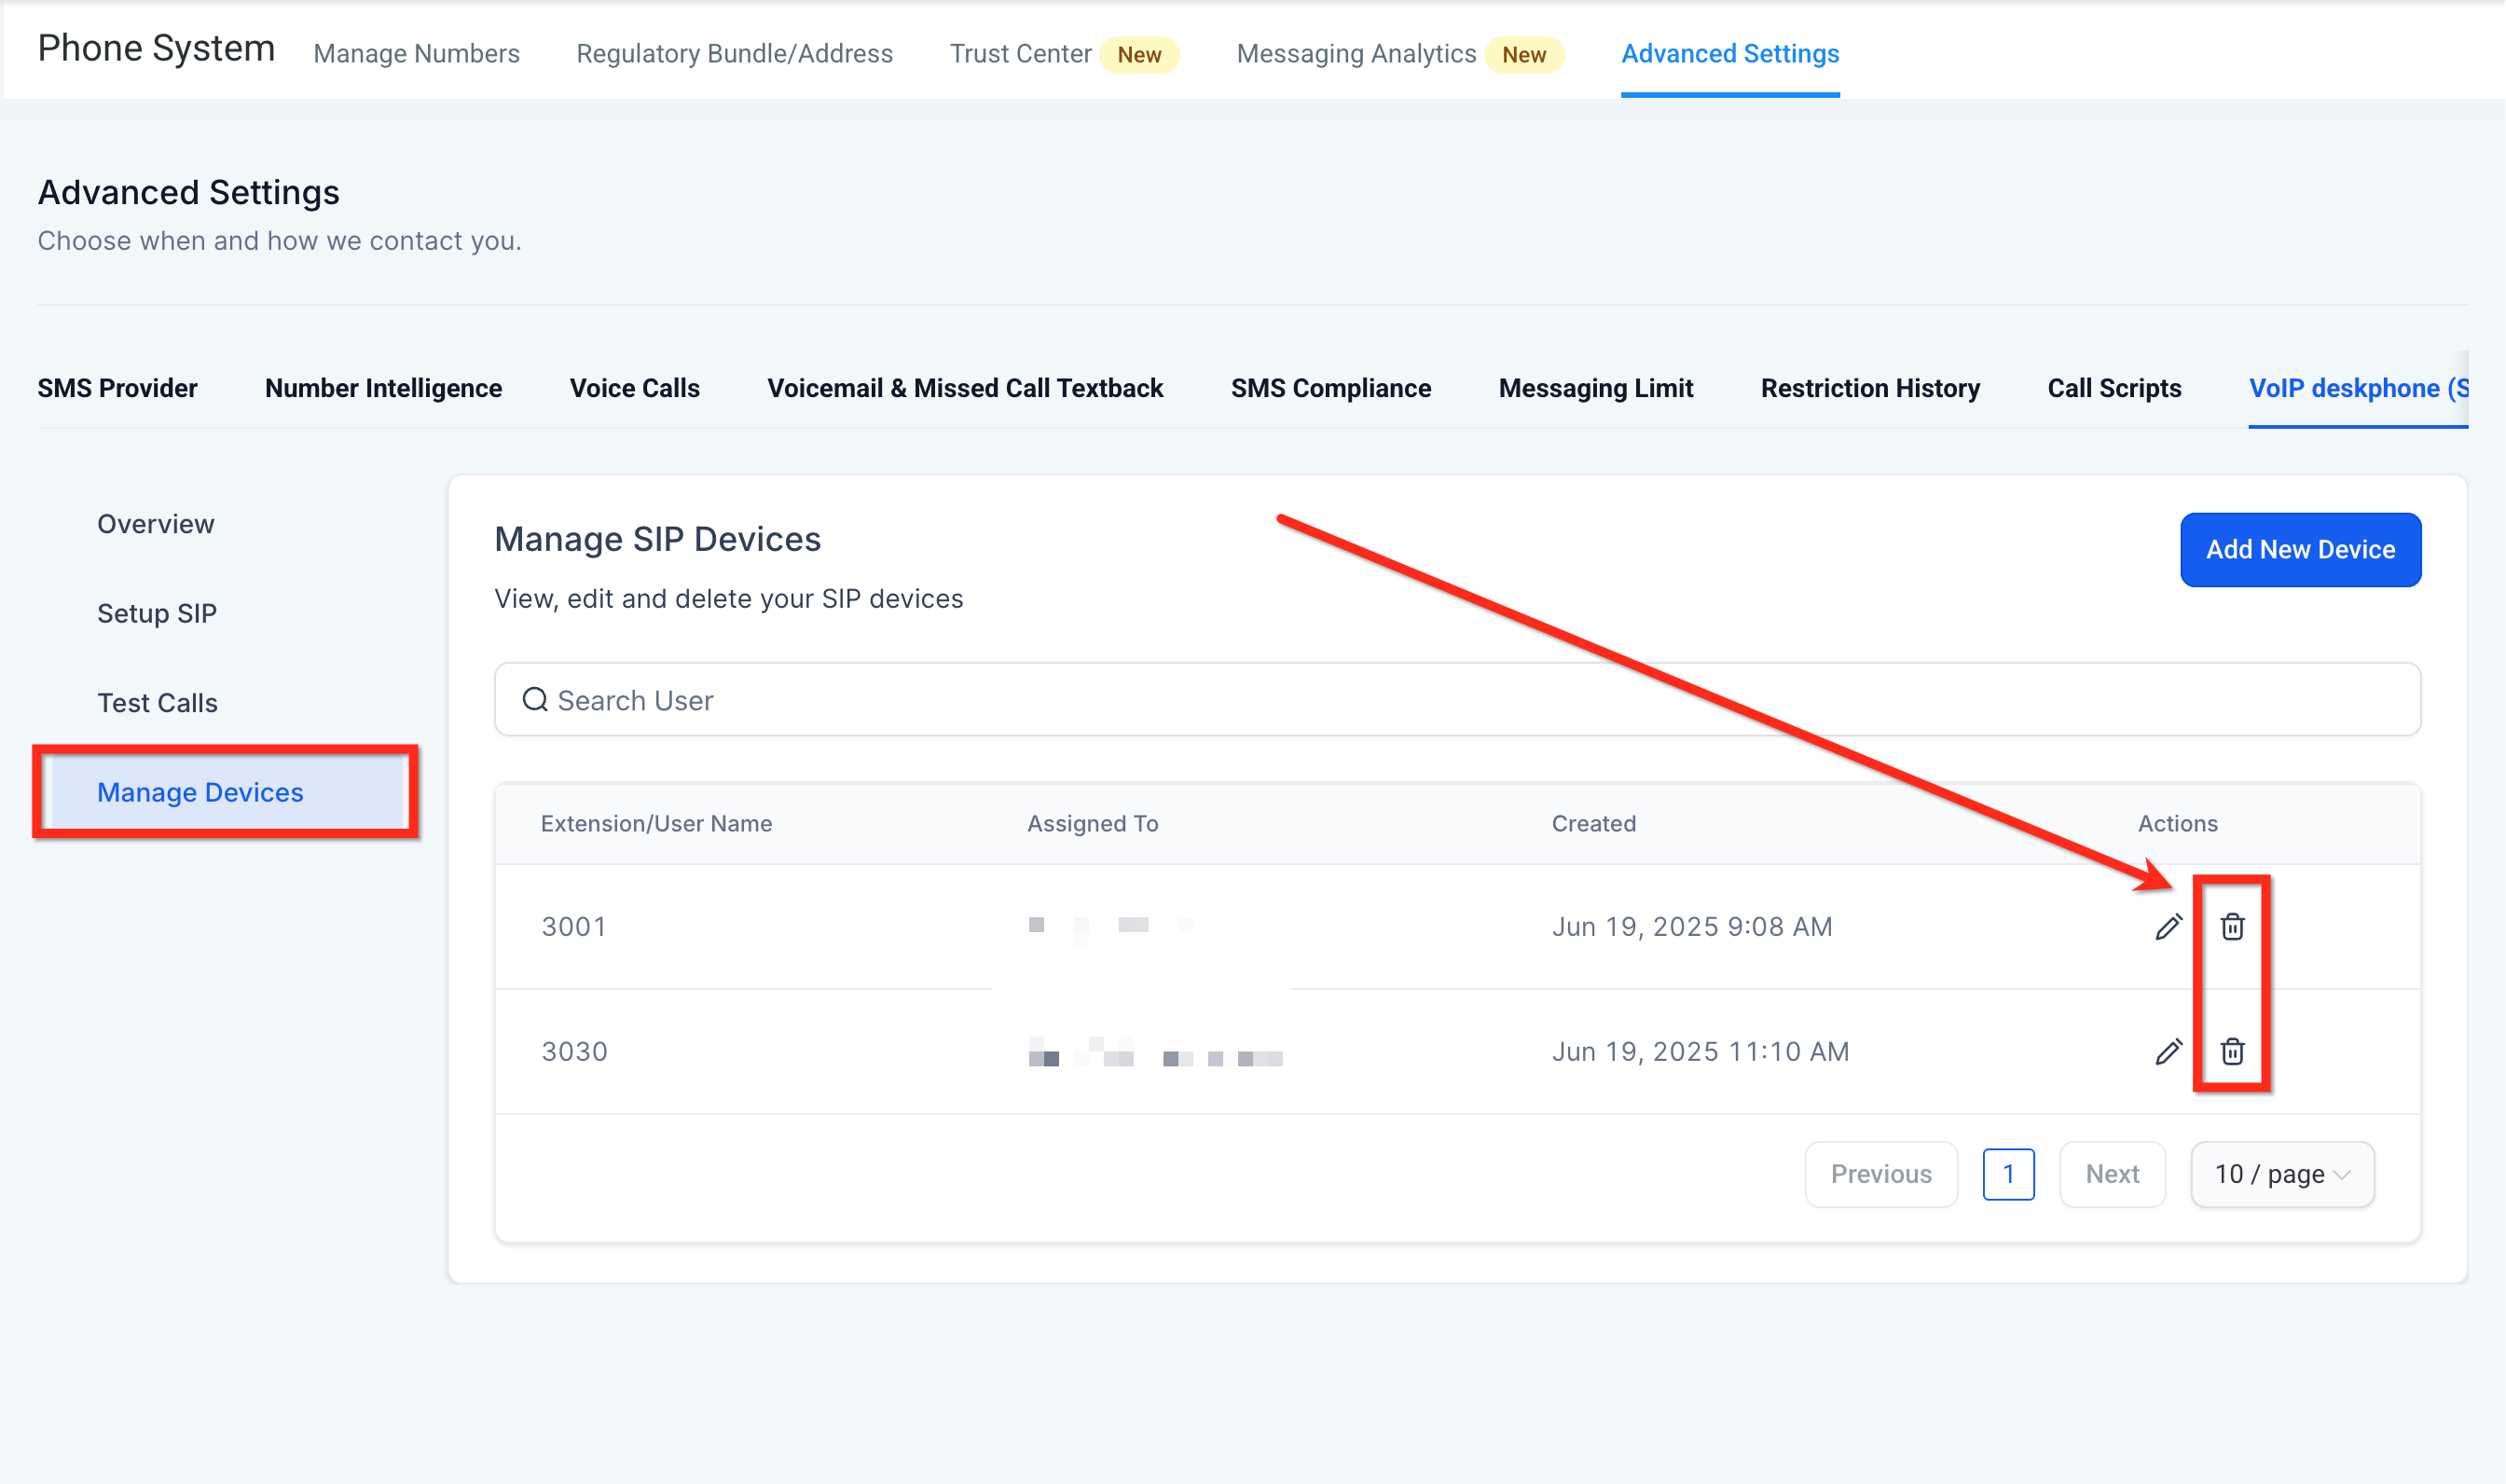
Manage Devices provides edit and delete controls for provisioned SIP users.
Deskphone-to-Deskphone Calling & Transfers
Configured SIP deskphones can communicate internally by extension and can use supported blind-transfer behavior to move calls between deskphones without dialing an external business number.
Direct Extension Dialing
To call another configured deskphone, dial that deskphone's SIP extension. For example, if the teammate's extension is 201, dial 201 from your physical deskphone.
- No external destination number is required for the internal extension call.
- Both deskphones must be configured and registered.
- Direct extension dialing is a deskphone feature.
Blind Transfer Between Deskphones
During a supported call, initiate the deskphone's transfer function, enter the destination user's extension, and complete the transfer according to the handset interface.
- Start the transfer from the active call.
- Dial the teammate's SIP extension.
- Complete the transfer on the handset.
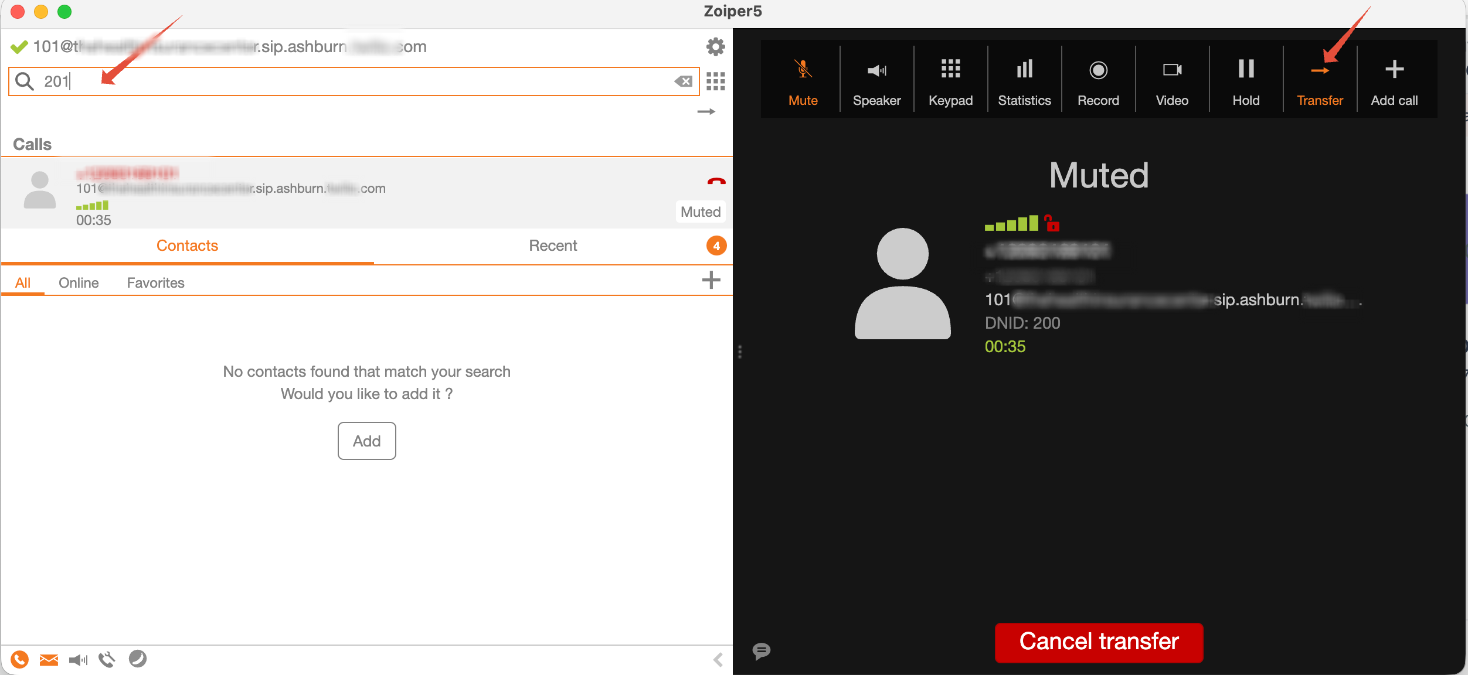
Enter the destination deskphone extension when initiating the transfer.
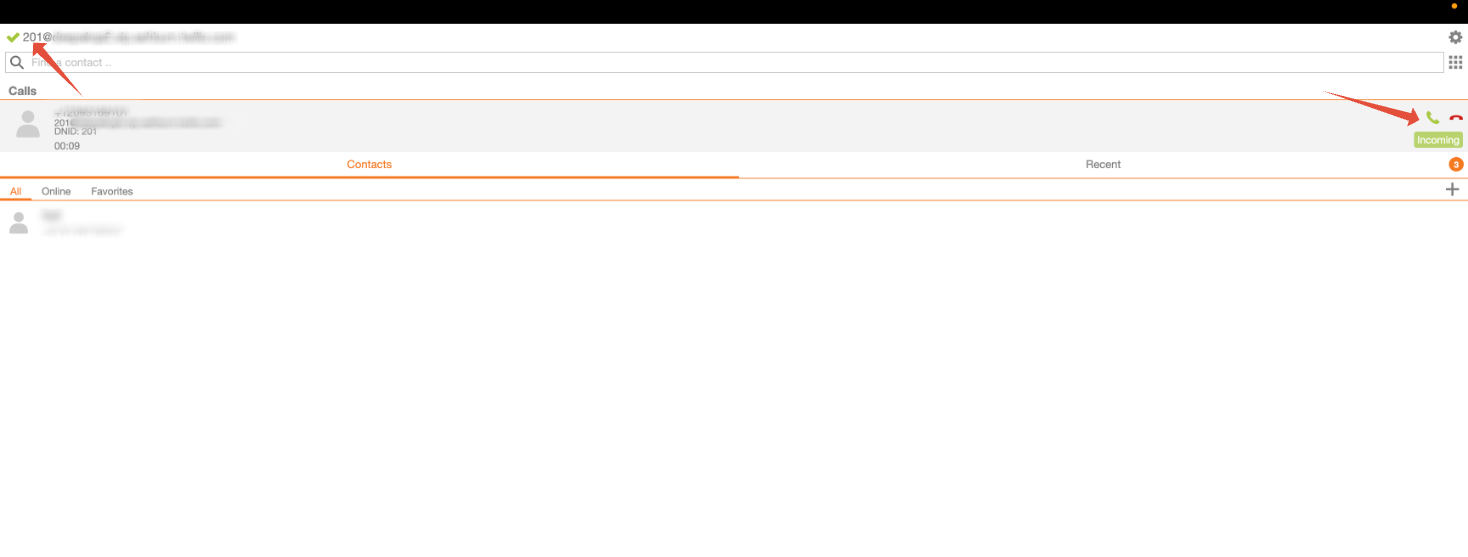
Complete the transfer using the physical phone or SIP client's Transfer control.
Transfer limitation: Physical SIP deskphones currently support blind transfers between extensions. Warm transfers from the deskphone are not currently supported.
Troubleshooting One-Way Calling
When only one call direction works, the successful direction provides an important diagnostic clue. Use the workflow that matches your issue instead of changing multiple SIP or firewall settings at once.
Inbound Calls Work but Outbound Calls Fail
If the deskphone receives calls but cannot place them, start with the SIP account, outbound network access, and HighLevel's built-in outbound test.
- Confirm the SIP account is registered.
The phone should show Registered or an equivalent status. If it is not registered, verify the SIP Domain, Username/Extension, and Password before troubleshooting call routing. - Verify the server and credentials exactly.
Use the HighLevel-generated SIP Domain as the device's Registrar / SIP Server and the exact SIP username and password created under Setup SIP. - Check the documented outbound SIP ports.
The network must allow outbound SIP signaling on 5060/5061. - Check the RTP audio range.
Allow UDP 10000–20000 for RTP audio. If the call establishes but has missing or one-way audio, this range and SIP ALG should be reviewed. - Review SIP ALG.
Disable SIP ALG on the router or firewall when it is modifying SIP traffic or causing registration, answering, or audio problems. - Run the built-in outbound test.
Go to VoIP deskphone (SIP) → Test Calls, select the SIP user, and use the physical phone to dial the displayed outbound test number. - If you receive 401 or 403 errors, recheck authentication.
These responses commonly indicate that the SIP username or password does not match the credentials configured in HighLevel. - If the built-in outbound test still fails, collect the diagnostic details listed below and contact Support.
Outbound Calls Work but Inbound Calls Do Not Ring
Successful outbound calling usually confirms that the phone can register and reach the SIP service. For inbound failures, test the device first, then verify user routing, call-flow priority, Keep Alive, and network behavior.
- Run the HighLevel inbound test.
Open VoIP deskphone (SIP) → Test Calls, select the SIP user, and use the inbound Test Ring option. - If the test ring fails, confirm SIP registration.
Check that the handset is still registered and that the SIP Domain, Username, and Password are correct. - Confirm the SIP user is assigned to the correct HighLevel user.
Go to VoIP deskphone (SIP) → Setup SIP or Manage Devices and verify the assigned user. - Verify the user's Call & Voicemail Settings.
Go to Settings → My Staff → Edit User → Call & Voicemail Settings. Enable Deskphone (SIP) under Forward Calls to when the deskphone should receive direct calls. - Check Ring All and IVR channels.
If the call reaches the user through Ring All, choose Deskphone (SIP) as the Default Channel for Ring All. If an IVR routes the call to the user, choose Deskphone (SIP) as the Default Channel for IVR. - Review the called phone number's inbound routing.
Confirm that the intended user is part of the number's call flow and that another configured route such as IVR or Voice AI is not handling the call before the team-member ring stage. - Enable SIP Keep Alive.
If the handset exposes a Keep Alive setting, enable it and set Keep Alive Type = Options. On some devices this appears under Account → Advanced; the exact menu varies by manufacturer and firmware. - Disable SIP ALG if the issue continues.
SIP ALG can interfere with SIP registration and inbound call signaling even when some outbound behavior still works. - Retest both the built-in Test Ring and a real inbound call.
If the built-in inbound test rings successfully but the public phone number still does not reach the deskphone, focus the next troubleshooting step on HighLevel inbound routing rather than changing the handset credentials.
- SIP Domain / SIP Endpoint
- SIP extension or username — do not send the password
- Assigned HighLevel user
- Deskphone manufacturer, model, and firmware version
- Registration status shown by the handset
- Result of the built-in outbound test
- Result of the built-in inbound Test Ring
- Date, time, and time zone of a failed call
- Calling number and called HighLevel number
- Any displayed SIP or test-call error code
- Screenshots of the relevant HighLevel routing settings
- Whether SIP ALG is enabled or disabled on the network
Additional Troubleshooting
Start with the symptom instead of changing every SIP field at once. The table below maps common deskphone problems to the first configuration or network area to review.
| Symptom | Likely Area | What to Check |
|---|---|---|
| 401 / 403 Unauthorized | Authentication | Re-enter the exact SIP username and password. Check for case or copy/paste errors. |
| Phone does not register | SIP server, credentials, or network | Verify the SIP Domain, credentials, transport, outbound 5060/5061 access, and SIP ALG. |
| Inbound works; outbound fails | Outbound SIP signaling or authentication | Run the outbound test, verify 5060/5061 outbound access, credentials, transport, and SIP ALG. |
| Outbound works; inbound does not ring | User routing, Keep Alive, or SIP ALG | Run Test Ring, verify the assigned user, Deskphone routing, Ring All/IVR channel, Keep Alive = Options, and SIP ALG. |
| No audio or one-way audio | RTP / firewall | Verify UDP 10000–20000 and disable SIP ALG if it interferes with media. |
| Phone rings but the call cannot be answered correctly | NAT / SIP ALG / media | Disable SIP ALG and verify the network permits the documented SIP and RTP traffic. |
| Built-in Test Ring works but real inbound calls do not | HighLevel inbound routing | Review phone-number routing, assigned users, IVR/Voice AI, Ring All, and the user's Deskphone channel. |
| Cannot save SIP domain | Domain configuration | Use the suggested available domain or another valid available name before completing the one-time setup. |
| Phone stopped registering after password reset | Stored handset password | Update the physical handset with the newly saved SIP password. |
Frequently Asked Questions
Was this article helpful?
That’s Great!
Thank you for your feedback
Sorry! We couldn't be helpful
Thank you for your feedback
Feedback sent
We appreciate your effort and will try to fix the article