Using the same countdown timer across an email and its destination funnel or website helps provide a consistent experience from the inbox to the landing page.
For example, if an email promotes a limited-time discount, the countdown displayed in the email should align with the timer on the offer page. This helps contacts understand exactly how much time remains to take action.
This article explains how to configure and use a countdown timer across emails and funnels or websites.
TABLE OF CONTENTS
- What Does Syncing a Countdown Timer Mean?
- When Should You Sync Countdown Timers?
- Before You Start
- Understanding Countdown Timer Types
- How to Sync a Countdown Timer Between an Email and Funnel
- Syncing a Dynamic Countdown Timer
- Timezone Adaptation
- Troubleshooting
- Related Articles
What Does Syncing a Countdown Timer Mean?
Syncing a countdown timer means using the same saved timer across your email campaign and the funnel or website page that contacts visit.
This helps maintain consistent timing and messaging throughout the customer journey.
For example:
A contact receives an email containing a countdown timer for a limited-time offer.
The contact clicks the call-to-action in the email.
The destination page displays the corresponding countdown timer.
When the timer expires, the configured expired-state behavior applies.
Important: Use the same saved countdown timer where applicable instead of creating separate timers with manually matched settings. Updates made to a saved timer can also be reflected wherever that timer is reused.
When Should You Sync Countdown Timers?
Synchronized timers are useful whenever an email directs contacts to a time-sensitive destination.
Common use cases include:
Limited-time sales and promotions
Product launches
Event registrations
Webinar registrations
Early-bird offers
Evergreen promotions
Time-sensitive lead offers
For example, an email promoting a 10% discount can display the same countdown experience as the funnel page where the contact redeems the offer.
Before You Start
Before syncing your countdown timer:
Create the funnel or website pages that contacts should visit.
Determine where contacts should be directed while the timer is active.
Determine what should happen after the timer expires.
Create the countdown timer under Marketing > Countdown Timers.
Select the timer type that matches your campaign.
Configure the timer's timing, timezone, links, and design.
Save the timer before adding it to your email and funnel or website.
Understanding Countdown Timer Types
HighLevel supports three countdown timer types: Fixed, Recurring, and Dynamic.
Fixed Timer
A Fixed Timer counts down to a specific date and time.
Use a Fixed Timer when everyone should work toward the same campaign deadline, such as:
A sale ending on a specific date
An event registration deadline
A product launch
A holiday promotion
Recurring Timer
A Recurring Timer follows a repeating schedule.
Use it when the countdown should restart according to a recurring interval or campaign schedule.
Dynamic Timer
A Dynamic Timer creates a personalized countdown based on a contact's interaction, such as when an email is sent or opened.
Use a Dynamic Timer when:
Each contact should receive their own offer window.
The countdown should begin based on email activity.
You are running an evergreen campaign.
You want a personalized countdown experience between an email and destination page.
How to Sync a Countdown Timer Between an Email and Funnel
Step 1: Create Your Countdown Timer
Navigate to:
Marketing > Countdown Timers
Click New and select a countdown timer template.
Choose the appropriate timer type:
Fixed
Recurring
Dynamic
Configure the required timing settings for the selected timer type.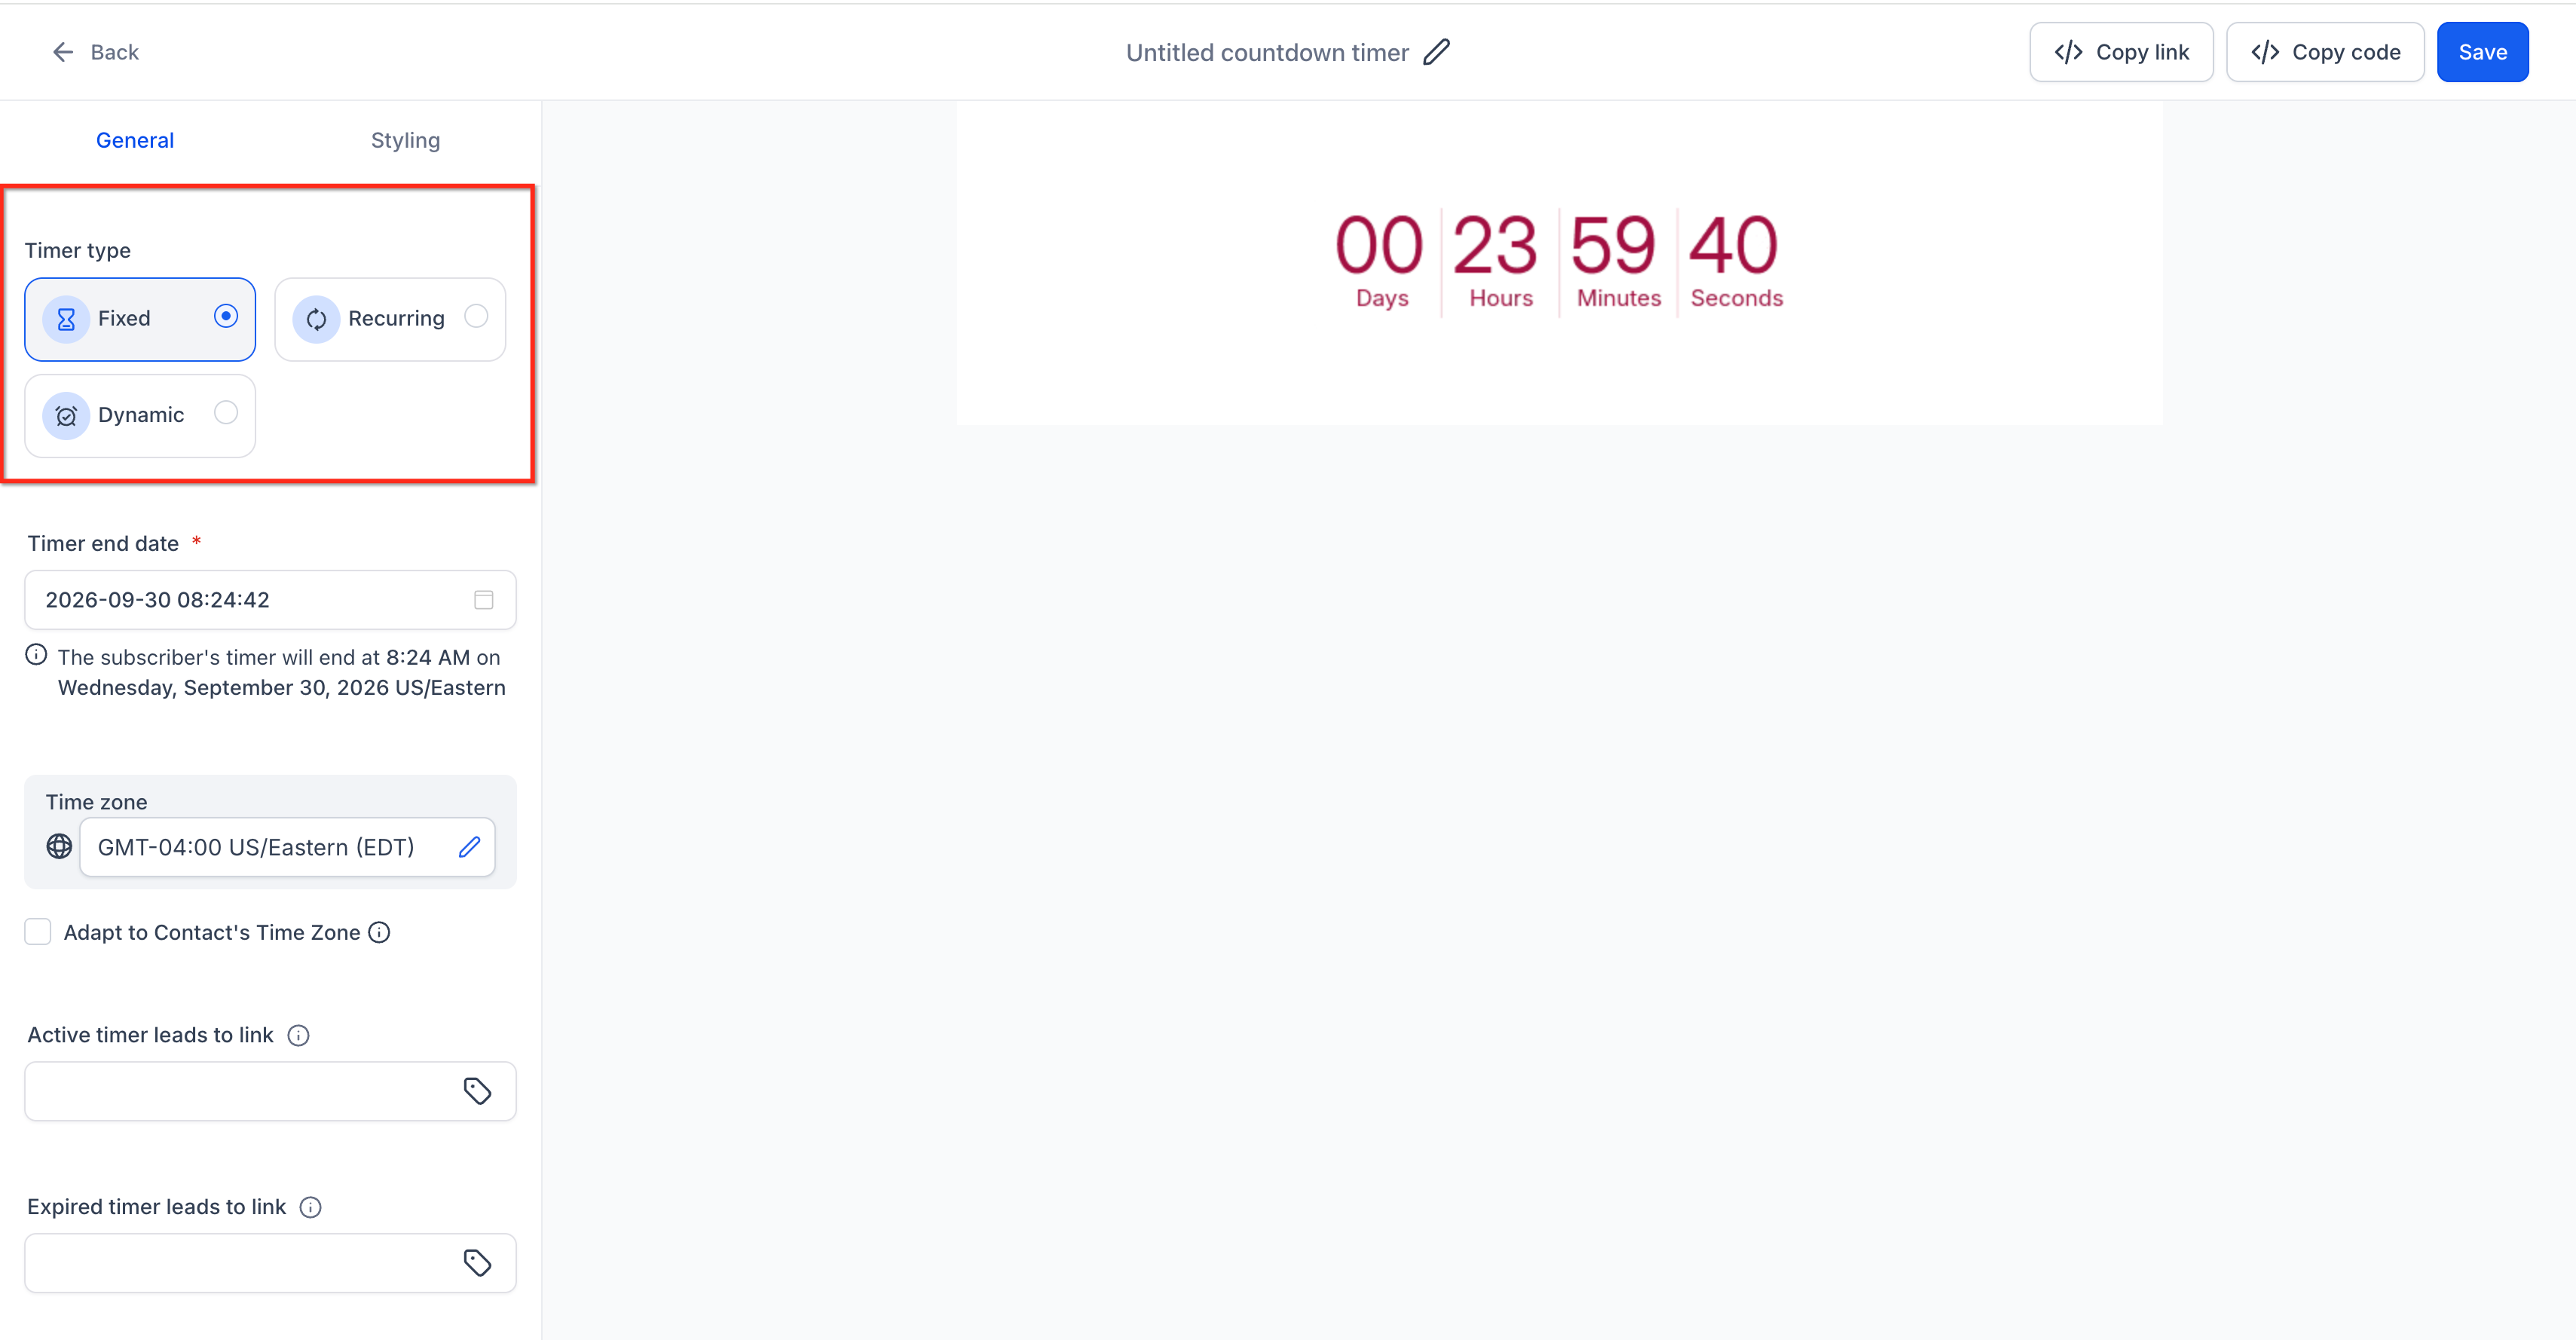
Step 2: Configure Active and Expired Links
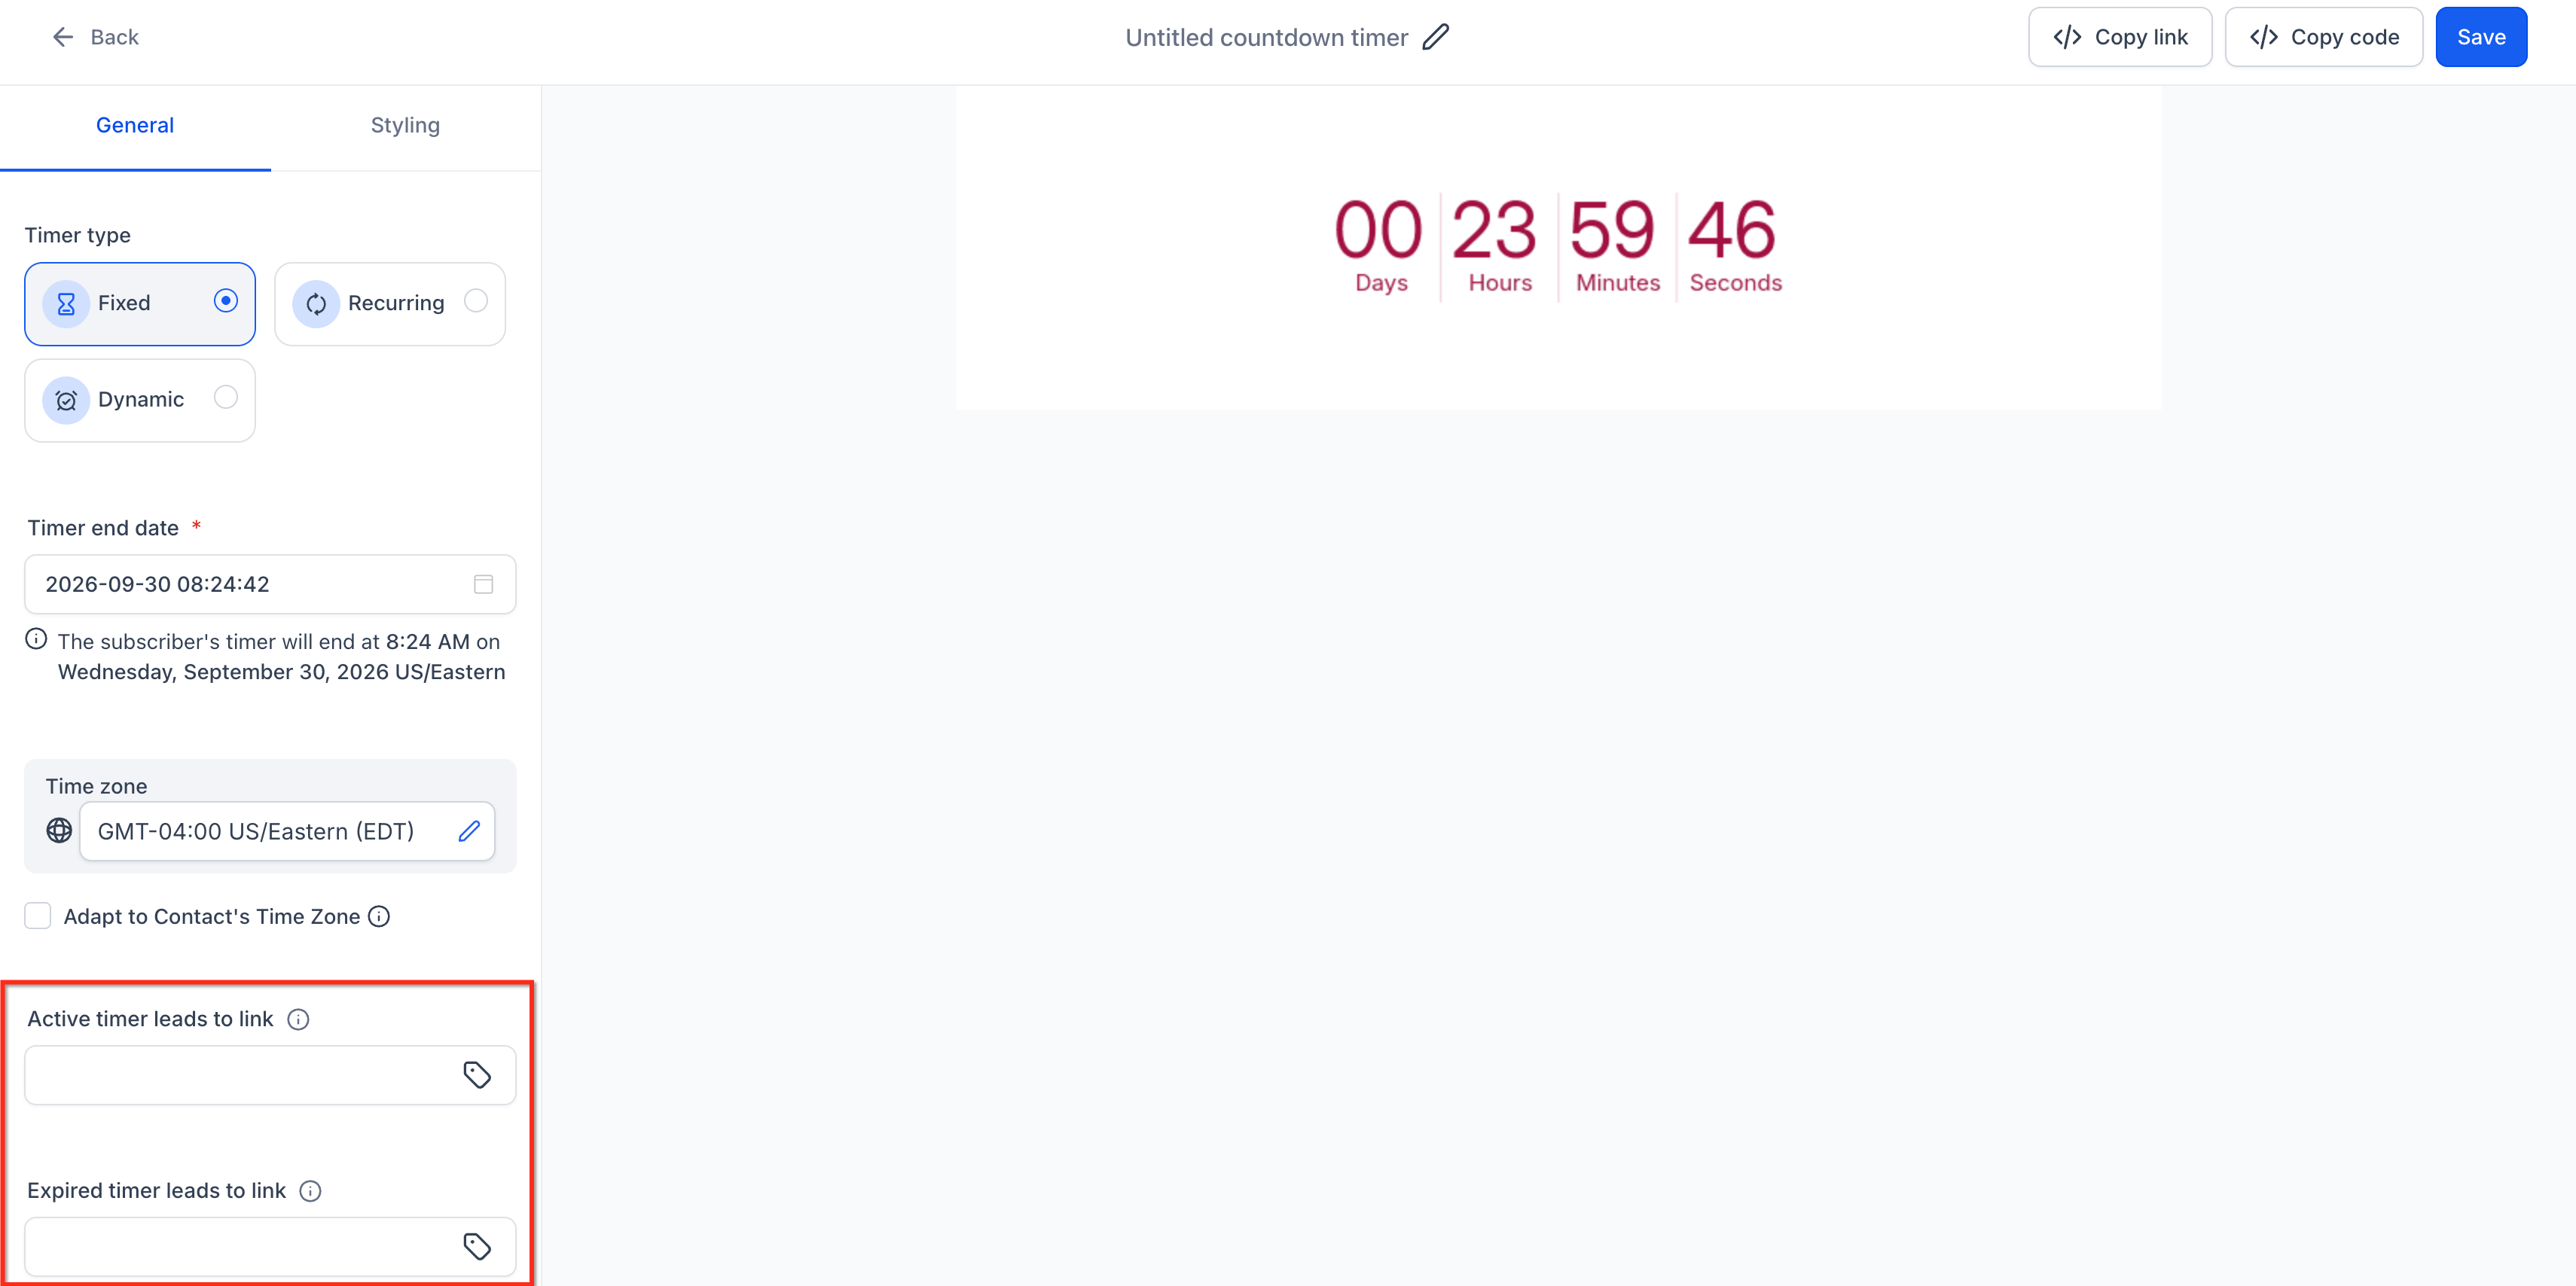
Configure the timer's Active Link and Expired Link.
Active Link
The Active Link should direct contacts to the page where they can take action while the timer is still active.
For example:
Email → Limited-Time Offer Page
Expired Link
The Expired Link should direct contacts to the appropriate destination after the offer or timer expires.
For example:
Expired Offer → Offer Ended Page
Configure both destinations according to your campaign requirements.
Step 3: Customize and Save the Timer
Customize the timer to match your campaign or brand.
Depending on the timer configuration, you can customize elements such as:
Timer colors
Font
Size
Background
Displayed time units
Expiry image
Give the timer a descriptive name so it is easy to identify later.
Click Save.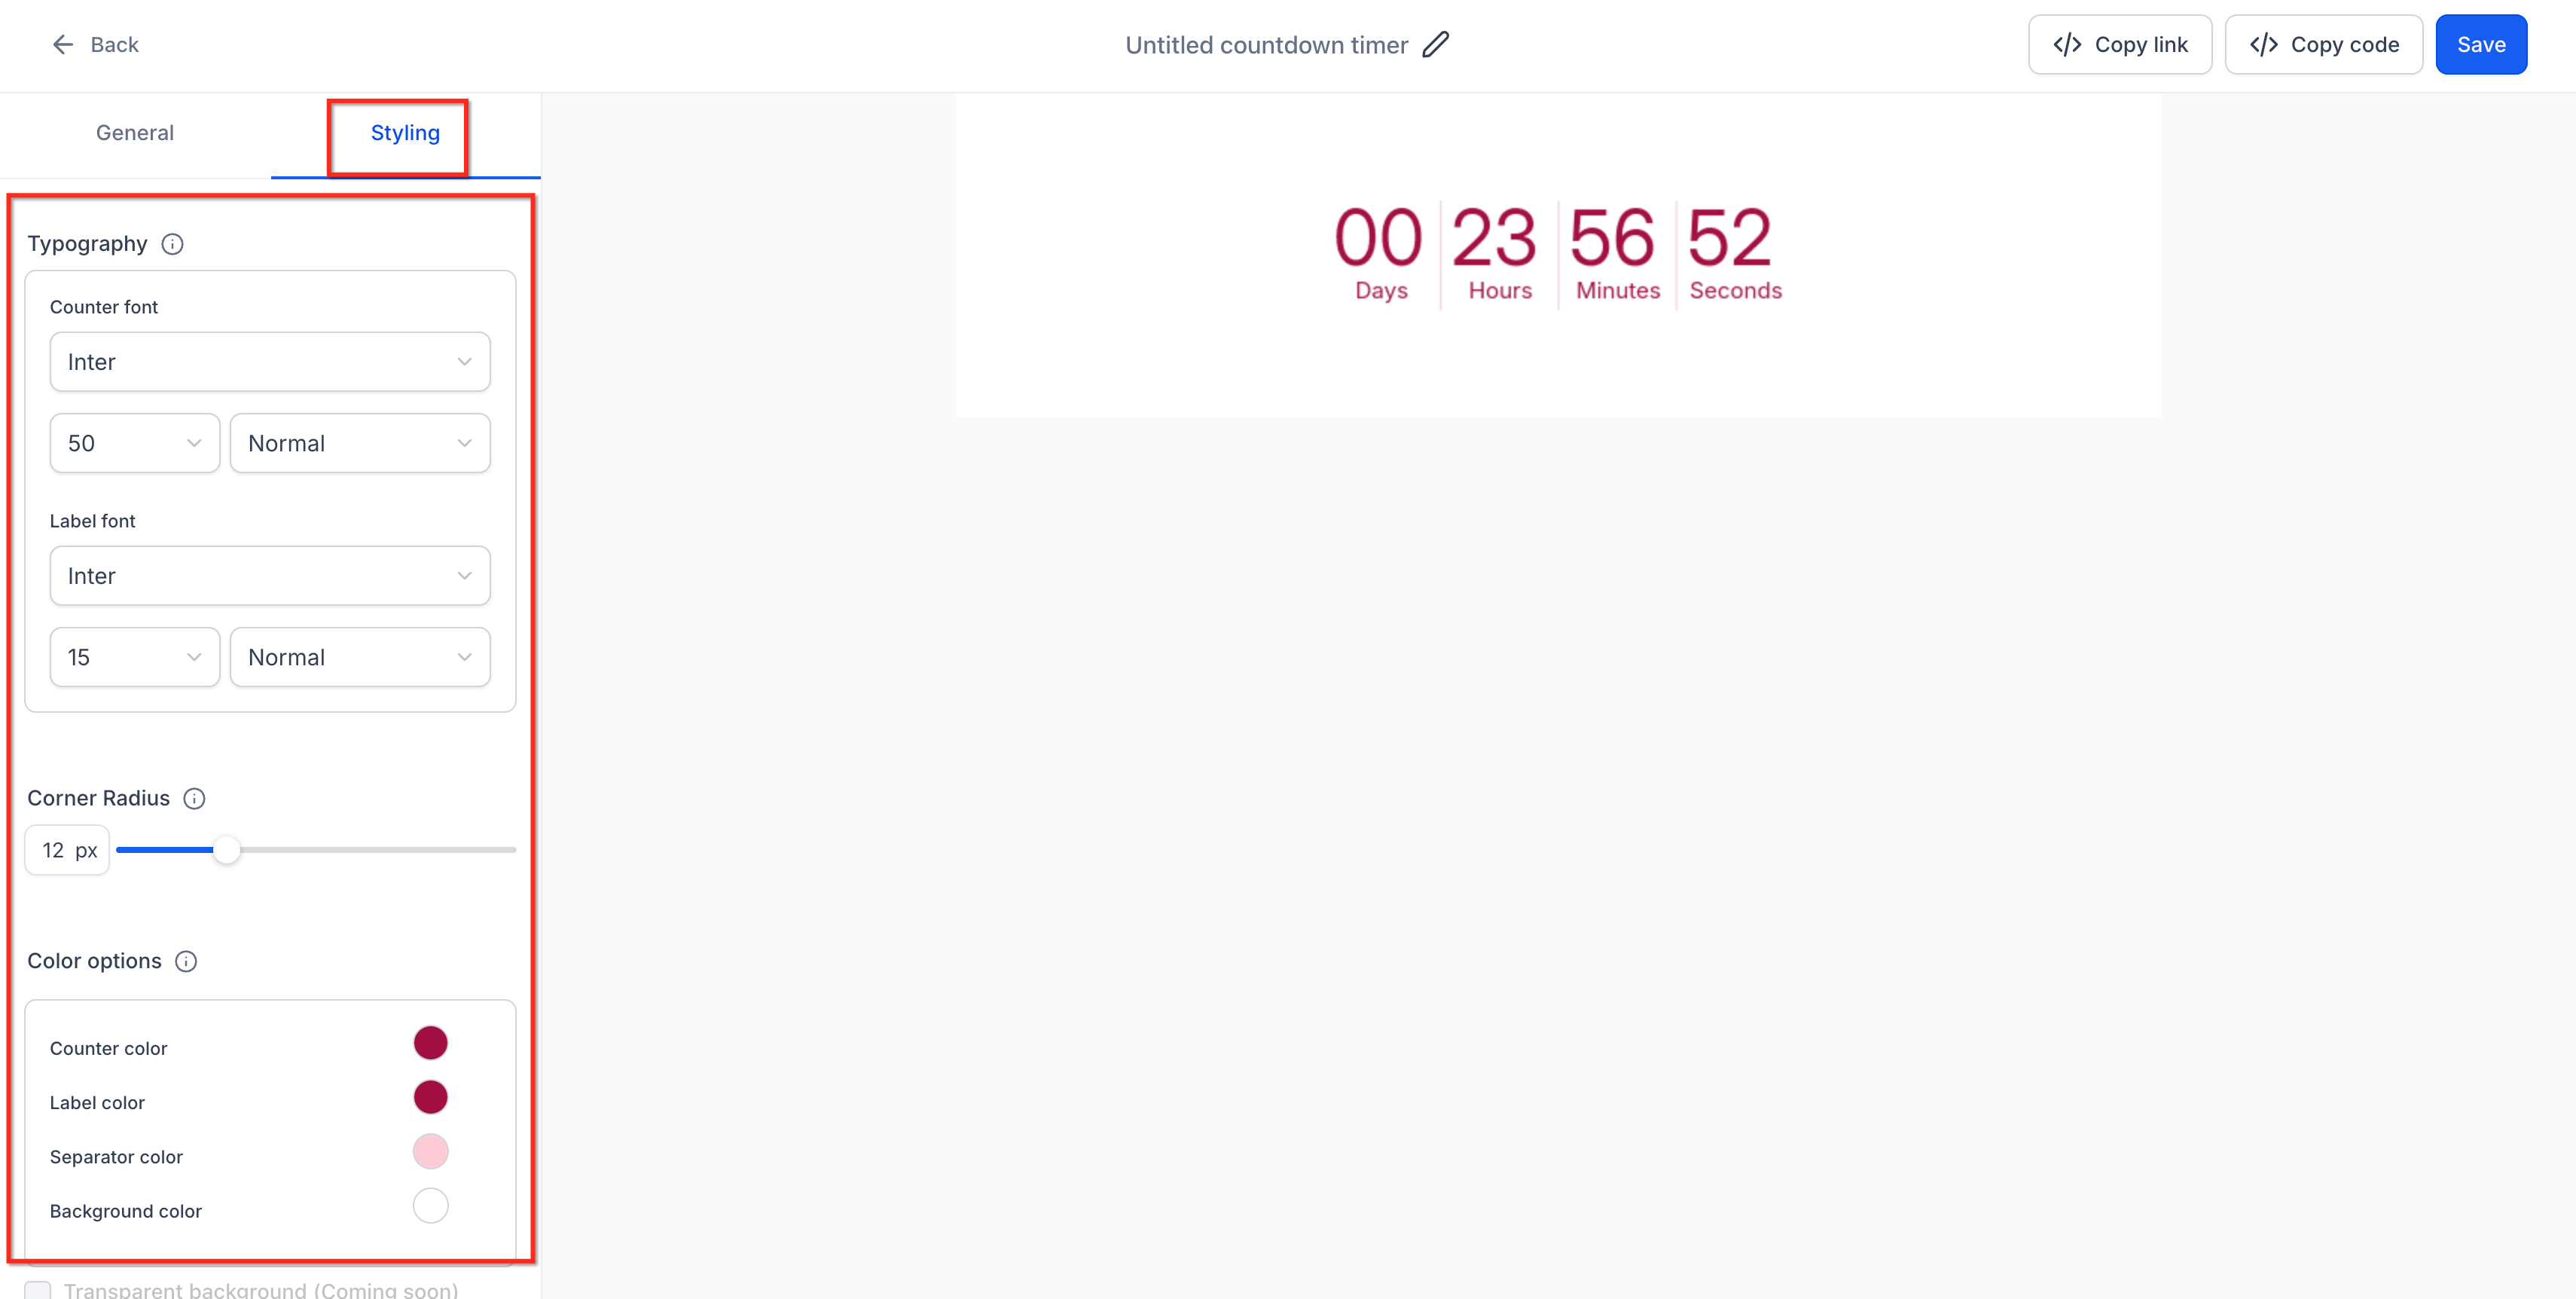
Step 4: Open the Email Builder
Navigate to:
Marketing > Emails > Templates
Create a new email template or edit an existing template.
Open the email in the Design Editor.
Step 5: Add the Countdown Timer Element
Add the Countdown Timer element to the email.
Select the countdown timer you created earlier.
Position the timer where it should appear within the email.
Adjust its alignment, background, padding, and other available display settings as needed.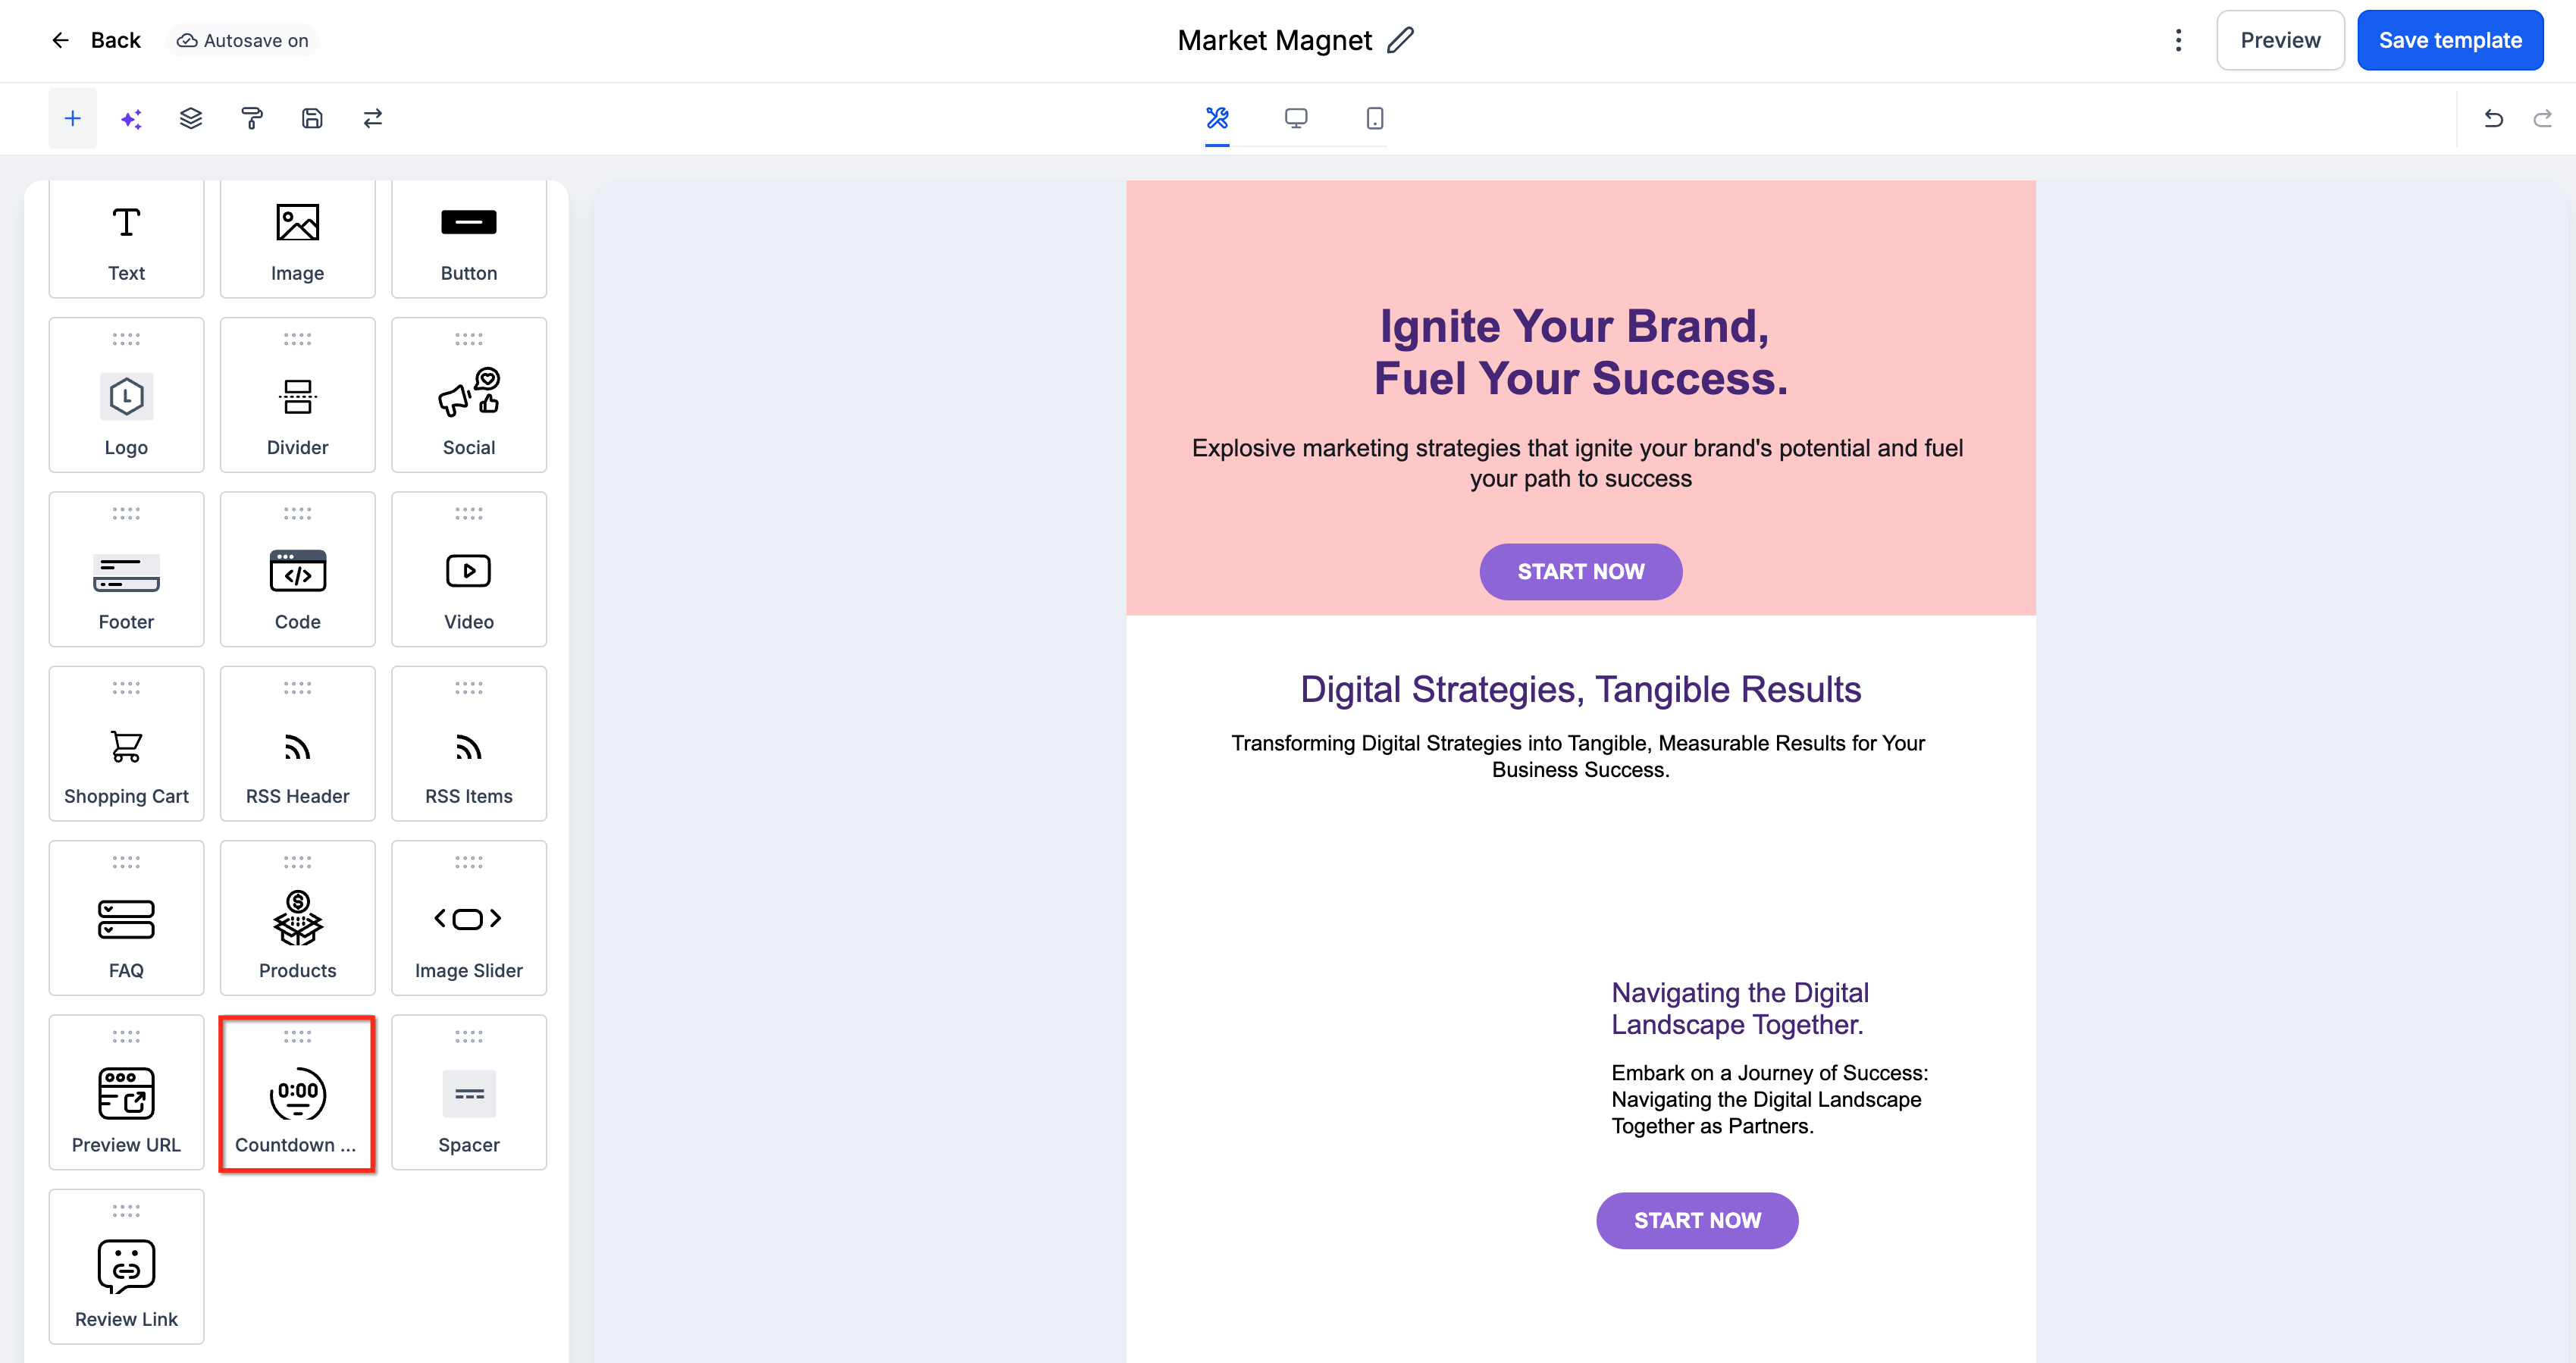
Step 6: Configure Your Email Call-to-Action
Add a button or other call-to-action to the email.
Use the timer's configured active destination for the CTA so contacts are directed to the appropriate funnel or website page while the offer is active.
This ensures that the email's countdown and CTA lead contacts into the same time-sensitive campaign experience.
Add the Countdown Timer to Your Funnel
Step 7: Open the Funnel Builder
Navigate to:
Sites > Funnels
Select the appropriate funnel and open the required funnel step.
Click Edit Page.
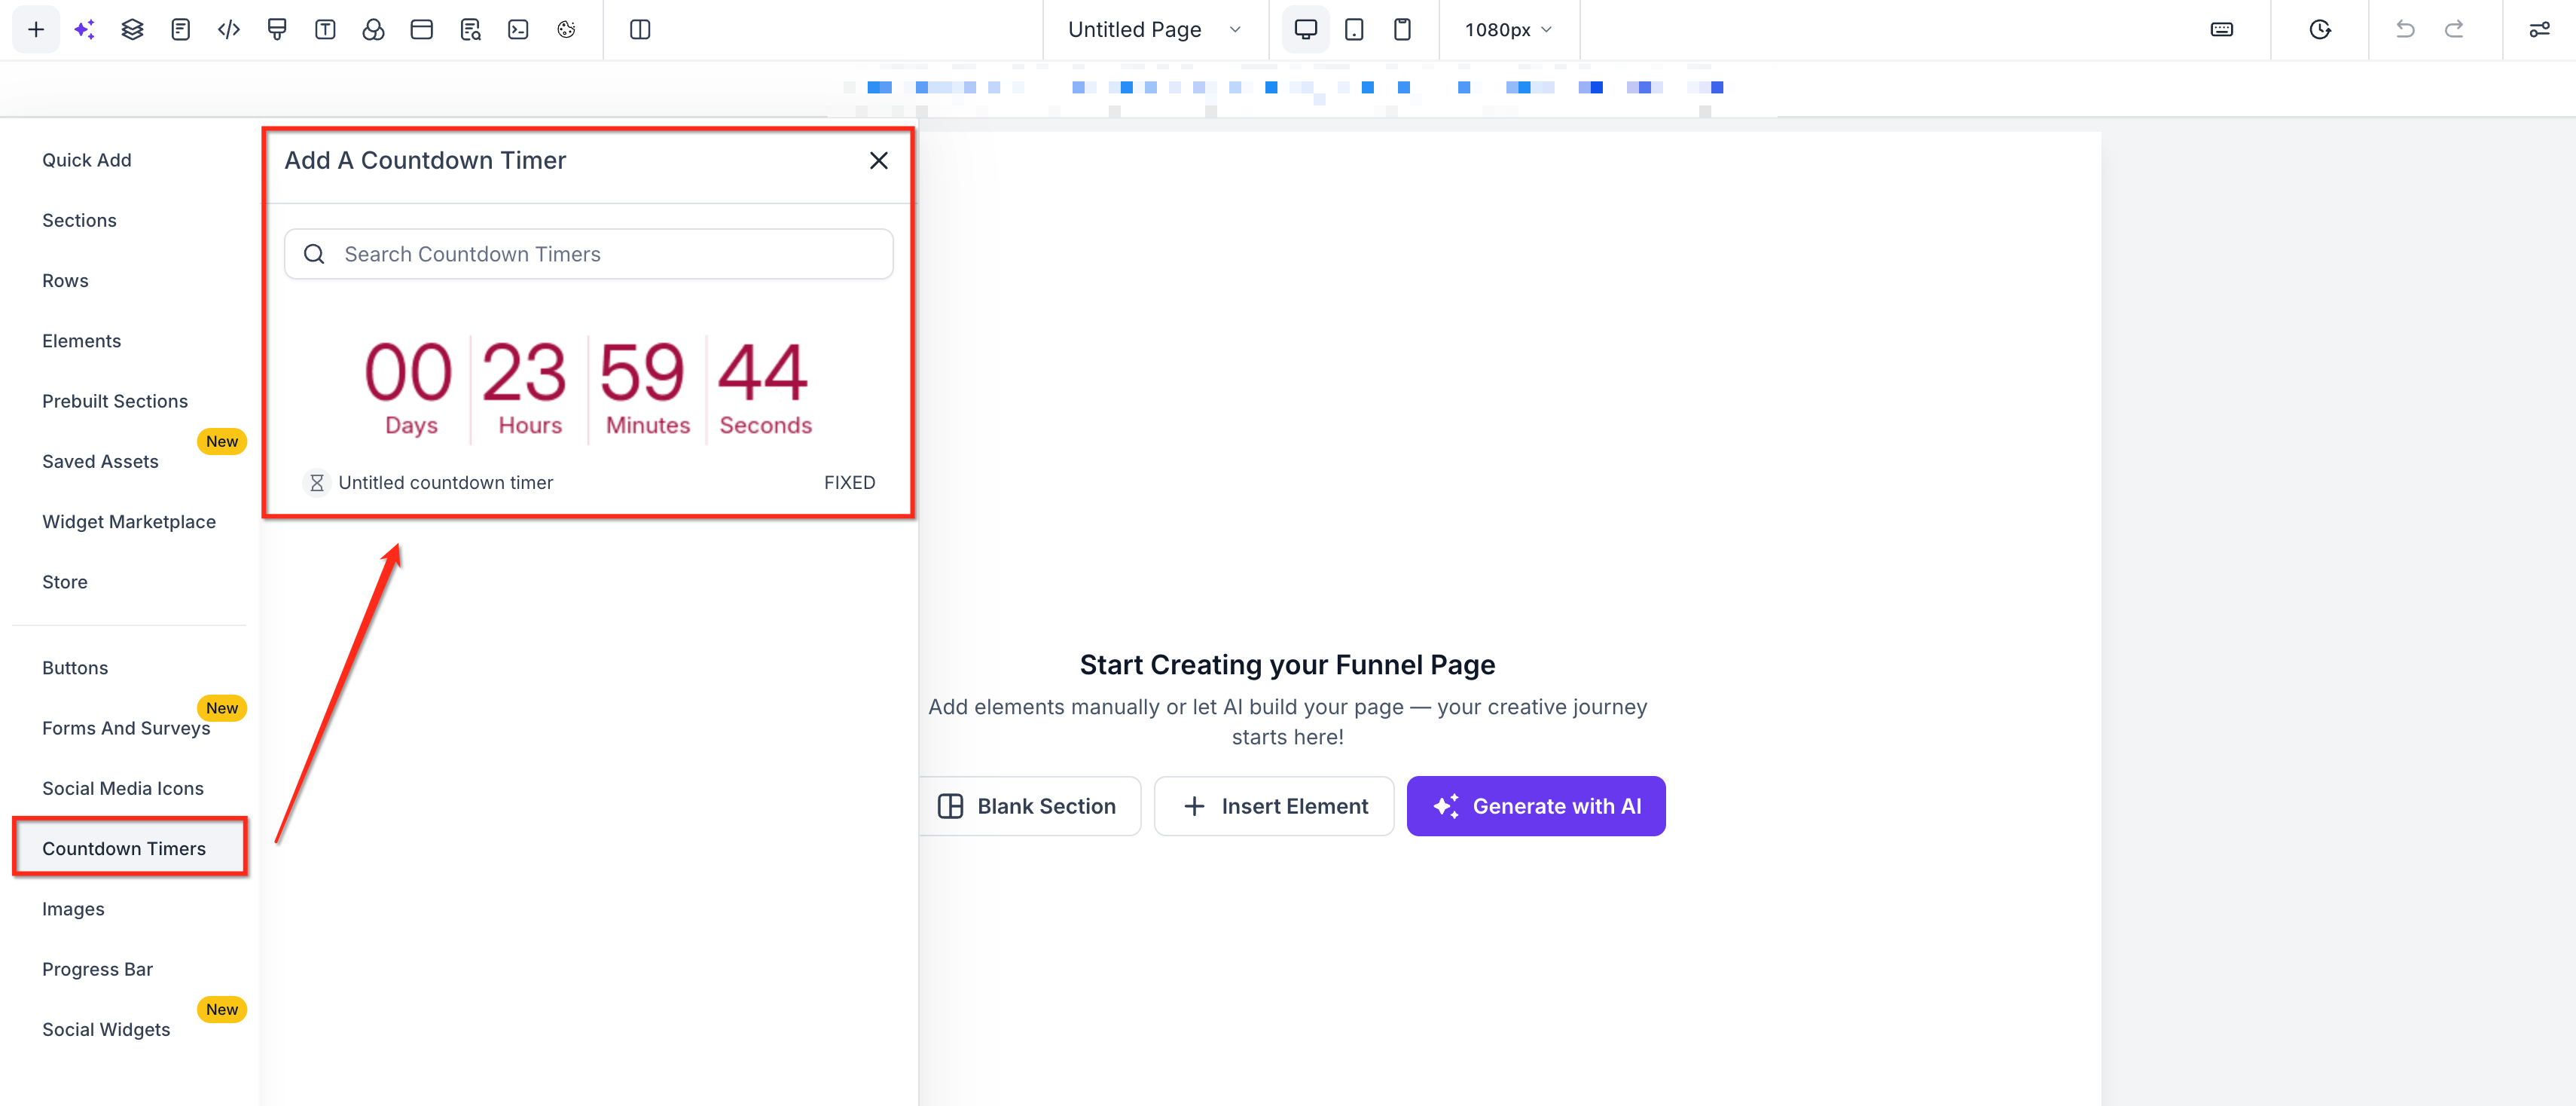
Step 8: Add the Countdown Timer Element
Click the + icon in the Funnel Builder to open the element panel.
Select the Countdown Timers element.
Choose the countdown timer you created for the campaign and place it in the appropriate section of the page.
Important: Select the corresponding saved timer instead of creating another timer solely for the destination page.
Step 9: Review the Funnel Experience
Position and style the timer appropriately on the page.
Make sure:
The correct timer is selected.
The offer or CTA matches the email campaign.
Active and expired destinations are correct.
The timer is clearly visible.
The page is published.
You can also embed a countdown timer using its code when required for a custom implementation.
Syncing a Dynamic Countdown Timer
Dynamic Timers are designed for personalized countdown experiences.
Unlike a Fixed Timer, where contacts share a specific deadline, a Dynamic Timer can start according to an individual contact's interaction.
For example, if a Dynamic Timer is configured with an Email Opened trigger and a two-hour duration:
Contact A opens the email at 2:00 PM and receives their applicable countdown window.
Contact B opens the email later and receives a countdown based on their own interaction.
When the Dynamic Timer is used with the corresponding funnel or website experience, the contact can continue through the campaign with a personalized countdown.
Dynamic Timers are particularly useful for:
Evergreen promotions
Personalized discounts
Follow-up campaigns
Lead-conversion offers
Individual registration windows
For detailed configuration options, see Guide: Dynamic Countdown Timer.
Timezone Adaptation
Countdown Timers also support Adapt to Contact Time Zone.
When enabled, the countdown can adapt according to the viewer's timezone.
In Emails
The timer first checks the contact's timezone. If the contact has a timezone available, the timer adapts accordingly.
If the contact does not have timezone information, the timer uses the timezone selected during timer setup as the fallback.
In Funnels and Websites
Funnels and websites can use the visitor's IP-detected timezone. If the visitor's timezone cannot be detected, the timer uses the timezone configured during timer setup as the fallback.
Enable Timezone Adaptation
Navigate to Marketing > Countdown Timers.
Create a timer or open an existing timer.
Select the timezone that should be used as the fallback.
Enable Adapt to Contact Time Zone.
Save the timer.
Important: Consider your campaign requirements before enabling timezone adaptation. A campaign intended to end at one absolute moment for everyone may require different configuration from a campaign intended to end at a particular local time for each viewer.
For more information, see Timezone Adaptation in Countdown Timers.
Email Timer Display Considerations
Countdown timers behave differently inside emails than they do on live web pages. In emails, countdown timers are displayed as animated images.
When a recipient opens the email, the timer is generated based on its configuration. However, the exact display behavior can depend on the recipient's email client.
Keep the following in mind:
Email clients can cache timer images.
Some email clients limit how frequently animated content refreshes.
Apple Mail may display a cached timer image instead of continuously refreshing it.
A live funnel or website timer may therefore appear to update differently from the timer image displayed inside an email.
This does not necessarily mean the underlying timer configuration is incorrect.
Best Practice: Preview and test your email and destination page before sending the campaign to your audience.
Troubleshooting
The Email and Funnel Appear to Show Different Times
Check the following:
Confirm that the intended saved timer is being used.
Verify the selected timer type.
Check the configured timezone.
Check whether Adapt to Contact Time Zone is enabled.
Confirm the contact's timezone when testing an email.
Consider whether the email client is caching the timer image.
The Timer in My Email Stops Updating
Countdown timers in emails are displayed as animated images. Some email clients cache images or limit how long animated content updates. Reopening the email may refresh the displayed timer depending on the email client.
Test the email across supported email clients before sending a large campaign.
The Funnel Shows a Different Timezone
If Adapt to Contact Time Zone is enabled, funnels and websites use the visitor's IP-detected timezone when available. Emails use contact-level timezone information.
If either timezone cannot be determined, the timer uses its configured fallback timezone.
The Timer Does Not Appear in the Funnel Builder
Confirm that:
The countdown timer has been saved.
You are selecting the Countdown Timers element.
You are working in the correct sub-account.
The expected saved timer is available for selection.
The Timer Has Expired but the Email Still Shows Time Remaining
The recipient's email client may have cached the timer image. Check the live destination page and the timer configuration before assuming that the timer itself has failed.
The CTA Opens the Wrong Page
Review the Active and Expired Links configured for the timer and confirm that the email CTA uses the intended destination. Also verify that the destination page has been published.
Frequently Asked Questions
Do I need to create separate countdown timers for my email and funnel?
Generally, no. Where the same campaign timer should be represented across both experiences, reuse the corresponding saved timer instead of manually creating duplicate timers.
Which countdown timer should I use?
It depends on the campaign. Use a Fixed Timer when contacts share a specific deadline.
Use a Recurring Timer for repeating countdown schedules.
Use a Dynamic Timer when each contact should receive a personalized countdown based on their interaction.
Can I use the same countdown timer on multiple funnels or websites?
Yes. Saved countdown timers can be reused across funnels and websites.
If I edit a saved timer, do I need to replace it everywhere?
No. Updates made to a saved countdown timer are reflected wherever that timer is used.
Always test the affected emails and pages after making significant changes to a live timer.
Can countdown timers adjust to each contact's timezone?
Yes. Enable Adapt to Contact Time Zone when creating or editing the timer.
For emails, the contact's timezone is used when available. For funnels and websites, the visitor's IP-detected timezone is used when available. The timezone configured on the timer serves as the fallback.
Why does the email timer sometimes look different from the funnel timer?
Email countdown timers are rendered as animated images and are subject to email-client behavior such as image caching. Funnels and websites display the timer in a live web environment, so their visual refresh behavior can differ from email.
What happens after the countdown expires?
The result depends on the timer configuration and where the timer is being viewed. Configure the timer's expired destination and expiry experience before using it in a campaign.
Can I use a countdown timer outside HighLevel?
Yes. Countdown Timers provide a Copy Code option that can be used for supported custom or third-party implementations.
Related Articles
Was this article helpful?
That’s Great!
Thank you for your feedback
Sorry! We couldn't be helpful
Thank you for your feedback
Feedback sent
We appreciate your effort and will try to fix the article