Learn how to connect and configure thermal receipt printers in the HighLevel mobile app. This article covers printing customer receipts and kitchen prep tickets, managing printers, and opening compatible cash drawers directly from your mobile Point of Sale (PoS).
TABLE OF CONTENTS
- What is Thermal Receipt Printer Support in HighLevel?
- Key Benefits of Thermal Receipt Printer Support
- Supported Printers and Connection Requirements
- Managing Receipt Printers
- Printing Customer Receipts
- Printing Kitchen Prep Tickets
- Using Cash Drawers with Receipt Printers
- How to Set Up a Thermal Receipt Printer in HighLevel
- Frequently Asked Questions
- Related Articles
What is Thermal Receipt Printer Support in HighLevel?
Thermal Receipt Printer Support lets you connect compatible network printers to the HighLevel mobile app to print customer receipts, kitchen prep tickets, and open connected cash drawers directly from your phone or tablet. It simplifies in-person checkout and order preparation without requiring a separate printing system.
Available on iOS and Android, starting with HighLevel mobile app v4.27.0.
Key Benefits of Thermal Receipt Printer Support
Thermal printing connects payment processing with physical receipts and order preparation, helping businesses manage checkout and fulfillment from one mobile device.
Faster Checkout: Print receipts and open connected cash drawers from the payment confirmation screen.
Simplified Kitchen Operations: Print tickets containing order items and variants without prices.
Flexible Receipt Printing: Print after supported payments or reprint eligible transaction receipts.
Compatible Hardware: Connect supported ESC/POS printers without a separate desktop application.
Printer Management: Save multiple printers, switch between them, and test connections.
Consistent Order Processing: Automatically print prep tickets after payment receipts.
Mobile Convenience: Manage receipt printing and cash drawers from a phone or tablet.
Supported Printers and Connection Requirements
A compatible printer and properly configured local network are required for reliable printing. Check these requirements before connecting or purchasing hardware.
| Requirement | Details |
|---|---|
| Printer | Thermal printer supporting ESC/POS commands |
| Connectivity | Supported Wi-Fi network printer |
| Network | Printer and mobile device must share the same local network |
| Paper size | 58mm or 80mm |
| IP address | Accessible local printer IP address |
| Port | 9100 by default; configurable |
| Platform | iOS or Android |
| App version | v4.27.0 or later |
Important:
Bluetooth-only and USB-only printers are not supported.
Confirm Wi-Fi and ESC/POS compatibility before purchasing.
On iOS, allow Local Network access. If previously denied, enable it under Settings > Privacy & Security > Local Network.
Printers are saved per device, so configure them on each phone or tablet that needs to print.
Saved printer configurations remain available after reopening the app.
Managing Receipt Printers
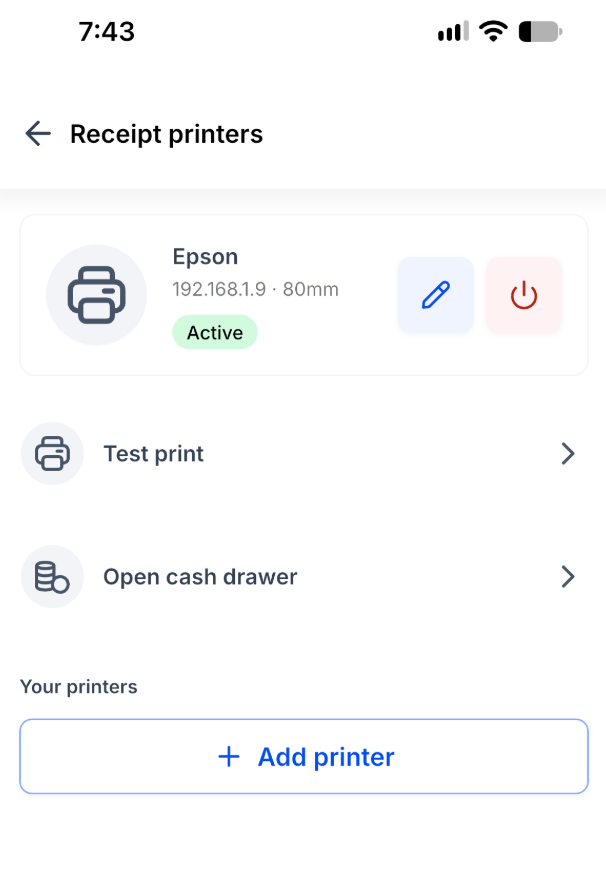
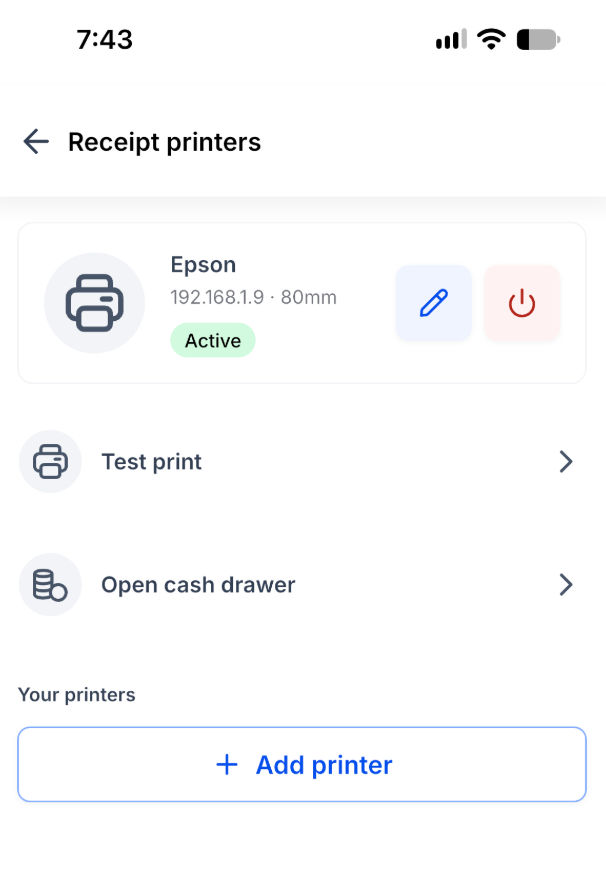
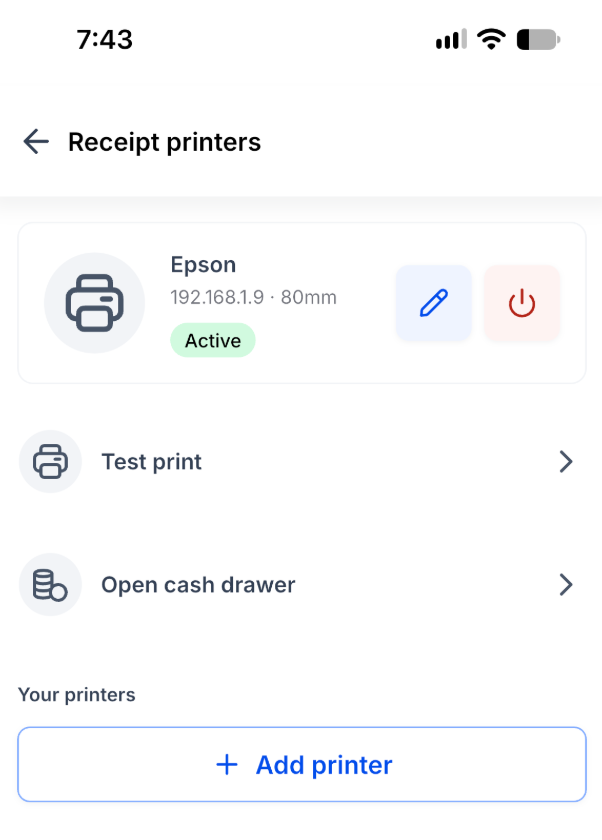
The Receipt printers page lets you manage saved printers, check their status, test connections, and control compatible cash drawers.
Navigate to Payment settings > Receipt printers.
Available options include:
Active Printer: View the printer name, IP address, paper size, and status.
Add Printer: Connect another network printer.
Edit Printer: Update the printer name or paper size.
Test Print: Verify the printer connection.
Open Cash Drawer: Open a compatible drawer connected to the printer.
Disconnect/Remove Printer: Manage printers no longer required.
Multiple printers can be saved and switched between as needed.
Important: To change a printer's IP address or port, remove it and add it again with the updated details.
Printing Customer Receipts
Customer receipts provide a physical payment record and can be printed immediately after checkout or reprinted from eligible transactions.
Supported payment methods include card, Tap to Pay, card reader, cash, and external payments.
Print a Receipt After Payment
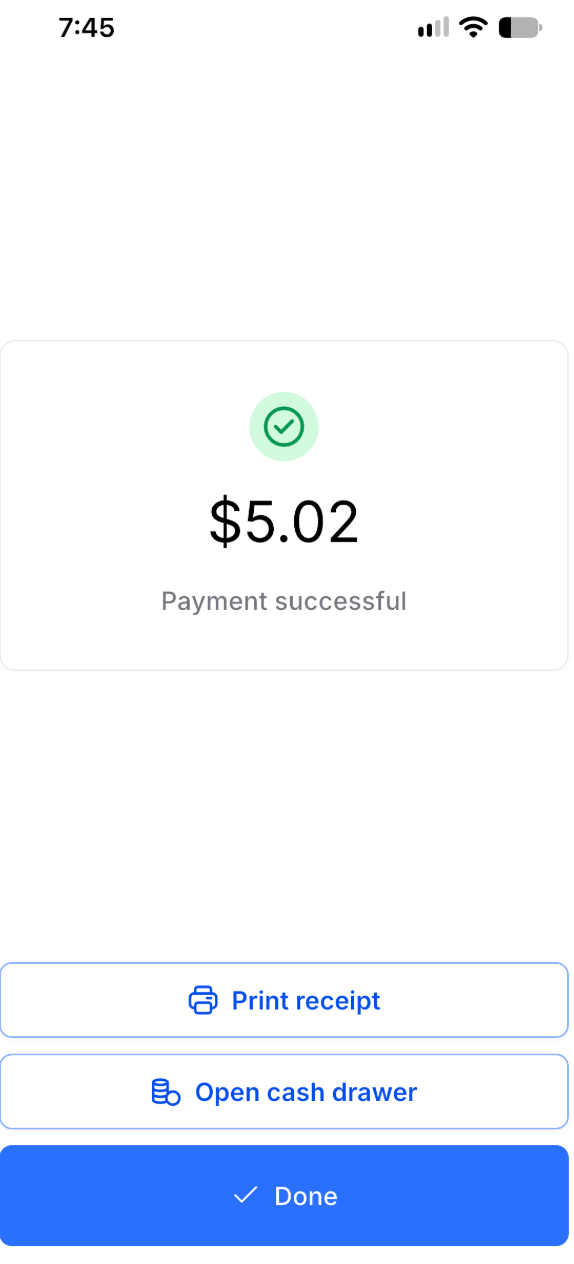
Complete a payment in the HighLevel mobile PoS.
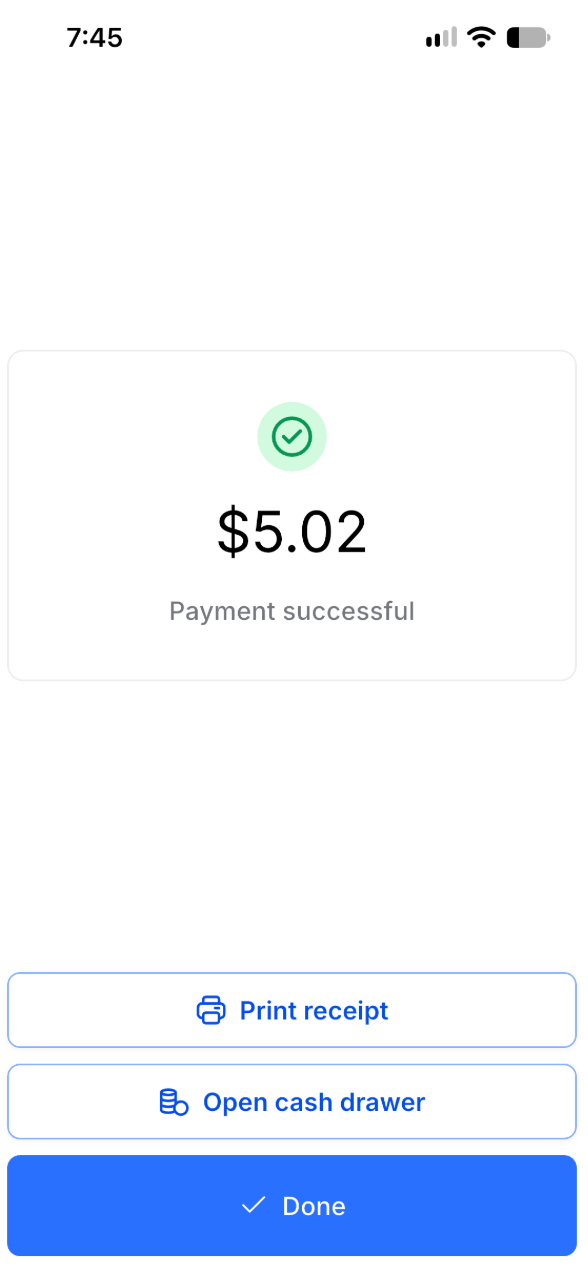
On the payment confirmation screen, tap Print receipt.
Collect the receipt from the connected printer.
Reprint a Receipt
Open the successful or partially refunded transaction.
Locate the receipt printing option.
Tap Print receipt to print another copy.
Receipt Information
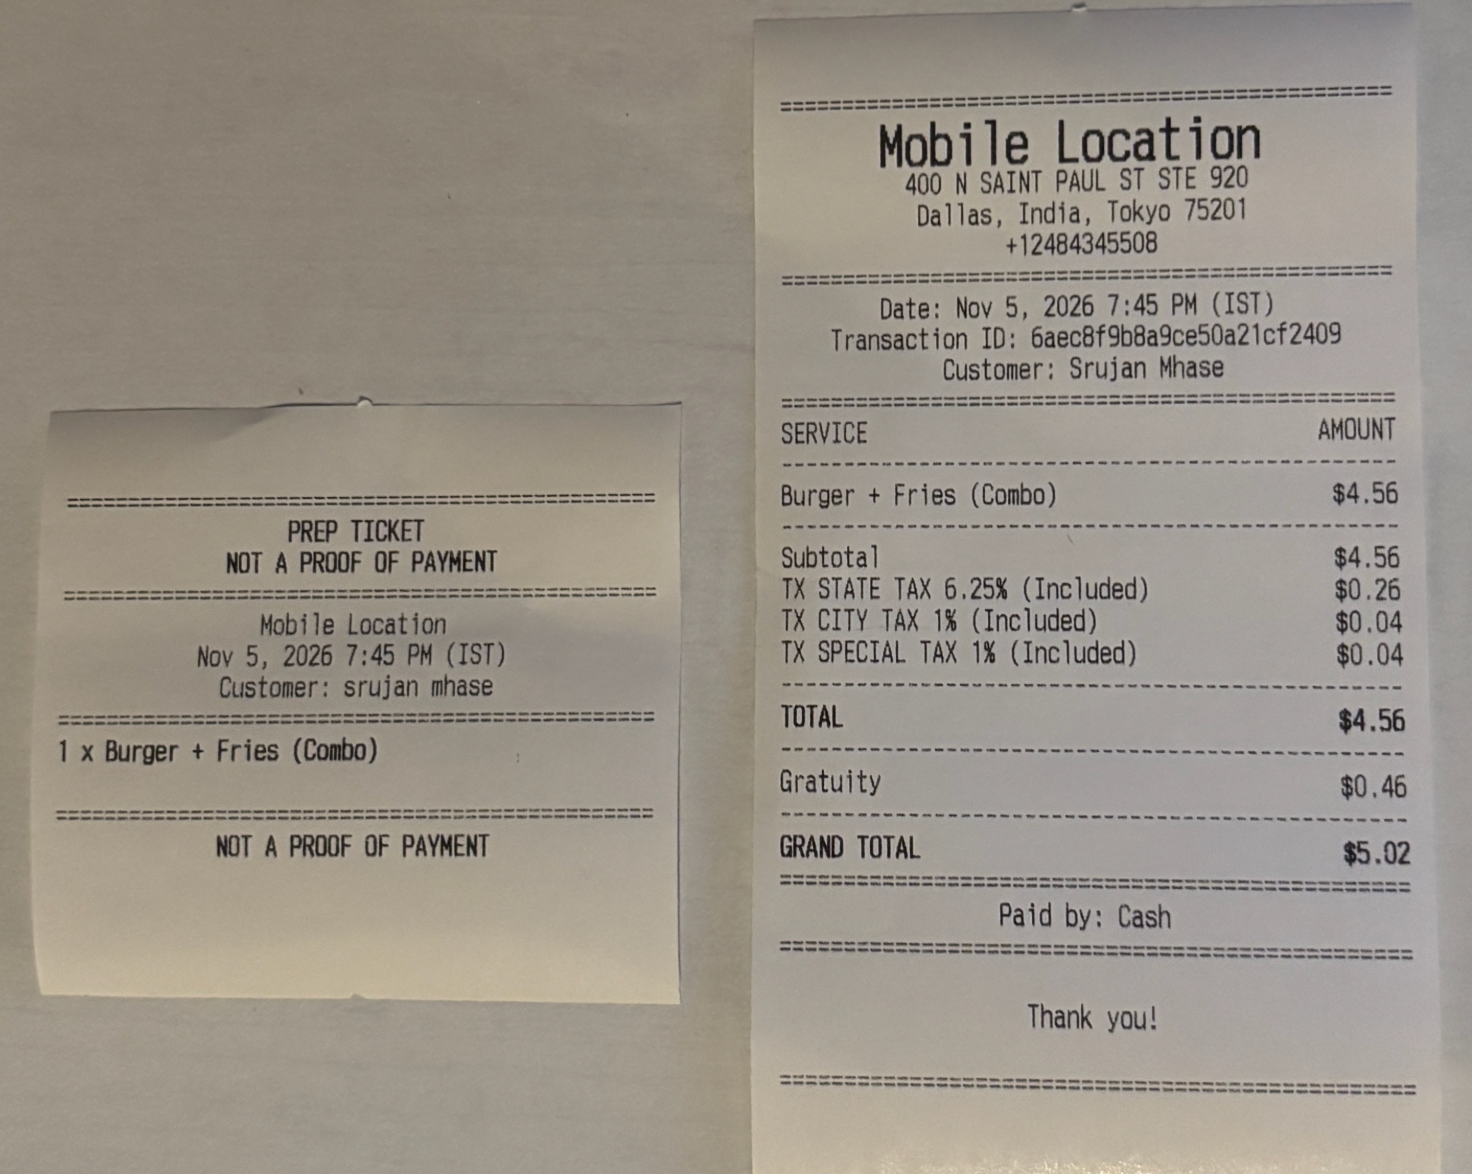
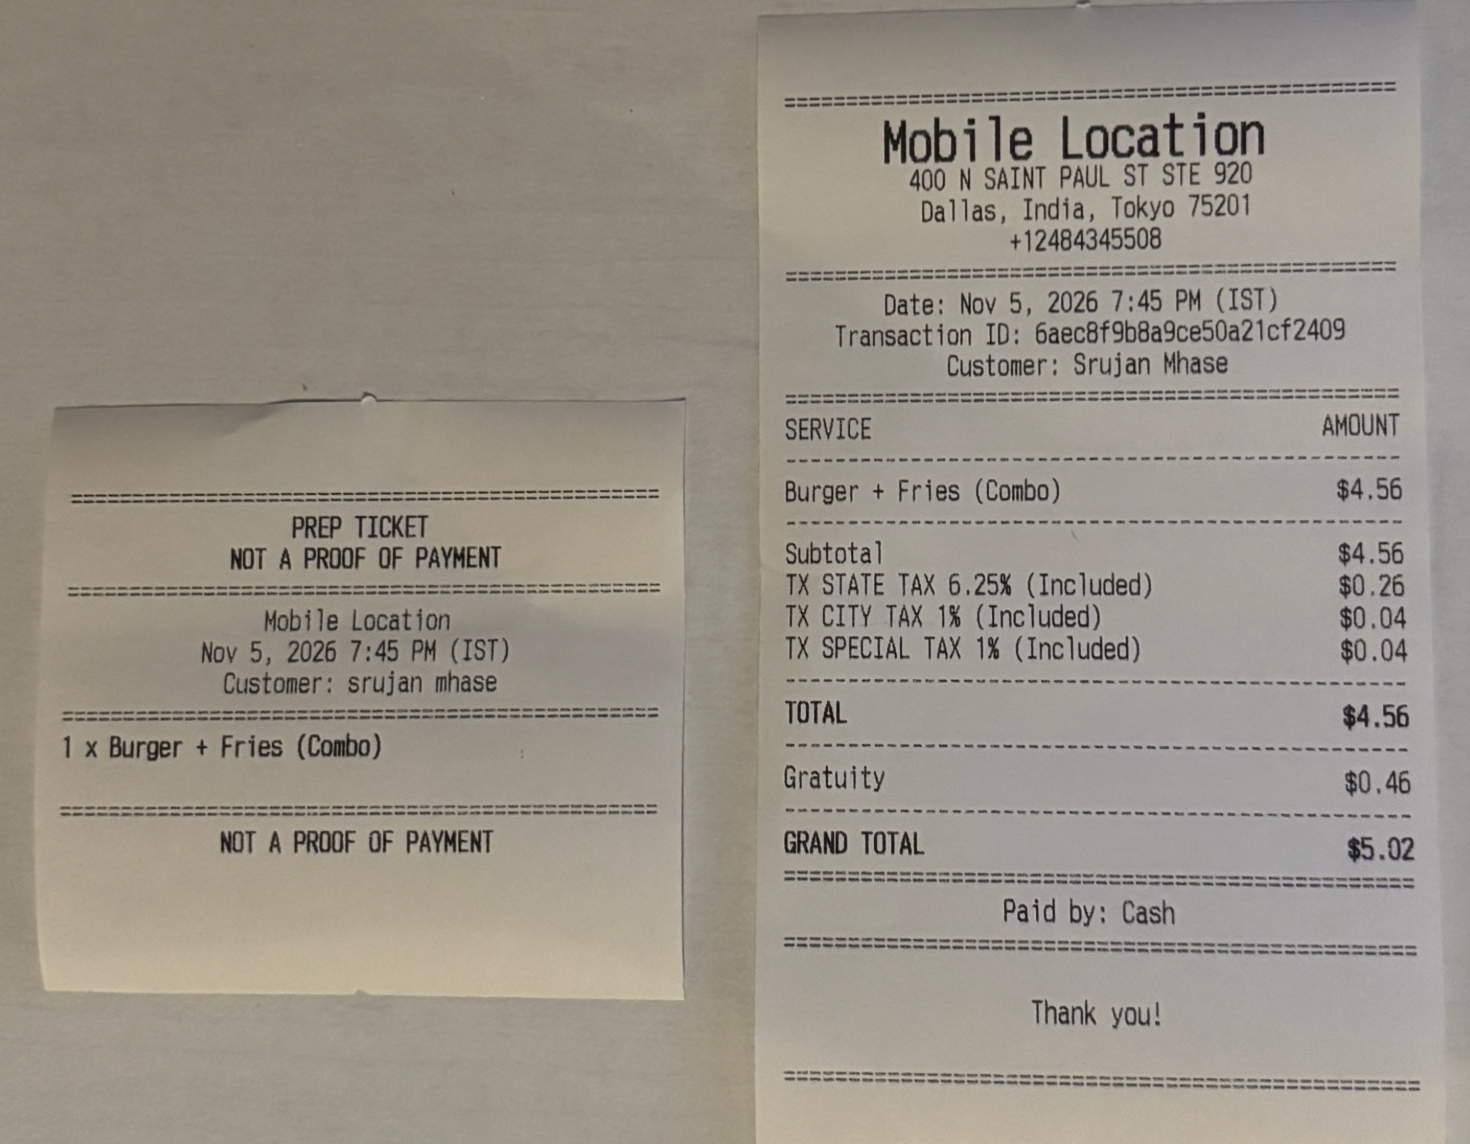
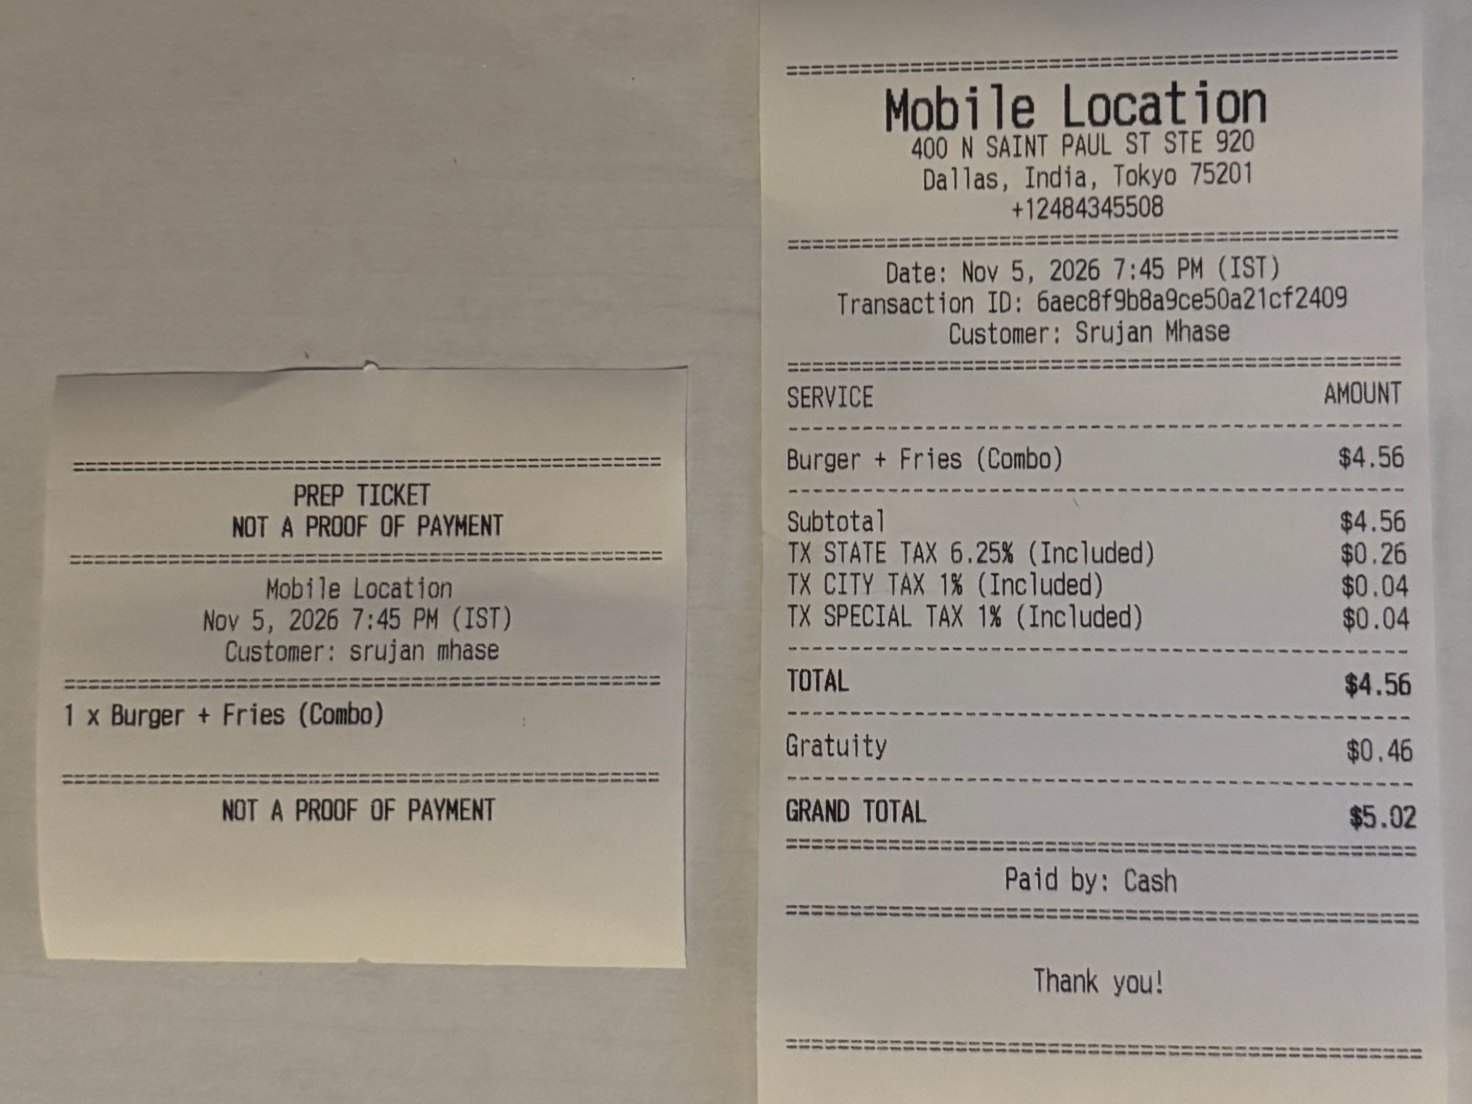
Depending on the transaction, printed receipts include:
Business name, address, and phone number
Date, transaction ID, and customer information
Purchased items or services
Subtotal, discounts, and applicable taxes
Gratuity and total
Amount paid, refunds, and outstanding balance
Payment method and authorization number, when applicable
Note: Thermal receipts are separate from emailed or downloadable PDF receipts. Learn more in How to Manage Sales Receipts for Order Form, Calendar and Invoice Payments.
Printing Kitchen Prep Tickets
Prep tickets send order details to kitchen or preparation staff without revealing prices or payment information. Each ticket includes the location, date and time, customer (when available), items, quantities, and variants, and is marked NOT A PROOF OF PAYMENT.
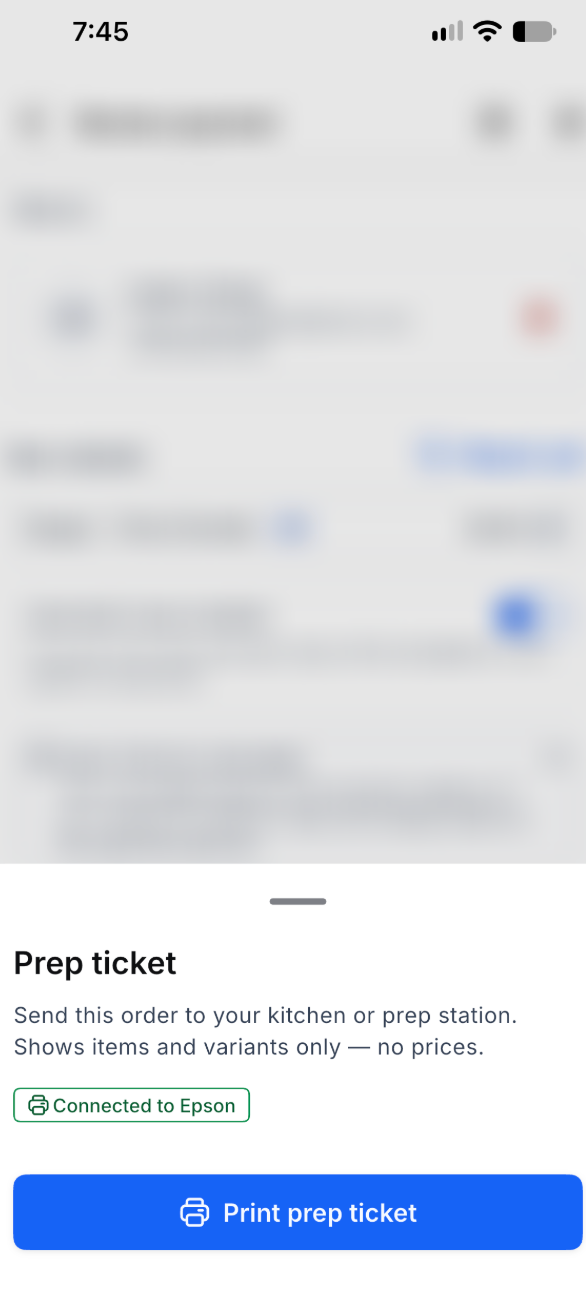
Print a Prep Ticket Manually
Add products or services to an order in the mobile PoS.
Open the Review payment screen.
Tap the printer icon at the top.
Select Print prep ticket.
Automatically Attach Prep Tickets to Receipts
Connect a compatible receipt printer.
Open Point of Sale settings.
Enable Attach prep ticket to payment receipt.
Complete a payment and print the receipt.
The prep ticket prints immediately after the payment receipt.
Important: This setting appears only when a printer is connected and is saved separately on each device.
Using Cash Drawers with Receipt Printers
HighLevel can open a compatible cash drawer through the connected receipt printer, allowing staff to manage cash transactions without leaving the mobile app.
Requirements
The drawer must connect directly to the receipt printer's DK/Drawer port.
These ports commonly use RJ11 or RJ12 connectors.
The drawer must be compatible with the printer.
Drawers connected directly to phones, tablets, or computers through USB or Bluetooth are not supported.
Open a Cash Drawer
After Payment: Tap Open cash drawer on the payment confirmation screen.
From Printer Settings: Navigate to Payment settings > Receipt printers > Open cash drawer.
The printer receives the command from HighLevel and triggers the drawer.
Important: A connected printer does not guarantee cash drawer compatibility. Verify the printer's cash drawer port requirements before purchasing hardware.
How to Set Up a Thermal Receipt Printer in HighLevel
Correct printer configuration helps ensure receipts and prep tickets print reliably during checkout. Before setup, connect the printer to its supported network, find its IP address, and update the HighLevel mobile app.
Step 1: Open Receipt Printer Settings
Open the HighLevel mobile app.
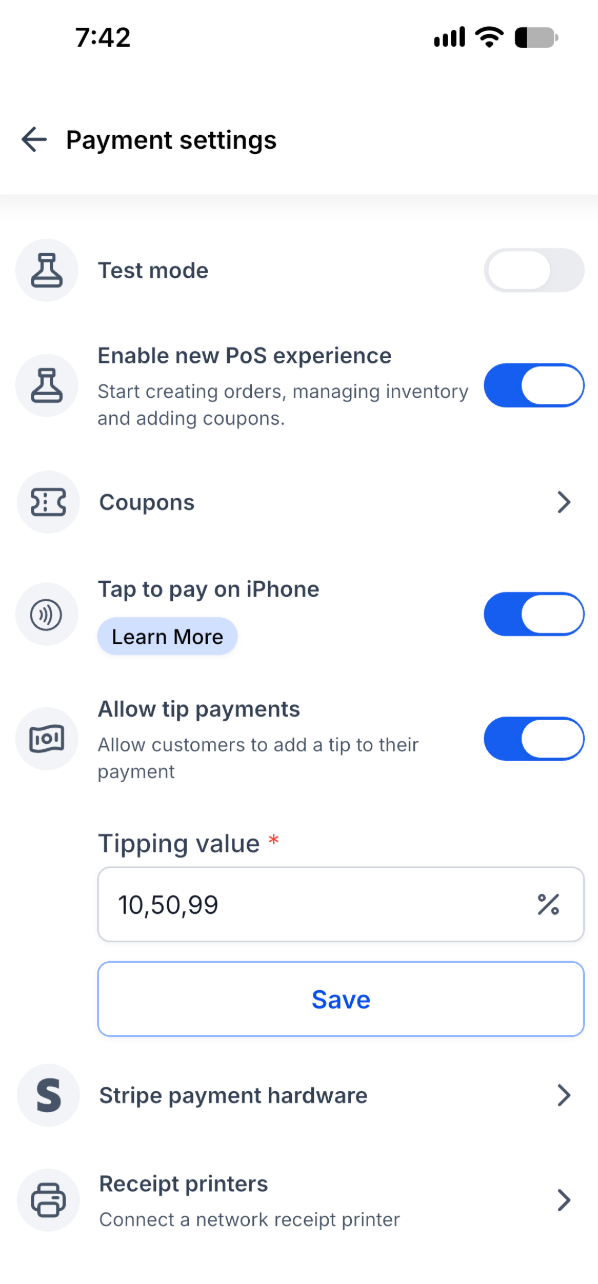
Navigate to Payment settings or Point of Sale settings.
Select Receipt printers.
Step 2: Add a Printer
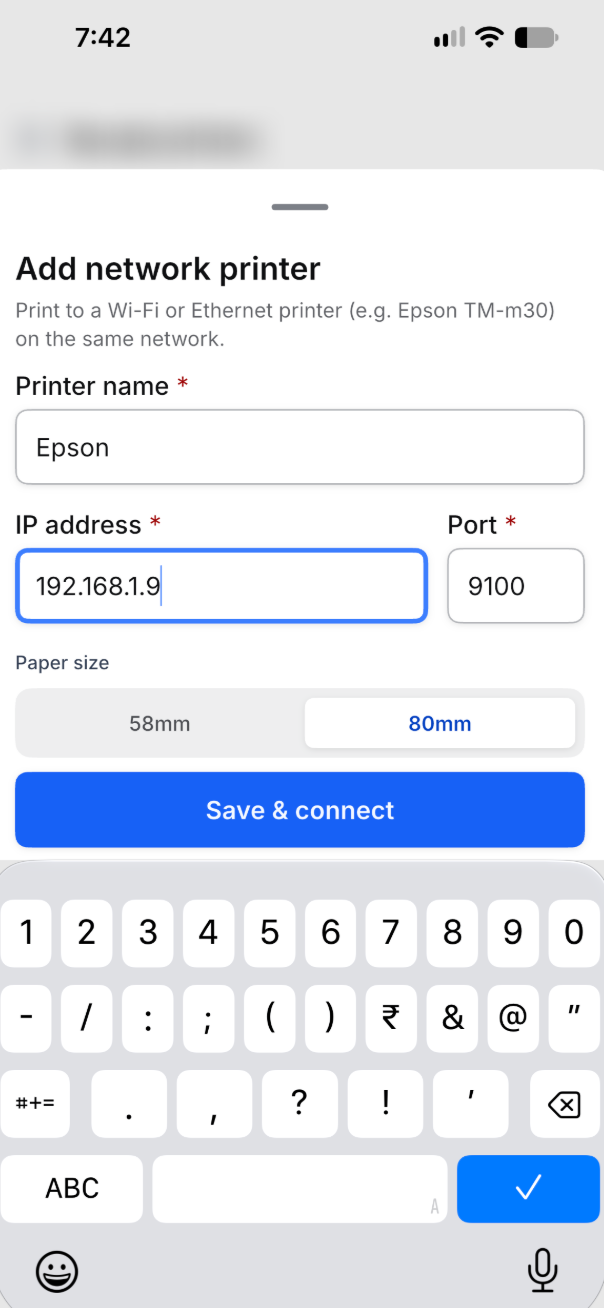
Tap Add printer.
In Add network printer, enter the following:
| Field | Description |
|---|---|
| Printer name | A recognizable name, such as Front Counter or Kitchen Printer |
| IP address | Printer's local IP address |
| Port | 9100 by default, or the printer's configured port |
| Paper size | 58mm or 80mm |
Example: Epson · 192.168.1.9 · Port 9100 · 80mm
Use your printer's actual connection details.
Step 3: Save and Test the Connection
Tap Save & connect.
Confirm the printer appears as Active.
Tap Test print to verify printing.
If the printer does not respond, check the network, IP address, port, and Local Network permissions.
Step 4: Print a Receipt
Create an order or select an eligible payment in the mobile PoS.
Complete the transaction using a supported payment method.
Tap Print receipt on the payment confirmation screen.
Step 5: Configure Additional Printing Options
Once printing works, you can:
Print Prep Tickets: Tap the printer icon on the Review payment screen.
Attach Prep Tickets: Enable Attach prep ticket to payment receipt in Point of Sale settings.
Open Cash Drawer: Connect a compatible drawer and select Open cash drawer.
Add More Printers: Go to Receipt printers > Add printer.
Frequently Asked Questions
Q: Can I use Bluetooth or USB receipt printers?
No. Bluetooth-only and USB-only printers are unsupported. Use a compatible Wi-Fi ESC/POS thermal printer.
Q: Why isn't my printer connecting?
Verify that both devices share the same local network, confirm the IP address and port, and enable Local Network permission on iOS.
Q: Can I save multiple receipt printers?
Yes. You can save multiple printers and switch between them.
Q: Do I need to configure printers on every device?
Yes. Printer configurations are saved separately on each phone or tablet.
Q: Will my printer stay connected after restarting the app?
Saved printer configurations persist after the app is closed and reopened.
Q: Why can't I see Attach prep ticket to payment receipt?
This option appears only after connecting a compatible printer.
Q: Can I change a printer's IP address or port?
Yes. Remove the printer and add it again with updated connection details. Printer name and paper size can be edited directly.
Q: Why isn't my cash drawer opening?
Confirm the drawer connects to the printer's DK/Drawer port and is compatible with the printer.
Q: Can I reprint partially refunded transaction receipts?
Yes. Successful and partially refunded transactions support receipt reprinting.
Q: Are kitchen prep tickets proof of payment?
No. They exclude prices and payment totals and are marked NOT A PROOF OF PAYMENT.
Related Articles
Was this article helpful?
That’s Great!
Thank you for your feedback
Sorry! We couldn't be helpful
Thank you for your feedback
Feedback sent
We appreciate your effort and will try to fix the article