HighLevel provides multiple ways to confirm a customer's purchase, depending on where the transaction occurs and how much customization you need. You can send built-in Sales Receipts for supported successful payments, use Store Order Confirmation Emails for e-commerce Store purchases, or create a custom post-purchase experience with the Order Submitted workflow trigger.
Choosing the correct method helps customers receive the appropriate transaction details while avoiding unnecessary or duplicate confirmation messages.
TABLE OF CONTENTS
- Key Benefits of Purchase and Order Confirmations
- Choose the Right Confirmation Method
- Send an Automatic Sales Receipt
- Send a Store Order Confirmation Email
- Send a Custom Confirmation with the Order Submitted Trigger
- Add Post-Purchase Automation
- Avoid Duplicate Confirmation Messages
- Test Your Purchase Confirmation
- Frequently Asked Questions
- Related Articles
- Automated Sales Receipts
- Order Submitted Trigger for Custom Automations
- Additional Resources
Key Benefits of Purchase and Order Confirmations
Purchase confirmations give customers immediate visibility into completed transactions while allowing businesses to automate the next steps after an order. HighLevel's different confirmation methods let you choose between standard transaction documentation and customized post-purchase communication.
Immediate Confirmation: Let customers know their supported purchase or order was received successfully.
Transaction Visibility: Provide applicable order, payment, and purchased-product information.
Custom Follow-Up: Send product-specific instructions, onboarding information, or other post-purchase content.
Post-Purchase Automation: Trigger internal actions, customer follow-up, or external integrations after an order.
Flexible Confirmation Methods: Choose built-in receipts, Store confirmations, or workflow emails based on the purchase source.
Choose the Right Confirmation Method
The appropriate confirmation method depends on where the purchase occurs and whether you need a standard transaction receipt or customized post-purchase communication.
| Method | Best For | Key Behavior |
|---|---|---|
| Automatic Sales Receipt | Supported order form, subscription, calendar, and invoice payments | Automatically sends standard transaction details after a supported successful payment |
| Store Order Confirmation Email | E-commerce Store orders | Sends a Store-specific confirmation and supports applicable order-access and digital-delivery experiences |
| Order Submitted Workflow | Customized post-purchase communication | Supports custom emails, order data, conditional logic, onboarding, internal actions, and external automation |
Tip: You can intentionally use more than one method—for example, a Sales Receipt for payment documentation and a workflow email for onboarding instructions. Review all active notifications to avoid sending customers unnecessary duplicate messages.
Send an Automatic Sales Receipt
Automatic Sales Receipts provide a straightforward way to send payment documentation without building a workflow. They are best when customers need a standard receipt containing the applicable transaction information after a successful payment.
HighLevel supports Automatic Sales Receipts for applicable:
1-step and 2-step order form purchases.
Bump purchases and upsells.
Subscriptions.
Calendar appointment payments.
Invoice payments.
When enabled, the receipt is automatically sent after a supported successful payment and can be delivered to the contact by email with the receipt attached as a PDF.
Sales Receipt settings also provide applicable customization for receipt information and email presentation.
Important: Automatic Sales Receipts apply globally to their supported payment types. If you need different post-purchase communication for particular products, order sources, or purchase conditions, use an Order Submitted workflow.
For detailed configuration, see How to Manage Sales Receipts for Order Form, Calendar and Invoice Payments.
Send a Store Order Confirmation Email
E-commerce Store orders have a dedicated Order Confirmation Email rather than relying solely on the general Sales Receipt configuration. This confirmation can provide customers with Store-specific order information and access to the applicable post-purchase experience.
To review this configuration:
Go to Payments > Settings.
Open Notifications.
Locate the Order Confirmation Email for Stores setting.
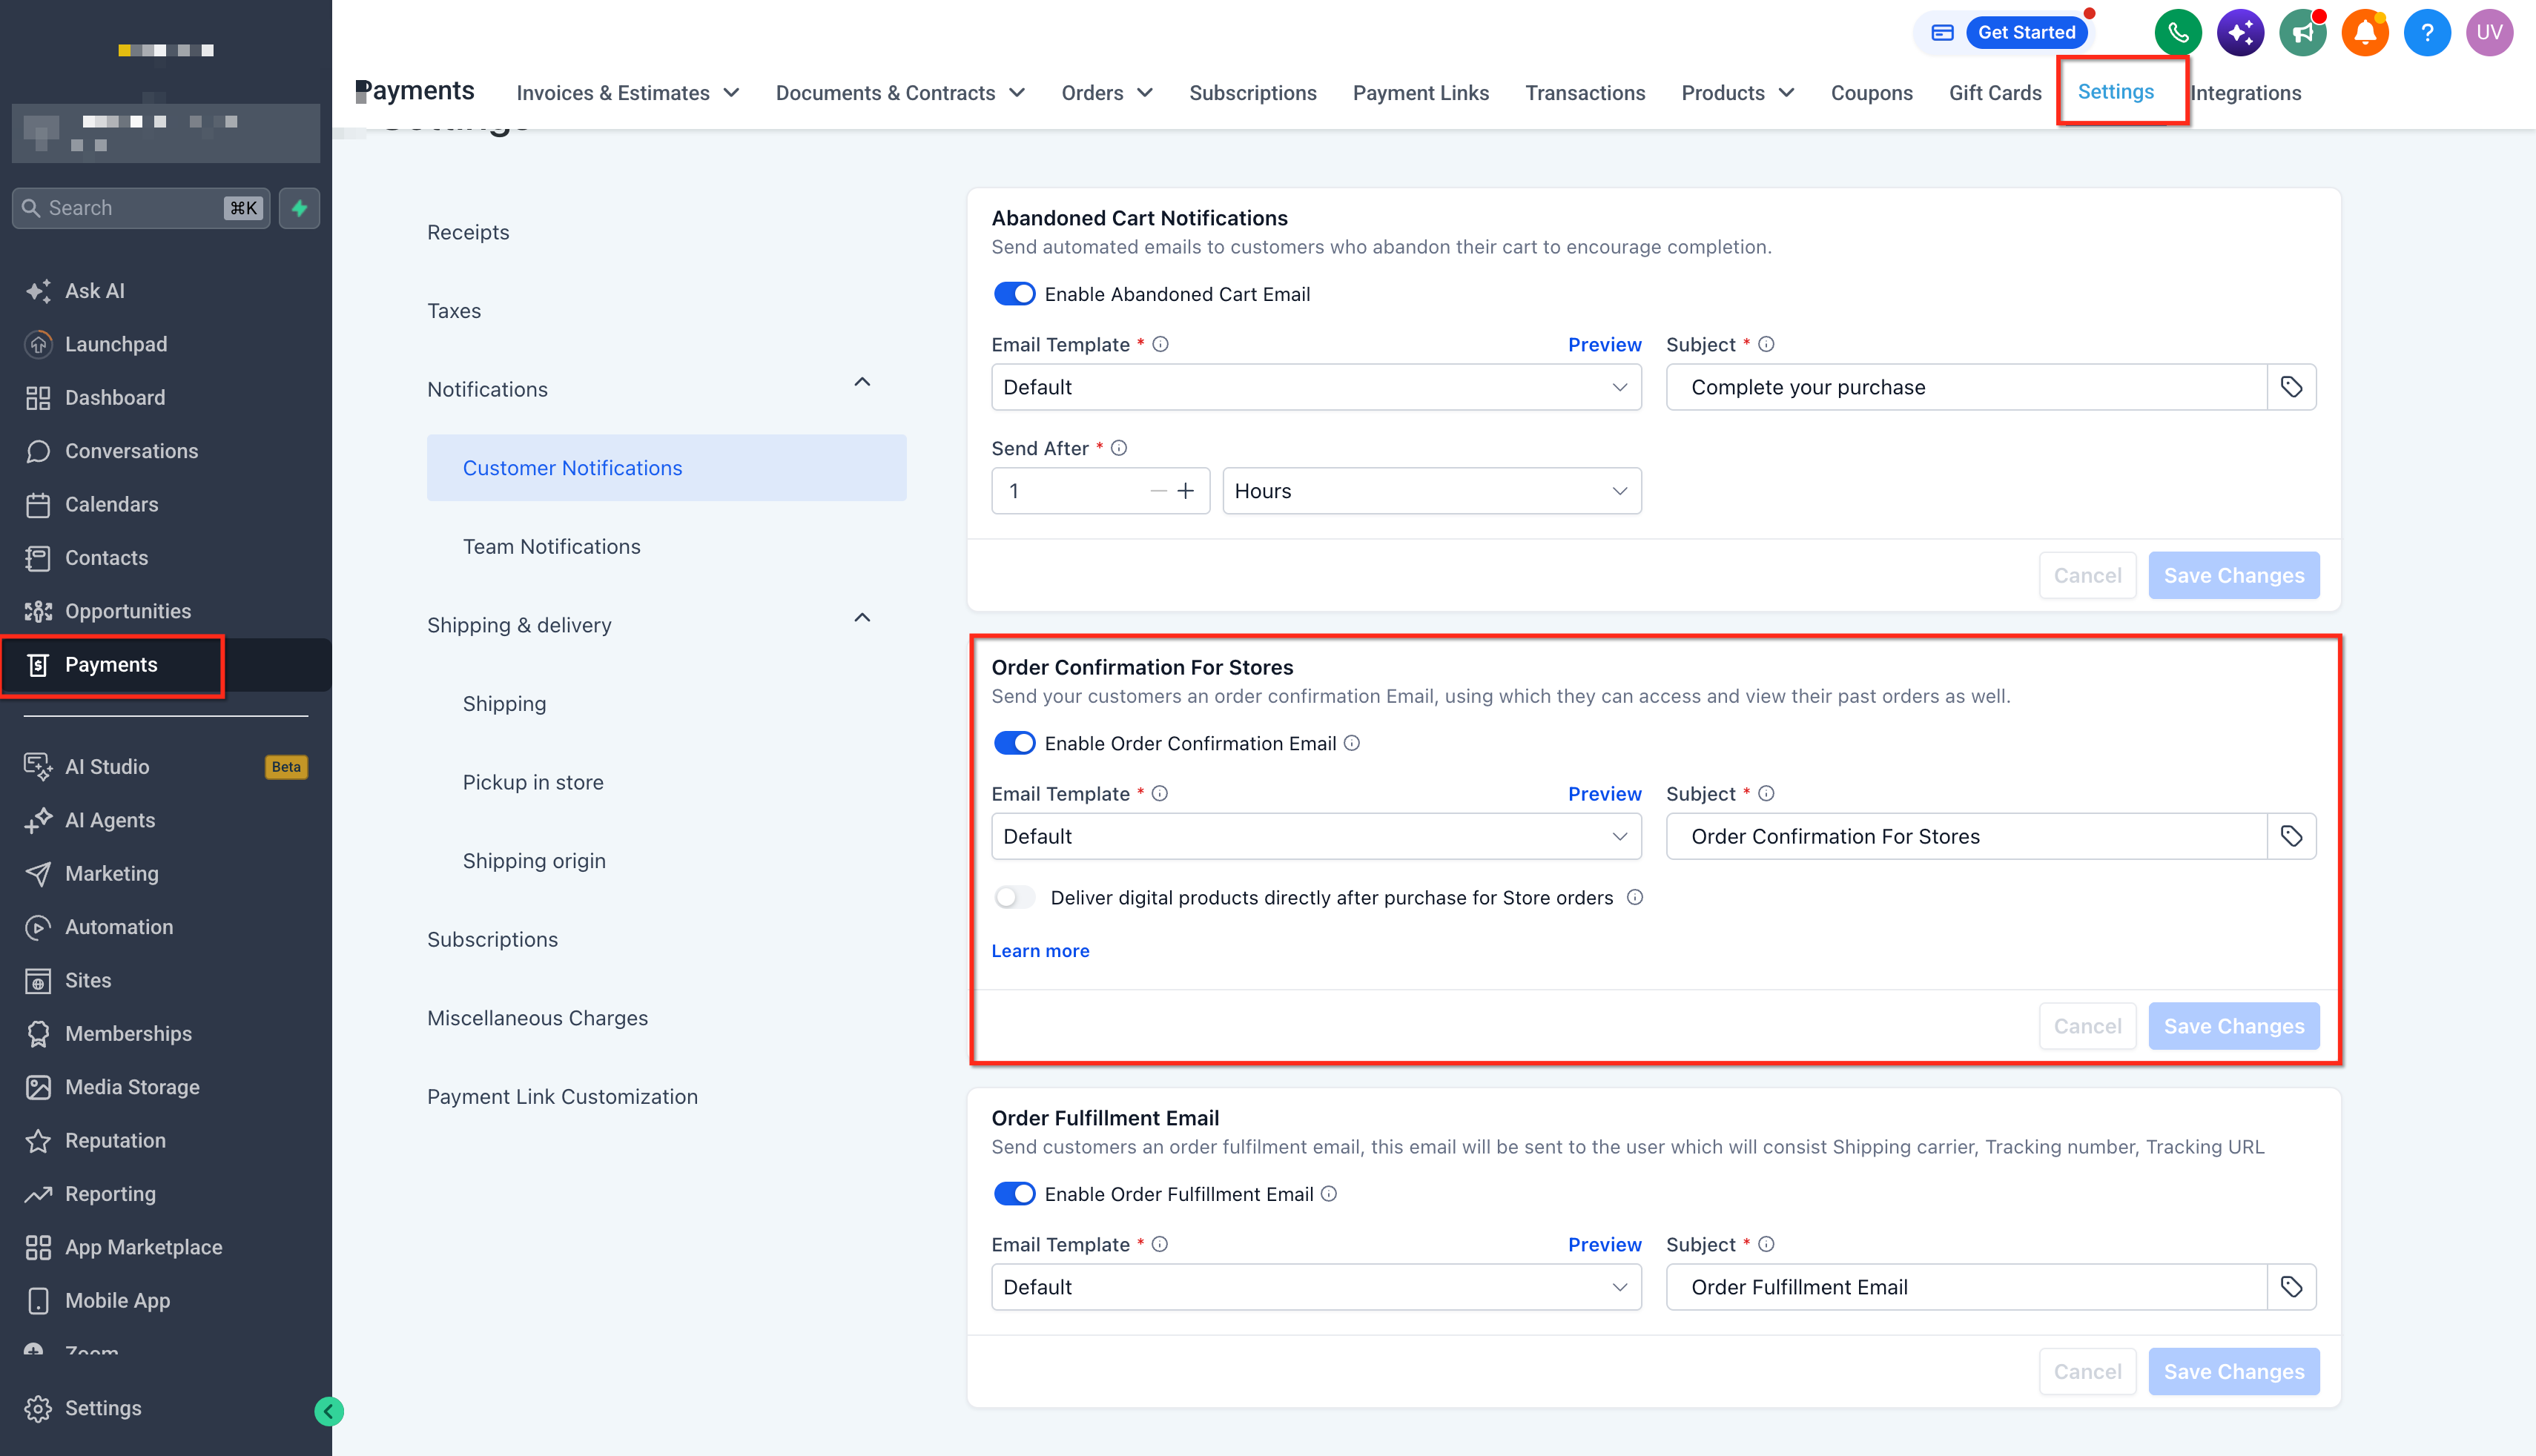
Configure the applicable Store order-confirmation experience.
Depending on the Store configuration, the confirmation can include a View Order option that takes the customer to their order information.
For applicable digital Store products, the Store order-confirmation experience can also provide access to downloadable purchases when digital delivery is configured.
Important: If you sell downloadable products, do not rely on a generic workflow confirmation as the only delivery mechanism. Configure the applicable Store digital-product delivery experience.
Send a Custom Confirmation with the Order Submitted Trigger
The Order Submitted workflow trigger gives you more control over what happens after an order. Use it when you need customized confirmation content, product-specific instructions, onboarding, conditional follow-up, internal actions, or external automation.
1. Create the Workflow
Go to Automation > Workflows.
Create a new workflow or open the workflow you want to use.
Add Order Submitted as the workflow trigger.
Important: Order Submitted and Order Form Submitted are different triggers. Order Submitted is tied to the order/purchase event, while Order Form Submitted is based on the form submission and does not necessarily establish a completed purchase.
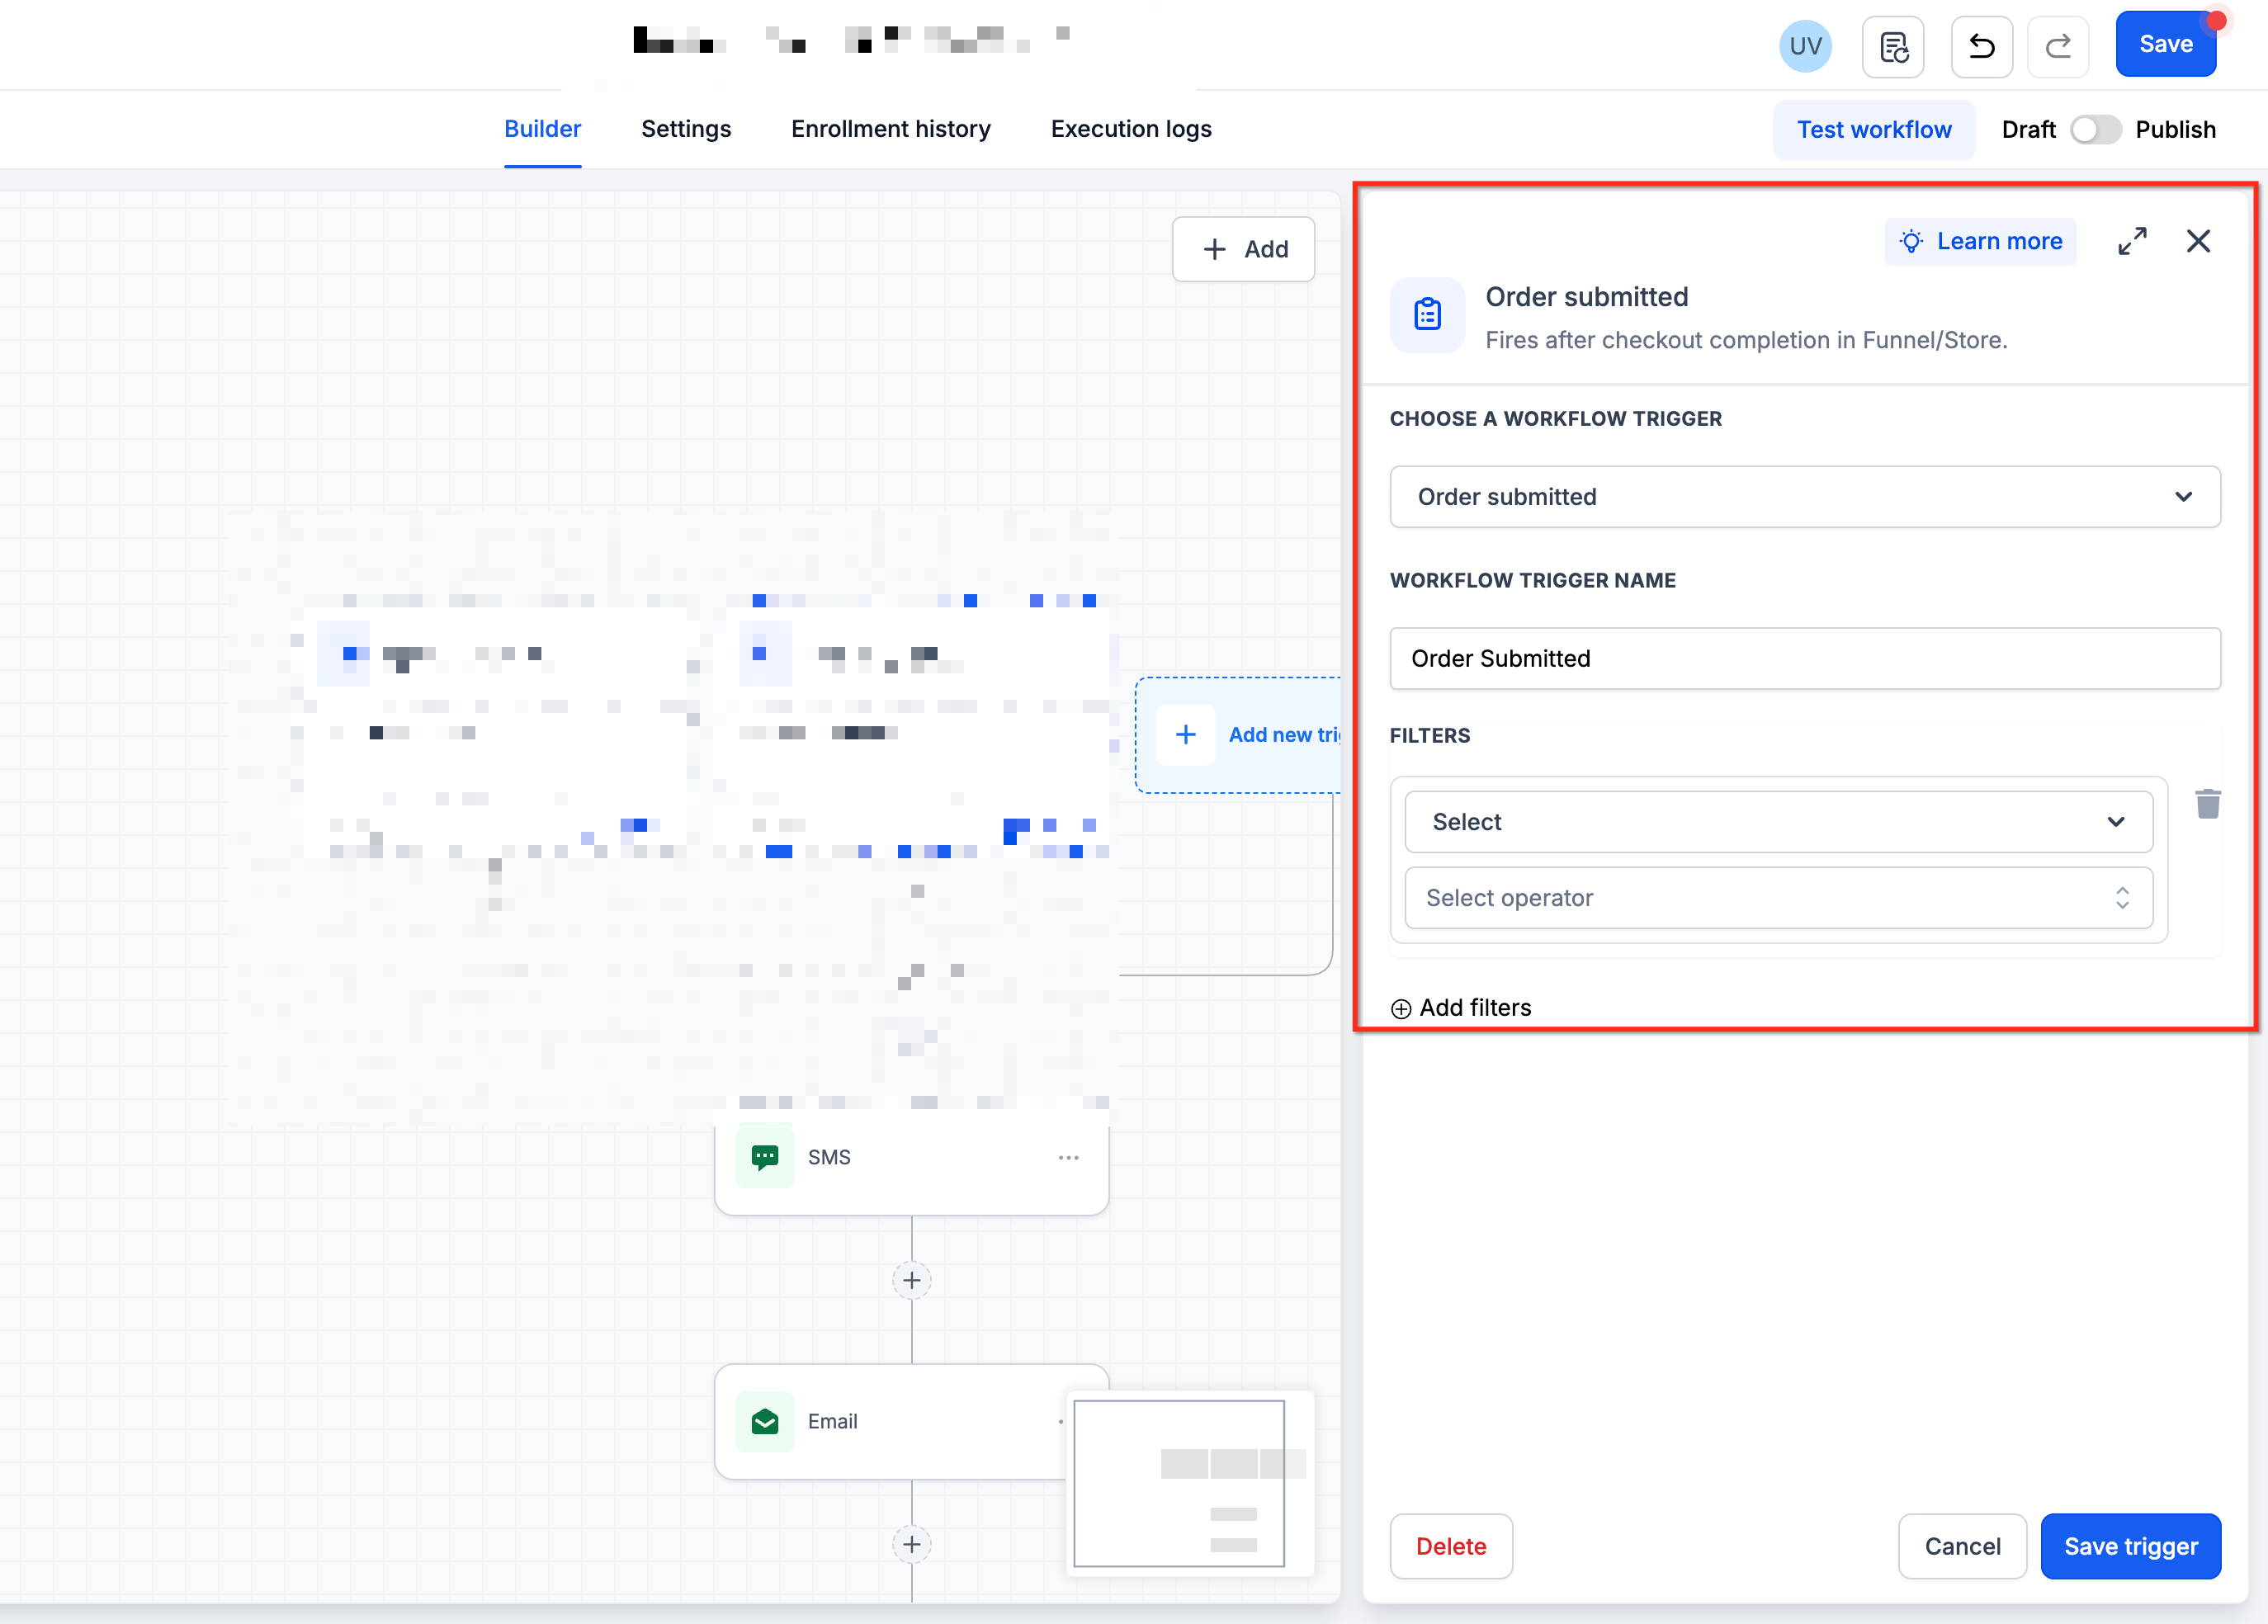
2. Add Order Filters
Filters let you control which purchases enter the workflow. This is useful when different products or purchase sources require different confirmation messages.
Depending on the order context, available filters can include criteria such as:
Product.
Order Source.
Sub-Source.
Funnel or Website.
Page.
Submission Type.
Product Price.
For example, if the workflow should send onboarding instructions only after a specific product is purchased, filter the trigger for that product.
3. Review Allow Multiple
A customer may generate more than one eligible order event, particularly when bump purchases or upsells are part of the checkout experience. Workflow enrollment settings determine whether the same contact can enter the workflow again.
If the confirmation workflow should run for subsequent eligible purchases by the same customer, review Allow Multiple in the workflow settings and configure it for the intended checkout behavior.
4. Add the Confirmation Email
Add a Send Email action after the trigger and create the confirmation message the customer should receive.
Your custom confirmation might include:
Thank-you messaging.
Order information.
Customer information.
Product-specific instructions.
Appointment or onboarding steps.
Support information.
Relevant next actions.
5. Add Order Details with Custom Values
When Order Submitted is used as a workflow trigger, applicable order-related custom values become available for use in downstream workflow actions.
Depending on the order data, these can include information such as:
Order ID.
Order total.
Cart total.
Currency.
Coupon or discount information.
Order date/time.
Payment gateway.
Customer name.
Customer email.
Customer phone.
Use only the information that makes the confirmation useful to the customer.
6. Show Purchased Products with the Shopping Cart Element
If the email should dynamically display the products included in the order, use the Shopping Cart element in the email template used by the Order Submitted workflow.
The Shopping Cart element can populate applicable information such as:
Purchased line items.
Product images.
Quantities.
Line-item prices.
A typical setup is:
Create or edit an email template.
Add the Shopping Cart element.
Save the template.
Use that template in the workflow's Send Email action.
Test the workflow with a representative purchase.
Add Post-Purchase Automation
Order Submitted can do more than send the customer a confirmation email. Additional workflow actions can automate the operational steps that should happen after an order is received.
Depending on your business process, you can add actions to:
Send an internal notification.
Update CRM information.
Apply tags or other segmentation.
Start onboarding.
Notify an account manager or fulfillment team.
Send order information to an external system using a webhook.
Trigger other appropriate post-purchase actions.
For example:
Order Submitted → Customer Confirmation → Internal Notification → Onboarding Actions
Keep the workflow focused on the actions actually required for that order type. Use trigger filters when different products need different fulfillment or onboarding paths.
Avoid Duplicate Confirmation Messages
HighLevel can send purchase-related communication from multiple areas. Reviewing these settings together helps prevent customers from receiving several messages containing essentially the same information.
Before enabling another confirmation workflow, check whether the purchase already generates:
An Automatic Sales Receipt.
A Store Order Confirmation Email.
An invoice payment notification.
A calendar-related notification.
Another workflow email or SMS.
Receiving both a receipt and a custom confirmation can be intentional. For example:
Sales Receipt: Provides payment documentation.
Workflow Confirmation: Provides onboarding instructions and next steps.
The goal is not necessarily to send only one message, but to make sure each message has a distinct purpose.
Test Your Purchase Confirmation
Testing the complete purchase flow helps confirm that the correct trigger, order data, email content, and follow-up actions work together. Test using the same purchase source and conditions your customers will use.
Before publishing or relying on the automation:
Complete a representative test purchase.
Confirm the correct workflow is triggered.
Verify any product/order filters.
Confirm the customer receives the intended message.
Review the customer and order custom values.
Confirm purchased products display correctly when using the Shopping Cart element.
Verify additional workflow actions execute as expected.
Check whether another receipt or notification was also sent.
Adjust overlapping messages if needed.
Frequently Asked Questions
Q: Should I use an Automatic Sales Receipt or an Order Submitted workflow?
Use an Automatic Sales Receipt when you need standard payment documentation after a supported successful payment. Use Order Submitted when you need customized post-purchase communication, conditional logic, onboarding, internal actions, or external automation. You can use both when each message serves a different purpose.
Q: Is Order Submitted the same as Order Form Submitted?
No. Order Submitted is associated with the order/purchase event. Order Form Submitted is associated with submitting the form and does not necessarily indicate that a completed purchase has occurred.
Q: Can I include the products a customer purchased in a custom confirmation email?
Yes. In the supported Order Submitted workflow context, you can use the Shopping Cart element in the email template to dynamically display applicable purchased line items and related information.
Q: Why did my customer receive more than one purchase confirmation?
Review your Automatic Sales Receipt, Store confirmation, invoice/calendar notification, and workflow settings. More than one of these can be active for the same customer journey. Keep multiple messages only when each serves a distinct purpose.
Q: What happens if the order is refunded later?
The original purchase confirmation has already been sent. Refunds are a separate lifecycle event. Use HighLevel's dedicated Refund workflow trigger when you need to send refund-specific communication or perform additional actions after a refund.
Q: Does an Order Submitted workflow automatically deliver digital products?
Not by itself. For digital products sold through an e-commerce Store, configure the applicable Store Order Confirmation Email and digital-product delivery experience so customers can access their purchases.
Related Articles
Was this article helpful?
That’s Great!
Thank you for your feedback
Sorry! We couldn't be helpful
Thank you for your feedback
Feedback sent
We appreciate your effort and will try to fix the article