Restaurant Settings lets you manage how your restaurant operates in HighLevel. Update your business information, opening hours, pickup and delivery options, payments, reservations, floor layout, and notifications from one place. These settings help your team run daily operations and keep guests informed. This article explains the available options and how to change them.
TABLE OF CONTENTS
What Is Restaurant Settings?
Restaurant Settings brings together the information entered during Restaurant Setup and ongoing options for dine-in, tips, reservations, and notifications. Changes can be reflected wherever the settings are used, including your restaurant website, Restaurant Orders, and Reservations.
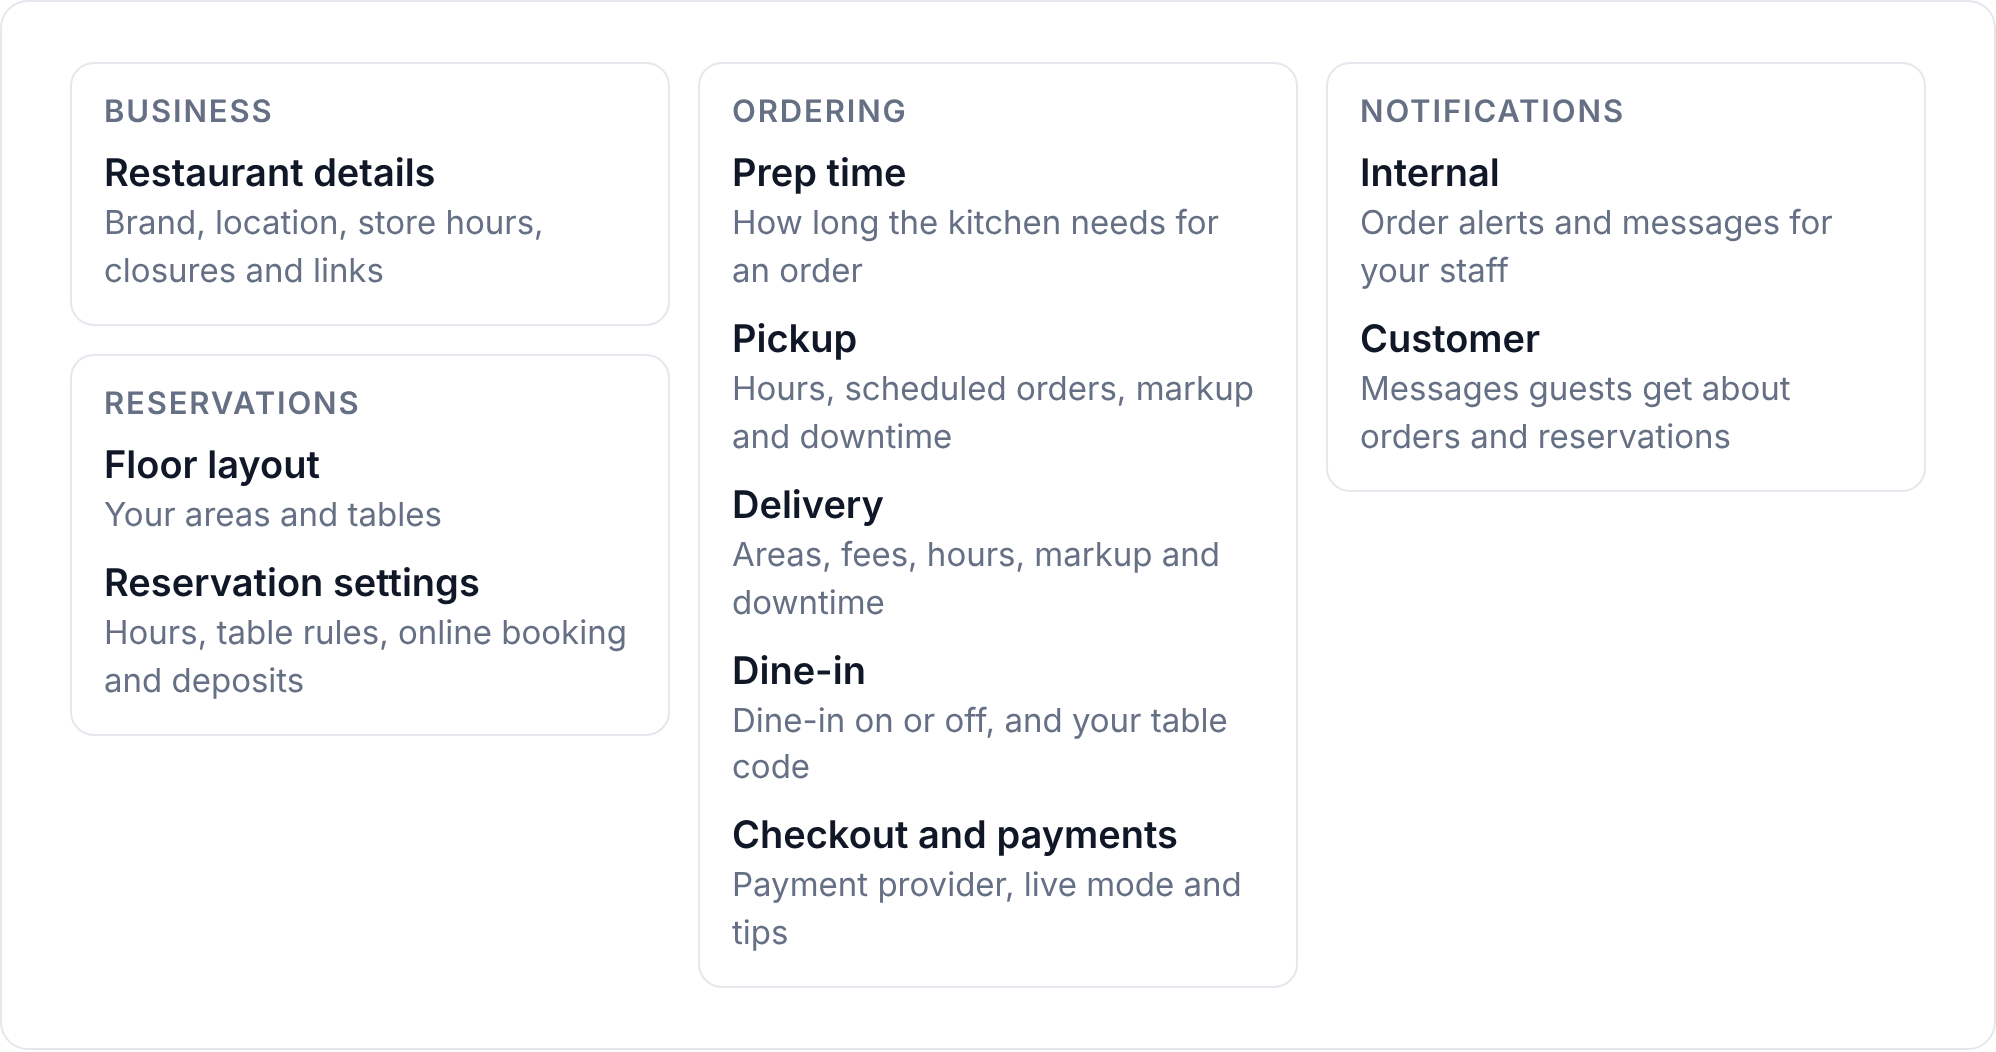
Key Benefits of Restaurant Settings
Keeping your settings up to date helps your team fulfill orders, manage tables, and communicate accurate information to guests.
- Centralized management: Update restaurant details, hours, and service rules from one location.
- Flexible ordering: Control pickup, delivery, preparation times, and ordering availability.
- Pricing control: Set order markups, delivery fees, payment options, and tips.
- Table management: Configure dining areas, capacities, and reservation rules.
- Clear communication: Customize alerts for staff and updates for guests.
Restaurant Details
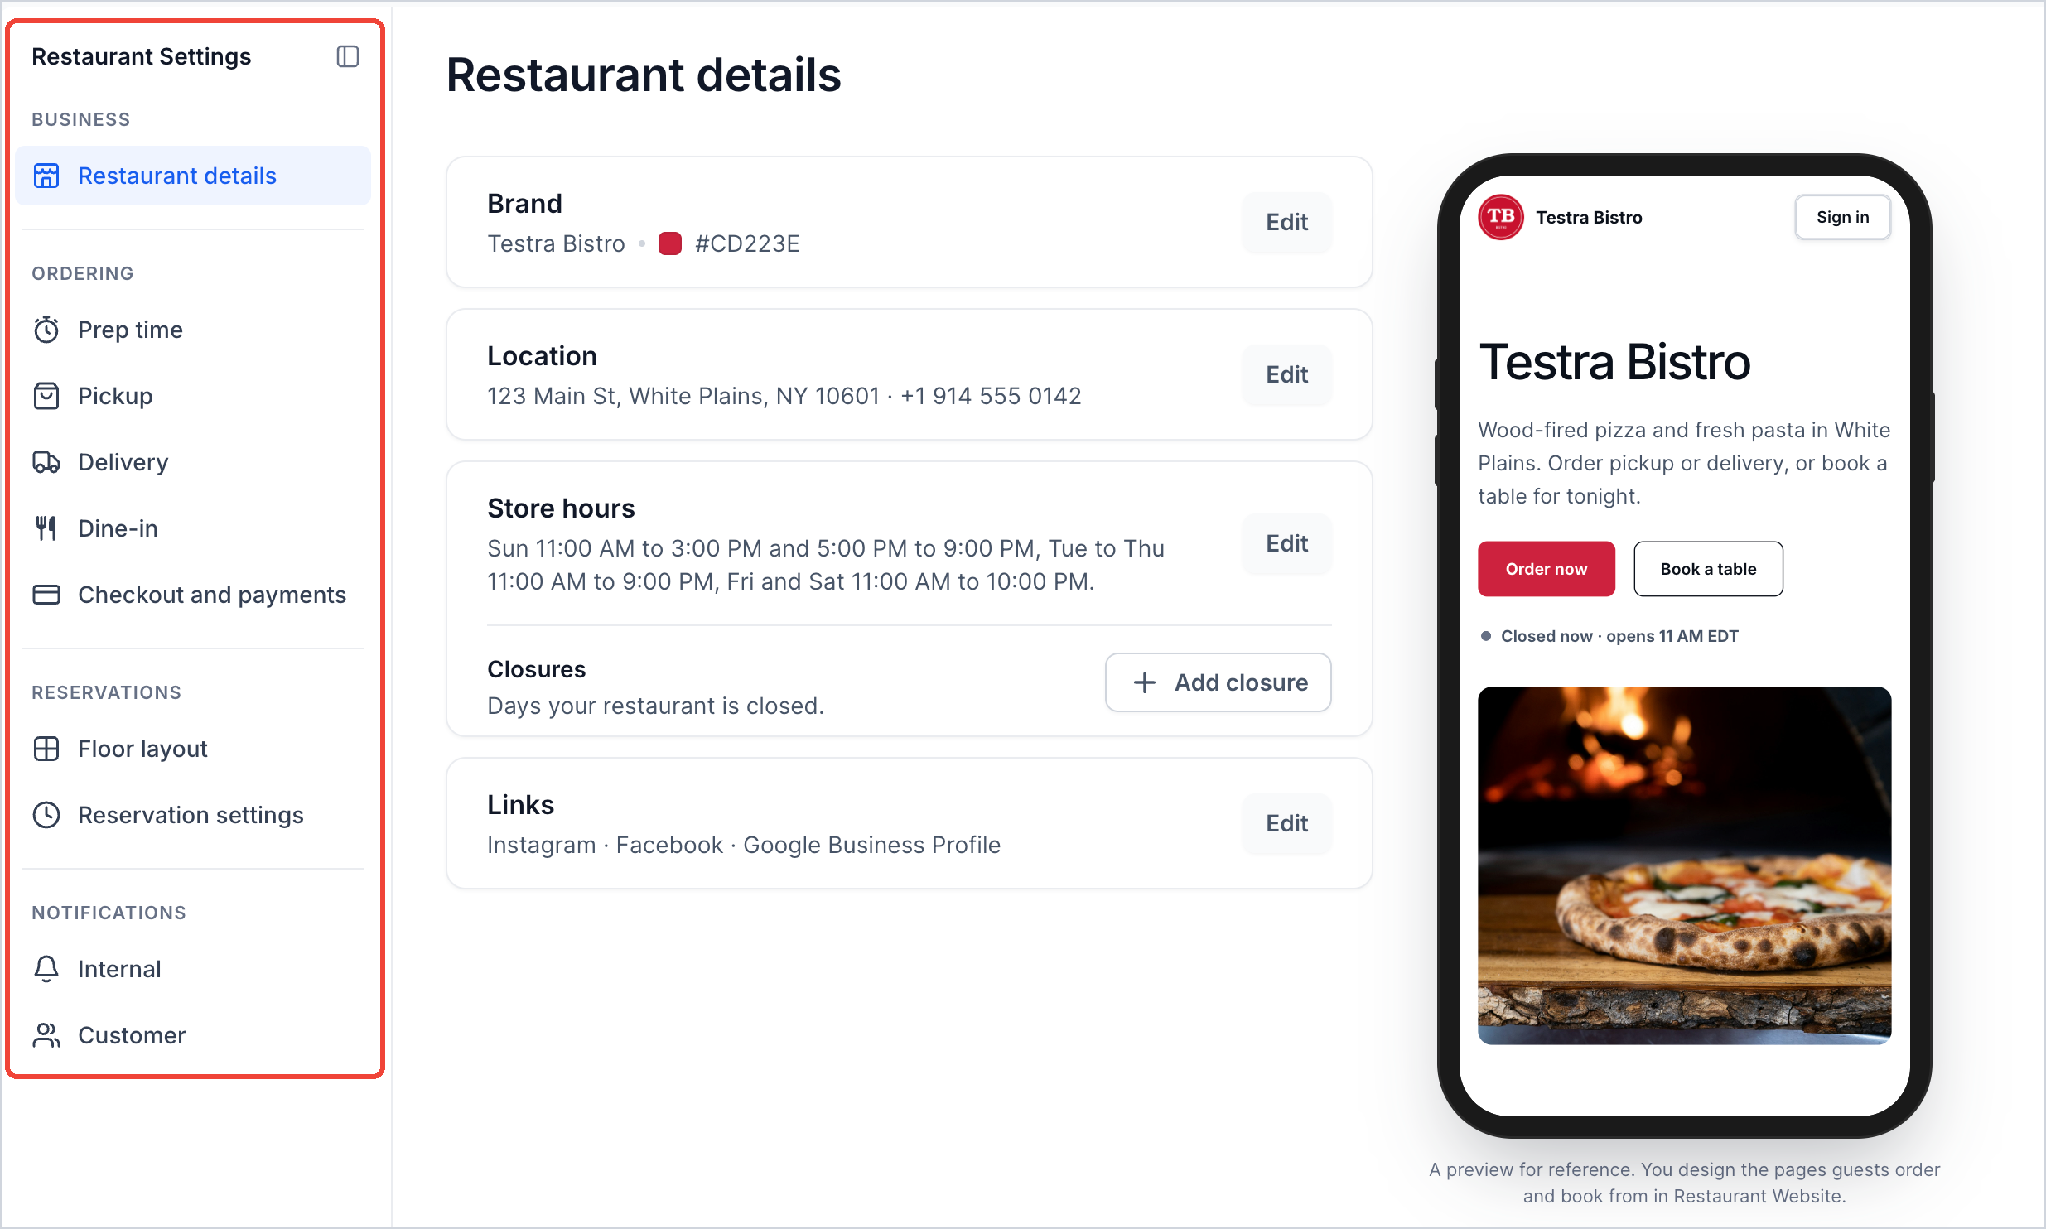
Restaurant Details stores the information guests use to recognize, locate, and contact your restaurant. Select Edit on a card to update its settings. The phone preview shows how your restaurant information appears to guests; customize the actual guest pages through Restaurant Website.
- Brand: Business name, logo, and brand color.
- Location: Address, phone number, email, and time zone.
- Store hours: Weekly opening hours that pickup, delivery, reservations, and your menu can follow.
- Links: Social media pages and other links.
Add a Closure
Closures mark dates when the whole restaurant is unavailable, such as holidays or staff training days.
- Under Closures, click Add closure.
- Select the Date and optionally enter a Reason.
- Click Add closure to save.
To stop only pickup or delivery, use Scheduled downtime for that service instead.
Prep Time, Pickup, and Delivery
Preparation and fulfillment settings determine how long orders take, when guests can place them, and what they pay for pickup or delivery. Review these settings when your kitchen capacity, service hours, or delivery coverage changes.
Prep Time
Enter the Default prep time in minutes. It represents how long your kitchen usually needs to prepare an order and is used to estimate readiness for pickup and delivery.
Pickup
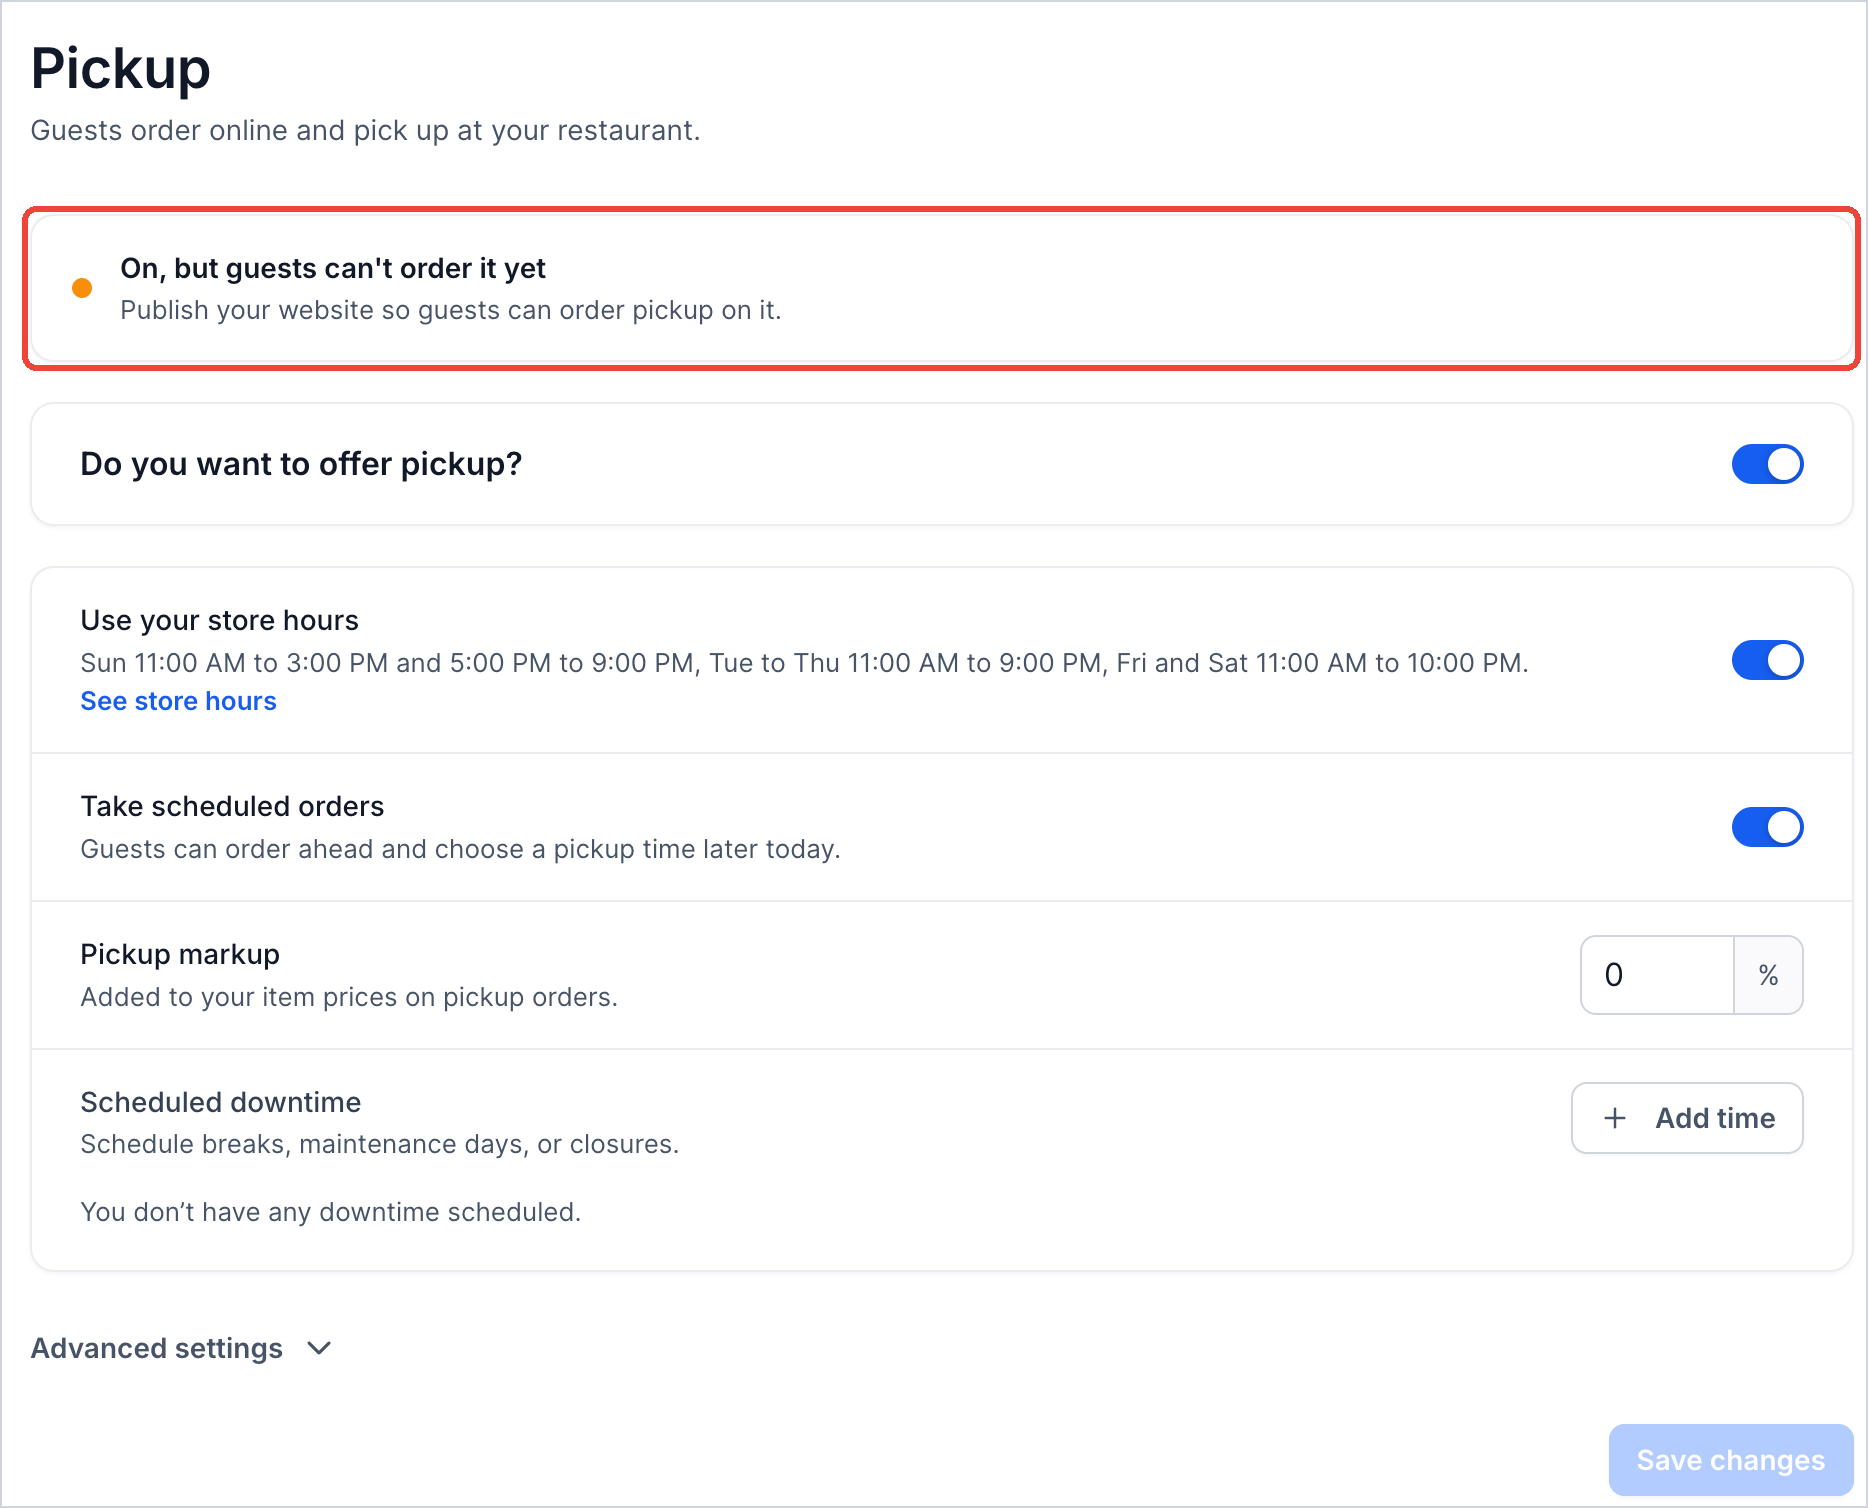
Pickup lets guests place orders online and collect them at your restaurant. The top of the Pickup page indicates whether guests can order now.
| Setting | What it does |
|---|---|
| Do you want to offer pickup? | Turns pickup ordering on or off. |
| Use your store hours | Accepts pickup orders during store hours. Click See store hours to check them. |
| Take scheduled orders | Allows guests to order ahead and choose a later pickup time. |
| Pickup markup | Adds a percentage to item prices on pickup orders. Enter 0 for menu prices. |
| Scheduled downtime | Stops pickup on a chosen date. Click Add time, select a Date, add a Reason, and click Add downtime. |
| Advanced settings → Order limits | Sets an optional minimum order amount before tax. Leave it empty for no minimum. |
Click Save changes after updating pickup.
Delivery
Delivery lets guests order online and receive their food from your restaurant's delivery staff. It uses the same hours, scheduled orders, markups, downtime, and order limits as pickup, plus delivery areas and fees.
Delivery pricing determines how far you deliver and what customers pay:
- How you charge: Use Distance bands for a fixed fee per range (for example, $2.99 for 2–4 miles) or Per mile for a distance-based rate.
- Distance unit: Select Miles or Kilometers.
- Measured from: Review the origin address and click Change to select a different one.
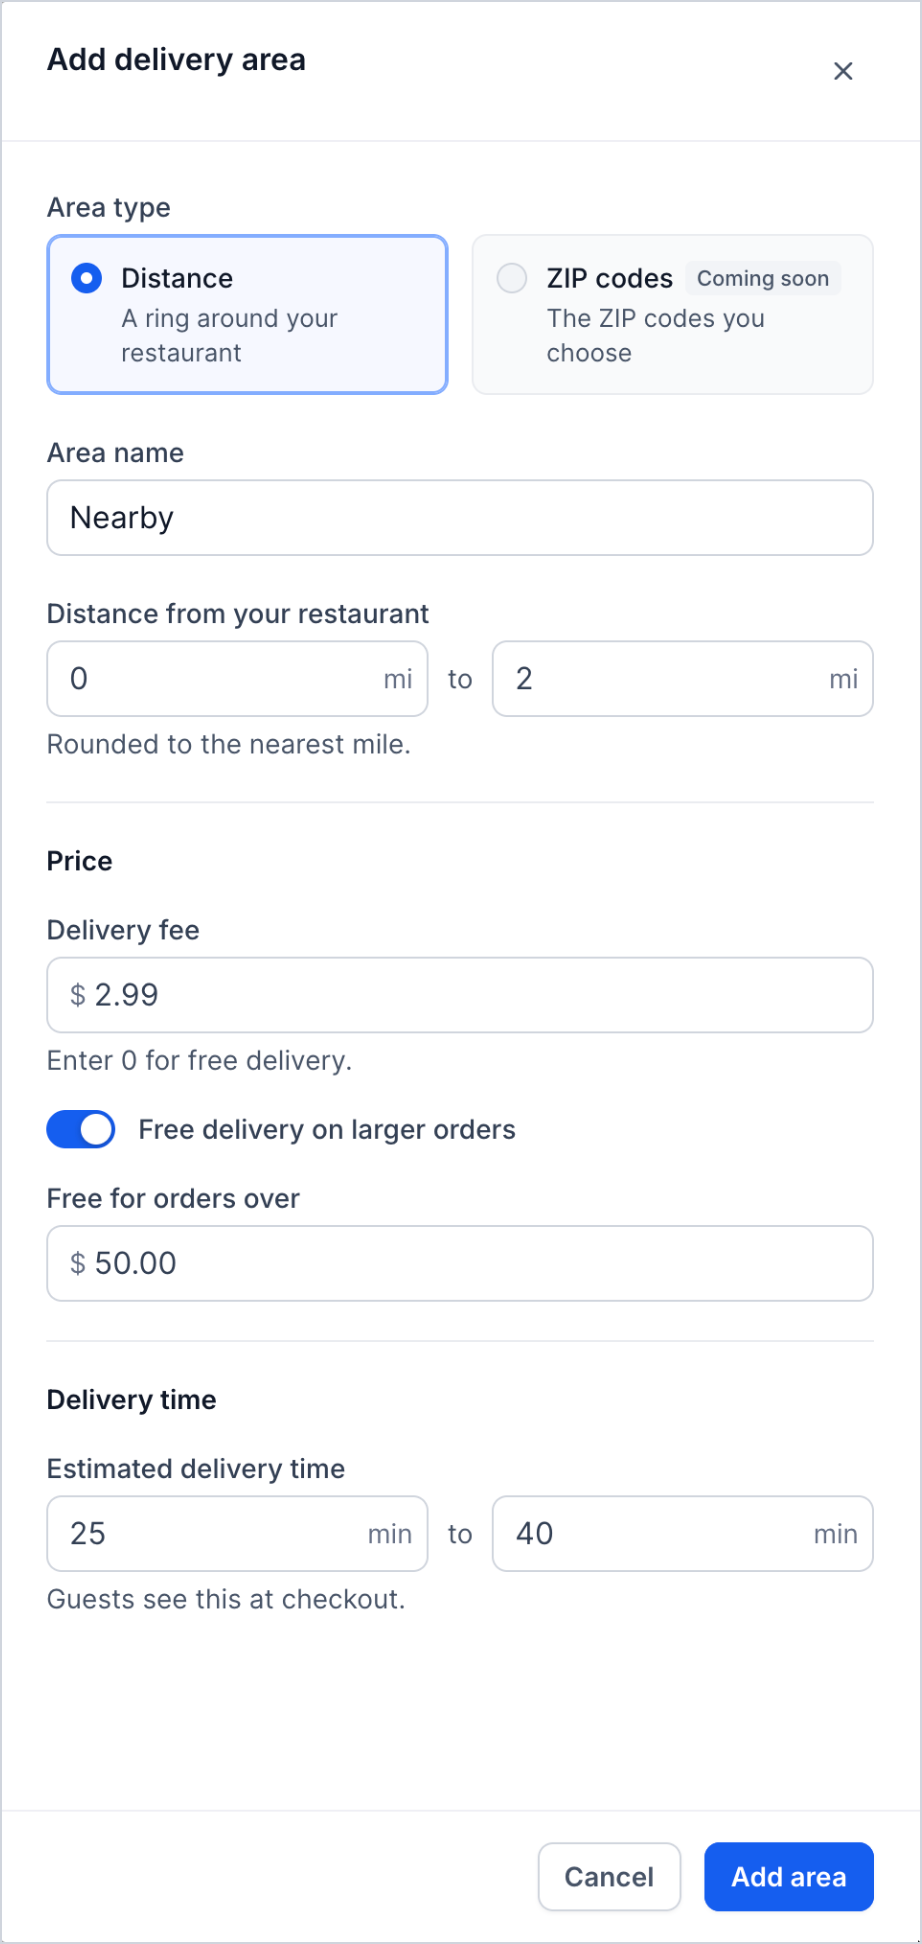
- Delivery areas: Define each area's distance, delivery fee, free-delivery threshold, and estimated delivery time. Areas appear as rings around your restaurant on the map.
To add a delivery area:
- Click Add area and choose Distance as the area type.
- Enter an Area name and starting and ending distances.
- Enter the Delivery fee (0 for free delivery).
- Optionally turn on Free delivery on larger orders and enter the qualifying amount.
- Set the Estimated delivery time and click Add area.
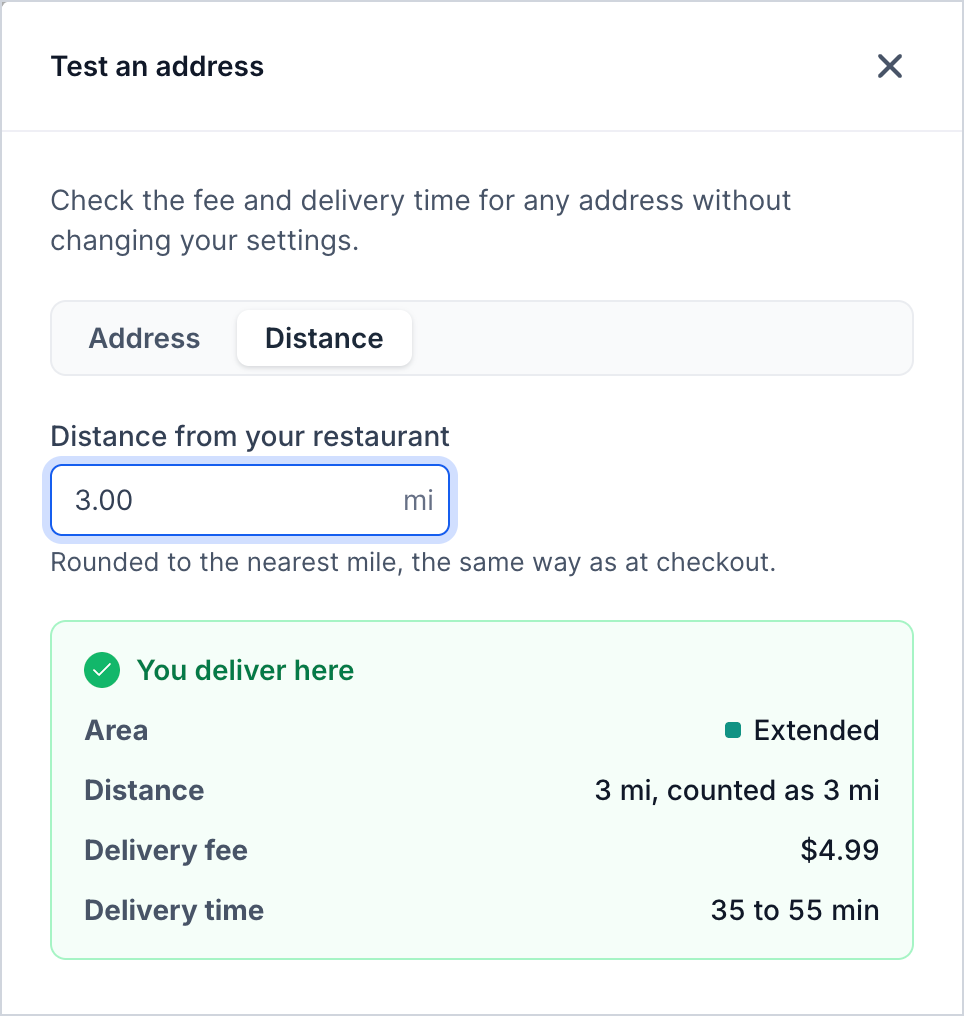
To modify or remove an area, use its three-dot menu and choose Edit or Delete. To check guest pricing, click Test an address and enter an address or distance. This shows the delivery area, fee, and time without changing your settings.
Click Save changes when finished.
Dine-in and Floor Layout
Dine-in settings control what guests see when they scan table QR codes, while Floor Layout defines the tables used for reservations and walk-ins.
Dine-in
Turn Dine-in on or off to control table service. Your team takes dine-in orders in Reservations; the menu item price is what the table pays.
Under A scanned code opens, choose Your menu (the current HighLevel menu), Menu PDF, or Menu link (an external menu). Guests view the menu, and your staff takes their order.
Floor Layout
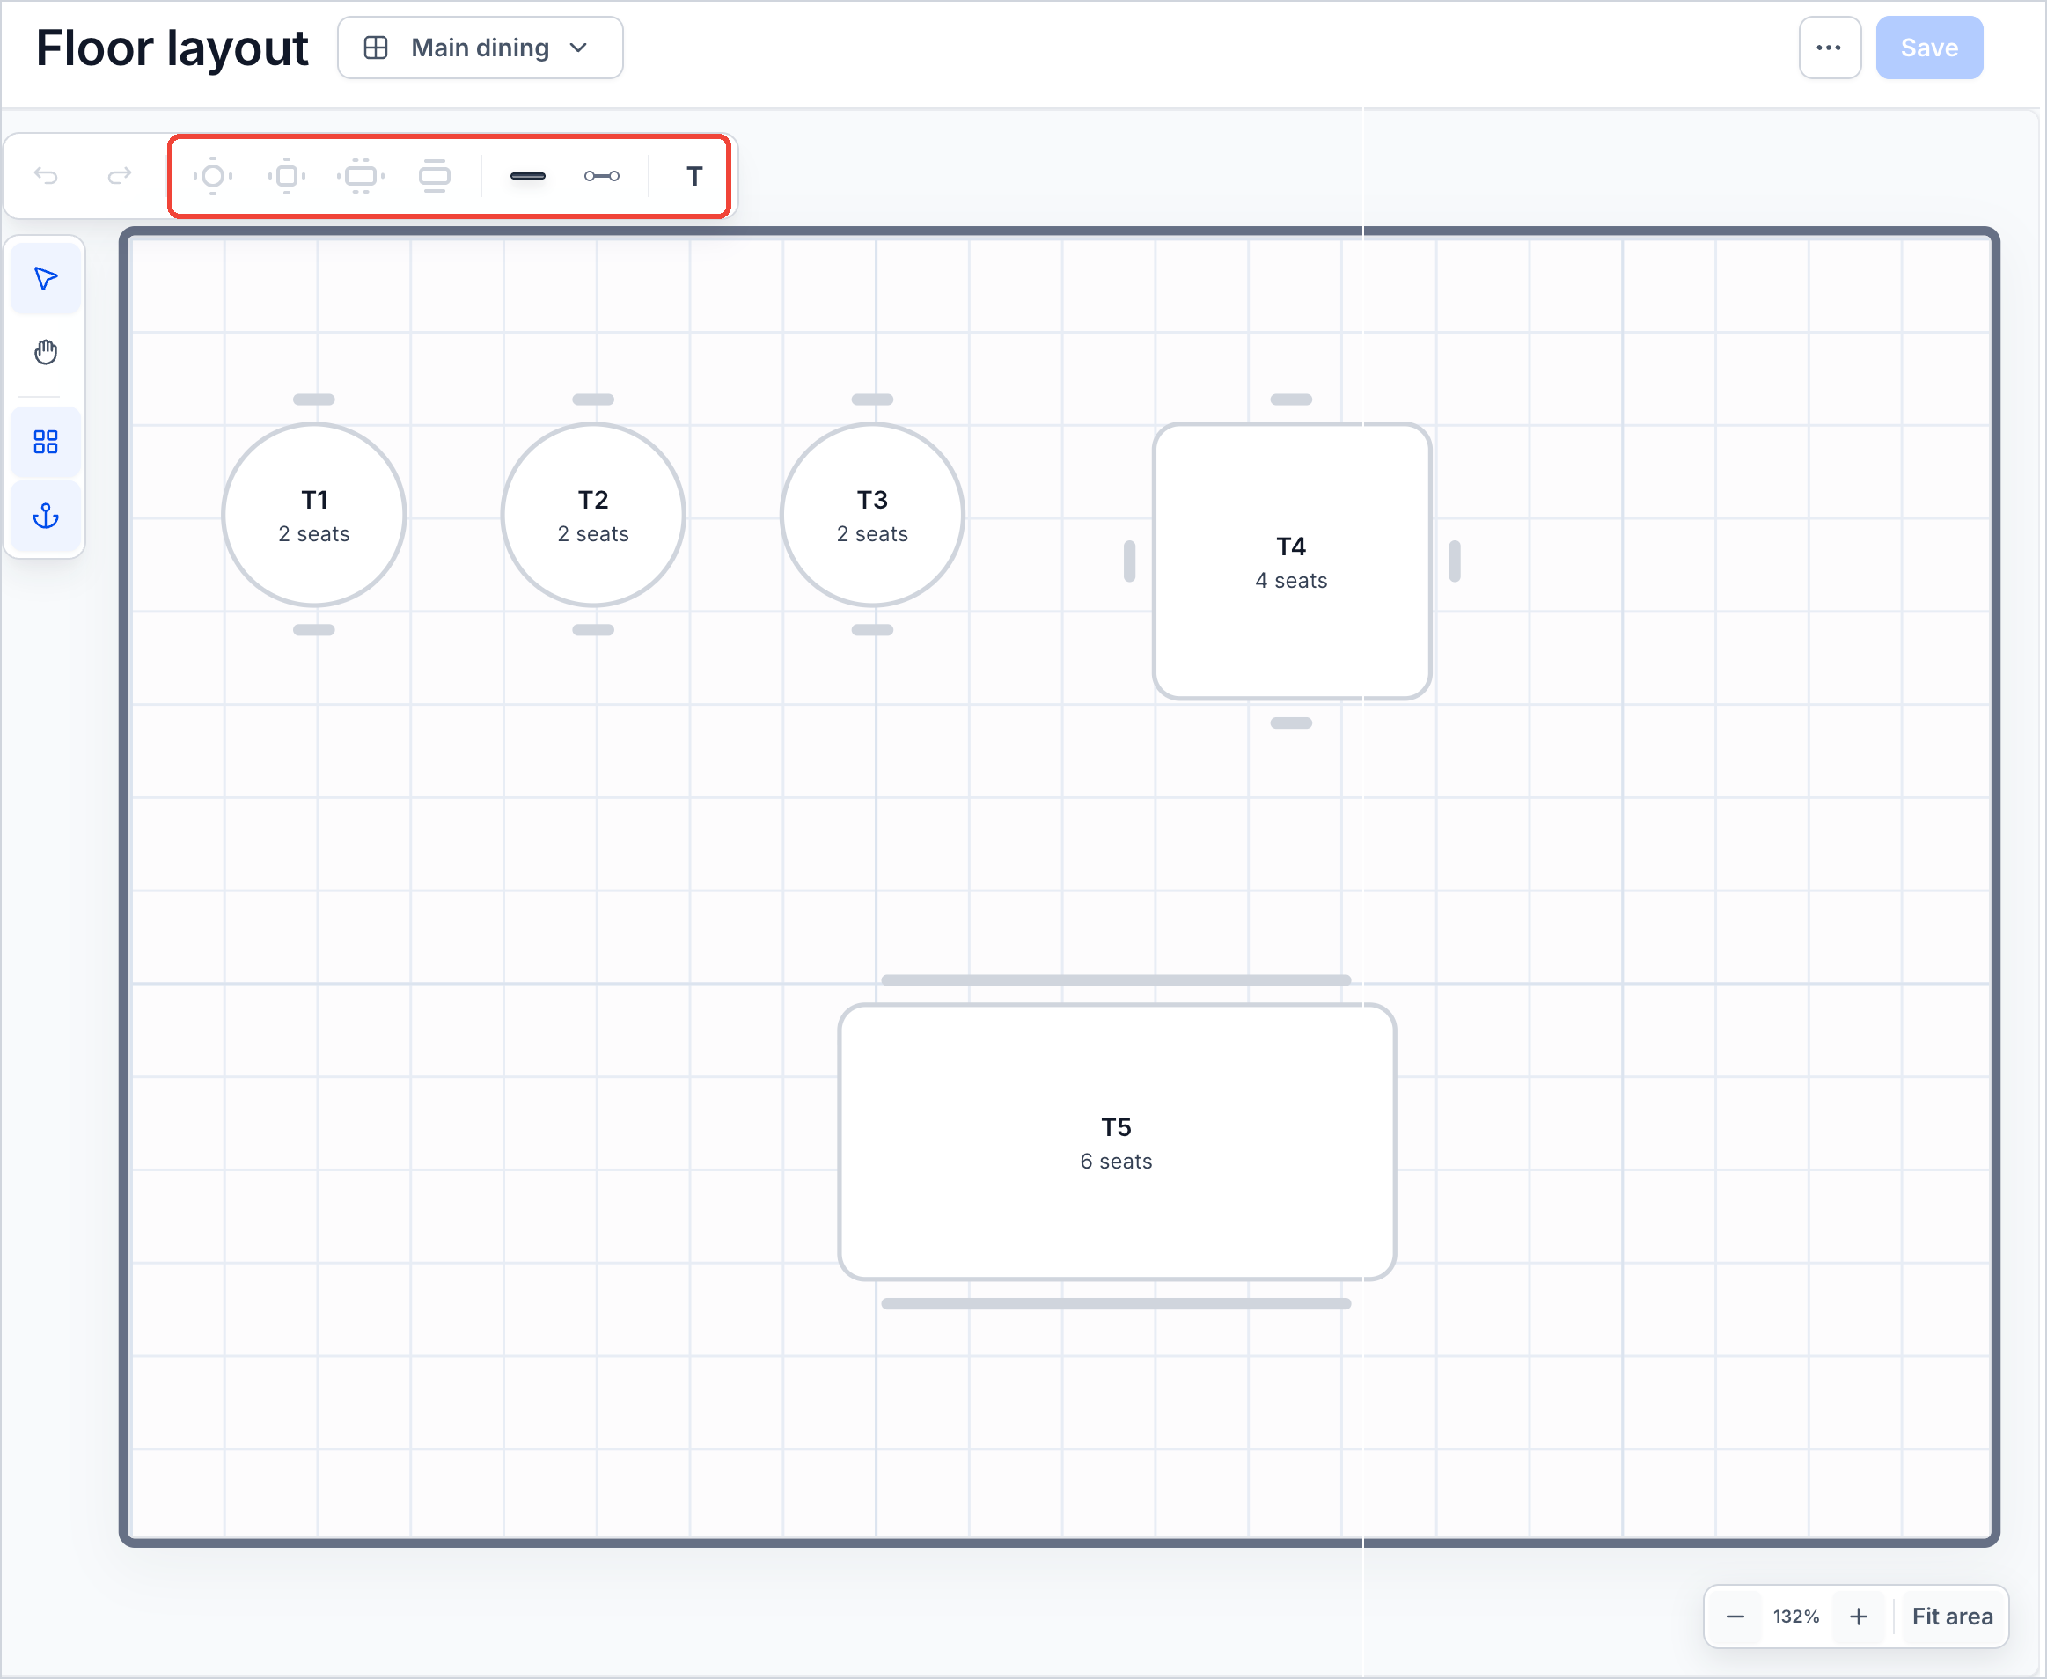
Floor Layout is a map of your dining areas and tables. Each reservation or walk-in is assigned to a configured table.
- Choose the dining area beside the page title, such as Main dining. Use the three-dot menu beside Save for additional area options.
- Use the top toolbar to add round, square, or rectangular tables, booths, walls, dividers, or text labels. Undo and redo are also available.
- Drag items into position. Use select, pan, grid, snap, zoom, and Fit area tools to adjust your view.
- Click a table to edit its Label, Capacity, Table/Booth type, Active status, Bookable online status, or Minimum party.
- Click Save.
Reservation Settings
Reservation rules determine when guests can book, how long they have a table, and whether they need to pay a deposit. These settings help manage availability and allow time to prepare tables between parties.
Reservation Hours and Table Rules
- Use your store hours: Leave this on for bookings during store hours, or turn it off to set separate reservation hours.
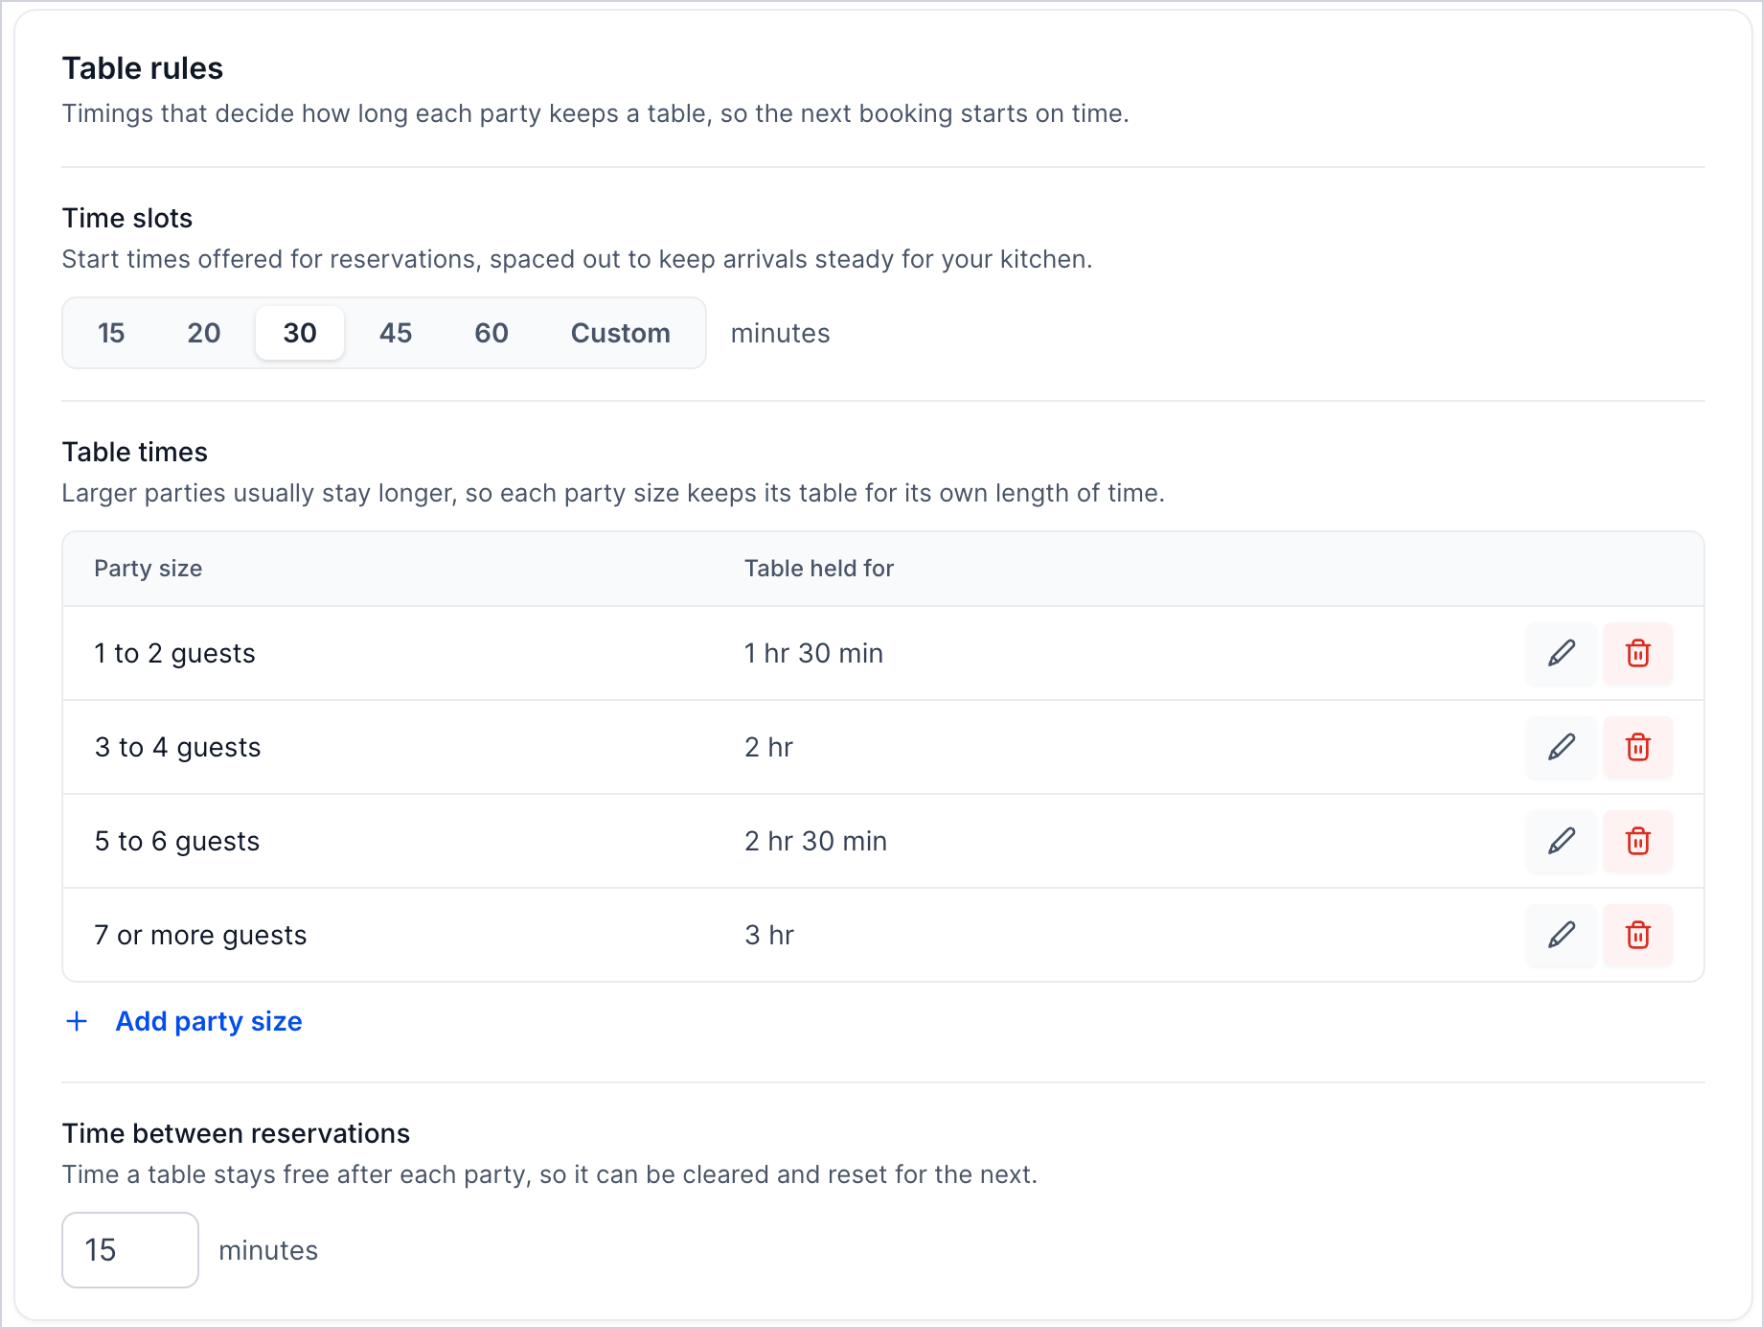
- Time slots: Choose reservation start intervals of 15, 20, 30, 45, or 60 minutes, or use Custom.
- Table times: Define how long parties of each size keep their tables. Edit or delete existing rows or click Add party size.
- Time between reservations: Leave a buffer to clear and reset the table after a party.
Online Booking
Online booking rules limit which reservations guests can make through your restaurant website while allowing staff to handle special requests.
- Online booking: Enable or disable website reservations.
- When guests can book: Set the Earliest and Latest booking limits, such as 30 days ahead and two hours before a reservation.
- Largest party online: Set the maximum online party size. Larger groups are directed to call; staff may still book them.
- Areas guests can book: Turn an area off to reserve it for staff bookings.
- Let guests choose their area: Allow guests to select a dining area when booking.
Deposits
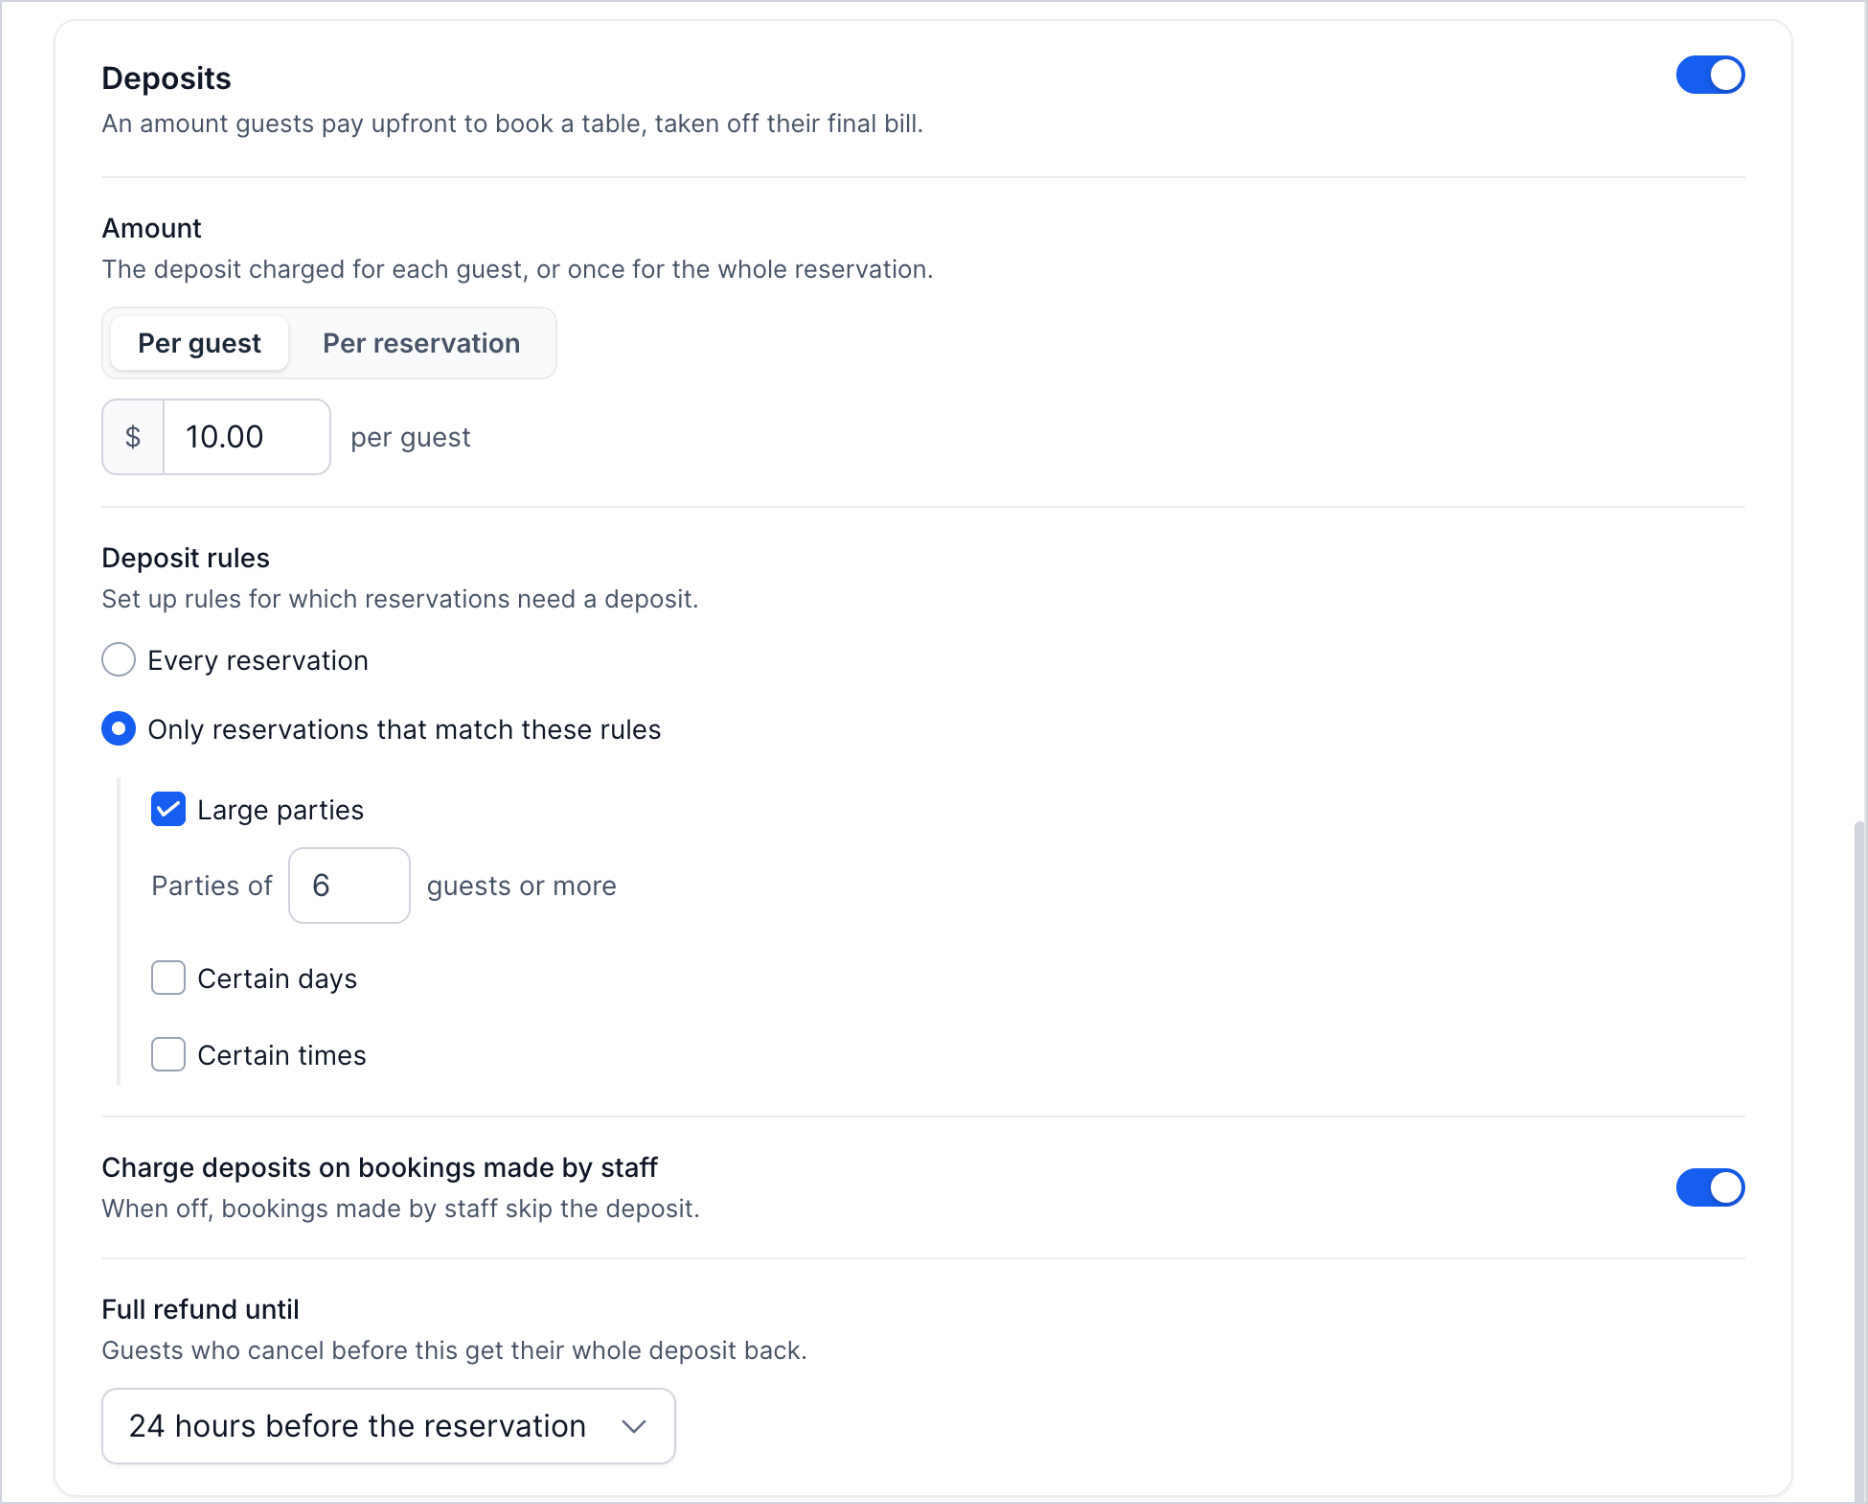
A reservation deposit is paid upfront and applied toward the guest's final bill. A connected payment provider is required.
- Turn on Deposits.
- Enter the Amount and choose Per guest or Per reservation.
- Configure Deposit rules and whether to Charge deposits on bookings made by staff.
- Set the eligibility period for a Full refund.
- Click Save settings.
Checkout and Payments
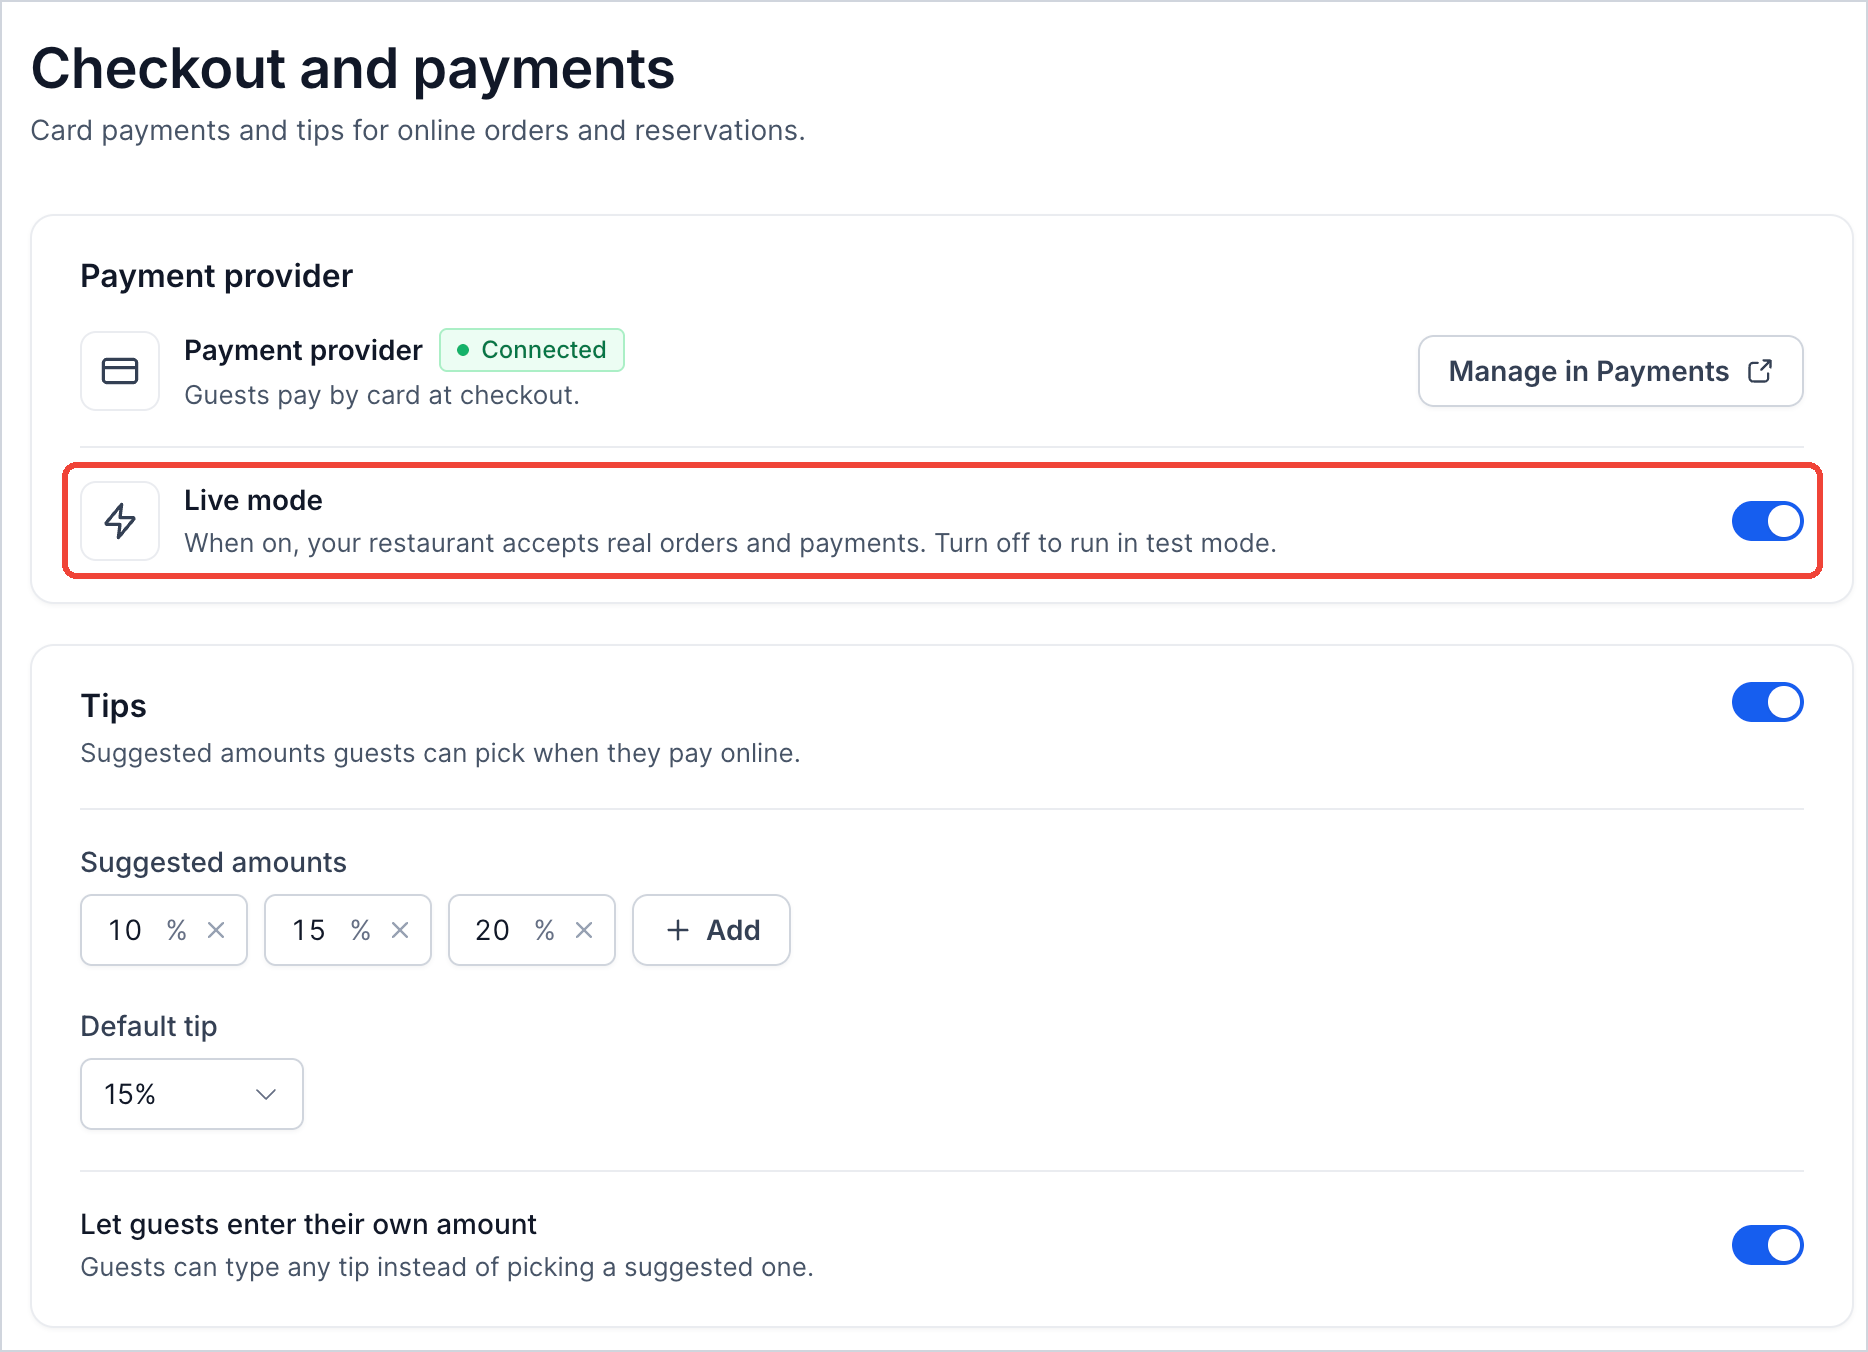
Checkout and Payments controls online card payments and the tip options offered to guests. Review these settings before accepting real orders or charging reservation deposits.
| Setting | What it does |
|---|---|
| Payment provider | Shows whether a provider is connected. Click Manage in Payments to update it. |
| Live mode | When on, the restaurant accepts real orders and payments. Turn it off for test mode. |
| Tips | Configure Suggested amounts. Click Add for another amount, or remove an existing one. |
| Default tip | Sets the initially selected tip, such as 15%. |
| Let guests enter their own amount | Allows guests to enter a custom tip instead of choosing a suggestion. |
Internal and Customer Notifications
Internal notifications alert your staff when orders or reservations need attention. Customer notifications keep guests informed as their orders and bookings move through different stages.
Internal Notifications
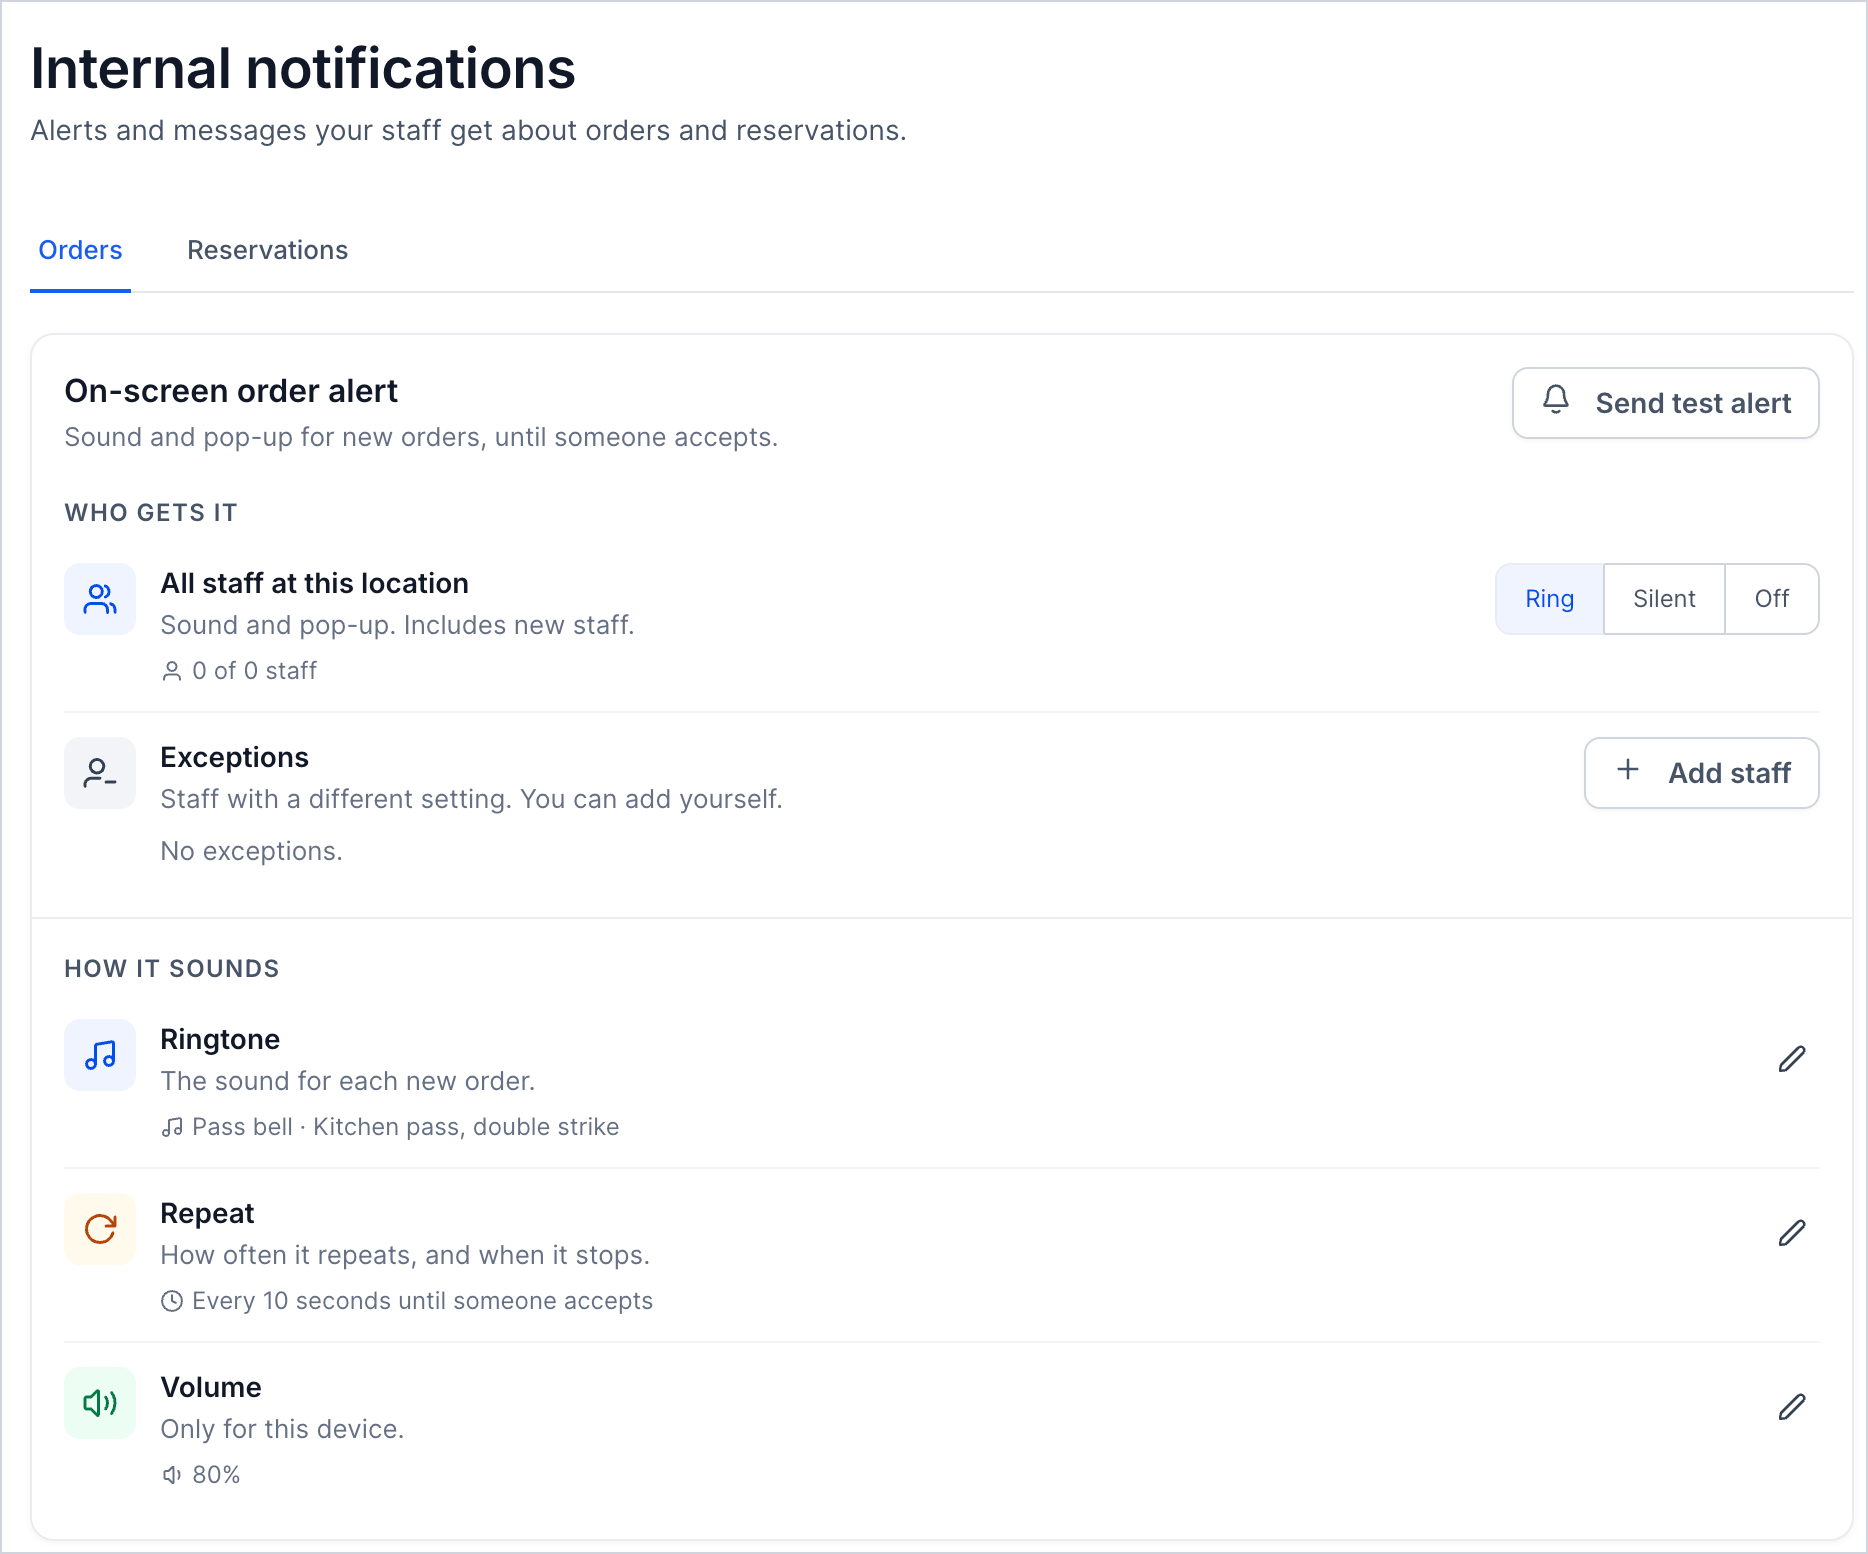
Choose the Orders or Reservations tab to adjust staff notifications.
- On-screen order alert: A pop-up and sound for a new order until it is accepted.
- Who gets it: Configure All staff at this location with Ring, Silent, or Off, and add staff Exceptions.
- Sound: Choose the Ringtone, Repeat frequency, and device Volume. Click Send test alert to check it.
- Order staff alerts: Notify staff of a New order waiting for acceptance or an Order canceled (including rejection, noncollection, or failed delivery).
- Reservation staff alerts: Notify the team about a New reservation (online or staff-made) or a Cancellation. Click the pencil icon (Edit) to change an alert.
Customer Notifications
Use the Orders and Reservations tabs to manage the messages guests receive.
| For | Messages |
|---|---|
| Pickup orders | Order received, Order accepted, Ready to collect, Collected, Order canceled |
| Delivery orders | Order received, Order accepted, On its way, Delivered, Order canceled |
| Reservations | Confirmed (with booking-management link), Reminder, Updated, Canceled. The supplied configuration describes SMS reminders two hours before and email reminders 24 hours before. |
To edit a message:
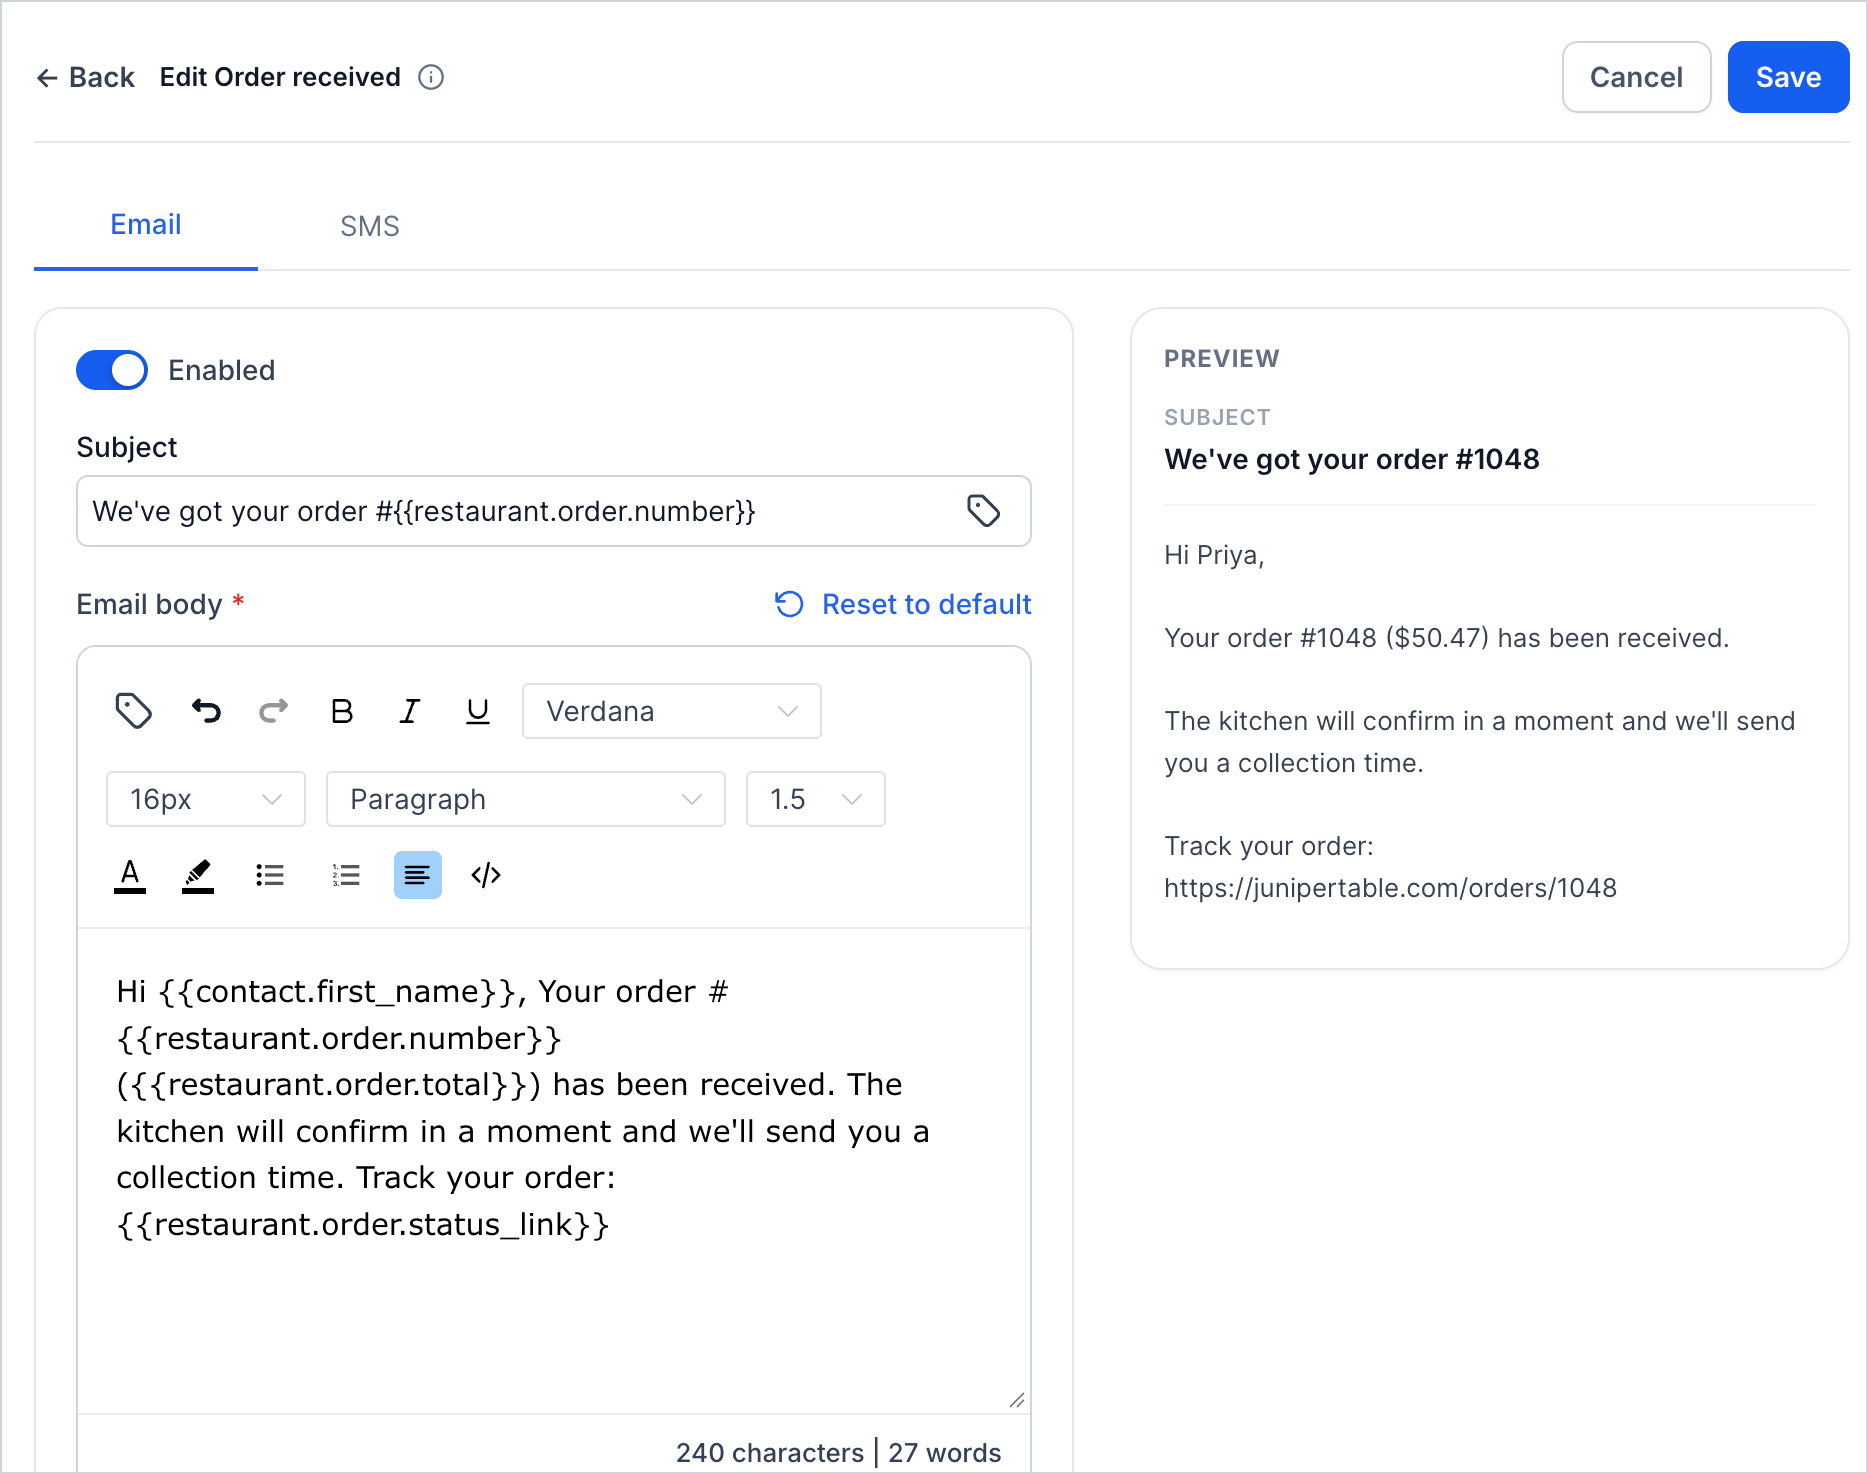
- Click the pencil icon (Edit) beside the notification.
- Select Email or SMS and turn Enabled on or off.
- Edit the email Subject and message. Use Insert merge tag to add guest names, order numbers, and other details; Reset to default restores the starting content.
- Optionally enter a From name and From email.
- Check the Preview and click Save.
How to Set Up Restaurant Settings
Opening Restaurant Settings gives you access to the controls described above. Review and save each applicable page so your ordering options, reservation rules, and notifications match how your restaurant operates.
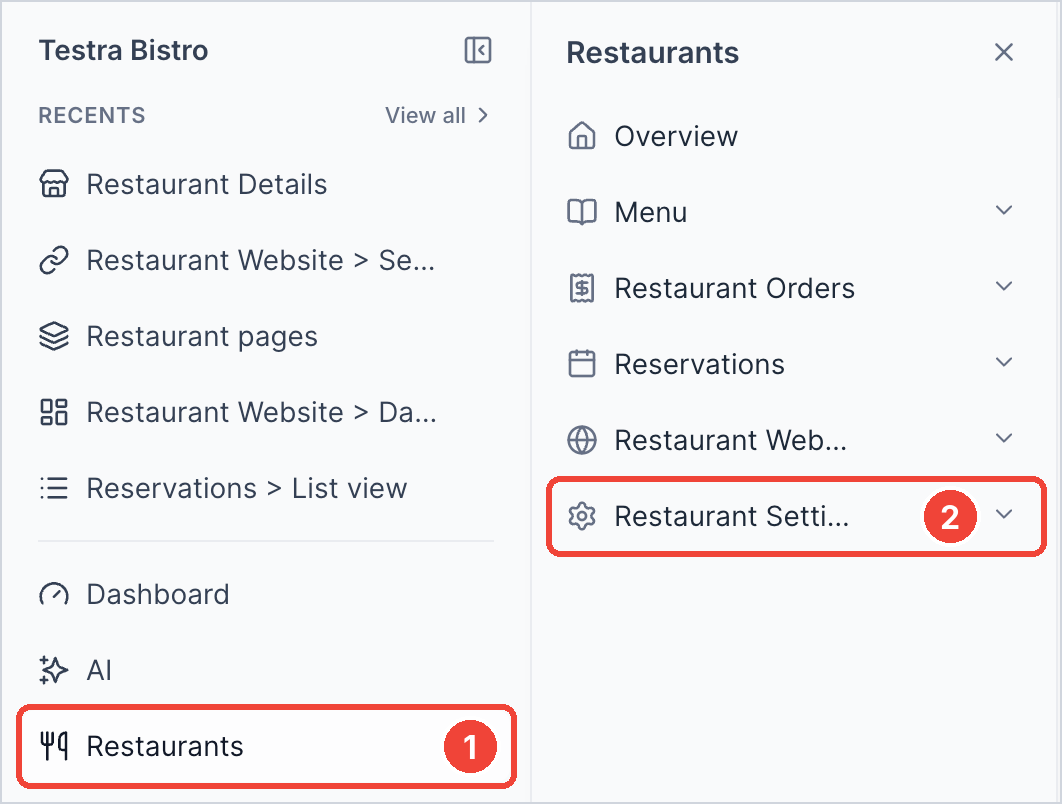
- In the HighLevel sub-account, click Restaurants in the left navigation.
- In the Restaurants panel, click Restaurant Settings.
- Choose a page from the left menu. Restaurant details opens first.
- Update the settings you need and use the page's Save, Save changes, or Save settings control.
Frequently Asked Questions
Q: Why does pickup say “On, but guests can’t order it yet”?
Your restaurant website is not yet published. Publish it through Restaurant Website.
Q: How do I close for a holiday without disabling everything permanently?
Use Restaurant details → Add closure for the restaurant, or Scheduled downtime for pickup or delivery alone.
Q: Can I test payments before going live?
Yes. Turn off Live mode under Checkout and Payments, then turn it back on before taking real orders.
Q: Why isn't a table available for online booking?
Check its Active and Bookable online settings, party-size rules, reservation hours, and whether the dining area permits online bookings.
Q: Can I keep a dining area for staff bookings only?
Yes. Turn that area off under Reservation settings → Areas guests can book. Staff can still book it.
Q: Who receives a new-order alert?
Staff selected under Internal Notifications → Orders → On-screen order alert. Use Exceptions to apply different settings to individual staff members.
Q: Can I change the message guests receive after booking?
Yes. Open Customer Notifications → Reservations, edit the message with the pencil icon, and click Save.
Related Articles
- Restaurant Setup Guide: Get Ready to Take Orders and Reservations
- How to Create a Restaurant Menu in HighLevel
- How to Manage and Customize Restaurant Menus in HighLevel
- Restaurant Orders: How to Manage Orders and Payments
- Restaurant Reservations: Manage Bookings, Tables, and Guests
- Restaurant Website: How to Customize and Publish Your Site
Was this article helpful?
That’s Great!
Thank you for your feedback
Sorry! We couldn't be helpful
Thank you for your feedback
Feedback sent
We appreciate your effort and will try to fix the article