Reservations in HighLevel helps restaurants manage table bookings, seat walk-in guests, and track dining activity from a single place. Your team can monitor table availability, manage guest reservations, take dine-in orders, and collect payments without switching between multiple systems. Once your restaurant website is published, guests can also book tables online.
TABLE OF CONTENTS
- What Is Reservations?
- Key Benefits of Reservations
- Before You Start
- Understanding Reservation Views
- How to Create and Manage Reservations
- Understand Booking Statuses
- Take Dine-In Orders and Collect Payments
- Let Guests Book Online
- Frequently Asked Questions
- Related Articles
What Is Reservations?
Reservations is the restaurant's front-of-house management system in HighLevel. It connects guest bookings to the tables in your restaurant's floor layout, making it easier to manage availability and seating throughout the day.
Each reservation also provides access to guest details, order history, payment information, and booking activity, helping your team manage the entire dining experience.
Key Benefits of Reservations
Managing reservations and table activity in one place helps your team reduce scheduling conflicts, improve guest service, and keep restaurant operations organized.
See the whole room: The floor view shows every table with its status, the party at it and how long they have been seated.
Book in seconds: Pick a party size, a day and an open time, and HighLevel finds a table that fits.
Walk-ins welcome: Seat a guest who came in without a booking, with or without their details.
Order at the table: Add rounds from your menu, send them to the kitchen and take payment, all from the booking.
Every change on record: Each booking keeps its activity, from booked to seated to paid.
Before You Start
Reservations uses your restaurant's floor layout and reservation settings to determine table availability. Completing the initial restaurant setup ensures that bookings are assigned to the appropriate tables and that your team can begin managing guests.
Make sure you have:
Floor layout and reservation settings: Reservations are seated at your tables, so add your areas and tables and choose your reservation rules first. See Restaurant Setup.
Menu: To take dine-in orders, add your menu.
Website (for online booking): Your team can book tables right away. Guests can book online once your restaurant website is published.
For detailed configuration instructions, refer to Restaurant Setup: Get Ready to Take Orders and Reservations and Restaurant Settings: Change Your Restaurant's Details and Rules.
Understanding Reservation Views
HighLevel provides three views of your restaurant's reservations. Each view displays booking information differently, allowing your team to manage current guests, review upcoming reservations, and monitor table occupancy.
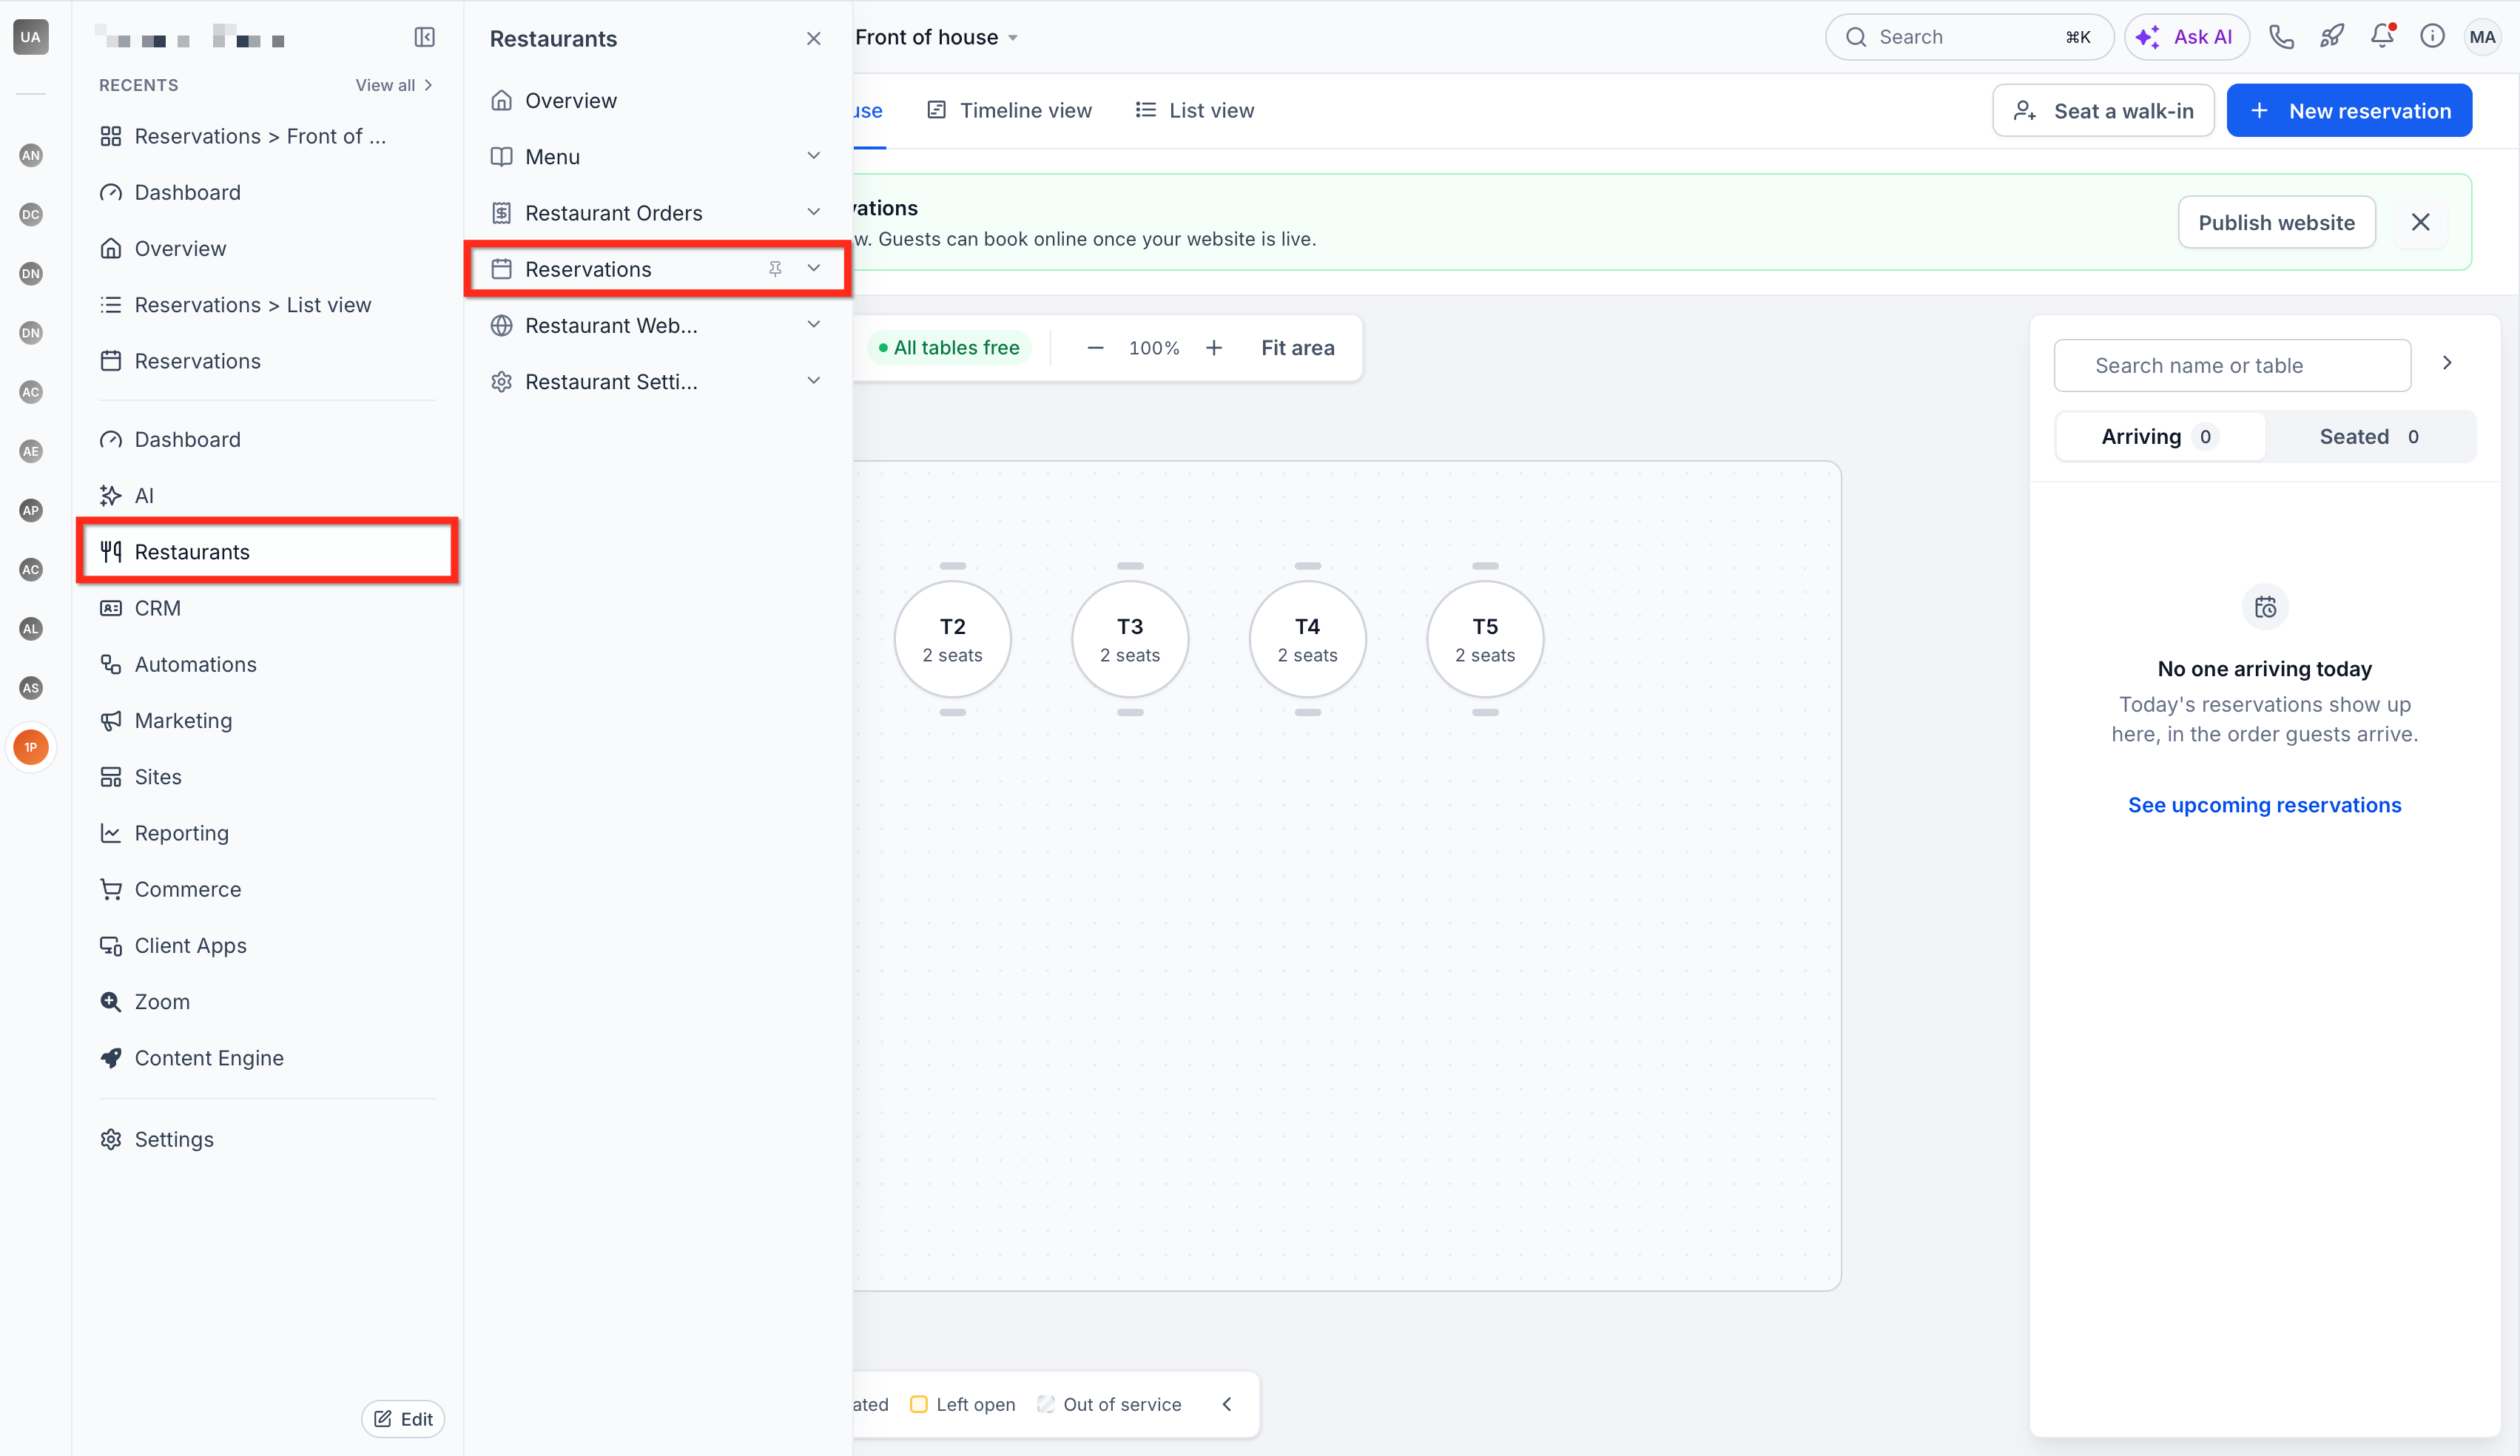
Navigate to Restaurants → Reservations from the left navigation. Reservations opens in Front of house by default. Use the tabs at the top to switch views.
Until your website is published, a banner says You’re ready to take reservations. Your team can book tables now, and guests can book online once your website is live.
Front of House
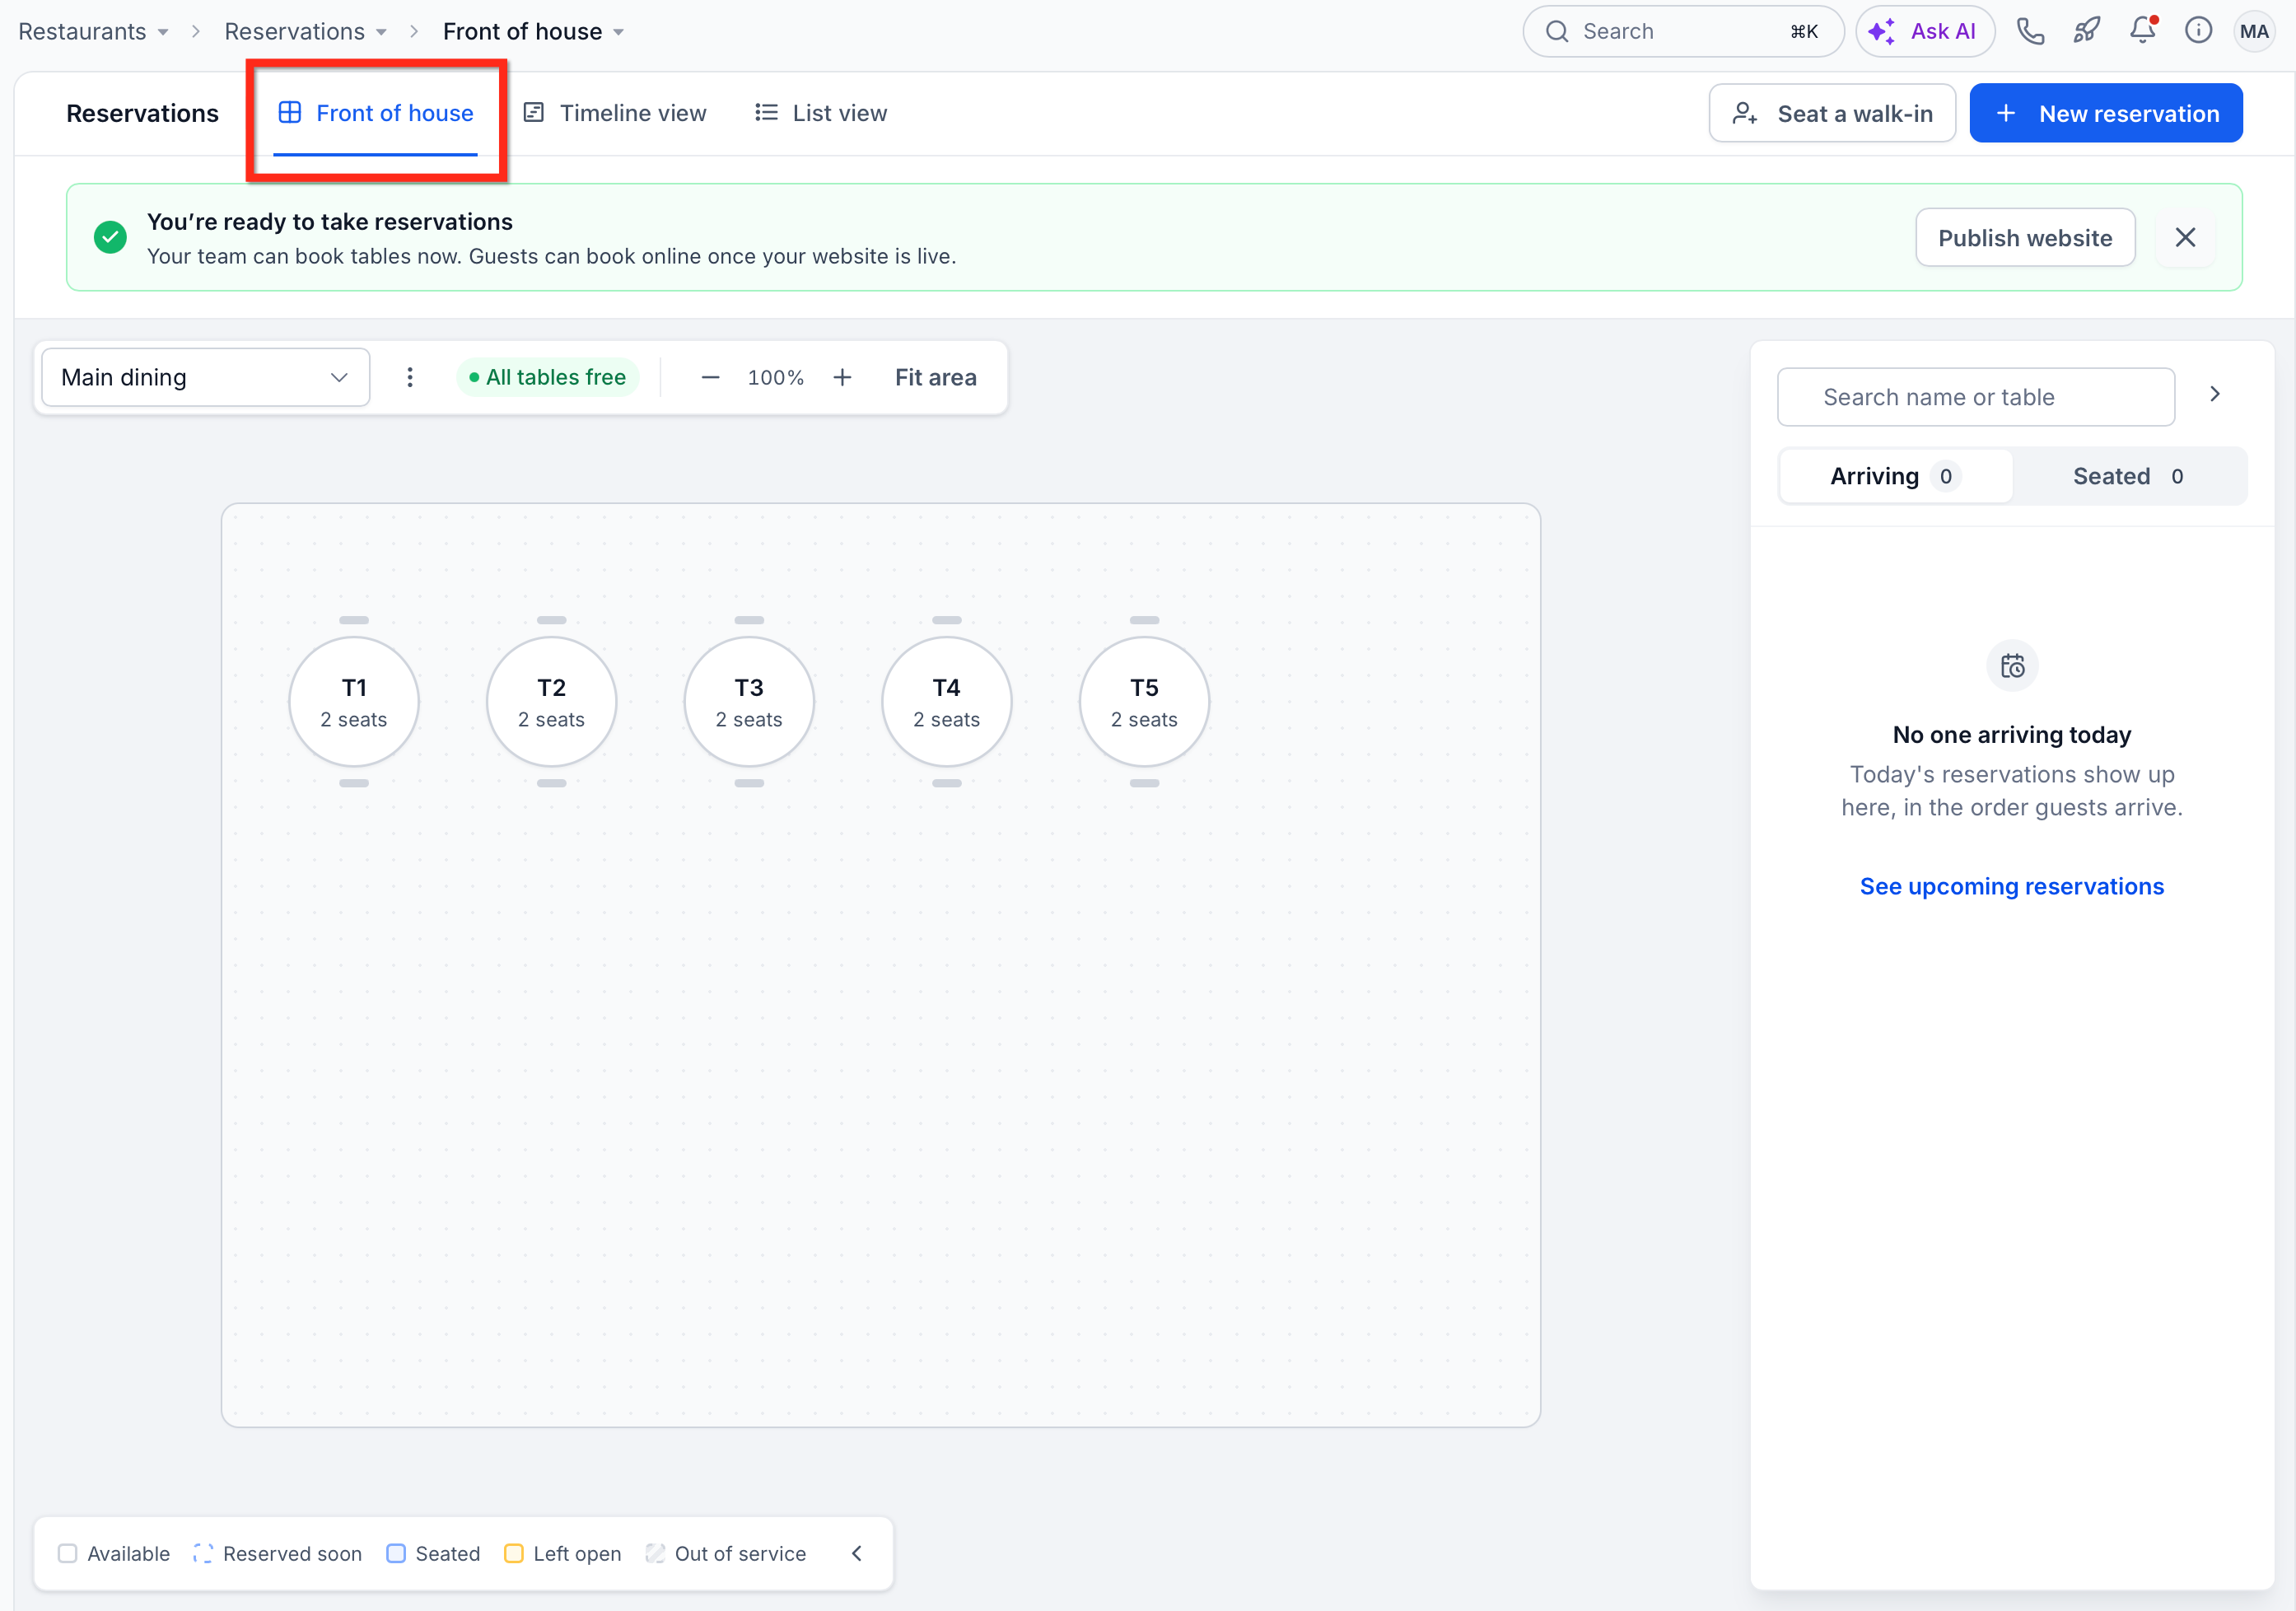
Front of house displays an interactive map of your restaurant's tables and their current status. Select an area, such as Main dining, to view the tables within that area.
You can:
Tables: A free table shows its seats. A seated table shows the party size, how long they have been seated and how far along their meal is, for example 3 of 4 · 36m and Served or Bill waiting. A party past its table time shows Over by and how long.
Free and need attention: The top of the map shows how many tables are free and how many need attention, such as a party past its table time or a bill waiting.
Arriving and Seated: The list next to the map shows today’s guests in the order they arrive, with a Seat button for each, and the parties who are seated. To look ahead, click See all reservations (or See upcoming reservations when no one is arriving today).
Table status: The key shows what each color means: Available, Reserved soon, Seated, Left open and Out of service.
Find and zoom: Search by name or table, zoom in or out, or click Fit area to see the whole area.
Area options: Choose Edit layout or Manage areas to change your tables.
Timeline View
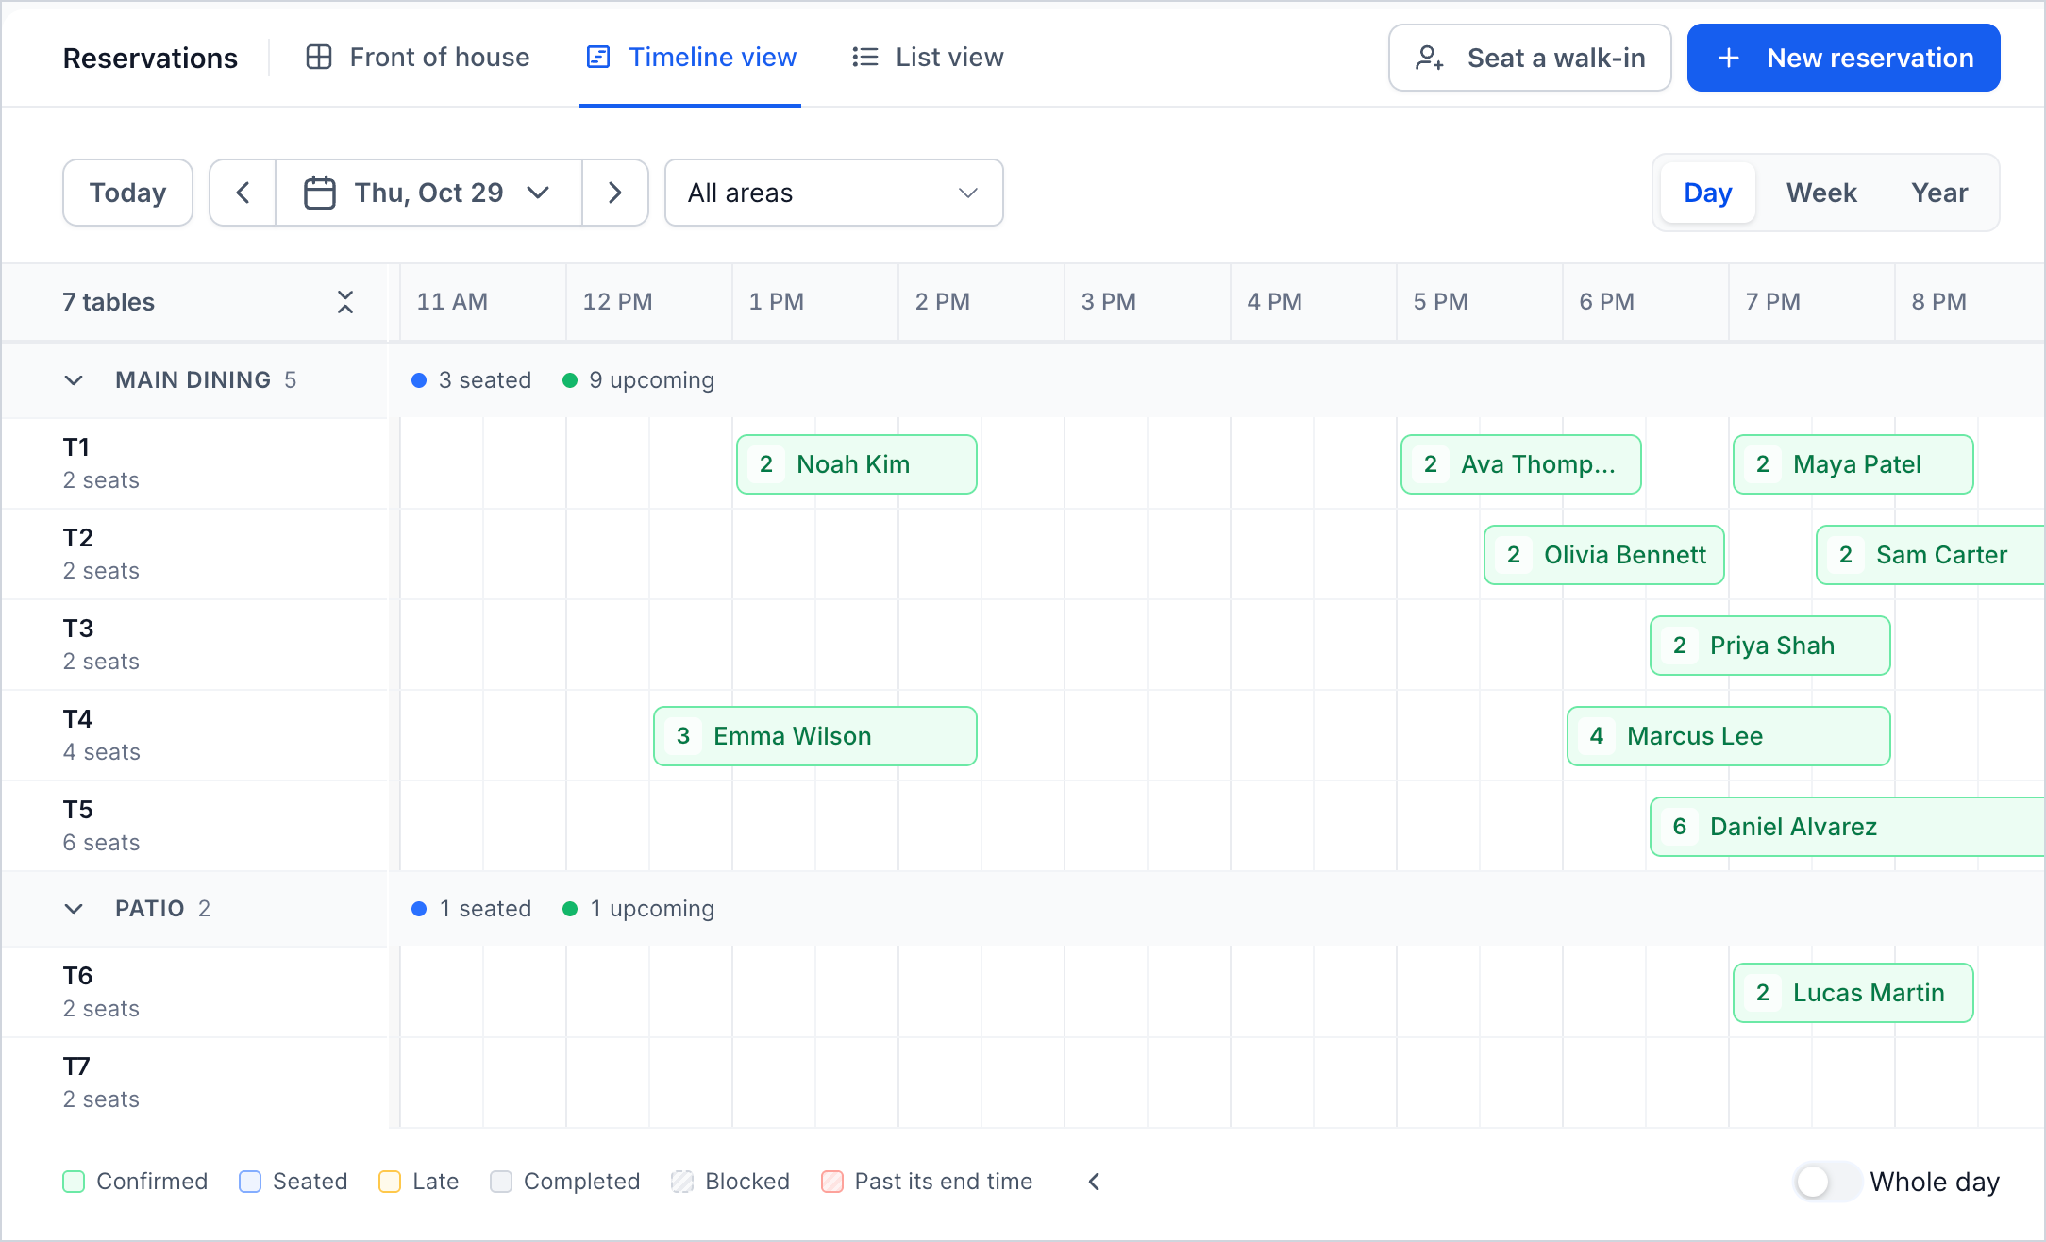
Timeline view displays reservations across a time-based schedule, helping your team identify available time slots, booking overlaps, and table occupancy throughout the day.
Each table appears as a row, with reservations displayed as booking bars.
You can:
Choose Day, Week or Year, and move between dates with the arrows or Today.
Filter by area, or fold an area to hide its tables.
The key shows Confirmed, Seated, Late, Completed, Blocked and Past its end time.
Turn on Whole day to see the full day.
To stop bookings in an area, click the three-dot menu next to the area and choose Block this area.
List View
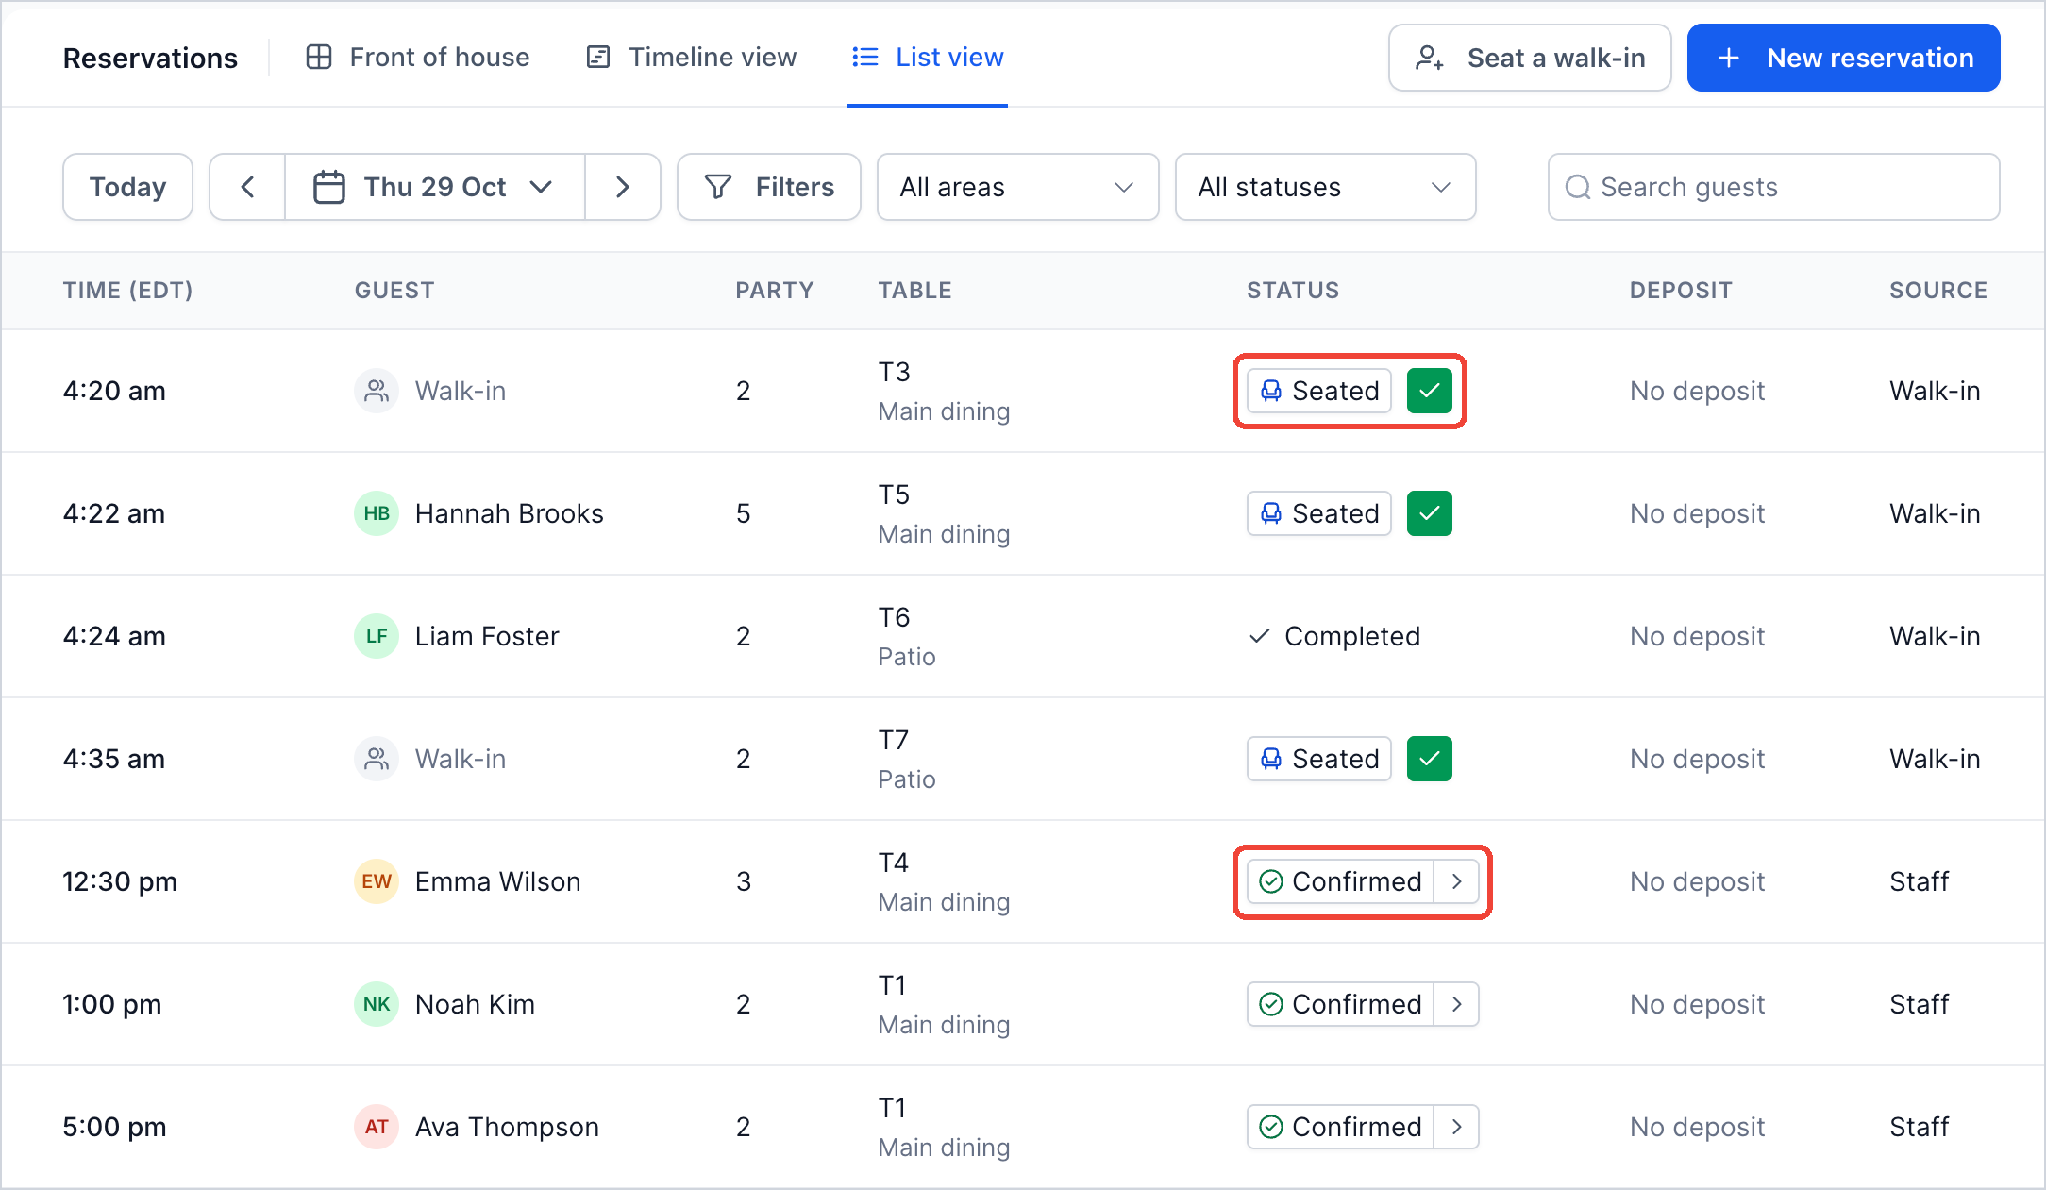
List view organizes reservations into a searchable list, making it easier to review booking details and take quick actions.
Each reservation displays its Time, Guest, Party, Table, Status, Deposit, and Source.
You can filter reservations by date, seating area, or status, or search for specific guests.
Click a guest’s name to open their contact record.
Click anywhere else in the row to open the booking.
Use the button next to the status for the next step, such as Seat now or Mark completed.
How to Create and Manage Reservations
Reservations allows your team to book tables for future visits, seat walk-in guests, and manage existing bookings. HighLevel assigns eligible tables based on the booking information, while allowing staff to adjust assignments when needed.
Book a Table for a Guest
Creating a reservation allows your team to select an available date and time, identify the guest, and assign a suitable table.
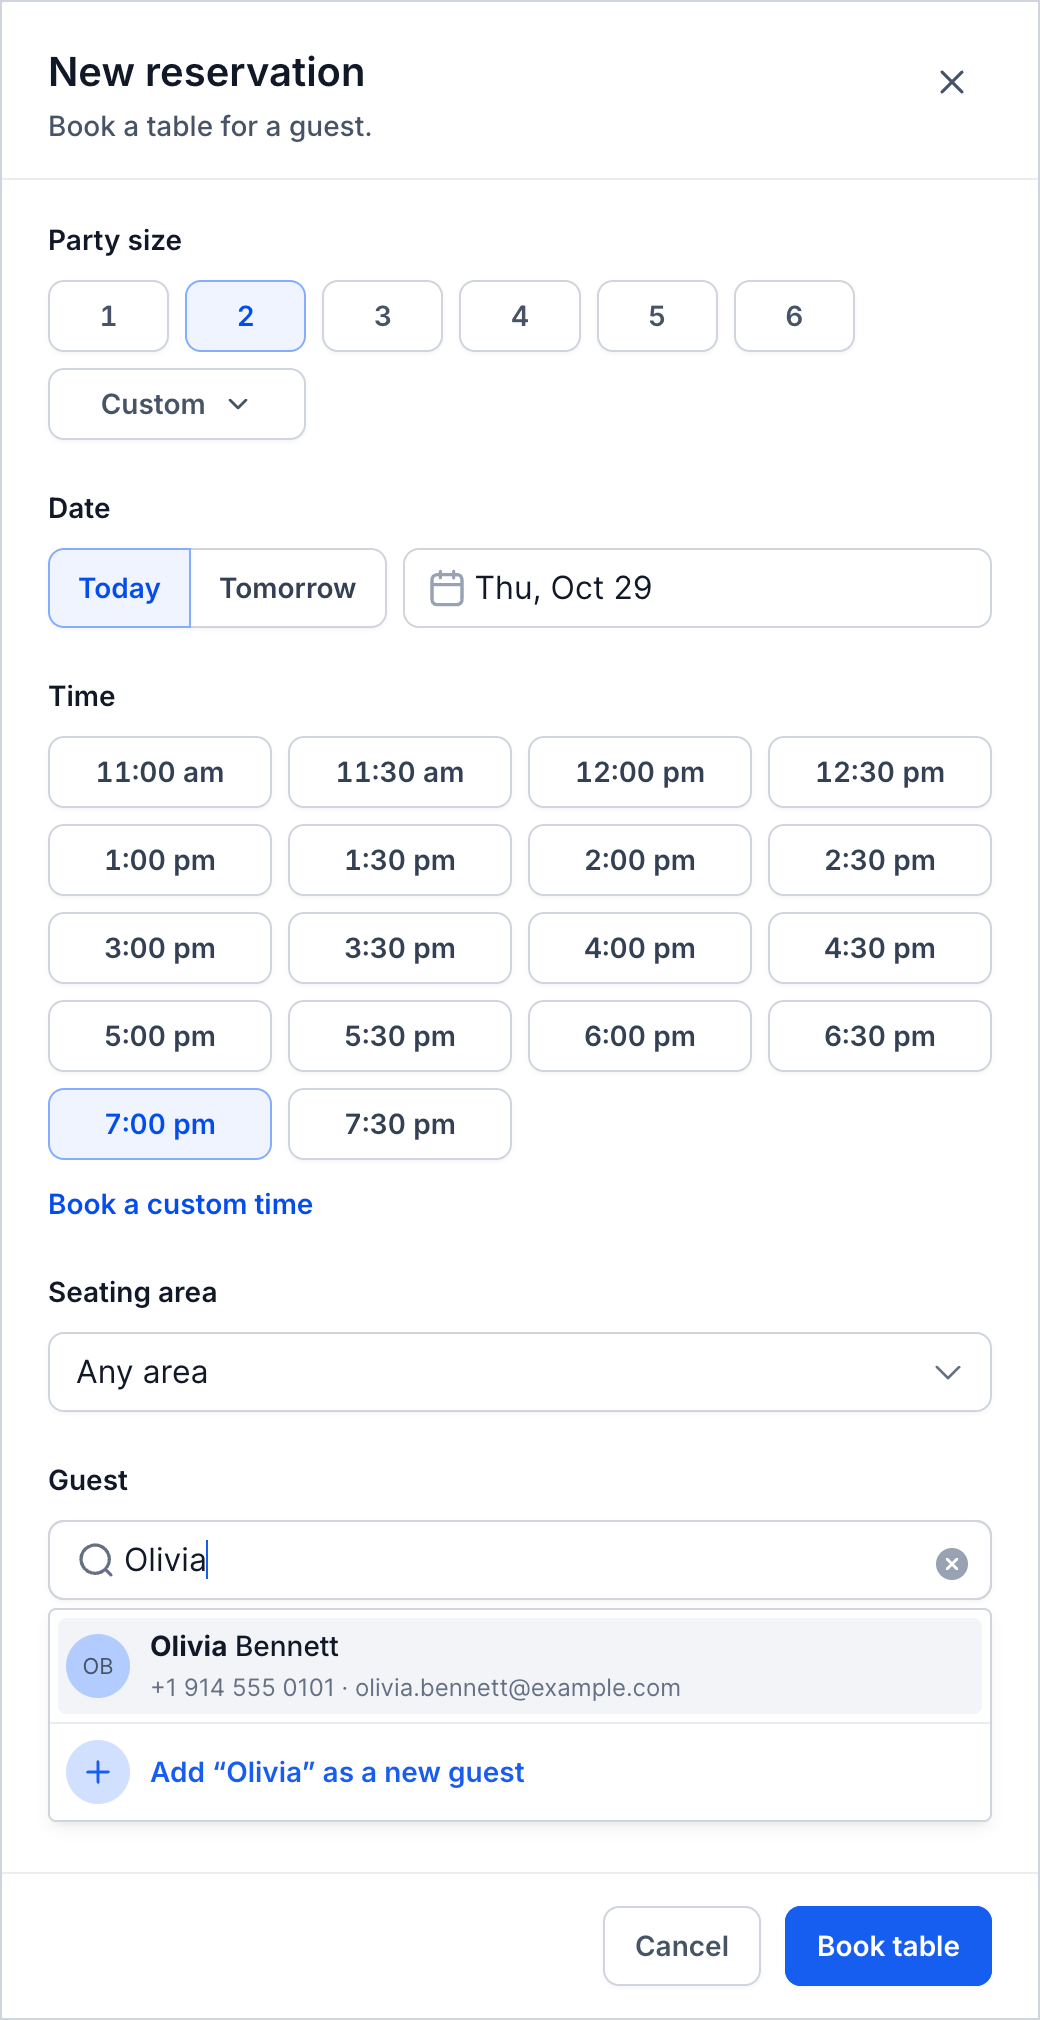
Click New reservation.
Choose the Party size (1 to 6), or click Custom for a bigger party.
Choose the Date: Today, Tomorrow, or pick a date.
Choose an open Time. If no table is free that day, you see a message such as No tables free for a party of 2 on this day. Choose another day, or click Book a custom time.
Optional: choose a Seating area, or leave it as Any area.
Under Guest, search by name, phone or email. If the guest is new, click the option to add them as a new guest, then enter their first name and a phone number or email so the guest can be saved.
Optional: add Special requests, such as allergies, occasions or seating preferences.
Click Book table.
HighLevel assigns a table that fits the reservation. You can change the table assignment afterward.
Seat a Walk-In Guest
Walk-in seating allows your team to accommodate guests who arrive without an advance reservation. Guest contact information is optional when seating a walk-in.
Click Seat a walk-in.
Choose the Party size.
Check the Time. The party is seated now and keeps the table for its table time, for example Now until 10:20 am · 1 h 30 min. Click Change to adjust it.
Check the Table. HighLevel picks one that fits the party, and you can choose another.
Optional: search for the guest, or leave Guest empty to seat them as a walk-in.
Click Seat now.
The table is marked as seated and appears in Front of house.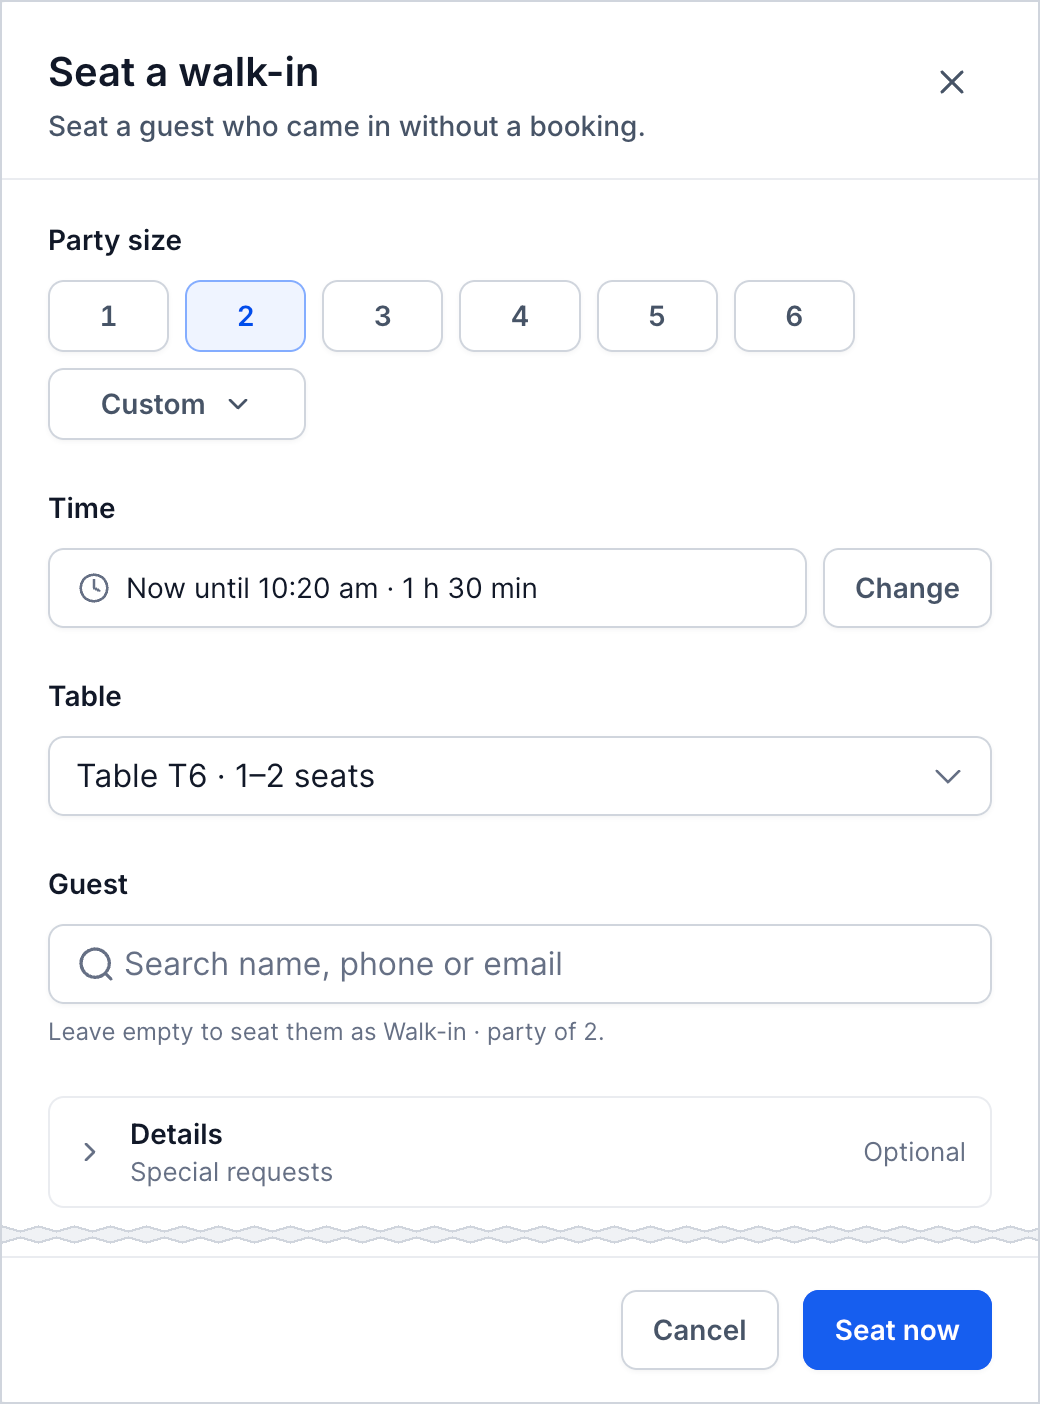
View and Update a Booking
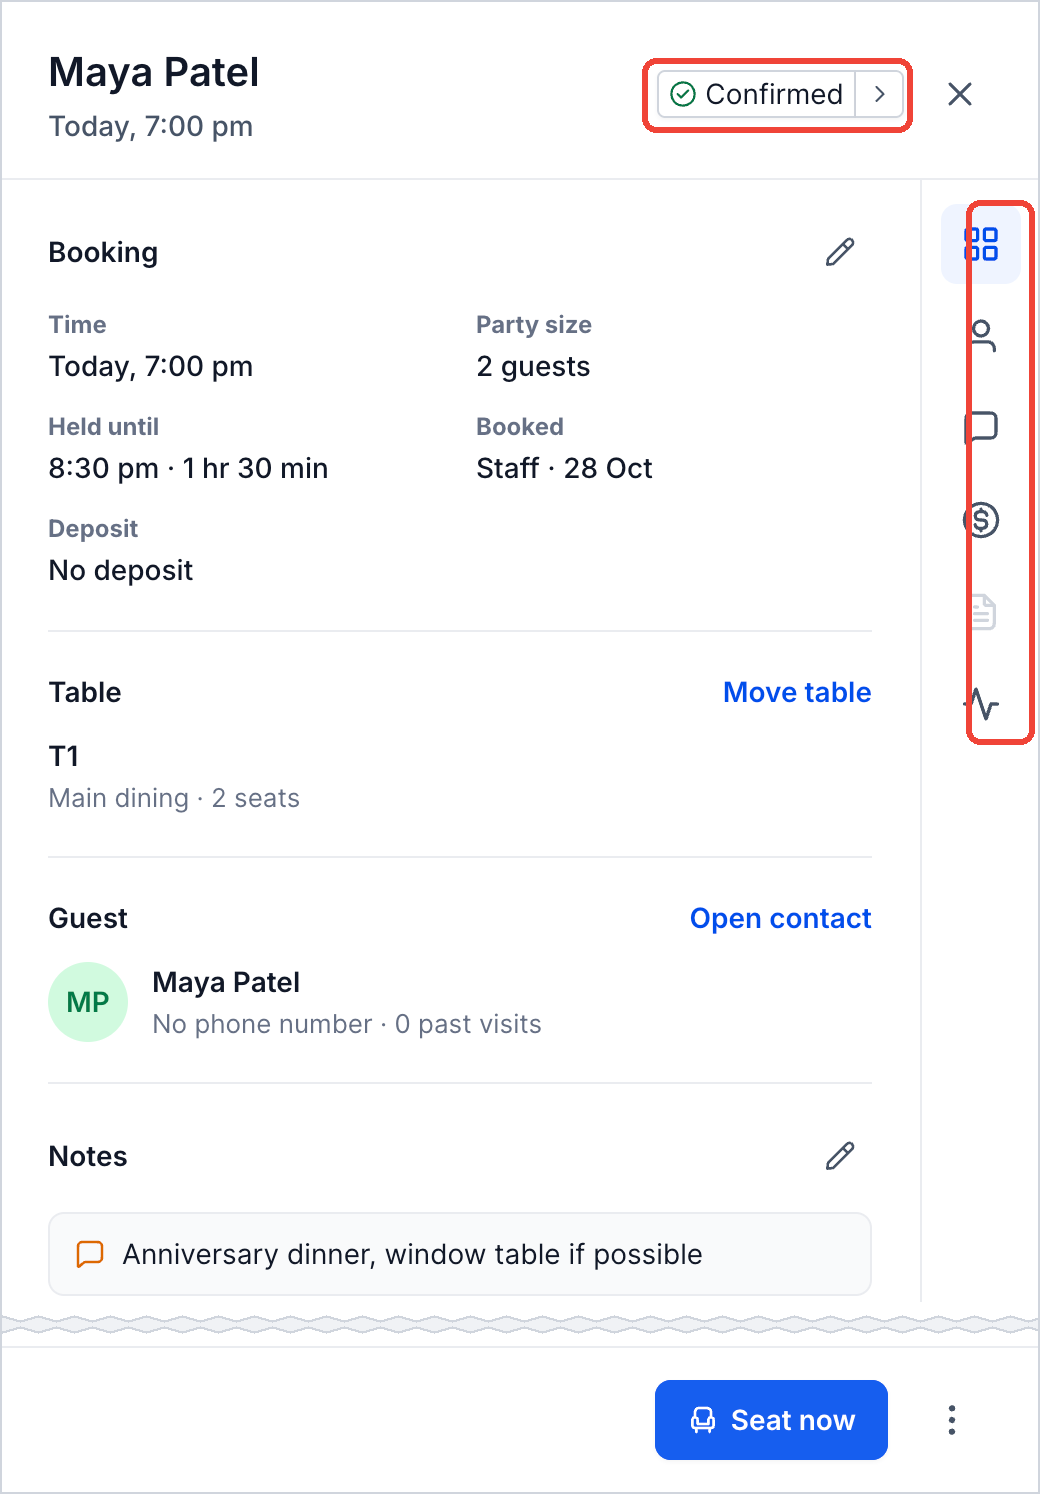
Each booking has a details panel containing information about the reservation, guest, table, orders, and payments. This allows staff to manage a guest's visit without creating separate records for each action.
Click an existing reservation or an occupied table to open its booking.
| Tab | What You Can Manage |
|---|---|
To make changes:
- Edit a reservation: Under Overview, click Edit booking. Update the party size, date, time, seating area, guest, or special requests, then click Save changes.
- Move a reservation: Click Move table, choose another option under Tables that fit, and confirm with Move to.
- Cancel a reservation: Open the three-dot menu, select Cancel reservation, enter the cancellation reason, and confirm. The table becomes available again.
- Share a booking management link: Open the three-dot menu and select Copy manage link.
Cancellation notifications are sent when the corresponding customer notifications are enabled in Restaurant Settings.
Understand Booking Statuses
Booking statuses help your team track where each reservation is in the guest journey. You can update the status using the selector at the top of the booking or the available action buttons.
| Status | Description |
|---|---|
| Pending payment | The reservation is awaiting payment. |
| Confirmed | The reservation is booked, but the guest has not been seated. |
| Seated | The guest is currently at the assigned table. Seating a guest early moves the reservation start time to the current time. |
| Completed | The dining visit has ended. Full payment completes the booking. |
| No-show | The guest did not arrive for the reservation. |
Note: Booking statuses are different from table-status indicators and kitchen order statuses. For example, a seated reservation can have an order that is still being prepared.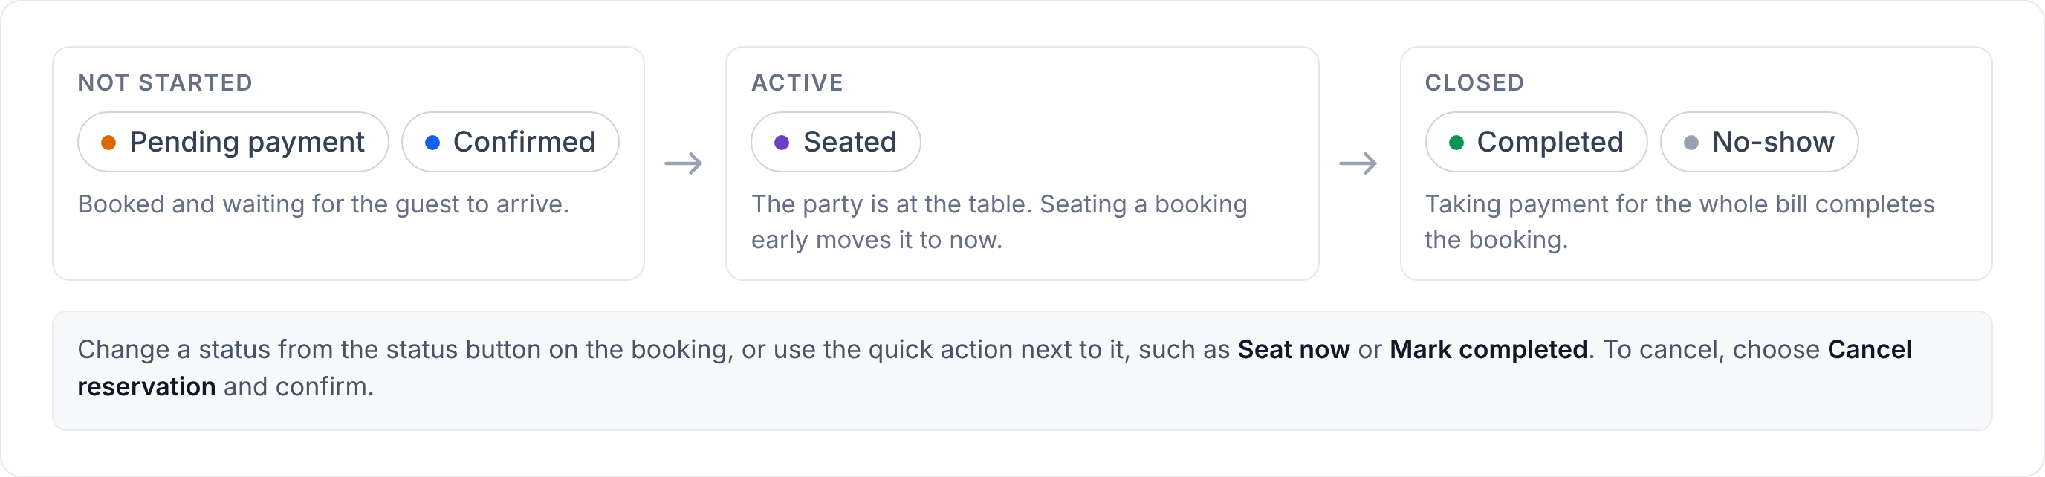
Take Dine-In Orders and Collect Payments
After seating a guest, your team can take orders and process payments directly from the reservation. Each dining visit can include multiple rounds of orders, all associated with the same bill.
Take a Dine-In Order
A round represents a group of items ordered together. Additional rounds allow guests to order more food or drinks without creating a separate bill.
Open the seated booking and go to Order.
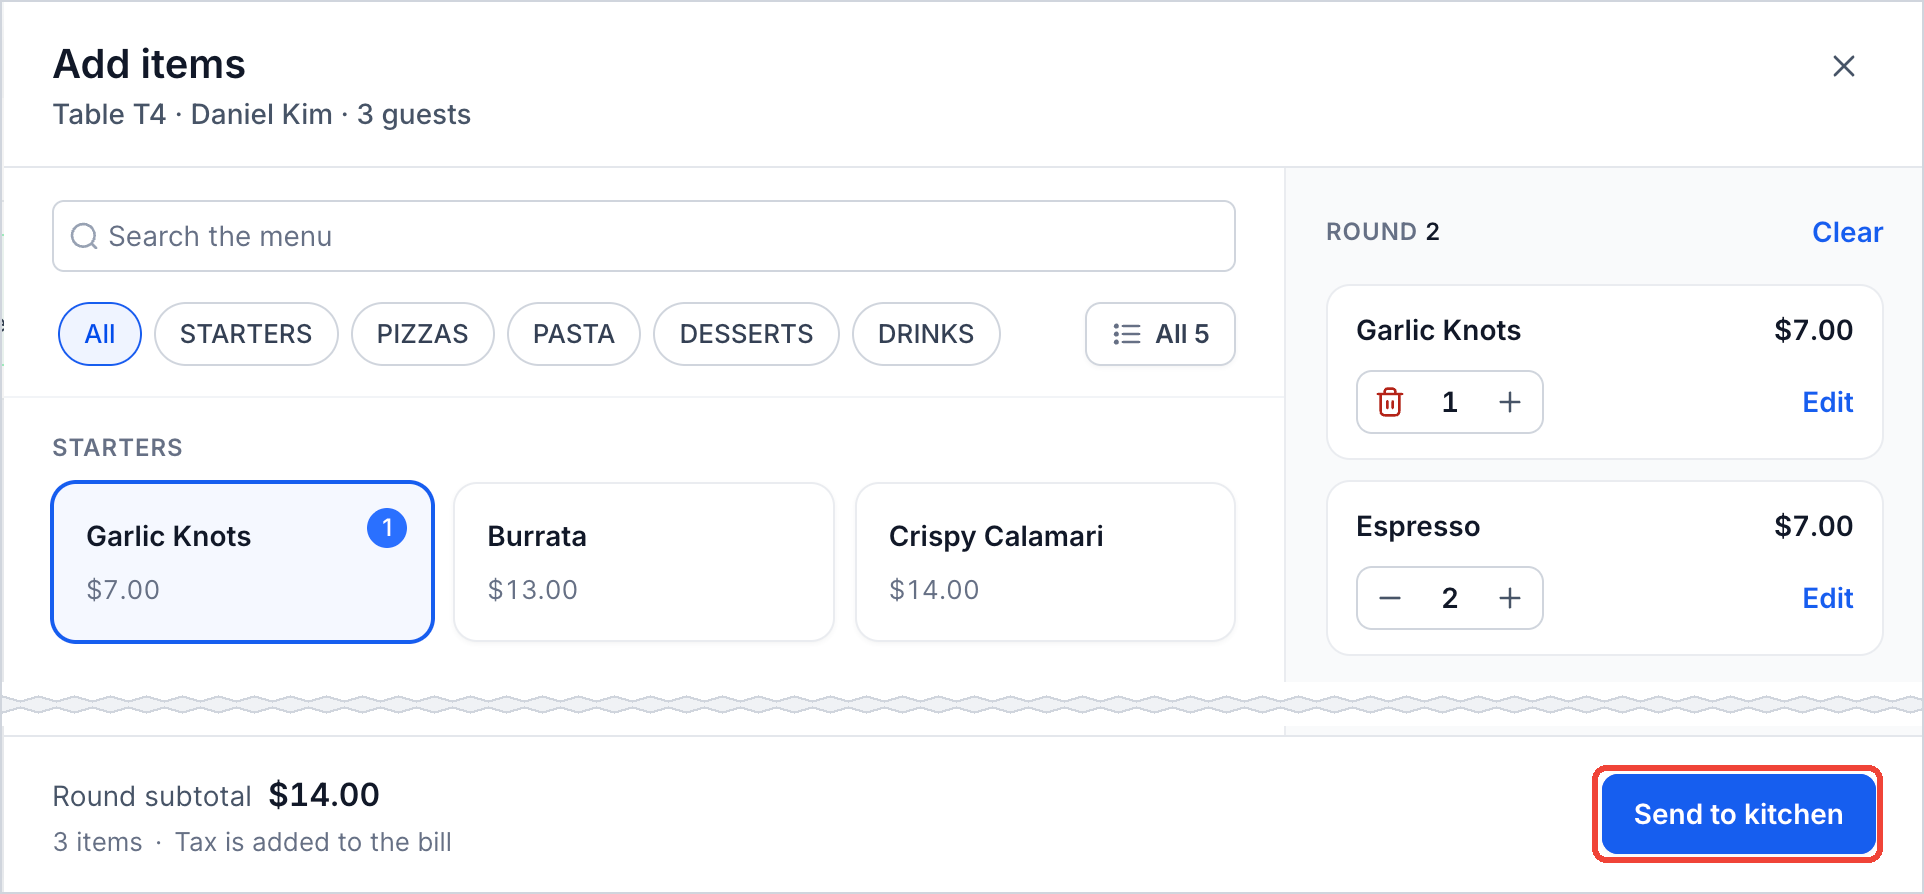
Click Add round. Your menu opens, with a search box and your categories.
Tap each item the table orders. A count shows how many of each are in the round.
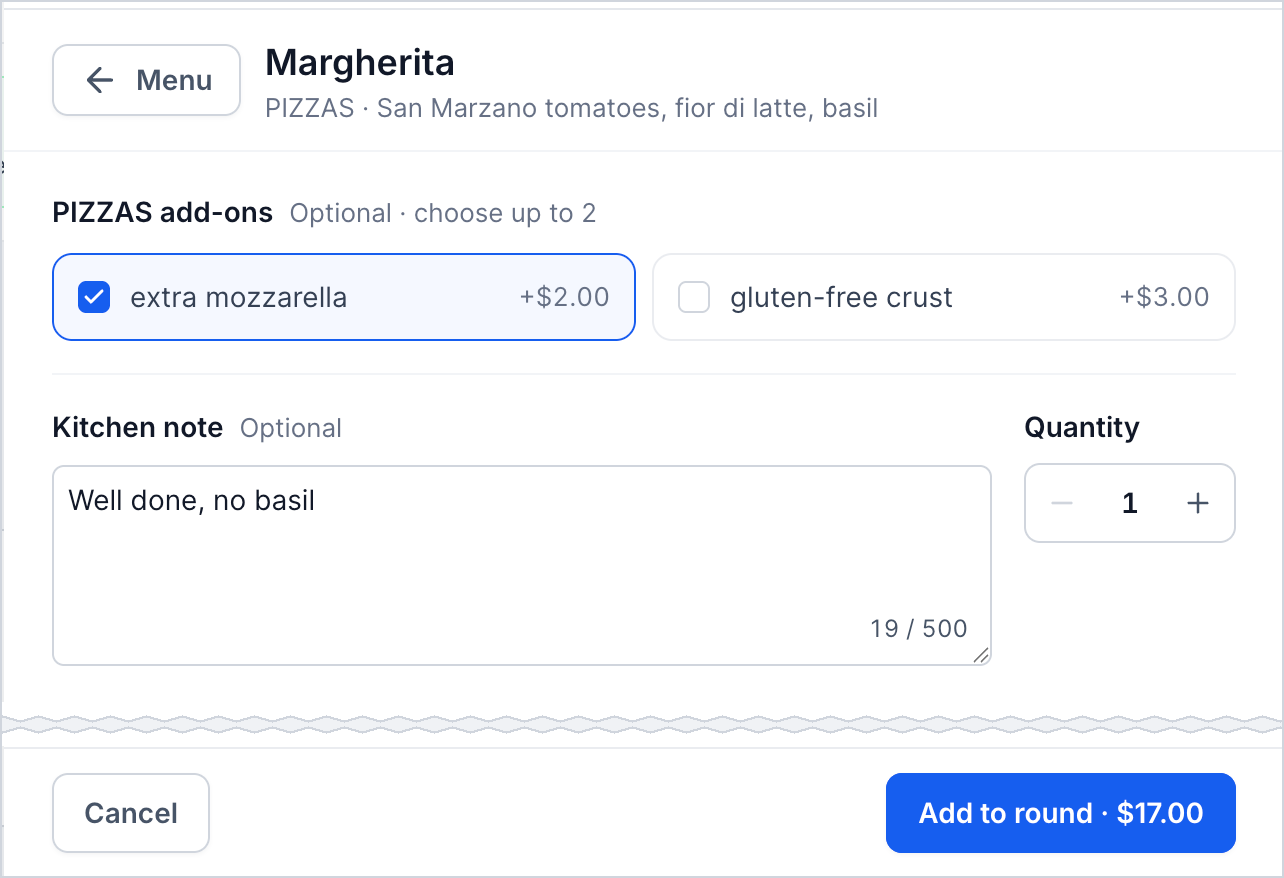
For items with choices, such as add-ons, pick the options, add an optional Kitchen note (like an allergy), set the Quantity and click Add to round.
Check the round on the right. Use One more, Remove or Edit on any line, or Clear to start over. The Round subtotal shows the total. Tax is added to the bill.
Click Send to kitchen.
The round appears in the reservation's Order tab and in Restaurant Orders, where the kitchen can manage it.
Repeat the process using Add round whenever the guests order additional items. All rounds contribute to the same bill, with applicable taxes included in the final amount.
Take Payment and Close the Table
Payments are managed directly from the booking. Staff can charge a card or record payments received through another method.
In the booking, click Take payment.
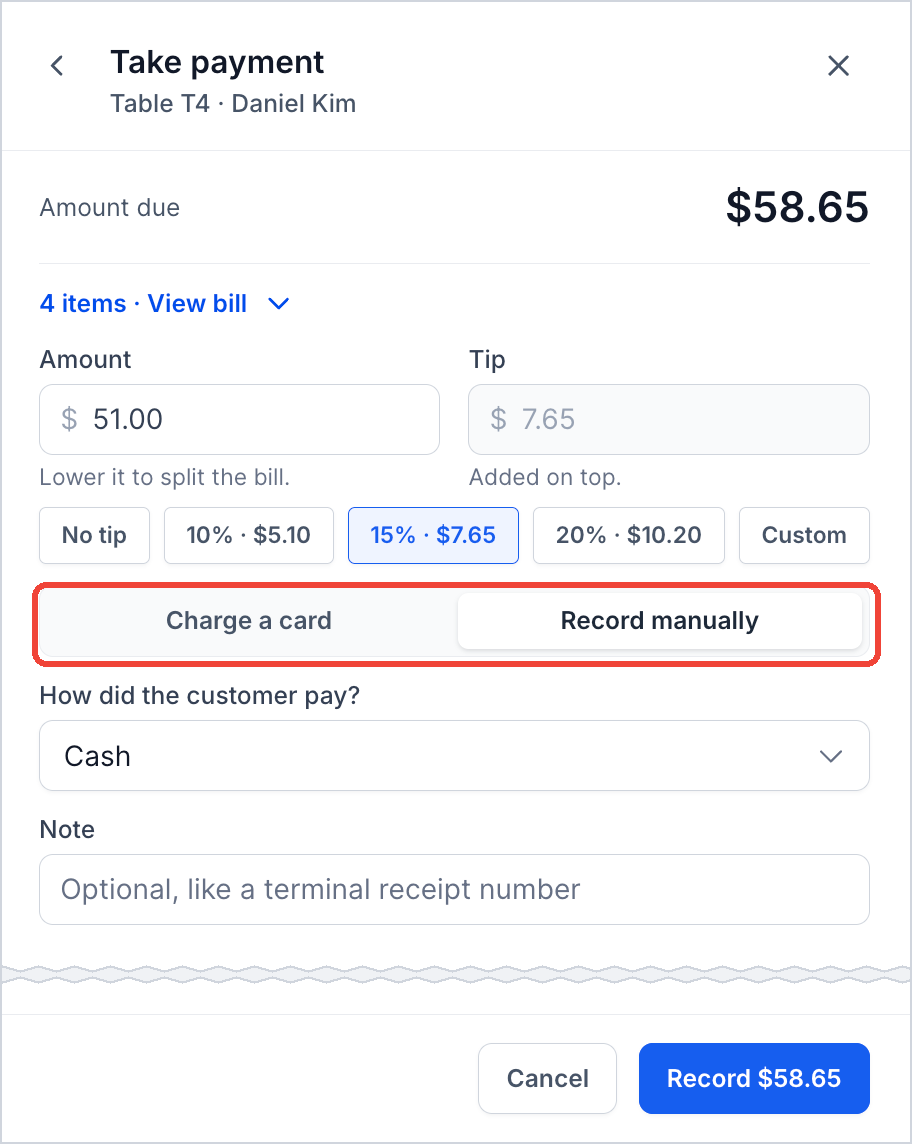
Check the Amount due, then choose a tip: No tip, one of your suggested amounts or Custom.
Search for the guest, or add them as a new guest with a phone number or email. A guest is needed to take payment.
Choose Charge a card, or Record manually for a payment taken another way (Cash, Card, Cheque, Bank transfer or Other).
Optional: to split the bill, choose Record manually and lower the Amount to what this guest pays. Take payment again for the rest. A card payment always pays the full amount due.
Click Charge or Record.
When the full bill has been paid, the booking is marked Completed, the table closes, and its order moves to the Completed tab in Restaurant Orders.
You can also use Mark completed to manually finish a booking.
Let Guests Book Online
Publishing your restaurant website allows customers to make reservations without contacting your staff. Available booking options are based on your restaurant's reservation settings, helping maintain consistency between online bookings and table availability.
Online reservations follow your configured:
- Reservation hours and available booking dates.
- Maximum online party size.
- Available seating areas.
- Table durations and availability.
- Deposit requirements, when configured.
Guests can receive reservation confirmations, reminders, and notifications about booking updates or cancellations based on your configured customer notification settings.
To configure these messages, navigate to Restaurant Settings → Customer.
To manually share a guest's reservation management link, open the booking's three-dot menu and select Copy manage link.
For website publishing instructions, refer to Restaurant Website: Set Up and Publish Your Website.
Frequently Asked Questions
Q: Can I take reservations before publishing my restaurant website?
Yes. Your team can create reservations and seat walk-in guests directly in HighLevel before your restaurant website is published.
Q: Why can't I find an available time for a reservation?
A suitable table may not be available during your restaurant's configured reservation hours. Try a different date or party size, or select Book a custom time.
Q: Why doesn't a particular table appear when moving a booking?
The available table list includes tables that meet the party's seating requirements. Tables that are too small, inactive, or restricted by minimum party size may not appear.
Q: What does "Held until" mean on a reservation?
It indicates the end of the reservation's allocated table duration, based on the table-time settings configured for your restaurant.
Q: Can I take a payment from a walk-in guest without contact details?
You can seat a walk-in without contact details. However, you must select or create a guest contact before collecting payment through the booking.
Q: Can guests split a bill?
Yes. Use Record manually to record partial payments. Repeat until the full bill is paid. The Charge a card option processes the full outstanding balance.
Q: How can I prevent reservations in a specific seating area?
Open Timeline view, select the three-dot menu beside the area, and choose Block this area.
Related Articles
- Restaurant Setup Guide: Get Ready to Take Orders and Reservations
- How to Create a Restaurant Menu in HighLevel
- Restaurant Orders: How to Manage Orders and Payments
- Restaurant Website: How to Customize and Publish Your Site
- How to Manage and Customize a Restaurant Menu in HighLevel
- Restaurant Settings: Change Your Restaurant’s Details and Rules
Was this article helpful?
That’s Great!
Thank you for your feedback
Sorry! We couldn't be helpful
Thank you for your feedback
Feedback sent
We appreciate your effort and will try to fix the article