The Contact Overlay in HighLevel makes it easier to review contact information and conversations while working in Opportunities or Appointments. Instead of automatically navigating away from your current page, you can access the contact while keeping your existing workflow in context. This reduces unnecessary navigation and gives you faster access to the information you need.
TABLE OF CONTENTS
- What is the Contact Overlay?
- Key Benefits of the Contact Overlay
- Where the Contact Overlay is Available
- Single-Column and Two-Column Views
- How To Use the Contact Overlay
- Frequently Asked Questions
- Related Articles
What is the Contact Overlay?
The Contact Overlay provides an in-context view of a contact directly from supported areas in HighLevel. It helps you review contact details and conversations without automatically leaving the Opportunities or Appointments page you are currently working on.
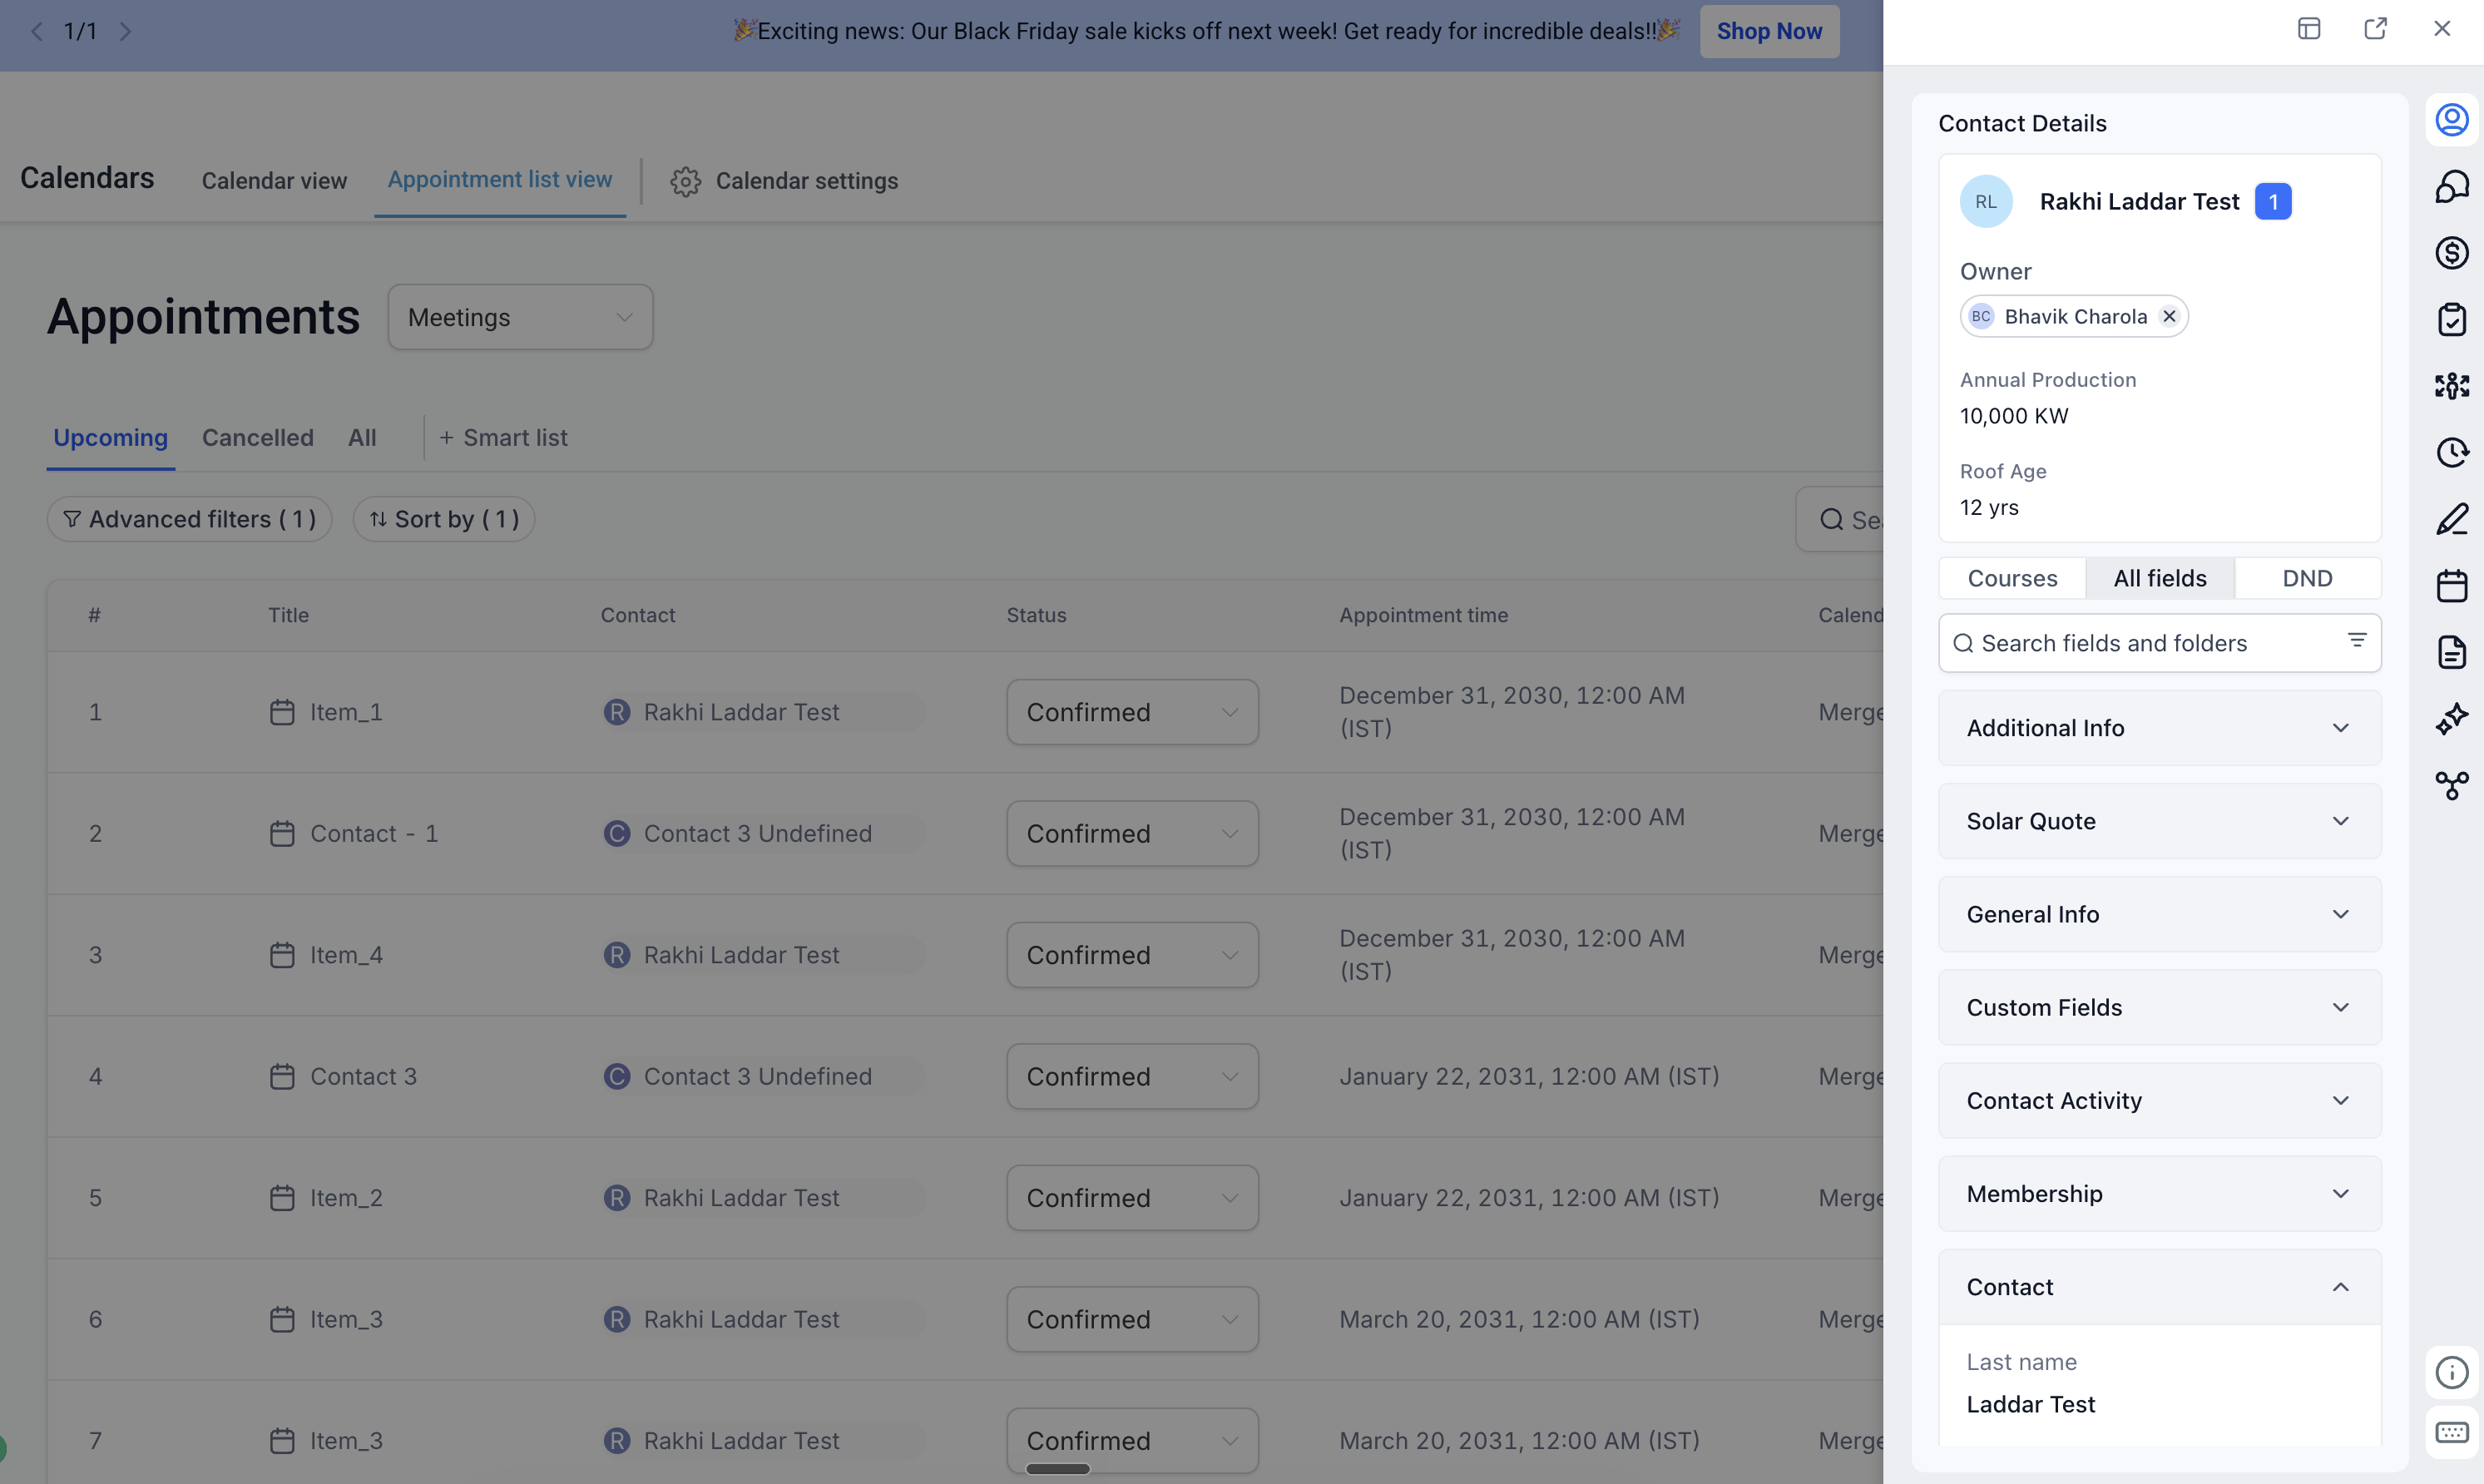
When you select a contact from Opportunities or Appointments, the Contact Overlay opens on the current page. You can use Single-column view for a more compact experience or Two-column view when you want additional conversation context. You can also open the full Contact Detail Page whenever needed.
Key Benefits of the Contact Overlay
Keeping contact context available while managing appointments and opportunities can reduce unnecessary navigation and help you work more efficiently.
- Stay in context: Review a contact without immediately leaving the Opportunities or Appointments page.
- Access conversations quickly: View conversation history alongside contact information when additional context is needed.
- Choose your preferred view: Switch between Single-column and Two-column views depending on how much information you want displayed.
- Access the full contact record: Open the Contact Detail Page whenever you need the complete contact experience.
- Maintain a consistent workspace: Existing Contact Detail Page customizations are reflected in the overlay.
- Reduce unnecessary navigation: Check the information you need and return to your existing workflow with fewer page changes.
Where the Contact Overlay is Available
The Contact Overlay is available from Opportunities and Appointments, allowing you to access the associated contact without automatically navigating away from the page you are working on.
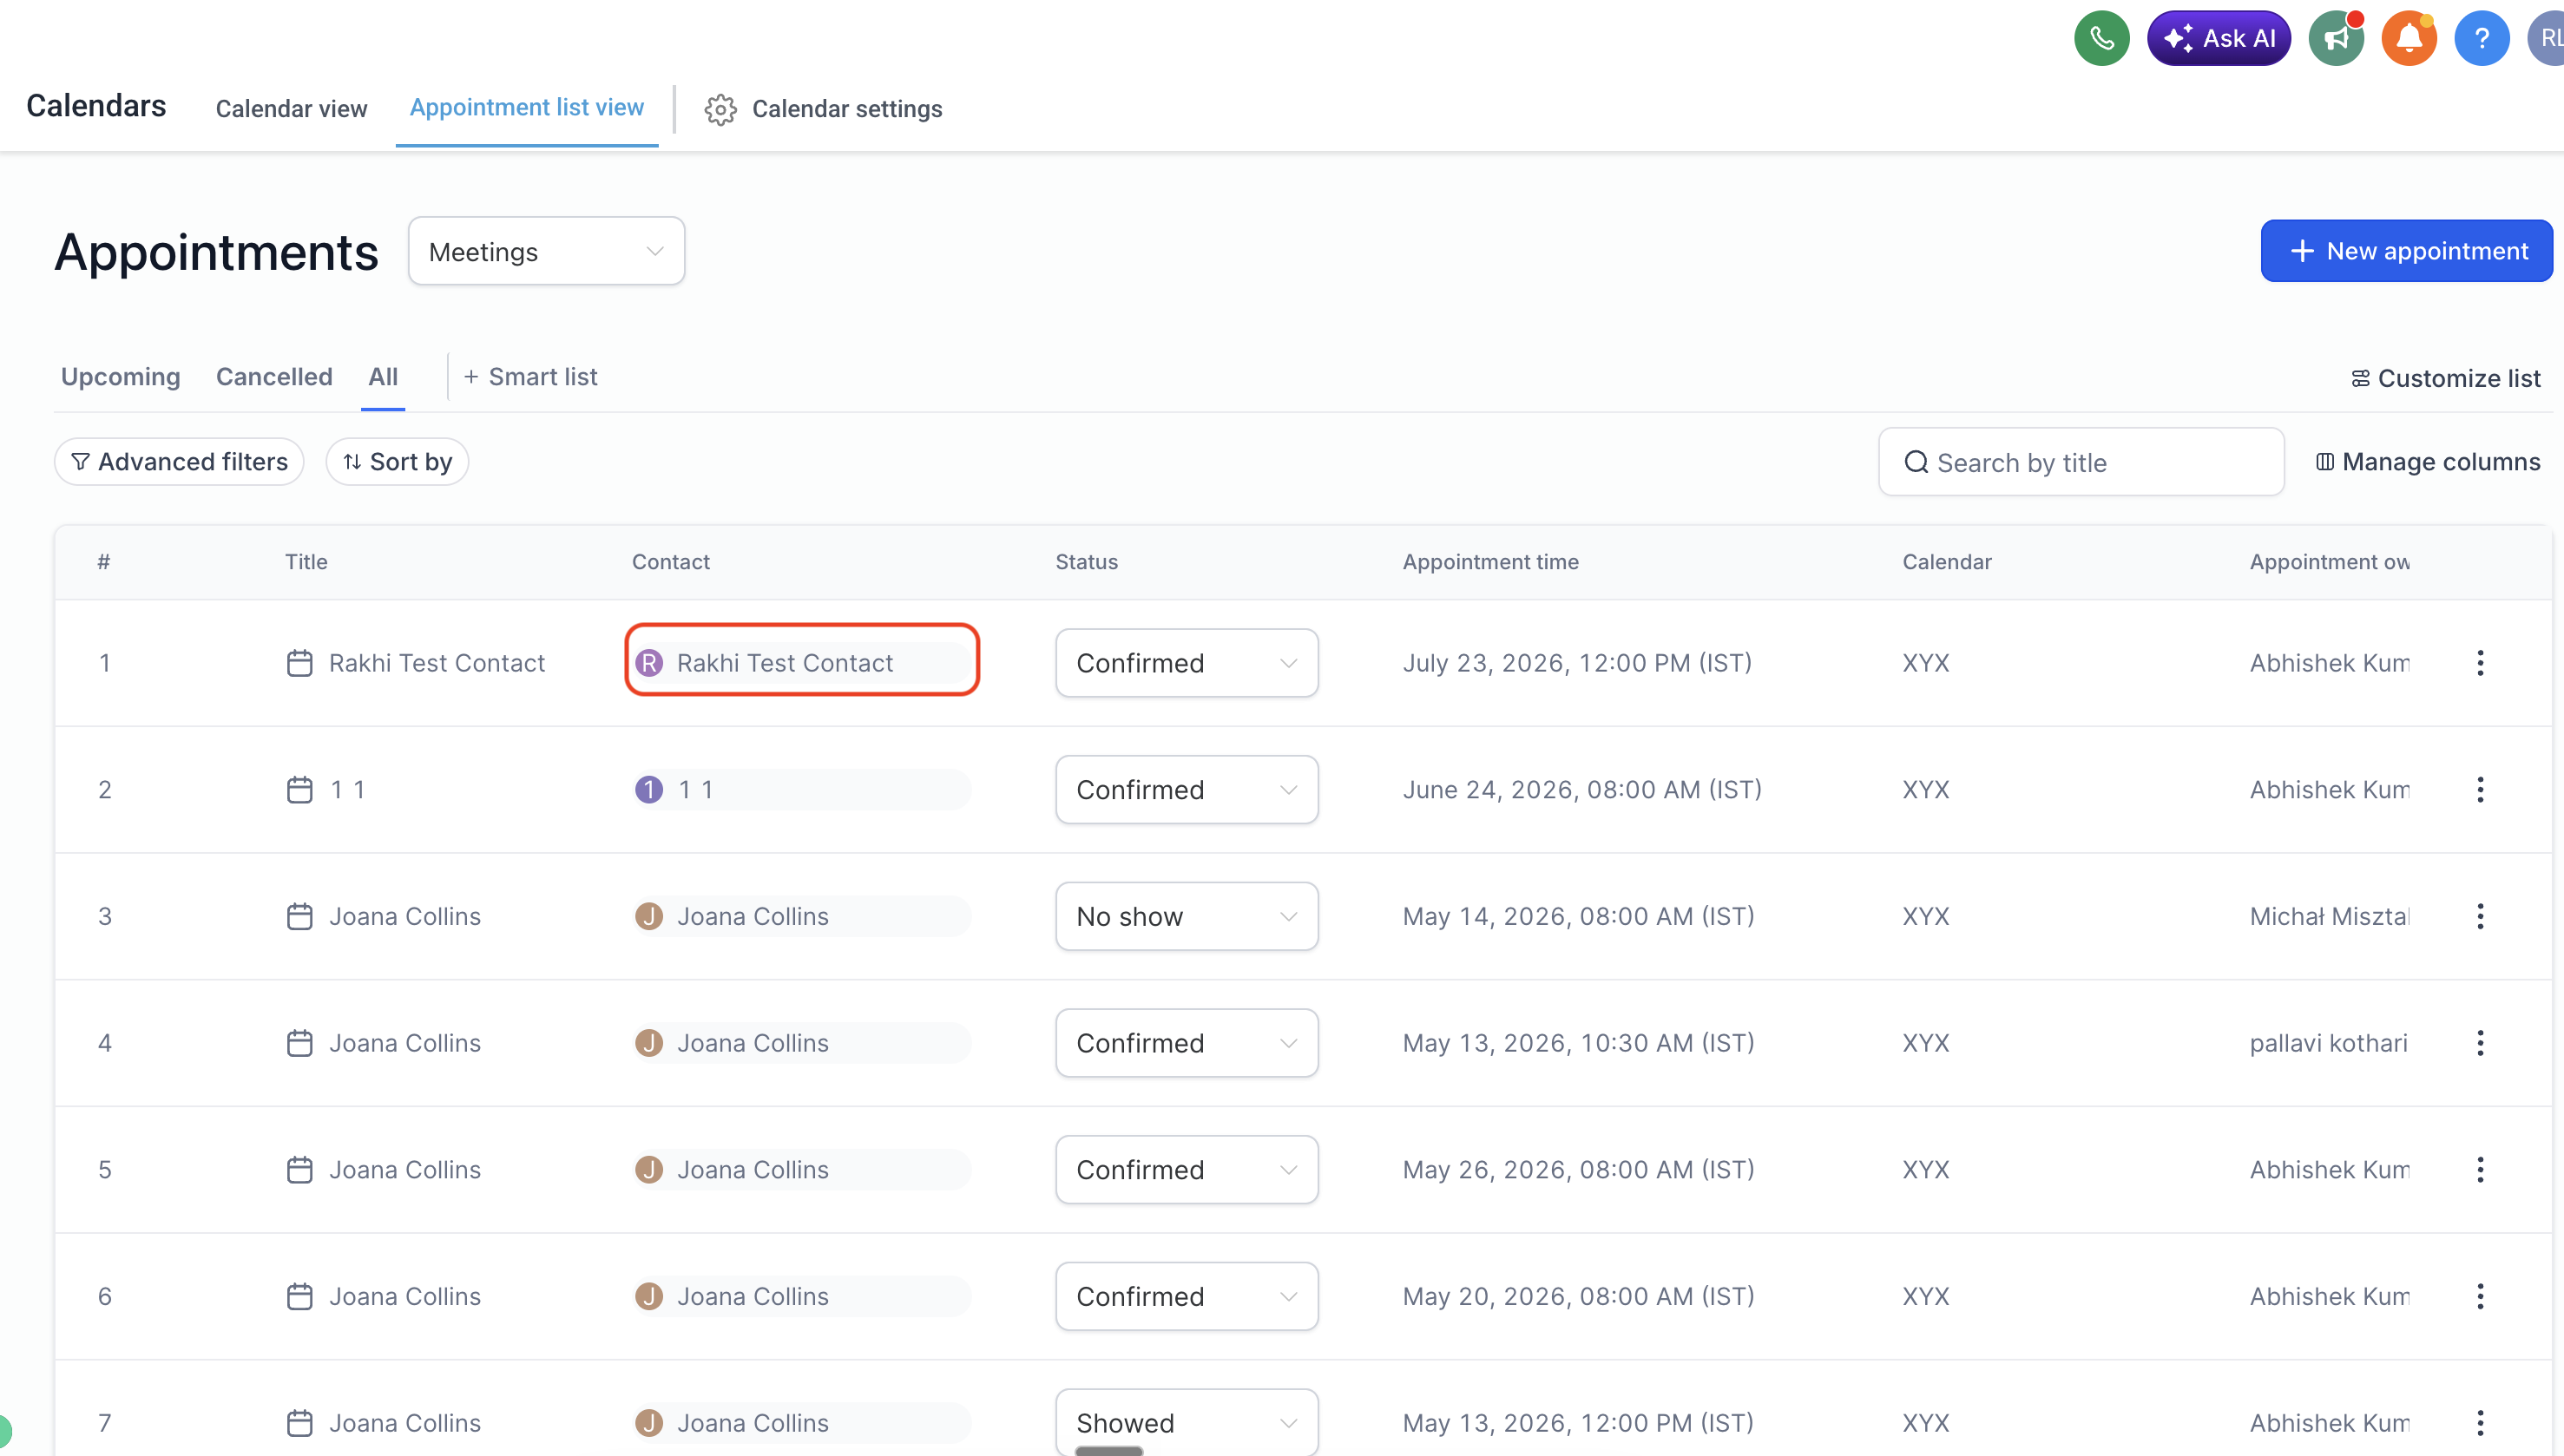
Appointments
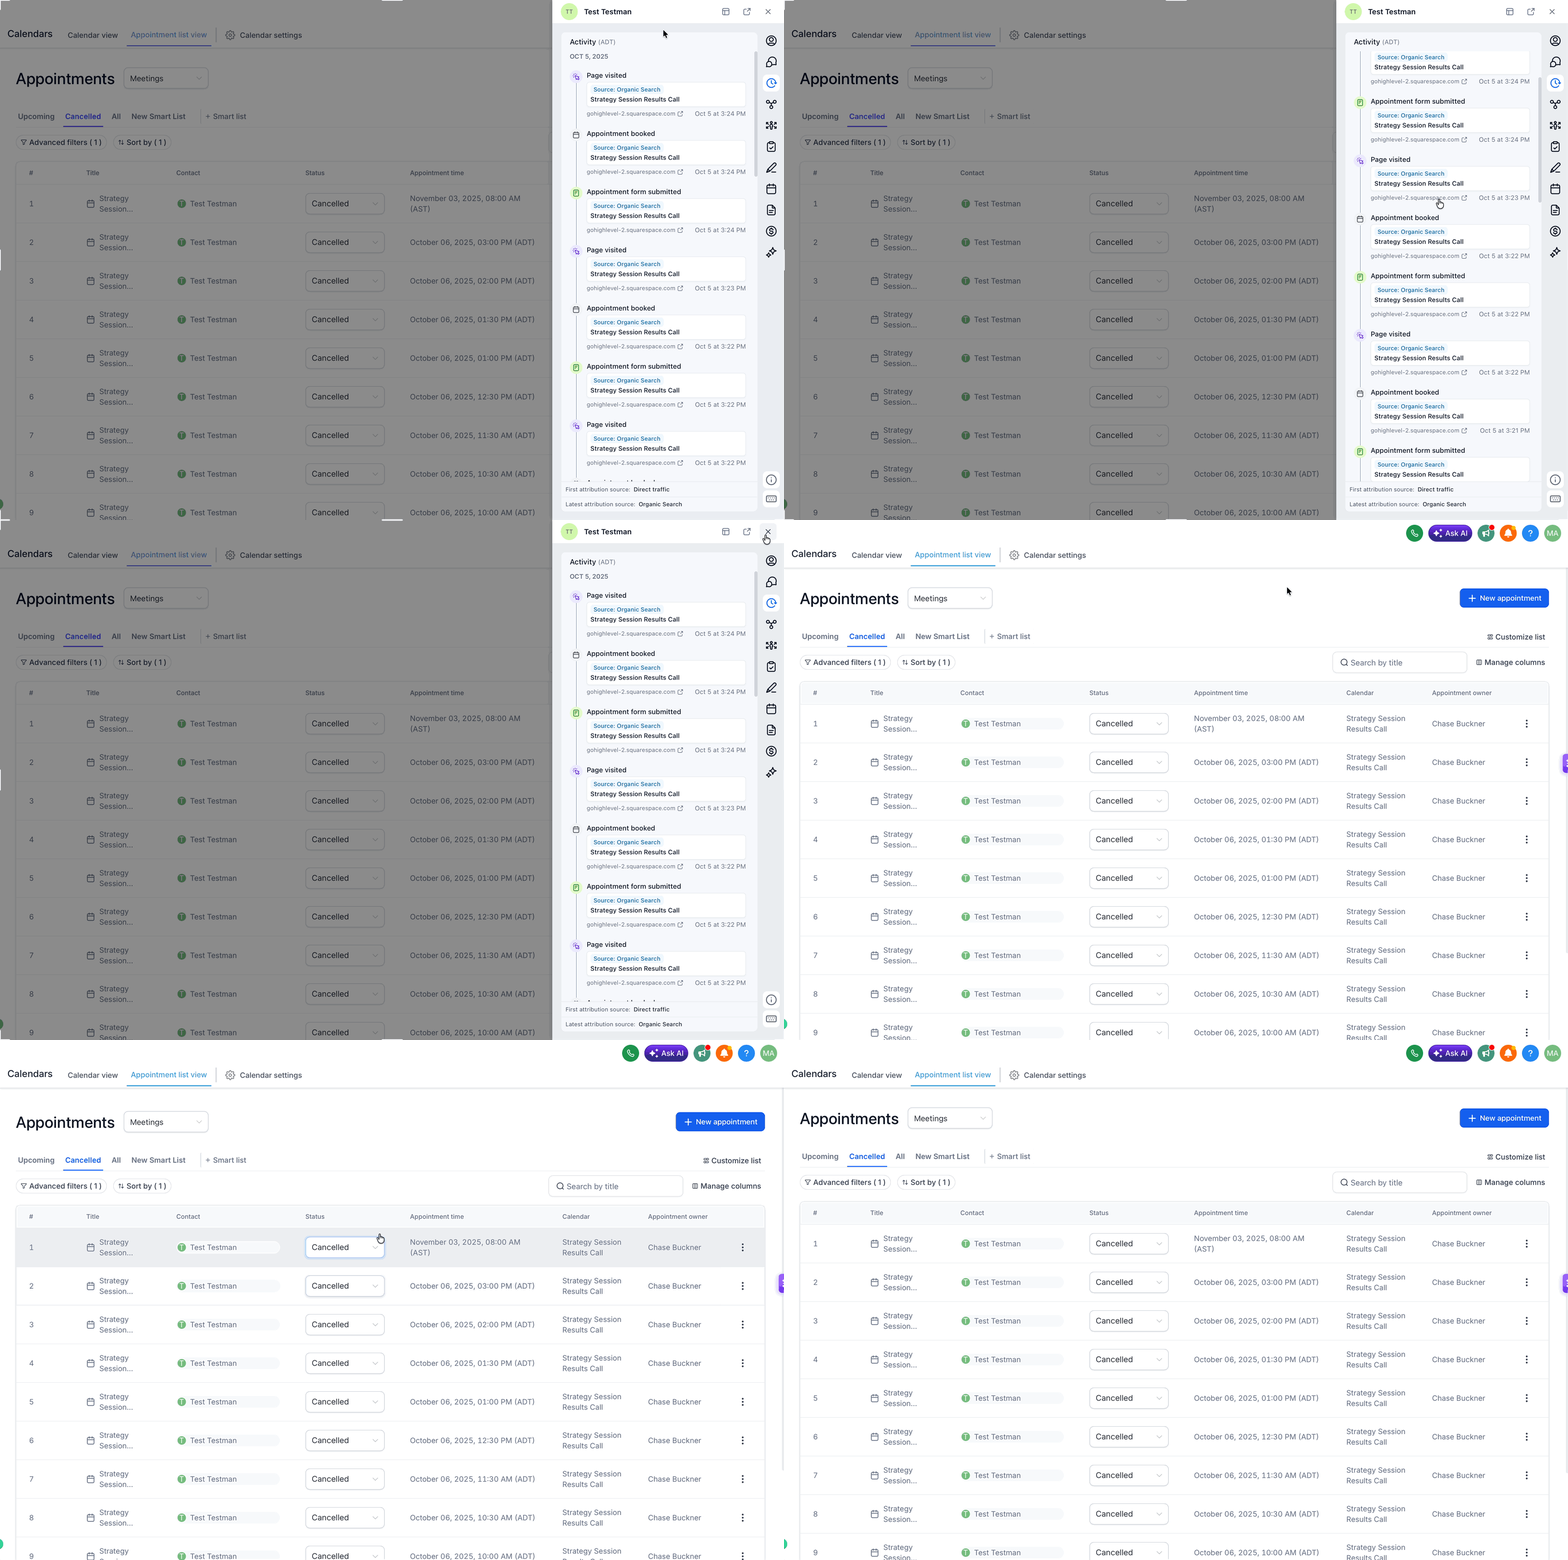
From the Appointment List View, selecting the contact associated with an appointment opens that contact in the overlay. This is useful when you need to check contact information or conversations while reviewing scheduled appointments.
Opportunities
From Opportunities, selecting the contact associated with an opportunity opens the Contact Overlay. This lets you review contact information while maintaining the context of the opportunity and pipeline.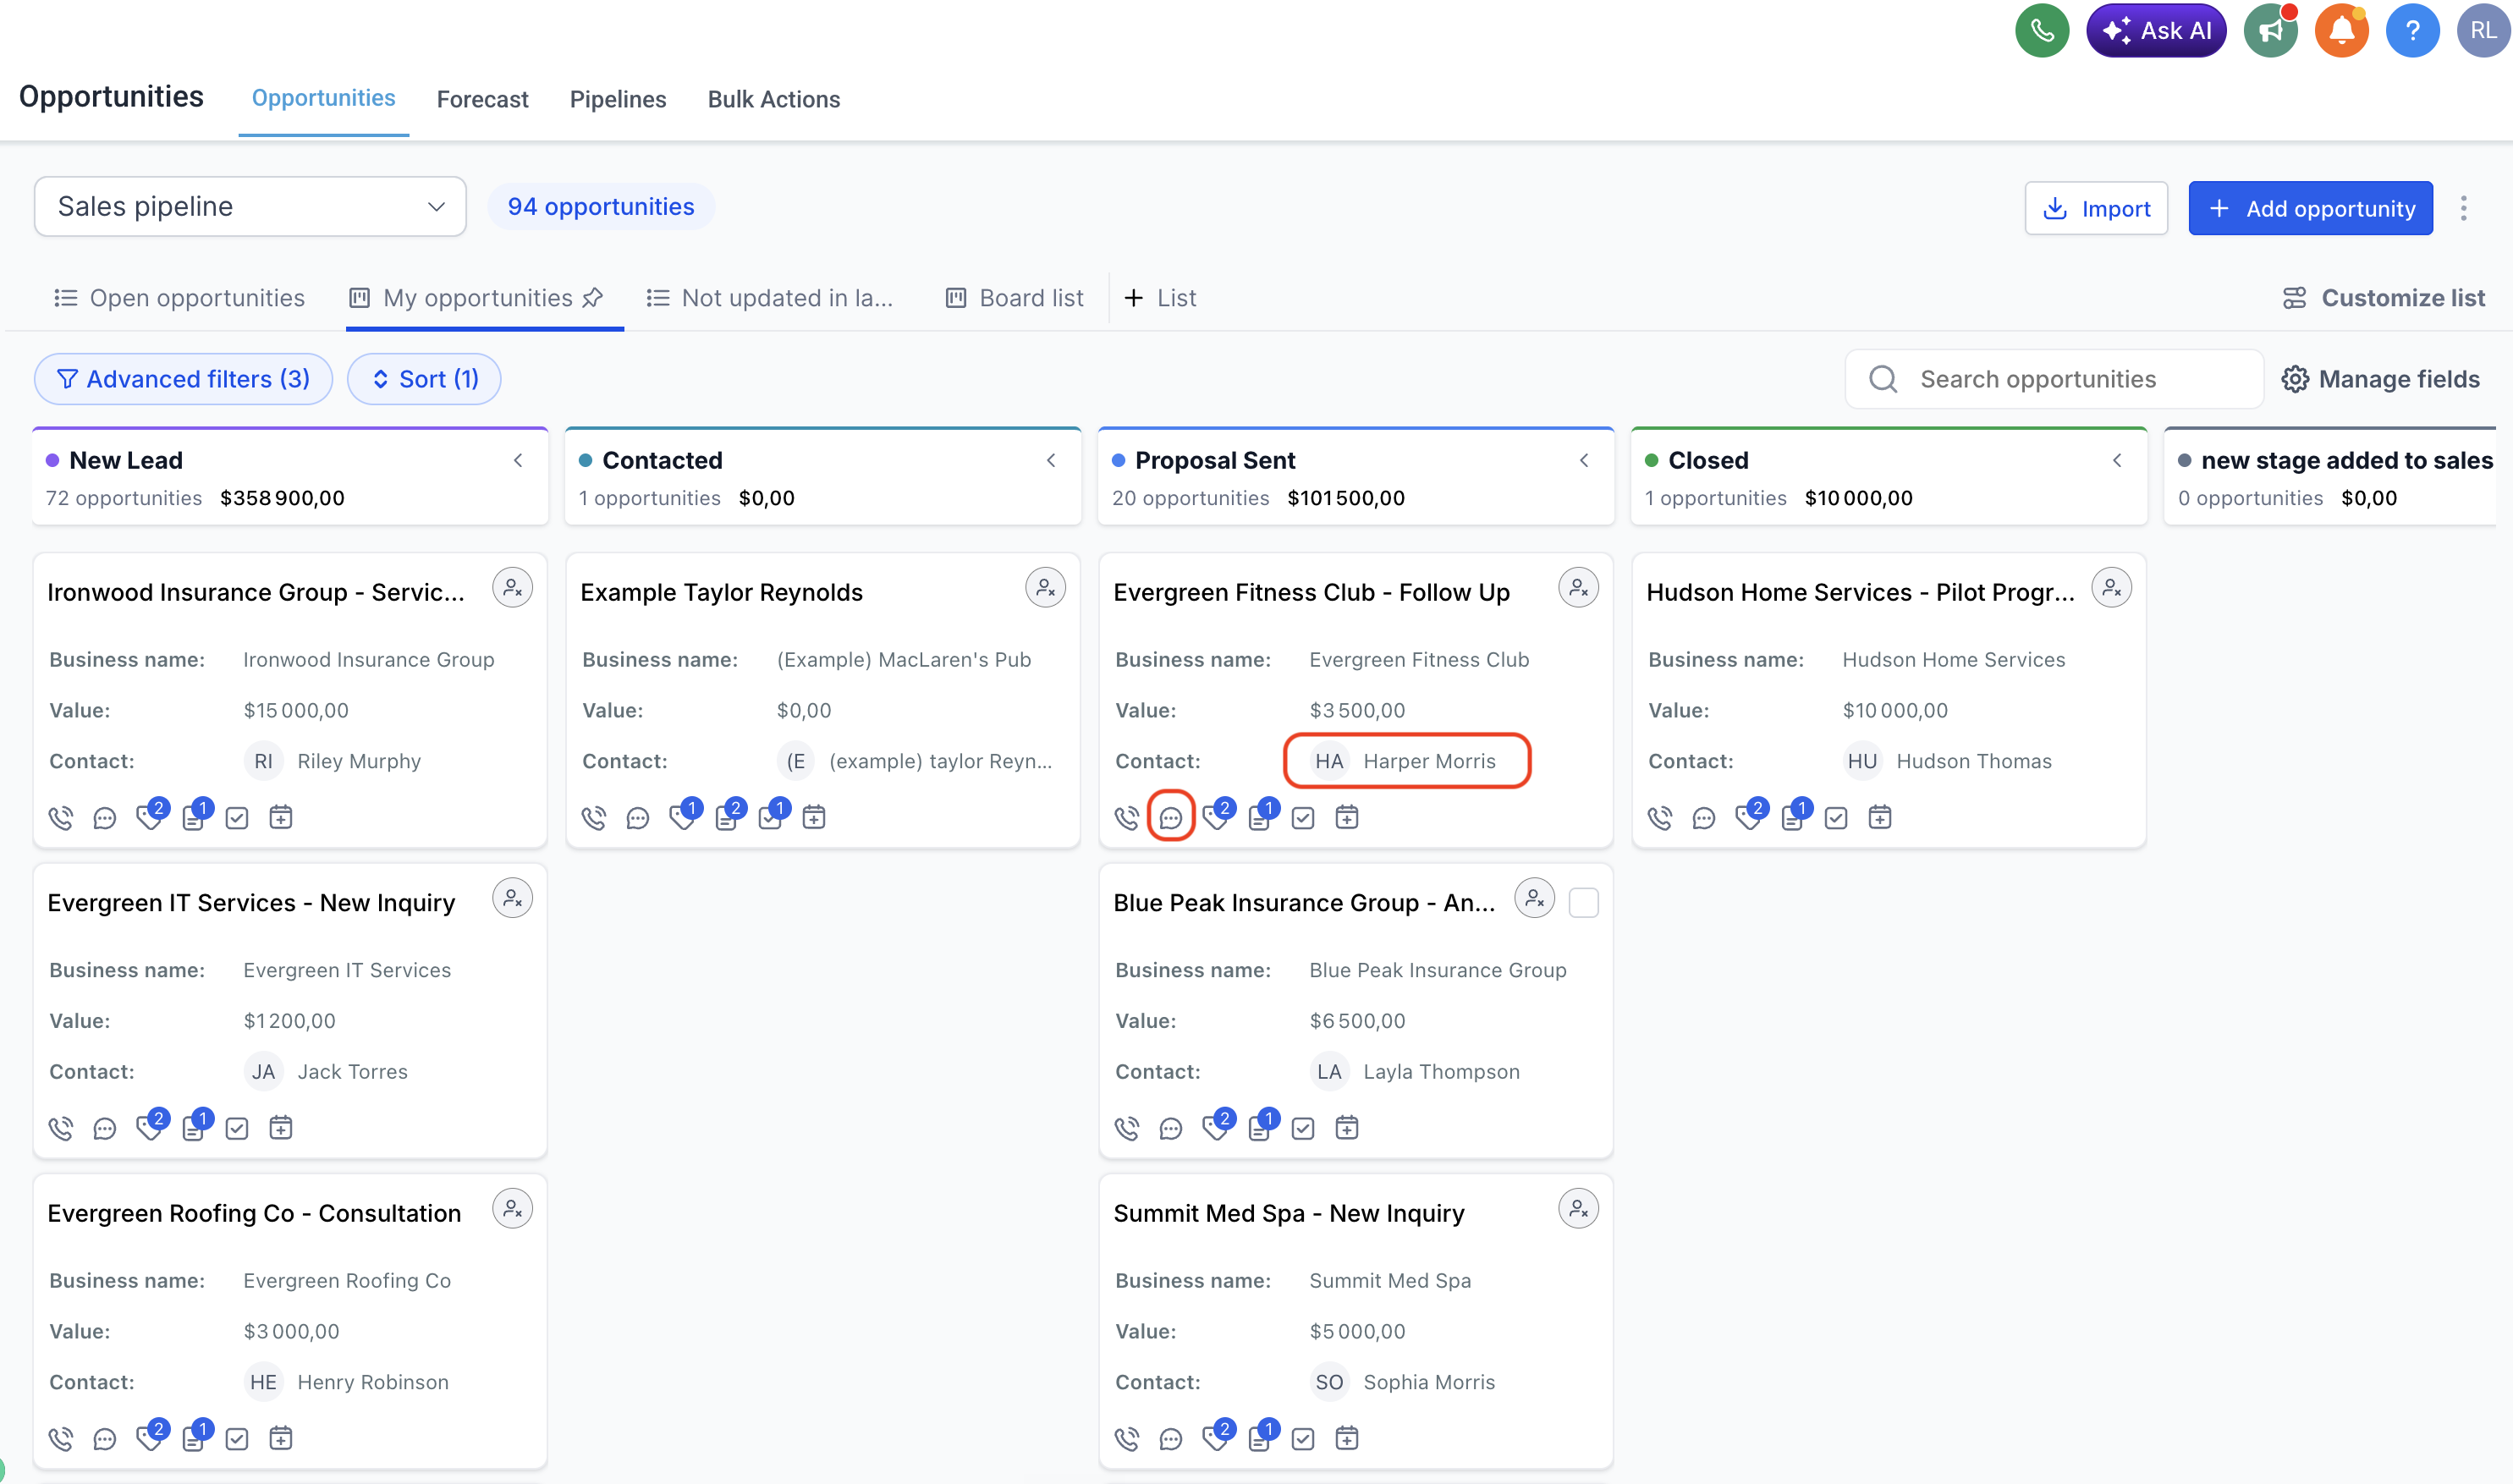
Single-Column and Two-Column Views
The Contact Overlay provides two display modes so you can choose how much contact and conversation information you want visible at once. These display modes apply to the overlay and are separate from the layout options used when customizing the Contact Detail Page.
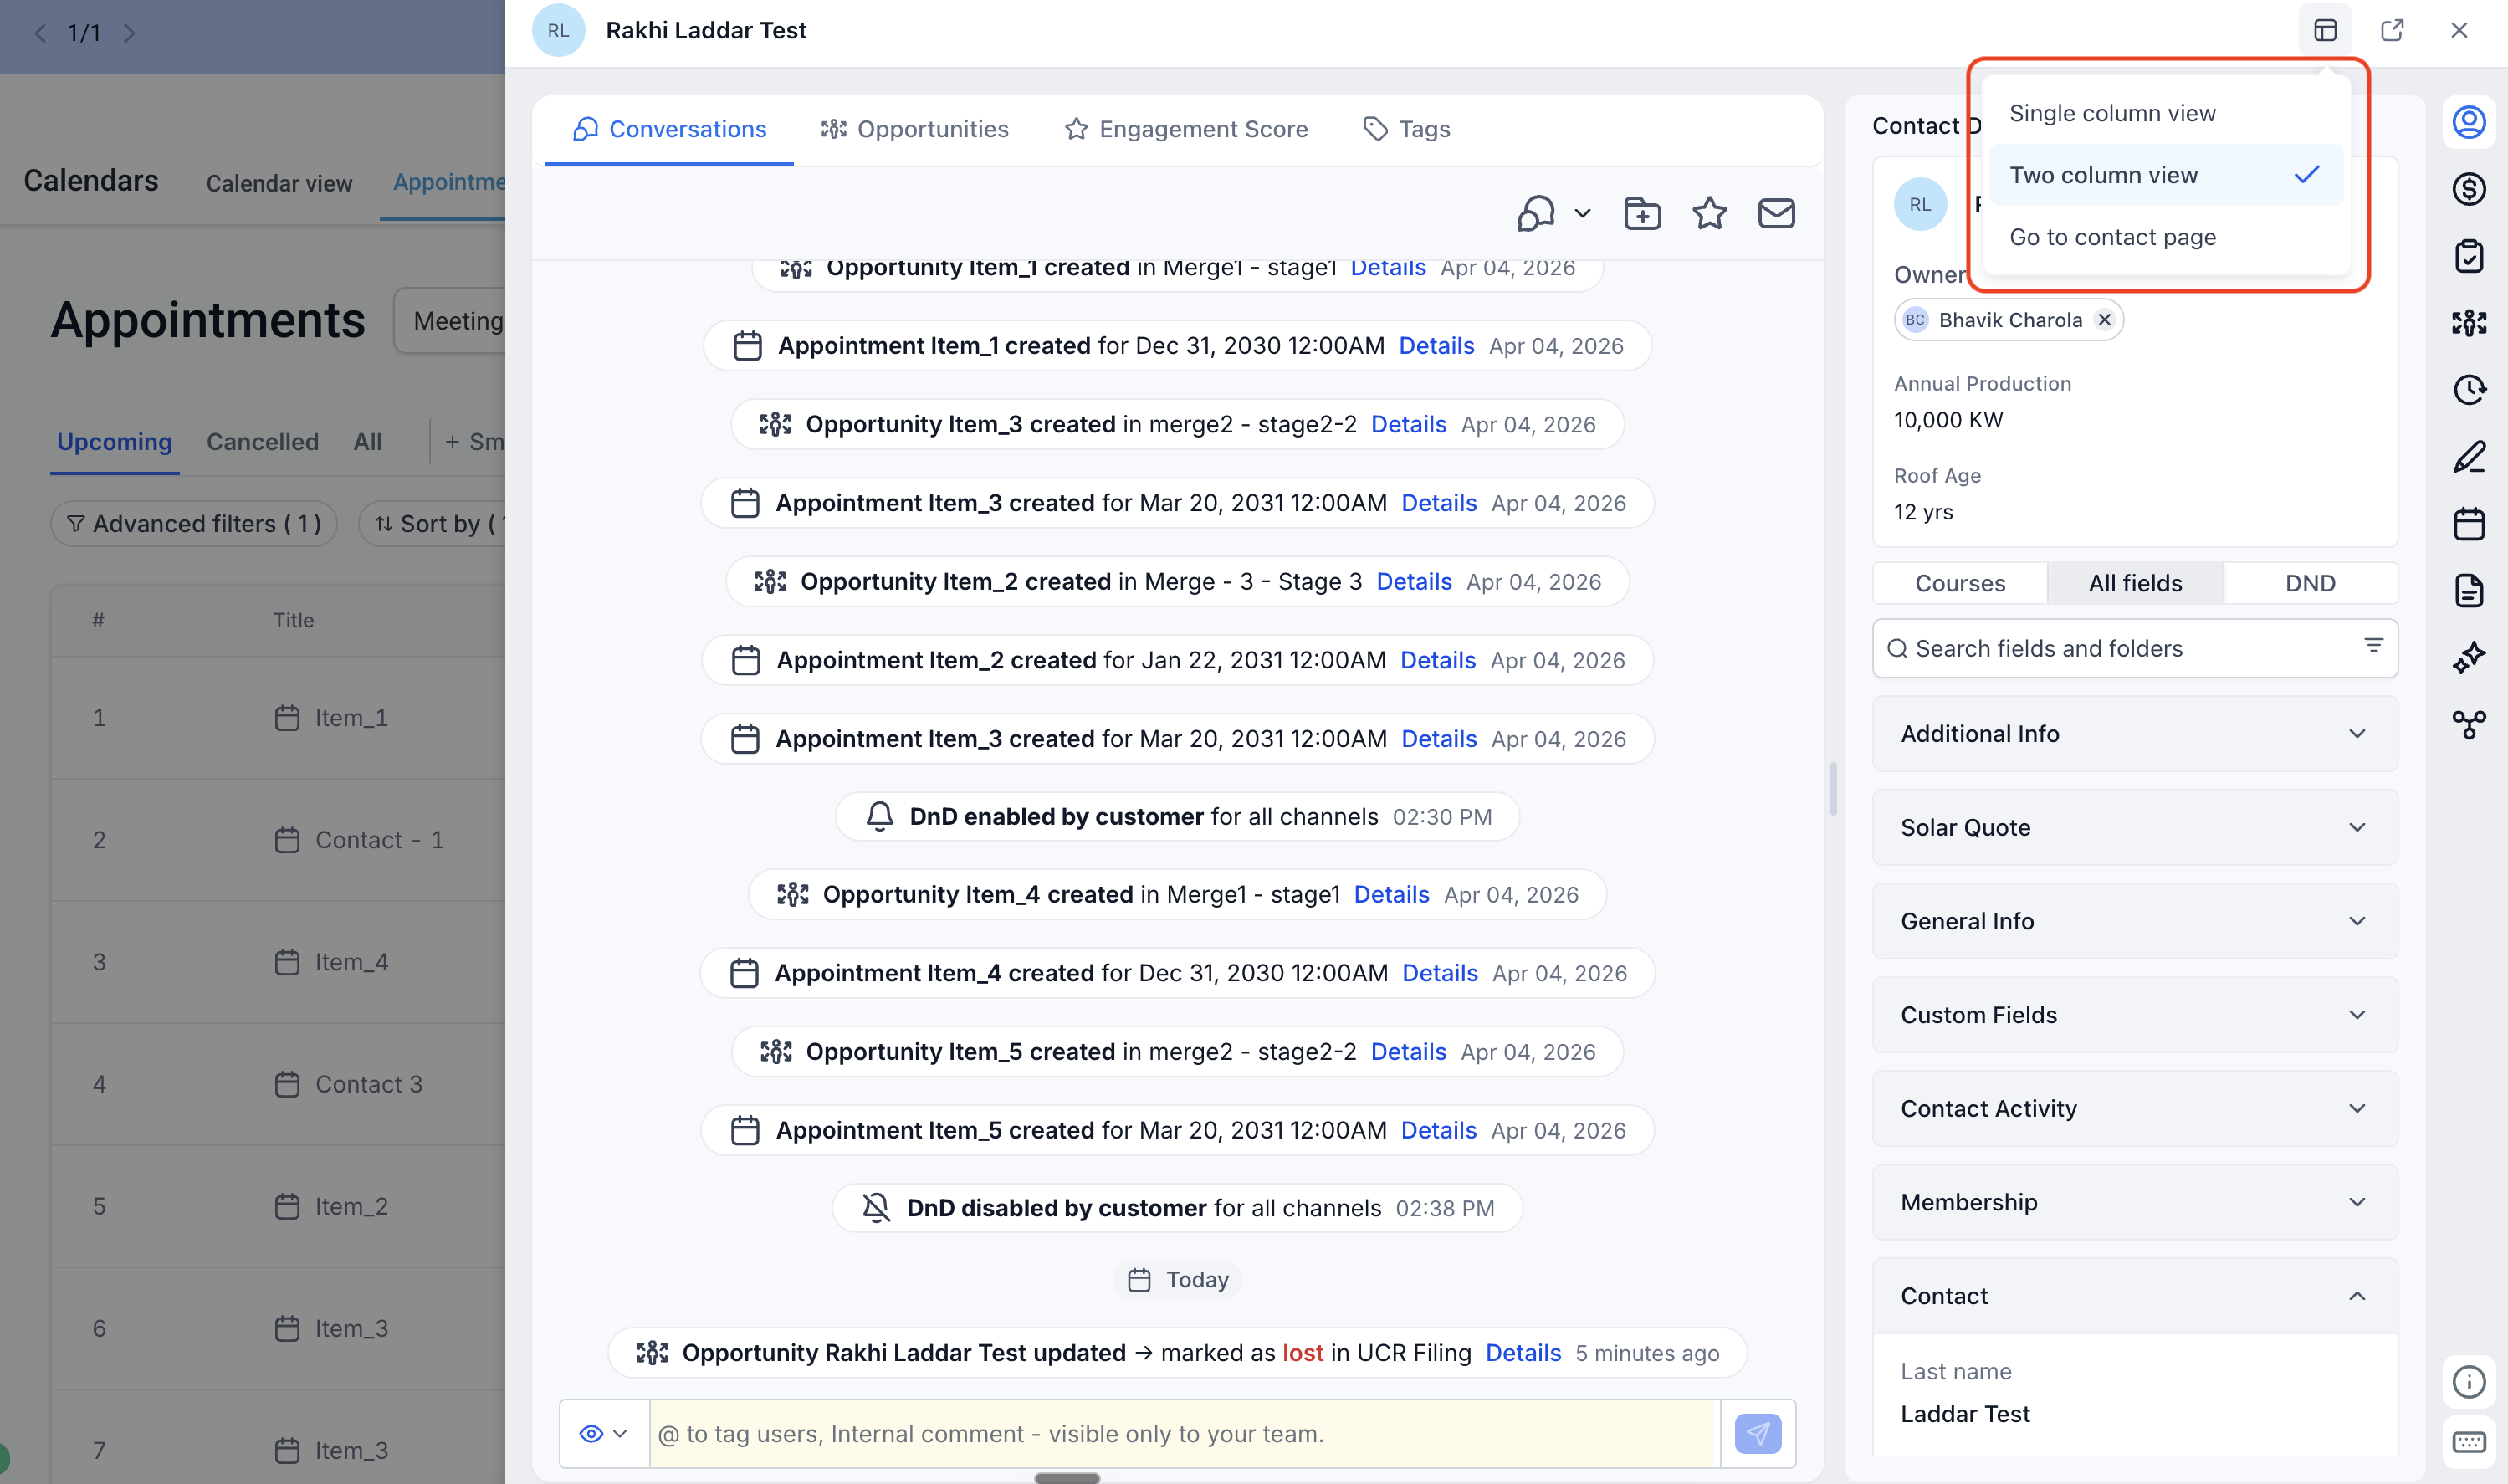
- Single-column view: Provides a more compact contact view for accessing contact information and related right-panel features.
- Two-column view: Expands the overlay to display Contact Details alongside an extended Conversations area, giving you additional context without navigating away from your current page.
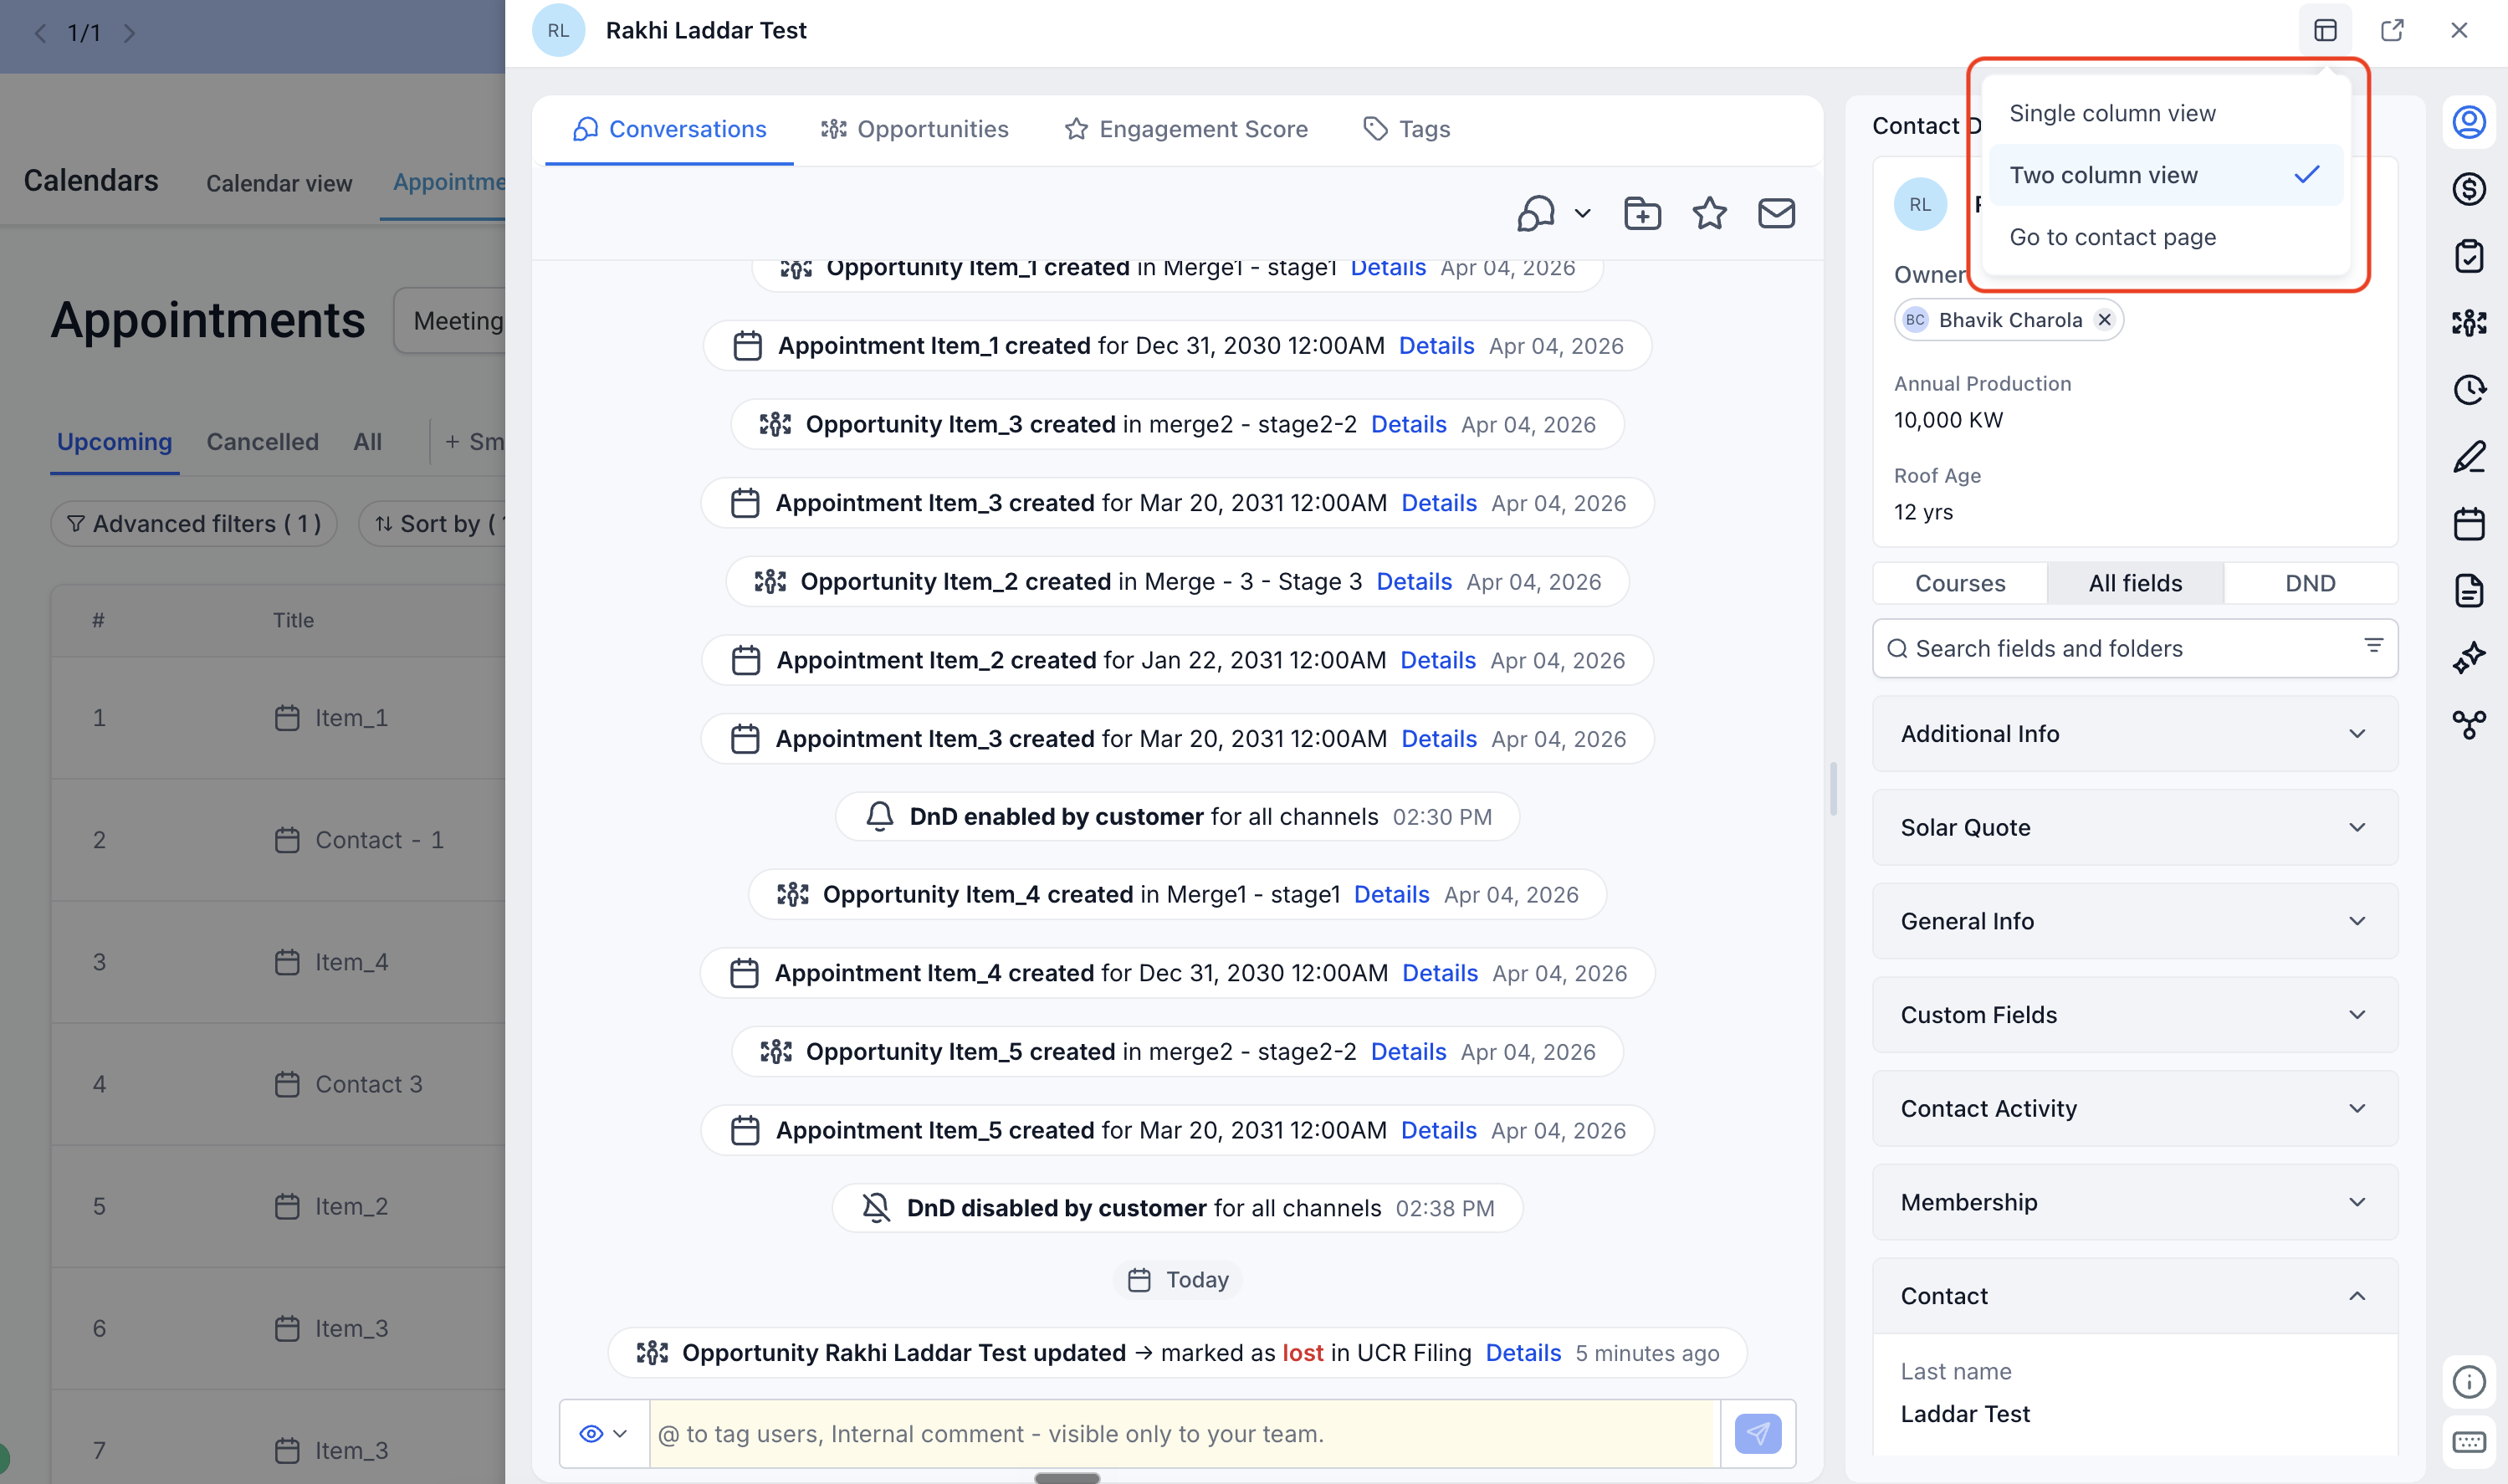
You can switch between these views from the layout control at the top of the overlay.
Note: Single-column and Two-column views are Contact Overlay display options. They are different from the Contact Detail Page layout configurations described in How to Customize the Contact Detail Page.
How To Use the Contact Overlay
The Contact Overlay gives you quick access to contact information while keeping your Opportunities or Appointments workflow in context. Once opened, you can choose the amount of contact and conversation information you want to see or move to the full Contact Detail Page when needed.
- Go to Opportunities or Calendars > Appointment list view.
- Locate the relevant opportunity or appointment.
- Find the contact name or contact icon associated with the record and click it.
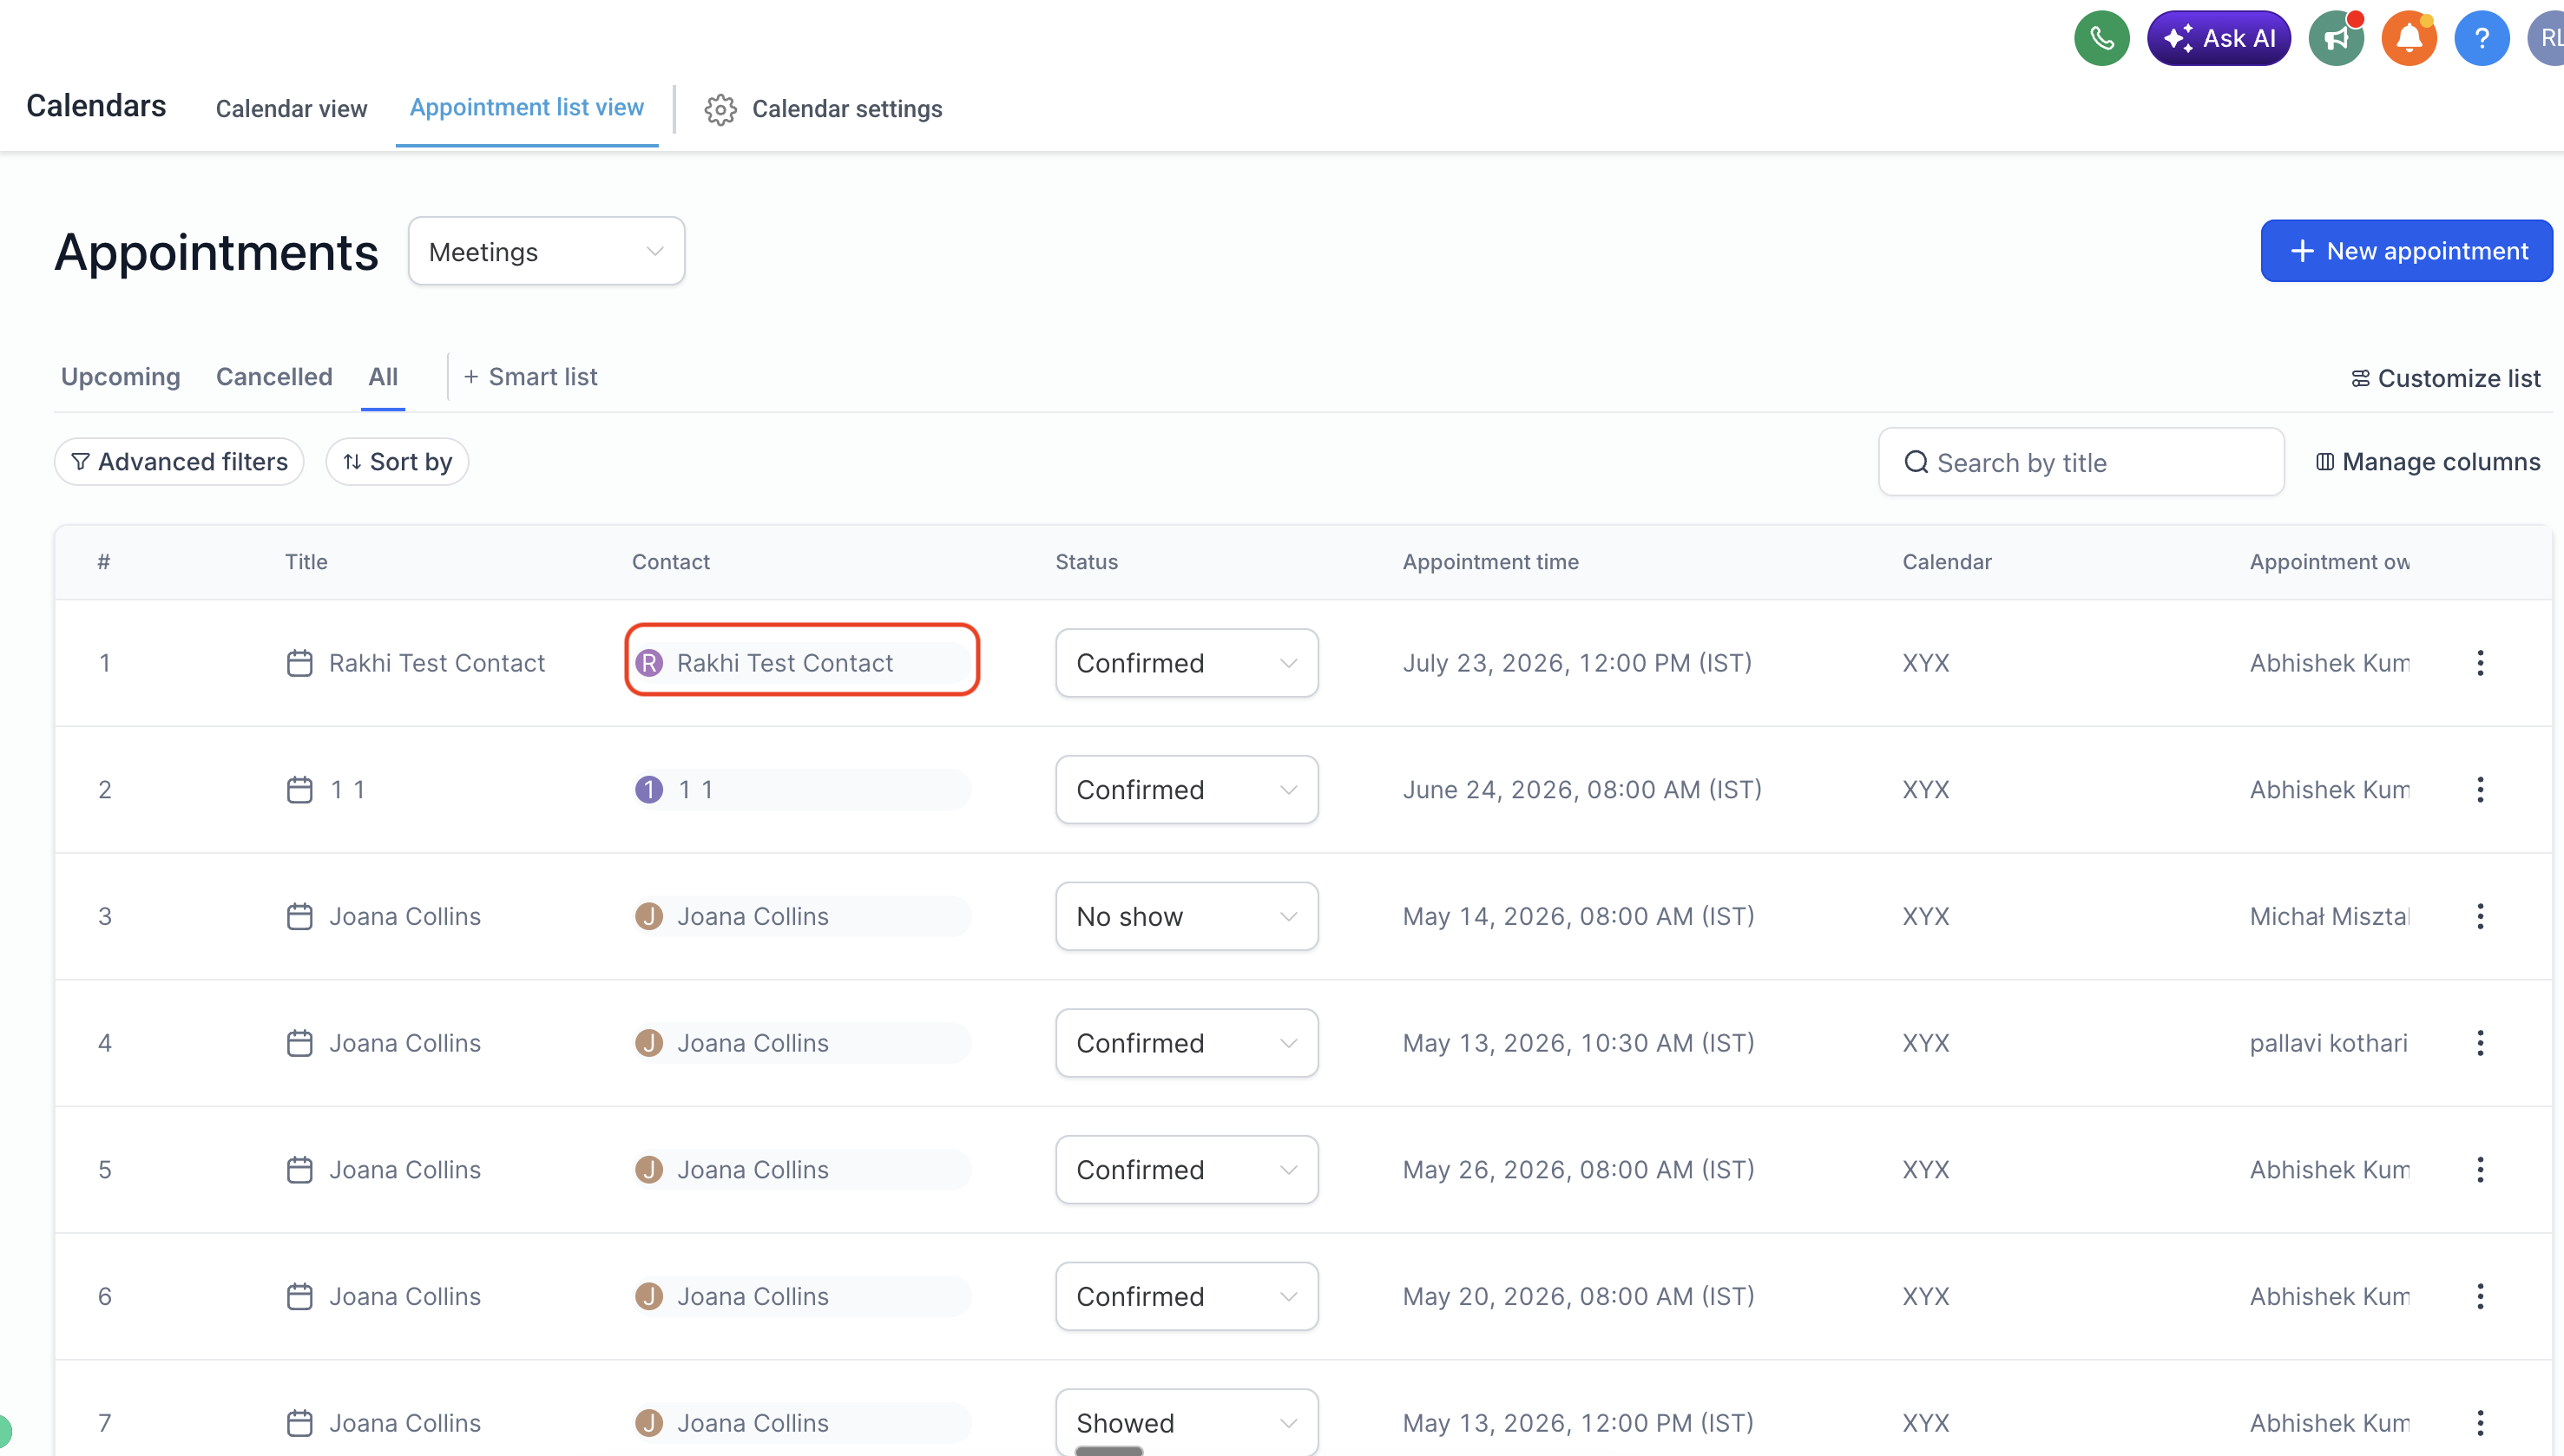
- The Contact Overlay opens while keeping your current Opportunities or Appointments page in context.
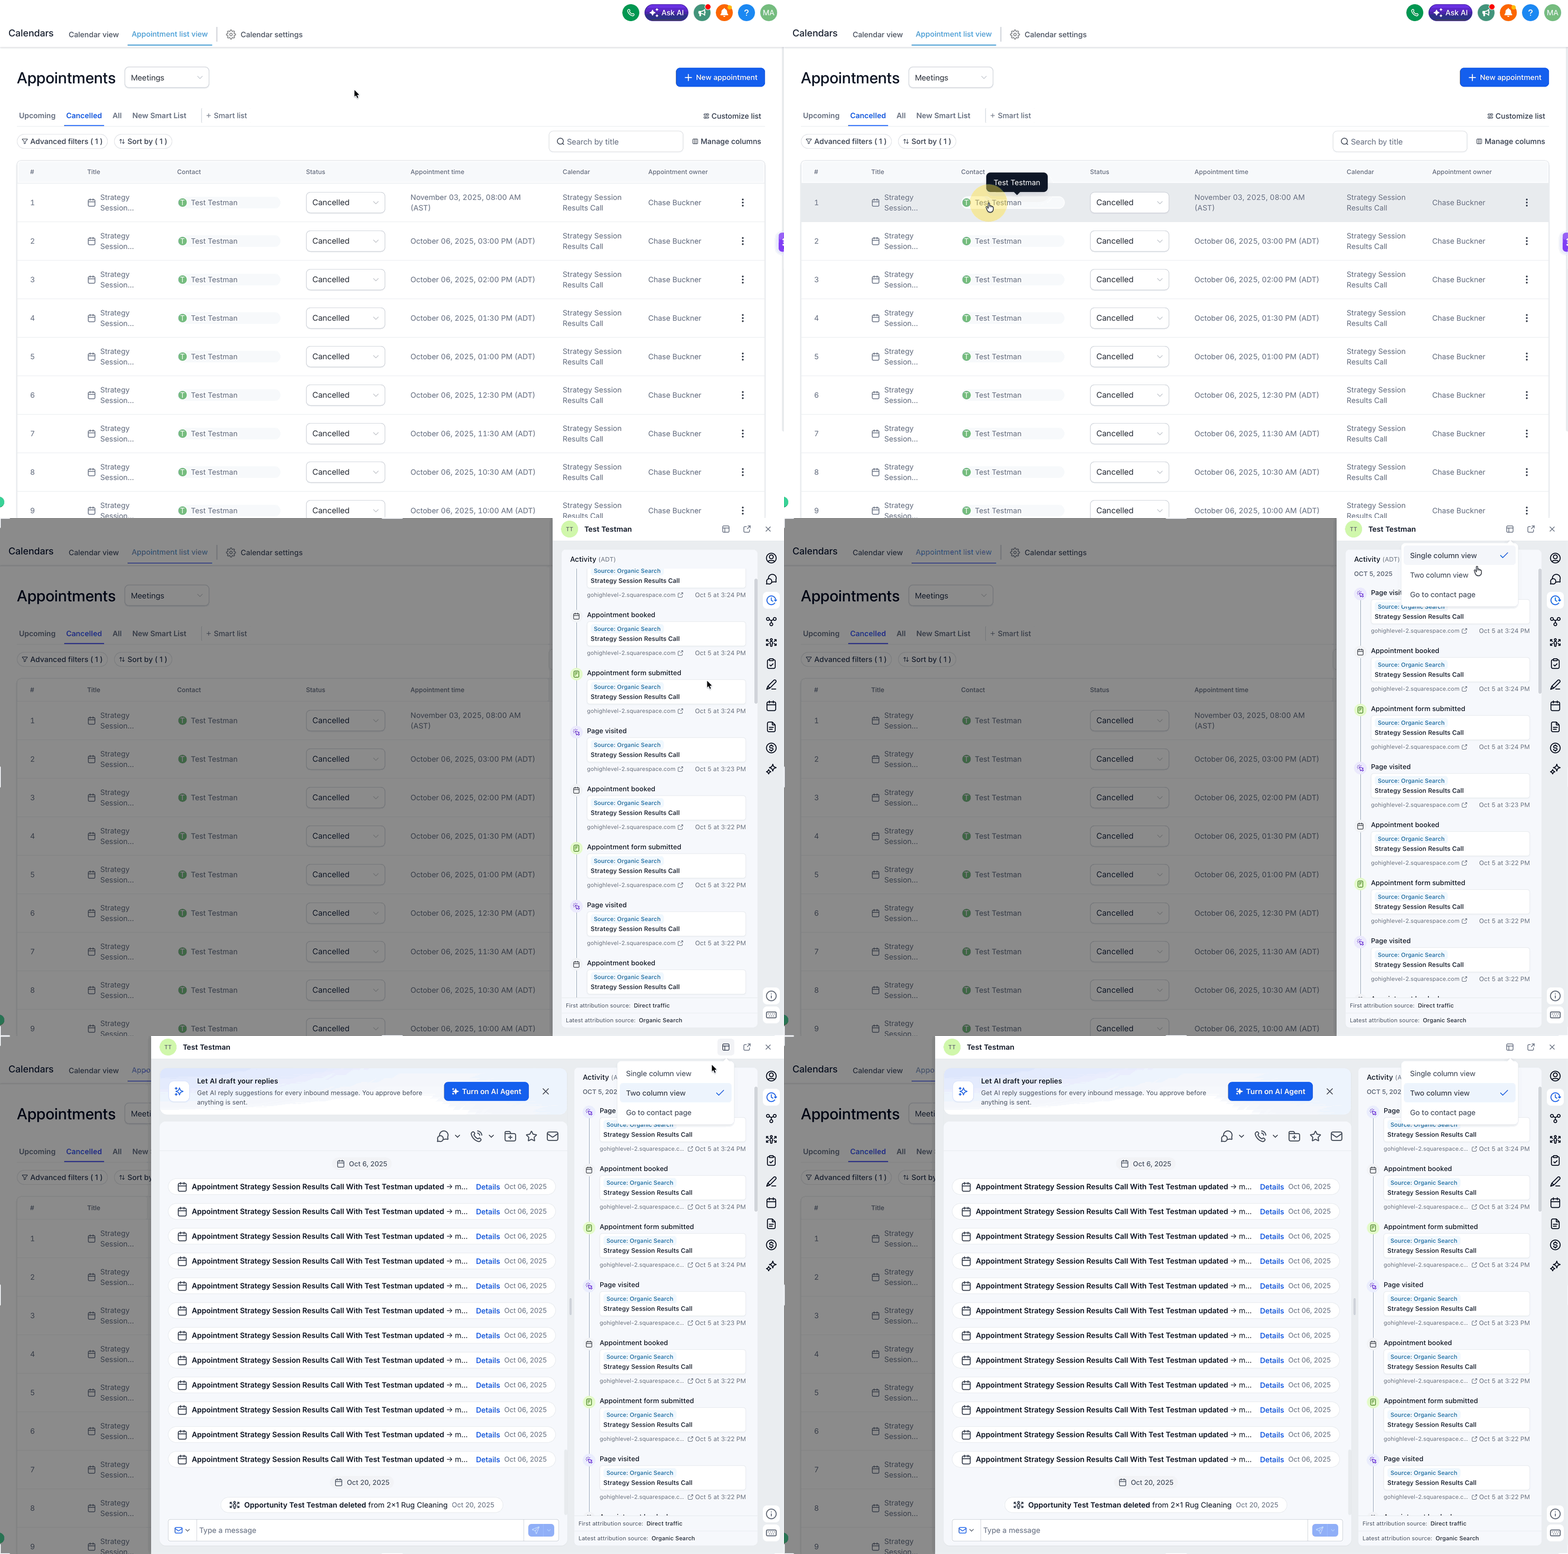
- Review the contact details, conversations, and other available information.
- Use the layout control at the top of the overlay to switch between Single column view, Two column view or Go to Contacts Page as needed.
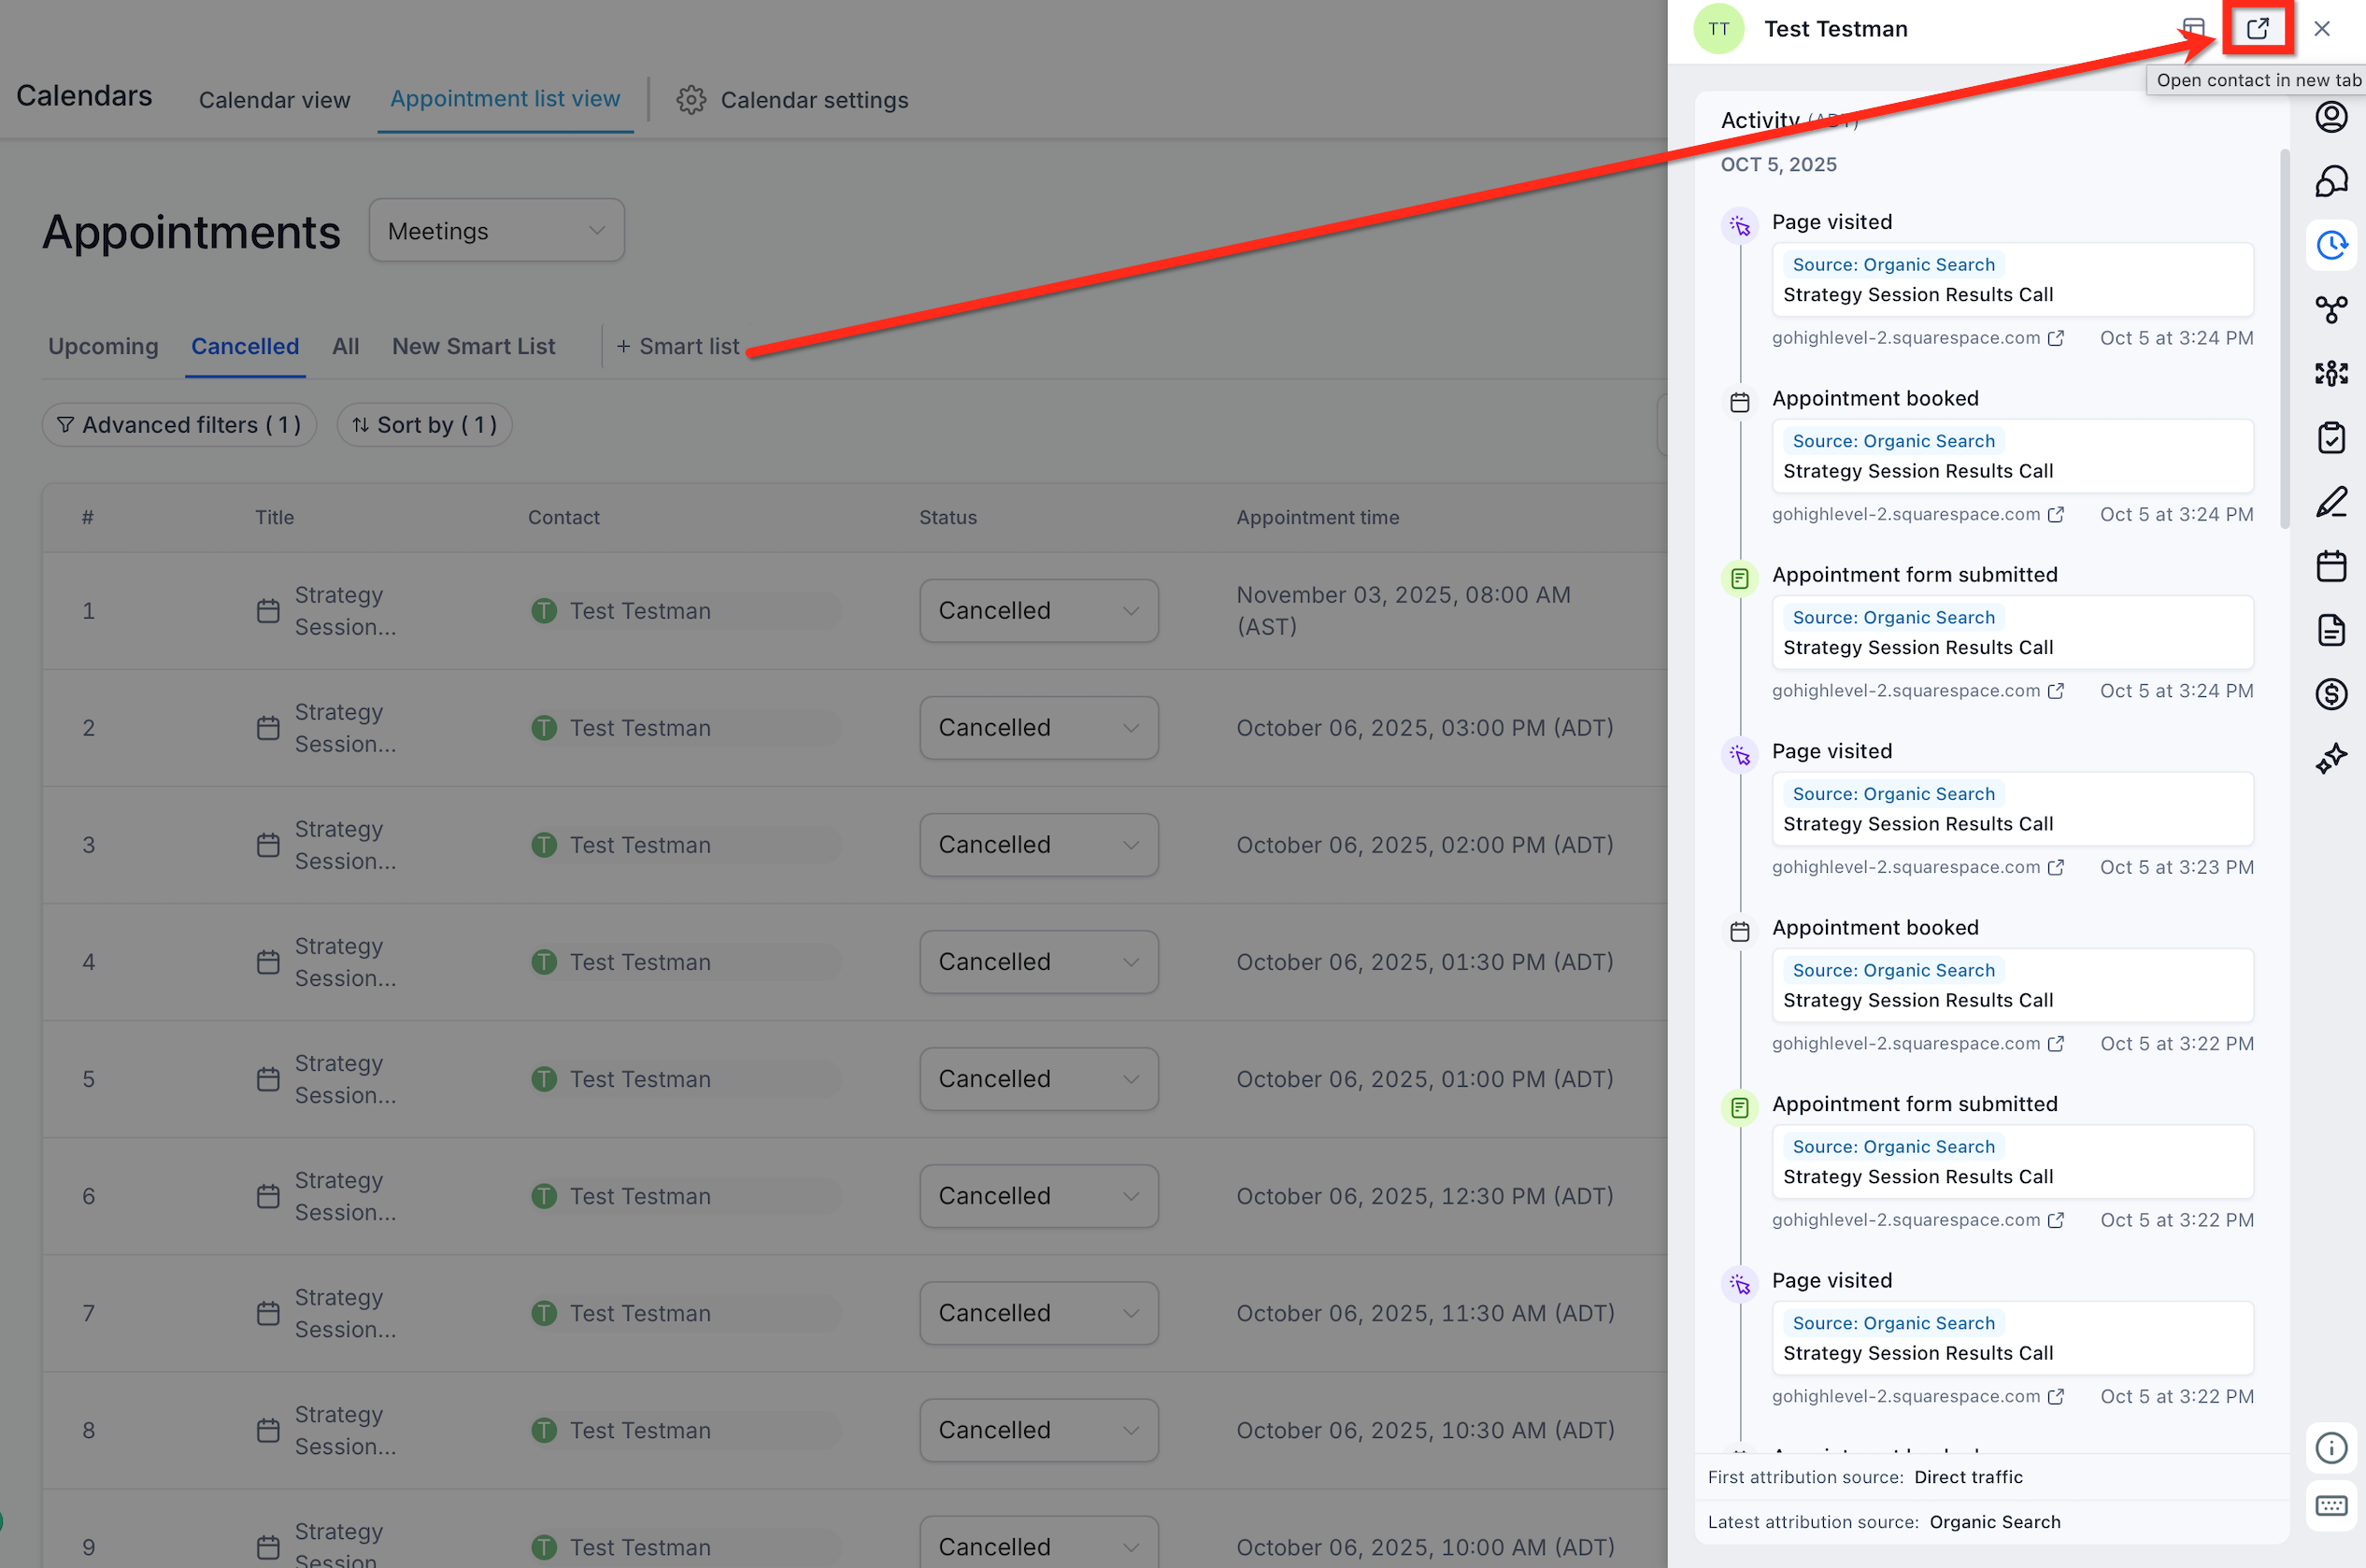
- To access the full contact record, use the Open contact in new tab icon.
- Click the X to close the overlay and continue working on the Opportunities or Appointments page.
Frequently Asked Questions
Q: Where is the Contact Overlay currently available?
The Contact Overlay is currently available when accessing contacts from Opportunities and Appointments.
Q: Are Single-column and Two-column views the same as Contact Detail Page layout settings?
No. Single-column and Two-column views control how the Contact Overlay is displayed. Contact Detail Page layouts are separately configured using the Contact Detail Page customization options.
Q: Do I have to use the Contact Overlay every time I want to access a contact?
No. HighLevel provides an option to open the full Contact Detail Page when you prefer that experience.
Q: Will my customized Contact Detail Page appear differently in the overlay?
The overlay respects your Contact Detail Page customizations, helping maintain a consistent contact experience between the overlay and the full page.
Q: Can I switch overlay views after opening a contact?
Yes. Use the layout control at the top of the overlay to switch between Single-column and Two-column views.
Q: Can I return to the page I was working on after opening the full Contact Detail Page?
Yes. When you move from the overlay to the full Contact Detail Page, you can navigate back to the page you were previously working on.
Q: Is the Contact Overlay available everywhere a contact name appears in HighLevel?
The current release specifically provides the Contact Overlay for Opportunities and Appointments. Availability in other areas should not be assumed.
Related Articles
Was this article helpful?
That’s Great!
Thank you for your feedback
Sorry! We couldn't be helpful
Thank you for your feedback
Feedback sent
We appreciate your effort and will try to fix the article