Custom values let you reuse the same dashboard or report across different subaccounts without manually changing location or user information each time. Instead of typing details such as a location name, address, phone number, or saved custom value, you can insert a placeholder that HighLevel replaces automatically when the dashboard is viewed. This makes dashboards easier to manage and helps agencies avoid creating separate versions for every client.
TABLE OF CONTENTS
- What are Custom Values in Dashboards and Reports?
- Key Benefits of Custom Values
- Types of Values You Can Use
- How the Custom Value Picker Works
- Using Custom Values in Widget Conditions
- Using Custom Values in Dashboard Elements
- One Dashboard for Multiple Subaccounts
- How To Set Up Custom Values in Dashboards and Reports
- Troubleshooting Custom Values
- Frequently Asked Questions
- Related Articles
What are Custom Values in Dashboards and Reports?
Custom values are placeholders that HighLevel replaces with real information when a dashboard or report is viewed. They help you create one dashboard that can automatically show the correct information for each subaccount or logged-in user.
For example, instead of typing a location address directly into a widget condition, you can insert:
{{ location.address }}
When the dashboard is viewed, HighLevel replaces that placeholder with the actual address of the current subaccount.
Custom values can be used in supported dashboard and reporting fields such as:
Widget conditions
Embed URLs
Title elements
Text box elements
You can also choose values from three groups:
Location: Information from the current subaccount
User: Information from the logged-in user
Custom values: Values created under Settings > Custom Values
Key Benefits of Custom Values
Custom values help reduce repeated dashboard setup by allowing the same dashboard to adjust automatically for different locations and users. This is especially useful for agencies that manage many subaccounts.
Reuse one dashboard: Create one dashboard and use it across multiple subaccounts.
Show the correct location information: Location details update automatically based on the subaccount viewing the dashboard.
Show user-specific information: User values can display information for the person currently logged in.
Use saved custom values: Values created under Settings > Custom Values can be added directly to supported dashboard fields.
Reduce manual updates: Update the source value once instead of editing every dashboard separately.
Find values quickly: Use the
{}button to search or browse available values.
Types of Values You Can Use
HighLevel groups available values into Location, User, and Custom values. Understanding the difference between these groups helps you choose the correct information for your dashboard or report.
Location Values
Location values come from the subaccount that is viewing the dashboard.
Available fields include:
Location ID
Location Name
Email
Phone
Website
Address
City
State
Country
Postal Code
Timezone
For example, {{ location.address }} displays the address of the current subaccount.
User Values
User values come from the user who is currently logged in.
Available fields include:
User ID
Email
Phone
Role
Type
First Name
Last Name
Name
Full Name
These values are useful when a dashboard should show information that changes depending on who is viewing it.
Custom Values
Custom values are reusable values created under Settings > Custom Values.
Examples may include:
Weekly coaching topic
Support phone number
Office hours
Internal links
Business-specific text
Custom values appear in the picker and are organized by folder.
How the Custom Value Picker Works
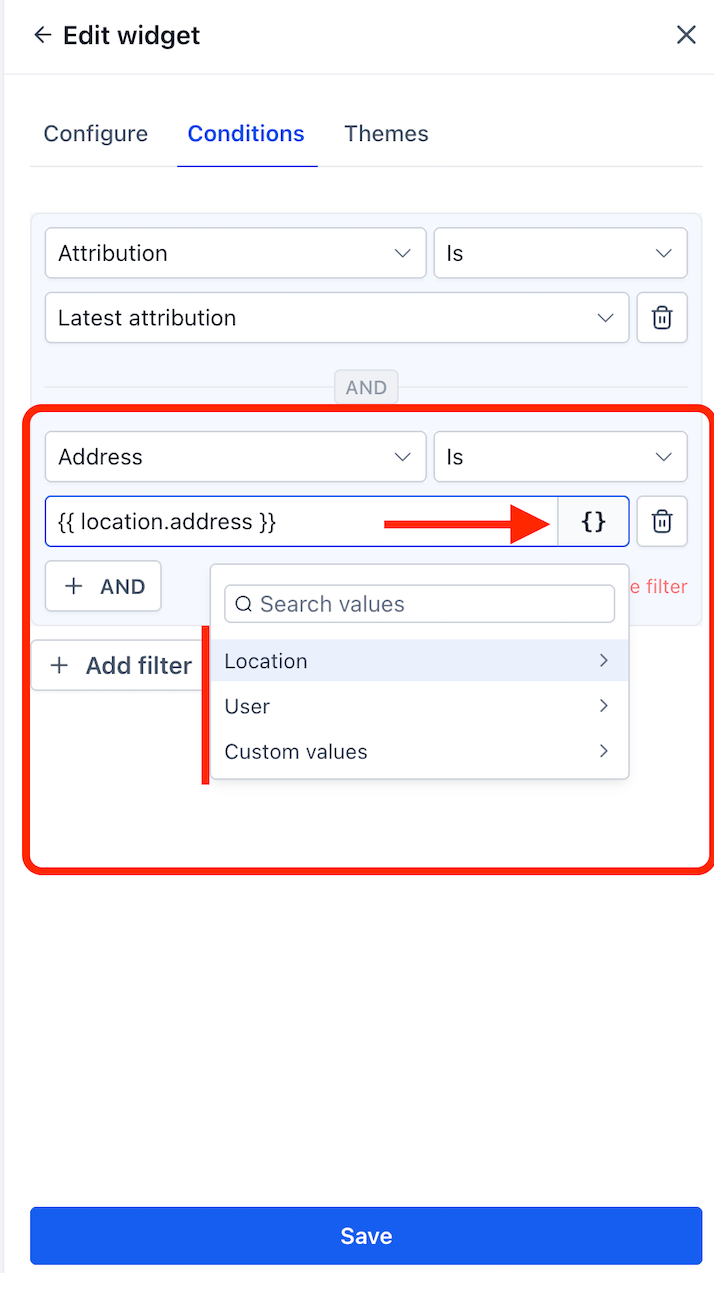
The custom value picker gives you a simple way to insert location, user, or saved custom values without typing the placeholder manually. Wherever the {} button appears beside a supported field, you can open the picker and choose the value you need.
To use the picker:
Click the
{}button beside a supported field.Search for a value or browse by category.
Choose Location, User, or Custom values.
Select the field you want.
HighLevel inserts the placeholder automatically.
For example:
{{ location.address }}
The placeholder stays visible while editing. When the dashboard is viewed, HighLevel replaces it with the actual value.
Using Custom Values in Widget Conditions
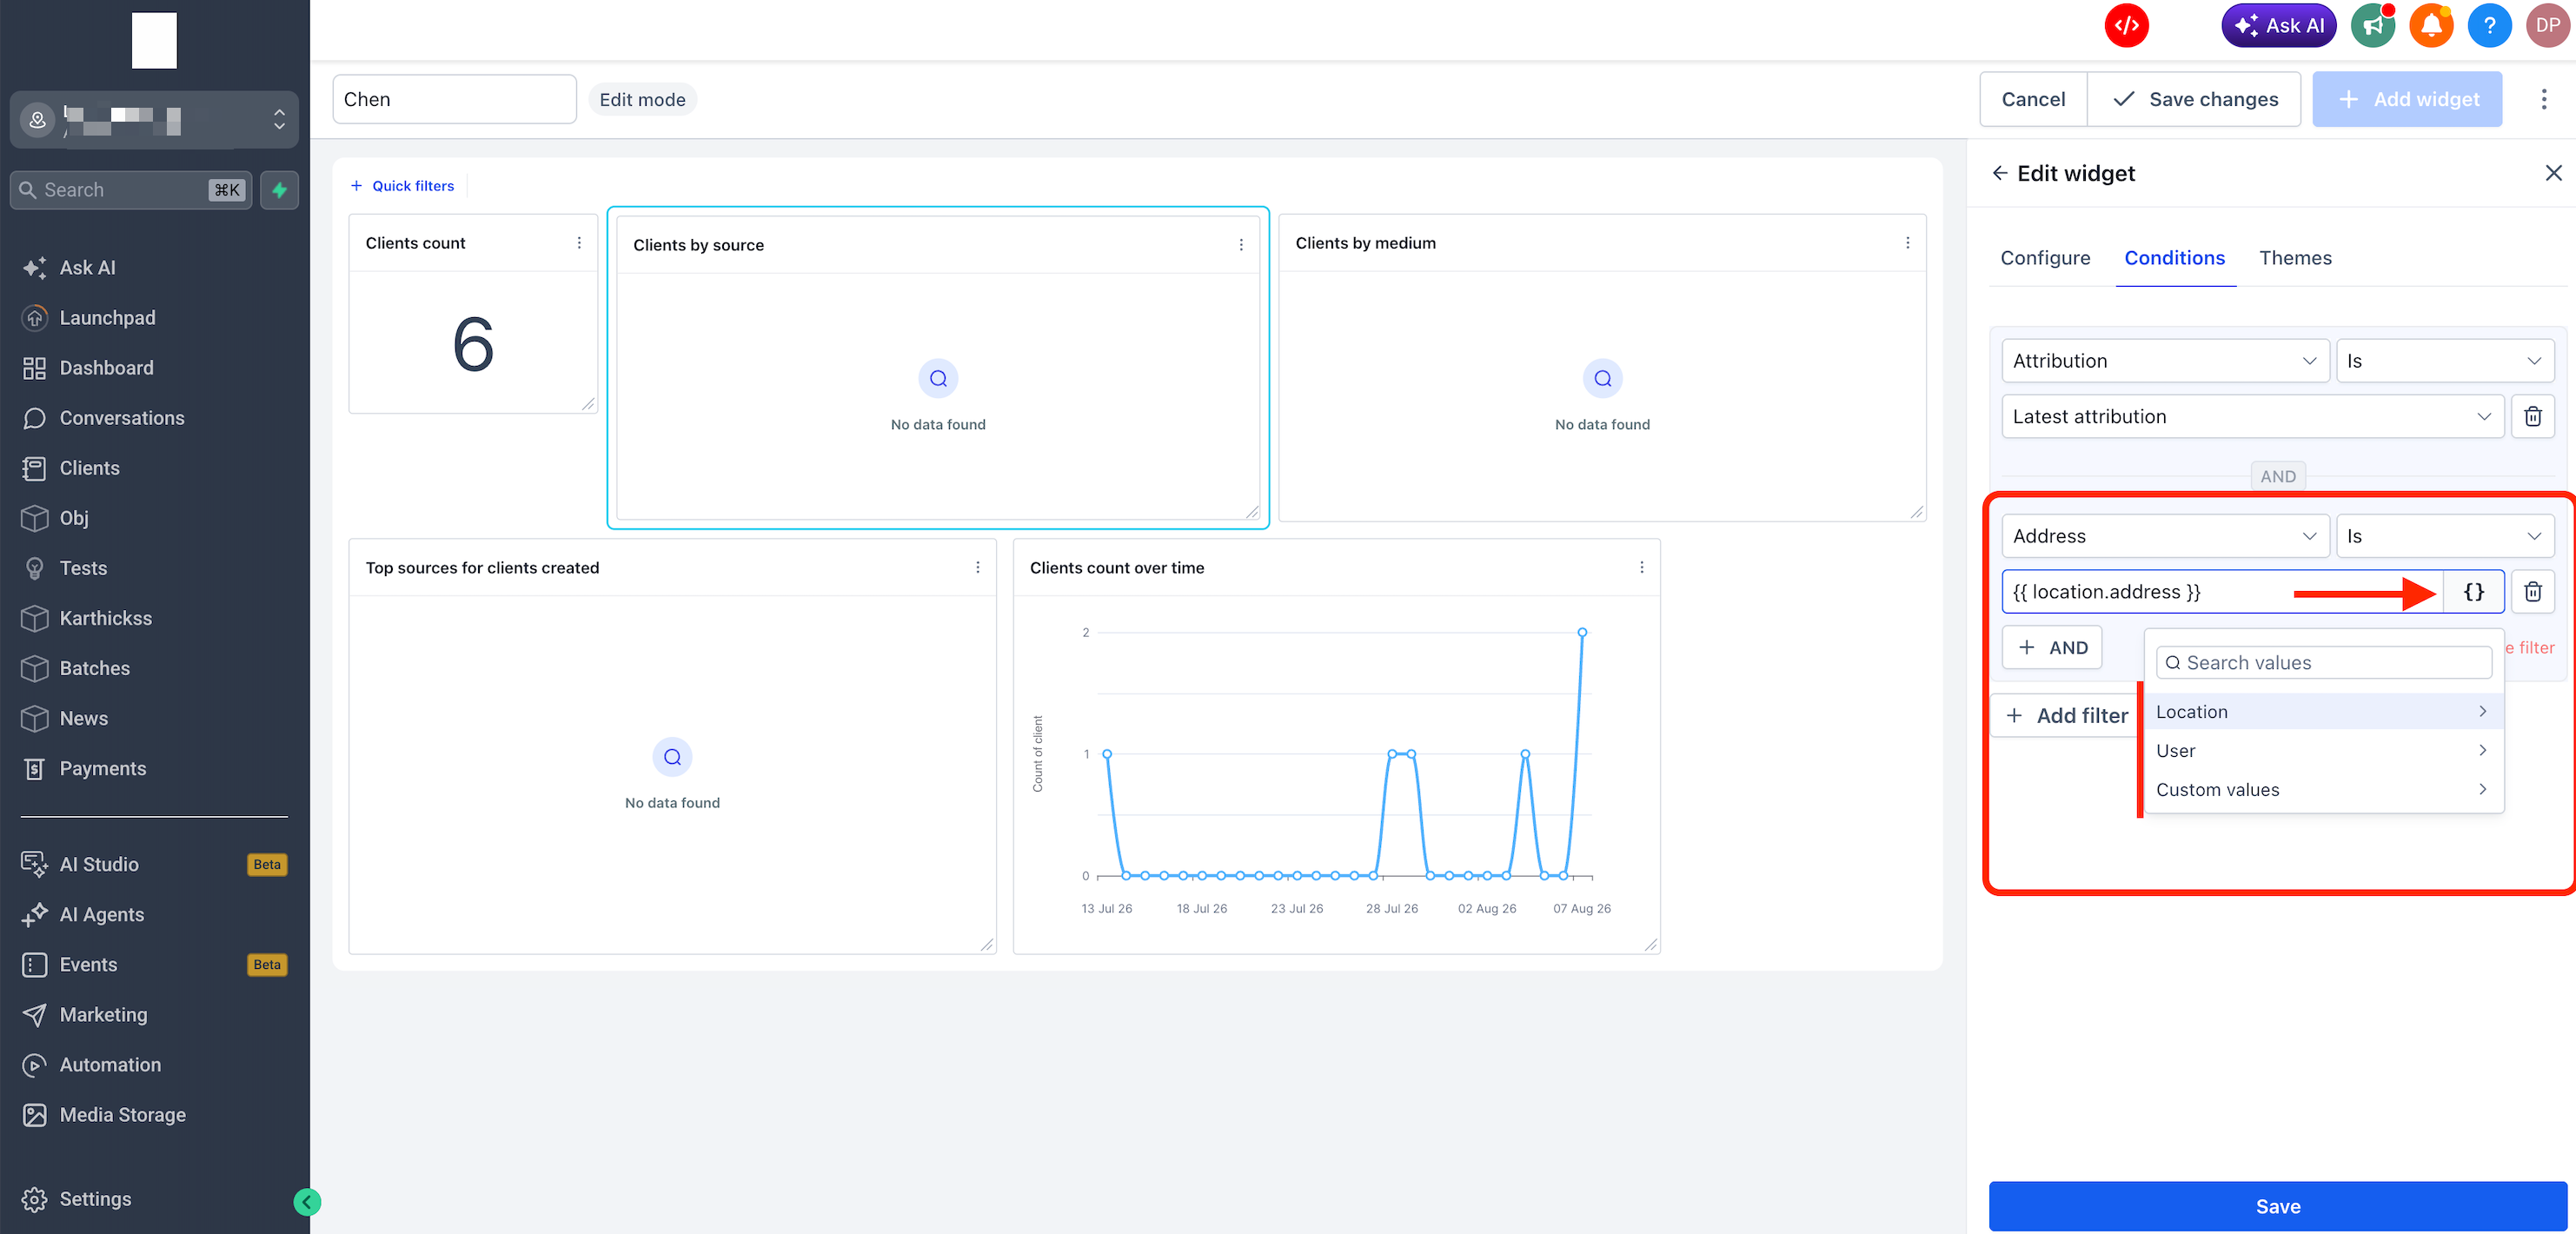
Custom values can be added to supported text fields inside widget conditions. This helps a widget automatically use the correct location, user, or saved value instead of relying on information entered manually.
For example, instead of typing a specific business address into a widget filter, you can insert:
{{ location.address }}
The widget then uses the address of whichever subaccount is viewing the dashboard.
This is useful when the same dashboard is shared across several subaccounts because you do not need to create a separate version for each location.
Using Custom Values in Dashboard Elements
Supported dashboard elements can also use dynamic values so titles, text, and links can change automatically. This helps you personalize dashboards without creating separate copies.
Custom values are supported in:
Embed URLs
Title elements
Text box elements
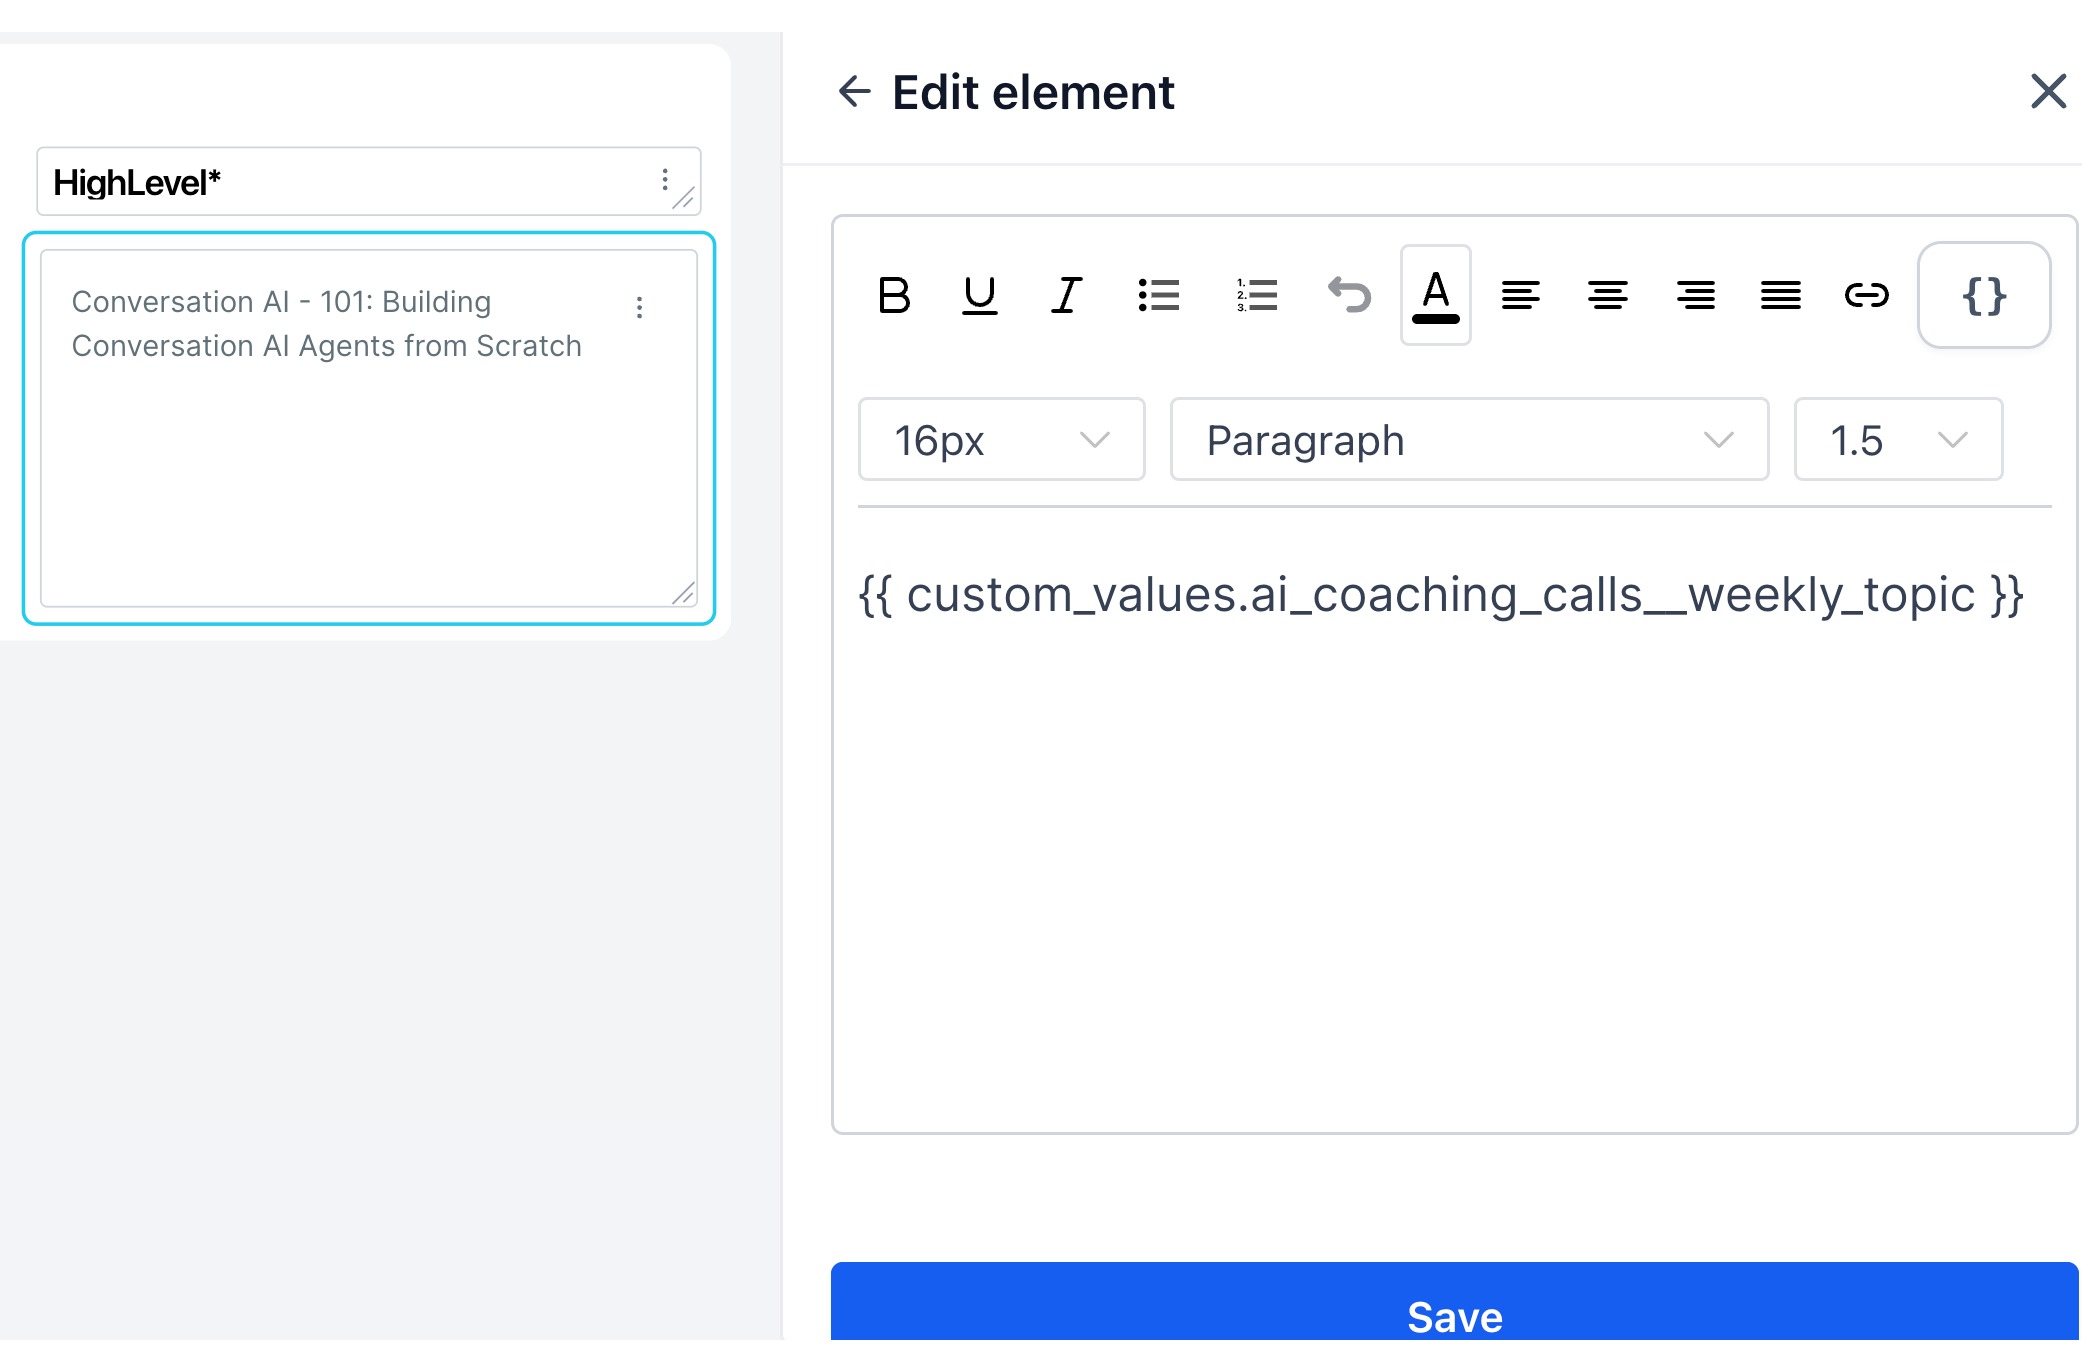
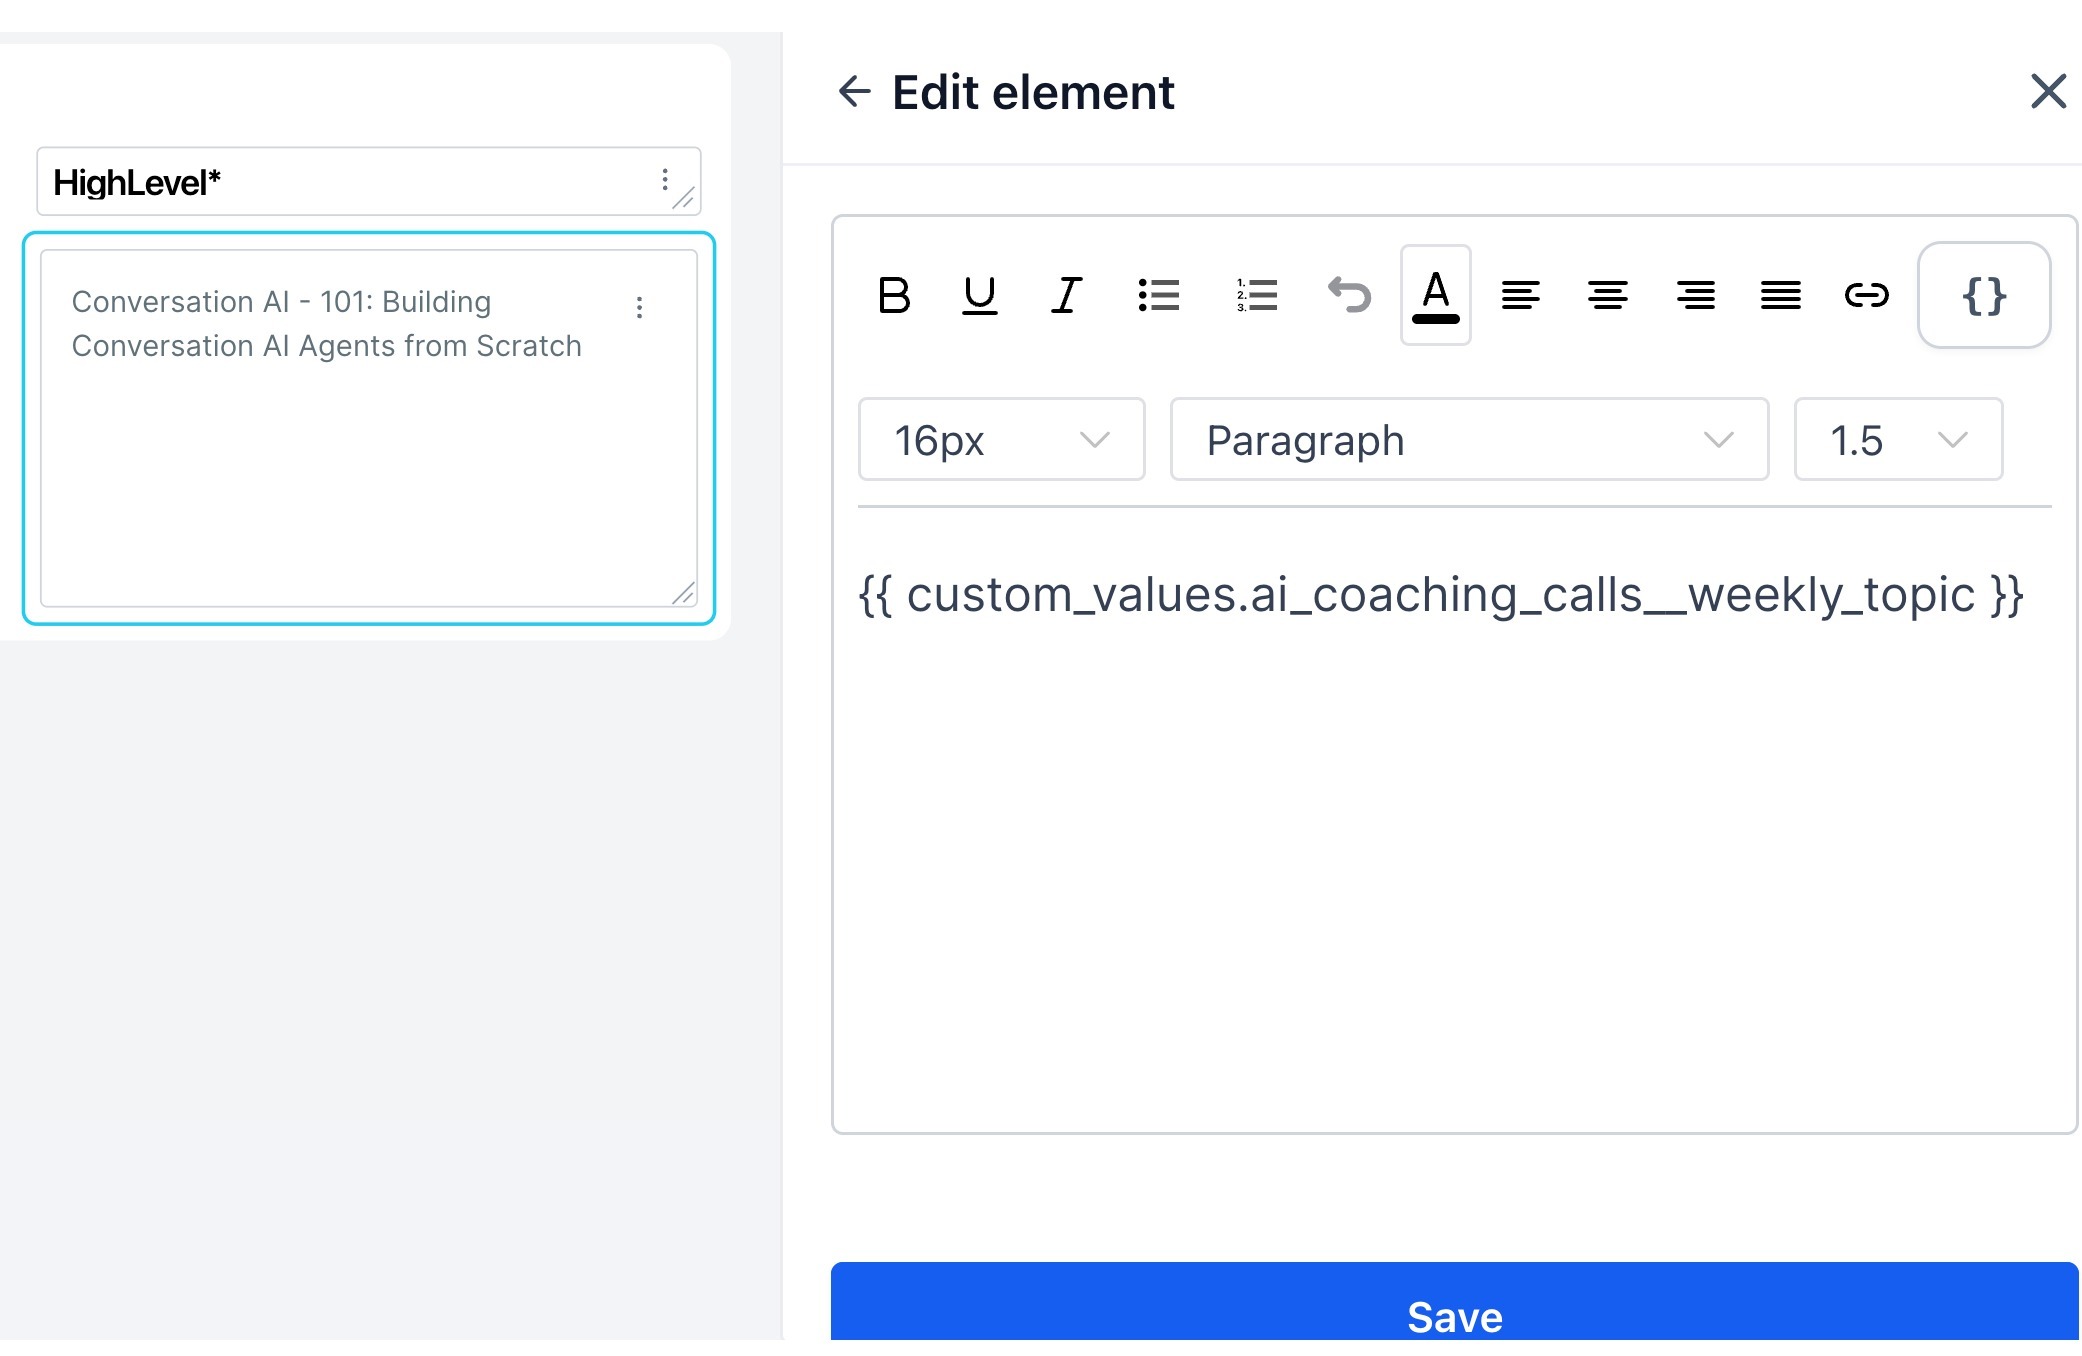
For example, a Text box can include a saved value such as:
{{ custom_values.ai_coaching_calls__weekly_topic }}
When the dashboard is viewed, HighLevel replaces the placeholder with the value saved for that subaccount.
One Dashboard for Multiple Subaccounts
Using dynamic values allows agencies to maintain one dashboard instead of creating a separate copy for every client. HighLevel fills in the correct information automatically when each subaccount views the dashboard.
For example, one dashboard could contain:
{{ location.name }}{{ location.address }}{{ location.phone }}
If Location A opens the dashboard, it sees Location A's information.
If Location B opens the same dashboard, it sees Location B's information.
The dashboard itself does not need to be copied or edited for each subaccount.
How To Set Up Custom Values in Dashboards and Reports
Adding a dynamic value only takes a few steps. The setup is slightly different depending on whether you are adding it to a widget condition or to a dashboard element.
Add a Custom Value to a Widget Condition
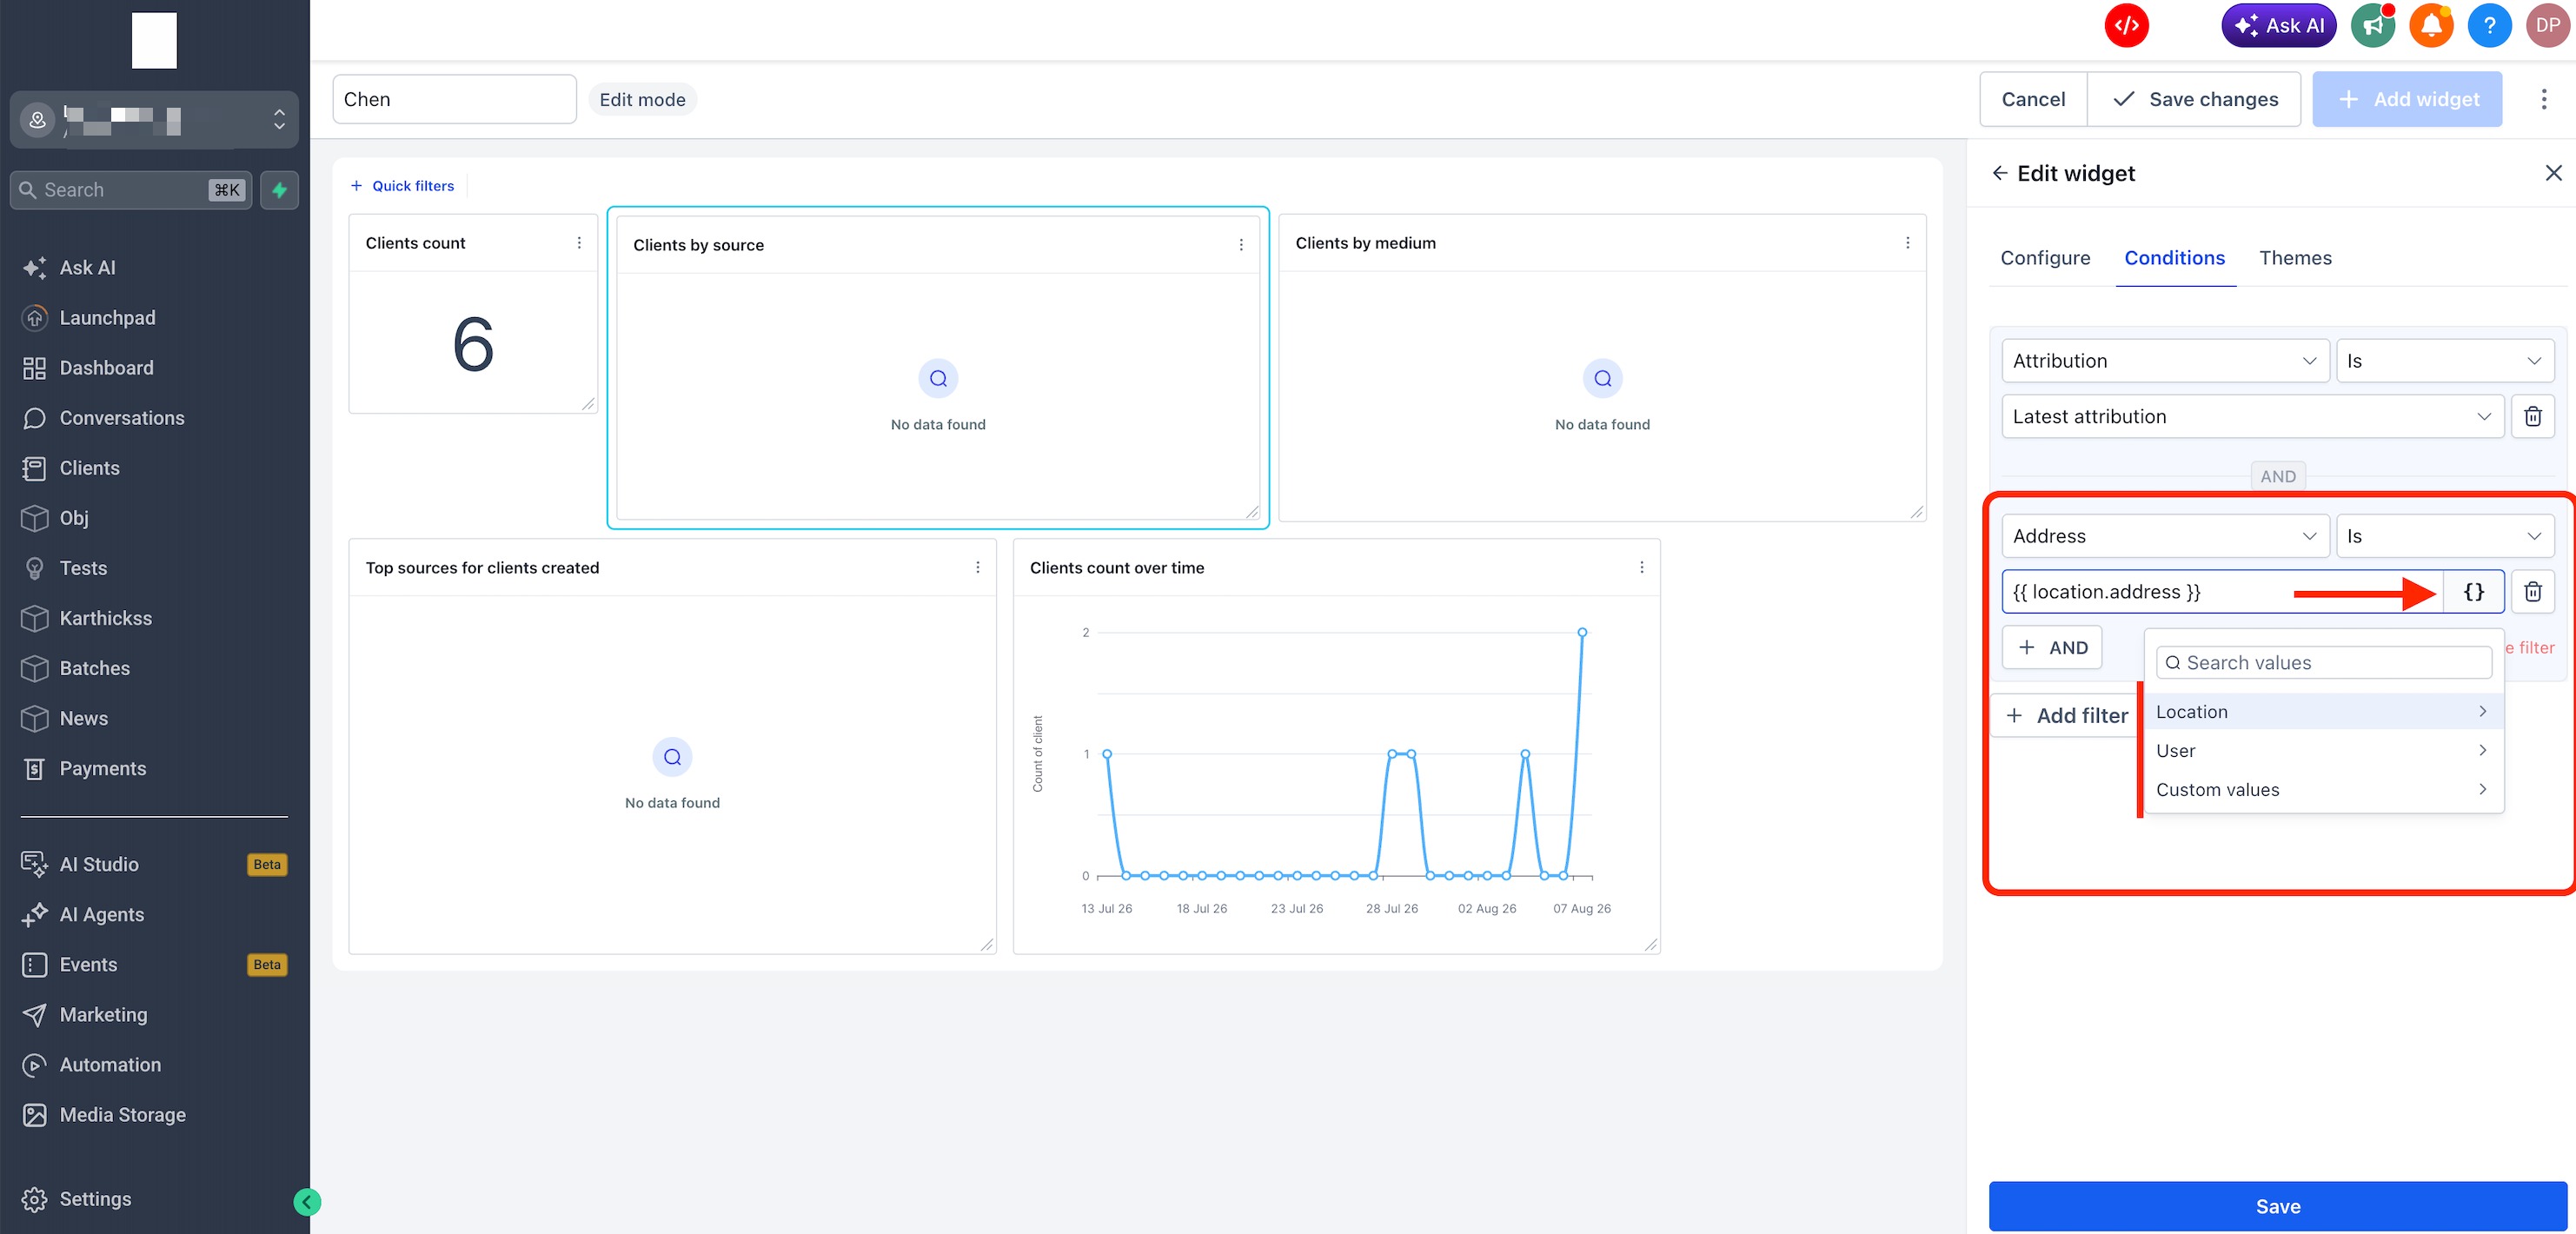
Open the dashboard in Edit mode.
Select the widget you want to update.
Open the Conditions tab.
Add or edit a condition that contains a supported text field.
Click the
{}button beside the field.Choose Location, User, or Custom values.
Search for or select the value you want.
Confirm that the placeholder appears in the field.
Click Save.
Save the dashboard changes.
Add a Custom Value to a Dashboard Element
Open the dashboard in Edit mode.
Add or edit a supported element.
Choose an Embed, Title, or Text box element.
Click the
{}button where available.Select Location, User, or Custom values.
Choose the value you want.
Confirm that the placeholder appears in the element.
Click Save.
Save the dashboard changes.
Create a Custom Value First
If the value you need does not already exist, create it before adding it to the dashboard.
Go to Settings > Custom Values.
Create the custom value.
Add it to a folder if needed.
Save the value.
Return to the dashboard.
Open the
{}picker.Find the new value under Custom values.
Troubleshooting Custom Values
Most problems happen when the field does not support dynamic values, the saved custom value is empty, or the wrong value type is selected. Checking the source value first can help you quickly find the issue.
The {} button does not appear
The field may not support dynamic values. Custom values only work in supported dashboard and report fields.
The custom value is missing
Check Settings > Custom Values and make sure the value exists and is saved.
The dashboard shows a blank value
The saved value may be empty for that subaccount. Check the source information or custom value.
The wrong location information appears
Location values use information from the subaccount viewing the dashboard. Confirm that the correct subaccount is open.
The wrong user information appears
User values are based on the user who is currently logged in.
Frequently Asked Questions
Q: Can I use Location, User, and Custom values in the same dashboard?
A: Yes. You can use different value types throughout the same dashboard wherever dynamic values are supported.
Q: Do Location values change automatically for each subaccount?
A: Yes. Location values use the information from the subaccount viewing the dashboard.
Q: Which user is used for User values?
A: User values use the information from the person who is currently logged in.
Q: Can I use custom values in every dashboard field?
A: No. Dynamic values work only in supported fields. Look for the {} button to confirm that a field supports them.
Q: Can I use more than one custom value in a Text box?
A: Yes, if the element supports the values you want to insert.
Q: What happens if a custom value is empty?
A: The dashboard may display a blank result where that value is used.
Q: Do custom values also work in Custom Reports?
A: Yes. Dynamic values are supported in applicable areas of Dashboards and Custom Reports.
Q: Do I need a separate dashboard for every subaccount?
A: Not when the differences can be handled with dynamic values. One dashboard can automatically show the correct location-specific information for different subaccounts.
Related Articles
Was this article helpful?
That’s Great!
Thank you for your feedback
Sorry! We couldn't be helpful
Thank you for your feedback
Feedback sent
We appreciate your effort and will try to fix the article