HighLevel’s Client Portal File Uploaded workflow trigger helps businesses respond automatically when a contact submits a document through the Client Portal. Use it to acknowledge uploads, notify team members, create review tasks, or begin the next stage of an onboarding or approval process. This removes the need to monitor contact records manually and helps document-based processes move forward without unnecessary delays.
TABLE OF CONTENTS
- What is the Client Portal File Uploaded Workflow Trigger?
- Key Benefits of the Client Portal File Uploaded Workflow Trigger
- How Client Portal File Uploads Work
- Supported File Types
- Share a File with a Client Through the Client Portal
- Upload a File as a Client Portal User
- How to Set Up the Client Portal File Uploaded Workflow Trigger
- Frequently Asked Questions
- Related Articles
What is the Client Portal File Uploaded Workflow Trigger?
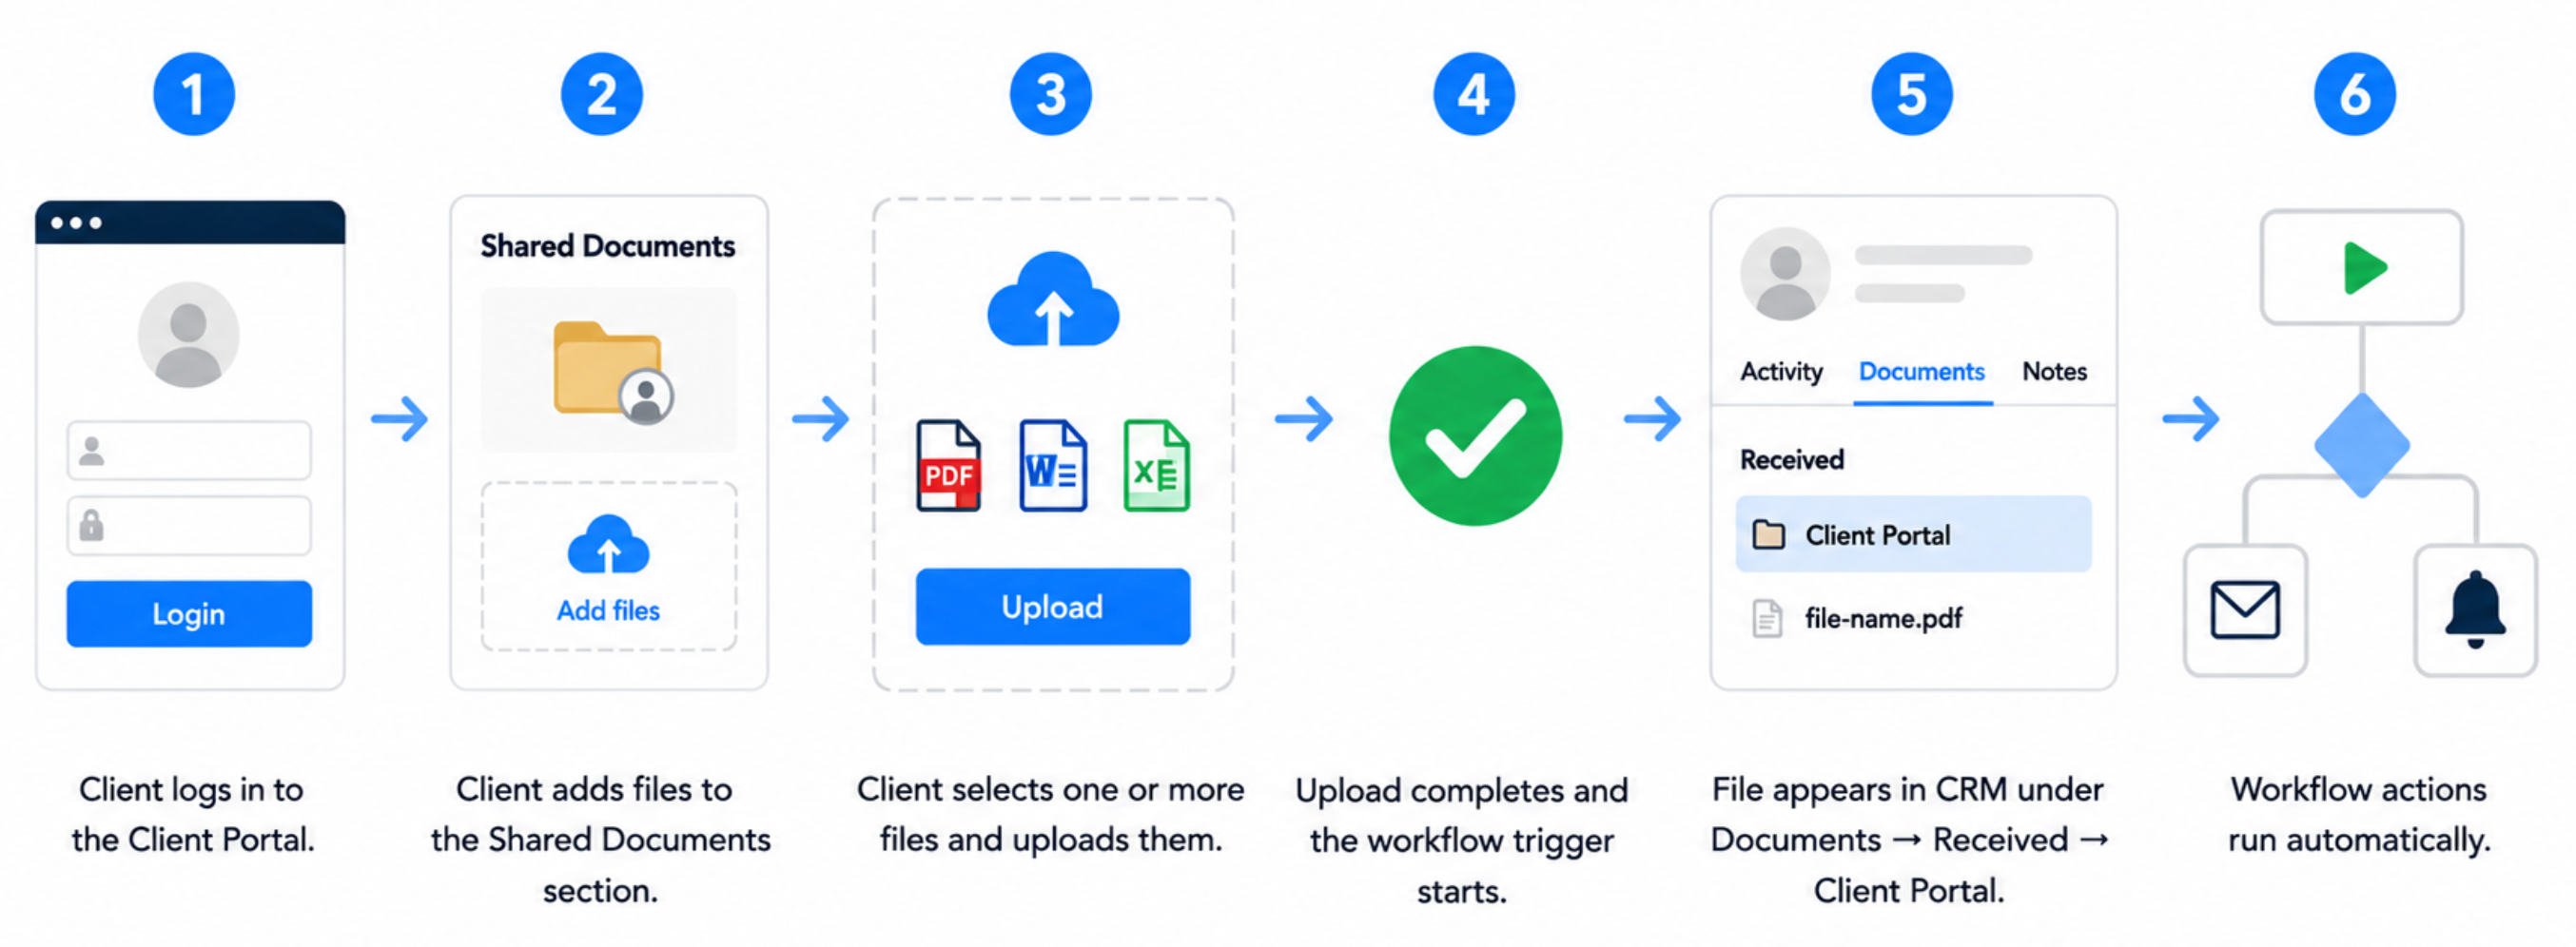
The Client Portal File Uploaded workflow trigger starts a workflow when a contact uploads a file through the Shared Documents experience in the Client Portal. The uploaded file is connected to the contact’s CRM record, allowing teams to manage the document and coordinate follow-up from one location.
After a client completes an upload, the workflow can run actions such as sending a confirmation, notifying an internal user, creating a task, updating a contact, or moving an opportunity forward. Uploaded files remain accessible under Contacts → Documents → Received → Client Portal.
Key Benefits of the Client Portal File Uploaded Workflow Trigger
Eliminate manual monitoring: Start the appropriate workflow as soon as a contact submits a file instead of repeatedly checking the contact record.
Reduce processing delays: Notify reviewers or create internal tasks immediately after documents arrive.
Improve client communication: Send an automatic acknowledgment or next-step message after an upload.
Support faster onboarding: Begin the next onboarding or approval stage without waiting for a team member to identify the new document.
Prevent missed submissions: Use workflow actions to make uploaded documents visible to the appropriate team members.
Create consistent processes: Apply the same review and follow-up steps to every qualifying Client Portal upload.
How Client Portal File Uploads Work
Understanding the upload flow helps you identify the event that starts the workflow and locate the file after the automation begins.
Supported File Types
Using a supported format helps ensure the client’s document uploads successfully and can be stored on the contact record.
The Client Portal supports the following document and image formats:
Documents
PDF:
.pdfMicrosoft Word:
.doc,.docxMicrosoft Excel:
.xls,.xlsxMicrosoft PowerPoint:
.ppt,.pptxPlain Text:
.txtRich Text Format:
.rtf
Images
JPEG:
.jpg,.jpegPNG:
.pngGIF:
.gif
Video formats such as MP4, MOV, AVI, MKV, and WMV are not supported for Client Portal document uploads.
Share a File with a Client Through the Client Portal
Sharing a document from the contact record can provide the client with instructions, a checklist, or a reference file before they submit their own documents. This creates a centralized exchange instead of relying on email attachments or separate file-sharing tools.
To share a new file with a client:
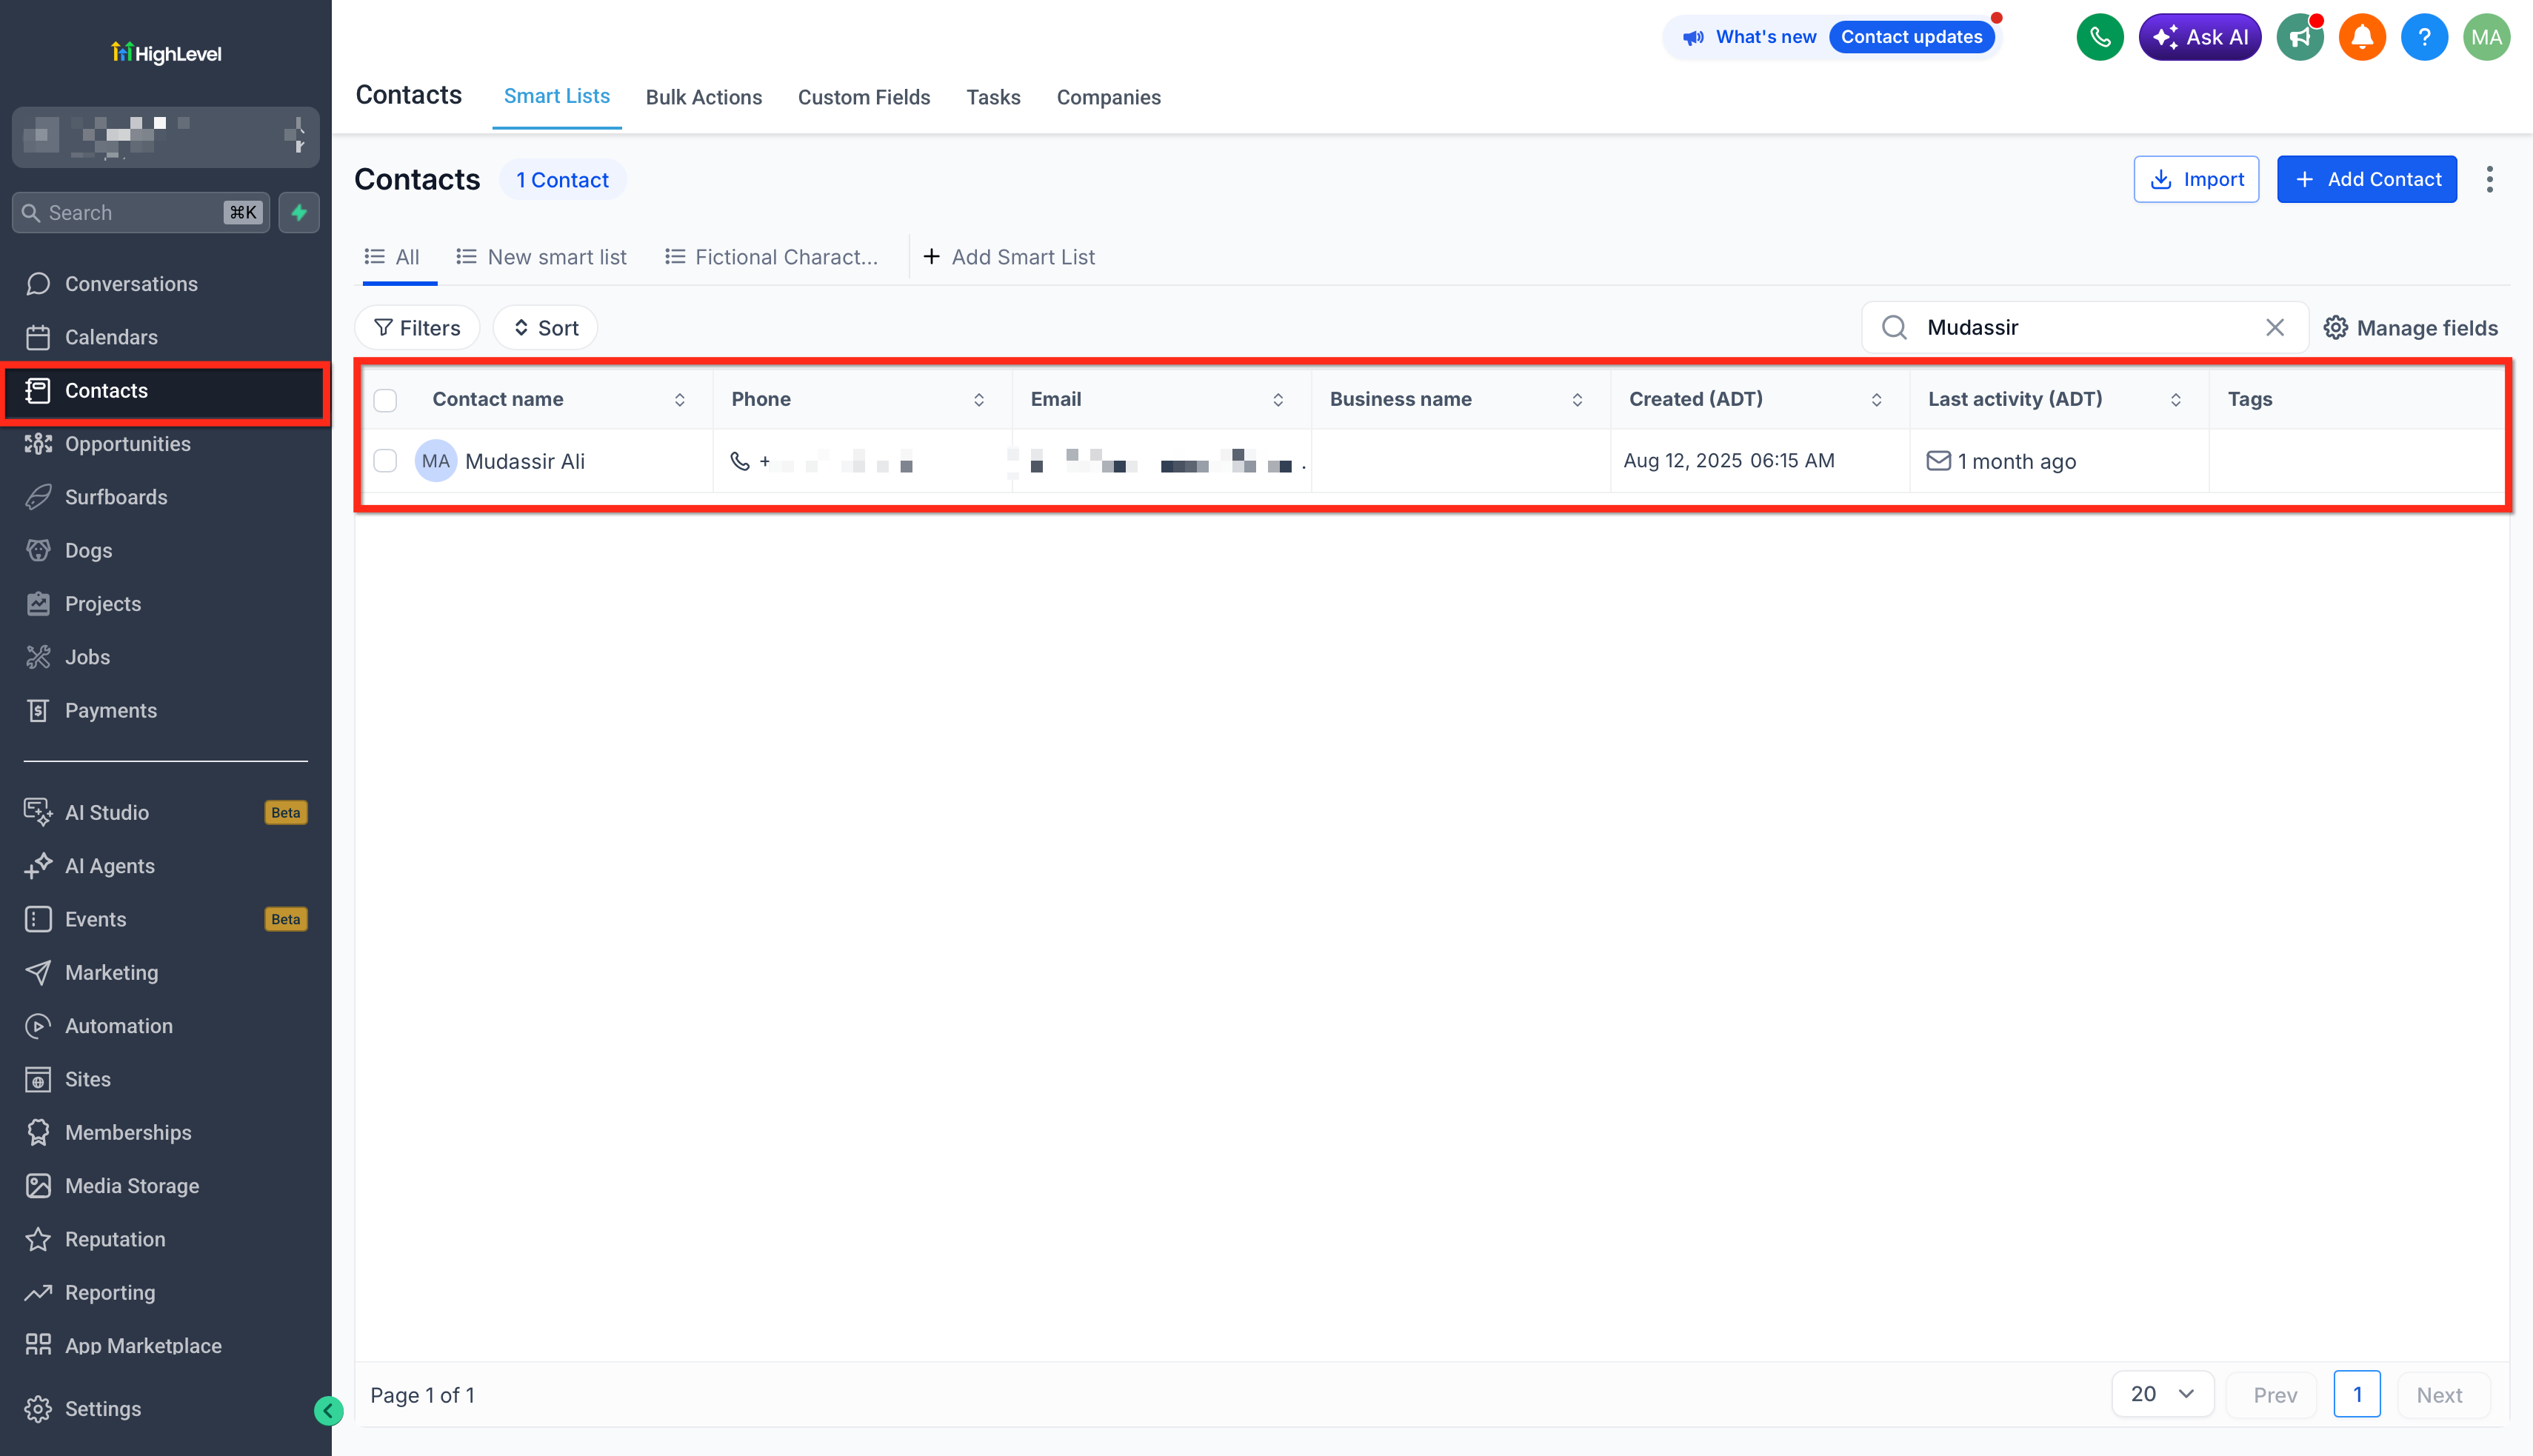
Go to Contacts. Select the particular contact.
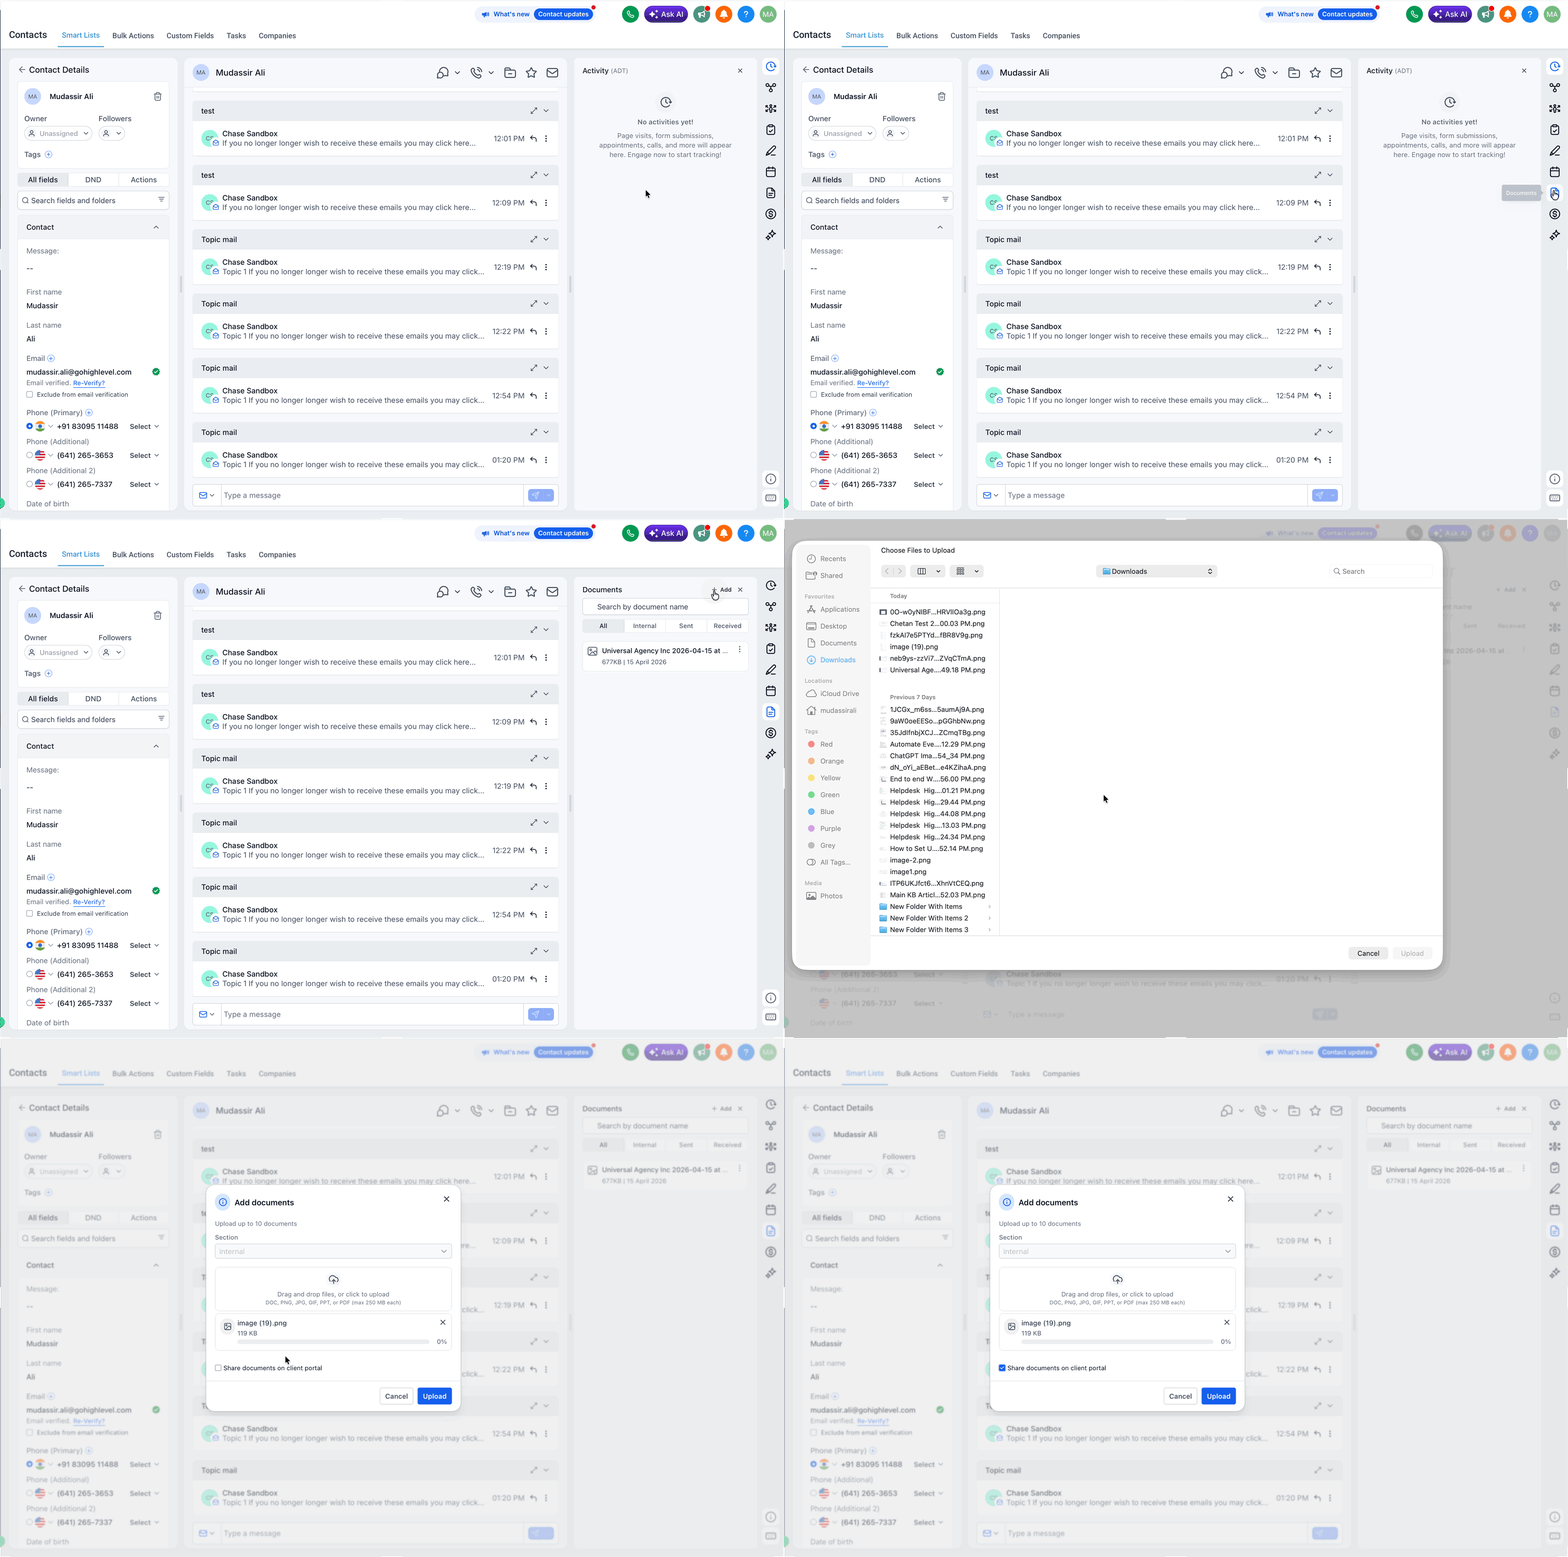
Open the contact’s Documents area.
Click the option to add or upload a new file.
Select the file from your device.
Enable Shared Documents on Client Portal or the available Client Portal sharing option. Save the file.
To share an existing file:
Locate the file in the contact’s Documents area.
Click the three-dot menu. Select Share to Client Portal.
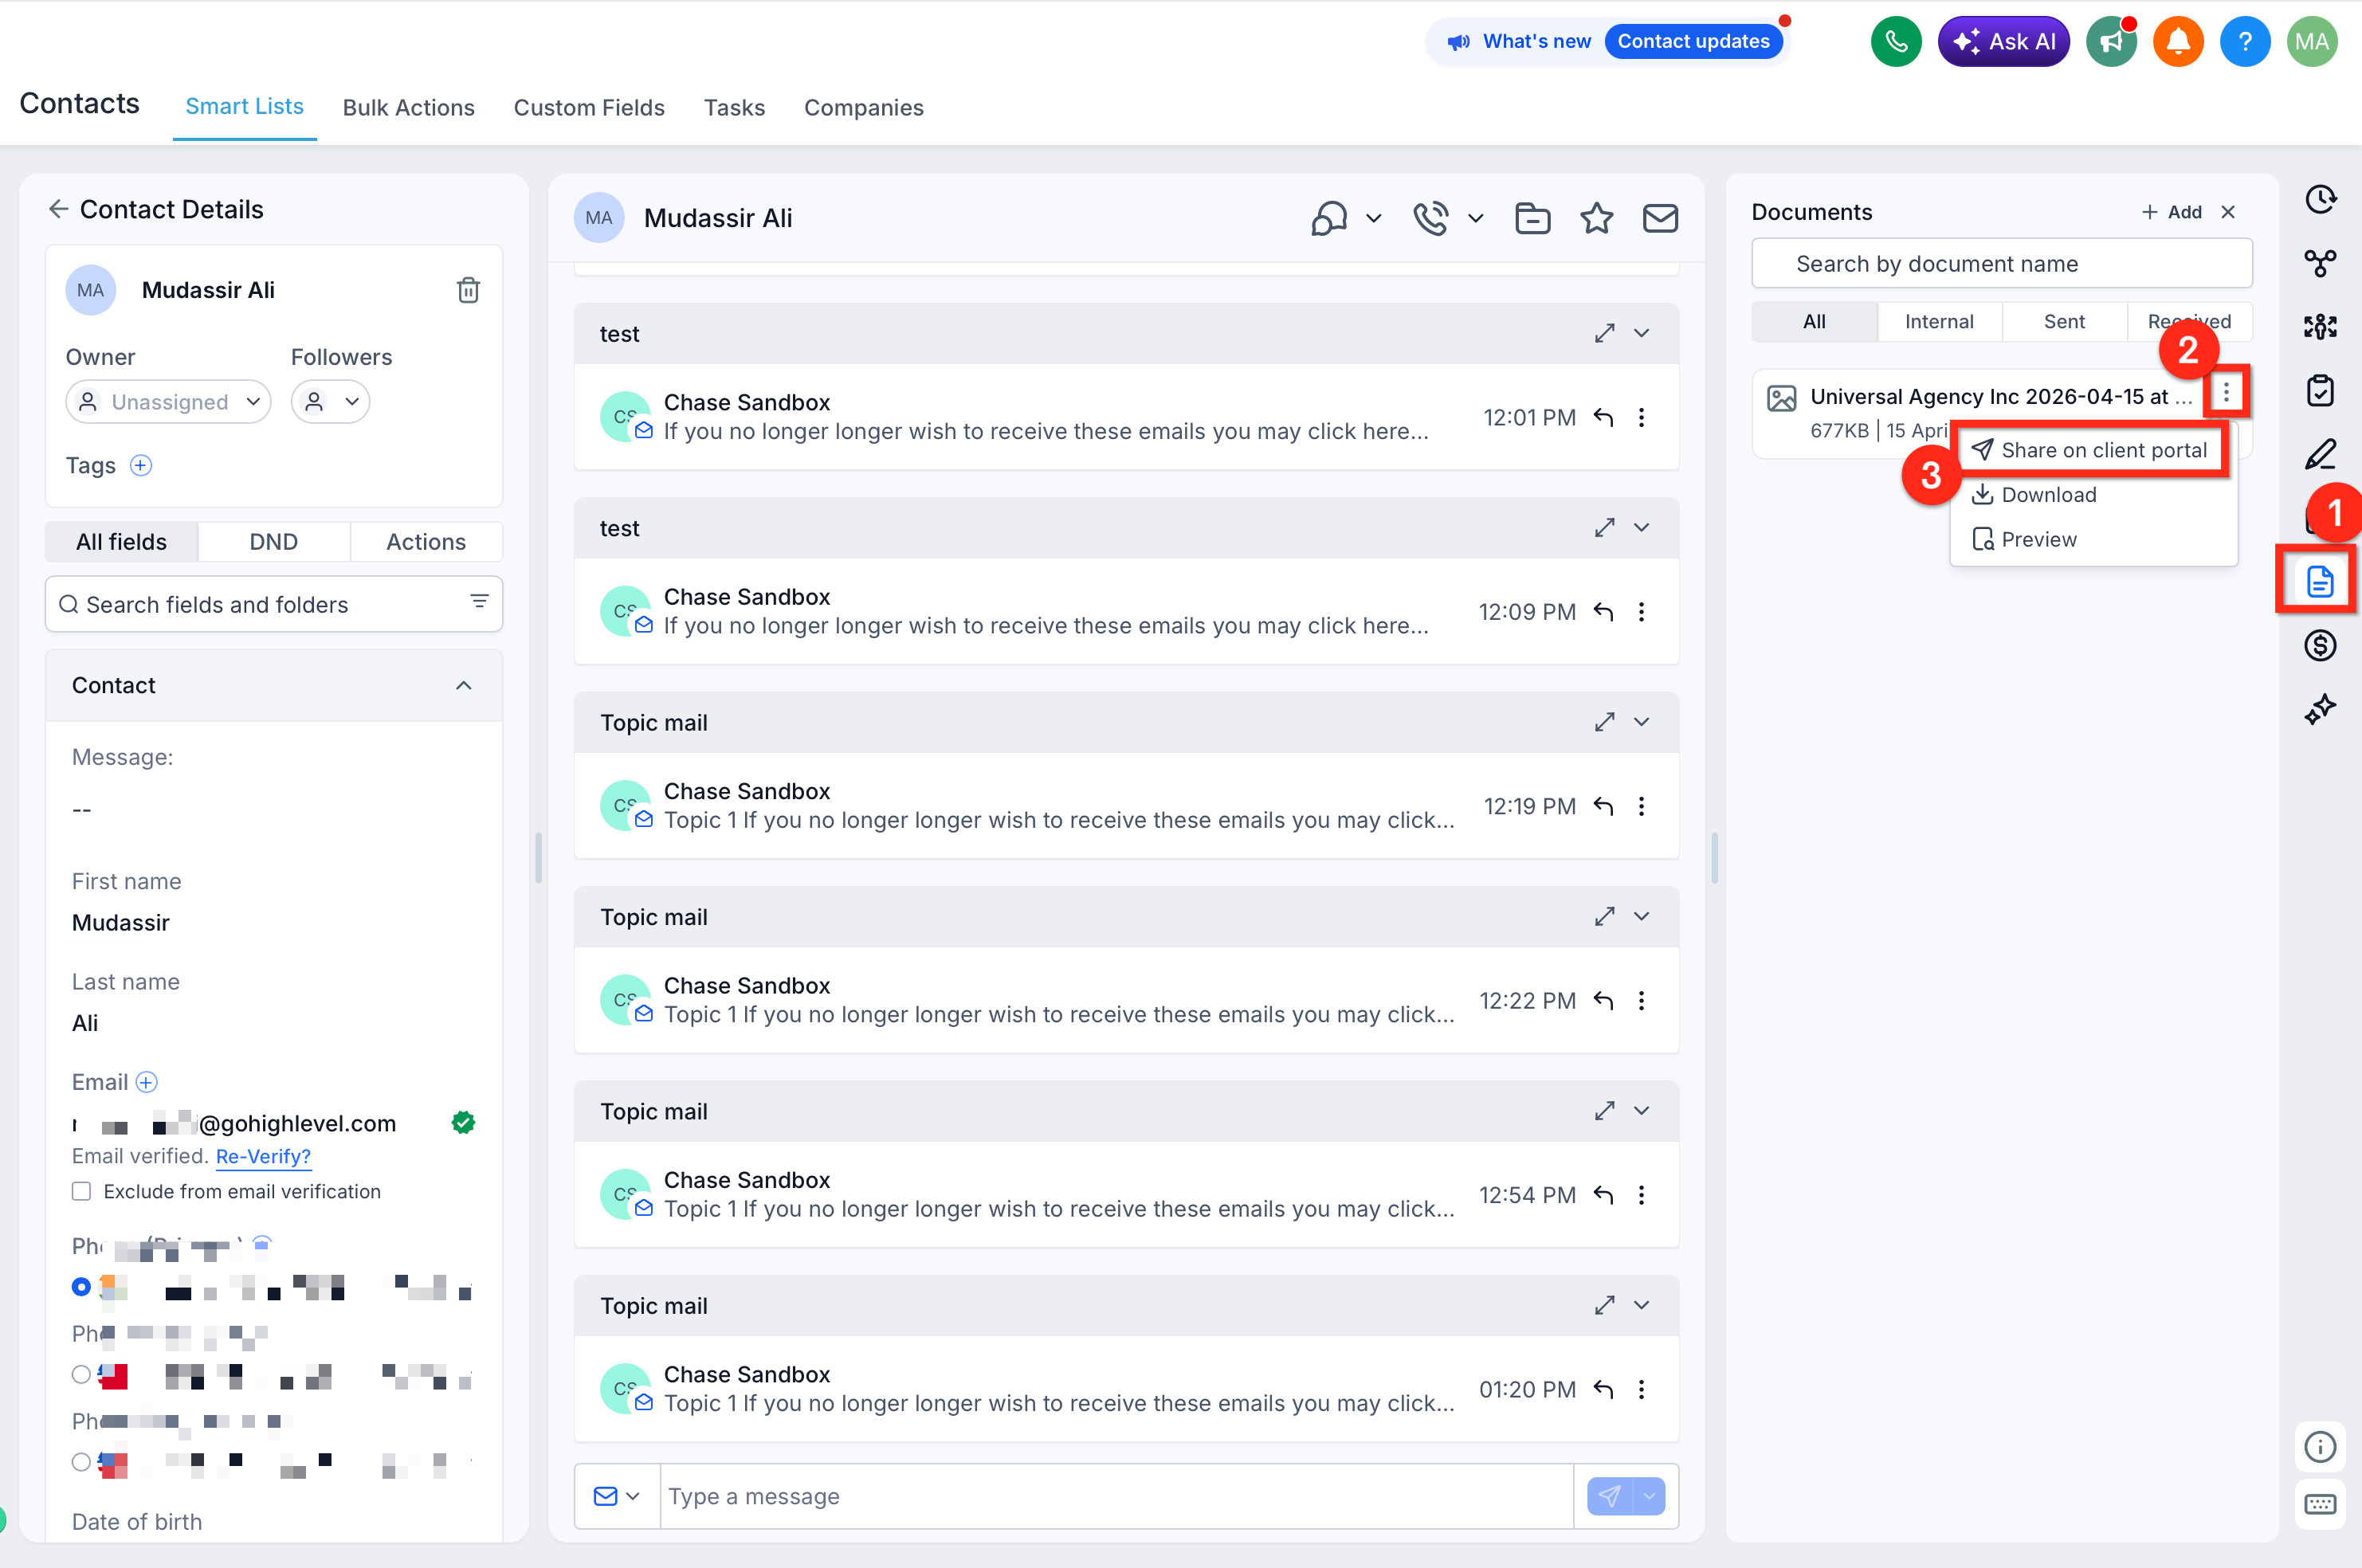
Confirm the sharing action.
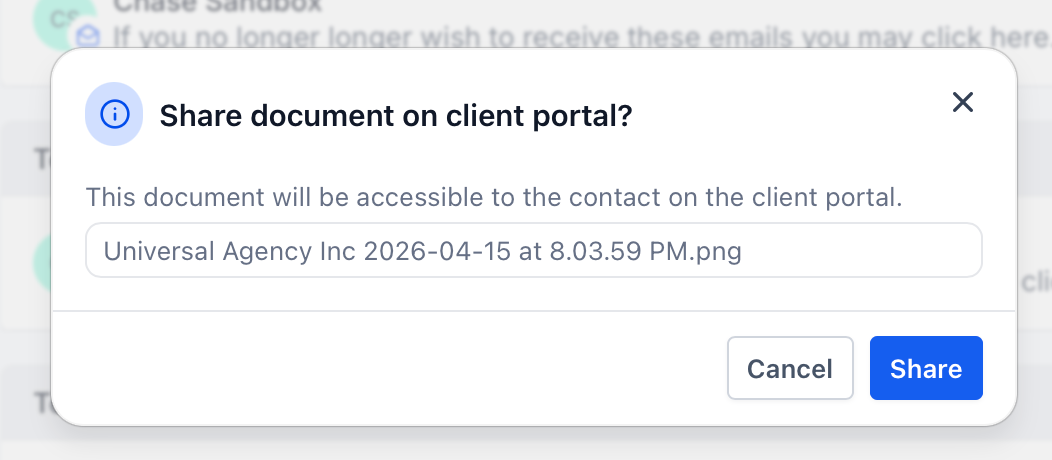
The shared file becomes available to the contact in the Client Portal’s Shared Documents area.
For additional file-sharing and management instructions, see How to Share and Manage Documents via Client Portal and CRM.
Upload a File as a Client Portal User
The client must upload the file from the Client Portal for the action to match the Client Portal File Uploaded event. Reviewing the client experience also helps you provide accurate instructions when requesting documents.
Log in to the Client Portal.
Click + Add Files in Shared Files section.
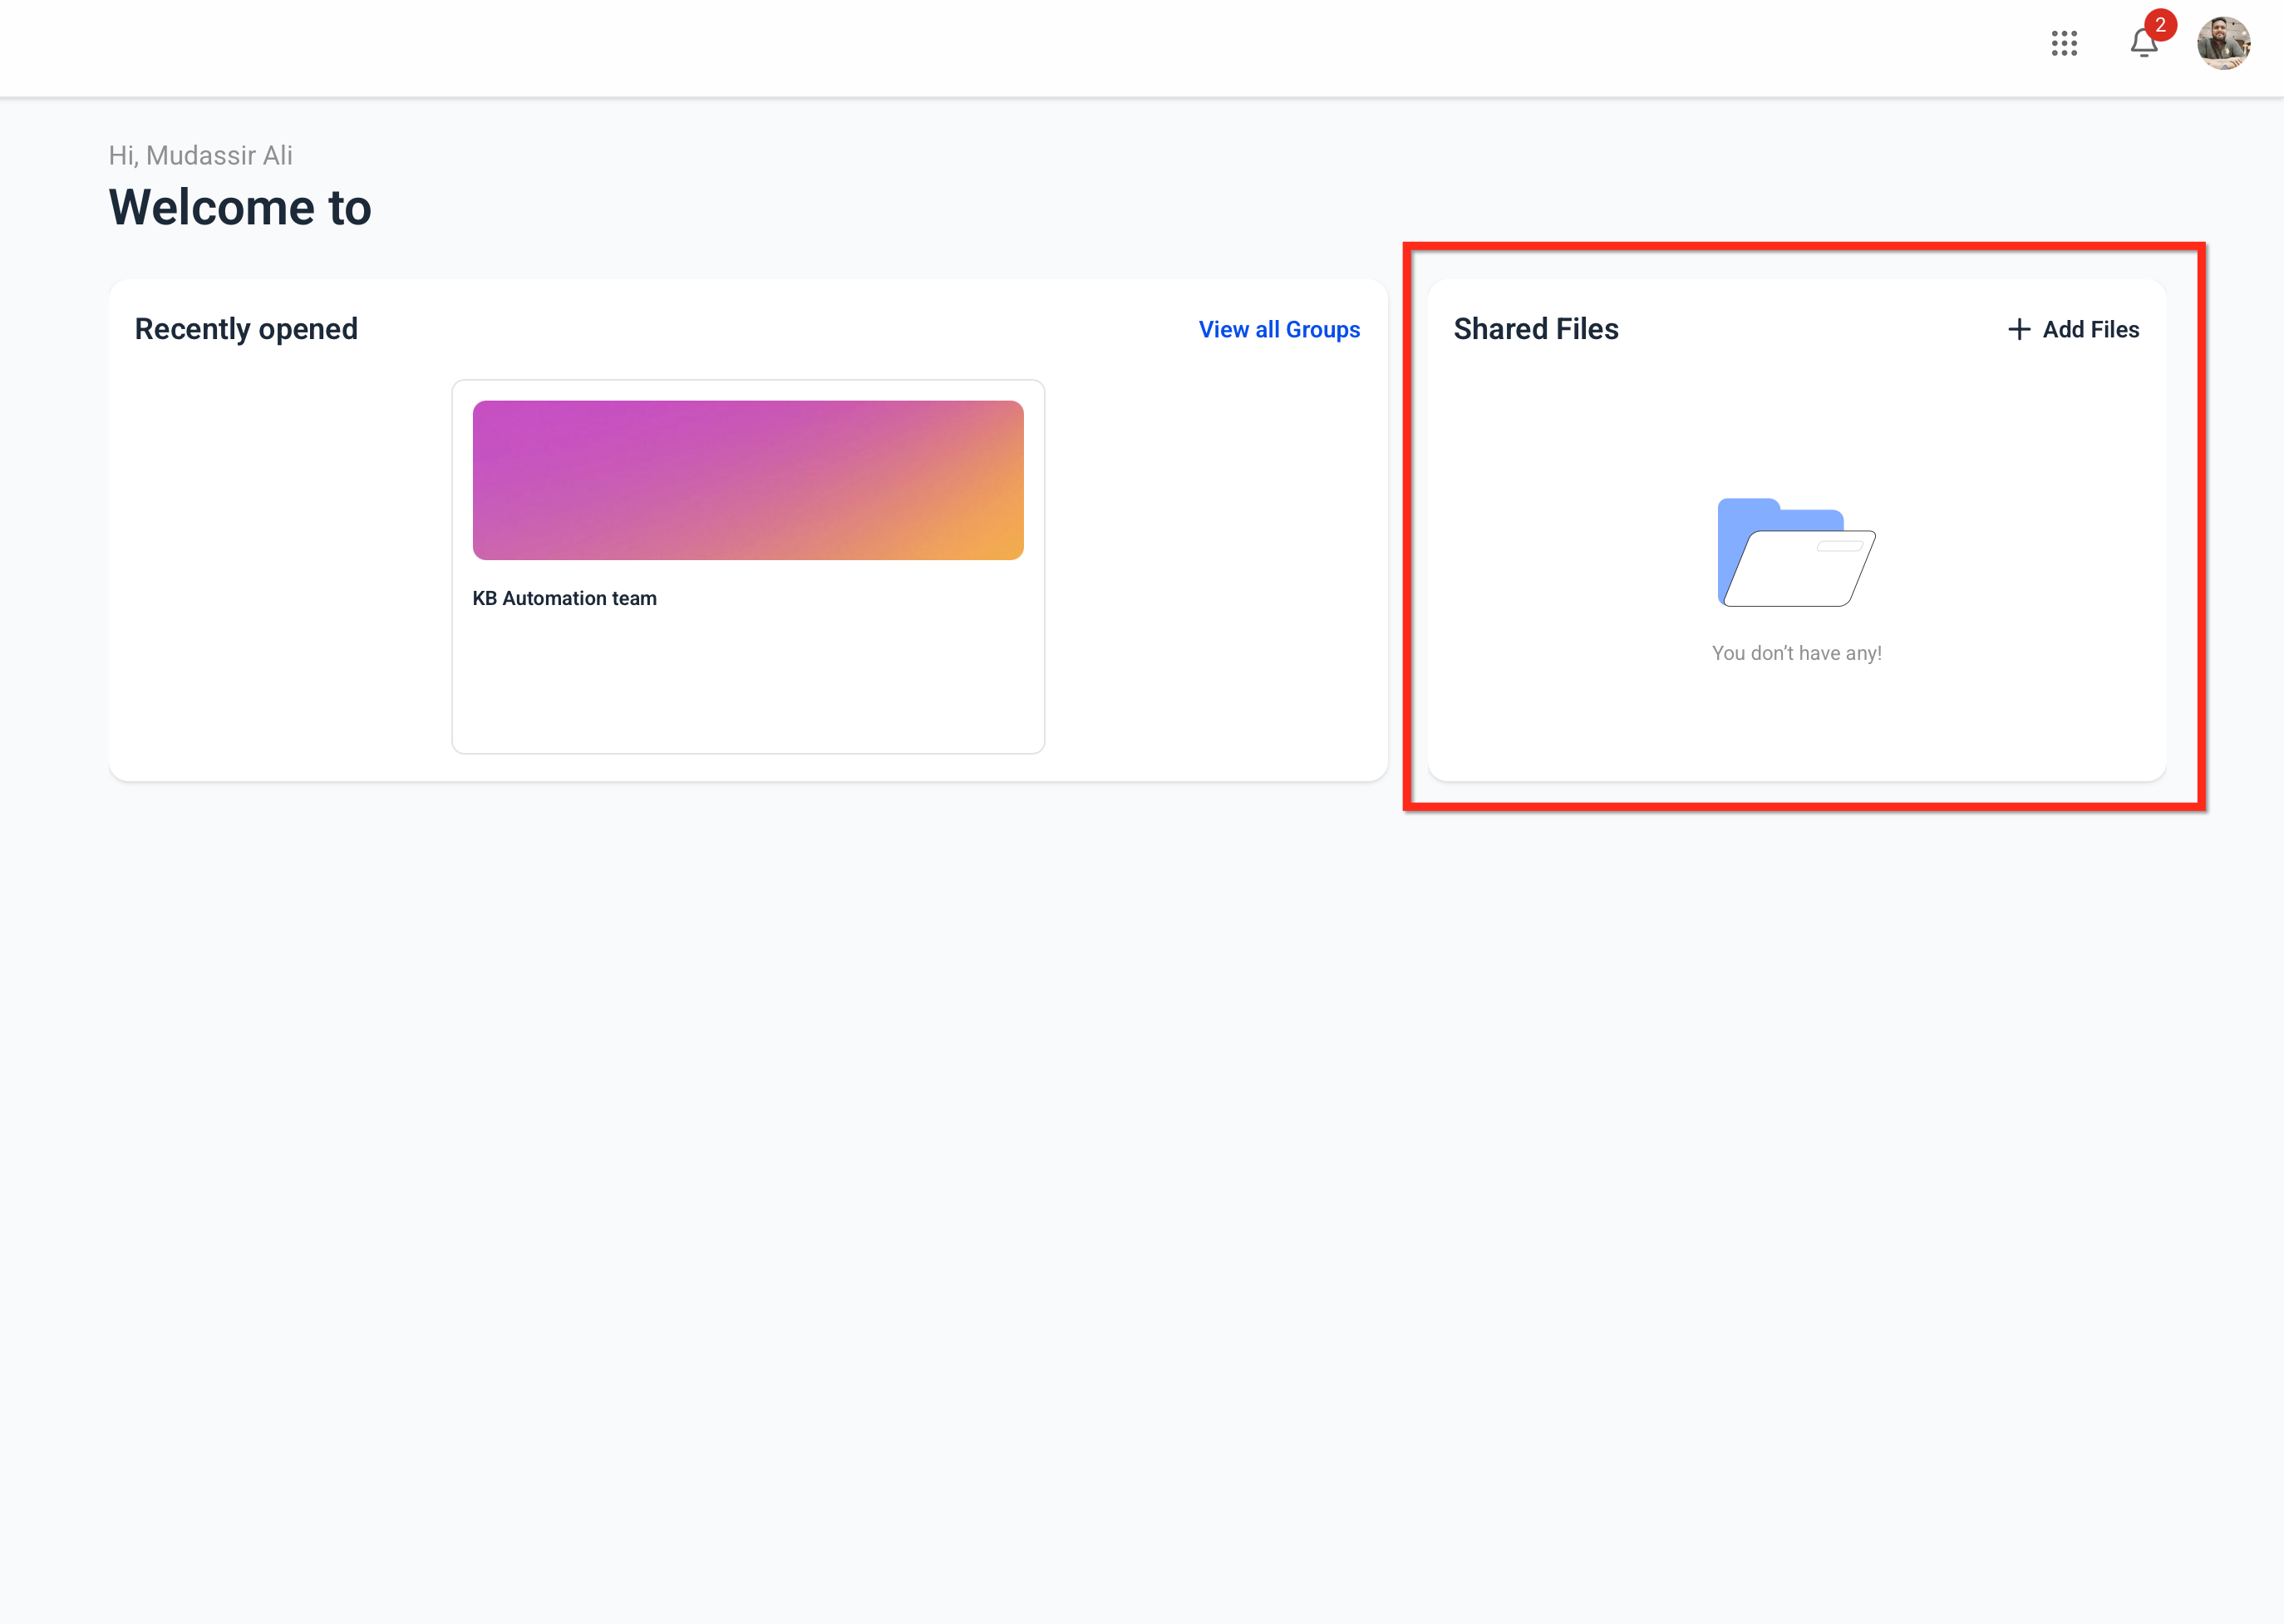
Select one or more supported files from the device. Click Upload.
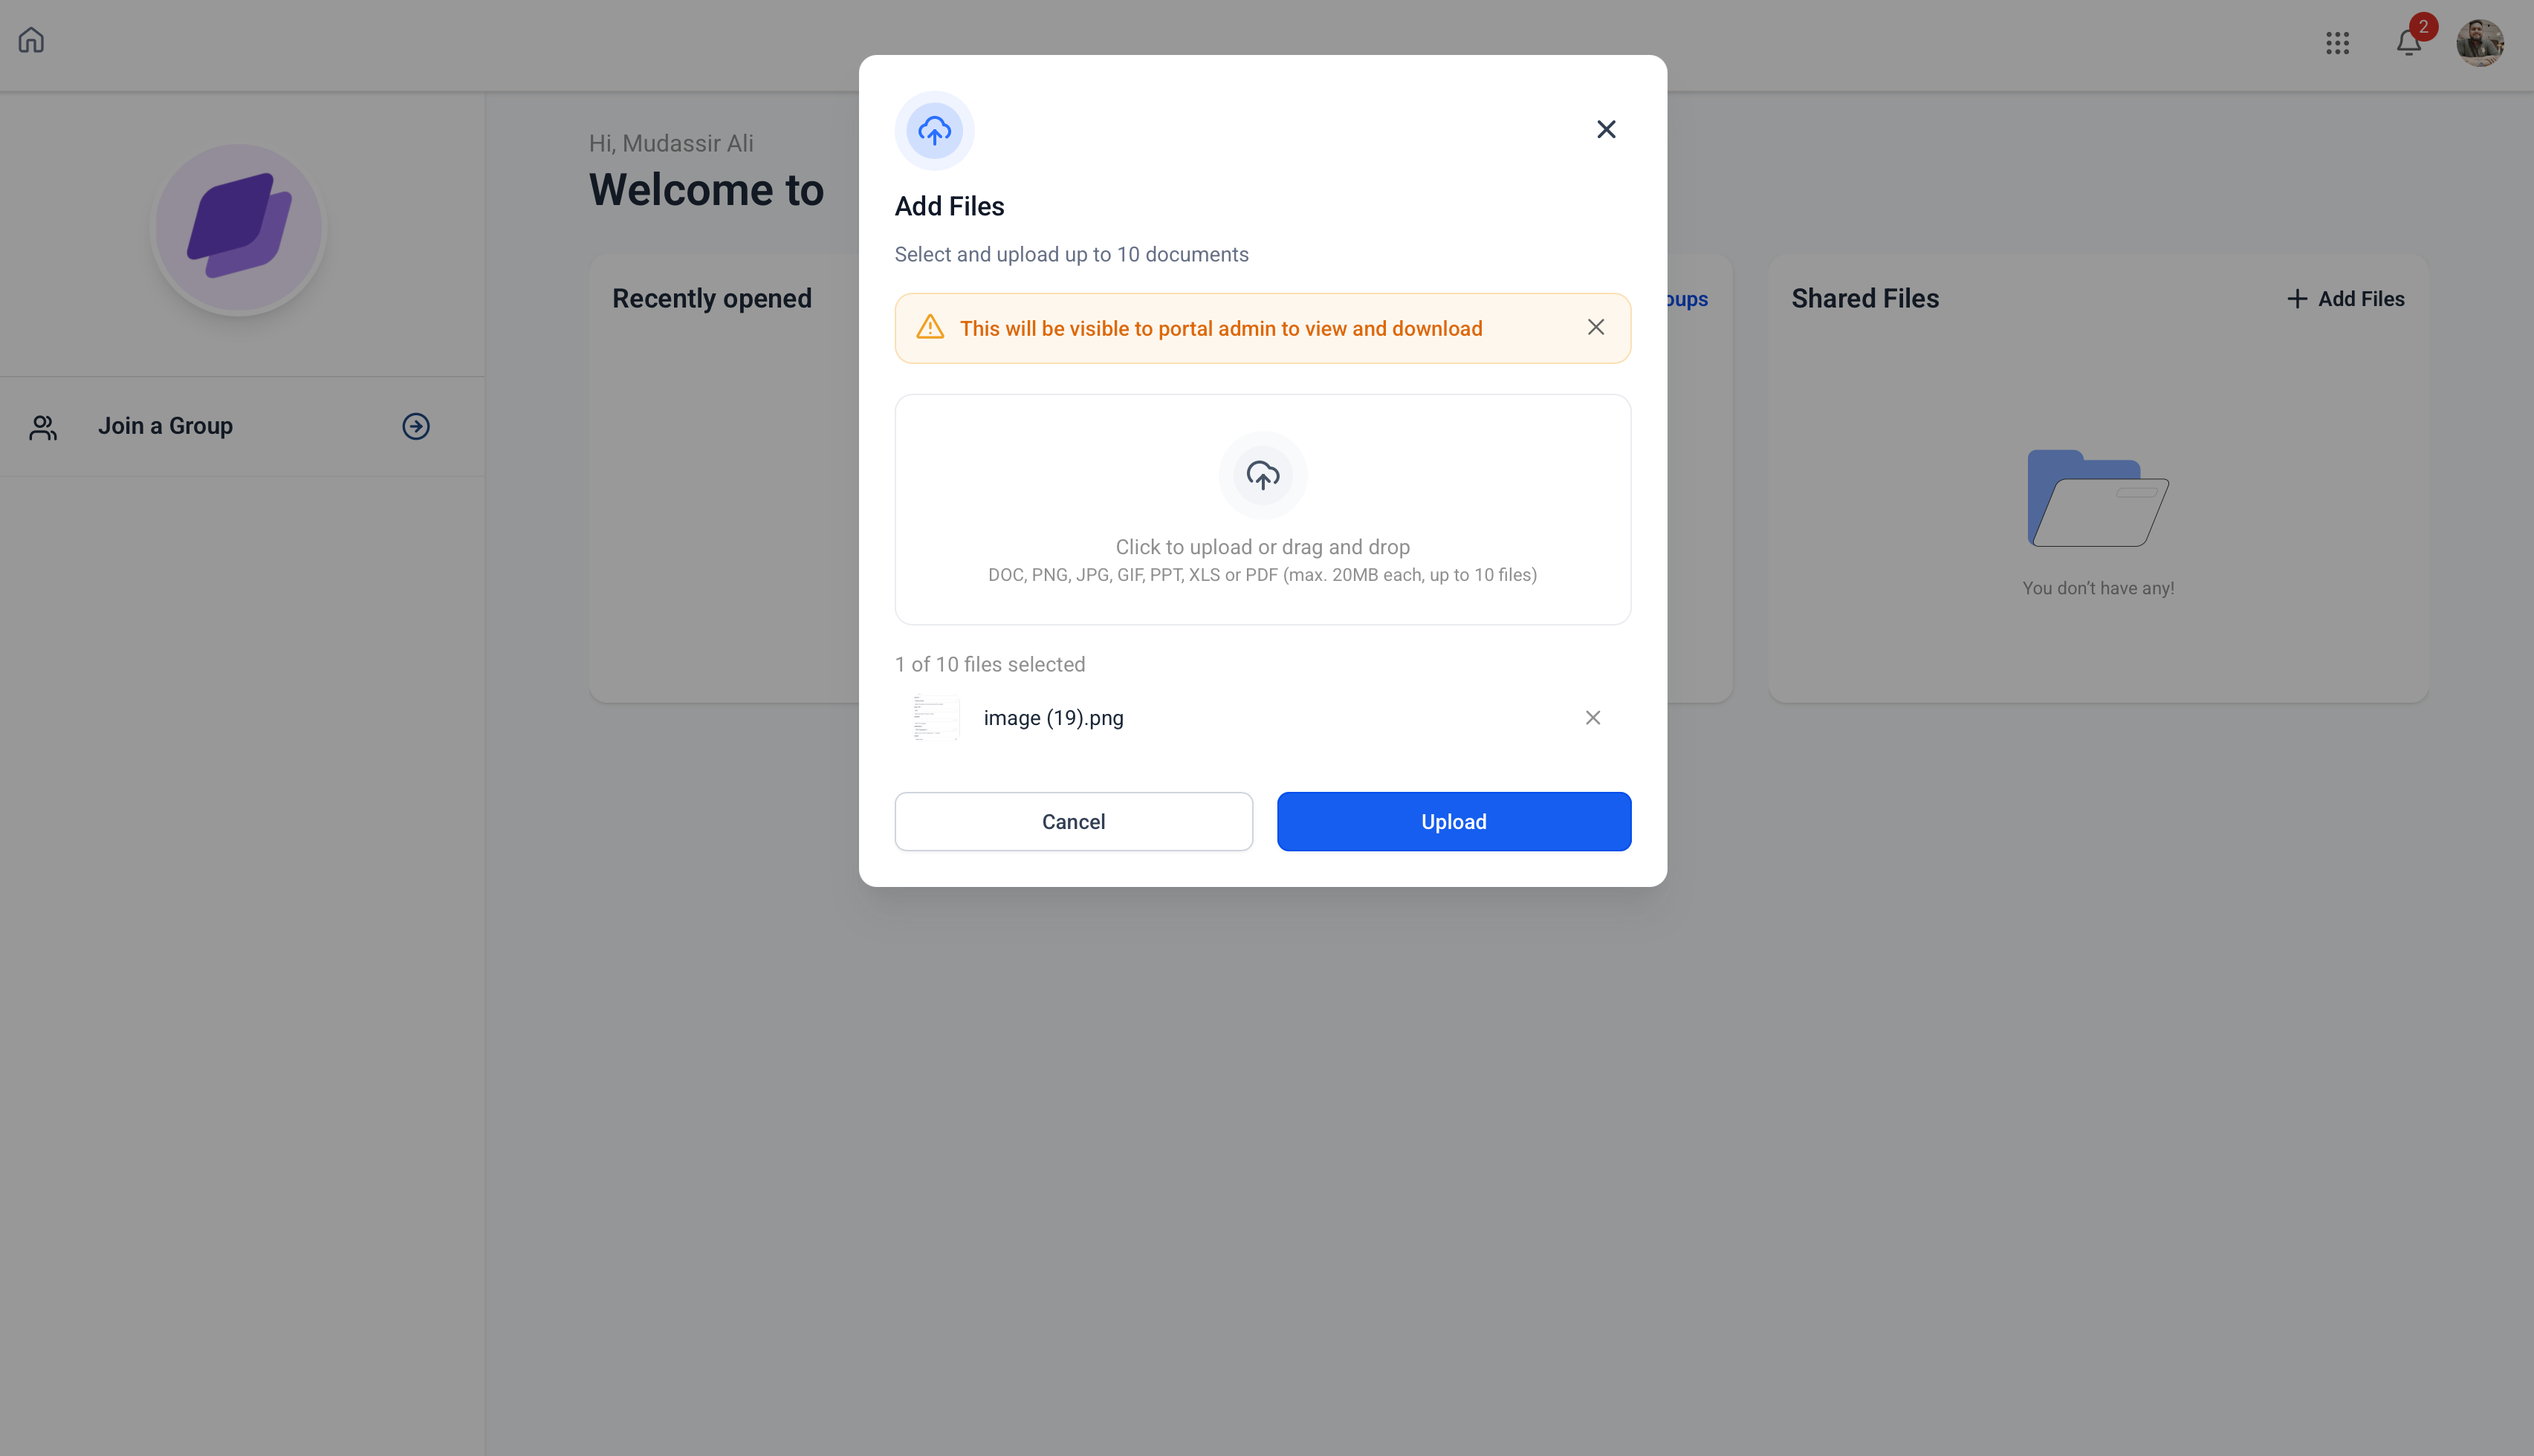
Note: The client can select up to 10 files in one upload. After the upload completes, the file becomes available under the contact’s received Client Portal documents and the workflow trigger fires automatically.How to Set Up the Client Portal File Uploaded Workflow Trigger
A published workflow is required to respond to live Client Portal uploads. Configure the trigger and follow-up actions, then complete a live test using a contact who has access to the Client Portal.
Confirm that the contact you plan to use has access to the Client Portal and can open the Documents or Shared Documents area.
Navigate to Automation → Workflows. Click Create Workflow, or open an existing workflow.
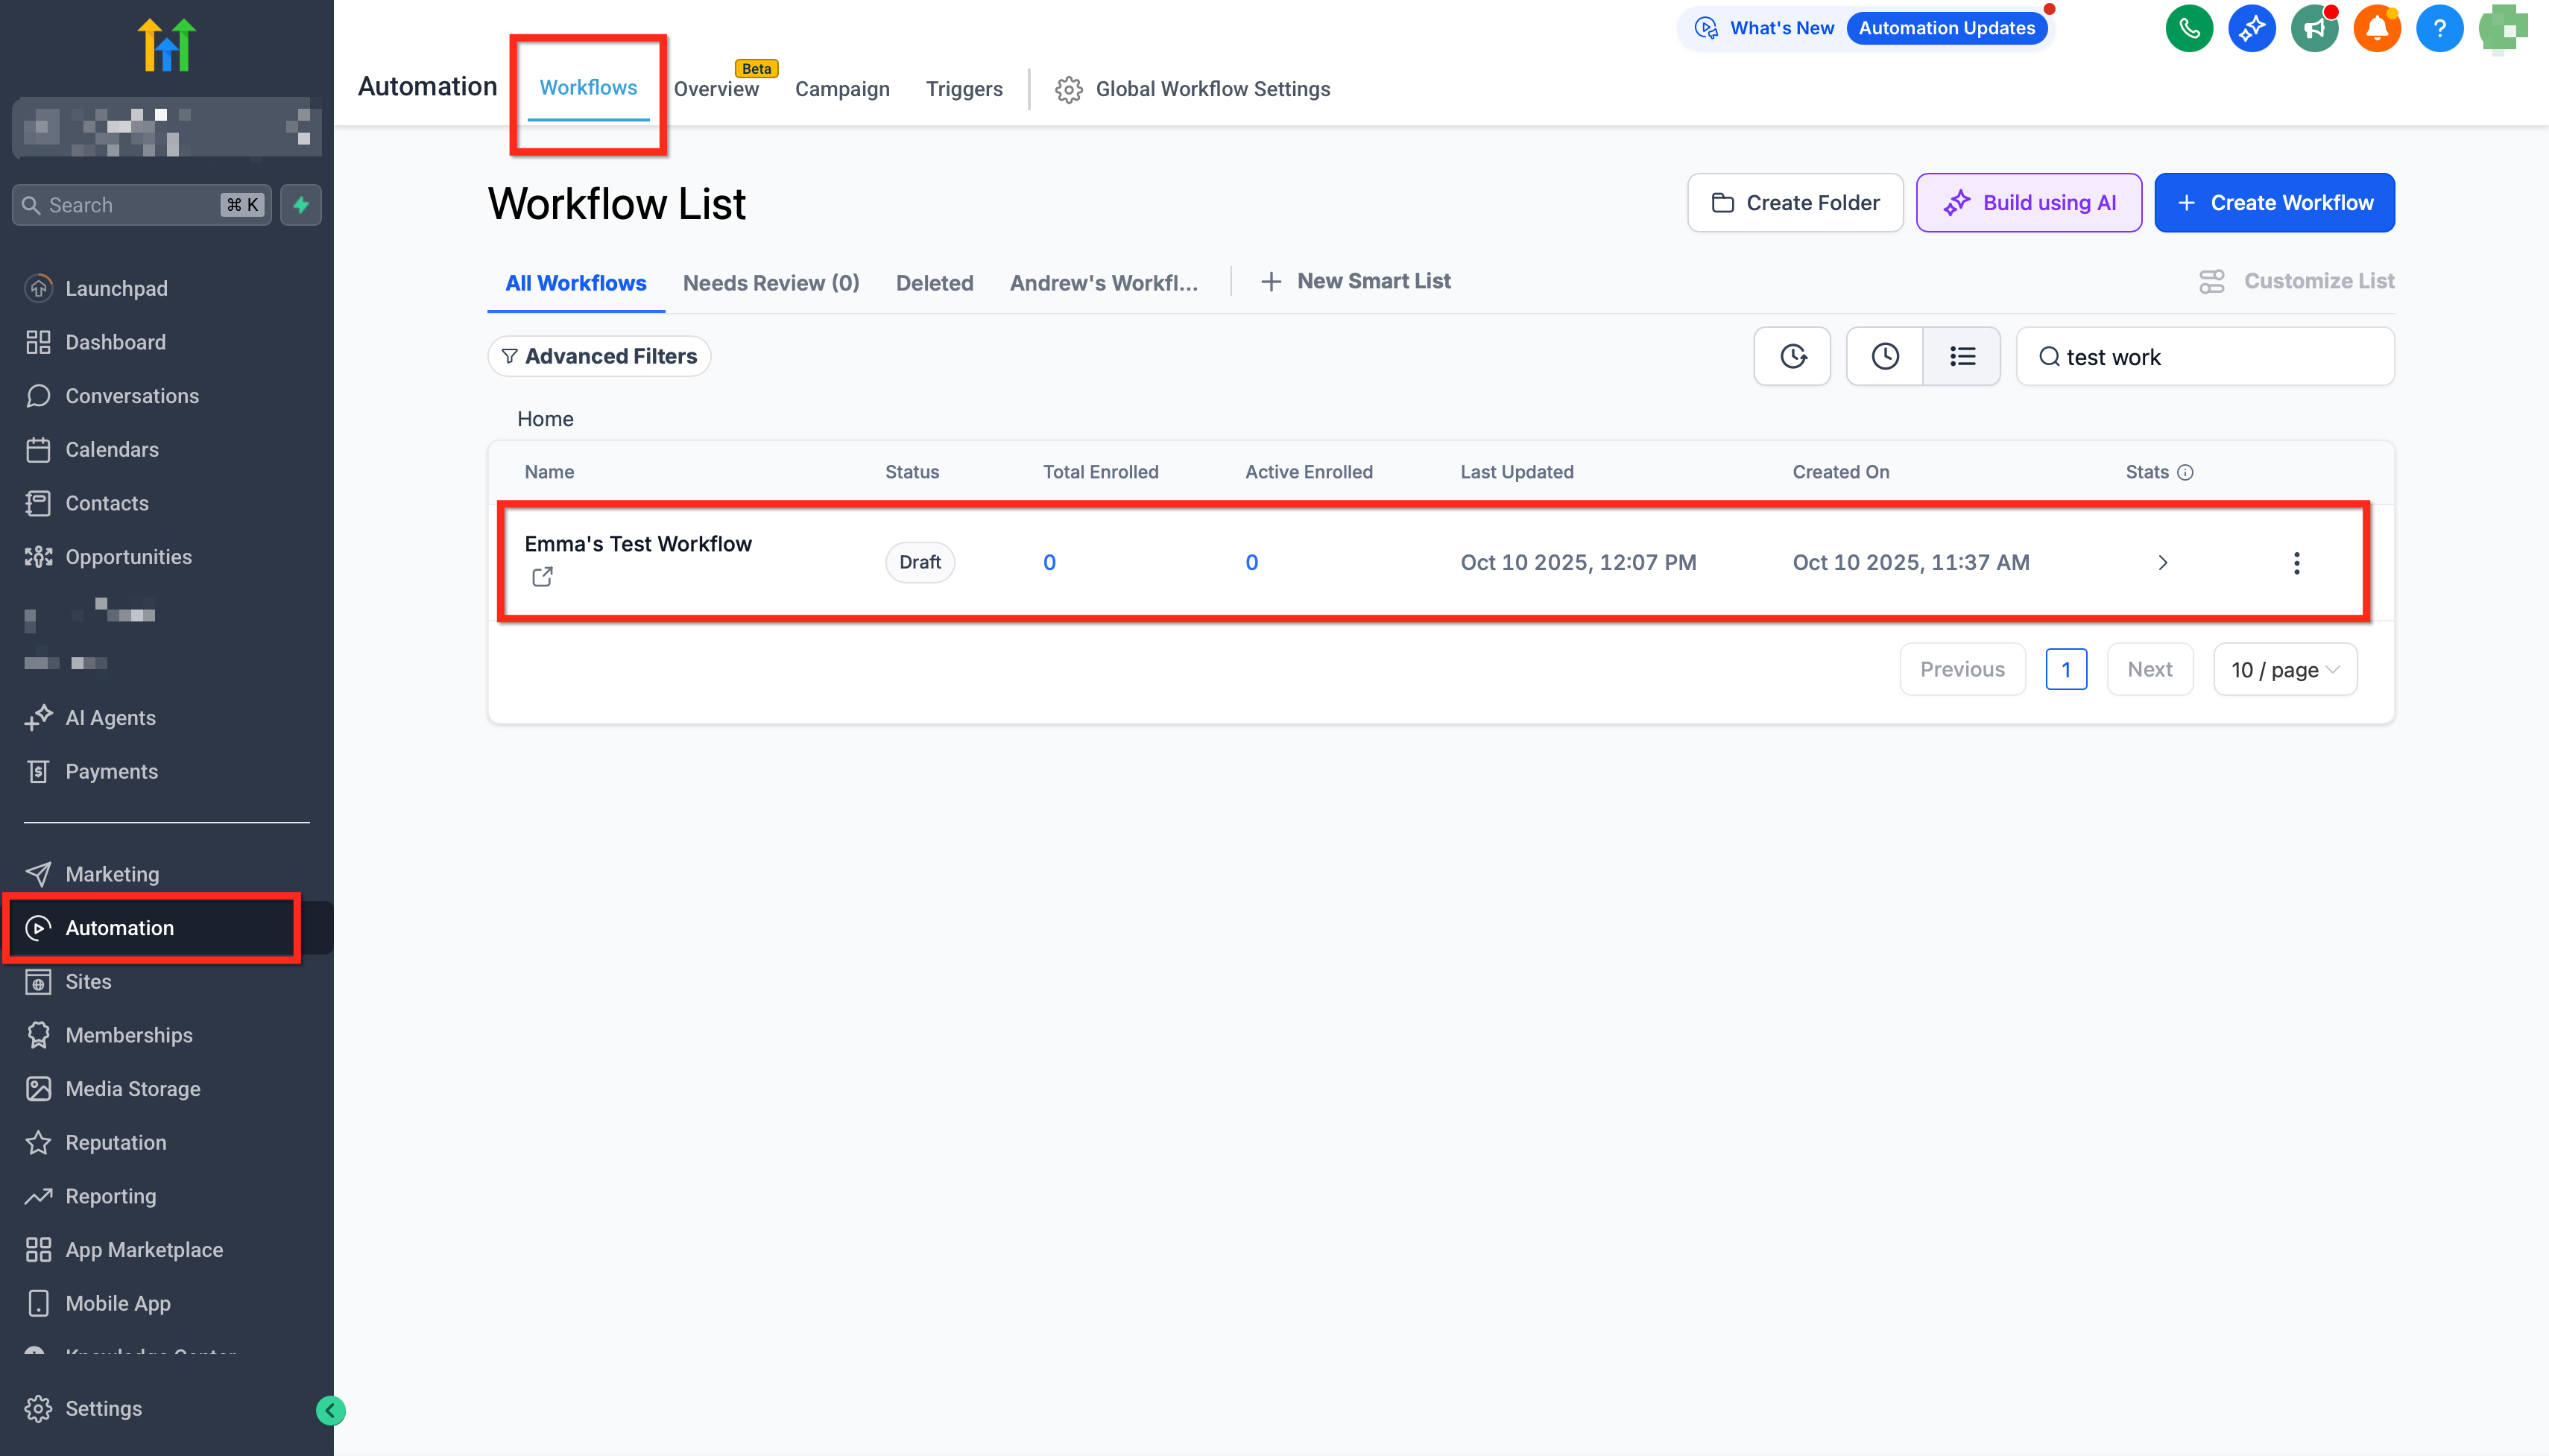
At the beginning of the workflow, click Add New Trigger. Search for and select Client Portal File Uploaded.
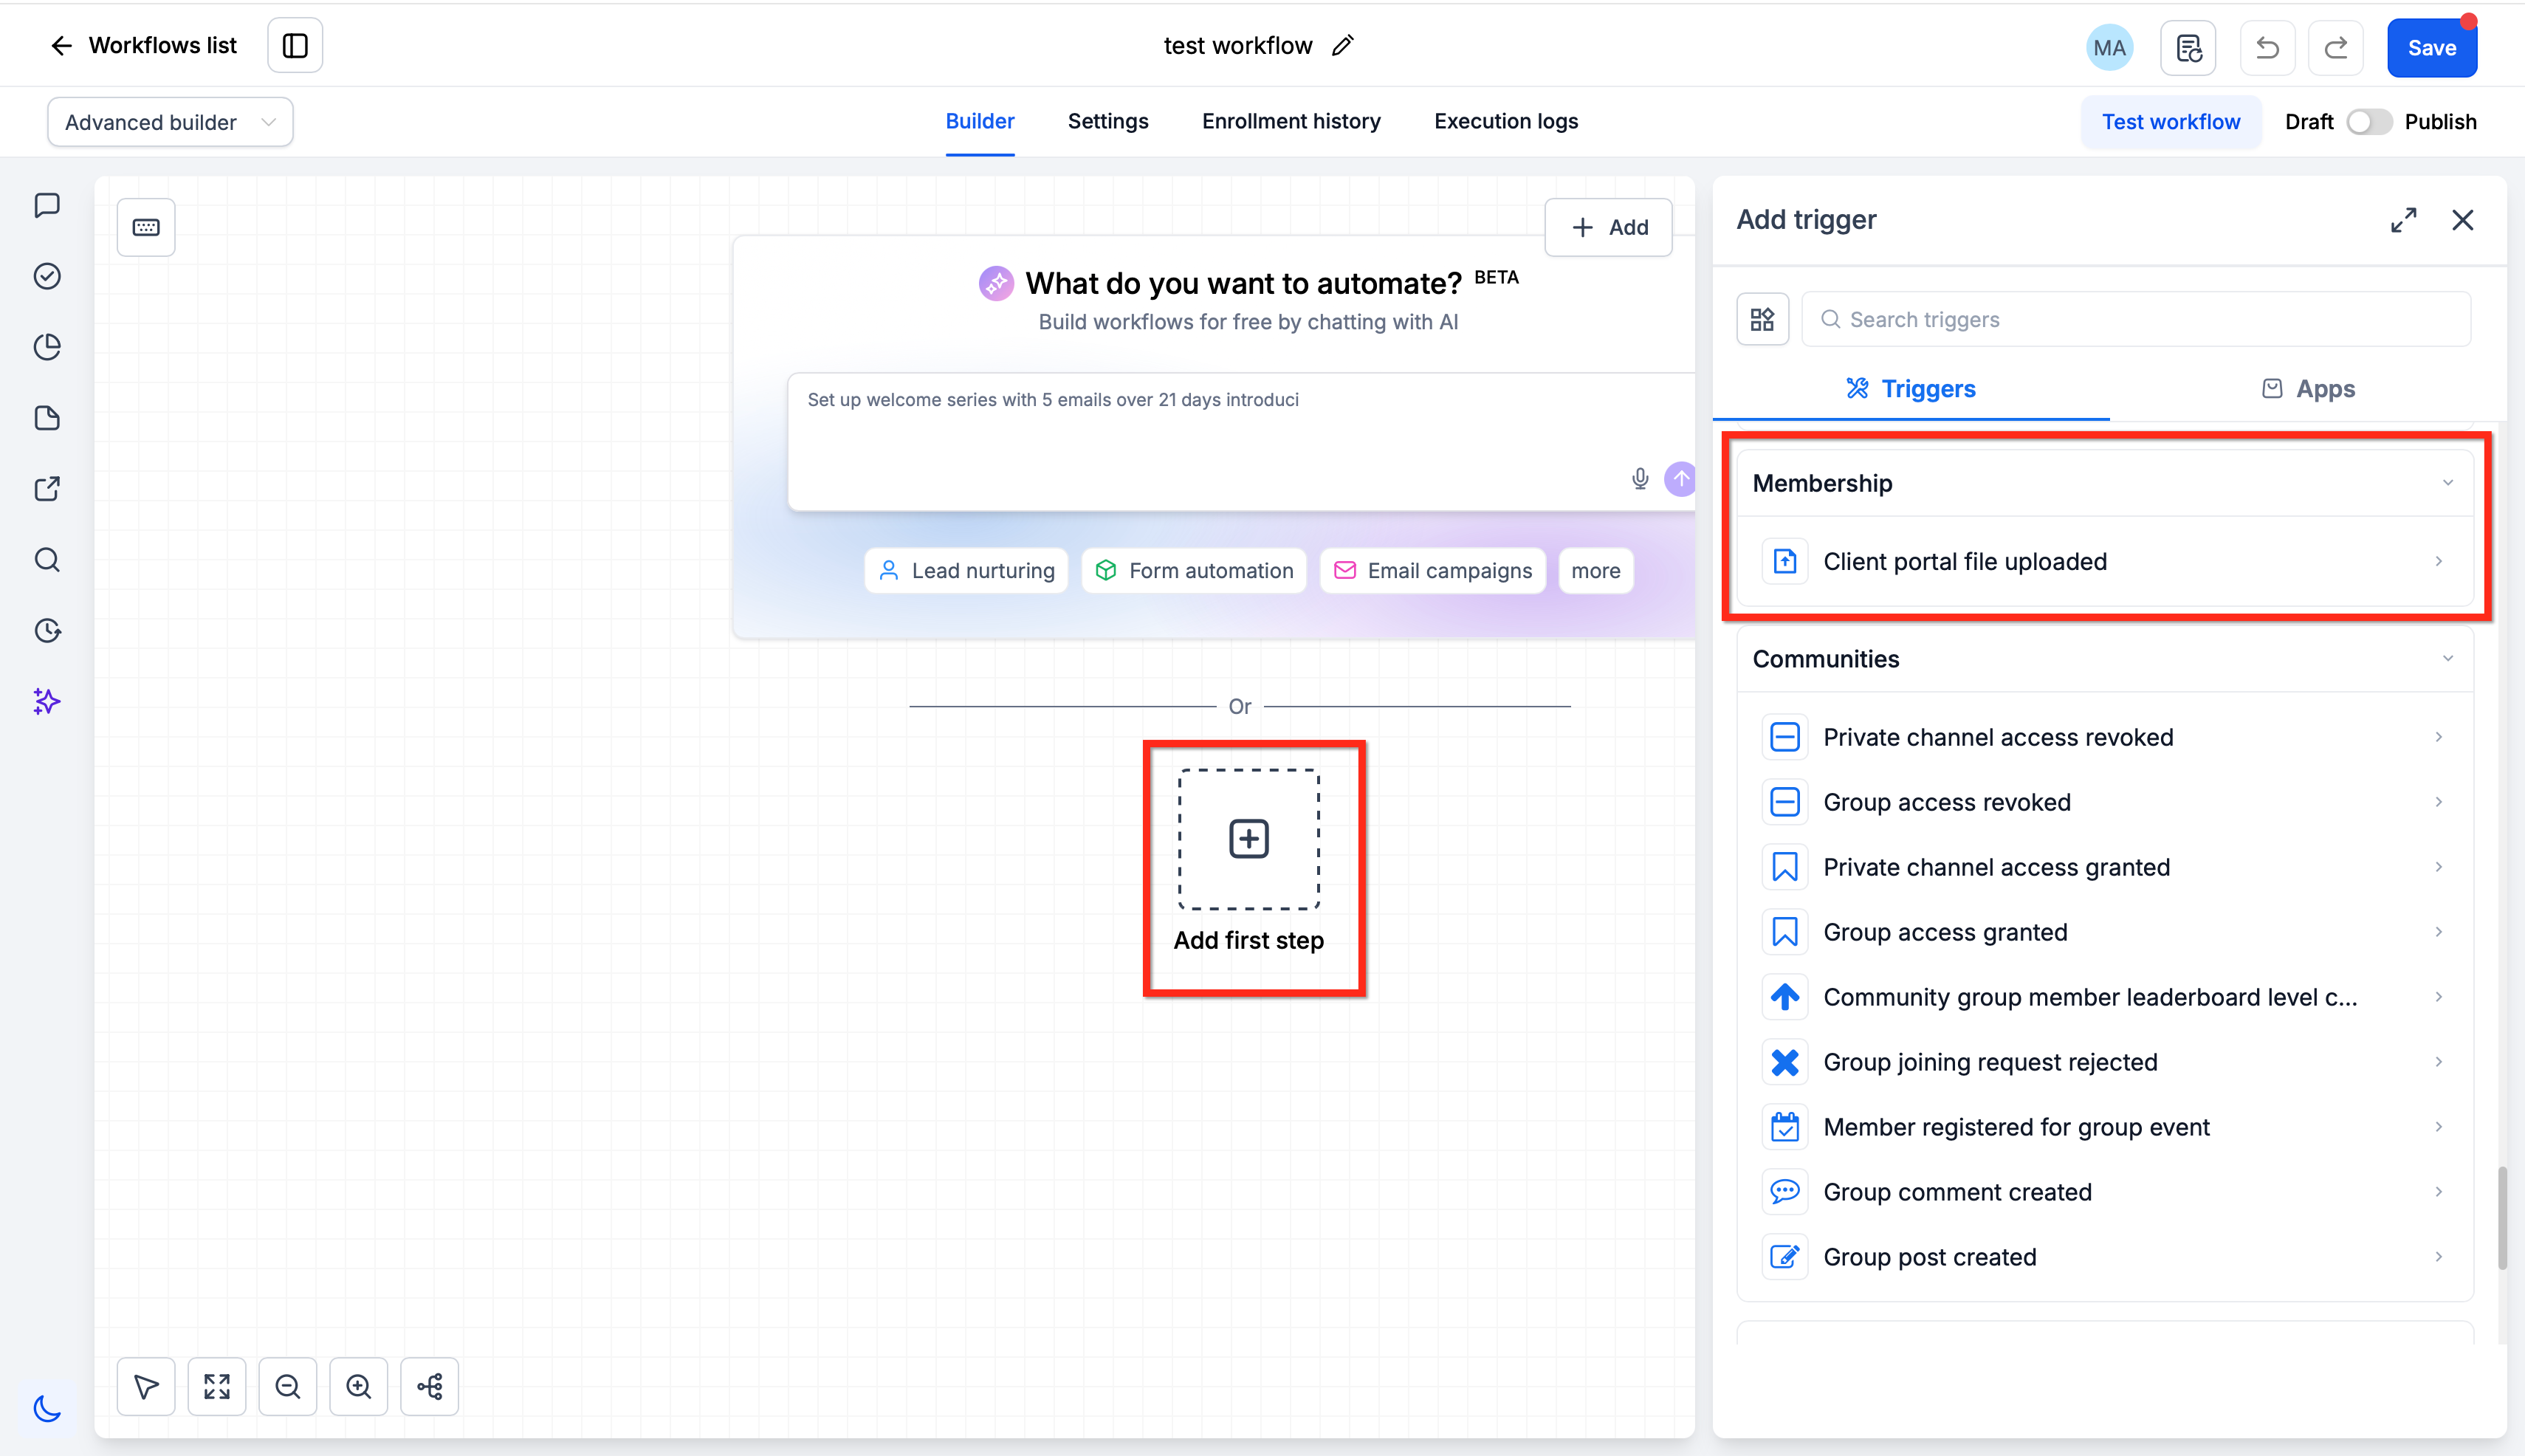
Complete any trigger settings / filters needed
Click the plus button beneath the trigger to add the action that should occur after the upload.
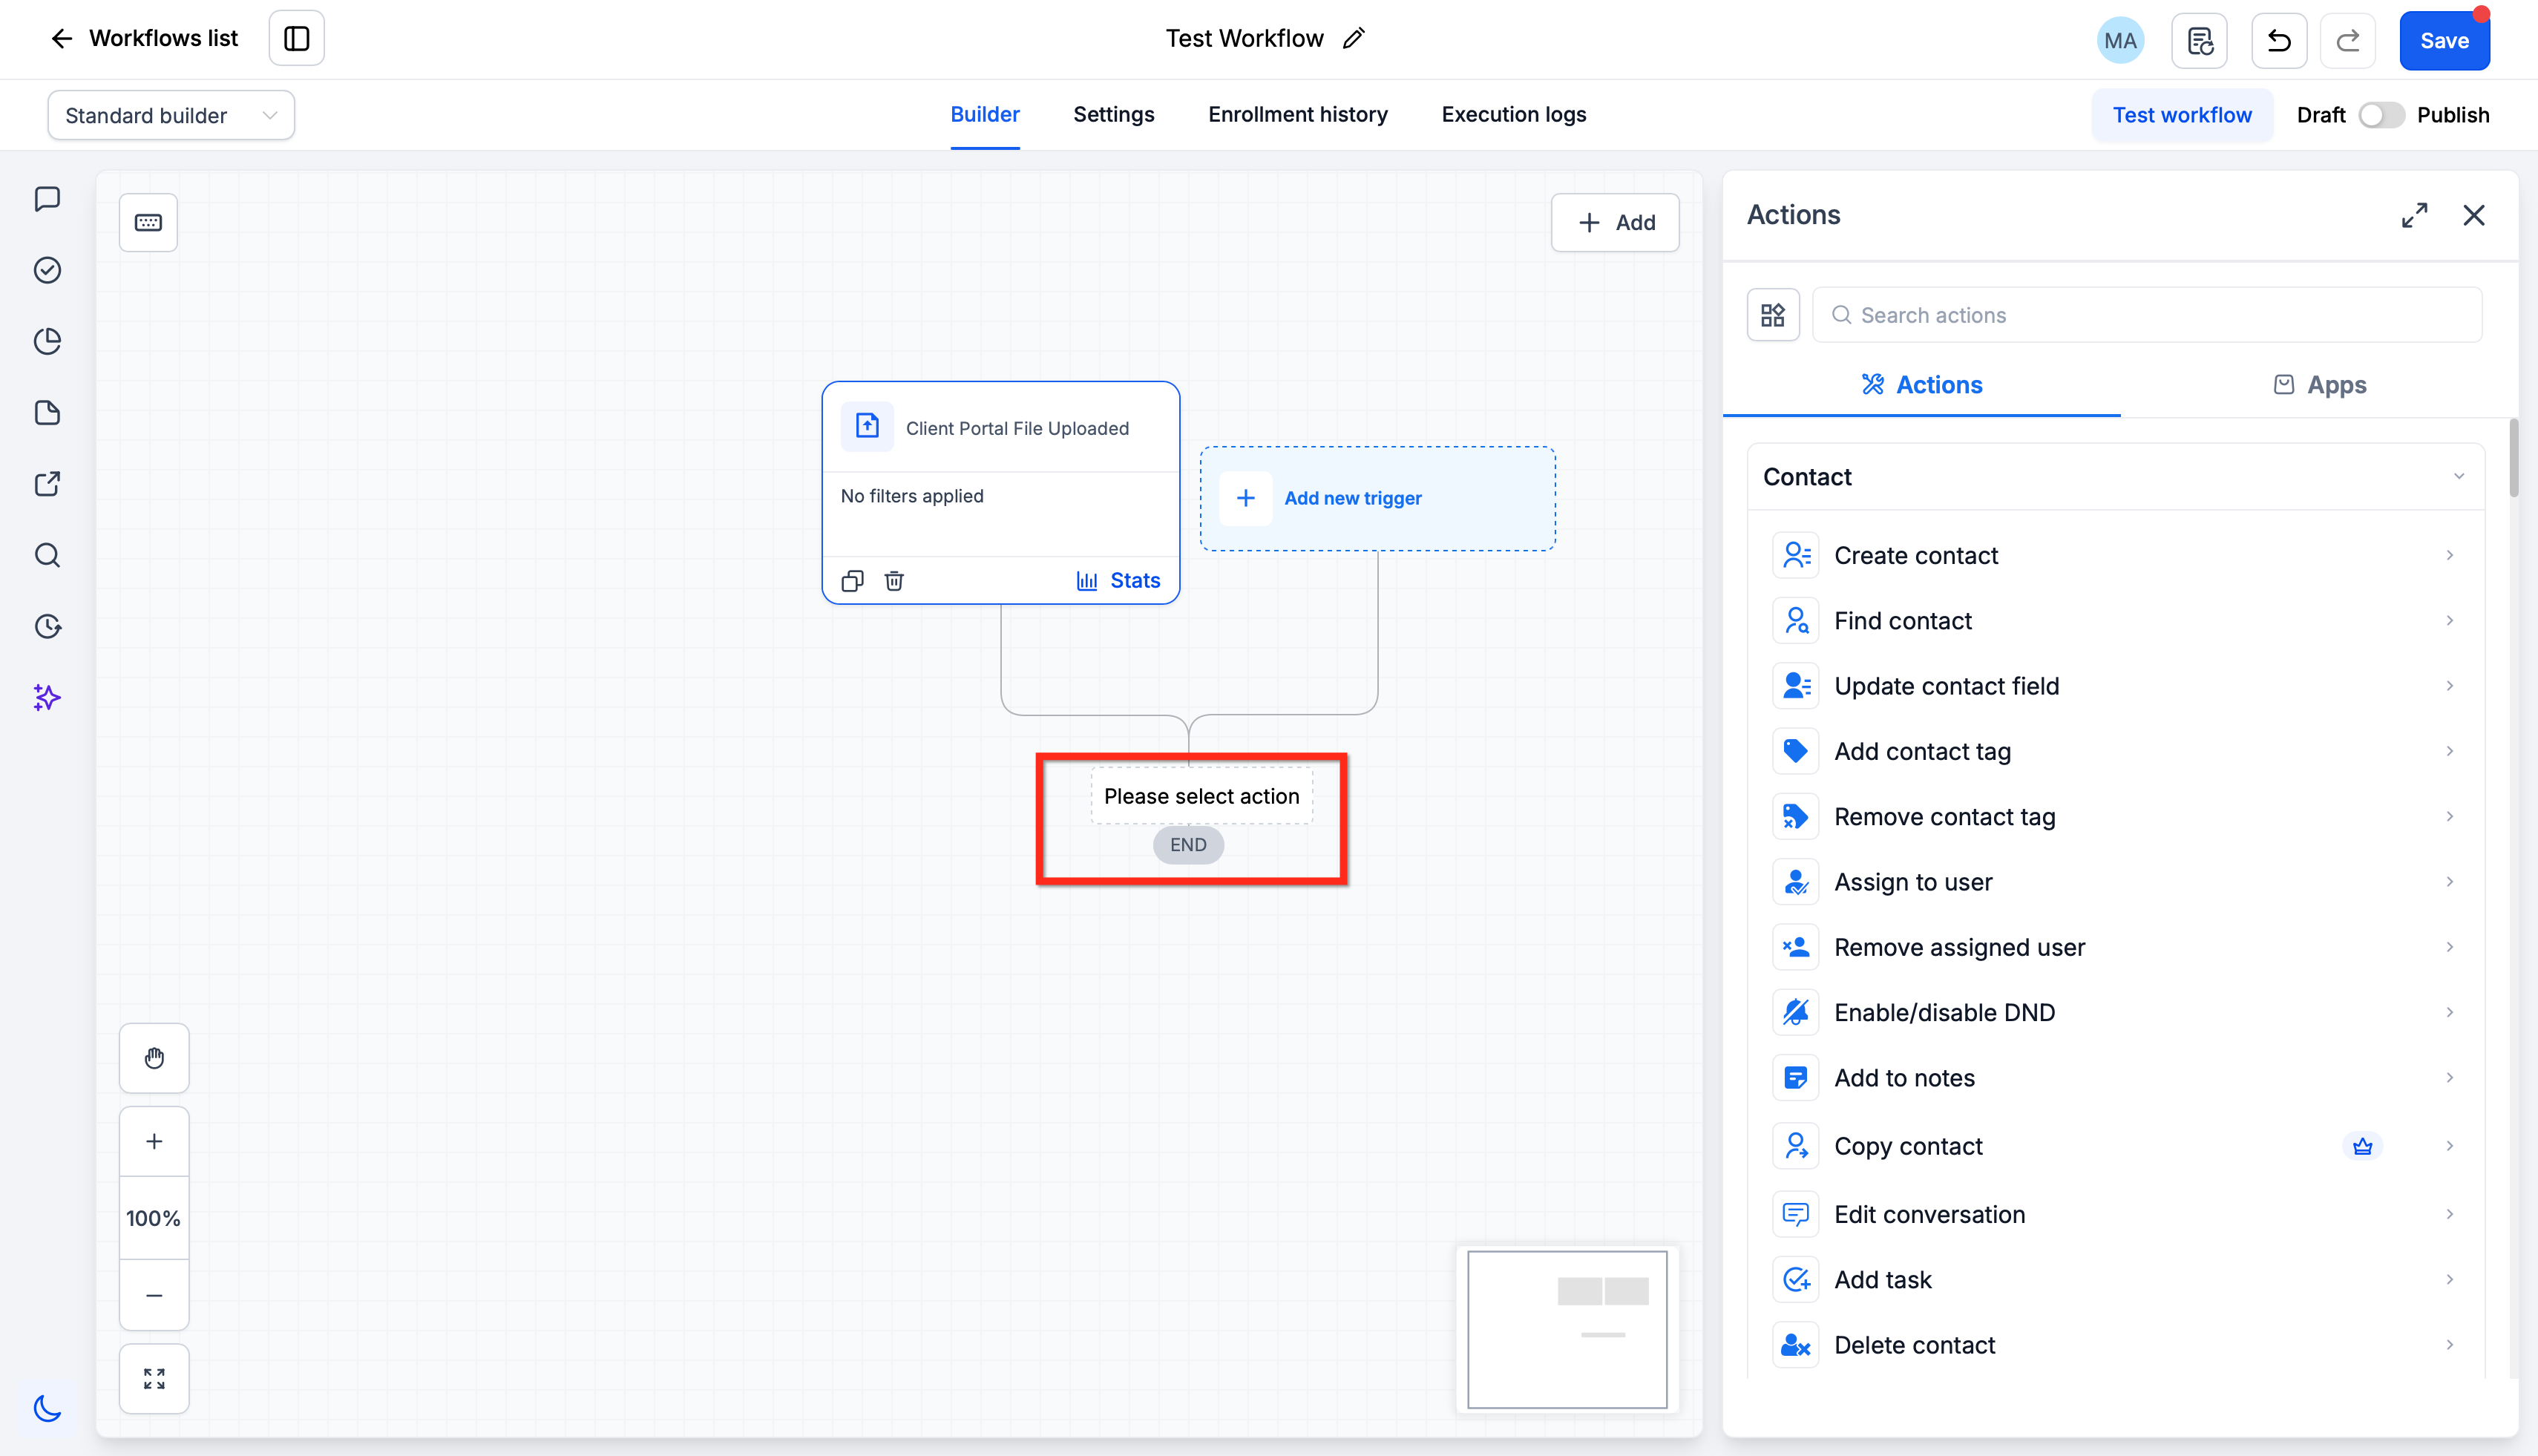
Common options include:Send an email or SMS confirming that the file was received.
Send an internal notification to the appropriate team member.
Create a task for document review.
Add a tag such as Documents Received.
Update a contact field used to track document status.
Update an opportunity or move it to the appropriate pipeline stage.
Send information to another system through a webhook.
Add any additional actions, waits, or conditions required by your process.
For example:Notify an onboarding specialist when intake documents arrive.
Create a review task for an application or approval process.
Update a project or opportunity after a client submits requested assets.
Begin a renewal process when updated documents are uploaded.
Save the workflow.
A live Client Portal upload is the most reliable way to test the complete process because it validates the trigger, document storage, and follow-up actions together.
Frequently Asked Questions
Q: How is Client Portal File Uploaded different from the Documents & Contracts trigger?
Client Portal File Uploaded responds to a file submitted by a contact through the Client Portal’s document-upload experience. The Documents & Contracts trigger responds to lifecycle events for HighLevel documents and contracts, such as when a document is sent, viewed, signed, completed, or declined.
Q: Does sharing a file from the CRM start this workflow?
The trigger is designed for files uploaded by contacts through the Client Portal Shared Documents experience. Sharing a file from the CRM makes it available to the client but is a separate document-sharing action.
Q: Should I use Test Workflow or perform a live upload?
A live upload from a test contact is recommended because it verifies the Client Portal event, document storage, and workflow actions together.
Q: Where can I troubleshoot a workflow that did not run?
Open the workflow and review Execution Logs and Enrollment History. Also confirm that the workflow is published, the contact has Client Portal access, the file type is supported, and the upload completed successfully.
Related Articles
Was this article helpful?
That’s Great!
Thank you for your feedback
Sorry! We couldn't be helpful
Thank you for your feedback
Feedback sent
We appreciate your effort and will try to fix the article