Manage every appointment from one place in the HighLevel mobile app. The Unified Appointment Screen brings appointment details, attendees, form submissions, notes, activity history, and payments into one tabbed view so your team can manage bookings without switching between Calendar, Contacts, Forms, and Payments.
This article explains how to access the Unified Appointment Screen, what each tab is used for, and how to manage appointment information directly from the mobile app.
TABLE OF CONTENTS
- What is the Unified Appointment Screen?
- Key Benefits of the Unified Appointment Screen
- Unified Appointment Screen Tabs
- Details
- Attendees
- Form Submission
- Notes
- Activity Log
- Payments
- How To Setup the Unified Appointment Screen
- Frequently Asked Questions
- Related Articles
What is the Unified Appointment Screen?
The Unified Appointment Screen is a centralized appointment view inside the HighLevel and LeadConnector mobile apps. It helps users review and manage the full appointment workflow from a single screen, including appointment details, attendees, form submissions, internal notes, activity history, and payments when payment settings are configured.
Instead of opening multiple modules to understand one booking, team members can open an appointment from the Calendar module and access the most important appointment information through organized tabs.
Key Benefits of the Unified Appointment Screen
A centralized appointment experience helps teams work faster, reduce missed details, and keep appointment-related
actions connected to the booking. This is especially useful for teams that manage appointments from mobile devices throughout the day.
- Save Time: Manage appointment details, notes, attendees, forms, activity, and payments from one appointment screen.
- Reduce Tab Switching: Access appointment-related information without moving between Calendar, Contacts, Forms, and Payments.
- Collect Payments Faster: Charge a card, record a manual payment, or review payment history from the appointment when payments are configured.
- Stay Organized: Keep internal notes, form submissions, and activity updates attached to the appointment.
- Improve Team Collaboration: Give assistants, sales reps, and staff members the context they need to manage appointments accurately.
- Reduce Errors: Keep appointment information in one place so teams spend less time searching across different modules.
Unified Appointment Screen Tabs
Each tab gives users access to a specific part of the appointment workflow. The available tabs may vary depending on the appointment type, booking setup, form configuration, and payment settings.
Details
The Details tab displays the core appointment information your team needs to confirm, update, or review the booking. Keeping this information accessible helps users make quick appointment changes without leaving the Calendar module.
Attendees
The Attendees tab helps you review and manage people associated with an appointment. For Class Bookings, individual attendee controls let you update one person's booking without affecting the rest of the class.
In HighLevel mobile app version 4.20.0 or later, tap the three-dot menu next to a Class Booking attendee to access these actions:
- Change Status: Set the attendee's status to Confirmed, Showed, No-Show, or Cancelled.
- Reschedule: Open the appointment editor for that attendee's booking.
- View Contact: Open the attendee's contact record.
- Cancel: Cancel that attendee's booking without canceling the rest of the class.
Note: Reschedule opens the appointment editor for the selected attendee's booking. Additional rescheduling fields and completion steps are not documented here because they are not confirmed by the available release evidence.
Form Submission
The Form Submission tab allows users to review booking form responses connected to the appointment. This helps teams prepare for meetings, services, consultations, or calls by keeping submitted intake information close to the appointment.
In the mobile Unified Appointment Screen, Form Submission currently supports default forms. Custom form support is planned for a future update.
Notes
The Notes tab gives team members a place to add and review internal appointment notes. Notes help preserve context, document updates, and support smoother handoffs between staff members.
Appointment notes are intended for internal team use and help users keep important context available across the appointment workflow.
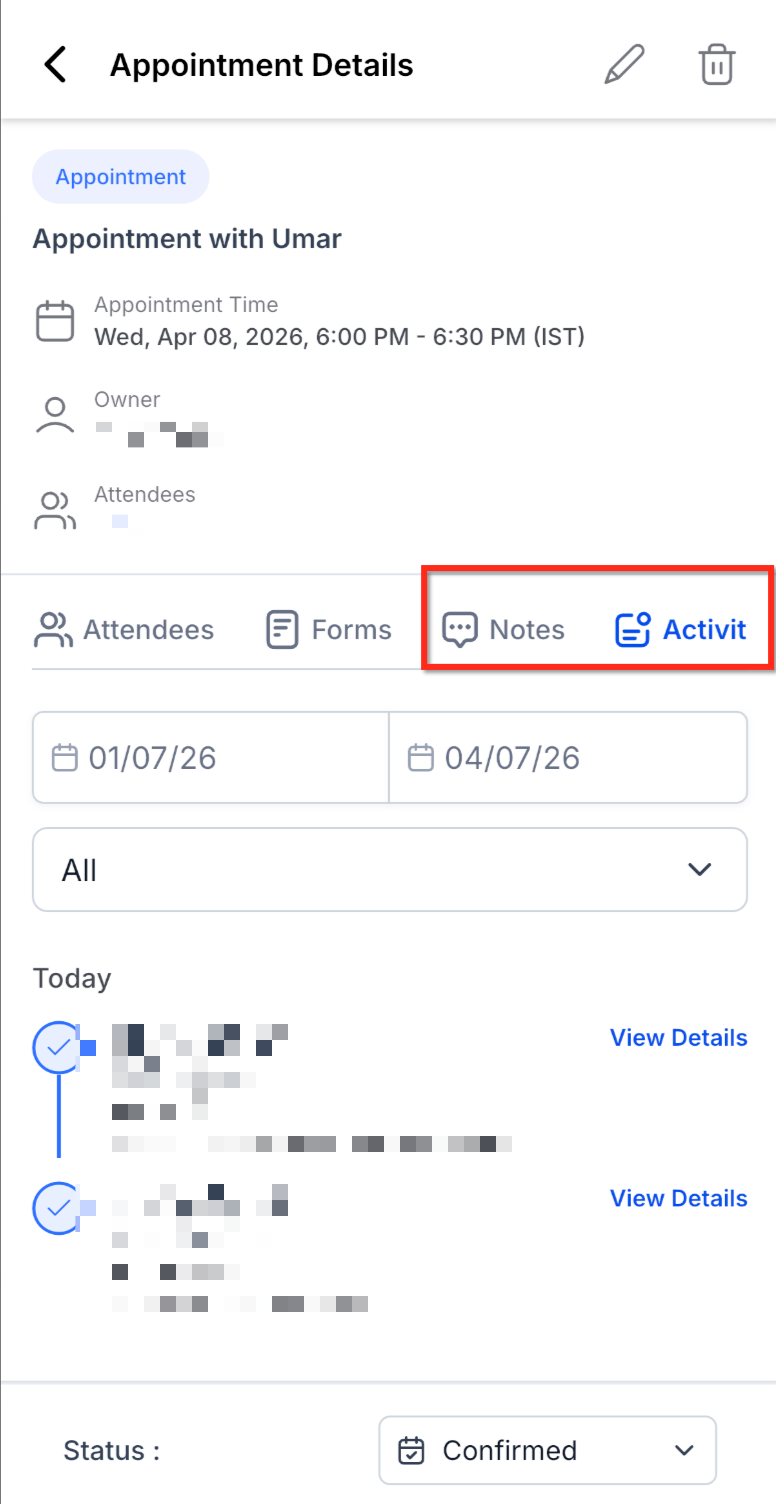
Activity Log
The Activity Log tab provides a read-only timeline of appointment updates. This helps teams understand what changed, when it changed, and how the appointment has progressed over time.
The Activity Log is read-only and is designed to help users audit appointment history without editing the timeline.
Screenshot Placeholder: Add a screenshot showing the Activity Log tab with appointment activity entries.
Payments
The Payments tab appears when payments are configured for the appointment. This tab helps users review payment activity and collect payments from the appointment screen without navigating to a separate payment area.
If the Payments tab does not appear, payment settings may not be configured for that appointment or calendar.
Generate and Share a Reschedule Link
You can share an appointment-specific reschedule link from the mobile app and let the customer choose a new appointment time.
This option is available for supported Meeting appointments and Service bookings.
To share a reschedule link:
1. Open the appointment from Contacts, Conversations, Appointments, or Opportunities.
2. Tap the three-dot menu in the upper-right corner.
3. Tap Generate reschedule link.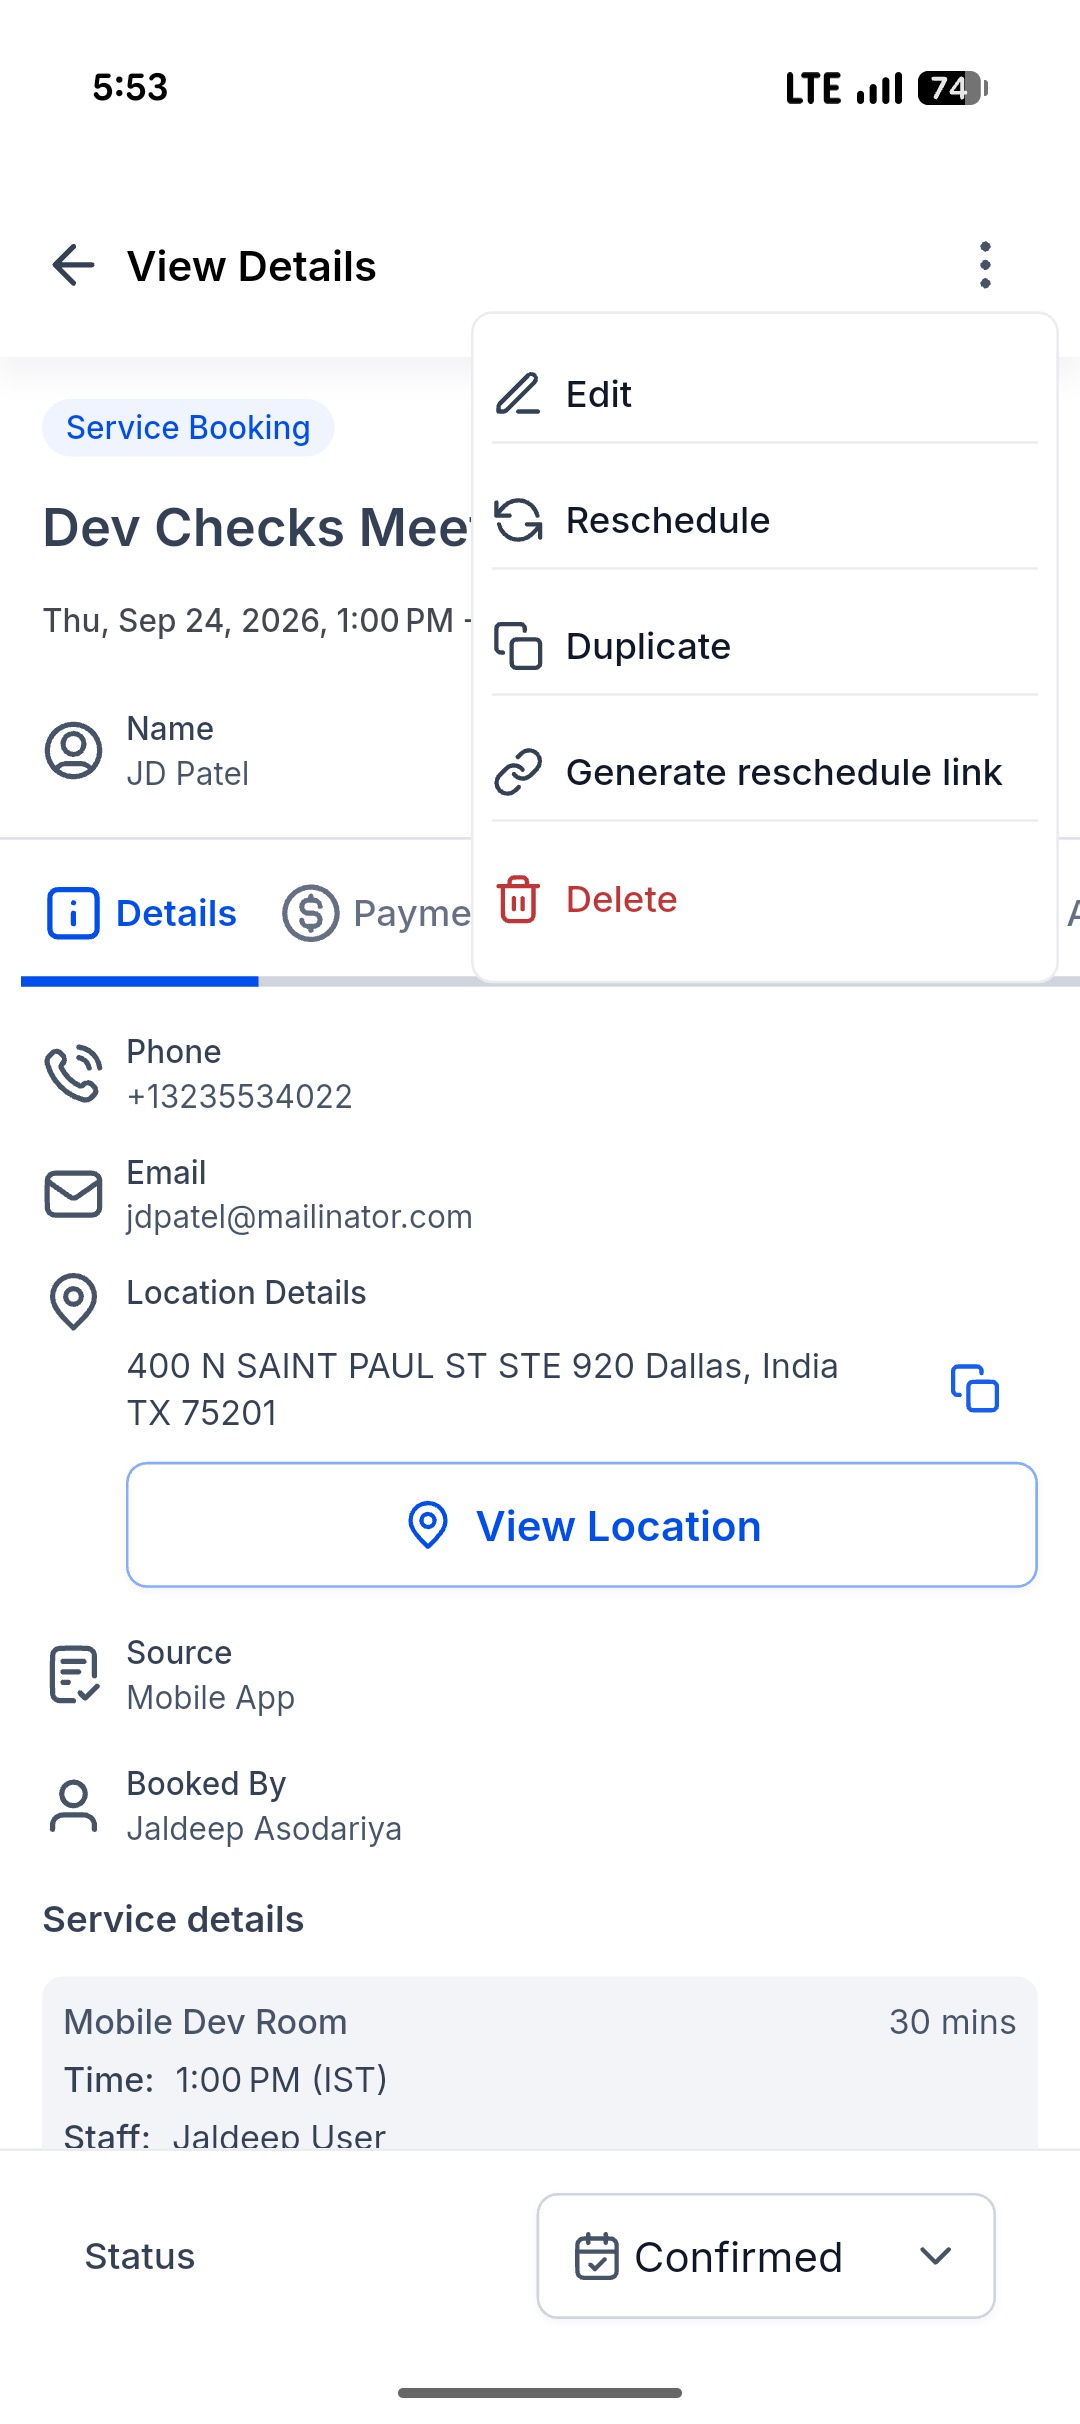
4. The Share a reschedule link sheet displays the appointment's reschedule link. Tap Share.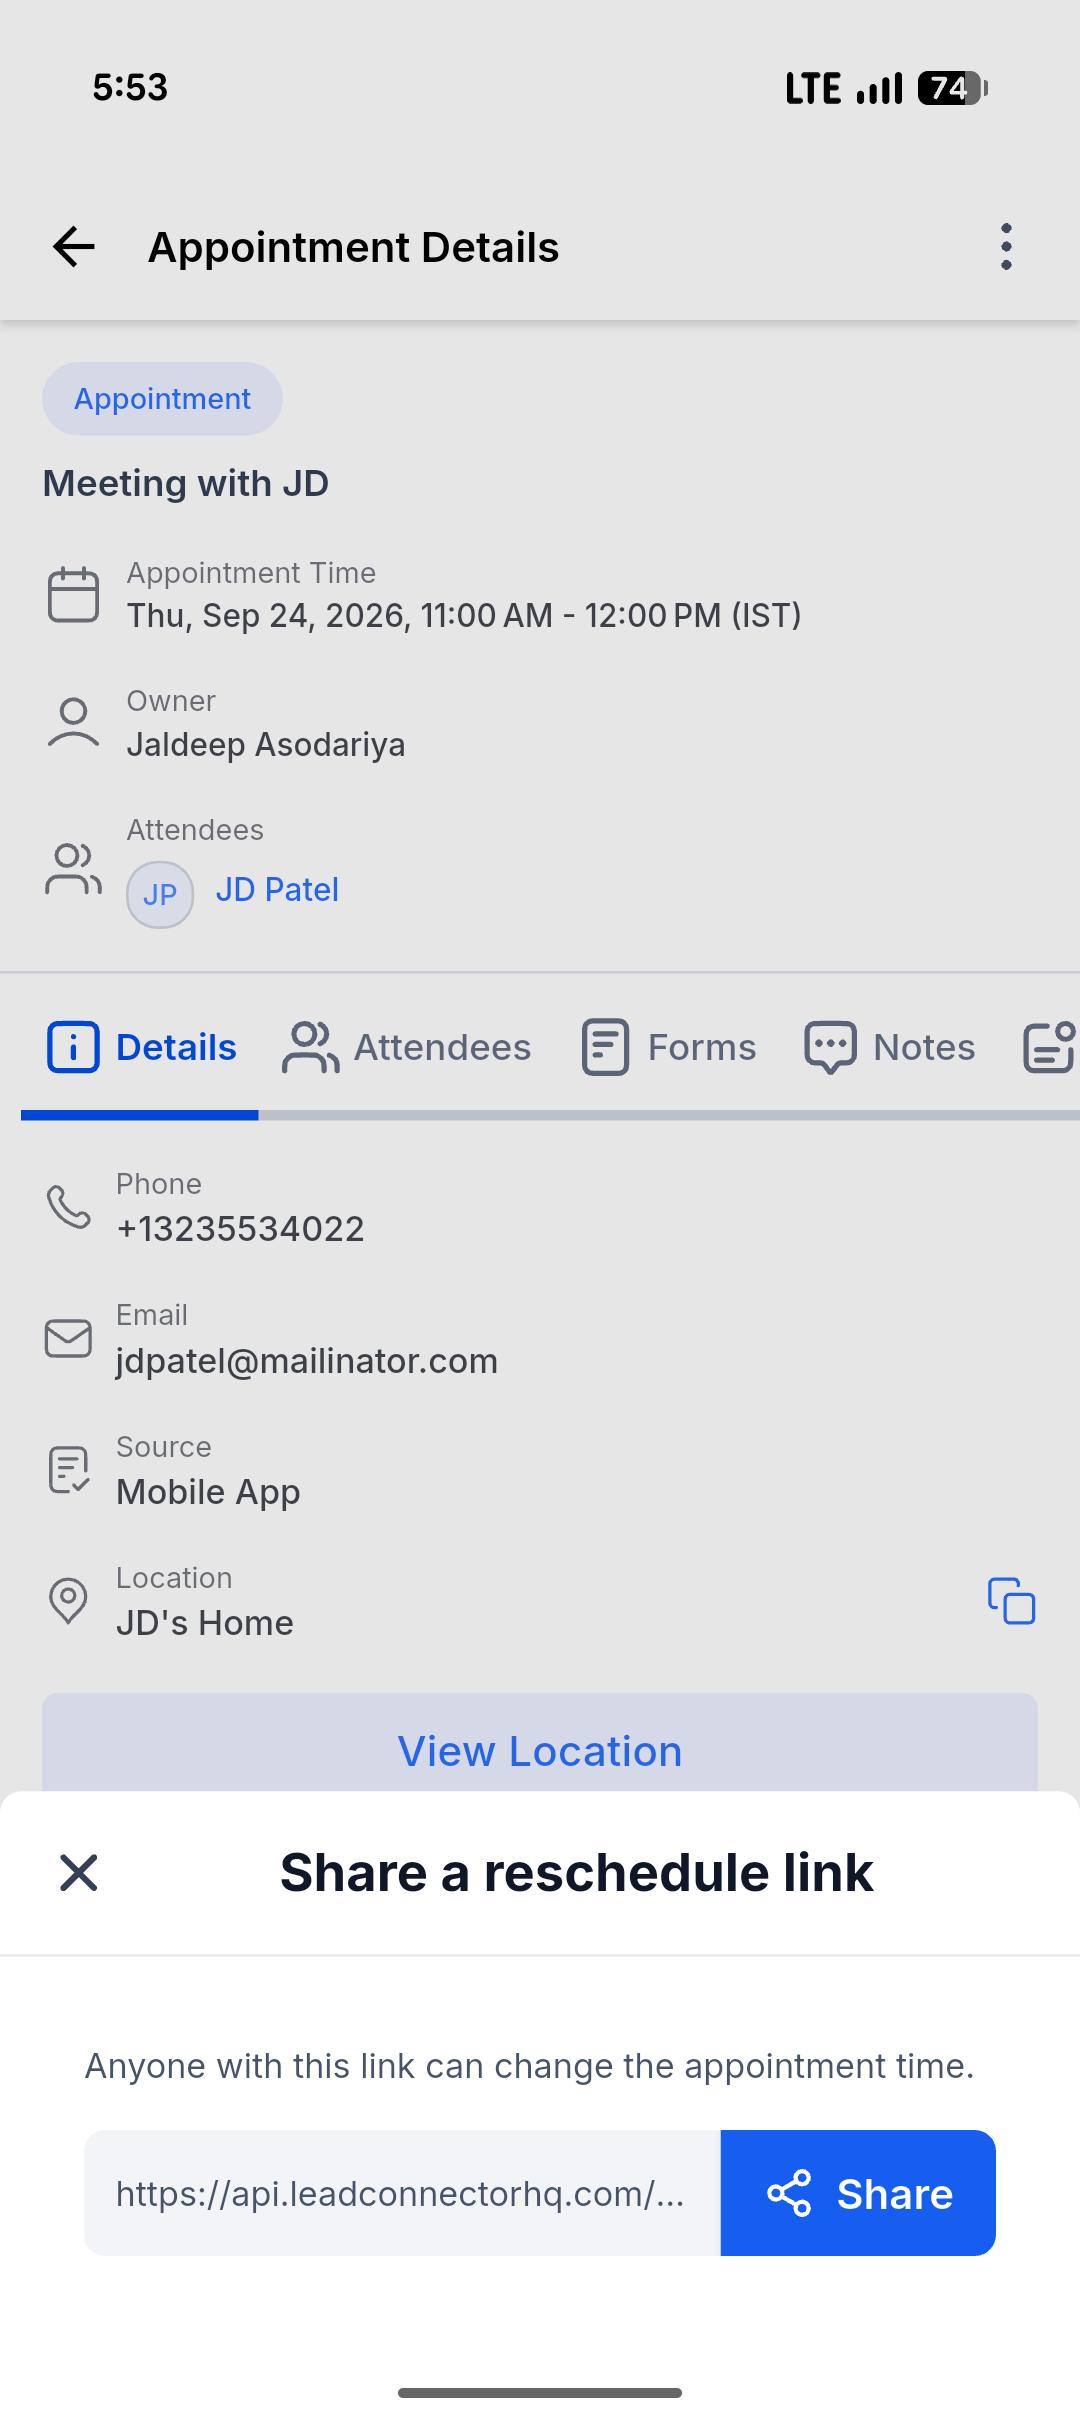
6. Select an app from your device's share sheet and send the link to the customer.
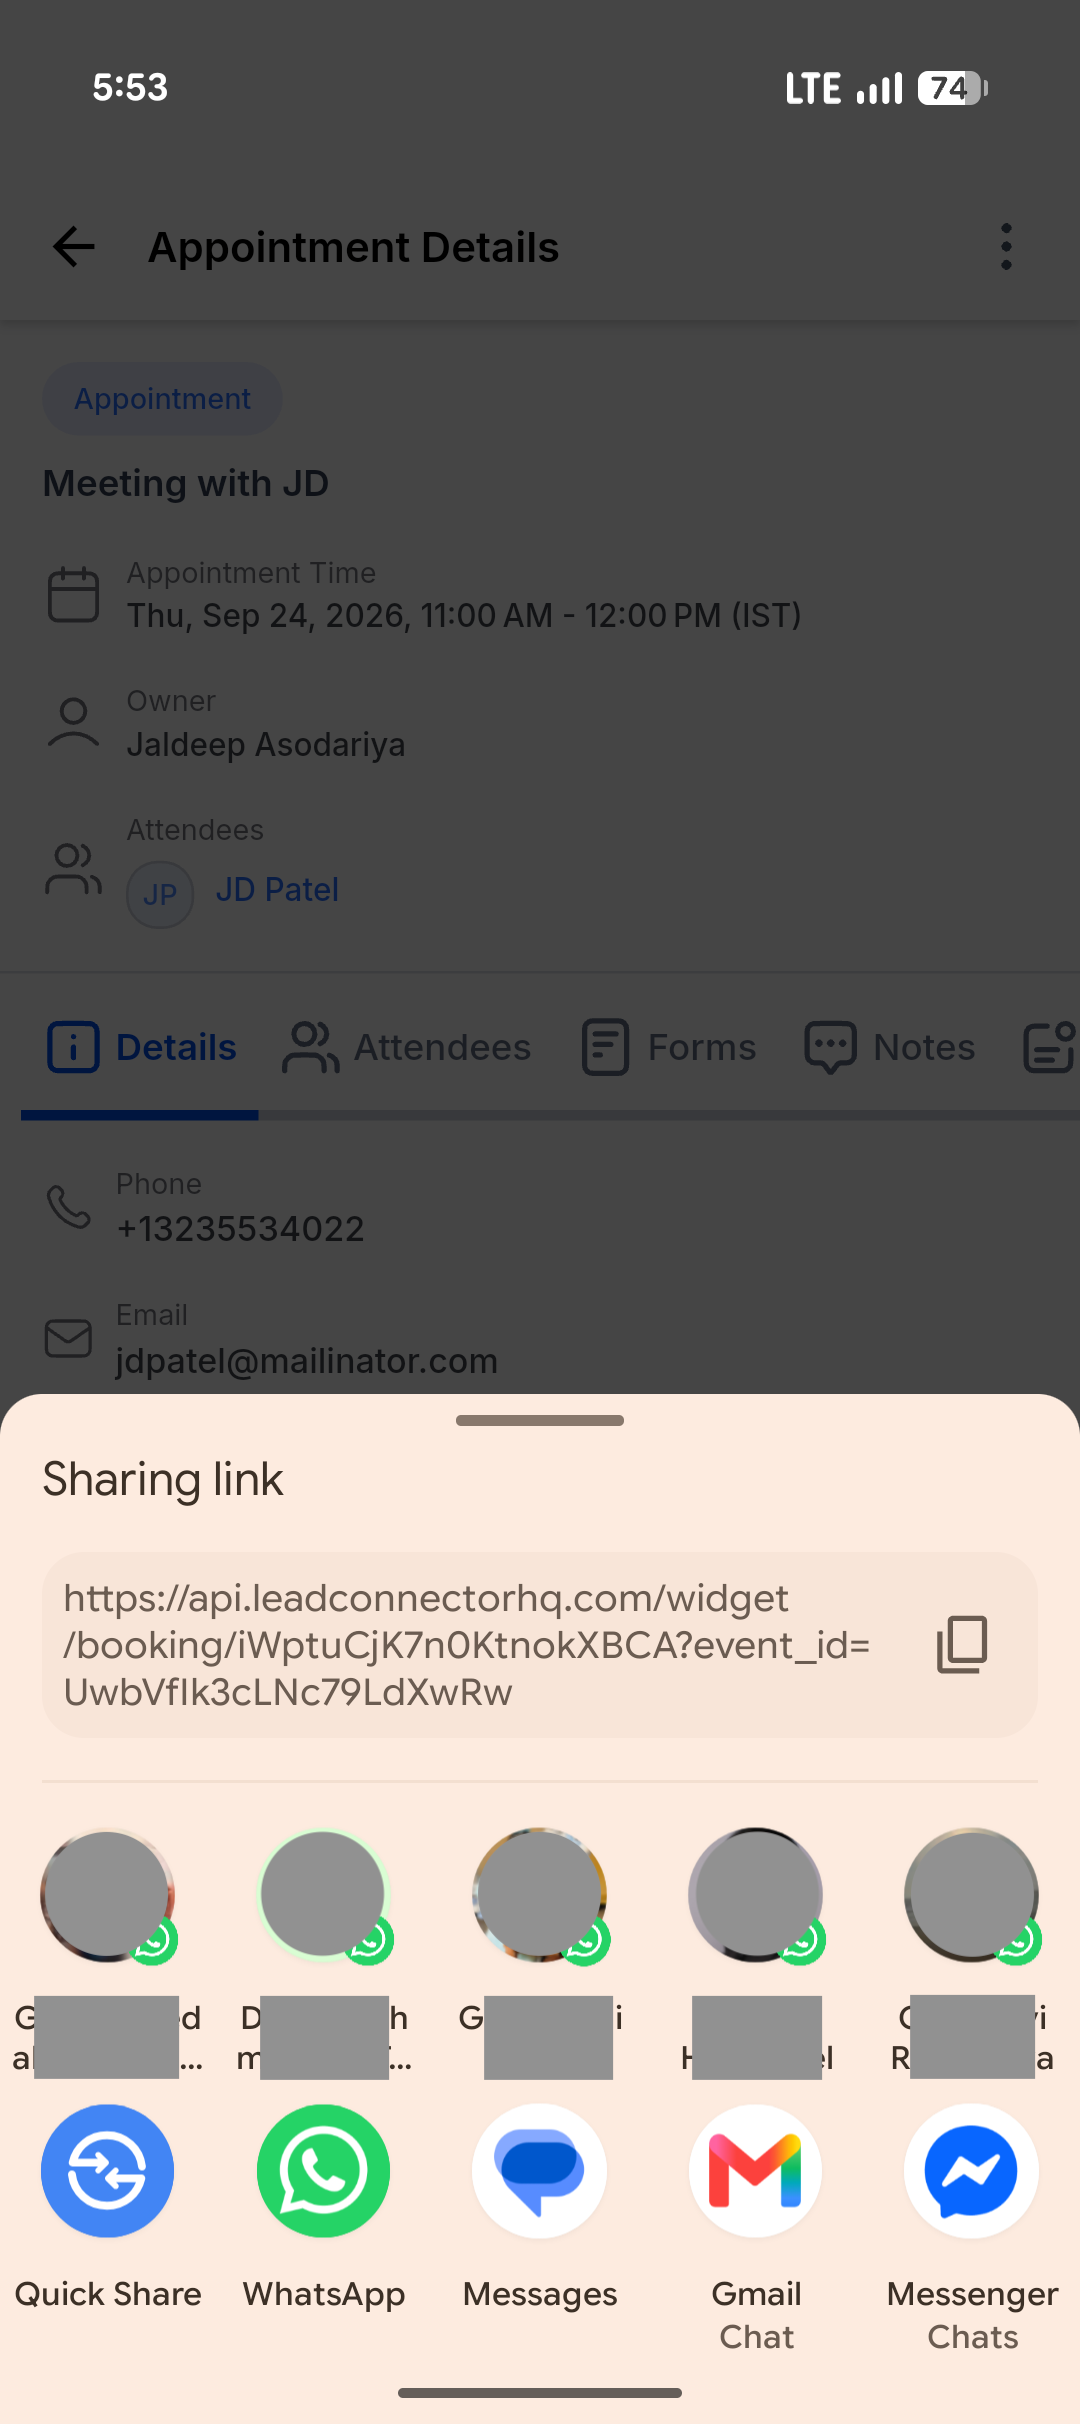
Important: Anyone with the link can change the appointment time. Share the link only with the intended customer.How To Setup the Unified Appointment Screen
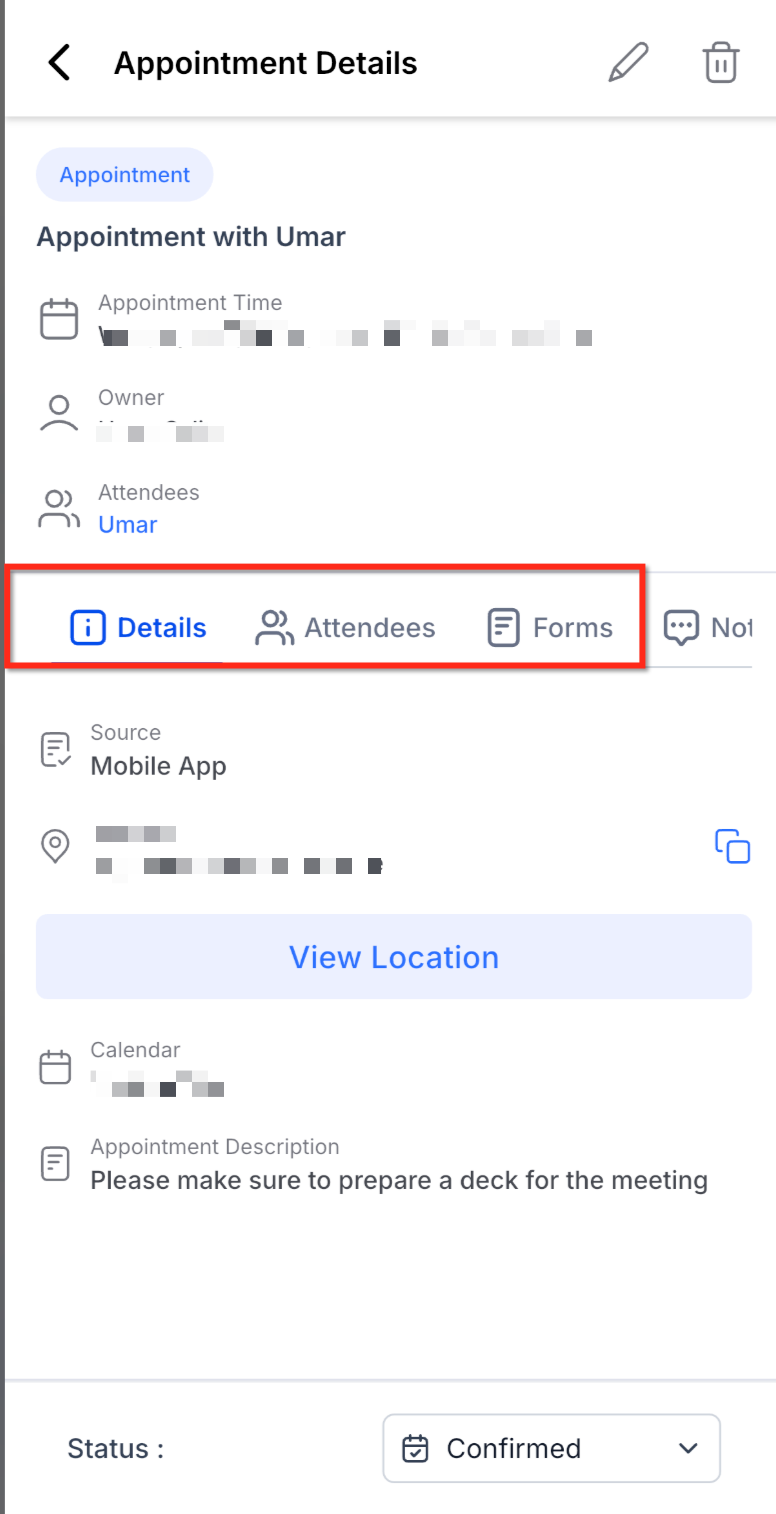
Proper setup ensures your team can access appointment details, payments, forms, notes, and activity information from the mobile app. Before using the Unified Appointment Screen, make sure your team is using a supported app version and has access to the Calendar module.
To access and use the Unified Appointment Screen:
- Open the HighLevel mobile app.
- Navigate to the Calendar module.
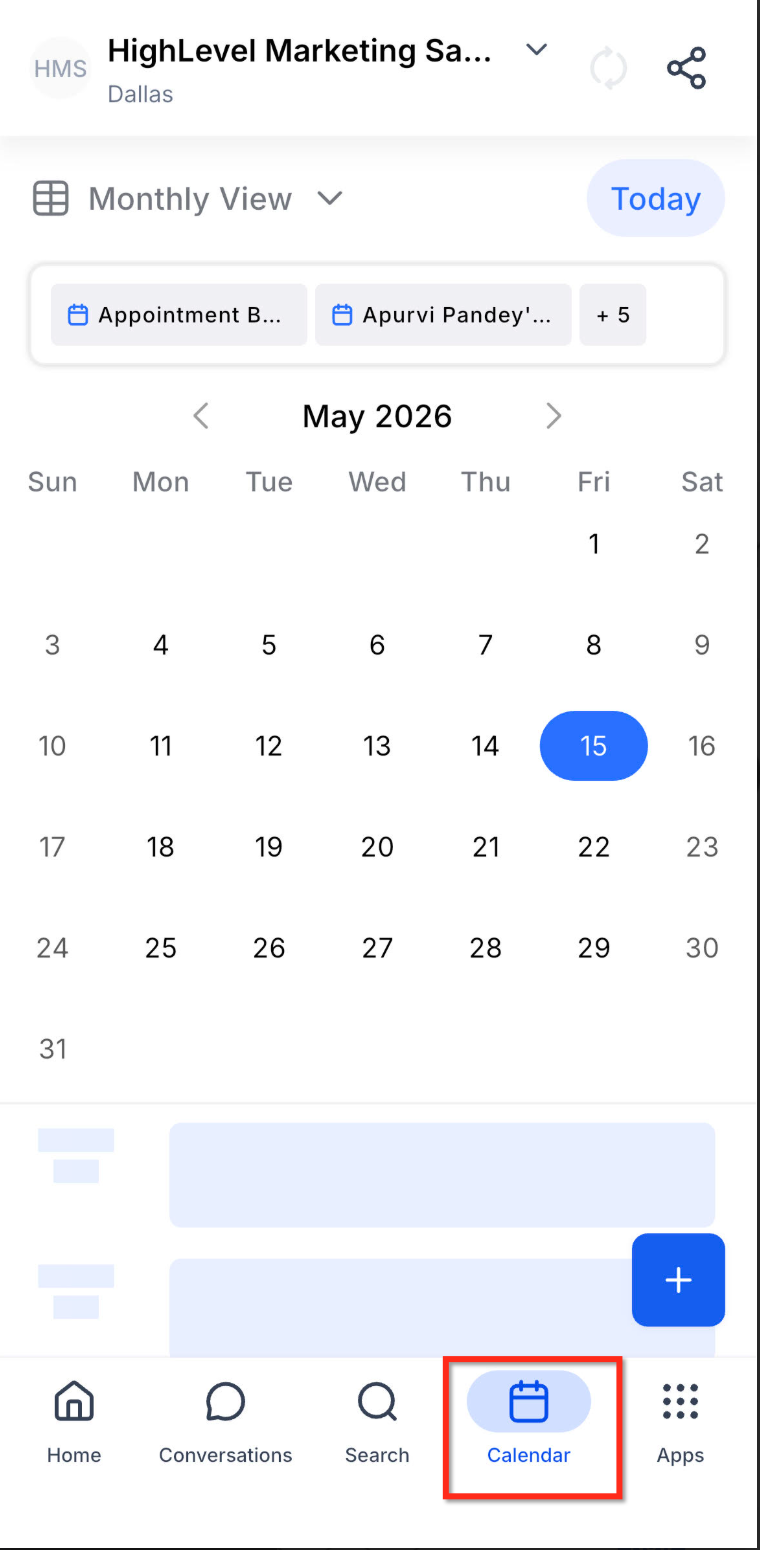
- Open an existing appointment or Service (v2) appointment.
- Review the available tabs:
- Details
- Attendees
- Form Submission
- Notes
- Activity Log
- Payments, if configured
- Details
- Select a tab to review or manage appointment information.
- Update appointment details, review attendees, view form submissions, add notes, review activity, or collect payment based on the available options
Manage an Individual Class Booking Attendee
Managing attendees individually helps you respond to status changes, cancellations, and rescheduling requests without changing the other bookings in the class.- Open the HighLevel mobile app.
- Select the Calendar module.
- Tap the Class Booking appointment you want to manage. Class Booking appointments display as a single calendar tile with a seat count, such as 2/5 Class Booking.
- Select the Attendees tab.
- Tap the three-dot menu next to the attendee you want to manage.
- Select the required action:
- Change Status
- Reschedule
- View Contact
- Cancel
If you select Change Status, choose Confirmed, Showed, No-Show, or Cancelled for that attendee.
Frequently Asked Questions
Q: Where can I access the Unified Appointment Screen?
A: Open the HighLevel or LeadConnector mobile app, go to the Calendar module, and open an existing appointment.
Q: Is the Unified Appointment Screen available in both HighLevel and LeadConnector?
A: Yes. The feature is available in both the HighLevel and LeadConnector mobile apps.
Q: Which app version is required?
A: The Unified Appointment Screen is available in version 4.12.0 (816) or later.
Q: Why do I not see the Payments tab?
A: The Payments tab appears only when payments are configured for the appointment or calendar.
Q: Can I collect payments from the appointment screen?
A: Yes. When payments are configured, users can collect payments, charge a card, record a manual payment, and review transaction history from the Payments tab.
Q: Can I view custom form submissions in the mobile Unified Appointment Screen?
A: Custom form support is planned for a future update. The current mobile release supports default forms in the Form Submission tab.
Q: Are appointment notes visible to customers?
A: Notes added from the Notes tab are intended for internal team use.
Q: Can I manage individual attendees for class bookings?
A: Yes. In HighLevel mobile app version 4.20.0 or later, open a Class Booking appointment from Calendar, select Attendees, and tap the three-dot menu beside an attendee. You can change that attendee's status, reschedule their booking, view their contact record, or cancel their booking individually.
Q: Why don’t I see the Generate reschedule link option for a Meeting appointment?
The Generate reschedule link option appears when the Meeting appointment is editable and has a contact attached. It does not appear for Calendly-sourced Meeting appointments, custom-recurring Meeting appointments, appointments that are still loading or are in an error state, or users who do not have permission to manage the appointment.
Q: When is the Generate reschedule link option available for Service bookings?
For Service bookings, the appointment action menu appears after the booking loads and when you have the required appointment permissions.
Q: Can I generate a reschedule link for a cancelled or no-show appointment?
Yes. Cancelled and no-show appointments can still provide a reschedule link.
Q: What happens if the reschedule link cannot be generated?
If the app cannot build the reschedule link, the Share a reschedule link sheet displays N/A and the Share button is disabled.
Related Articles
Was this article helpful?
That’s Great!
Thank you for your feedback
Sorry! We couldn't be helpful
Thank you for your feedback
Feedback sent
We appreciate your effort and will try to fix the article