Use Chat Widget customization settings to control how your widget looks, where it appears, what visitors see, and how it behaves on your website.
Available settings vary by Chat Widget type. For example, Live Chat, SMS/Email, WhatsApp, All-in-One Chat, Facebook, Instagram, and Voice AI can provide different customization options.
TABLE OF CONTENTS
- Key Benefits of Customizing Your Chat Widget
- Create or Open a Chat Widget
- Widget
- Chat Window
- Messaging
- Frequently Asked Questions
- Related Articles
Key Benefits of Customizing Your Chat Widget
- Match your brand: Customize the widget theme, colors, icons, avatar images, and visitor-facing messages.
- Control widget placement: Choose between sticky and embedded placement options based on your website layout.
- Adjust the visitor experience: Configure messages for first-time and returning visitors, Chat Window content, and acknowledgement messages.
- Optimize loading behavior: Delay widget loading until a visitor interacts with the page or allow it to load immediately.
- Configure notice and consent: Display a legal notice and configure whether a consent checkbox is shown, required, or pre-selected.
Create or Open a Chat Widget
- Go to Sites > Chat Widget.
- Click New to create a Chat Widget, or open an existing widget you want to customize.
- Open the widget configuration to customize its settings.
- If you create a new widget, select the Chat Widget type you want to configure. Available customization settings depend on the selected widget type.
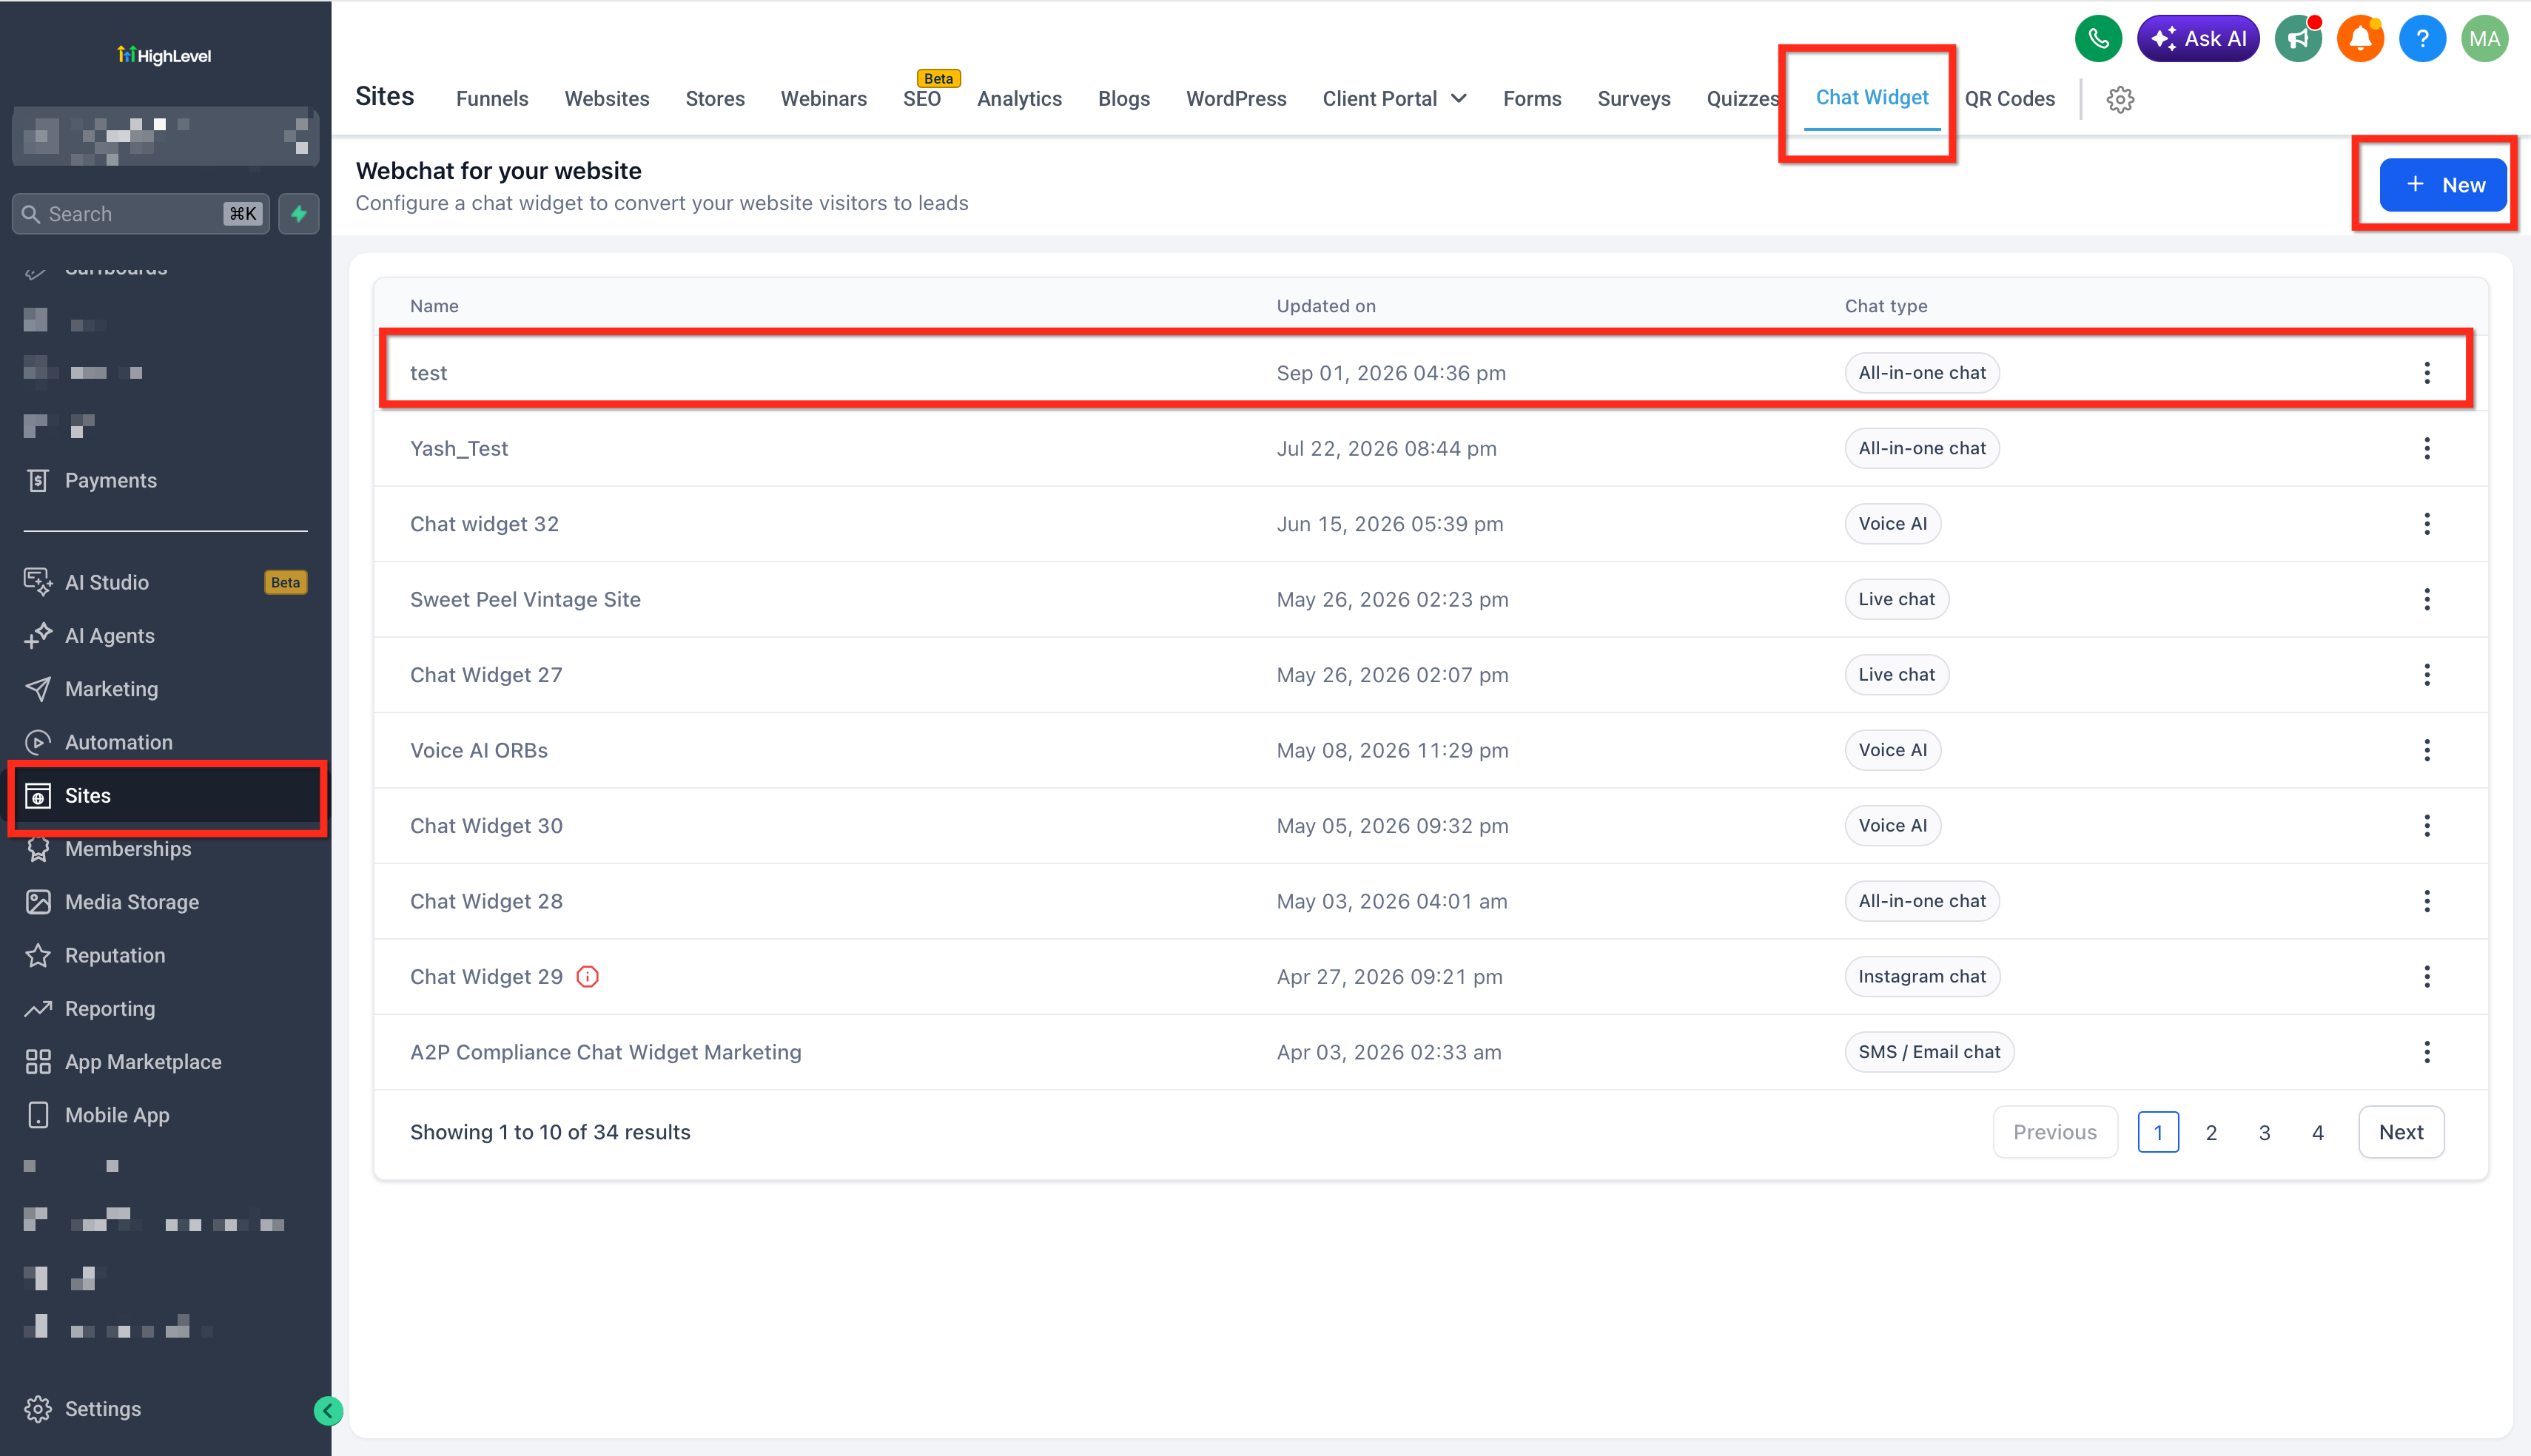
For complete instructions on Chat Widget types, creation, setup, and installation, see Getting Started with Chat Widget .
Widget
Use the Widget section to control the appearance, placement, and dimensions of your Chat Widget.
Note: Available settings can differ based on the Chat Widget type. If you do not see a setting described below, confirm that your selected widget type supports it.
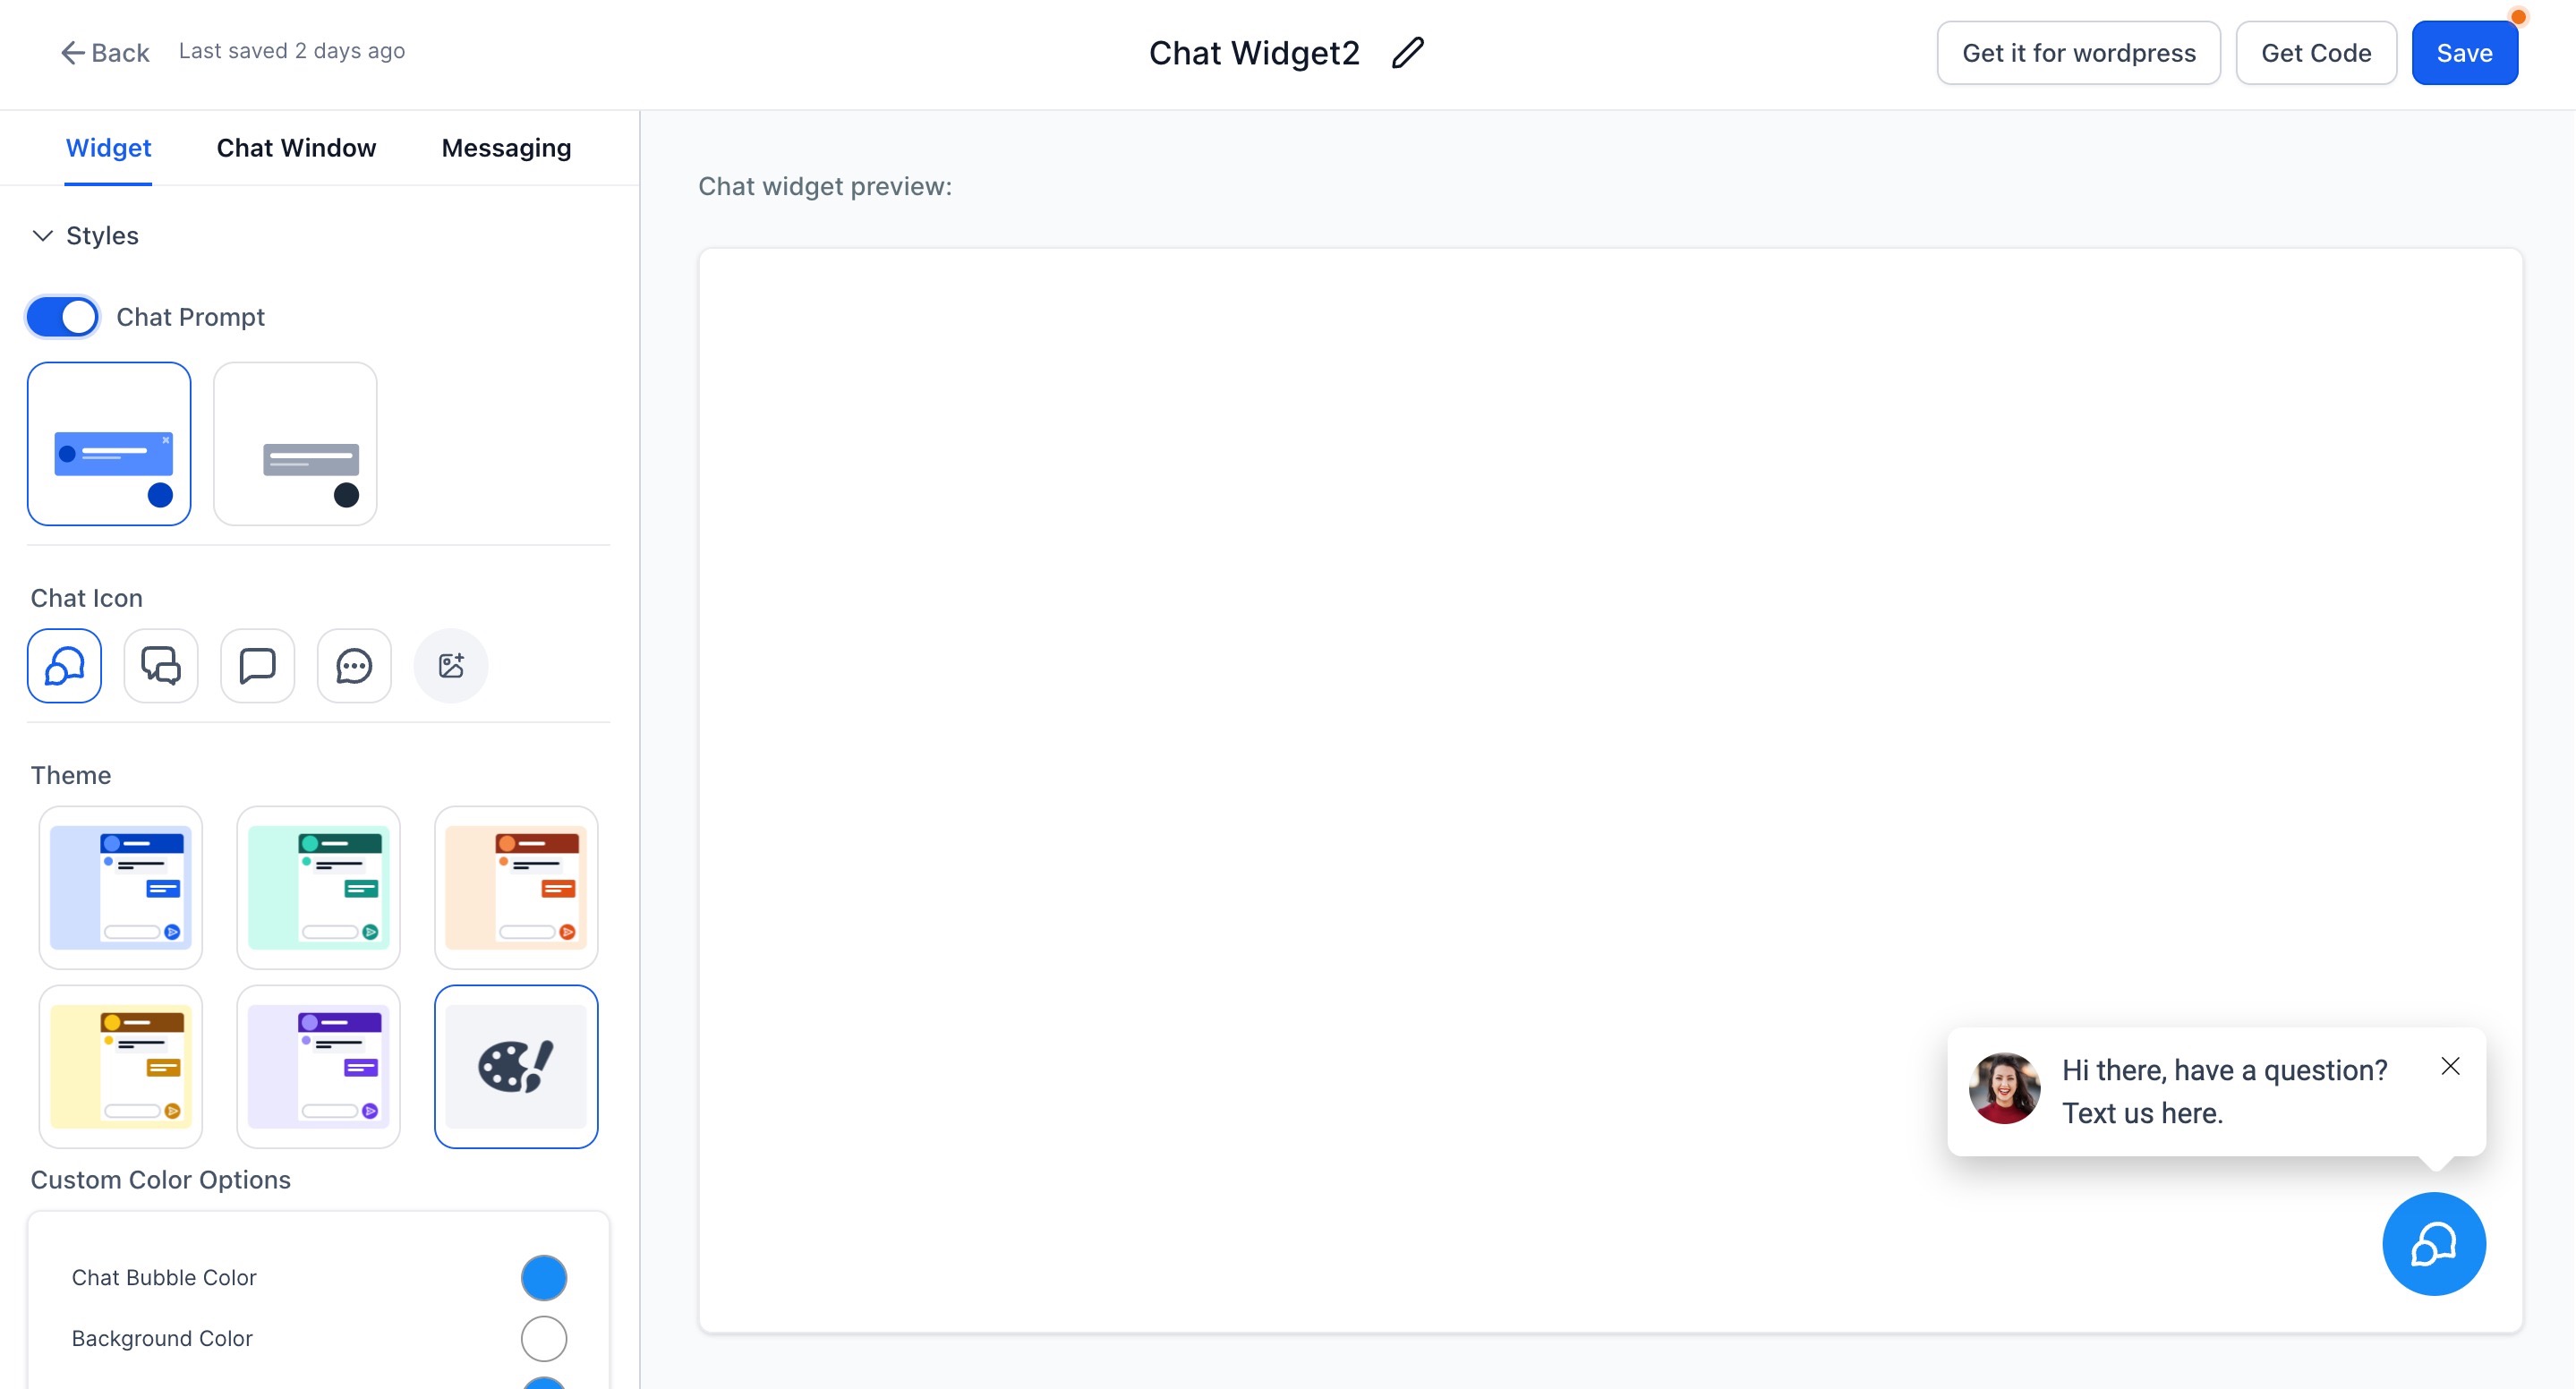
Chat Launcher
Configure the Chat Launcher that visitors use to open the widget.
You can display the launcher with or without a prompt message to encourage visitors to start a conversation.
Sticky widgets use a launcher that visitors click to open the chat experience. Embedded/Inline widgets appear directly within the page content and do not rely on a floating launcher in the same way.
Chat Icon Selection
Choose the chat icon that best matches your website and brand experience.
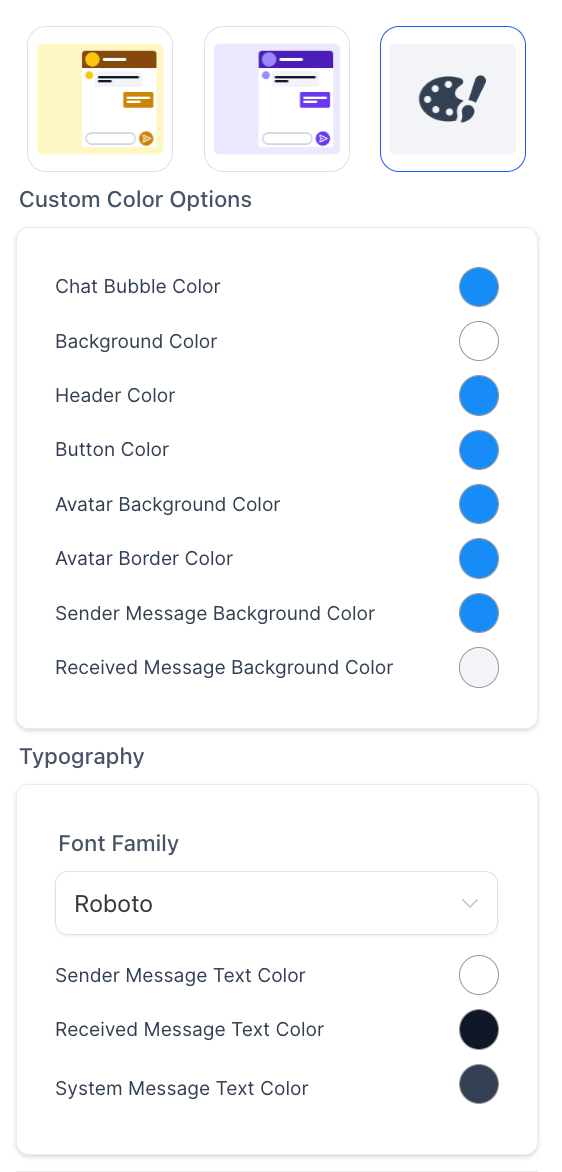
Theme Customization
Select a predefined theme or customize the widget colors and styling to match your brand.
First-Time and Returning Visitor Messages
Configure different prompt messages depending on whether the visitor is opening the Chat Widget for the first time or returning to your website.
Use these messages to provide a more relevant greeting without changing the underlying conversation routing.
Avatar Images
Add avatar images for agents or support teams to give visitors a more recognizable and personalized interaction.
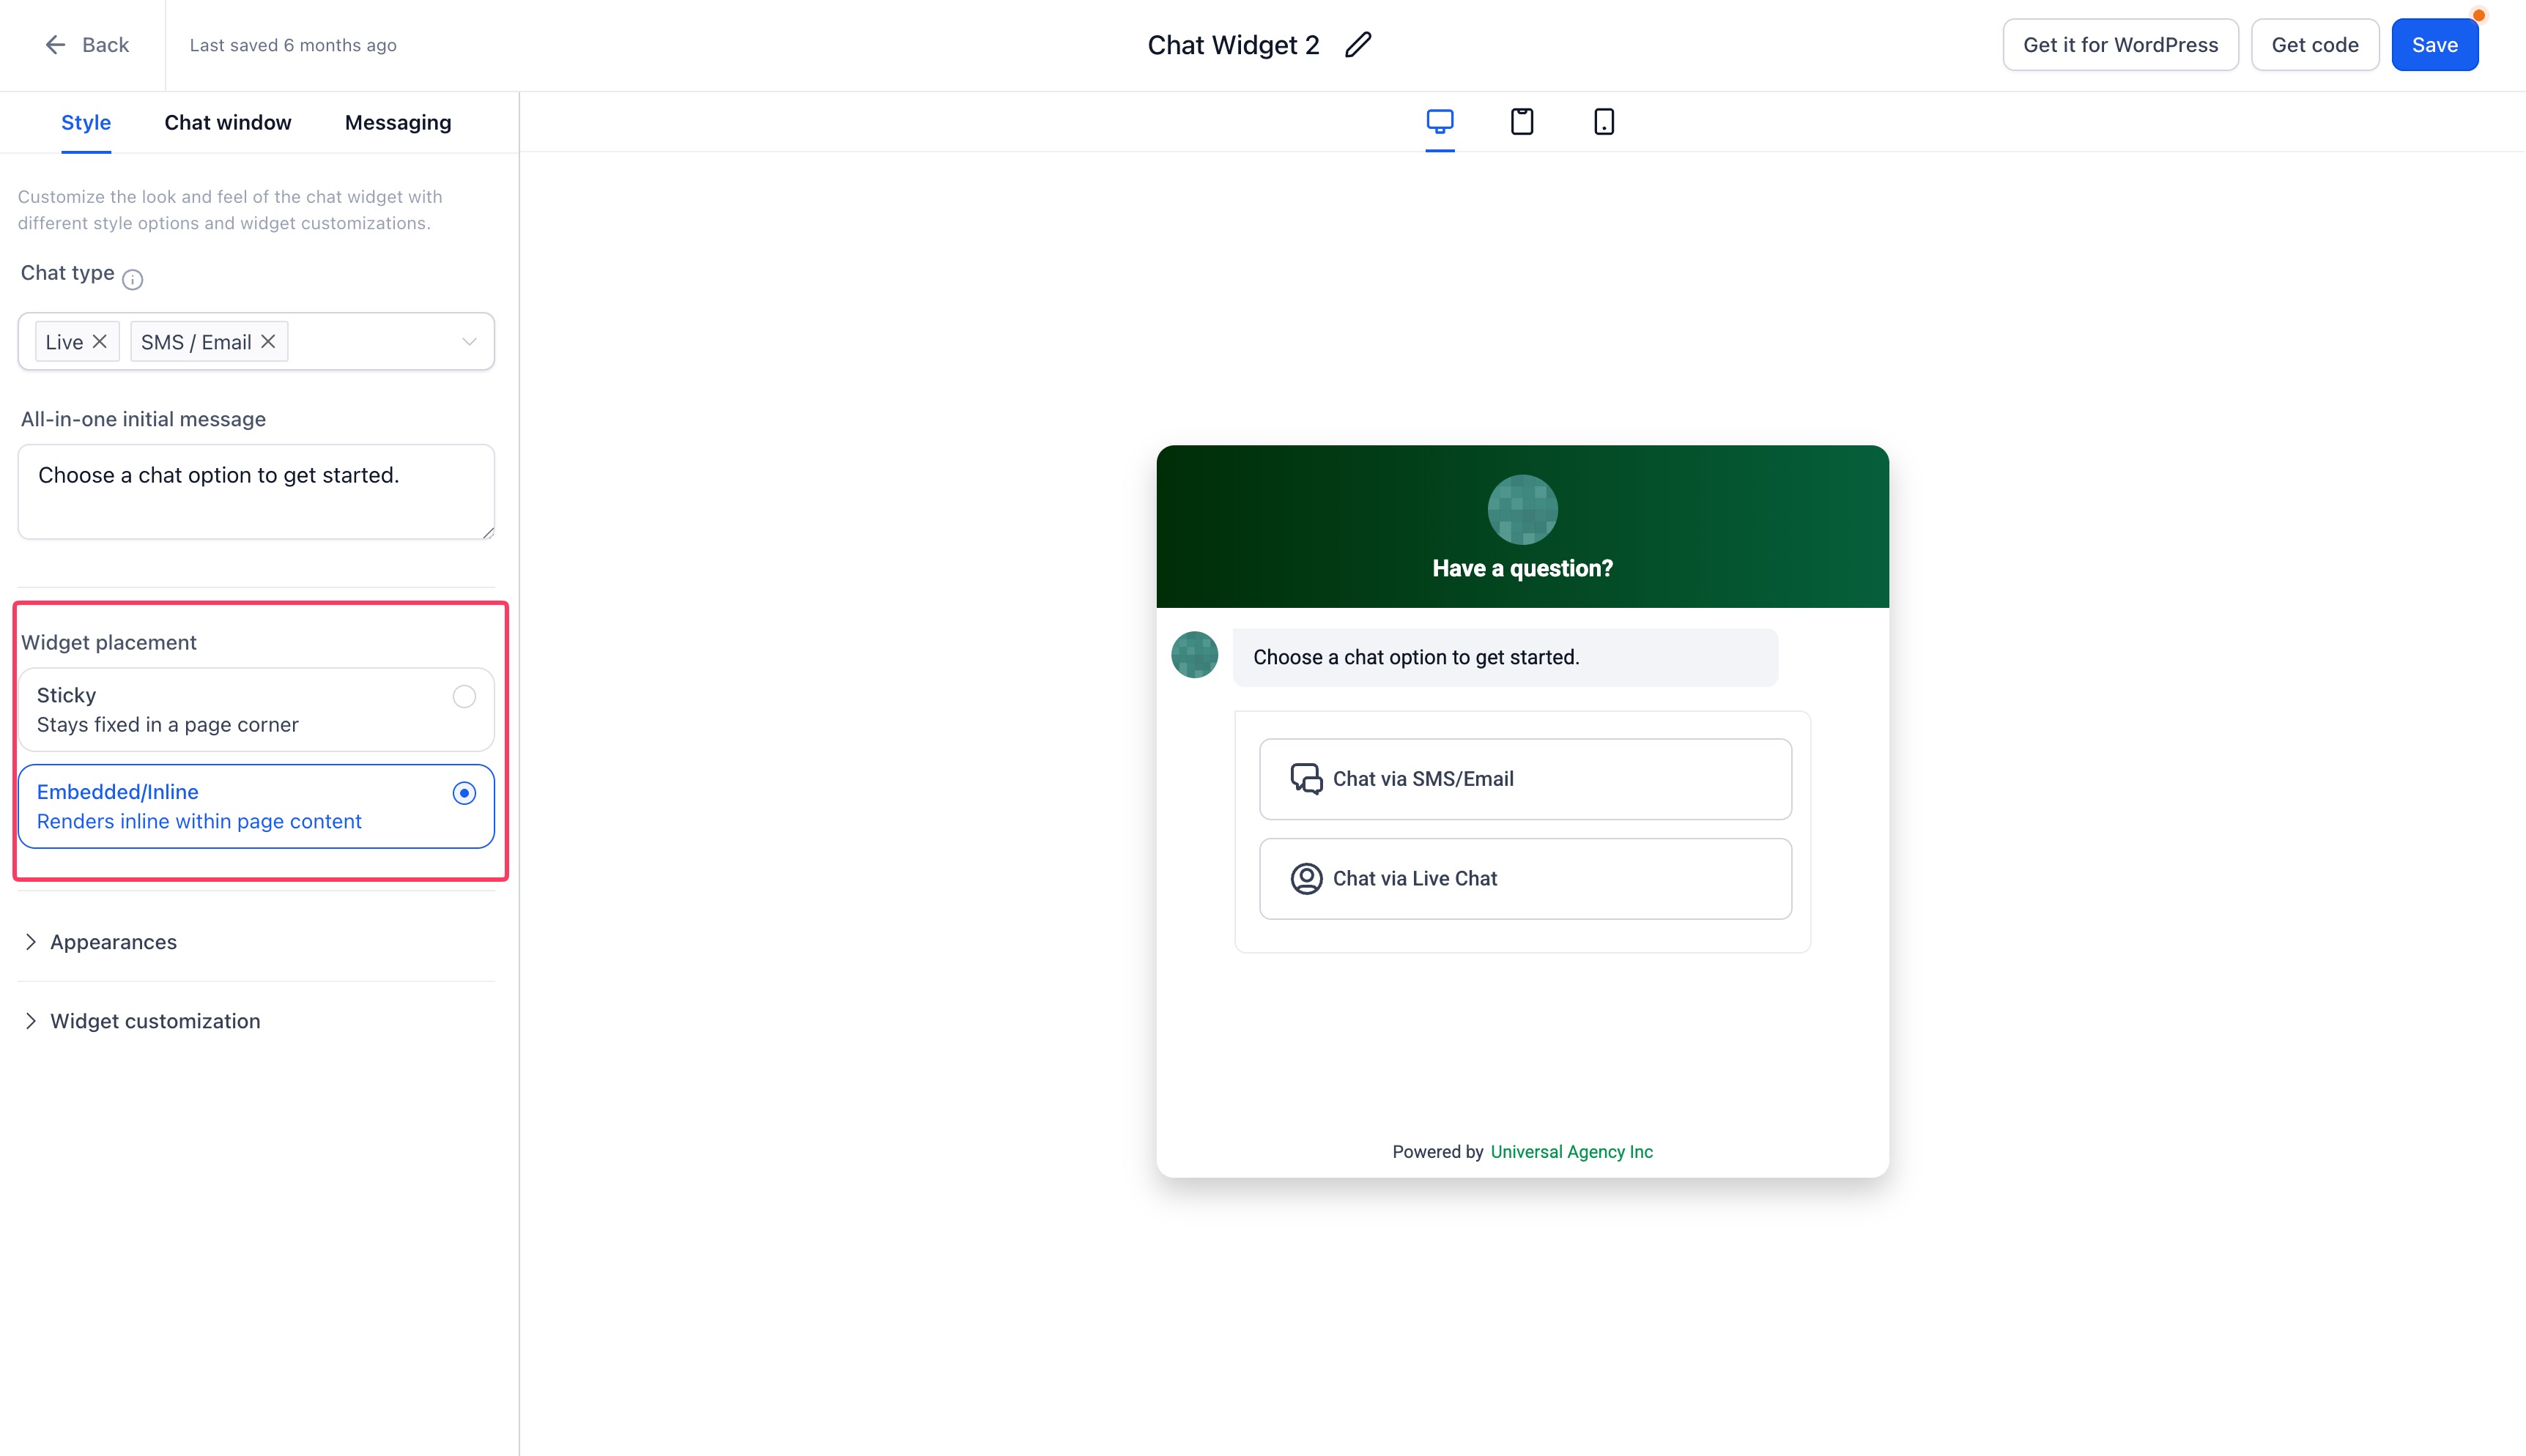
Widget Placement
Choose how and where the Chat Widget appears on your website.
- Sticky: Keeps the widget fixed in a page corner, such as the bottom-left or bottom-right corner.
- Embedded / Inline: Displays the complete conversation experience within your page content.
Embedded / Inline placement is available for All-in-One Chat, Email/SMS, WhatsApp, Facebook, Instagram, Live Chat, and Voice AI.
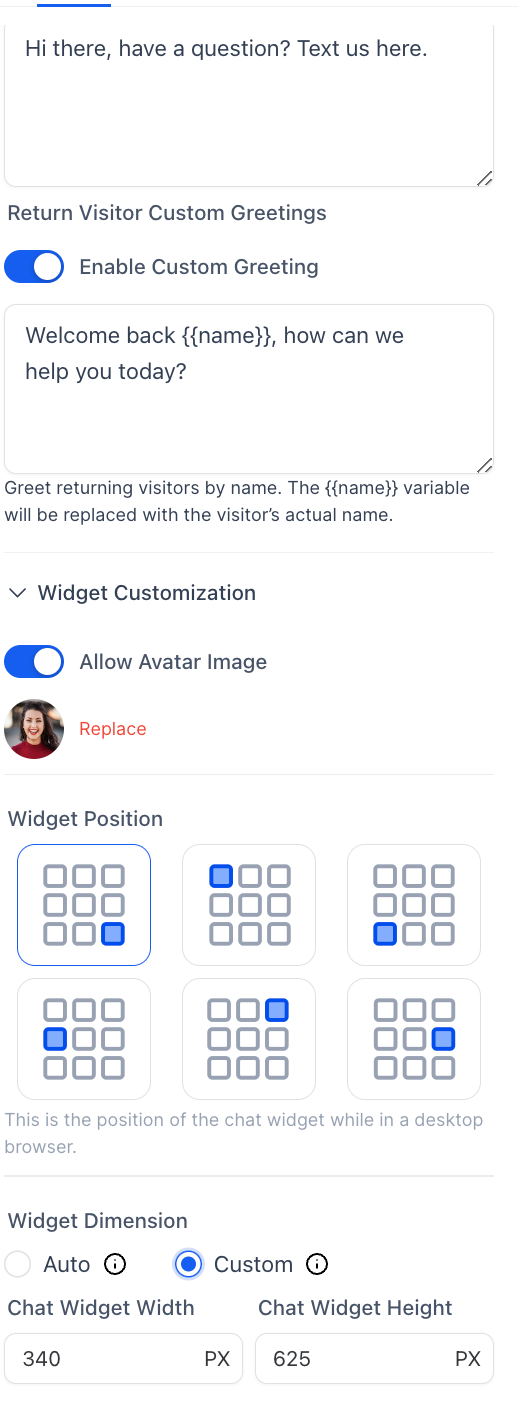
Widget Dimensions
Keep the widget dimensions set to Auto, or select Custom to configure the width and height for your website layout.
Custom dimensions support values starting from 200px and are not restricted by the previous placement-based minimum dimensions.
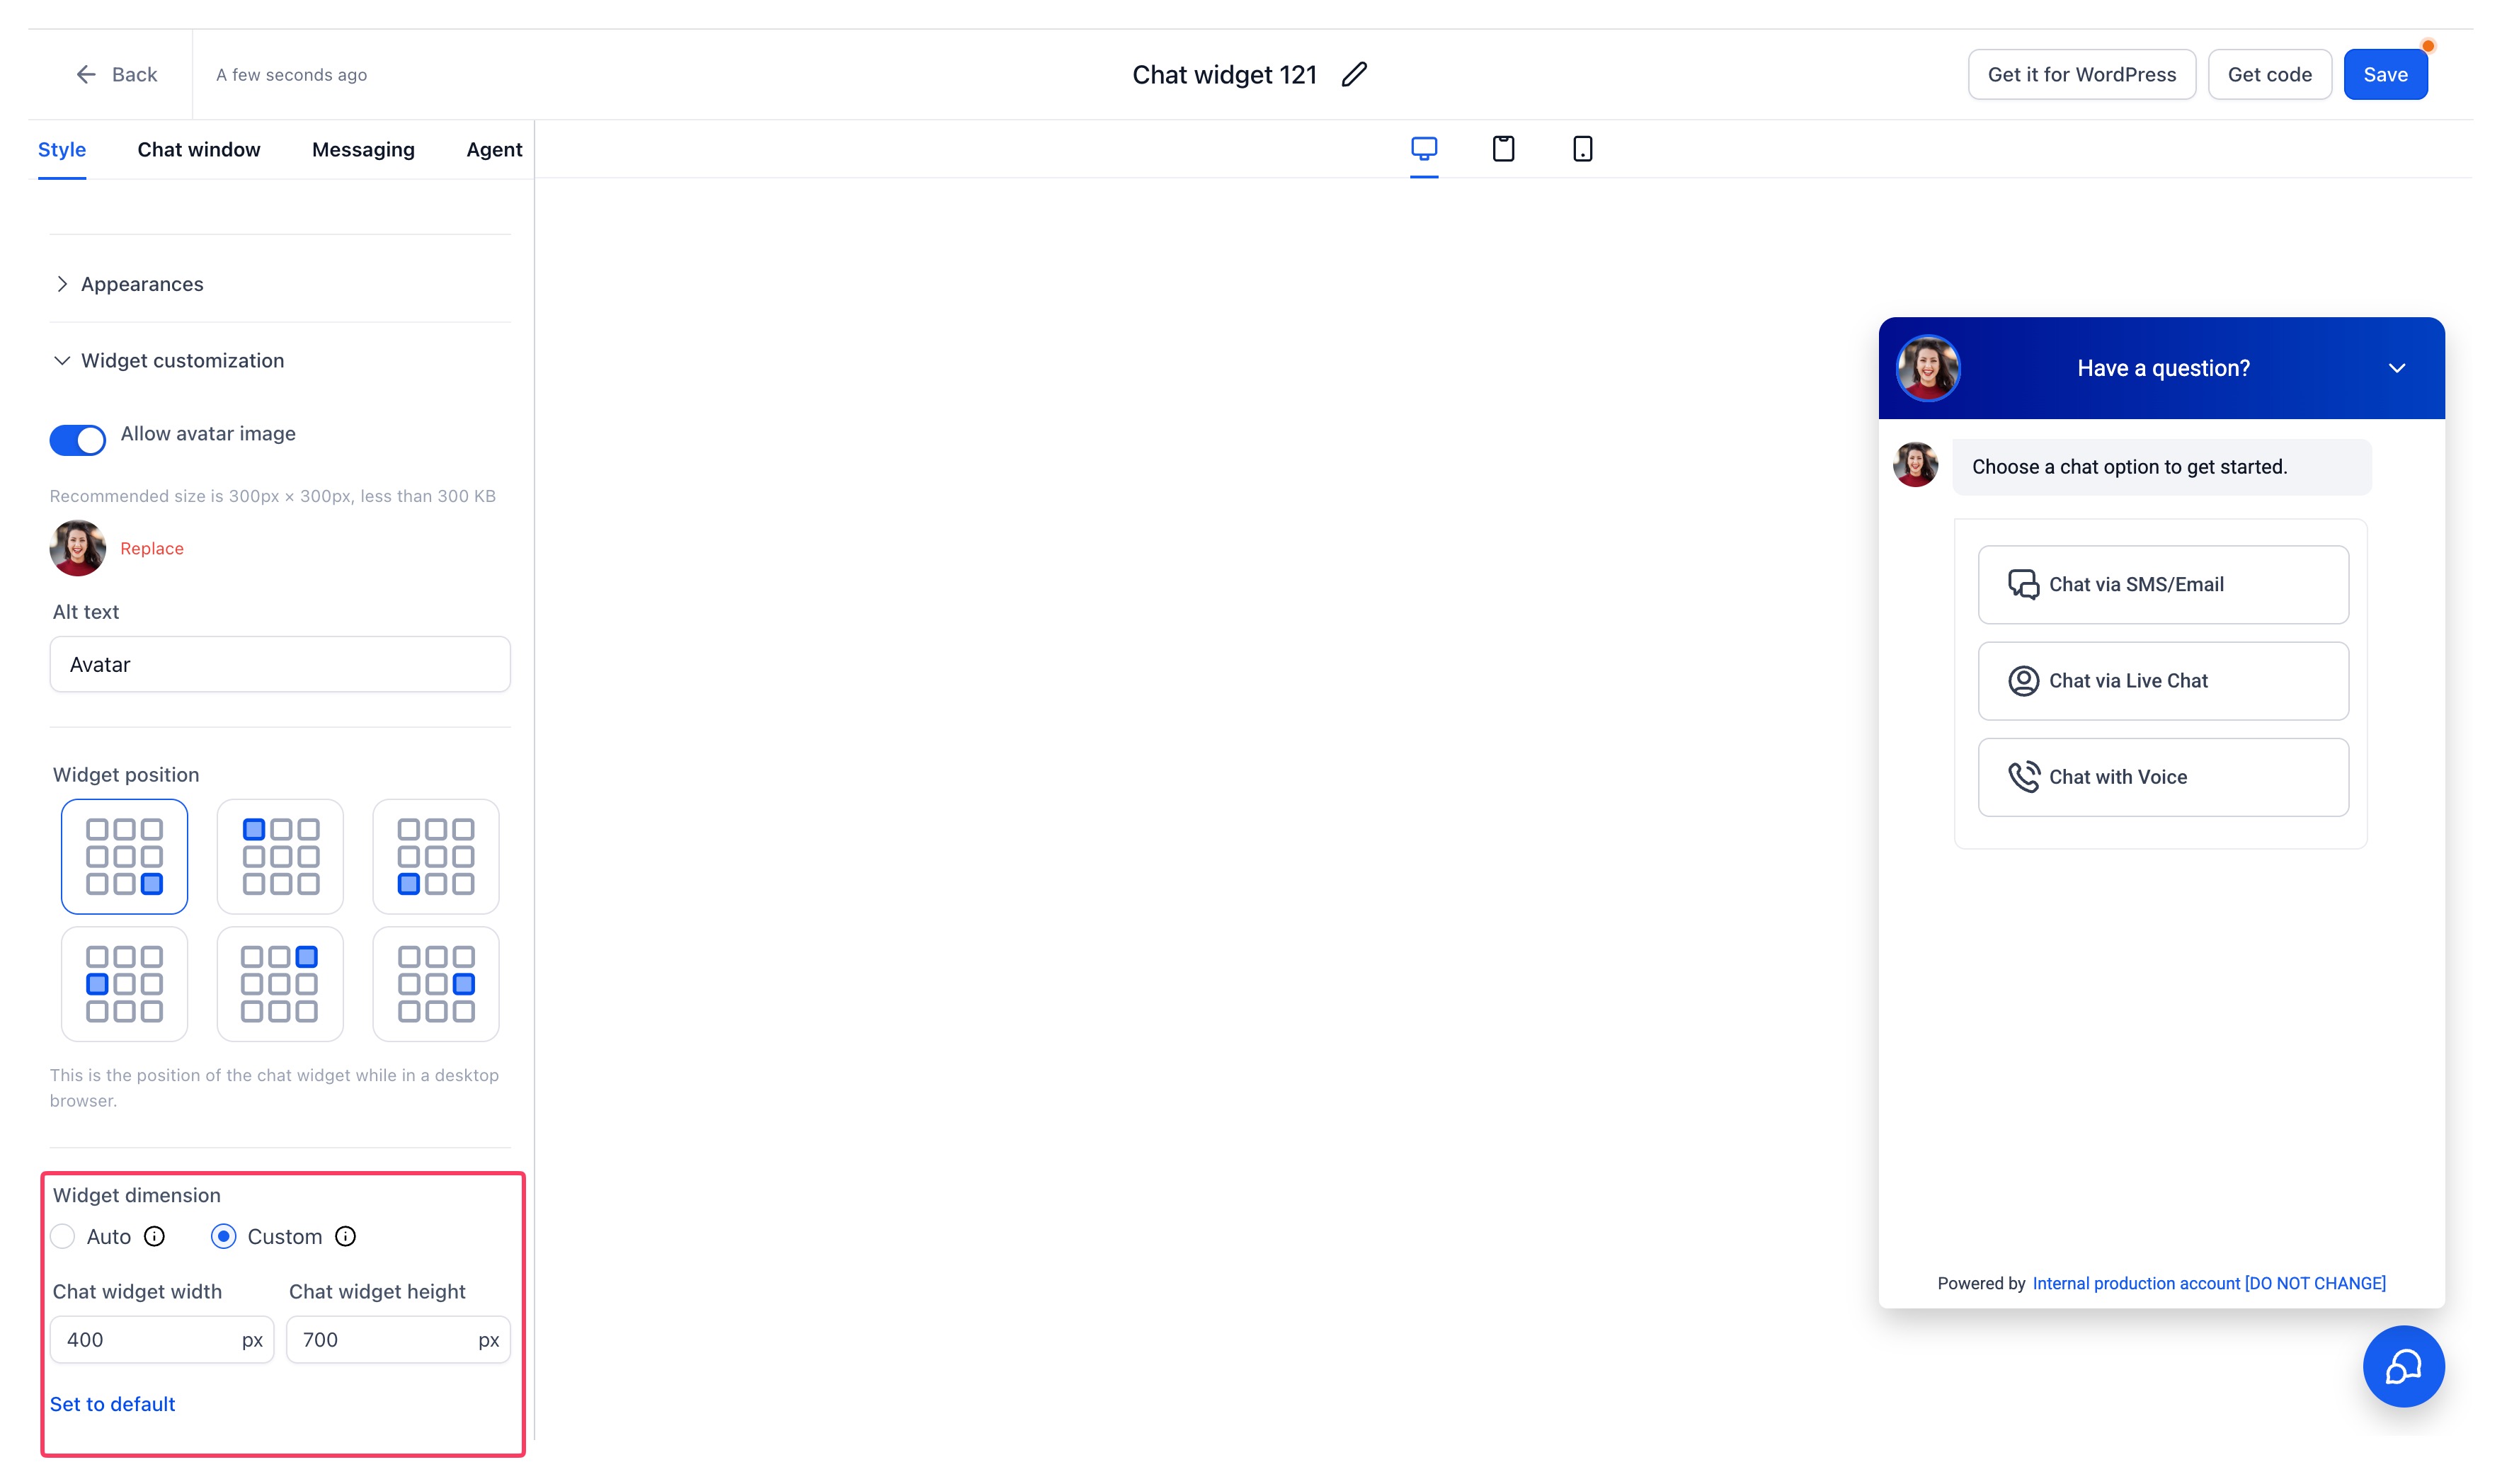
Use Set to Default to restore the recommended dimensions for the current widget placement.
When you switch between Sticky and Embedded Live Chat, custom dimensions reset to the recommended defaults for the newly selected placement.
If custom dimension values are missing or set to Auto, the widget uses the default dimensions.
Configured dimensions are respected without being automatically increased to previous minimum values. he widget also adjusts its display to stay within the available container space.
Chat Window
Use the Chat Window settings to configure the information visitors see when they open or interact with the widget.
Depending on the selected Chat Widget type, available settings can include:
- Chat Window title
- Introductory message
- Contact form fields
- Call-to-action text
- Email or phone collection options
- Prefilled message content
- Additional visitor-facing messages
Not every option is available for every Chat Widget type.
Use the Chat Window section to configure the static content visitors see when they open the widget.
Available fields can vary depending on the Chat Widget type.
Chat Window Content
Supported Chat Widget types can include a prefilled Message field that gives visitors a starting message they can edit before submitting.
This is available for supported widget types such as:
- SMS/Email
- All-in-One Chat
- Voice AI
Live Chat continues to use its standard free-form message experience.
For complete setup instructions, see Customizable Message Field in Chat Widgets.
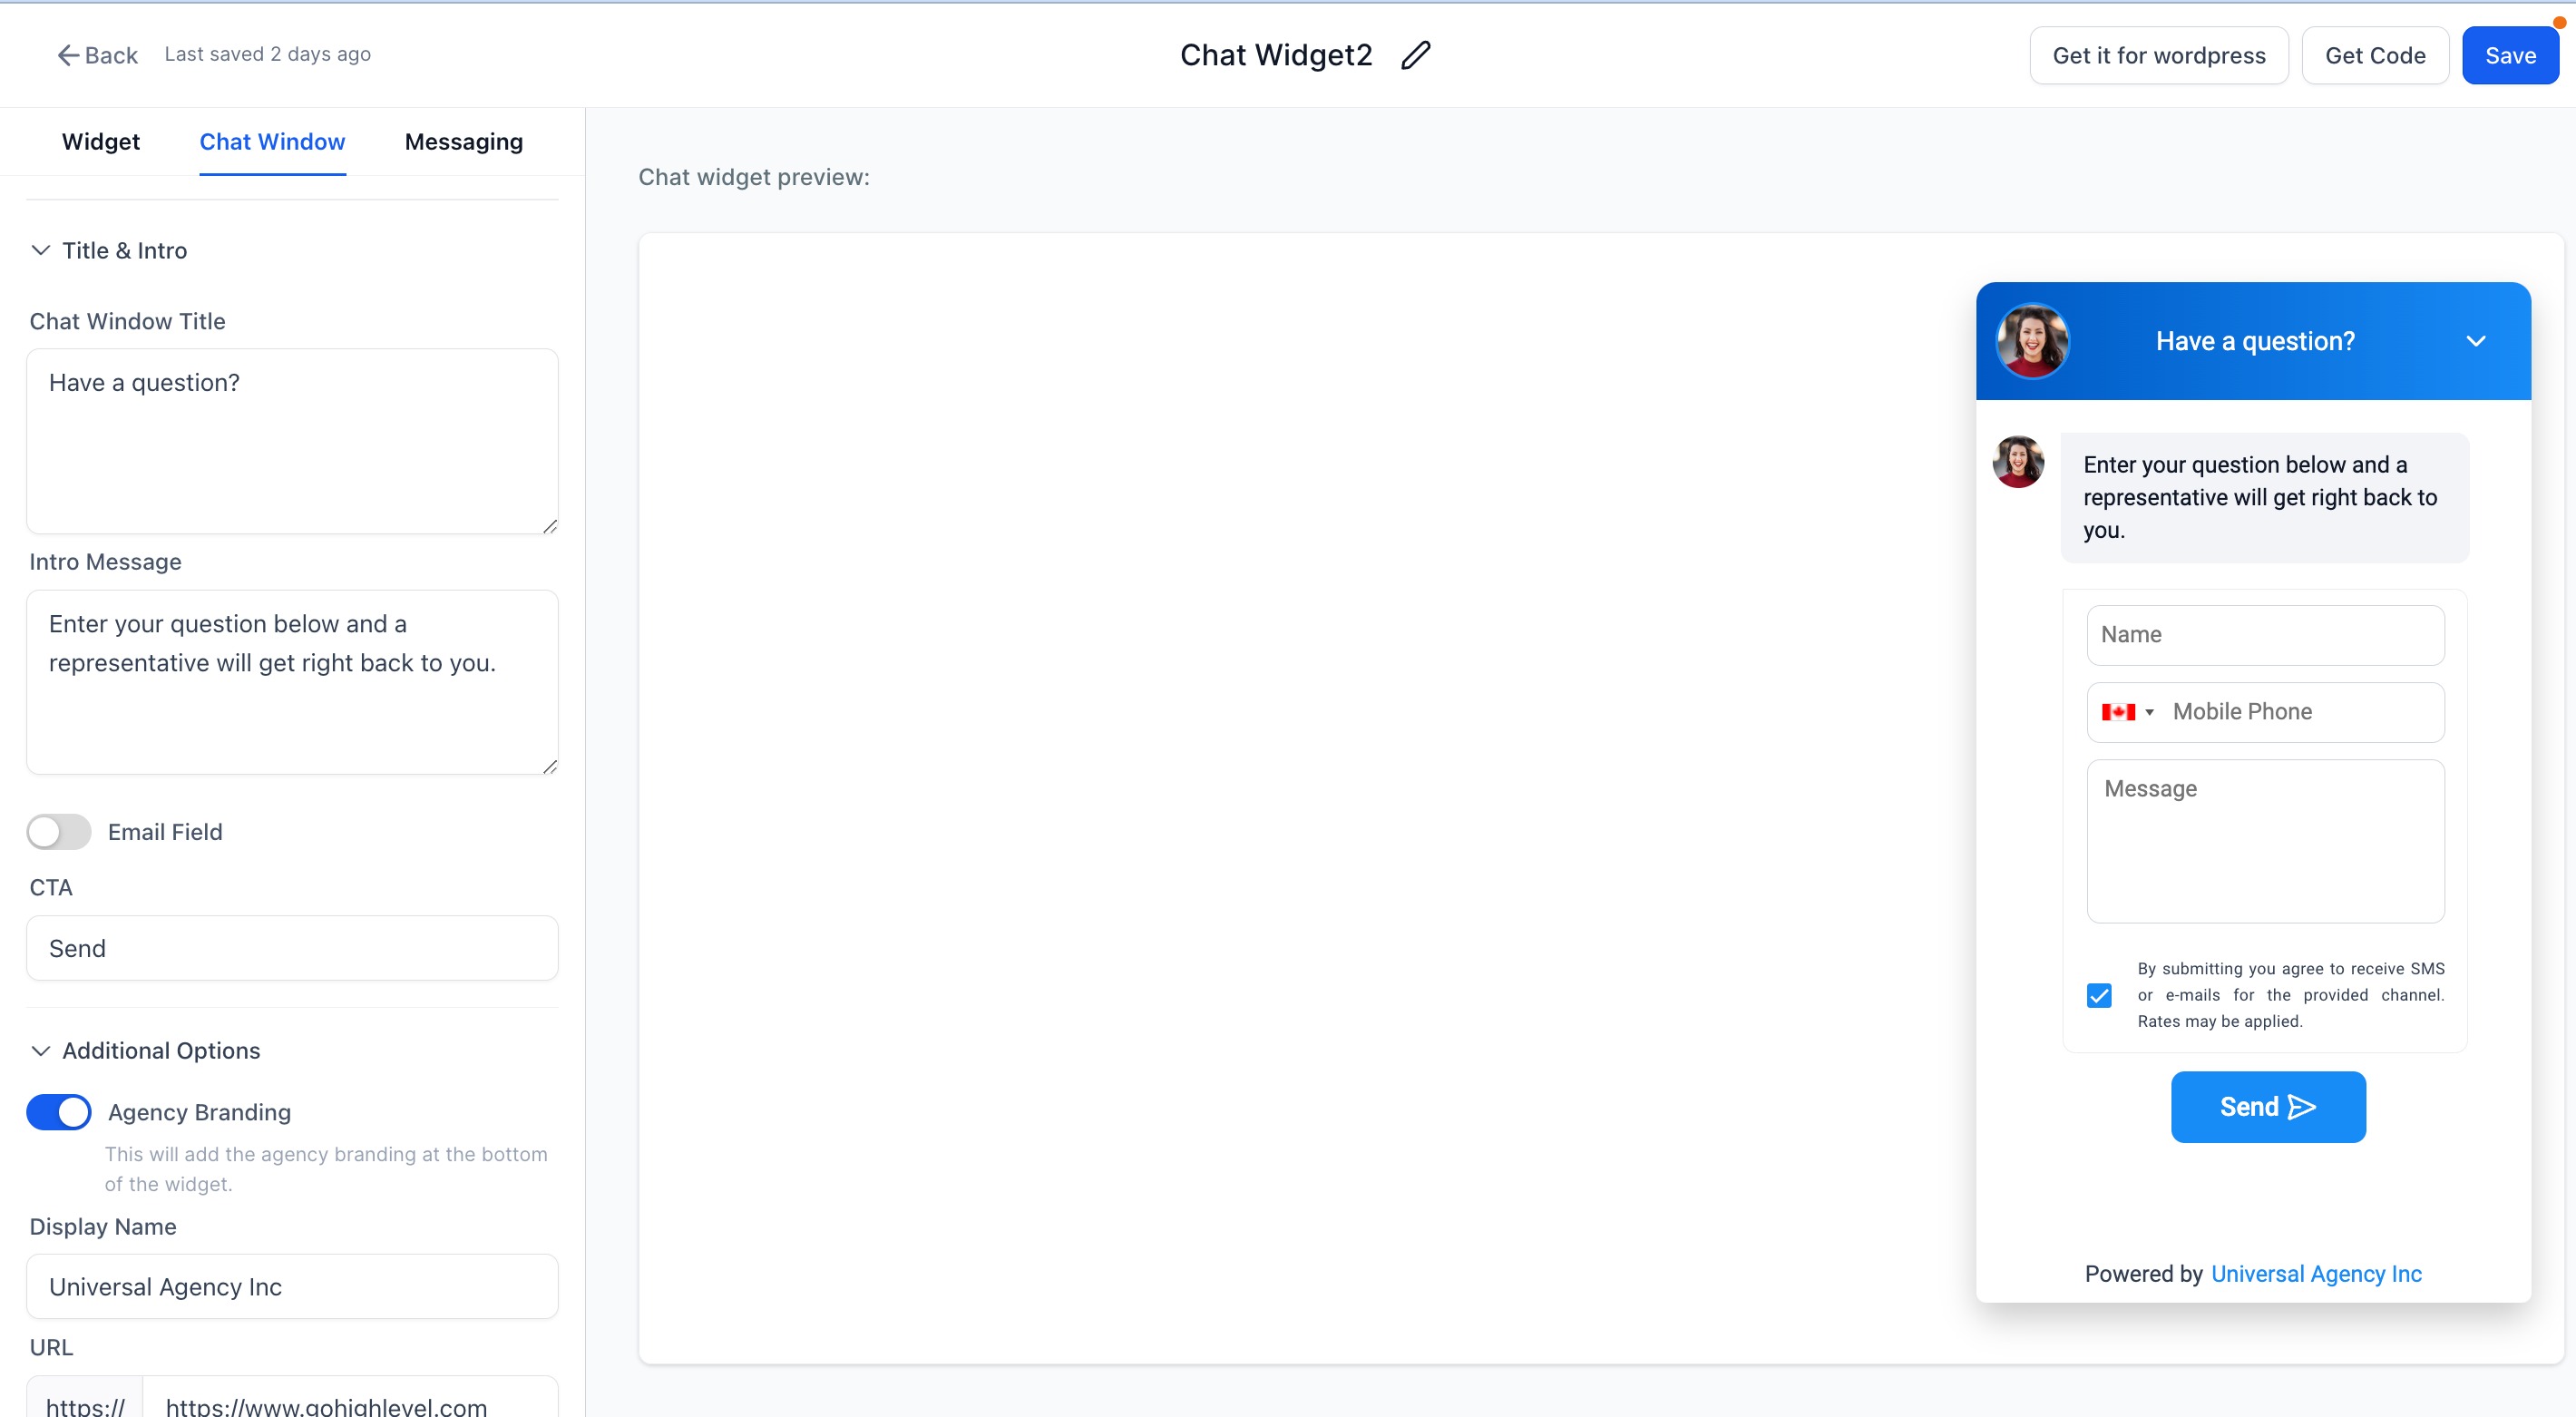
Configure visitor-facing content such as the Chat Window title, introductory message, email option, and call-to-action button.
Redirect Call-To-Action
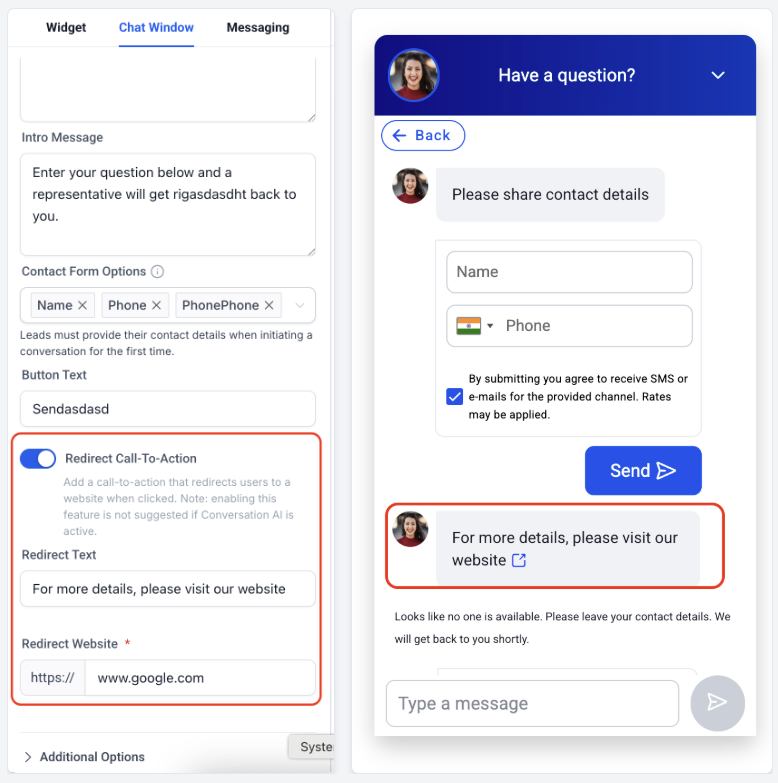
Use Redirect Call-To-Action to display a clickable message that directs visitors to an external website from the chat.
When you enable this option:
- Use Redirect Text to enter the message visitors see in the chat.
- Use Redirect Website to enter the destination website URL.
Redirect Call-To-Action is supported in the All-in-One Chat widget.
Note: Redirect Call-To-Action is not recommended when Conversation AI is active because redirecting visitors may interfere with the intended conversation flow.
Load on User Interaction
Use Load on user interaction to control when the Chat Widget loads on your website.
| Enabled | Disabled |
|---|---|
| The widget loads after visitor interaction, such as a scroll, click, or touch. If no interaction occurs, it automatically loads after approximately 8 seconds. | The widget loads immediately. |
Compliance Notice & Consent
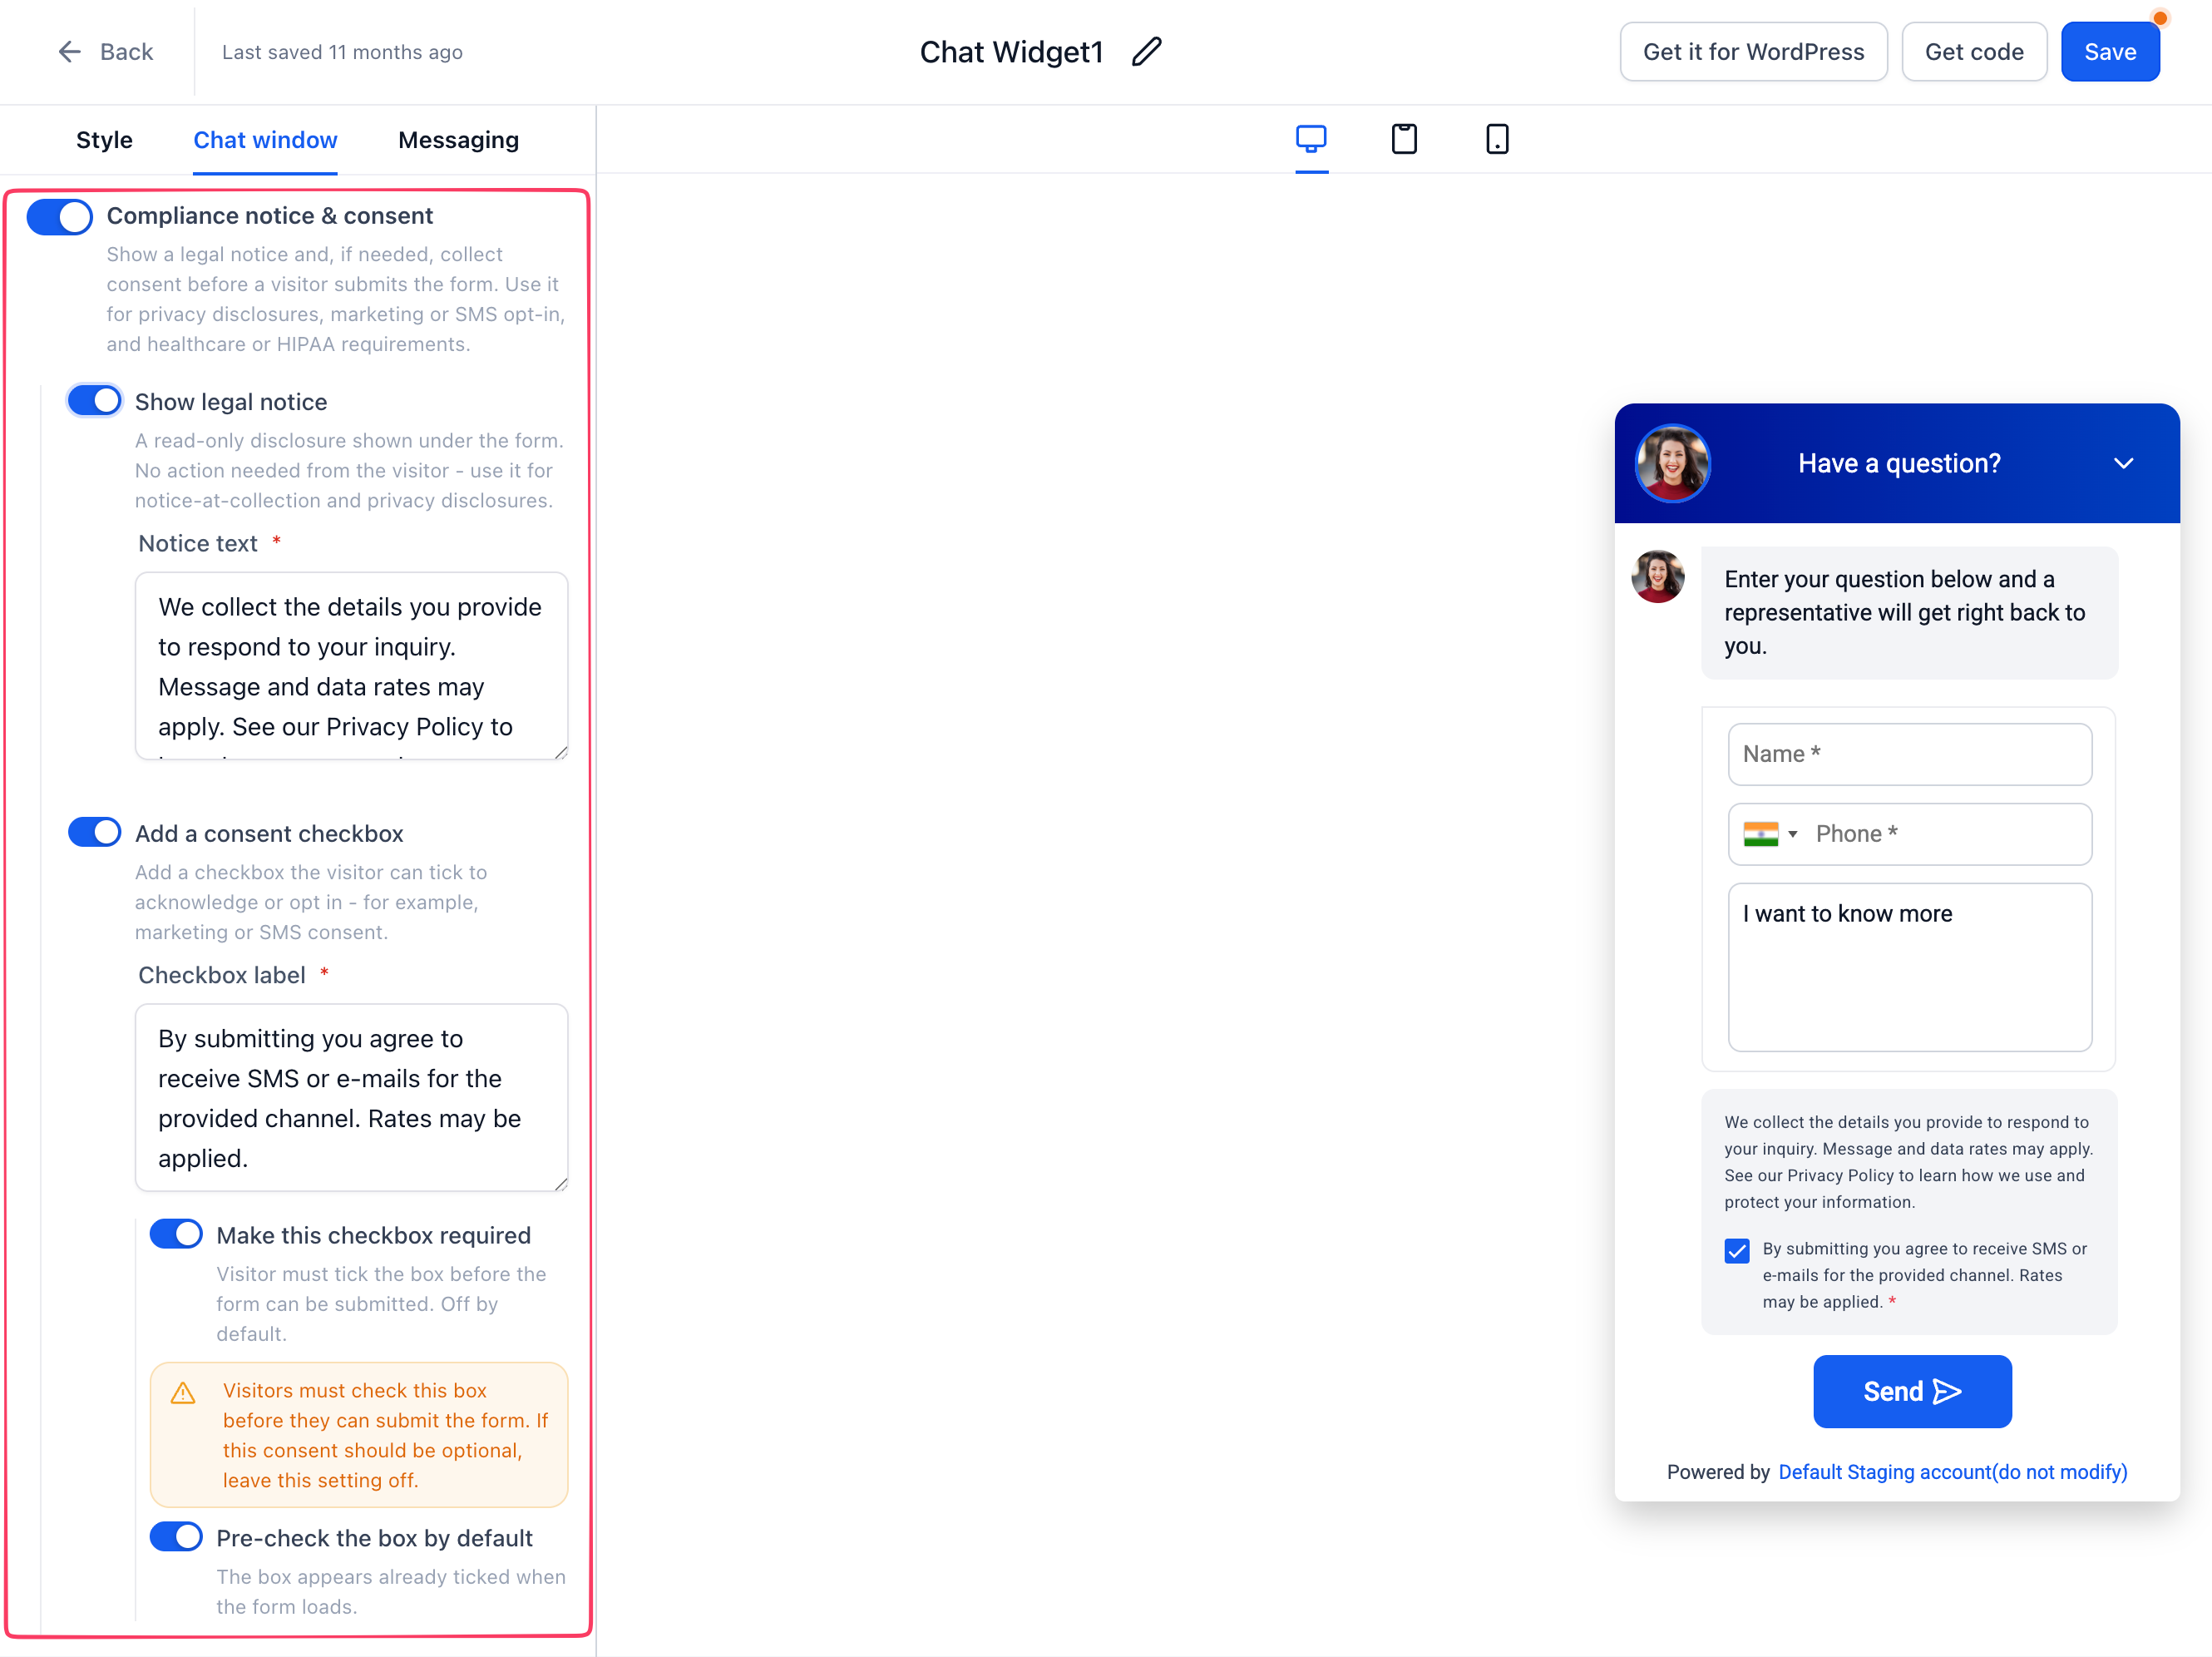
Use Compliance notice & consent to configure the legal notice and consent experience shown with your Chat Widget contact form.
Go to Chat Widget > Chat window > Additional options > Compliance notice & consent.
You can configure the following options:
- Show legal notice: Display a read-only disclosure below the contact form. Visitors do not need to take action on the notice.
- Add a consent checkbox: Display a checkbox with custom consent text for visitors to acknowledge or opt in.
- Make this checkbox required: Require visitors to select the consent checkbox before submitting the form. Leave this setting off to make consent optional.
- Pre-check the box by default: Display the consent checkbox as already selected when the form loads.
If consent is required and the visitor does not select the checkbox, the widget displays Please tick this box to continue.
The live preview updates as you configure these settings. Click Save when you finish.
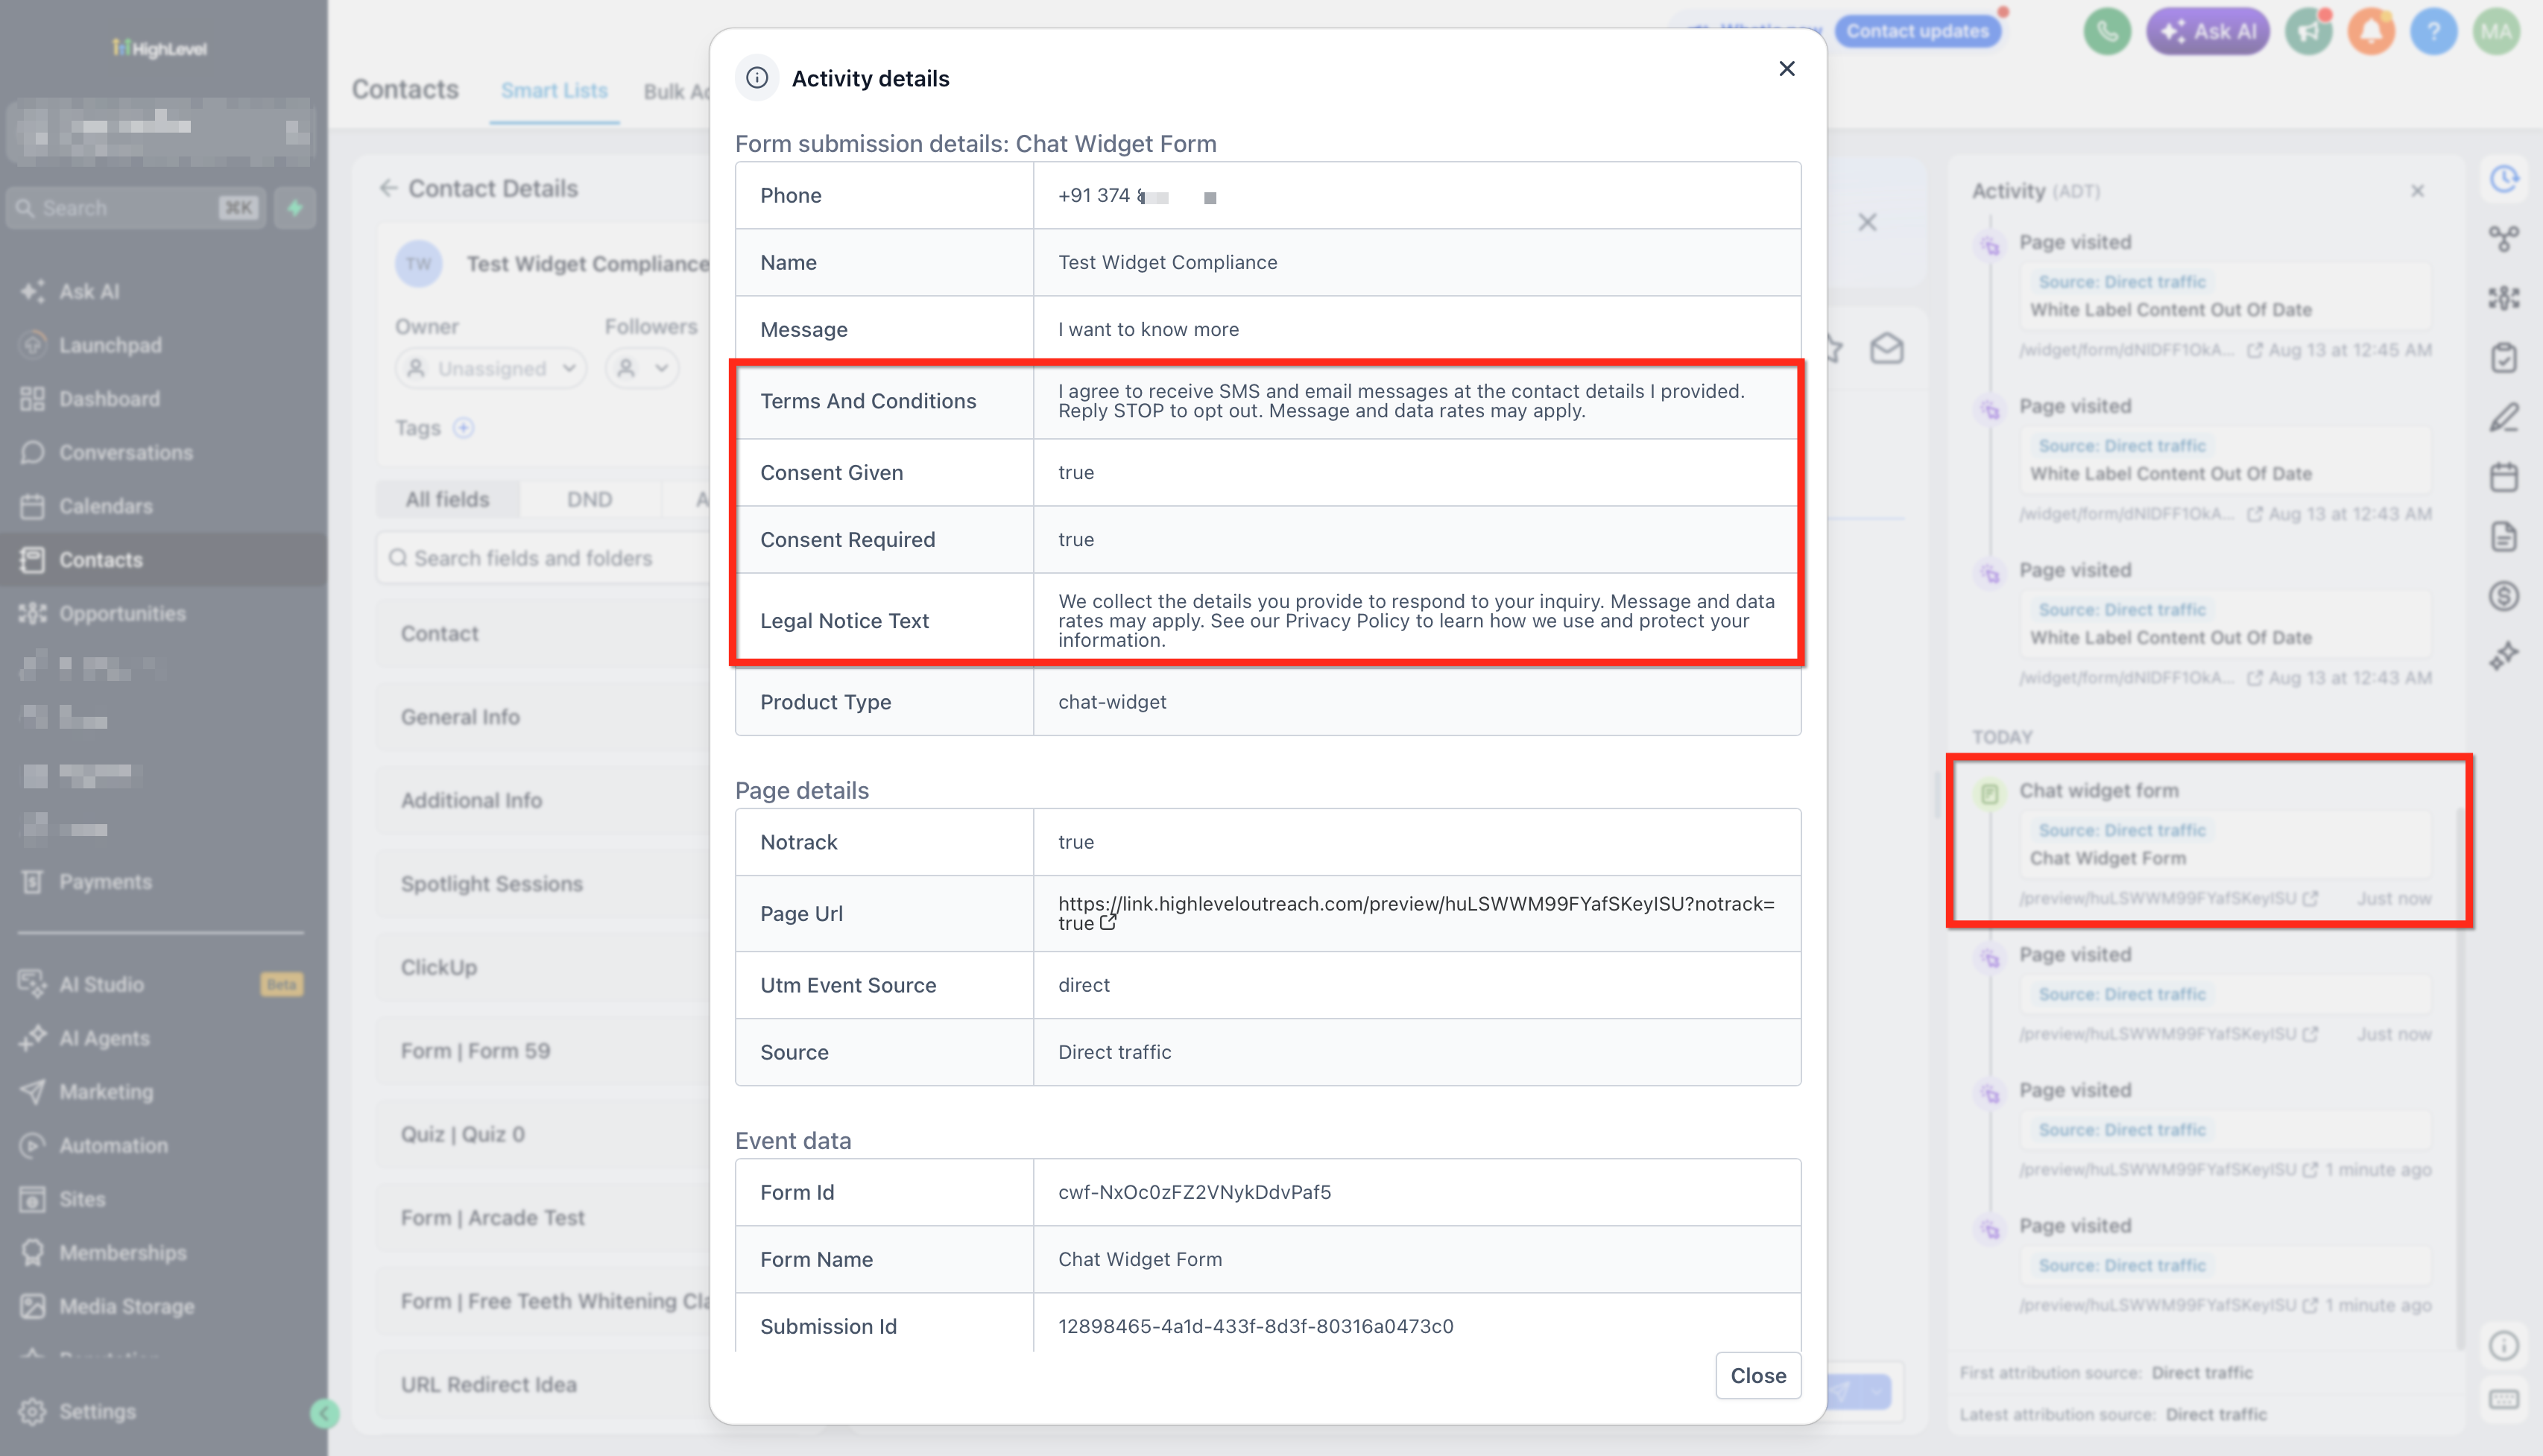
View Consent Details for a Submission
Chat Widget form submissions record consent information in the contact's Activity details.
The Activity details show:
- Whether the visitor gave consent.
- Whether consent was required.
- The consent text shown to the visitor.
Existing Widgets and Default Compliance Settings
- Existing widgets keep their current appearance and behavior until you open and save them in the builder.
- Existing legal text is carried over automatically to the corresponding compliance field.
- Widgets created through A2P registration keep their existing compliance configuration.
- New widgets start with the legal notice enabled and the consent checkbox enabled. Required consent is disabled by default.
- You do not need to change your existing website embed code.
Note: A2P-generated Chat Widgets can contain locked disclosure language, required fields, and consent settings. See the A2P article in the Related Articles section for details.
Messaging
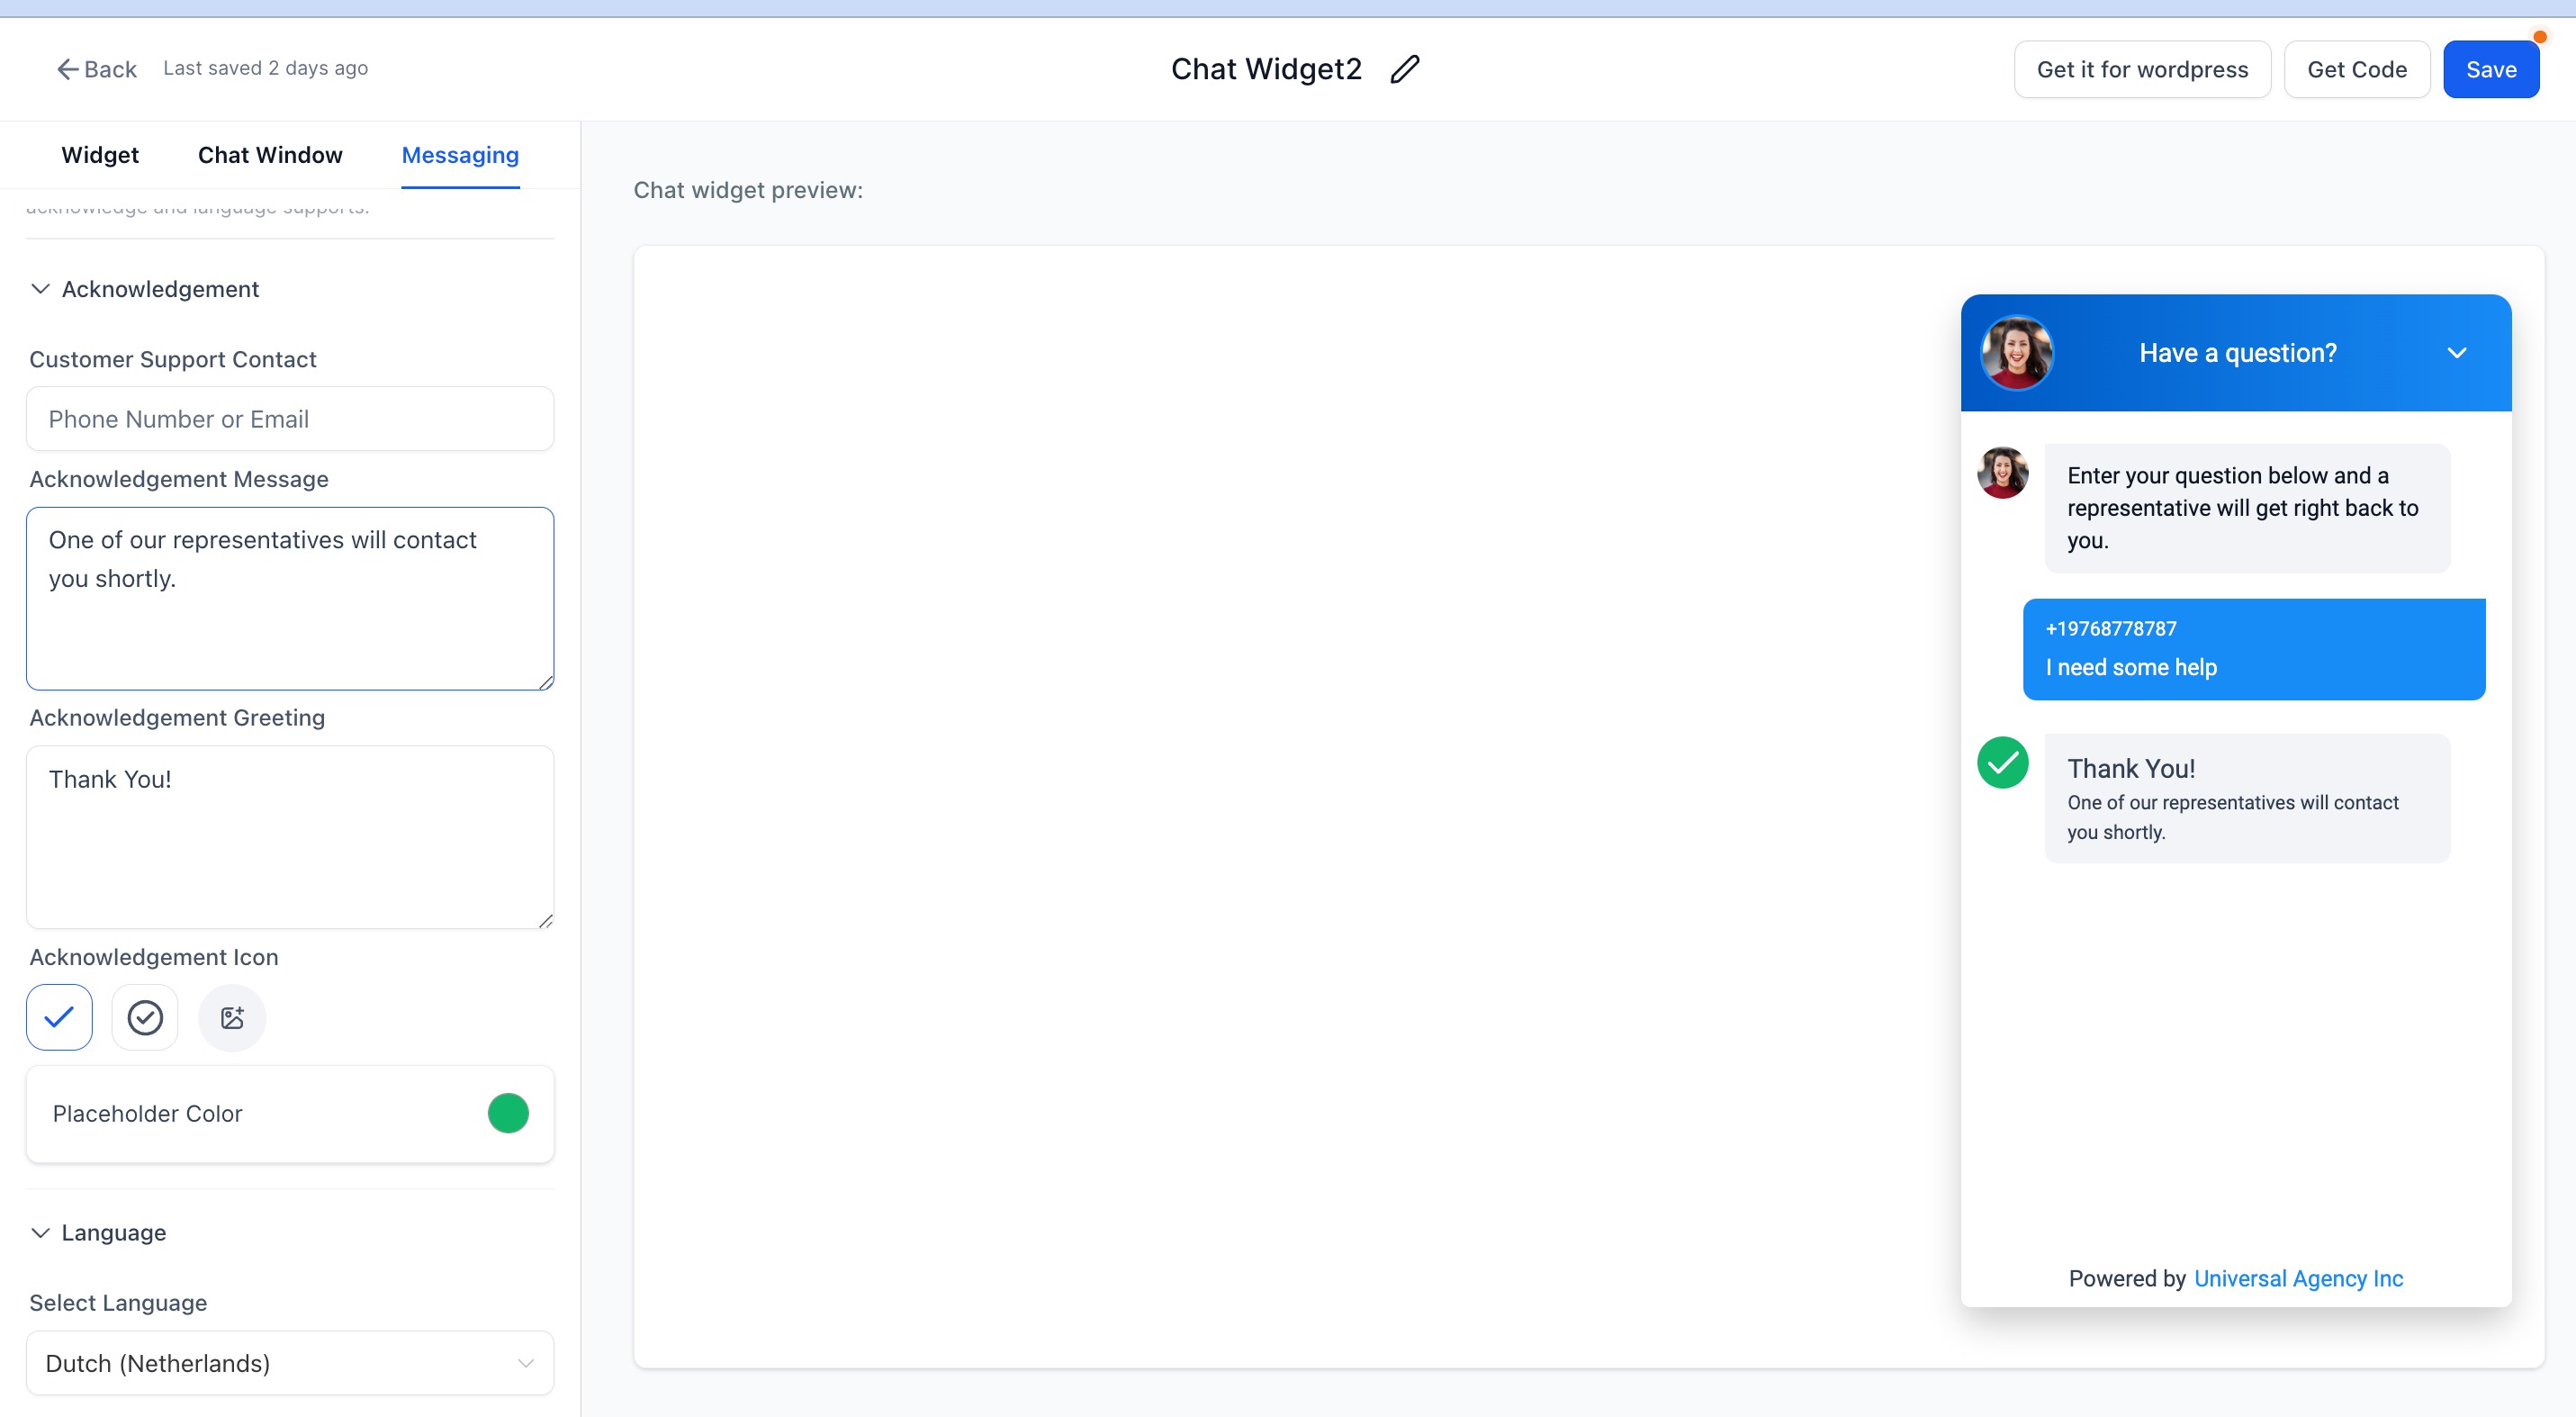
Use the Messaging section to configure acknowledgement messages, greetings, support information, and language settings.
Support Details, Greetings, and Acknowledgement Messages
Configure the support contact details, greeting, and acknowledgement message shown to visitors.
Language Settings
Select the language used by the Chat Widget.
Frequently Asked Questions
Can I Customize Different Chat Widgets Differently?
Yes. Each Chat Widget can have its own supported appearance and configuration settings.
Are All Customization Settings Available for Every Chat Widget Type?
No. Available options depend on the selected Chat Widget type.
Can I Use an Embedded Widget Instead of a Floating Widget?
Yes. Supported Chat Widget types offer Embedded / Inline placement in addition to Sticky placement.
Do I Need to Replace My Embed Code After Changing the Widget Design?
Generally, no. Saved configuration changes update the existing widget without requiring a new embed code.
Why Did My Custom Dimensions Reset?
Changing between Sticky and Embedded placement can restore the recommended dimensions for the new placement.
Can I Customize the Visitor's First Message?
Supported WhatsApp, SMS/Email, All-in-One Chat, and Voice AI widgets provide a customizable prefilled Message field. Live Chat uses its standard free-form message box.
Related Articles
Was this article helpful?
That’s Great!
Thank you for your feedback
Sorry! We couldn't be helpful
Thank you for your feedback
Feedback sent
We appreciate your effort and will try to fix the article