Managing agency user permissions helps you give users the access they need without exposing unnecessary accounts, modules, or sensitive settings. HighLevel lets Agency Admins control user type, role, sub-account access, module visibility, and granular actions from one permission-management area.
If you need to manage users who work only inside a specific sub-account, see Manage Sub-Account User Roles & Permissions.
TABLE OF CONTENTS
- What Are Agency User Roles and Permissions?
- User Type and Role
- Restrict Access to Specific Sub-Accounts
- Create and Delete Sub-Accounts
- Module and Granular Permissions
- Sub-Account Settings Permissions
- User Management and Login As
- Copy Permissions
- Add Clients With Limited Sub-Account Access
- Dashboard Export Permission
- Sub-Account Transfer Permission
- User Management API Support
- Set Up Agency User Roles and Permissions
- Frequently Asked Questions
- Related Articles
What Are Agency User Roles and Permissions?
Agency user roles and permissions determine which HighLevel accounts, modules, settings, and actions a user can access.
Access is controlled through several layers:
- User Type: Determines the scope in which the user operates.
- Role: Determines the user's authority within that scope.
- Sub-Account Assignment: Determines which sub-accounts an Account-type user can access.
- Module Permissions: Control whether an entire feature or module is available.
- Granular Permissions: Control supported actions within a module.
Use the least amount of access required for each user's responsibilities. For users who need selected client accounts without agency-wide access, use the Account user type and assign only the required sub-accounts.
User Type and Role
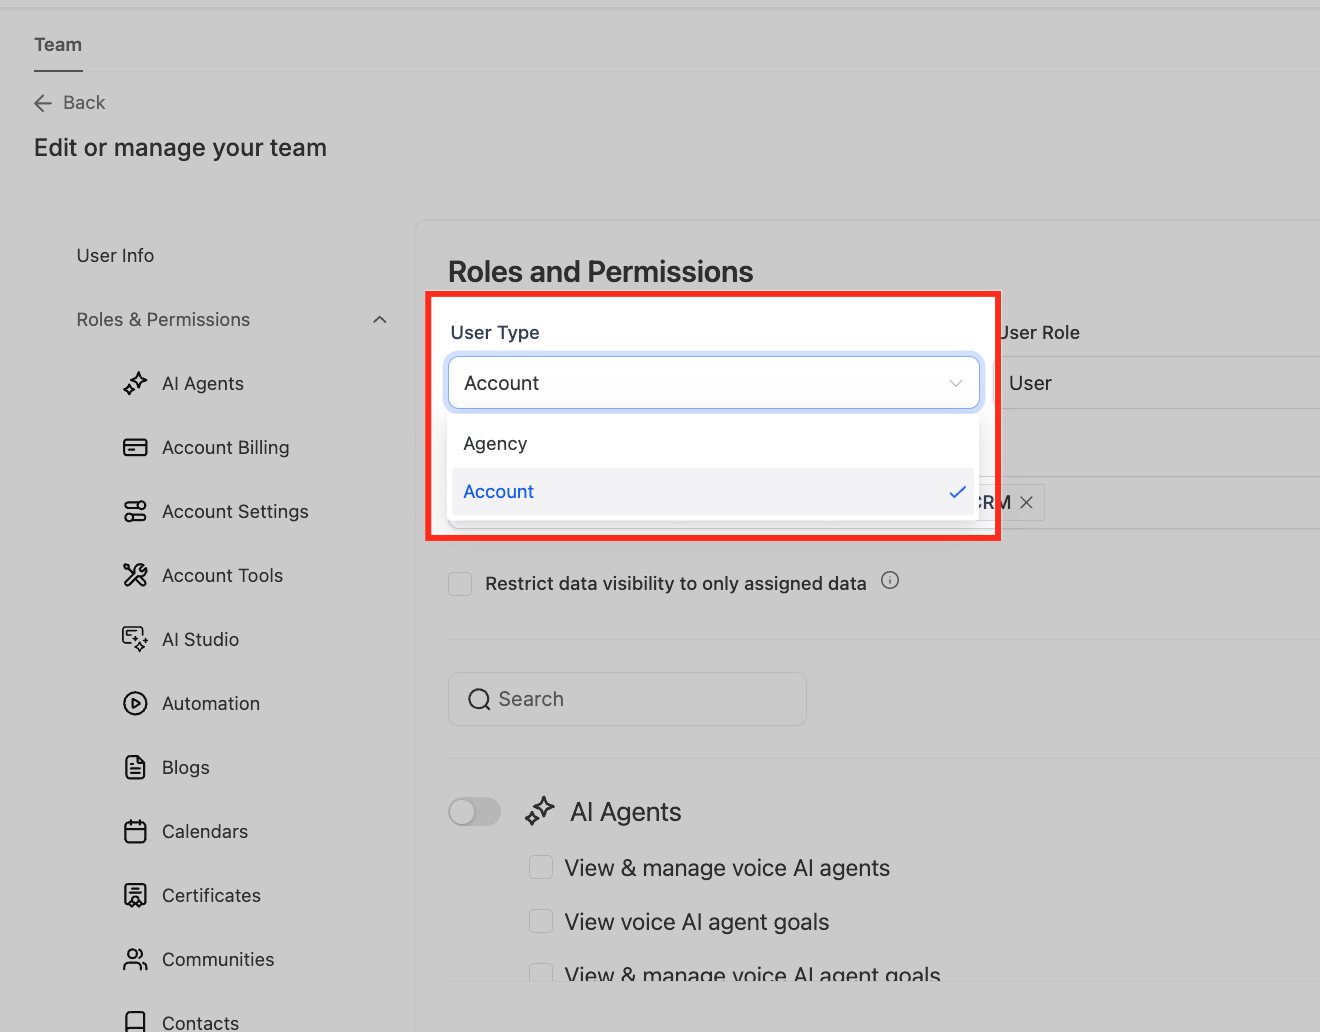
User Type determines where a user can operate, while Role determines their authority within that scope.
User Type
- Agency: Use for users who require agency-level access.
- Account: Use for users who should access only selected sub-accounts.
When Account is selected, assign only the sub-accounts the user needs.
Role
- Admin: Provides administrative capabilities within the user's applicable access scope.
- User: Provides access according to the permissions configured for that user.
Restrict Access to Specific Sub-Accounts
Use an Account-type user when someone needs access to specific client accounts without receiving agency-wide access.
- From Agency View, go to Settings → Users.
- Edit the applicable user.
- Open Roles & Permissions.
- Set User Type to Account.
- Select the sub-accounts the user should be able to access.
- Choose the appropriate Role.
- Configure the required module and granular permissions.
- Save the changes.
The user can access only the sub-accounts assigned to them.

Create and Delete Sub-Accounts
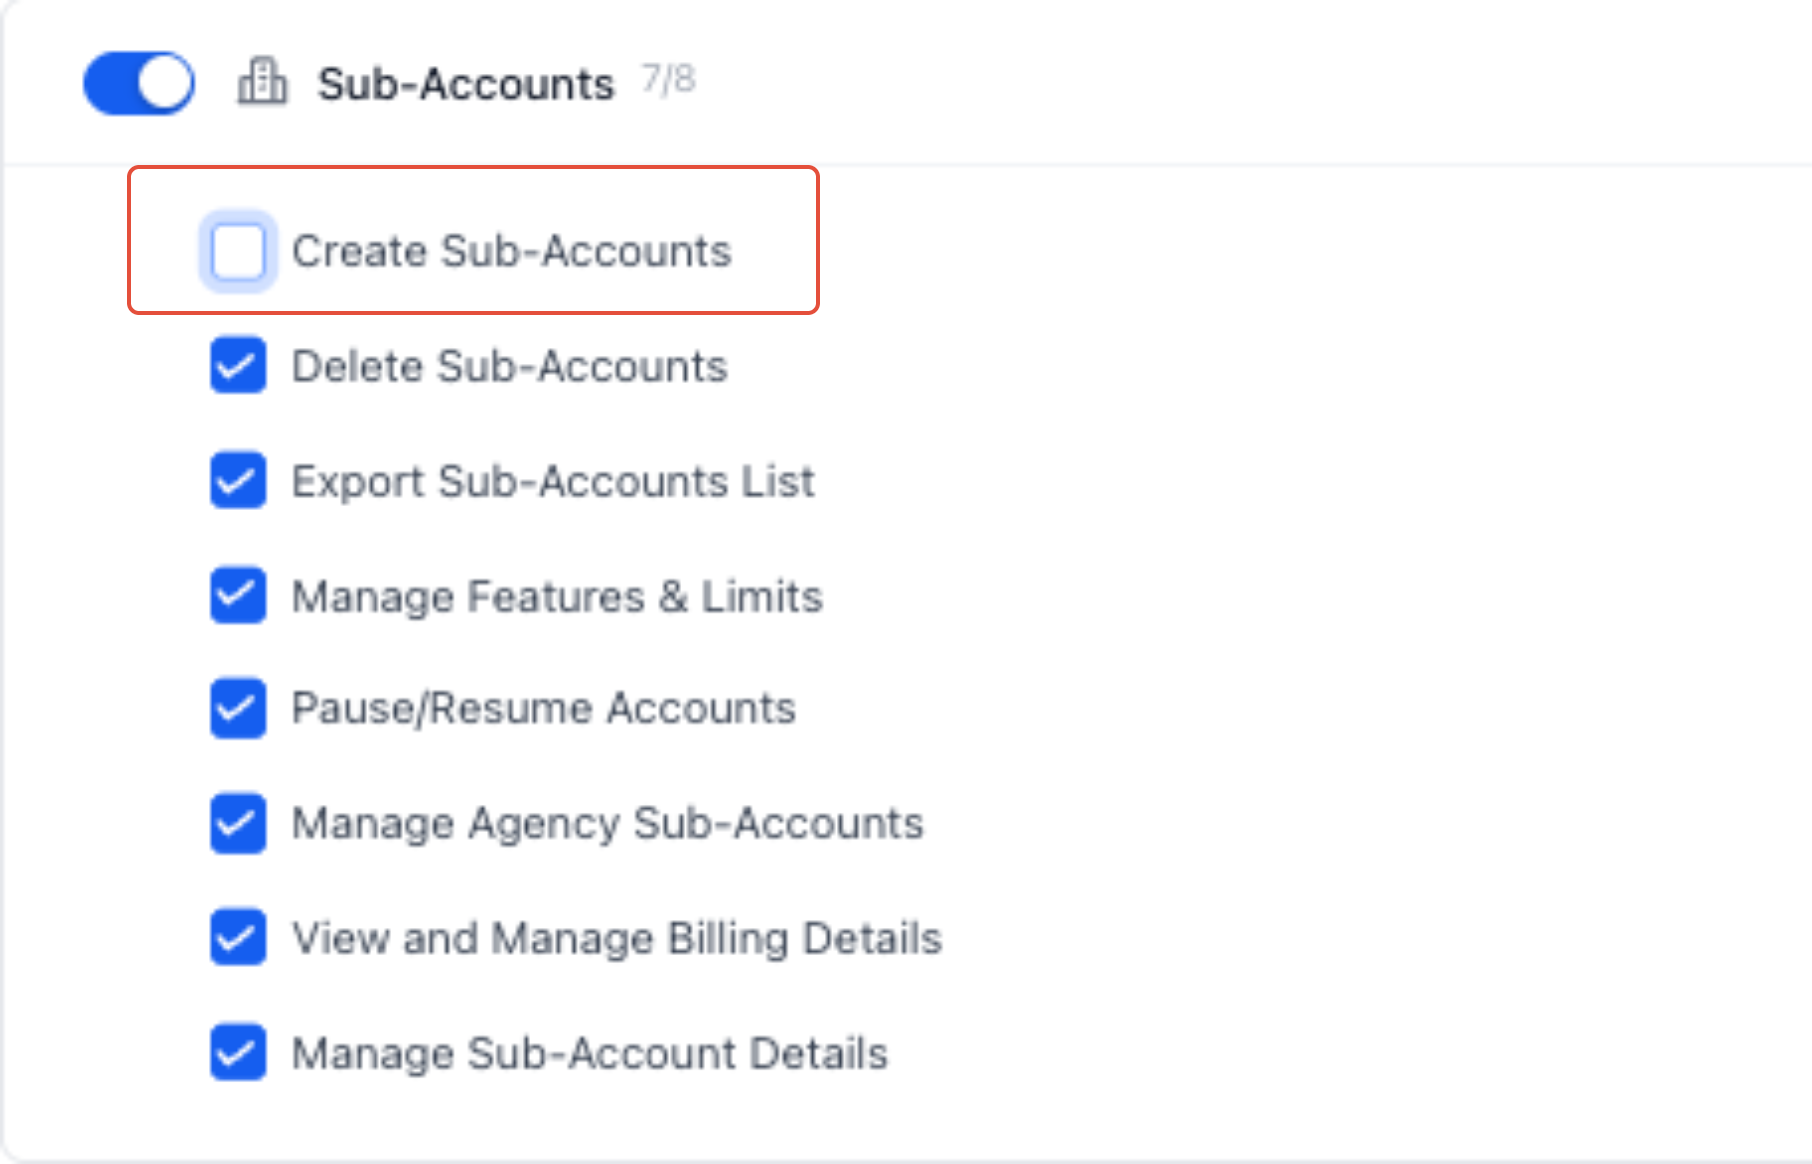
Creating or deleting a sub-account is controlled separately from permissions that govern what a user can do inside an existing sub-account.
- From Agency View, go to Settings → Users.
- Edit the applicable user.
- Open Roles & Permissions.
- Locate the Sub-Accounts Agency module.
- Clear Create Sub-Accounts if the user should not create new sub-accounts.
- Clear Delete if the user should not delete sub-accounts.
- If the user should not access the Sub-Accounts module, turn off the entire module.
- Save the changes.
Module and Granular Permissions
Module and granular permissions work together to control what a user can access and what actions they can perform.
- Module permissions: Turn off an entire module when the user should not access that feature.
- Granular permissions: Control individual supported actions within an enabled module.
If a module is disabled, the user cannot access functionality contained within that module.
Forms, Surveys, Quizzes, and QR Codes
Forms, Surveys, Quizzes, and QR Codes support user-level permission controls. Use the module toggle and the available View & manage permission to control access.
Affiliate Manager Payout Permission
The Pay Affiliate Manager Payout permission controls whether an eligible admin can process affiliate payouts.
- Agency Admins: The permission is enabled by default and can be enabled or disabled.
- Agency Users: Users cannot process affiliate payouts.
When this permission is disabled, payout actions are hidden in Affiliate Manager.
Available Permission Areas
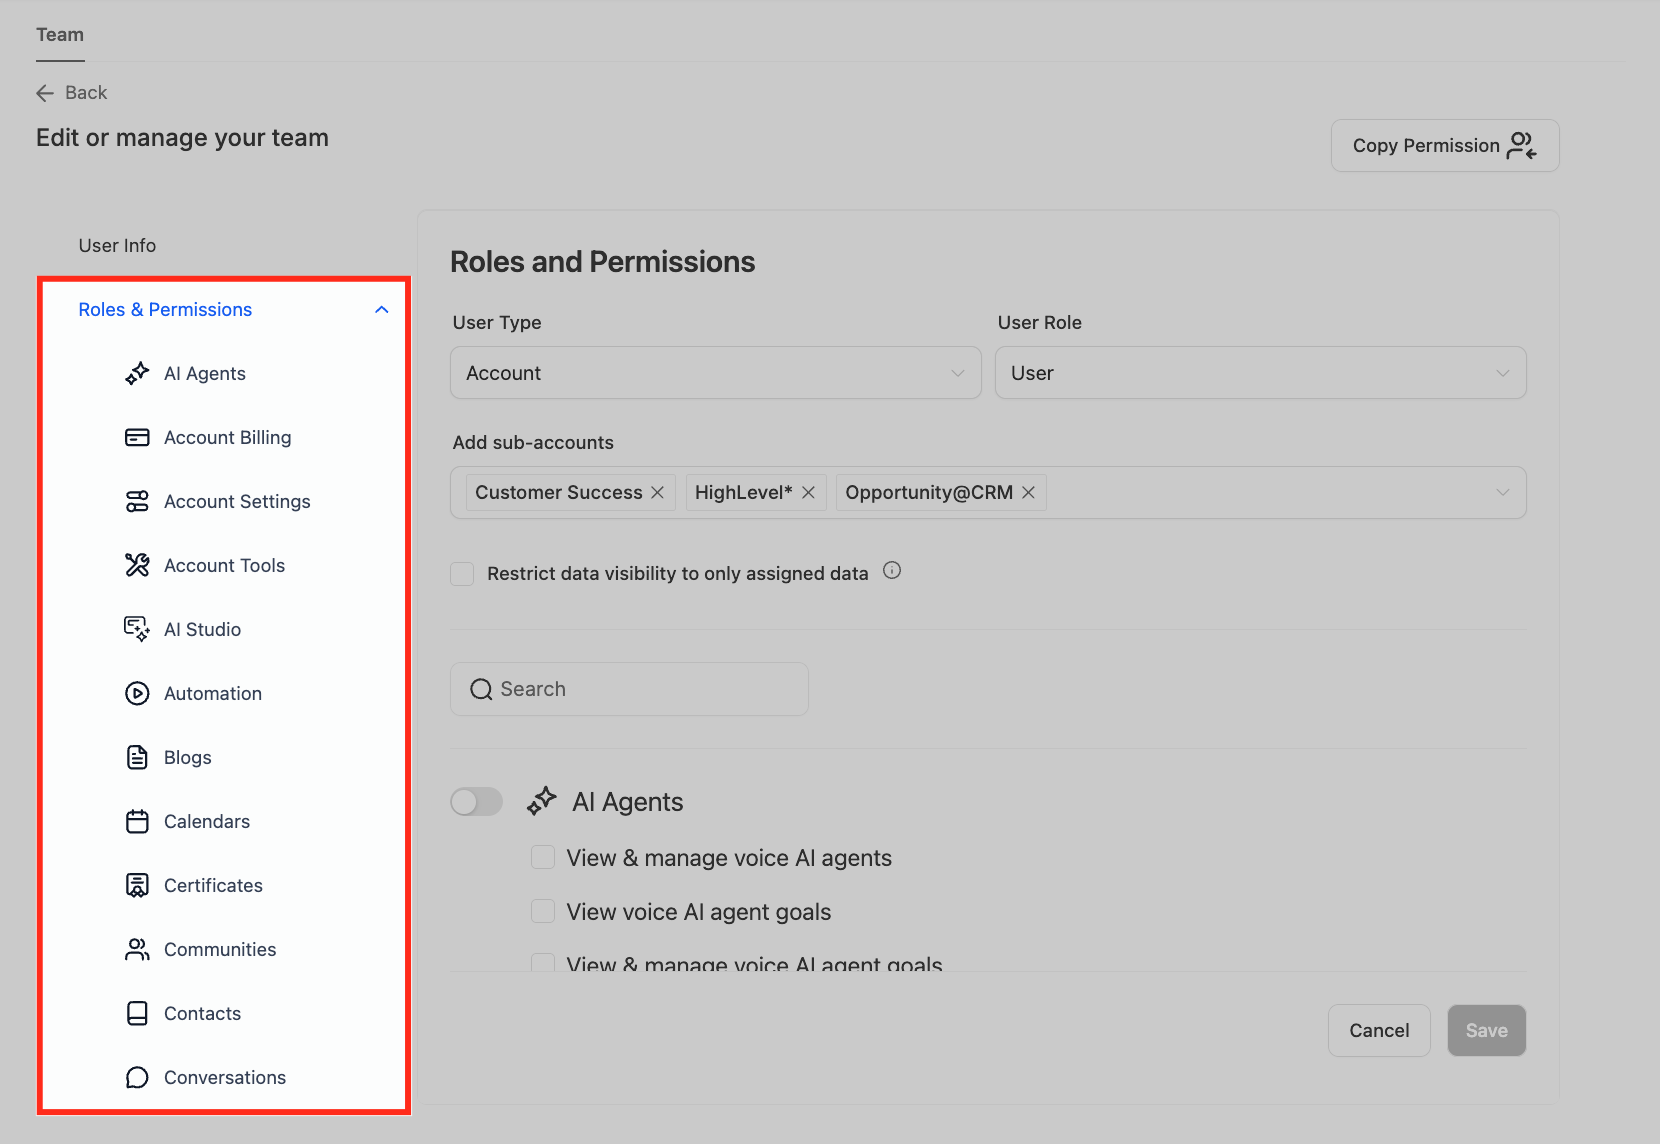
Available permission areas can include the following modules and functions. The exact controls shown depend on the user's type, role, and available features.
| Permission Area | Controls |
|---|---|
| AI Agents | Supported AI Agents, training, logs, summaries, and related functionality. |
| Account Settings | Business information, domains, branding, time zone, and supported account settings. |
| Account Tools | Supported imports, exports, redirects, and administrative tools. |
| Automation | Workflows, triggers, automation activity, and logs. |
| Blogs | Blog posts, categories, authors, and settings. |
| Calendars | Calendars, availability, assignments, appointment types, and scheduling settings. |
| Certificates | Supported course-completion certificates. |
| Communities | Groups, posts, members, and moderation functions. |
| Contacts | Contact creation, editing, deletion, import, export, and supported actions. |
| Conversations | Inbox, messaging, calling, email, SMS, and supported social communication features. |
| Dashboard | Dashboard access and supported dashboard actions. |
| Forms | Forms and form submissions. |
| Funnels | Supported funnel and website assets. |
| GoKollab | Supported GoKollab functionality. |
| Integrations | Supported third-party integrations. |
| Launchpad | Supported onboarding and quick-start tools. |
| Marketing | Campaigns, Social Planner, templates, and supported scheduling features. |
| Media | Images, videos, and files in the media library. |
| Memberships | Courses, lessons, offers, access levels, learners, and related functionality. |
| Opportunities | Pipelines, stages, opportunities, values, and statuses. |
| Orders | Supported order records. |
| Payments | Payments, invoices, refunds, receipts, and related financial records. |
| Payment Settings | Payment gateways, taxes, receipts, dunning, and payment-related settings. |
| Products | Products, prices, and supported product variations. |
| QR Codes | QR-code creation and management. |
| Quizzes | Supported quizzes. |
| Reputation | Reviews, listings, responses, and supported reputation tools. |
| Subscriptions | Recurring plans, subscriber status, and cancellations. |
| Sub-Account Transfers | Eligible transfer functionality when the required role and permission are present. |
| Surveys | Surveys and responses. |
| Taxes | Supported tax rates and rules. |
| Transactions | Supported transactions, charges, refunds, and payouts. |
| WordPress | Supported WordPress connections and site-management functionality. |
Sub-Account Settings Permissions
Sub-Account Settings permissions provide additional control over administrative areas that can affect client configuration, billing, and other sensitive settings.
- Sub-Accounts List Page: Controls supported access to the sub-account list and related management actions.
- Manage Client Page – Basic Details: Controls supported client-level configuration.
- Sub-Account Billing: Restricts supported billing and financial actions.
- Sub-Account Company Settings: Restricts access to supported high-impact company settings.
If a user attempts an action their permissions do not allow, HighLevel displays messaging indicating that their permission level does not allow the action.
User Management and Login As
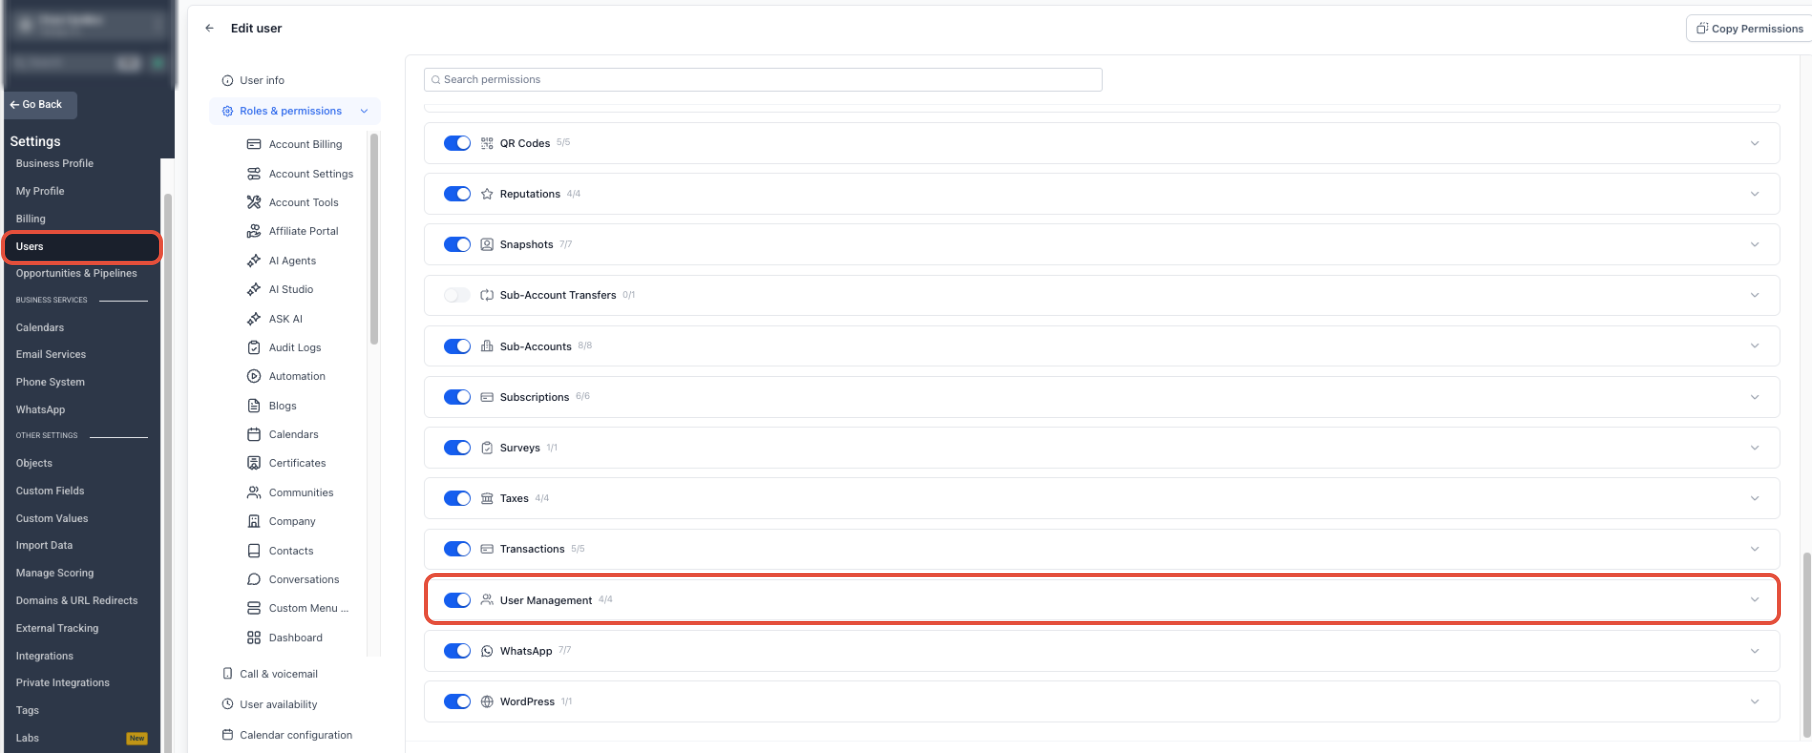
User Management permissions control supported user-administration actions, including whether an eligible Agency Admin can use Login As.
Enable Login As
The Enable Login As permission controls whether an eligible Agency Admin can impersonate another user.
- Default: Enabled.
- When disabled: The Login As option is hidden for that admin.
- Location: Agency View → Settings → Users → Edit User → Roles & Permissions → User Management.
The redesigned Users experience also provides clearer guidance for owner-role handling and ownership transfer when those options are available.
Copy Permissions
Agency Admins can copy an existing user's granular permission configuration to another user instead of configuring each permission individually.
Before copying permissions, confirm that the destination user's role, responsibilities, and account scope are appropriate for the copied configuration.
Add Clients With Limited Sub-Account Access
Clients who need access only to their own business can be created as Account-type users and assigned only to the applicable sub-account. This prevents agency-wide access while allowing their role, module permissions, and data visibility to be configured.
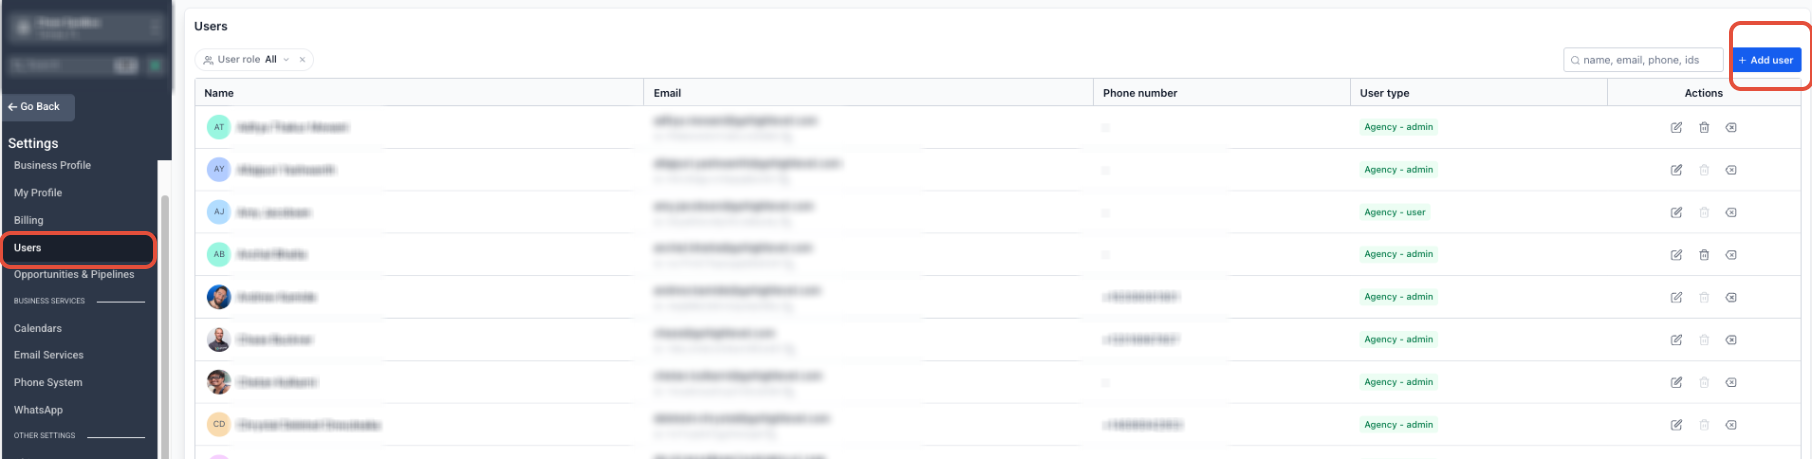
- From Agency View, go to Settings → Users.
- Click + Add User.
- Enter the client’s name, email address, and required user information.
- Open Roles & Permissions.
- Set User Type to Account.
- Select only the client’s applicable sub-account.
- Choose the appropriate Role.
- Configure the modules and individual permissions the client should be able to access.
- Enable Only Assigned Data when supported record visibility should be limited to records assigned to that user.
- Click Save.
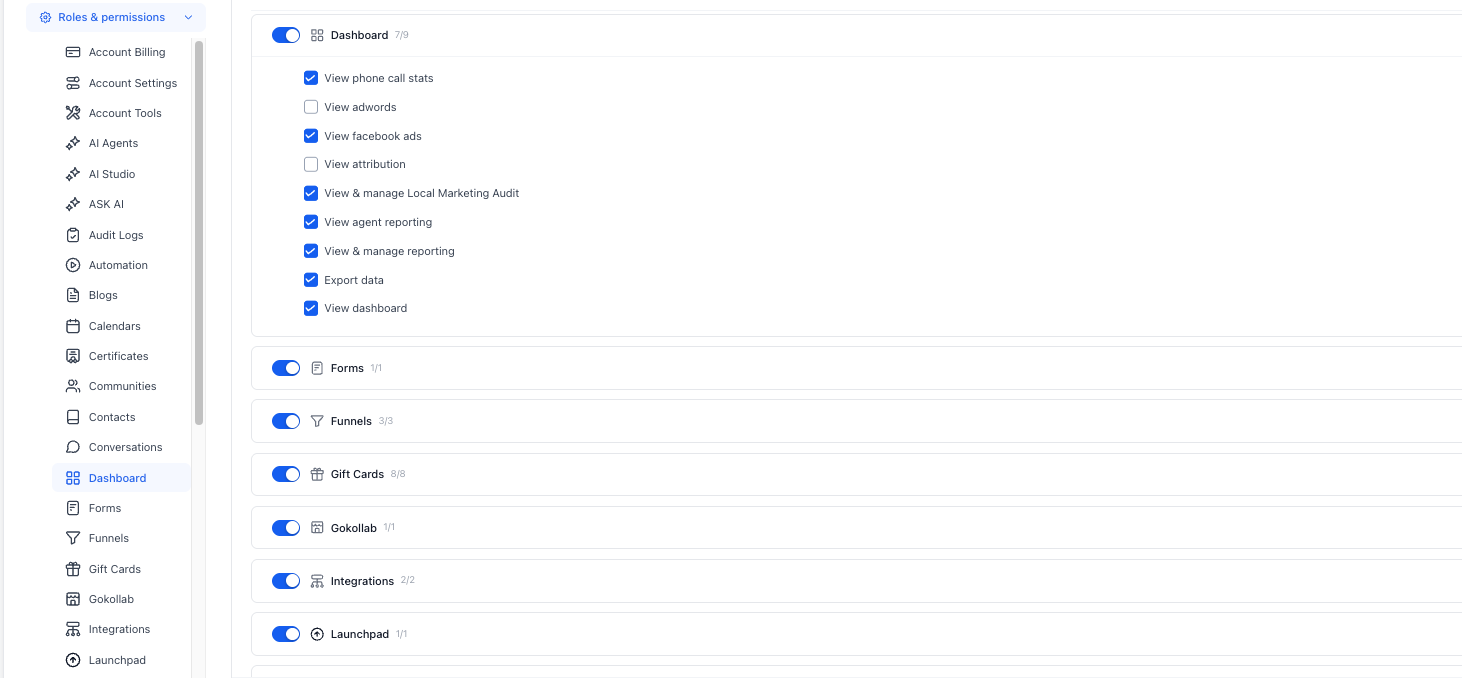
Dashboard Export Permission
Dashboard permissions can be managed separately from general account access.
- Dashboard → Export data: Allows the user to export supported dashboard widget data.
Sub-Account Transfer Permission
Sub-account transfers can affect ownership, access, billing, integrations, and other account resources. Grant transfer permissions only to authorized users.
- By default, the Agency Owner can request or complete eligible sub-account transfers.
- The Agency Owner can grant transfer permissions to specific Agency Admins.
- Agency Admins without the required permission cannot submit or approve transfer requests.
A sub-account transfer moves the entire eligible sub-account between agencies rather than transferring only selected data.
User Management API Support
API-based User Management workflows can be affected by the Enhanced Security setting.
- View & Manage Users: Allows supported viewing, creation, and editing of users.
- View Users: Allows supported viewing of users without broader user-management access.
When Enhanced Security is enabled, affected API-based User Management operations are restricted.
If your agency requires an affected API-based User Management workflow:
- Go to Agency View → Settings → Company → Advanced Settings.
- Locate Enhanced Security.
- Disable the setting only when the required workflow depends on the affected API operations.
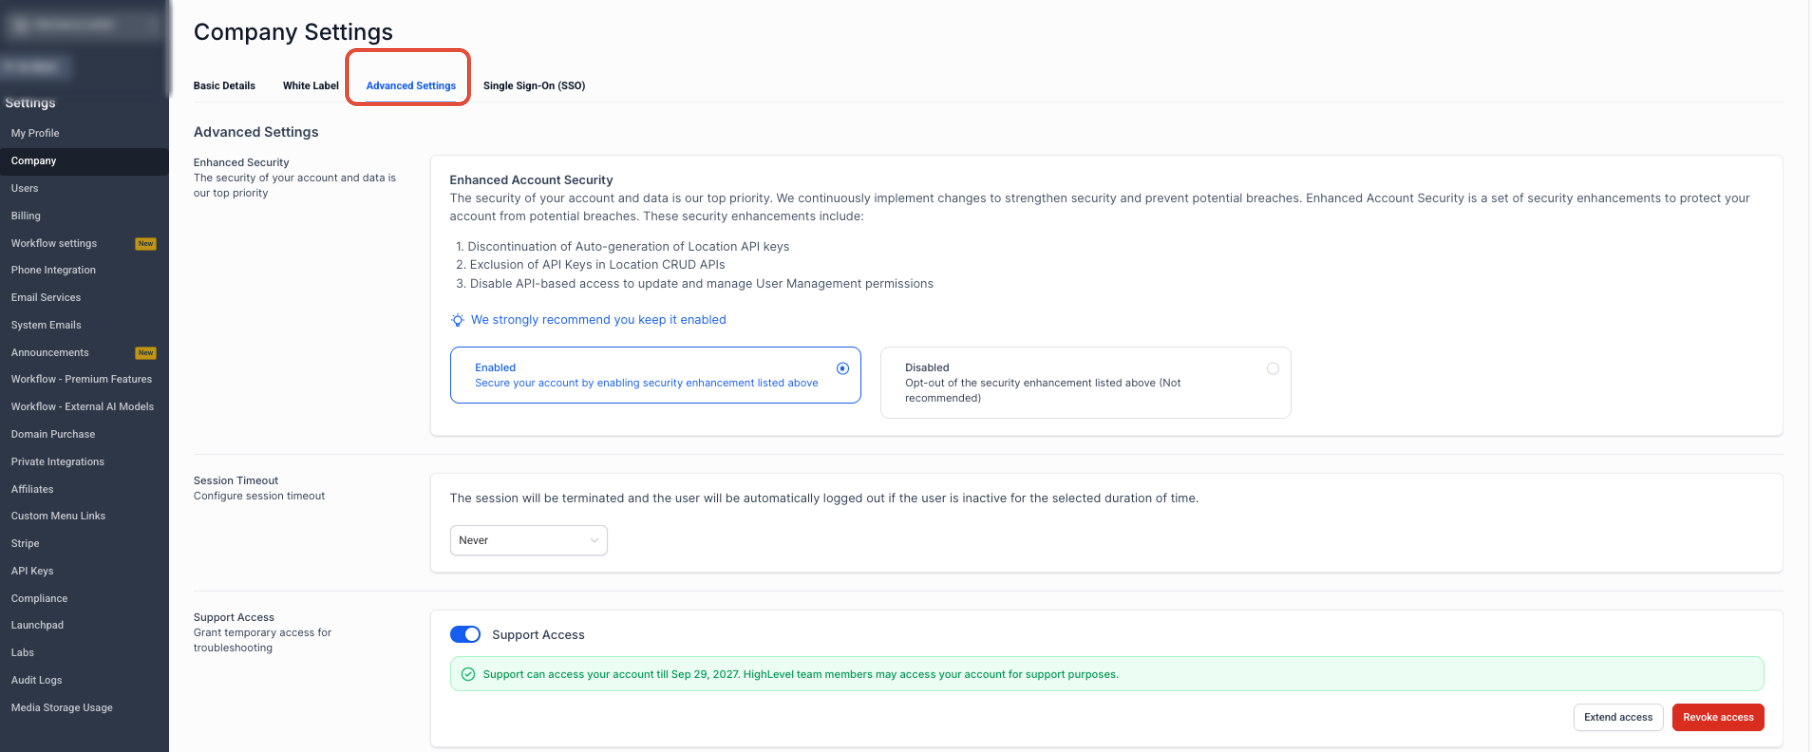
Important: Disabling Enhanced Security can increase account security risk. Keep it enabled unless your agency specifically requires an affected API-based workflow.
Set Up Agency User Roles and Permissions
Configure the user's access scope first, then refine individual permissions.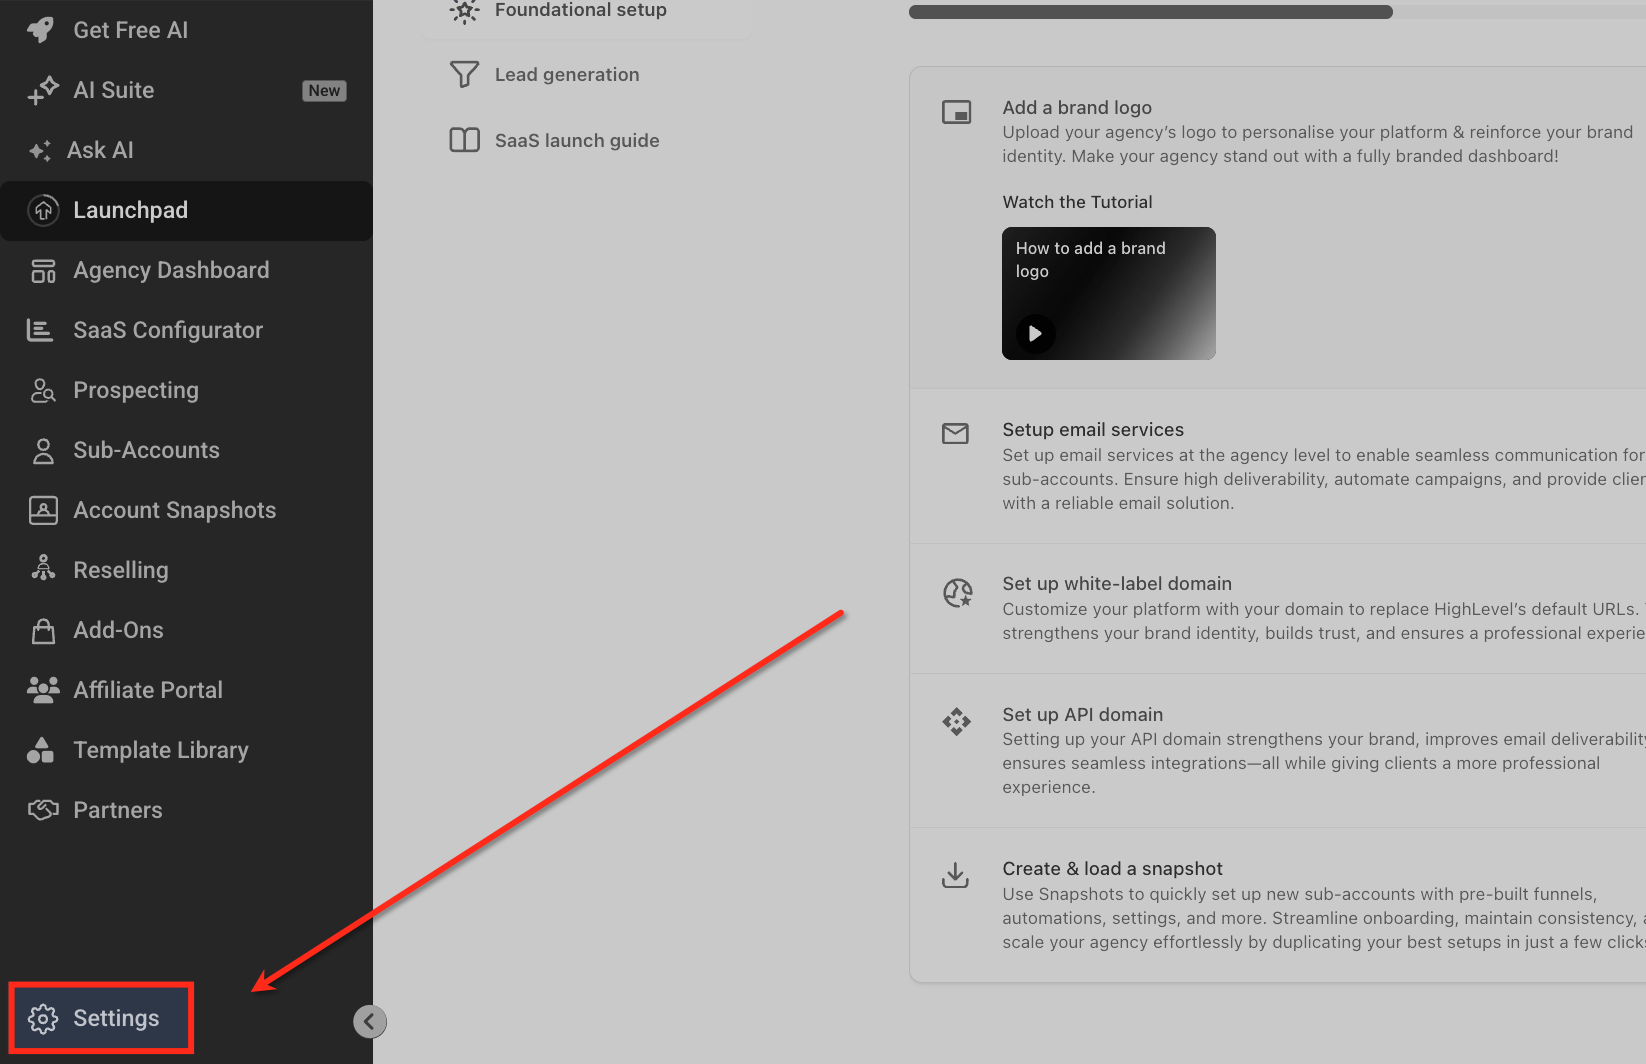
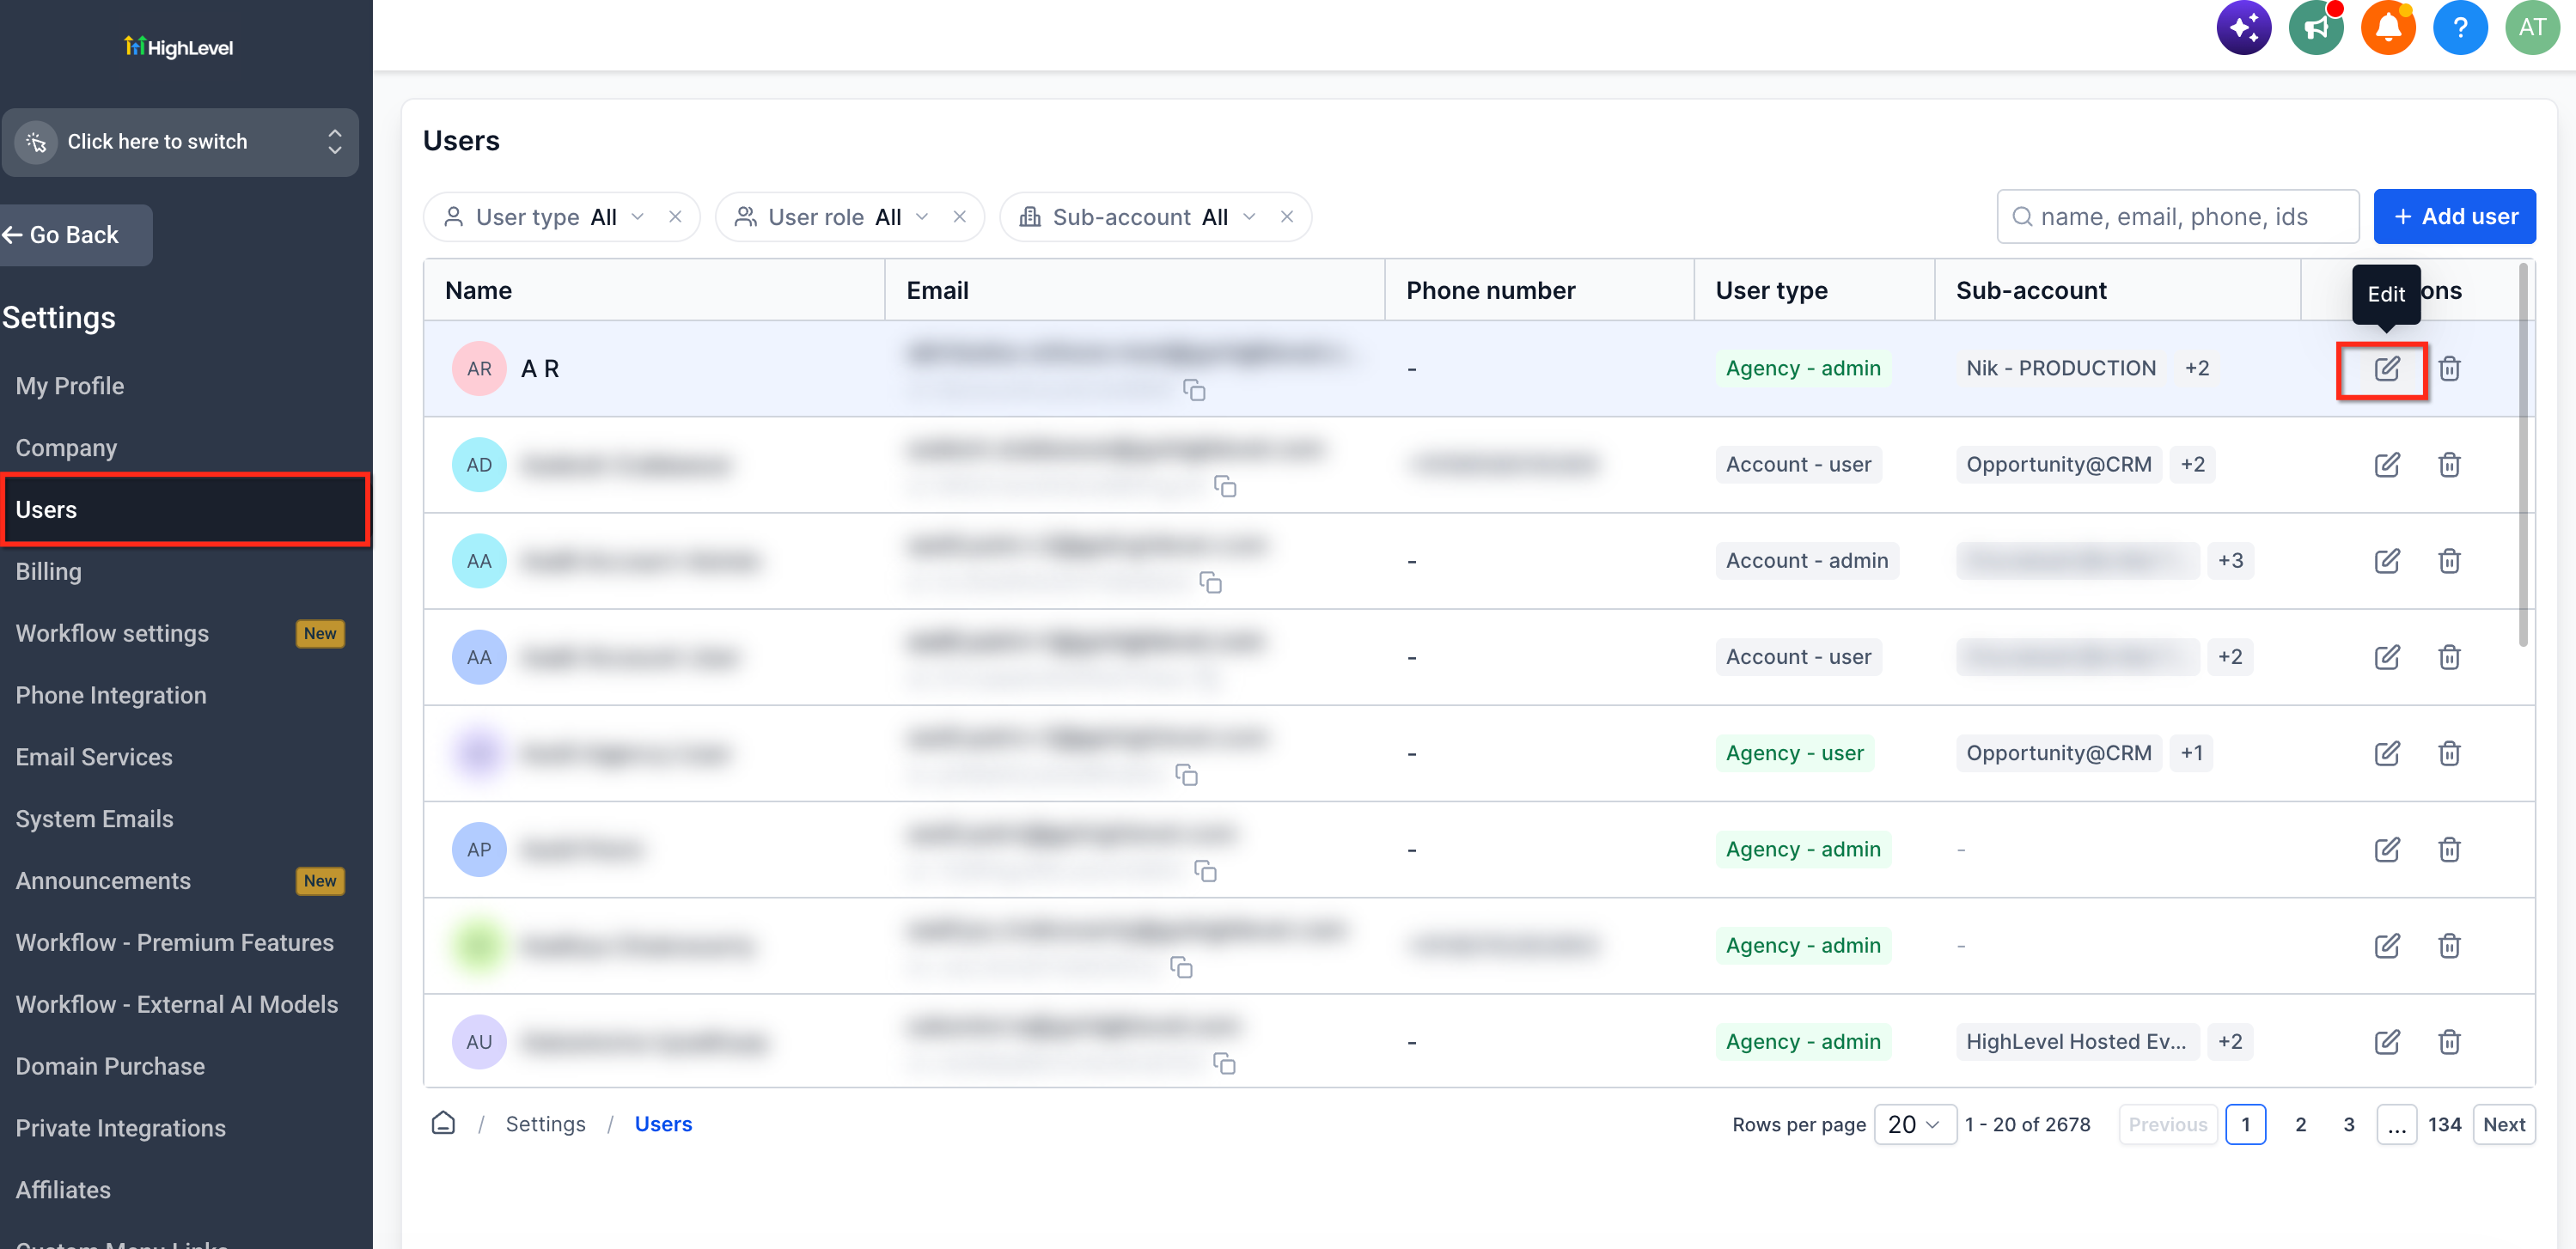
- From Agency View, go to Settings → Users.
- Select the applicable user and open the user for editing.
- Select Roles & Permissions.
- Choose the appropriate User Type:
- Agency: Use when the user requires agency-level access.
- Account: Use when the user should access selected sub-accounts only.
- Agency: Use when the user requires agency-level access.
- Choose the appropriate Role.
- If the User Type is Account, select the sub-accounts the user should be able to access.
- Turn off modules the user does not need.
- Configure the available granular permissions within enabled modules.
- Review sensitive permissions separately.
- Save the user's configuration.
Sensitive permissions to review include:
- Creating or deleting sub-accounts
- Sub-Account Settings
- User Management
- Login As
- Dashboard exports
- Sub-Account Transfers
Review user permissions periodically and update them when responsibilities change.
Frequently Asked Questions
Q: What is the difference between User Type and Role?
User Type determines the scope in which the user operates, while Role determines their authority within that scope.
Q: Can I give someone access to multiple sub-accounts without giving them agency-wide access?
Yes. Set the user's User Type to Account and assign the specific sub-accounts they should be able to access.
Q: Why can a user open a sub-account but still be blocked from certain settings?
Sub-account assignment determines whether the user can enter the account. Module and granular permissions determine what they can access or do after entering it.
Q: Is Only Assigned Data the same as turning off a module?
No. Module permissions determine whether a user can access a feature. Only Assigned Data limits supported record visibility based on assignment.
Q: Can every Agency Admin transfer a sub-account?
No. By default, the Agency Owner can request or complete eligible transfers. Transfer permission can be granted to specific Agency Admins.
Q: Why can't my API update User Management permissions?
Enhanced Security can restrict affected API-based User Management operations. Review the security implications before changing this setting.
Q: Should I add a client as an agency-level user?
If the client only needs access to their own business account, add them as a user within the appropriate sub-account to avoid unnecessary agency-level visibility.
Related Articles
- Manage Sub-Account User Roles & Permissions
- User Access in HighLevel | Agency & Sub-Accounts
- How to Create a User or Admin to Manage Multiple HighLevel Locations Without Giving Them Agency Access
- Login As User (Agency Admin Only)
- Enhanced Account Security
- Sub-Account Transfer Guide
Was this article helpful?
That’s Great!
Thank you for your feedback
Sorry! We couldn't be helpful
Thank you for your feedback
Feedback sent
We appreciate your effort and will try to fix the article