TABLE OF CONTENTS
- How to allow Customers to upgrade their SAAS plan themselves?
- How to change the SaaS plan from your end?
- How to allow the client to cancel their subscription?
- How to cancel SaaS-enabled sub-account yourself?
How to allow Customers to upgrade their SAAS plan themselves?
- Step-1: Allow your SaaS clients to upgrade their SaaS subscriptions from the company billing page. This setting is controlled on the Agency SaaS Configurator. Once you mark the checkbox next to Allow clients (sub-accounts) to upgrade to a higher plan, Your SAAS clients will then be able to Upgrade their subscription from within their Account Settings > Company Billing.
 This will apply this setting to all SAAS accounts that will be created using your SAAS configurator moving forward.
 - Step-2: This setting can also be personalized at a per-client level by Going to the Agency Sidebar > Sub-Accounts > Scroll to the specific client > Click on their name or on Manage Client:

- Step-3: Please scroll down to subscription details and check to mark the checkbox to Allow them to upgrade. This setting will only apply to this sub account and not all SAAS accounts created using your SAAS configurator moving forward. sub-account,

- Step-4: Once this checkbox is marked, your client will see a Modify Subscription button below their subscription details in Settings > Company Billing:


- Step-5: They will then be allowed to choose between the higher-tier plans you have configured in your SAAS configurator.

- Step-6: Upon choosing their desired plan, they will see a confirmation message which will also allow them to choose between the Monthly and the annual variant of your created plan:

- Step-7: Clicking on Confirm & Pay will charge them and you can then unlock the features associated with that plan in their account.


How to change the SaaS plan from your end?
In this example, we have 3 SaaS plans, Standard, Professional, and Premium. Each higher plan has more features offered.

We have a location on the Standard plan with basic features only.

To upgrade this location to the Professional plan, we will need to go into our Stripe account and open the customer associated with this location.
Finding the Stripe Customer
You can search the customer in Stripe using your client's email. However, the preferred method is to search for the invoice ID for this location and get the customer ID from there.
- Step-1: Go into Subaccount Settings > Company Billing and click "View" for any invoice shown in the Billing History

- Step-2: Copy the invoice number

- Step-3: Search for the invoice number on Stripe and click on the invoice to open the details

- Step-4: Click on the customer email shown in the 'Billed to' column on the invoice; it will take you to the customer's profile in Stripe


Changing the subscription plan
Now that we are in the customer profile on Stripe, we have updated the client's subscription plan.
- Step-1: Click on the pencil icon to update the subscription plan

- Step-2: Remove the current price and add the new plan's price

- Step-3: Review your changes, prorate changes if you want to adjust the billing difference in the next invoice, and then hit the update button

- Step-4: On your agency account, go to the Accounts tab > View details for the location. The plan is now upgraded, BUT you still need to update their accessible features according to the new plan:

- Step-5: Save the updated feature set for this location, and then you're good to go!


How to allow the client to cancel their subscription?
SaaS agencies can now allow their SaaS clients to cancel their subscriptions. This feature is turned off by default because we believe taking cancellation requests and getting an opportunity to save the SaaS client is essential in churn-aversion. But regardless, the decision rests with you now! Agencies can enable this feature by going to their SaaS configurator.
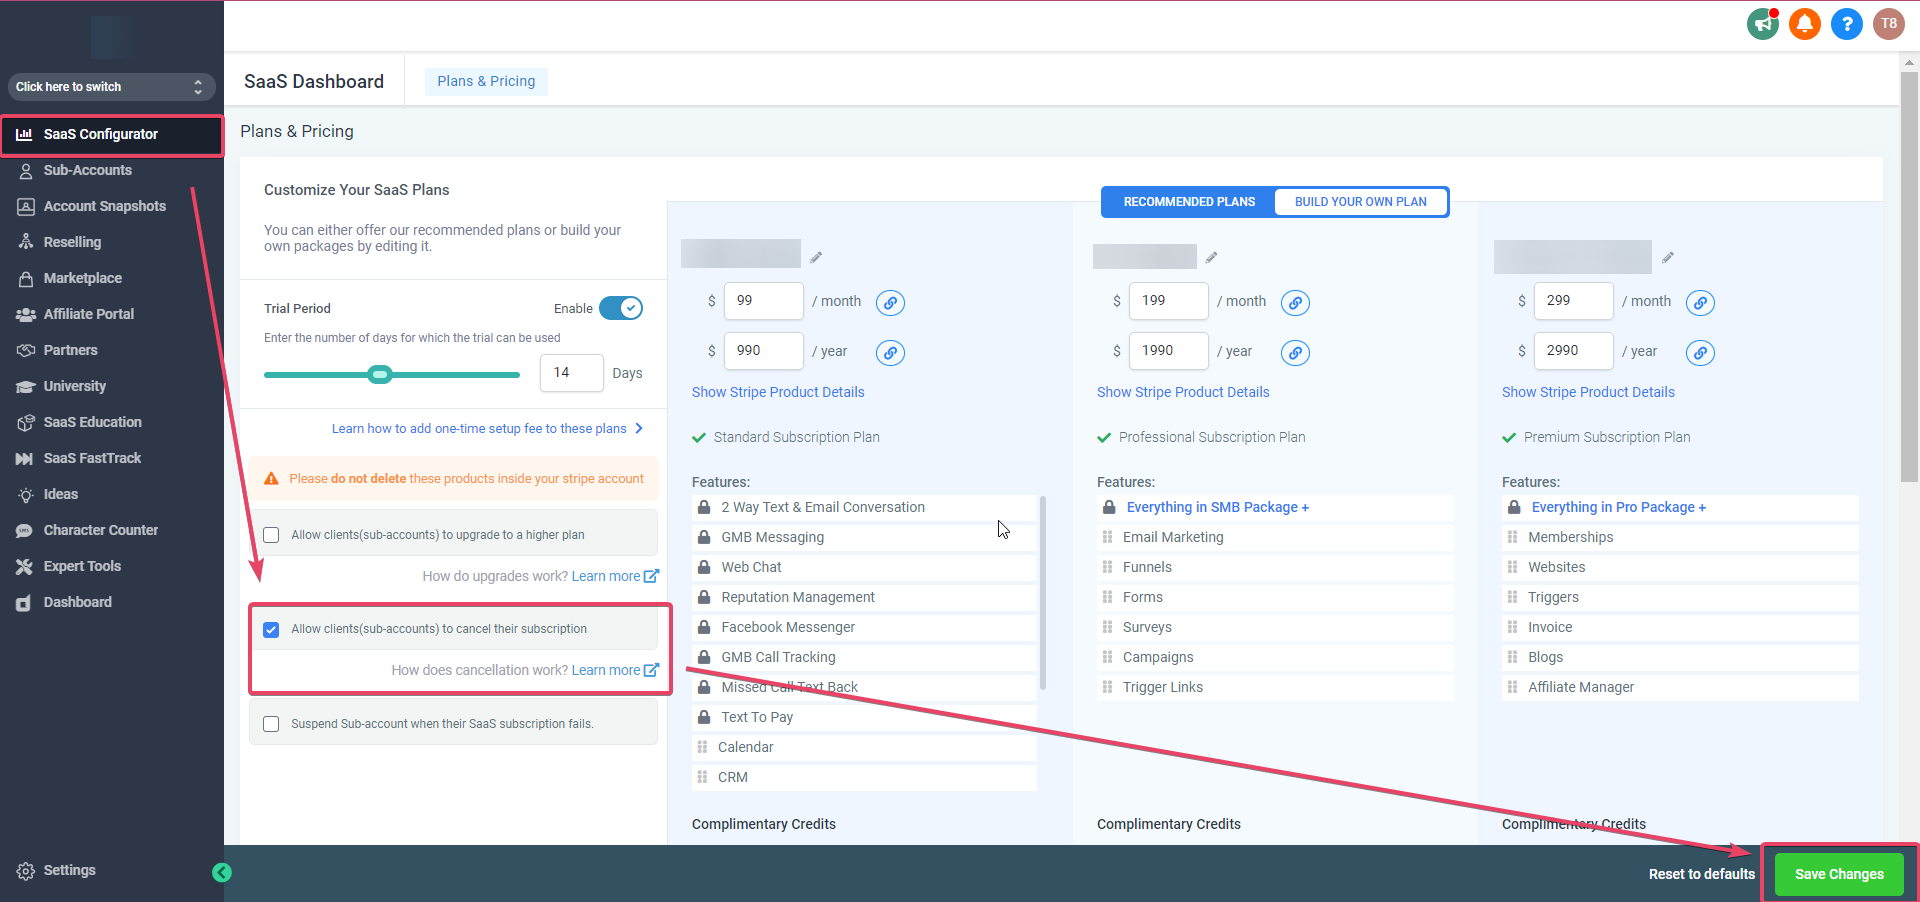
- Step-1: Mark the checkbox to Allow clients (sub-accounts) to cancel their subscriptions and then hit the Save Changes button.
This will apply this setting to all SAAS accounts that will be created using your SAAS configurator moving forward. - Step-2: This feature can also be controlled at a per-client level by Going to the Agency Sidebar > Sub-Accounts > Scroll to the specific client > Click on their name or on Manage Client


- Step-3: Once you mark the checkbox to Allow client (sub-account) to cancel their subscription, your clients will be able to cancel their Subscription. This setting will only apply to this sub-account and not all SAAS accounts created using your SAAS configurator moving forward.
Once this checkbox is marked, your client will see a Modify Subscription button below their subscription details in Settings > Company Billing:
- Step-4: Upon clicking Cancel, your client will see the following confirmation popup:

- Step-5: Once they click on Confirm Cancellation, They will see this message:

- Step-6: Whenever they try to access that canceled account they will see this message until they reactivate:

- Step-7: Your clients can reactivate their sub-accounts by clicking the reactivate button if they cancel their subscriptions. Also, they will have the option to change payment methods if required.
Your client can also reach out to you using the agency's email under company settings if they ever get locked out erroneously.
How to cancel SaaS-enabled sub-account yourself?
Step 1: Reconcile SaaS Wallet Balance
If the client has any non-complimentary credits in their wallet, you must refund those in Stripe.
You can check if the wallet credits are complimentary or non-complimentary by going to Sub-Account Settings > Company Billing > See Details (Transaction History)
For more details, please check the article: SaaS Wallet Credit Management

Step 2: Disable SaaS on the Sub-Account from Agency View
Disable SaaS for this sub-account by going to Agency View > Accounts Tab > View Details

Cancel the Stripe subscription if you no longer want to charge the client for the SaaS plan:
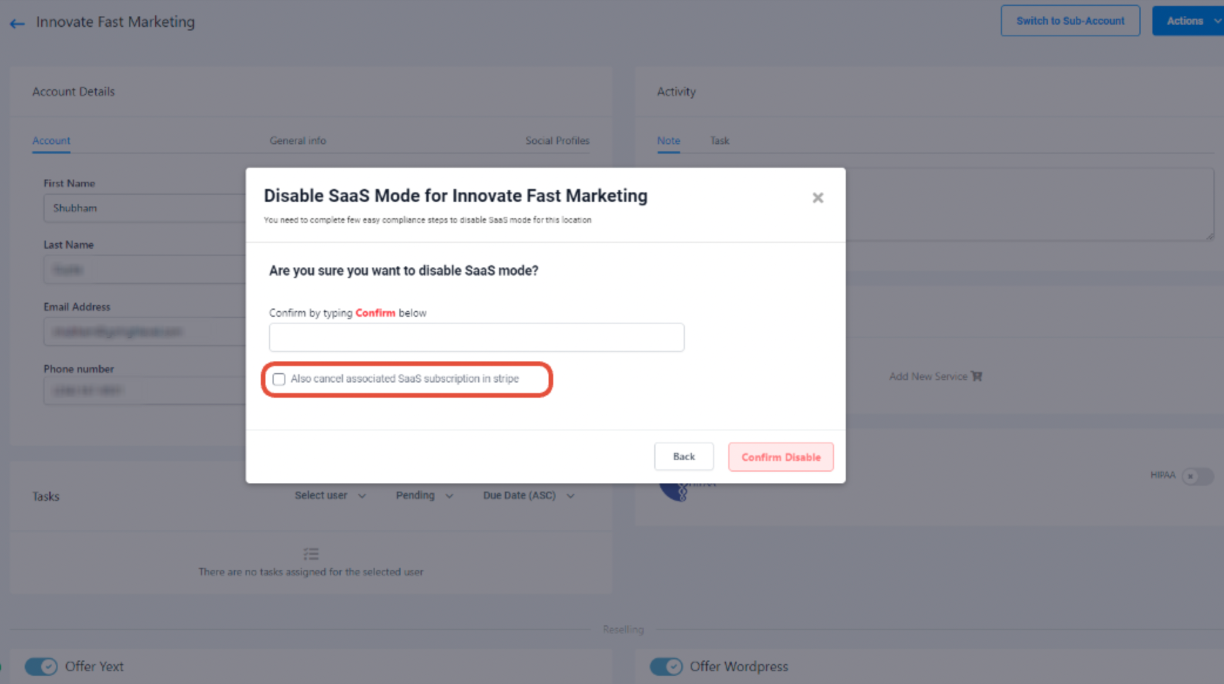
We recommend exporting all transaction details before disabling SaaS, because once SaaS mode is disabled, all transaction/wallet history will be removed.
Step 3: Close Twilio / Mailgun Sub-Accounts - For Clients who're leaving your Agency
If the sub-account has Twilio or Email (Mailgun), Rebilling is turned on after disabling SaaS; their Twilio / Mailgun sub-account will still be connected in Agency Settings > Twilio / Mailgun. Make sure you've deleted those connections and closed these sub-accounts.
Step 4: Remove User from Team Management / Delete the Sub-Account - For Clients who're leaving your Agency
This step depends on your choice.
- If you want to keep the client's data even after removing them, go to Agency Settings > Team and remove the client's user.
- If you don't want to keep their data, go to Accounts > View Details, and delete the sub-account

Was this article helpful?
That’s Great!
Thank you for your feedback
Sorry! We couldn't be helpful
Thank you for your feedback
Feedback sent
We appreciate your effort and will try to fix the article