This guide walks through signing up for Mailgun, adding your domain, and configuring the five DNS records Mailgun requires — two TXT records, two MX records, and one CNAME — inside Cloudflare's DNS Records panel.
It also covers a Cloudflare-specific step that trips people up: switching the CNAME record from Proxied to DNS only.
Sign up for Mailgun & add your domain


Log in to Mailgun, then click Sending → Add New Domain.

If your domain is companyname.com, decide whether to set up the main domain or a subdomain with Mailgun.
- Main domain: if you use the main domain, it should not also be used with Google Workspace or any other email provider — see Mailgun's guidance on sharing a domain with another email server.
- Subdomain: type ANYTHING_HERE.companyname.com — for example mg.companyname.com, replies.companyname.com, or support.companyname.com.
Set up the domain or subdomain under the US region — not EU.
Click Add domain.

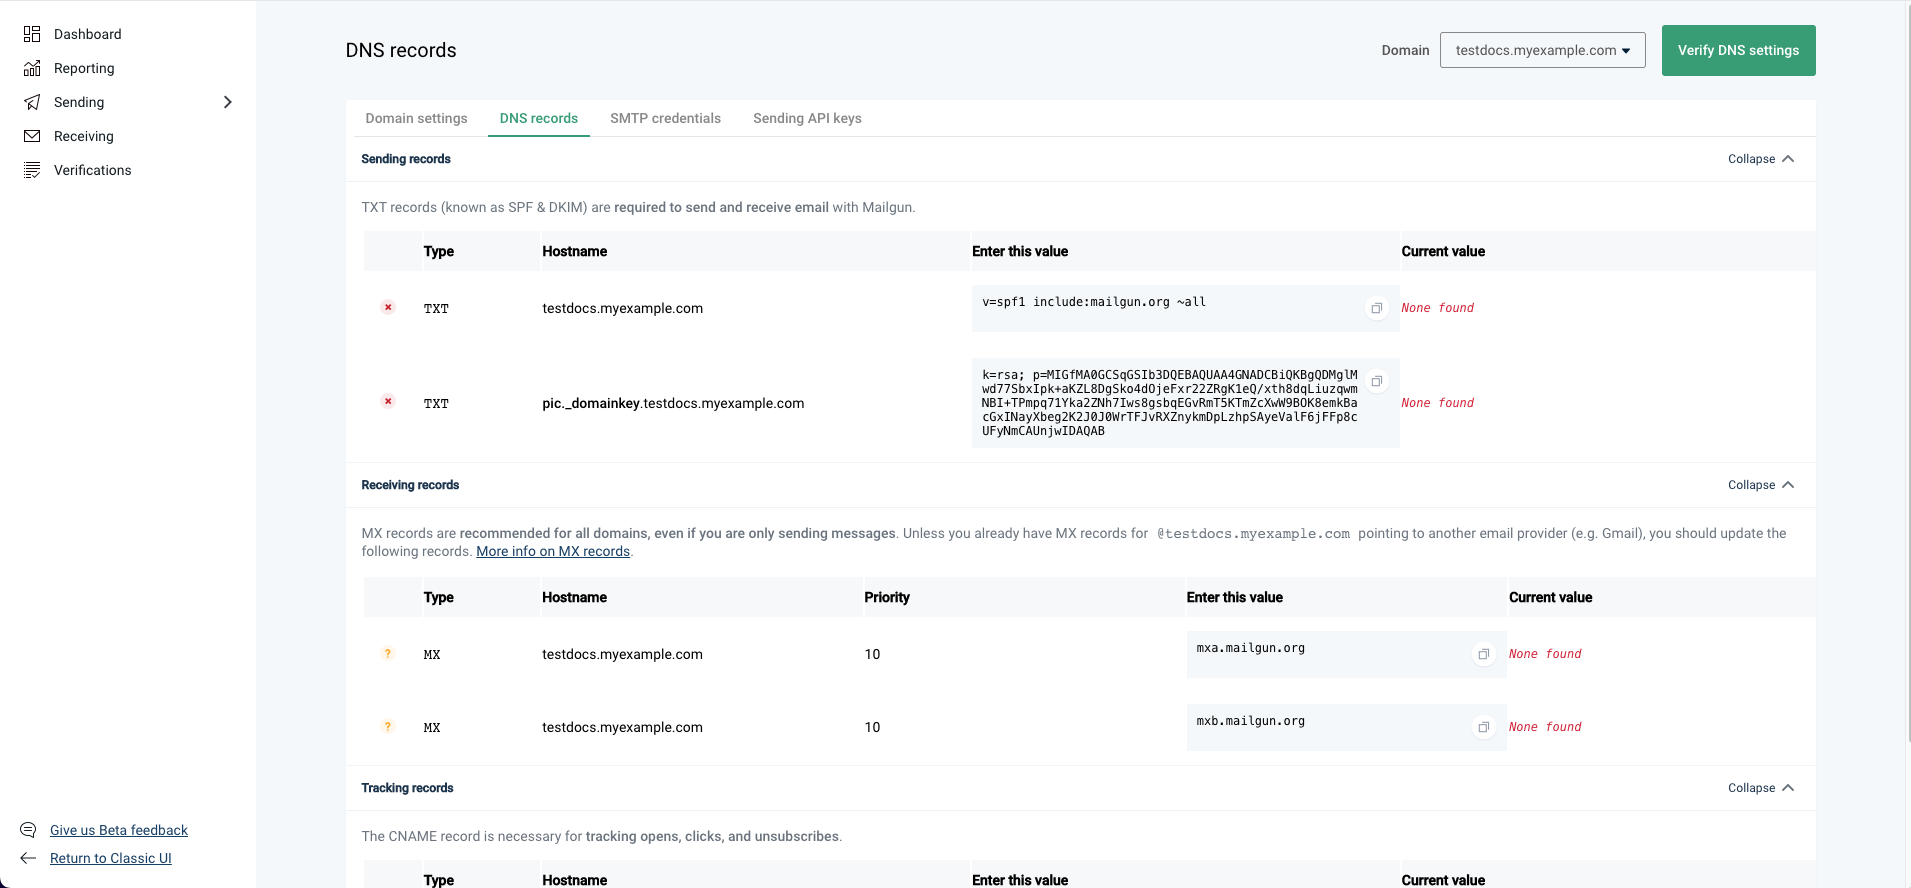
The next screen asks you to add DNS records to your domain. Leave this screen open — you'll need it for the next step.
Access DNS records in Cloudflare
Now log in to your DNS records and add the 5 DNS records Mailgun requires.
Log in to the Cloudflare dashboard and select your account and domain. See Cloudflare's own guide on creating DNS records if you'd like more detail.
Click on DNS → Records.

Click + Add Record. You'll repeat this for each of the 5 records below.

Add the 1st TXT record (SPF)

A. Type: select TXT from the Type menu.
B. Name: different for everyone — do not include the root domain.
- mg.companyname.com → host name is mg
- replies.companyname.com → host name is replies
- Main domain (companyname.com) → host name is @
C. Content: the same for everyone — paste v=spf1 include:mailgun.org ~all.
D. Click Save.

Add the 2nd TXT record (DKIM)
Click + Add Record again.

A. Type: select TXT from the Type menu.
B. Name: this part is a little tricky. Copy everything from the beginning of the value up until the subdomain part — do not include the root domain. Everyone's 2nd TXT record name and value are different.
| Example | Name to copy | Highlighted part |
|---|---|---|
| Using a subdomain | mx._domainkey.helpdesk |  |
| Using the main domain | mailo._domainkey |  |
C. Content: head back to Mailgun and copy the 2nd, much longer TXT record — highlighted in the screenshot below — and paste it here.

D. Click Save.
Add the 1st MX record

Click + Add Record again.

If you have a Google Workspace account capturing incoming email for your main domain, make sure you're using a subdomain for Mailgun instead. See Can I Use the Same Domain Name for Mailgun and for Google Apps (Or Another Email Server)?
A. Type: select MX from the Type menu.
B. Name: different for everyone —
- mg.companyname.com → host name is mg
- replies.companyname.com → host name is replies
- Main domain → host name is @
C. Mail Server: the same for everyone — paste mxa.mailgun.org.
D. Priority: 10 — the same for everyone, no matter what domain you're setting up.
E. Click Save.
Add the 2nd MX record
Click + Add Record again.

A. Type: select MX from the Type menu.
B. Name: different for everyone —
- mg.companyname.com → host name is mg
- replies.companyname.com → host name is replies
- Main domain → host name is @
C. Mail Server: the same for everyone — paste mxb.mailgun.org.
D. Priority: 10 — the same for everyone.
E. Click Save.
Add the CNAME record

In Cloudflare, click + Add Record again.

A. Type: select CNAME from the Type menu.
B. Name: different for everyone. Head back to Mailgun to copy the host name — copy everything from the beginning up until the subdomain part, do not copy the main domain.

- mg.companyname.com → host name is email.mg
- replies.companyname.com → host name is email.replies
- Main domain (companyname.com) → host name is email
C. Target: the same for everyone — paste mailgun.org.
D. Click the orange cloud icon to switch it from Proxied to DNS only. If this record stays proxied, Mailgun won't be able to verify it and mail delivery will fail.
E. Click Save.

Verify DNS & finish setup
Now that you've added all 5 records, go back to Mailgun and click Verify DNS Settings. If some records still aren't showing a green checkmark, click the same button again — DNS propagation can take a little time.

Once all records are verified, grab your Mailgun API key and add it to your email service settings.
Then send a test email to confirm everything works — see how to send a test email in the Conversation.
Frequently Asked Questions
Was this article helpful?
That’s Great!
Thank you for your feedback
Sorry! We couldn't be helpful
Thank you for your feedback
Feedback sent
We appreciate your effort and will try to fix the article