Setting up and launching your online course might seem daunting at first, but trust me—it's simpler than you think! With just a few clicks, you'll be on your way to sharing your expertise, building your audience, and even earning some income. Let's dive in step-by-step.
In this guide, you'll learn how to:
- Create a course
- Build and organize course content
- Create an offer
- Configure pricing
- Publish and test your course
- Share your course with learners
TABLE OF CONTENTS
- Overview
- Before You Begin
- Create a Course
- Build Your Course Content
- Create an Offer
- Sell Offer
- Publish & Share Your Offer
- Frequently Asked Questions
- Related Articles
Overview
HighLevel Courses help you create, organize, and sell online learning experiences. Whether you're offering free training or paid programs, launching a course involves more than just creating content—you'll also need to create an offer, configure pricing, and test the learner experience before sharing it with your audience.
Before You Begin
Before launching your course, make sure you have:
- Access to Memberships → Courses
- Your course content (videos, lessons, PDFs, quizzes, etc.)
- A course thumbnail (optional but recommended)
- A connected payment provider if you're selling a paid course
- A clear pricing model (Free, One-Time, or Recurring)
Tip: If you're creating a paid course, verify that your payment provider is connected before creating your offer.
Create a Course
Creating your first course is like laying the foundation for your teaching empire. It’s exciting and easy—let's walk through it together.
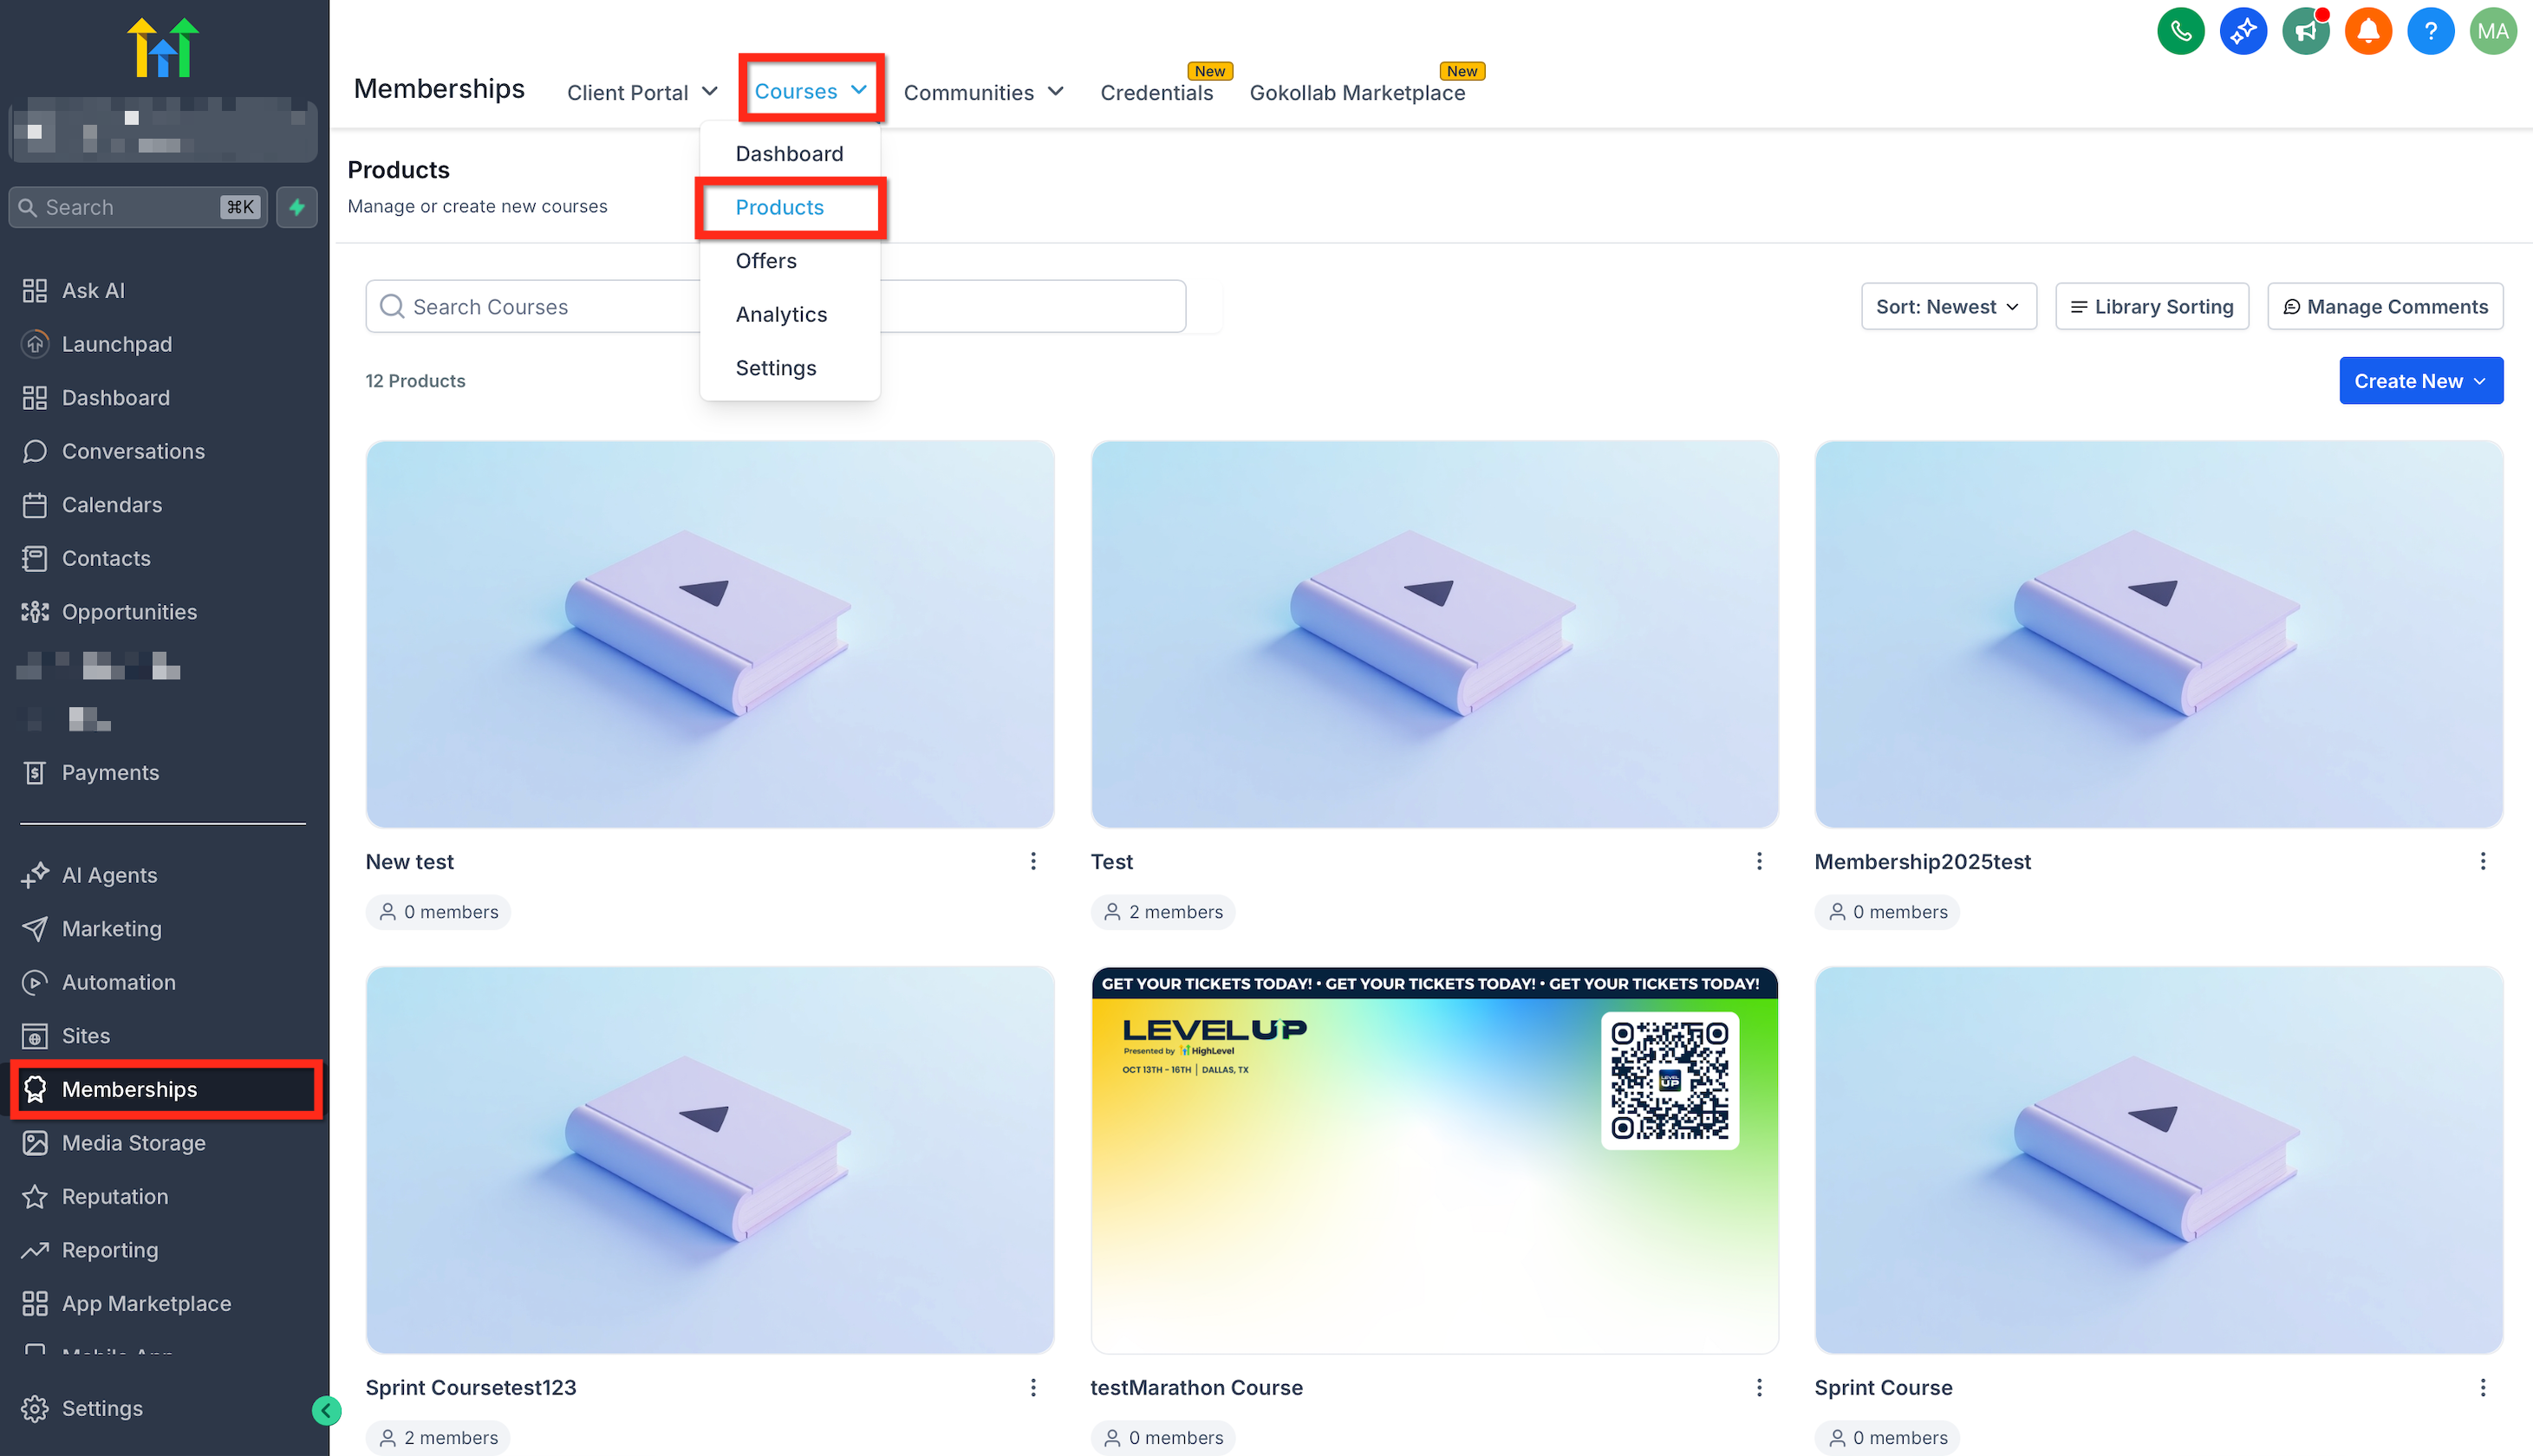
- Navigate to Memberships > Courses > Products.
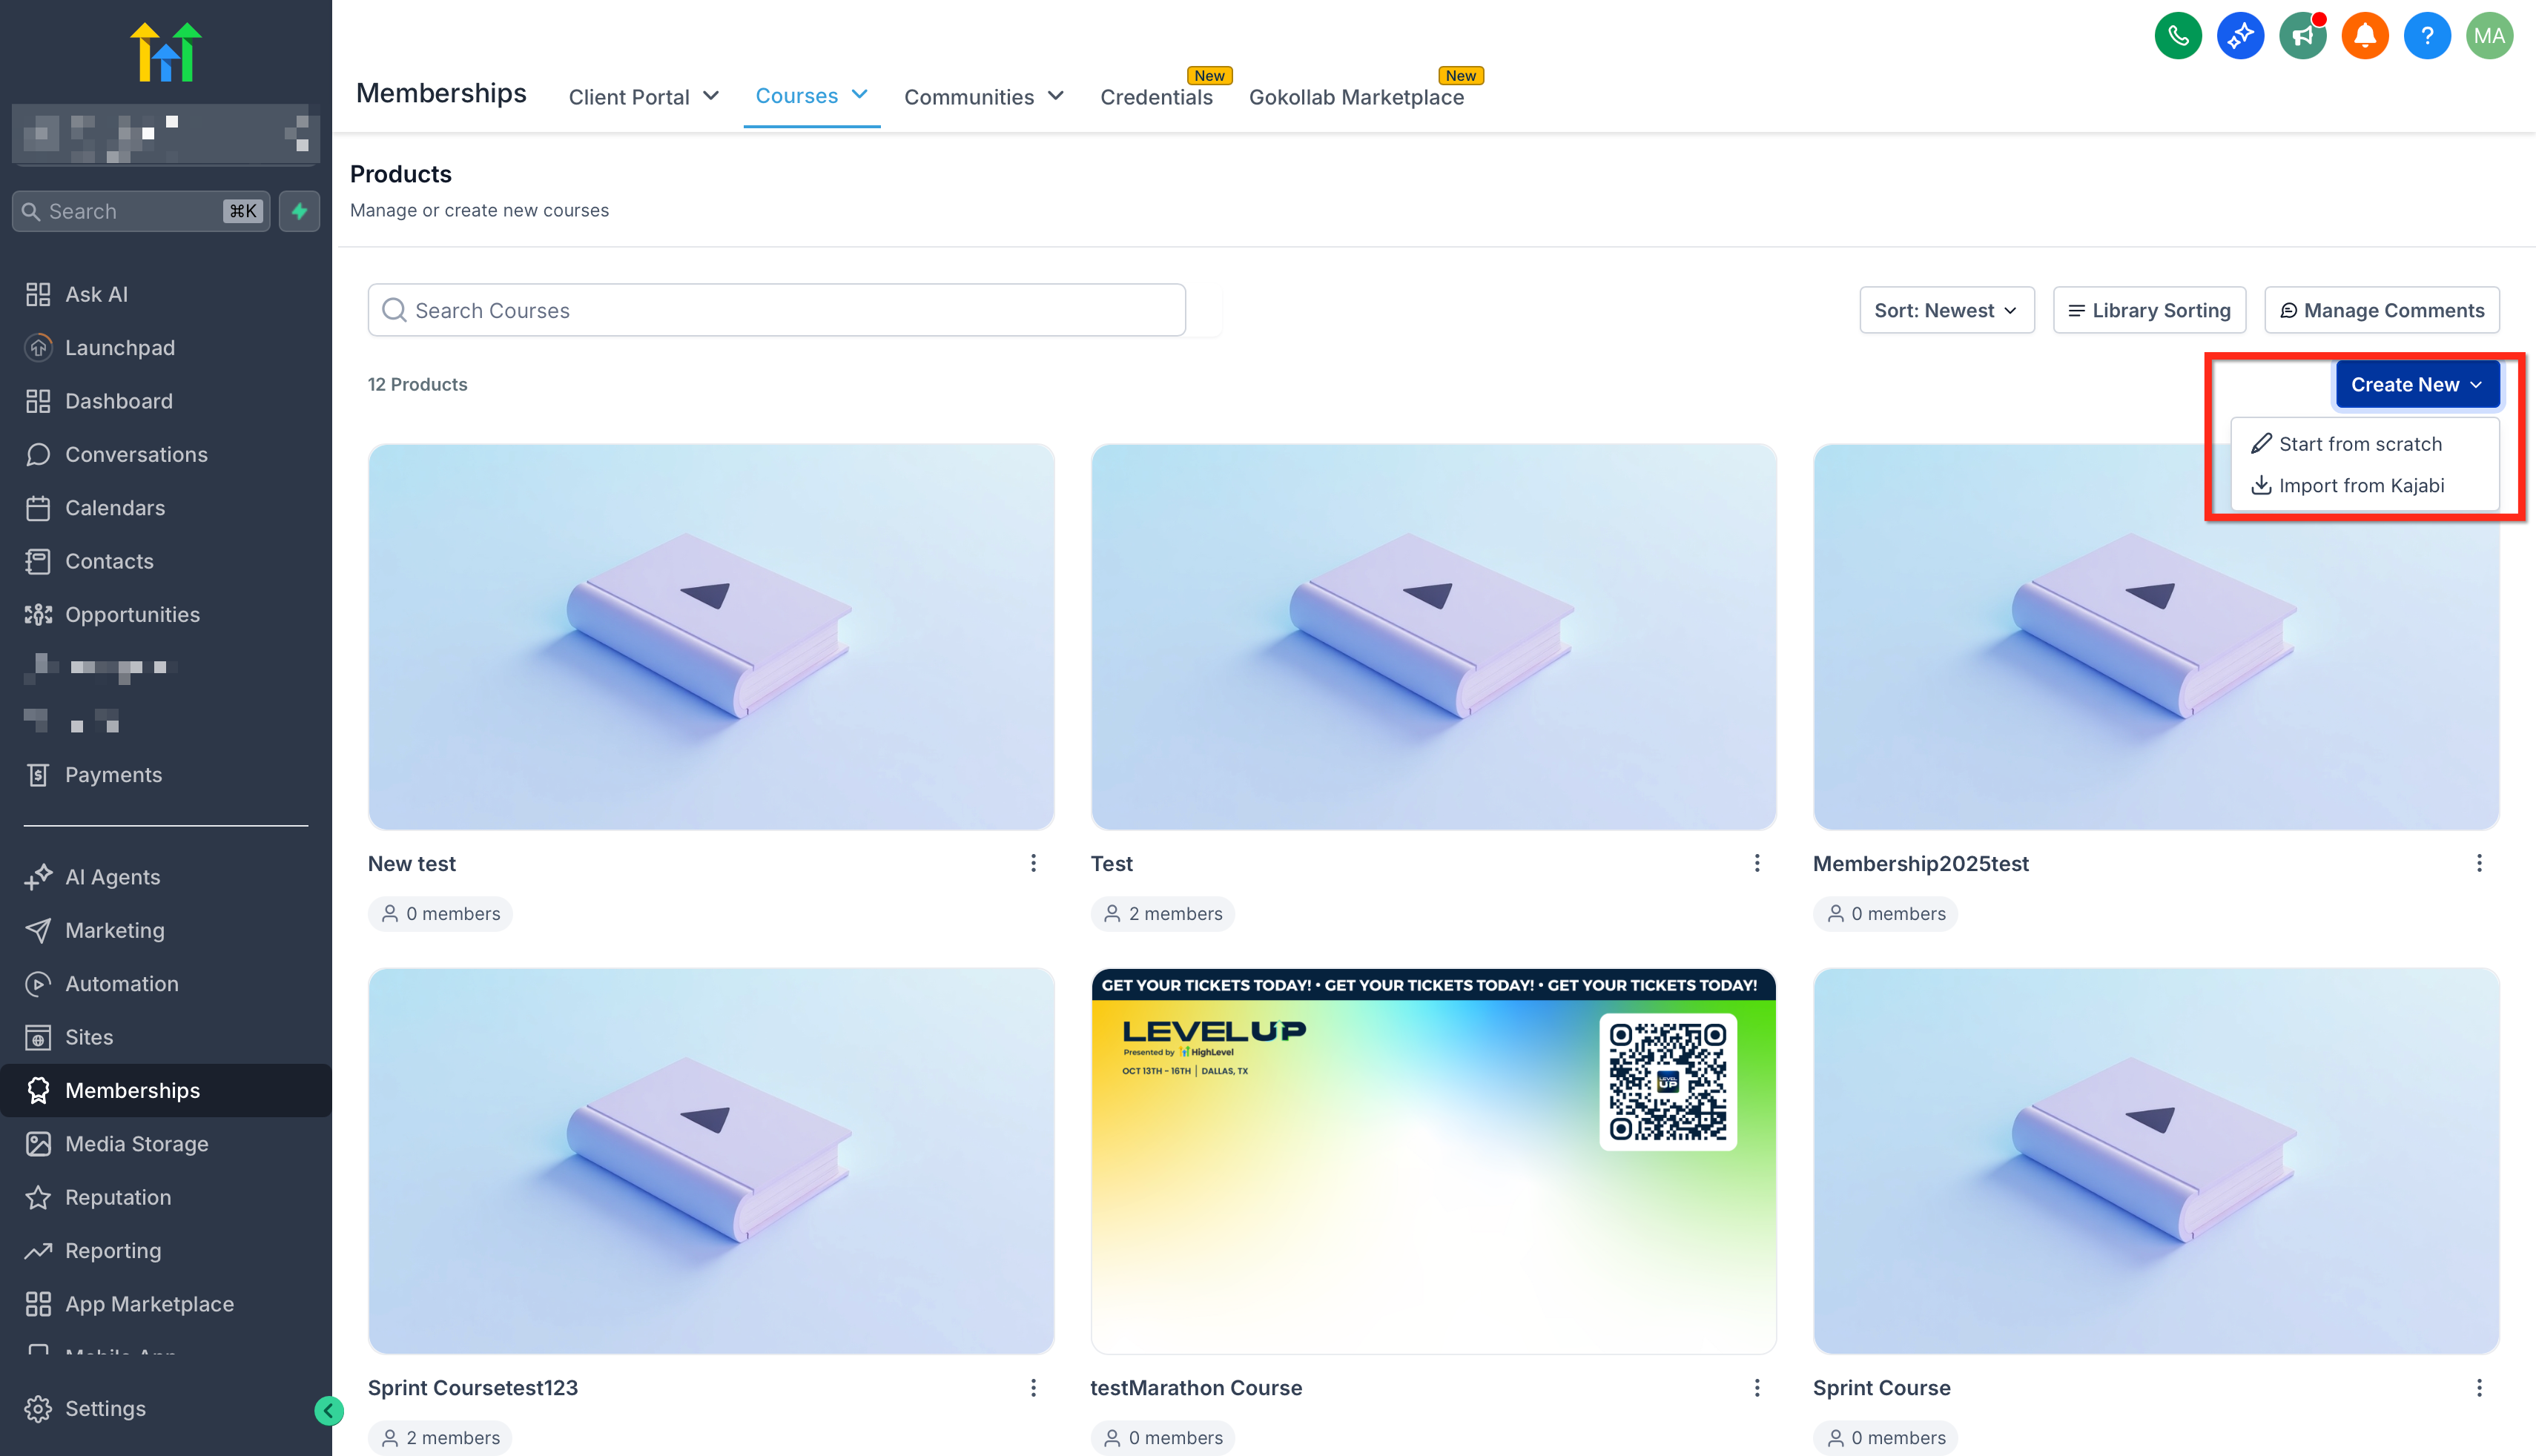
- Click Create Product > Start from Scratch.
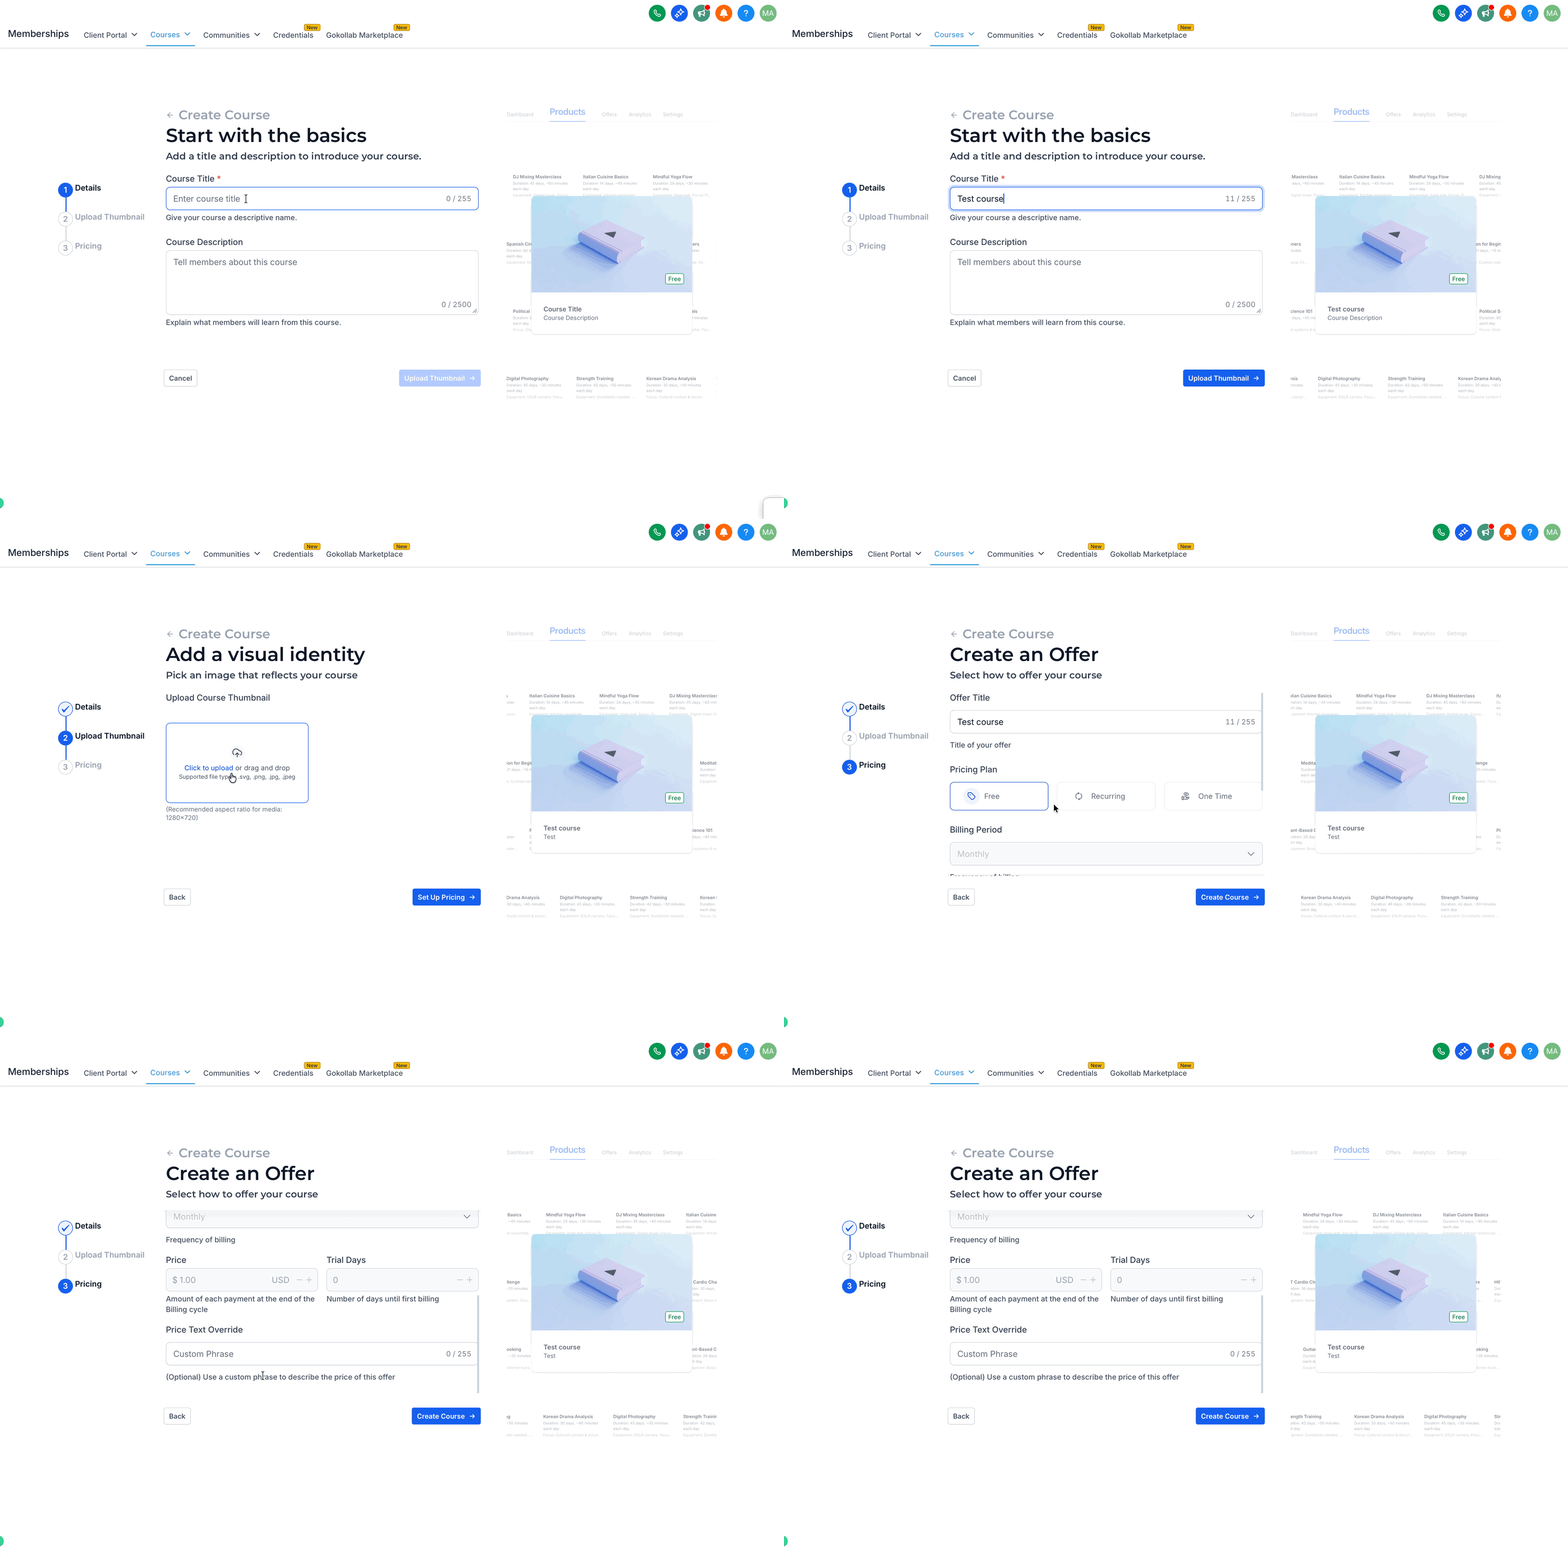
- Add your course details, including the Course Title and Course Description. Upload a thumbnail image for your course. Set the pricing for your course by selecting Free, Recurring, or One Time, then click Create Course.
- Build out your course content from scratch or edit the template.
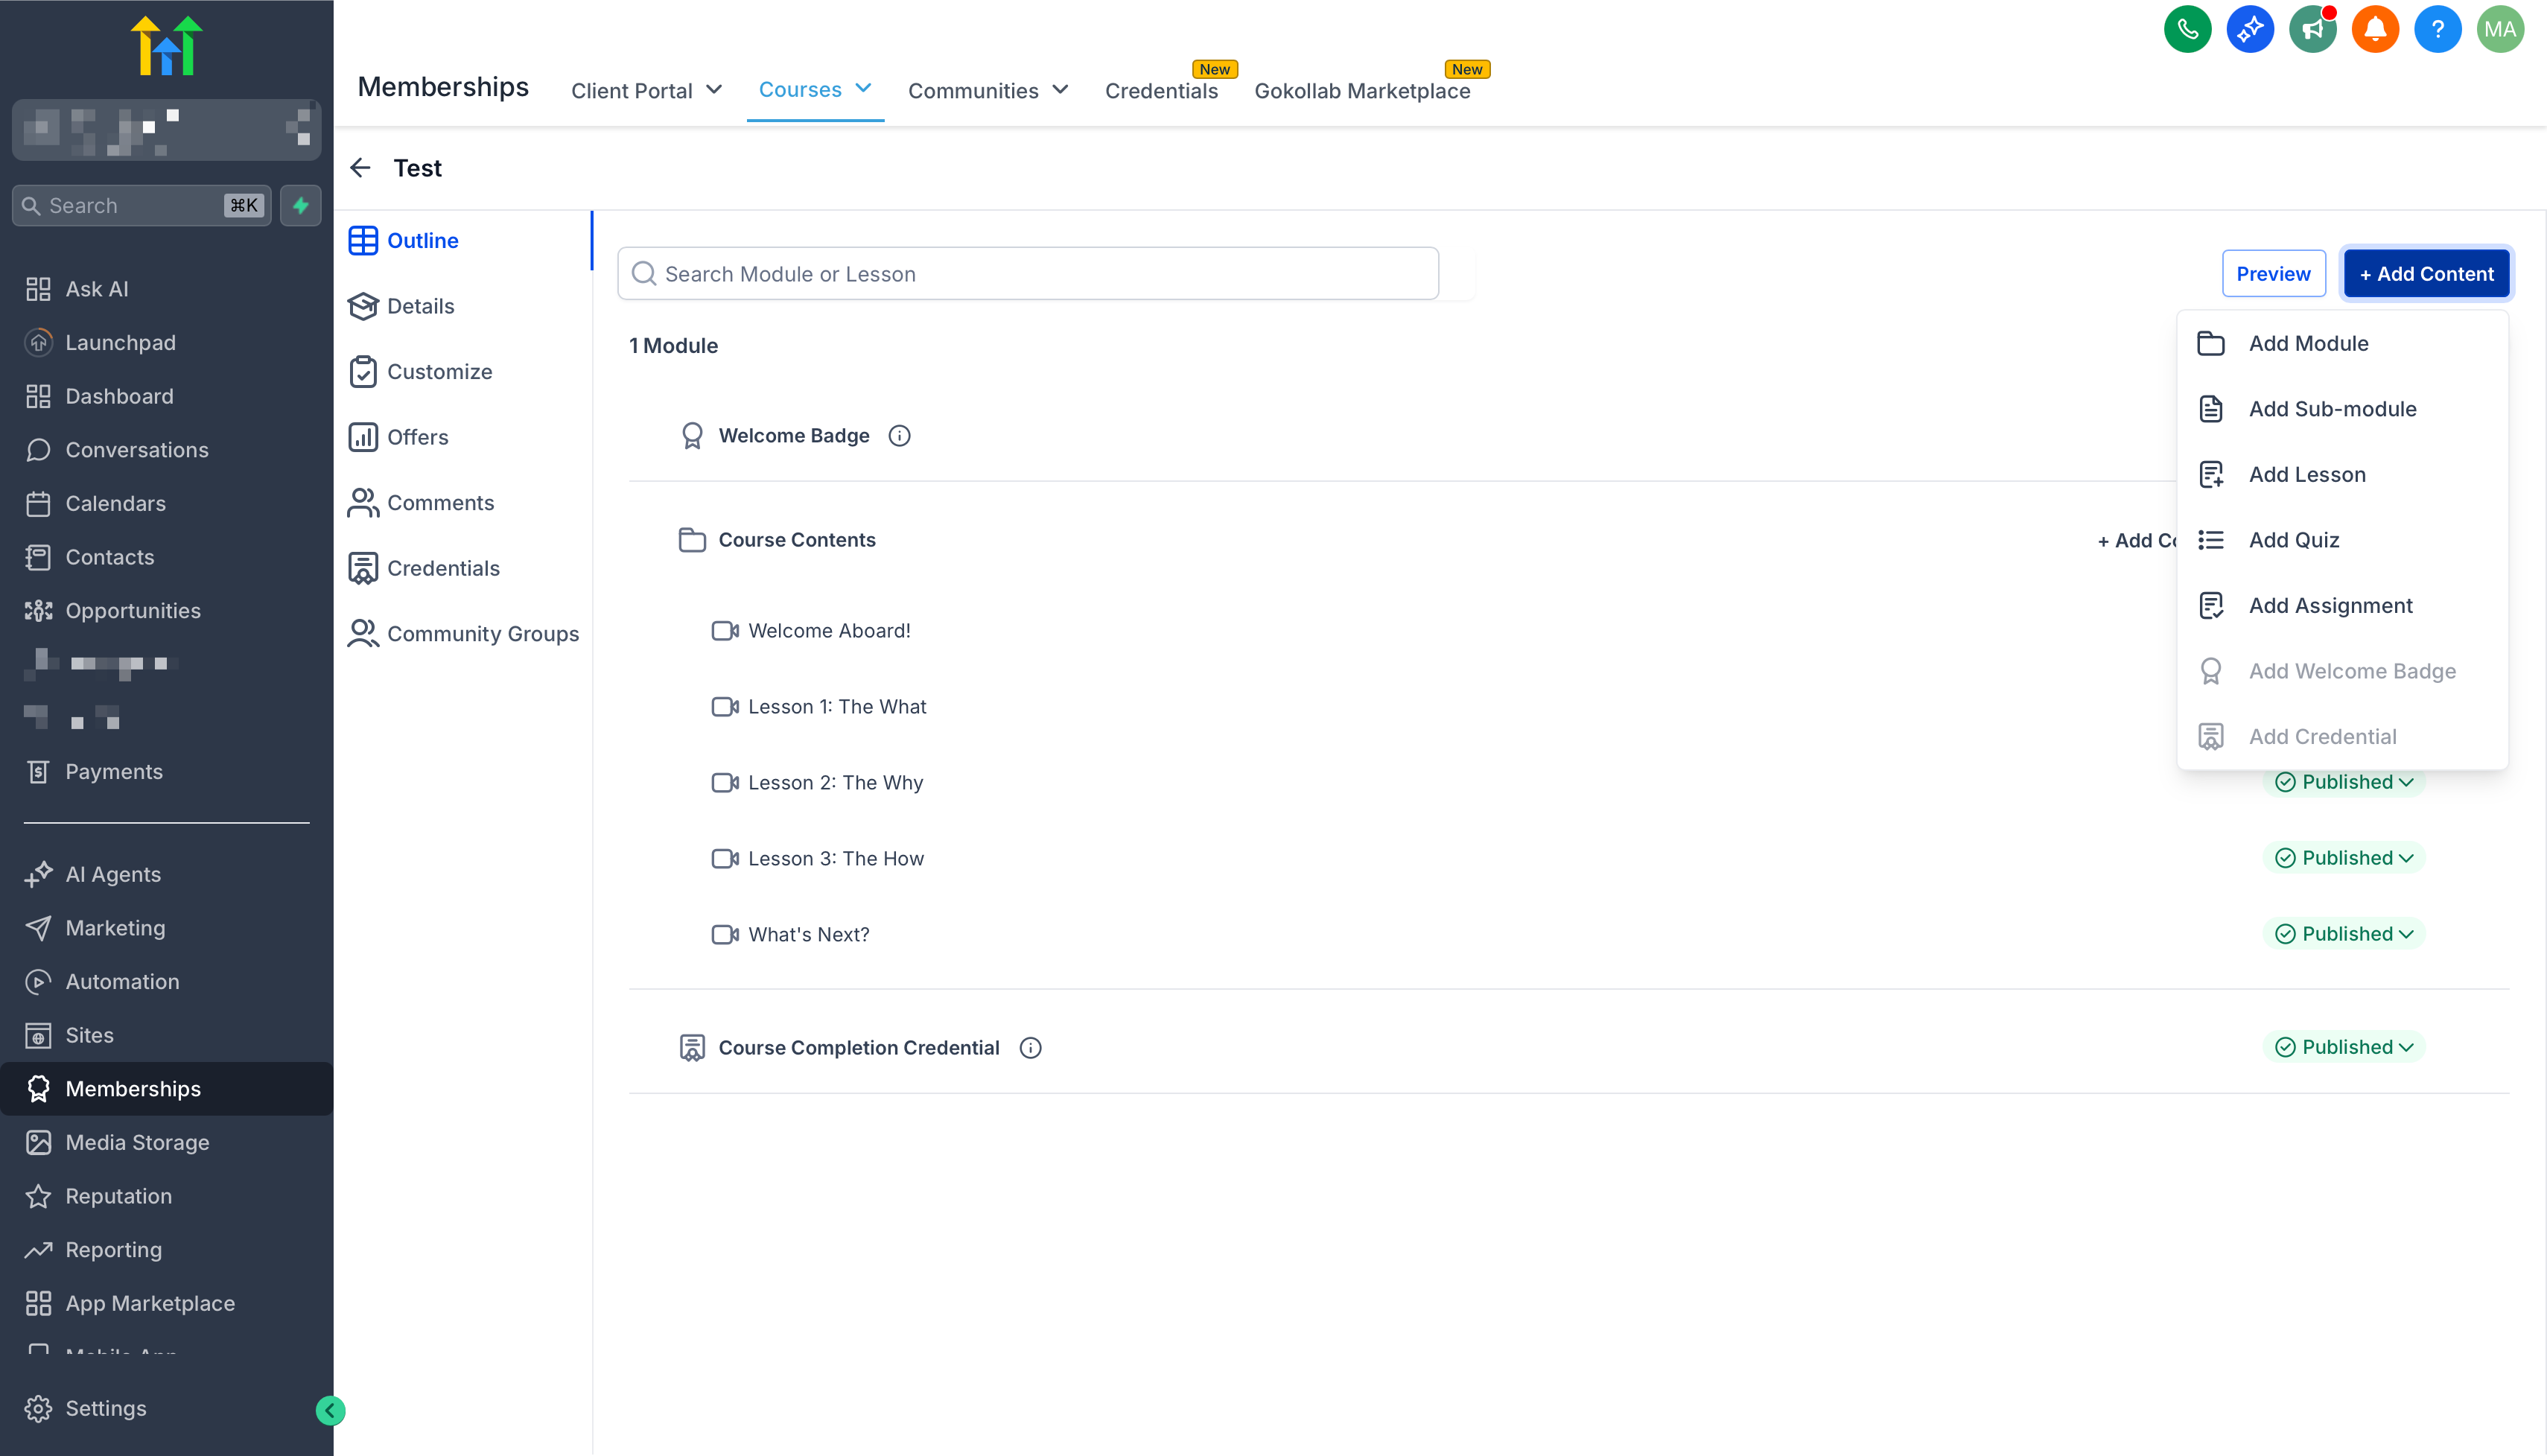
Use the course editor (New Layout)
- A left panel that shows your course structure (modules, lessons, quizzes, and assignments).
- A main editor area for the item you selected.
- Breadcrumbs at the top so you always know where you are in the course.
- Select any lesson or quiz in the left panel to open it in the editor.
- Drag and drop items in the left panel to reorder content.
- Expand or collapse modules to focus on one section at a time.
Note: UI labels and button names may vary by account rollout.
Next step: Explore more ways to enhance your course:
- How To Build Courses / Membership Sites
- Paid Courses inside Communities
- Advanced Course Unlock Options in Communities
Build Your Course Content
Once your course has been created, begin adding your learning content.
Use the Course Editor to:
- Create modules or sections
- Add lessons
- Upload videos or downloadable files
- Organize content in the desired order
- Save your changes
Note: Your course contains the learning content that students will access after enrollment.
Create an Offer
Once your amazing course is ready, creating an offer is like packaging a beautiful gift—enticing and clearly valuable. Here's how to make it irresistible:
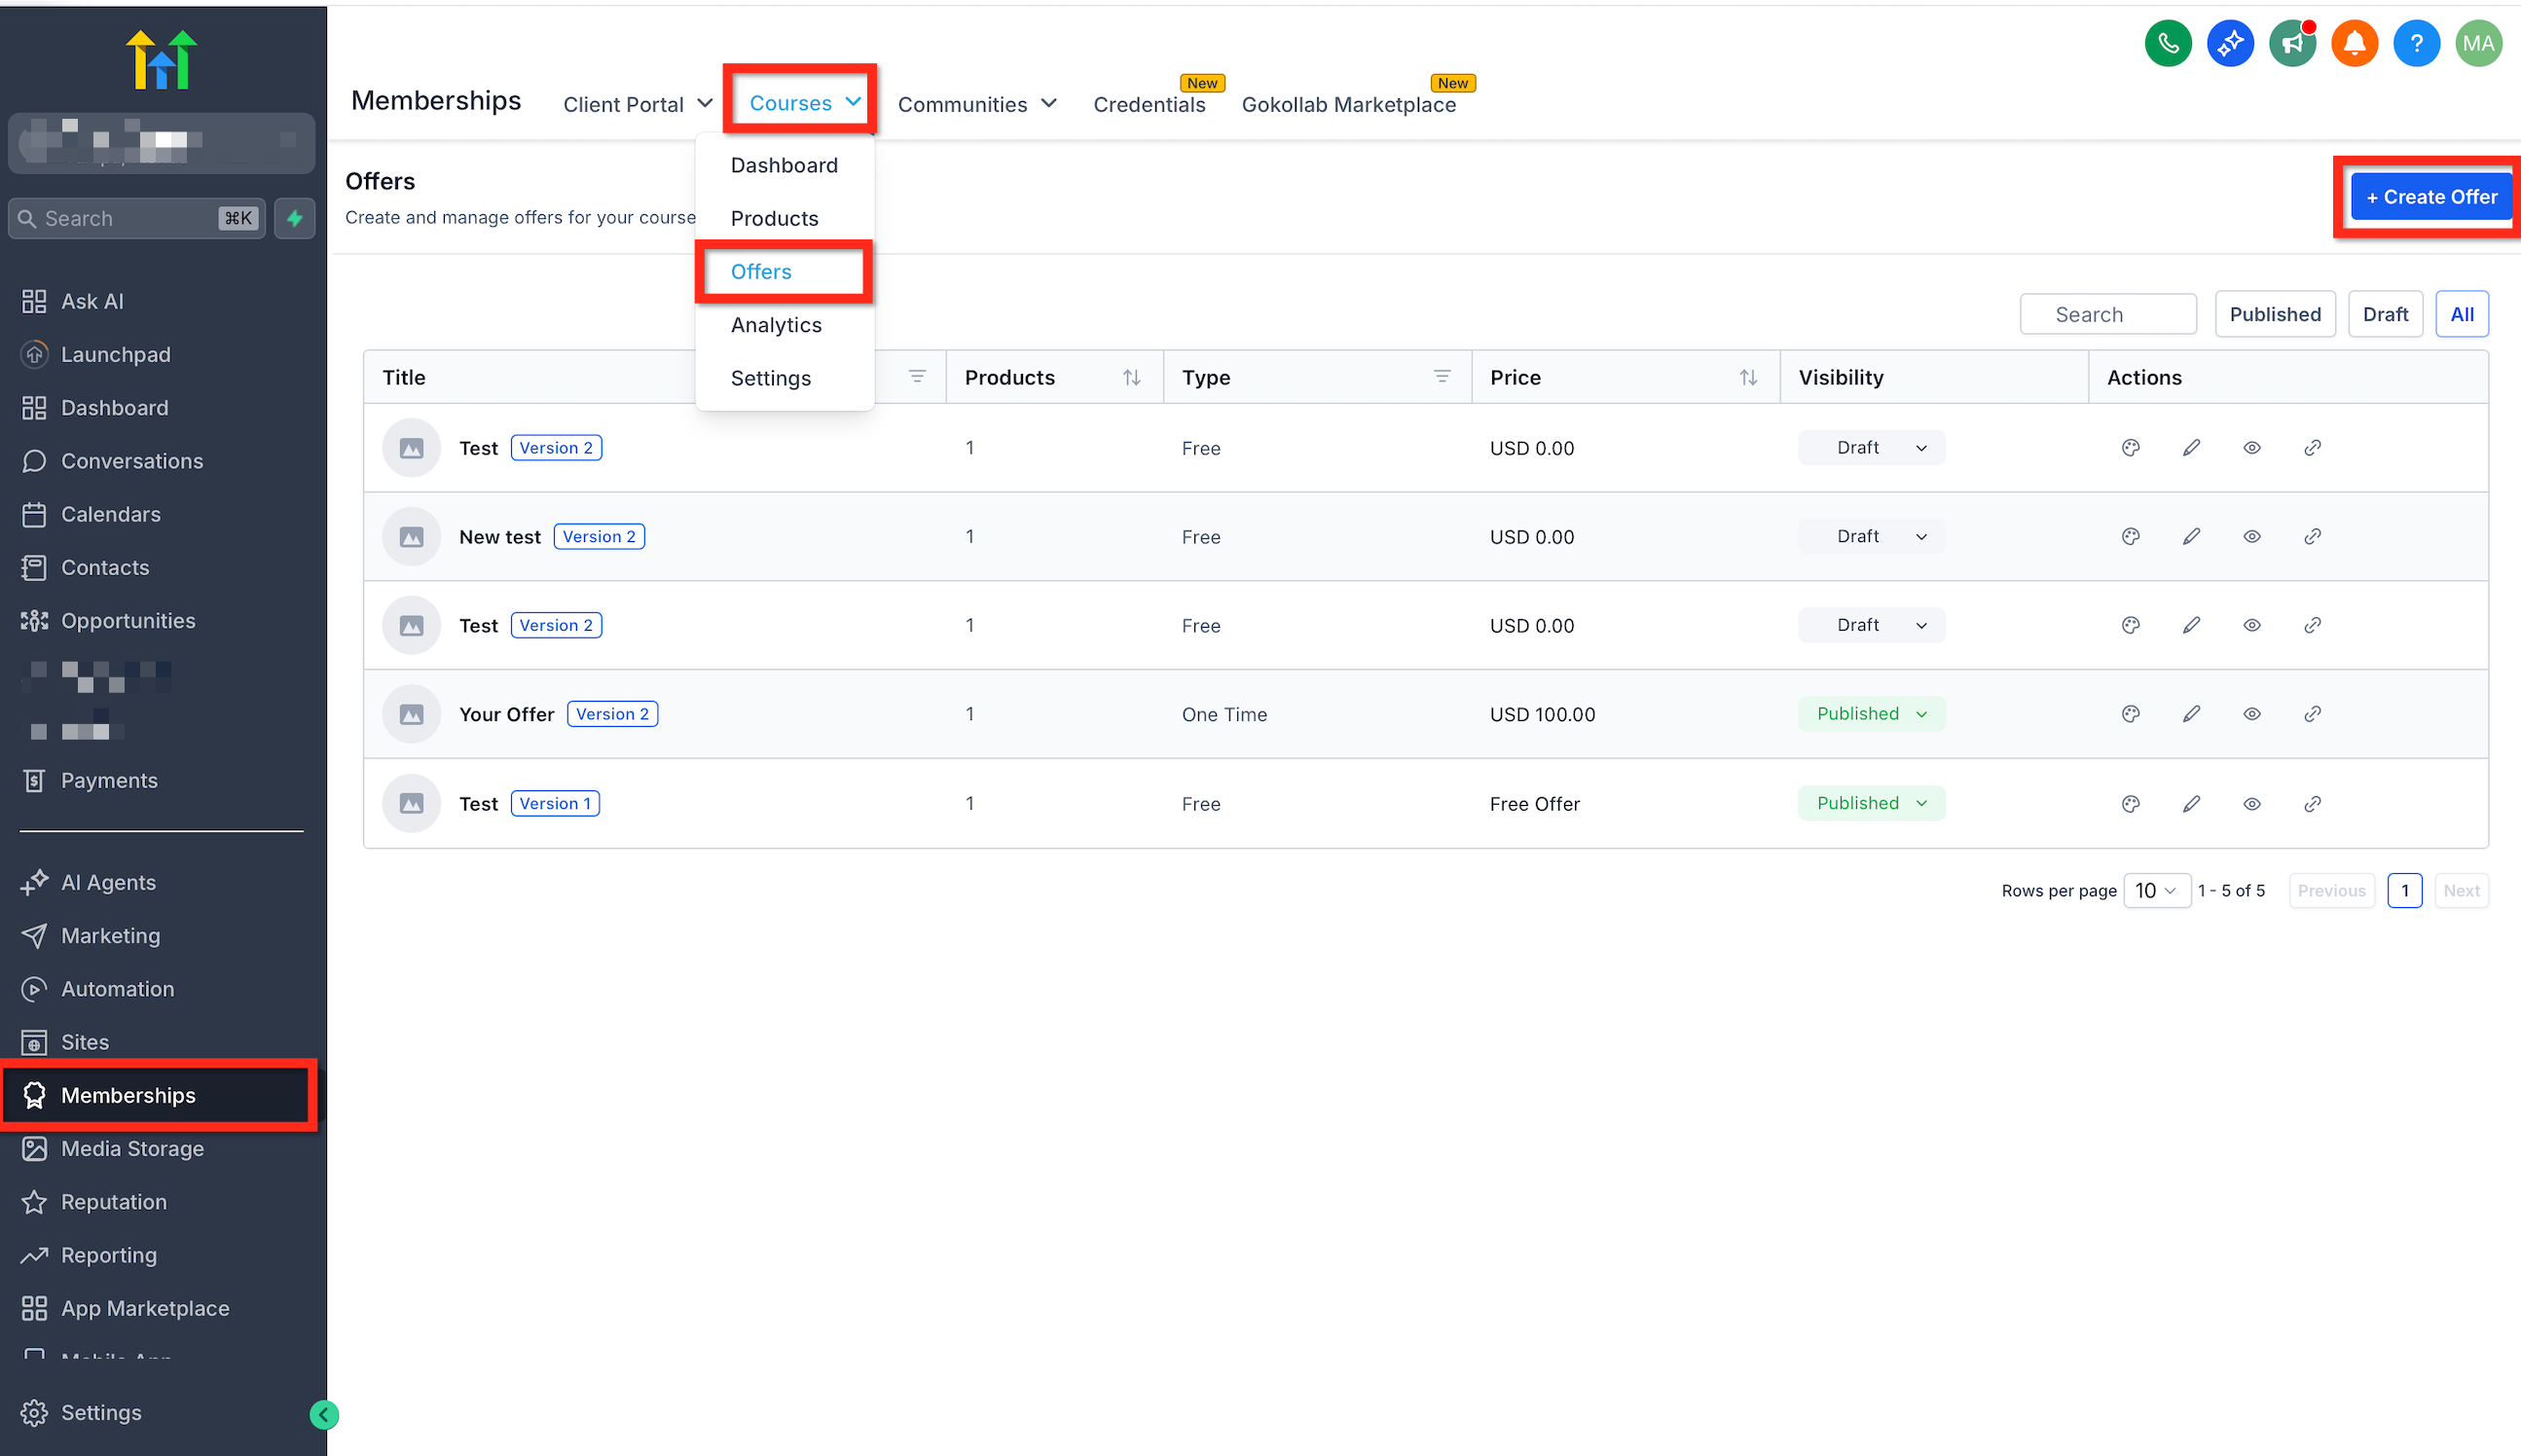
- Navigate to Memberships > Courses > Offers.
- Click Create Offer.
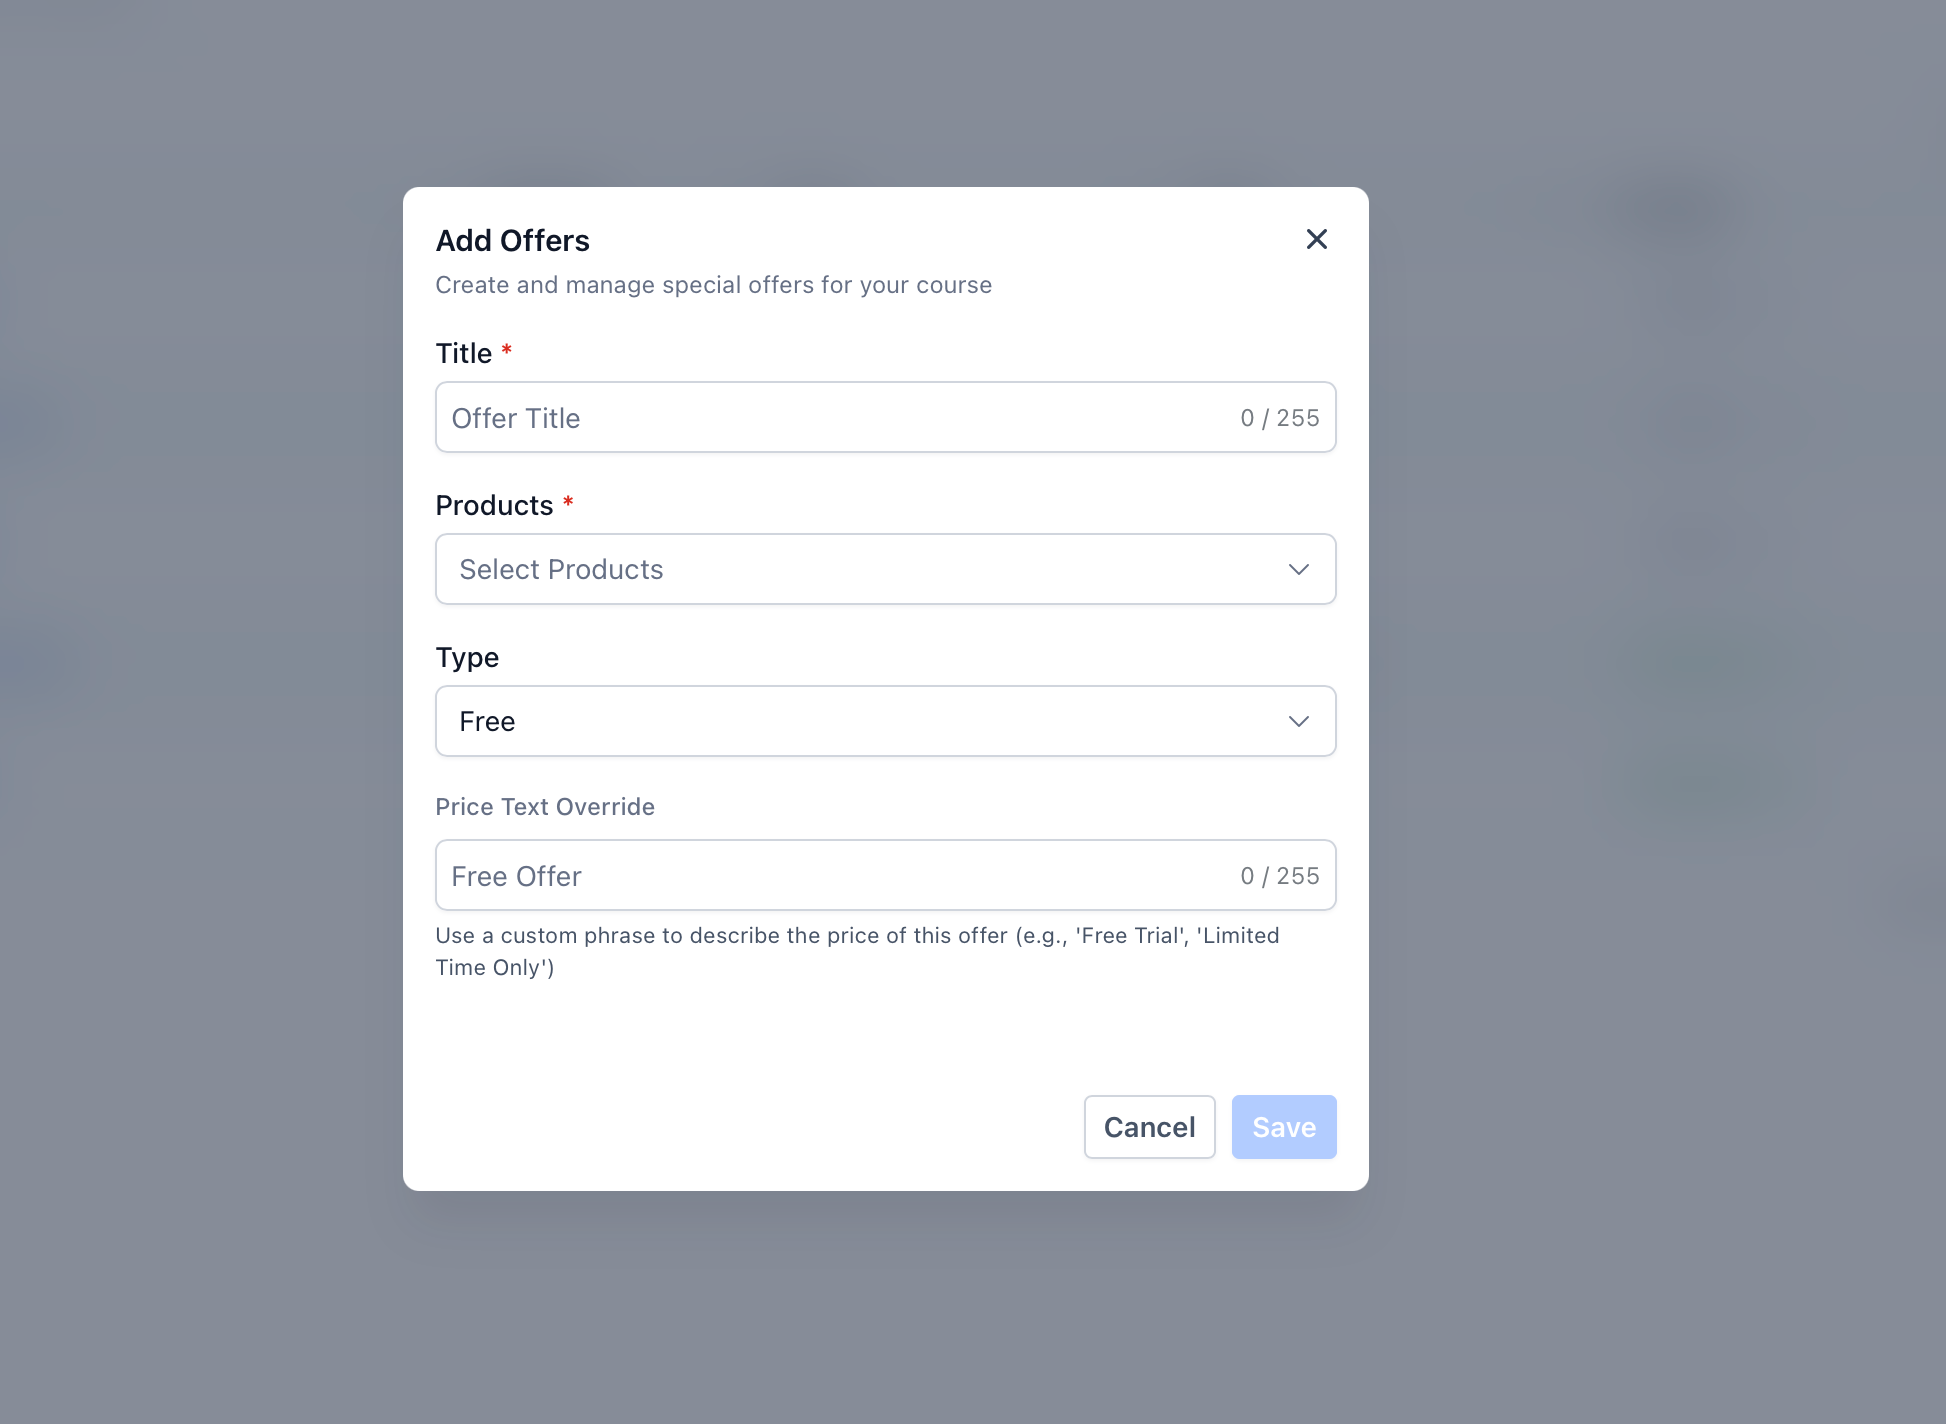
- Fill in your offer details to clearly communicate the value.
- Assign your newly created course product to the offer.
- Set your desired price.
- Click Create.
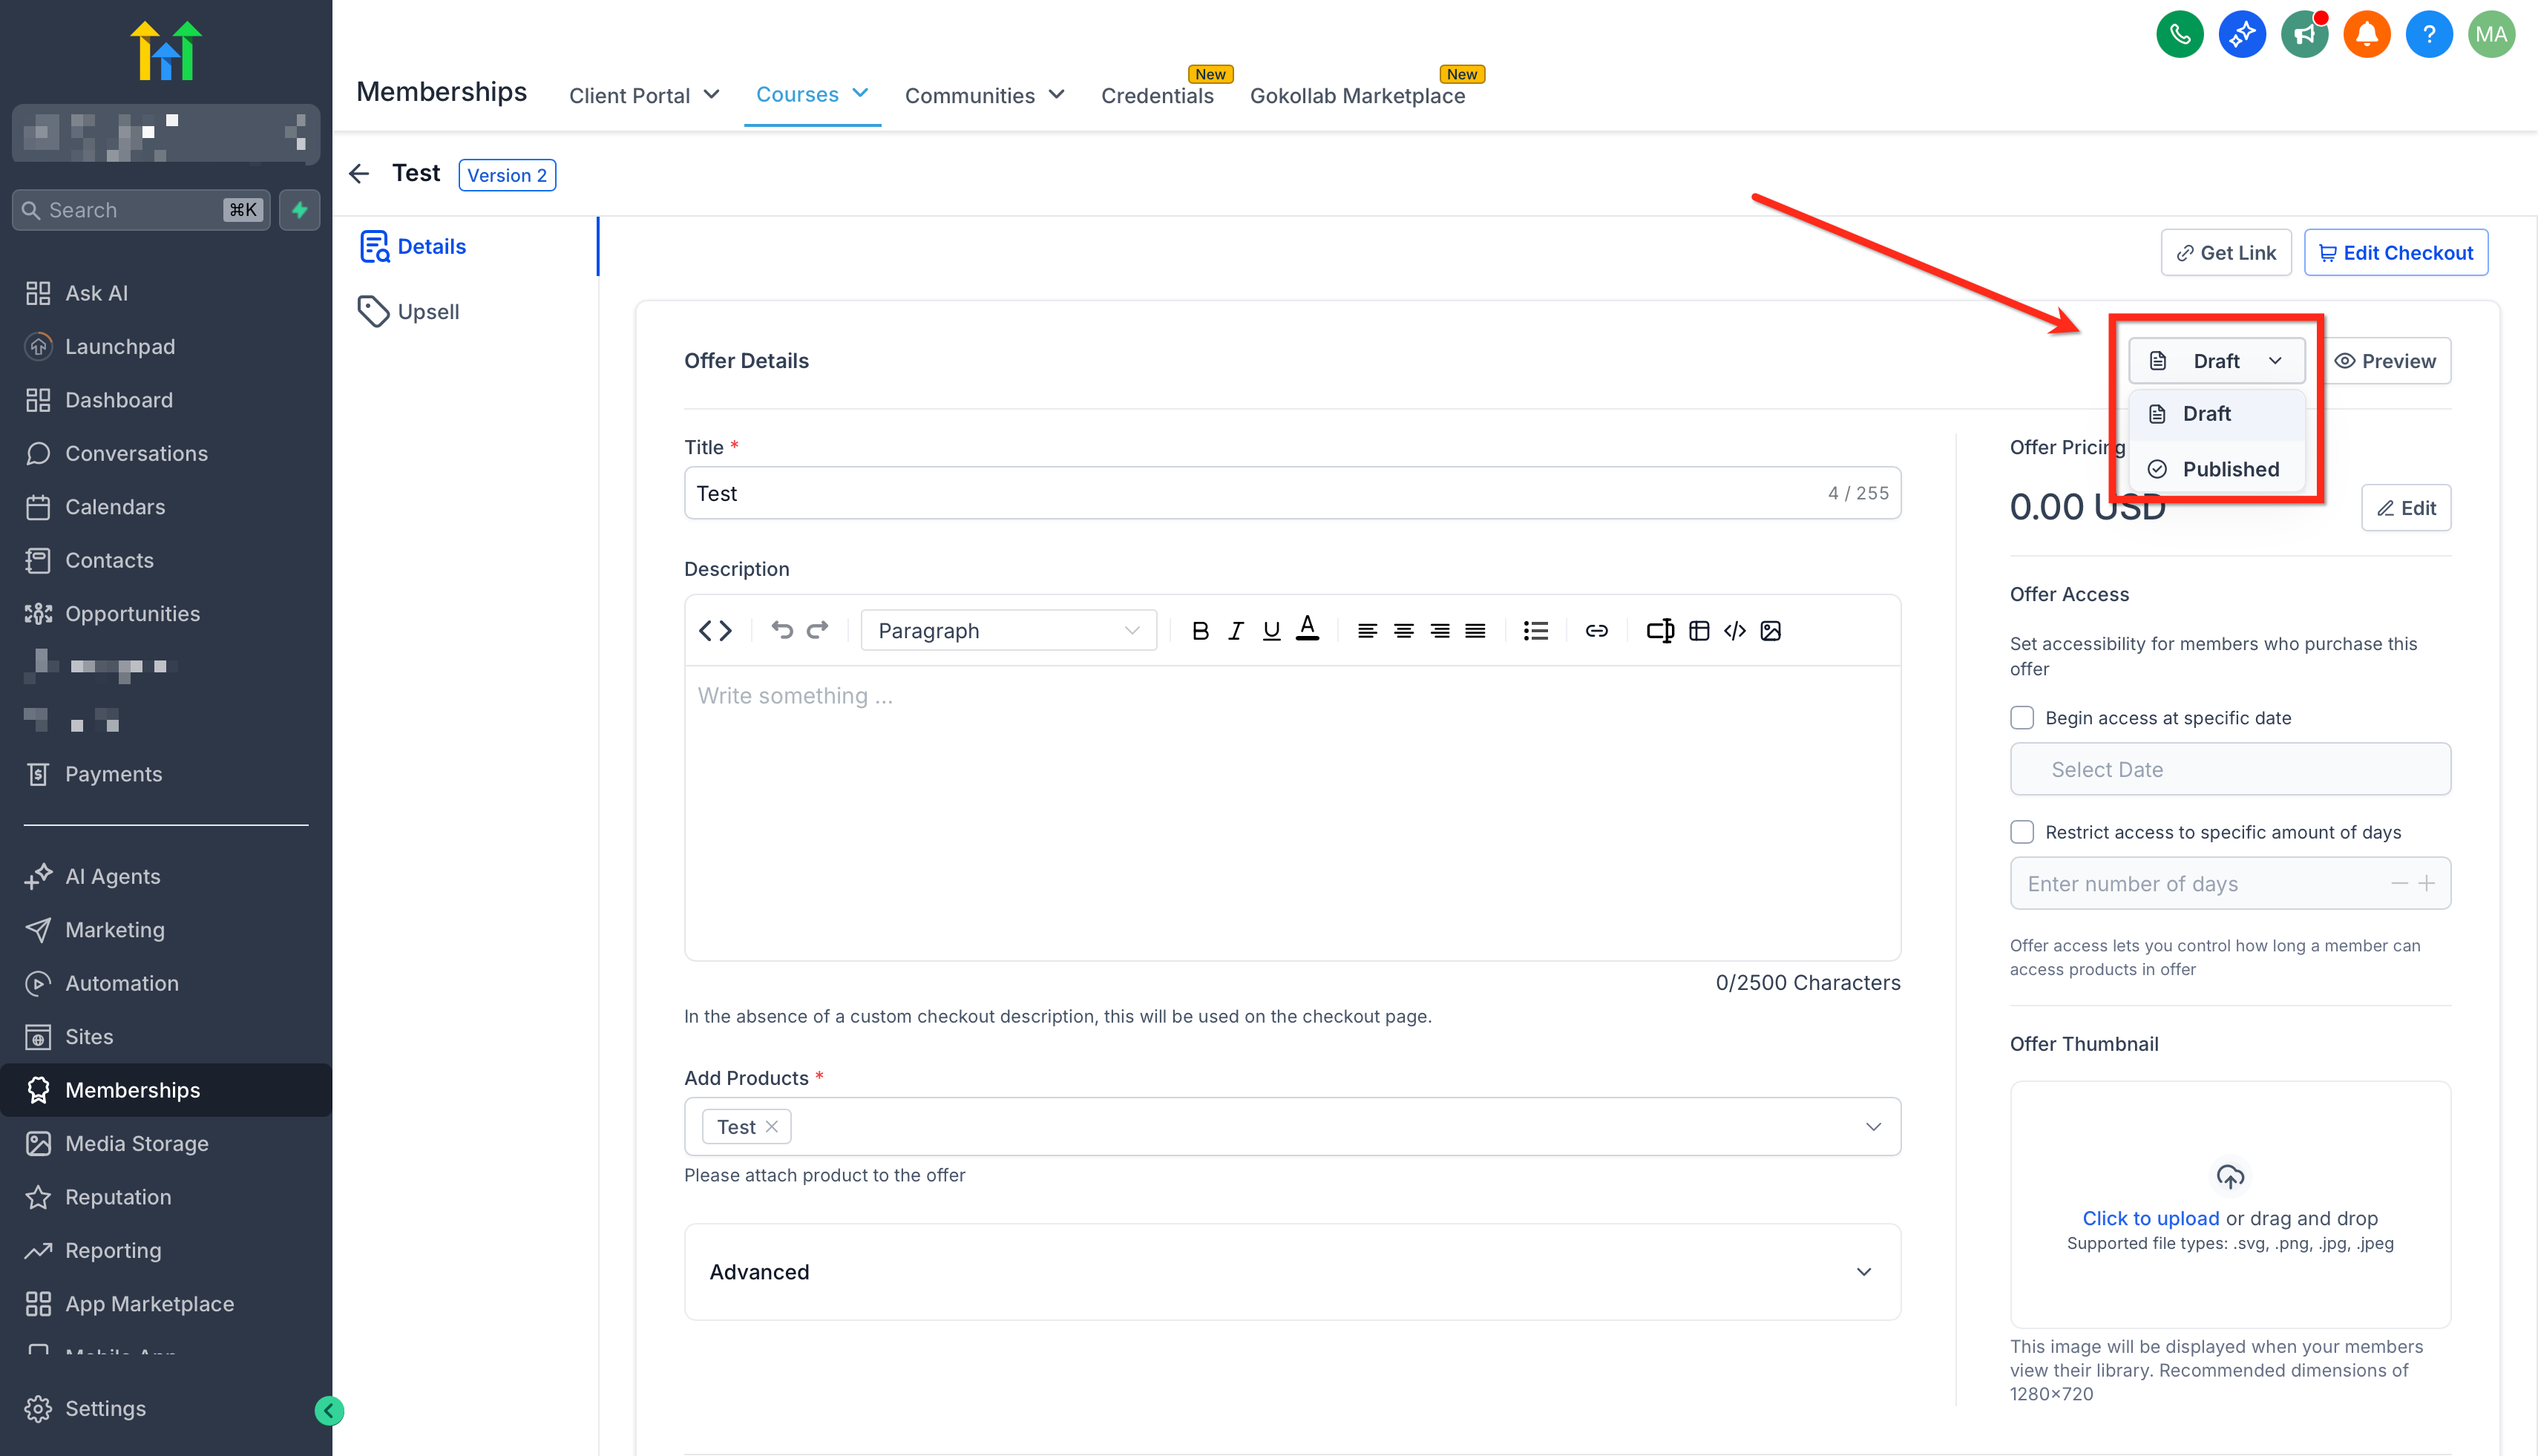
- Switch your Offer from Draft to Published and click Save.
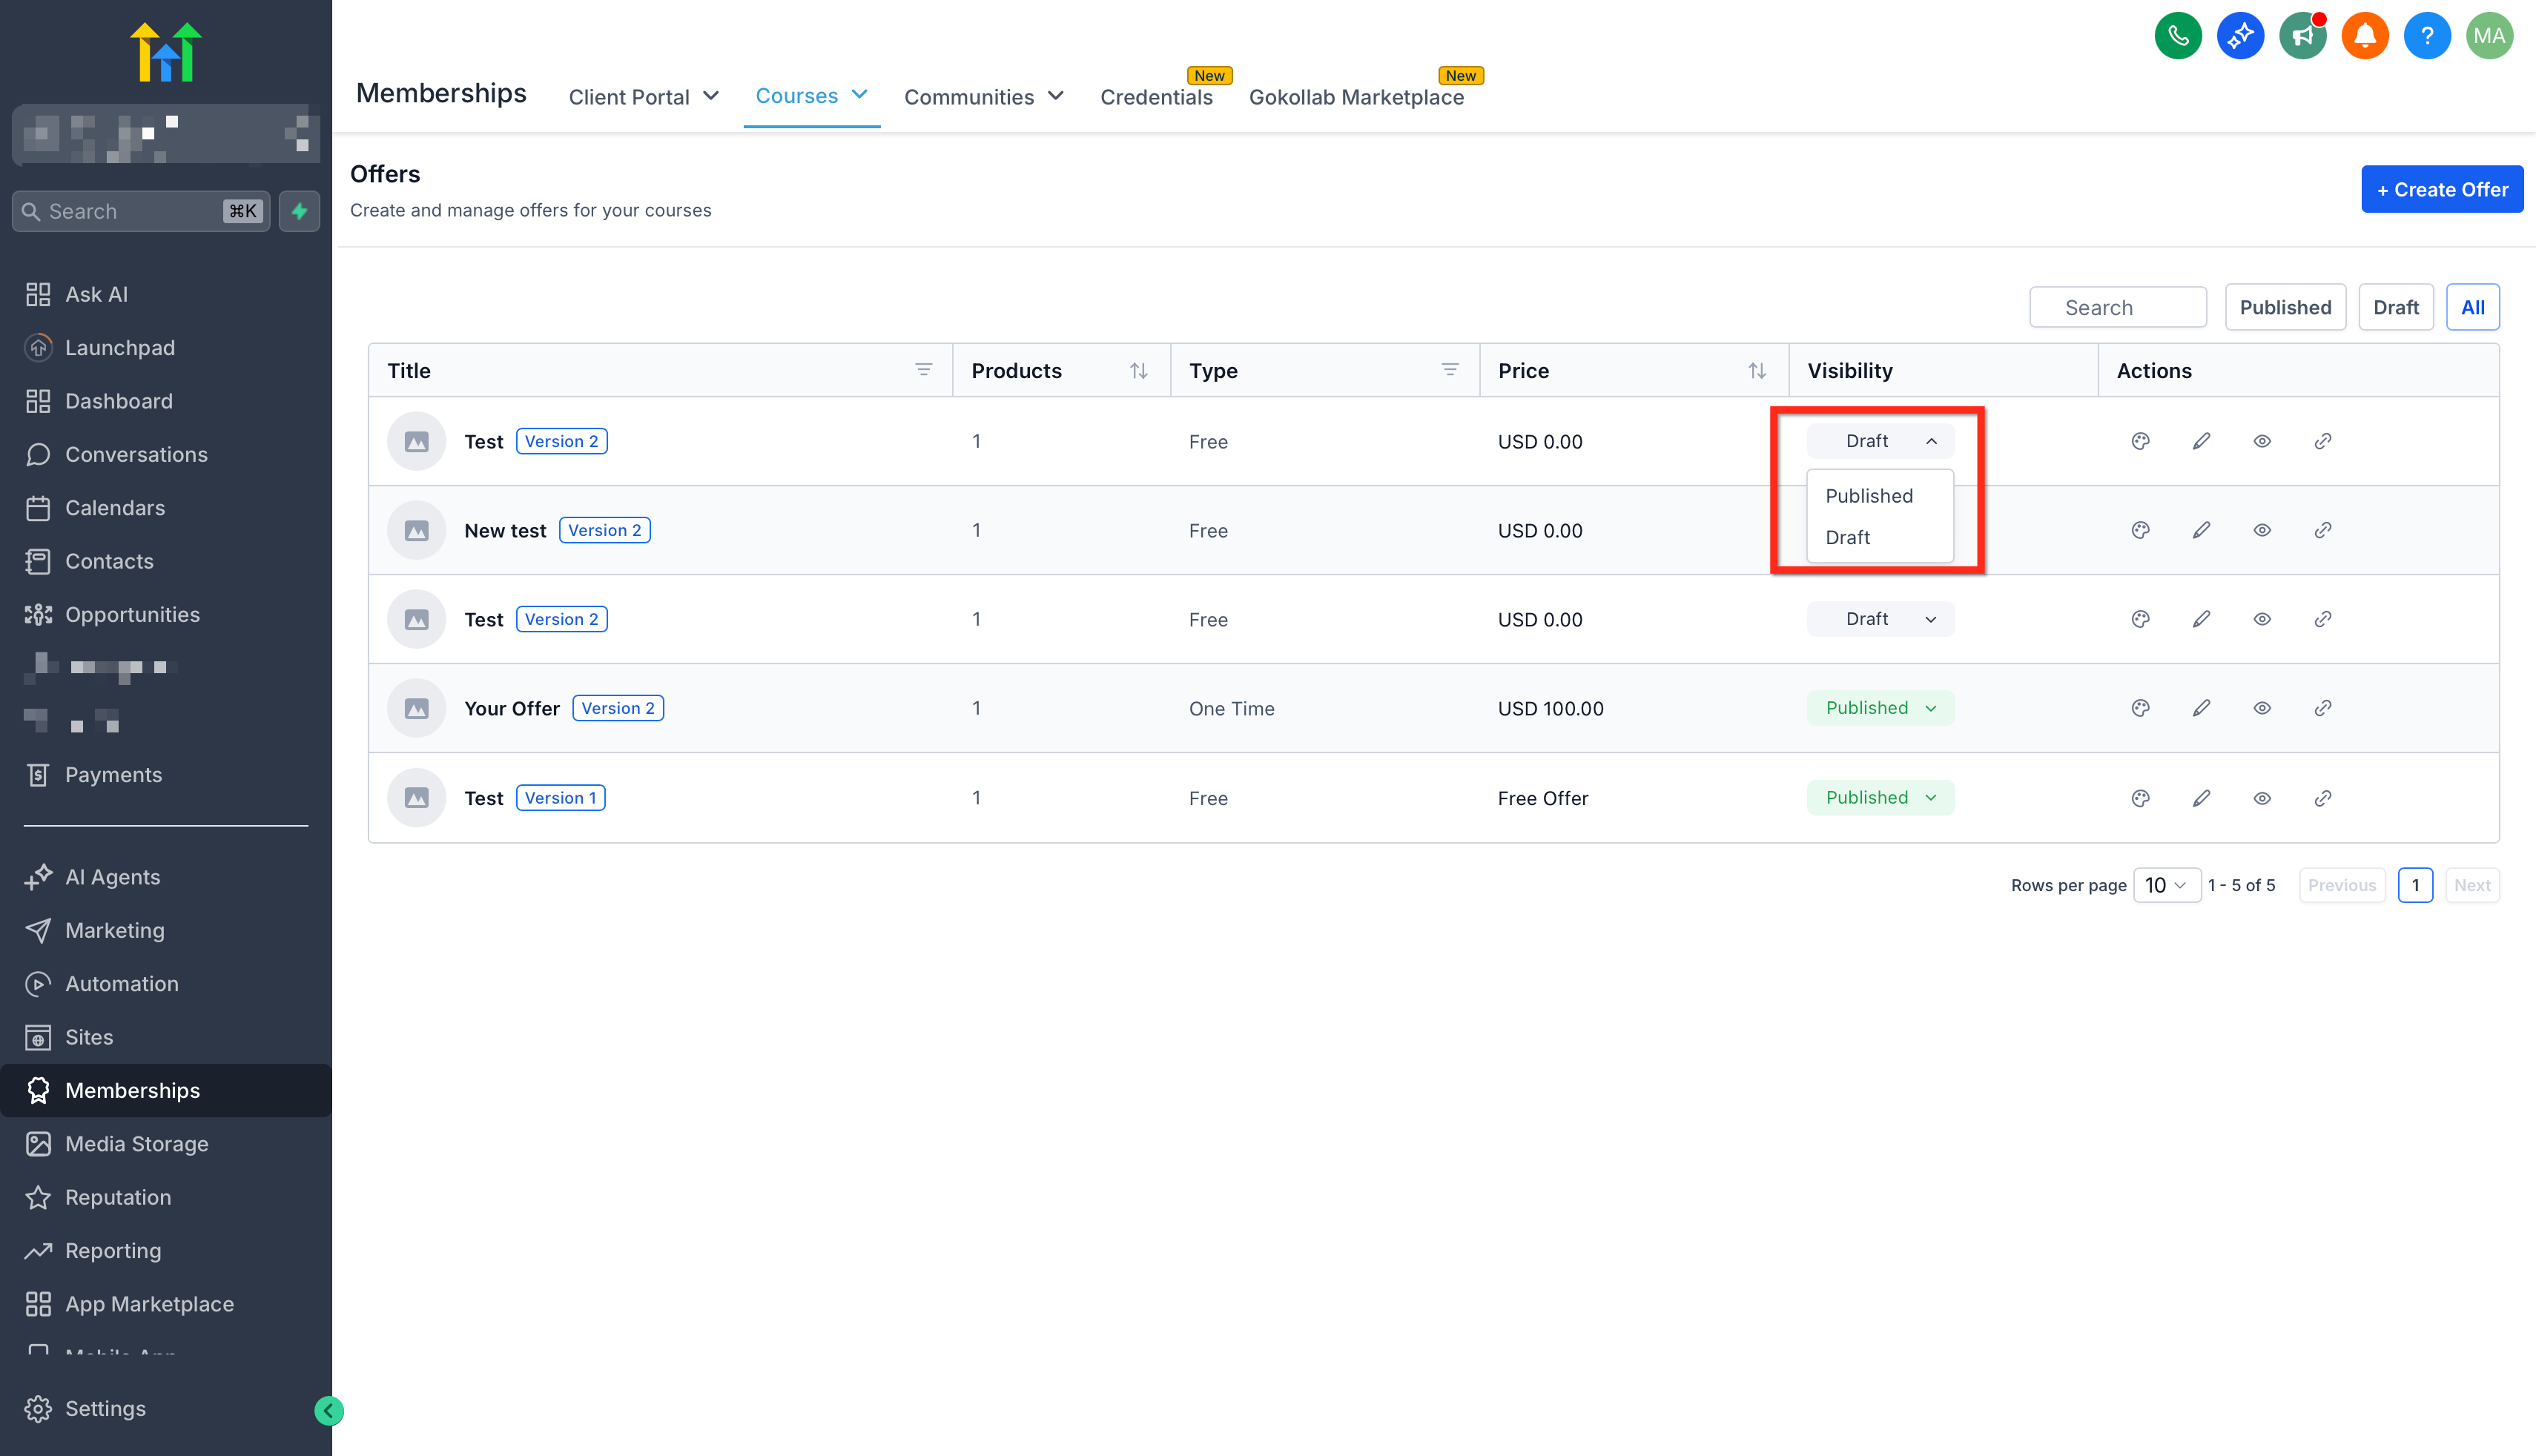
- Or switch between draft and published directly in the offers list.
Next you can: Consider bundling offers or creating discount codes to attract more learners.
Sell Offer
Congratulations, your offer is ready to share with the world! The final step is all about connecting with your audience. Let’s quickly generate and share your offer:
- Navigate back to Memberships > Courses > Offers.
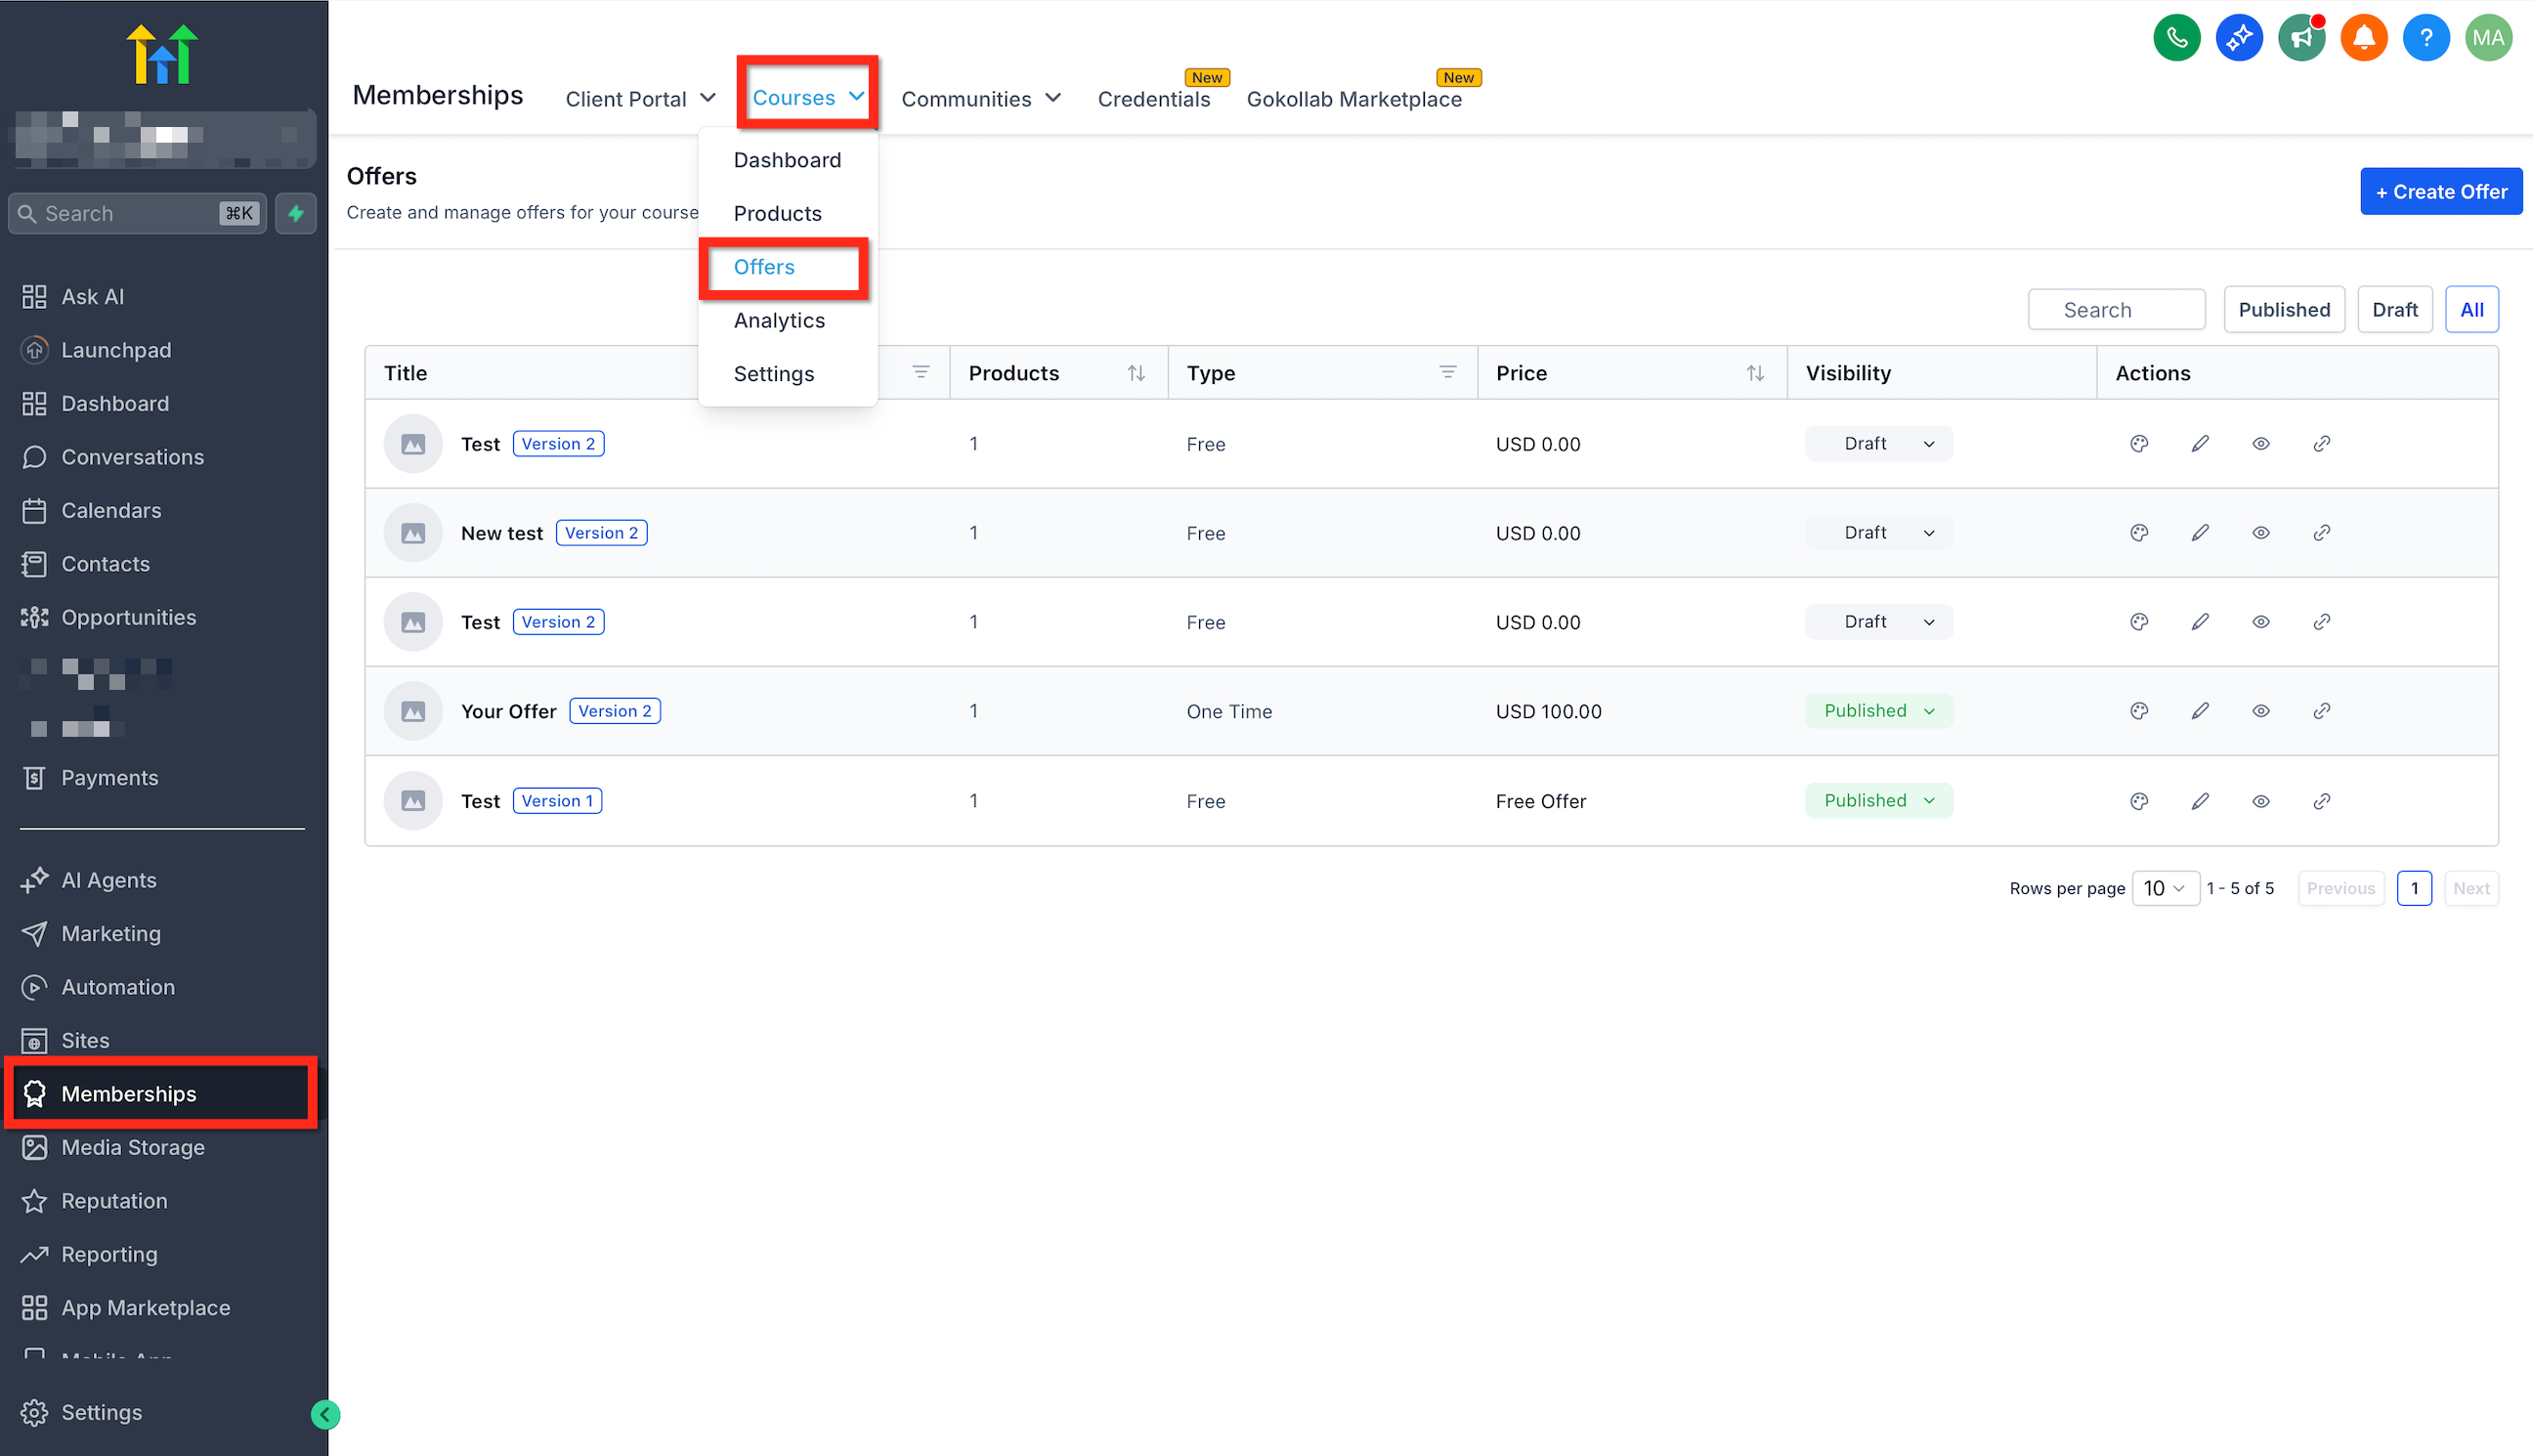
- Click the link icon to get the link for an offer.
- Click Copy.
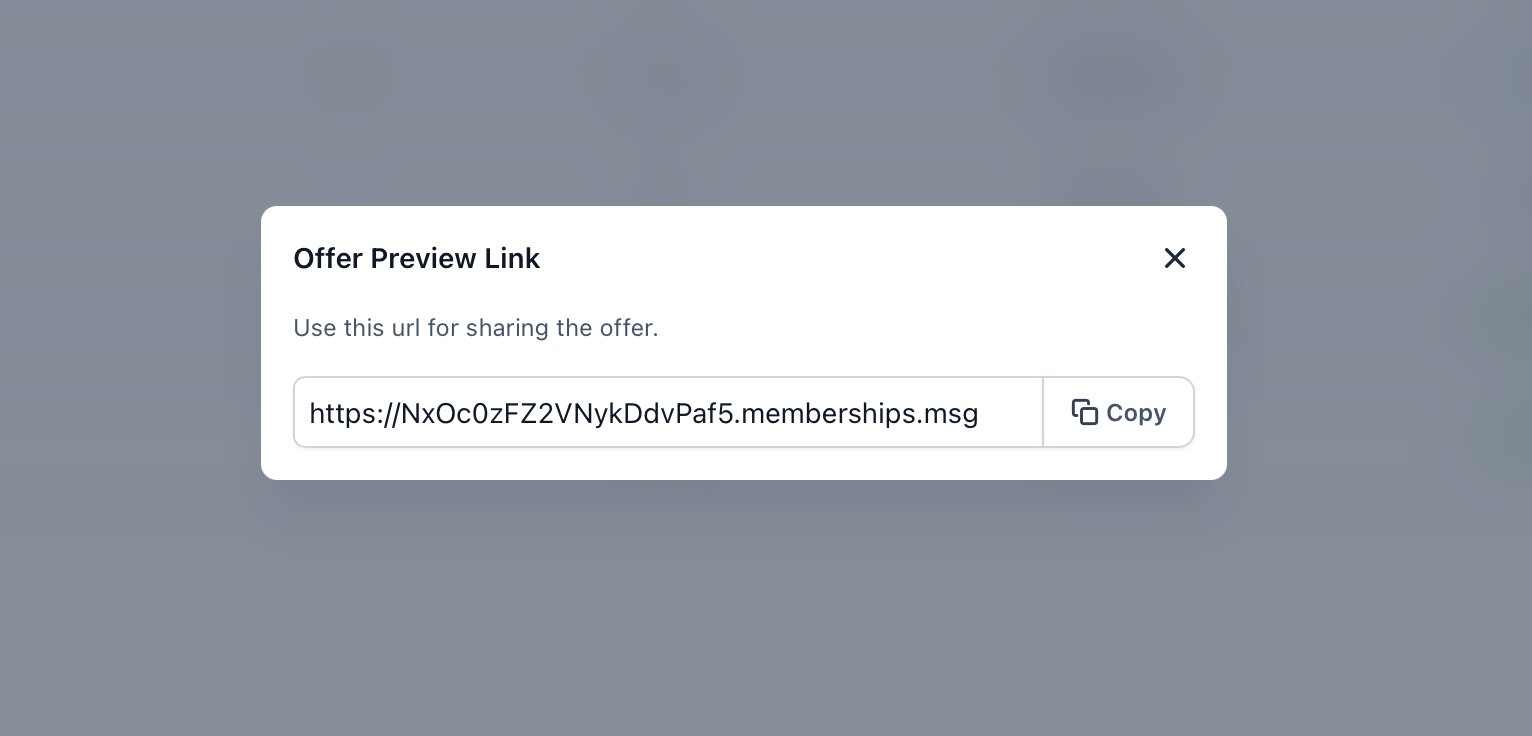
- Share it across your channels—social media, emails, or your website.
Next you can: Explore marketing strategies or launch a campaign to boost your course sales.
Publish & Share Your Offer
Once your offer has been configured:
- Review the pricing details.
- Confirm the correct course is attached.
- Publish the offer.
- Copy the offer link.
Your offer link can be shared through:
- Email campaigns
- Landing pages
- Websites
- Social media
- Direct messages
Frequently Asked Questions
Q. Why isn't my course visible?
If you can't find your course:
- Confirm the course was created successfully.
- Verify you're working in the correct sub-account.
- Refresh the Courses page to ensure you're viewing the latest changes.
Q. Why isn't my offer available?
If your offer isn't appearing:
- Verify the offer has been published.
- Confirm the correct course is attached to the offer.
- Review your offer configuration to ensure it has been saved successfully.
Q. Why can't customers purchase my course?
If learners can't complete a purchase:
- Verify that a supported payment provider is connected to your account.
- Review your offer pricing and payment configuration.
- Confirm the offer is published and available for purchase.
Q. Why can't a learner access my course?
If a learner has purchased or enrolled but can't access the course:
- Confirm the learner successfully completed enrollment.
- Verify the correct course is associated with the offer.
- If you're granting access through workflows, review the workflow configuration to ensure it is active and functioning as expected.
Q. Why aren't my videos or files loading?
If course media isn't loading correctly:
- Refresh the page and confirm the upload completed successfully.
- Verify that the lesson contains the correct media file.
- If the issue persists, try uploading the file again and ensure it is supported by the Course Editor.
Related Articles
Was this article helpful?
That’s Great!
Thank you for your feedback
Sorry! We couldn't be helpful
Thank you for your feedback
Feedback sent
We appreciate your effort and will try to fix the article