HighLevel's enhanced Date, Time, and Date & Time fields give you greater flexibility when collecting date and time information through Forms, Surveys, and Quizzes. Choose whether respondents provide a date, a time, or both, and configure formatting, default values, and allowed ranges to match your requirements. These controls help reduce invalid entries and improve the consistency of submitted information. The fields can also be used in existing Forms, Surveys, and Quizzes without rebuilding them.
TABLE OF CONTENTS
- What is the Date & Time Field in HighLevel?
- Key Benefits of Date, Time, and Date & Time Fields
- Date & Time Field
- General Field Settings
- How to Set Up Date, Time, and Date & Time Fields
- Frequently Asked Questions
- Related Articles
What is the Date & Time Field in HighLevel?
The Date & Time field is a customizable input element that allows you to collect date-only, time-only, or combined date and time information. Each collection type offers settings that help control how respondents enter information, including display formats, allowed ranges, and default values. Selecting the appropriate type ensures you collect only the information your business needs.
Three collection types are available:
- Date: Collect a calendar date without requiring a time. Ideal for birthdays, renewal dates, event dates, and deadlines.
- Time: Collect a specific time without requiring a date. Ideal for preferred contact times, business hours, and availability.
- Date & Time: Collect a calendar date and a specific time together. Ideal for event preferences, scheduled follow-ups, and other date-and-time-specific information.
The enhanced Date field and the new Time and Date & Time field types are supported in both new and existing Forms, Surveys, and Quizzes.
Key Benefits of Date, Time, and Date & Time Fields
These fields provide greater control over how date and time information is collected, helping you standardize responses and minimize manual corrections. By configuring the appropriate input type and restrictions, you can create a more intuitive experience for respondents while improving data accuracy.
- Flexible Data Collection: Collect a date, time, or both, depending on the information you need.
- Improved Input Validation: Restrict selectable dates and times to prevent responses outside the intended ranges.
- Customizable Date Formats: Choose date formats and separators that match your preferred presentation.
- Flexible Time Formats: Display time using either 24-hour or AM/PM formatting.
Date & Time Field
The Date & Time field combines date and time collection into a single input element. It is useful when respondents must provide both values for the same event or activity, such as a preferred follow-up date and time. Combining these inputs allows you to manage date and time restrictions together while keeping data collection straightforward.
The following settings are available:
| Setting | Description |
|---|---|
| Date Format | Choose how the date is displayed: MM.DD.YYYY, YYYY.MM.DD, or DD.MM.YYYY. |
| Date Separator | Select a hyphen (-), forward slash (/), or period (.) to separate date components. |
| Time Format | Choose between 24-hour and AM/PM time formats. |
| Default Time | Select None, Current, or Custom to control the default time value. |
| Allowed Date Range | Allow any date, future dates only, past dates only, or dates within a specific range. |
| Available Days | Specify which days of the week respondents can select. |
| Allowed Time Range | Define the permitted time range for respondents to select. |
| Picker Settings | Configure the available calendar and time picker options, including disabling picker popups for manual entry. |
For example, a service inquiry form can use a Date & Time field to collect a customer's preferred follow-up date and time while restricting selections to the business's available days and hours.
General Field Settings
General settings determine how Date, Time, and Date & Time fields appear and behave within Forms, Surveys, and Quizzes. Configuring clear labels, placeholders, and field properties helps respondents understand what information to provide and ensures the field meets your data collection requirements.
After adding a Date & Time element to the builder, select it to access the General tab in the right sidebar.
| Setting | Description |
|---|---|
| Field Type | Choose whether the field collects Date, Time, or Date & Time information. |
| Label | Enter the name displayed above the field to identify the information being collected. |
| Label Alignment | Adjust the label's position or retain the form's default alignment. |
| Placeholder | Enter guidance text that appears inside the input before a value is entered. |
| Short Label | Add an optional short label to provide additional context. |
| Query Key | View the field's unique query key used to identify the field. |
| Field Width | Adjust the field's width as a percentage of the available form space. |
| Required | Make the field mandatory before respondents can submit the form. |
| Hidden | Hide the field from respondents when appropriate. |
| Advanced Settings | Access additional field properties, including applicable custom-field settings. |
Important: The selected Date, Time, or Date & Time collection type cannot be changed after the custom field has been saved. Ensure the correct type is selected before saving.
How to Set Up Date, Time, and Date & Time Fields
Adding and configuring the Date & Time element ensures respondents can enter information in the required format and within the permitted ranges. The field can be added directly to new or existing Forms, Surveys, and Quizzes, with customization options available in the right sidebar.
- Navigate to Sites in your HighLevel sub-account and select Forms, Surveys, or Quizzes.
- Create a new Form, Survey, or Quiz, or open an existing one in the builder.
- In the left sidebar, select Quick Add and locate Date & time under Other Elements.
- Drag and drop the Date & time element into the desired position on the canvas.
- Select the added field and open the General tab in the right sidebar.
- Under Select what this field should collect, choose Date, Time, or Date & time, depending on the information you want respondents to provide.
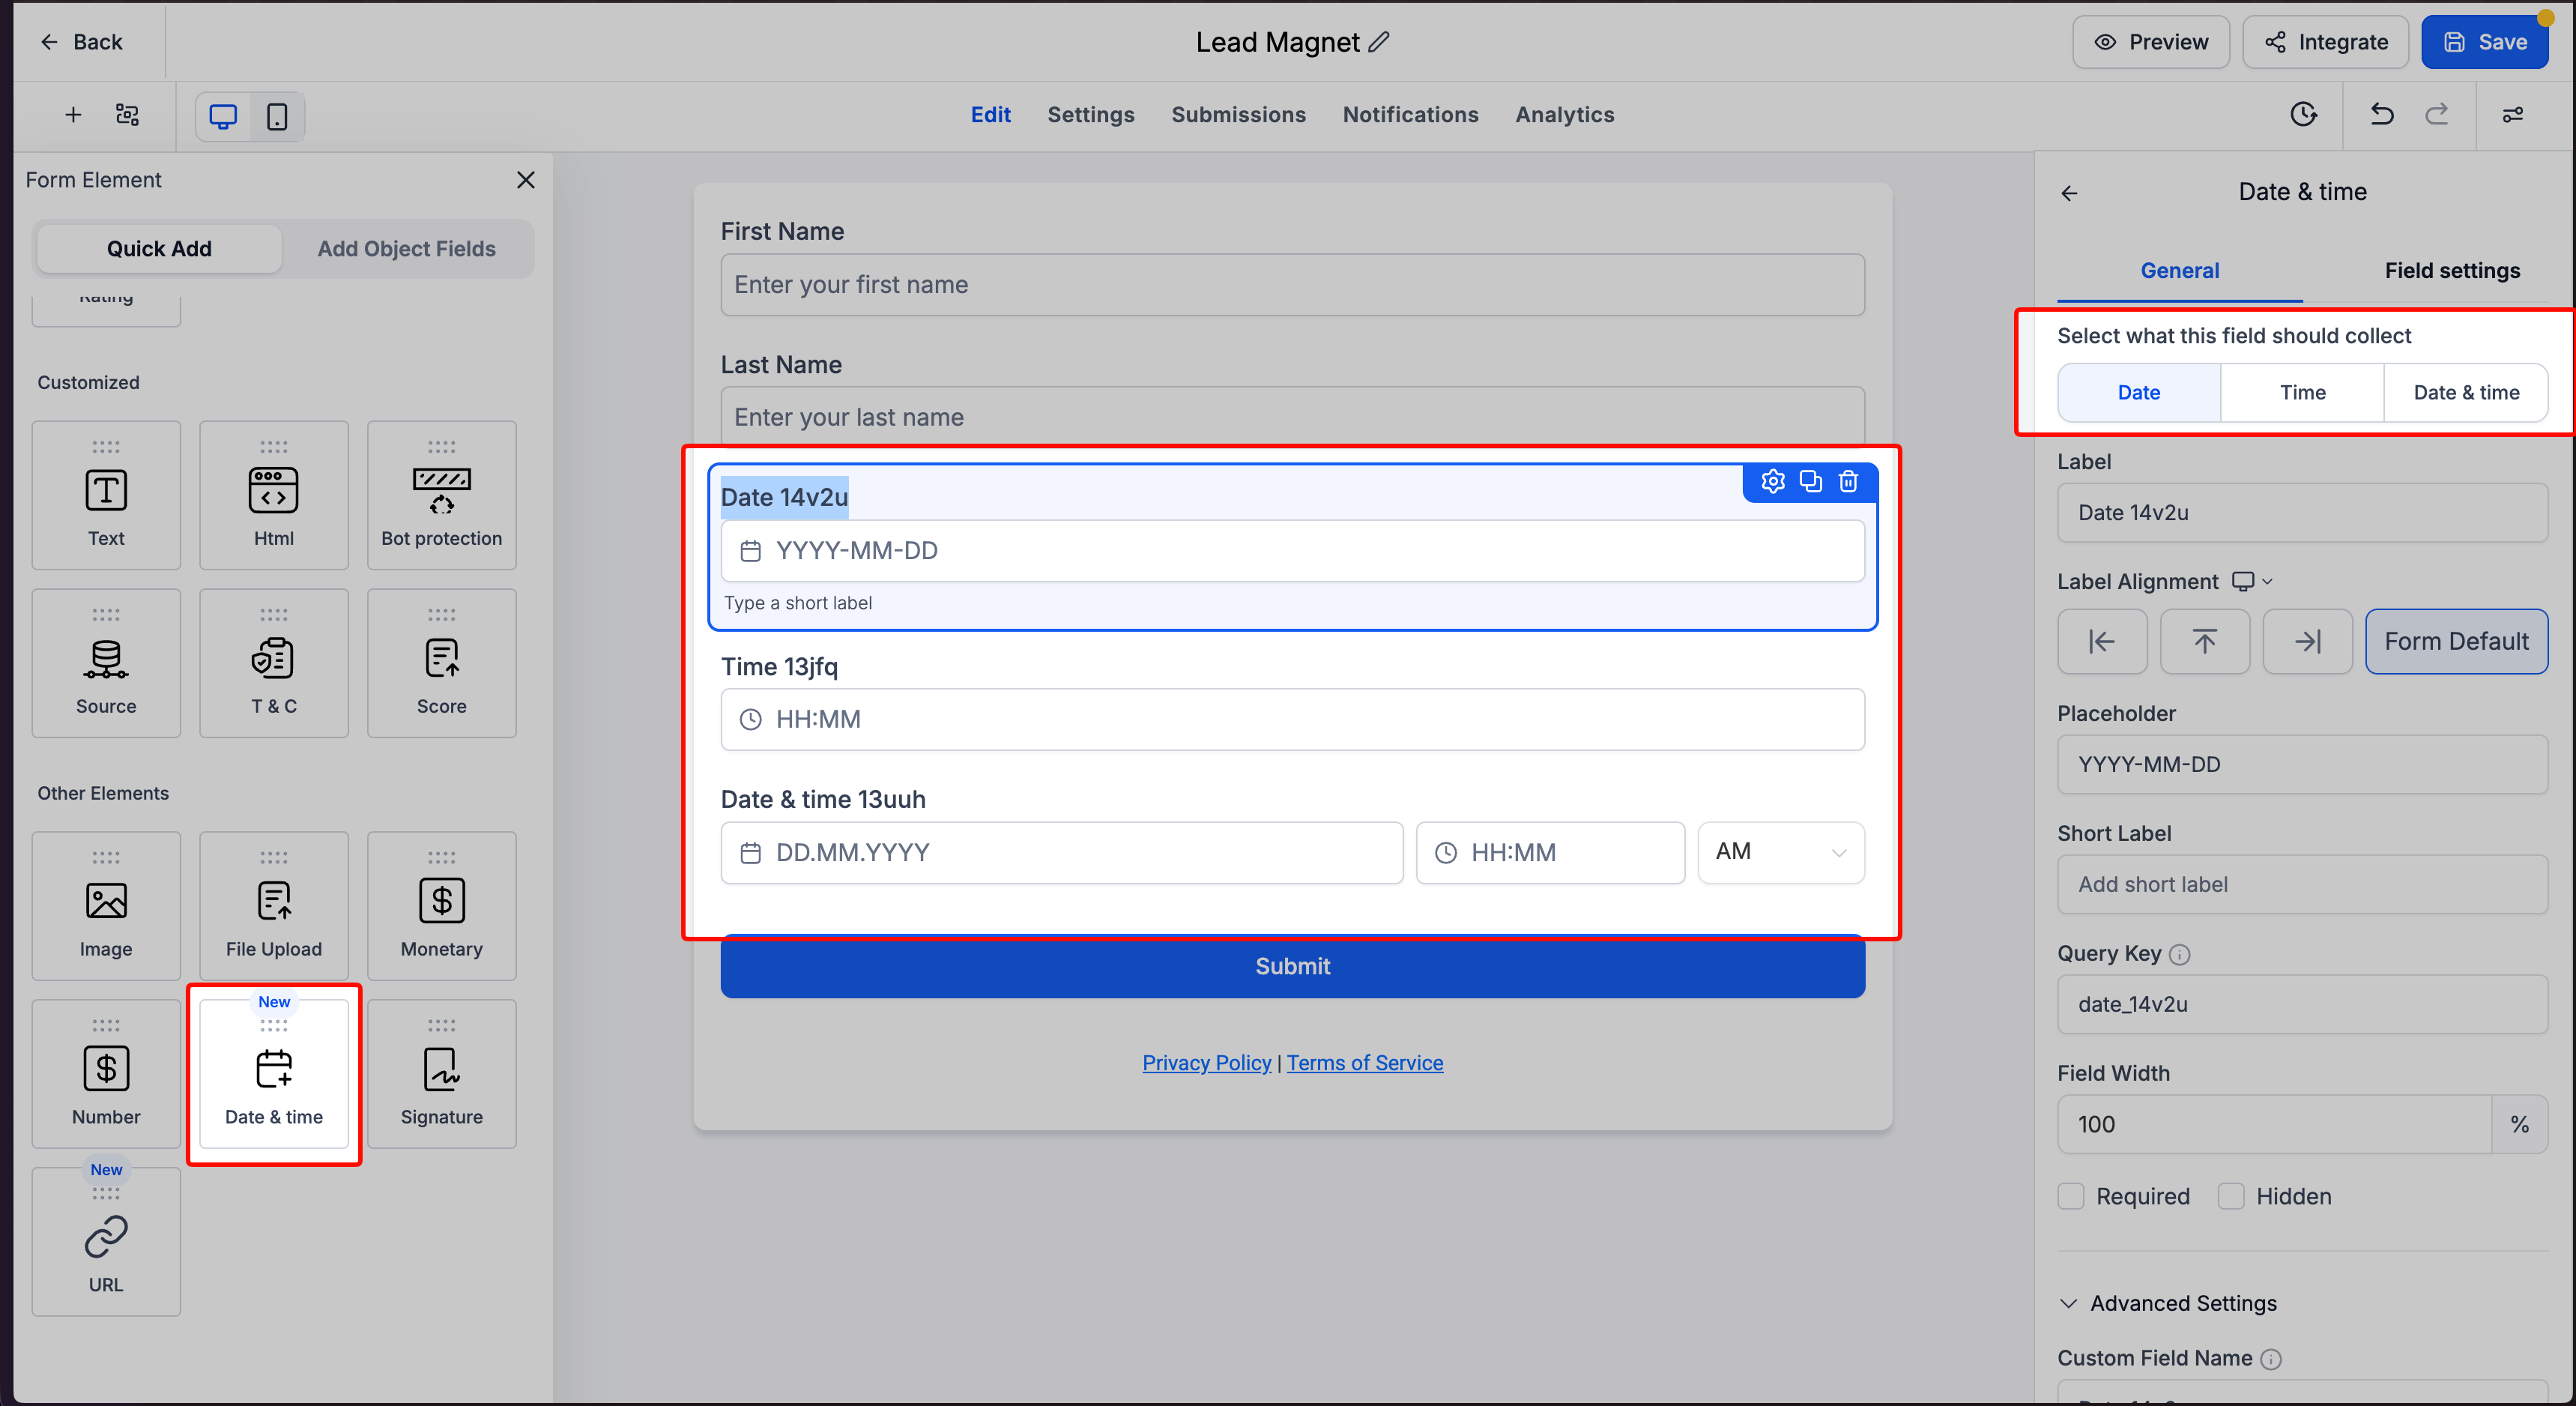
- Configure the Label, Placeholder, Field Width, and other applicable properties. Enable Required if respondents must complete the field.
- Open the Field settings tab and configure the available date and time options, including formats, separators, default values, allowed ranges, available days, and picker behavior, as applicable to the selected field type.
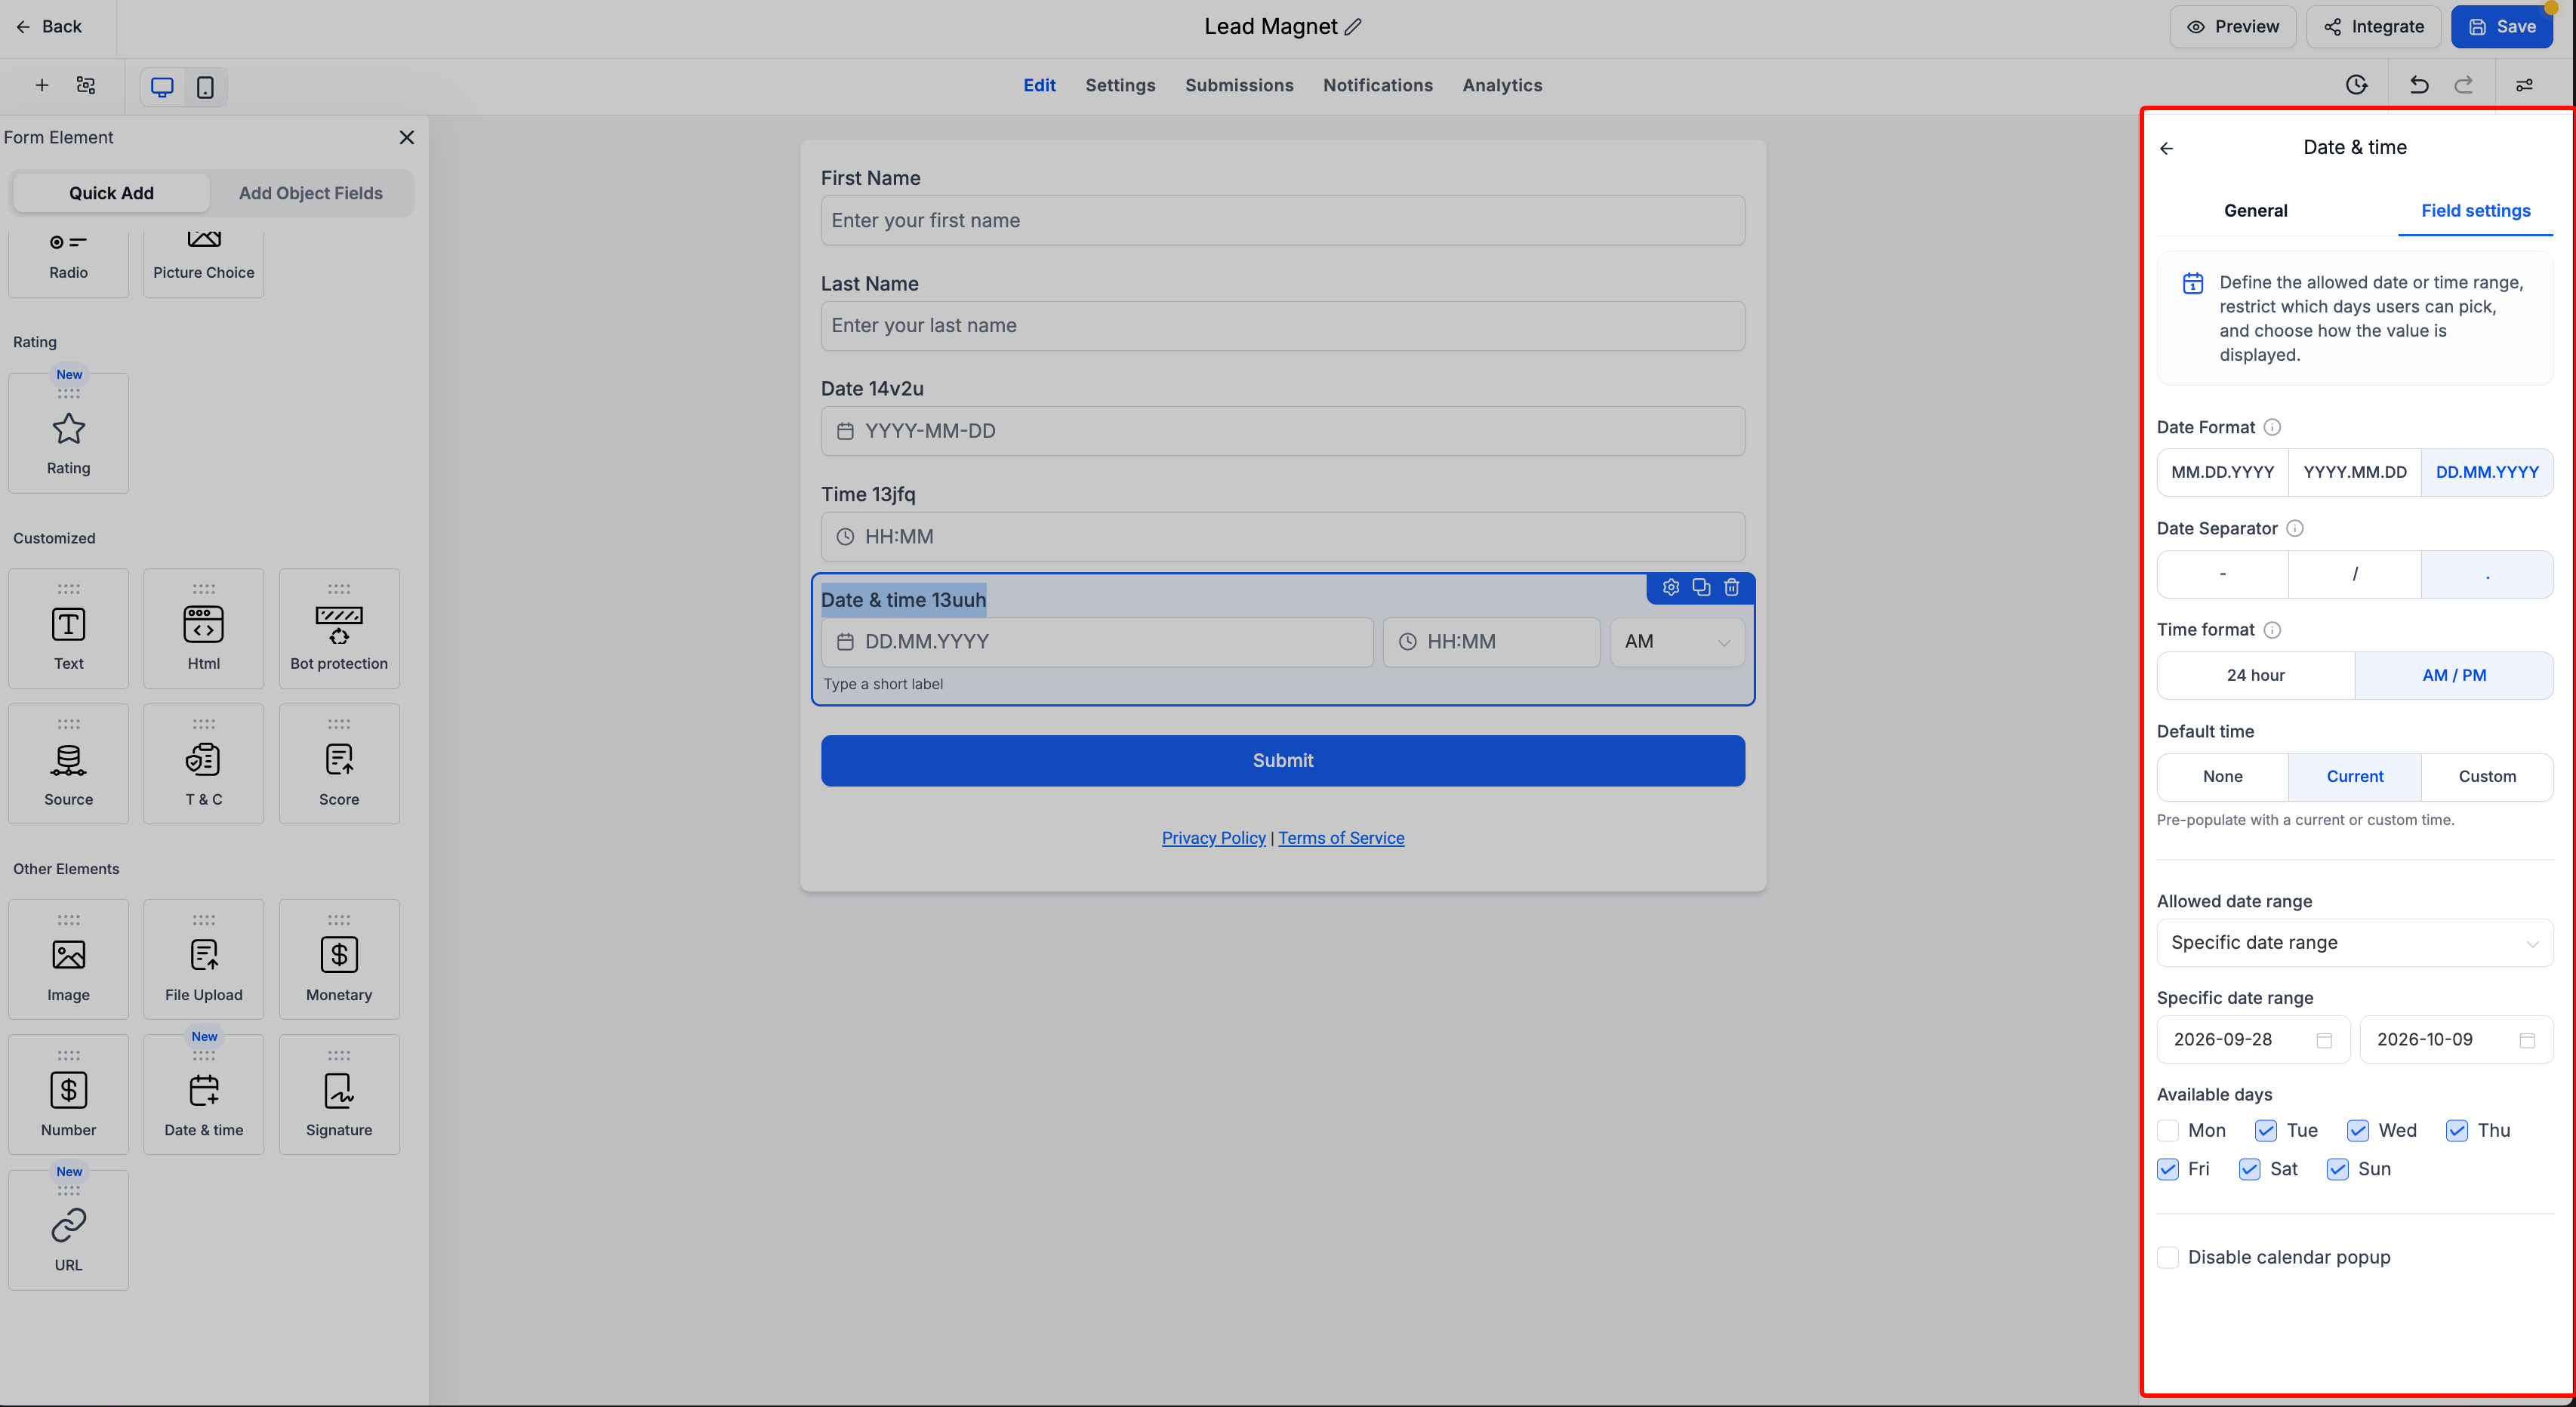
- Review the configuration and click Save in the upper-right corner of the builder. Remember that the selected field type cannot be changed after the custom field is saved.
Frequently Asked Questions
Q: Does adding a Date & Time field automatically schedule an appointment in a HighLevel calendar?
No. The Date & Time field collects a respondent's date and time preferences but does not automatically book an appointment. Appointment scheduling requires the appropriate calendar functionality.
Q: Can I change a Date field to a Time or Date & Time field after saving it?
No. The selected collection type cannot be changed after the custom field has been saved. You must create a new custom field if you need a different collection type.
Q: Can I reuse an existing Date, Time, or Date & Time custom field?
Yes. If the custom field is available for the selected object and builder, you can add it from Add Object Fields without creating a duplicate.
Q: Does restricting selectable dates also control when a Form, Survey, or Quiz accepts submissions?
No. Date restrictions only control which dates respondents can enter into the field. Submission availability is managed separately through the applicable scheduling settings.
Q: Can I collect multiple preferred dates or times from one respondent?
Yes. Add multiple Date, Time, or Date & Time fields with distinct labels, such as First Preference and Second Preference, to collect separate responses.
Related Articles
- Expanded Custom Field Types and Configuration Options
- How to Quickly Add and Edit Custom Fields in Forms and Surveys
- Creating and Managing Custom Fields for Better Data Organization
- How to Create and Manage a Contact Form in HighLevel
- Quiz Builder Guide
- Timezone in Forms and Surveys
Was this article helpful?
That’s Great!
Thank you for your feedback
Sorry! We couldn't be helpful
Thank you for your feedback
Feedback sent
We appreciate your effort and will try to fix the article