Communities
How to Use Voice Notes in Community Posts and Comments
Record voice notes or upload audio files directly in Community posts and comments for a faster and more expressive way to communicate with members.
What You'll Learn
HighLevel Community members can record and send voice notes directly from post and comment composers. Members can also upload existing audio files alongside other post attachments.
This article explains how to record a voice note, upload an audio file, use playback controls, understand the difference between recorded and uploaded audio, and add voice notes to Community comments.
1
What Are Voice Notes in Communities?
Voice Notes give Community members a quick way to communicate without typing a long message. Instead of writing everything into a post or comment, you can record your message using the microphone control and publish the recording as part of the conversation.
This can be useful for quick updates, explanations, feedback, instructions, or any situation where speaking is easier than typing. Members can listen to the recording directly from the Community post or comment.
HighLevel also supports uploaded audio files. This means a single Community post can include a voice note that you record in the composer, an existing audio file that you upload, or both.
Voice communication without leaving the discussion
Members can add voice directly to Community posts and comments instead of switching to a separate conversation just to share a quick spoken update.
2
Record a Voice Note in a Community Post
You can record a new voice note while creating a Community post. The recording control is available directly from the post composer, alongside the other attachment options.
Step 1
Open the post composer
Open the Community channel where you want to publish and start creating a new post. Enter the title and description required for your post.
Step 2
Select the microphone
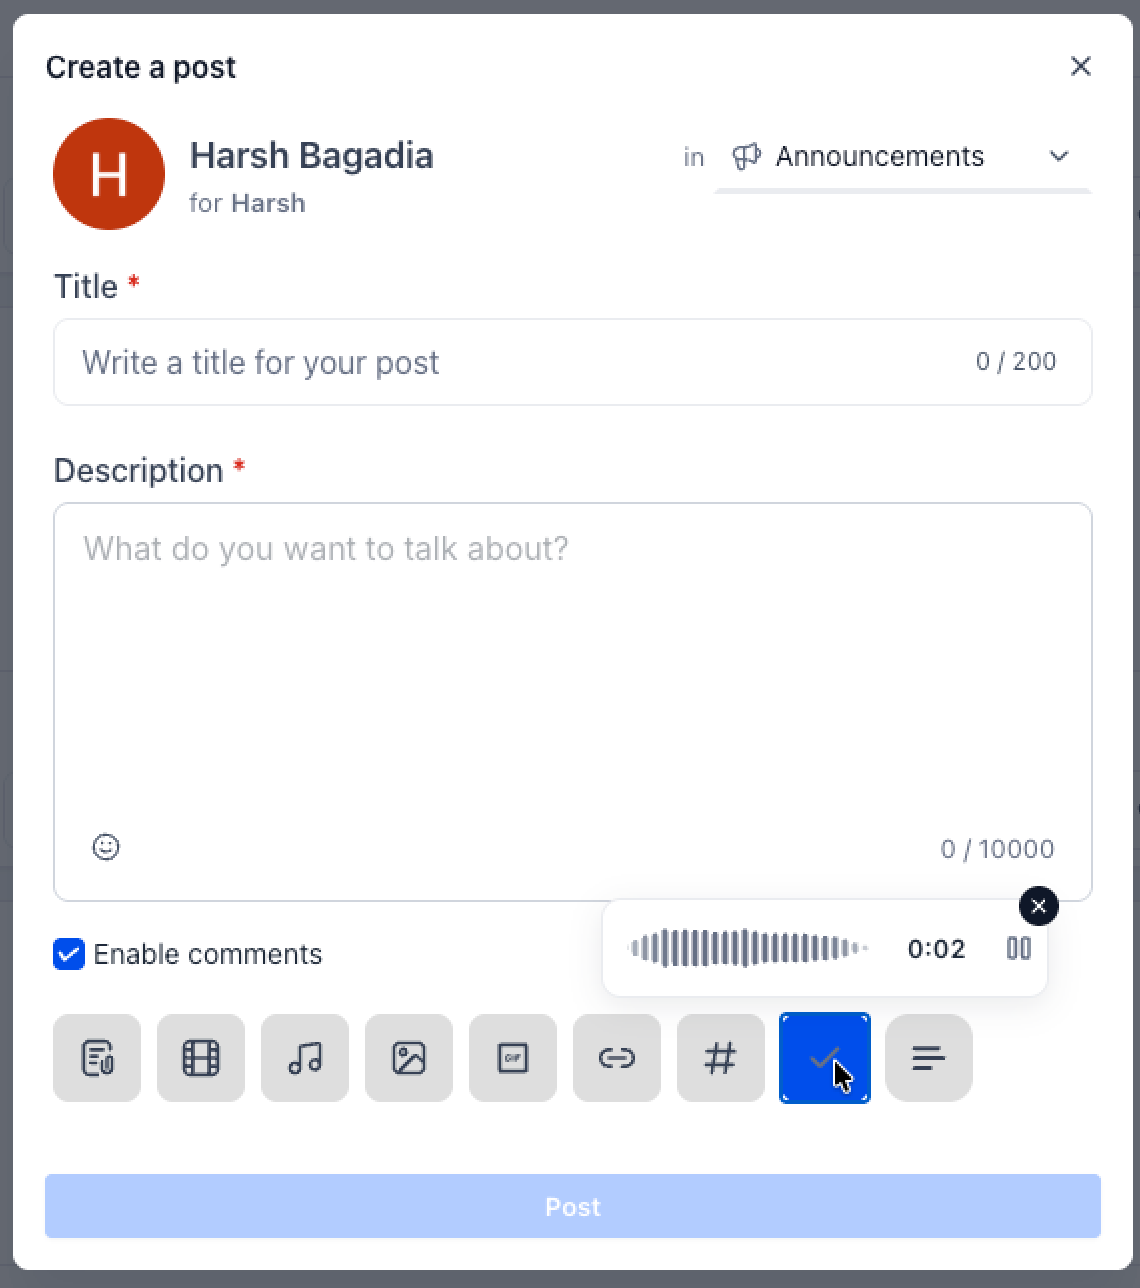
Select the microphone button in the composer to begin creating a Voice Note.
Step 3
Record your message
Speak your message. While recording, the composer displays an audio waveform and recording duration so you can see that your voice is being captured.
3
Manage Your Recording Before Posting
You do not have to publish a recording immediately after you start speaking. The Voice Note controls give you time to manage the recording before the post is published.
Pause — Temporarily stop recording without ending the Voice Note.
Resume — Continue recording after you have paused.
Cancel — Discard the current recording when you do not want to keep it.
After finishing the recording, the Voice Note is added to the post as an audio attachment. You can then continue preparing the rest of your post before publishing it.
Review before you publish
Use the available playback control to review your recorded audio before publishing the post when needed.
4
Upload an Existing Audio File
You can also attach an existing audio file instead of recording a new Voice Note. This is useful when you already have an audio update, recording, lesson, or other audio content saved as a file.
Step 1
Open the attachment options
While creating the post, use the attachment controls in the composer.
Step 2
Choose your audio file
Select the audio file you want to include. Audio can be added alongside other supported Community post attachments.
Step 3
Review the attachment
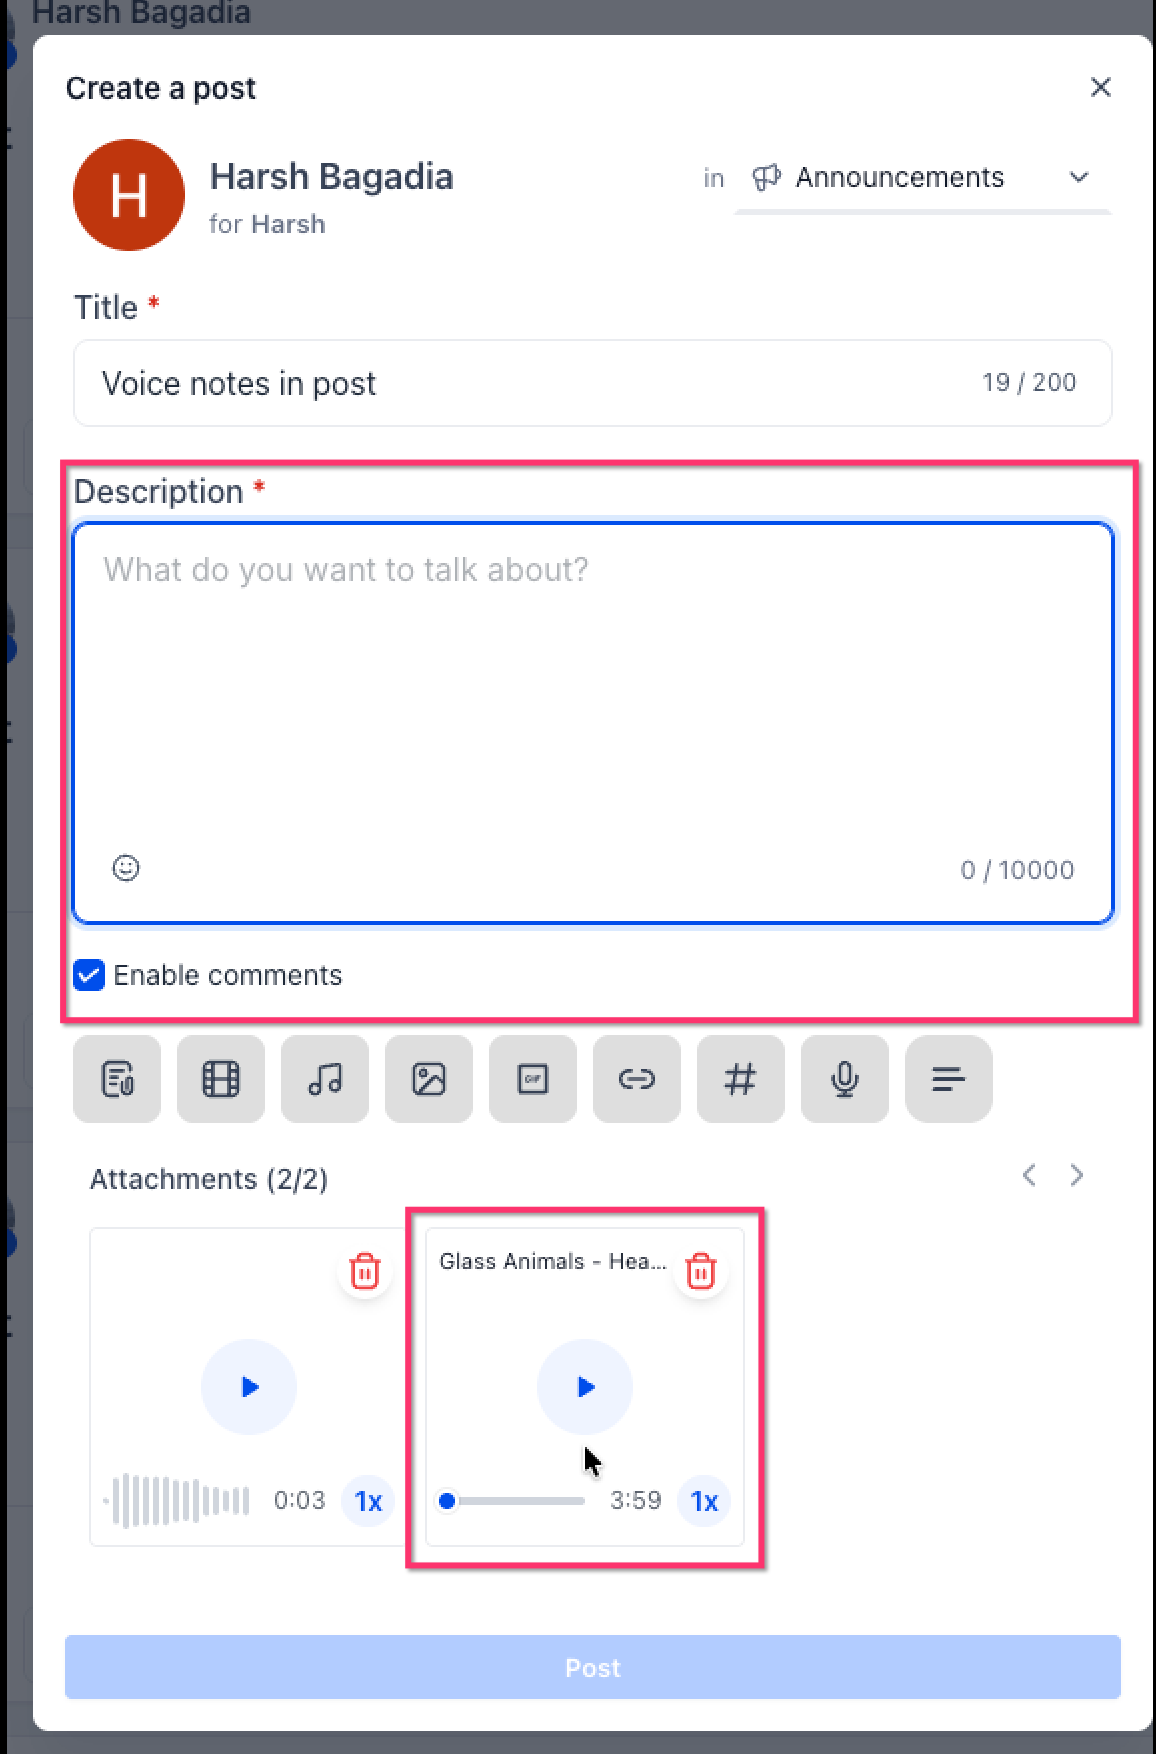
The uploaded audio appears with the other attachments in your post composer. A recorded Voice Note and an uploaded audio file can appear together in the same post.
More Ways to Participate
Speak, Upload, and Listen Without Leaving the Community
Voice Notes make Community discussions more flexible by letting members contribute spoken updates directly inside posts and comments.
5
Play Voice Notes and Audio Files
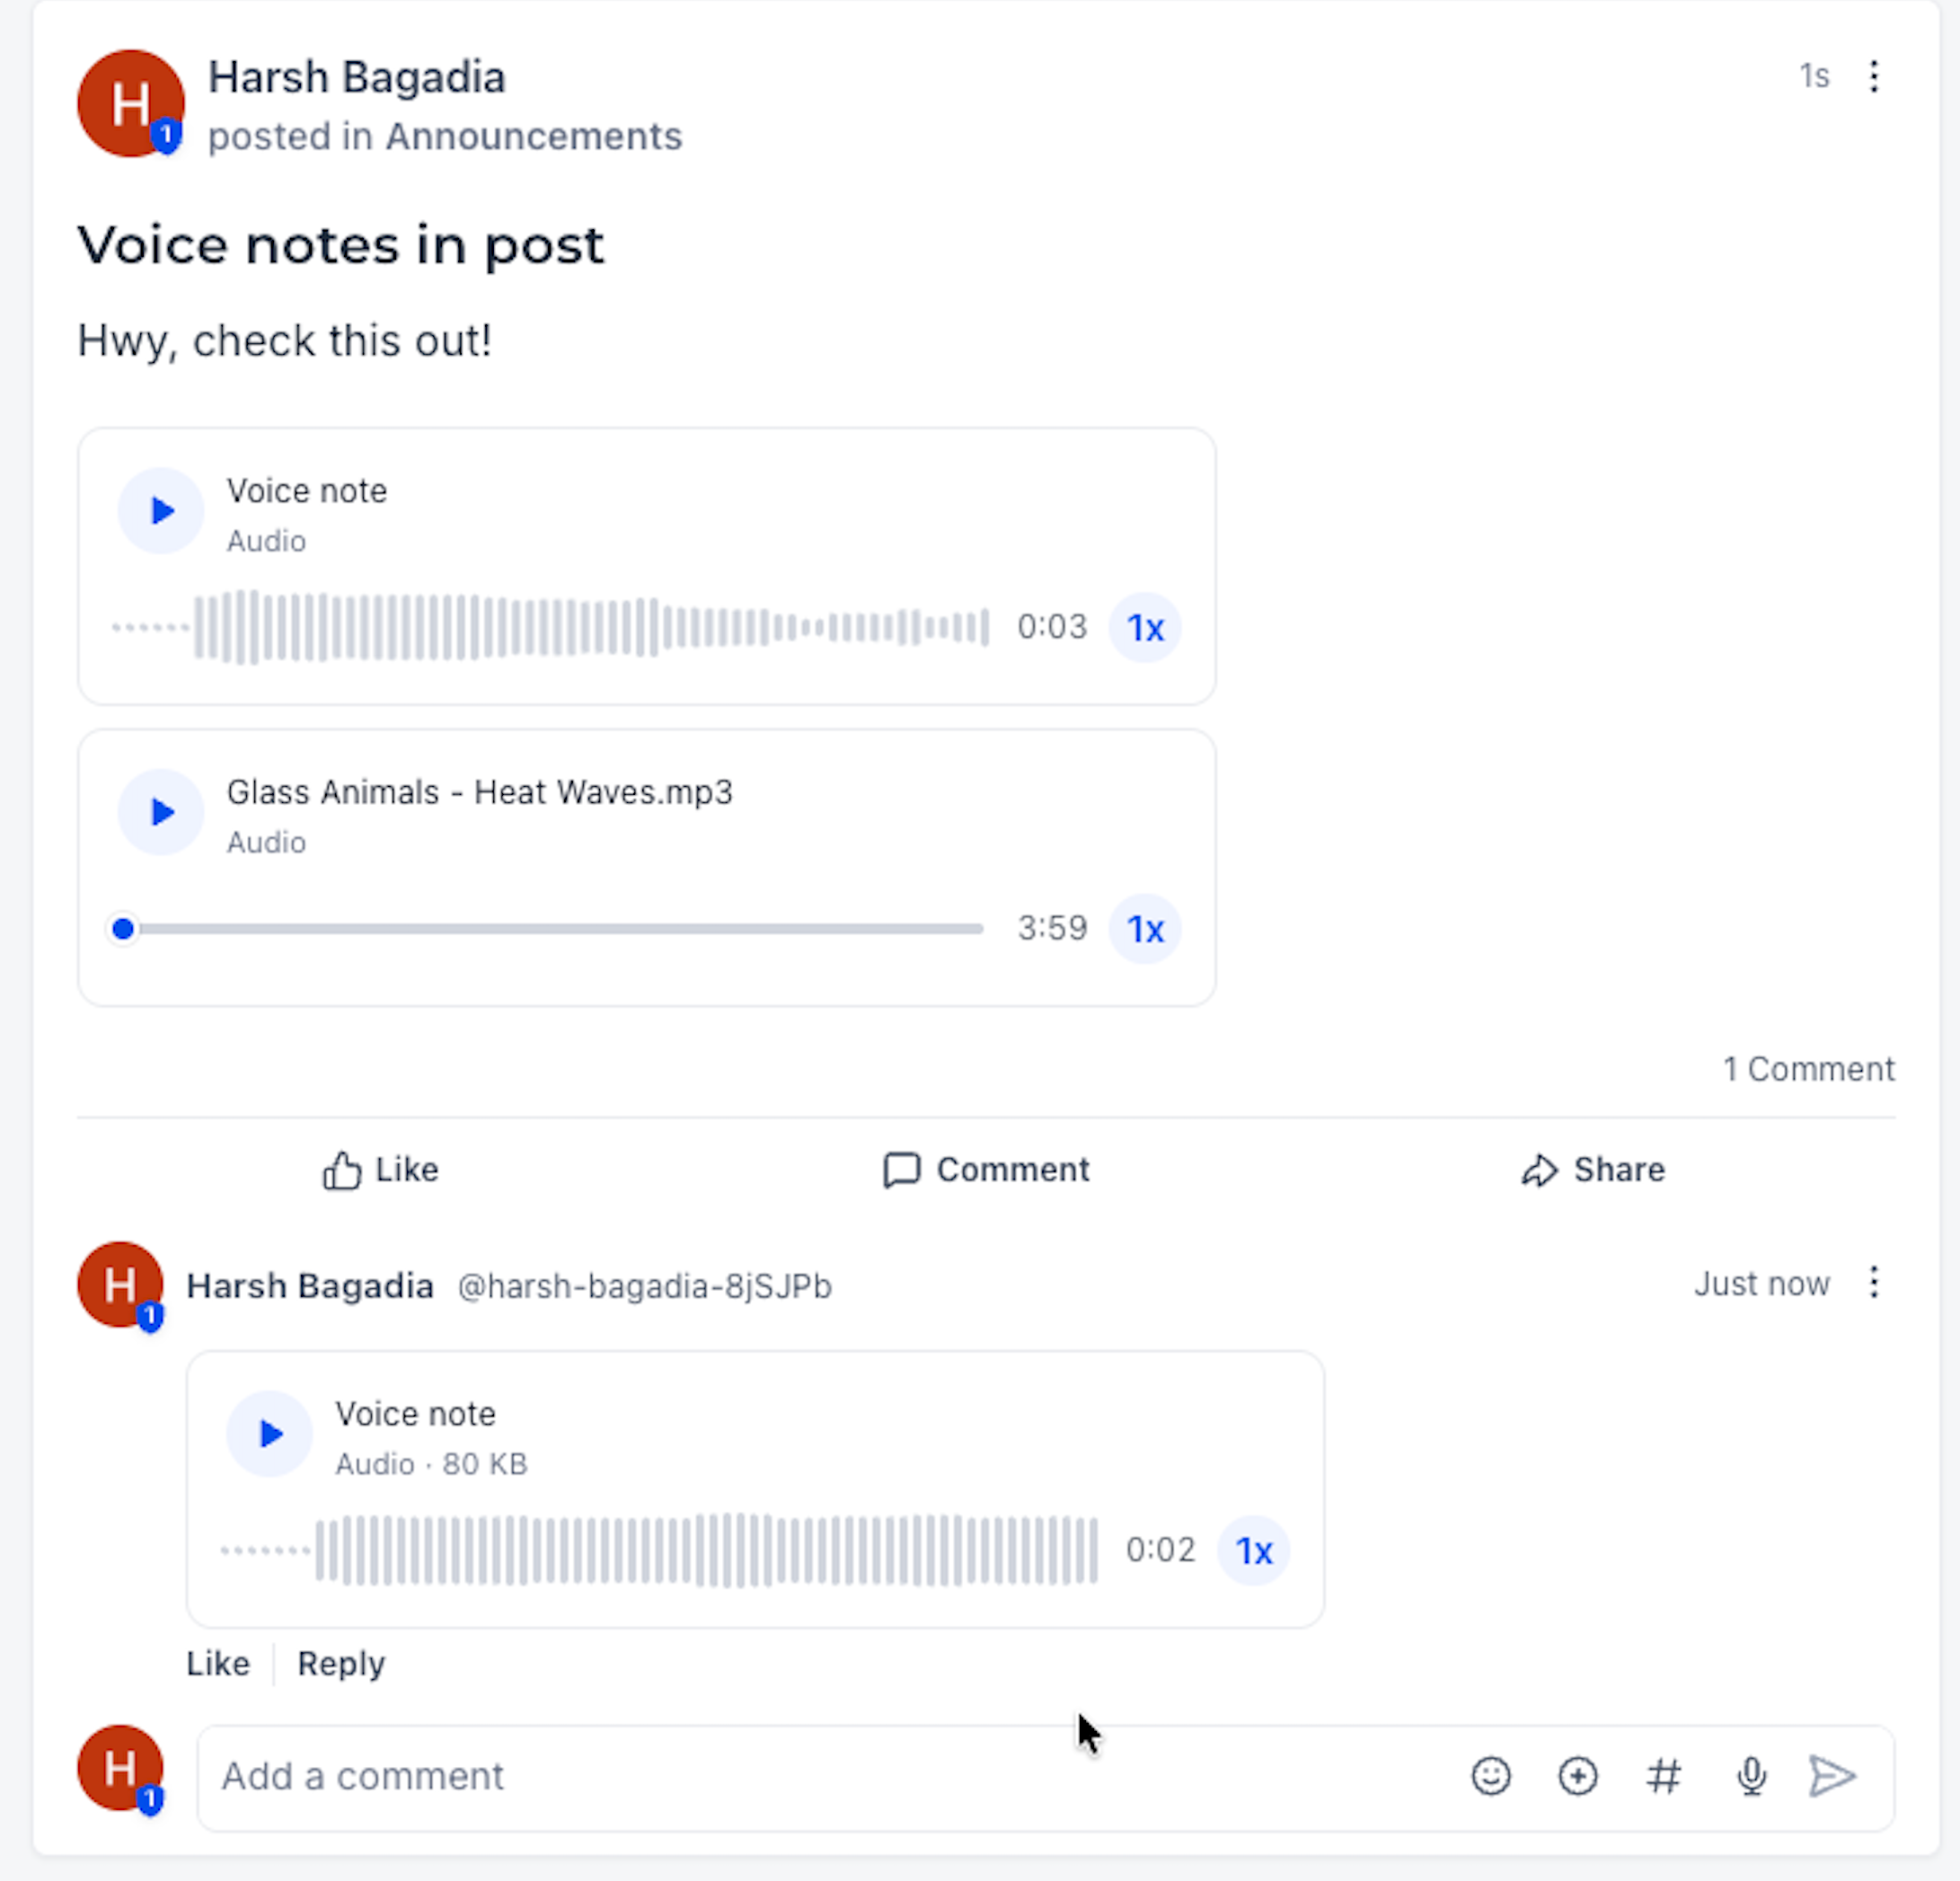
After a post is published, members can play its Voice Notes and uploaded audio directly from the post. Each audio item includes its own playback controls so members can listen without leaving the Community discussion.
Recorded Voice Notes are displayed with a waveform. Uploaded audio files use a timeline-style player that allows members to follow playback progress through the file.
Audio stays connected to the conversation
Members can listen to the audio while viewing the post and its discussion, making it easier to keep spoken information in the same place as the rest of the Community content.
6
Add a Voice Note to a Comment
Voice Notes are not limited to the main post. When the comment composer is available, members can record a spoken response and publish it directly as a comment.
Step 1
Open the comment composer
Go to the Community post where you want to respond and select the comment field.
Step 2
Select the microphone
Use the microphone control in the comment composer to begin recording your response.
Step 3
Send the Voice Note
Finish your recording and send the comment. The Voice Note appears inside the comment thread with its audio playback controls.
7
Recorded Voice Notes vs. Uploaded Audio
Both recorded Voice Notes and uploaded audio allow members to listen to spoken or audio content directly inside a Community. They are displayed differently so members can easily recognize how the audio was added.
Recorded Voice Note
Created directly in the composer
A Voice Note is recorded using the microphone control while creating a post or comment. After publishing, the recording is displayed with a waveform-style player.
Uploaded Audio
Added from an existing file
Uploaded audio already exists as a file before you add it to the Community. After publishing, it uses a timeline-style player rather than the Voice Note waveform display.
You can use both in the same post
A Community post can contain a newly recorded Voice Note together with uploaded audio, allowing you to combine a quick introduction with longer prepared audio content.
8
Playback Speed and Continuous Listening
Members can control how quickly audio plays. This is useful when listening to longer updates or when someone prefers to review spoken information more quickly.
1x — Plays the recording at its normal speed.
1.5x — Plays the recording faster while keeping it easy to follow.
2x — Plays the recording at twice its normal speed.
Select the speed control on the audio player to move between 1x, 1.5x, and 2x.
HighLevel also supports continuous listening by automatically moving to the next audio item or Voice Note after the current audio finishes. This helps members listen through multiple audio items without manually starting each one.
9
Frequently Asked Questions
Q: Can I record a Voice Note directly in a Community post?
Yes. Use the microphone control in the post composer to record a Voice Note before publishing the post.
Q: Can I pause a recording and continue later?
Yes. While recording, you can pause the Voice Note and resume recording before you finish it.
Q: Can I cancel a Voice Note before publishing it?
Yes. You can cancel the recording if you do not want to keep it and then start again if needed.
Q: Can I upload an audio file instead of recording a Voice Note?
Yes. Existing audio files can be uploaded to a Community post alongside other supported attachments.
Q: Can a post contain both a Voice Note and uploaded audio?
Yes. Recorded Voice Notes and uploaded audio files can appear together in the same Community post.
Q: Can Voice Notes be added to comments?
Yes. When the comment composer is available, members can use its microphone control to record and send a Voice Note as a comment.
Q: What playback speeds are available?
Listeners can cycle through 1x, 1.5x, and 2x playback speeds.
Q: Why do some audio items show a waveform while others show a timeline?
Voice Notes recorded directly in the composer use a waveform display. Existing audio files uploaded to the post use a timeline-style audio player.