Customize Image Layouts in Forms & Surveys
This article explains how to customize image layouts in HighLevel Forms & Surveys using new layout options, image styling controls, focal points, and survey slide overrides.
You'll learn how to choose from five layout options, adjust styling and spacing, set focal points for fixed layouts, and customize image layouts at the individual survey slide level.
What are Image Layouts in Forms & Surveys?
Image layouts determine how images are displayed alongside your form fields or survey content. Choosing the right layout helps improve visual hierarchy, keeps important content in focus, and creates a more engaging experience for visitors.
With this update, you can choose from multiple image placement styles, adjust spacing and image styling for supported layouts, and customize individual survey slides with their own image layouts.
Key Benefits of Image Layouts
Image layout options provide greater flexibility when designing Forms and Surveys, making it easier to create experiences that align with your brand and improve usability.
Available Image Layout Options
Each layout offers a different way to display images alongside your content. Selecting the appropriate layout helps improve readability while supporting your overall design goals.
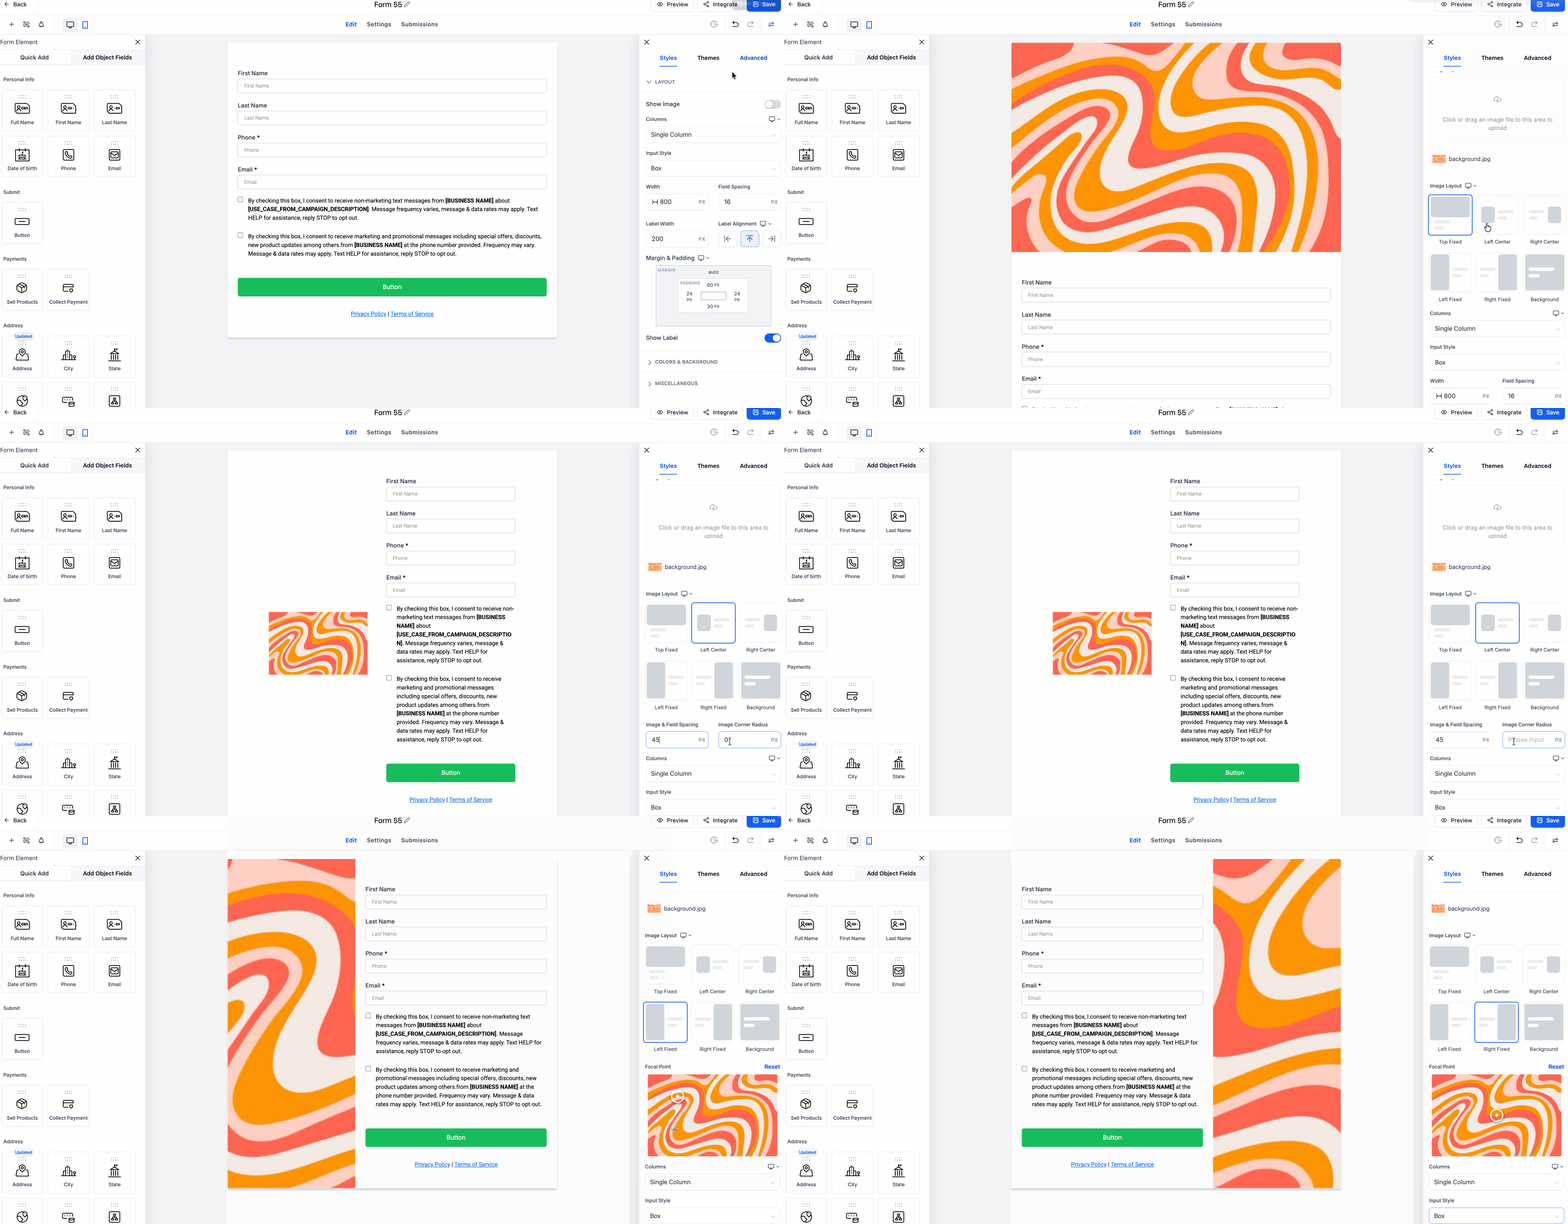
Displays the image on the left side of the form or survey while keeping it vertically centered next to the content.
Best suited for:
- Registration forms
- Contact forms
- Lead capture forms
- Marketing forms
Supports:
- Image Corner Radius
- Image-Field Spacing
Displays the image on the right side of the form or survey while vertically centering it with the content.
Best suited for:
- Marketing pages
- Appointment forms
- Promotional forms
Supports:
- Image Corner Radius
- Image-Field Spacing
Displays a fixed image on the left side of the form while the form content appears alongside it.
Best suited for:
- Hero images
- Large promotional graphics
- Lifestyle photography
Supports:
- Focal Point selection
Displays a fixed image on the right side of the form while content remains on the opposite side.
Best suited for:
- Promotional campaigns
- Event registration pages
- Landing pages
Supports:
- Focal Point selection
Uses the uploaded image as the background behind the form or survey.
Best suited for:
- Landing pages
- Promotional campaigns
- Branded experiences
Customize Image Styling
Additional styling controls allow you to refine how images appear within supported layouts, helping create cleaner spacing and a more polished design.
Image Corner Radius lets you round the corners of images used in supported layouts.
Supported layouts:
- Left Center
- Right Center
Use this setting to:
- Match your website branding
- Create softer visual designs
- Modernize the appearance of images
Image-Field Spacing controls the distance between the image and the form fields.
Supported layouts:
- Left Center
- Right Center
Increasing the spacing can:
- Improve readability
- Reduce visual clutter
- Create a more balanced layout
Different screen sizes and aspect ratios may crop portions of fixed images. Focal Point allows you to choose which area of the image remains visible, helping preserve the most important content.
Supported layouts:
- Left Fixed
- Right Fixed
To adjust the focal point:
- Select a Left Fixed or Right Fixed layout.
- Click the uploaded image.
- Choose the area you want to keep centered.
- Save your changes.
Customize Image Layouts for Individual Survey Slides
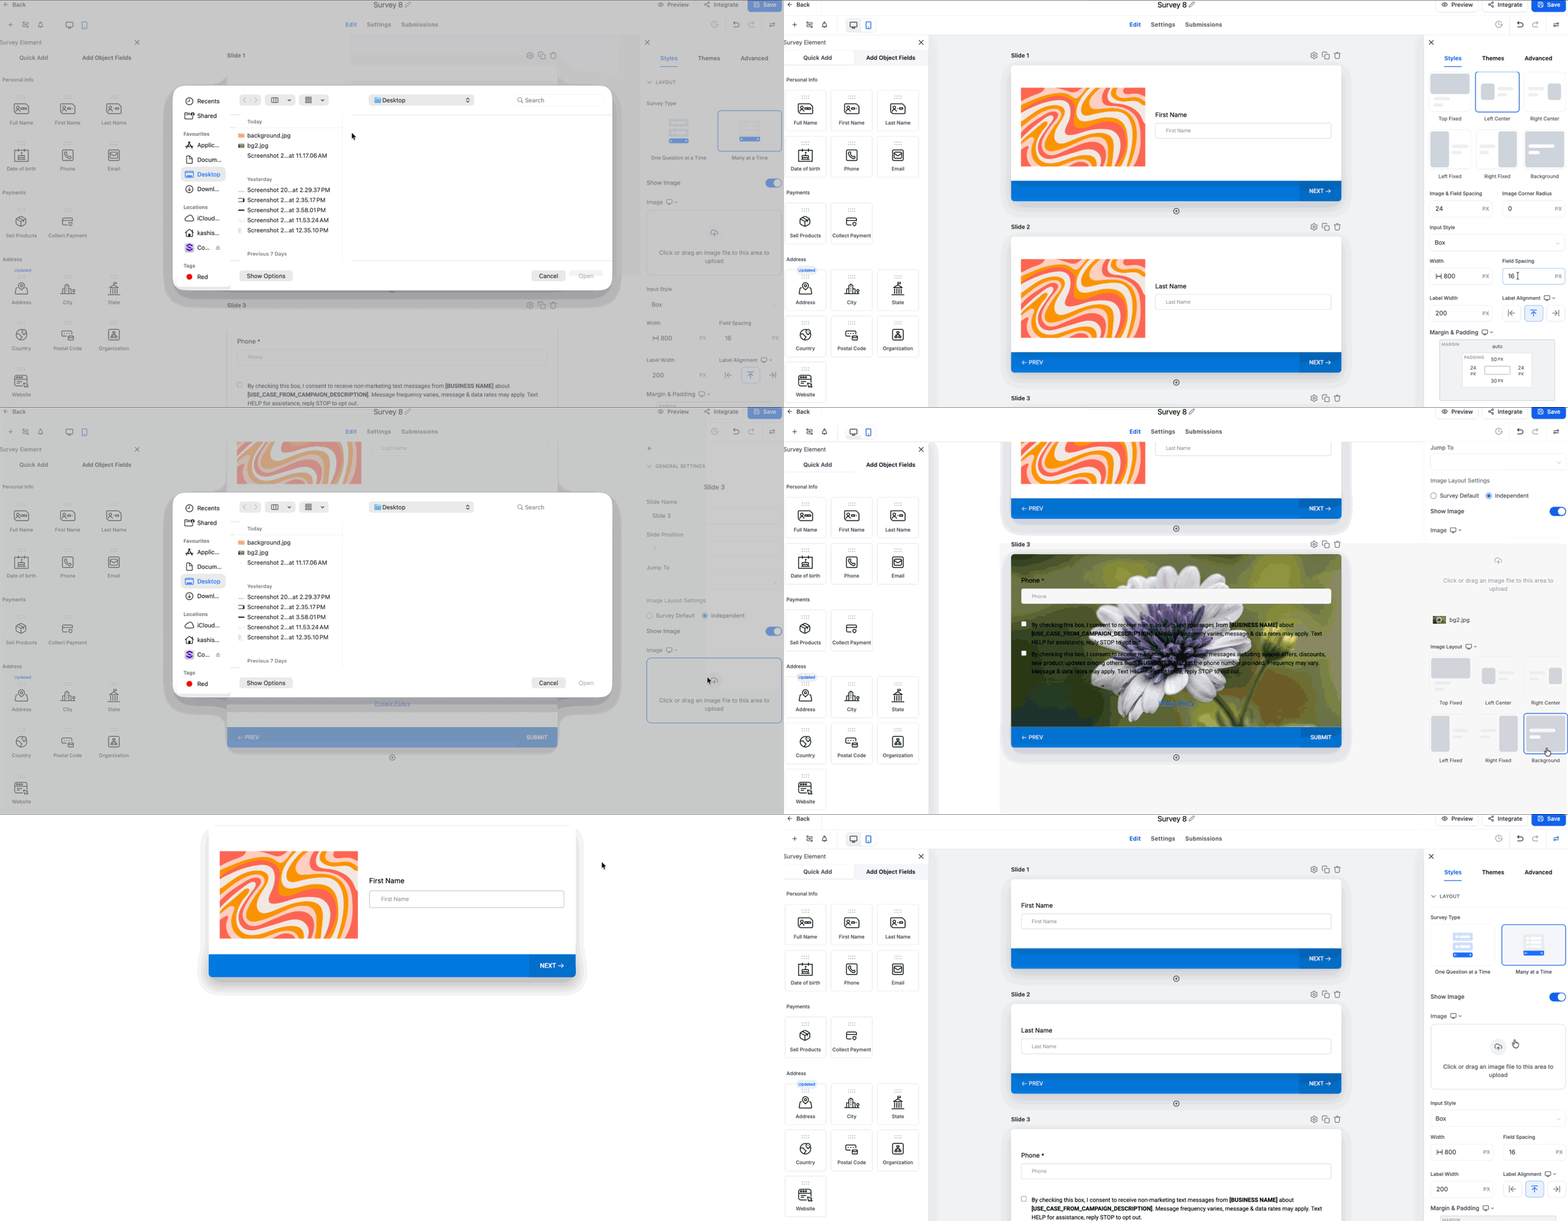
By default, every survey slide inherits the main survey image layout. When a specific slide requires a different visual treatment, you can override the default settings and configure its own image and layout.
Slide-level image layout customization is currently available only for Surveys.
You can customize:
- Image
- Image Layout
- Layout behavior
This is useful when:
- Different questions require different visuals.
- Each slide represents a different topic.
- You want to emphasize specific survey sections.
How to Configure Image Layouts in Forms
Properly configuring image layouts helps ensure your Forms look consistent across devices while making the best use of available design space.
Navigate to Sites > Forms.
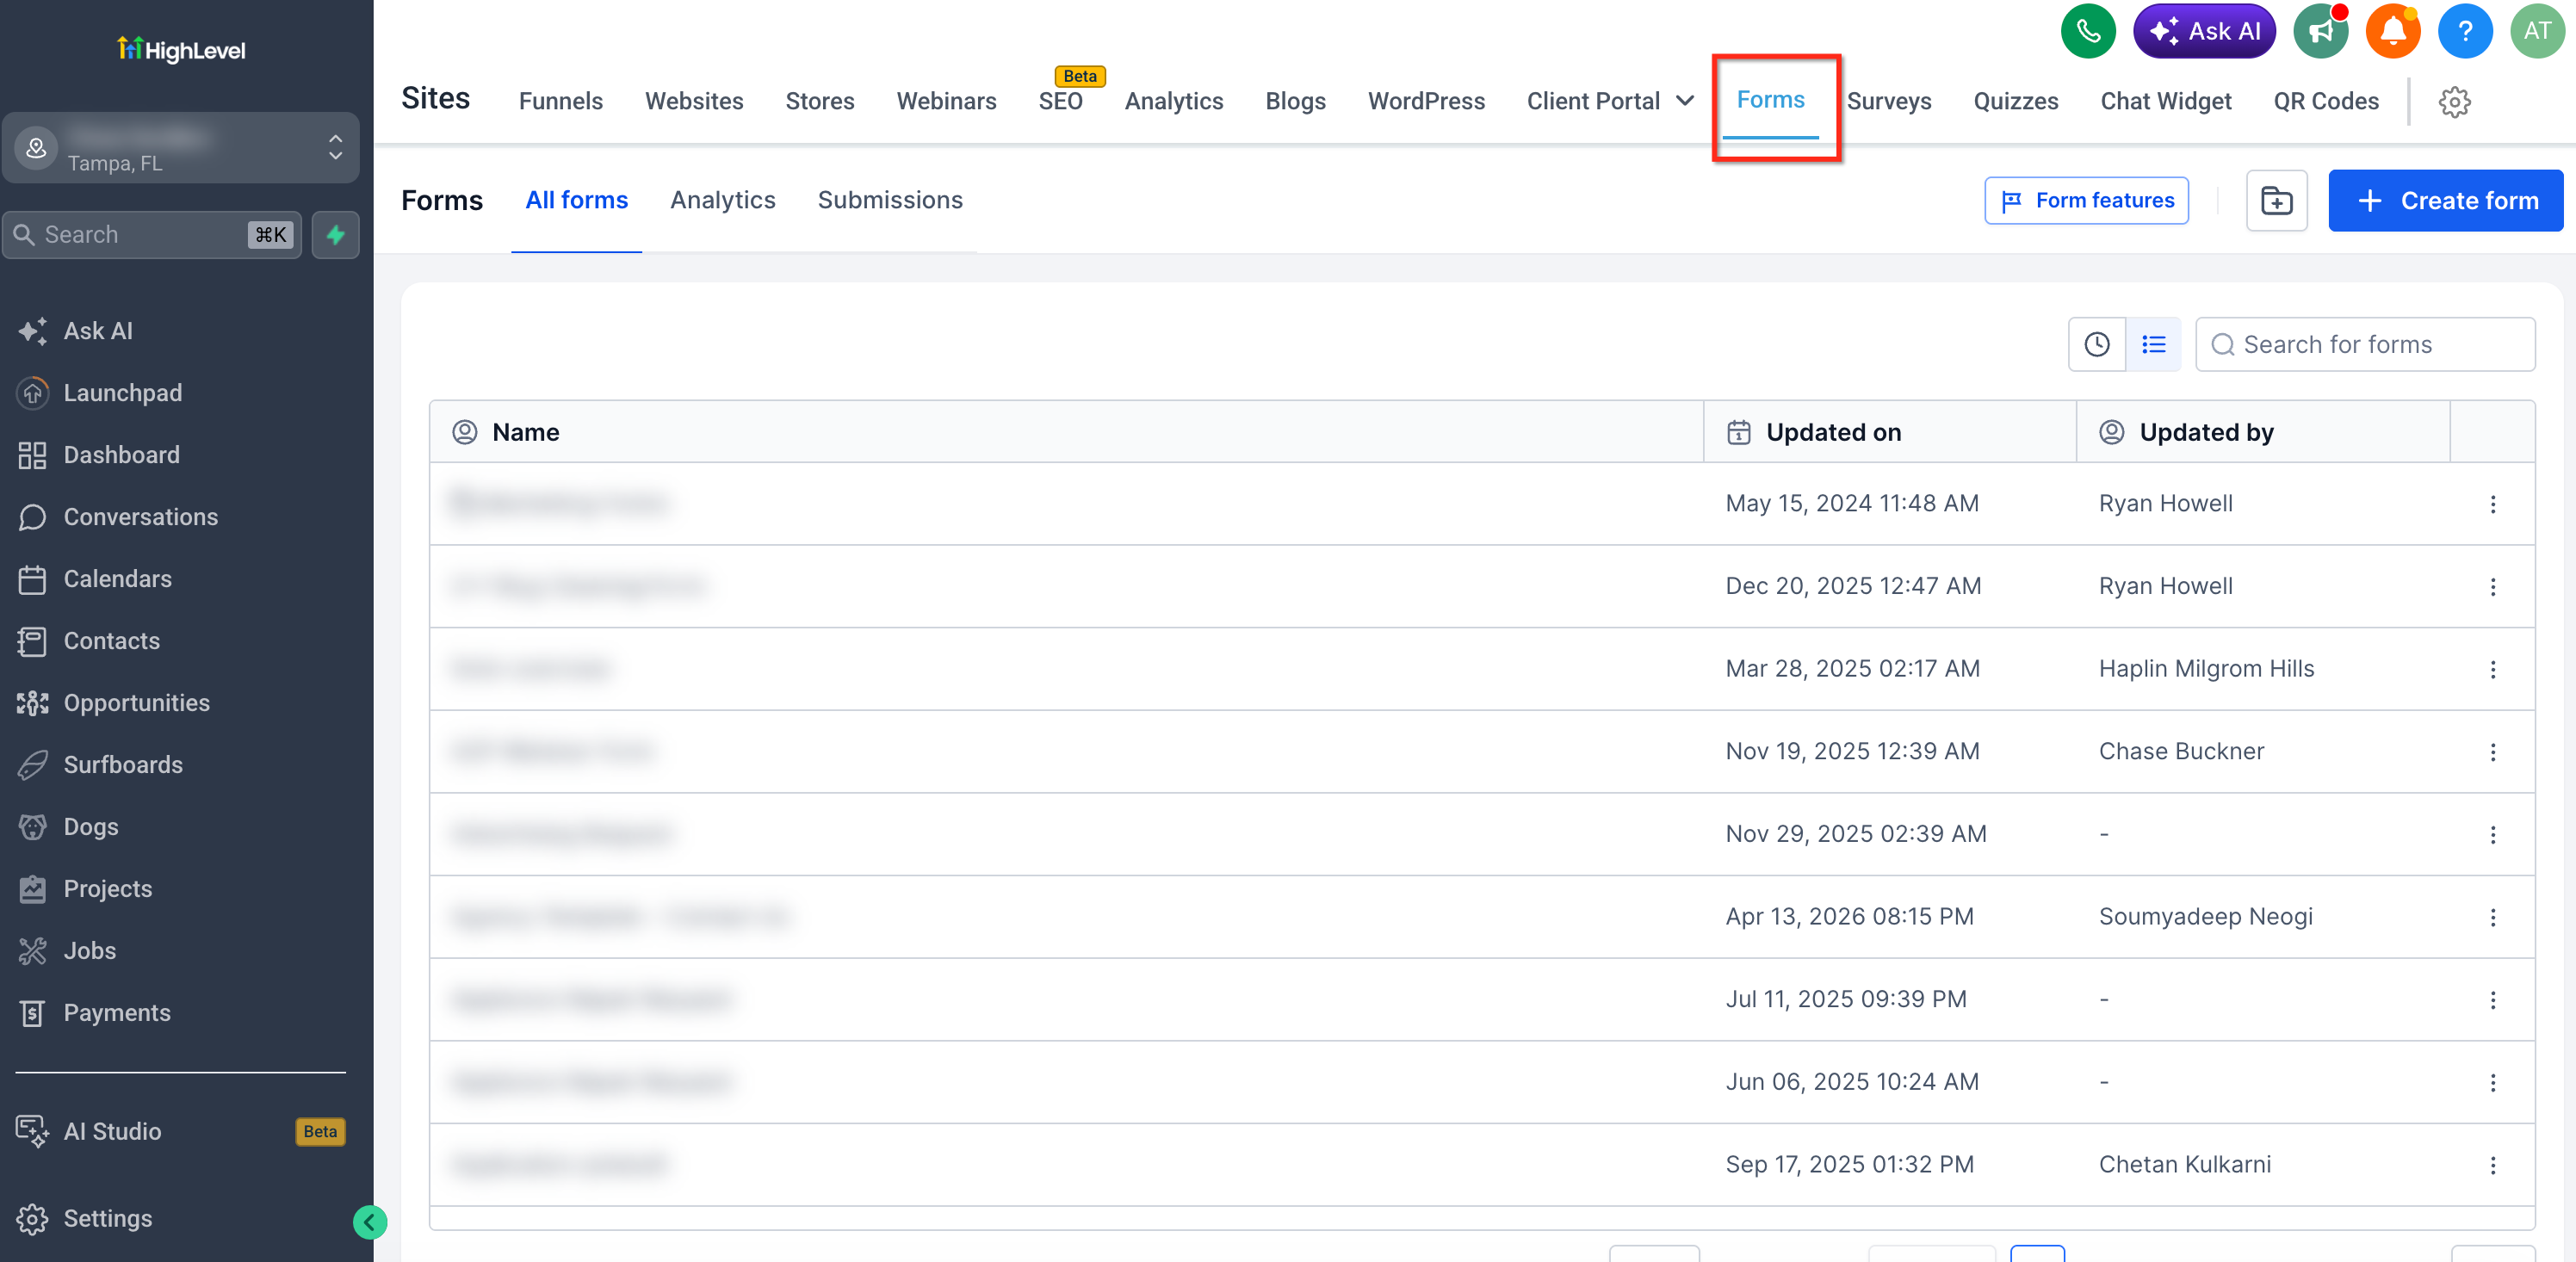
Create a new form or open an existing one.
Open the Styles and Options tab in the right sidebar.
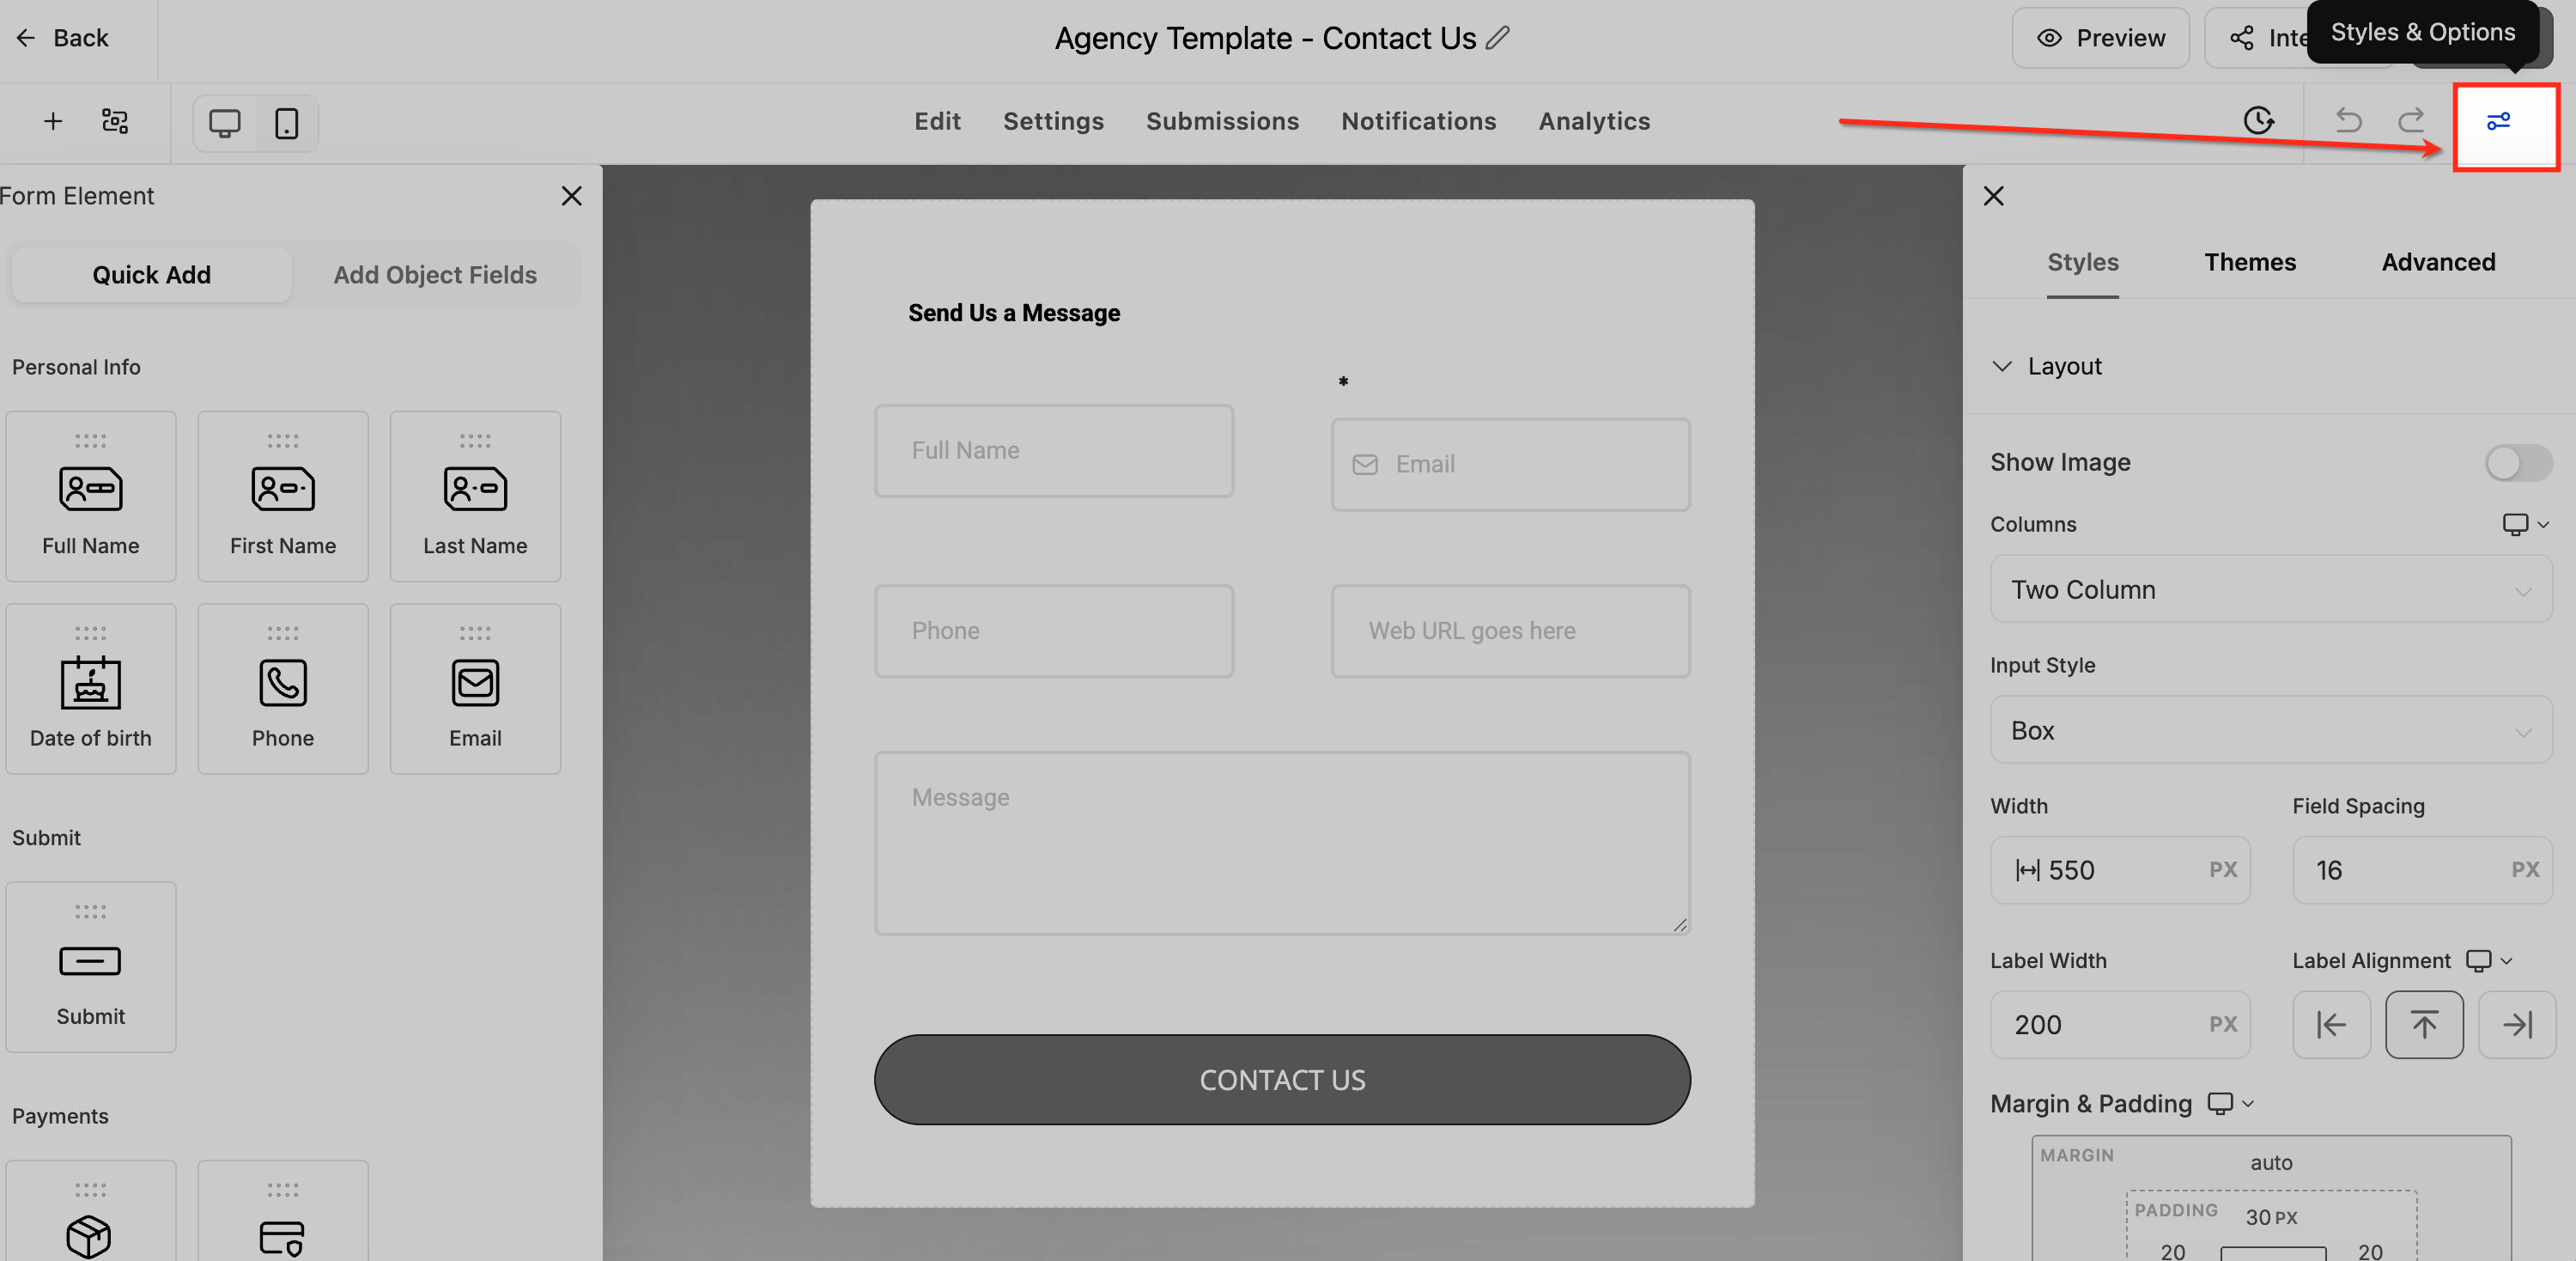
Expand Layout.
Enable Show Image.
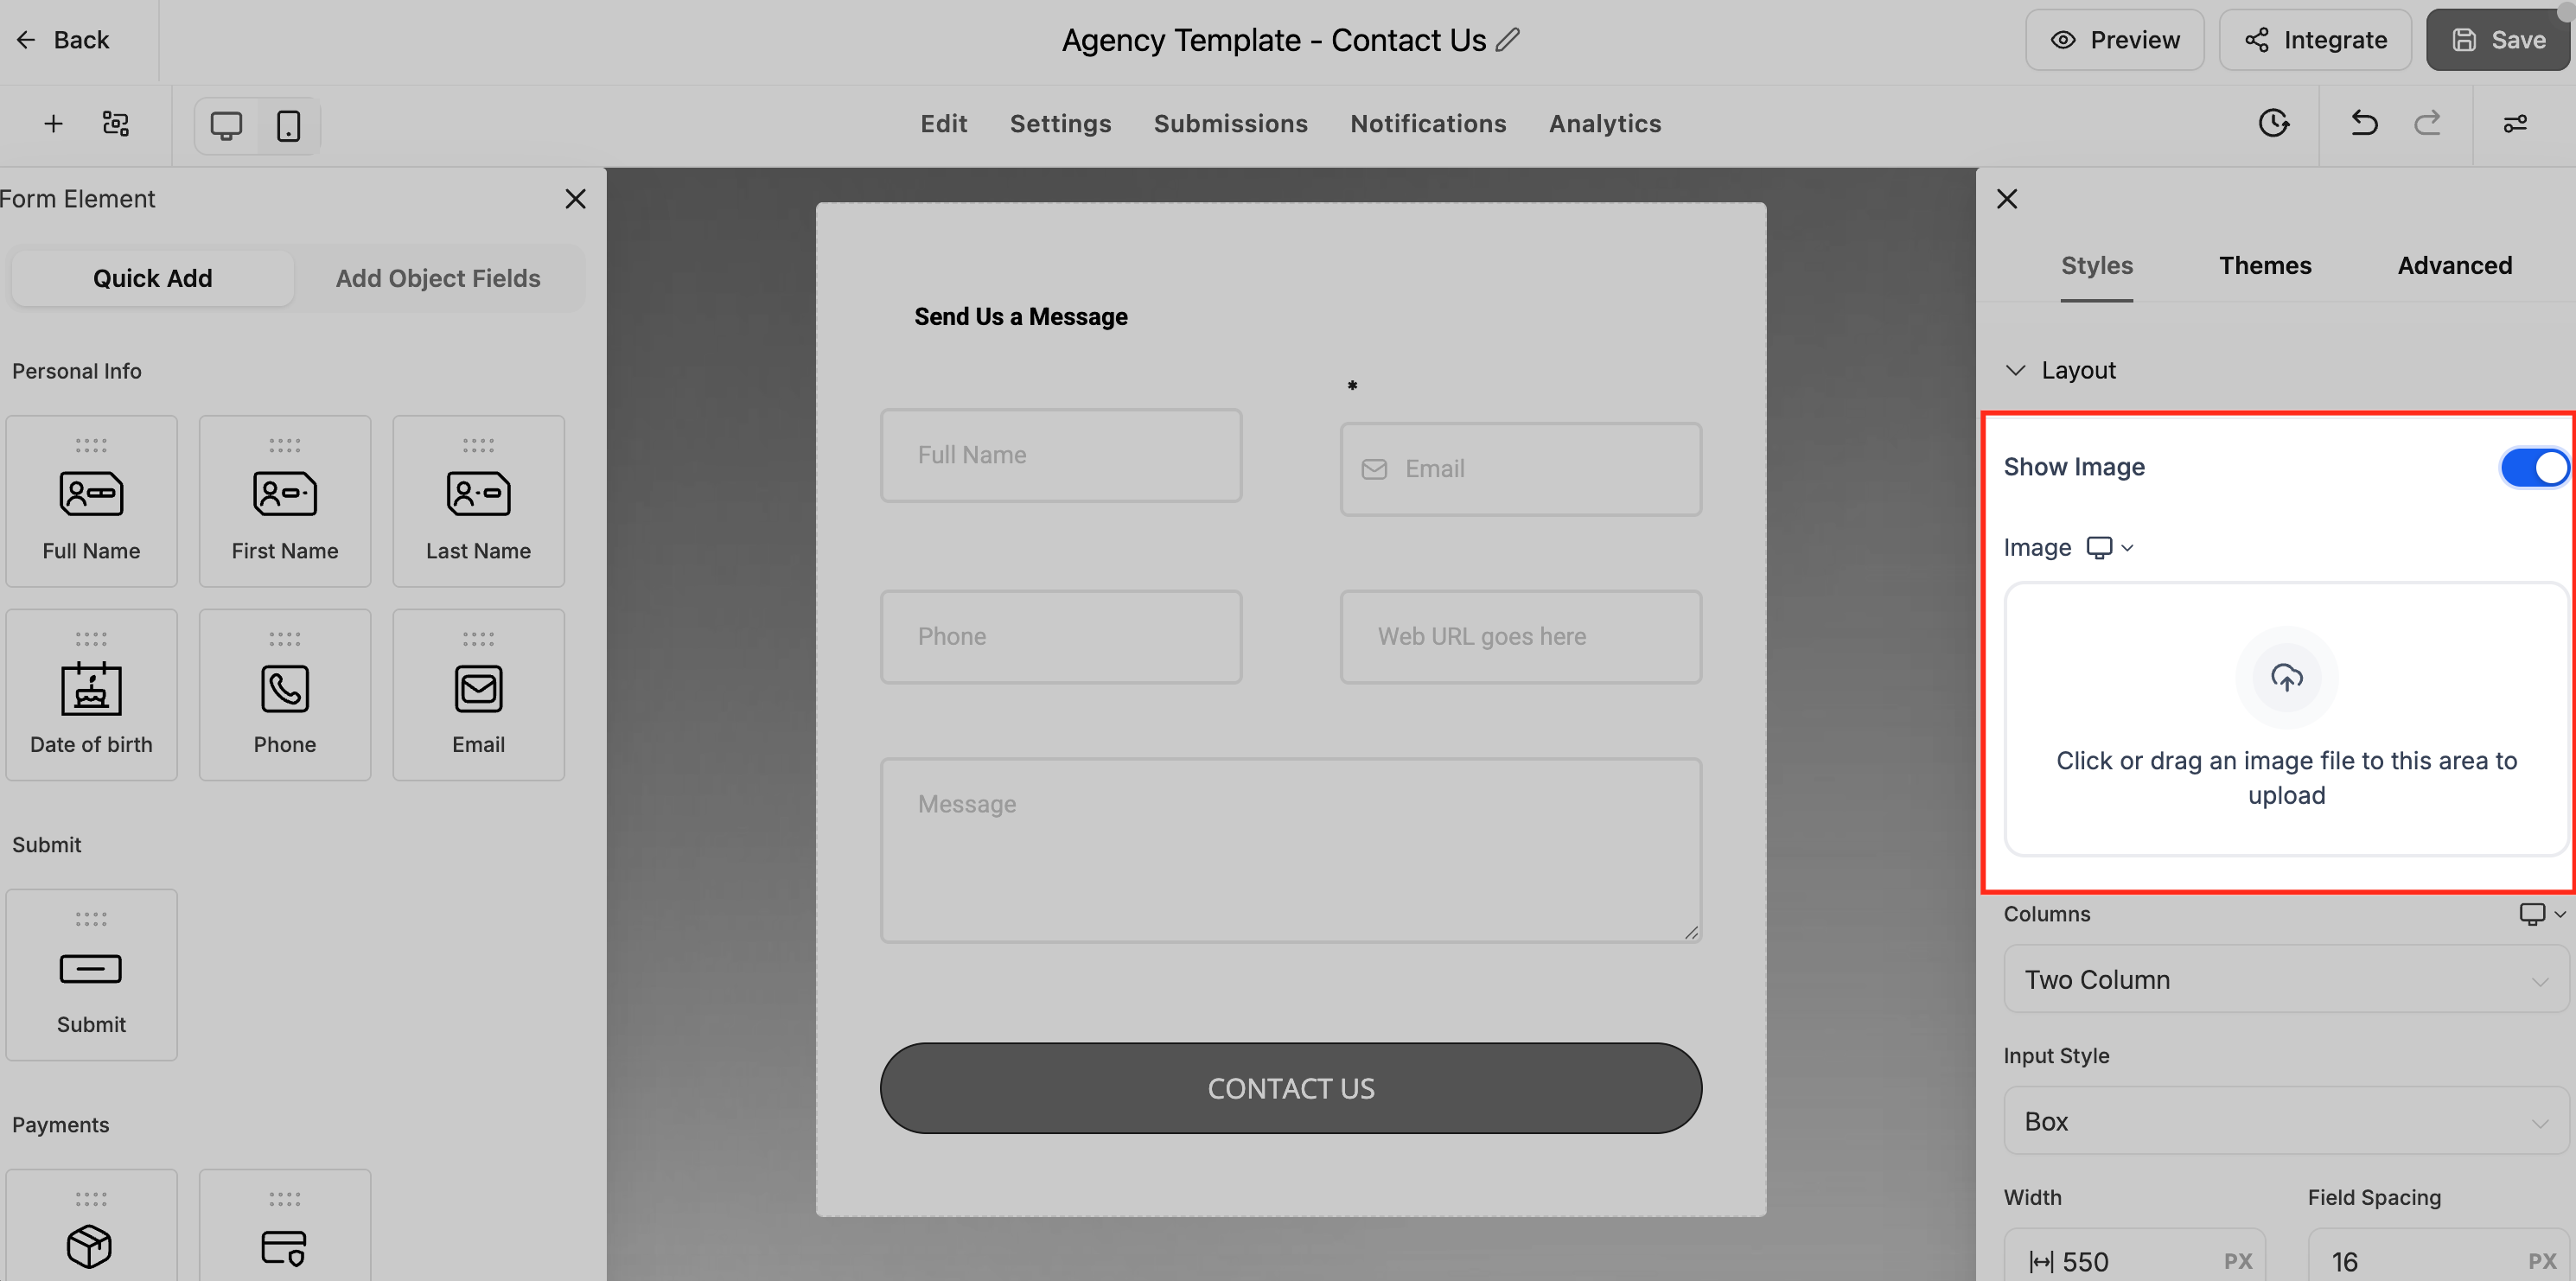
Upload or select an image.
Choose an Image Layout.
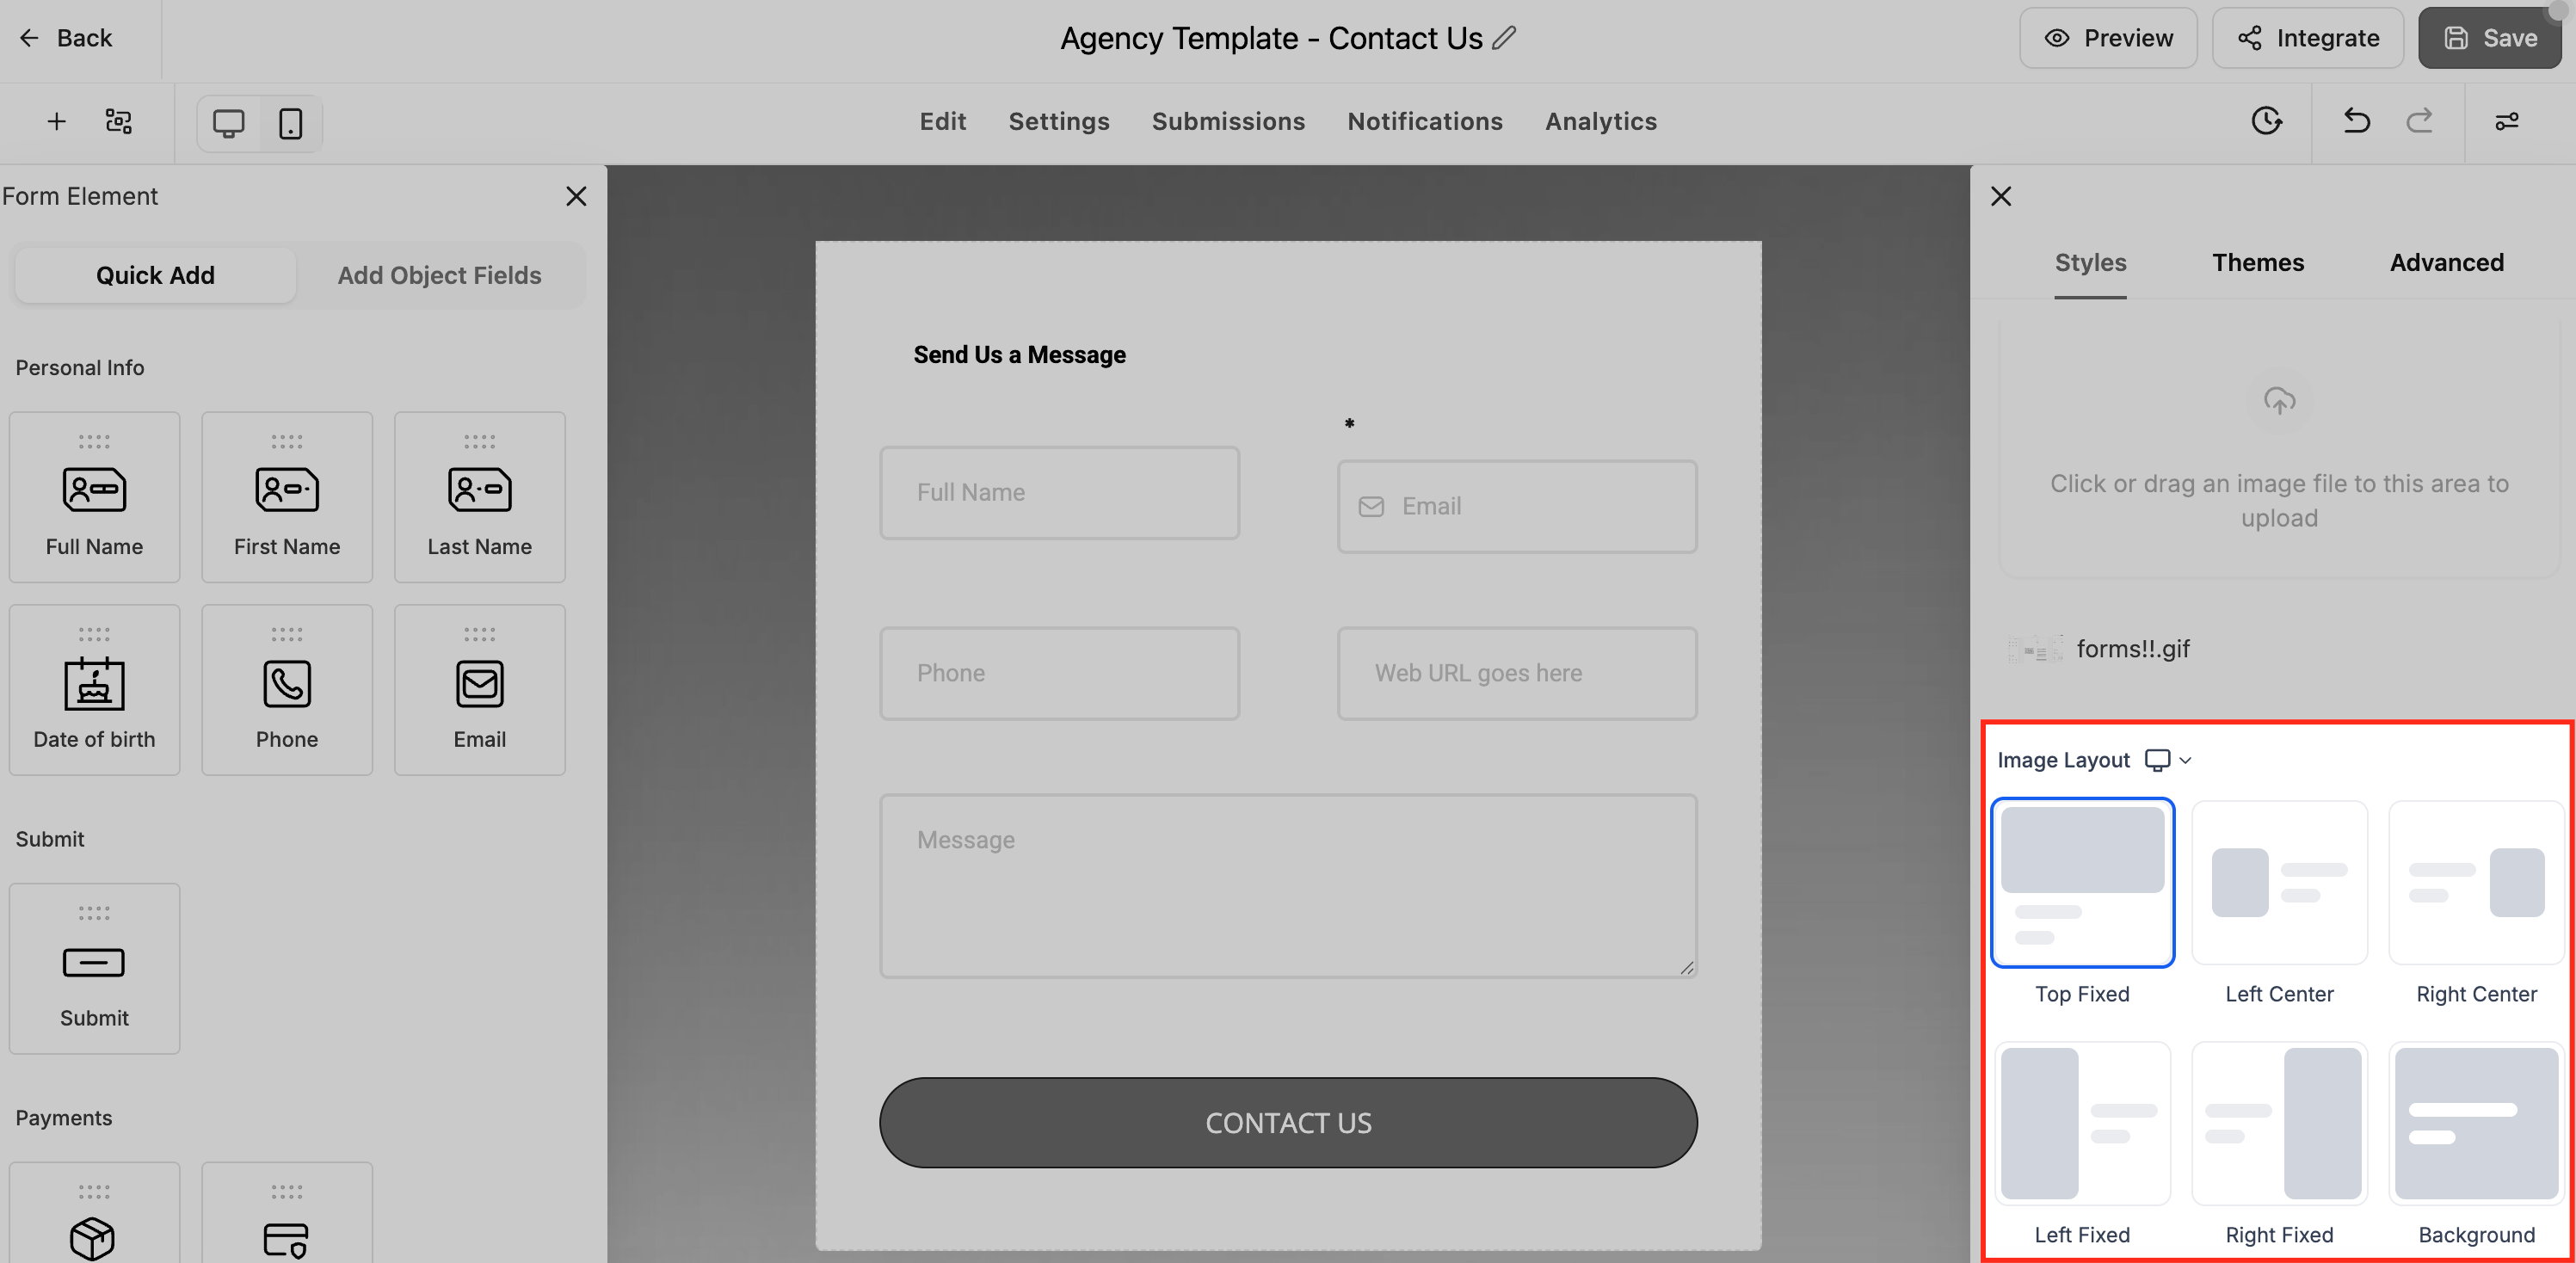
Configure the available layout-specific options:
- Left Center or Right Center
- Image Corner Radius
- Image-Field Spacing
- Left Fixed or Right Fixed
- Focal Point
Preview your form.
Save your changes.
How to Configure Image Layouts in Surveys
Survey image layouts can be applied globally or customized for individual slides, giving you more flexibility when designing multi-step experiences.
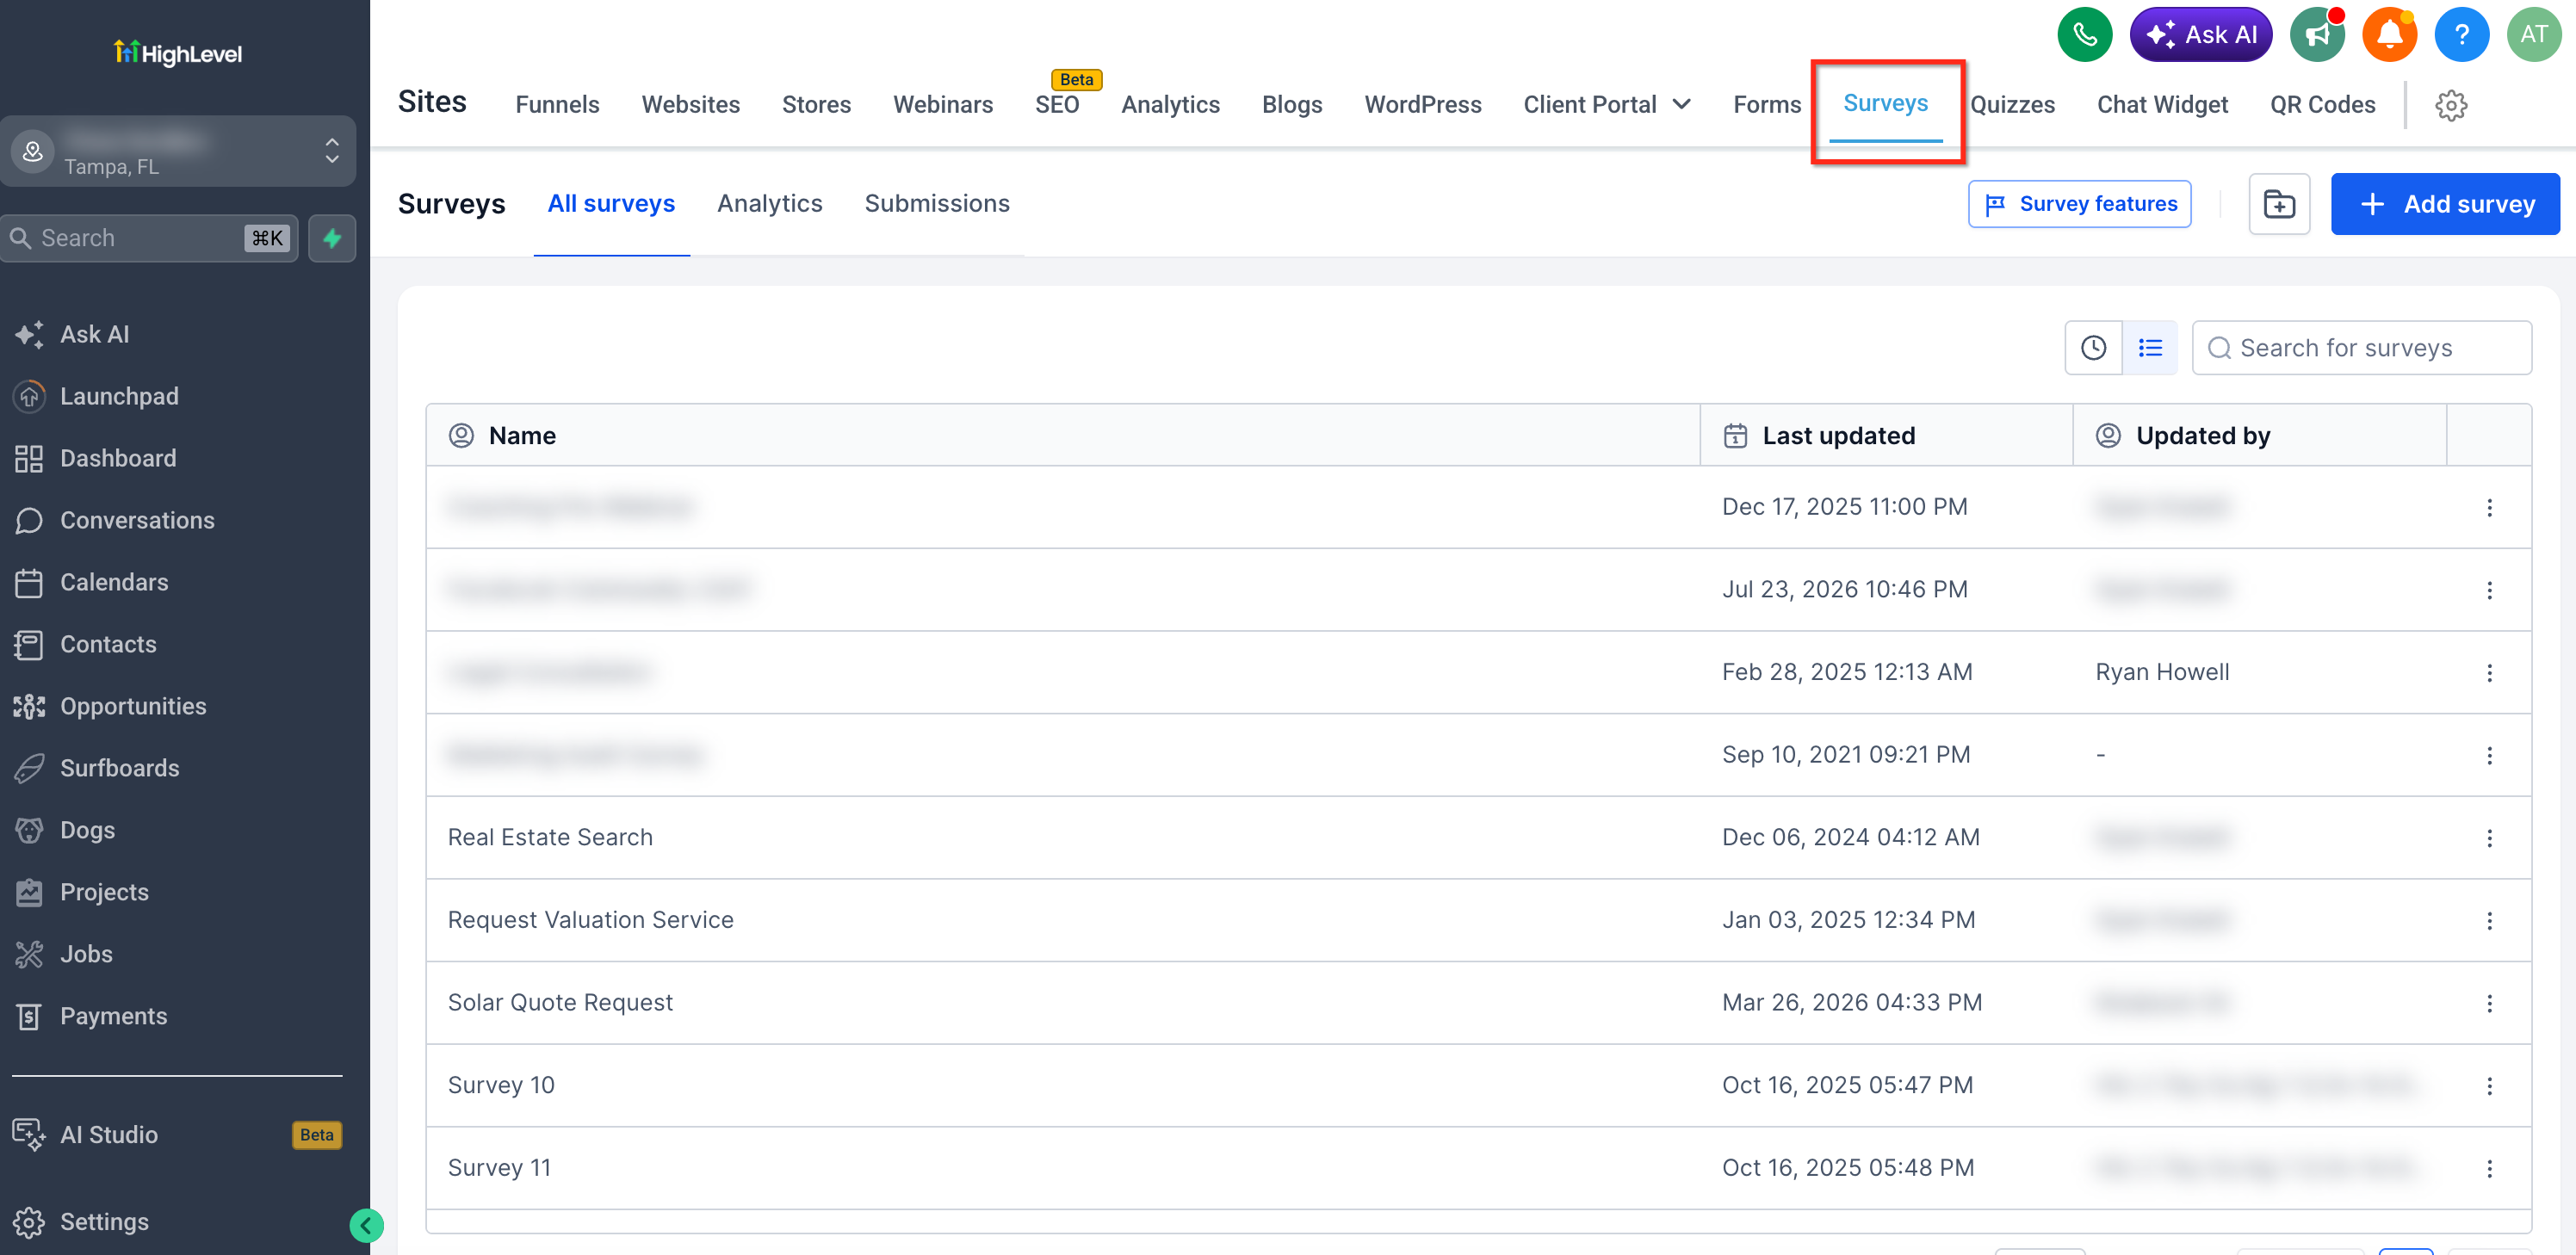
Navigate to Sites > Surveys.
Create or edit a survey.
Open the Styles tab.
Enable Show Image.
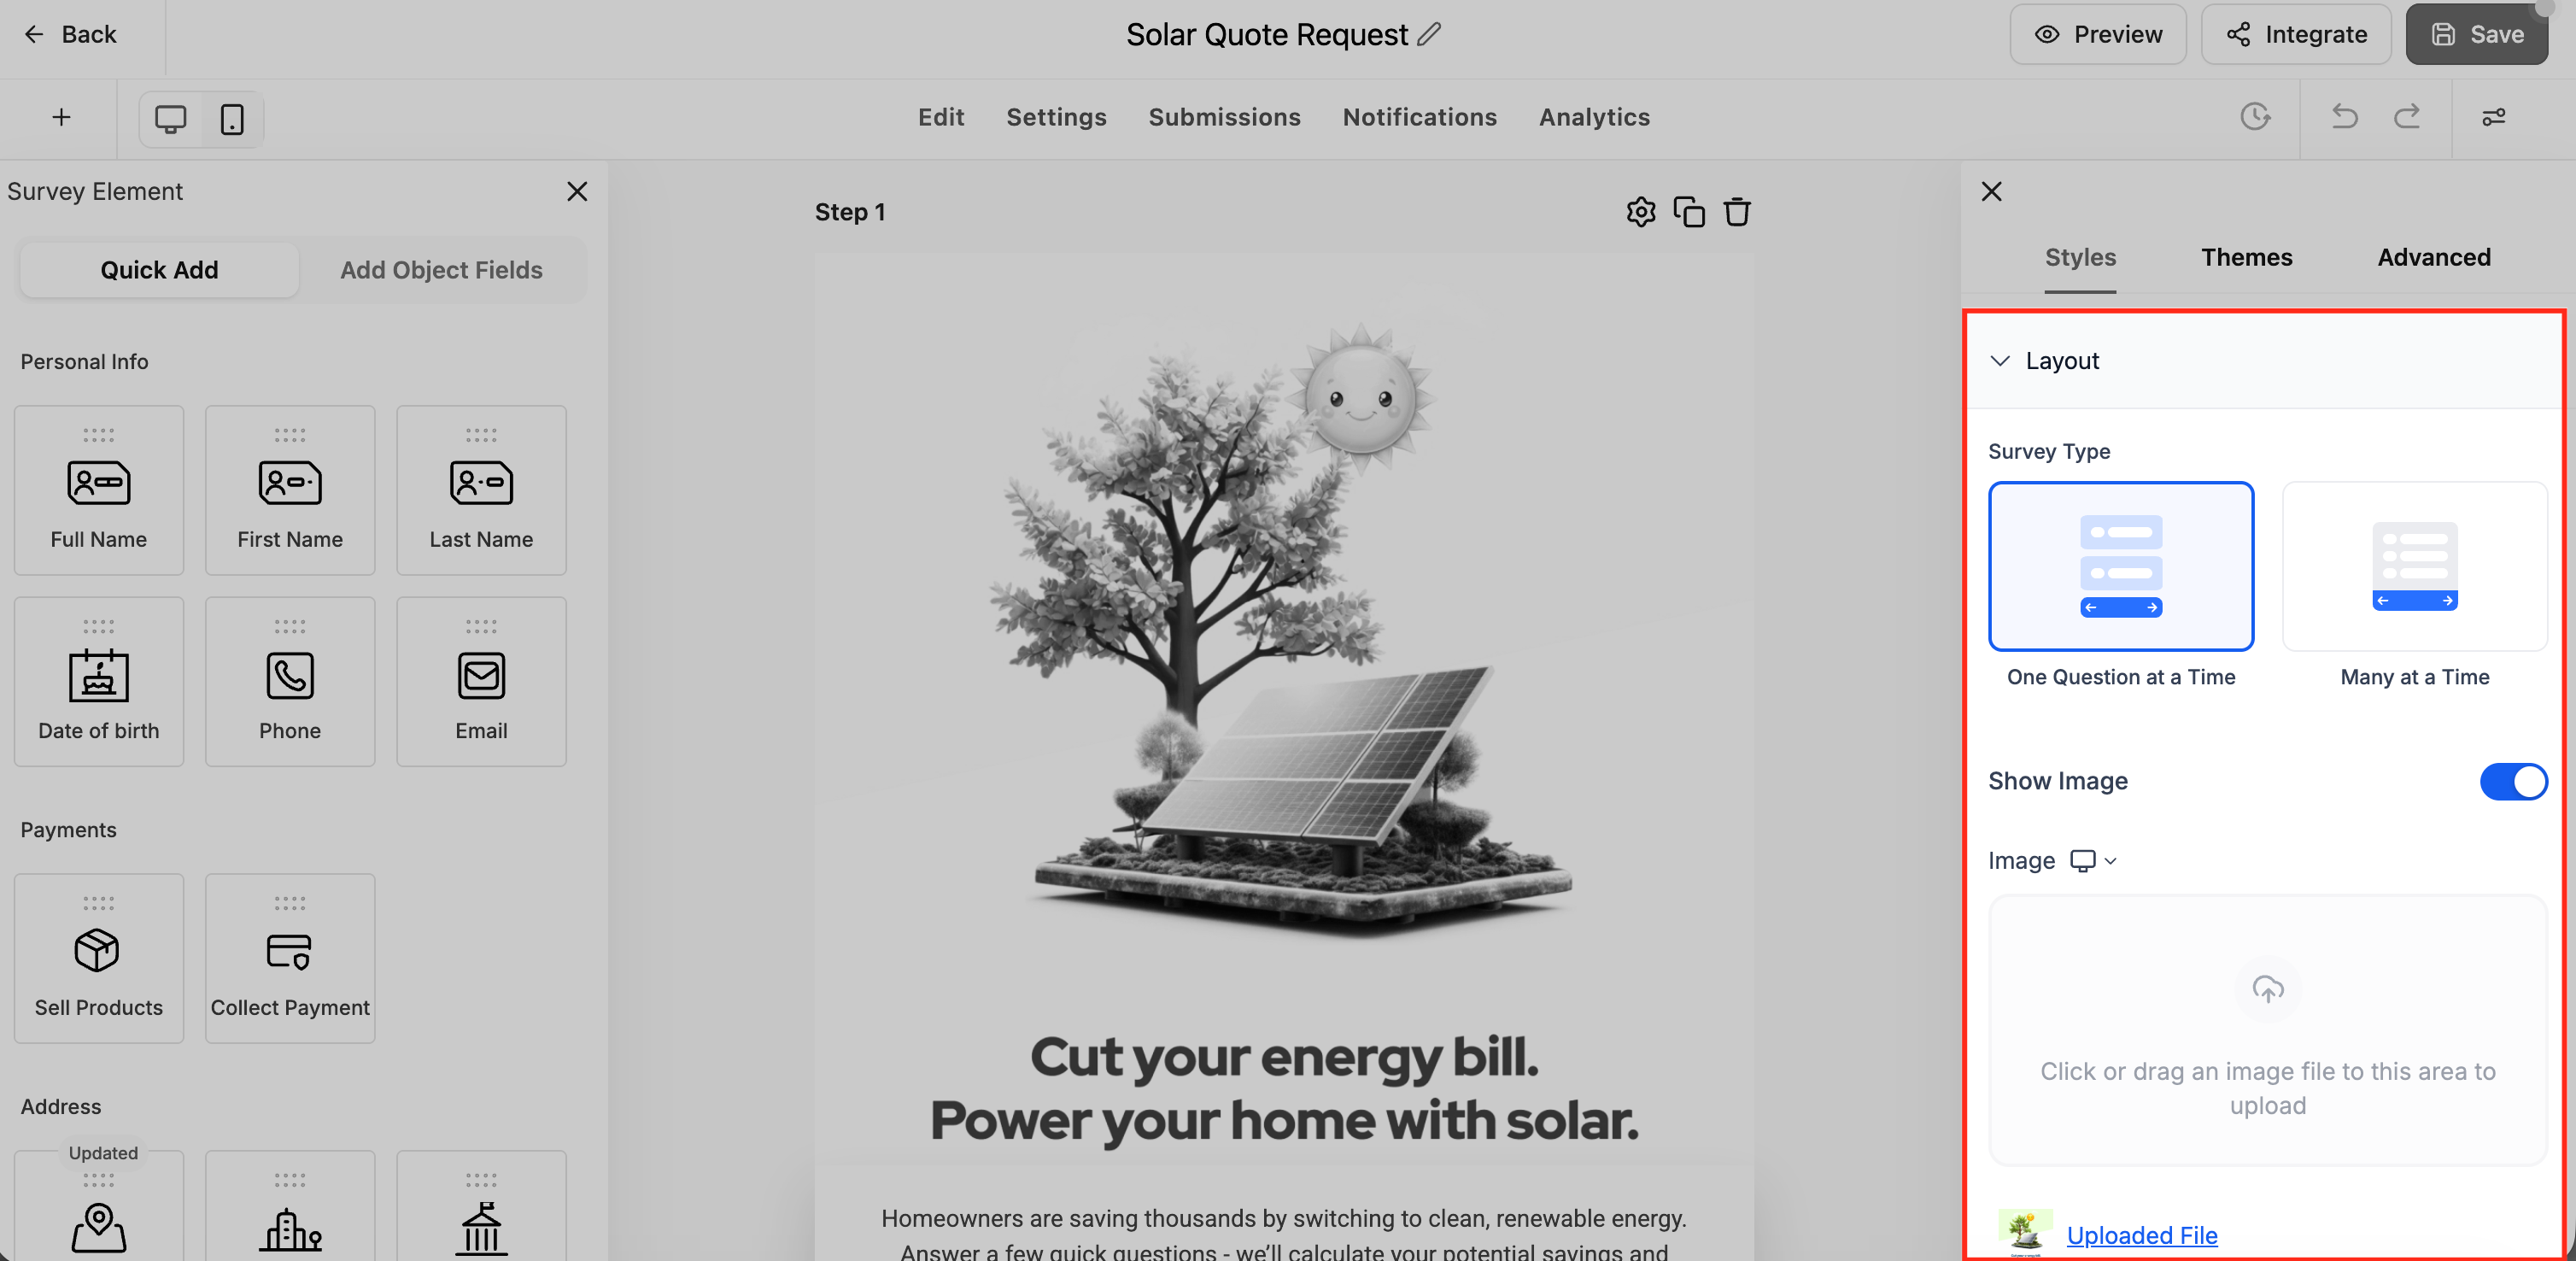
Upload or select an image.
Choose an Image Layout.
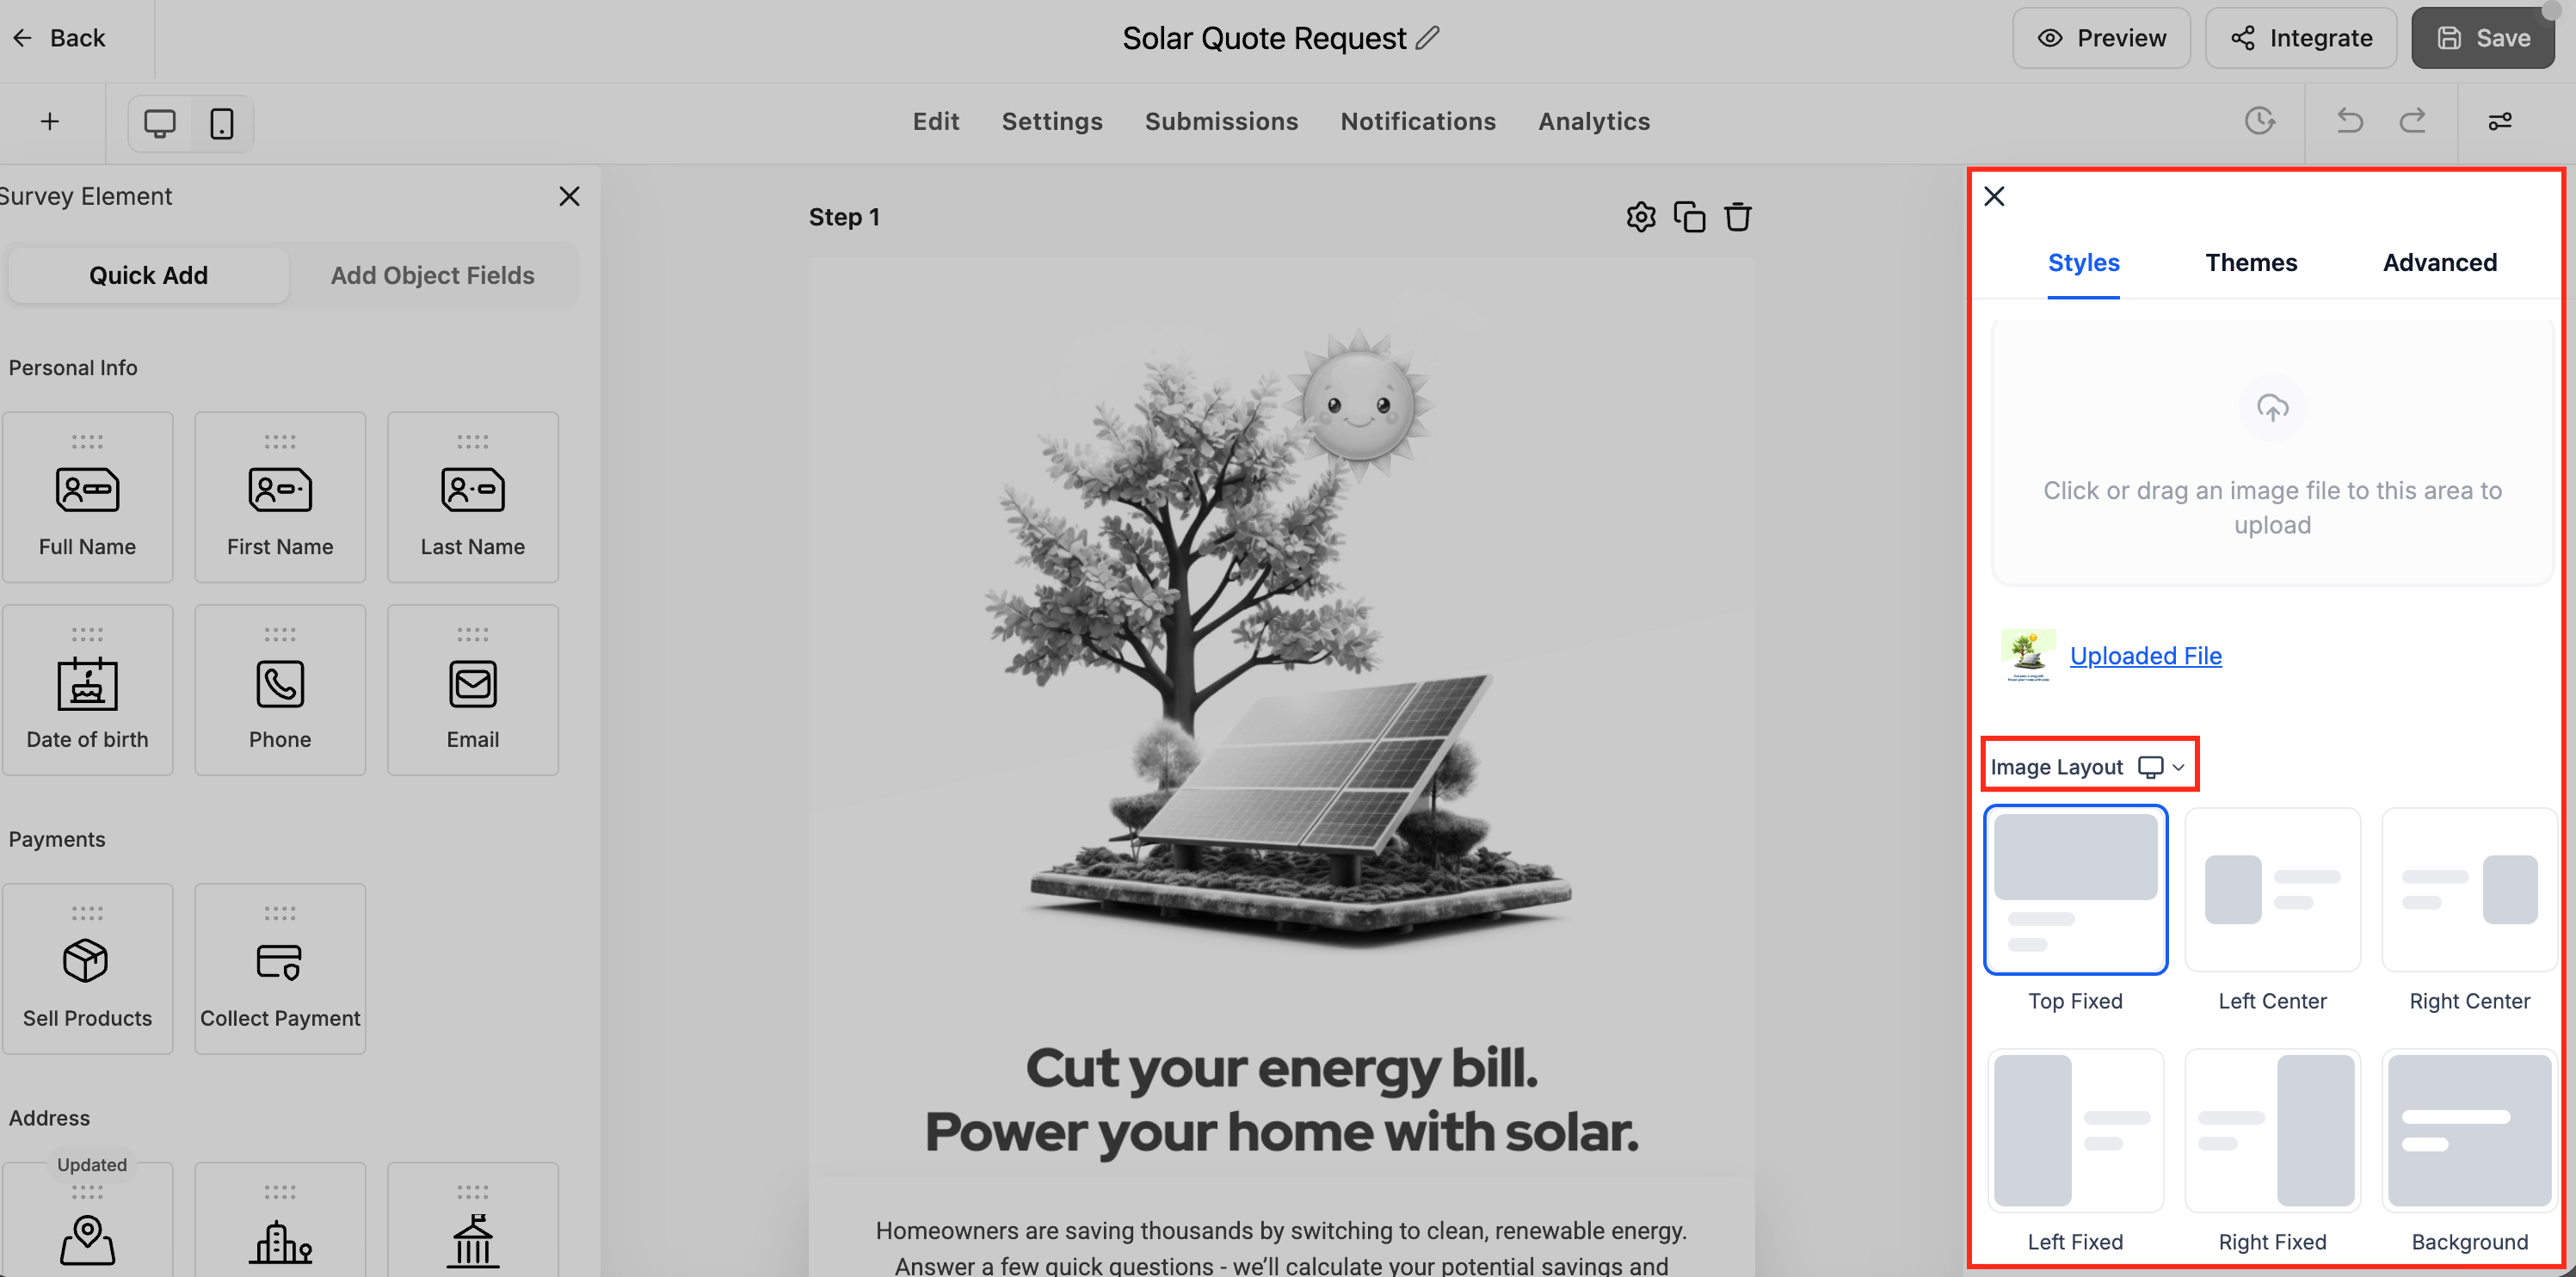
Configure the available layout-specific settings.
Save your survey.
Open the survey builder.
Select the slide you want to customize.
Click the Settings icon for that slide.
Locate Image Layout Settings.
Change the setting to Independent.
Upload a different image if desired.
Select a different Image Layout.
Save your changes.
Best Practices
Following a few design recommendations can help create more visually balanced Forms and Surveys while improving the overall user experience.
- Use Center layouts for forms with smaller images.
- Use Fixed layouts for larger promotional or hero images.
- Select a Focal Point before publishing fixed layouts to ensure important content remains visible.
- Increase Image-Field Spacing when forms contain many fields to improve readability.
- Use Corner Radius to match your brand's visual style.
- Override survey slide layouts only when individual slides benefit from unique imagery.
Frequently Asked Questions
Was this article helpful?
That’s Great!
Thank you for your feedback
Sorry! We couldn't be helpful
Thank you for your feedback
Feedback sent
We appreciate your effort and will try to fix the article