Opportunity CSV import lets you create new Opportunities or update existing Opportunities in bulk using a CSV file. This is useful when migrating deal data from another system, adding Opportunities to existing contacts, or updating Opportunity information such as Pipeline, Stage, Status, Value, and custom fields.
Every Opportunity must be associated with a contact. If the contacts already exist in HighLevel, you can perform an Opportunities-only import using their Contact IDs. If you also need to create or import the contacts, use a Contacts + Opportunities import instead.
Important: For an Opportunities-only import, each row must contain a valid Contact ID, Opportunity Name, and Pipeline.
Key Benefits of Importing Opportunities with a CSV File
CSV import provides a faster way to create or update multiple Opportunities without editing each record individually. Preparing the data correctly before importing also helps preserve the relationship between contacts, pipelines, stages, and Opportunity information.
Bulk Opportunity Creation: Create multiple Opportunities from one CSV file.
Existing Opportunity Updates: Use Opportunity IDs to update existing records in bulk.
Contact Association: Connect imported Opportunities to the appropriate existing contacts.
Pipeline Organization: Import Opportunities into existing HighLevel pipelines and applicable stages.
Custom Data Migration: Map supported Opportunity custom fields from another CRM or data source.
Import Troubleshooting: Review import results and failed rows through Bulk Actions.
Before You Import Opportunities
Preparing your CSV and HighLevel account before starting the import reduces mapping errors and unintended duplicate Opportunities. Confirm that the required CRM records and fields exist before uploading the file.
Before importing:
Save the file in CSV format.
Keep the CSV file under the currently documented 30 MB limit.
Create the HighLevel pipelines you intend to use before importing.
Create the applicable pipeline stages before importing stage information.
Create any Opportunity custom fields you want to map.
Confirm that every Opportunity-only row contains a valid Contact ID.
Include Opportunity ID when updating an existing Opportunity.
Review your data for blank or incorrect values.
Test the process with a small sample file before importing a large dataset.
Important: Completed imports do not have a one-click undo option. Review your mappings and test with a small group of records before running a large import.
Prepare Pipeline and Stage Values
Pipeline information determines where imported Opportunities are organized. Preparing these values in HighLevel before the import helps ensure the Opportunities are assigned to the intended sales process.
The Pipeline value in the CSV should correspond to an existing HighLevel pipeline.
If you include Pipeline Stage, make sure the intended stage already exists in the applicable pipeline.
Opportunity-Only vs Contacts + Opportunities Import
HighLevel supports importing only Opportunities or importing Contacts and Opportunities together. Choose the method based on whether the contacts associated with the Opportunities already exist in HighLevel.
| Import Type | Use When |
|---|---|
| Opportunities Only | The contacts already exist in HighLevel and you have their valid Contact IDs. |
| Contacts + Opportunities | You need to import or create contacts and associate their Opportunities from the same CSV rows. |
For an Opportunities-only import, do not add unnecessary Contact-import requirements such as Name, Email, or Phone formatting when the contact already exists and is being associated through Contact ID.
For a Contacts + Opportunities import, the applicable Contact-import requirements also apply because HighLevel is creating or importing the Contact records.
Required and Optional Opportunity Fields
The fields included in your CSV determine what information HighLevel can create or update on each Opportunity. Required fields establish the contact relationship and pipeline placement, while optional fields let you migrate additional deal information.
| Field | Requirement | Purpose |
|---|---|---|
| Contact ID | Required for Opportunities-only import | Associates the Opportunity with an existing HighLevel contact. |
| Opportunity Name | Required | Defines the Opportunity name. |
| Pipeline | Required | Assigns the Opportunity to an existing pipeline. |
| Pipeline Stage | Recommended when stage placement is needed | Places the Opportunity in the applicable stage of the selected pipeline. |
| Opportunity ID | Required when updating an existing Opportunity | Identifies the specific existing Opportunity HighLevel should update. |
| Opportunity Value | Optional | Stores the monetary value associated with the Opportunity. |
| Status | Optional | Sets the applicable Opportunity status. |
| Custom Opportunity Fields | Optional | Imports additional Opportunity-specific information. |
Opportunity Status
HighLevel supports the following Opportunity statuses:
Open
Won
Lost
Abandoned
If your source CRM uses different status names, normalize those values to the applicable HighLevel statuses before importing.
Opportunity Custom Fields
Opportunity custom fields are separate from Contact custom fields. Create the required custom fields for the Opportunity object before starting the import.
During field mapping, map each CSV column to the corresponding Opportunity custom field.
How to Import Opportunities Using a CSV File
The import workflow lets you choose the record type, upload the CSV, map each column to a HighLevel field, and review import settings before processing the records. Carefully review the mappings before starting because incorrect identifiers or pipeline values can create unintended records.
Step 1: Start the Import
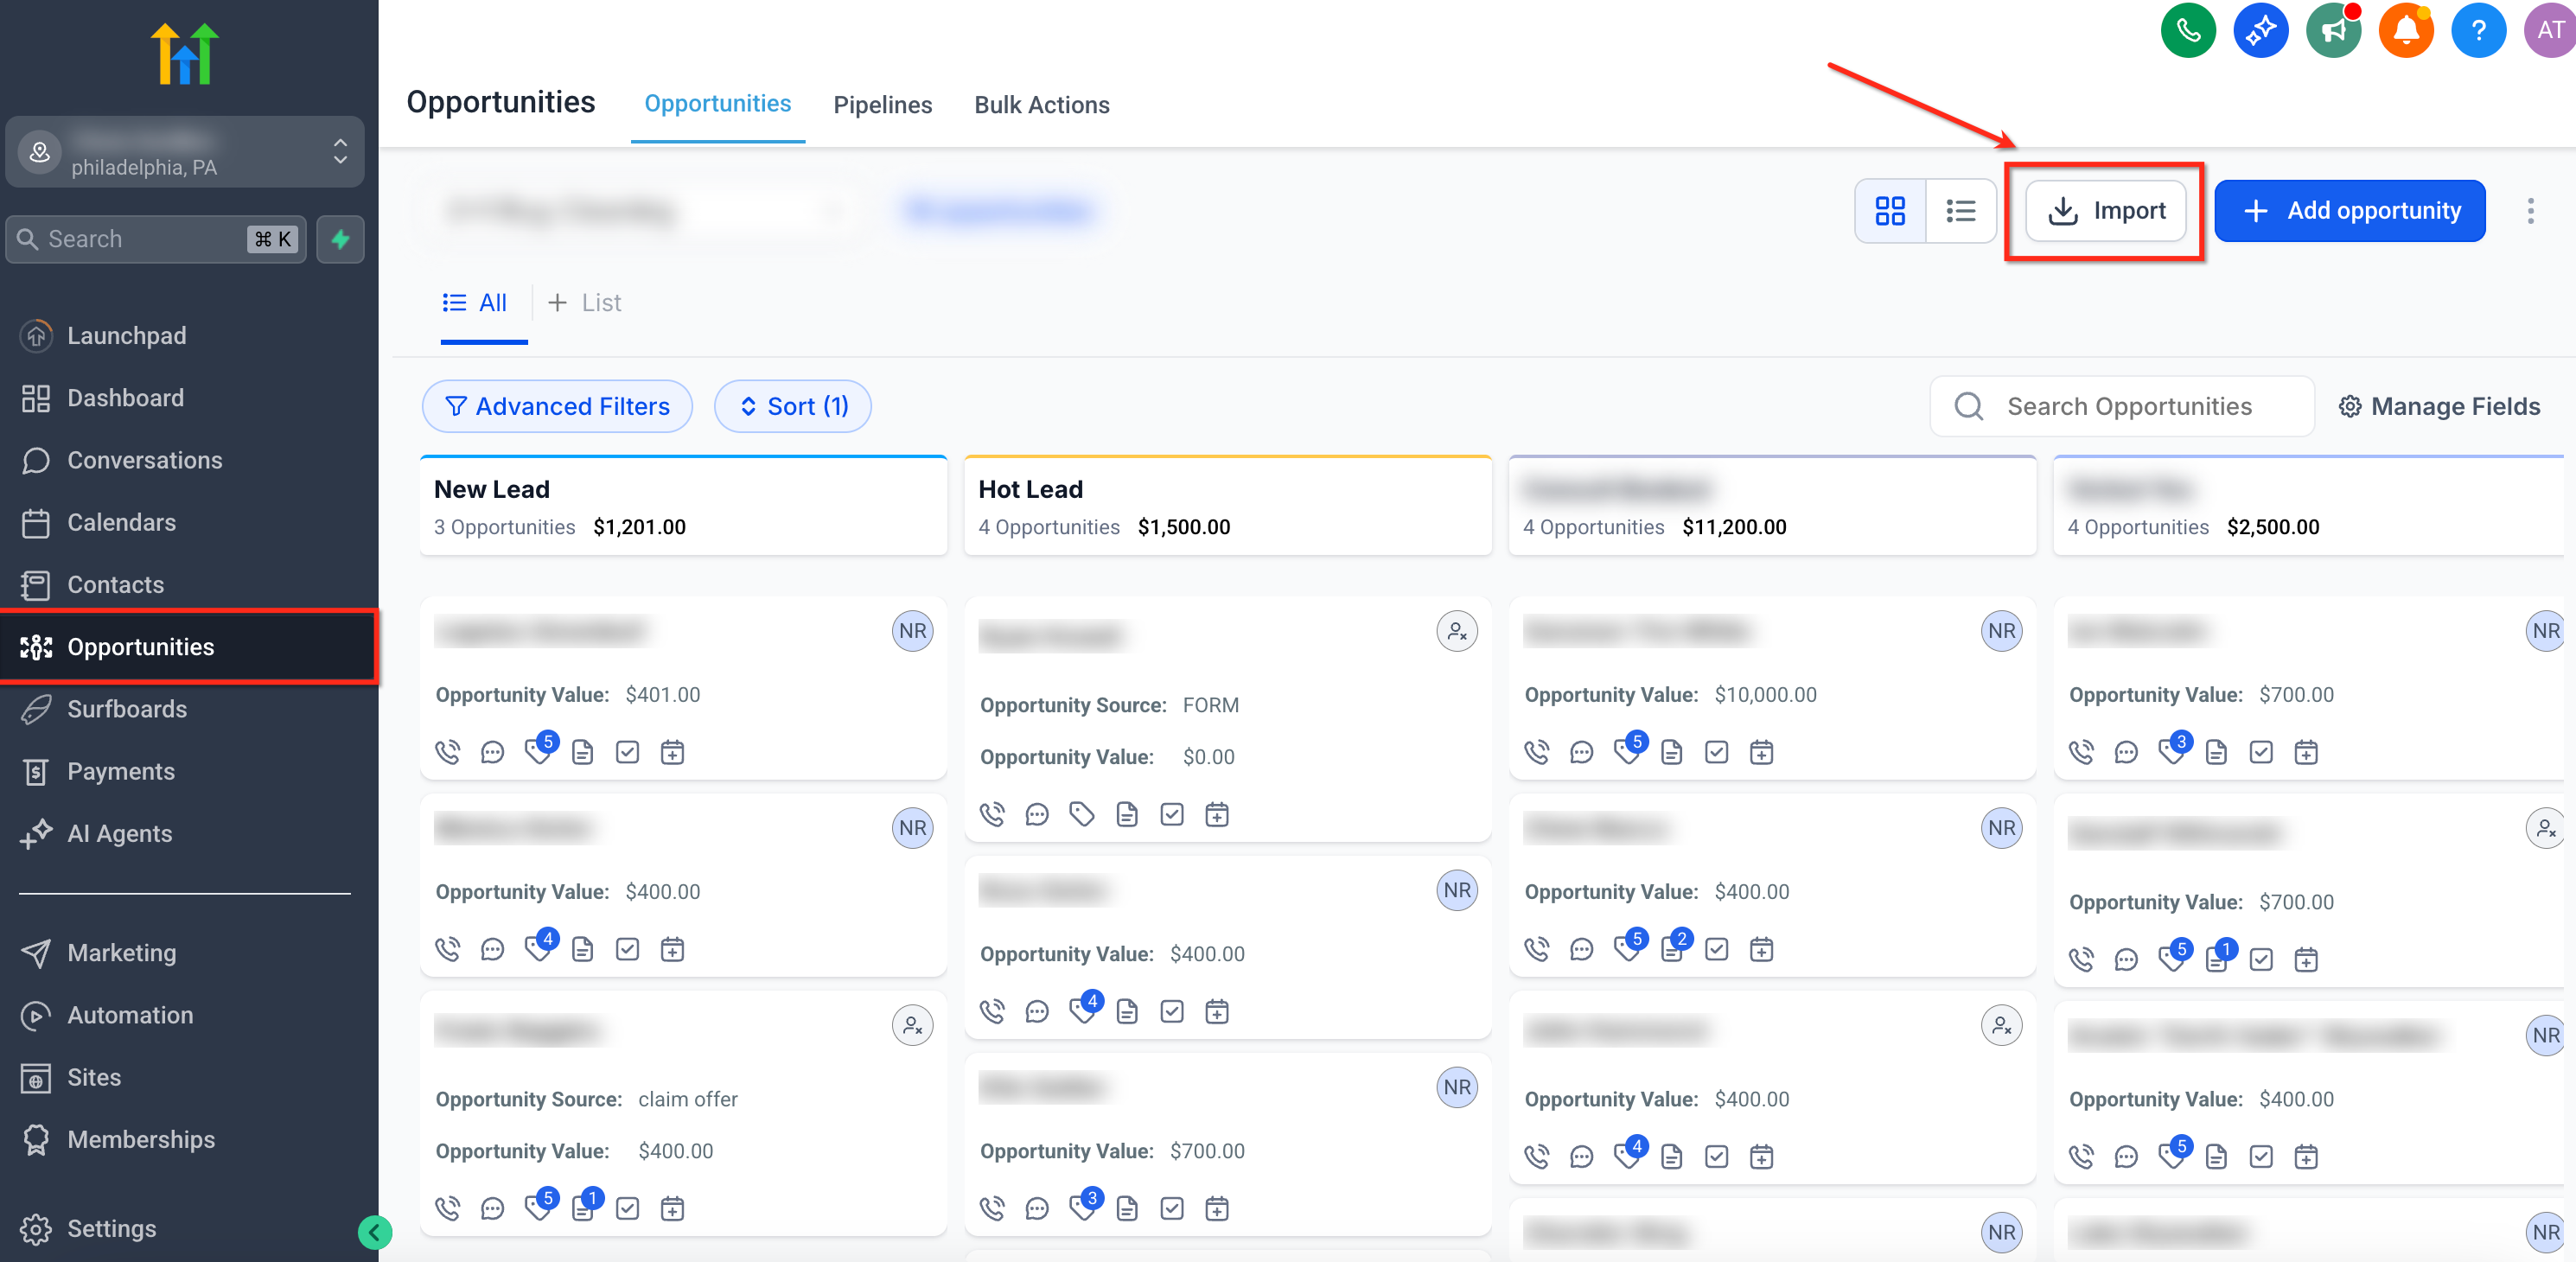
Go to Opportunities in your HighLevel sub-account.
Click the available Import option.
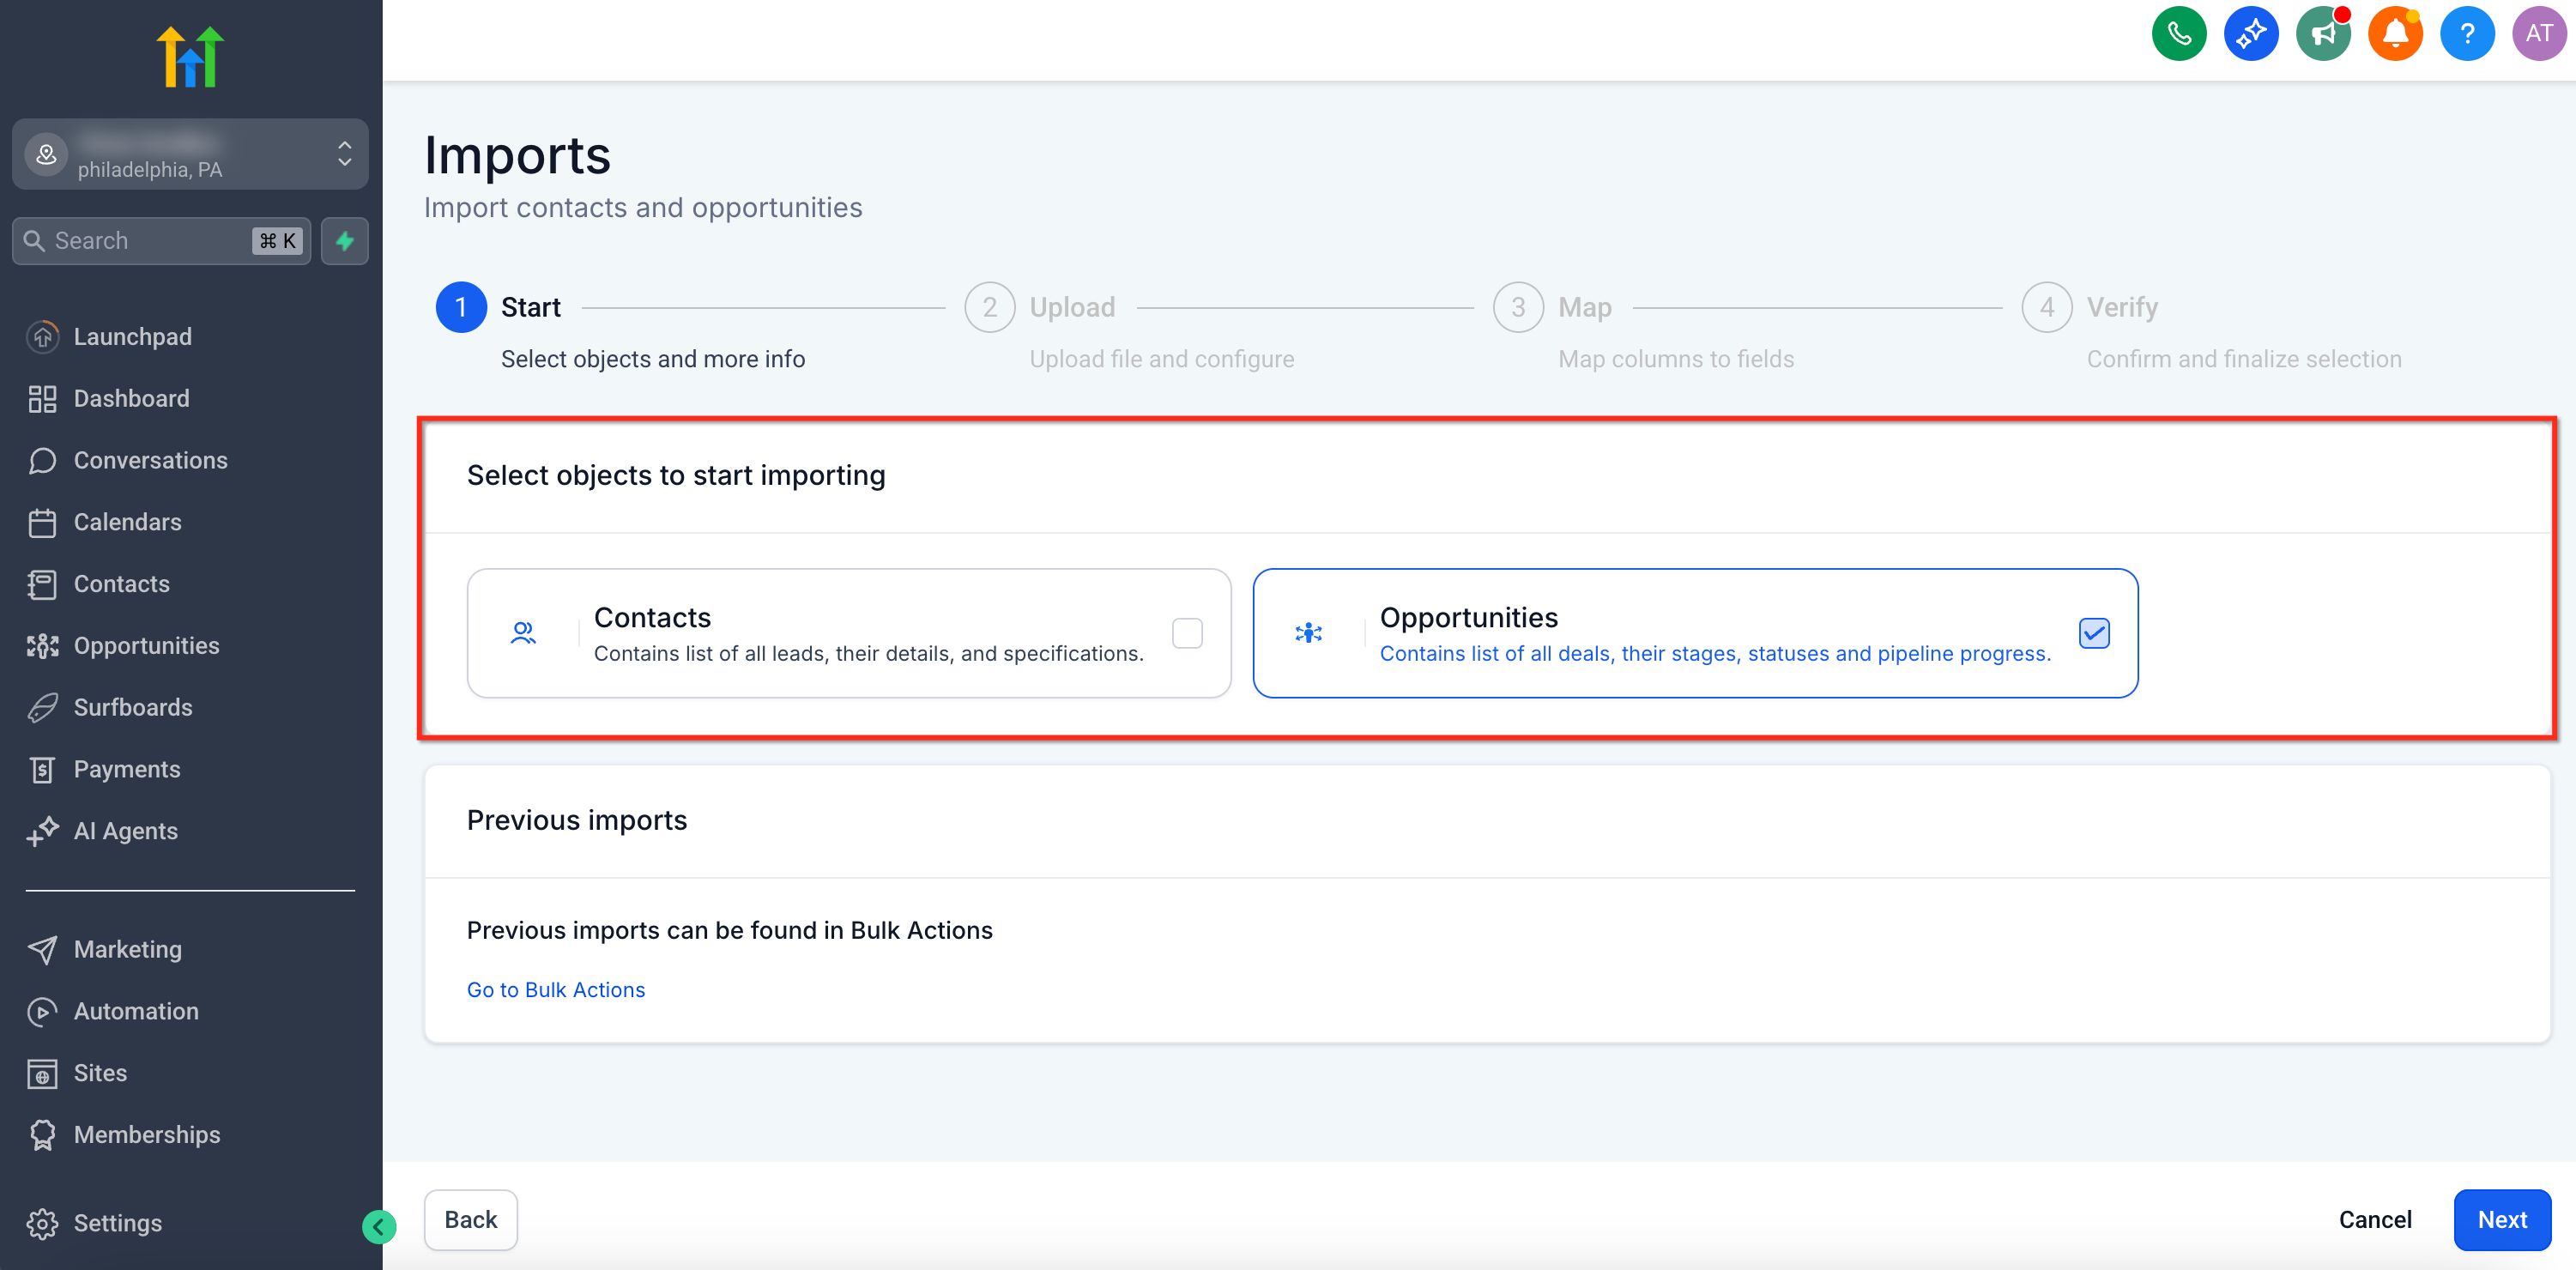
Choose the applicable import type:
Opportunities, or
Contacts + Opportunities, when both record types need to be imported.
Step 2: Upload the CSV File
Select or drag and drop your CSV file into the importer.
Confirm that the file uploads successfully.
Review any initial file warnings before continuing.
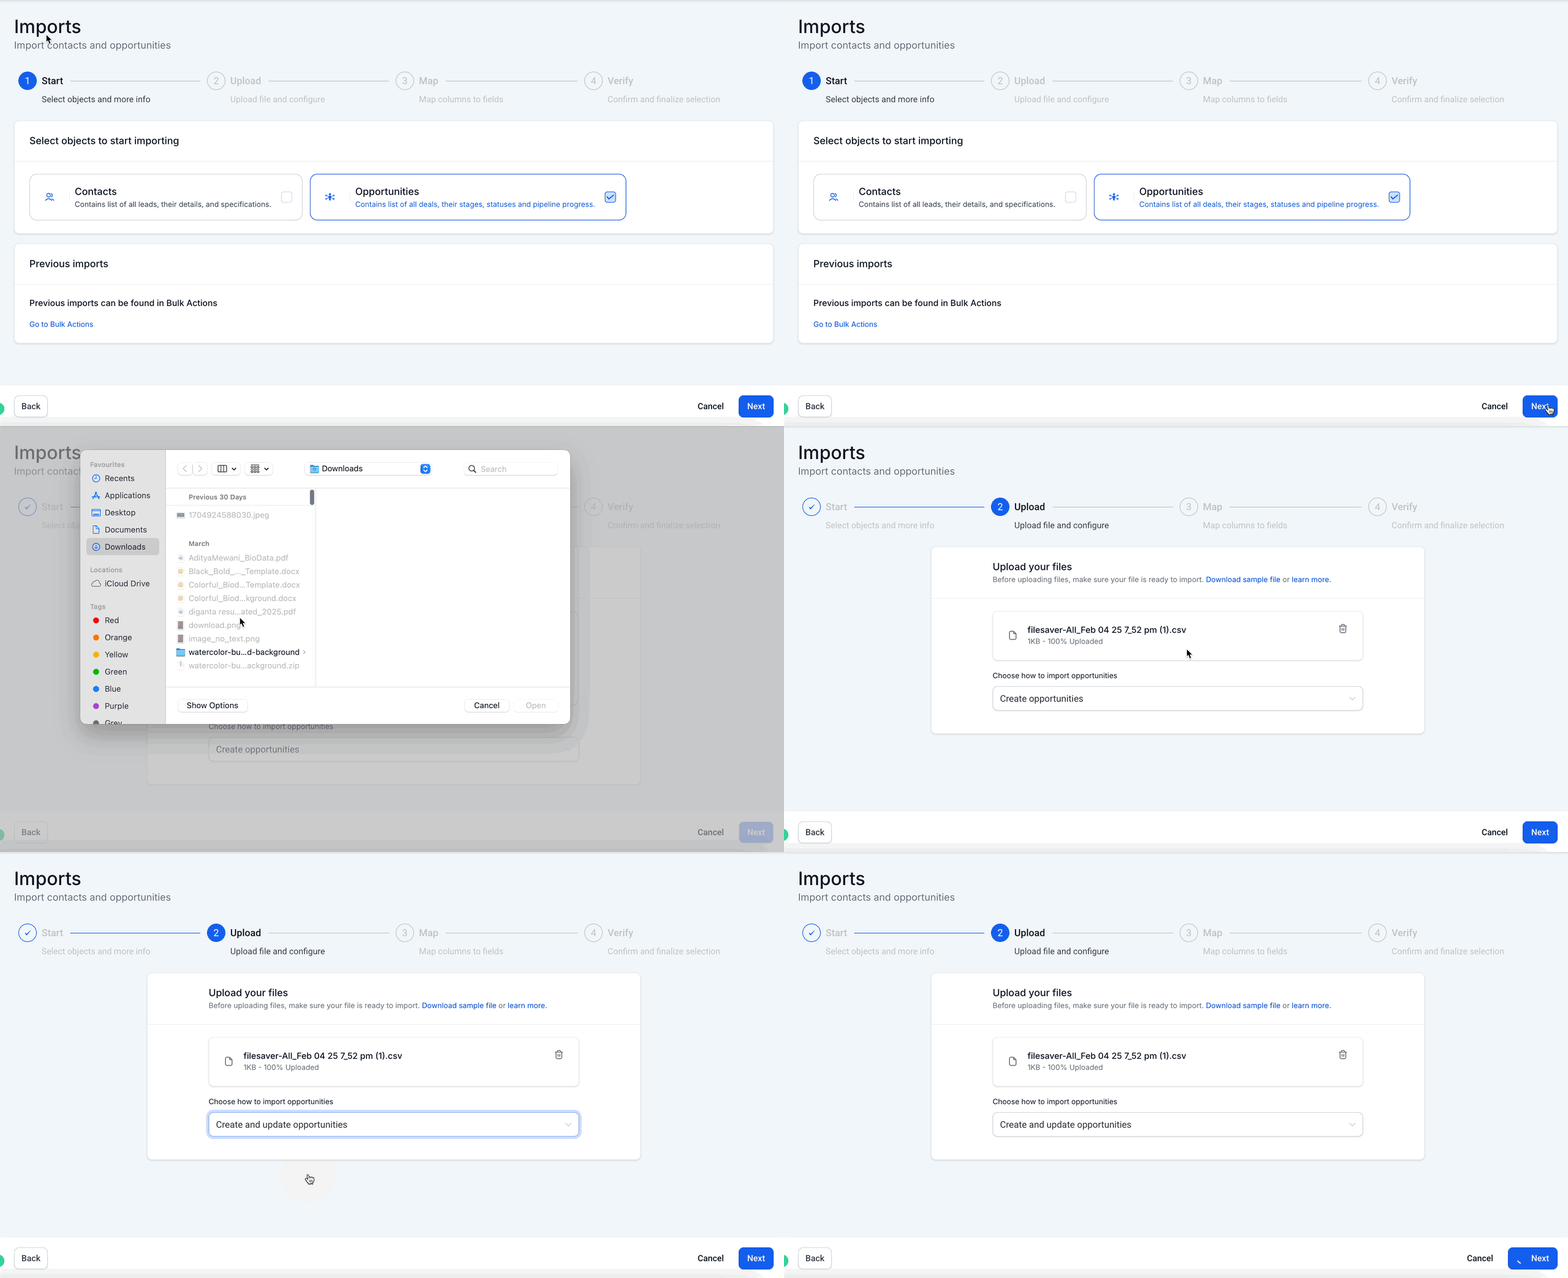
Select the applicable import behavior based on whether you are creating new records or updating existing records.
When updating existing Opportunities, make sure the CSV includes the correct Opportunity ID values.
Important: If you intend to update an existing Opportunity but do not provide the correct Opportunity ID, HighLevel may create another Opportunity instead of updating the intended record.
Step 4: Map CSV Columns to HighLevel Fields
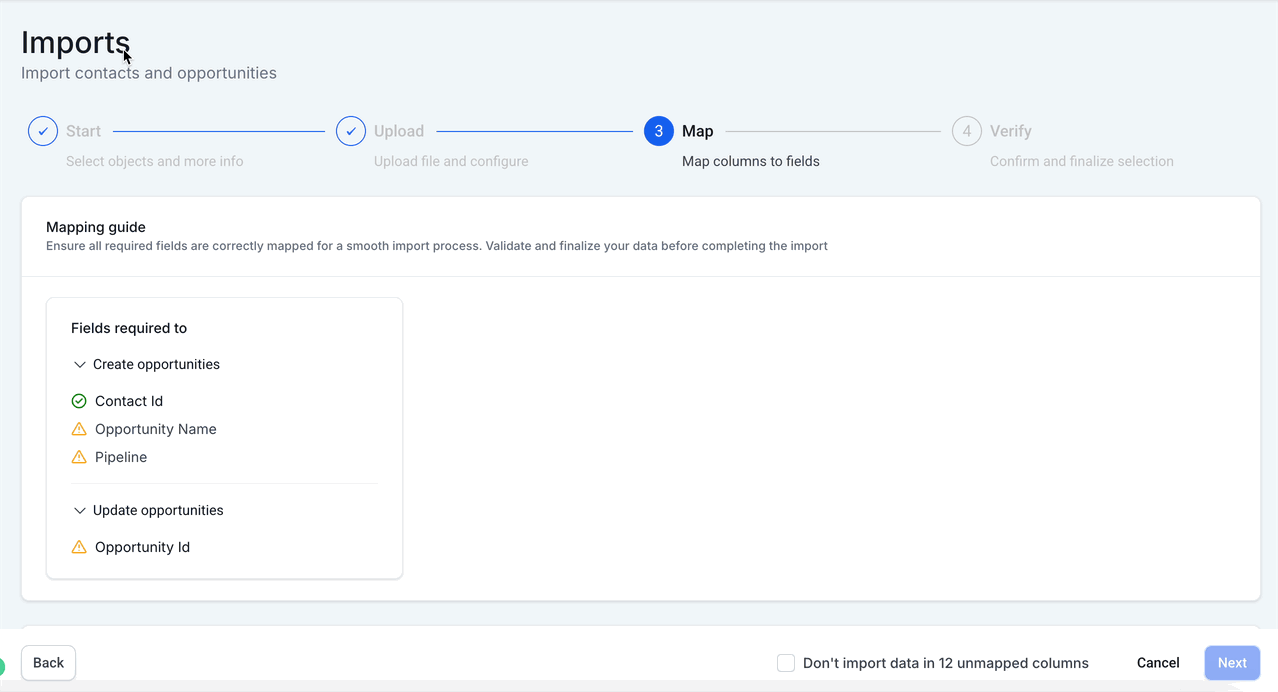
Field mapping tells HighLevel where each CSV column belongs. Verify identifiers and Opportunity fields carefully before proceeding.
Map the required fields:
Contact ID
Opportunity Name
Pipeline
Then map applicable optional fields such as:
Pipeline Stage
Opportunity ID
Opportunity Value
Status
Opportunity custom fields
If a CSV column should not be imported, leave it unmapped and confirm Don't import data for unmapped columns when prompted.
Step 5: Configure Empty-Value Behavior
When updating existing Opportunities, decide how blank cells in the CSV should affect existing HighLevel data.
Enable Don't update Empty Values when blank CSV cells should leave existing Opportunity values unchanged.
For example:
If an existing Opportunity has a value in a custom field but the corresponding CSV cell is blank, enabling this option preserves the existing HighLevel value instead of replacing it with an empty value.
Step 6: Review and Start the Import
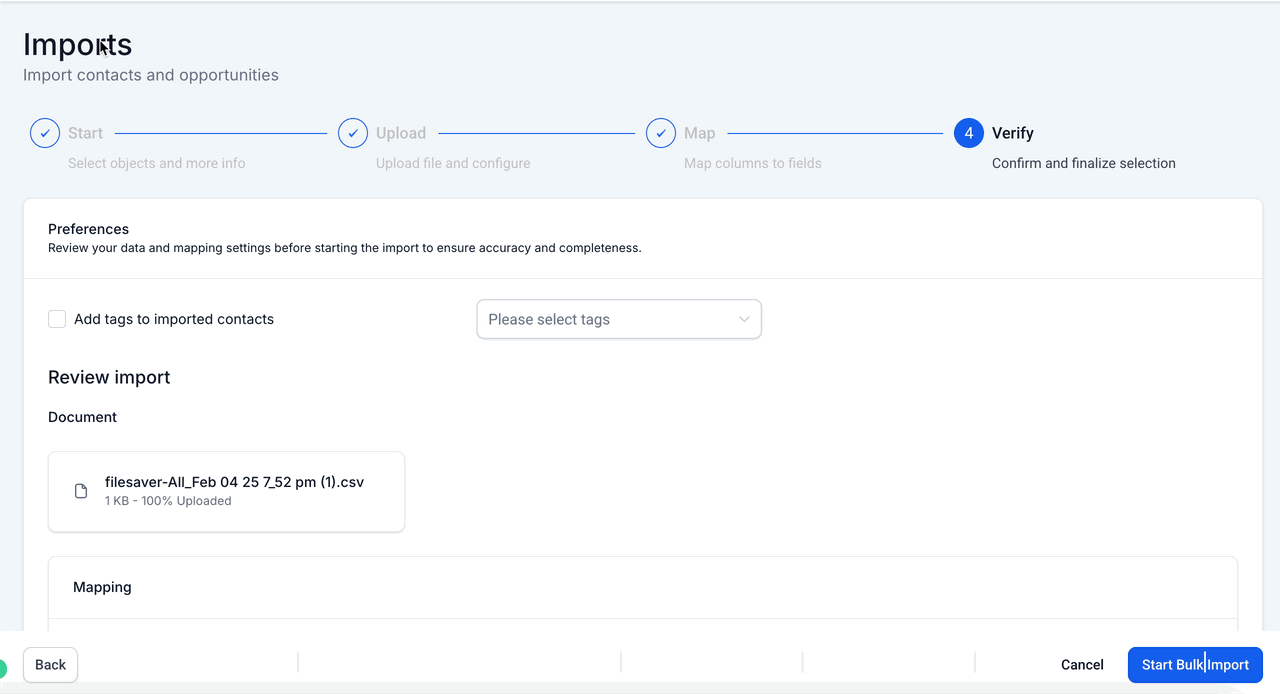
Before submitting:
Review the mapped fields.
Confirm that required fields are mapped.
Review any warnings.
Confirm your empty-value settings.
Verify that unwanted columns are excluded.
Start the import.
How Opportunity Updates Work
Updating Opportunities requires a reliable way to identify the existing record. Opportunity ID provides that identifier so HighLevel can apply imported values to the intended Opportunity rather than treating the row as a new deal.
Creating New Opportunities
When creating a new Opportunity:
Include a valid Contact ID.
Include Opportunity Name.
Include Pipeline.
Add Stage, Status, Value, and custom fields when needed.
Opportunity ID is not required for a new Opportunity.
Updating Existing Opportunities
When updating an Opportunity:
Include the existing Opportunity ID in the CSV.
Map that column to Opportunity ID.
Map the fields you want to update.
Decide whether blank cells should overwrite existing values.
Start with a small test import before updating a large number of Opportunities.
Important: A missing or incorrect Opportunity ID can result in the importer creating another Opportunity instead of updating the intended one.
If you need the IDs before preparing your CSV, see the related HighLevel documentation for locating Pipeline, Stage, and Opportunity IDs.
Import Contacts and Opportunities Together
A combined import is useful when the contacts associated with the Opportunities do not already exist in HighLevel. Contact and Opportunity information can be placed on the same CSV row so the records can be created/imported and associated during the import.
Use this method when migrating data such as:
| Contact Data | Opportunity Data |
|---|---|
| First Name | Opportunity Name |
| Last Name | Pipeline |
| Pipeline Stage | |
| Phone | Opportunity Value |
| Contact custom fields | Opportunity Status |
| Opportunity custom fields |
During the import:
Select Contacts + Opportunities.
Upload the combined CSV.
Map Contact columns to Contact fields.
Map Opportunity columns to Opportunity fields.
Review both sets of mappings.
Complete the import.
Contact-specific requirements such as valid identifying information and phone formatting apply when Contact records are being imported.
For complete Contact-import preparation requirements, see the dedicated Contact CSV import documentation rather than duplicating those rules here.
Review Import Results and Fix Errors
Bulk Actions provides visibility into the status and outcome of your CSV import. Reviewing the results is especially important after large migrations because some rows can succeed while others fail due to missing IDs, invalid values, or mapping problems.
After starting the import:
Go to Bulk Actions.
Locate the applicable import.
Review its status.
Click Show Stats to view the import results.
Review successful and failed records.
Open the Error tab when failures are present.
Download the available error log.
Review the reason each affected row failed.
Correct the failed rows in your CSV.
Re-import only the corrected records as appropriate.
Avoid immediately re-importing the entire original file when only some rows failed, especially if the successful rows already created Opportunities.
Troubleshooting Common Opportunity Import Issues
Most Opportunity import errors are caused by missing identifiers, pipeline mismatches, incorrect update behavior, or field-mapping problems. Checking these areas first can help resolve failed rows without rebuilding the entire import.
Opportunity Is Not Linked to the Correct Contact
Confirm that the CSV contains the correct Contact ID and that the column is mapped to Contact ID.
For an Opportunities-only import, each Opportunity must be associated with an existing contact.
A New Opportunity Was Created Instead of Updating the Existing One
Check the Opportunity ID. If the update row does not contain the correct Opportunity ID, HighLevel may treat it as a new Opportunity.
Pipeline Is Not Accepted
Confirm that the Pipeline value corresponds to an existing HighLevel pipeline. Create the required pipeline before importing rather than expecting the CSV import to create the pipeline automatically.
Opportunity Appears in the Wrong Stage
Review the Pipeline Stage value and confirm that the intended stage exists within the selected pipeline.
Existing Data Was Replaced by Blank Values
Review whether Don't update Empty Values was enabled during an update import. Enable it when blank CSV cells should preserve the existing HighLevel values.
A Custom Field Is Missing During Mapping
Confirm that:
The custom field was created before starting the import.
It was created for the Opportunity object rather than the Contact object.
You are mapping the CSV column to the correct Opportunity field.
Some Rows Failed While Others Imported Successfully
Open the import under Bulk Actions > Show Stats > Error, download the error log, correct the failed rows, and re-import the corrected data.
Frequently Asked Questions
Q: Can I import Opportunities without importing Contacts?
Yes, if the contacts already exist in HighLevel. For an Opportunities-only import, each Opportunity must include a valid Contact ID so HighLevel can associate it with the correct contact.
Q: Is Contact ID required for an Opportunities-only import?
Yes. Current HighLevel documentation requires Contact ID, Opportunity Name, and Pipeline for an Opportunities-only CSV import.
Q: How do I update an existing Opportunity instead of creating a new one?
Include the existing Opportunity ID in your CSV and map it during the import. Without the correct Opportunity ID, HighLevel may create another Opportunity instead of updating the intended record.
Q: Do my Pipelines and Stages need to exist before importing?
Create the required pipelines and applicable stages before importing. Pipeline values should correspond to existing HighLevel pipelines, and any imported stage should belong to the intended pipeline.
Q: What happens to existing values when my update CSV contains blank cells?
Enable Don't update Empty Values when blank CSV cells should leave existing HighLevel Opportunity data unchanged.
Q: Can I import Opportunity custom fields?
Yes. Create the custom fields for the Opportunity object before starting the import, then map the applicable CSV columns during field mapping.
Q: Can I undo an Opportunity import?
No. HighLevel does not provide a one-click rollback for a completed import. Test with a small sample file and review your mappings carefully before processing a large dataset.
Q: Where can I find failed Opportunity import rows?
Open Bulk Actions, locate the import, select Show Stats, and review the Error tab. Download the error log to identify and correct failed rows.
Related Articles
Was this article helpful?
That’s Great!
Thank you for your feedback
Sorry! We couldn't be helpful
Thank you for your feedback
Feedback sent
We appreciate your effort and will try to fix the article