This article will guide you through the A2P Sole Proprietor Brand Registration process for 10DLC messaging. By following this guide, you will understand who qualifies, how to register, the associated fees, and limitations. This ensures your SMS/MMS campaigns stay compliant with carrier regulations and operate smoothly.
Note: Customers with a tax ID are not eligible for Sole Proprietor Brands. They should use a Low Volume Standard Brand instead.TABLE OF CONTENTS
- What is A2P Sole Proprietor Brand Registration?
- Key Benefits of A2P Sole Proprietor Brand Registration
- What are the Requirements for Sole Proprietor Registration?
- Brand Compliance Checklist (Required for Approval)
- How to Register as a Sole Proprietor Brand?
- Step 1: Navigate to Trust Center
- Step 2: Determine Profile Needs
- Step 3: Add Business Details
- Step 4: Add Business Address
- Step 5: Add Contact Information of Authorized Representatives
- Step 6: Business Use case Acknowledgement
- Step 7: Add Business Brand Details
- Step 8: Add Campaign Details
- Step 9: User Consent
- Step 10: Persona Verification
- Tips to Successfully Pass Persona Verification
- Frequently Asked Questions
- Related Articles
What is A2P Sole Proprietor Brand Registration?
Sole Proprietor registration is ideal for individuals or small businesses in the U.S. and Canada who operate under their own name, have no formal business entity or Tax ID (like an EIN), and only one employee. This registration allows them to send compliant SMS/MMS messages via 10DLC (10-Digit Long Code) channels, ensuring better messaging compliance and deliverability.
Key Benefits of A2P Sole Proprietor Brand Registration
- Legally send SMS/MMS through 10dlc-compliant routes.
- Build brand trust with better deliverability and fewer message filtering issues.
- Avoid heavy carrier penalties for unregistered messaging.
- Access basic messaging throughput suitable for low-volume messaging needs.
What are the Requirements for Sole Proprietor Registration?
Sole Proprietor brands are available to individuals or small businesses who meet the following requirements:
- No Tax ID: Customers with a tax ID are not eligible for Sole Proprietor Brands; they should use a Low Volume Standard Brand instead.
- 1 Phone Number per Campaign: Sole Proprietor accounts purchasing multiple local numbers may encounter errors when texting, specifically error code 30034, even with approved numbers. This issue arises because each purchased number needs to be specifically linked to an approved A2P 10DLC campaign.
- OTP Verification: Confirm your identity using a One-Time Password (OTP) verification step.
- Valid Details: Must include a valid and accurate business name, first name, last name, email address, phone number, and physical address.
- US Addresses: Only valid U.S. addresses (including P.O. boxes) are allowed. Addresses in other countries are no longer permitted.
- Operate under your legal name: No LLC, Corporation, etc.
- Carrier-matching contact details: Mobile number and email must match carrier records for successful verification.
Brand Compliance Checklist (Required for Approval)
Before submitting your A2P Brand Registration, verify the following:
Note: Failure to comply with these standards will result in brand rejection by carriers.- Verify Message Category
Ensure your campaign does not fall under a Forbidden Message Category:- Debt relief, consolidation, and forgiveness programs are prohibited for A2P SMS, even if first-party.
- Lead Generation and Marketing used to acquire new leads are not allowed (including bought lists, shared databases, or unclear opt-in practices).
- Promotional campaigns for lending and investment brands are disallowed, even if first-party. These brands may only send transactional notifications.
- Websites mentioning data sharing with affiliates or third parties will likely be rejected.
- Debt relief, consolidation, and forgiveness programs are prohibited for A2P SMS, even if first-party.
- Avoid Deceptive Advertising
Your website must NOT include:- False claims about products or services
- Missing required disclosures
- Misleading information
- Hidden terms in small print
- Unverified comparative claims
- False claims about products or services
How to Register as a Sole Proprietor Brand?
Follow these steps carefully to complete your Sole Proprietor Brand registration:
Step 1: Navigate to Trust Center
- Click on Settings from your sub-account.
- Select Phone System under Business Services.
- Click on the Trust Center tab.

Step 2: Determine Profile Needs
Note: You can check the brand name at https://opencorporates.com/ to make sure the business name does not have an EIN.- Click on the Start Registration button under A2P Messaging (SMS) tab.

- Select United States or Canada from the "In which country is your business entity registered?" dropdown.
- Select 'No, the business I'm registering does not have a tax ID' option from the "Does the business you're registering have a tax ID (Ex. US EIN, Canada BN9, etc)?" section.
- Click on Continue.

Step 3: Add Business Details
Important: Make sure the business name doesn’t include “LLC” or any terms suggesting it’s more than a sole proprietorship.
- Enter either the legal name of the organization which is sending the messages, or your own name if this brand is not for an organization.
- Click on Continue.

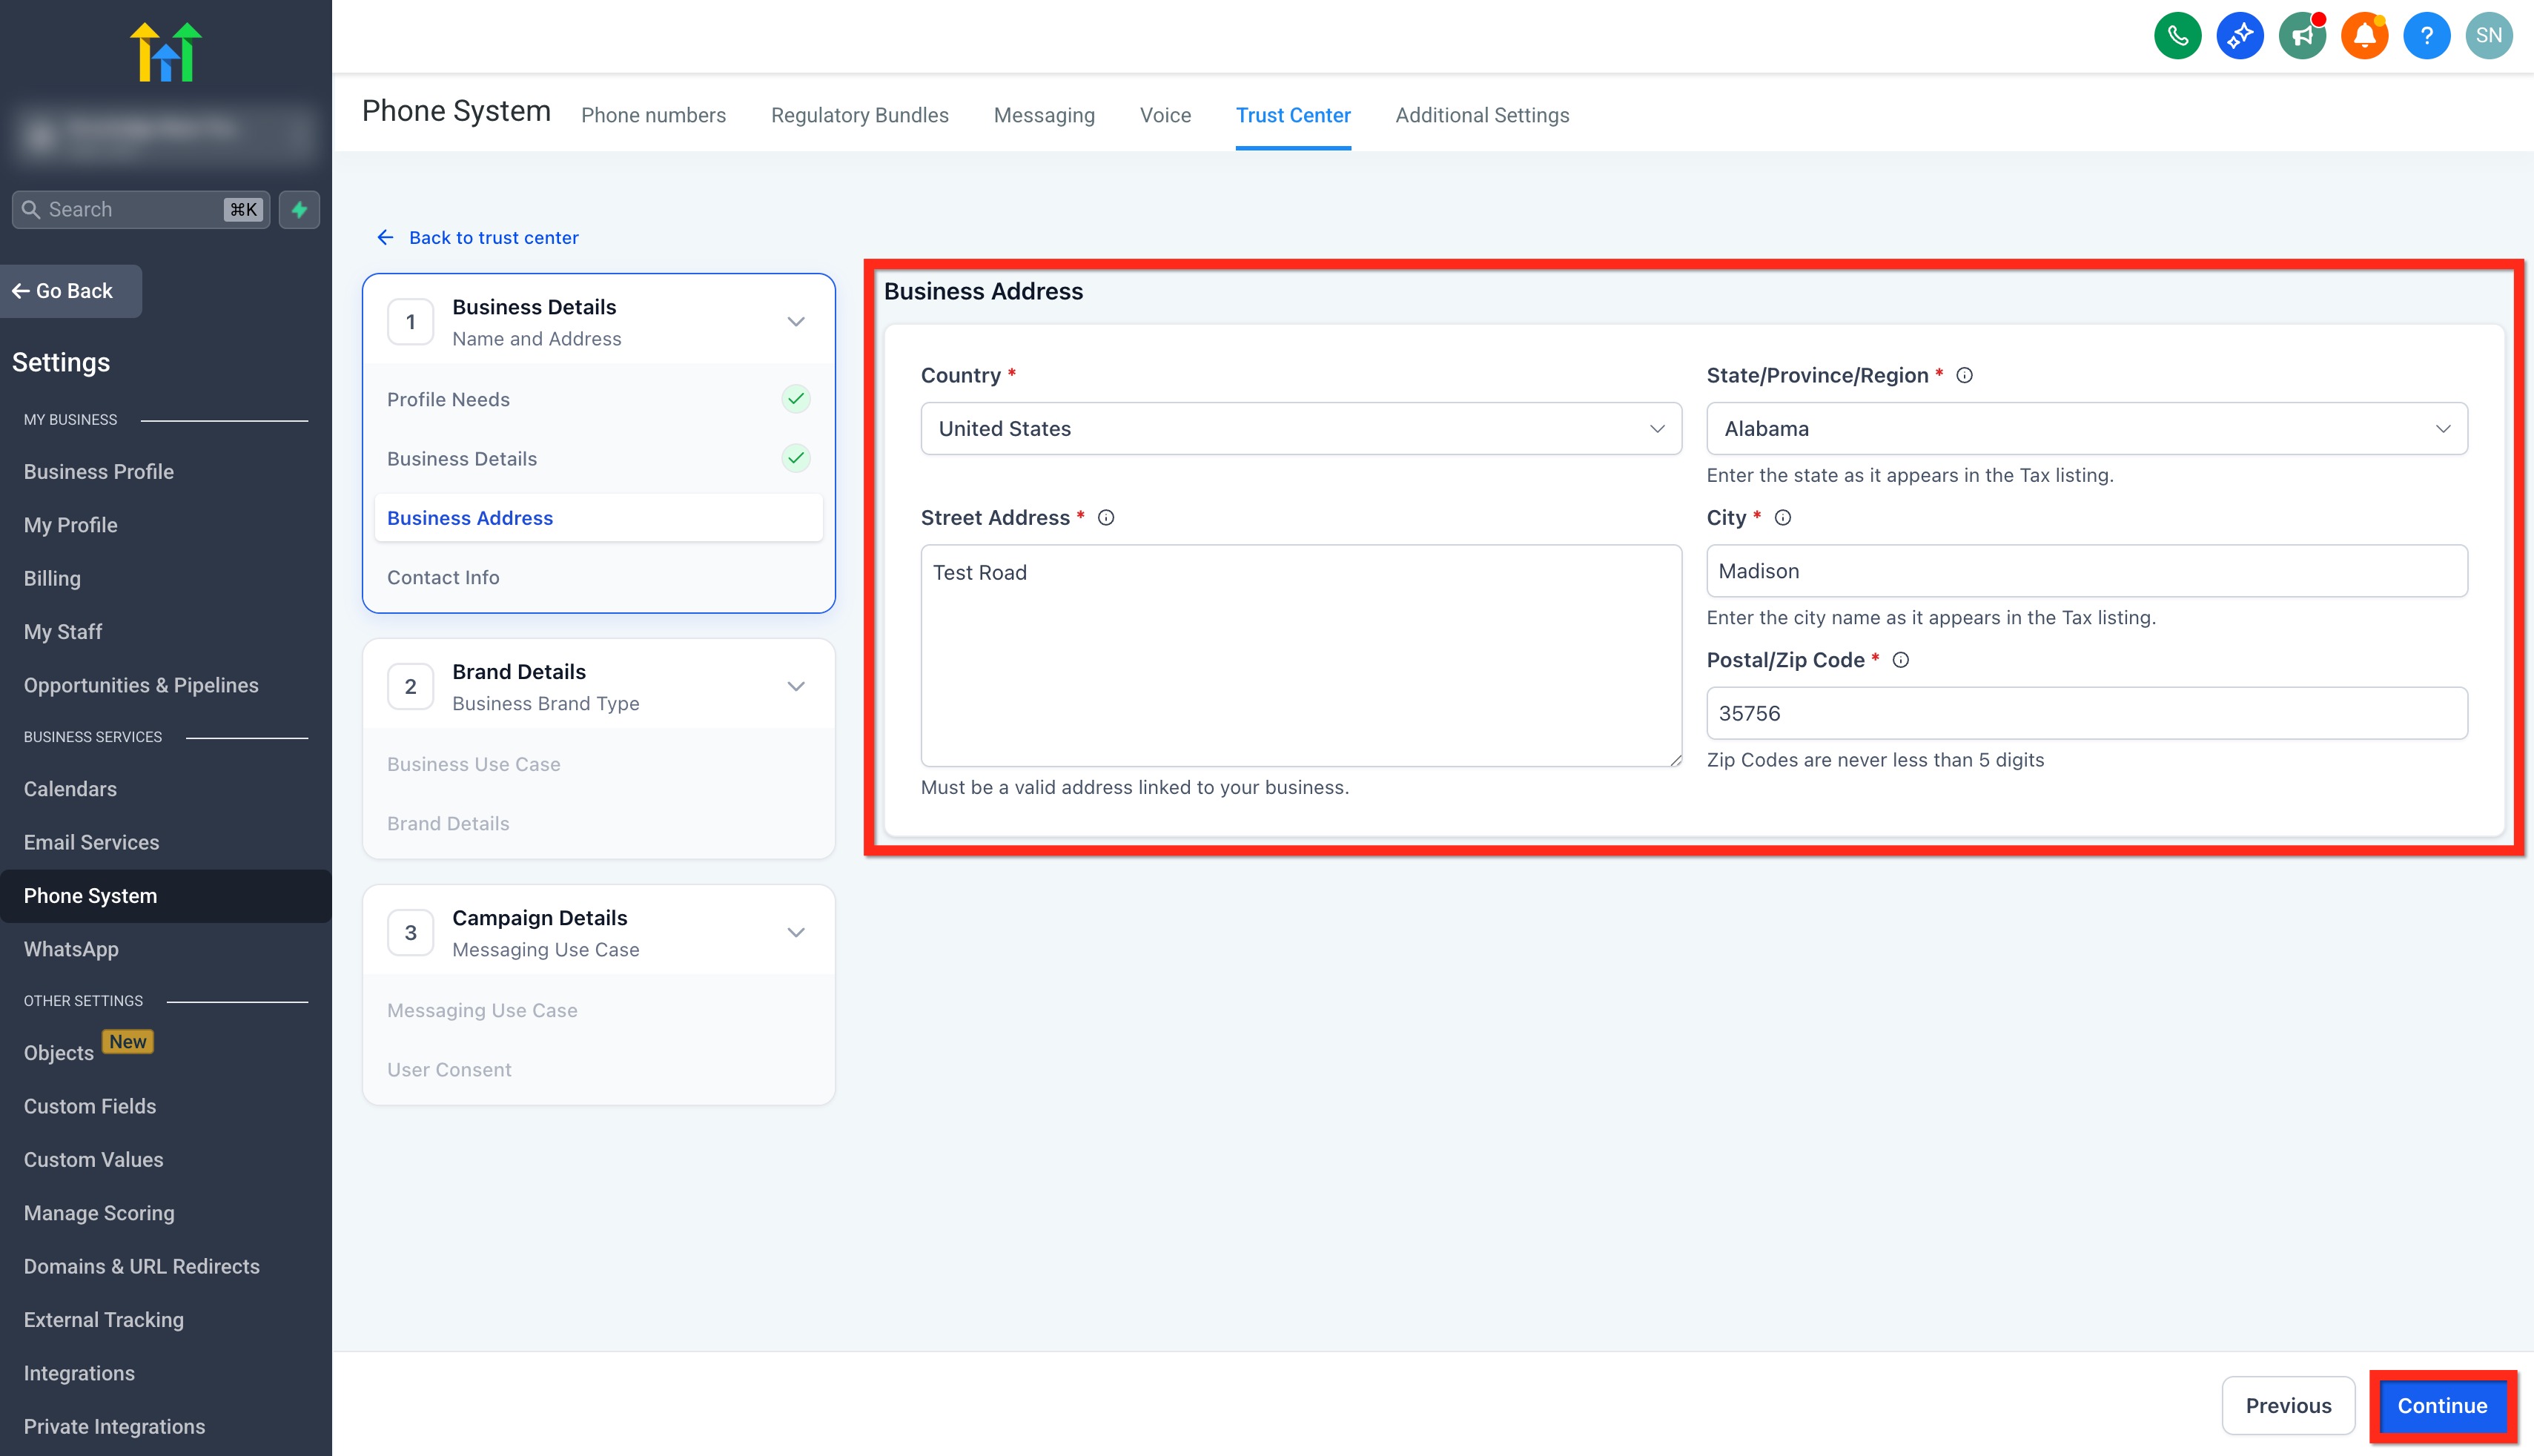
Step 4: Add Business Address
- Select your Country.
- Select your State/Province/Region. (The address provided here should match the address mentioned in the cp575 form (US Only)
- Add Street Address. (Must be a valid address linked to your business. Please don't add a P.O box in the Street Address)
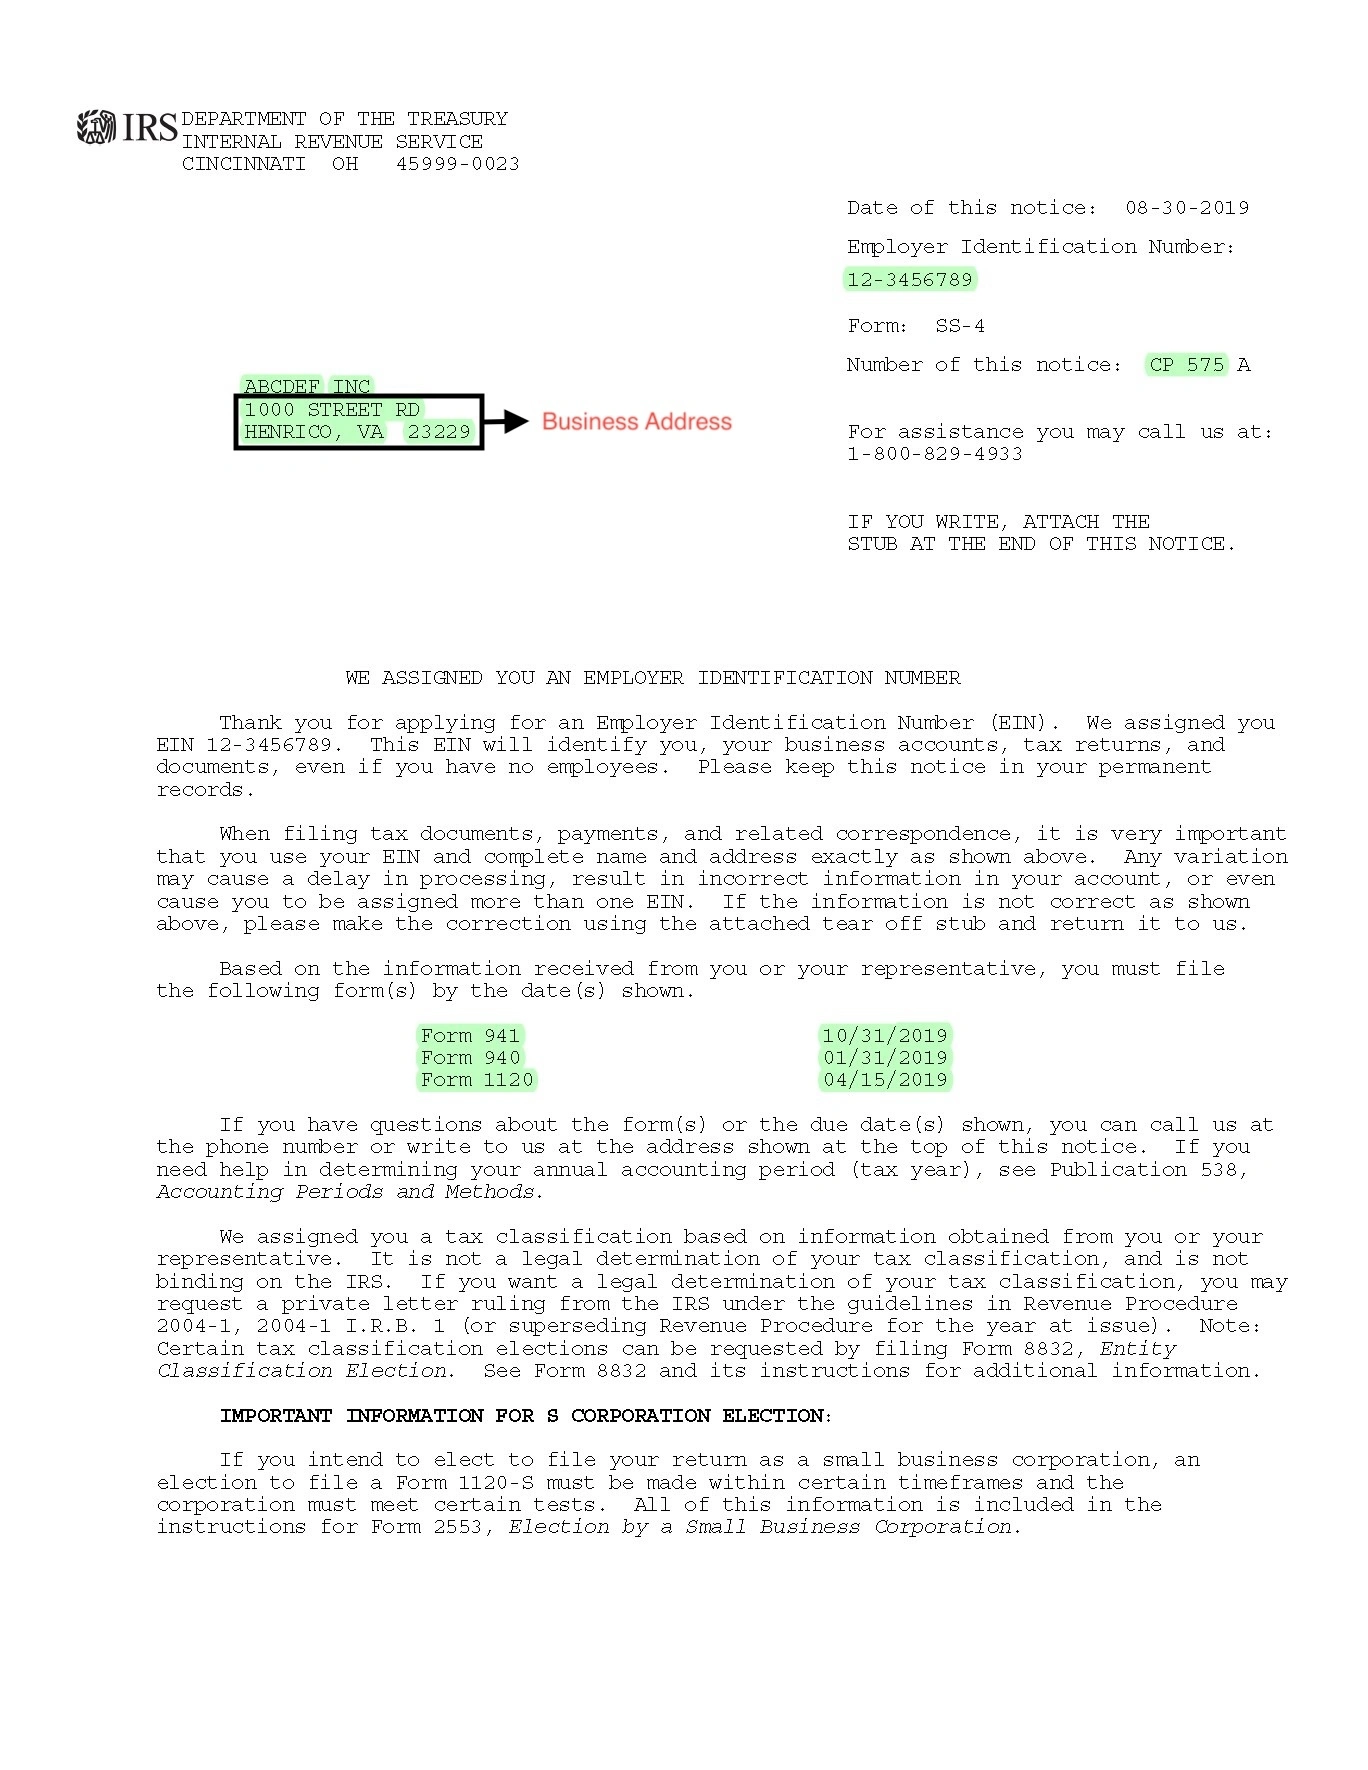
- Add your City. (The address provided here should match the address mentioned in the cp575 form (US Only)
- Enter your Postal/Zip code. (The address provided here should match the address mentioned in the cp575 form (US Only)
- Click on Continue.
Step 5: Add Contact Information of Authorized Representatives
This can be any person that can answer questions about this brand, if needed. Please note that you cannot reuse contact information between brands. Each brand you create must have unique contact information.
- Add Authorized Representative's First and Last Name.
- Add Email Address. (Don't use the same email for more than 5 brands. Private email domains are not eligible for Sole prop Brand registration. Make sure you are using a public domain email (e.g., Gmail (NOT Gsuite), Hotmail, Yahoo, etc)
- Add Phone Number. (Don't use the same number for more than 5 brands and number provided should be reachable)
- Select your Job Position from the list of designations or select Other and type in your designation.
- Click on Continue.

Step 6: Business Use case Acknowledgement
Important: Only one number can be linked to a Sole Prop Campaign. Once approved, your default number will be linked automatically, but you can update it after approval if needed.
- The Brand and Campaign type is automatically set to "Sole Proprietor" based on the responses provided under Profile Needs.

- Check the box to acknowledge the applicable fees and charges, then click Continue to proceed.

Step 7: Add Business Brand Details
- Enter either the legal name of the organization which is sending the messages, or your own name if this brand is not for an organization.
- Select your Business Industry from the dropdown. If an exact match isn’t available, choose the category that best aligns with your business.
- Add a Phone Number. (DO NOT use numbers obtained using LeadConnector)
- Click on Continue.
Important: Please enter a mobile number that you can receive text messages on to complete OTP verification. Only US/Canadian mobile numbers are accepted.

Do not use a number purchased through LeadConnector or a VoIP number purchased from any platform. You can use the same mobile number for up to 3 Sole Proprietor brand registrations. This limit is set by the carriers.

The mobile number is critical in the registration process and is used for sending a One-Time Password (OTP) verification request, which you must respond to with "Yes".

Step 8: Add Campaign Details
- In the Campaign Use Case dropdown, Sole Proprietor will be pre-selected based on previous steps.
- In the Use Case Description field, explain what the campaign will be used for.
Use Case Description Tips:• Explain what messages you'll send, who receives them, and how often.
• Examples are for guidance only copying them may cause rejection.• Don't forget to list your business name and all DBAs.
Example: This campaign sends appointment information - confirmation and reminder messages - to customers once they have booked an appointment with company_name on the website and opted in to receive promotional and notification SMS from company_name.
- Add Sample Message #1 and #2
Use the sample message fields to show the exact types of SMS your campaign will send.
Sample Message #1 (Promotional/Marketing)
Provide a promotional/marketing example that includes:
1. Lead’s name
2. Your name (or staff name)
3. Business name
4. Opt-out language (for example, “Reply STOP to unsubscribe”)

Sample Message #2 (Transactional/Informational)
Provide a transactional/informational example that includes the same required elements above. This message should reflect informational content such as confirmations, reminders, or support updates.

Tip: If your campaign includes both promotional and transactional content, make sure you include one of each using the correct field.
- Choose Content Included in Your Messages
Select the options that your messages might include and click on Continue.- The message will include an embedded link.
- The messages will include phone numbers.
- The messages include age gated content as defined by Carrier and CTA guidelines.
- The messages will include content related to direct lending or other loan arrangement.

- The message will include an embedded link.
Step 9: User Consent
To comply with carrier regulations, you’ll need to provide details on how your contacts give consent to receive messages and what your opt-in message looks like. Follow these steps:
Opt-In Method
- Choose an Opt-In Method from the options: Website Form, Paper Form, Facebook Lead Form, QR Code, Kiosk, Verbal.

- Add Opt-In Form URL: Share a publicly accessible link to the website form where users enter their phone number and opt in to receive messages.

- Example opt-In Form:
Add the Opt-in Flow and Confirmation Message
- Add your Opt-in flow in the How do Contacts Opt-in to Messages? field.
Example: End users opt in via Website Form by visiting (Form Link) and completing a form that collects their phone number. Users can optionally select a consent checkbox to agree to receive SMS messages.
- In the "Opt-in Message" field, enter the confirmation message users receive once they’ve opted in.
This message must: Include your business name and the opt-out keyword like STOP.
Example: You have successfully opted in to receive notifications and promotional SMS from company_name. Reply STOP to unsubscribe.
- Privacy Policy URL and Terms & Conditions URL
These fields are now required for self-serve campaign registration.
- In the "Privacy Policy URL" field, enter the publicly accessible link to your business's Privacy Policy page.
- In the "Terms & Conditions URL" field, enter the publicly accessible link to your
Terms & Conditions (or Terms of Service) page. - Both fields appear directly below the "How do contacts Opt-in" and "Opt-in Message" fields in the registration flow.
- If you do not have these URLs, consider registering through the prebuilt chat widget flow, which includes compliant Privacy Policy and Terms & Conditions automatically.
Tip: Your Privacy Policy must include the following paragraph to comply with carrier requirements:
"No mobile information will be shared with third parties/affiliates for marketing/promotional purposes. Information sharing to subcontractors in support services, such as customer service is permitted. All other use case categories exclude text messaging originator opt-in data and consent; this information will not be shared with any third parties."

Business Website Compliance Checklist
Ensure your opt-in form and website meets the following carrier and platform guidelines.
Business Website Best Practices:
1. Use a live, publicly accessible website with no broken links or "under construction" pages.
2. Clearly display your business name and maintain consistent branding across your domain, website content, and legal policies.
3. Clearly explain the services or products offered on your website.
4. Provide visible and up-to-date Privacy Policy and Terms & Conditions pages.
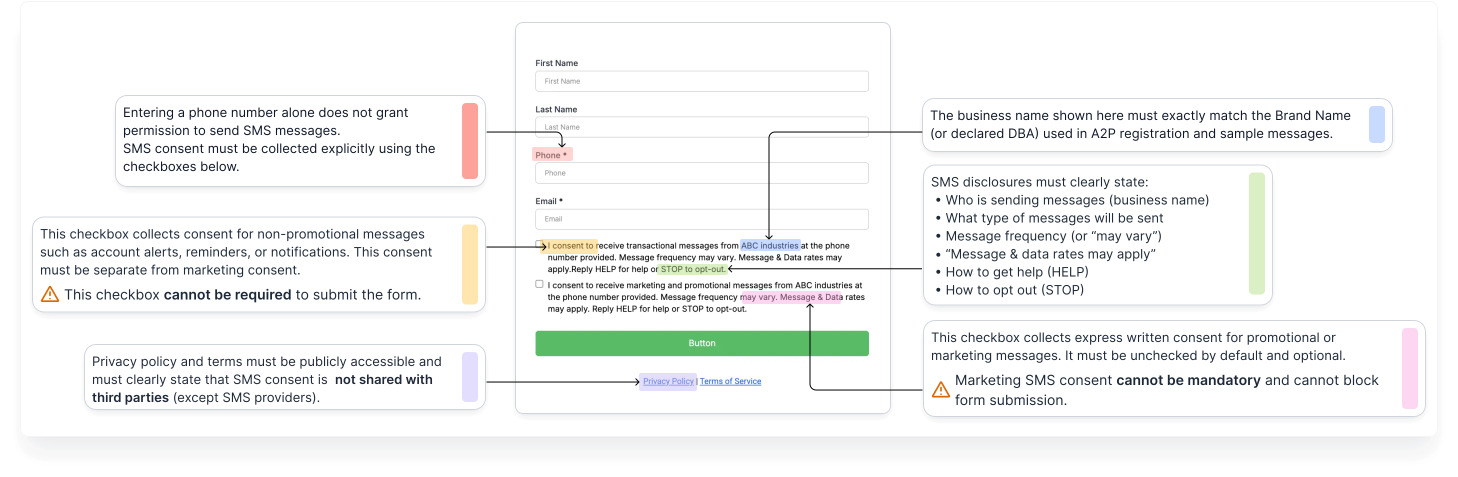
5. Ensure your opt-in form is easy to find and easy to understand, with CTIA-compliant language.
6. Collect explicit SMS opt-in consent; consent must be clearly stated and not implied.
7. Ensure sample messages accurately reflect your website content and intended messaging use case.
8. Link social media icons directly to your brand's official pages (not generic platform homepages).
9. Implement age-gating where required (e.g., alcohol, tobacco, or restricted content).
10. Use social media pages or app store listings only as supporting proof if a full website is not available.
11. Clearly display any DBA or alternate business names in the footer, Privacy Policy, or Terms & Conditions (if applicable).
- Please select all items in the Website Compliance Checklist to proceed and click Review Application.

- Our system will review your application, provide improvement suggestions, and display a Pass/Fail status. Make sure to address all flagged items and achieve a “Pass” across every section to maximize your chances of approval.
- Once done, click on Proceed.

- Review your details for the last time and click on Submit Application.

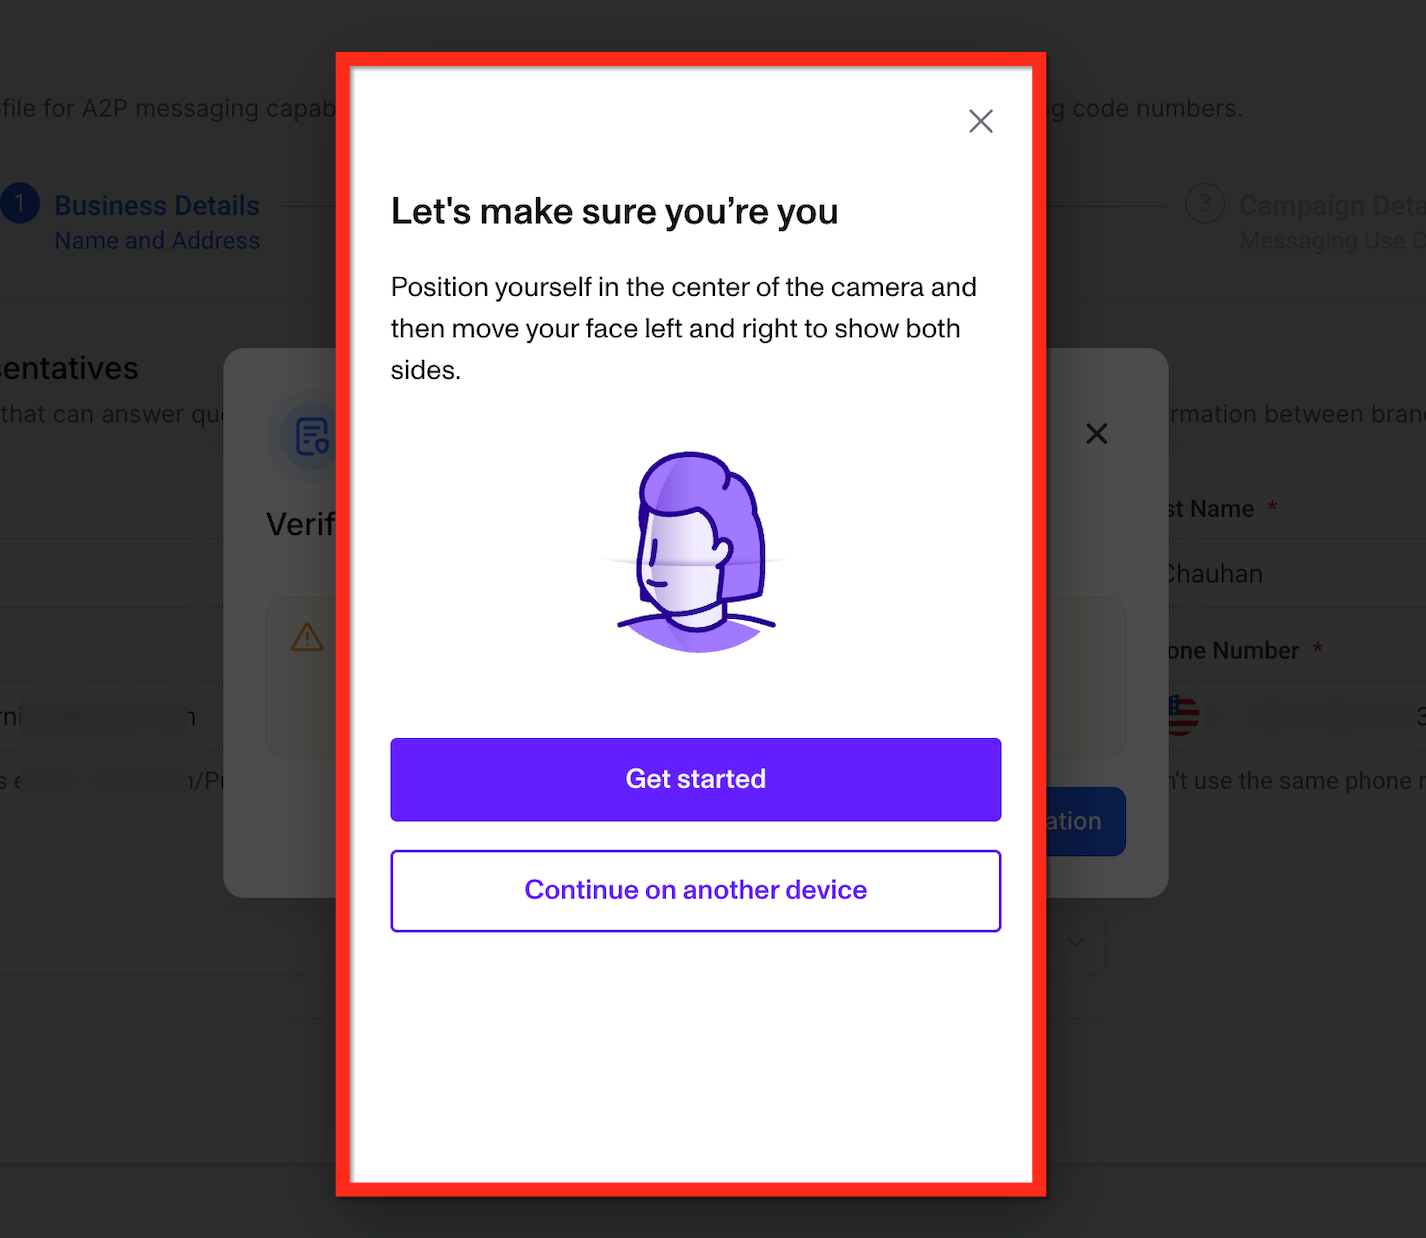
Step 10: Persona Verification
After clicking on Submit, users need to complete a third party verification step for successful Sole Proprietor registration.
Note: Persona identity verification in HighLevel is a one-time process per sub-account. - Click on Start Verification from the pop-up.

- Click on Begin Verifying.

- Select the Country your Government ID is from and click on Select.

- Choose which photo ID you want to upload from the options: A photo of a government ID is needed to verify your identity. Please use the latest issued ID.

- Take a clear photo of the Government ID you chose in the previous step.

- Live Selfie Check: You will be prompted to take a live selfie using your computer webcam or smartphone to verify the ID matches your face.
Tips to Successfully Pass Persona Verification
To pass the Persona verification, follow these best practices:
- Do not use a VPN during verification.
- Verify from the same country/region as your ID document. (Example: If your document is issued in Argentina, you must complete verification while located in Argentina.)
- Use a physical, government-issued ID (not a scan, screenshot, digital replica, or paper printout) and capture both the front and back if prompted.
- Upload clear images: avoid glare, reflections, shadows, and blur. Make sure all text and your photo are readable.
Using a VPN, verifying from a different location than your ID document, or submitting unclear/incorrect ID images commonly results in verification failure.
Frequently Asked Questions
Q: Can I update my Sole Proprietor Brand details after submission?
Minor changes are possible, but major edits may require re-registration.
Q: Can I use a VoIP, Google Voice, or LeadConnector number for OTP verification?
No. OTP verification requires a real US or Canadian mobile number that can receive SMS. VoIP, CPaaS, LeadConnector, or app-based numbers are not allowed and will cause verification failure.
Q: Can I send promotional marketing messages as a Sole Proprietor?
You can send compliant promotional content only if it’s first-party and properly opted-in. However:
- Lead generation campaigns are not allowed
- Affiliate/shared list marketing is prohibited
- Lending/investment promotional content is restricted
Always ensure your use case matches your website and opt-in flow.
Q: Do I need a website to get approved?
A website is not strictly required, but approval chances are much higher if you have:
- A live website
- Clear service descriptions
- Privacy Policy and Terms pages
- A visible opt-in form
Carriers heavily review web presence during approval.
Q: What throughput can I expect as a Sole Proprietor?
Sole Proprietor campaigns are designed for low-volume messaging and have limited throughput compared to Standard Brands. They are not ideal for high-scale marketing.
Q: Will my messages be blocked if I skip registration?
Yes. Unregistered 10DLC traffic may:
- Be heavily filtered
- Experience delivery failures
- Face carrier penalties or surcharges
Registration is mandatory for reliable delivery.
Q: Can I reuse the same email or phone number for multiple Sole Proprietor brands?
There are limits:
- Email: Avoid using the same email for more than 5 brands
- Mobile number: Can only be used for up to 3 Sole Proprietor registrations
Exceeding these limits may result in automatic rejection.
Q: What if my registration fails?
Review your carrier records for mismatches and correct any errors. Contact Support if necessary.
Q: Are there forbidden message types I should avoid?
Yes. See Forbidden Message Categories here.
Q: How long does registration take?
Approval typically takes 24–72 hours, depending on carrier verification.
Related Articles
Was this article helpful?
That’s Great!
Thank you for your feedback
Sorry! We couldn't be helpful
Thank you for your feedback
Feedback sent
We appreciate your effort and will try to fix the article