Layout AI Builder lets you create custom invoice layouts from natural-language instructions or an existing invoice design. You can refine the result with AI or edit the layout manually in the visual builder. Publish multiple layouts, manage their version history, and select a published design while creating an invoice. This guide covers the complete workflow from Labs activation through invoice use.
TABLE OF CONTENTS
- What is Layout AI Builder?
- Key Benefits of Layout AI Builder
- How To Set Up Layout AI Builder
- Create an Invoice Layout With AI
- Recreate an Existing Invoice Layout
- Refine and Preview an Invoice Layout
- Publish an Invoice Layout
- Download Option
- Manage Invoice Layouts
- Apply a Published Layout to an Invoice
- Frequently Asked Questions
What is Layout AI Builder?
Layout AI Builder is a Labs feature for creating and managing custom invoice designs in HighLevel. It combines AI-assisted generation with a visual editor, versioning, publishing, and per-invoice layout selection.
You can start by describing the invoice you want or by providing an existing invoice for AI to recreate. After generation, continue prompting Layout AI or manually edit the design.
The overall workflow is:
Create → Refine → Preview → Publish → Select on an invoice
Layout AI Builder is separate from the existing sub-account invoice customization settings. Those settings continue to control the established invoice branding, labels, and field-visibility workflow.
Key Benefits of Layout AI Builder
Layout AI Builder combines AI generation with manual design tools so teams can create multiple invoice experiences without starting each design from scratch.
- Create with AI: Describe the invoice layout you want in natural language and let Layout AI build it.
- Recreate existing designs: Attach or describe an invoice you already use instead of starting from a blank layout.
- Refine with AI: Continue prompting Layout AI to make changes after the first version is generated.
- Edit visually: Add, remove, align, and modify layout elements manually.
- Restore earlier versions: Each AI change creates a restore point you can return to from the chat.
- Undo builder changes: Use the toolbar Undo control to reverse manual edits.
- Manage multiple layouts: Keep separate invoice designs for different clients, services, or business needs.
- Track layout activity: Review who created, edited, published, or copied a layout and when.
- Apply layouts per invoice: Select a published design from the invoice editor.
- Preserve sent invoices: Deleting a layout does not change invoices that were already sent.
How To Set Up Layout AI Builder
Setup starts by activating the Labs feature, then opening the dedicated Layouts workspace under Invoices & Estimates.
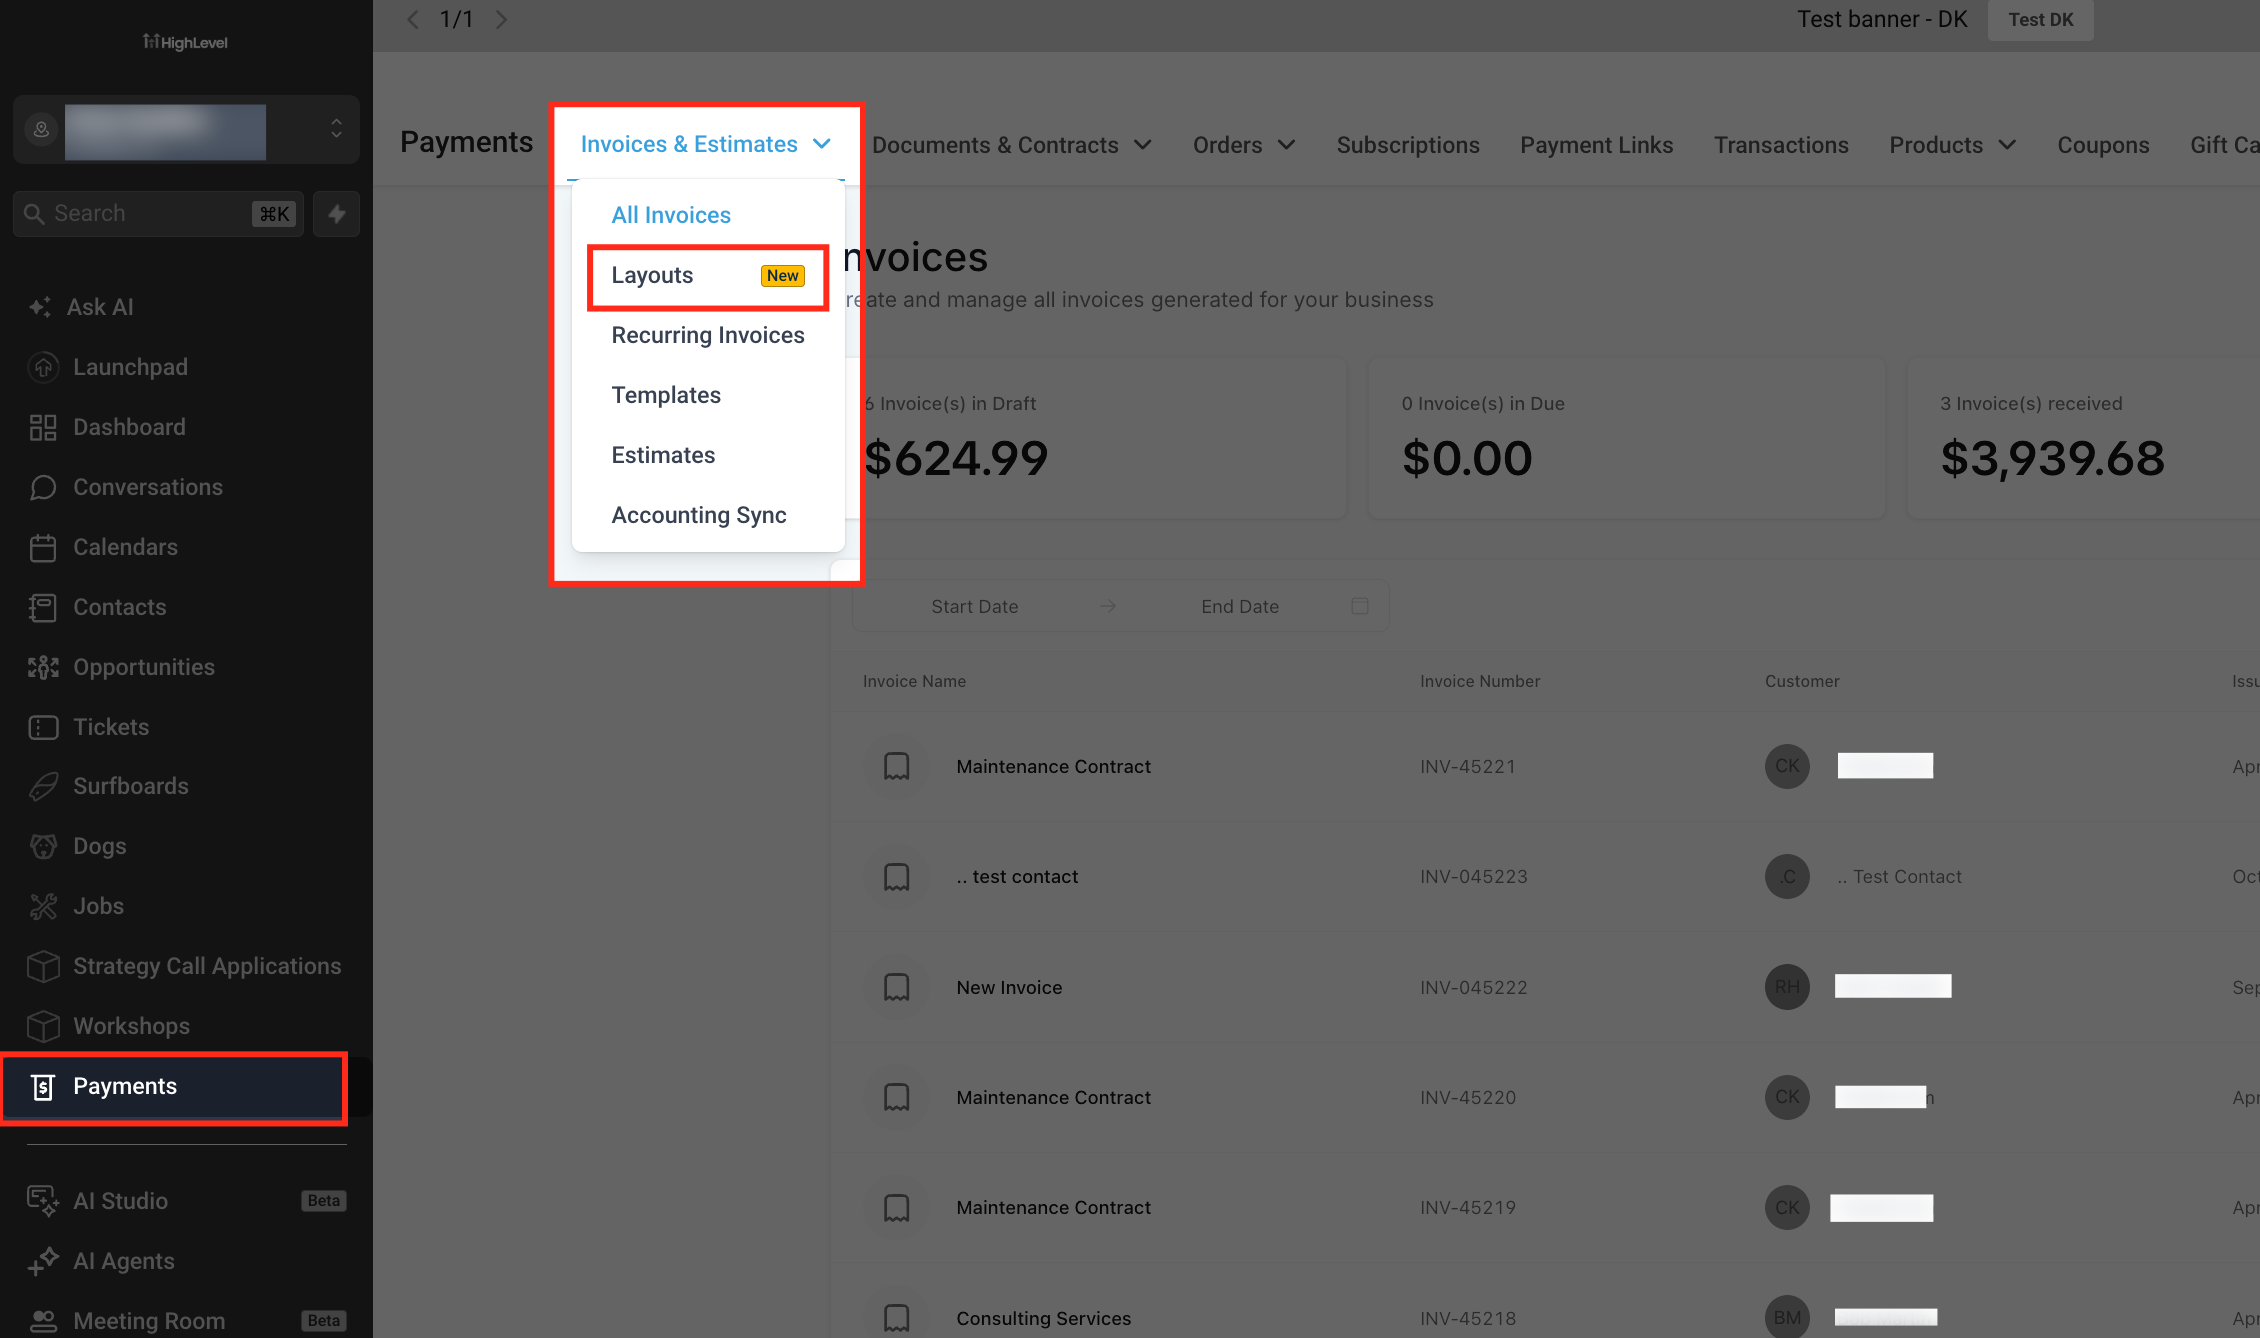
Open the Layouts Page
The Layouts page is the central workspace for creating, publishing, and managing custom invoice layouts.
- Go to Payments.
- Open Invoices & Estimates.
- Select Layouts.
The page is labeled Invoice layouts and includes the Layout AI prompt, layout-management controls, and existing layout cards.
Create an Invoice Layout With AI
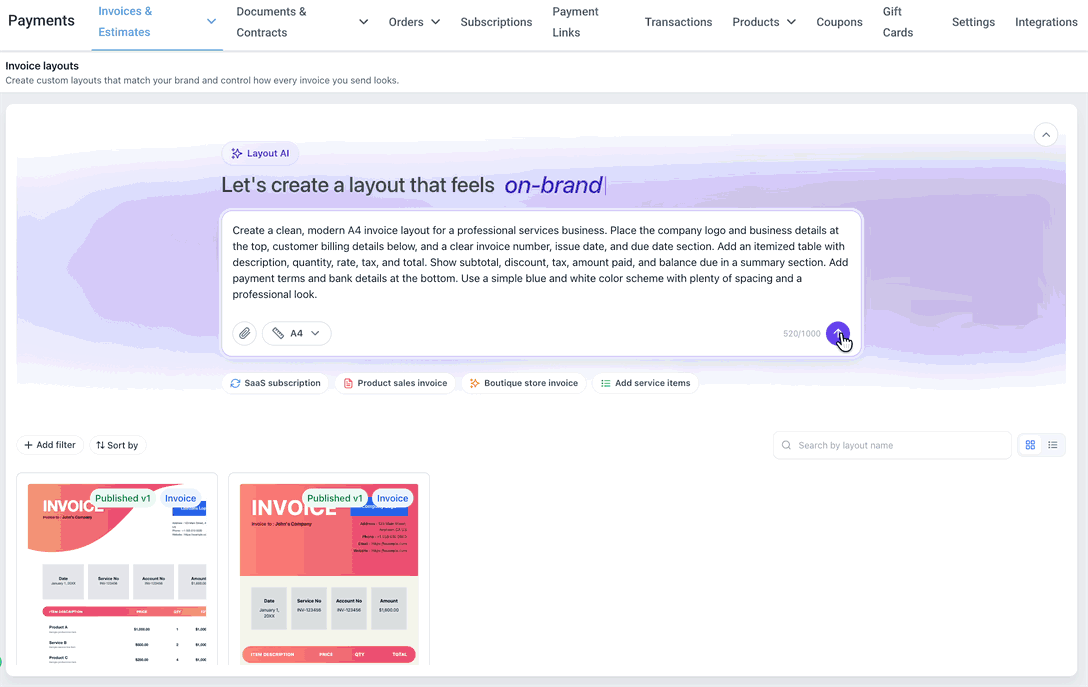
Layout AI turns a written description into an editable invoice layout.
- Open Payments → Invoices & Estimates → Layouts.
- Enter the invoice design you want in the Layout AI prompt.
- Select the page size, such as A4, when needed.
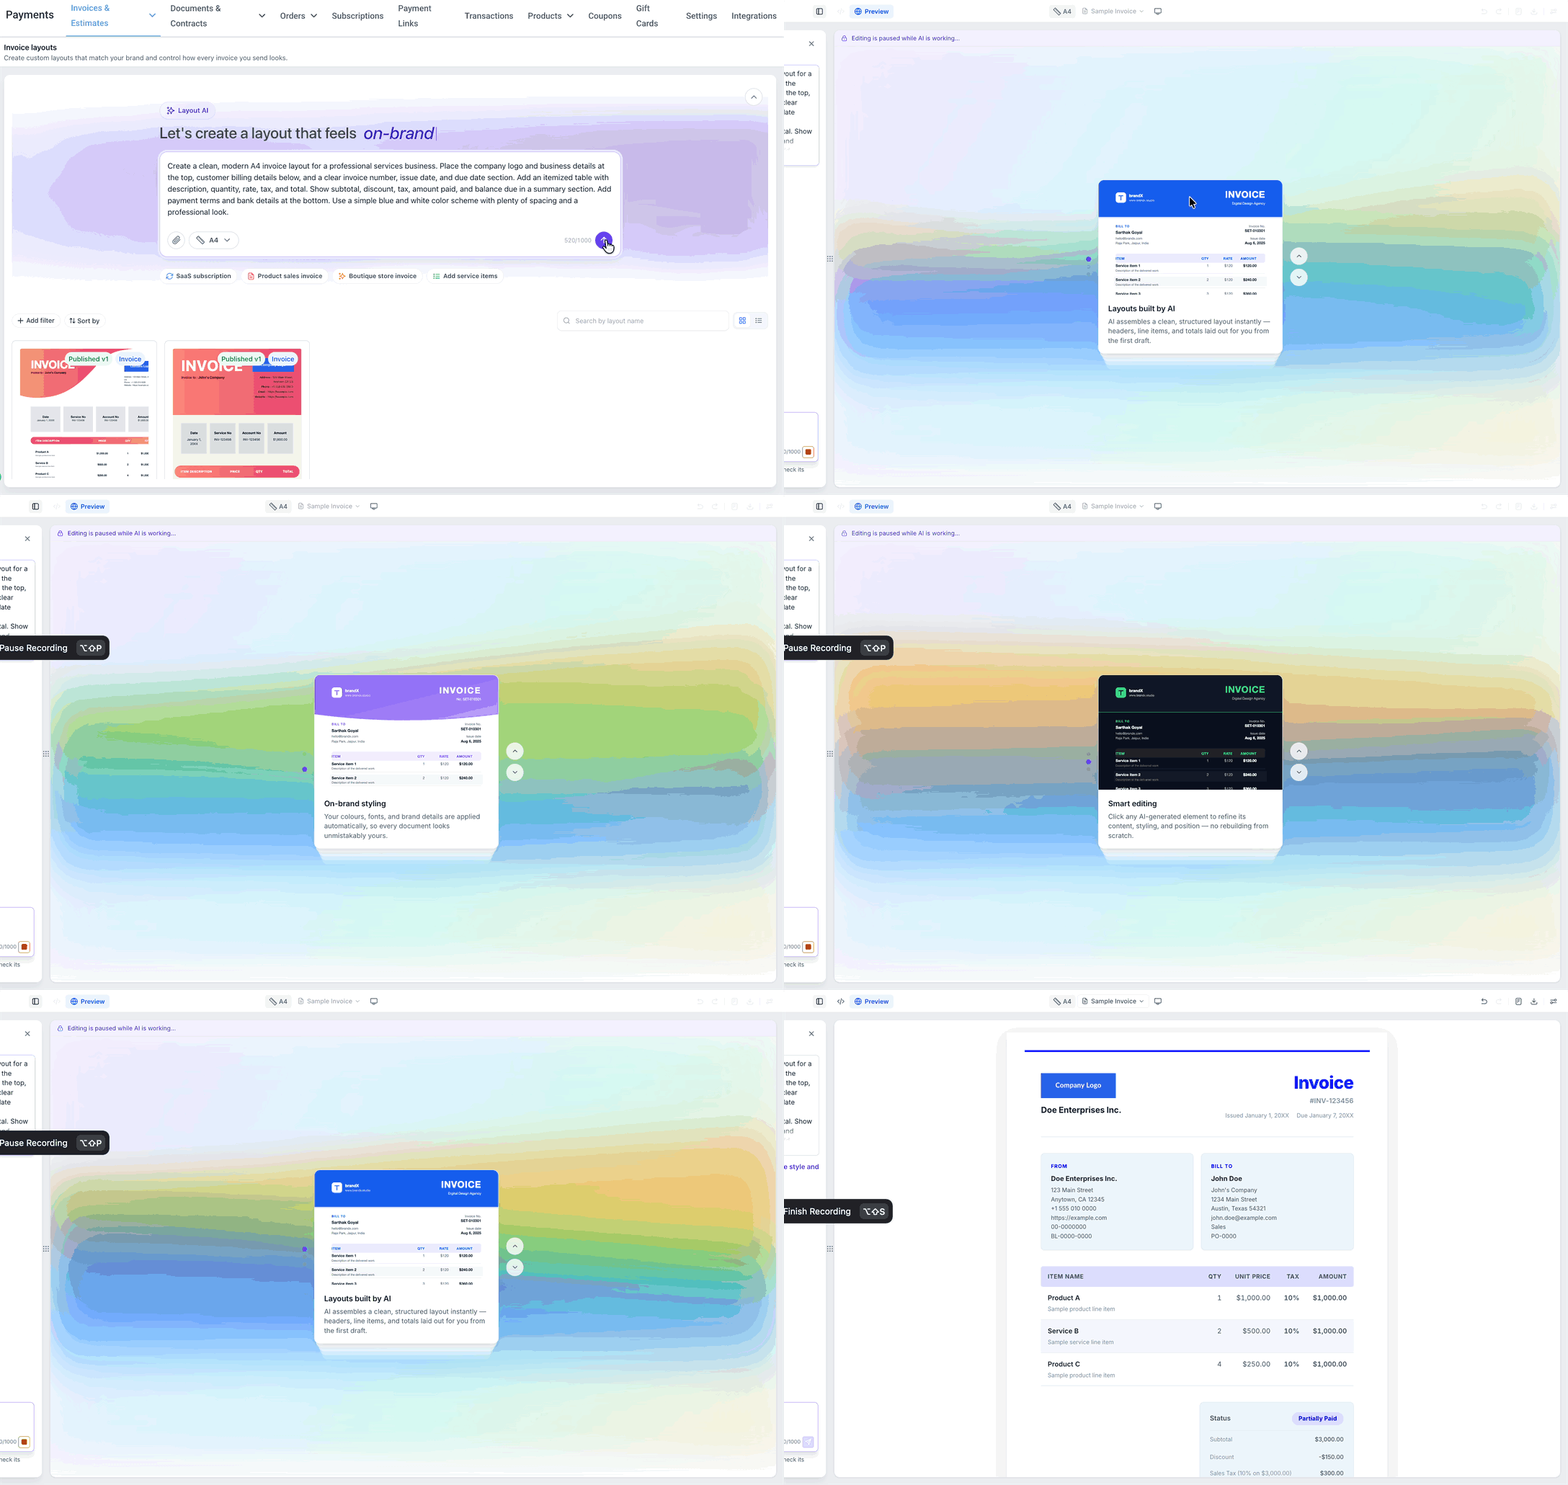
- Submit the prompt.
- Wait while Layout AI generates the design.
- Review the generated layout in the editor.
The prompt supports up to 1,000 characters.
The Layouts page also provides starter suggestions such as SaaS subscription, Product sales invoice, Boutique store invoice, and Add service items.
Recreate an Existing Invoice Layout
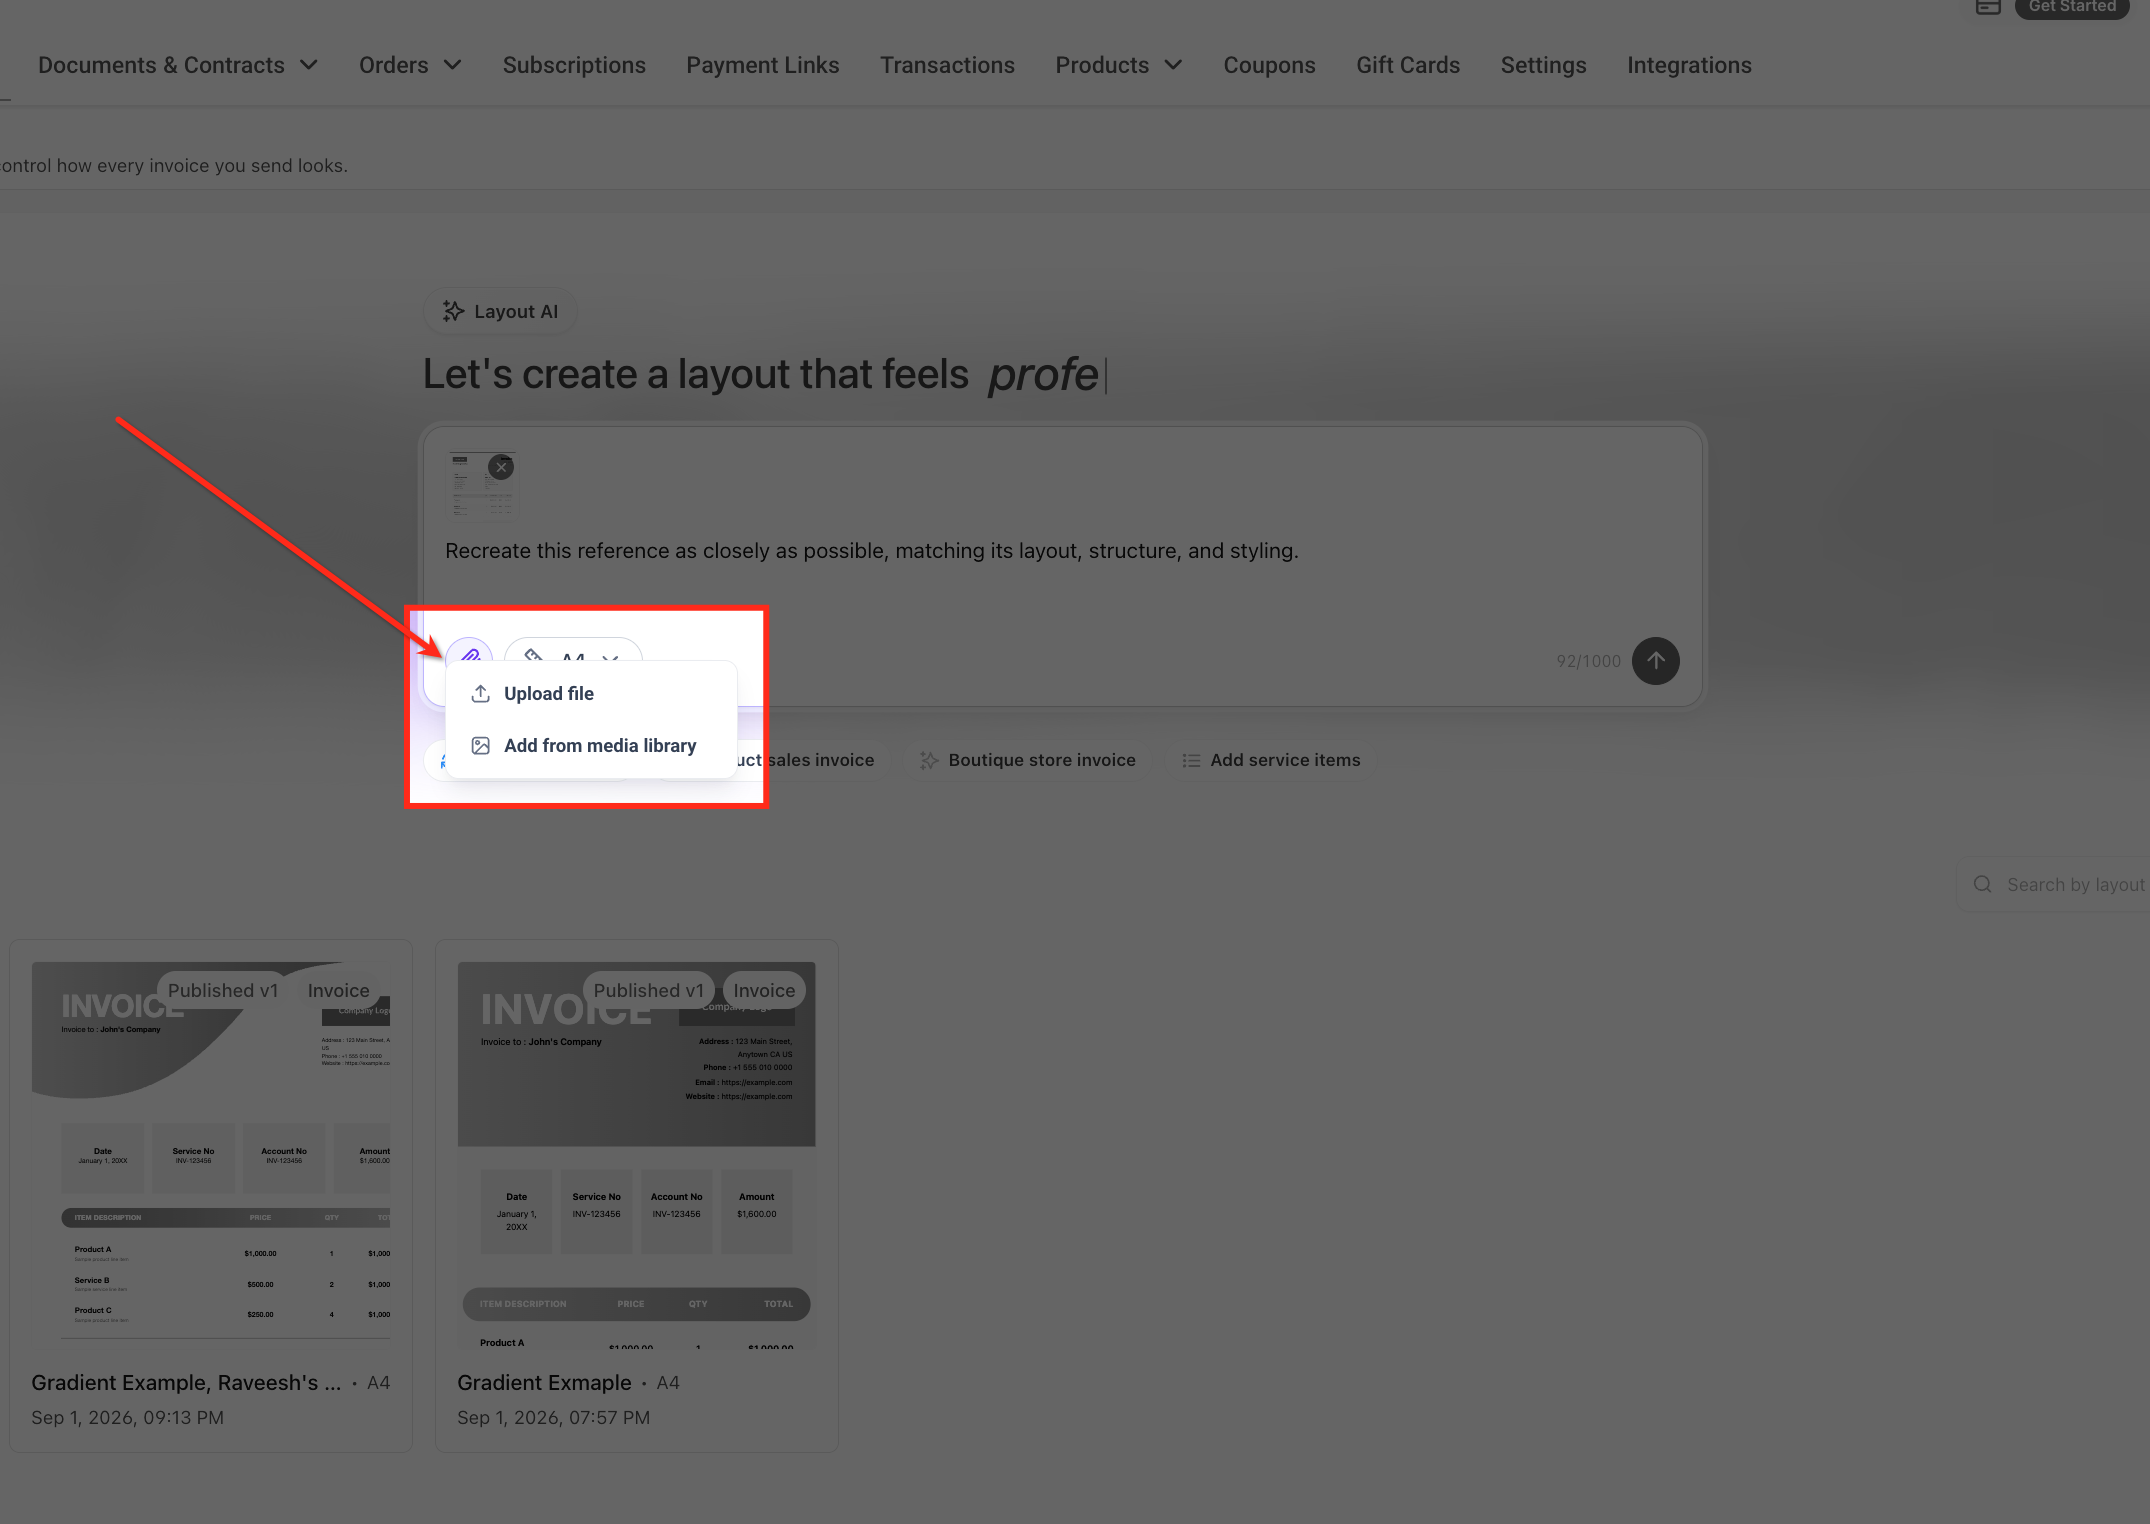
Layout AI can also use an existing invoice as the starting point for a new design.
- Go to Payments → Invoices & Estimates → Layouts.
- Click the attachment icon in the Layout AI prompt.
- Attach the existing invoice you want Layout AI to use.
- Add instructions describing how you want the invoice recreated or adjusted.
- Submit the request.
- Review the generated layout.
You can also describe an existing invoice without attaching a file.
Refine and Preview an Invoice Layout
After generation, you can continue refining the layout through AI or switch to manual editing for more direct control.
8d
Continue Editing With Layout AI
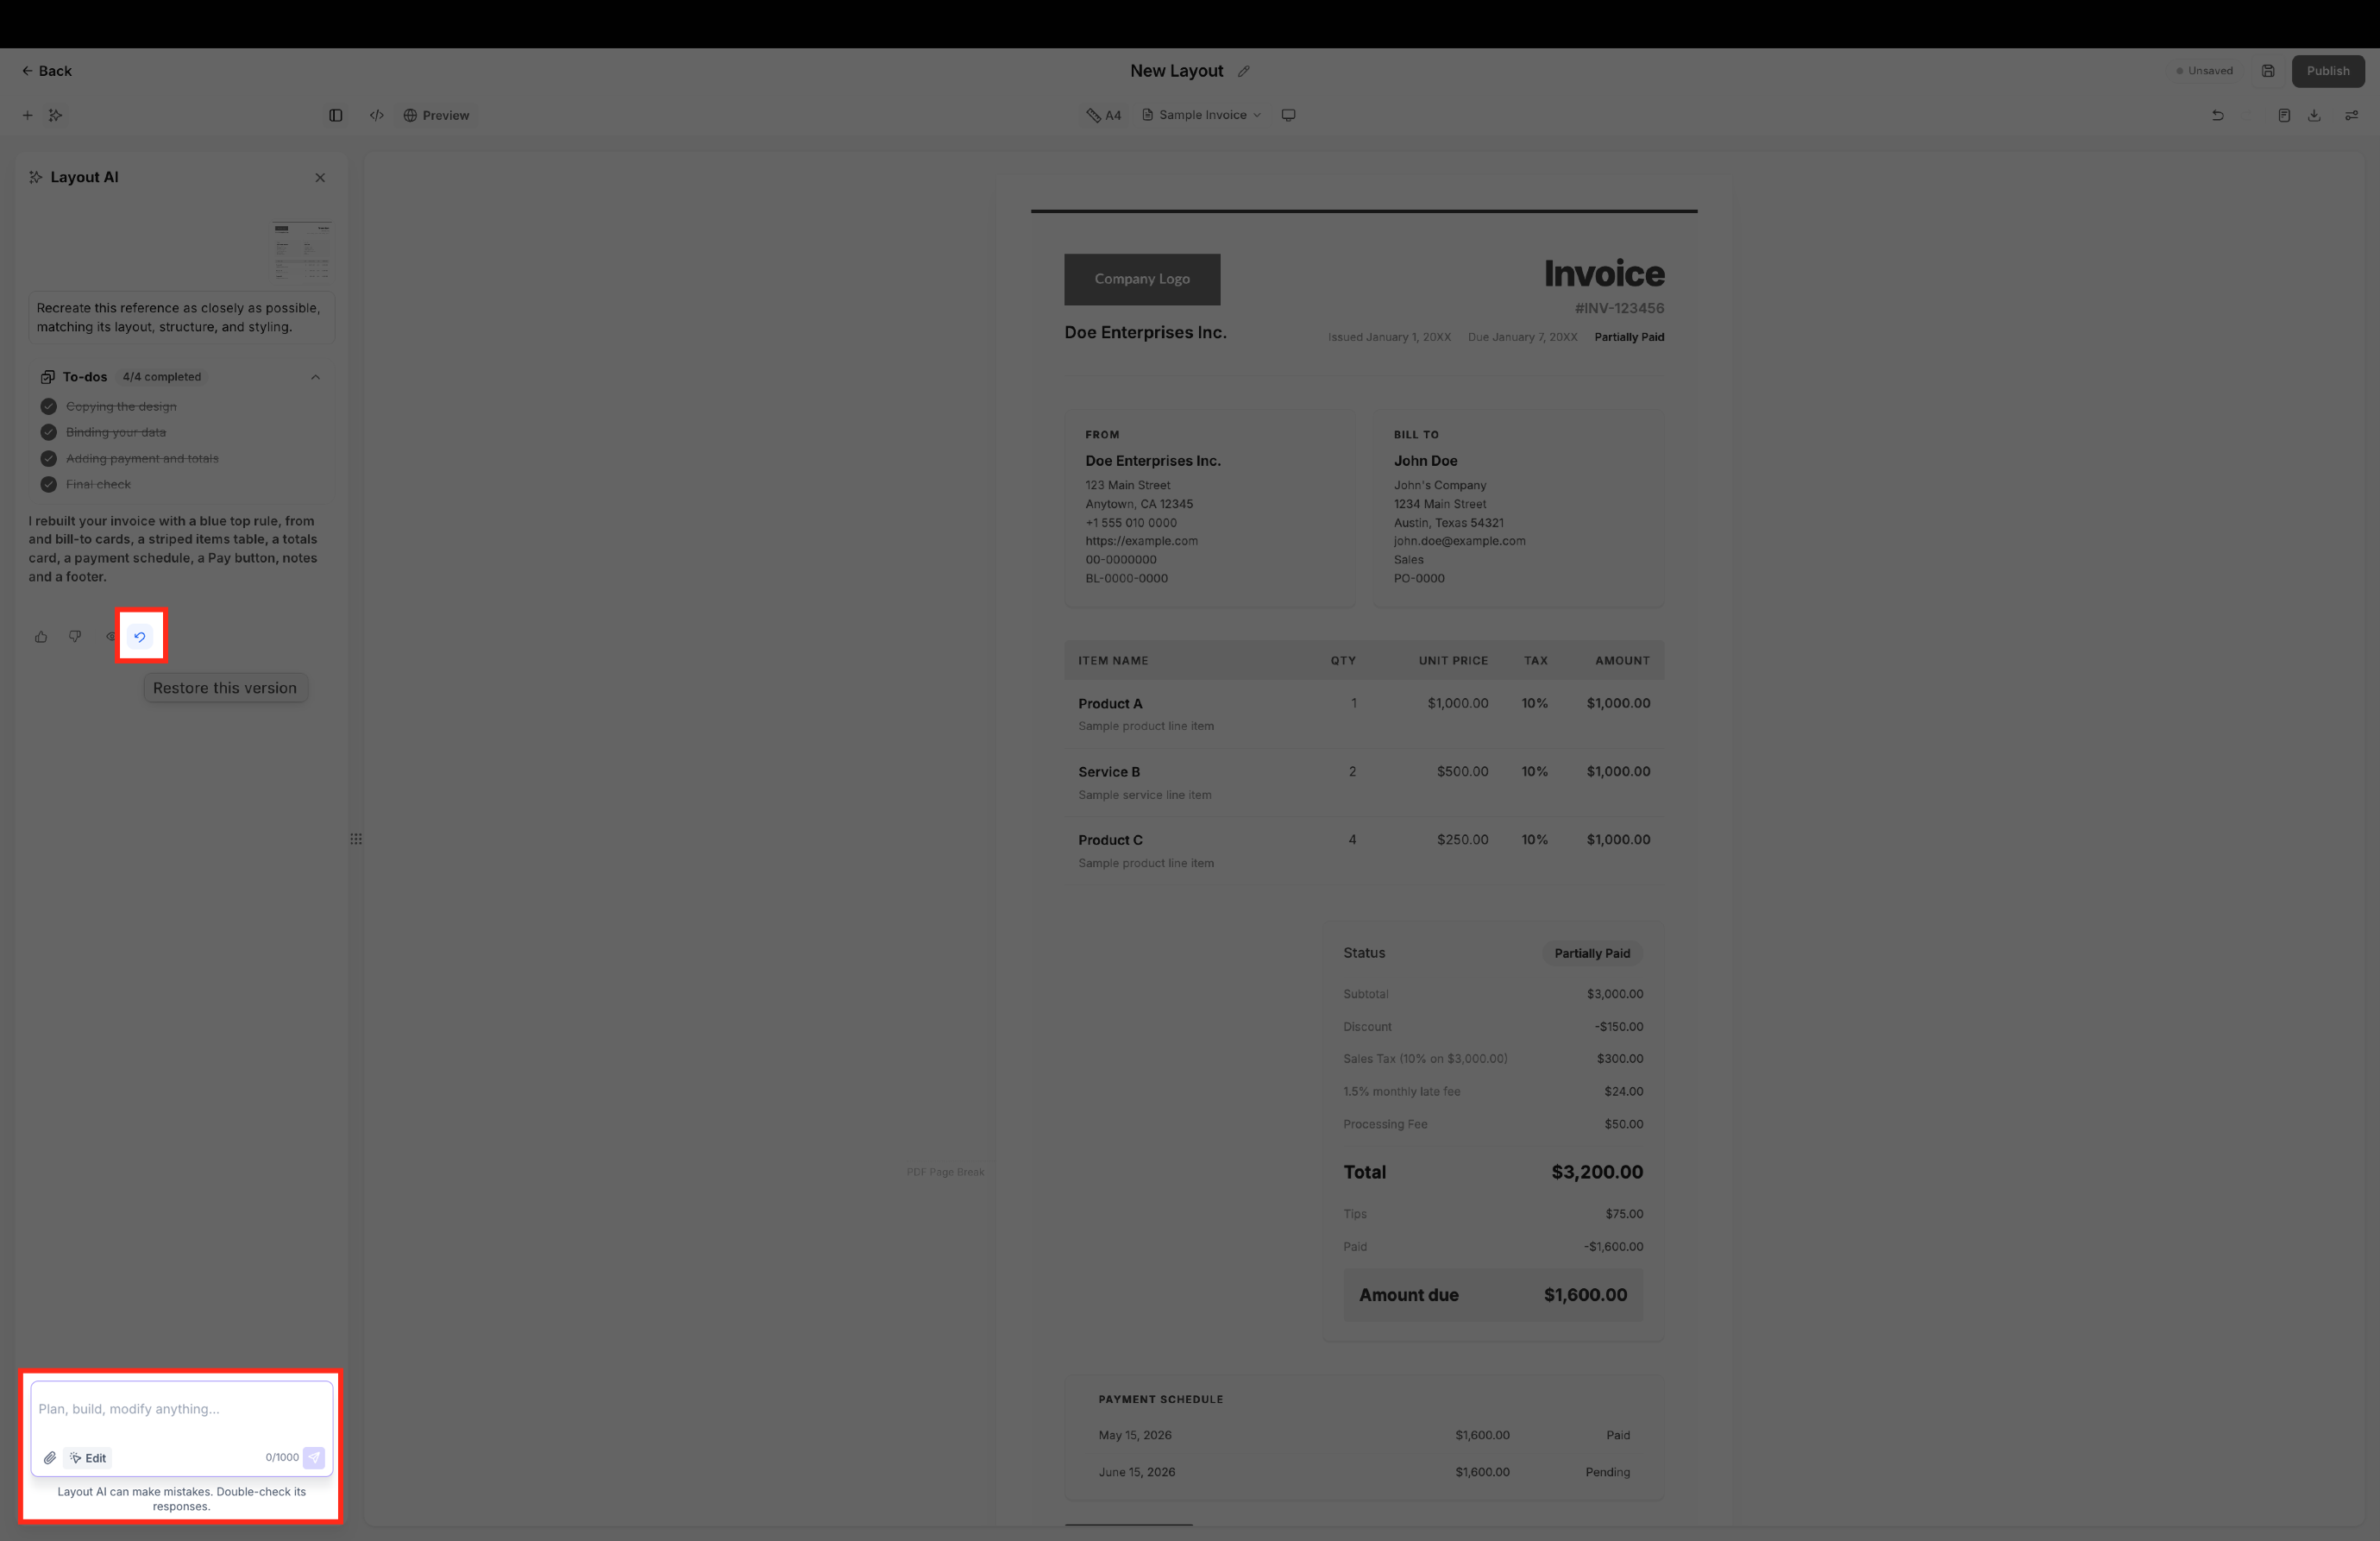
Layout AI remains available beside the generated design so you can request additional changes.
- Use the field labeled Plan, build, modify anything....
- Describe the change you want.
- Submit the request.
- Review the updated layout.
- Continue prompting until the result meets your needs.
Every AI change creates a restore point.
Edit the Layout in the Visual Builder
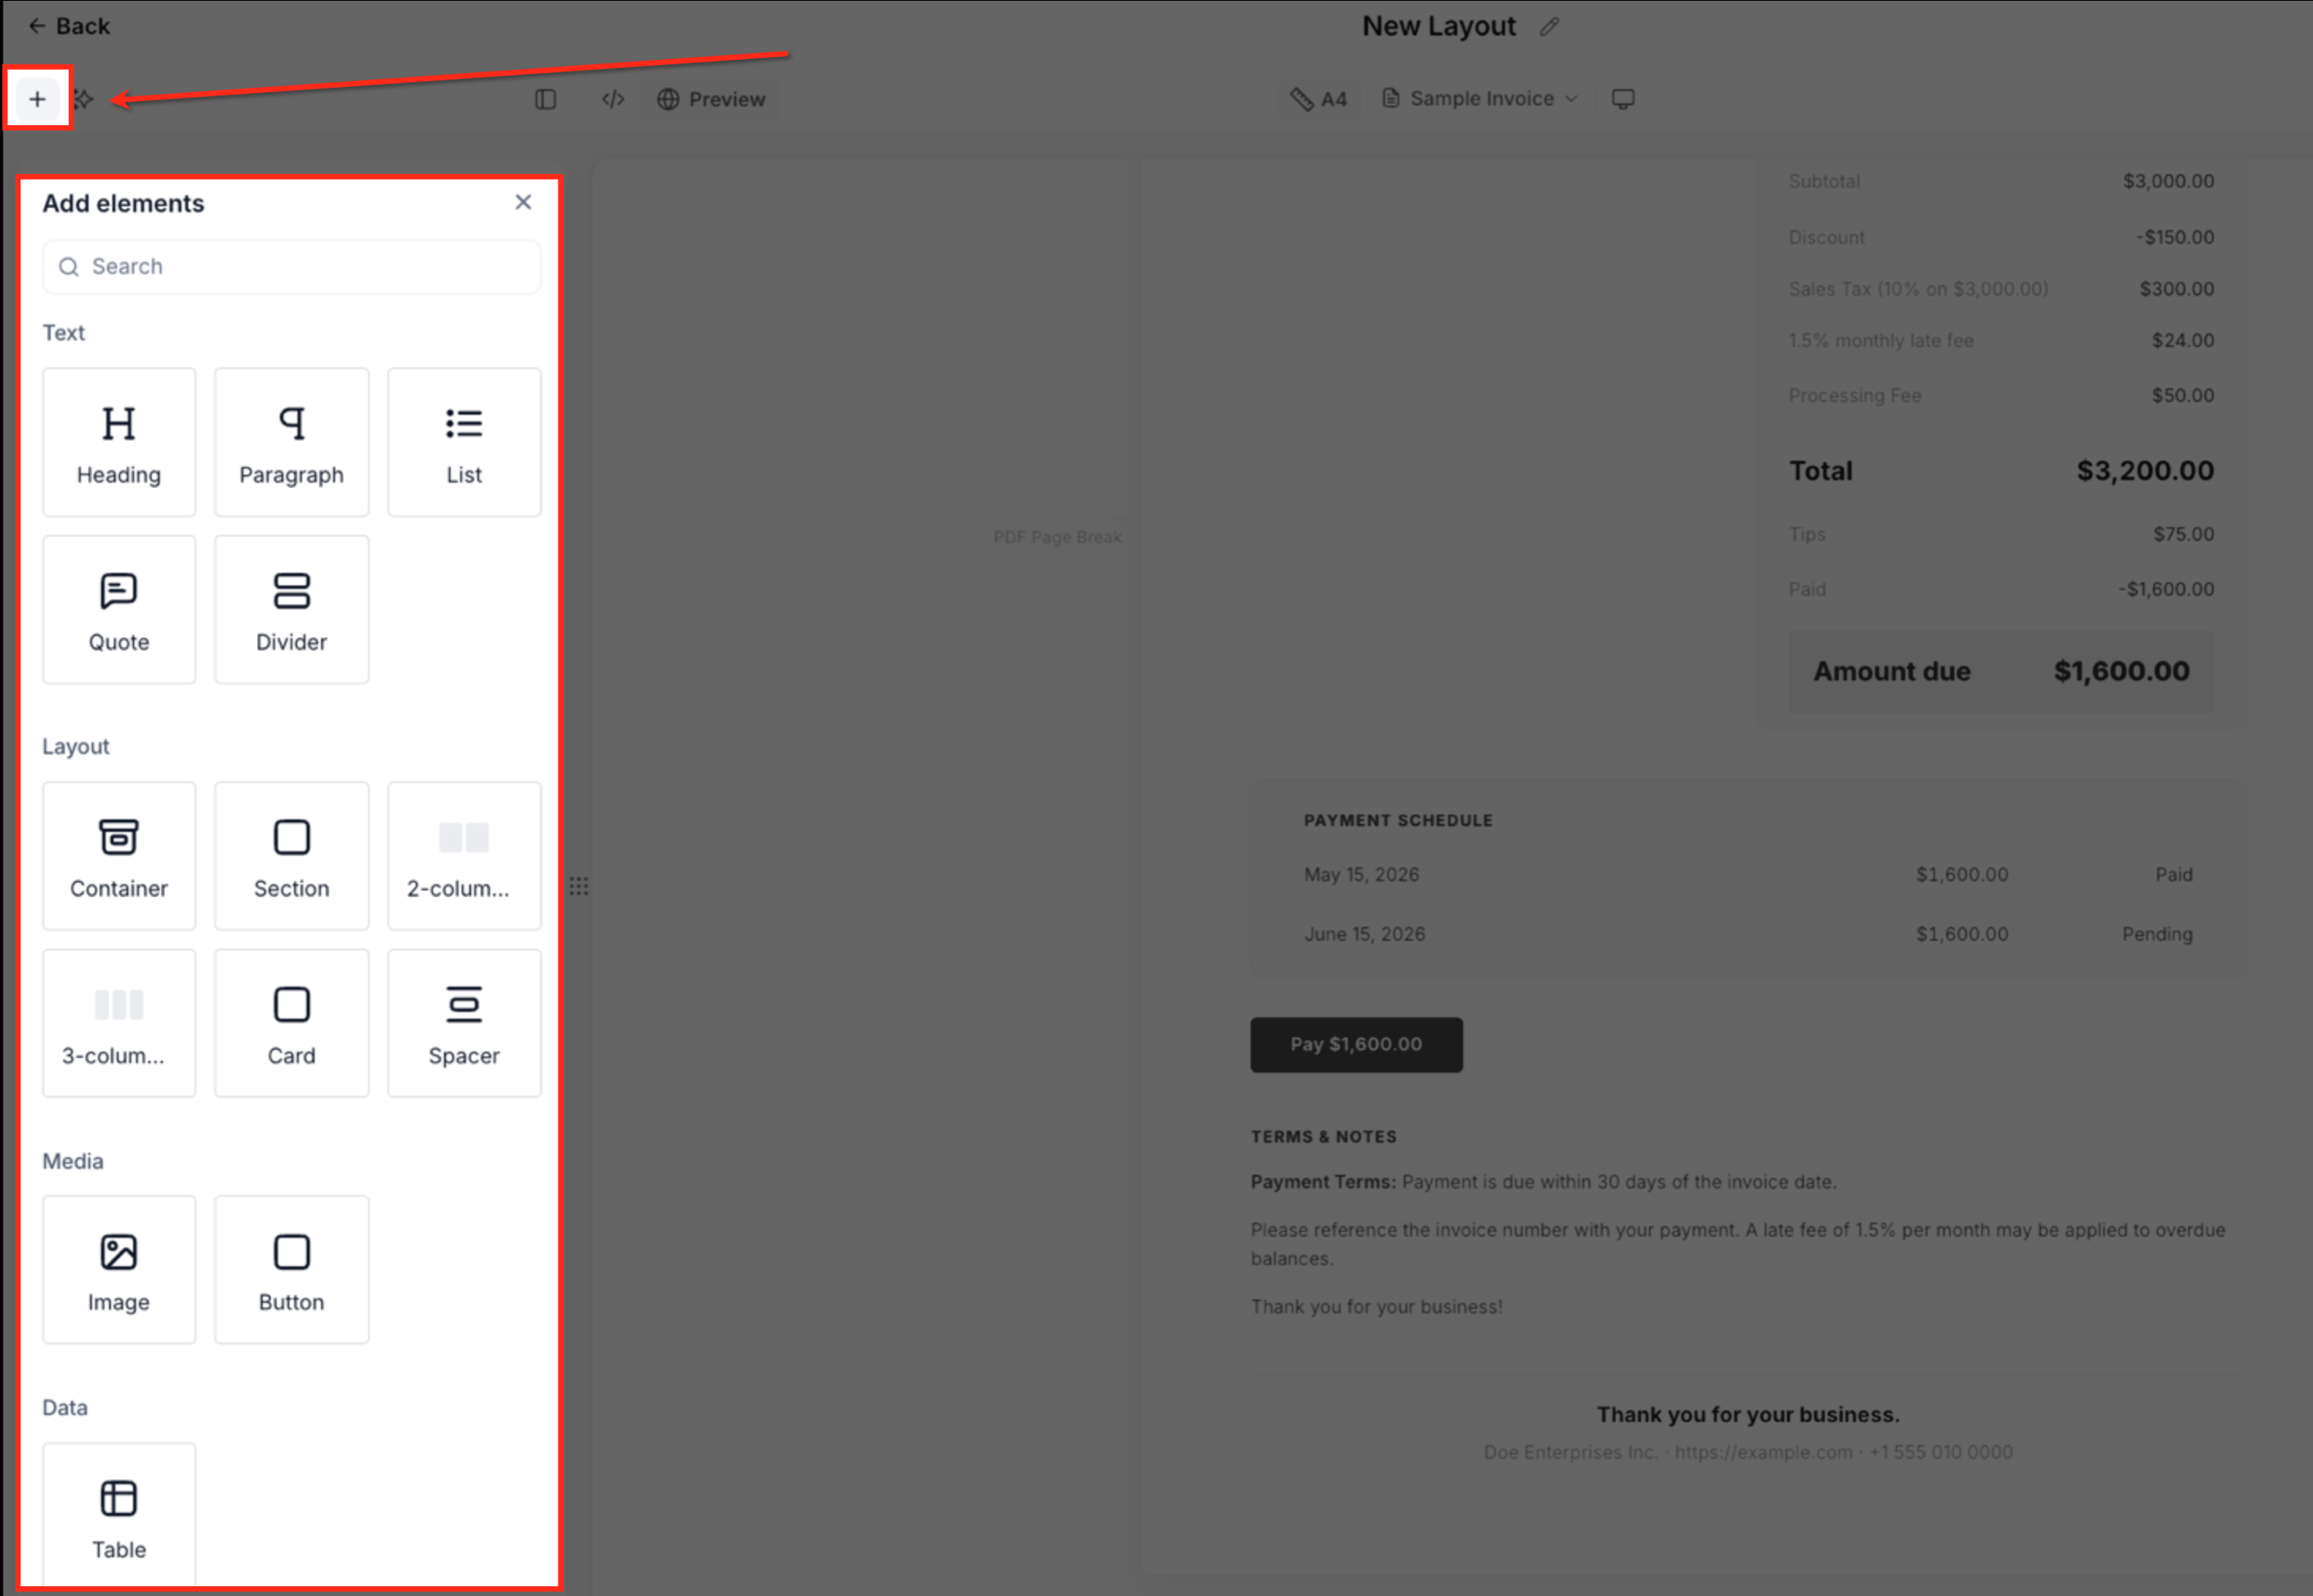
The visual builder lets you manually change the layout without relying on another AI prompt.
- Open the generated layout.
- Click the + control to open Add elements.
- Search for an element or select one from the available categories.
- Add and arrange the elements needed for the design.
- Continue editing the layout until the structure and content are ready.
Undo Manual Changes
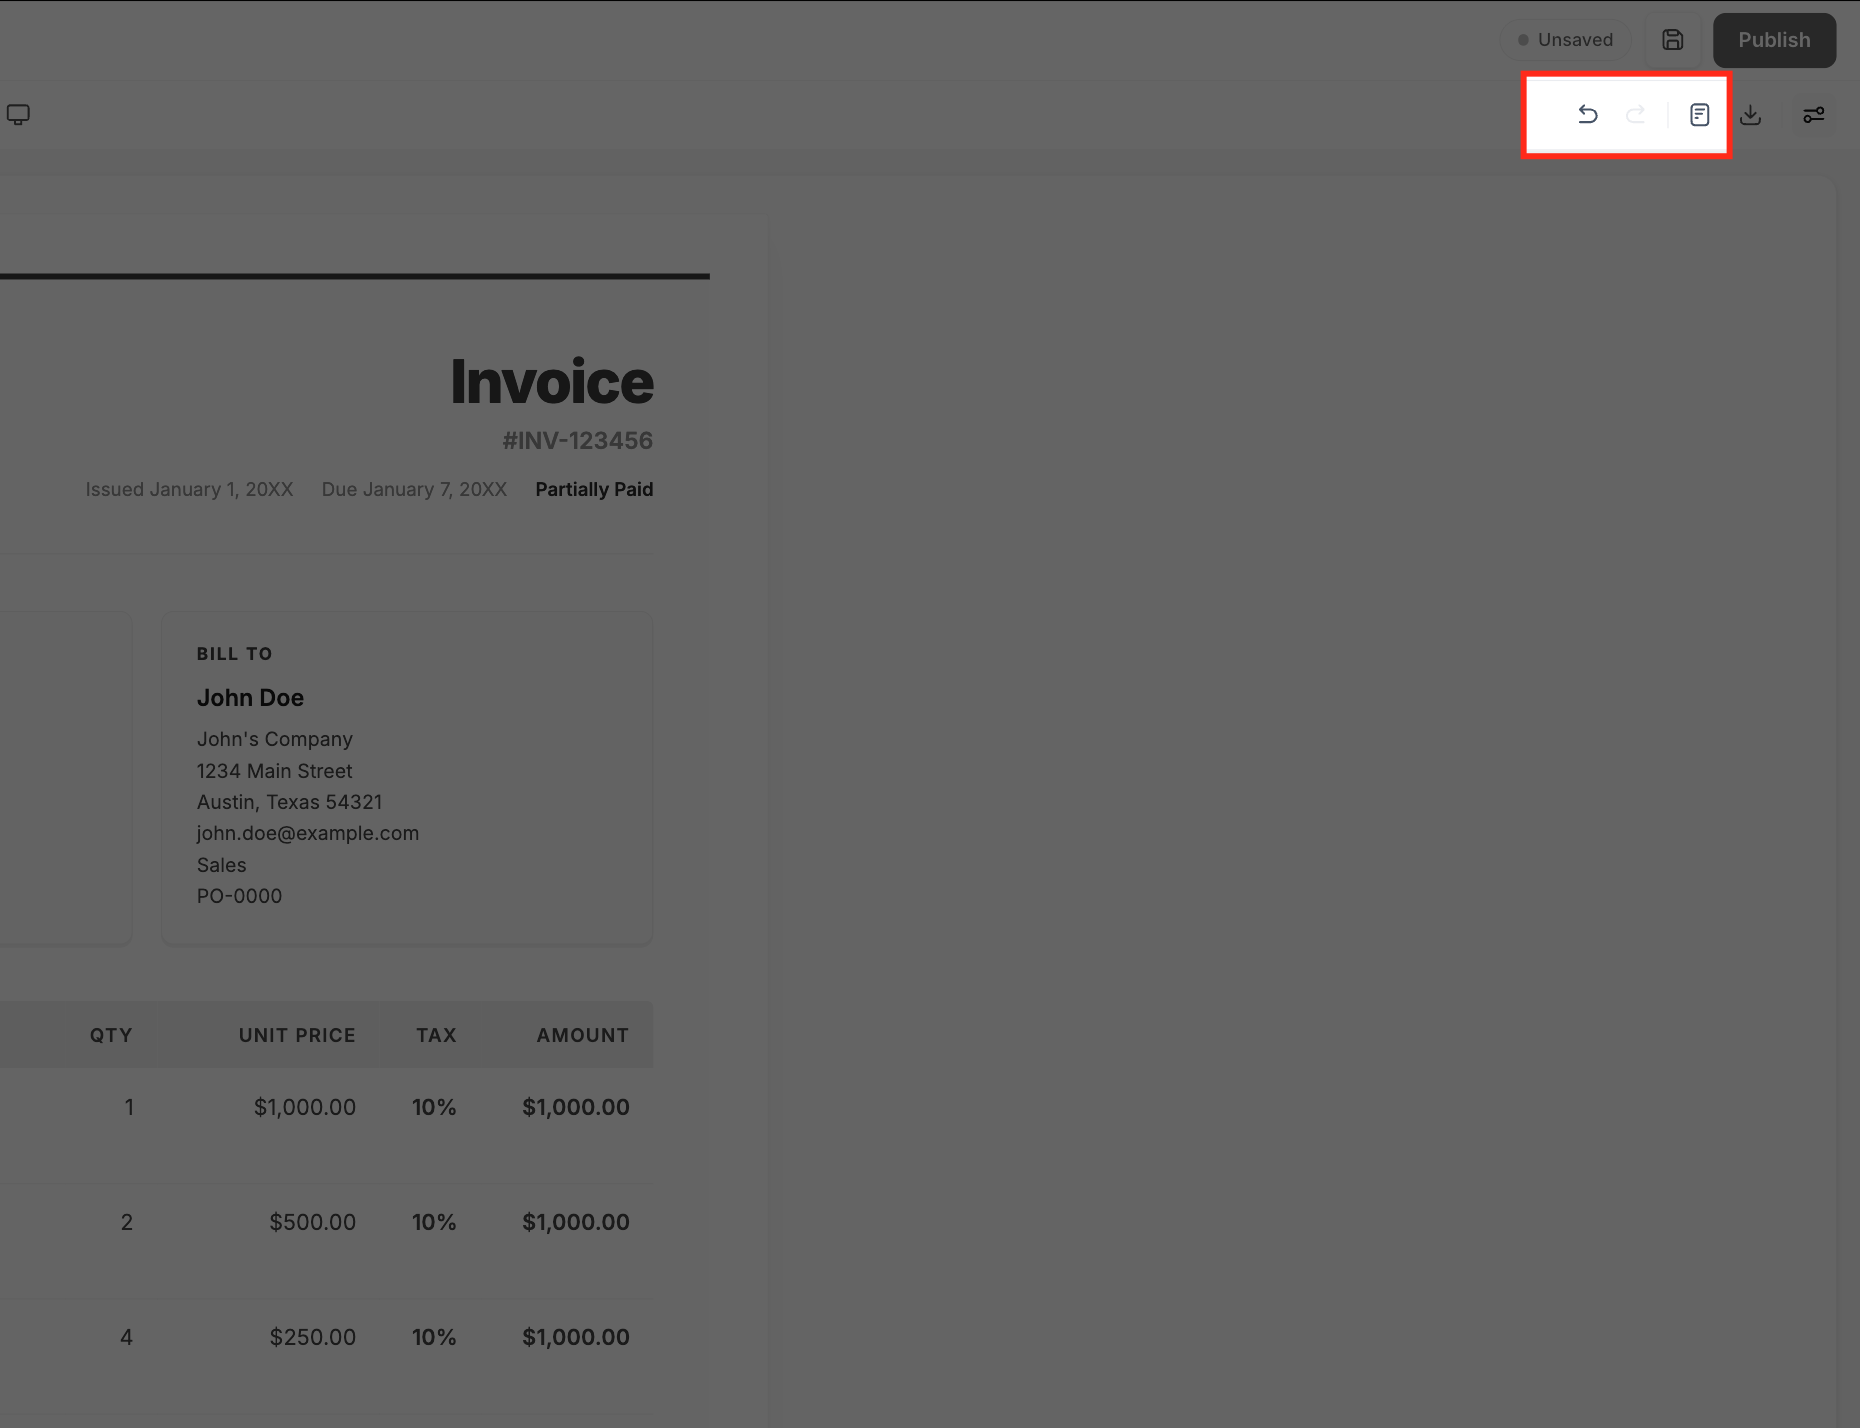
The editor toolbar provides an Undo control for reversing manual changes.
Use the Undo icon in the top toolbar when you need to reverse the most recent builder edit.
Preview the Layout
Previewing helps you review how the design behaves with invoice data before publishing.
- Open the layout editor.
- Click Preview.
- Use the Sample Invoice selector when you want to review the design with sample invoice data.
- Review the layout before publishing.
Publish an Invoice Layout
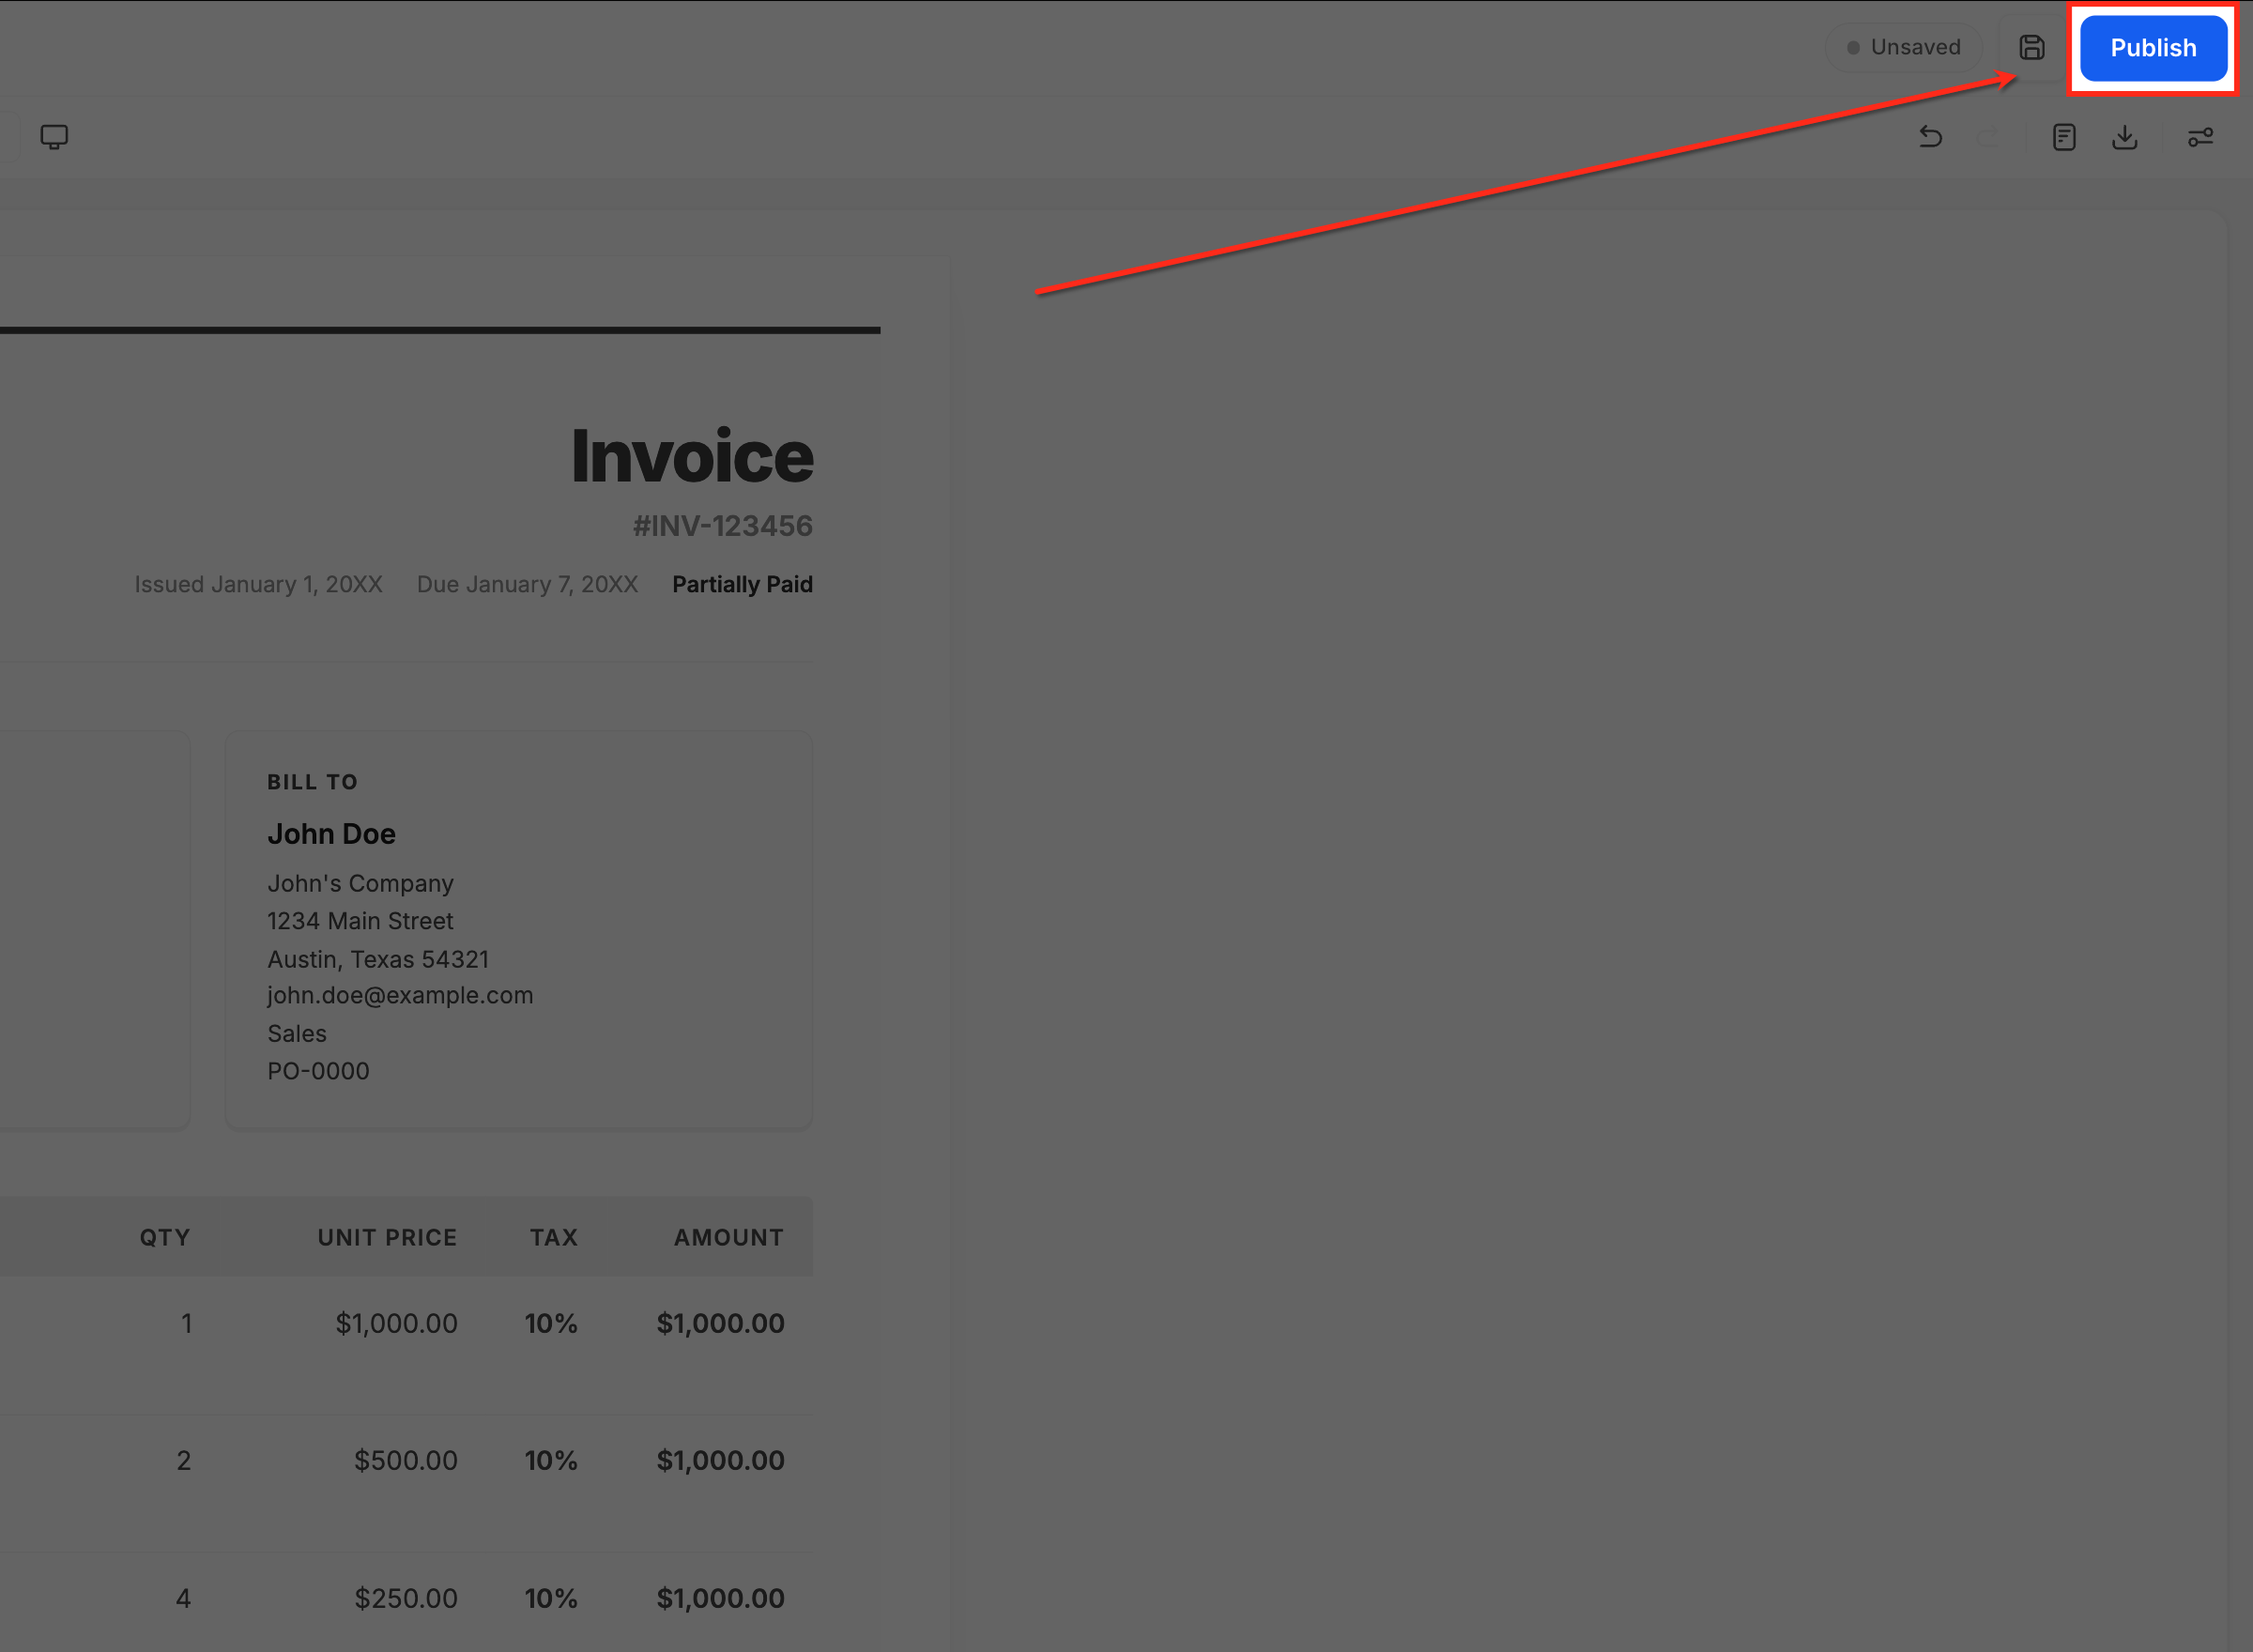
Publishing creates the version that becomes available for invoice use. You can continue editing afterward, but later edits do not go live until the layout is published again.
- Review the completed layout.
- Click Publish in the top-right corner.
- Review the Publish layout dialog.
- Optionally enter a note under What changed? (optional).
- Click Publish layout.
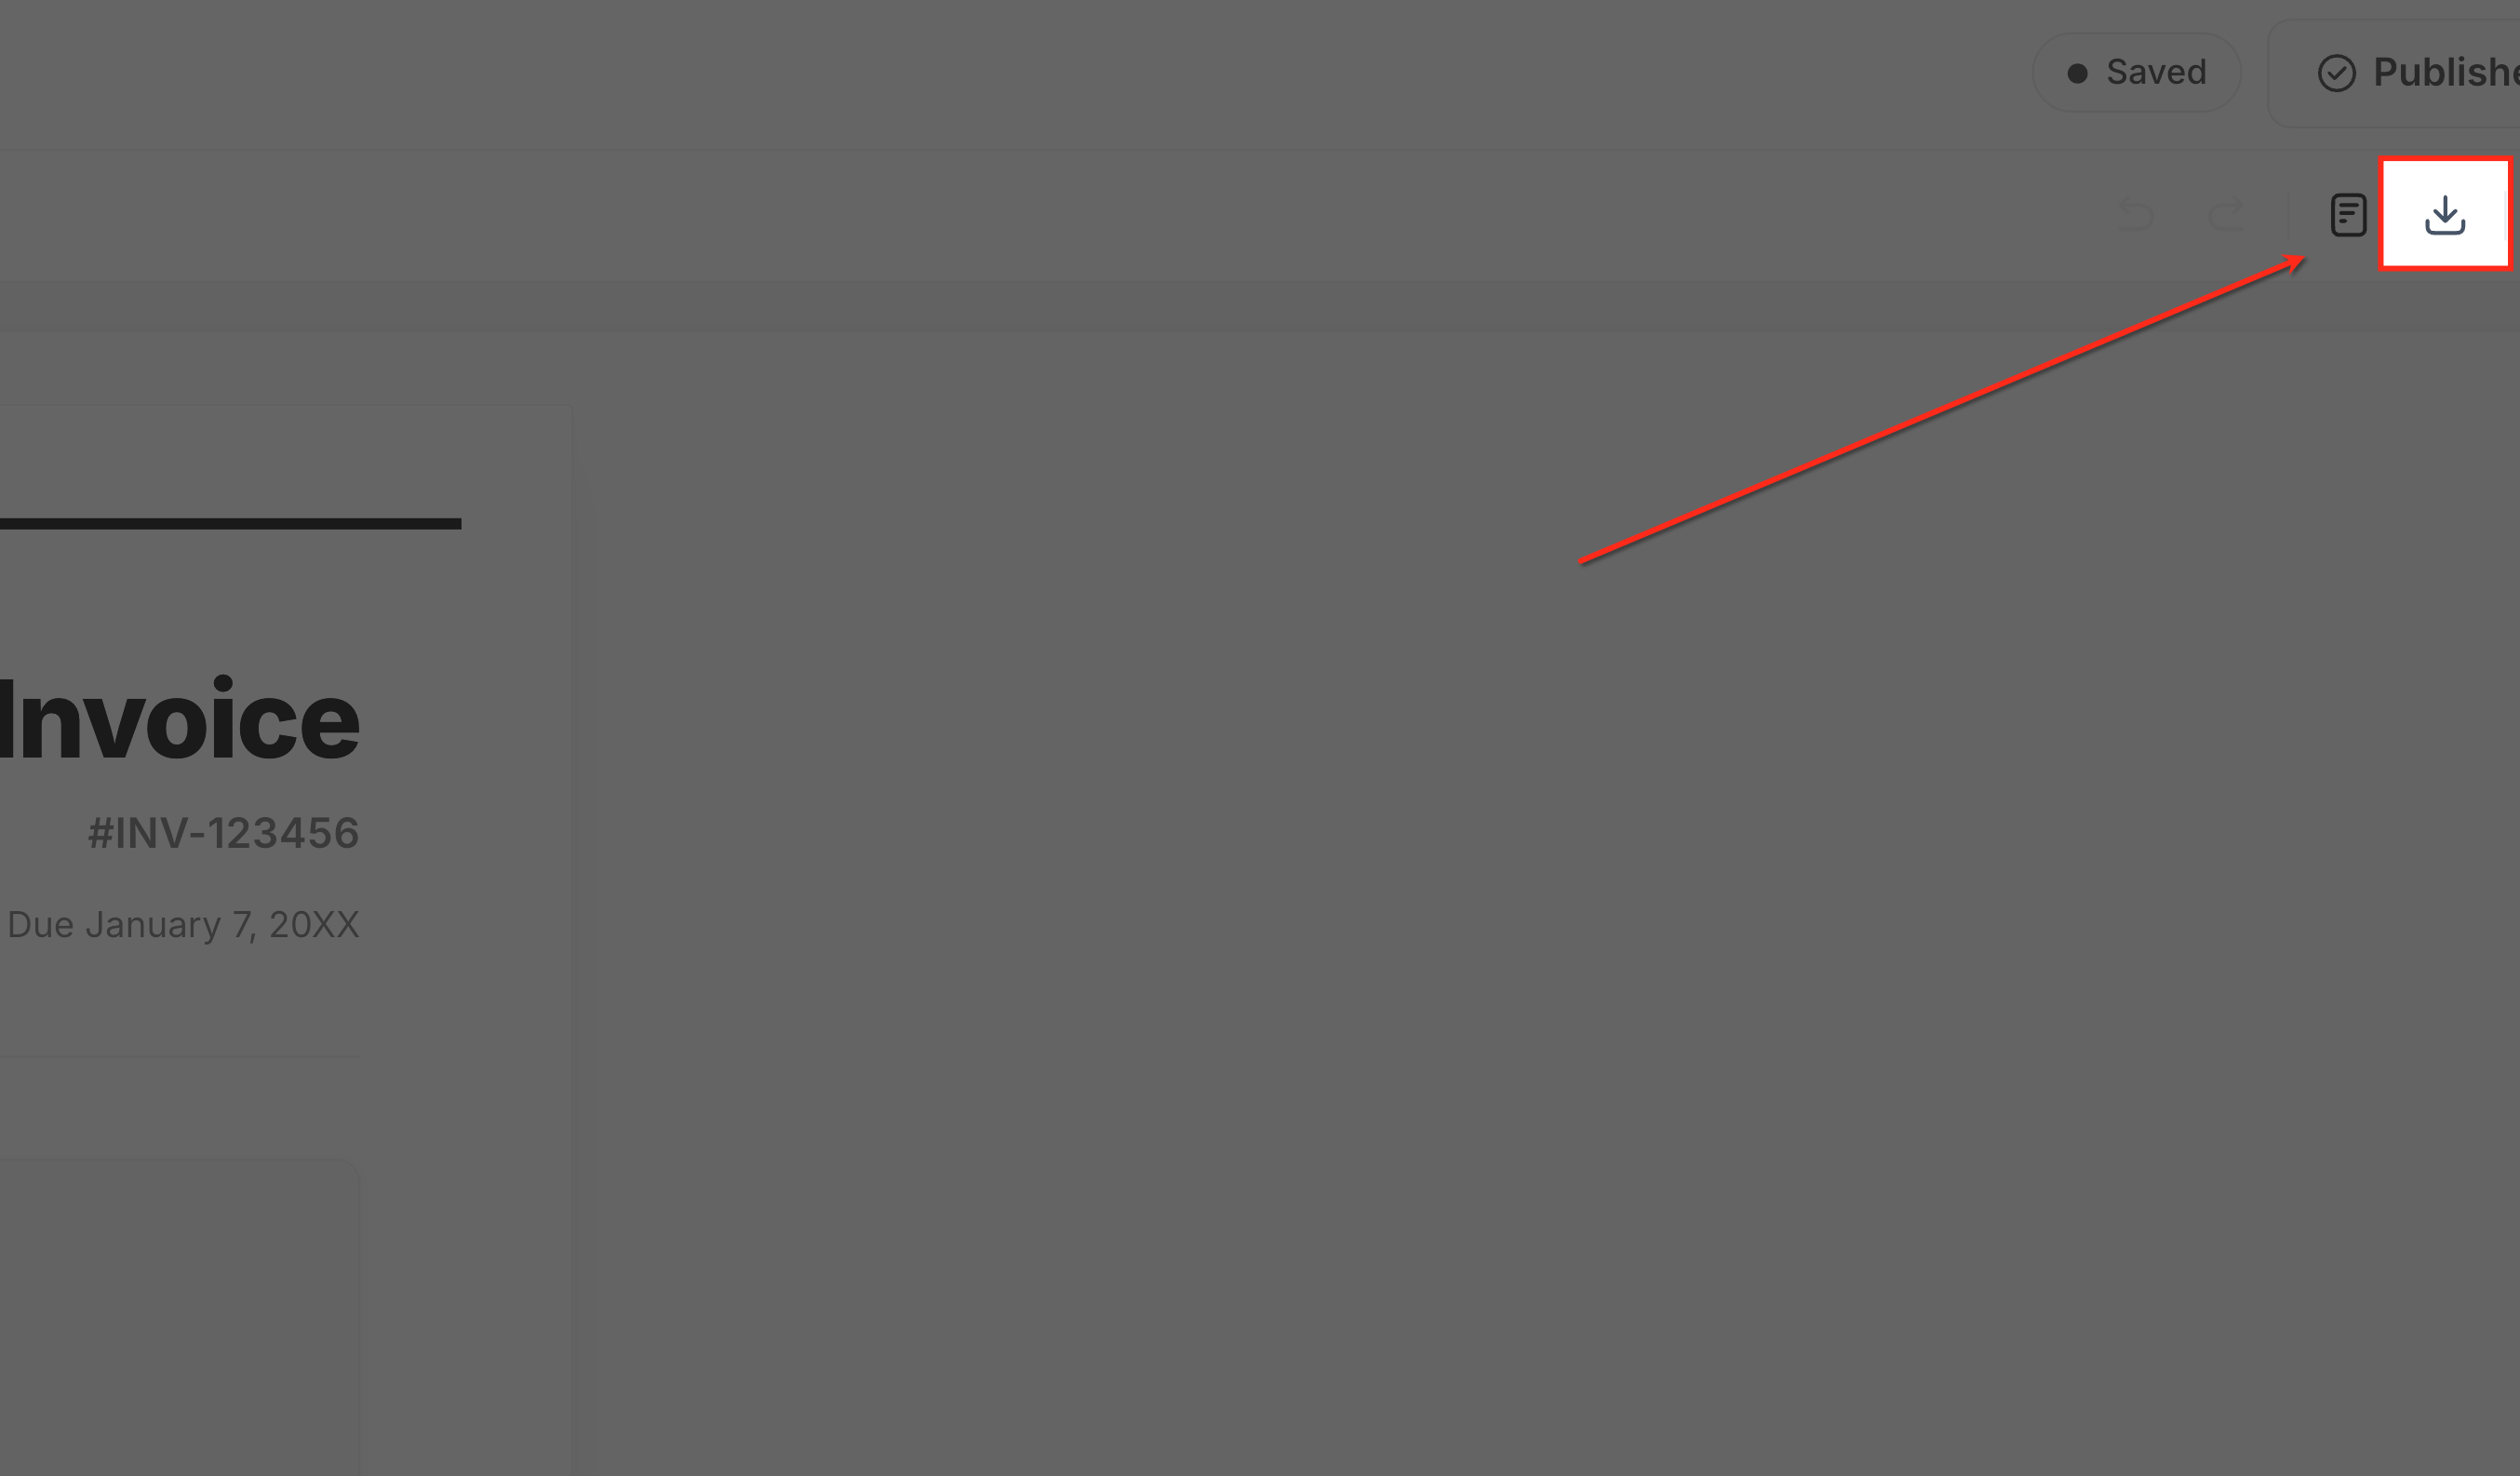
Download Option
Inside a builder, you can download the layout invoice template.
Manage Invoice Layouts
The Layouts page provides a central library for finding, previewing, editing, copying, and reviewing custom invoice designs.
Find and Organize Layouts
Search and view controls help you work with larger layout libraries.
From Payments → Invoices & Estimates → Layouts, you can:
- Use Search by layout name.
- Click Add filter.
- Click Sort by.
- Sort layouts by supported criteria such as name or last updated date.
- Switch between Grid and List views.
Edit, Preview, Clone, Rename, or Delete a Layout
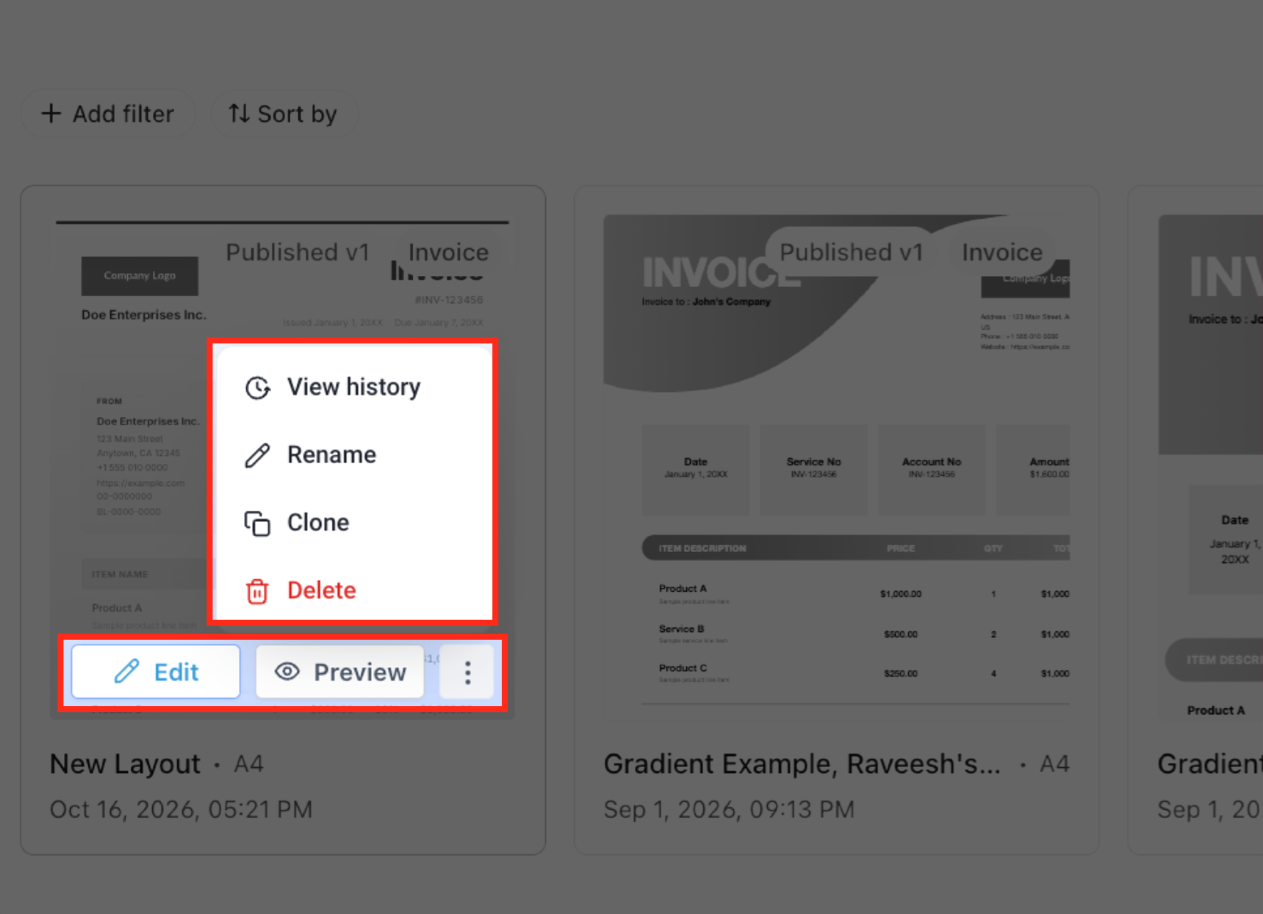
Each published layout card provides direct actions for working with the design.
- Click Edit to open the layout editor.
- Click Preview to review the design.
- Open the three-dot menu to select:
- View history
- Rename
- Clone
- Delete
The card also displays the layout name, page size, published version, and updated date and time.
View Layout History
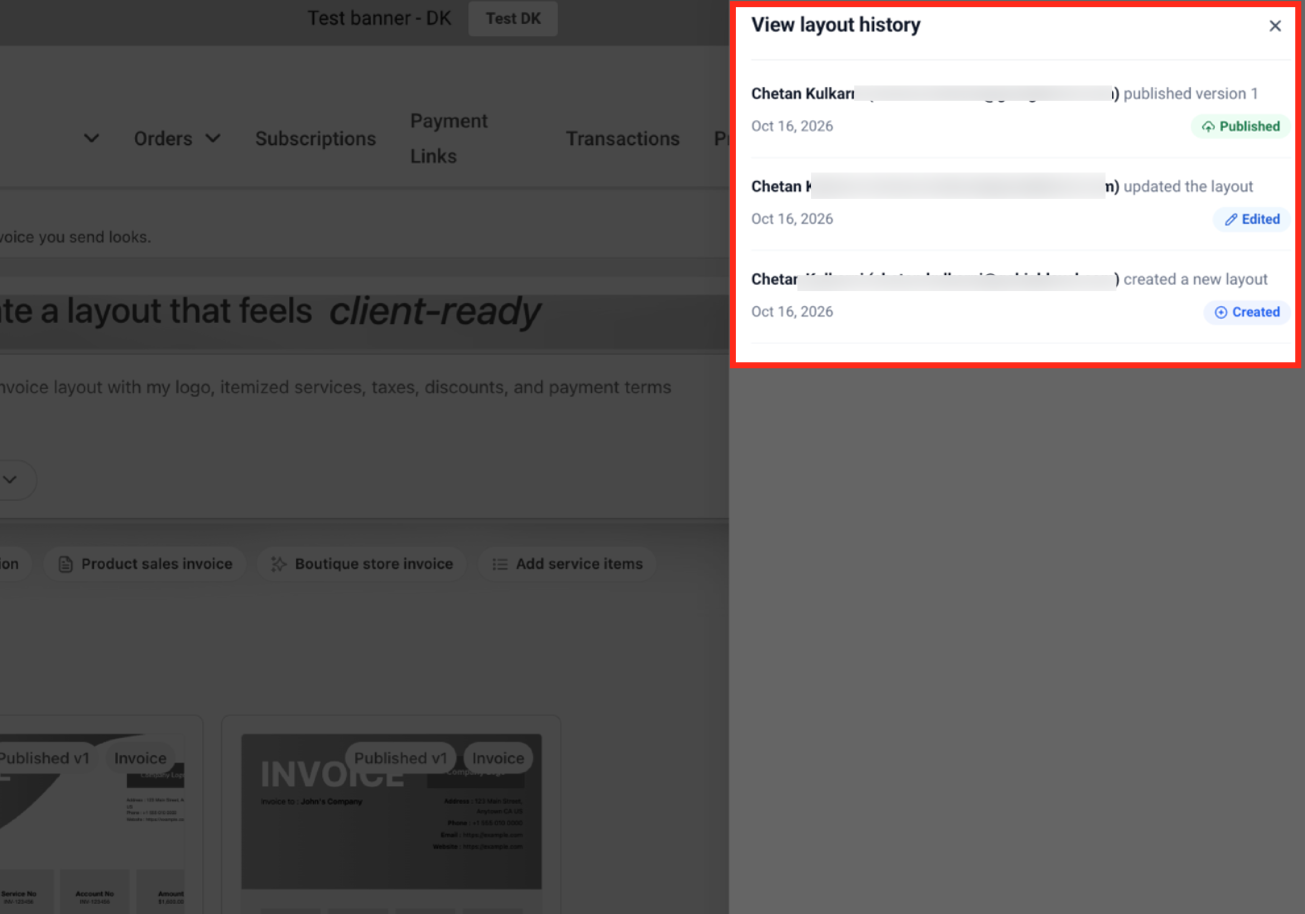
Layout History provides an audit trail for significant changes to a layout.
- Open the three-dot menu on a layout card.
- Click View history.
- Review the View layout history panel.
History can show:
- The user who performed the action.
- The user's email address.
- The action performed.
- The date.
- Status labels such as Created, Edited, and Published.
Apply a Published Layout to an Invoice
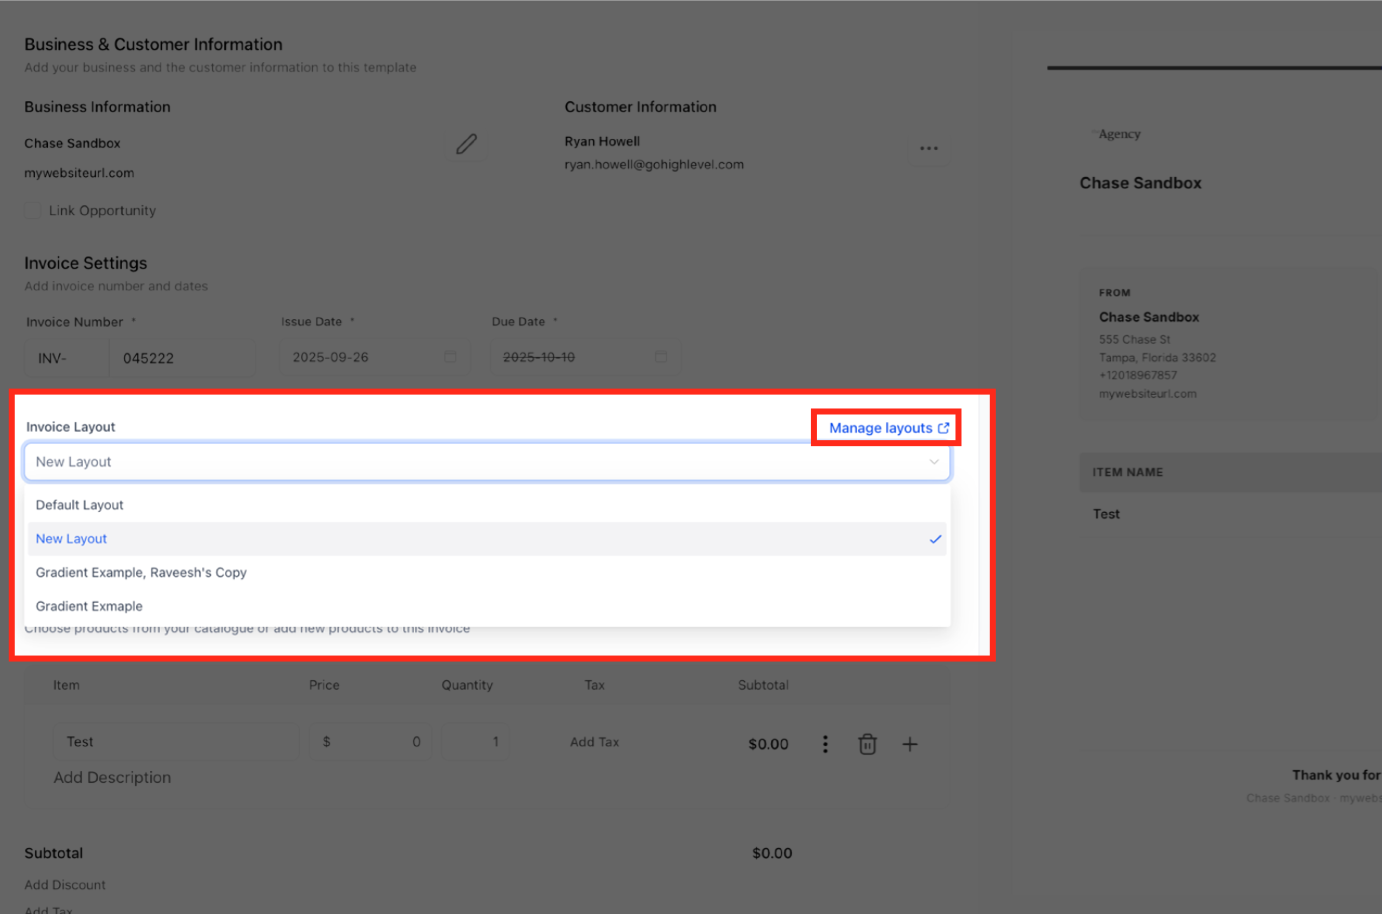
Published layouts can be selected while creating or editing a draft invoice. The selected design controls the layout used for that invoice.
- Go to Payments → Invoices & Estimates → All Invoices.
- Create a new invoice or open a draft invoice.
- In Invoice Settings, locate Invoice Layout.
- Open the Invoice Layout dropdown.
- Select the published layout you want to use.
- Review the invoice layout before sending.
The selector includes Default Layout and available published custom layouts.
Click Manage layouts beside the selector when you need to return to the Layouts workspace.
The editor's right-side preview can help you review the layout structure. For the accurate customer-facing result, save the invoice and use the dedicated Preview action from the menu beside Save.
Understand Layout Behavior After an Invoice Is Used
Layout behavior changes after an invoice moves beyond the draft stage. These rules preserve the design used on customer-facing invoices while protecting existing invoice records.
After an Invoice Is Sent or Partially Paid
The selected invoice layout becomes locked once the invoice is sent or partially paid.
This lock applies to the selected layout. It does not mean every invoice field becomes uneditable after partial payment.
HighLevel separately supports editing eligible invoice details on partially paid invoices.
If a Layout Is Deleted
Deleting a custom layout affects draft and sent invoices differently.
• Invoices that were already sent continue displaying their original design.
• Draft invoices using the deleted layout switch to the default layout.
Review affected drafts before deleting a layout that is still in use.
Layout behavior changes after an invoice moves beyond the draft stage. These rules preserve the design used on customer-facing invoices while protecting existing invoice records.
After an Invoice Is Sent or Partially Paid
The selected invoice layout becomes locked once the invoice is sent or partially paid. This lock applies to the selected layout. It does not mean every invoice field becomes uneditable after partial payment. HighLevel separately supports editing eligible invoice details on partially paid invoices. If a Layout Is Deleted
Deleting a custom layout affects draft and sent invoices differently. • Invoices that were already sent continue displaying their original design. • Draft invoices using the deleted layout switch to the default layout.
Review affected drafts before deleting a layout that is still in use.
Frequently Asked Questions
Q: Do I need to activate Layout AI Builder before using it?
Yes. Go to Settings → Labs → Sub-Account, search for AI-Powered Custom Invoice Layouts, and click Activate Feature.
Q: Can I create an invoice layout from a written description?
Yes. Enter a natural-language description in Layout AI, then submit the prompt to generate the layout.
Q: Can I recreate an invoice design I already use?
Yes. You can attach an existing invoice or describe the design you want Layout AI to recreate.
Q: Can I manually edit an AI-generated layout?
Yes. Use the visual builder to add, remove, arrange, and edit supported elements.
Q: Can I return to an earlier AI-generated version?
Yes. Every AI change creates a restore point that can be used to return to an earlier version.
Q: When can I publish a layout?
Publish becomes available after the layout contains content.
Q: Can I keep editing after publishing?
Yes. Your published version stays live while you continue editing. Later edits do not go live until you publish the layout again.
Q: Can I create more than one invoice layout?
Yes. The Layouts page supports multiple custom layouts for different clients, services, or business needs.
Q: What happens to the layout after an invoice is sent or partially paid?
The selected layout becomes locked for that invoice.
Q: What happens if I delete a layout that is already being used?
Sent invoices keep their original design. Draft invoices using the deleted layout switch to the default layout.
Related Articles
Was this article helpful?
That’s Great!
Thank you for your feedback
Sorry! We couldn't be helpful
Thank you for your feedback
Feedback sent
We appreciate your effort and will try to fix the article