Create a personalized Profile Card QR code in HighLevel to share your professional details, social links, and important destinations from one mobile-friendly page. Visitors can save your contact information, submit their own details through an Exchange Contact form, and connect with you more easily. Both the digital profile card and the QR code can be customized to match your branding.
TABLE OF CONTENTS
- What Is a Profile Card QR Code?
- Key Benefits of Profile Card QR Codes
- Built-In and Custom Links
- Save Contact
- Exchange Contact
- How to Set Up a Profile Card QR Code
- Frequently Asked Questions
- Related Articles
What Is a Profile Card QR Code?
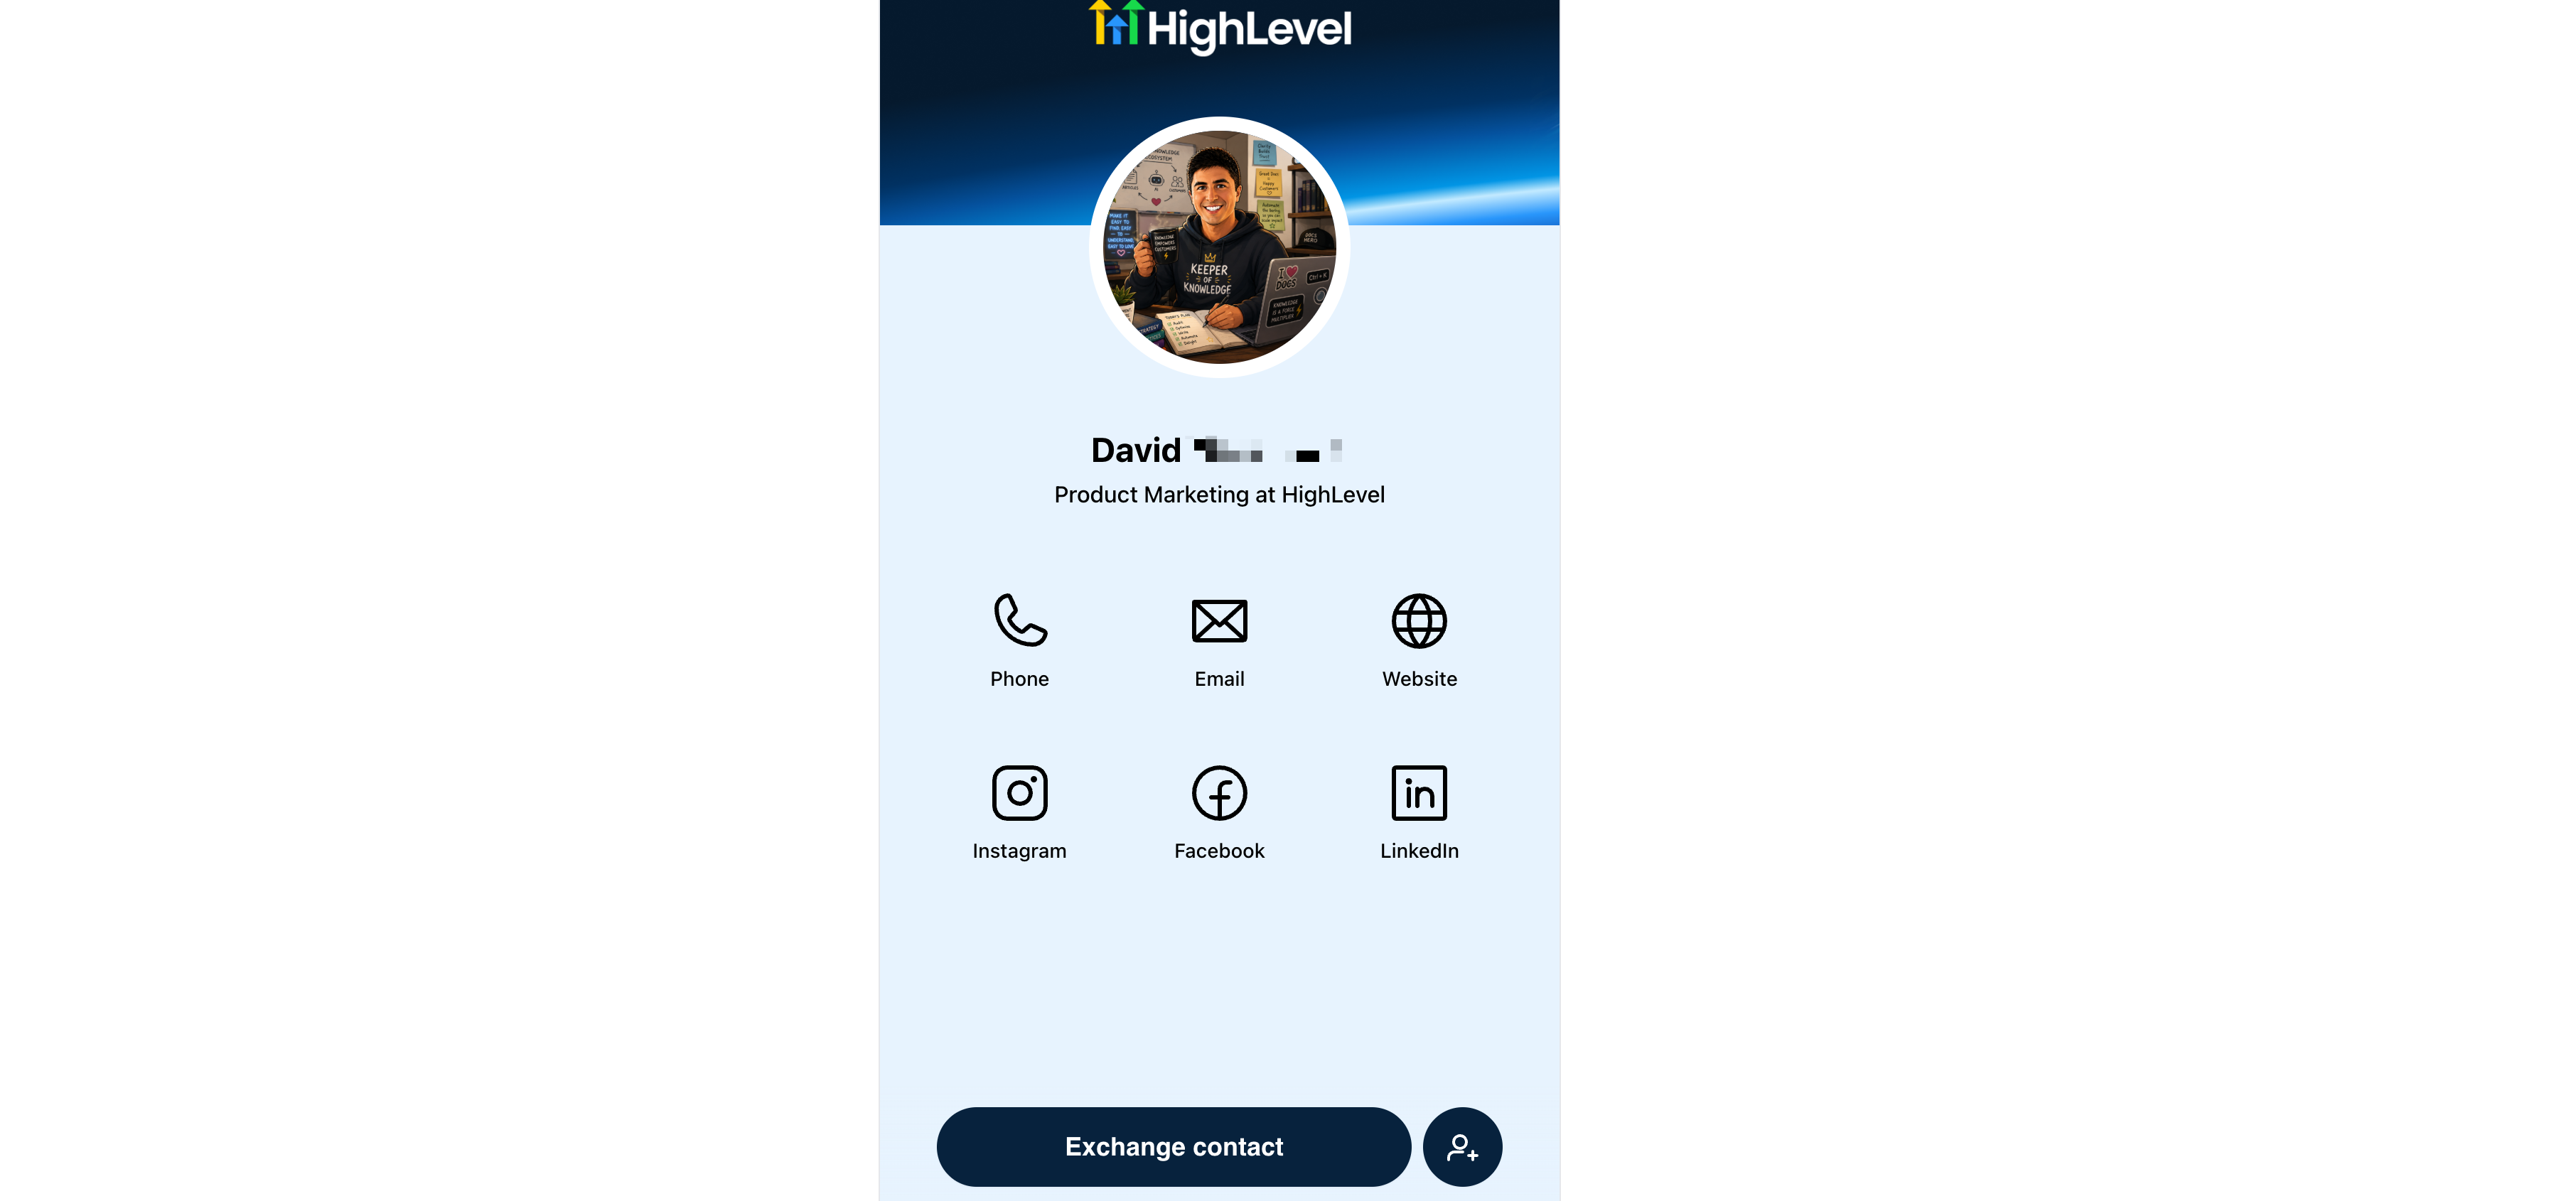
A Profile Card QR code opens a mobile-friendly digital profile when scanned. It gives individuals one convenient place to share professional details, contact information, social profiles, booking links, portfolios, and other important resources.
Visitors can use the card to call, email, visit a website, open shared links, or save the profile owner’s contact information directly to their device. The card can also include an Exchange Contact form, allowing visitors to submit their own details and become contacts in the CRM. This makes Profile Cards useful for networking, events, sales conversations, email signatures, printed materials, and other situations where someone needs a fast way to connect.
Key Benefits of Profile Card QR Codes
- Professional digital presence: Present your professional information through a modern, mobile-friendly page.
- Faster contact sharing: Let visitors save your contact details directly to their device.
- Built-in lead capture: Collect visitor information through an Exchange Contact form and create contacts in the CRM.
- Flexible branding: Customize images, colors, text, icons, and buttons to match your personal or company brand.
- Centralized links: Share websites, booking calendars, portfolios, payment pages, social profiles, and landing pages.
- Customizable QR design: Match the QR code’s colors, frame, logo, background, and supporting text to your campaign.
- Flexible sharing: Download the QR code or copy the direct link for use in digital and printed materials.
Built-In and Custom Links
Links turn the Profile Card into a central destination for professional actions such as booking an appointment, viewing a portfolio, making a payment, or connecting on social media. Add only the most useful destinations and arrange them in the order visitors should see them.
Built-in social link options include X, Instagram, Facebook, LinkedIn, YouTube, TikTok and Pinterest.
Custom links can be used for destinations such as Booking calendars, Portfolios, Landing Pages or Additional social profiles.
Use the built-in link dropdown to add supported social platforms. Select Add custom links to enter another destination, name the link, and choose a matching icon.
Save Contact
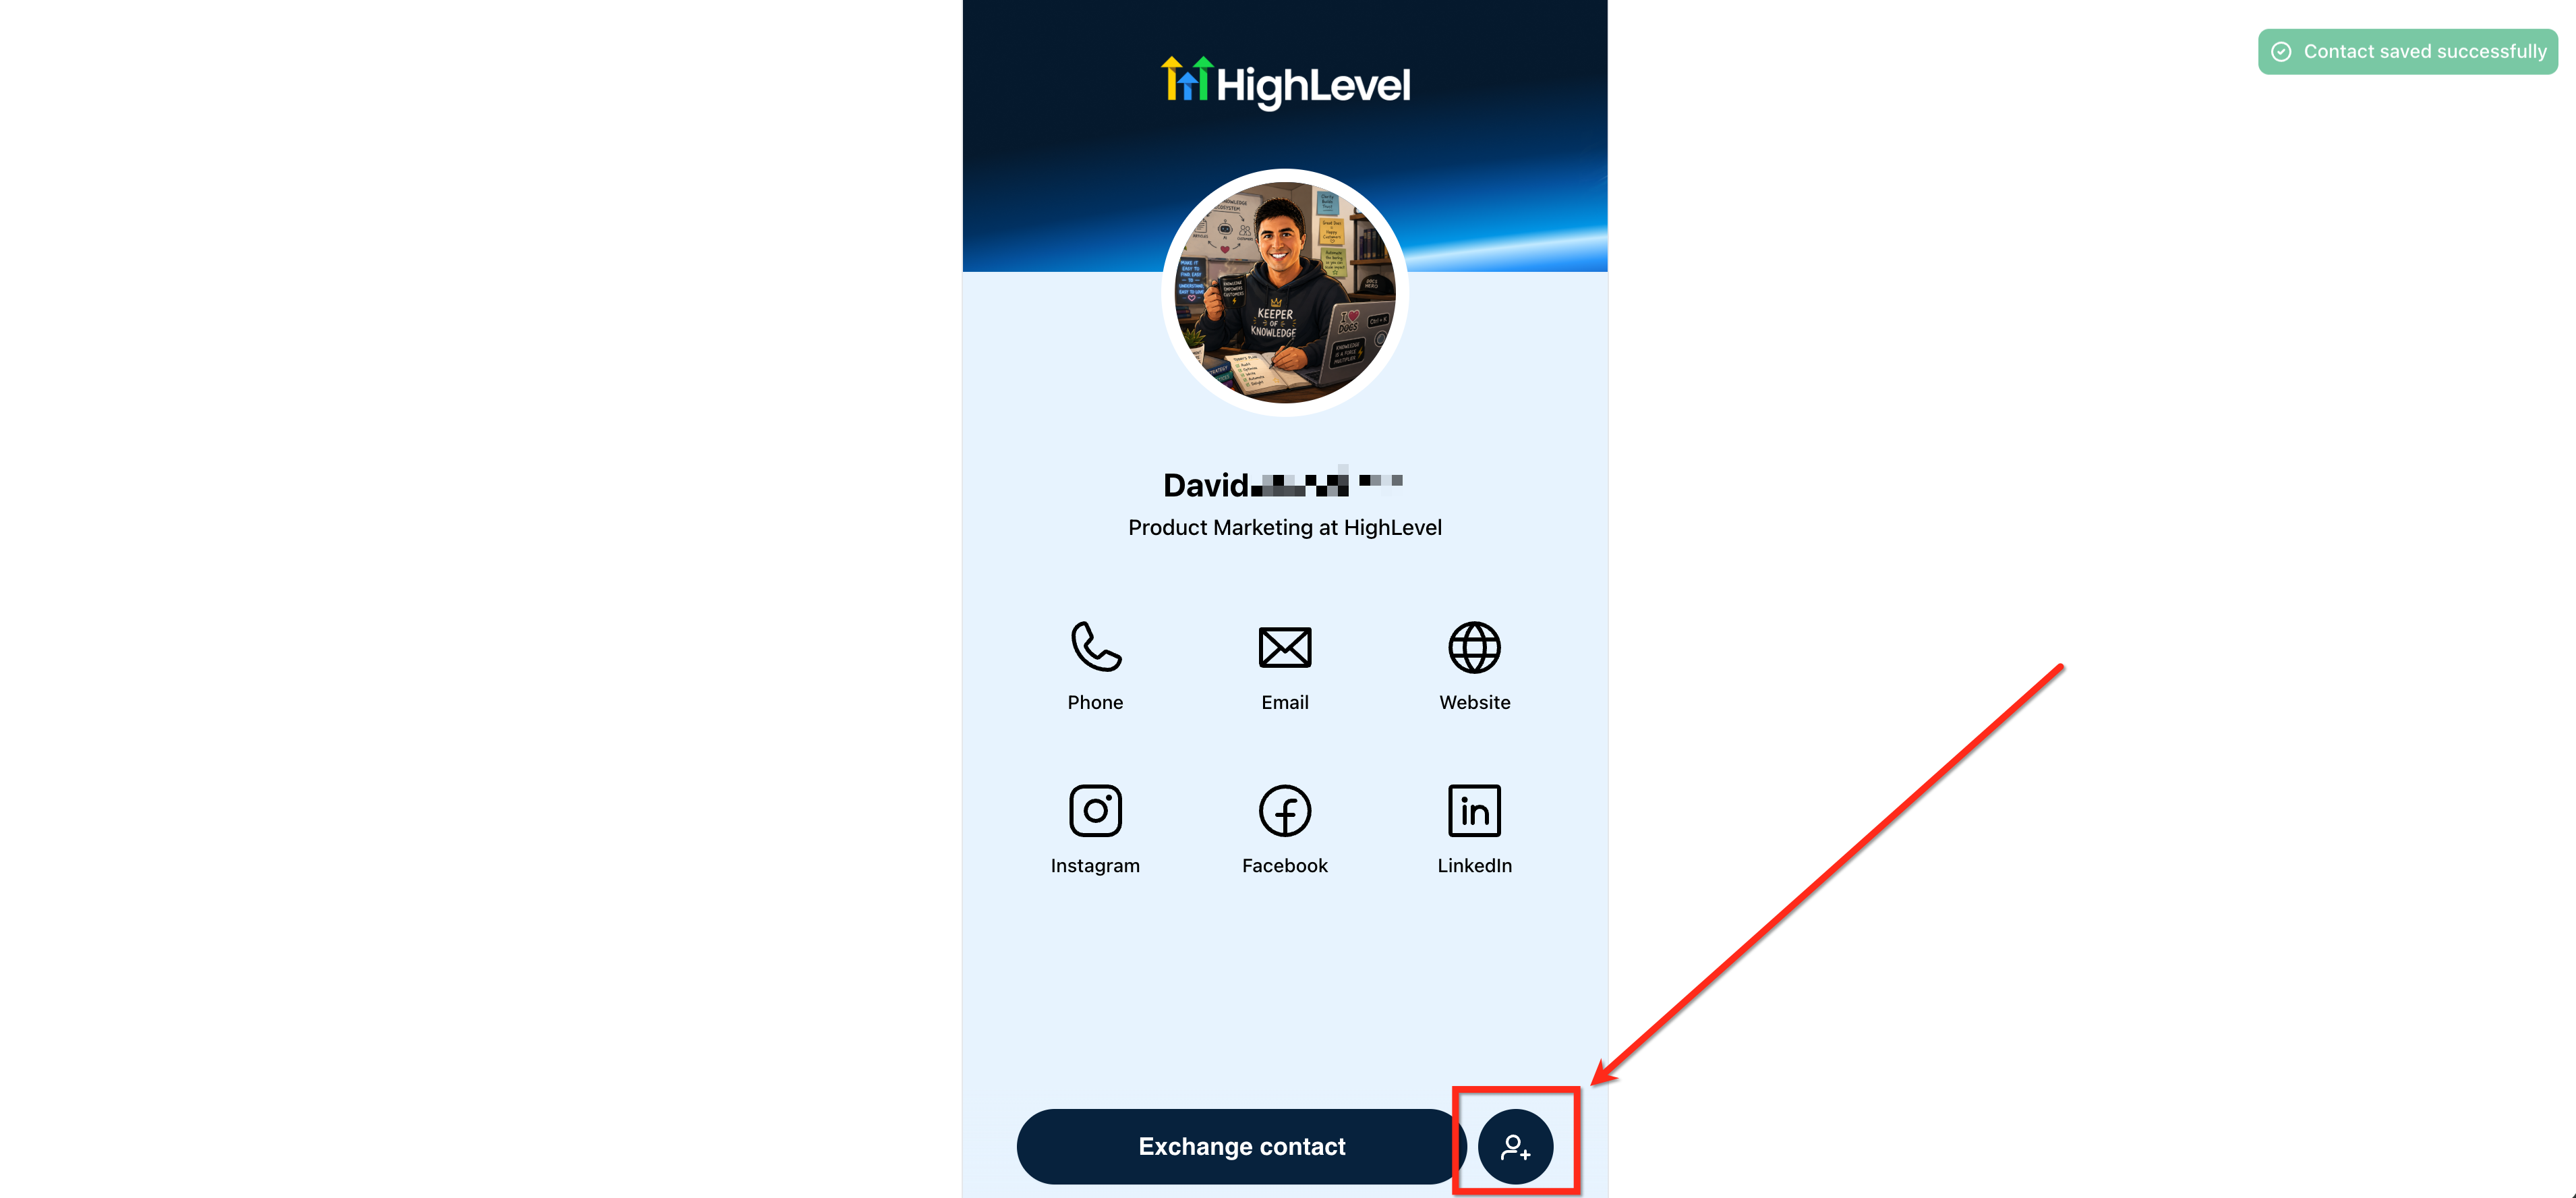
The Save Contact button gives visitors a faster way to add your professional information to their device. It appears on Profile Cards by default and does not require Exchange Contact to be enabled.
When a visitor selects Save Contact, their device begins the process of adding your contact information. The confirmation or save experience may vary by browser, operating system, and device settings.
Automatically Download My Contact Info
Starting the contact-download experience automatically makes it easier for visitors to save your information without locating the Save Contact button.
Enable Automatically Download My Contact Info to initiate the contact-saving experience when the Profile Card opens. The visitor’s browser or device may still require confirmation before downloading or saving the information.
Exchange Contact
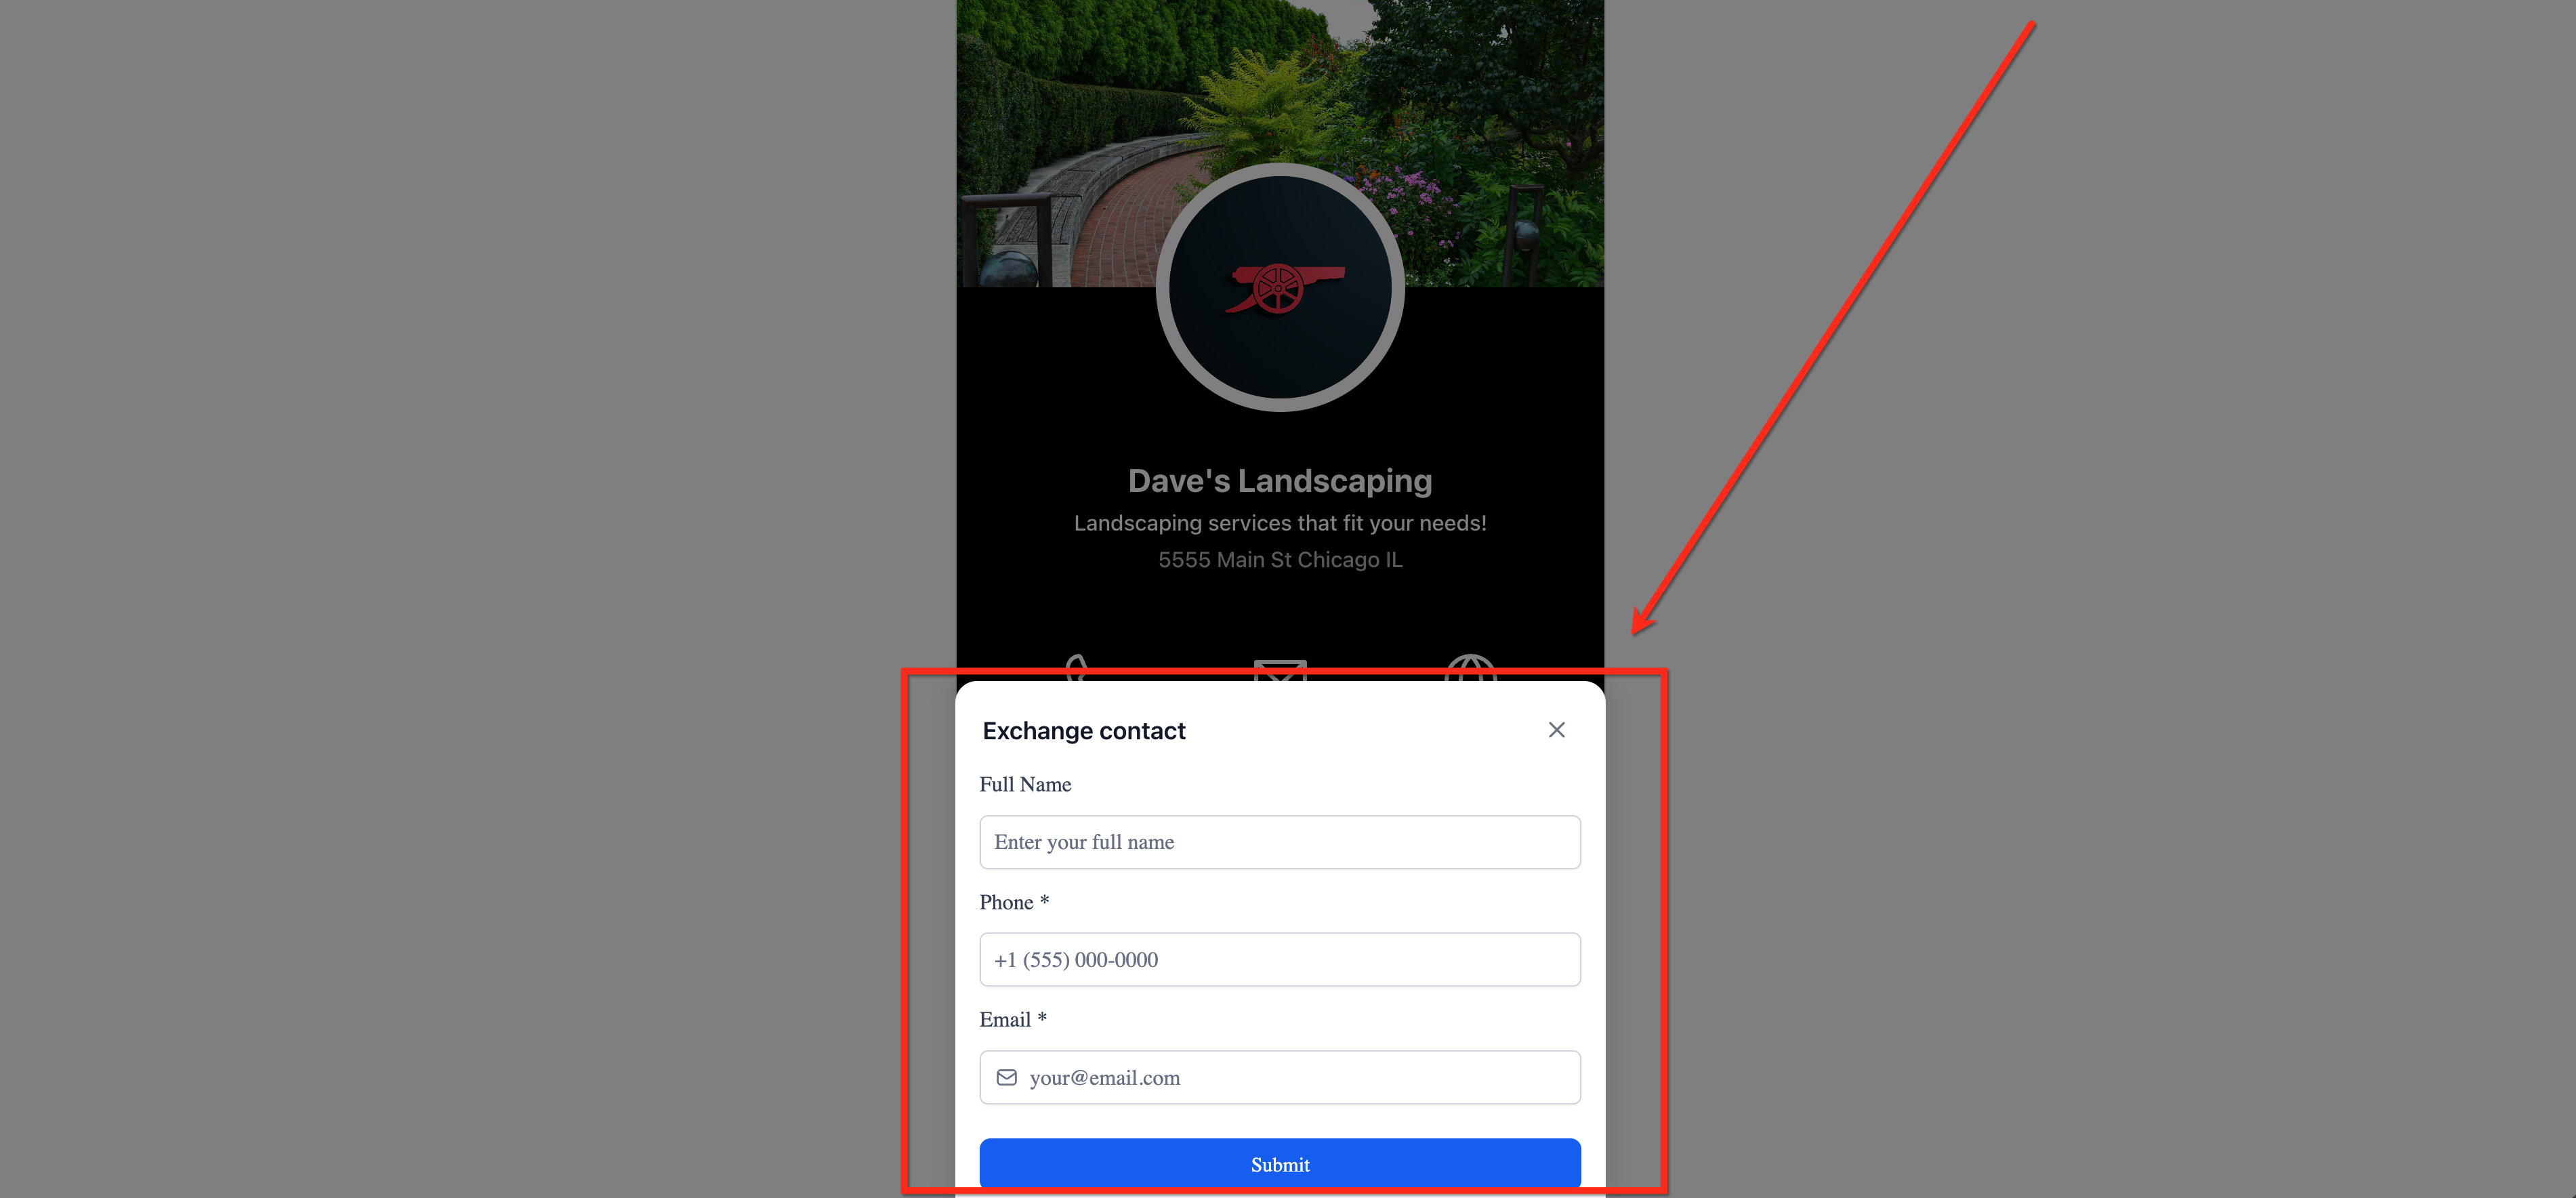
Exchange Contact allows visitors to submit their own information from your Profile Card. This turns the card into a lead-capture tool while still allowing visitors to view and save your details. When Exchange Contact is enabled, an Exchange Contact button appears on the card. Selecting the button opens a form where the visitor can enter their information.
When the visitor submits the form, a contact is created in the CRM. Contact activity identifies the Profile Card as the origin of the lead.
Open Exchange Contact Form by Default
Opening the form automatically places lead capture at the beginning of the visitor experience. This is useful when collecting visitor information is the primary purpose of the Profile Card.
Enable Open Exchange Contact Form by Default to display the form as soon as the Profile Card opens. Visitors do not need to select the Exchange Contact button first.
How to Set Up a Profile Card QR Code
Step 1: Open the QR Code Builder
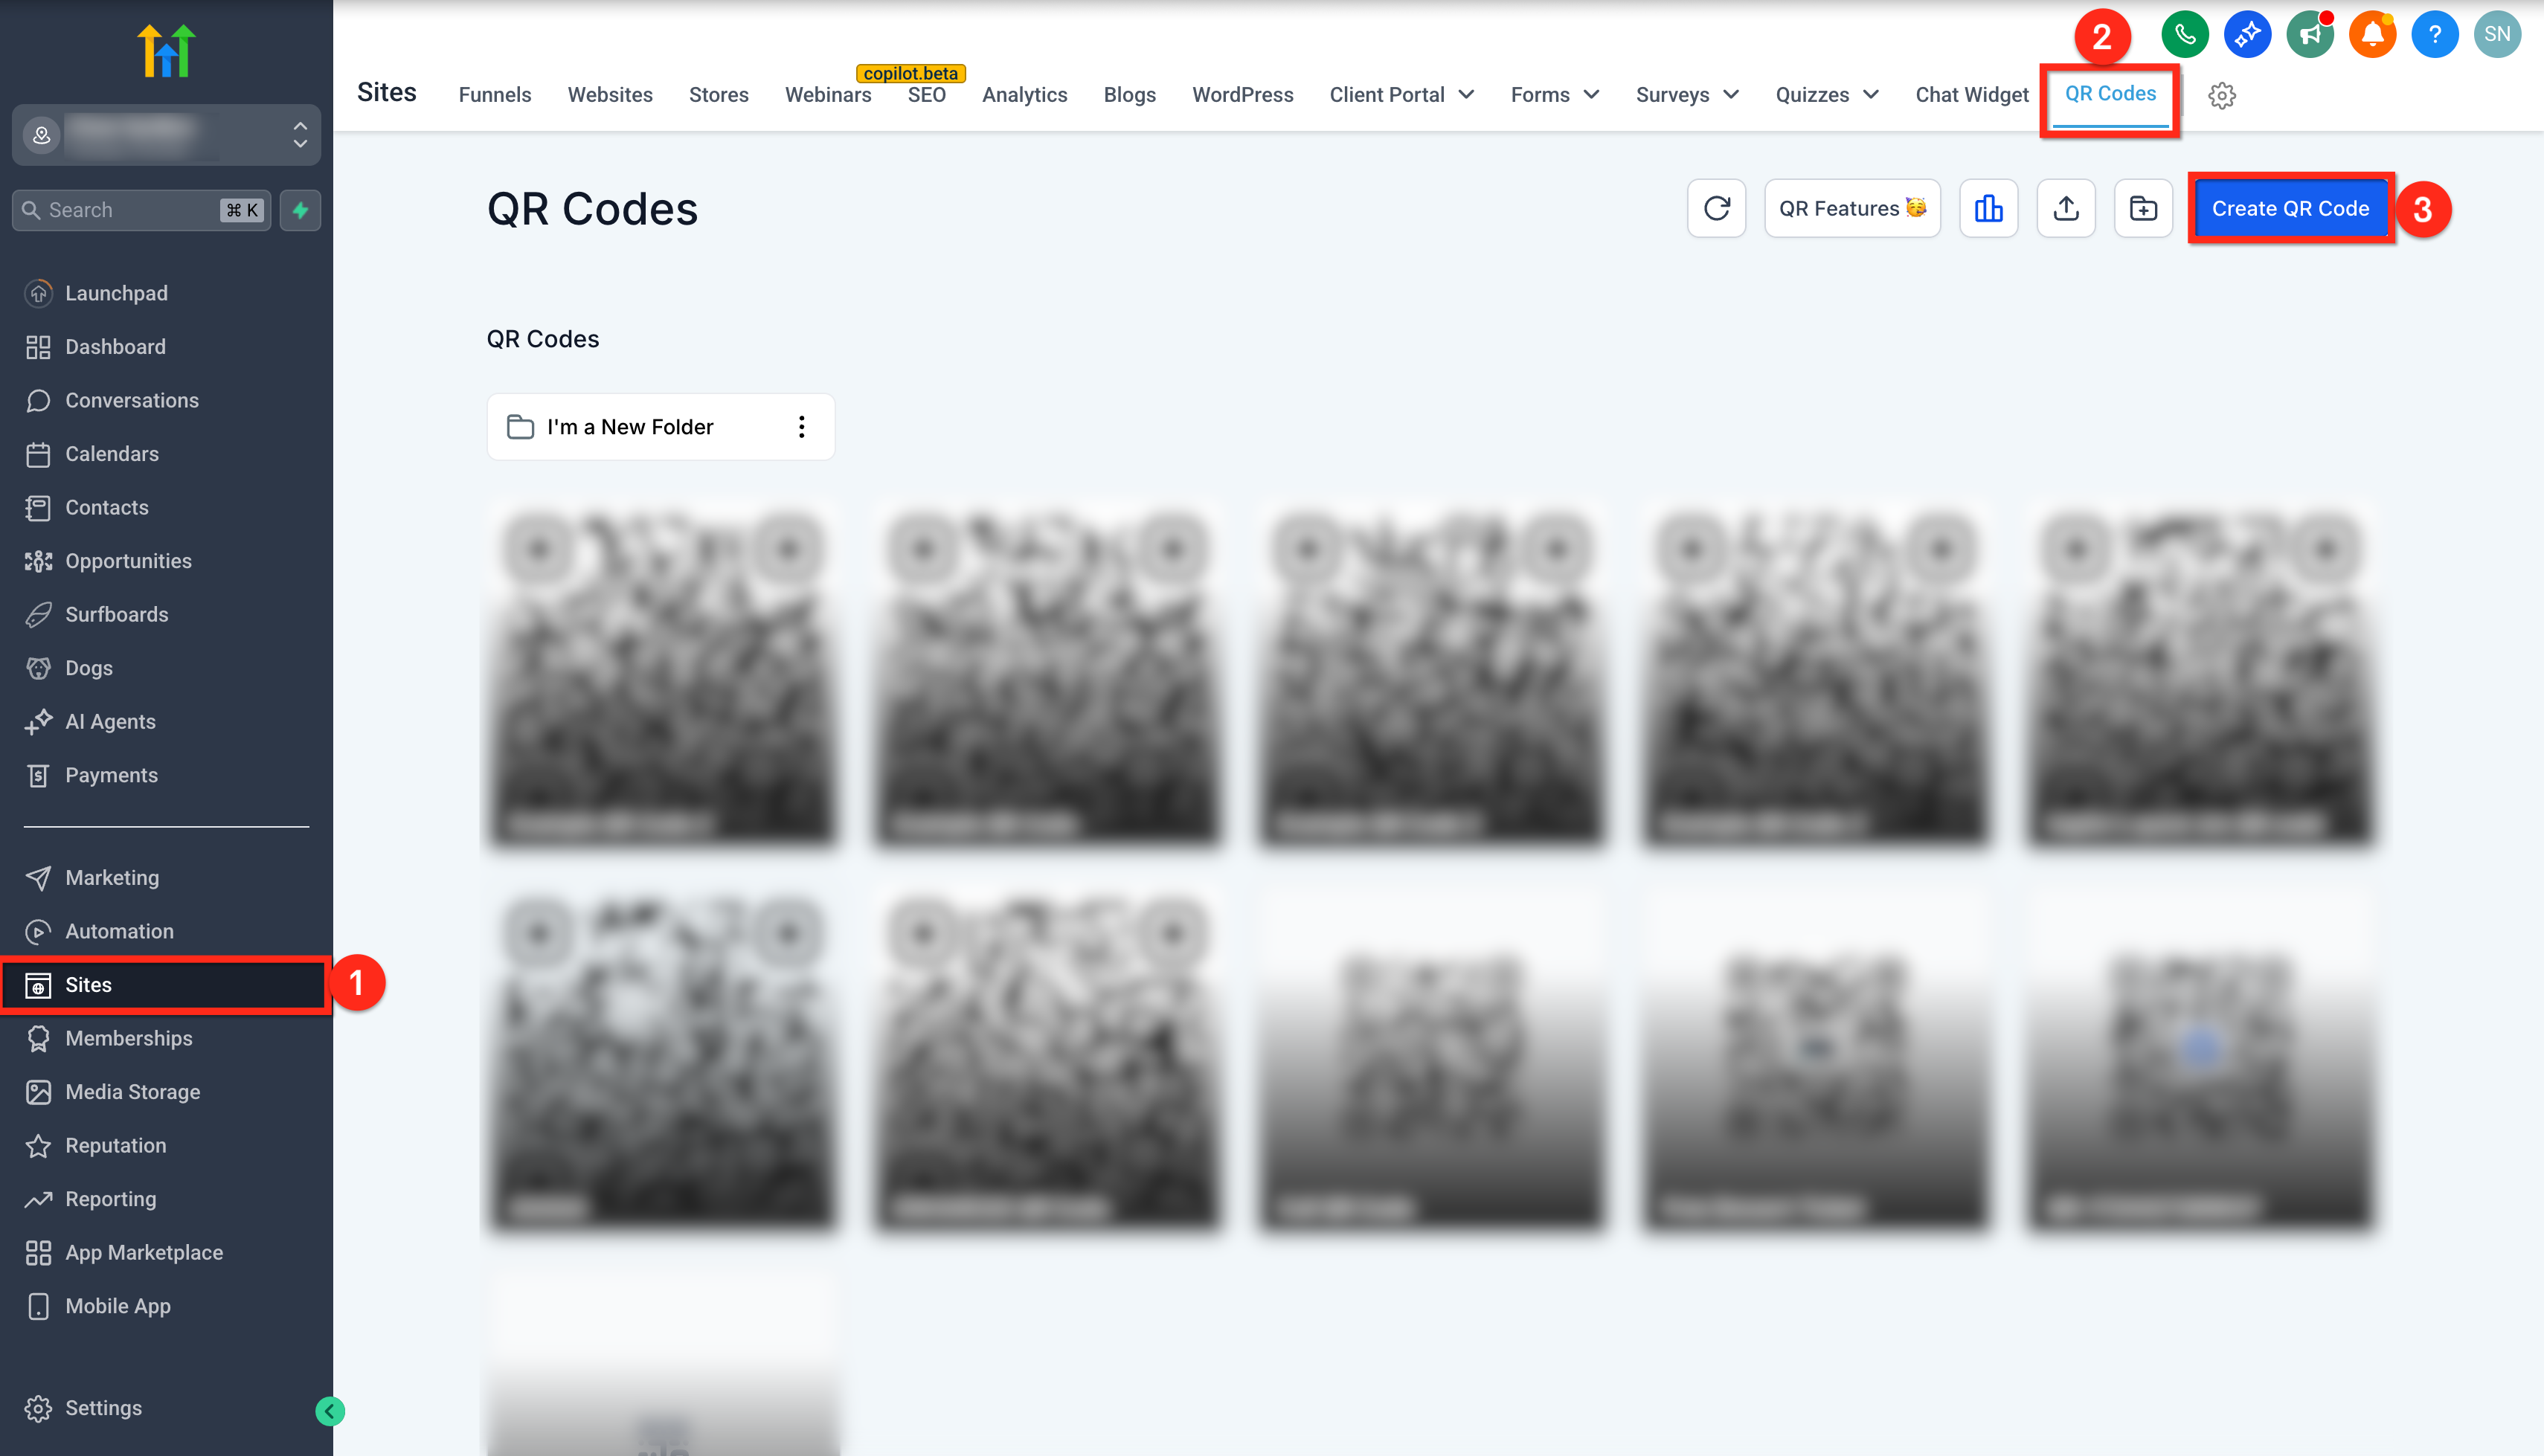
- Click Sites in the left navigation menu.
- Click QR Codes in the top navigation bar.
- Click Create QR Code in the upper-right corner.
Step 2: Configure QR Code Details
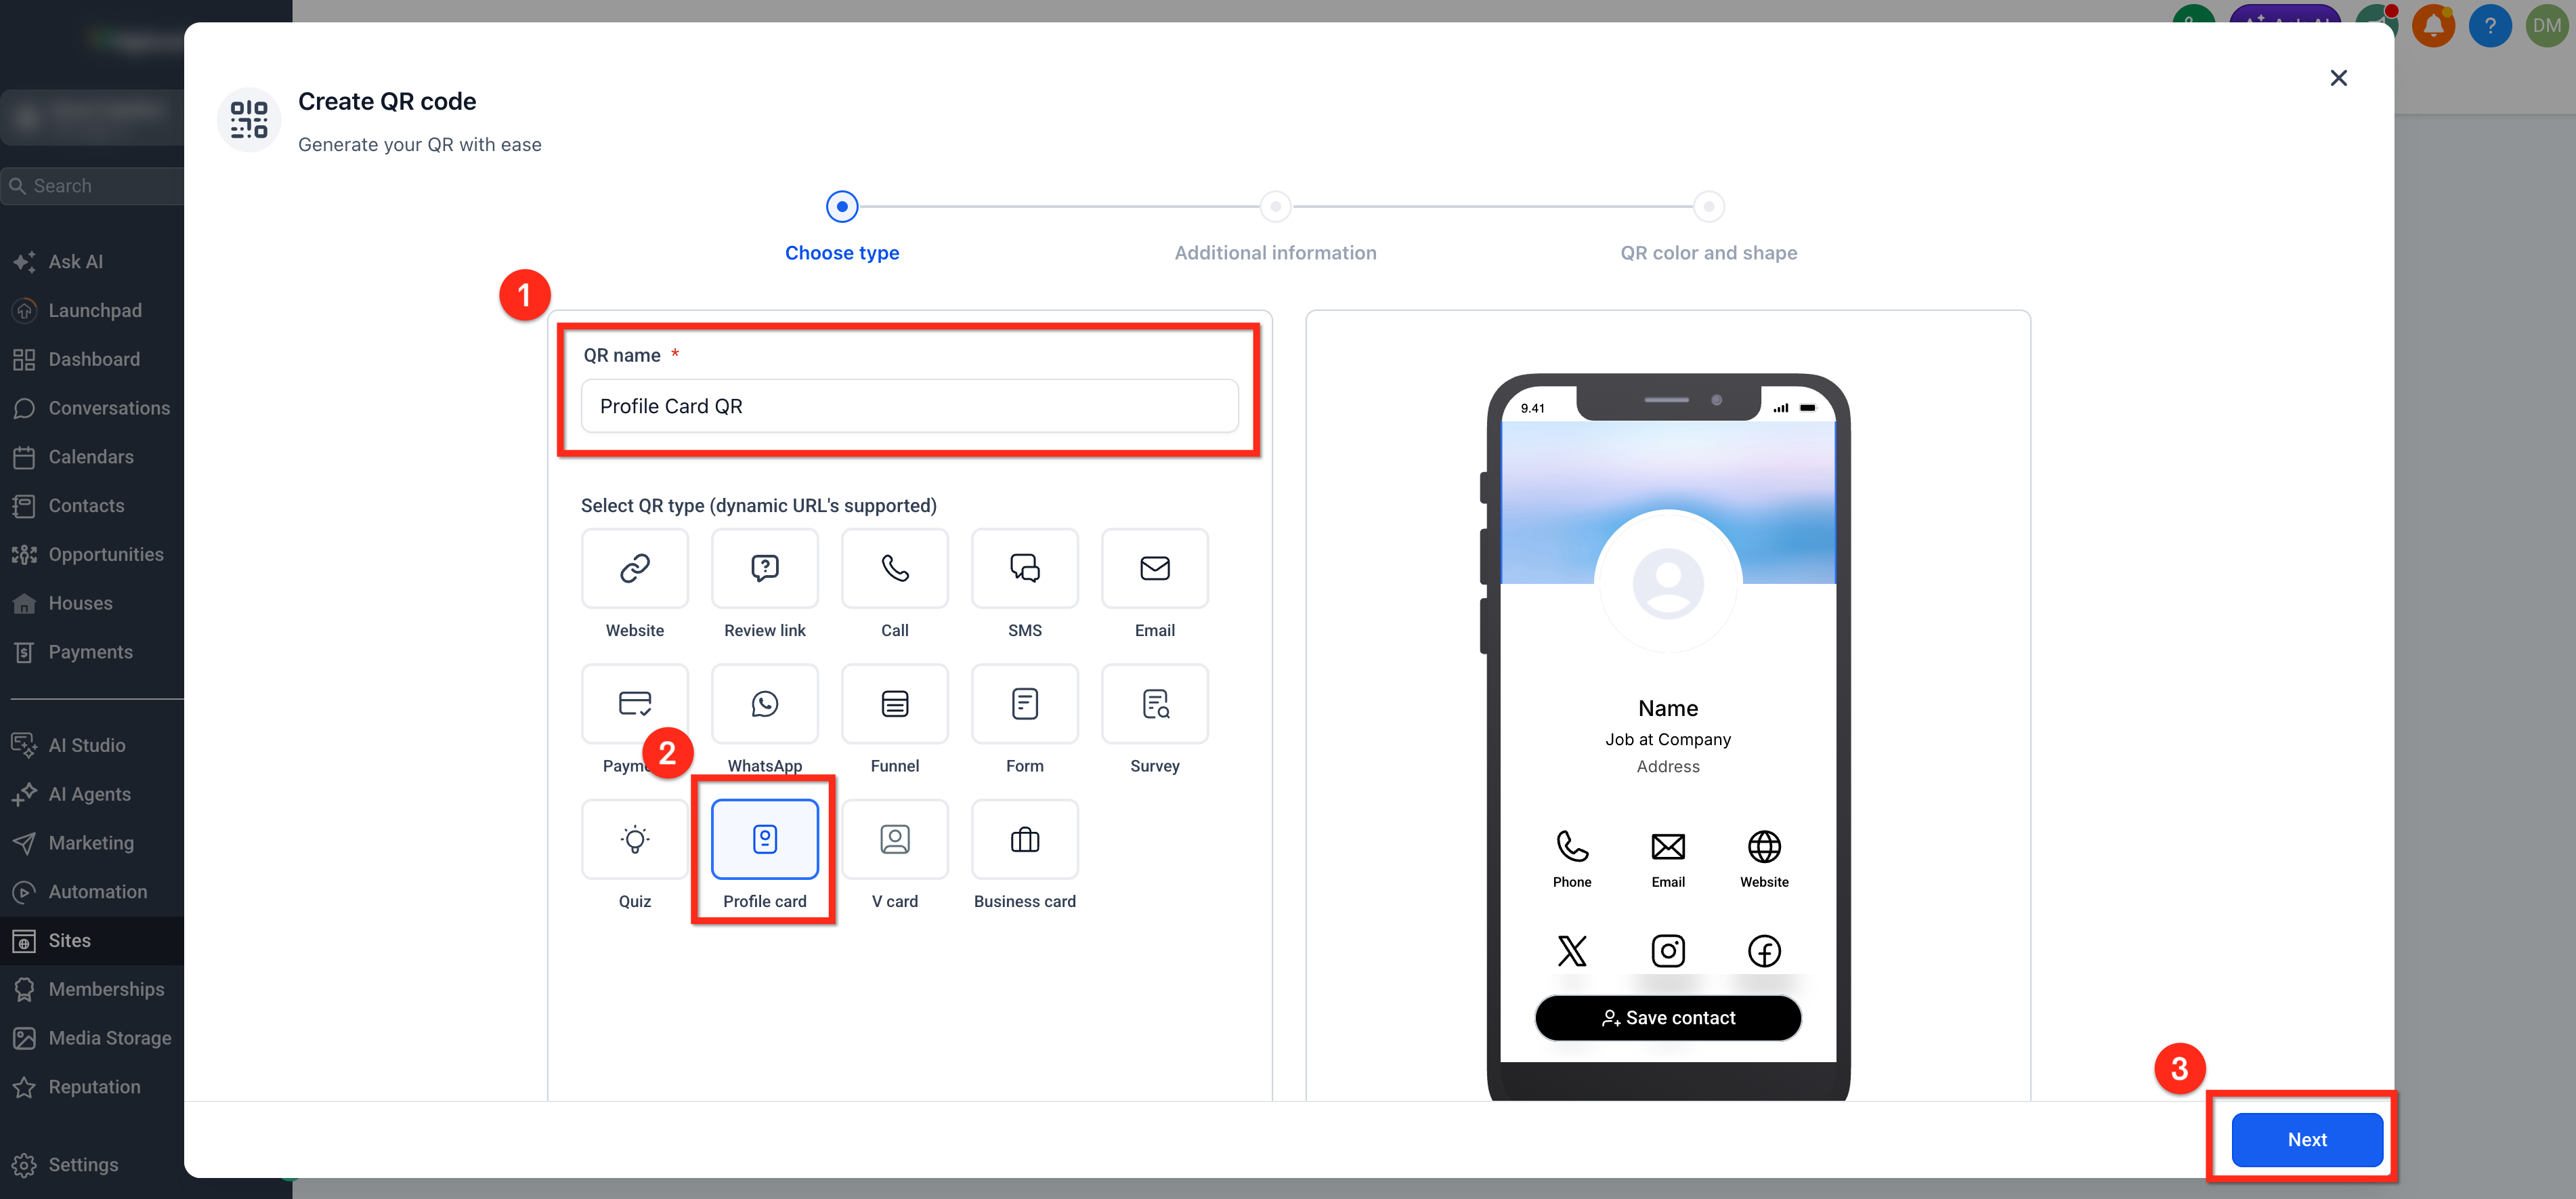
- Enter a recognizable name in the QR name field.
- Select Profile card from the available QR types.
- Click Next.
Step 3: Enter Your Profile Information
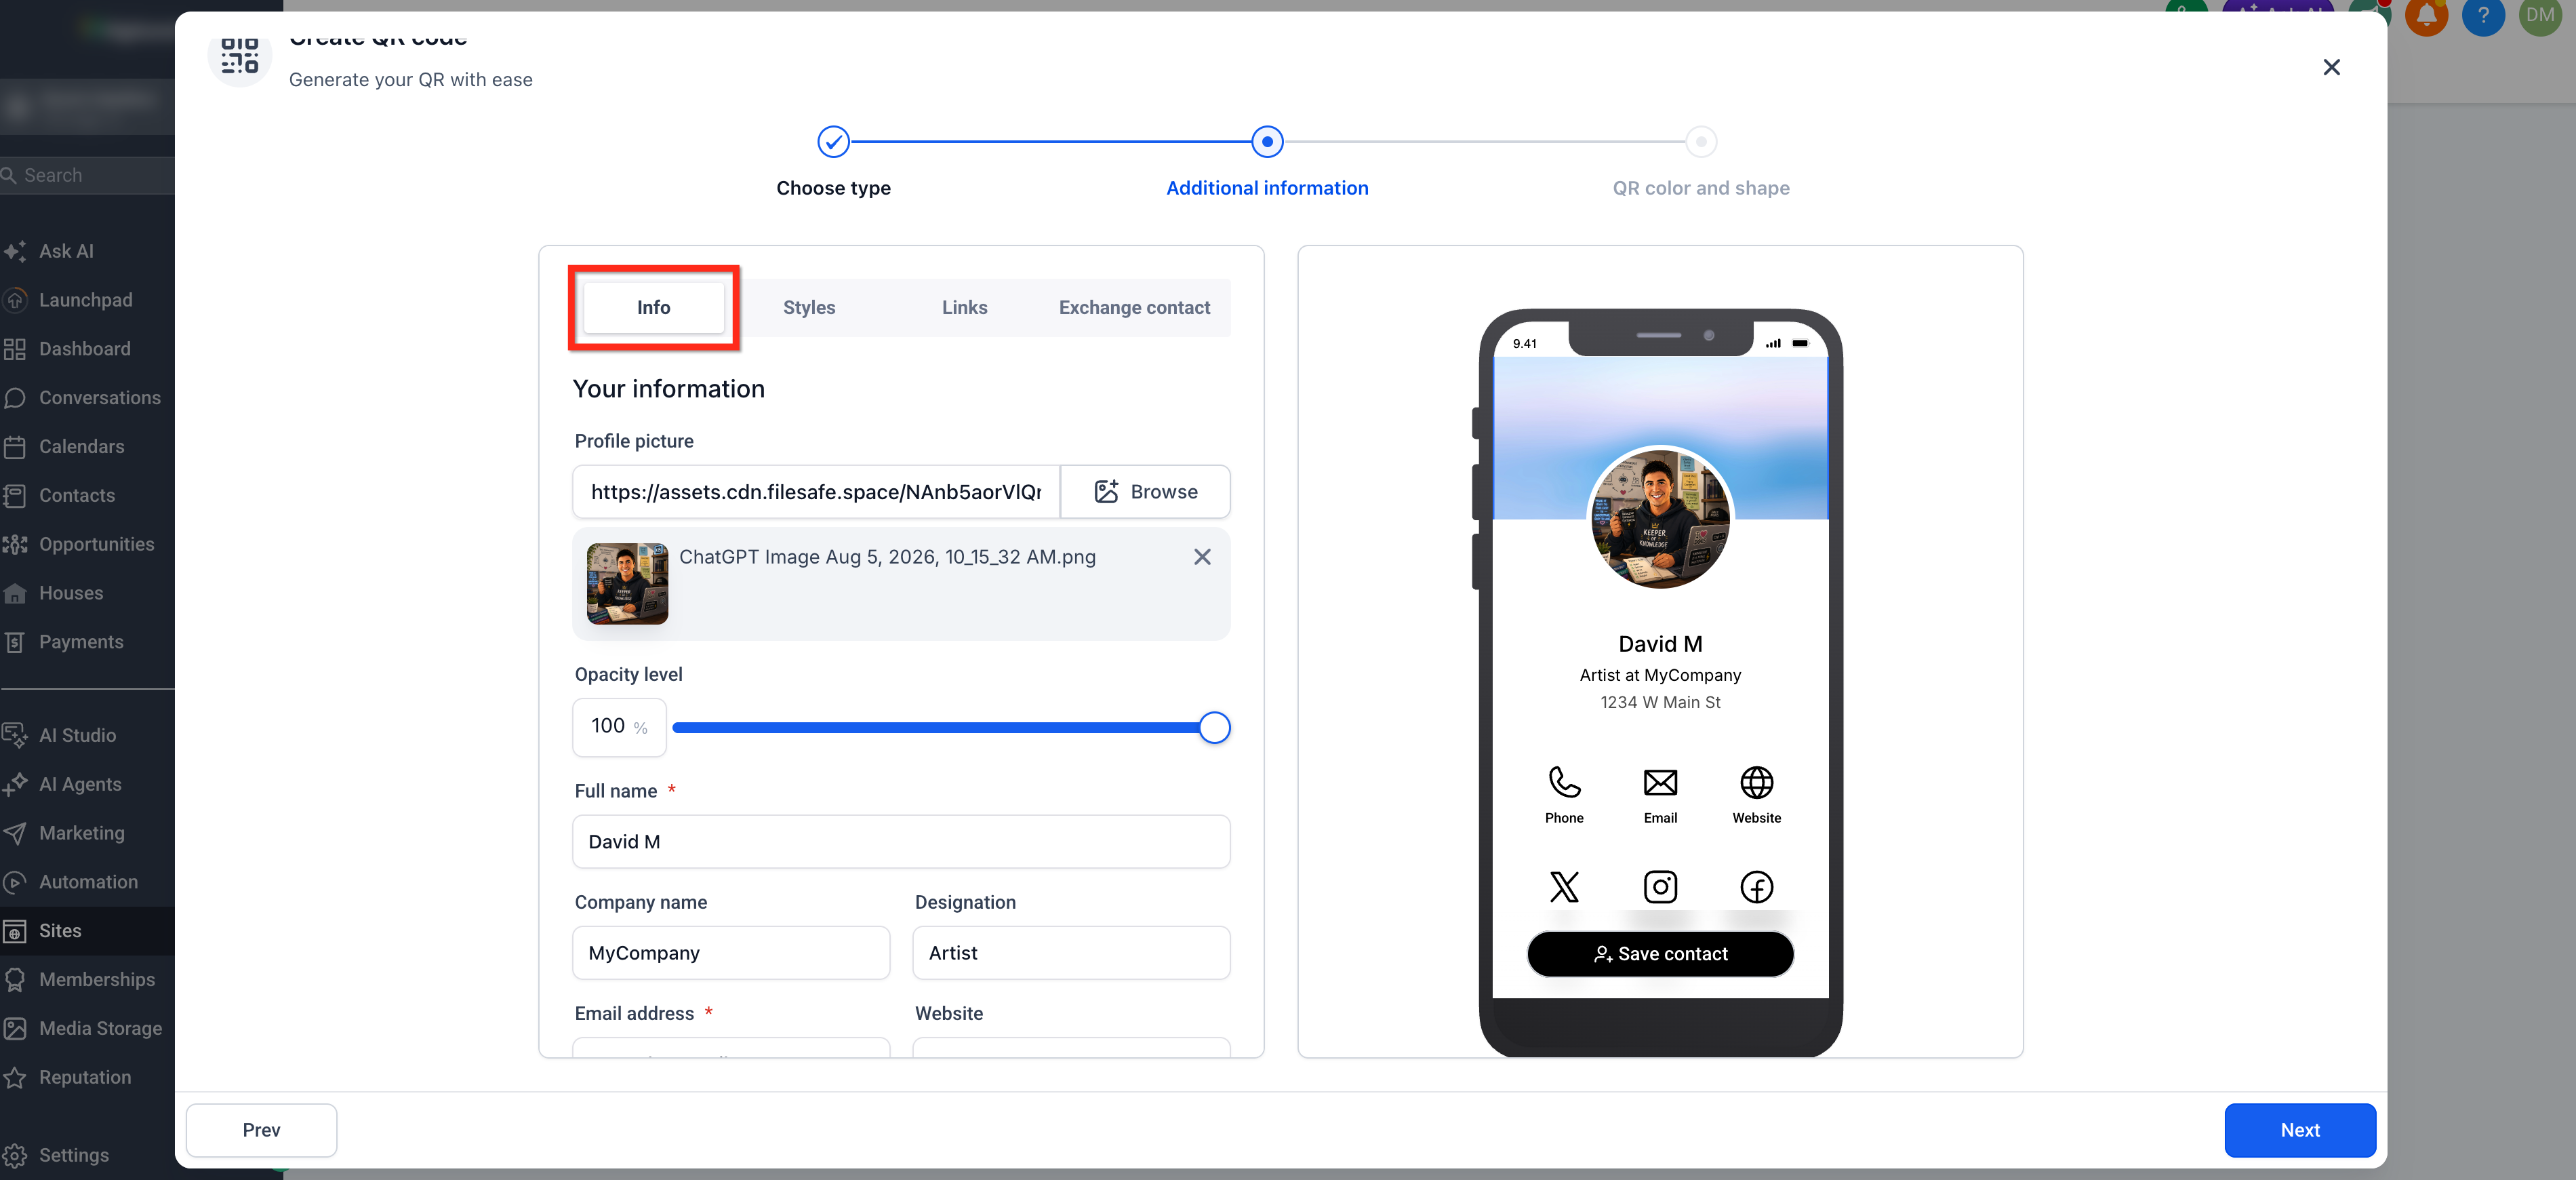
- Open the Info tab and click Select to add a profile picture then select the opacity level (%).
- Enter your full name, company name, designation, email address, website, phone number, and address as needed.
Step 4: Customize the Profile Card Style
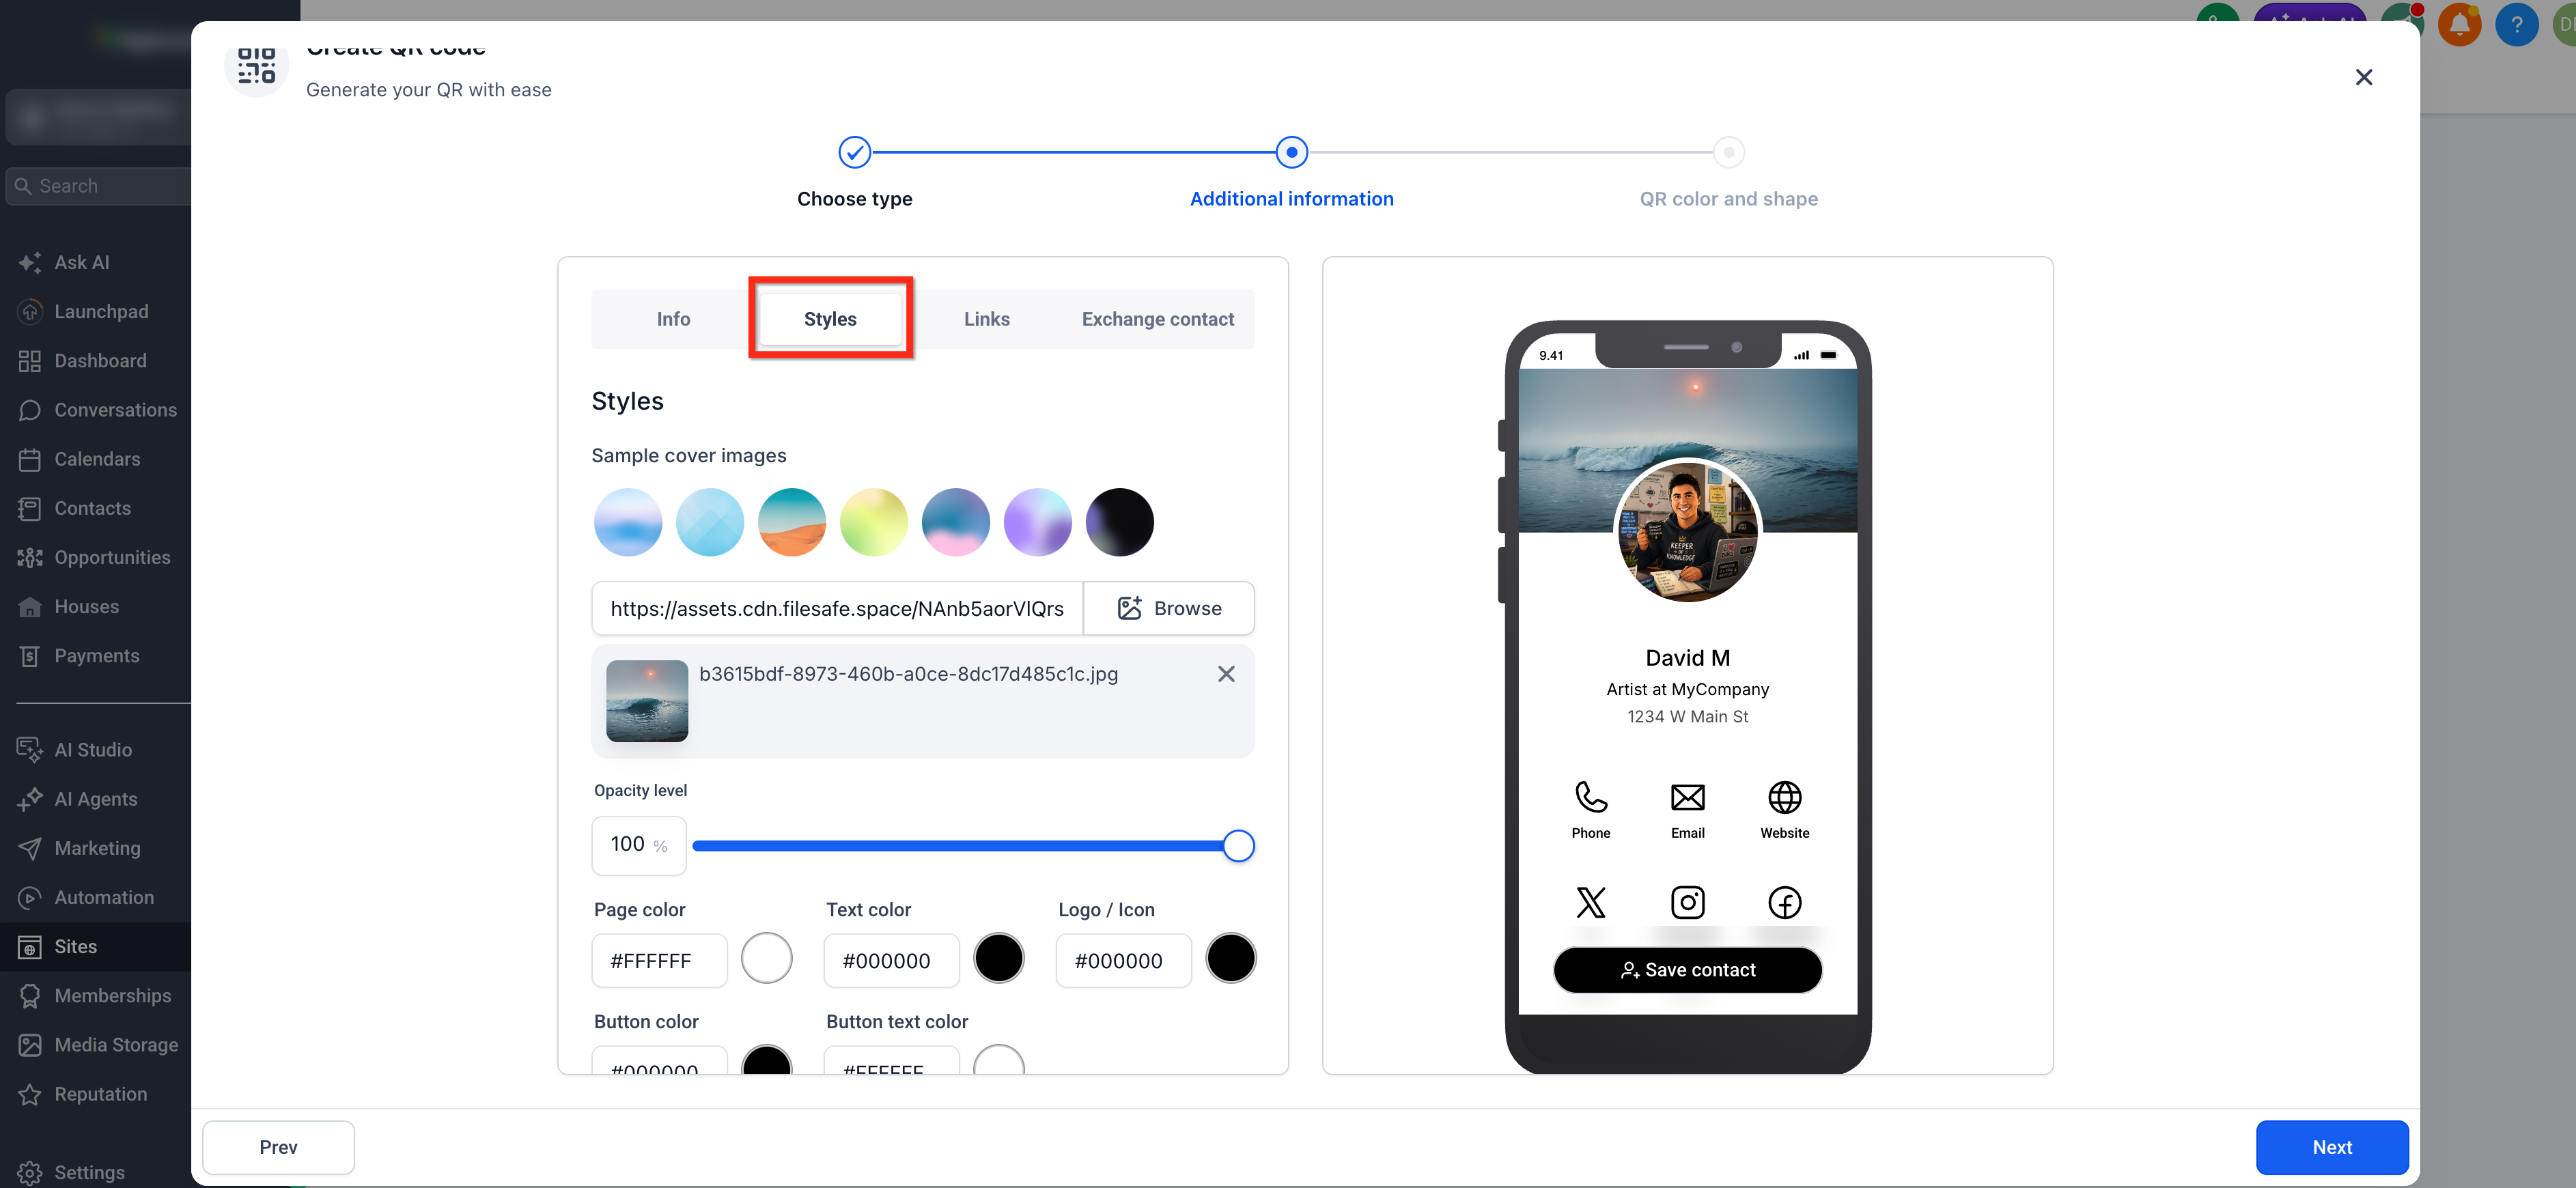
- Open the Styles tab and select a cover-image template, or click Browse to add a custom image.
- Adjust the image opacity and choose the page, text, icon, button, and button-text colors.
- Turn Show icon label on or off, then review the card in the live preview.
Step 5: Add and Organize Links
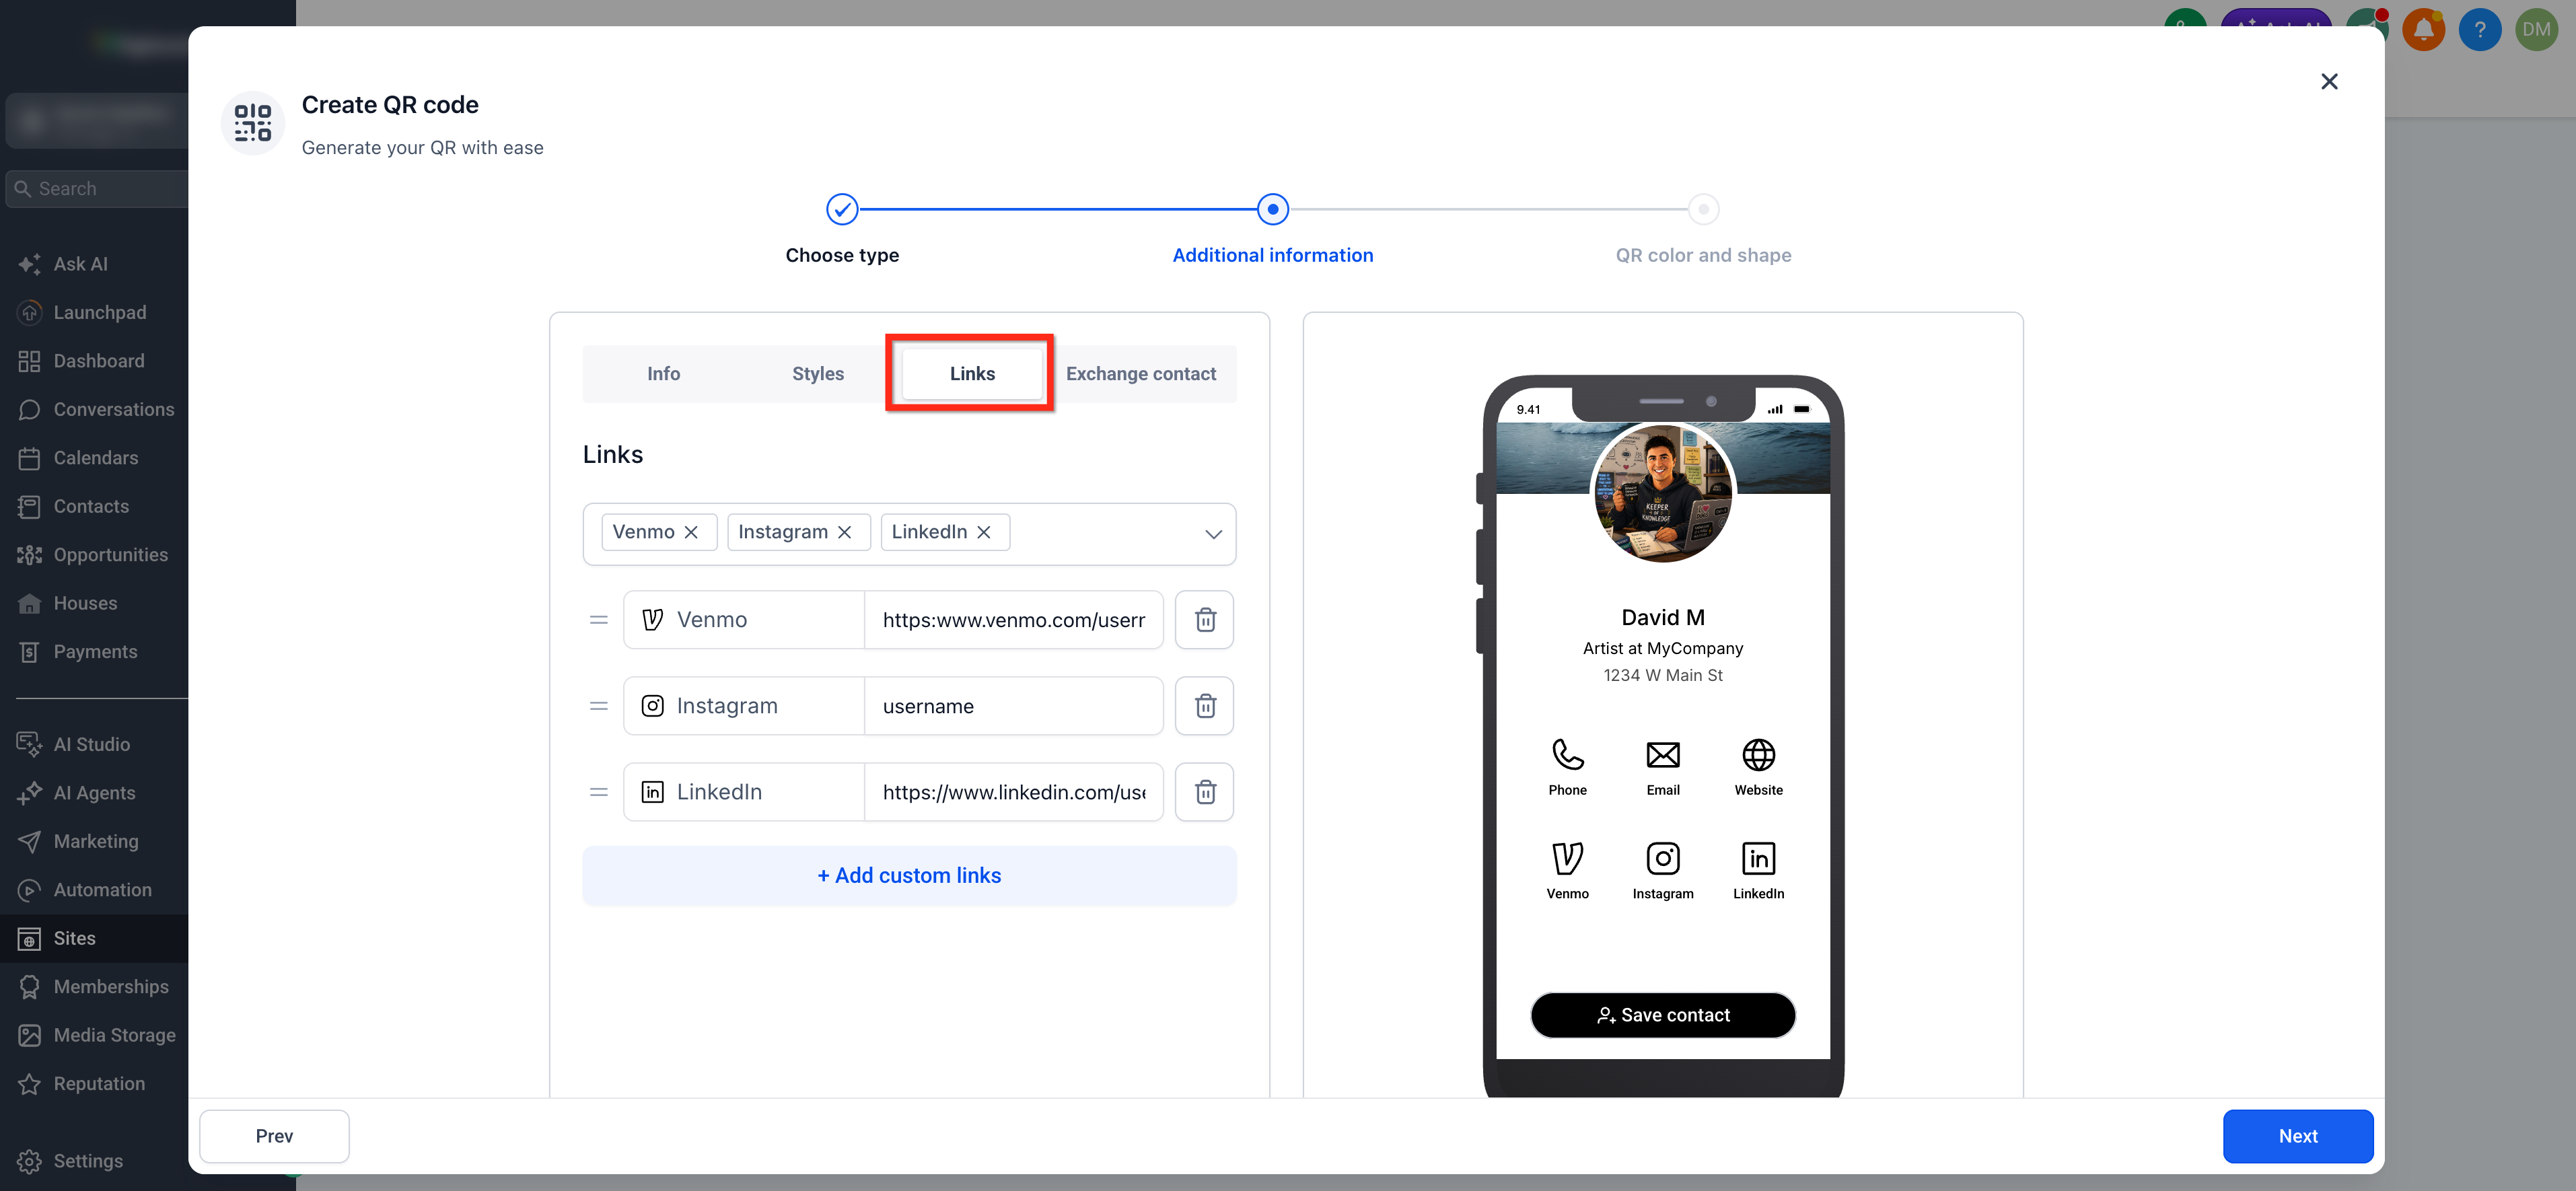
- Open the Links tab and select the built-in social platforms you want to display, then enter the corresponding URLs or usernames.
- Click Add custom links to add another destination, enter its name and URL, and choose a matching icon.
- Use the drag handles to reorder links or the trash icon to remove them, then review the links in the live preview.
Step 6: Configure Exchange Contact
Exchange Contact turns your Profile Card into a lead-capture tool by letting visitors submit their own contact information. When they complete the form, a new contact is created in the CRM and contact activity identifies the Profile Card as the lead origin.
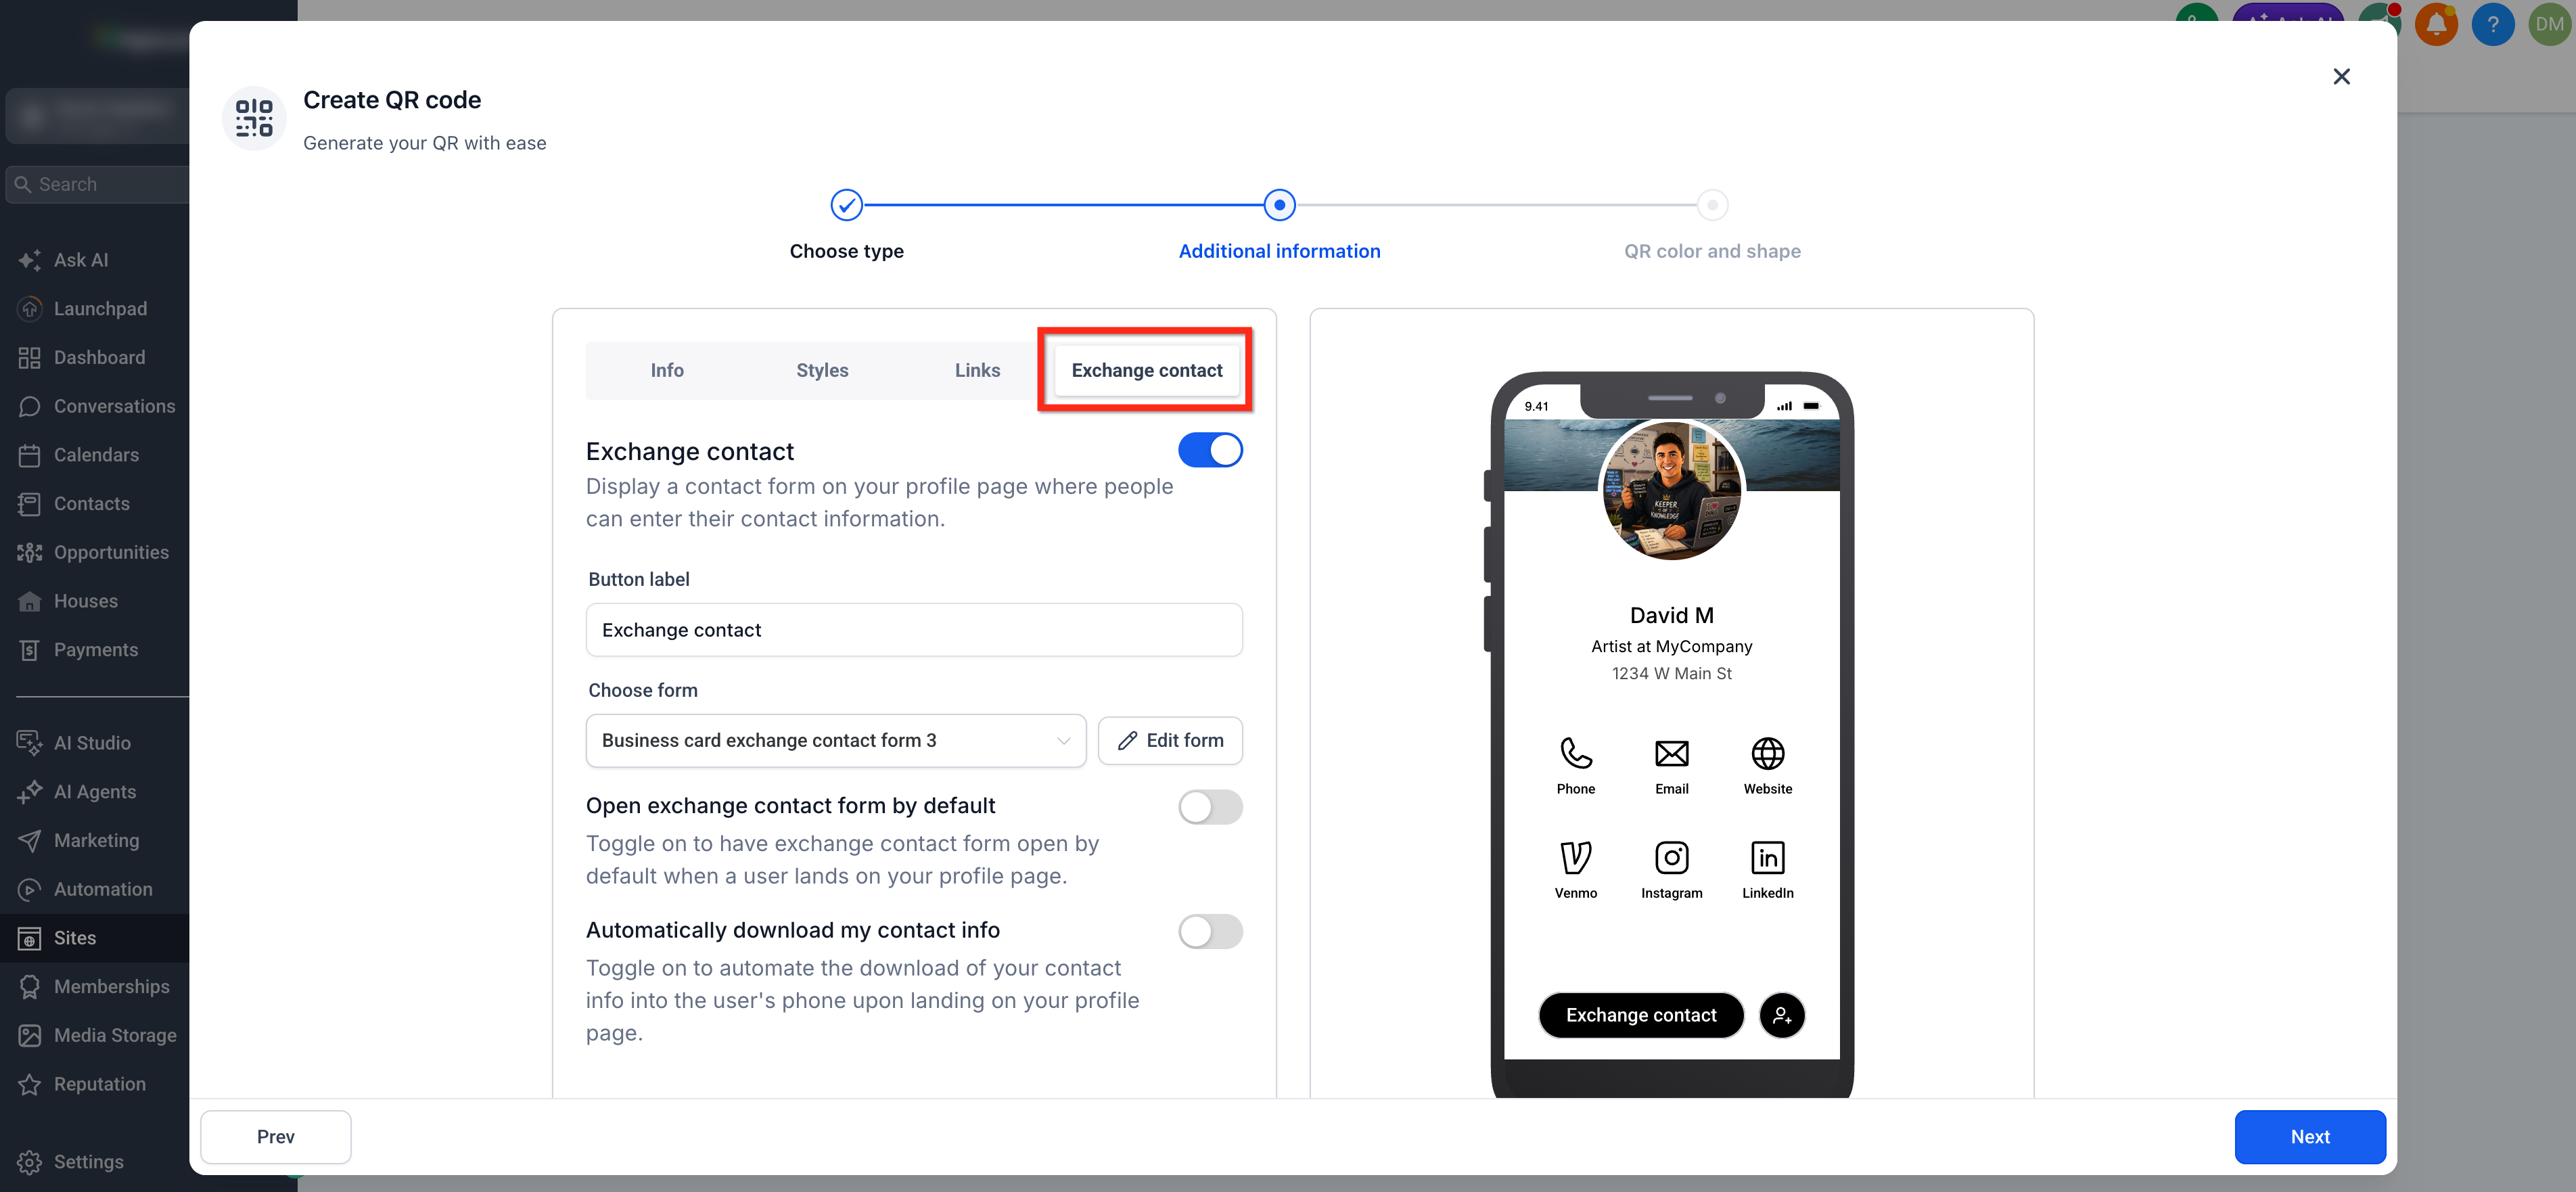
- Open the Exchange contact tab and turn on Exchange contact.
- Choose New form to create a form for the card, or Use an existing form to select a HighLevel form you already created.
- Click Edit form to update the form without leaving the QR Code Builder, then customize the button text as needed.
- Review the Exchange Contact button and form in the live preview.
Step 7: Configure Contact Options
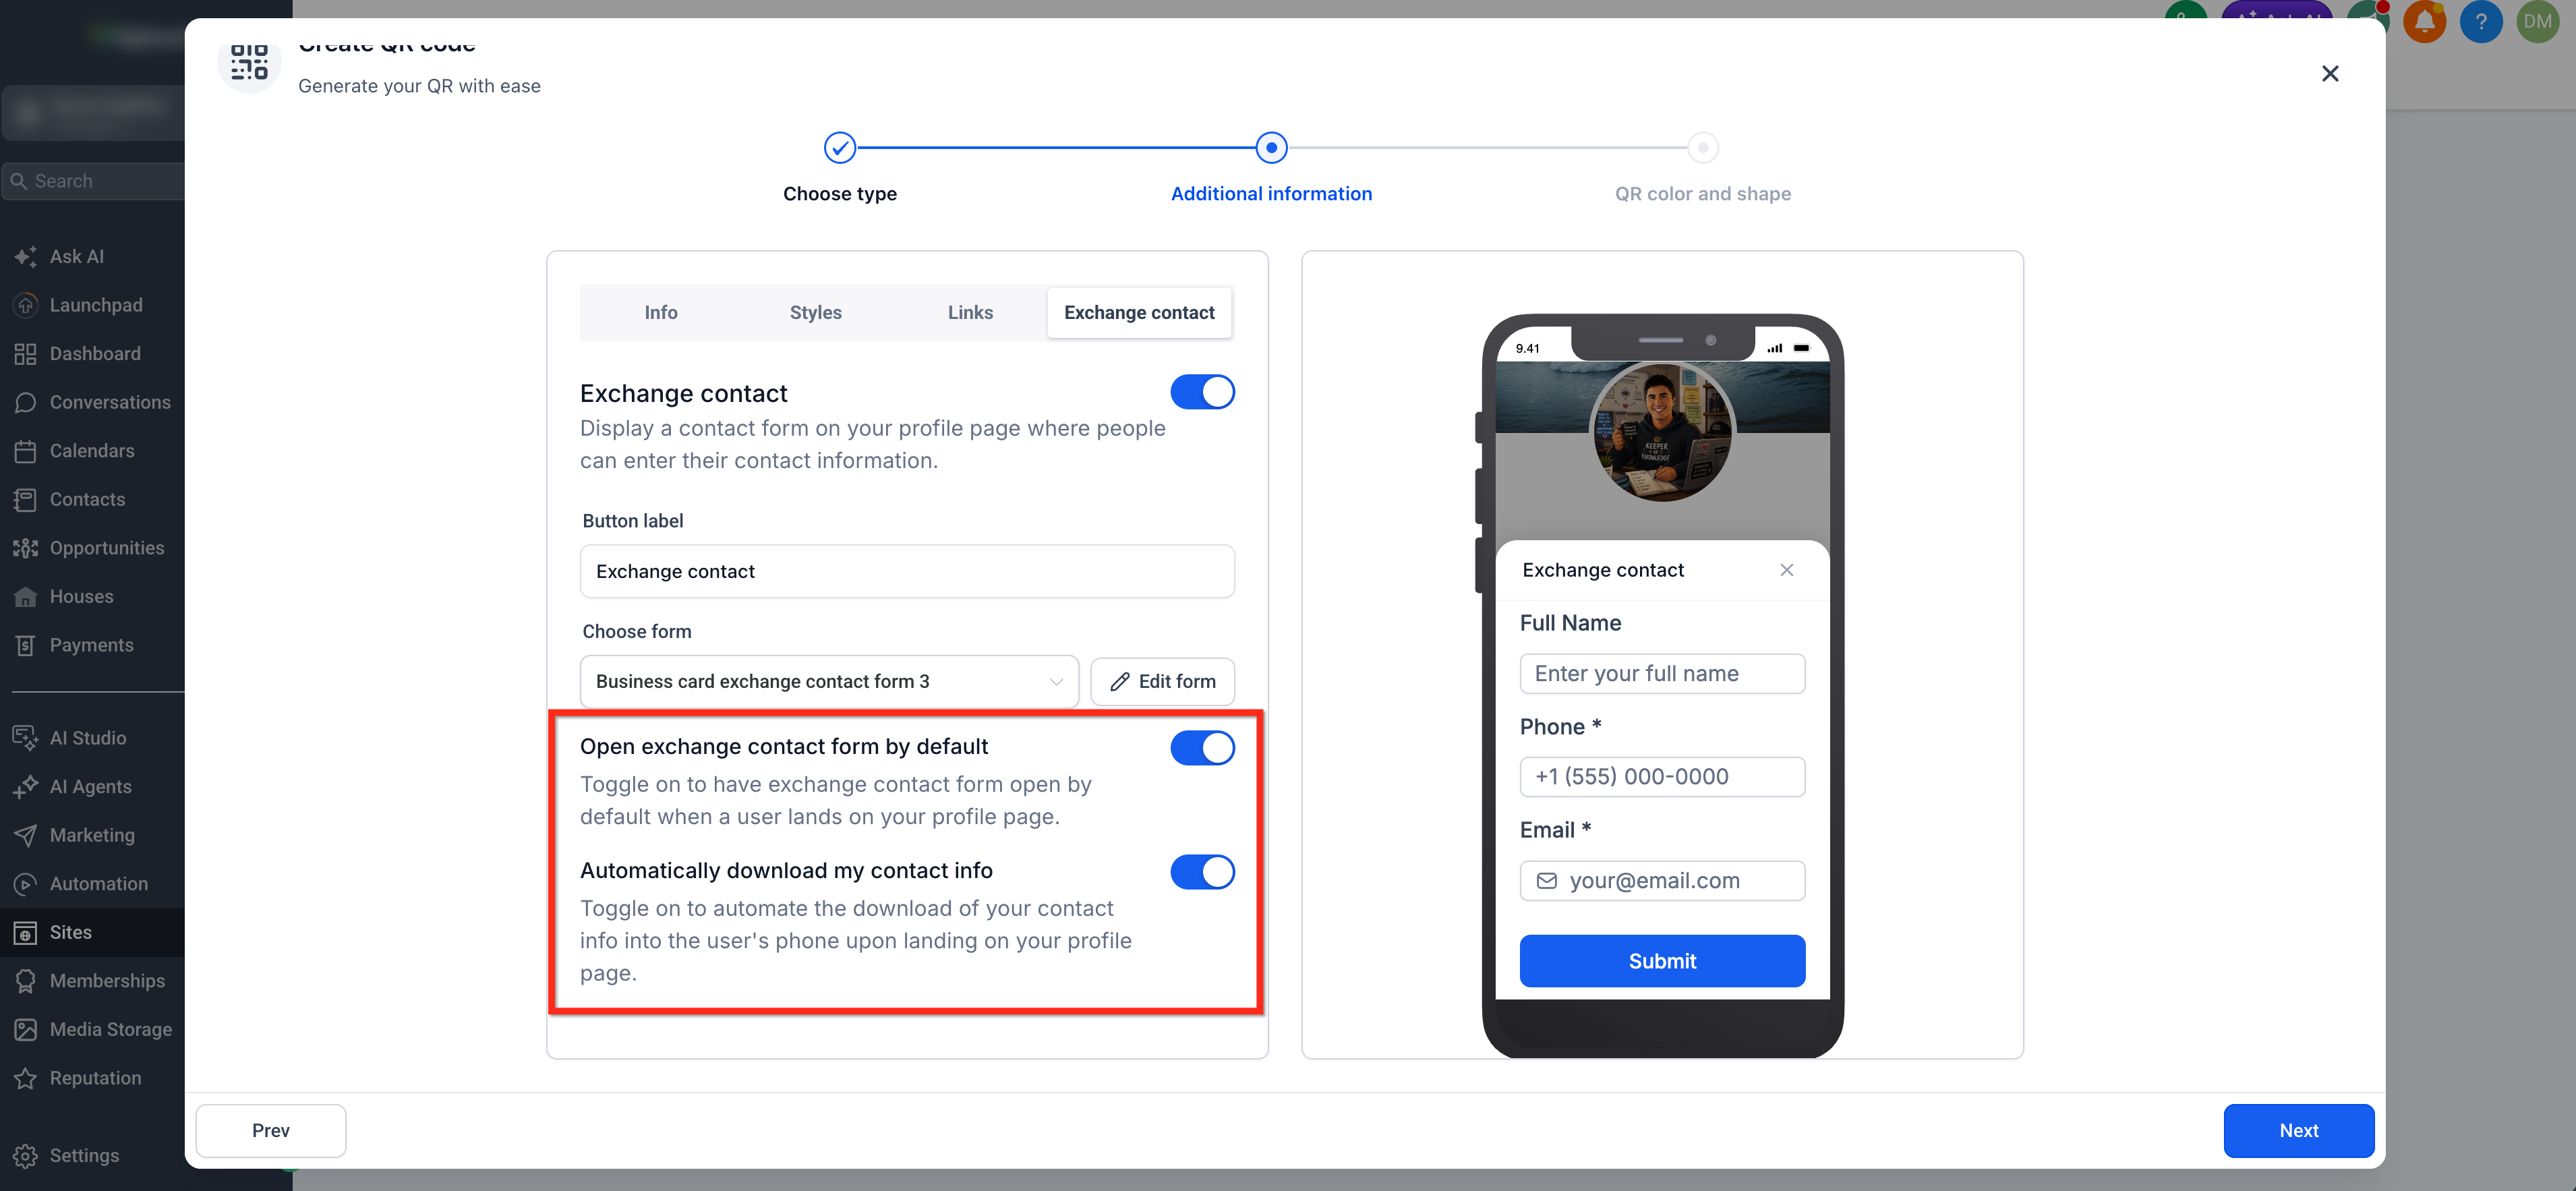
- Turn on Open Exchange Contact Form by Default when the form should appear as soon as the Profile Card opens.
- Turn on Automatically Download My Contact Info when the contact-saving experience should begin automatically.
- Test both settings on a mobile device before sharing the card. Then click Next.
Step 8: Customize the QR Code Design
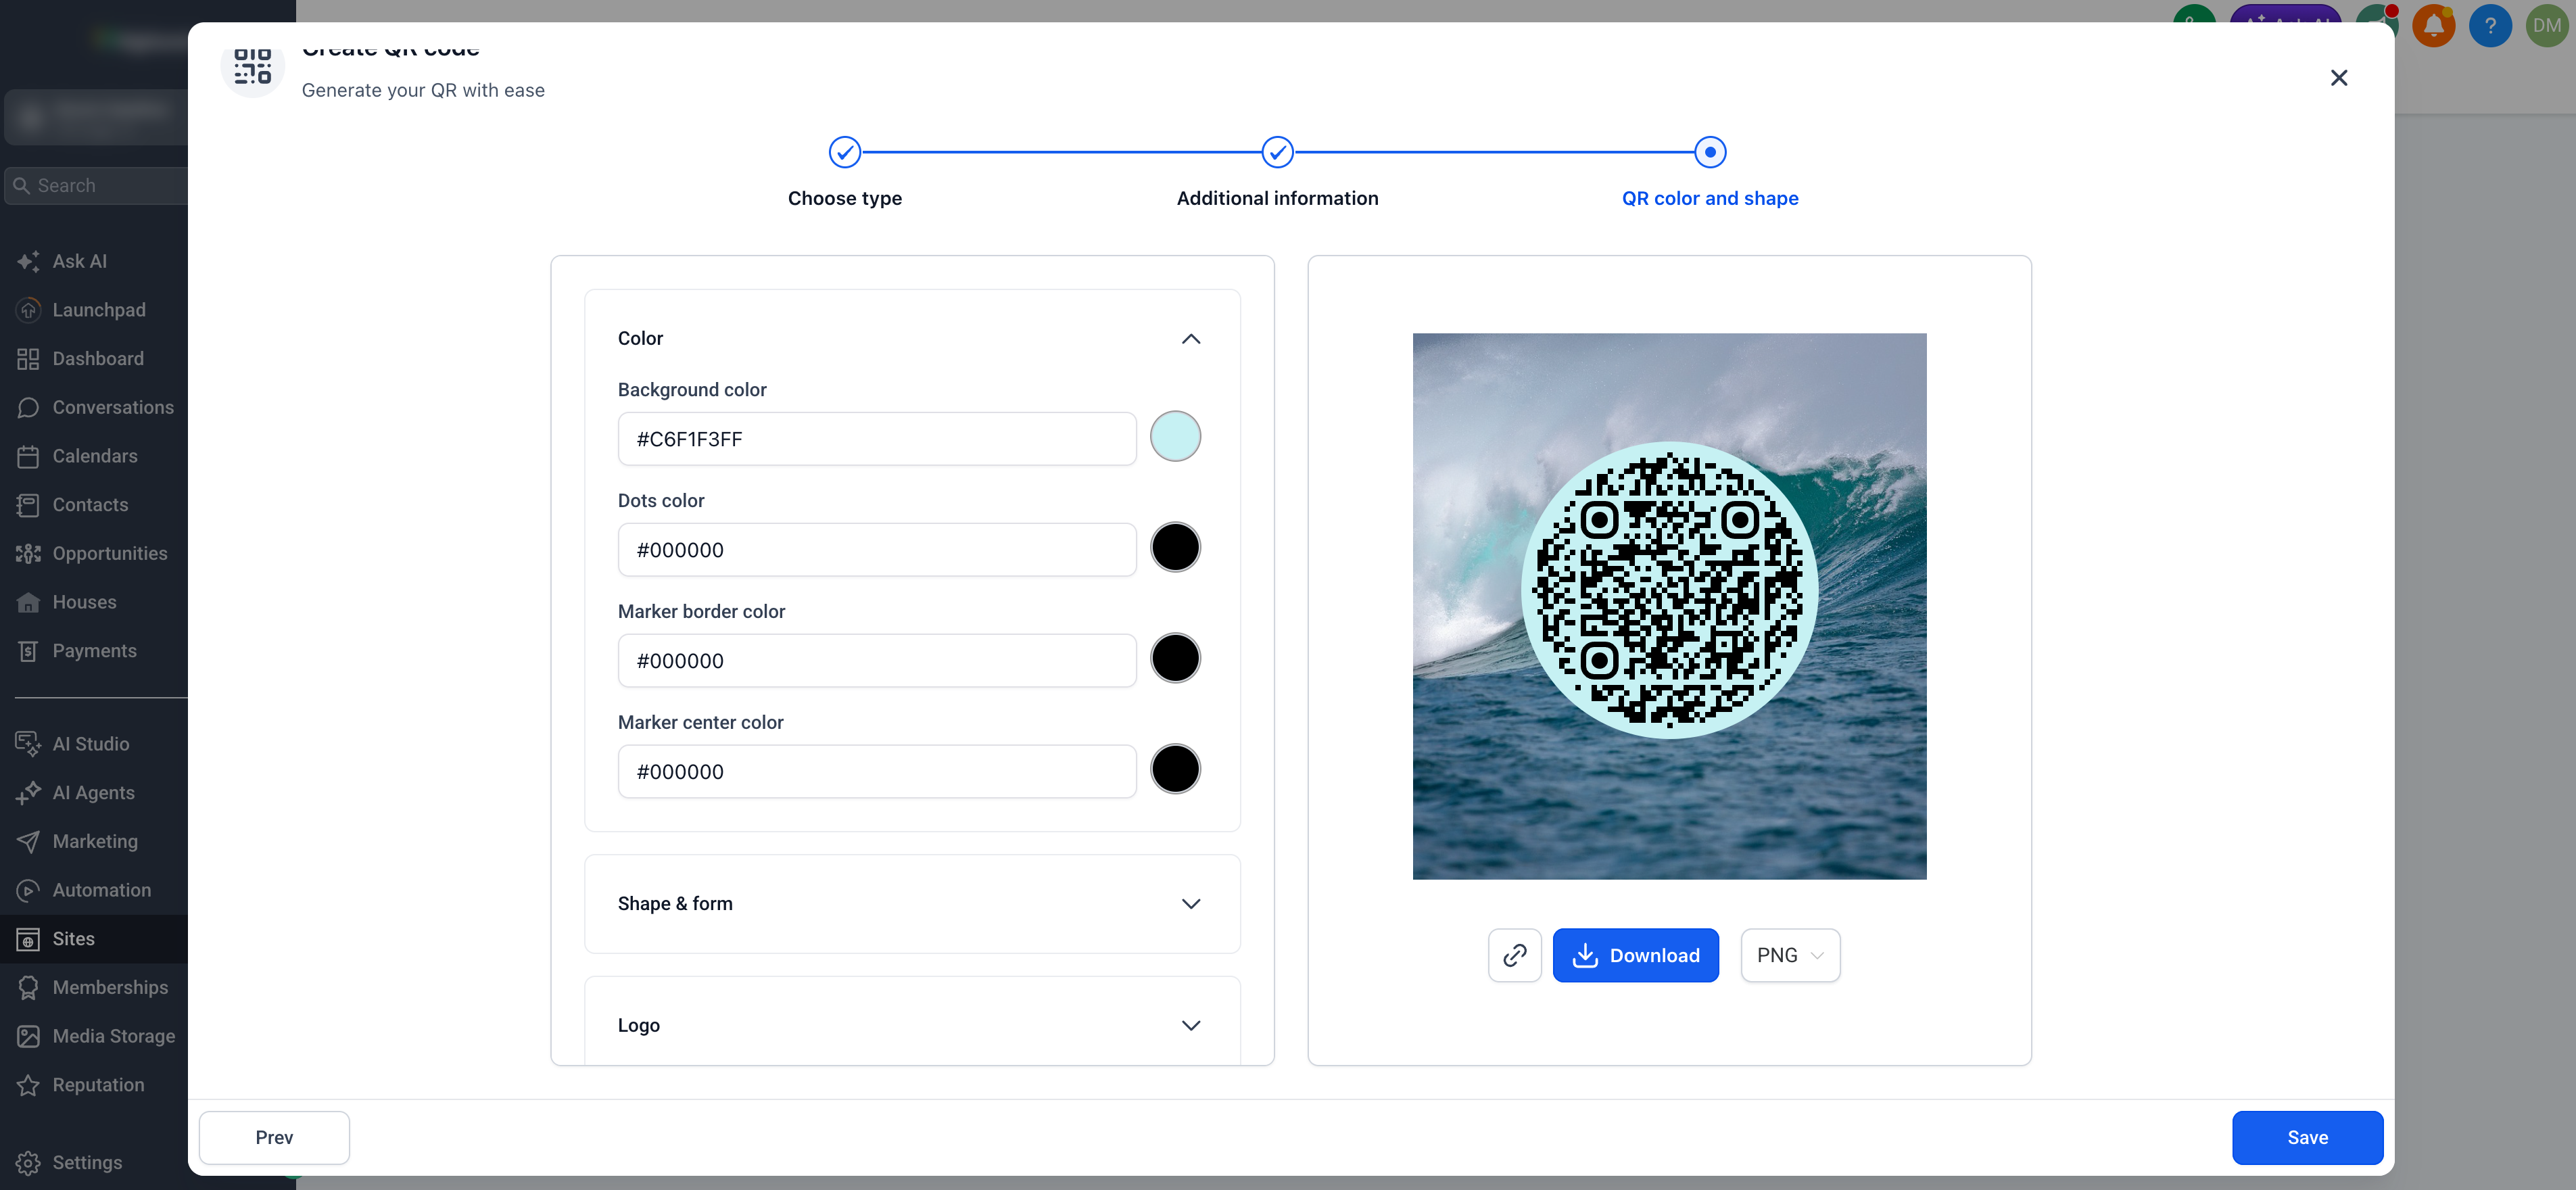
Customize the QR code so it matches your brand while remaining easy to scan. The design tools control the appearance of the scannable code, not the Profile Card page.
- Customize the QR code’s colors, dots, markers, border, and frame.
- Add a built-in or custom center logo, adjust the logo background, and choose a page background image with the preferred transparency.
- Add supporting text, such as “Scan Me” or your name, then choose the font and text color.
- Once all customizations have been made, click Save.
Step 9: Download or Share the Profile Card
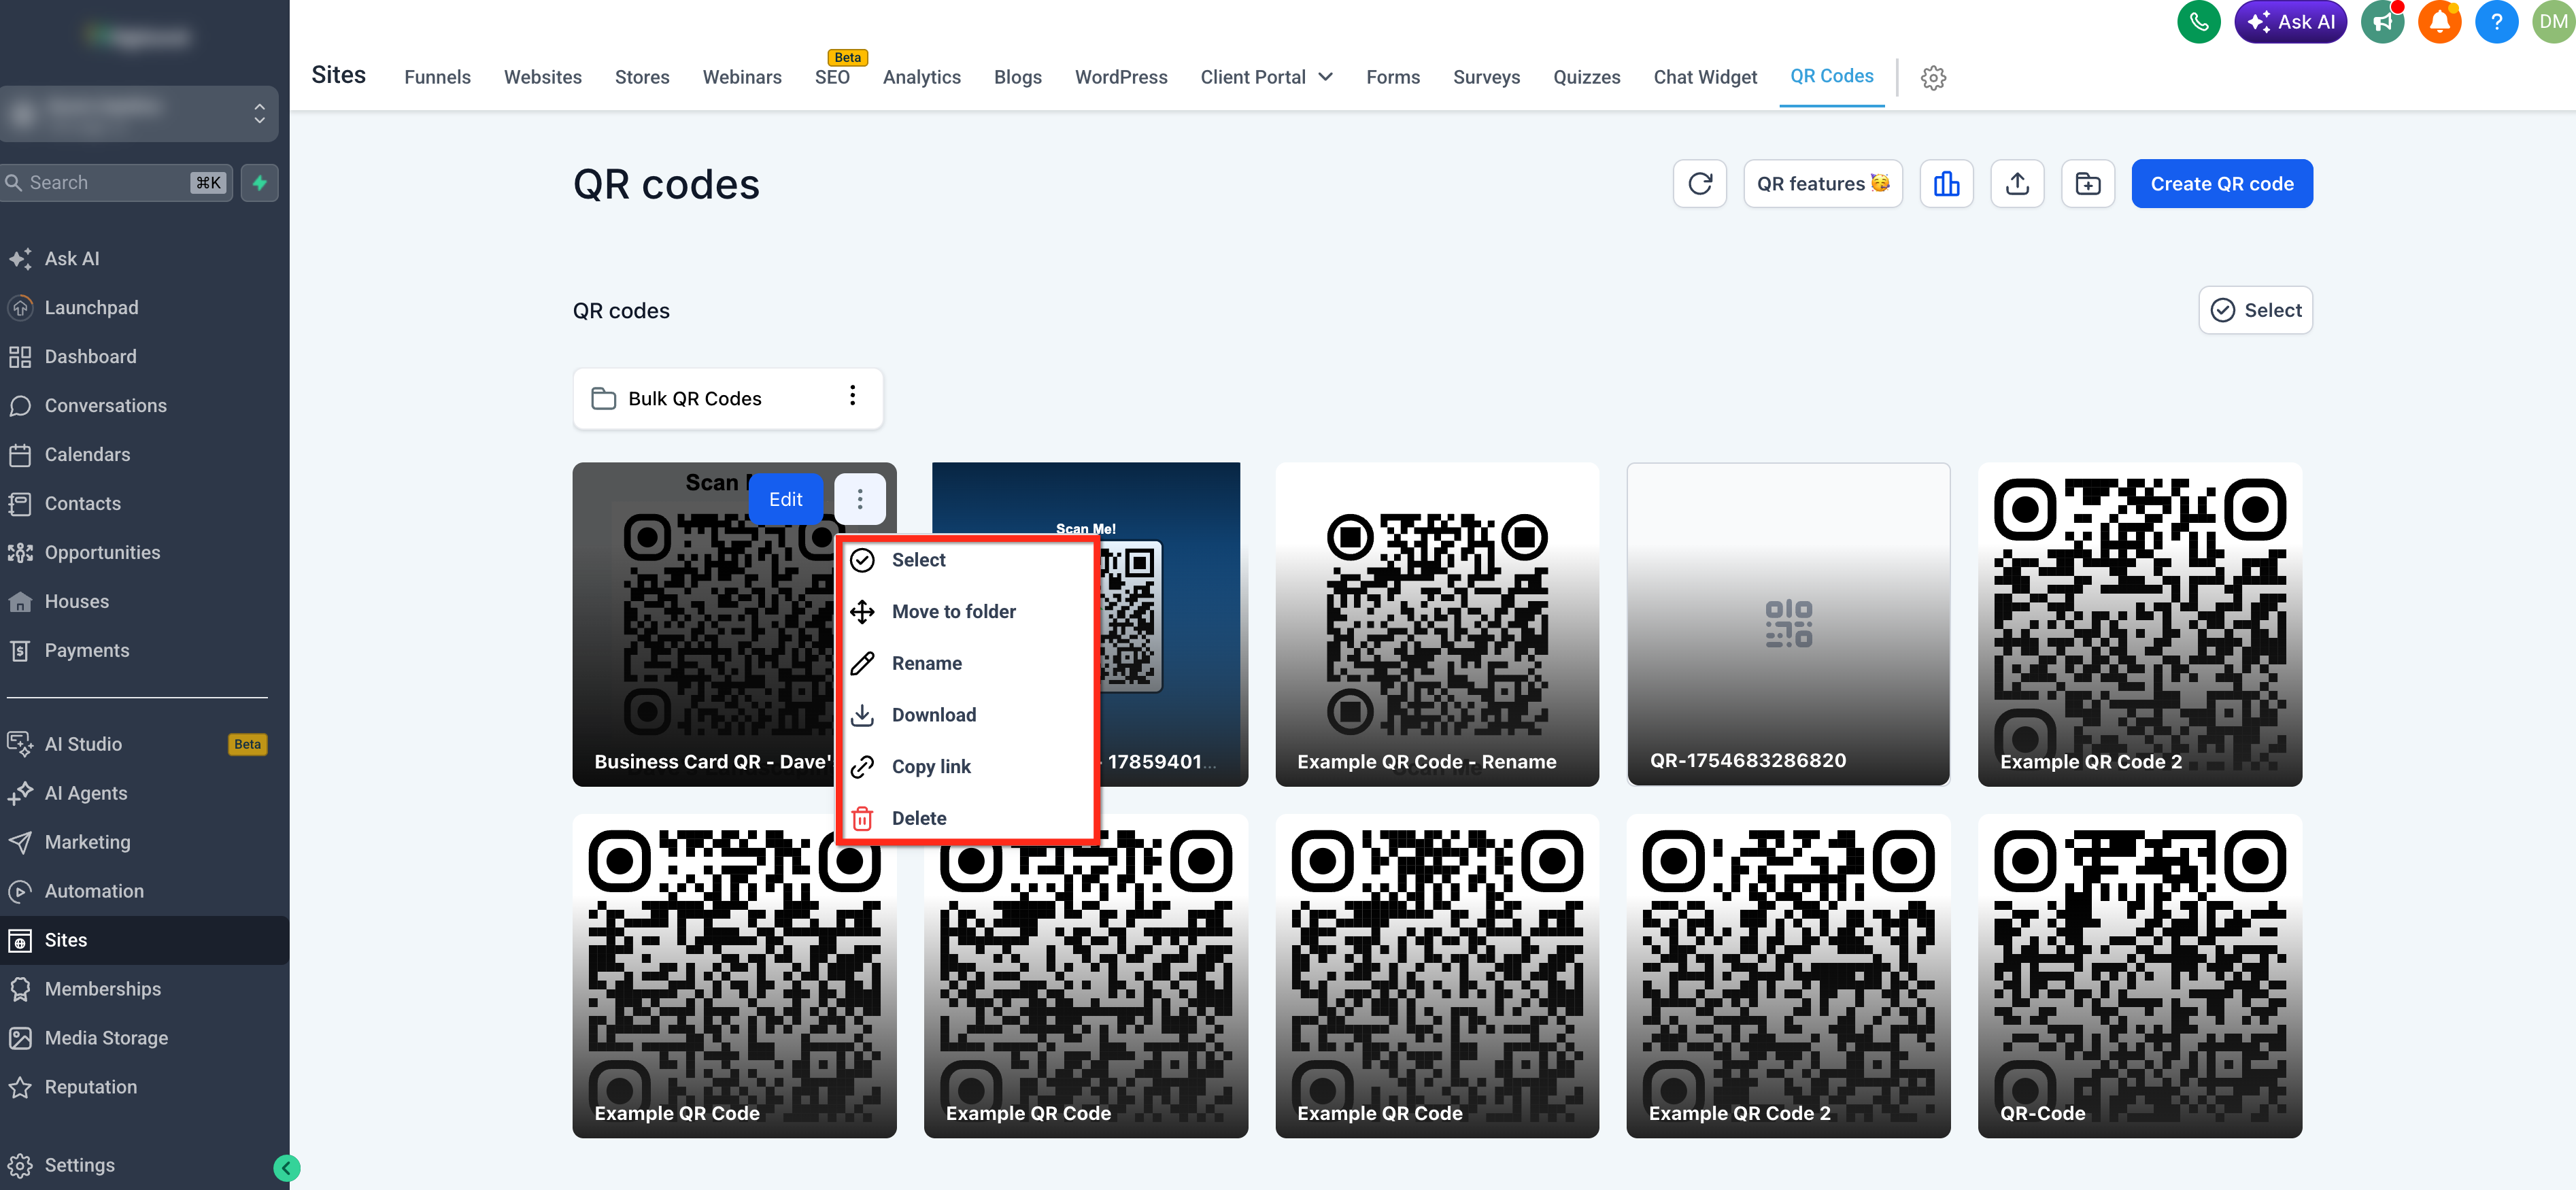
- Open the saved QR code from Sites > QR Codes.
- Download the QR code in PNG, SVG, or PDF format, or copy the Profile Card’s direct link.
- Add the QR code or link to email signatures, printed materials, websites, presentations, text messages, or digital campaigns.
Frequently Asked Questions
Q: Is Exchange Contact required?
No. Leave Exchange Contact turned off when visitors only need to view and save your contact information.
Q: What is the difference between Save Contact and Exchange Contact?
Save Contact gives the visitor your information. Exchange Contact asks the visitor to submit their information to you through a form.
Q: Can I use an existing HighLevel form?
Yes. Enable Exchange Contact and choose Use an existing form to select an available form.
Q: Can I change the Exchange Contact button text?
Yes. You can rename the call-to-action to better match your branding or intended action.
Q: Can I add a booking calendar, portfolio, or payment page?
Yes. Add the destination as a custom link, enter its URL, and choose a matching icon.
Related Articles
Was this article helpful?
That’s Great!
Thank you for your feedback
Sorry! We couldn't be helpful
Thank you for your feedback
Feedback sent
We appreciate your effort and will try to fix the article