The AI Agent workflow action helps you automate multi-step tasks in HighLevel Workflows using plain-language instructions and selected tools. Instead of building every action manually, you can configure one AI Agent action to decide what to do, which tools to use, and what inputs to provide during execution. This article explains how the action works, how to configure it, and how to review its output.
Note: This is a premium action. Using this action will incur additional charges per execution
TABLE OF CONTENTS
- What is the AI Agent Action in Workflows?
- Key Benefits of the AI Agent Workflow Action
- AI Agent Action Details
- Templates
- Writing Instructions
- Configuring Tools
- Built-in Conversation History (Cross-Channel)
- How To Setup the AI Agent Workflow Action
- Execution Logs
- Pricing
- Frequently Asked Questions
- Related Articles
What is the AI Agent Action in Workflows?
AI Agent is a Workflow AI action that plans and executes tasks autonomously based on your instructions and the tools you make available to it. It is useful when a workflow needs flexible decision-making, dynamic tool usage, or multiple actions completed in sequence without manually building each step.
For example, instead of creating separate workflow actions to find a contact, generate a booking link, format a date, and send follow-up messages, you can configure one AI Agent action to handle the full process.
Key Benefits of the AI Agent Workflow Action
Autonomous execution: The agent decides which tools to use, in what order, and with what inputs based on your instructions.
Faster workflow building: One AI Agent action can replace multiple manually configured workflow steps for supported use cases.
Flexible configuration: You can build from scratch or start with a template and customize the setup.
Downstream workflow support: The agent can return text or JSON output for use in later workflow steps.
Built-in visibility: Execution Logs let you review the agent’s reasoning steps, tool usage, and token consumption.
AI Agent Action Details
These settings control how the AI Agent behaves and give you the core inputs needed to configure the action correctly.
Action Name: Add a custom name for the action. The default name is AI Agent, but renaming it based on the use case makes the workflow easier to manage.
Template: Choose a pre-built template to prefill the Instructions and Tools fields, or select Build Your Own to start from scratch. Some templates require a specific workflow trigger.
Instructions: Define what the agent should do, how it should make decisions, and any rules it should follow. This is the most important part of the configuration.
Enhance Prompt: Improves loosely written instructions by restructuring them into a more detailed and organized prompt. You can undo the enhancement if needed.
Model: Select the AI model that powers the agent.
Tools: Choose the actions the agent is allowed to execute.
Conversation Memory: Use a rolling summary of past runs for the same Contact on this step so the agent has context.
Output format: Choose how the agent formats its response.

Templates
Templates help you get started faster by pre-filling common instructions and tools for specific workflow scenarios. They are useful when you want a starting point that matches a known use case and then customize it for your business.
Templates are pre-built agent configurations that populate the Instructions and Tools fields. If a template requires a specific trigger and that trigger is not already present, the template appears unavailable until the required trigger is added.
Available Templates Include:
- Build Your Own: Start from scratch with a blank agent and full control over instructions and tools
- Form Lead Follow Up: Thank new form leads, assign ownership, create an opportunity, and send a personalized SMS and email with a booking link as the first touchpoint
- No Show Appointment Recovery: Send a personalized SMS and email simultaneously with a fresh rebooking link as the first no-show touchpoint, without guilt-tripping or calling out the missed appointment
- Facebook Lead Nurturing: Engage inbound Facebook leads within minutes by assigning ownership, enriching the contact, creating an opportunity, and sending SMS-first outreach with a booking link
- Stale Deal Nudge Agent: Evaluate deal value and stage, then nudge high-value opportunities with email + SMS + owner notification + task, or standard deals with a lighter SMS and notification
- Lead Research & Enrichment: Research new contacts and their companies via internet search, enrich CRM fields with findings, score the lead, and create an opportunity if they meet ICP criteria
- New Appointment: Enrich & Confirm: Enrich the contact from CRM data, send a warm confirmation SMS and email, generate a pre-meeting research brief for the rep, handle opportunity creation, and flag any rep assignment mismatches
- Quiz Lead Scoring & Routing: Read the quiz score, segment the lead as hot, warm, or cold, update their profile, and send an internal notification to the team — no messages to the contact
- Call Transcript Summary & Action Items: Summarize the call, extract action items, log everything as a note on the contact, create tasks for the rep, and send a recap notification
- Task Creation from Won Deals: Create fulfillment or onboarding tasks in ClickUp or Asana when opportunities are marked as won, notify the team, and update the opportunity with an onboarding flag
- Instagram / Facebook Comment-to-DM: Send personalized DMs based on comment context to move contacts toward a booking, purchase, or next step
- Lead Pipeline Tracker: Track leads through pipeline stages with periodic check-ins, using Conversation Memory to remember prior outreach and avoid repeating messaging

Writing Instructions
Strong instructions help the agent make better decisions, use tools correctly, and produce more reliable results. The clearer your guidance is, the easier it is for the agent to carry out the task as intended.
The Instructions field defines what the agent does, how it reasons, and how it uses the tools you provide. You can keep instructions simple or make them more detailed depending on the complexity of the task.
Good instructions usually include:
A role statement
Context about the available trigger data
A step-by-step workflow
Decision logic using if/then rules
Messaging guidelines
Rules or constraints for what the agent should avoid doing
If you are unsure how to structure the prompt, enter your instructions in plain language and use Enhance Prompt to reorganize them.
The editor also supports rich text formatting, including headings, bold text, bullet lists, numbered lists, code blocks, and block quotes.

Configuring Tools
Tools determine what the agent is allowed to do during execution. Giving the agent the right tools, and deciding which fields it can control, helps balance flexibility with predictability.
Click + Add Tool to open the tool picker. Tools are organized by category, and you can also search by name. Each selected tool appears in the configuration panel and can be configured individually.
When configuring a tool, you can choose how field values are populated:
Let AI decide all field values: ON: The agent generates values for all fields at runtime based on your instructions and workflow data.
Let AI decide all field values: OFF: You can manually set some values yourself while allowing the agent to fill any remaining blank fields.
Each field also includes its own toggle, so you can switch individual fields between AI-generated and manually configured values.

Search Knowledge Base (Tool)
Search Knowledge Base lets the AI Agent retrieve relevant business information from your native Knowledge Bases during execution. This avoids pasting large FAQ lists and business details into your Instructions.
Common use cases include:
- Service details, pricing, and offerings
- Booking rules, service menus, and availability
- FAQs and policy information
How to Set It Up
1. In the AI Agent action, click Add Tool.
2. Select Search Knowledge Base.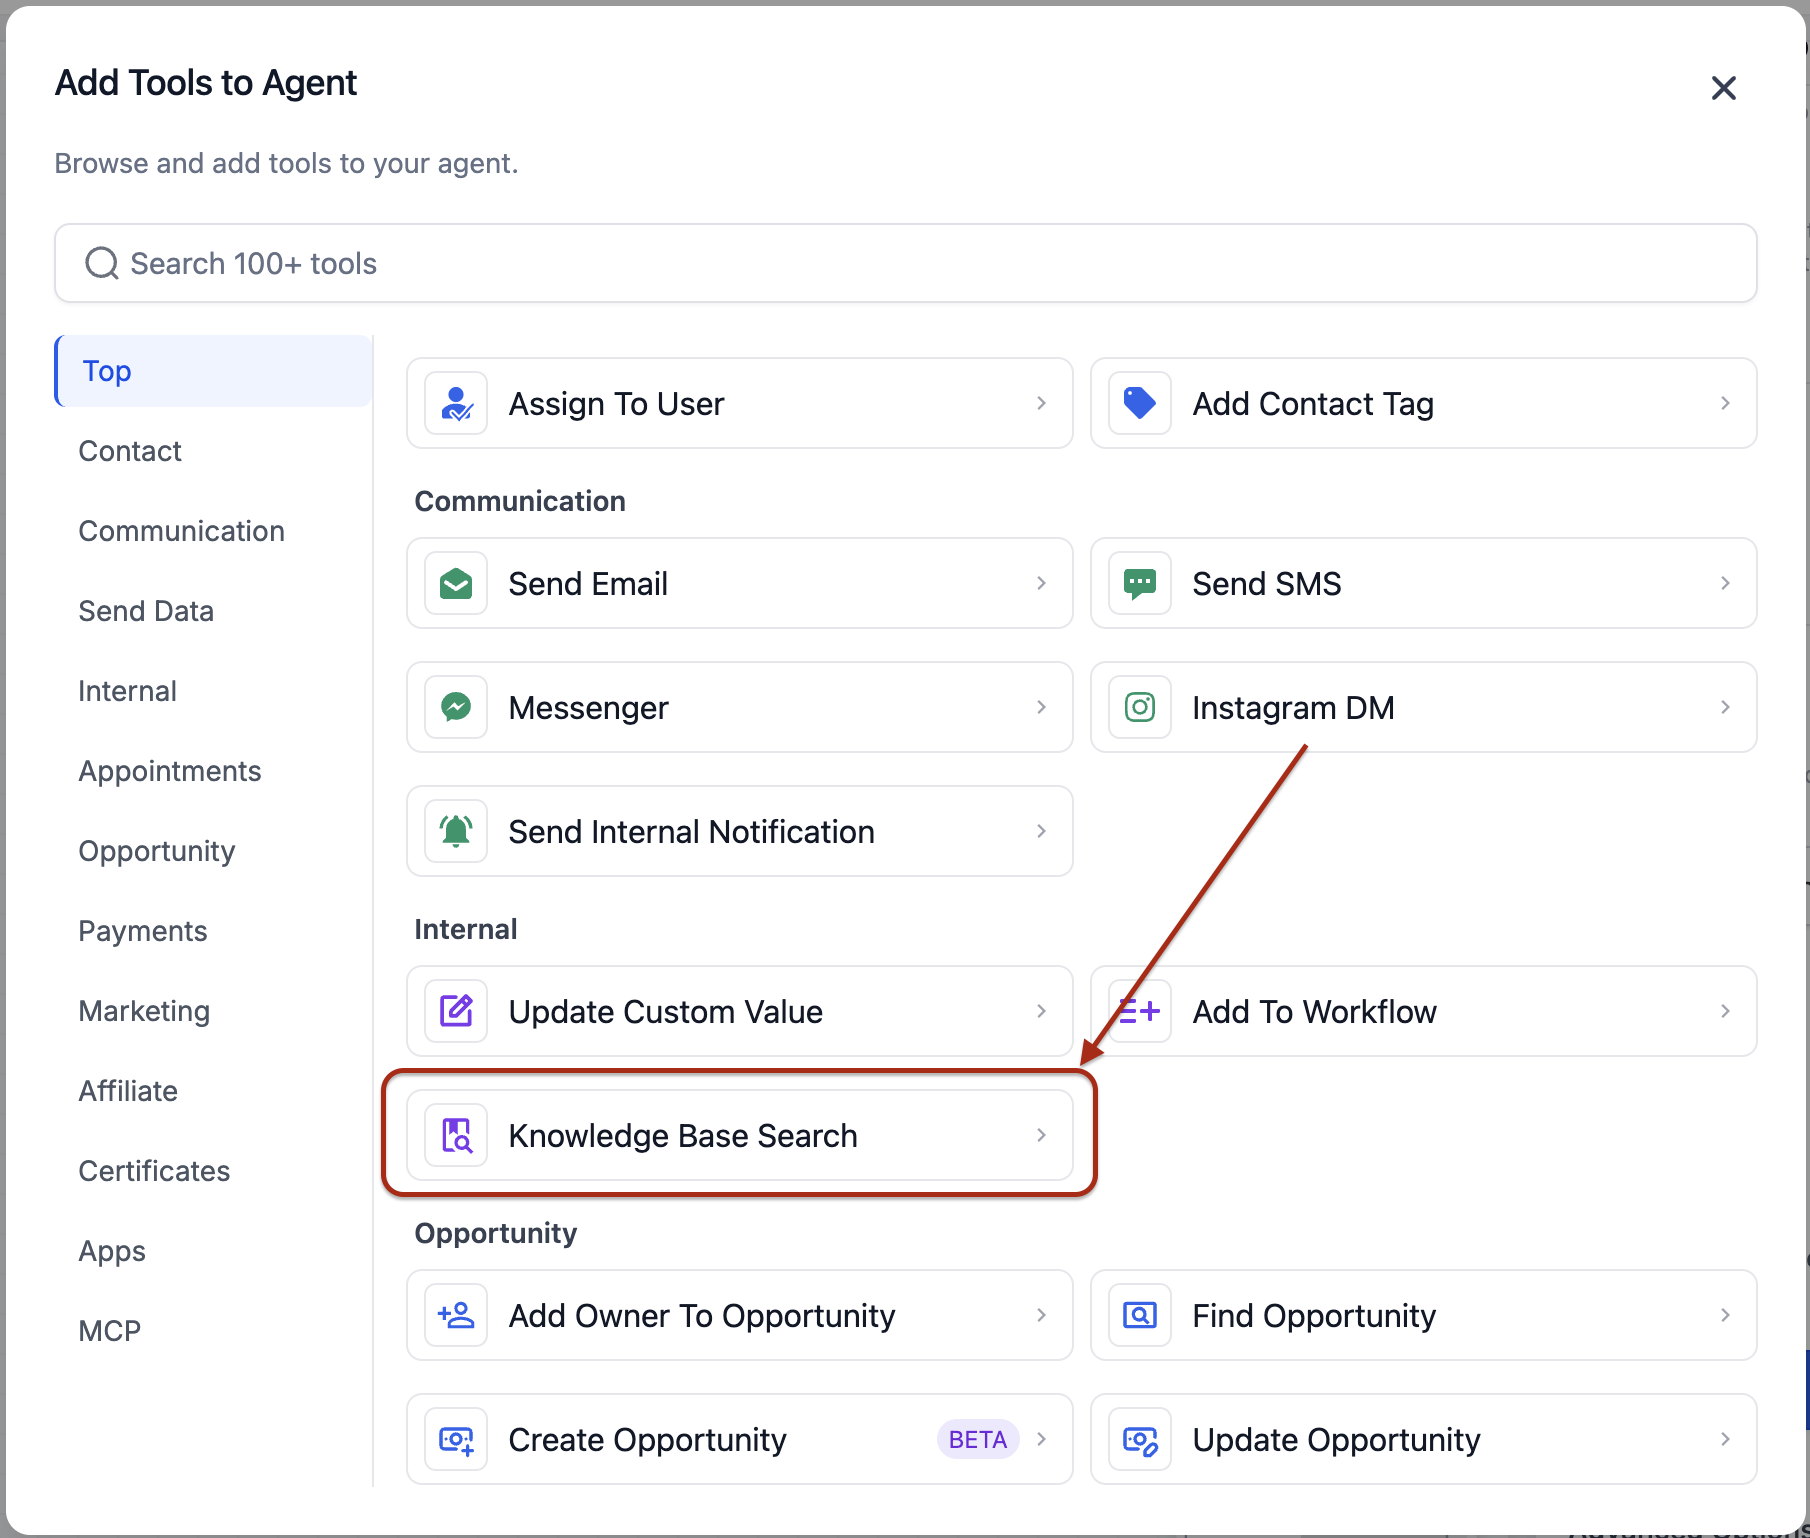
3. Choose which Knowledge Base(s) the agent can search.
4. Configure how the search query is created:
Static Query: Provide a fixed query the tool uses each time.
Dynamic query (AI decides): Let the agent generate the query based on the conversation and workflow context.
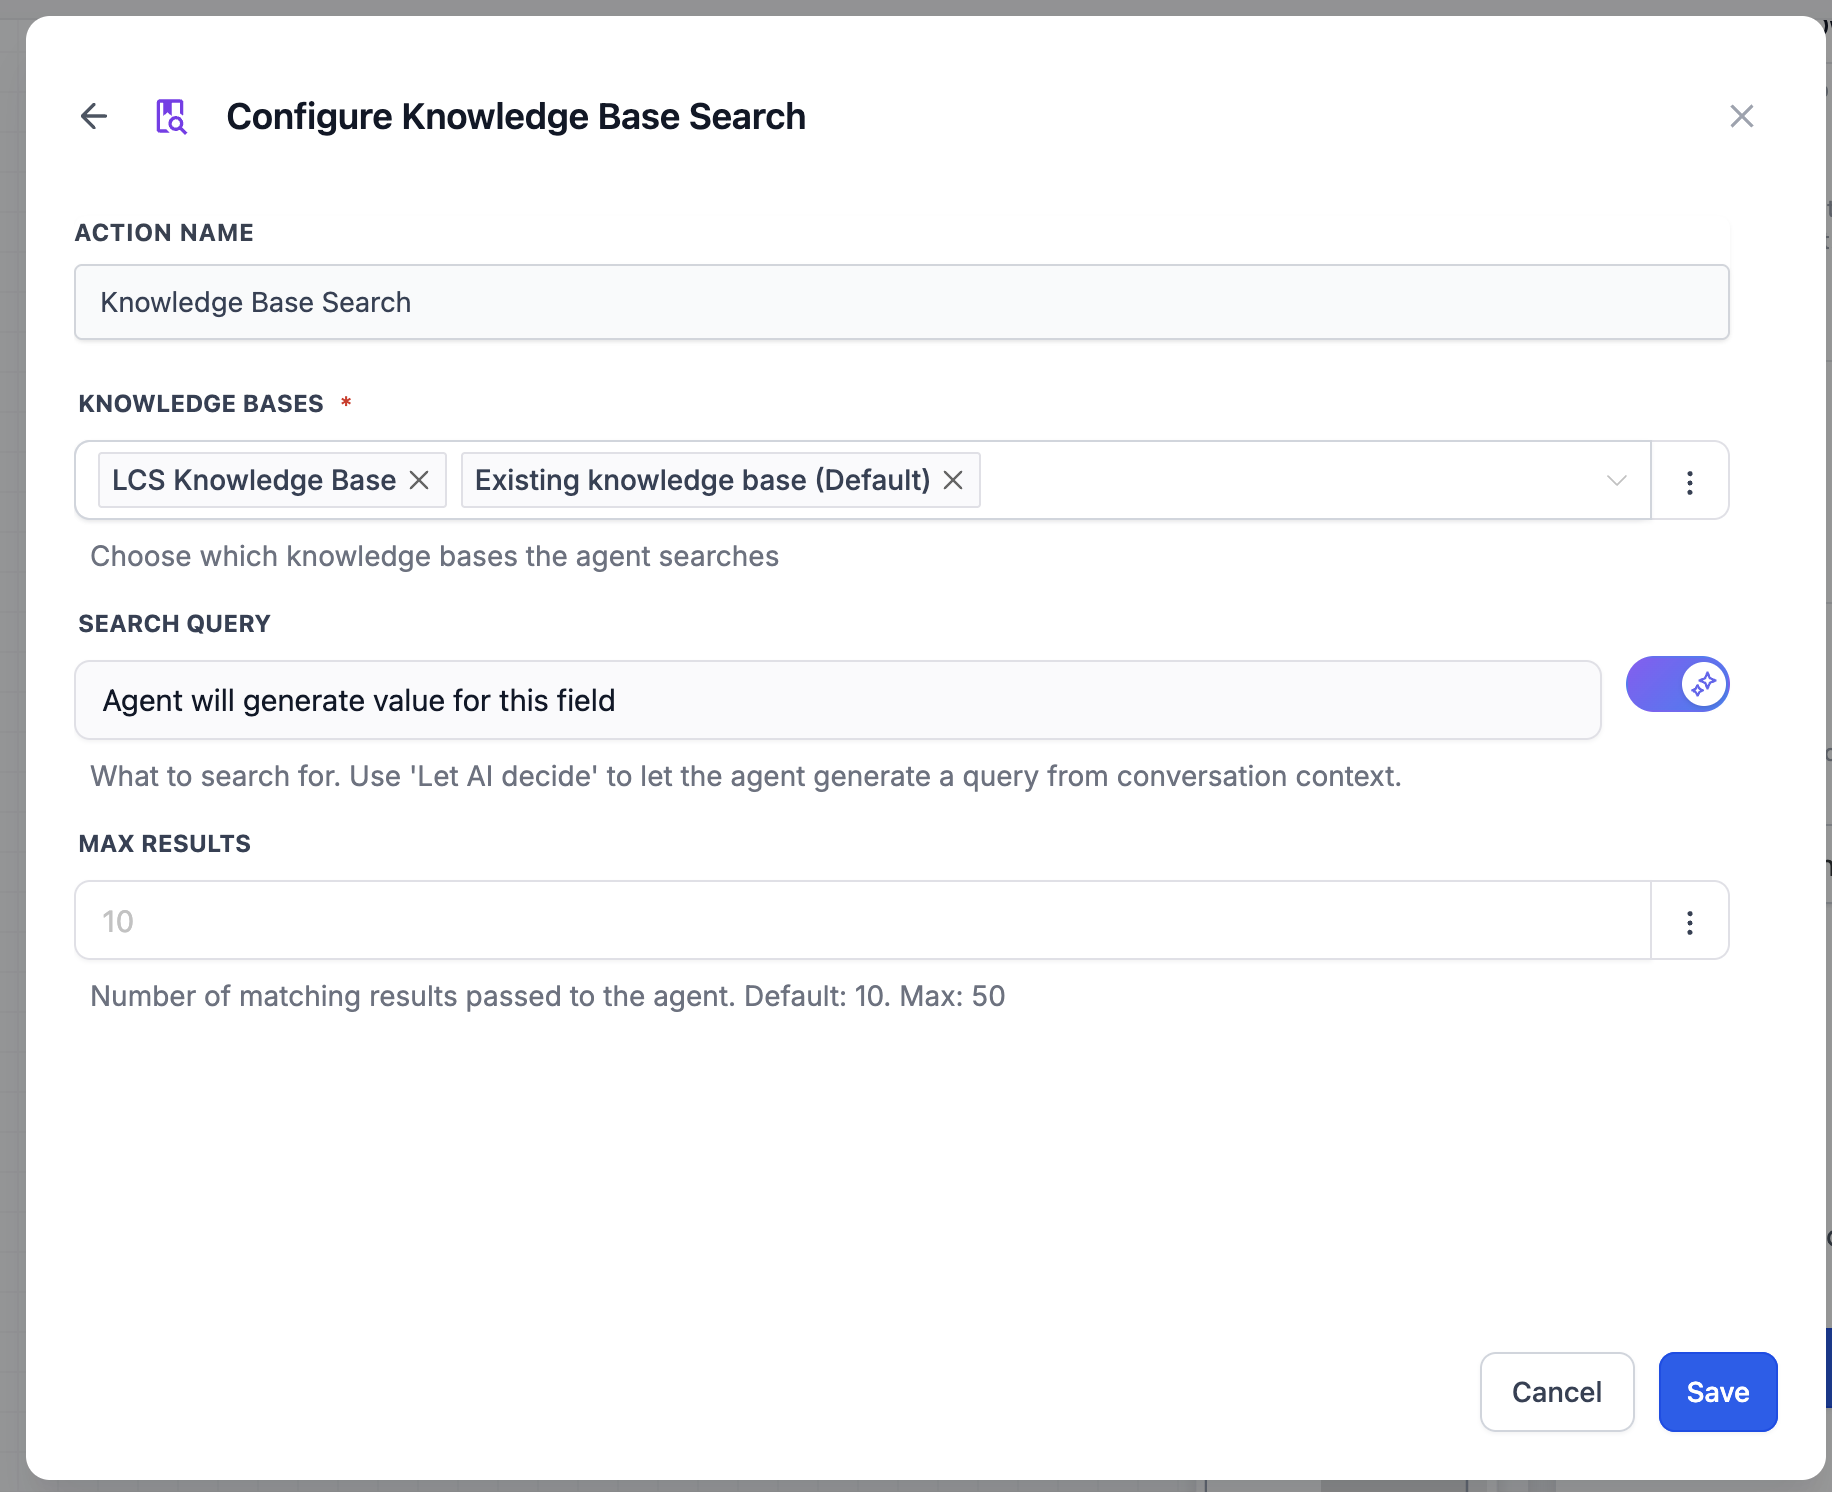
5. Set the number of chunks the agent retrieves from the Knowledge Base.
Why it Matters
Search Knowledge Base keeps your context window lean by pulling only the information the agent needs at runtime. This reduces token usage and helps the agent respond with more accurate, grounded answers.
Update Custom Value Tool
The Update Custom Value tool lets the AI Agent update custom values directly during workflow execution. This is useful when you want the agent to set or change values based on context, instead of building large If/Else branches for every possible outcome.
You can use this tool for scenarios like:
- setting business-hour messages based on the day of the week
- updating formatted date values
- assigning context-aware promo codes
- storing values based on timezone, contact data, or pipeline stage
How to add the tool
- Open your workflow and add or edit the AI Agent action.
- In the tool list, select Update Custom Value.
- Configure the fields you want the agent to use.
- Save the tool and publish the workflow.
Tool fields
Custom Value
Choose the custom value to update. You can either:
- select a specific custom value, or
- use Let AI decide so the agent chooses which custom value to update
New Value
Set the value that should be written to the custom value. You can either:
- enter a fixed value or variable, or
- use Let AI decide so the agent generates the value from your prompt instructions
If you choose a specific custom value, the tool may also show the Current Value so you can review the existing value before updating it.
Common setup patterns
Specific custom value + AI-generated value
Use this when the field is fixed, but the agent should determine what to write into it.
AI-selected custom value + AI-generated value
Use this when the agent needs to decide both which field to update and what value to assign.
Why use this tool
This tool helps reduce workflow complexity by replacing large condition trees with a single AI Agent step. It is especially useful when workflows would otherwise need many branches and repeated update actions just to set custom values dynamically.
Built-in Conversation History (Cross-Channel)
AI Agent includes a built-in capability that can retrieve a contact’s past conversations across supported channels when additional messaging context is needed. The agent decides when to use this automatically, so history is fetched only when it’s relevant.
No setup required: This is available by default for the AI Agent workflow action.
What the agent can retrieve:
- Channel (where each exchange occurred)
- Message content
- Direction (inbound vs outbound)
- Timestamps
- AI-generated summary (high-level context)
Channels covered
- SMS
- Email
- WhatsApp
- Instagram
- Facebook Messenger
- TikTok
- Other connected messaging channels.
Built-in Call Transcripts
AI Agent can automatically retrieve and reference a contact’s call transcripts when voice context is relevant. No setup required: This capability is available by default for the AI Agent workflow action.
How to use it: Mention call transcripts in your Instructions (for example, “Use the last call transcript to identify objections and next steps.”).

How To Setup the AI Agent Workflow Action
A structured setup makes it easier to choose the right template, write clear instructions, and give the agent the tools it needs to complete the task successfully.
Go to Automations > Workflows.

Create a new workflow or edit an existing one.

Add a relevant trigger like Form Submitted, Contact Created, etc or you can select a pre-built template as well during the action setup.

Click + Add or select the Please select action placeholder in the workflow canvas.
Select AI Agent action from the Workflow AI section.
Enter an Action Name.

You can select Build Your Own to configure the action from scratch.
Add your Instructions.
Click Enhance Prompt if you want to improve the structure of the prompt.
Choose the Model you want to use.
Click + Add Tool and select the tools the agent can use.
Configure each tool, including whether AI should decide field values or whether specific values should be set manually.

Or you can also select a Template: Templates are pre-built agent configurations that populate the Instructions and Tools fields. If a template requires a specific trigger and that trigger is not already present, the template appears unavailable until the required trigger is added.

Open Advanced Options if you want to enable Conversation Memory or configure Output Format. Advanced settings give you more control over how the agent remembers prior activity and how its output can be passed into later workflow steps.
Conversation Memory: Conversation Memory helps the agent keep continuity across repeated runs for the same contact. This is helpful for workflows where the same contact may re-enter the step and the agent should adapt based on previous interactions.
This setting is off by default. When enabled, the agent uses a rolling summary of past runs for the same contact on that step.
Use Conversation Memory for recurring or multi-touch workflows, such as periodic lead follow-up. For one-time workflows, such as a single form follow-up, it can usually remain off.
Output Format: Output Format controls whether the agent returns data that later workflow steps can use. Choosing the right output type helps when the workflow needs to reference the agent’s result after it finishes running.
Available options:
None: The agent performs actions but does not return structured output for downstream steps.
Text: The agent returns a free-text response. When selected, an Output Description field appears so you can describe what the response should contain.
JSON: The agent returns structured data based on a defined schema. You can add properties with a name, type, and optional description to make the output easier to reference later in the workflow.
Save the action.

Execution Logs
Execution Logs make it easier to understand what the agent did during a workflow run. They are useful for validating behavior, checking tool usage, and troubleshooting unexpected results.
After the workflow runs, open the Execution Logs tab in the workflow builder and select an AI Agent execution to view the trace.
The trace can include:
Agent Input: The full input received by the agent.
LLM: Each model call used to reason about the next step.
Tool executions: Each tool the agent called, including execution time and success or failure status.
You can expand each step to review input and output data. The log view supports both a table format and raw JSON view.

Pricing
Understanding how pricing works helps you estimate the cost of using AI Agent in production workflows, especially when different models or premium actions are involved.
The cost of each AI Agent execution is based on two components:
Note: You can review token usage in the Execution Logs and check billing details in the account billing section.LLM token usage: The agent may make one or more model calls during execution. Total token usage depends on instruction length, task complexity, and how many tool calls are needed.
Premium action executions: If the agent uses premium actions as tools, those executions are charged at the same per-execution rate as when they are used as standalone workflow actions.
Total cost per execution = (total tokens consumed across all LLM calls × selected model's per-token rate) + (number of premium tool executions × their per-execution rate)
Standard built-in tools such as Send SMS, Update Contact Field, and Add Tag do not add an extra premium action execution charge beyond normal platform usage.
Frequently Asked Questions
Q: Is there a limit on how many tools I can add?
Yes. You can add up to 10 tools per agent. Internal tools such as Date Calculator and Math Operations do not count toward this limit.
Q: Which model should I use?
GPT-5.2 (Low thinking) is recommended for most use cases because it provides a strong balance of quality and speed. Use higher thinking levels for more complex logic, and use GPT-5 Nano for simpler tasks where speed and cost matter most.
Q: Can I use the AI Agent with any trigger?
Yes. AI Agent works with any workflow trigger. Templates may recommend specific triggers because their instructions are written for that context.
Q: What does Enhance Prompt do?
Enhance Prompt restructures your instructions into a more organized and detailed prompt, including clearer steps and edge-case handling. You can undo the enhancement if needed.
Q: What context does AI Agent use when running in a workflow?
AI Agent uses your instructions, the tools you enable, and the contact/workflow data available at runtime. When messaging context is relevant, it can also retrieve the contact’s conversation history across channels.
Q: What’s the difference between Conversation Memory and Conversation History?
Conversation Memory: A rolling summary of prior runs of this AI Agent step for the same contact (optional).
Conversation History: Cross-channel messaging history retrieval used when needed (available by default).
Q: When should I use the JSON output format?
Use JSON when later workflow steps need to reference specific values from the agent’s response, such as qualification results or other structured outputs.
Q: How can I see what the agent did during a workflow run?
Open the Execution Logs tab in the workflow builder and select the AI Agent execution to review the trace, including model calls, tool executions, inputs, outputs, and token usage.
Q: Do templates lock me into a specific configuration?
No. Templates pre-fill the Instructions and Tools fields, but you can edit the instructions, change the model, add or remove tools, and update advanced options after applying a template.
Q: When should I enable Conversation Memory?
Enable it when the same contact may go through the agent step more than once and the agent should adapt based on prior runs. For one-time workflows, it is usually not needed.
Q: When should I use Search Knowledge Base instead of adding business details to Instructions?
Use Search Knowledge Base when your business context lives in a Knowledge Base and the agent should retrieve only what it needs at runtime (for example pricing, policies, FAQs, or booking rules). This reduces prompt size and keeps responses grounded in your stored content.
Related Articles
Was this article helpful?
That’s Great!
Thank you for your feedback
Sorry! We couldn't be helpful
Thank you for your feedback
Feedback sent
We appreciate your effort and will try to fix the article