This article provides a comprehensive guide to the WhatsApp Settings page within your HighLevel location. Learn how to manage your account status, add phone numbers, create message templates, and build interactive WhatsApp Flows to streamline your customer communication.
TABLE OF CONTENTS
- What are the WhatsApp Settings?
- Key Benefits of Managing Your WhatsApp Settings
- How To Navigate and Use the WhatsApp Settings
- The Numbers Tab: Managing Your Phone Lines
- The Templates Tab: Crafting Your Messages
- The Flows Tab: Automating Interactions
- Frequently Asked Questions
What are the WhatsApp Settings?
The WhatsApp Settings page is the central hub for managing your entire WhatsApp Business API integration within a specific HighLevel location. From this dashboard, you can monitor account performance, configure essential assets like phone numbers and message templates, and manage your subscription. It is the command center for all your WhatsApp-related activities, ensuring your communication channel is set up for success.
How to Access WhatsApp Settings
You can open WhatsApp Settings in either of these ways:
Go to Settings → WhatsApp inside the sub-account.
If your agency offers WhatsApp through Agency Dashboard → Reselling, you may also see a WhatsApp card on the Integrations page. Clicking the card opens onboarding (if not subscribed) or management (if subscribed).

Key Benefits of Managing Your WhatsApp Settings
Properly configuring these settings unlocks the full potential of WhatsApp as a marketing and communication channel. From here, you can ensure compliance, automate conversations, and monitor your messaging performance, all in one place.
- Centralized Management: Control all aspects of your WhatsApp Business account, from phone numbers to message templates, without leaving HighLevel.
- Performance Monitoring: Keep track of your account status and message delivery rates with at-a-glance statistics.
- Scalable Communication: Create and manage pre-approved message templates to send consistent, high-quality messages to your audience.
- Interactive Engagement: Build automated WhatsApp Flows to handle common tasks like appointment booking, enriching the customer experience.
- Seamless Integration: Easily connect your WhatsApp activities with other HighLevel features like Ad Manager and Calendars.
How To Navigate and Use the WhatsApp Settings
Understanding the layout of the WhatsApp Settings page is the first step to effectively managing your integration. This section breaks down each component, from the main dashboard to the specific configuration tabs.
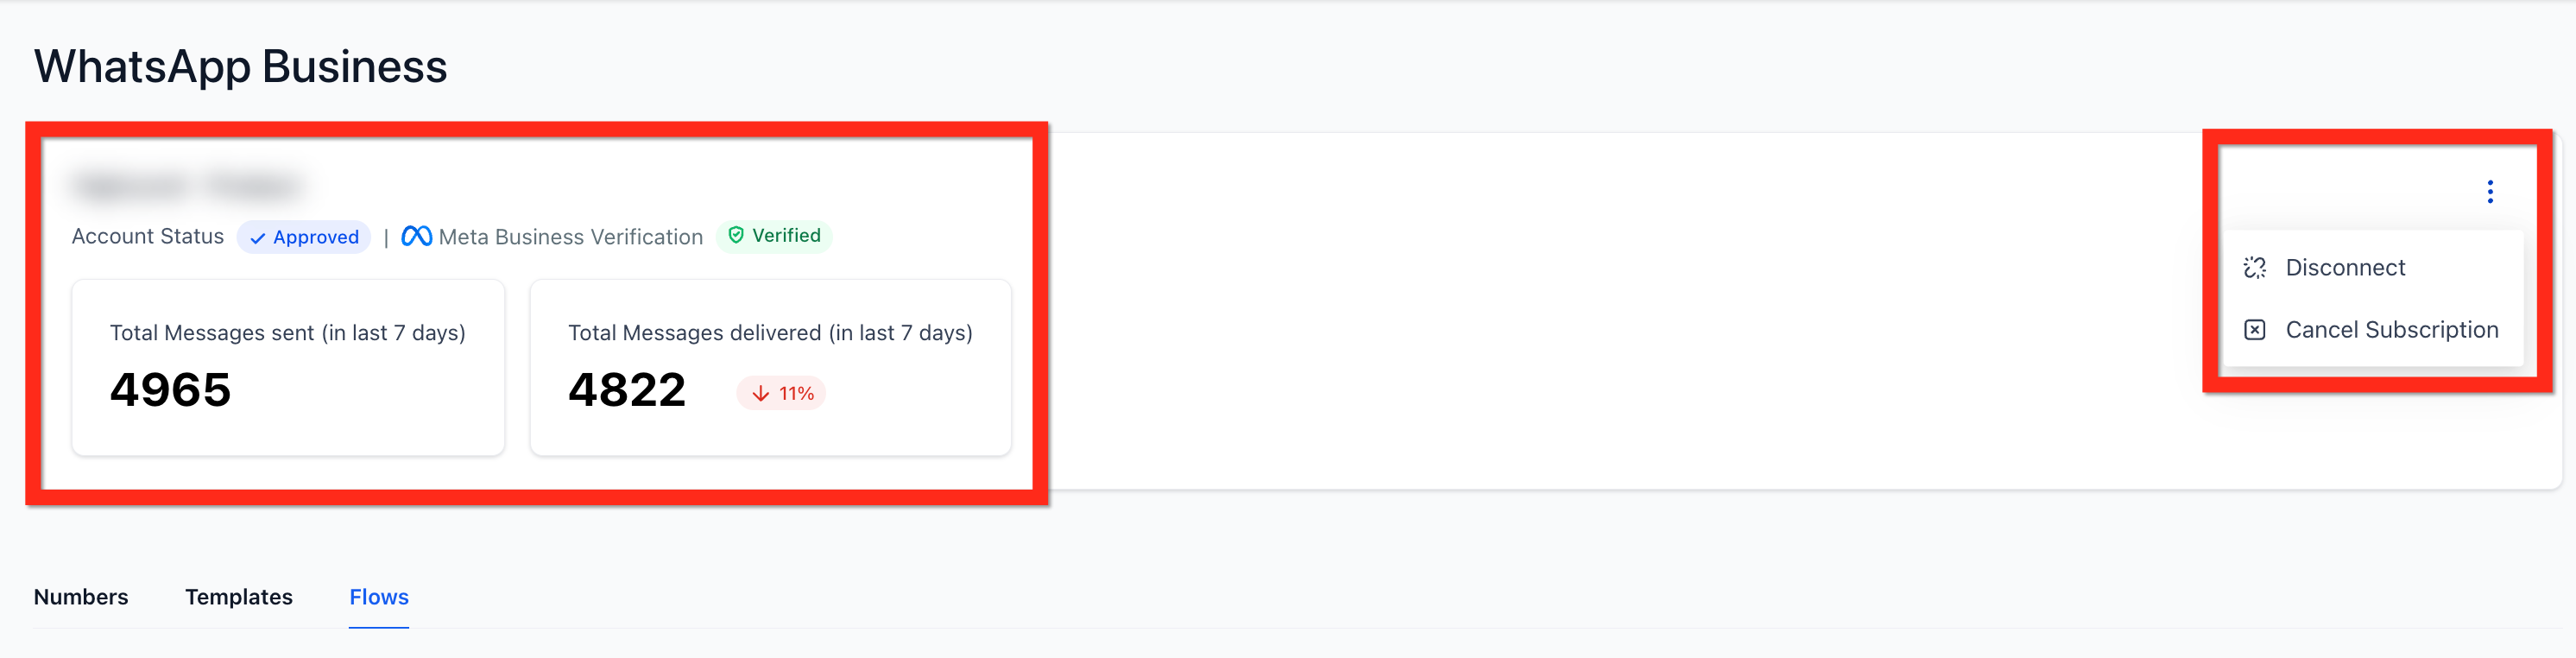
The Header Card
The header card provides a quick, real-time snapshot of your WhatsApp account's health and recent activity. Use it to monitor key metrics and access high-level account management options.
The card displays your 'Account Status', 'Meta Business Verification' status, and two key statistics:
- Total Messages Sent (in last 7 days): A count of all messages initiated from your account in the past week.
- Total Messages Delivered (in last 7 days): A count and percentage of messages successfully delivered to recipients in the past week.
In the top-right corner of the card, a three-dot action menu button allows you to manage your overall connection:
- Disconnect: Click this to sever the connection between HighLevel and your WhatsApp account.
- Cancel Subscription: Click this to end your WhatsApp subscription through HighLevel.
The Numbers Tab: Managing Your Phone Lines
This tab is your control center for all phone numbers linked to your WhatsApp Business account. Here, you can provision new numbers for messaging and launch targeted ad campaigns, ensuring your communication channels are properly configured and ready for outreach.

Adding a New Number
Follow these steps to add and configure a new phone number for WhatsApp messaging:
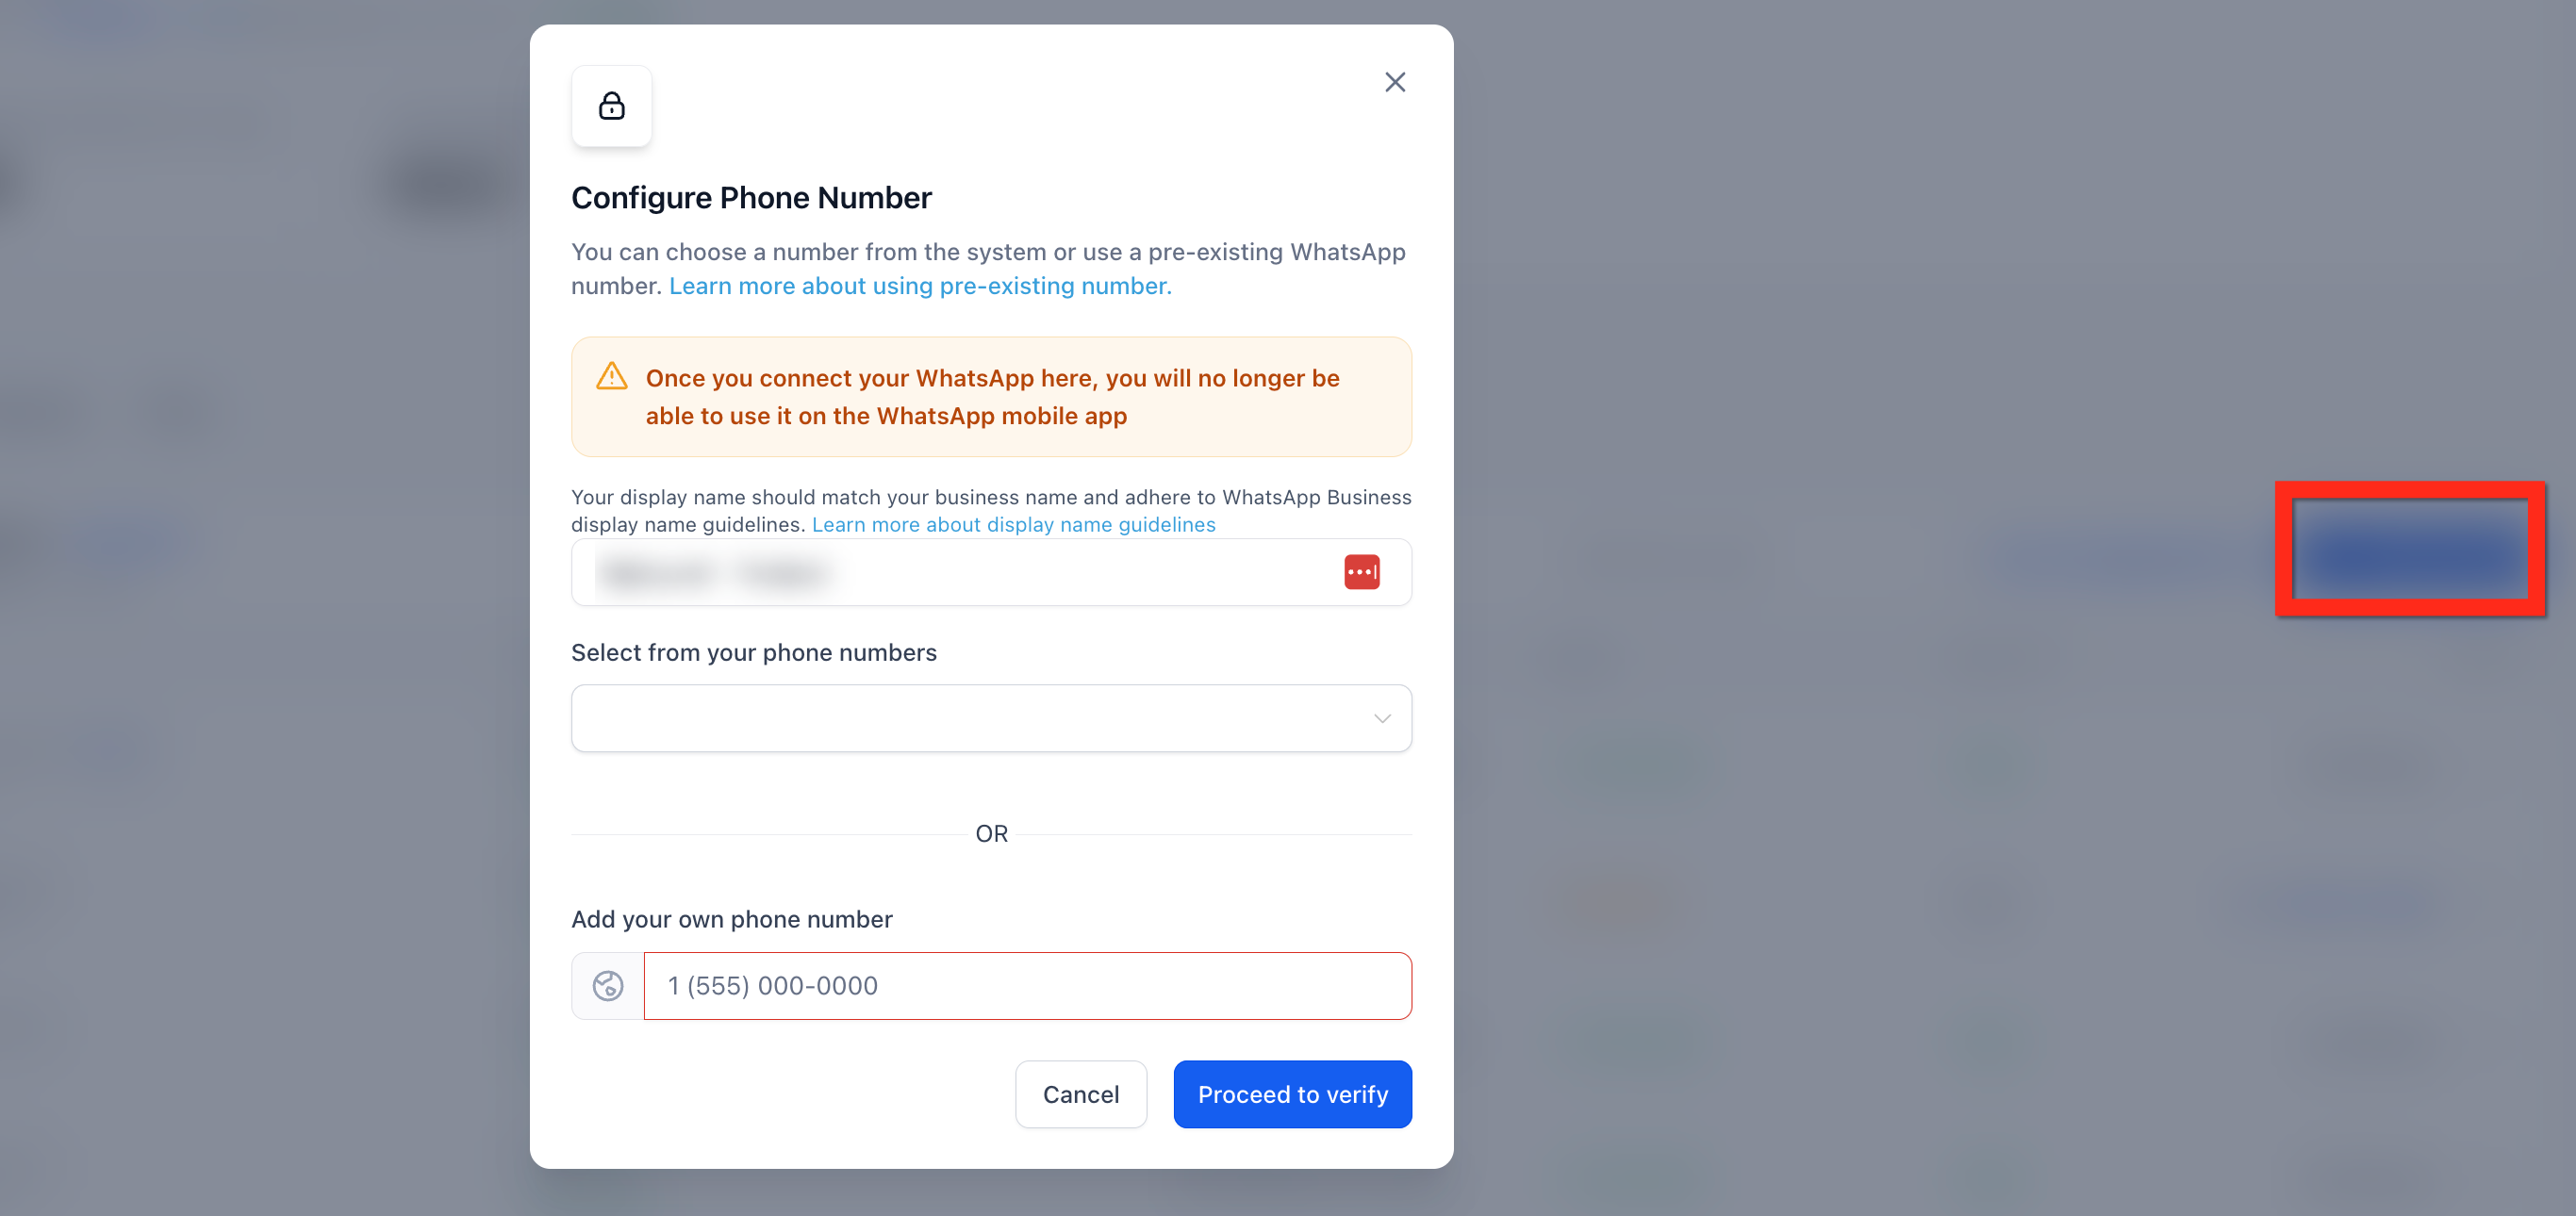
1. Click the + Add Number button to open the configuration modal.
2. In the 'Configure Phone Number' modal, enter a Display Name. This is the name users will see.
3. Either select an existing number from the 'Select from your phone numbers' dropdown or type a new one in the 'Add/type new phone number' field.
4. Click Proceed to verify and follow the on-screen instructions from Meta to complete the process.
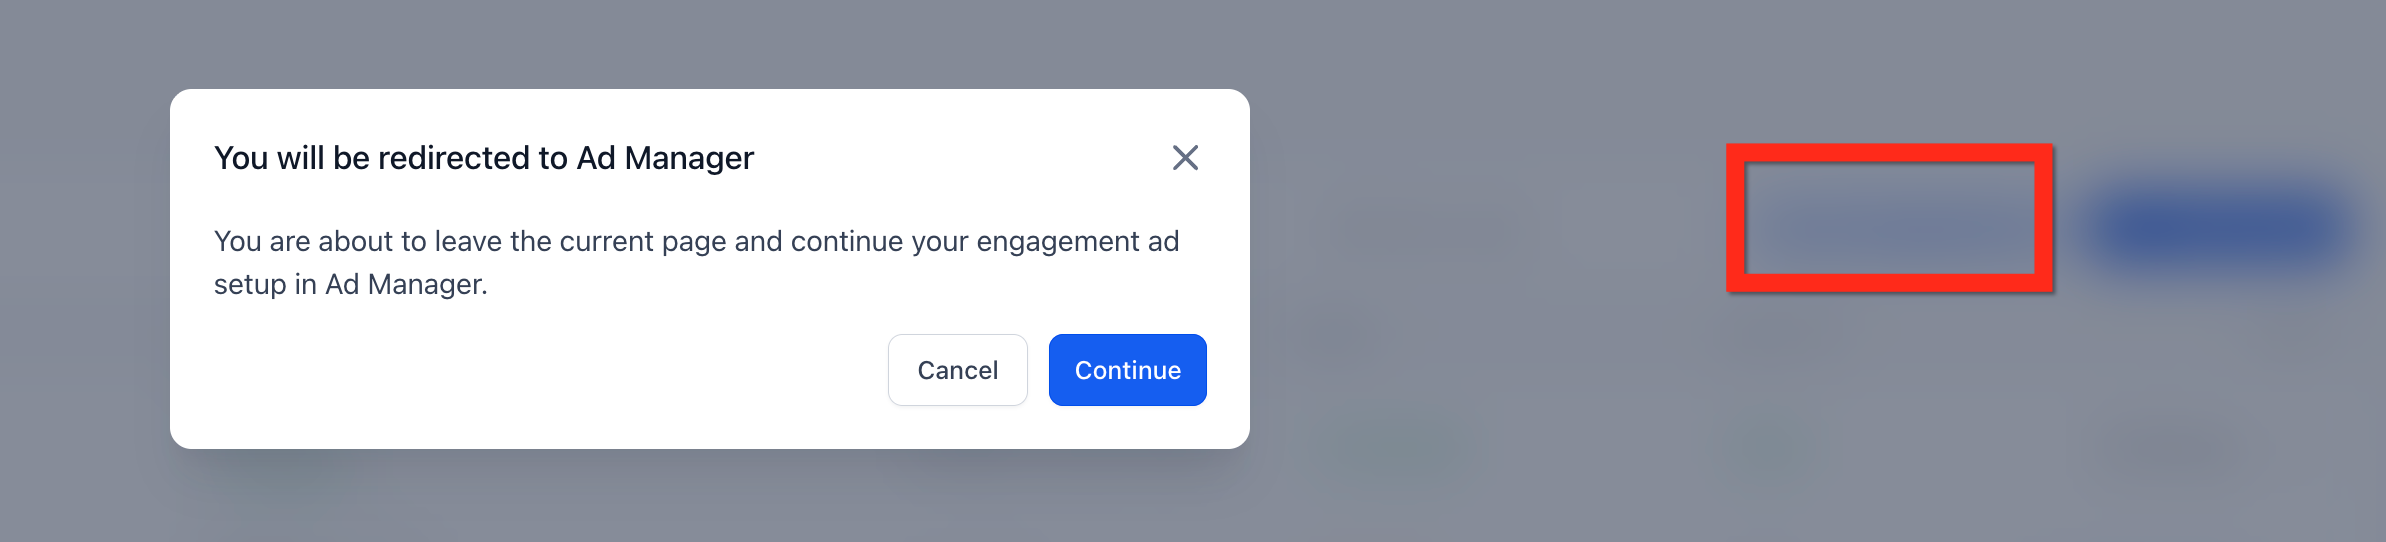
Creating an Engagement Ad
This feature redirects you to Meta's Ad Manager to create a WhatsApp Engagement ad campaign.
1. Click the Create Engagement Ad button.
2. A modal will appear, informing you that you are about to leave the current page.
3. Click Continue to be redirected to Ad Manager to build your campaign.
The Templates Tab: Crafting Your Messages
WhatsApp requires businesses to use pre-approved message templates for initiating conversations. This section is where you build, organize, and manage these templates to ensure your outbound communications are compliant and effective.

Managing Templates
Before creating a new template, you have two management options:
- WhatsApp Template Rewriter: Click this to use an AI-powered tool that helps convert existing marketing templates into utility templates, which can be useful for different communication strategies.
- Create Folder: Click this to create folders to better organize your message templates as your library grows.
Creating a New Template
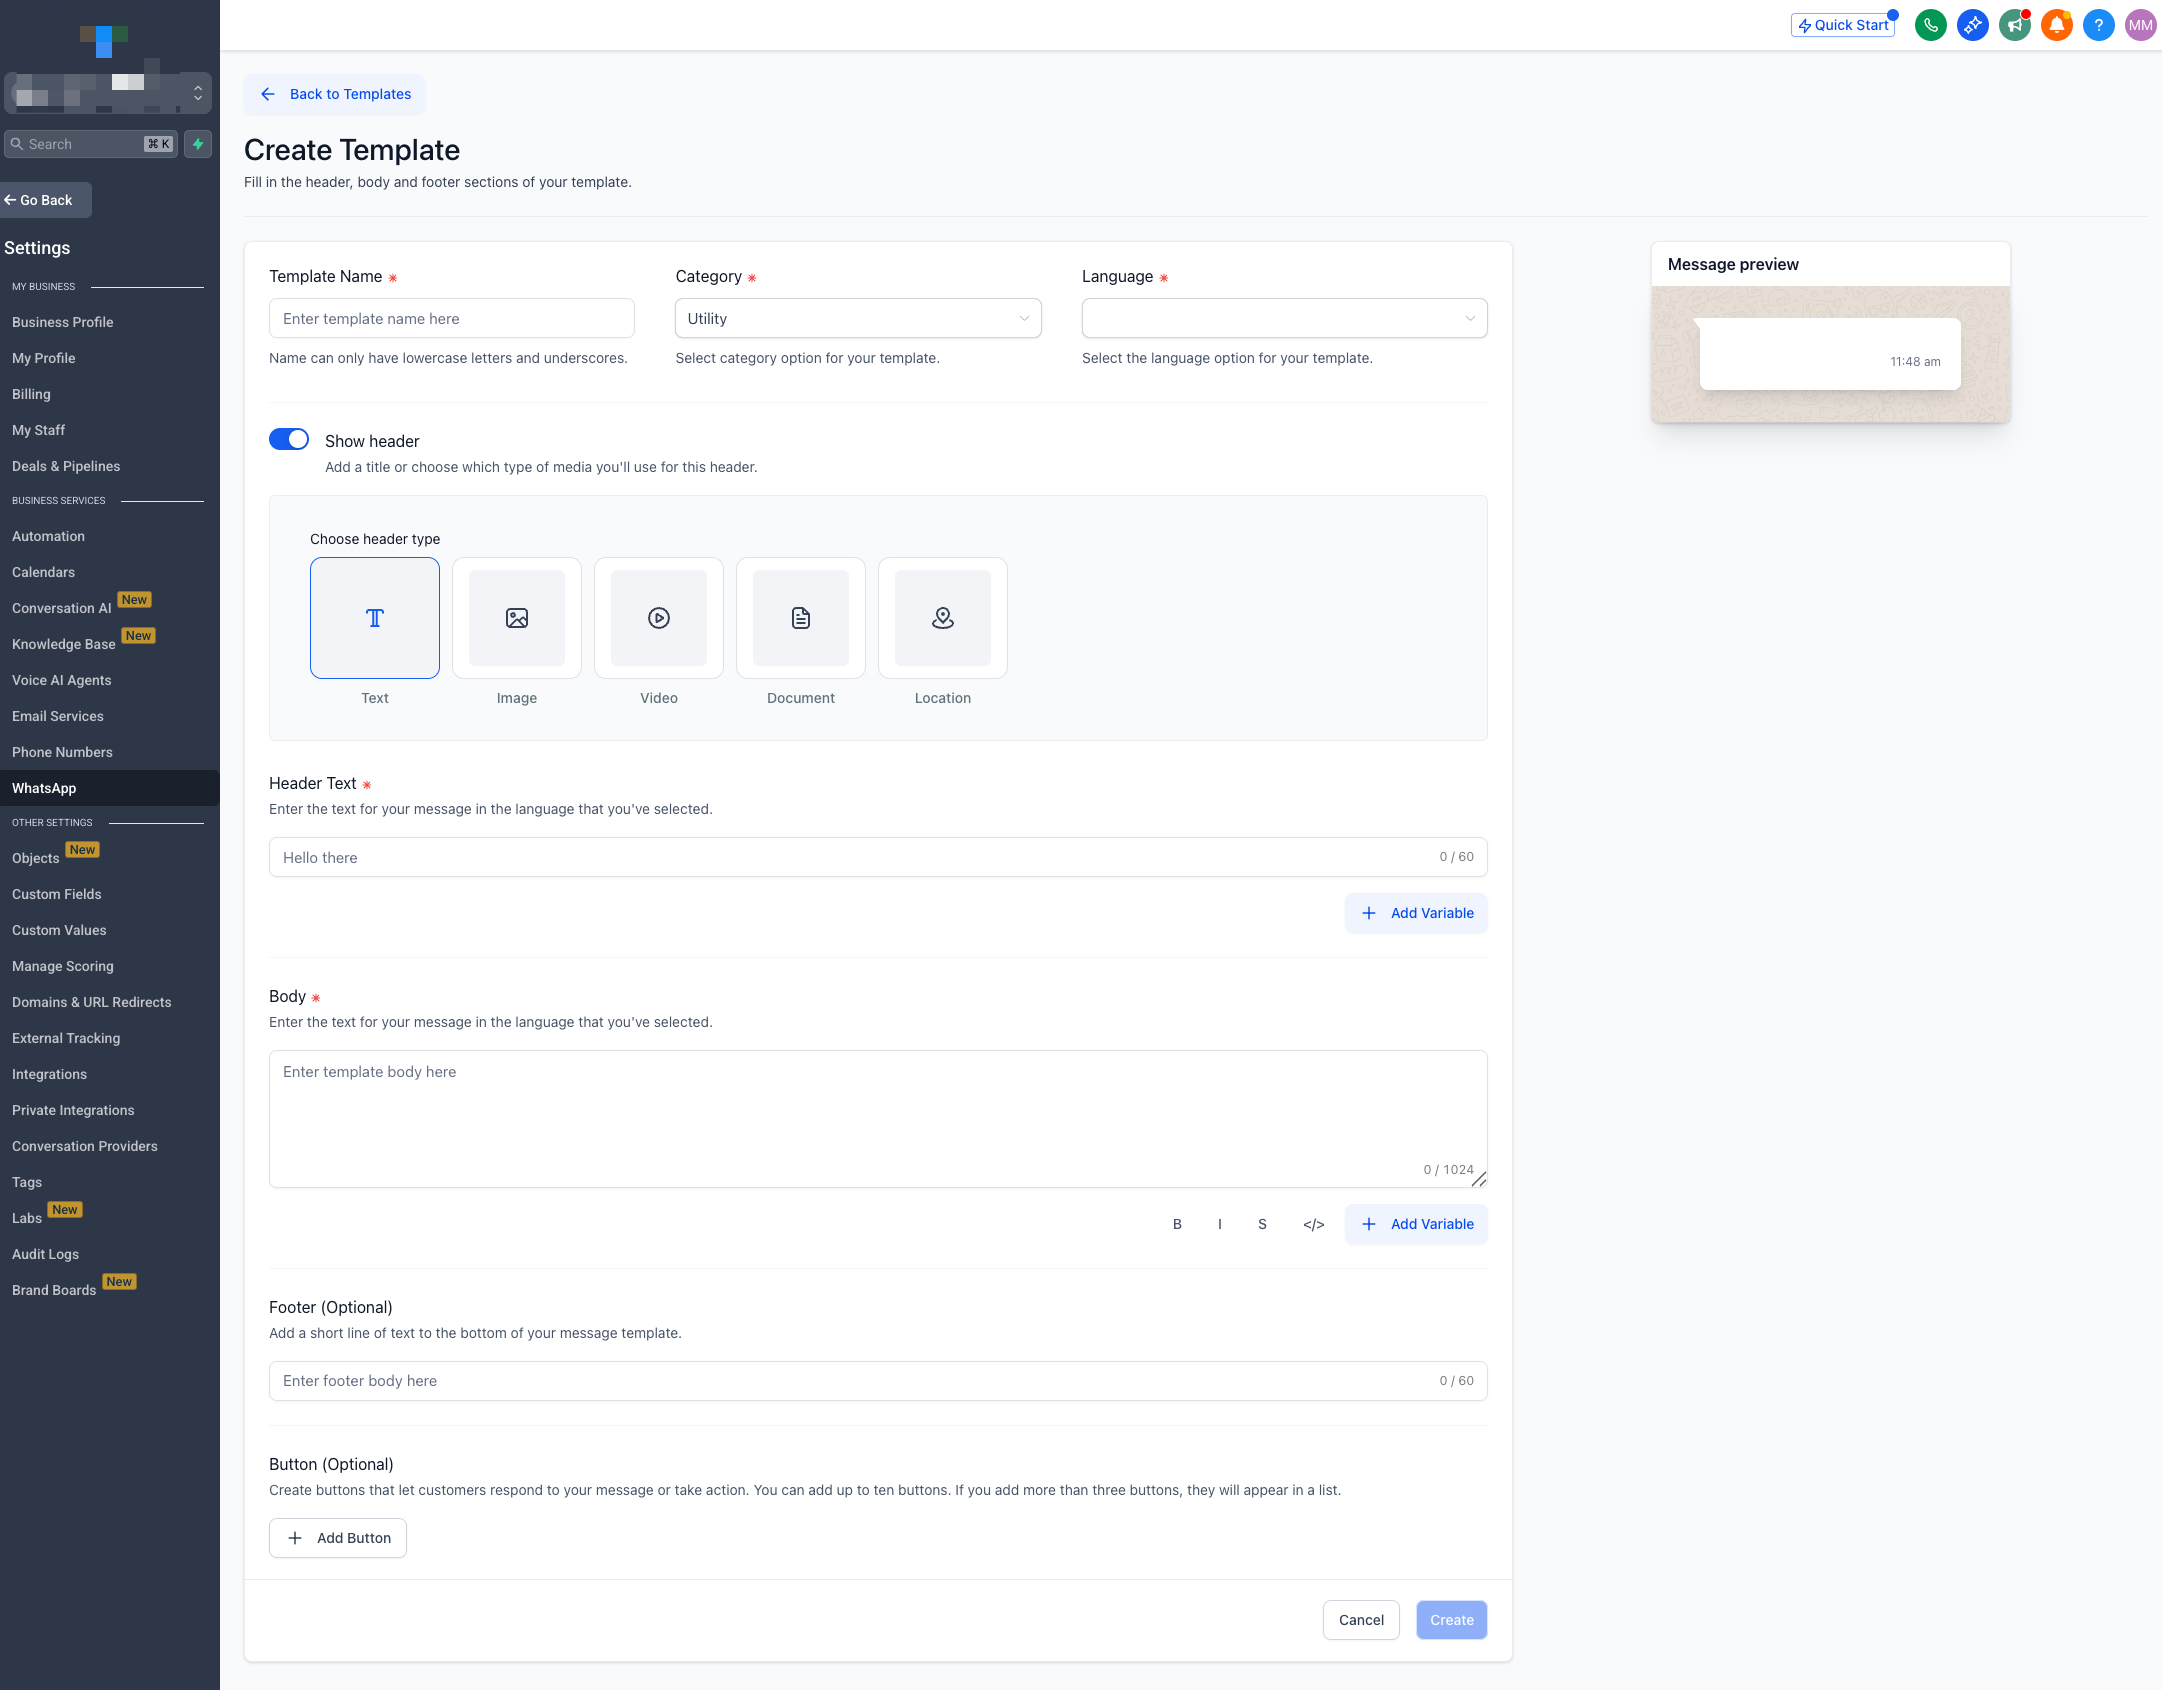
1. Click the + Create Template button.
2. From the dropdown menu, select Blank Template to build one from scratch.

On the 'Create Template' page, you will construct your message piece by piece.
1. Core Details: Fill in the Template Name, select a Category (e.g., Marketing, Utility), and choose a Language.
2. Header (Optional): Enable the Show Header toggle to add a header. You can choose from Text, Image, Video, Document, or Location types. Use the + Add Variable button to insert personalized placeholders like a customer's name.
3. Body: Write the primary content of your message in the Body text area. You can also add variables here for personalization.
4. Footer (Optional): Add a short line of supplementary text in the Footer field.
5. Buttons (Optional): Click + Add Button to include interactive elements. You can choose from:
- QUICK REPLY BUTTONS: Allow users to send a quick response, such as a 'Custom' reply or a pre-built 'Marketing opt-out'.
- CALL-TO-ACTION BUTTONS: Prompt users to perform an action, such as 'Visit website', 'Call phone number', 'Copy offer code', or trigger a WhatsApp 'Flow'.
6. Finalize: Once your template is complete, click Create to submit it to Meta for approval.
The Flows Tab: Automating Interactions
WhatsApp Flows are powerful, interactive experiences you can build directly within a chat. Use them to automate tasks like appointment booking or data collection, providing a seamless and efficient user journey without forcing them to leave the app.
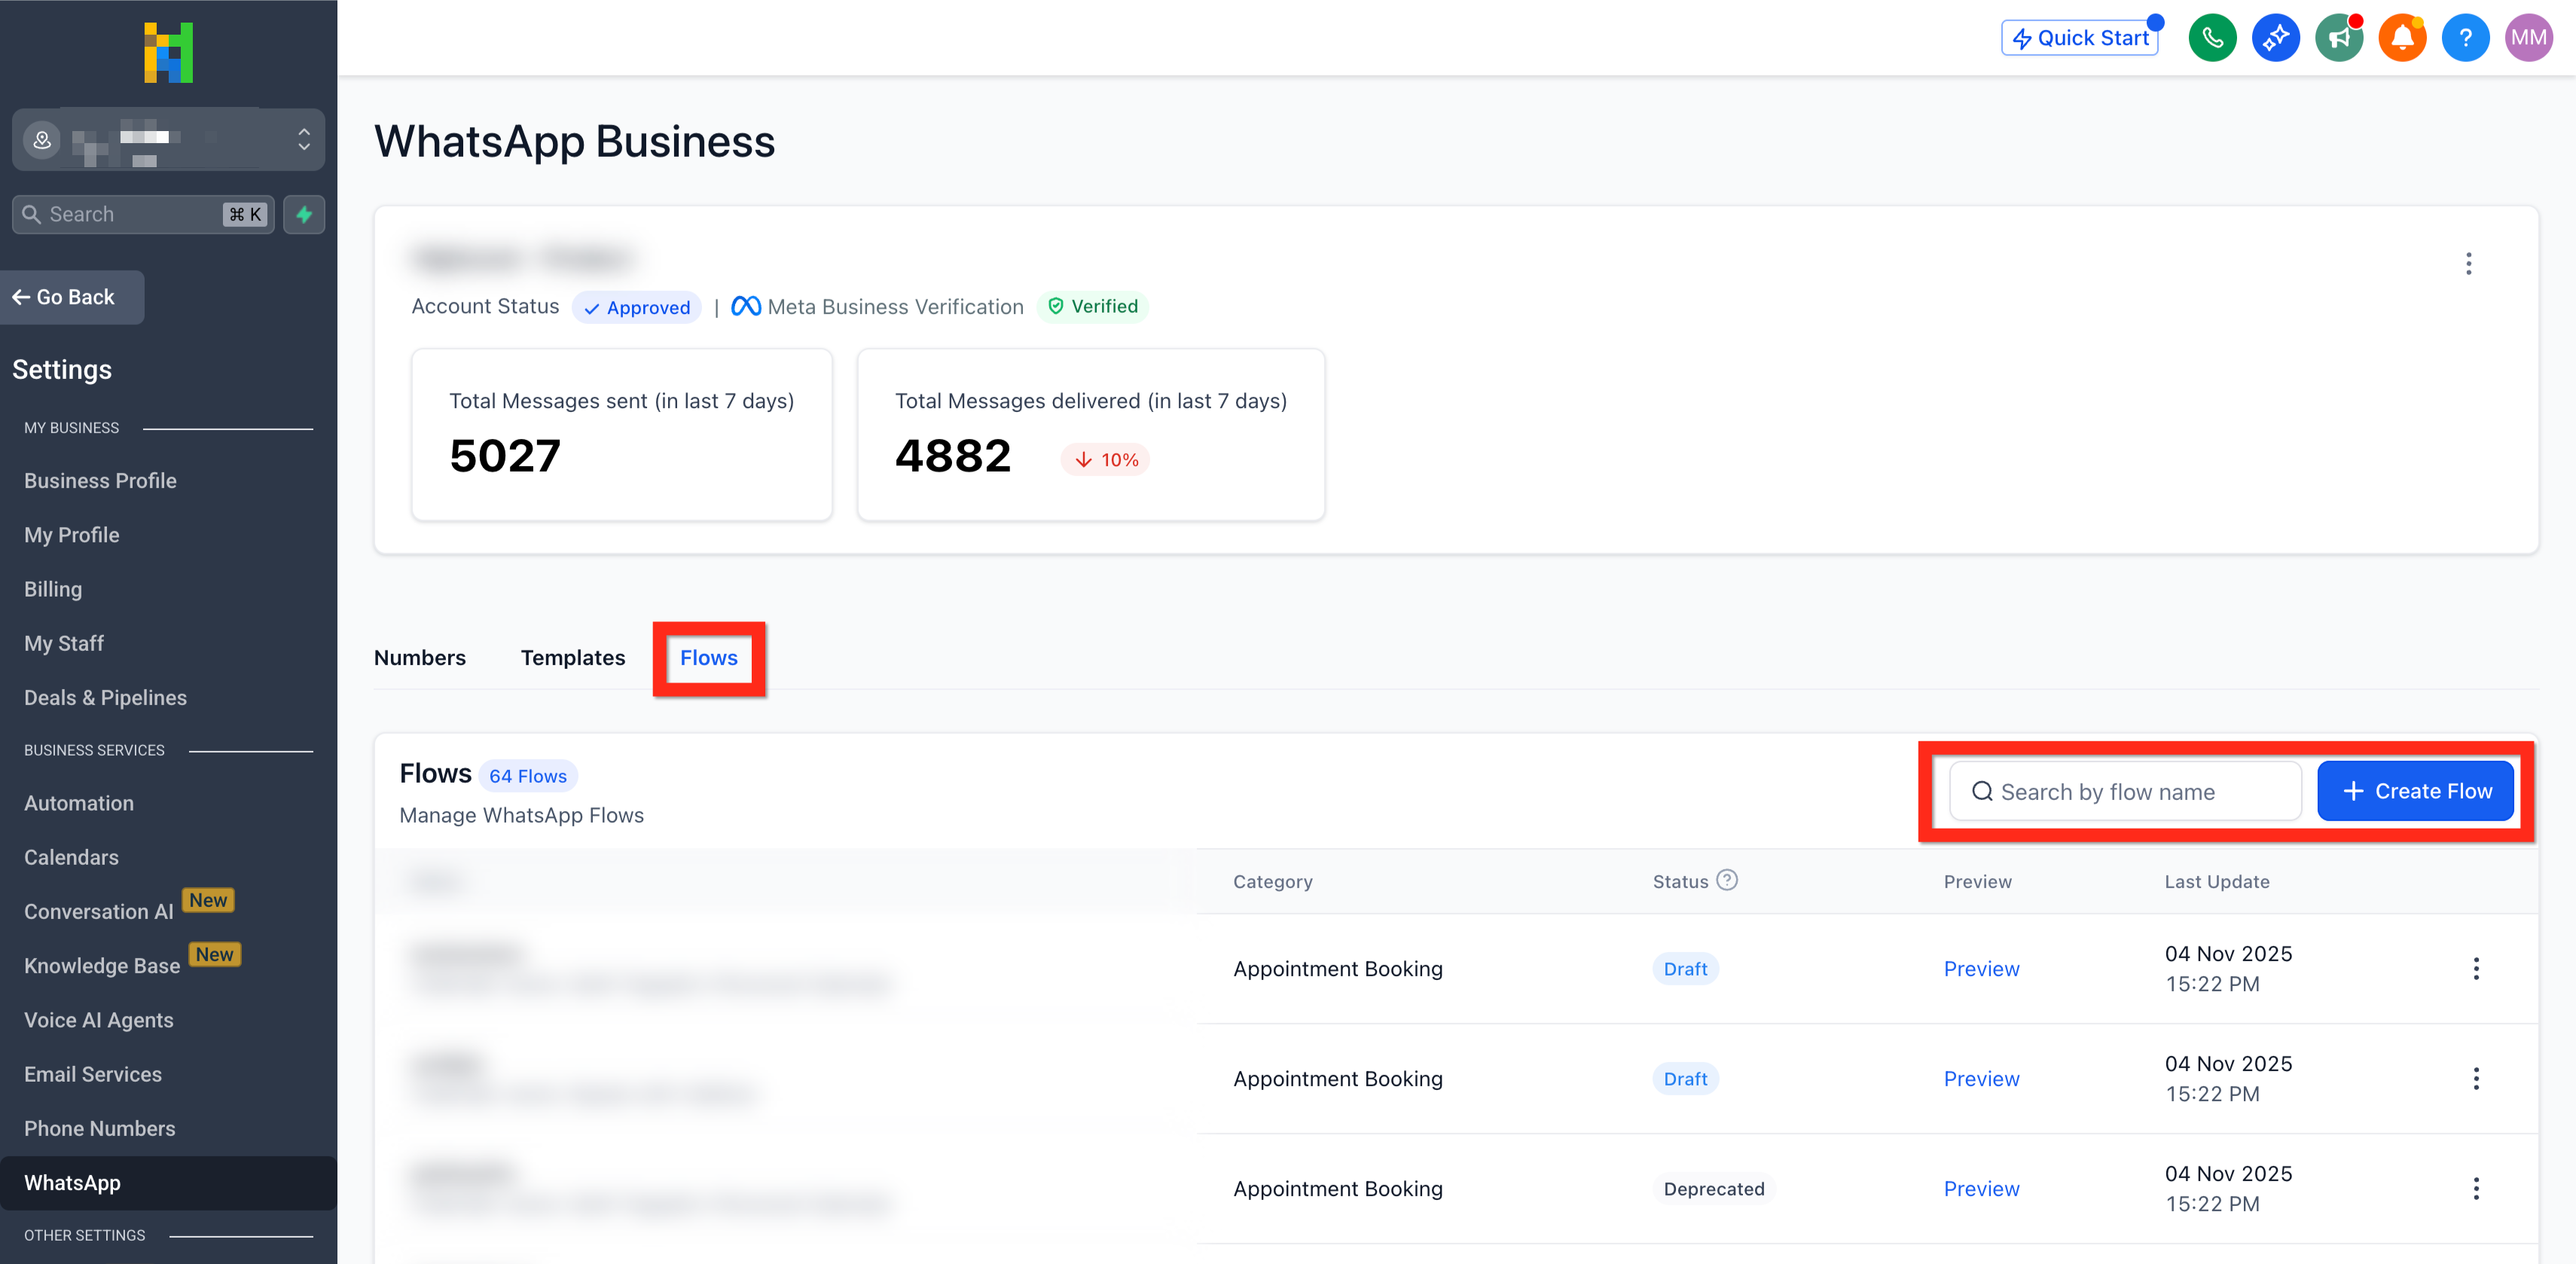
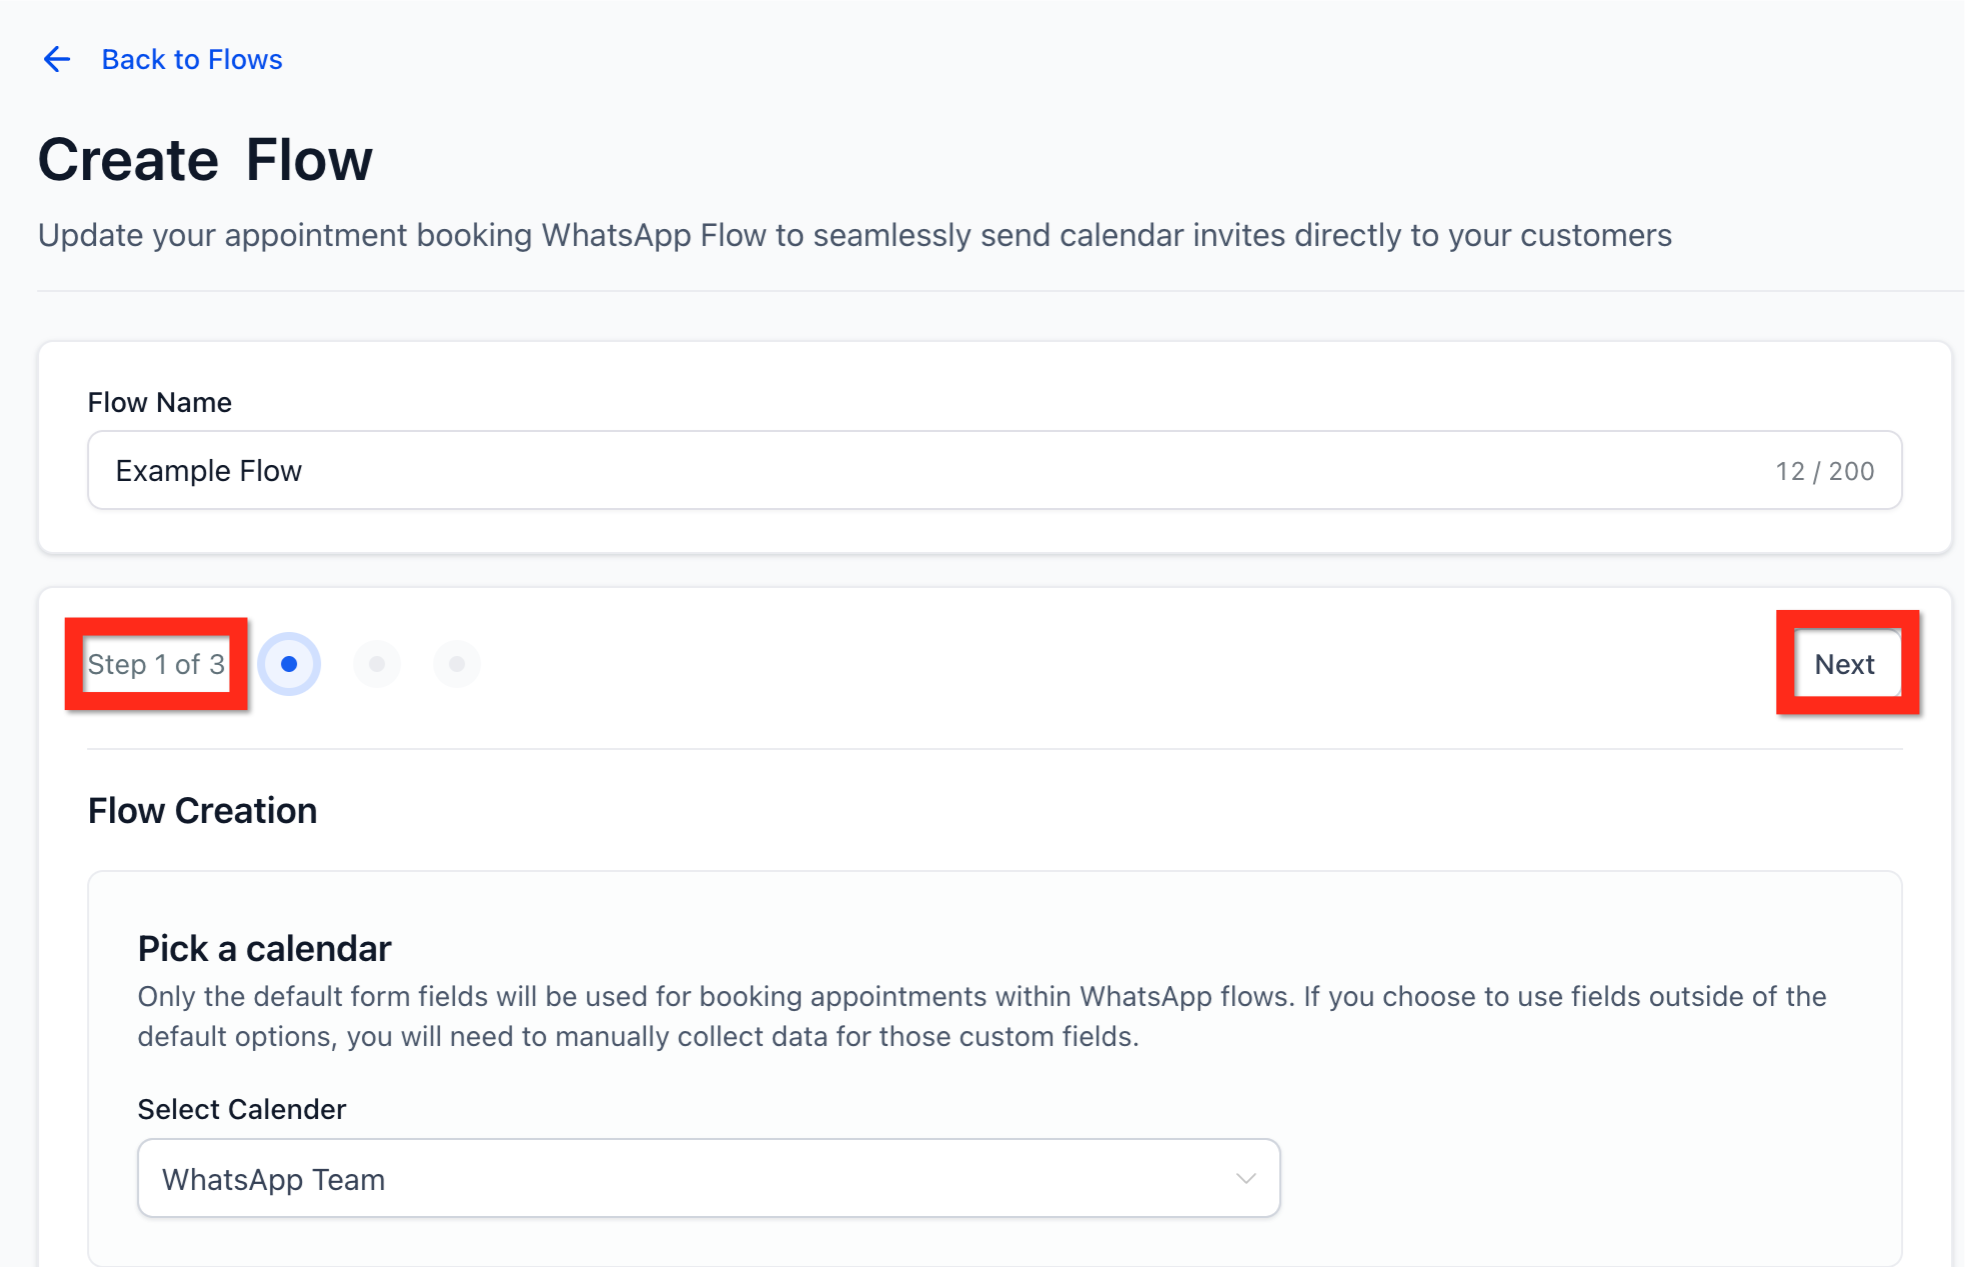
Creating a New Flow (Step-by-Step)
Building a flow is a guided, three-step process. Click the + Create Flow button to begin.
Step 1: Create Flow
- Enter a unique Flow Name to identify it.
- Use the Select Calendar dropdown to link the flow to a specific HighLevel calendar for appointment booking.
- Click Next.
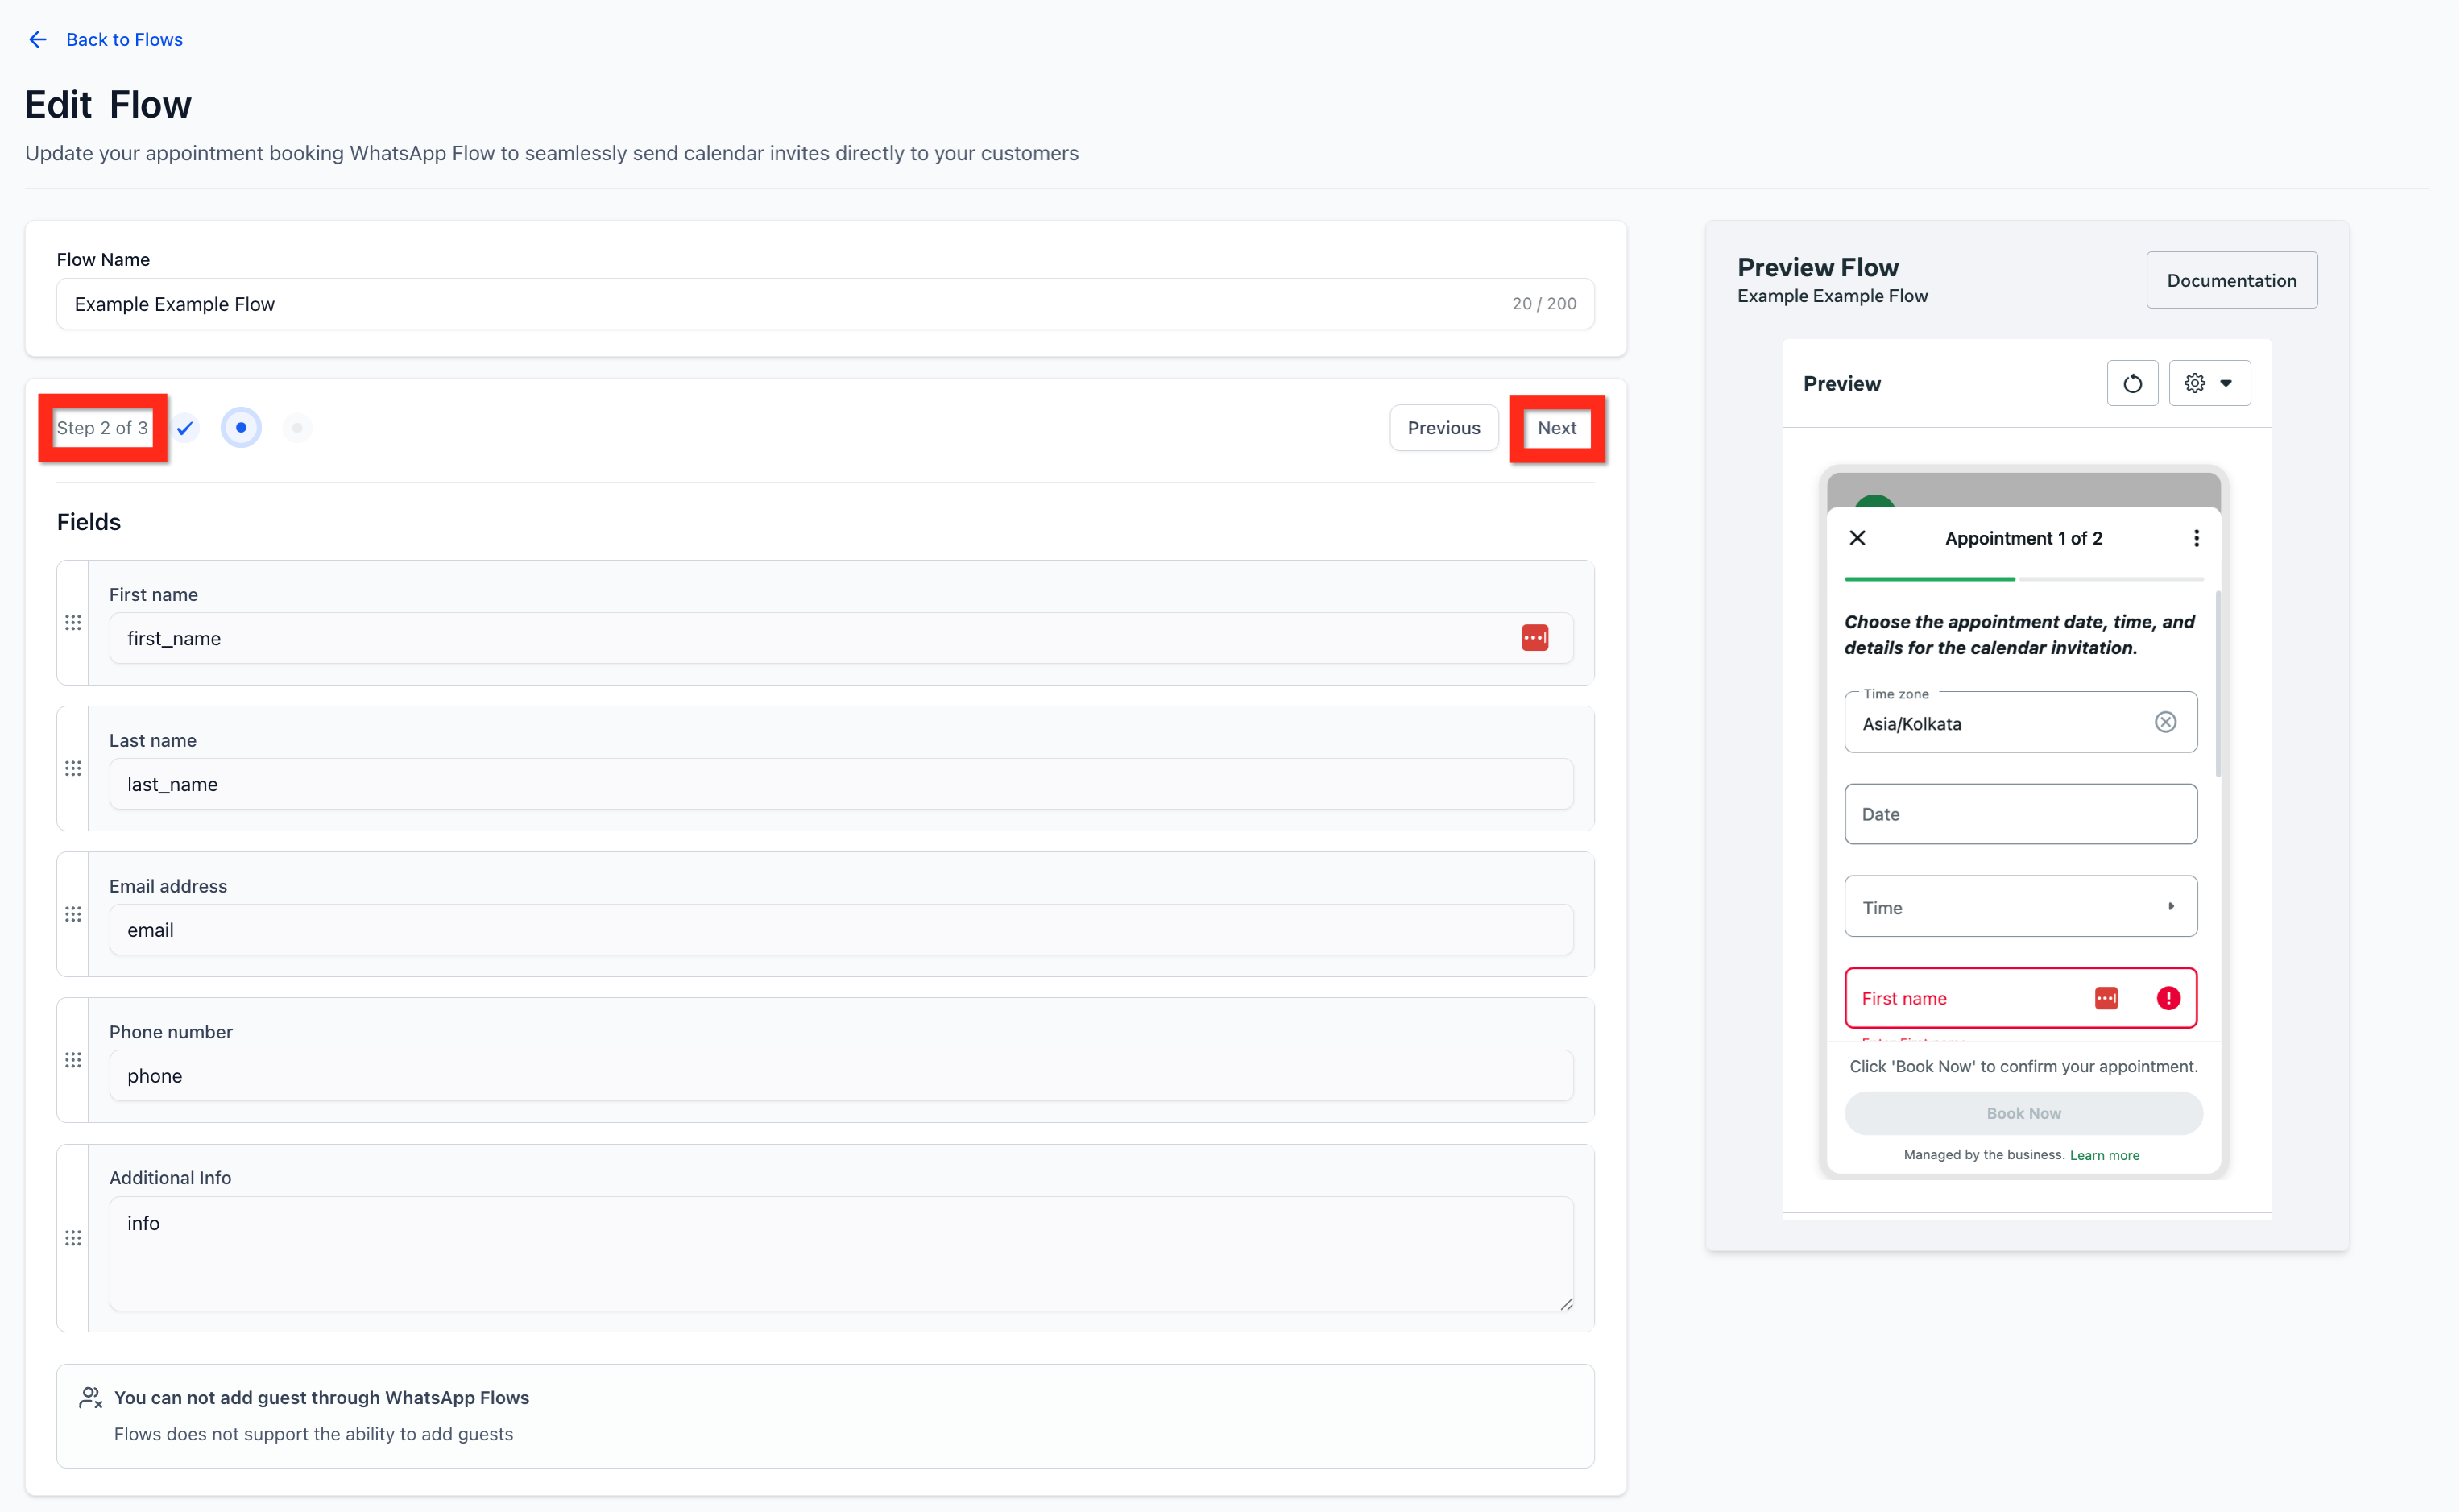
Step 2: Edit Flow
- In this step, you review the fields that the flow will ask the user to fill out (e.g., First name, Last name, Email address).
- A preview panel on the right shows how the flow will look to the user.
- Click Next.
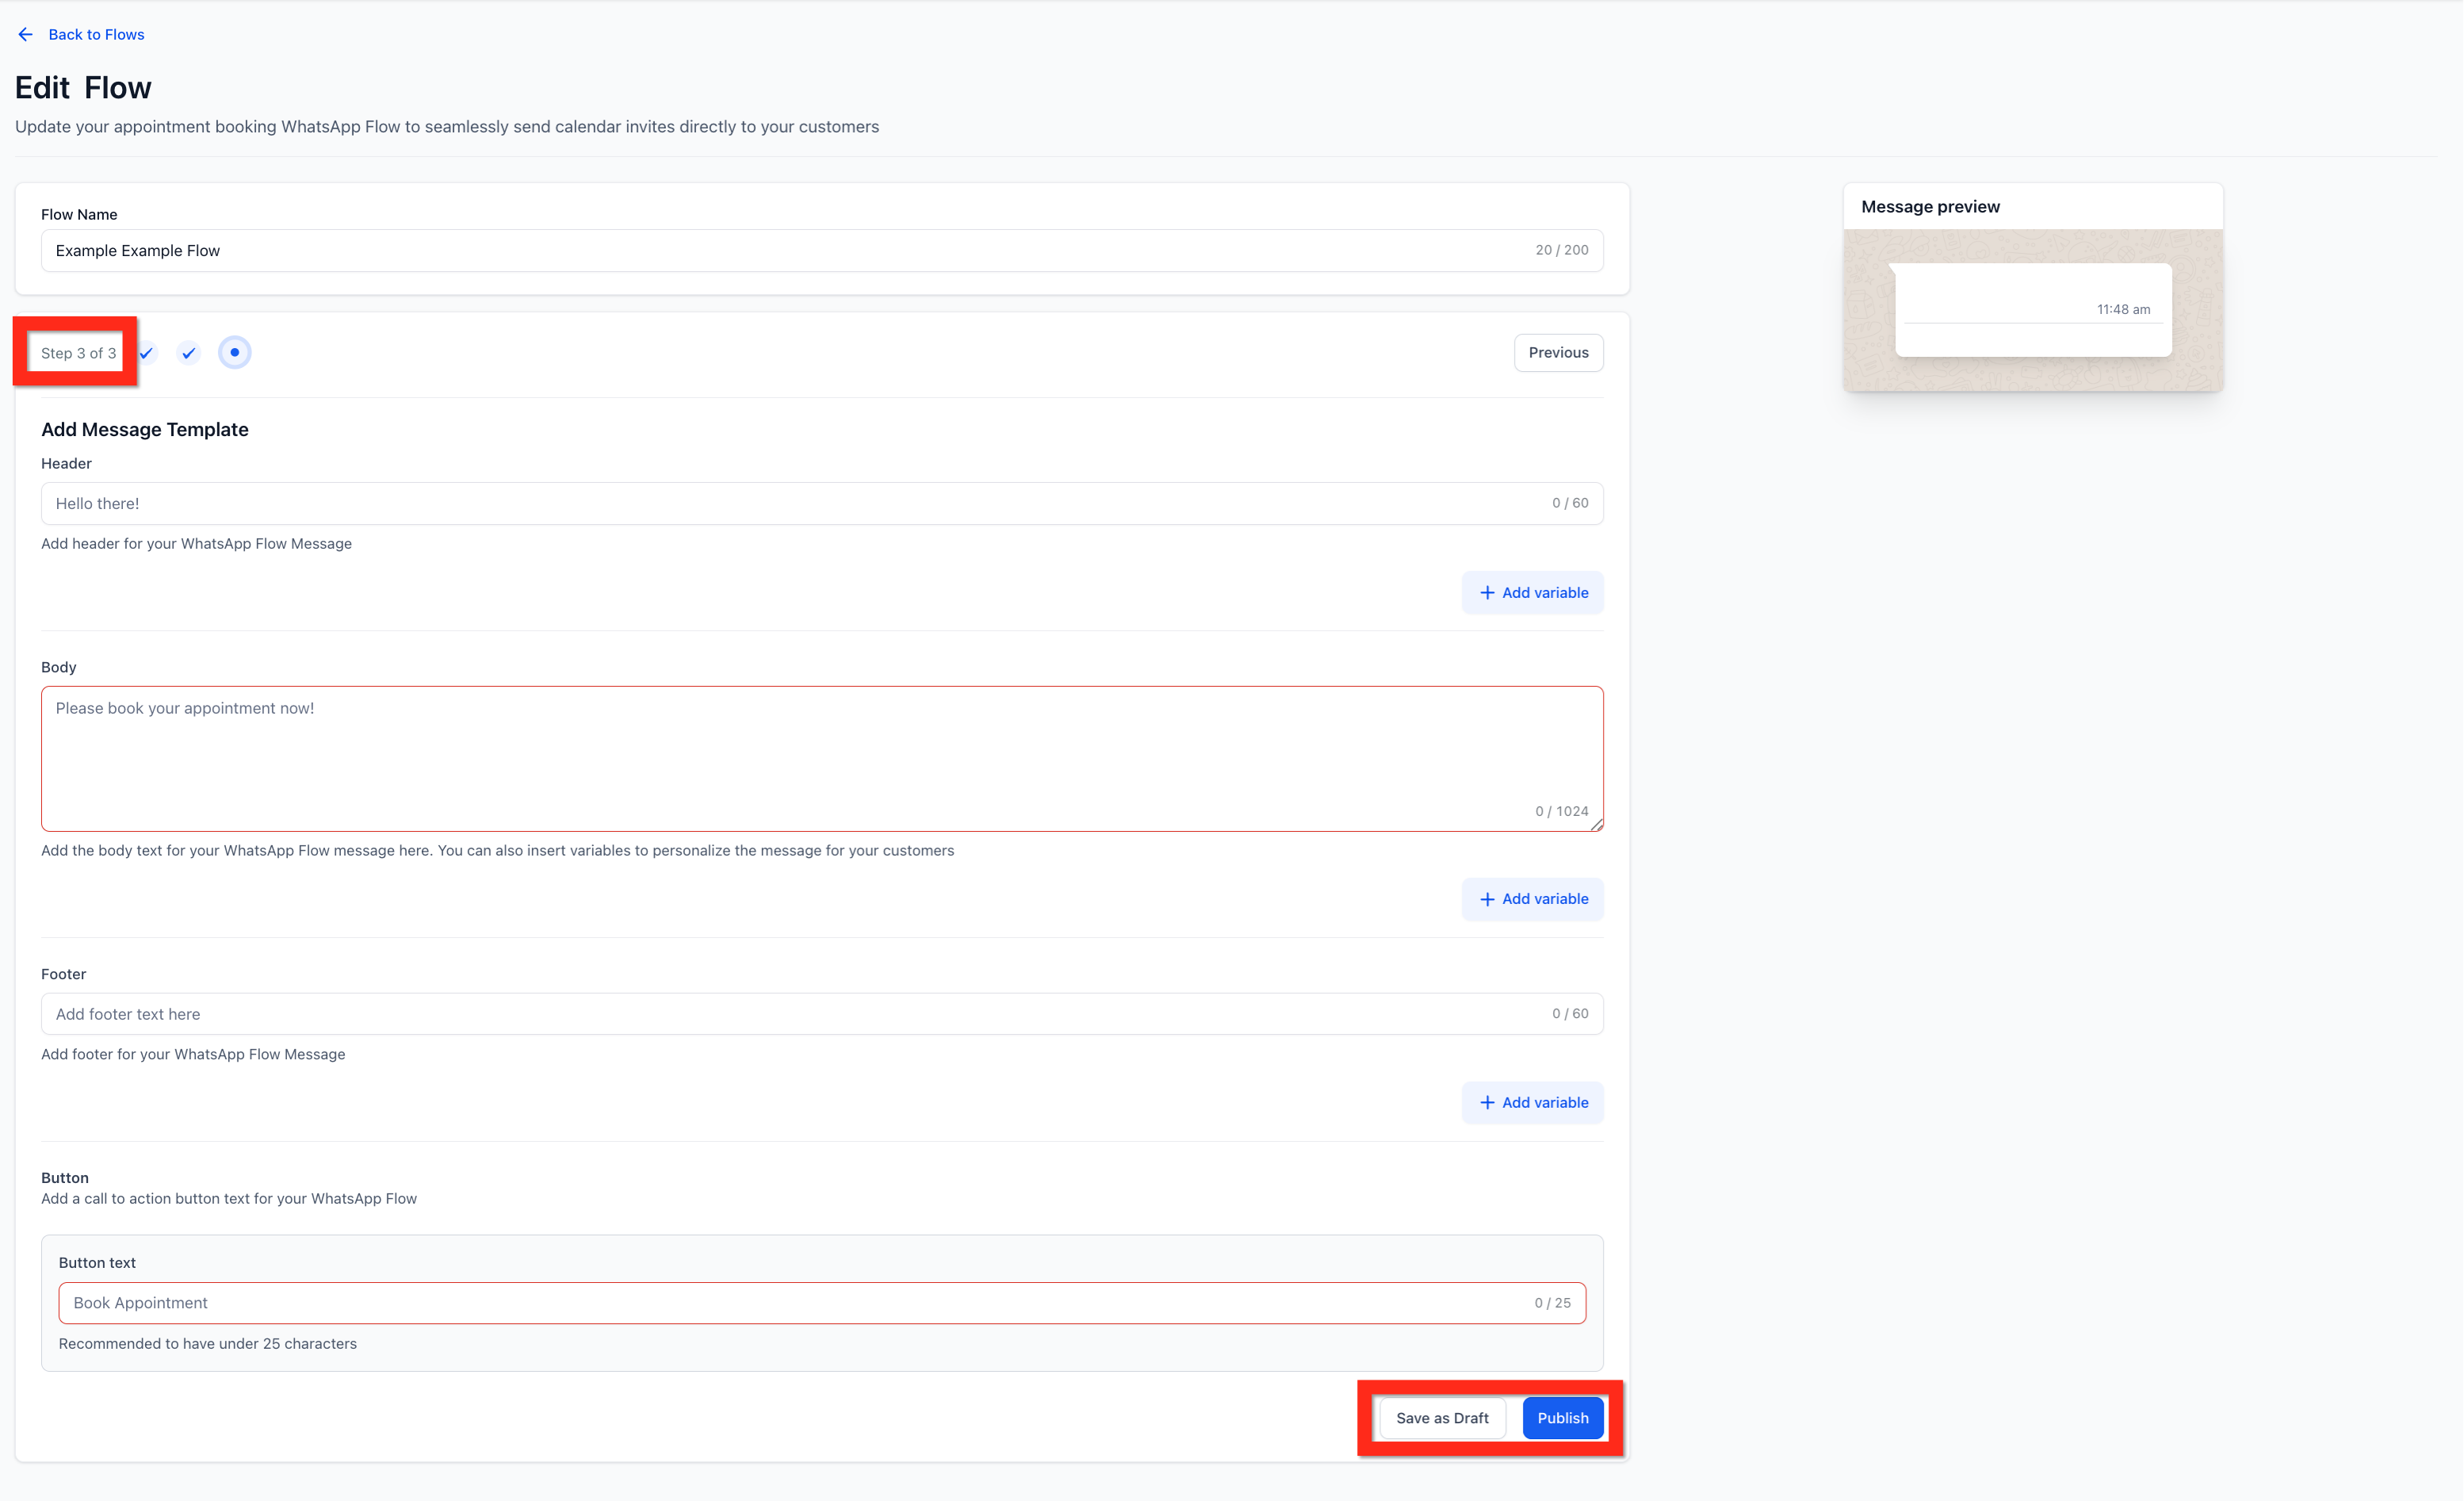
Step 3: Add Message Template
Here, you will create the message template that contains the button to launch this flow.
- Fill in the Header, Body, and Footer text for the message.
- Enter the Button text that the user will click to start the flow (e.g., "Book an Appointment").
- Click Save as Draft to save your progress or click Publish to submit the flow and its associated template for approval.
Frequently Asked Questions
Q: What is the difference between the 'Disconnect' and 'Cancel Subscription' options?
A: 'Disconnect' temporarily severs the connection between HighLevel and your WhatsApp Business Account, but your subscription and assets remain. 'Cancel Subscription' terminates your WhatsApp functionality.
Q: Why do I need to create message templates?
A: Meta's WhatsApp Business Policy requires that businesses use pre-approved message templates to initiate conversations with customers. This ensures a high-quality user experience and prevents spam.
Q: How long does it take for a template to be approved?
A: Template approval is handled by Meta and typically takes anywhere from a few minutes to 24 hours. You can see the status of your templates in the 'Templates' tab.
Q: Can I use a regular WhatsApp number for this integration?
A: No, this integration requires the WhatsApp Business Platform (API), which uses a phone number that is not tied to an active regular or WhatsApp Business app account. You can configure a new or existing number through the 'Numbers' tab.
Was this article helpful?
That’s Great!
Thank you for your feedback
Sorry! We couldn't be helpful
Thank you for your feedback
Feedback sent
We appreciate your effort and will try to fix the article