A2P Campaign Registration: Step-by-Step Guide
This guide walks you through A2P 10DLC Campaign registration in HighLevel, including how to choose between Chat Widget Setup and Manual Setup, select your messaging use case, complete consent requirements, and submit your Campaign for carrier review.
Campaign registration is required after Brand registration approval to send SMS messages from applicable standard 10-digit local phone numbers in the United States.
Before You Start
Your Brand must be eligible to continue into Campaign registration. Campaign registration is required after your Brand registration is approved.
If you are completing Brand and Campaign registration in one workflow, HighLevel will guide you into Campaign Details when the Brand portion is ready to proceed.
You must have an active HighLevel account, approved Brand registration, and a business website accessible to carriers for verification.
What is a Messaging Use Case?
Your messaging use case describes the primary purpose of the SMS messages you send. Carriers require accurate use-case classification to filter spam, enforce compliance, and maintain recipient trust.
Chat Widget Setup supports Marketing / Promotional, Informational / Non-Marketing, and Mixed. Select Mixed when one messaging program genuinely includes both promotional and informational messages. When Mixed is selected, HighLevel automatically sets the Campaign Use Case to Low Volume Mixed.
Review the A2P 10DLC Campaign Use Cases article before selecting a use case if your messaging includes more than one purpose or you are unsure which category applies.
Messaging Volume Options
HighLevel offers two messaging-volume options for standard Brand Campaigns. Your selection determines daily throughput capacity and associated fees.
Low Volume Standard Brand is a messaging-volume option and is different from the Low Volume Mixed Campaign use case. When Mixed is selected in Chat Widget Setup, the Campaign Use Case is automatically set to Low Volume Mixed. Refer to current HighLevel documentation for exact daily segment limits and fees.
Chat Widget Setup vs. Manual Setup
HighLevel offers two paths to complete Campaign registration. Choose the method that fits your consent workflow and compliance requirements.
Chat Widget Setup opens by default and uses a HighLevel-generated opt-in widget with pre-filled Campaign information to simplify registration. The guided flow supports Marketing / Promotional, Informational / Non-Marketing, and Mixed messaging programs.
If your business collects SMS consent through another method, switch to Manual Setup. Manual Setup supports consent methods such as existing website forms, paper forms, lead forms, QR codes, kiosks, and verbal consent.
If you switch to Manual Setup and later decide to use the Chat Widget, you can return to Chat Widget Setup from the Campaign details step panel.
The remainder of this guide provides instructions for both paths. Follow the steps that correspond to your selected setup method.
How to Access Campaign Registration
There are two ways to access Campaign registration. The correct starting point depends on whether you are completing registration for the first time or adding a Campaign to an existing approved Brand.
If you are completing A2P registration for the first time, you may continue into Campaign Details after completing the Brand Registration steps.
If your Brand is already approved and you want to create another Campaign, start from Trust Center.
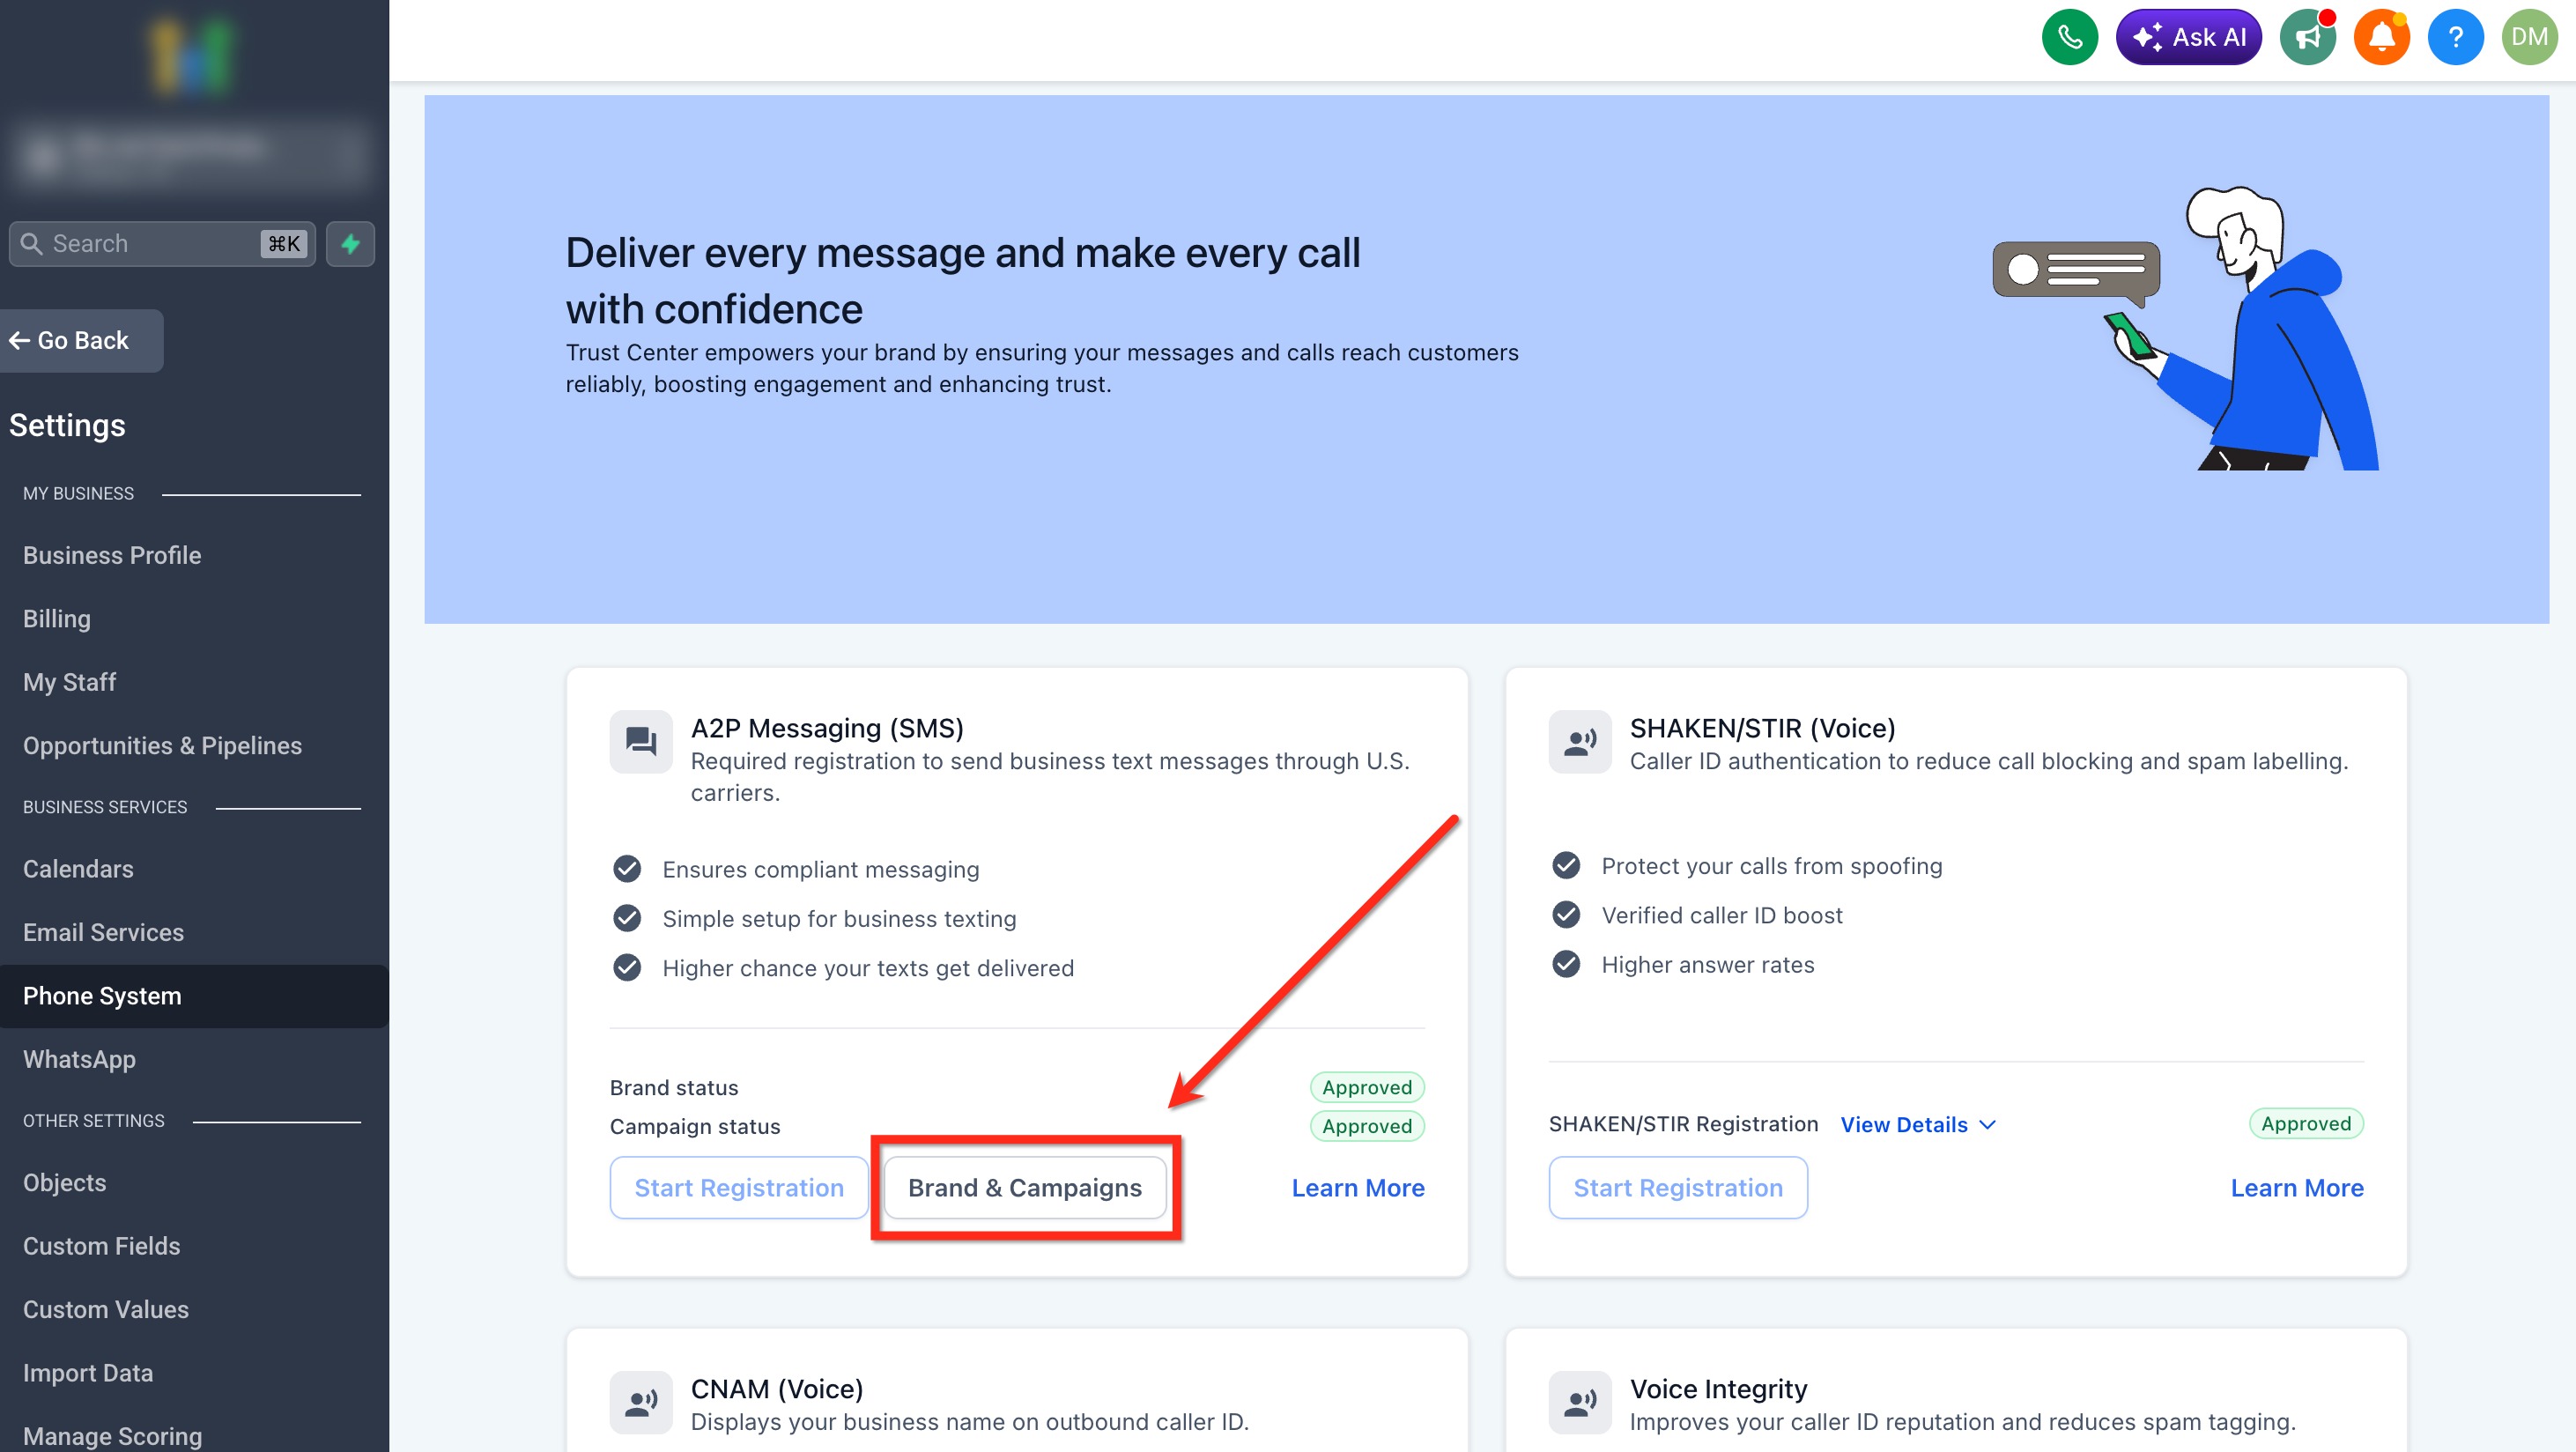
Navigate to Settings > Phone System > Trust Center. In the A2P Messaging (SMS) card, click Brand & Campaigns.
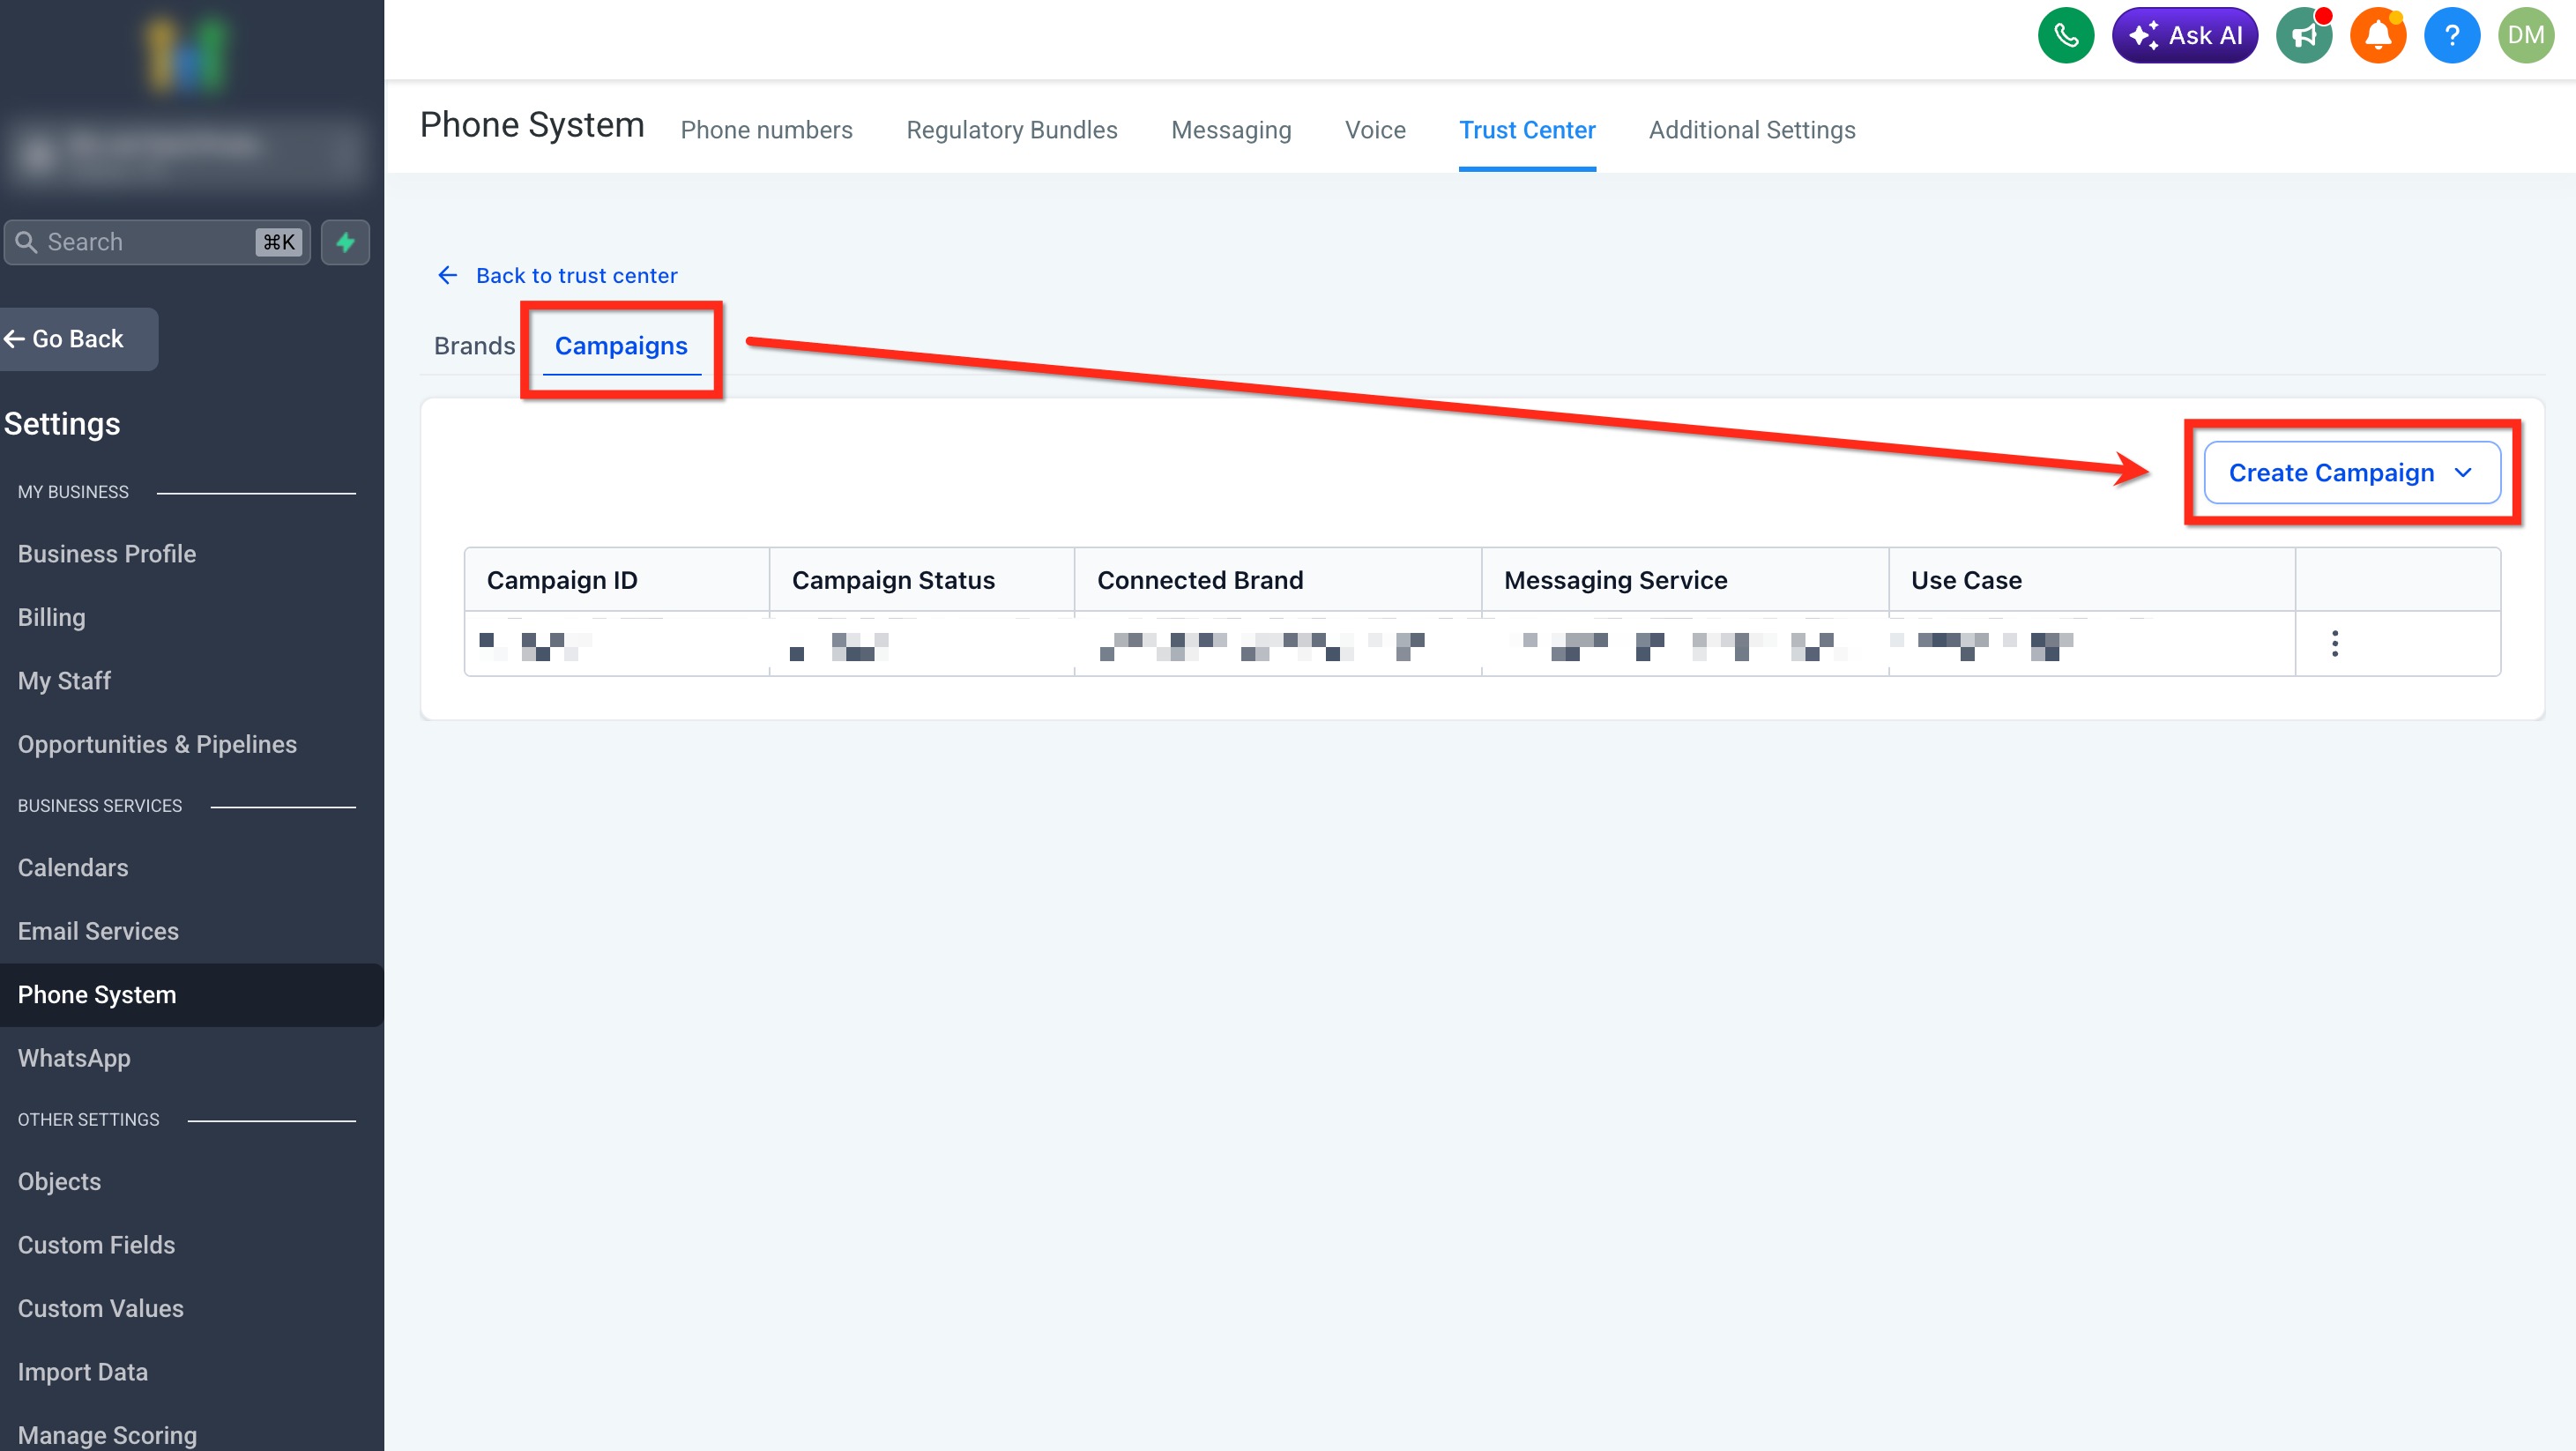
Open the Campaigns tab, then click Create Campaign. From the dropdown, select the Brand you want to create the Campaign for. After selecting the Brand, you will enter the Campaign setup flow described in this article.
How to Register an A2P Campaign
After accessing Campaign registration, complete the Campaign setup steps below. Your Brand type, messaging volume, use case, and consent method determine the information required during registration.
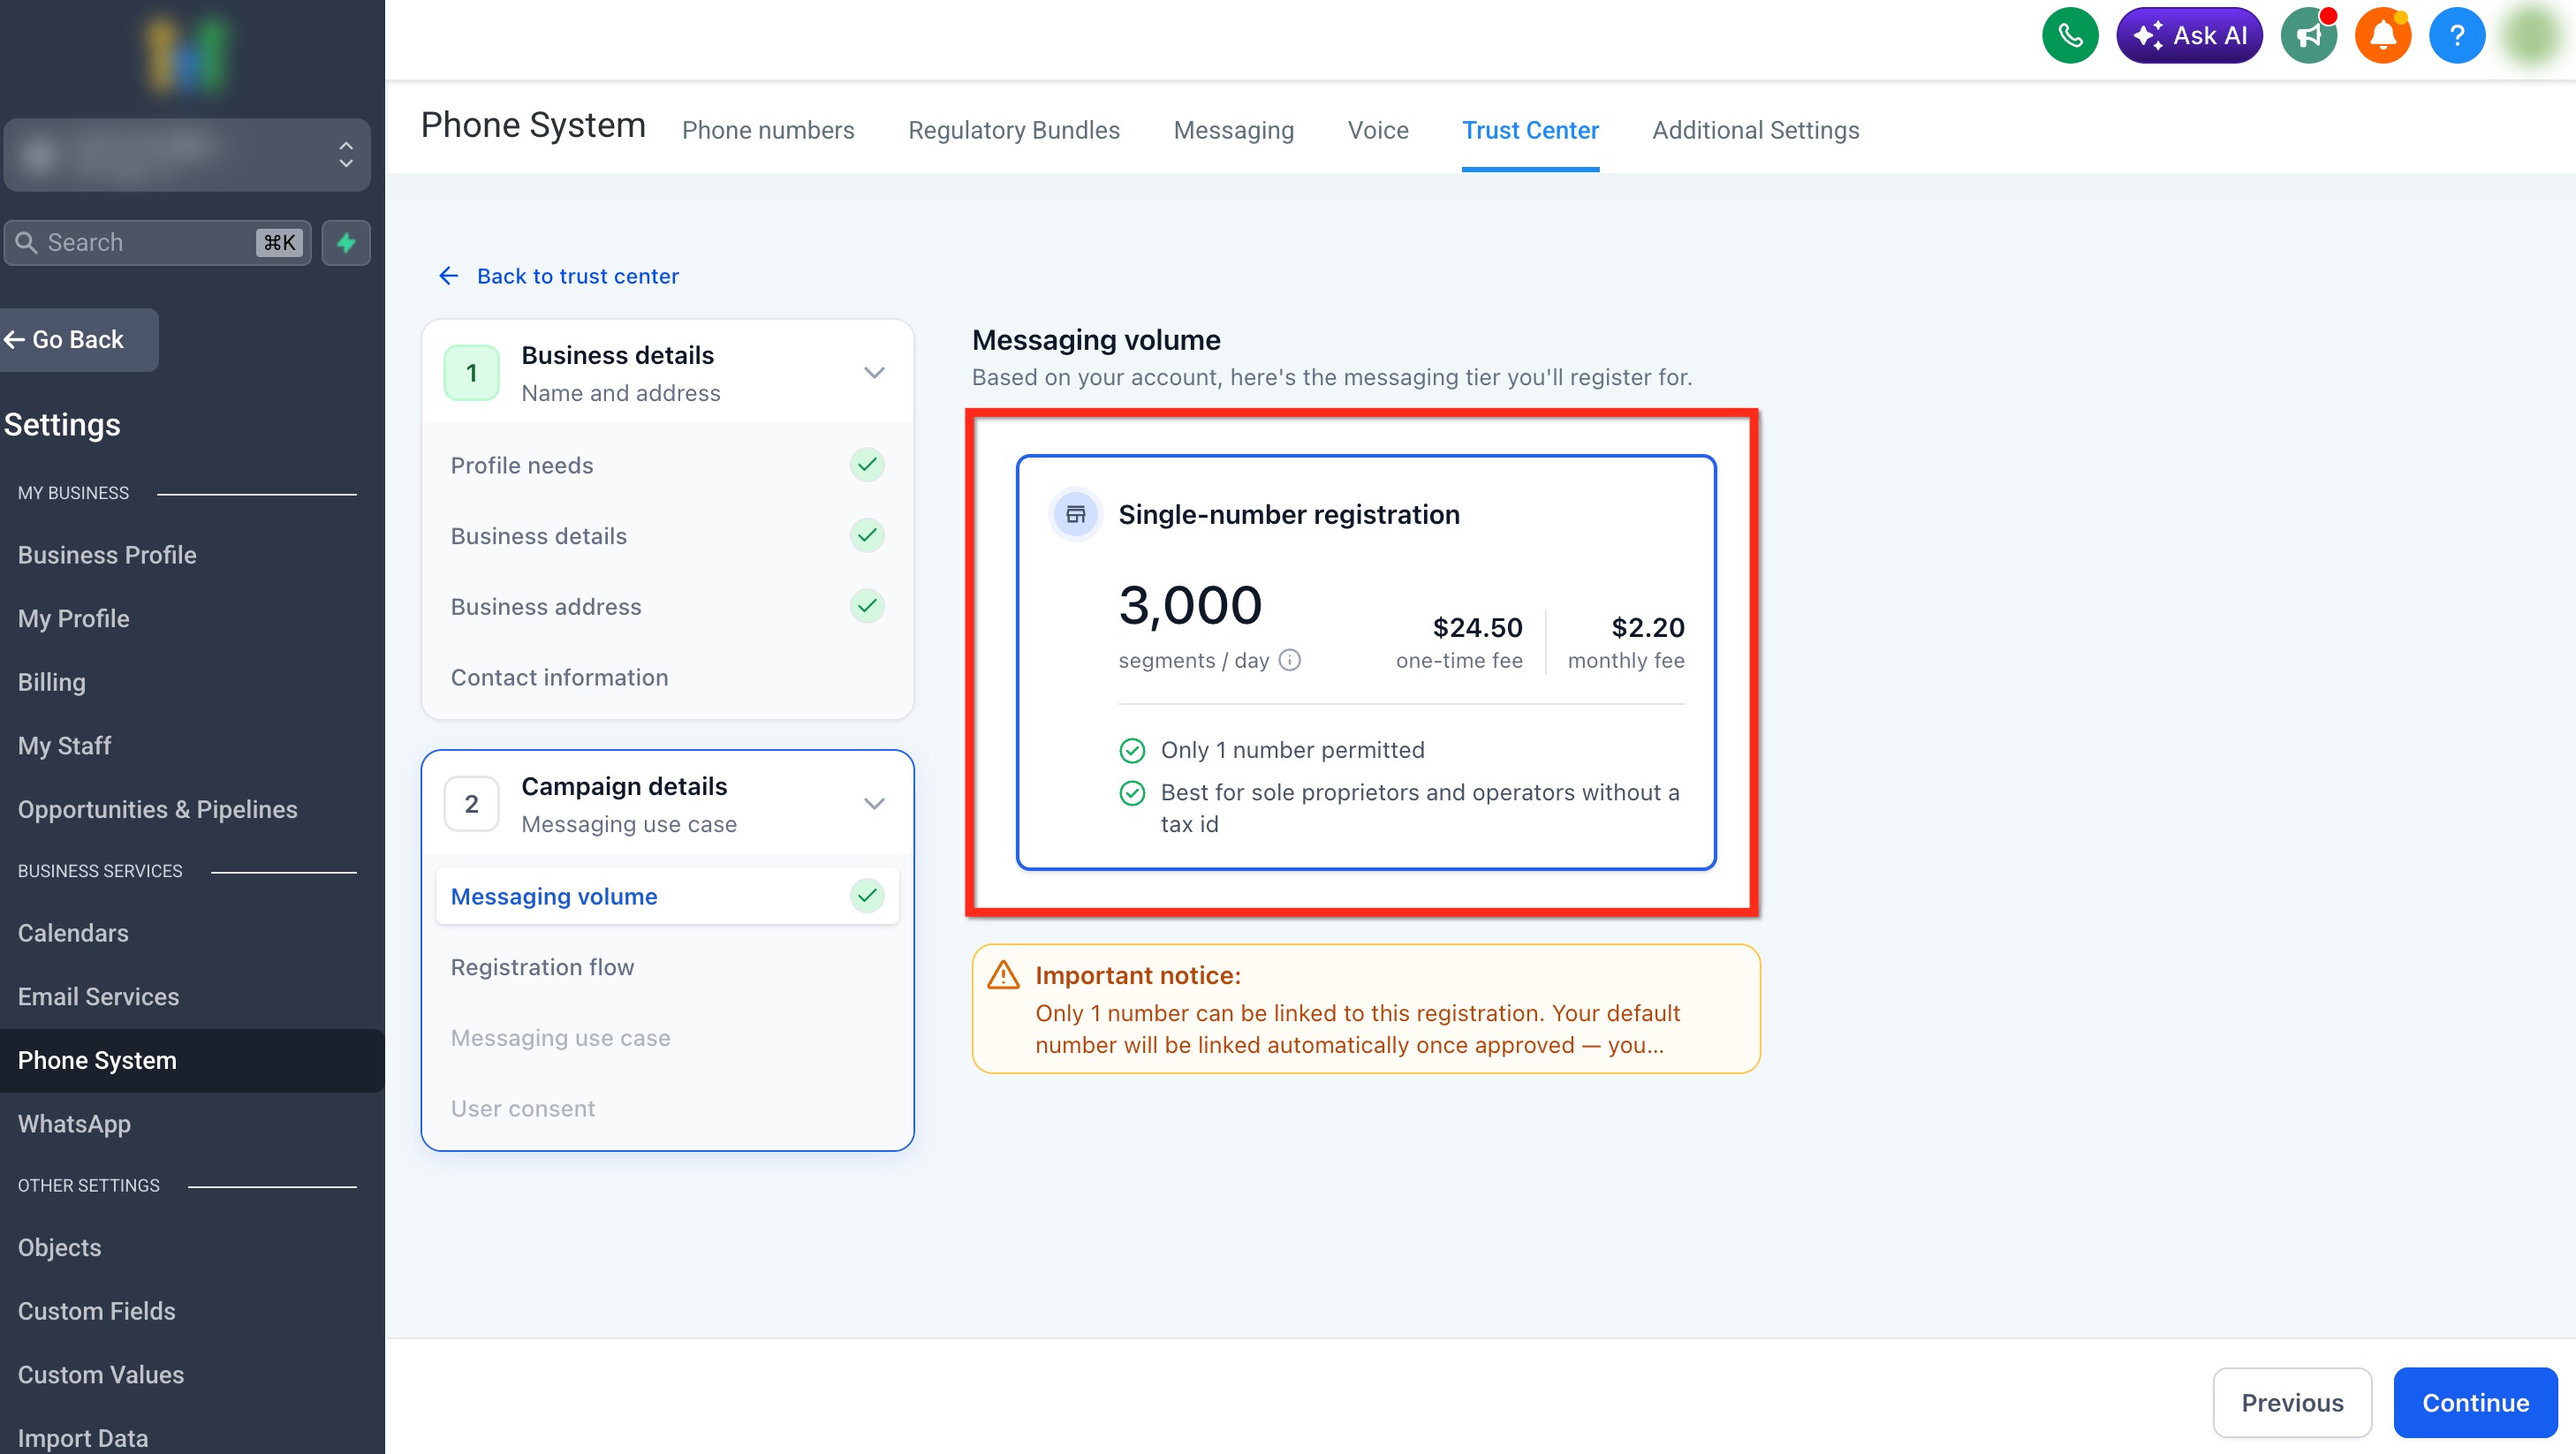
The first step in Campaign details is selecting your messaging volume. The available options depend on your Brand type.
If you have a Tax ID, choose the messaging volume option that best matches your business texting needs.
*For specific pricing information, see: A2P 10DLC Messaging Fees: Registration, Monthly, and Carrier Costs.
If you do not have a Tax ID, the only available option is Single-number registration. Only one number can be linked to this registration. You can change the number later.
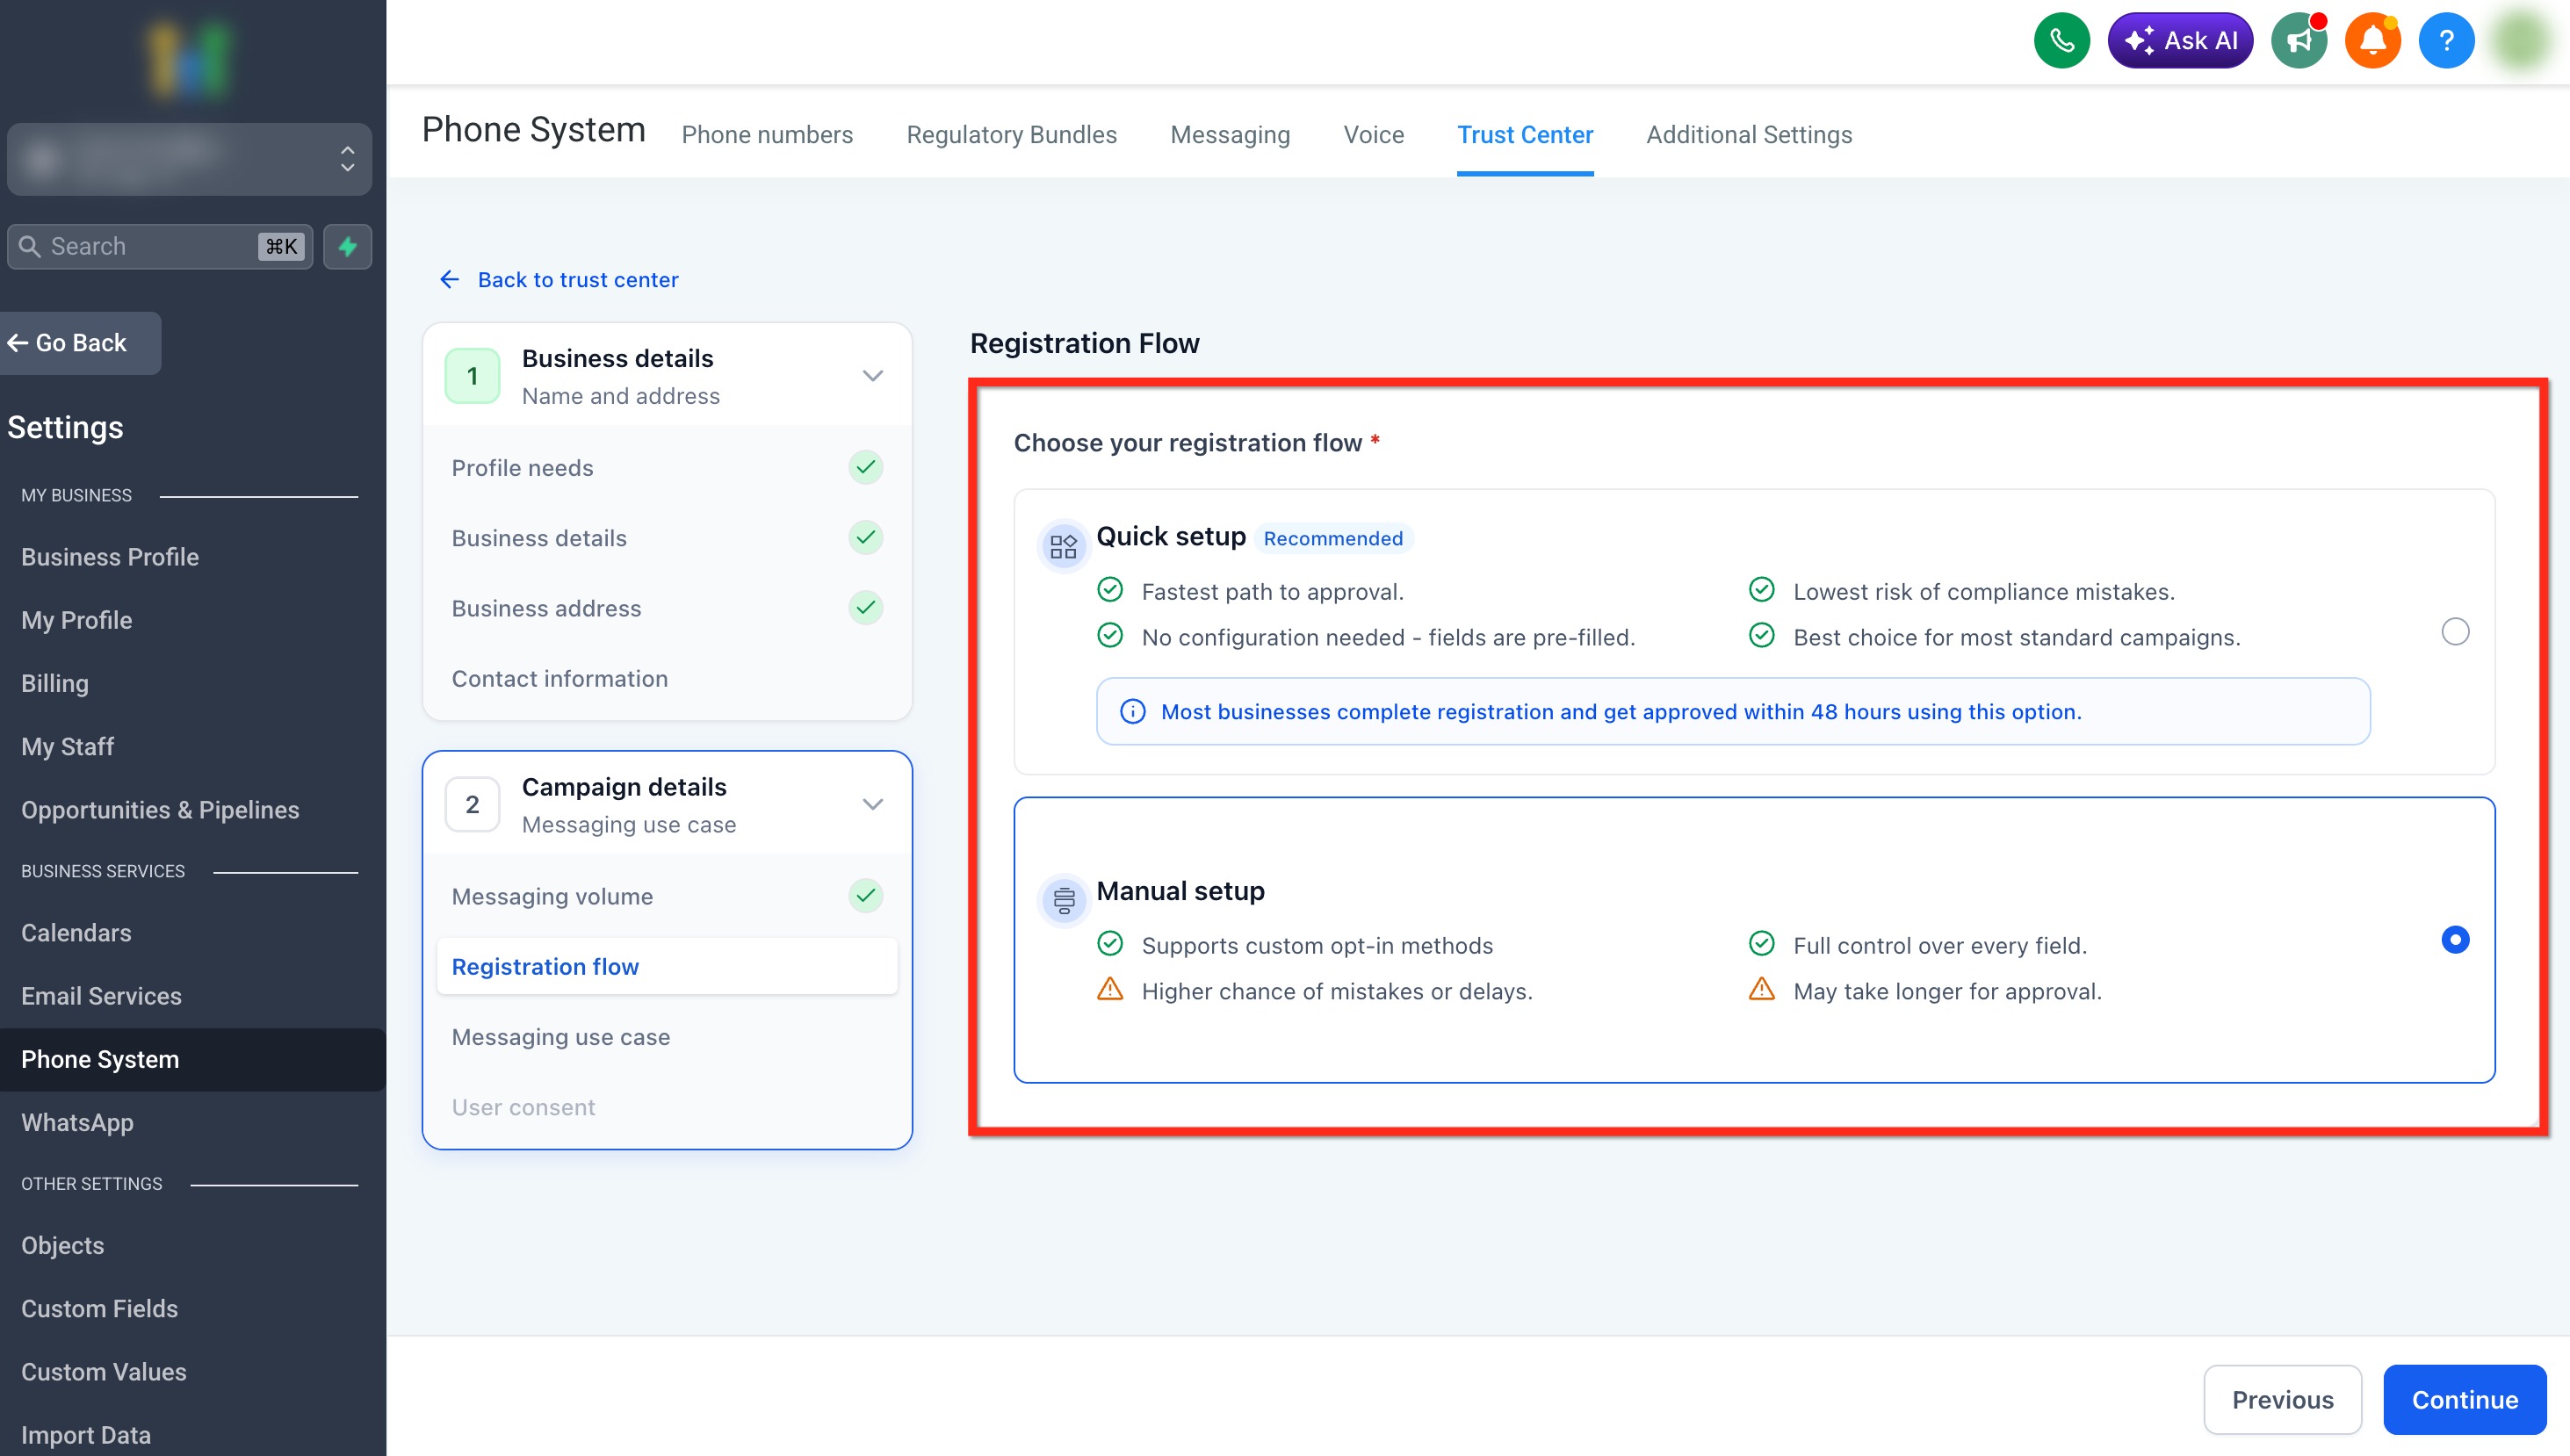
Campaign registration opens in Chat Widget Setup by default after you complete Brand registration. Chat Widget Setup uses a HighLevel-generated opt-in widget and pre-fills Campaign information to simplify registration.
If your business collects SMS consent through another method, select Switch to manual setup from the Chat Widget Setup screen. Manual Setup lets you provide your existing consent method and Campaign information.
You can return to Chat Widget Setup from Manual Setup by selecting Chat widget setup — recommended in the Campaign details step panel.
If you are using Chat Widget Setup, continue to Step 3A: Complete Chat Widget Setup.
If you selected Manual Setup, continue to Step 3B: Complete Manual Setup.
Complete Chat Widget Setup
Messaging Use Case, Widget Setup, and Compliance
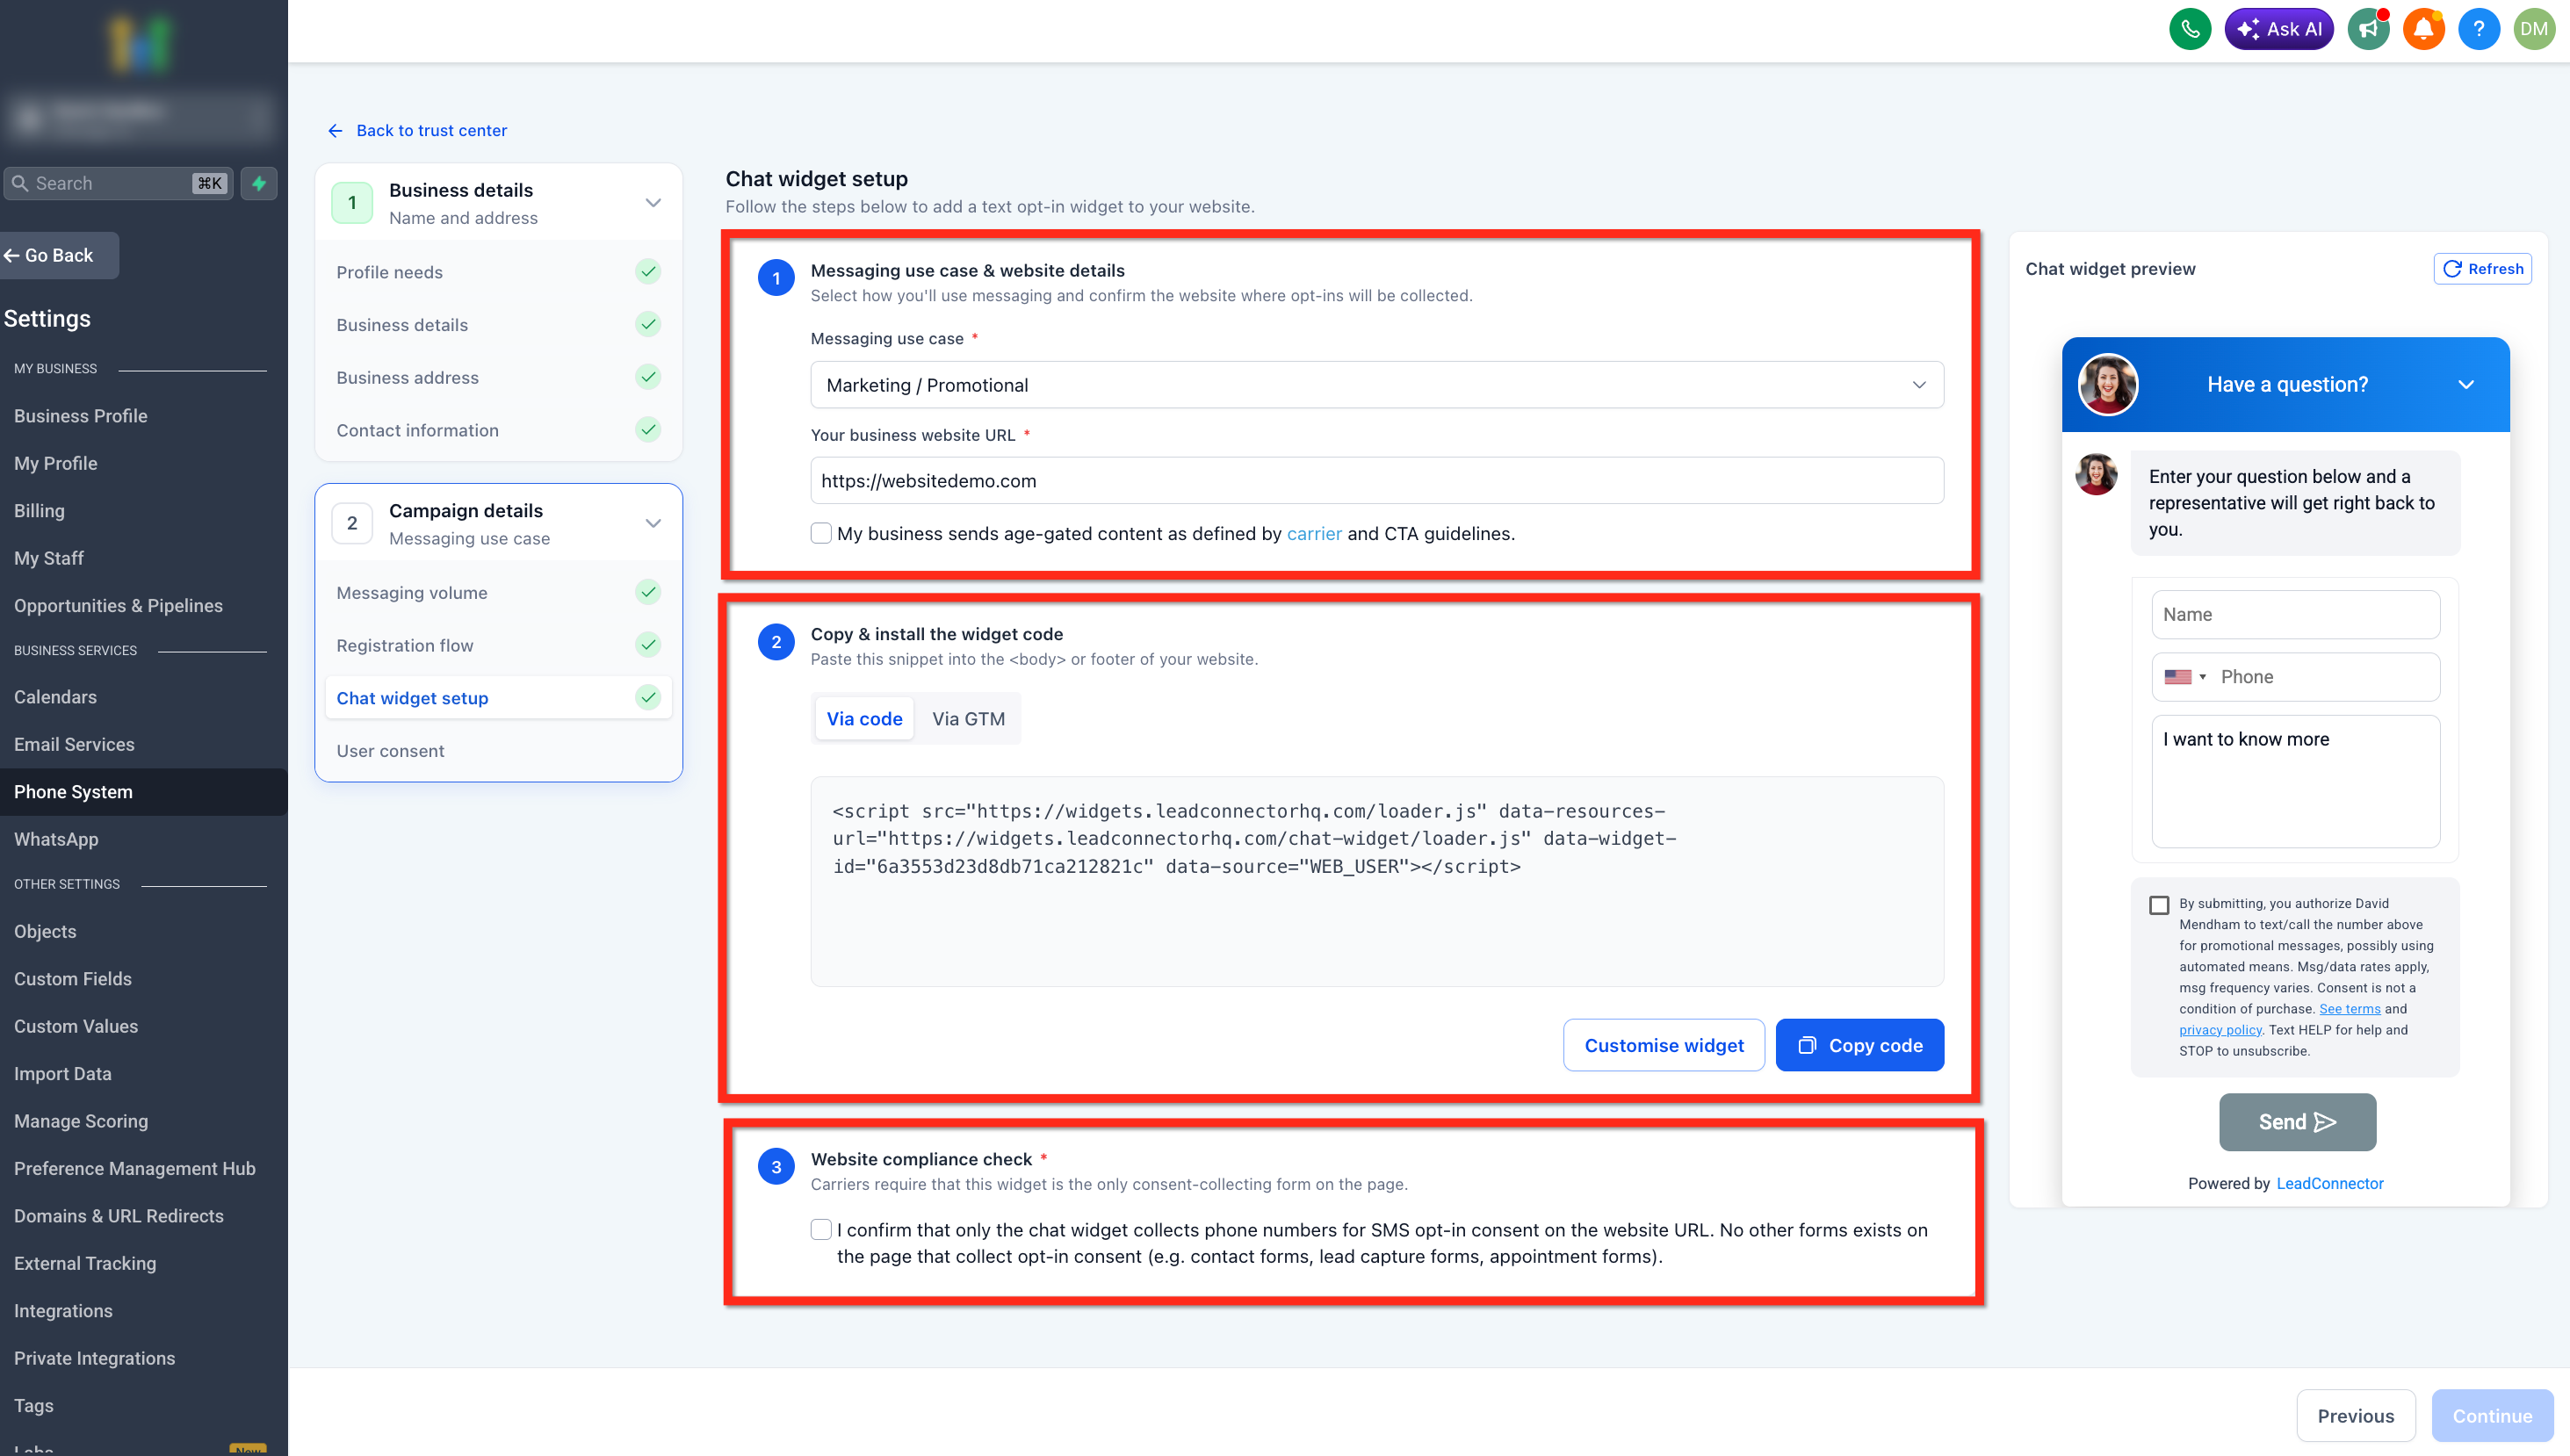
Chat Widget Setup combines messaging-use-case selection, website information, widget installation, and consent configuration into a guided registration experience.
- Messaging use case:Choose the option that accurately represents your messaging program:
- Marketing / Promotional for promotional messaging.
- Informational / Non-Marketing for transactional or informational messaging.
- Mixed when the same messaging program includes both promotional and informational communication.
- When Mixed is selected, HighLevel automatically sets the Campaign Use Case to Low Volume Mixed.
- Your business website URL: Enter the website where users will provide consent to receive messages. This should be a live, publicly accessible site that represents your business and matches the information provided in your Brand registration. The website should clearly display your business name and contact details.
- Age-gated content checkbox: Select this option only if your business sends age-restricted content.
Using Mixed? For additional details about the Mixed option, Low Volume Mixed assignment, and the generated dual-consent experience, see Mixed Use-Case Support for Chat Widget Flow.
Copy the widget code provided in Chat Widget Setup and install it on your website. Click Copy code, then paste the snippet into the <body> or footer section of your website. If needed, use Customize widget to adjust supported appearance settings before installation.
Make sure the widget is fully installed and visible on your website before continuing.
The Chat Widget should be the only form on the submitted page collecting SMS consent.
Do not place the widget on a submitted page that also contains another SMS opt-in form, such as a Contact Form, Lead Capture Form, or Appointment Form.
Switch to Manual Setup
If your business collects SMS consent through a method other than the Chat Widget, select Switch to manual setup below the Chat Widget Setup screen. Use Manual Setup when you need to provide a different approved consent method.
For more detailed guidance on compliance requirements and examples, see A2P 10DLC Campaign Approval Best Practices.
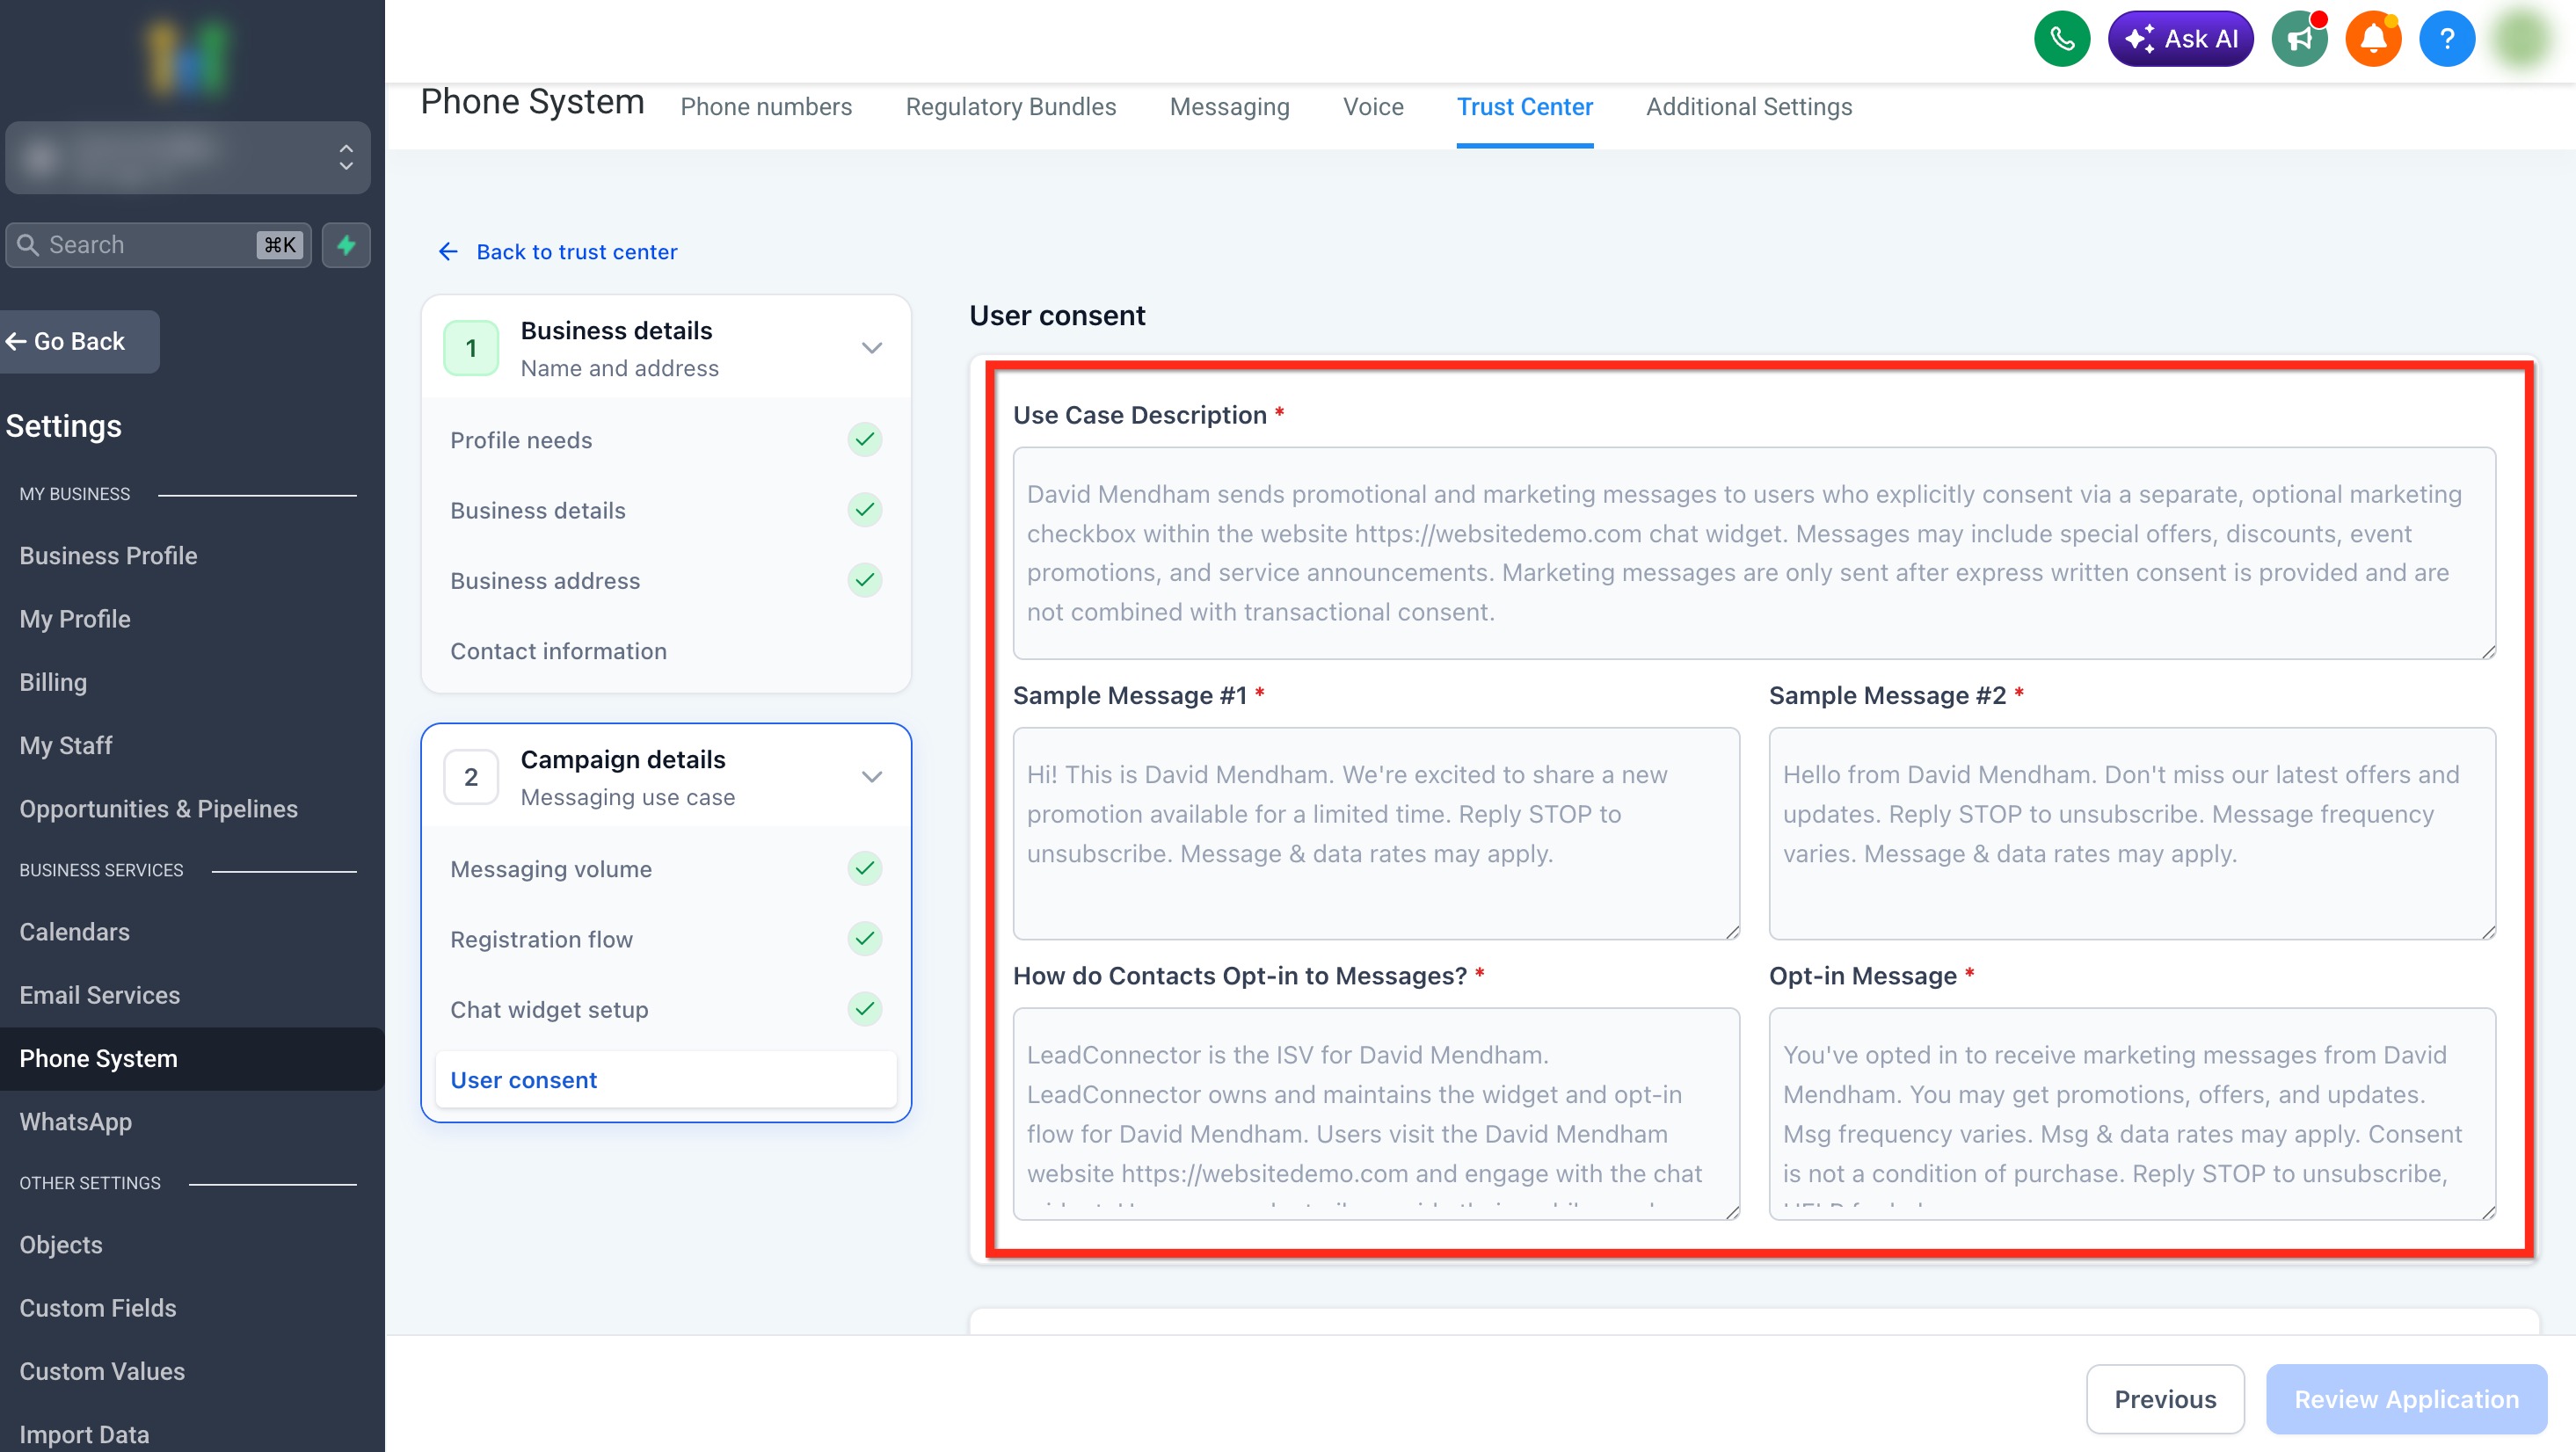
After completing Chat Widget Setup, HighLevel automatically fills in the inputs for Use Case Description, Sample Message #1, Sample Message #2, How do Contacts Opt-in to Messages, and the Opt-in Message.
If Mixed is selected, the generated Chat Widget includes two independent consent checkboxes: one for informational/transactional messaging and one for marketing/promotional messaging. Neither checkbox is pre-selected, and each consent choice includes its own locked disclosure content.
Review the generated information carefully to ensure it matches your business and messaging intent.
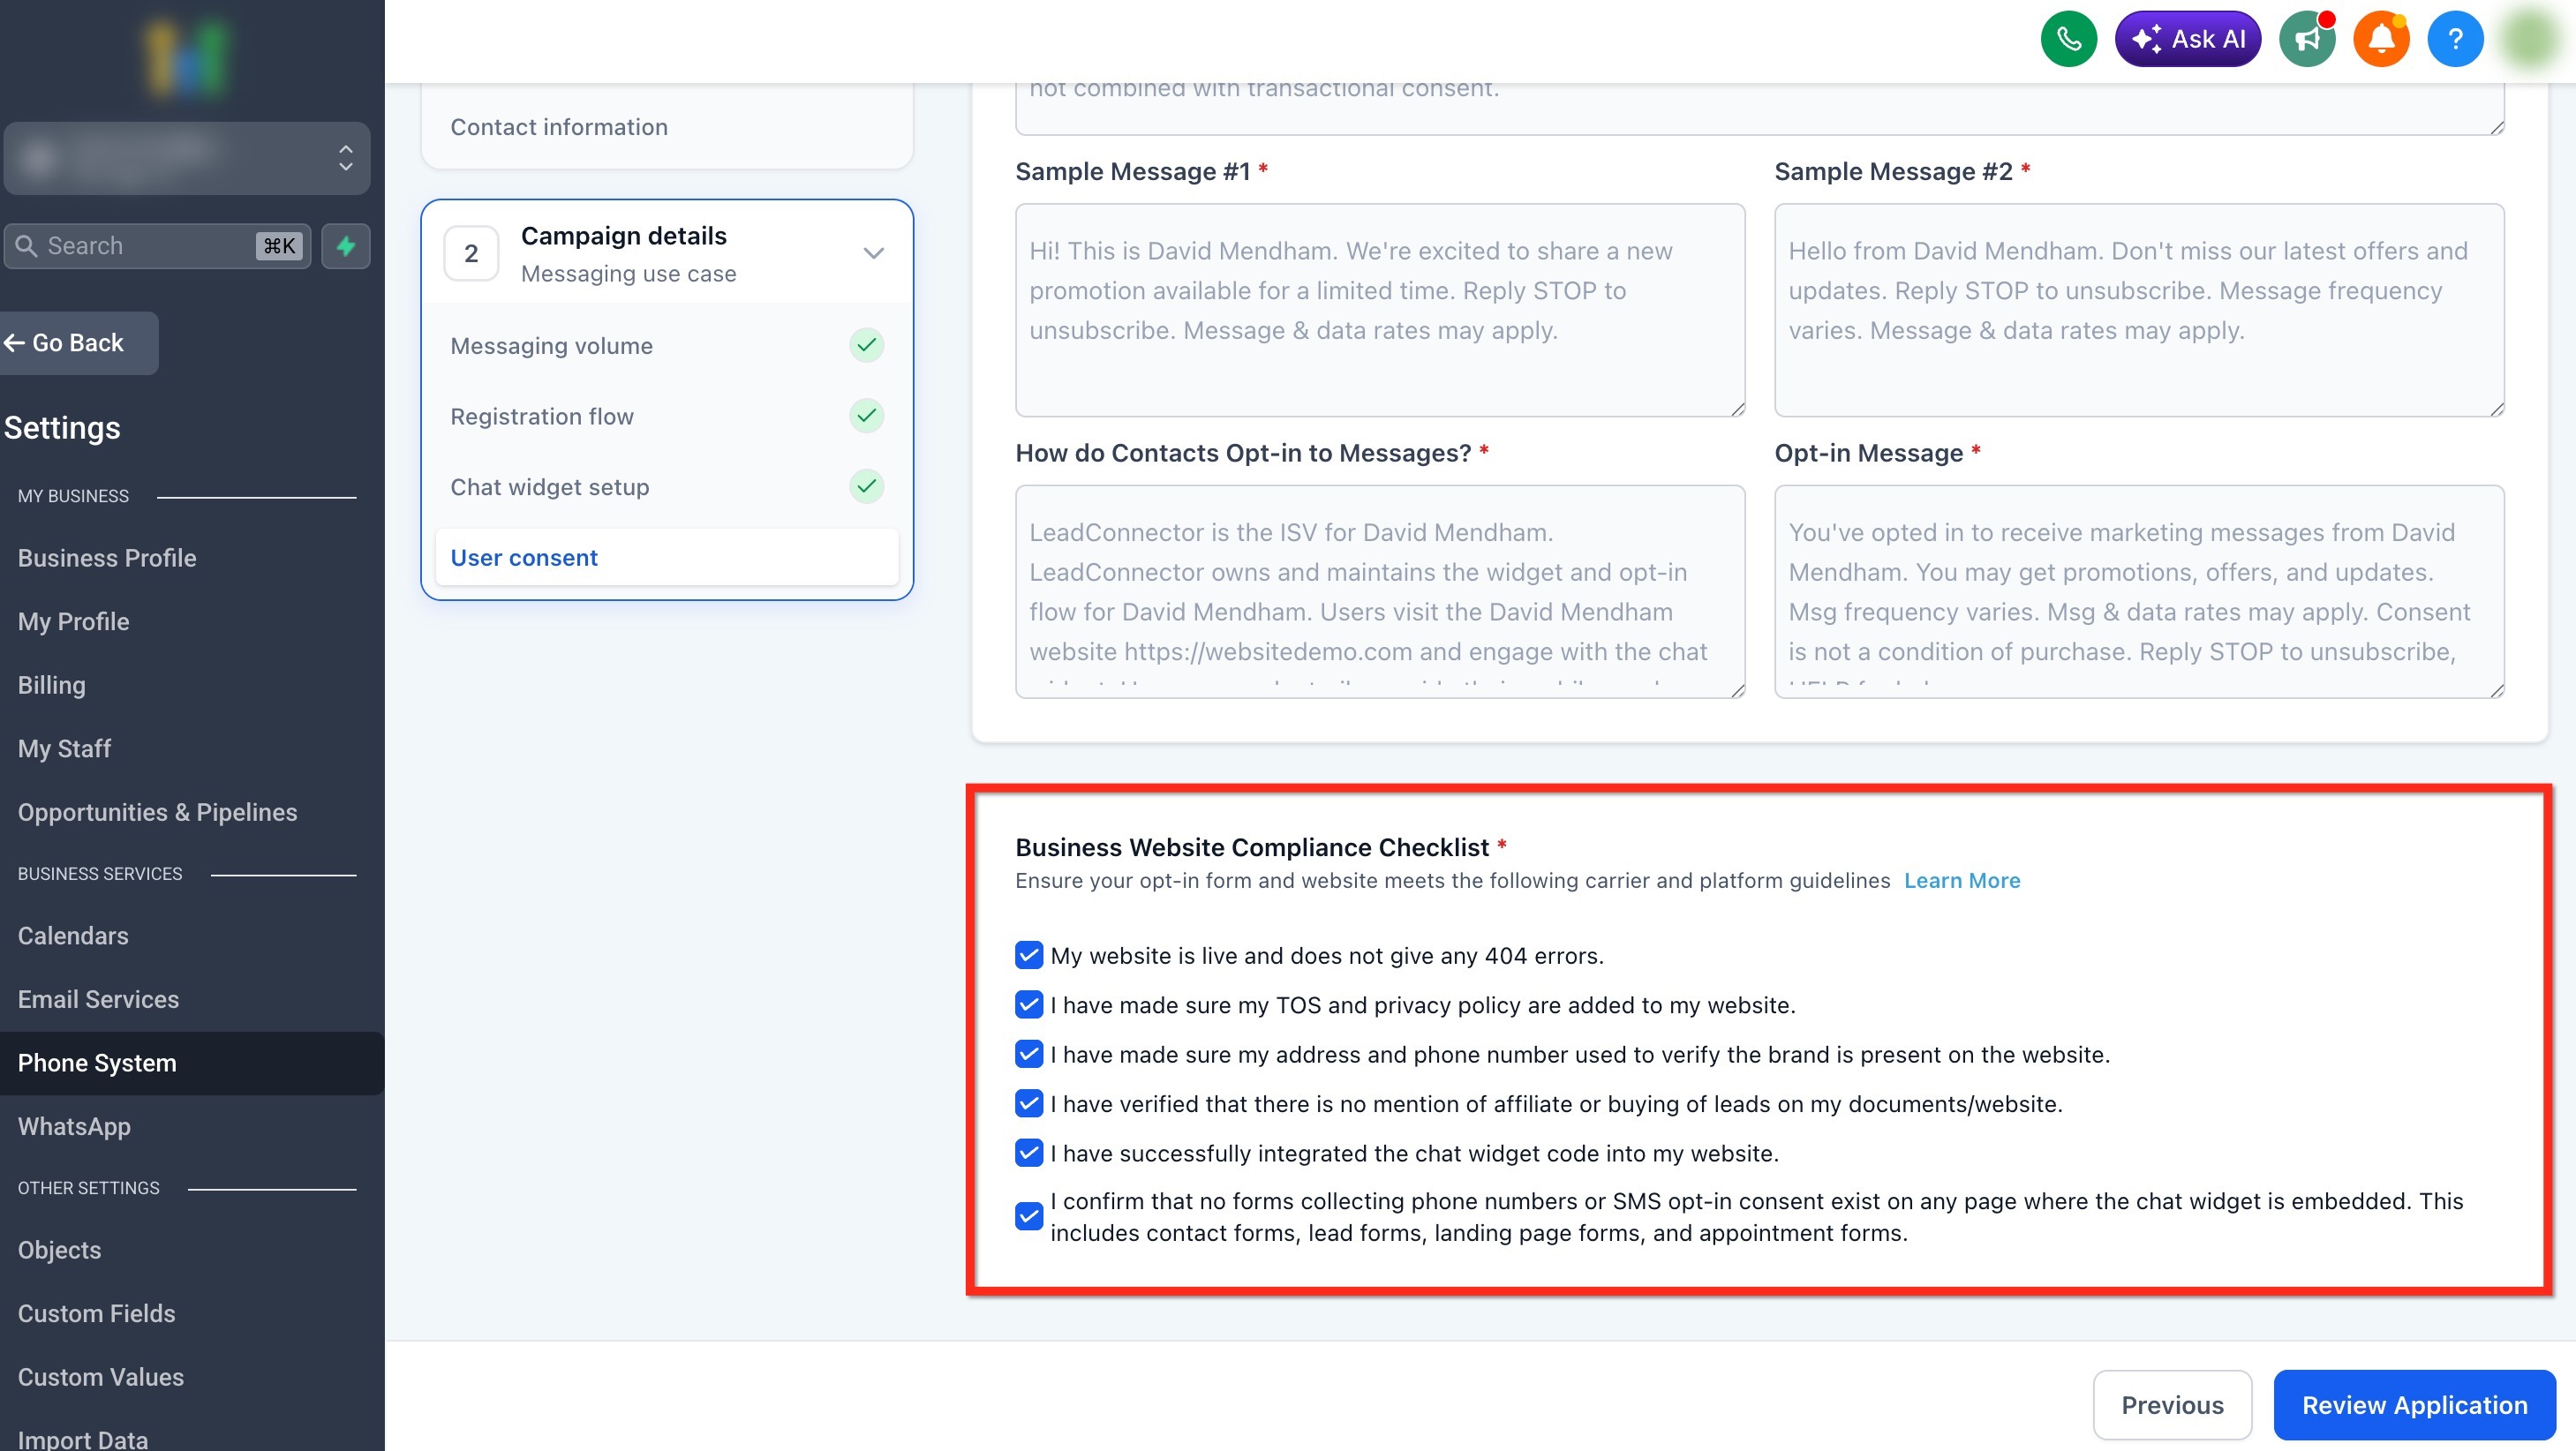
The website compliance checklist helps confirm that the submitted business information, consent experience, and required website content are accessible before the Campaign moves to final review.
After reviewing all checklist items, select the blue Review Application button, then continue to Step 6.
Complete Manual Setup
Use Manual Setup when your business collects consent through a method other than the HighLevel Chat Widget. From Chat Widget Setup, select Switch to manual setup to continue with the Manual Setup flow.
Complete the required Campaign details and consent information for your existing opt-in method.
For Chat Widget Setup, see Step 3A above.
Tip: To return to Chat Widget Setup, select Chat widget setup — recommended from the Campaign details step panel.
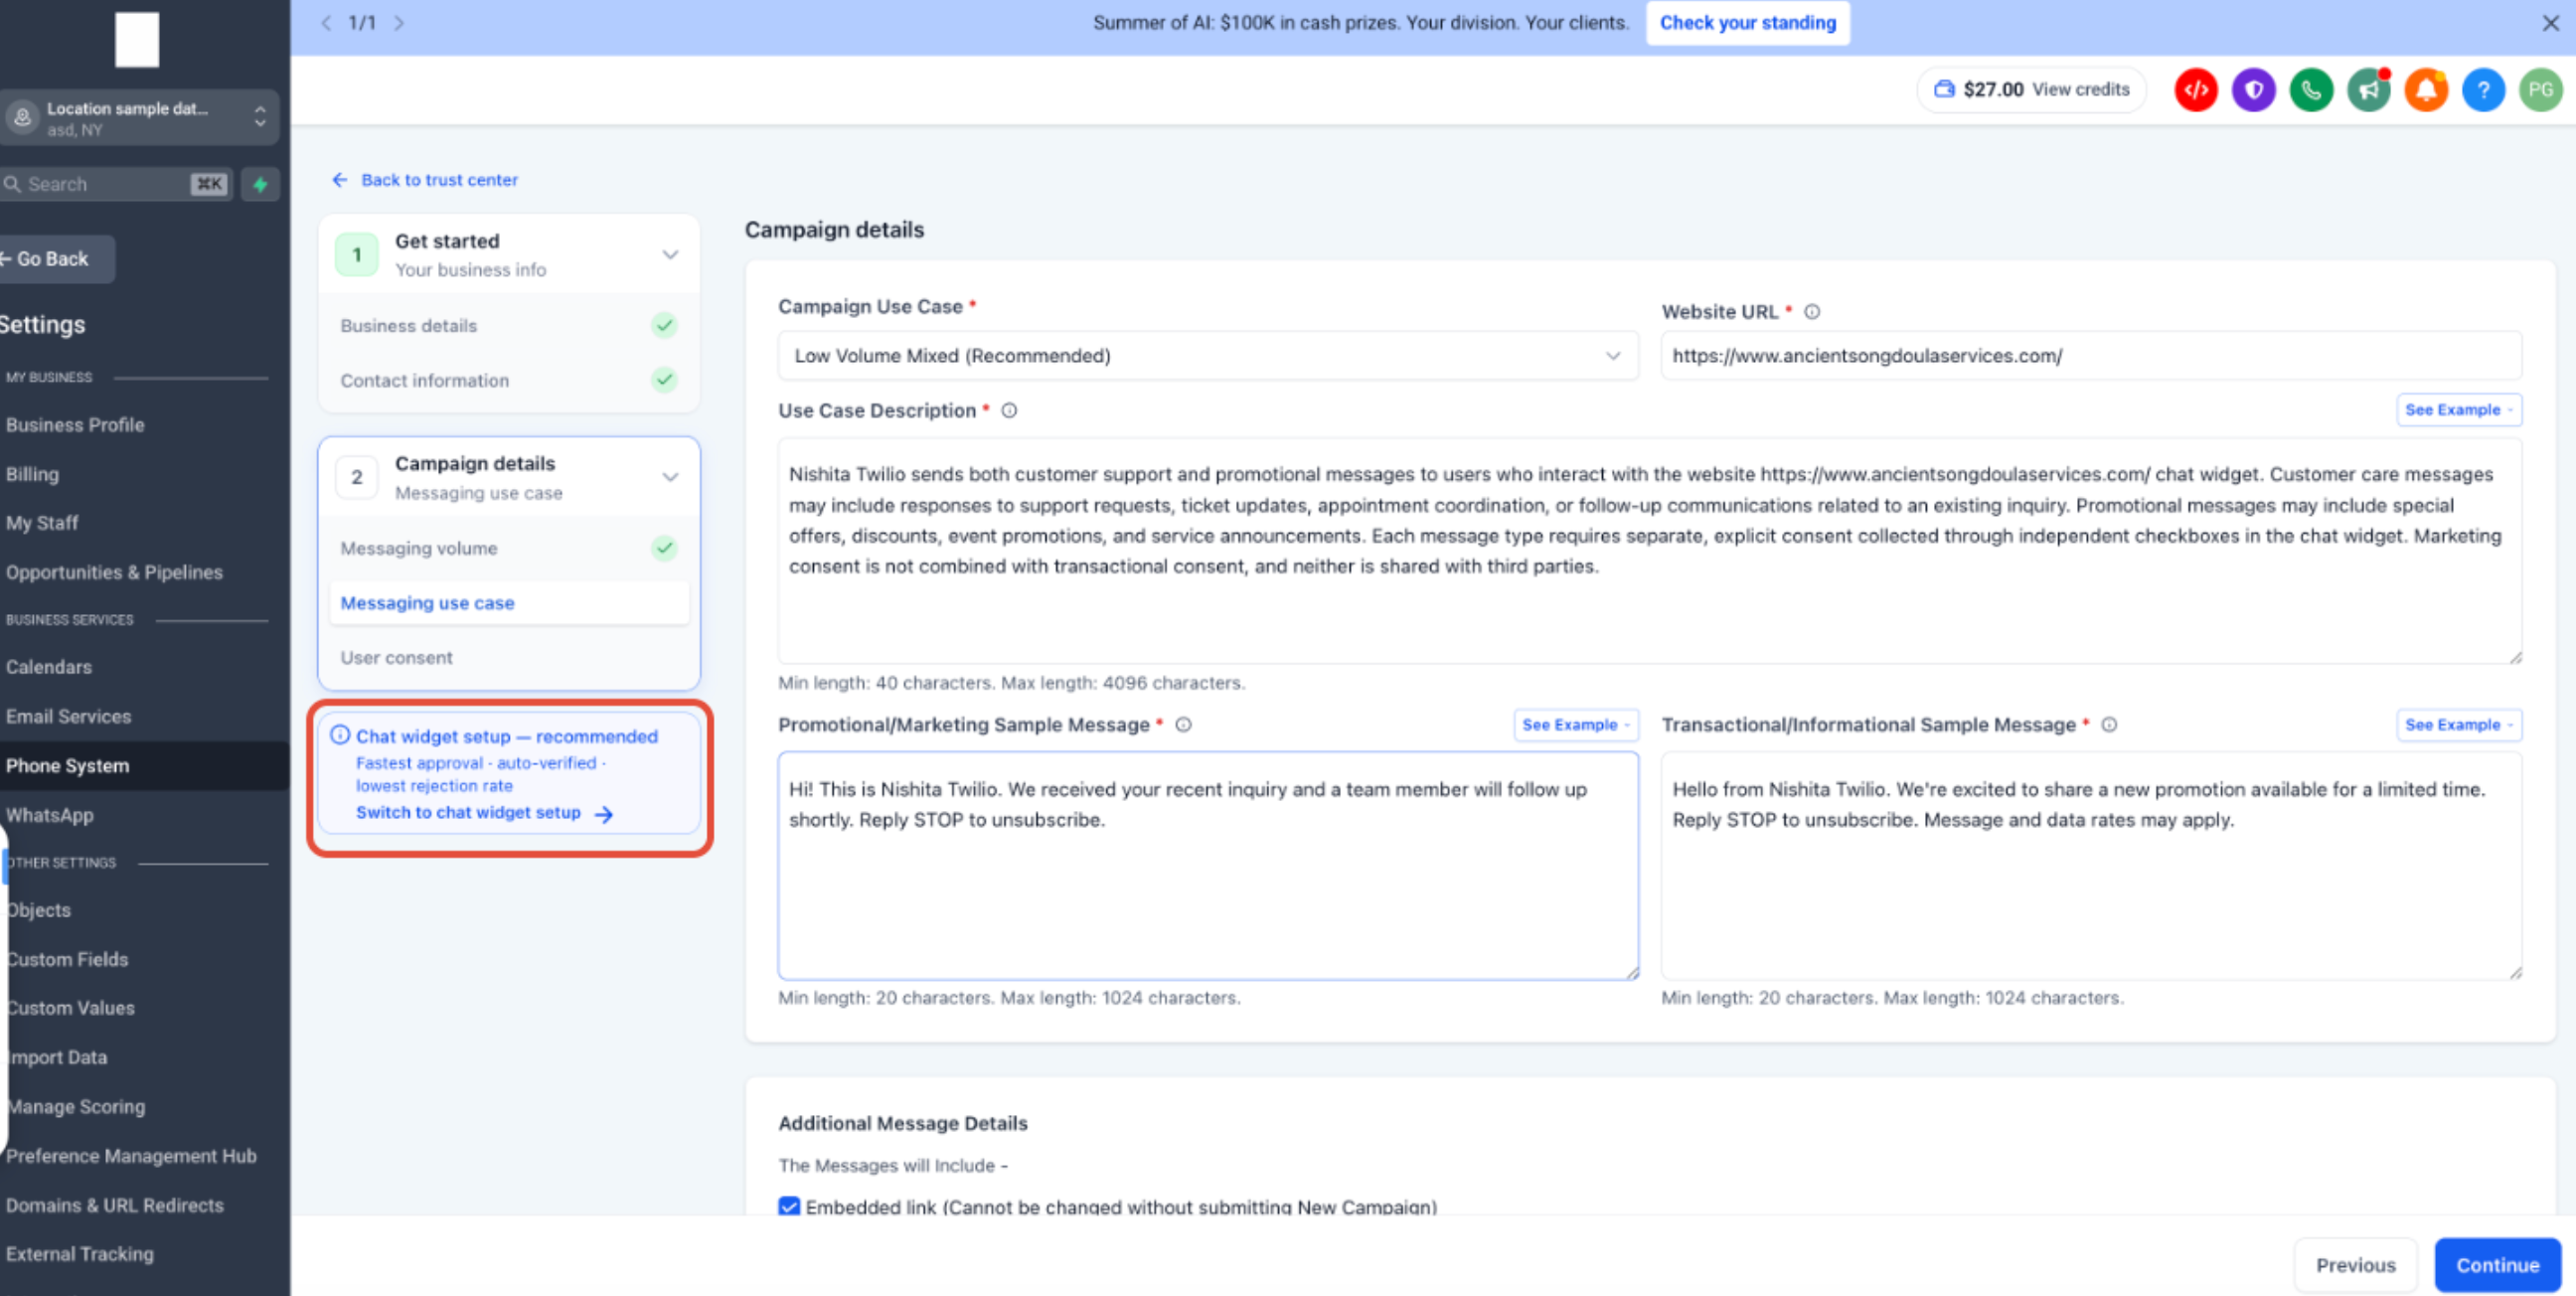
Manual Setup requires you to provide the Campaign information and consent details that would otherwise be generated through Chat Widget Setup. Keep every field aligned with the selected Campaign use case and the messaging program recipients will actually receive.
Click See Example in HighLevel for guidance on completing these fields.
For detailed requirements and examples, see A2P 10DLC Campaign Approval Best Practices.
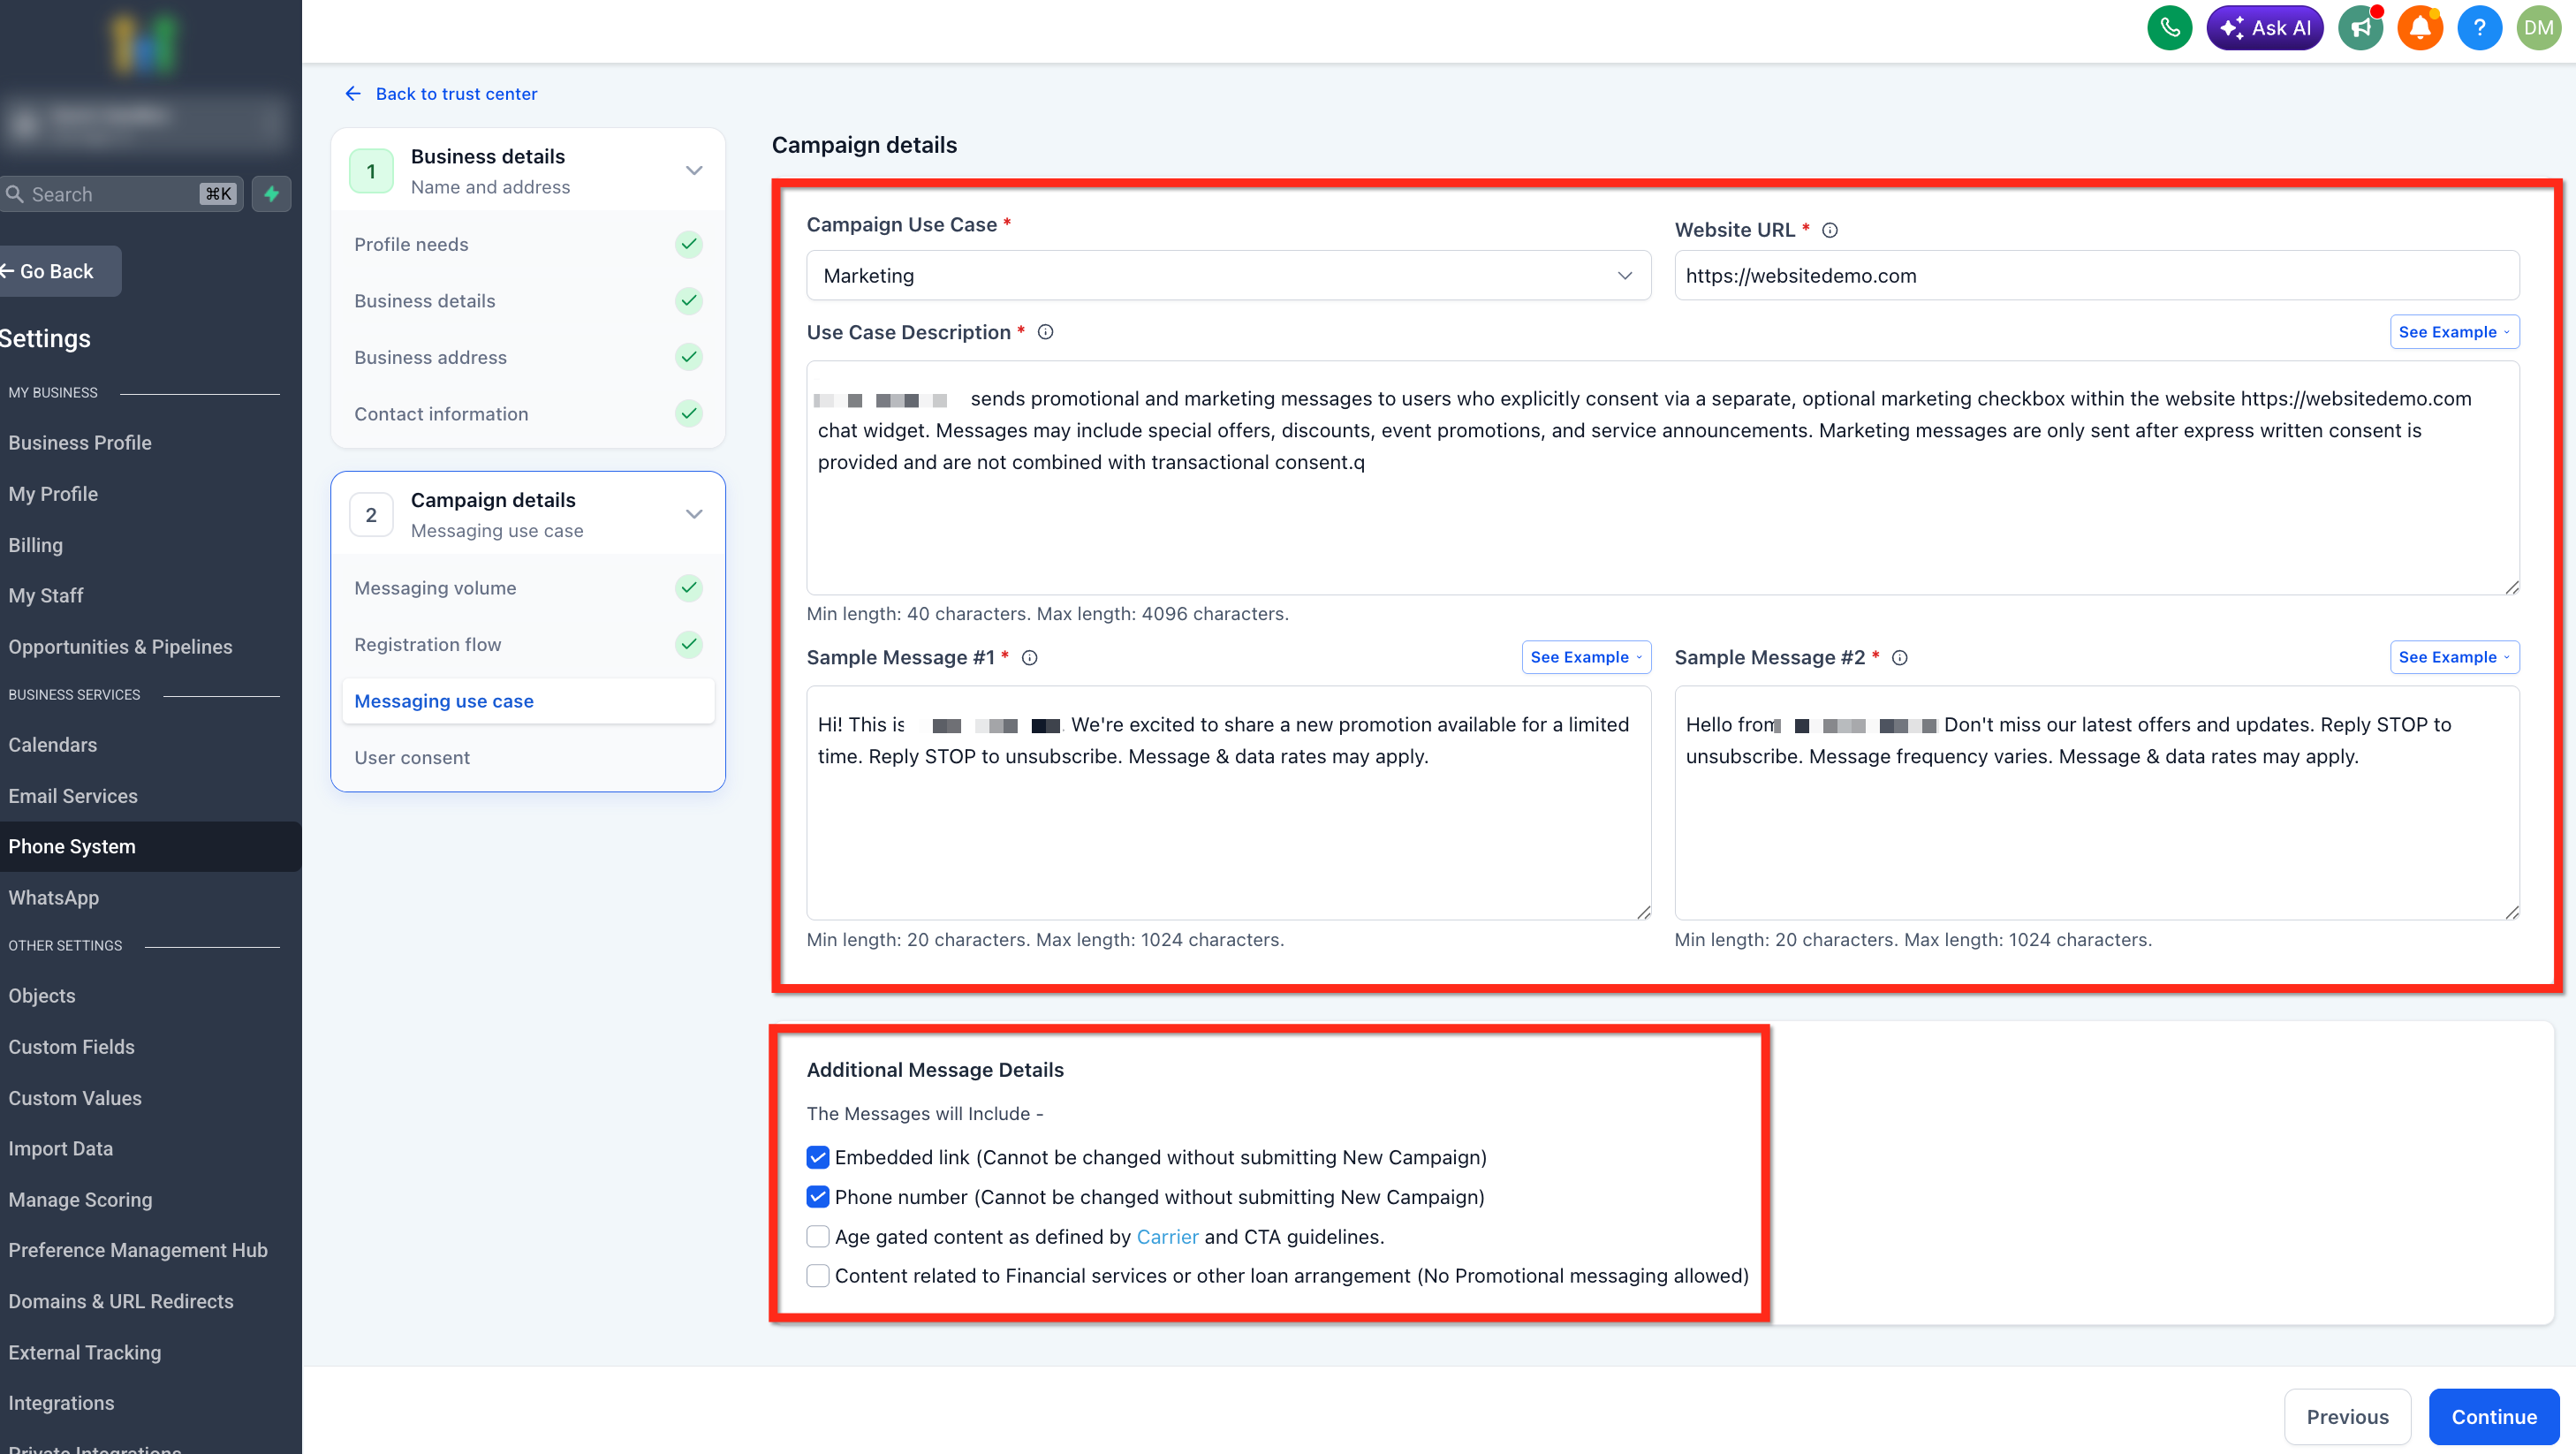
If you have an EIN for your company but want to use a different brand name for your messages, you can add the sentence "We are doing DBA as [Business_Name]" in the Campaign Use Case.
Make sure the rest of the submission, including the website, Privacy Policy, Terms & Conditions, and business name shown in opt-in form checkboxes, matches the declared [Legal Business Name] DBA [DBA Name]. You can register the same EIN for up to 10 brands.
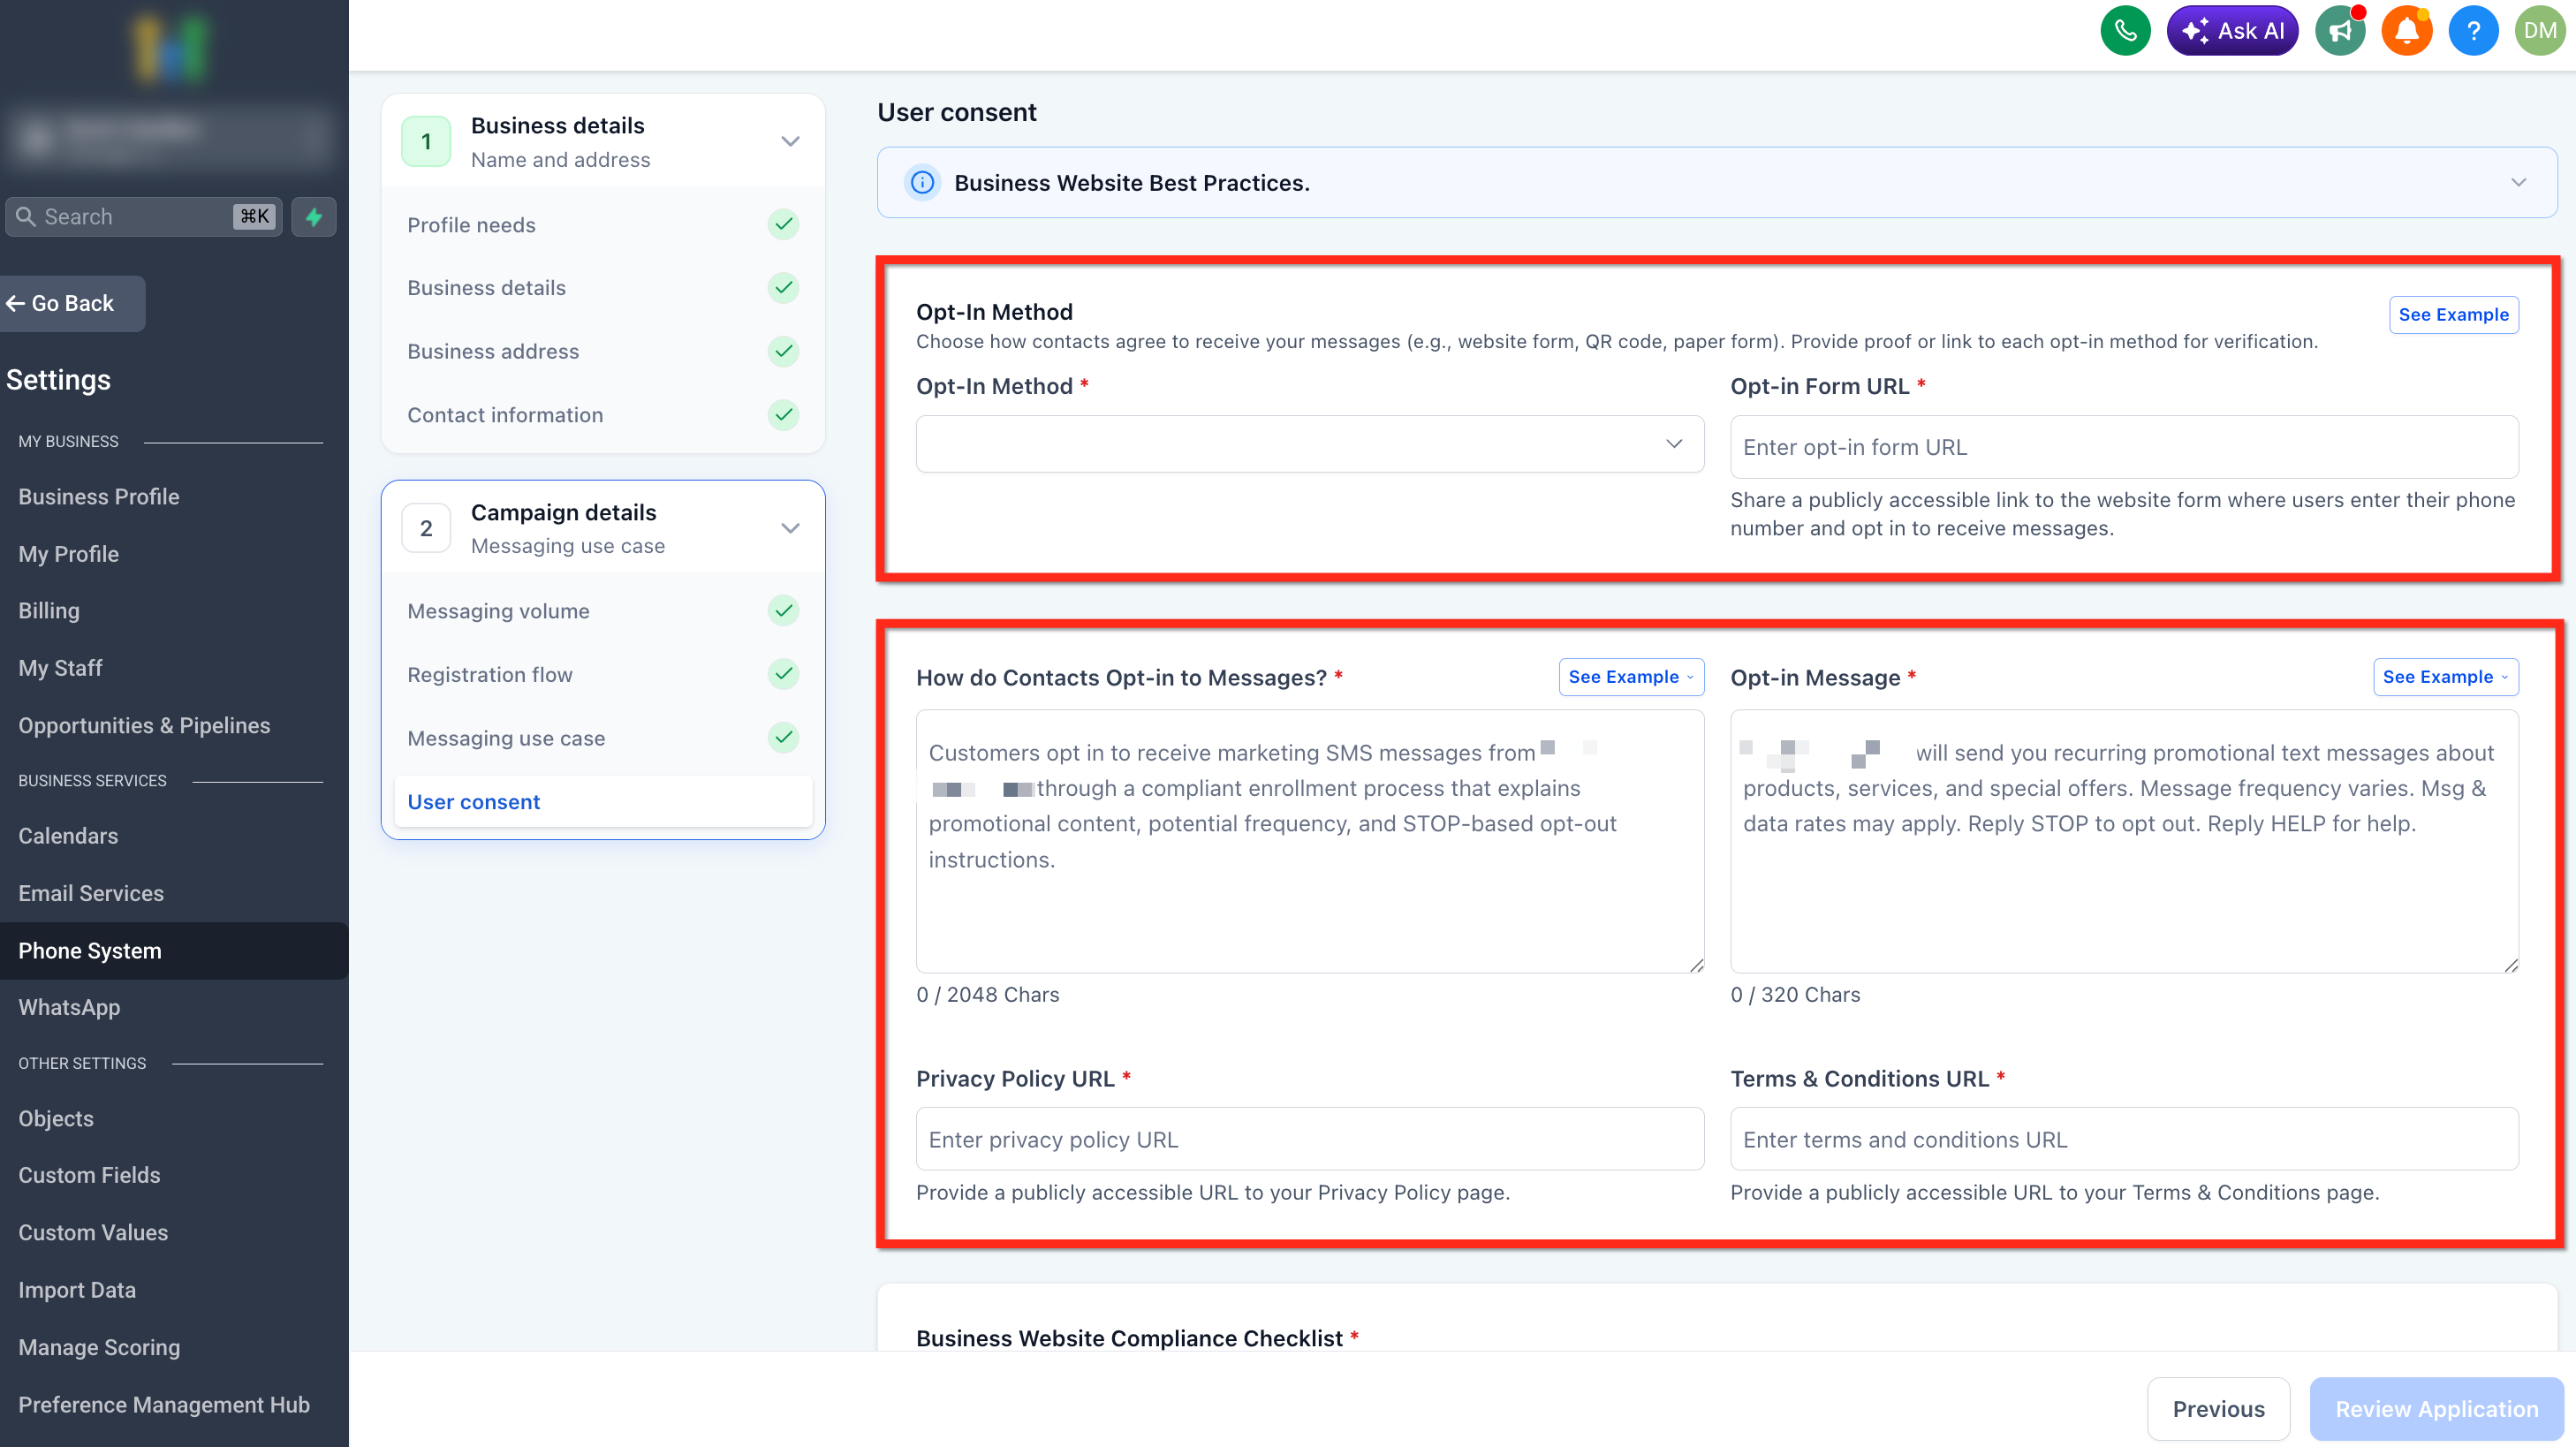
Manual Setup requires clear documentation of how contacts provide permission to receive SMS. The opt-in method, consent language, and supporting URLs should align with the Campaign use case and sample messages.
Click See Example in HighLevel for guidance on completing these fields.
For detailed requirements and examples, see A2P 10DLC Campaign Approval Best Practices.
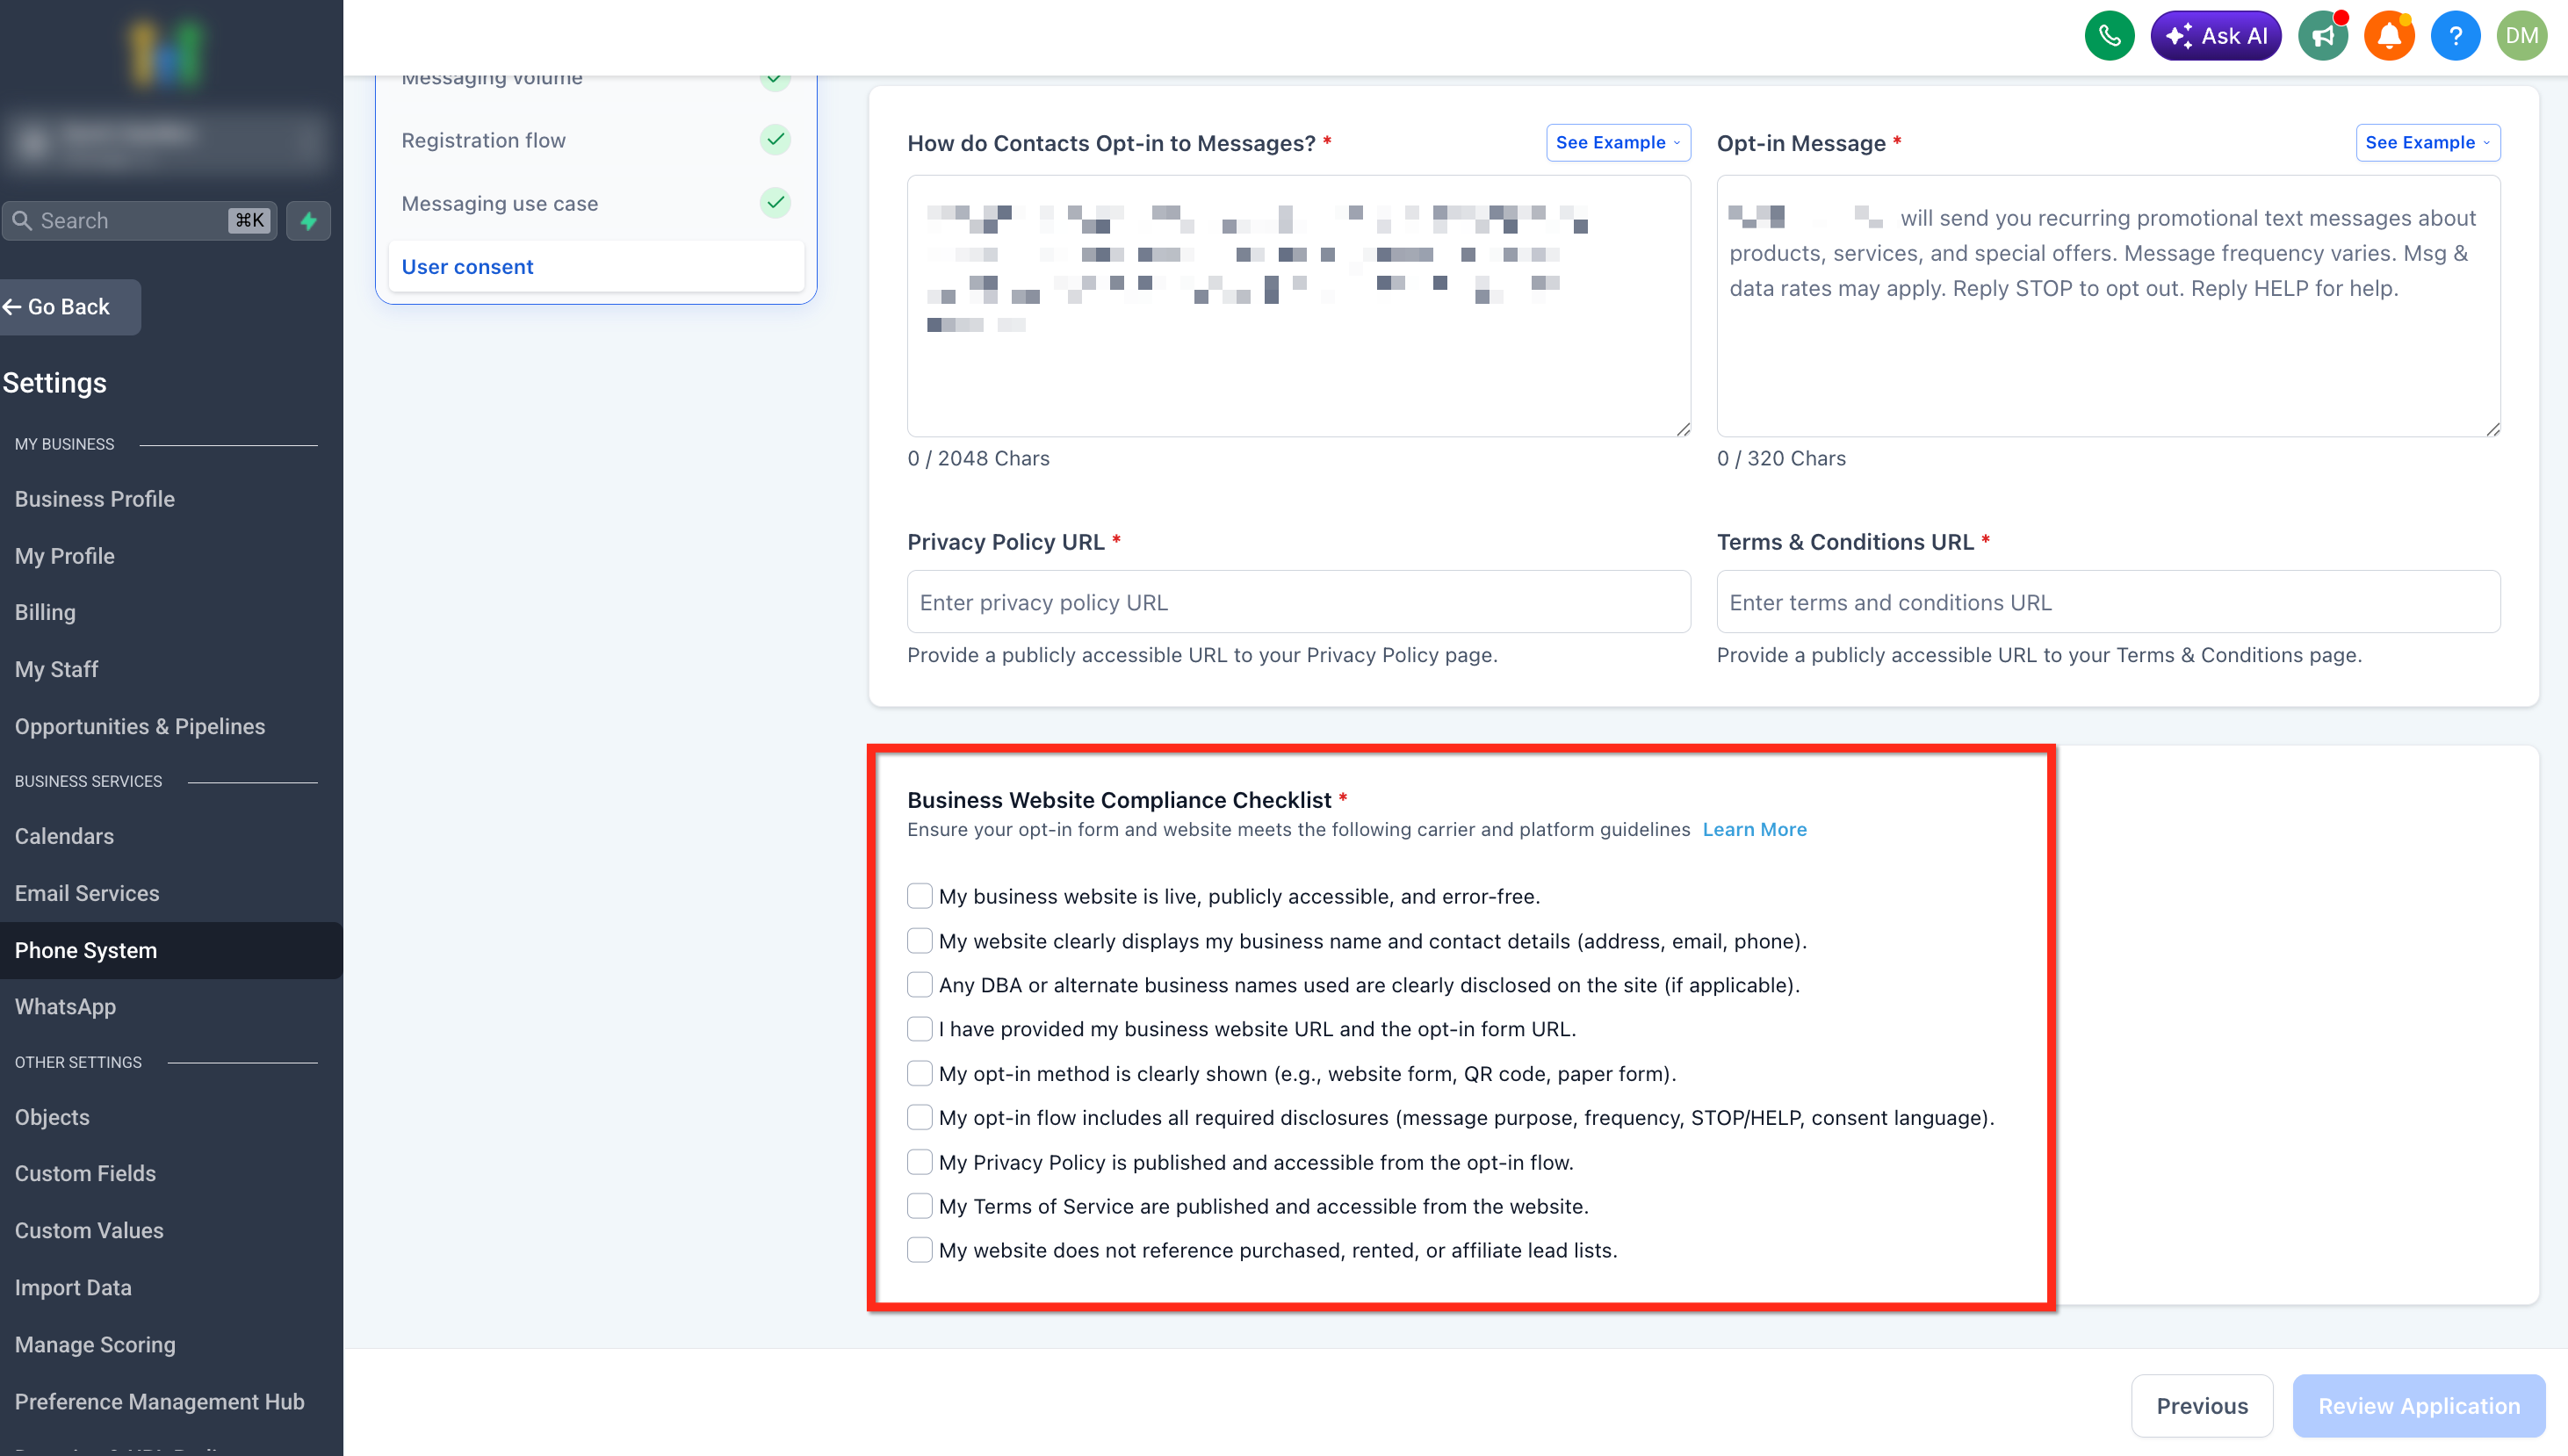
Reviewing the website checklist before submission helps ensure reviewers can verify the business, consent method, and required legal information associated with the Campaign.
After reviewing all checklist items, select the blue Review Application button. Then continue to Step 6.
Step 6: Run AI Compliance Review and Submit
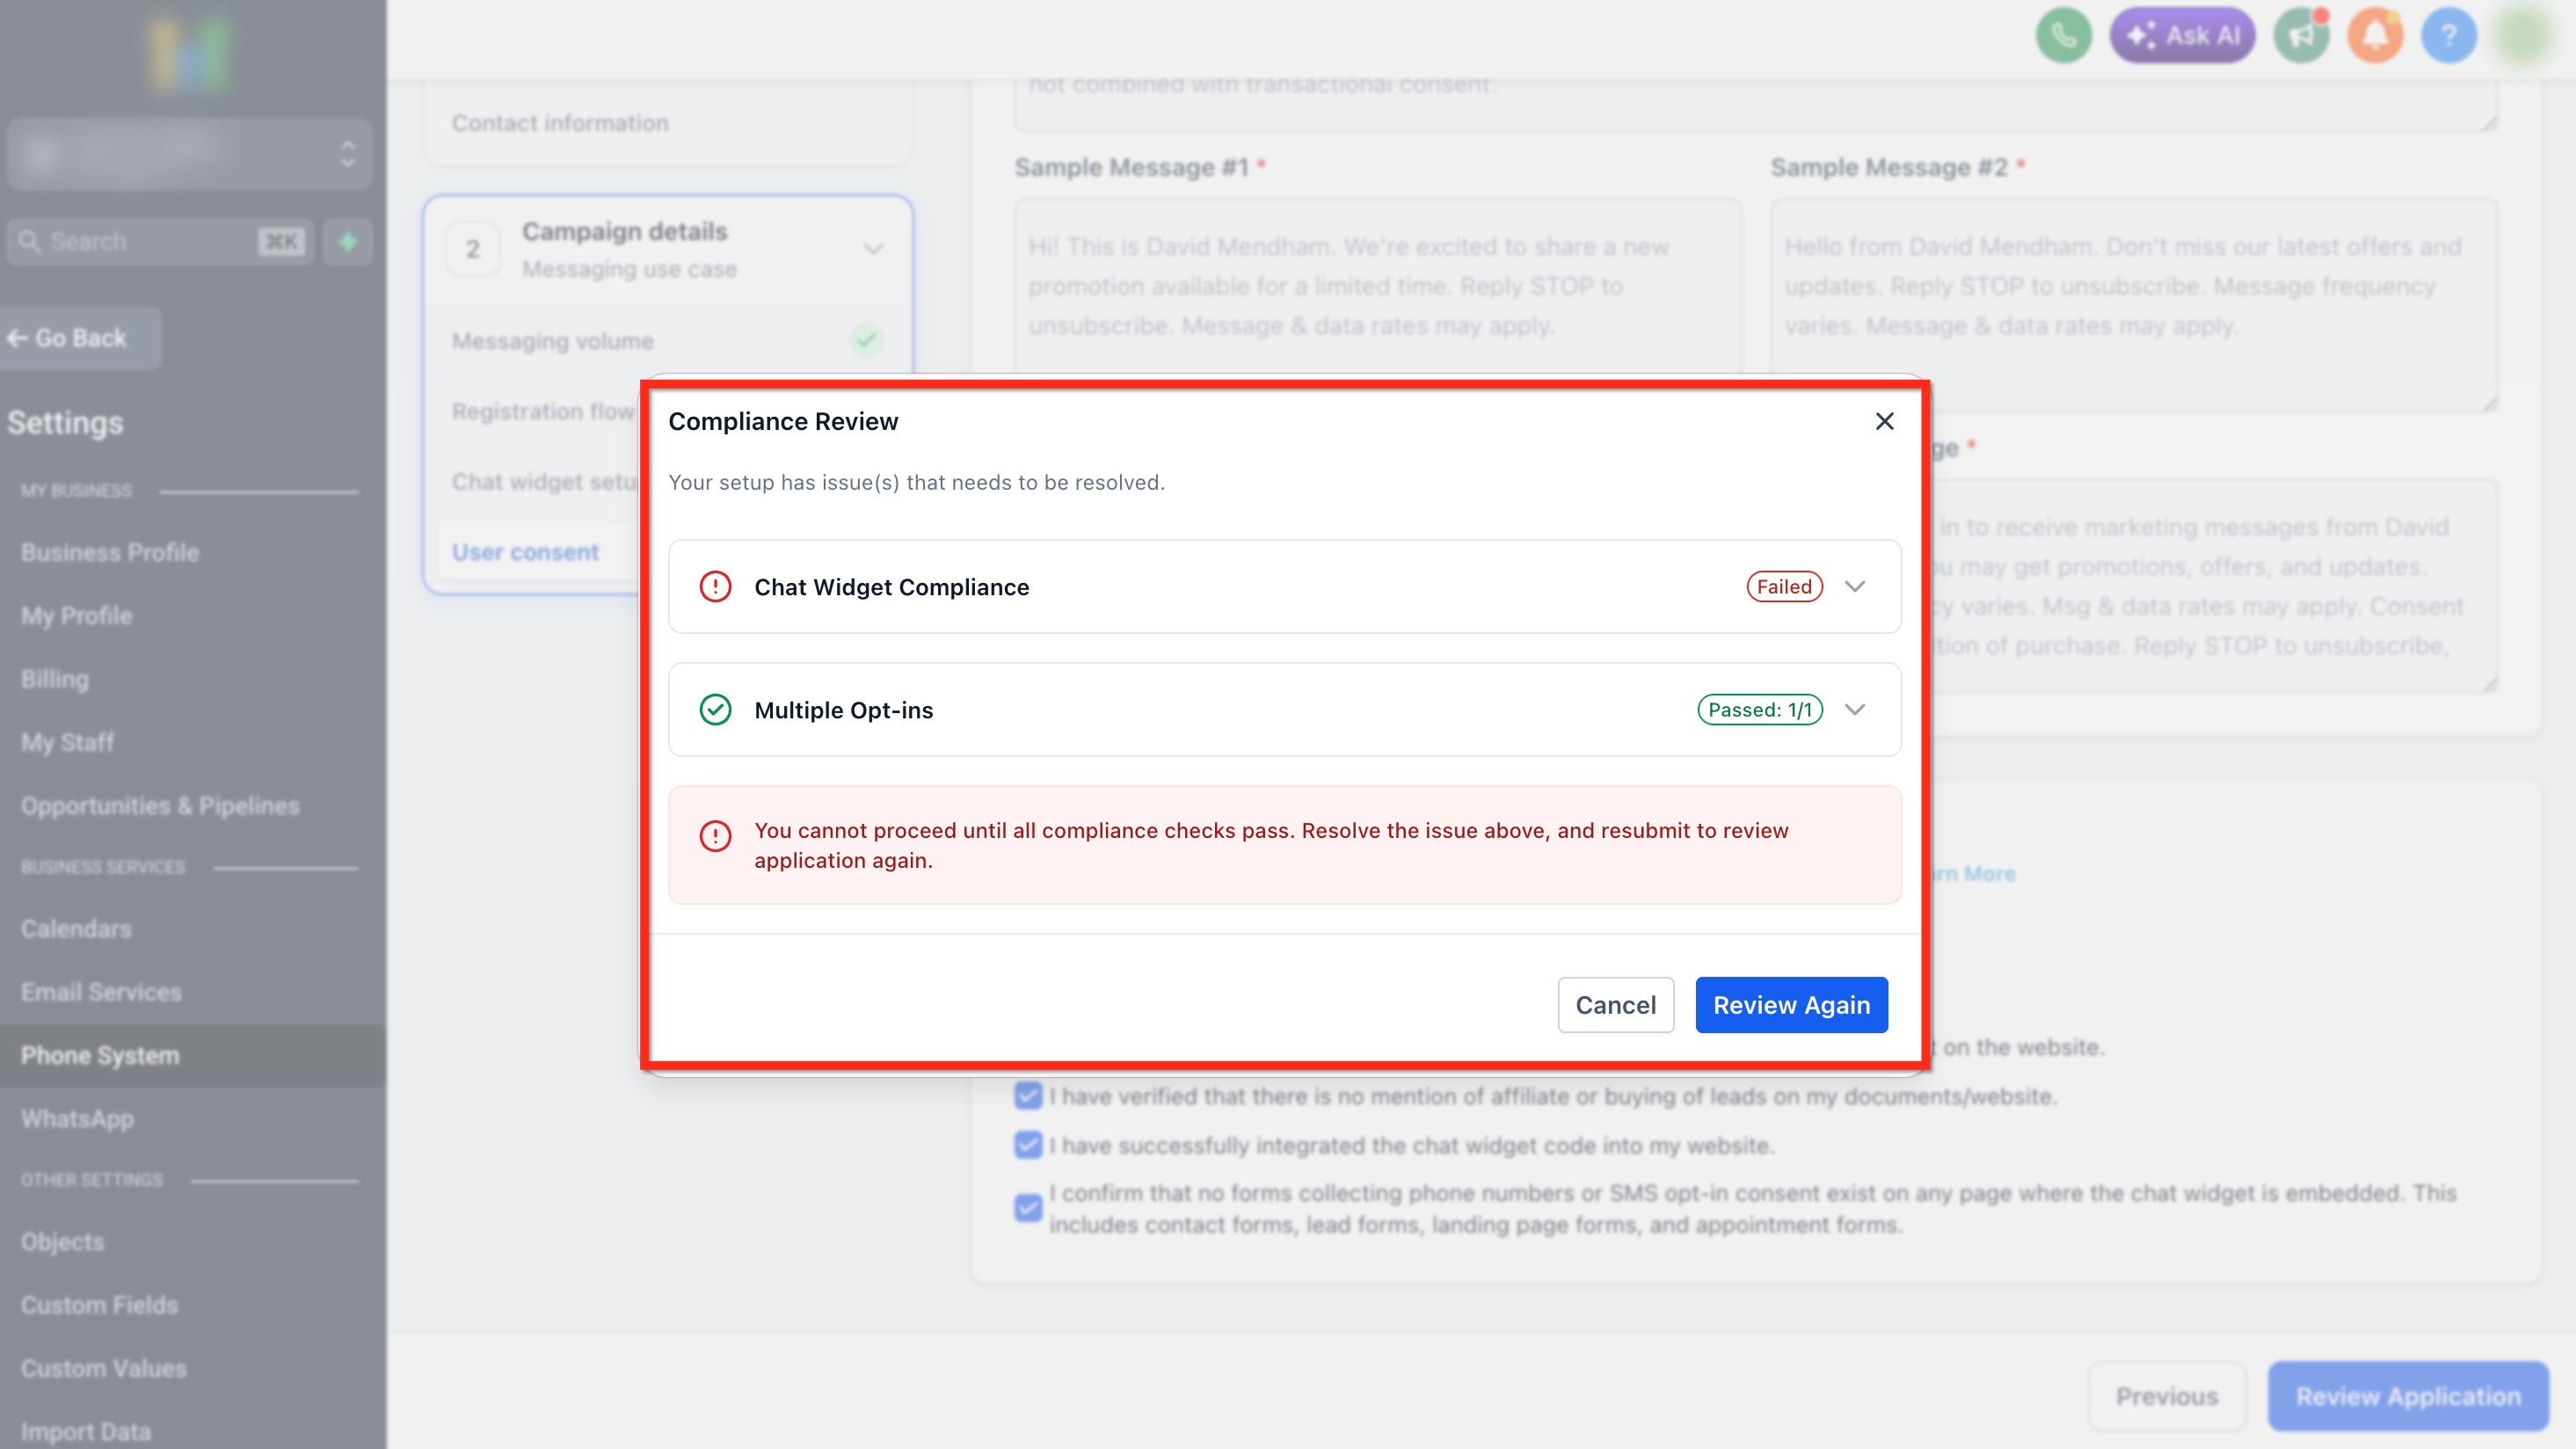
The compliance review checks Campaign and website information for issues that should be corrected before submission. Passing these checks prepares the application for carrier review but does not guarantee final approval.
Click Review Application to run the AI compliance review.
If any checks fail, review the issue, fix the required item, and click Review Again. You cannot submit the Campaign until all required compliance checks pass. Once the checks pass, submit your Campaign for carrier review.
After Your A2P Campaign is Approved
An approved Campaign can only be used successfully when the applicable sending phone number is associated with that Campaign. Verifying the number-to-Campaign connection prevents an approved registration from appearing complete while SMS is still unable to use the A2P route.
To confirm your number is ready:
- Go to Settings > Phone System > Phone Numbers.
- Locate the phone number you want to use for messaging.
- Confirm that the number displays the green A2P Verified label.
- If the label is missing, link the number to the approved A2P Campaign.
- Repeat this check whenever you purchase or add another applicable local number.
For step-by-step instructions, see How to Link a Phone Number to an Approved A2P Campaign.
Troubleshooting A2P After Submission
Campaign status helps identify whether you should wait for review, correct a rejection, or troubleshoot the phone number after approval. Use the status before creating another Campaign or making unrelated changes.
| Campaign Status | What It Means | What to Do Next | Resources |
|---|---|---|---|
| Pending | Your Campaign is still being reviewed. | Wait for the review to finish. Do not create another Campaign or resubmit while the current Campaign is Pending. | — |
| Rejected | One or more issues were identified during review. | Open View required fixes → for every rejection reason and correct all applicable issues before taking the next action. | A2P Campaign Rejections, Required Fixes & Vetting Errors |
| Approved, but SMS still isn't working | The Campaign is approved, but the sending number may not be linked correctly or the SMS failure may have another cause. | Verify the sending number is linked to the approved Campaign and displays A2P Verified. If it is already verified, troubleshoot the SMS error. | Error 30034: How to Link a Phone Number to an Approved A2P Campaign |
Frequently Asked Questions
Was this article helpful?
That’s Great!
Thank you for your feedback
Sorry! We couldn't be helpful
Thank you for your feedback
Feedback sent
We appreciate your effort and will try to fix the article