This comprehensive guide is intended to help you through the migration process from Wix to HighLevel, ensuring a smooth and efficient transition. By following the steps outlined in this document, you will be able to transfer your website content, e-commerce data, contacts, forms, automations, and social planning from Wix to HighLevel.
Whether you’re looking to optimize your marketing efforts, streamline customer management, or take advantage of HighLevel’s advanced features, this SOP provides the detailed instructions needed to successfully complete the migration.
IMPORTANT: Make sure you address all of the following components when migrating from Wix to HighLevel.

1. Contacts
2. Pipelines
3. Products
4. Forms
5. Websites and Pages
6. Social Posts
7. AI Tools and Custom Integrations
TABLE OF CONTENTS
- Migrate Contacts
- Recreate Pipelines (Wix Workflows)
- Migrate Products (Wix Stores)
- Migrate Forms and Submission Data
- Recreate Websites and Connect Domains
- Recreate Wix Automations
- Recreate Social Posts and Marketing
- Recreate AI Tools and Content
- Exporting and Recreating Other Data
Migrate Contacts
When a lead submits a contact form, subscribes to a newsletter, makes a purchase, or engages with the site in other ways, Wix automatically adds them to the user's Contact List, including the information they provided.
Step 1: Exporting Contacts from Wix
- Log in to Wix: Access your Contacts dashboard by logging into your Wix account.
- Export Contacts: Click the More Actions icon
 and click Export contacts. Select the option By Label to select a contact group, or select All Contacts.
 - Save the CSV: Save the CSV file for future import into HighLevel.
Step 2: Prepare CSV for HighLevel Import
- Check Date Formats: Ensure all date fields in the CSV are in the YYYY-MM-DD format. This is essential for compatibility with HighLevel.
- Encode Special Characters: Make sure the CSV file uses UTF-8 character encoding to properly handle special and accented characters.
- Clean Up Data: Remove any line breaks, emojis, and unnecessary special characters from the file. This step helps prevent import errors.
- Recreate Custom Fields: Log in to HighLevel and navigate to Contacts > Settings > Custom Fields. Add custom fields to store contact data in a similar way to how they were stored in Wix.
Step 3: Import Contacts into HighLevel
- Log in to HighLevel: Navigate to the Contacts section using the left-hand menu.
- Start Import Process: Click the Import Contacts button.
- Upload CSV File: Select and upload the prepared CSV file.
- Map Fields: HighLevel will prompt you to map the fields from the CSV file to the corresponding fields in HighLevel. For example, map “First Name” in the CSV to “First Name” in HighLevel.
- Assign Tags and Lists: During the import process, you can assign contacts to specific lists and apply tags. Consider applying a tag that indicates the source of the contacts, such as “Imported from Wix.”
- Complete Import: After mapping all fields and setting tags/lists, click Import. HighLevel will process the import, and the contacts will be added to your account.
Field Mapping Tip: Ensure all required fields are correctly mapped. If a field in your CSV does not have a corresponding field in HighLevel, you may need to create a custom field in HighLevel before proceeding.

Recreate Pipelines (Wix Workflows)
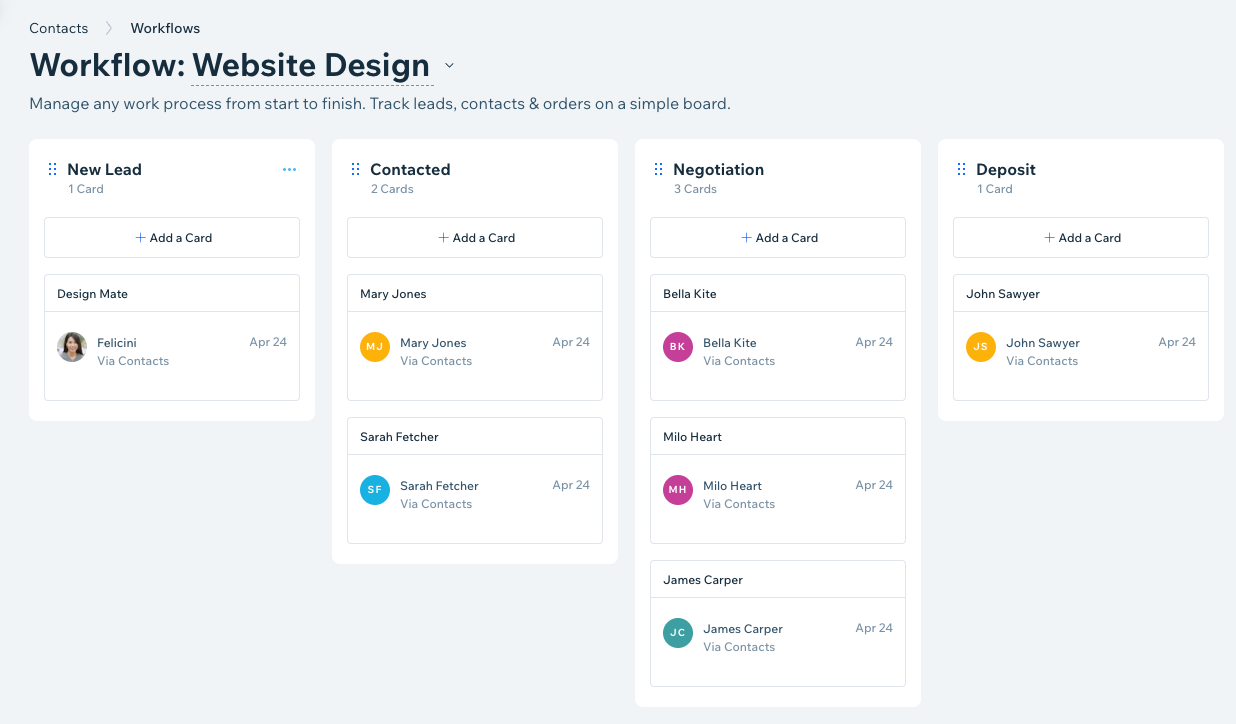
A Wix Workflow is a board that displays all of the steps of a project so you can easily keep track of contact cards in every column. Wix workflows cannot be exported and must be recreated in HighLevel Pipelines & Opportunities.
IMPORTANT: When migrating pipelines, the naming conventions are slightly different.

Workflow (Wix)  ➡️  Pipeline (HighLevel)
Column (Wix)  ➡️  Pipeline Stage (HighLevel)
Cards (Wix)  ➡️  Opportunity Cards (HighLevel)
Step 1: View Wix Workflows(Pipelines)
- Log in to Wix: Go to Workflows in your site's dashboard. View All Pipelines and their columns.
Step 2: Recreate Pipelines in HighLevel
- Log in to HighLevel: Go to Opportunities on the left sidebar. Select Pipelines.
- Add Pipelines: Click Add Pipeline. Recreate the pipelines stages to match the stages in Wix.
Migrate Products (Wix Stores)
Users can export up to 5,000 physical products to a CSV file. Each product has media files available in the Wix Media Manager.
Step 1: Export Product Data from Wix
- Log in to Wix: Access your Wix Stores dashboard by logging into your Wix account.
- Export Products: Go to the Products section, click on More Actions, and select Export. Save your product list as a CSV file, then choose what you want to export. To finalize your export, click the More Actions (dropdown) then click Export.
- Export all products: Select the checkbox at the top left.
- Export a category or other filtered products: Click filter, select the type of products you want to export, and click Done.
- Export selected products: Select the checkboxes next to the products you want to export.
- Export all products: Select the checkbox at the top left.
Step 2: Download Product Media from Wix
- Log into Wix
- Go to Wix Media Manager
- Hold the Command / Control key on your keyboard.
- Click the files you want to download.
- Click Download in the panel on the right in Wix Media Manager to ensure you have all necessary product visuals.
Step 3: Prepare Wix Products CSV for Import
- Clean up Data: Ensure the Wix Product CSV has the same headers and organization as in the HighLevel Sample CSV. Click here to download a sample product .csv file
IMPORTANT: There must be EXACTLY 29 columns in your CSVStep 4: Add Payment Gateway in HighLevel
- Set Up Payment Gateways: Integrate your preferred payment gateways within HighLevel, and configure product pricing, taxes, and shipping options to match your Wix store settings.
Step 5: Import Products into HighLevel
- Log in to HighLevel: Log in to HighLevel and navigate to Payments> Products, then select Import as CSV.
- Import Products: Manually enter product details into HighLevel, or use the CSV import feature if available. Re-upload product images and assign them to the corresponding products.

Migrate Forms and Submission Data
Users can embed customizable Wix Forms directly to their site for visitors to fill out (e.g. Contact forms or Get a Quote forms) or share standalone forms with unique URL. By default, when someone submits a form, an email is automatically sent to the site owner notifying them about the submission.
Step 1: Export Form Data from Wix
- Log in to Wix: Access Forms & Submissions dashboard by logging into your Wix account.
- Export Submissions: Navigate to Forms & Submissions, click on More Actions, and select Export. Save the form submissions as a CSV file for future use.
Step 2: Recreate Forms in HighLevel
- Create Forms in HighLevel: Log in to HighLevel, navigate to Sites > Forms and create a new form. Rebuild the form by adding custom fields that match those from your Wix forms.
- Configure Form Actions: Set up automated actions in HighLevel, such as form notifications or conditional logic in forms, to replicate the functionality from Wix.
Recreate Websites and Connect Domains
Wix does not offer direct export options for full website content. In order for Wix sites to work properly, it needs to be hosted and operated on Wix's servers. Therefore, you will need to manually copy text, images, and other media files to rebuild sites and online stores in HighLevel.
Step 1: Export Content from Wix
- Log in to Wix: Begin by logging into your Wix account and accessing your Wix dashboard.
- Export Website Content: Download images, videos, and documents from the Wix Media Manager to ensure you have all the necessary content for your migration.
- Save HTML/CSS: If you have used custom code on your Wix site, copy the HTML, CSS, and any custom scripts to preserve the design and functionality of your website.
Step 2: Rebuild Your Website in HighLevel
- Log in to HighLevel: Access your HighLevel account and navigate to Sites > Funnels or Sites > Websites, depending on your website’s structure.
- Rebuild Pages: Manually recreate each page by pasting the copied content and re-uploading media files into HighLevel. Utilize HighLevel’s drag-and-drop editor to design your pages and add forms similarly to your Wix site.
- Add Custom Code: If you used custom HTML/CSS in Wix, you can add this code to the relevant sections in HighLevel to maintain the original functionality and design.
Step 3: Disconnect your Domain from Wix
- Log in to Wix
- Go to the Domains page.
- Click the Show More icon
 next to the relevant domain and select Unassign from This Site.
Step 4: Connect your Domain to HighLevel
- Login to HighLevel: Go to Settings > Domains > Add Domain. Enter the domain you need for your newly created site.
- Log in to Wix: Go to the Domains page. Click the Domain Actions icon
 next to the relevant domain. Select Manage DNS records.
 - Add DNS Records to Wix: Scroll to the record type you'd like to add (e.g. CNAME, TXT) and click + Add Record.

Recreate Wix Automations
Wix does not offer direct export options for automations. Wix Automations streamline website tasks like sending emails, reminders, and user assignment.
Step 1: Review Wix Automations
- Log in to Wix: Go to Automations in your site's dashboard.
- View Active Automations: Scroll down to the Your automations section to view all of your automations across 2 tabs. Filter for active automationsin each tab.
- Created by you: Active automations you've created here or directly through an app.
- Installed for you: Active created automatically when you've installed Wix apps.
- Created by you: Active automations you've created here or directly through an app.
Step 2: Recreate Triggers and Actions in HighLevel
- Log in to HighLevel: Go to Automation > Workflows.
- Set up Triggers and Actions: Configure similar triggers and actions in HighLevel using the Workflow feature, ensuring that all essential automations, such as email sequences and task assignments, are replicated. Click here to learn more about creating Workflows in HighLevel.
Recreate Social Posts and Marketing
Wix does not offer a way to export social posts. We must connect their social accounts to HighLevel's Social Planner and download social posts.
Step 1: Download Social Posts from Wix
- Log in to Wix: Access your Social Media Marketing dashboard by logging into your Wix account. Click Your Social Posts.
- Download Social Posts: Manually download the content of your social posts, including scheduled date and time of the post, captions, images, and links, to prepare them for re-creation in HighLevel.
Step 2: Recreate Social Posts in HighLevel
- Create Social Posts: Log in to HighLevel and navigate to Marketing > Social Planner. Recreate your social posts using the copied content from Wix.
- Schedule or Publish: Depending on your marketing calendar, schedule the posts to be published at a future date or publish them immediately.
Recreate AI Tools and Content
Step 1: Recreating AI-Powered Content
- Review Wix AI Tools: Identify the AI-generated content you have used in Wix, such as text, images, and SEO tags.
- Get Familiar with Content AI Tools in HighLevel: Use HighLevel’s AI tools to generate text and images. Manually copy the generated content from Wix or recreate any custom AI prompts using HighLevel AI as needed.
Exporting and Recreating Other Data
- Export Other Data: Manually export or copy any additional data or configurations from Wix, such as blog posts, or analytics data, that are not covered by the previous sections.
- Recreate in HighLevel: Manually input or upload this data into the relevant HighLevel sections, ensuring that all important information is transferred.
Was this article helpful?
That’s Great!
Thank you for your feedback
Sorry! We couldn't be helpful
Thank you for your feedback
Feedback sent
We appreciate your effort and will try to fix the article