Social Planner helps you connect social accounts, create content, and schedule posts from one calendar. This guide covers the essential setup, including account connections, templates, custom posts, media, scheduling, and performance tracking.
TABLE OF CONTENTS
- What Is Social Planner?
- Key Benefits of Social Planner
- Before You Begin
- Explore Social Planner
- How To Set Up and Use Social Planner
- Monitor Posts and Social Performance
- Frequently Asked Questions
- Related Articles
What Is Social Planner?
Social Planner is HighLevel's centralized tool for drafting, scheduling, publishing, and tracking social content. You can manage Facebook, Instagram, Threads, Google Business Profile, LinkedIn, TikTok, YouTube, Pinterest, HighLevel Community, and Bluesky from one location. Available post types, media options, and analytics vary by platform.
Key Benefits of Social Planner
Managing social content from one calendar reduces manual work and helps maintain a consistent publishing schedule.
- Centralized publishing: Manage multiple social platforms without switching between separate applications.
- Flexible scheduling: Publish immediately, schedule for later, save drafts, request approval, or create recurring
content. - Reusable content: Start with templates, bulk uploads, RSS feeds, recurring posts, or Category Queues.
- Platform-specific posts: Customize captions and media for each selected social channel.
- Performance tracking: Review publishing activity and available engagement metrics.
Before You Begin
Social platforms require the correct permissions before HighLevel can publish on their behalf. Preparing your access and content first helps prevent missing accounts and failed posts.
- Confirm that you can sign in to each social platform you want to connect.
- Verify that you have admin or publishing access to the required page, profile, channel, board, or location.
- Prepare the captions, links, images, or videos you plan to publish.
- Confirm that your media meets the selected platform's requirements.
- Review the location timezone before scheduling posts.
Important: You can explore Social Planner and prepare content without connecting an account, but an active social connection is required to publish or schedule content to that channel.
Explore Social Planner
The Social Planner welcome screen provides direct access to the most common content-planning tools.
- Schedule Now: Create a single custom post.
- Bulk Scheduling: Upload up to 90 posts using a supported CSV or XLSX file.
- Evergreen Queue Post: Build a reusable Category Queue. You can later edit, reorder, view, or reschedule the queue.
- Recurring Post: Repeat a post on a selected schedule.
- RSS Post: Turn new RSS feed items into social posts.

How To Set Up and Use Social Planner
A reliable Social Planner workflow follows five steps: connect an account, choose how to create the post, review the content, schedule or publish it, and monitor the connection.
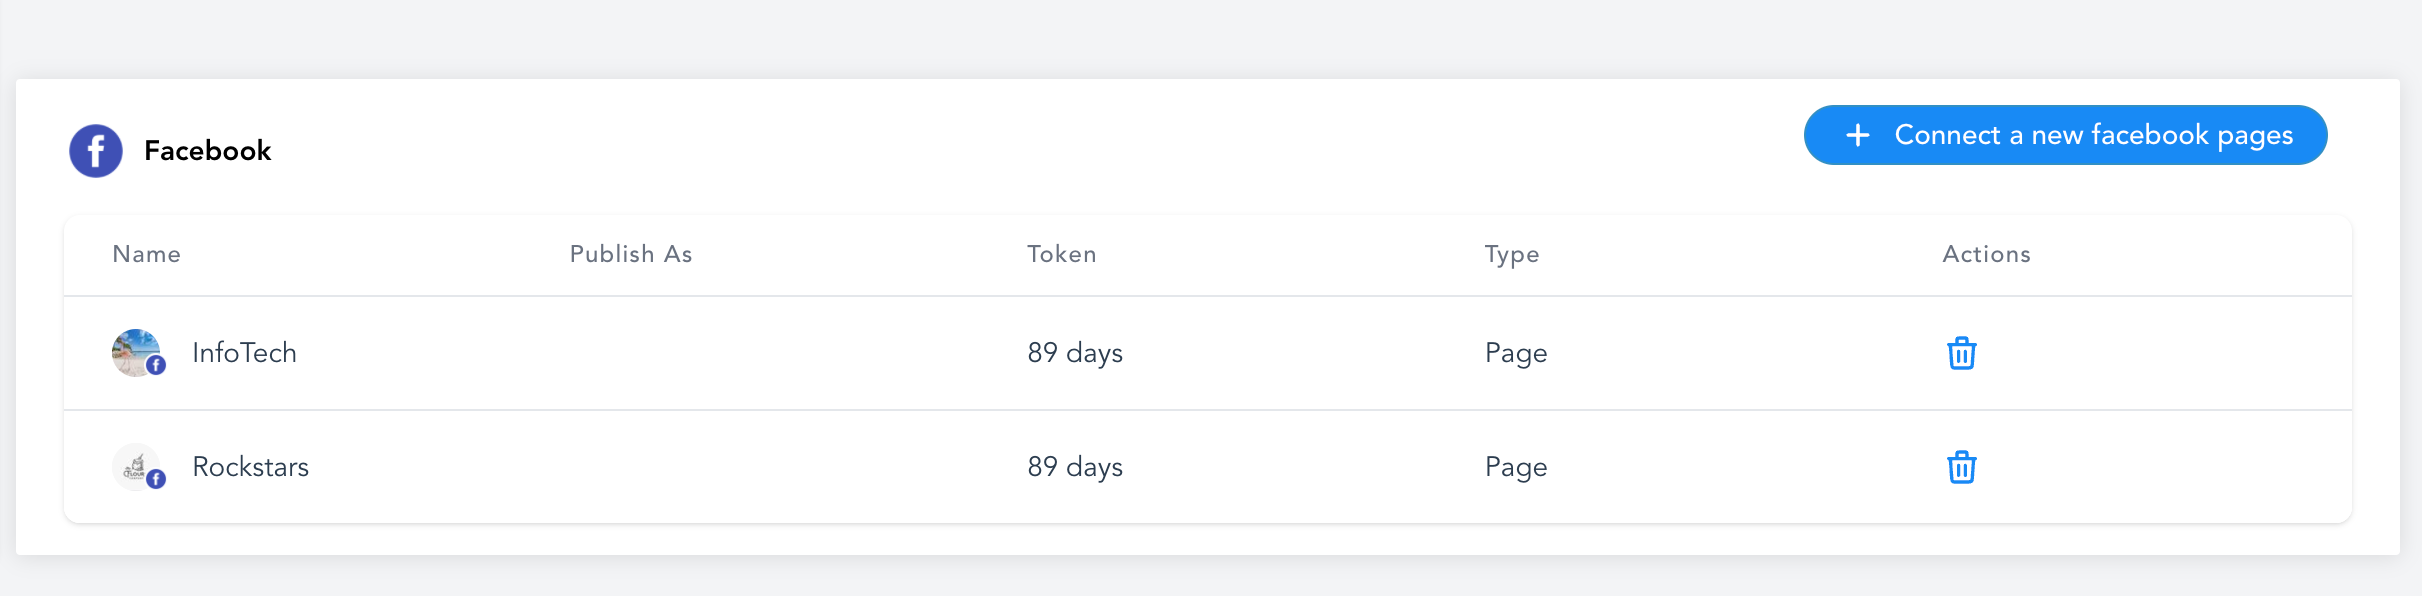
1. Connect Your First Social Account
Connecting an account authorizes HighLevel to publish to the selected page, profile, channel, board, or location.
- Go to Marketing → Social Planner.
- Select the social platform you want to connect.
- Sign in and approve the requested permissions.
- Select the page, profile, channel, board, or location you want to manage.
- Complete the authorization process.
- Confirm that the account appears in Social Planner.
Facebook Pages: Sign in with a Facebook profile that has admin access to every Page you want to connect.
2. Create Posts From Social Planner Templates
Templates provide ready-to-use content that you can customize and schedule for connected social accounts.
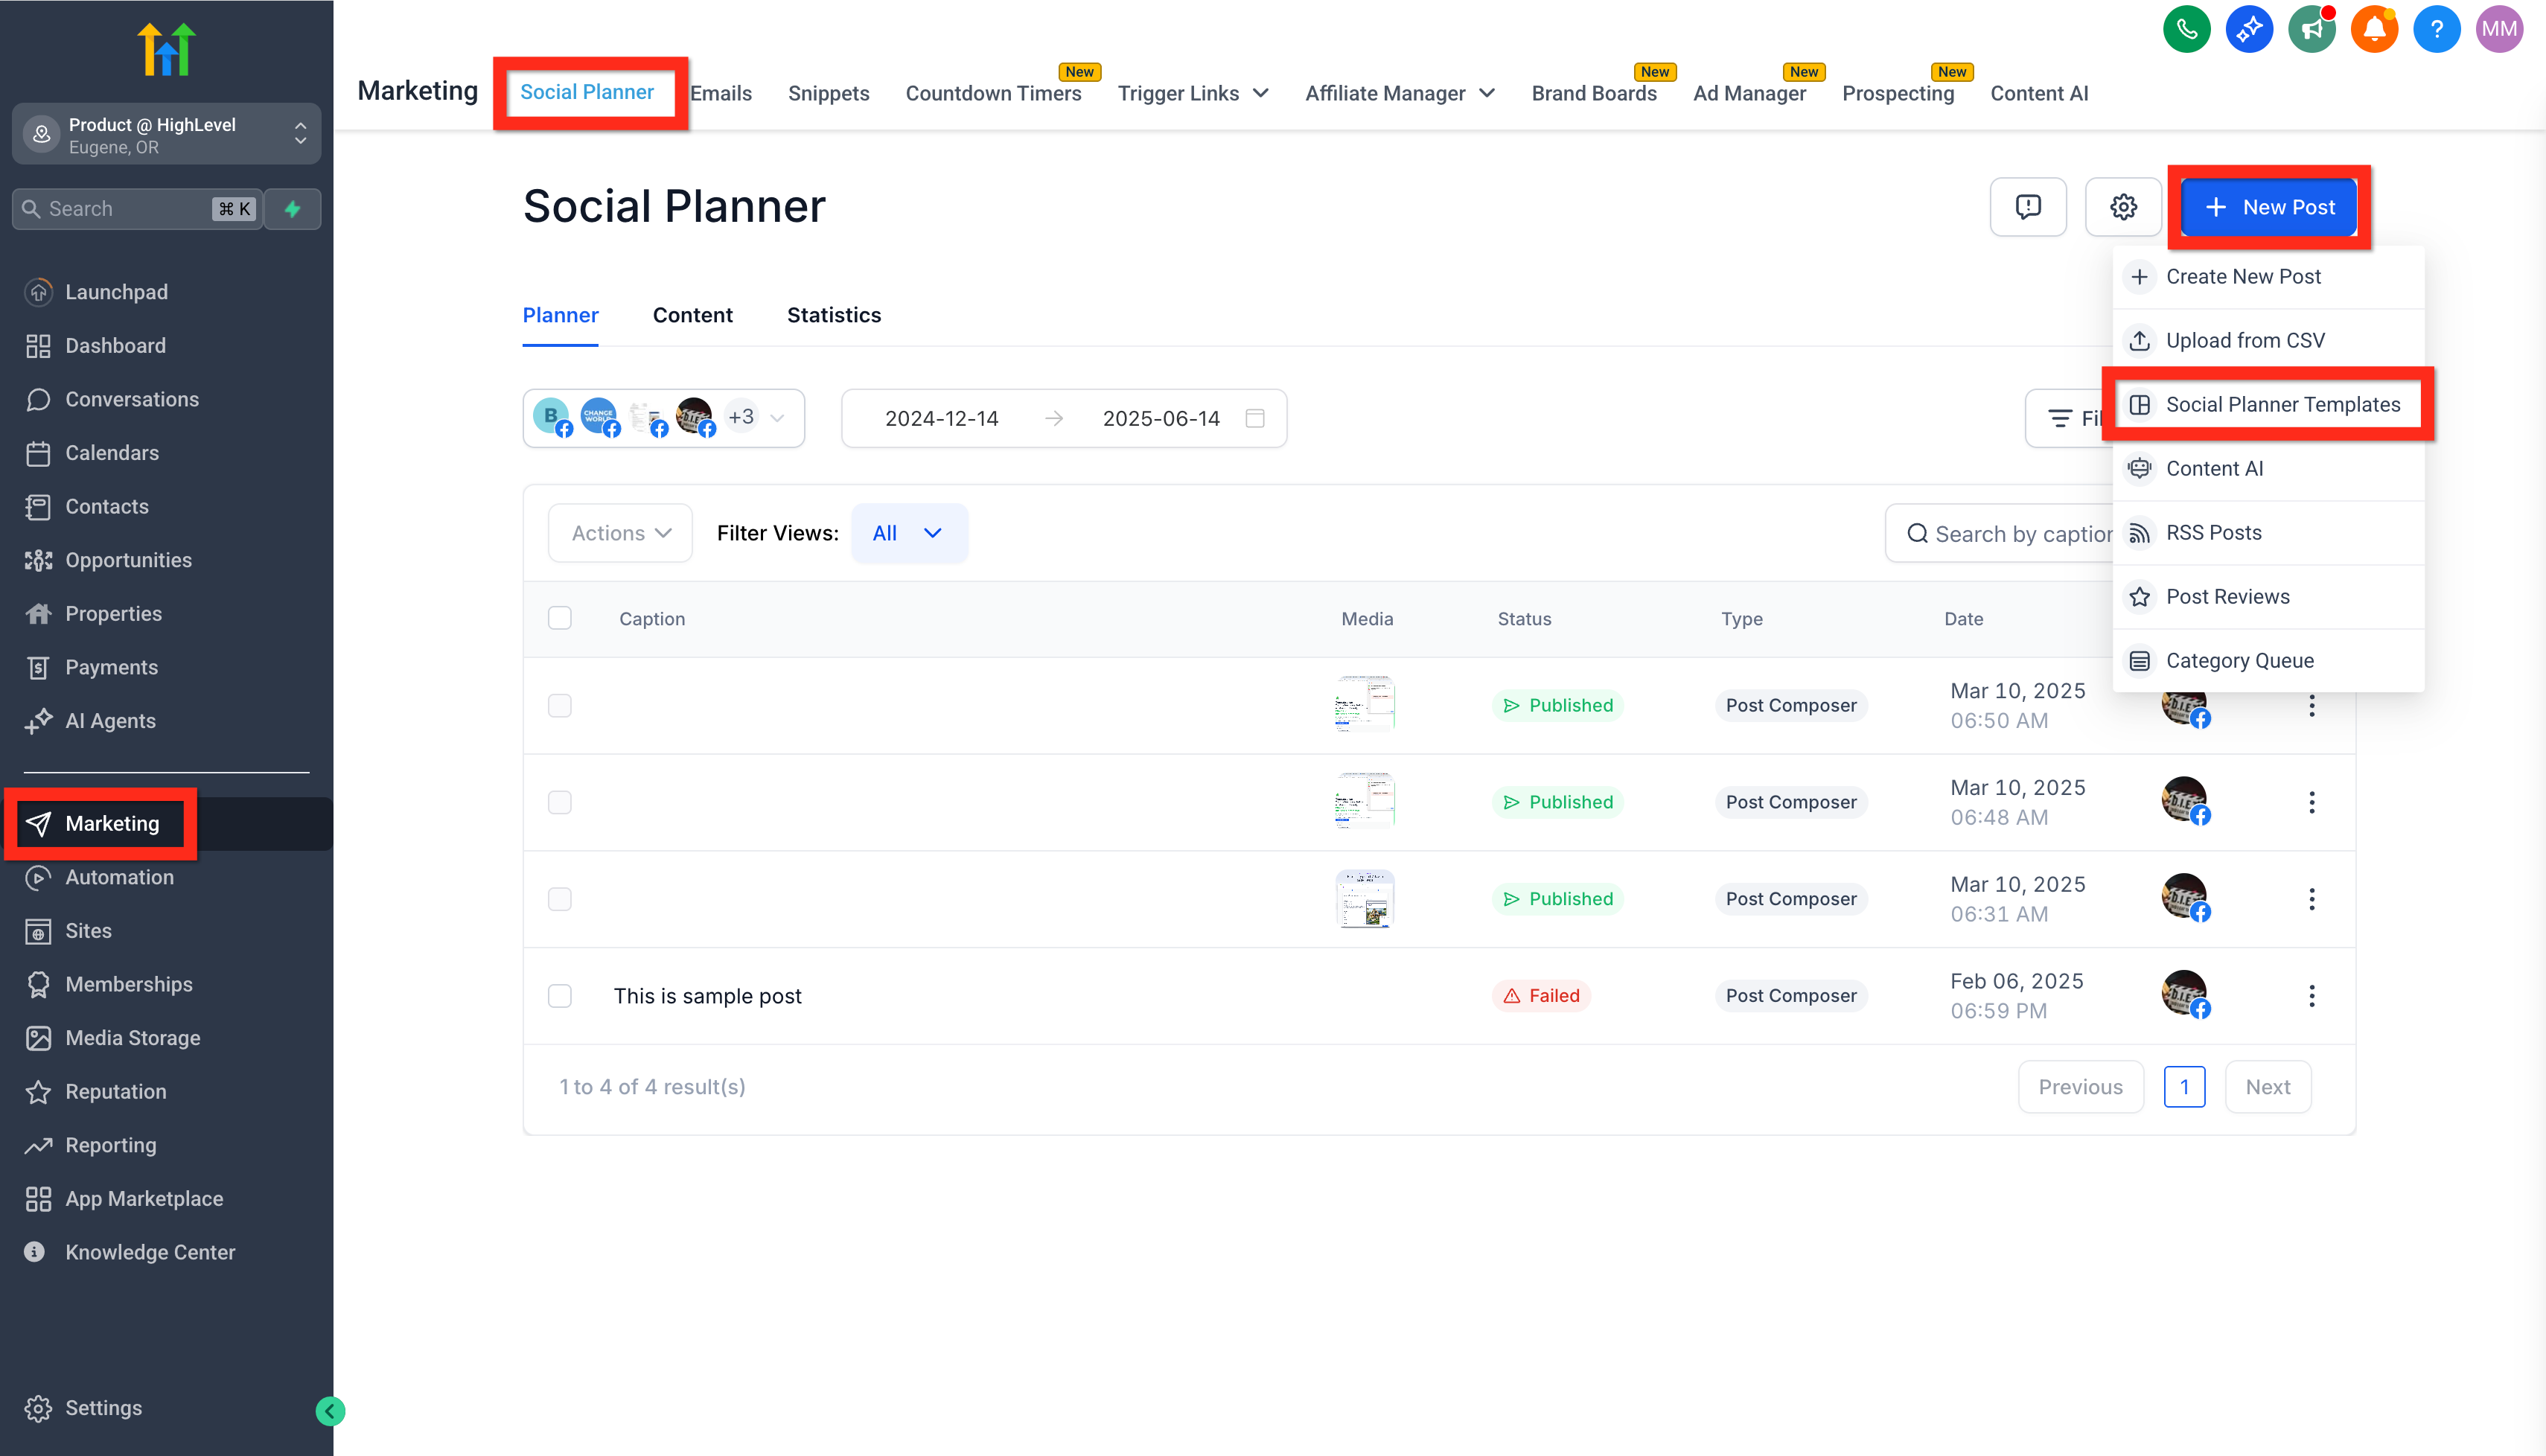
- Go to Marketing → Social Planner.
- Click + New Post.
- Select Social Planner Templates.
- Search, browse, or filter the available templates.
- Select a template and click Continue.
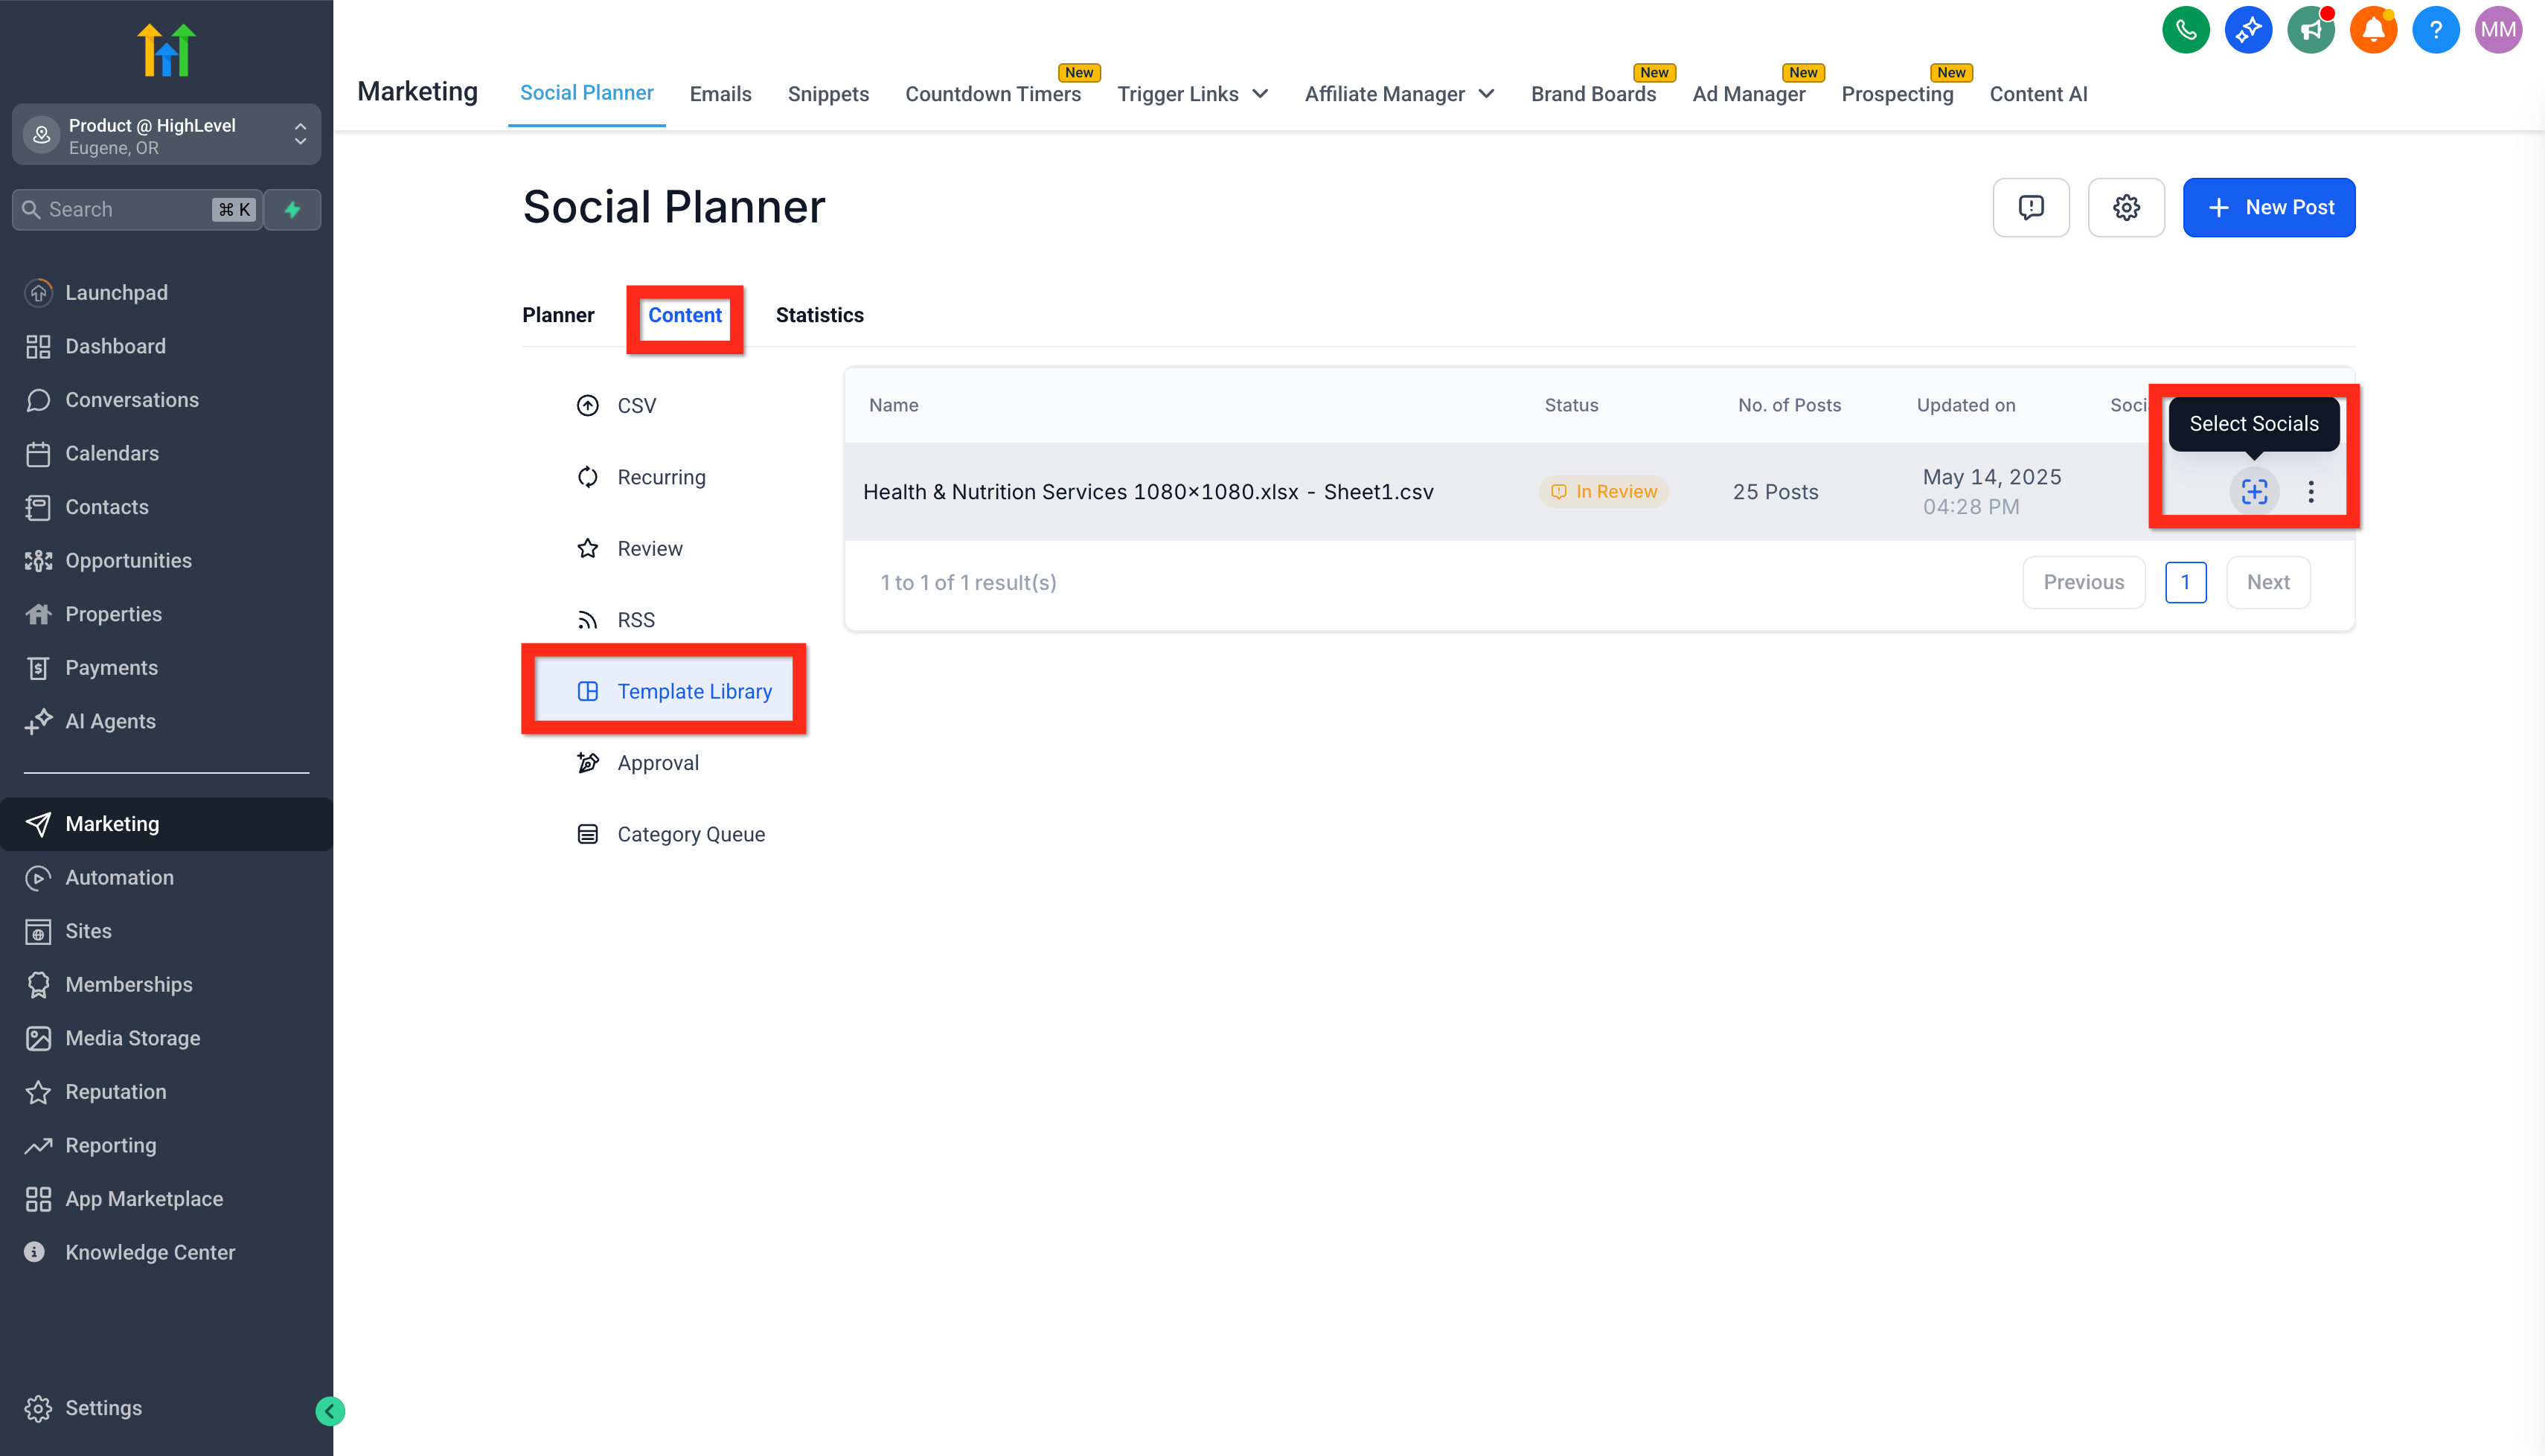
- Open Content → Template Library when prompted.
- Find the selected template and click Select Socials, represented by the plus icon.
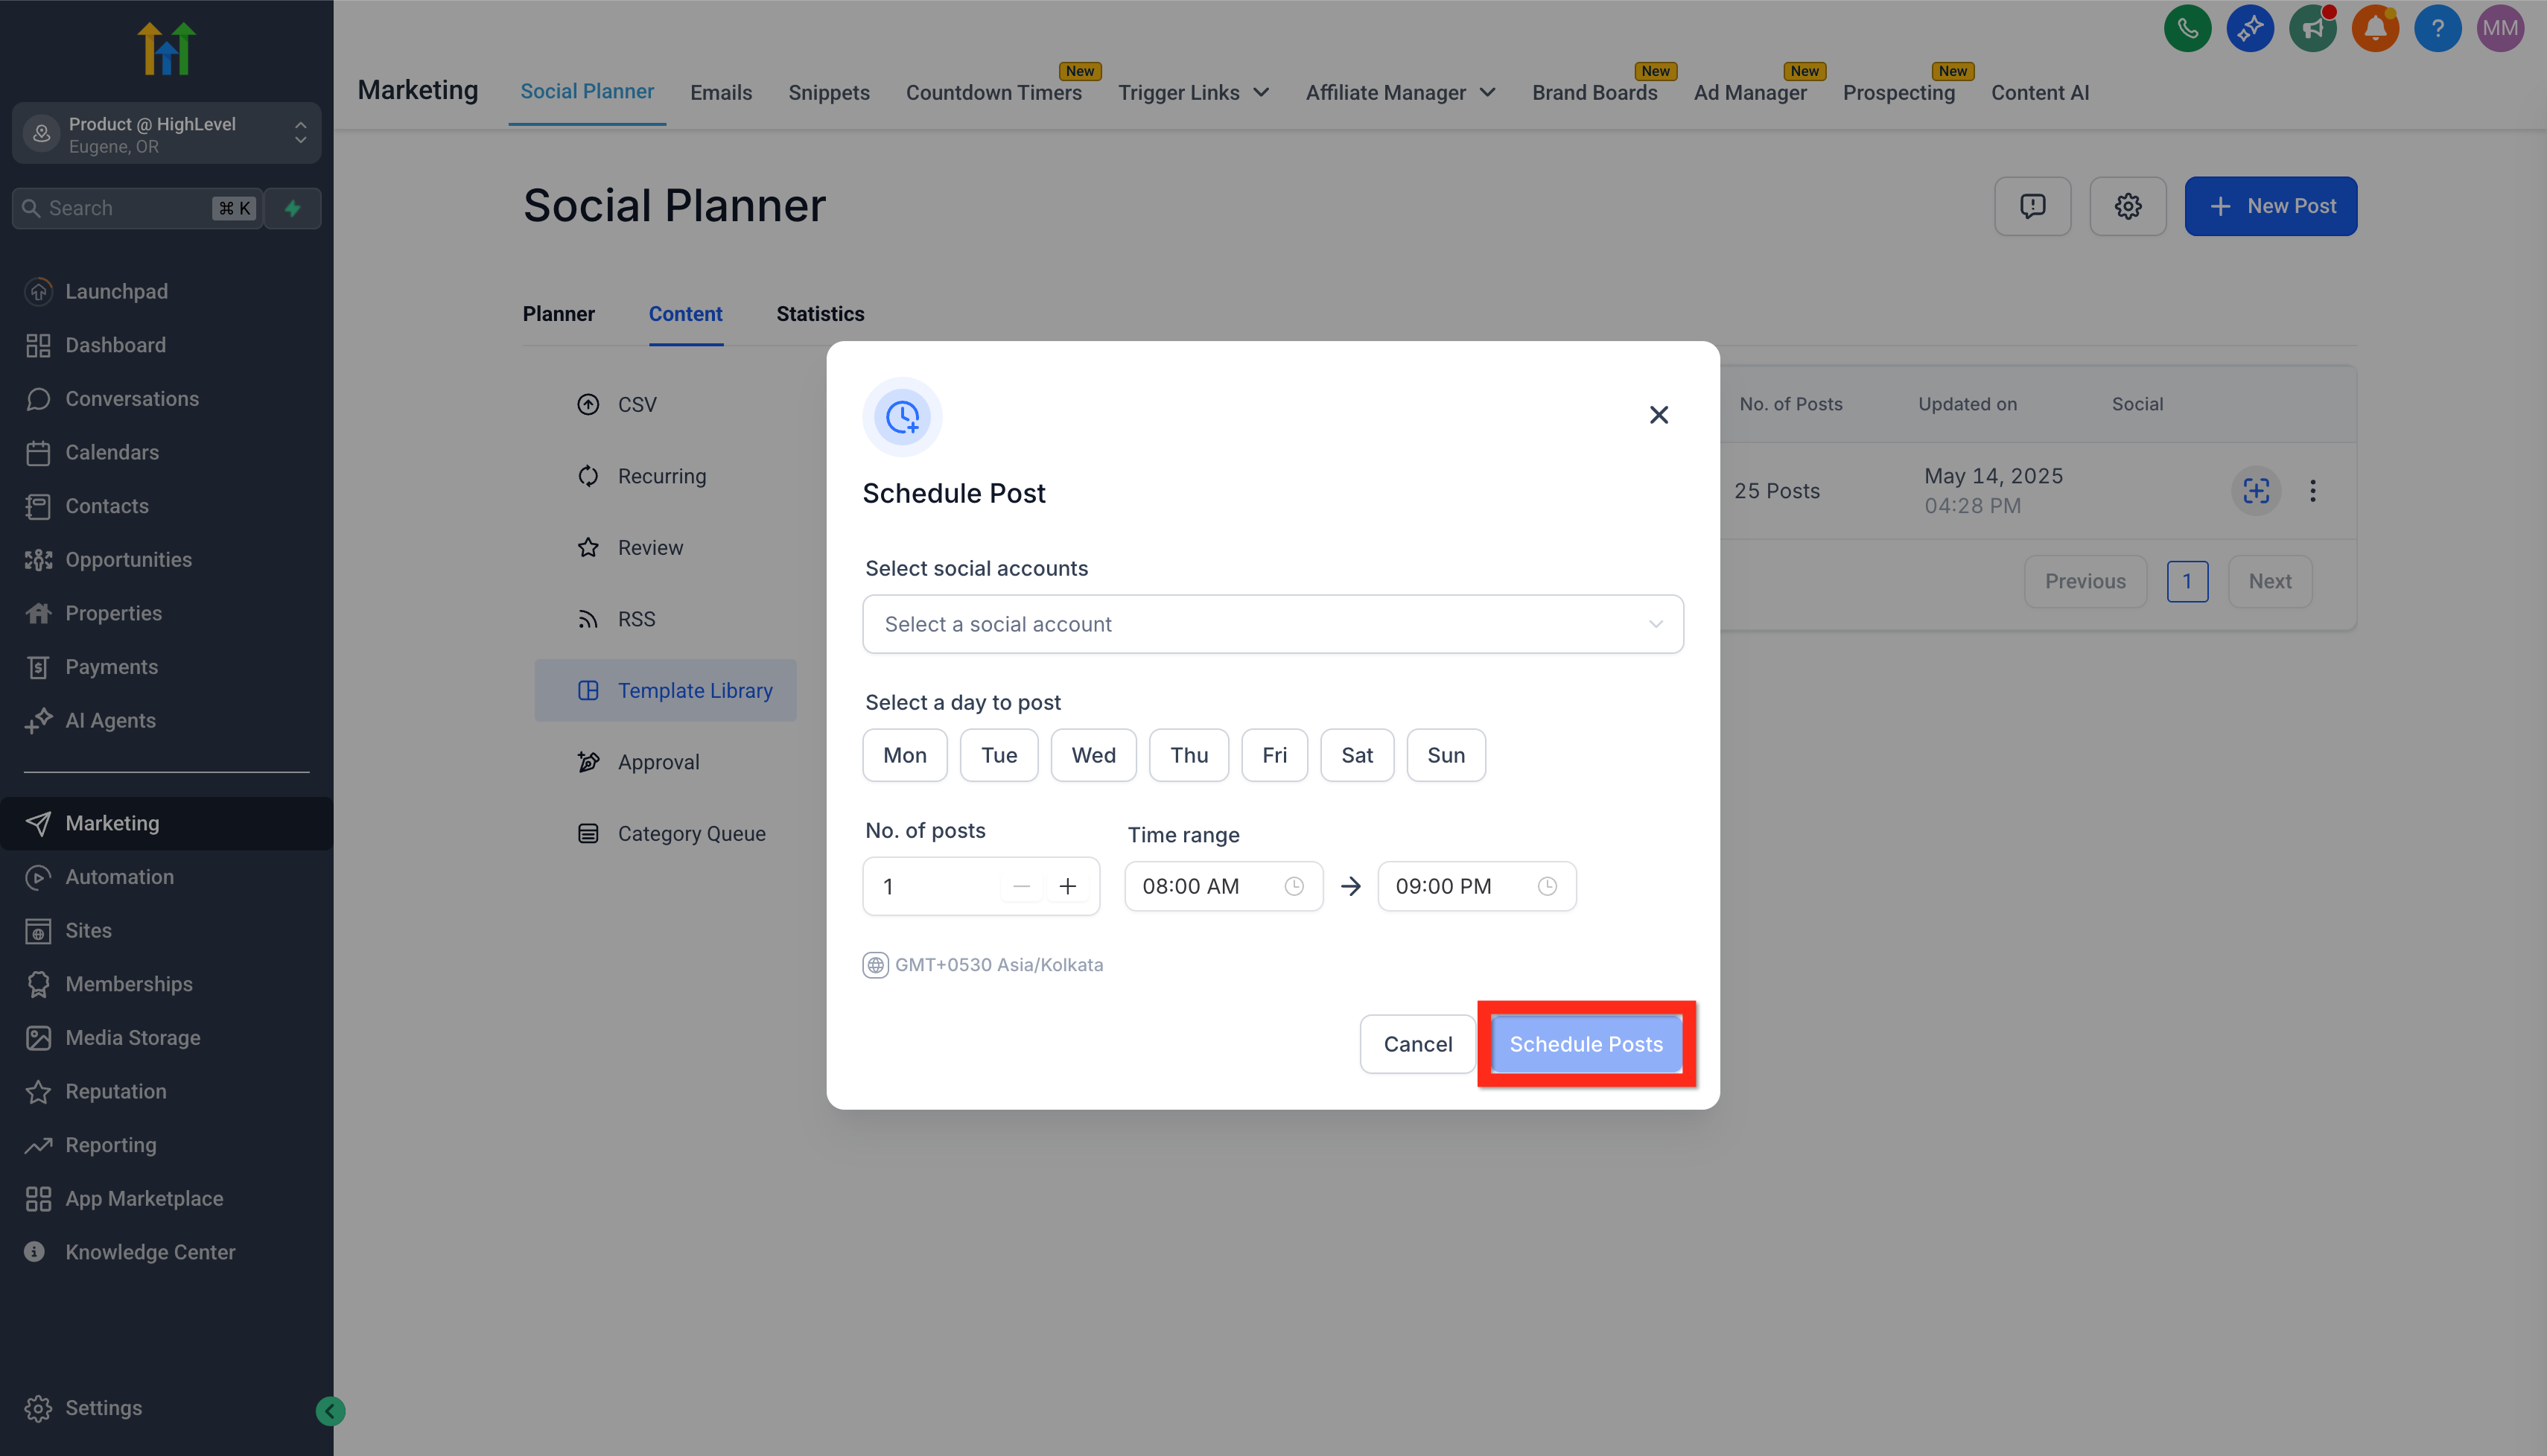
- Select the social accounts that should receive the posts.
- Choose the posting days, number of posts, and time range.
- Confirm the timezone shown in the scheduling window.
- Click Schedule Posts.
- Open Review & Schedule after the template is processed.
- Review the captions, media, accounts, and scheduled times.
- Correct any flagged errors.
- Click Import to add the approved posts to the planner.
Final review required: Template posts are not added to the publishing calendar until you complete Review & Schedule and click Import.
3. Create a Custom Post
Custom posts give you full control over the caption, media, selected accounts, and publishing method.
- Go to Marketing → Social Planner.
- Click + New Post → Create New Post.
- Select the social accounts that should receive the post.
- Enter the caption, links, hashtags, and other content.
- When posting to multiple platforms, enable Customize for Each Channel to use different captions or media by platform.
- Review each platform in the Post Preview panel.
- Choose to publish now, schedule for later, save as a draft, send for approval, or create a recurring post.
4. Add Media and Edit a Video Thumbnail
Reviewing media before scheduling helps prevent cropping, format, and compatibility issues.
- Use the Image or Video icon in the post composer to add media.
- Wait for the upload to finish before switching accounts or enabling channel-specific customization.
- Review the media in the Post Preview panel.
- Leave Media Optimization enabled when you want HighLevel to adjust supported media for platform requirements.
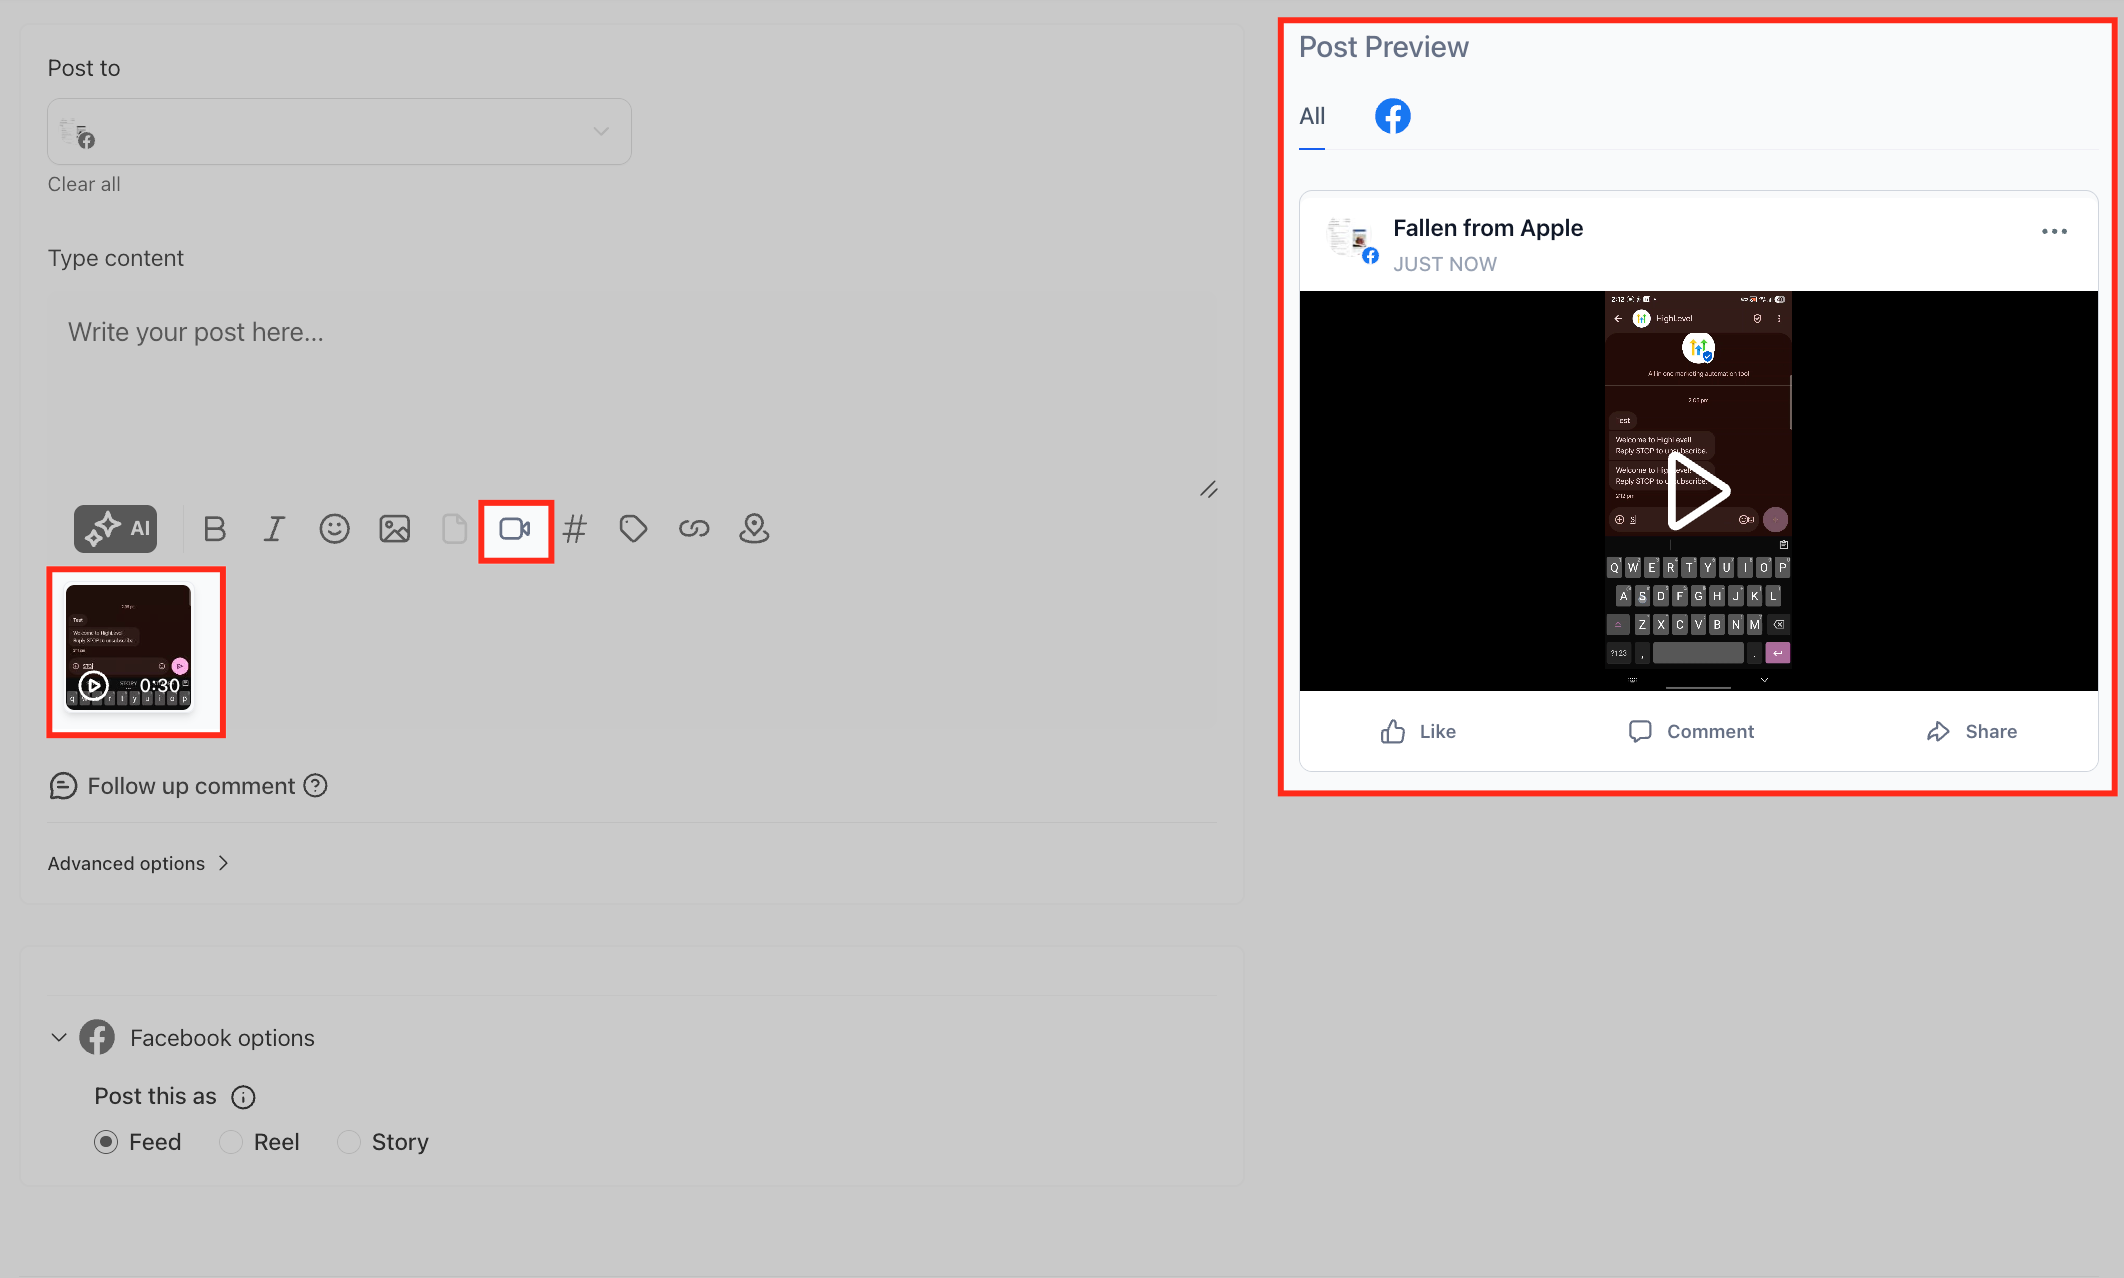
To edit a supported video thumbnail:
- Hover over the uploaded video.
- Click the pencil icon.
- Select Edit Video Thumbnail.
- Upload or select the thumbnail.
- Review the updated preview.
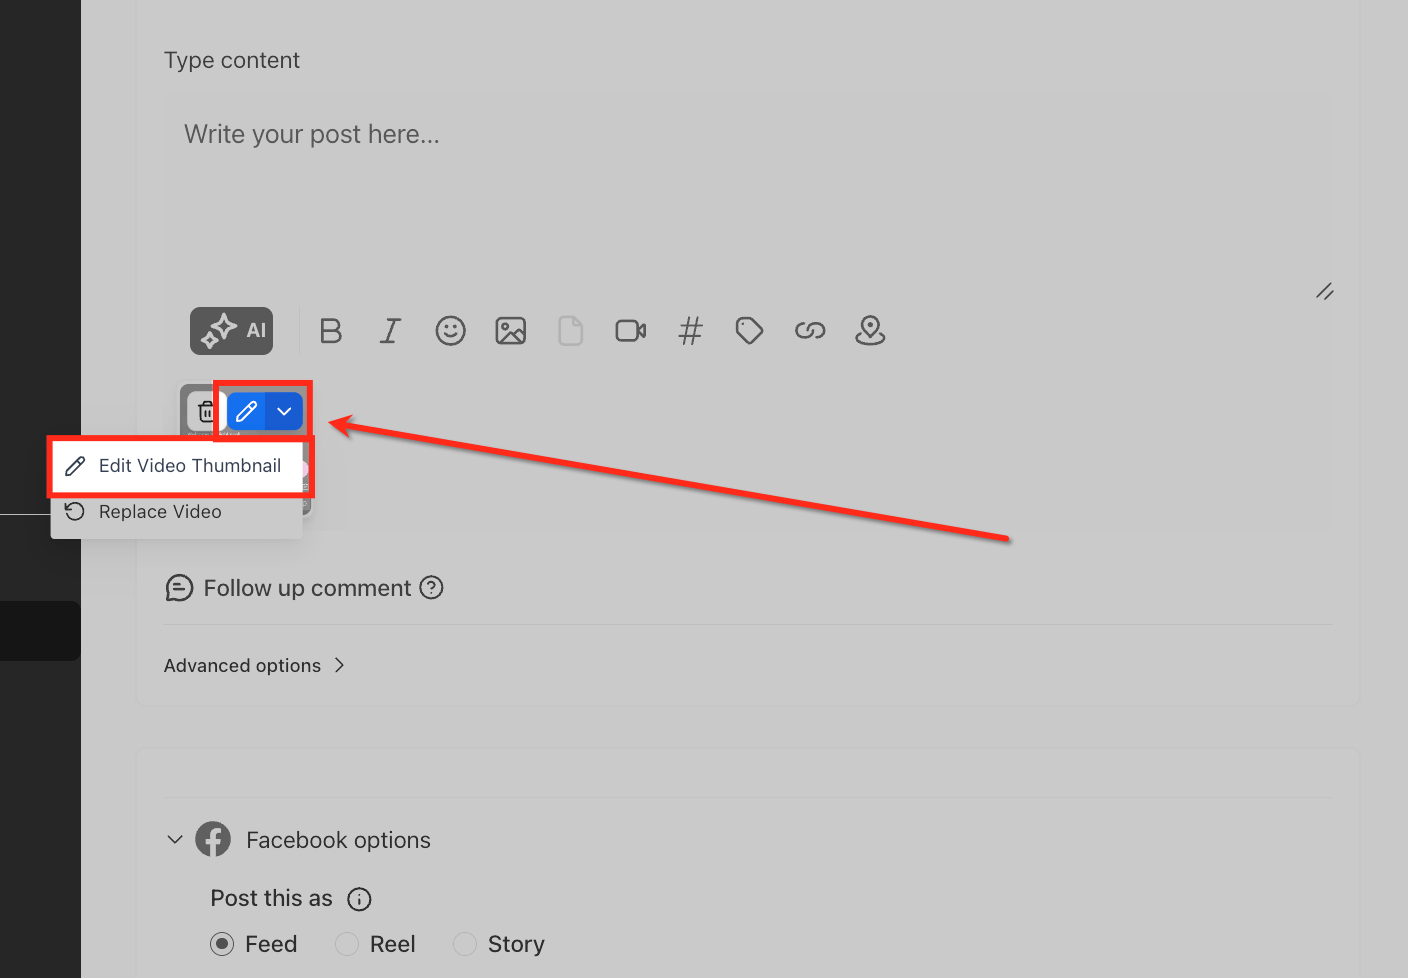
Tip: Thumbnail support depends on the selected platform and post type. If the option does not appear, review the current Social Planner media guidelines.
5. Connect Additional Social Accounts
Adding more accounts lets you manage multiple brands, locations, profiles, and platforms from the same Social Planner.
- Click the Settings gear in Social Planner.
- Open Social Accounts.
- Click + Connect Social.
- Select the platform you want to add.
- Sign in, approve the permissions, and select the account.
- Confirm that the account shows as connected.
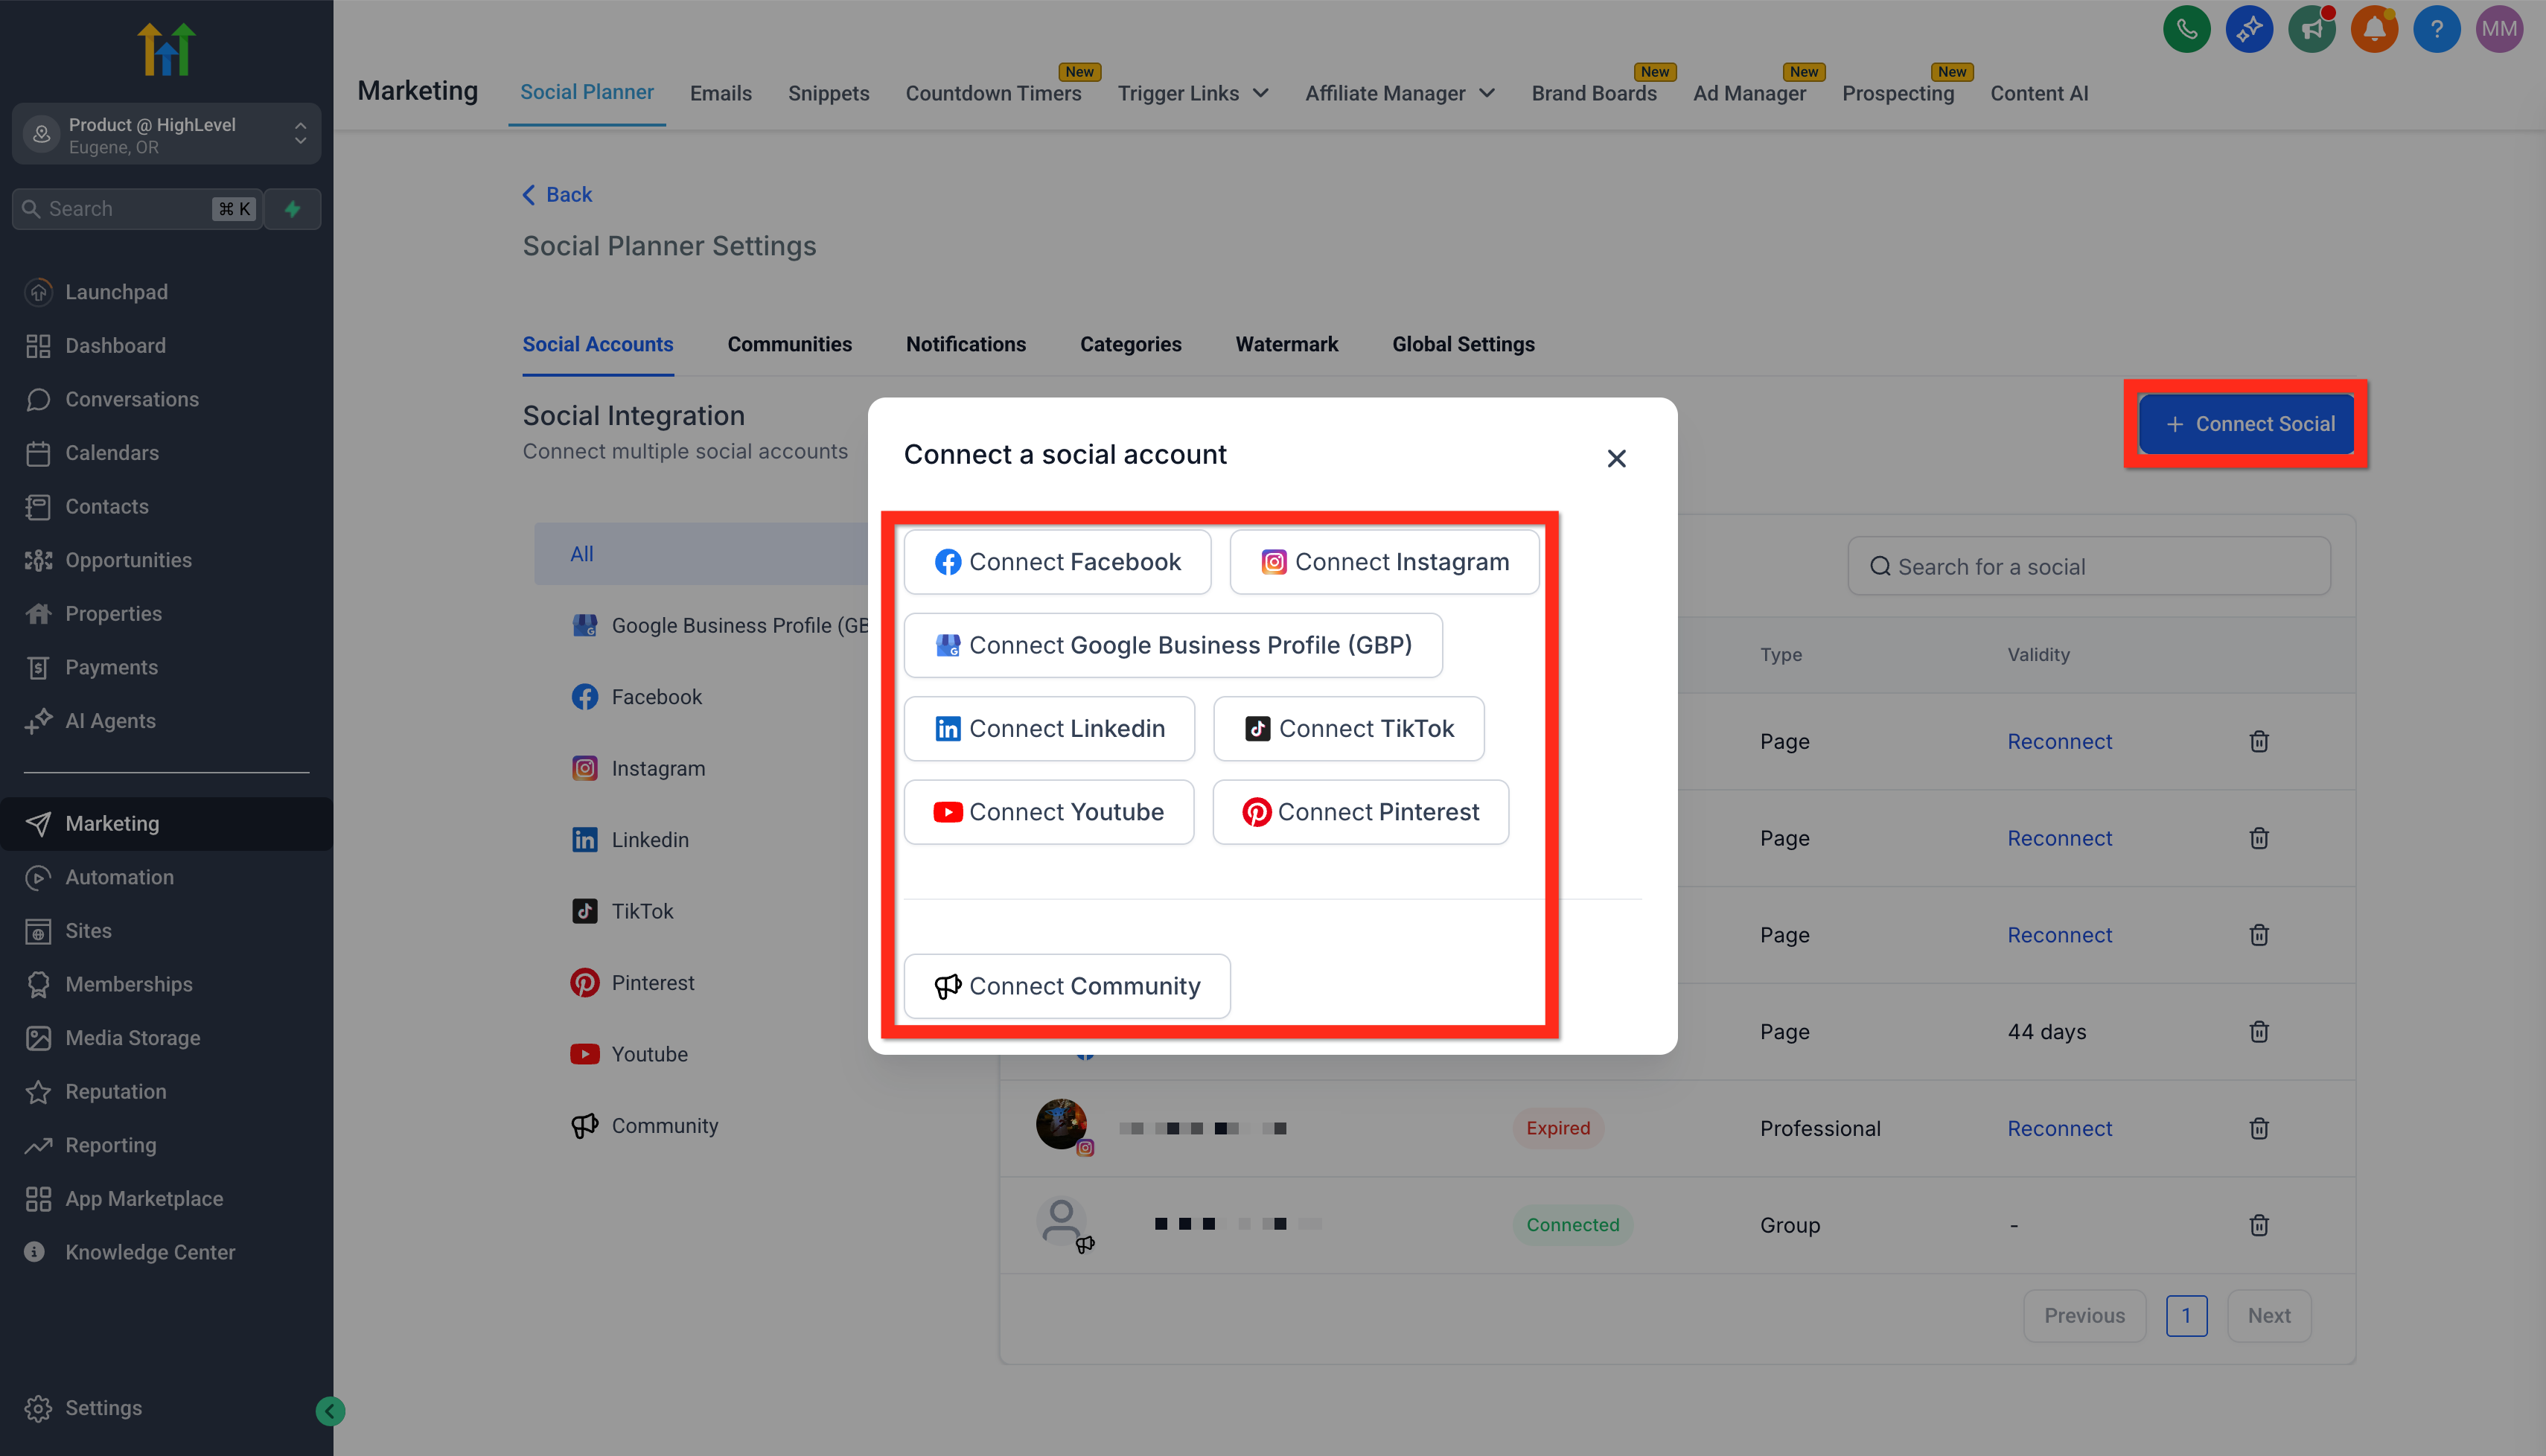
Account health: HighLevel displays in-app and email alerts when a connected account loses authorization. Reconnect it promptly because scheduled posts cannot publish while the account is disconnected.
Monitor Posts and Social Performance
Reviewing publishing status and analytics helps you catch failed posts, maintain active connections, and identify the content that performs best.
- Use the Planner tab to review drafts, scheduled posts, published posts, and failures.
- Go to Marketing → Social Planner → Statistics to review the metrics available for each connected platform.
- Filter results by supported platform or social account.
- Reconnect an account when HighLevel displays a permissions or authentication alert.
When Social Planner dashboard widgets are available in your account, you can also display aggregated metrics such as posts, likes, comments, shares, impressions, reach, and followers. These widgets support platform, social-account, and date-range filters but do not include post-level names, images, or descriptions.
Frequently Asked Questions
Q: Why can I create a draft but not publish it?
At least one active social account must be selected before a post can be published or scheduled. Open Social Planner Settings and confirm that the account is connected.
Q: Why can't I find my Facebook Page during setup?
Confirm that the Facebook profile used for authorization has admin access to the Page. Reconnect Facebook and approve all requested permissions if the Page still does not appear.
Q: What happens when a social account disconnects?
Scheduled posts cannot publish to that account until it is reconnected. HighLevel displays an in-app alert and can also send an email notification.
Q: Can I use different captions or media on each social platform?
Yes. Select multiple social accounts and enable Customize for Each Channel. You can then edit each platform's caption and media separately.
Q: Can I schedule posts in bulk?
Yes. Social Planner supports CSV and XLSX uploads with up to 90 posts per file. Review and correct all flagged errors before importing.
Q: Why is Edit Video Thumbnail unavailable?
Custom thumbnails are only available for supported platforms and post types. Review the current Social Planner media guidelines when the option does not appear.
Q: Why are some analytics missing?
Available metrics and reporting delays depend on the platform, account type, permissions, and selected date range. Reconnect the account when HighLevel requests updated analytics permissions.
Related Articles
Was this article helpful?
That’s Great!
Thank you for your feedback
Sorry! We couldn't be helpful
Thank you for your feedback
Feedback sent
We appreciate your effort and will try to fix the article