Migrating from Shopify to HighLevel helps you bring your ecommerce data, customer records, order history, and marketing workflows into one platform. This guide explains how to prepare your Shopify store, connect Shopify to HighLevel, import supported data, configure future sync settings, rebuild key automations, and validate your migration before fully transitioning.
HighLevel’s Shopify integration supports importing and syncing products, collections, contacts, orders, and transactions. It also supports future ecommerce automation using triggers such as Order Submitted and Payment Received.
Note: Changes to Shopify connection setup
Shopify is updating how new integrations connect to third-party apps and moving to an OAuth-based setup. Here's what this means for you:

1. Already connected your Shopify store to GHL: No action needed. Your integration will continue to work as-is.
2. New Shopify store without the custom app option or for new connections: Shopify no longer shows this option on some newer stores (specifically from Jan 1, 2026). Our new OAuth-based connection flow will make setup easier for you.

What's new: We've rolled out a new OAuth-based Shopify connection which is more secure, faster to set up, and aligned with the Shopify's latest standards.
TABLE OF CONTENTS
- What is the Shopify to HighLevel Migration?
- Key Benefits of Migrating Shopify to HighLevel
- Before You Begin
- What Shopify Data Can Be Imported and Synced?
- Create a Custom App in Shopify
- Connect Shopify to HighLevel
- Review Imported Products and Collections
- Rebuild Ecommerce Operations and Automations in HighLevel
- Manage Sync Settings After Migration
- Decommission Shopify After Validation
- Frequently Asked Questions
- Related Articles
What is the Shopify to HighLevel Migration?
The Shopify to HighLevel migration allows store owners to move supported ecommerce data from Shopify into HighLevel so they can manage contacts, products, orders, payments, and follow-up automation in one place. The migration uses the Shopify integration in HighLevel to import historical data and keep selected data synced going forward.
This migration is best used when you want to centralize ecommerce operations, customer communication, and sales automation inside HighLevel. Some parts of the migration are handled through the native Shopify integration, while other items, such as workflows, store pages, payment settings, and team processes, should be reviewed and rebuilt manually.
Key Benefits of Migrating Shopify to HighLevel
Migrating your Shopify store to HighLevel helps reduce platform switching and gives your team a more complete view of ecommerce activity, contacts, and automation opportunities.
- Centralized ecommerce data: Import supported Shopify products, collections, contacts, orders, and transactions into HighLevel.
- Improved customer follow-up: Use ecommerce data with HighLevel CRM tools to create better customer communication and segmentation.
- Automation-ready order activity: Use triggers such as Order Submitted and Payment Received for workflow automation after the Shopify integration is connected.
- Simplified migration planning: Review Shopify data, workflows, payments, and store operations before transitioning fully to HighLevel.
- Ongoing sync control: Choose which supported Shopify data should continue syncing into HighLevel after the initial import.
Before You Begin
A successful migration starts with the right access, permissions, and expectations. Reviewing these requirements before setup helps prevent missing data, failed imports, and sync limitations.
Before migrating, make sure you have:
- Admin access to the Shopify store
- Admin access to the HighLevel sub-account
- Permission to create or manage custom apps in Shopify
- Access to generate a Shopify Admin API access token
- The Shopify store URL or store name
- A clear list of automations, notifications, checkout flows, and customer follow-up processes that need to be rebuilt in HighLevel
Important Shopify plan limitation: Shopify Basic may not provide access to customer PII through the updated Shopify API. This can prevent contacts, orders, and transactions from syncing into HighLevel. Products and collections can still be imported and synced on Shopify Basic, but contacts, orders, and transactions may require Shopify Grow, Advanced, or Plus. If your Shopify plan does not provide access to the required customer or order data, some import or sync options may appear unavailable during setup.What Shopify Data Can Be Imported and Synced?
The Shopify integration includes two important migration choices: one-time historical import and future sync. Understanding the difference helps you decide what data to bring into HighLevel now and what data should continue updating after the connection is complete.
| One-Time Import Options | Future Sync Options |
|---|---|
| Contacts | Contacts |
| Orders | Orders |
| Transactions | Transactions |
| Products | Products |
| Collections | Collections |
| Order Submitted trigger | |
| Payment Received trigger |
Note: Contact import includes Shopify customers who have placed an order in the past. Customers who have not placed an order may not be included in the Shopify contact import.
The import and sync process may take time to complete depending on the size of the Shopify store and the selected data types.
Connect via Shopify OAuth App
For every new connection and reconnection, Shopify will be integrated using OAuth approach. If you had previously connected Shopify using a custom app, your existing integration continues to work. See the note below for guidance.
| OAuth App (Recommended) | Custom App (Legacy)- Deprecated | |
|---|---|---|
| Setup effort | Low. one-click install from Shopify | Requires manual API token creation |
| Who it's for | All new connections | Existing integrations set up before the OAuth app was available |
| Security | OAuth 2.0. No API tokens to manage | Requires storing Admin API access token manually |
| Availability | Available now | Still supported for existing accounts |
If you already connected Shopify using a custom app, your integration is not affected. You do not need to switch. The OAuth App is the recommended path for any new Shopify connections going forward.
The Shopify OAuth App lets you connect in a few steps and requires no custom app creation, no API tokens and no manual configuration in Shopify's developer settings.
Steps to Connect Using the OAuth App:
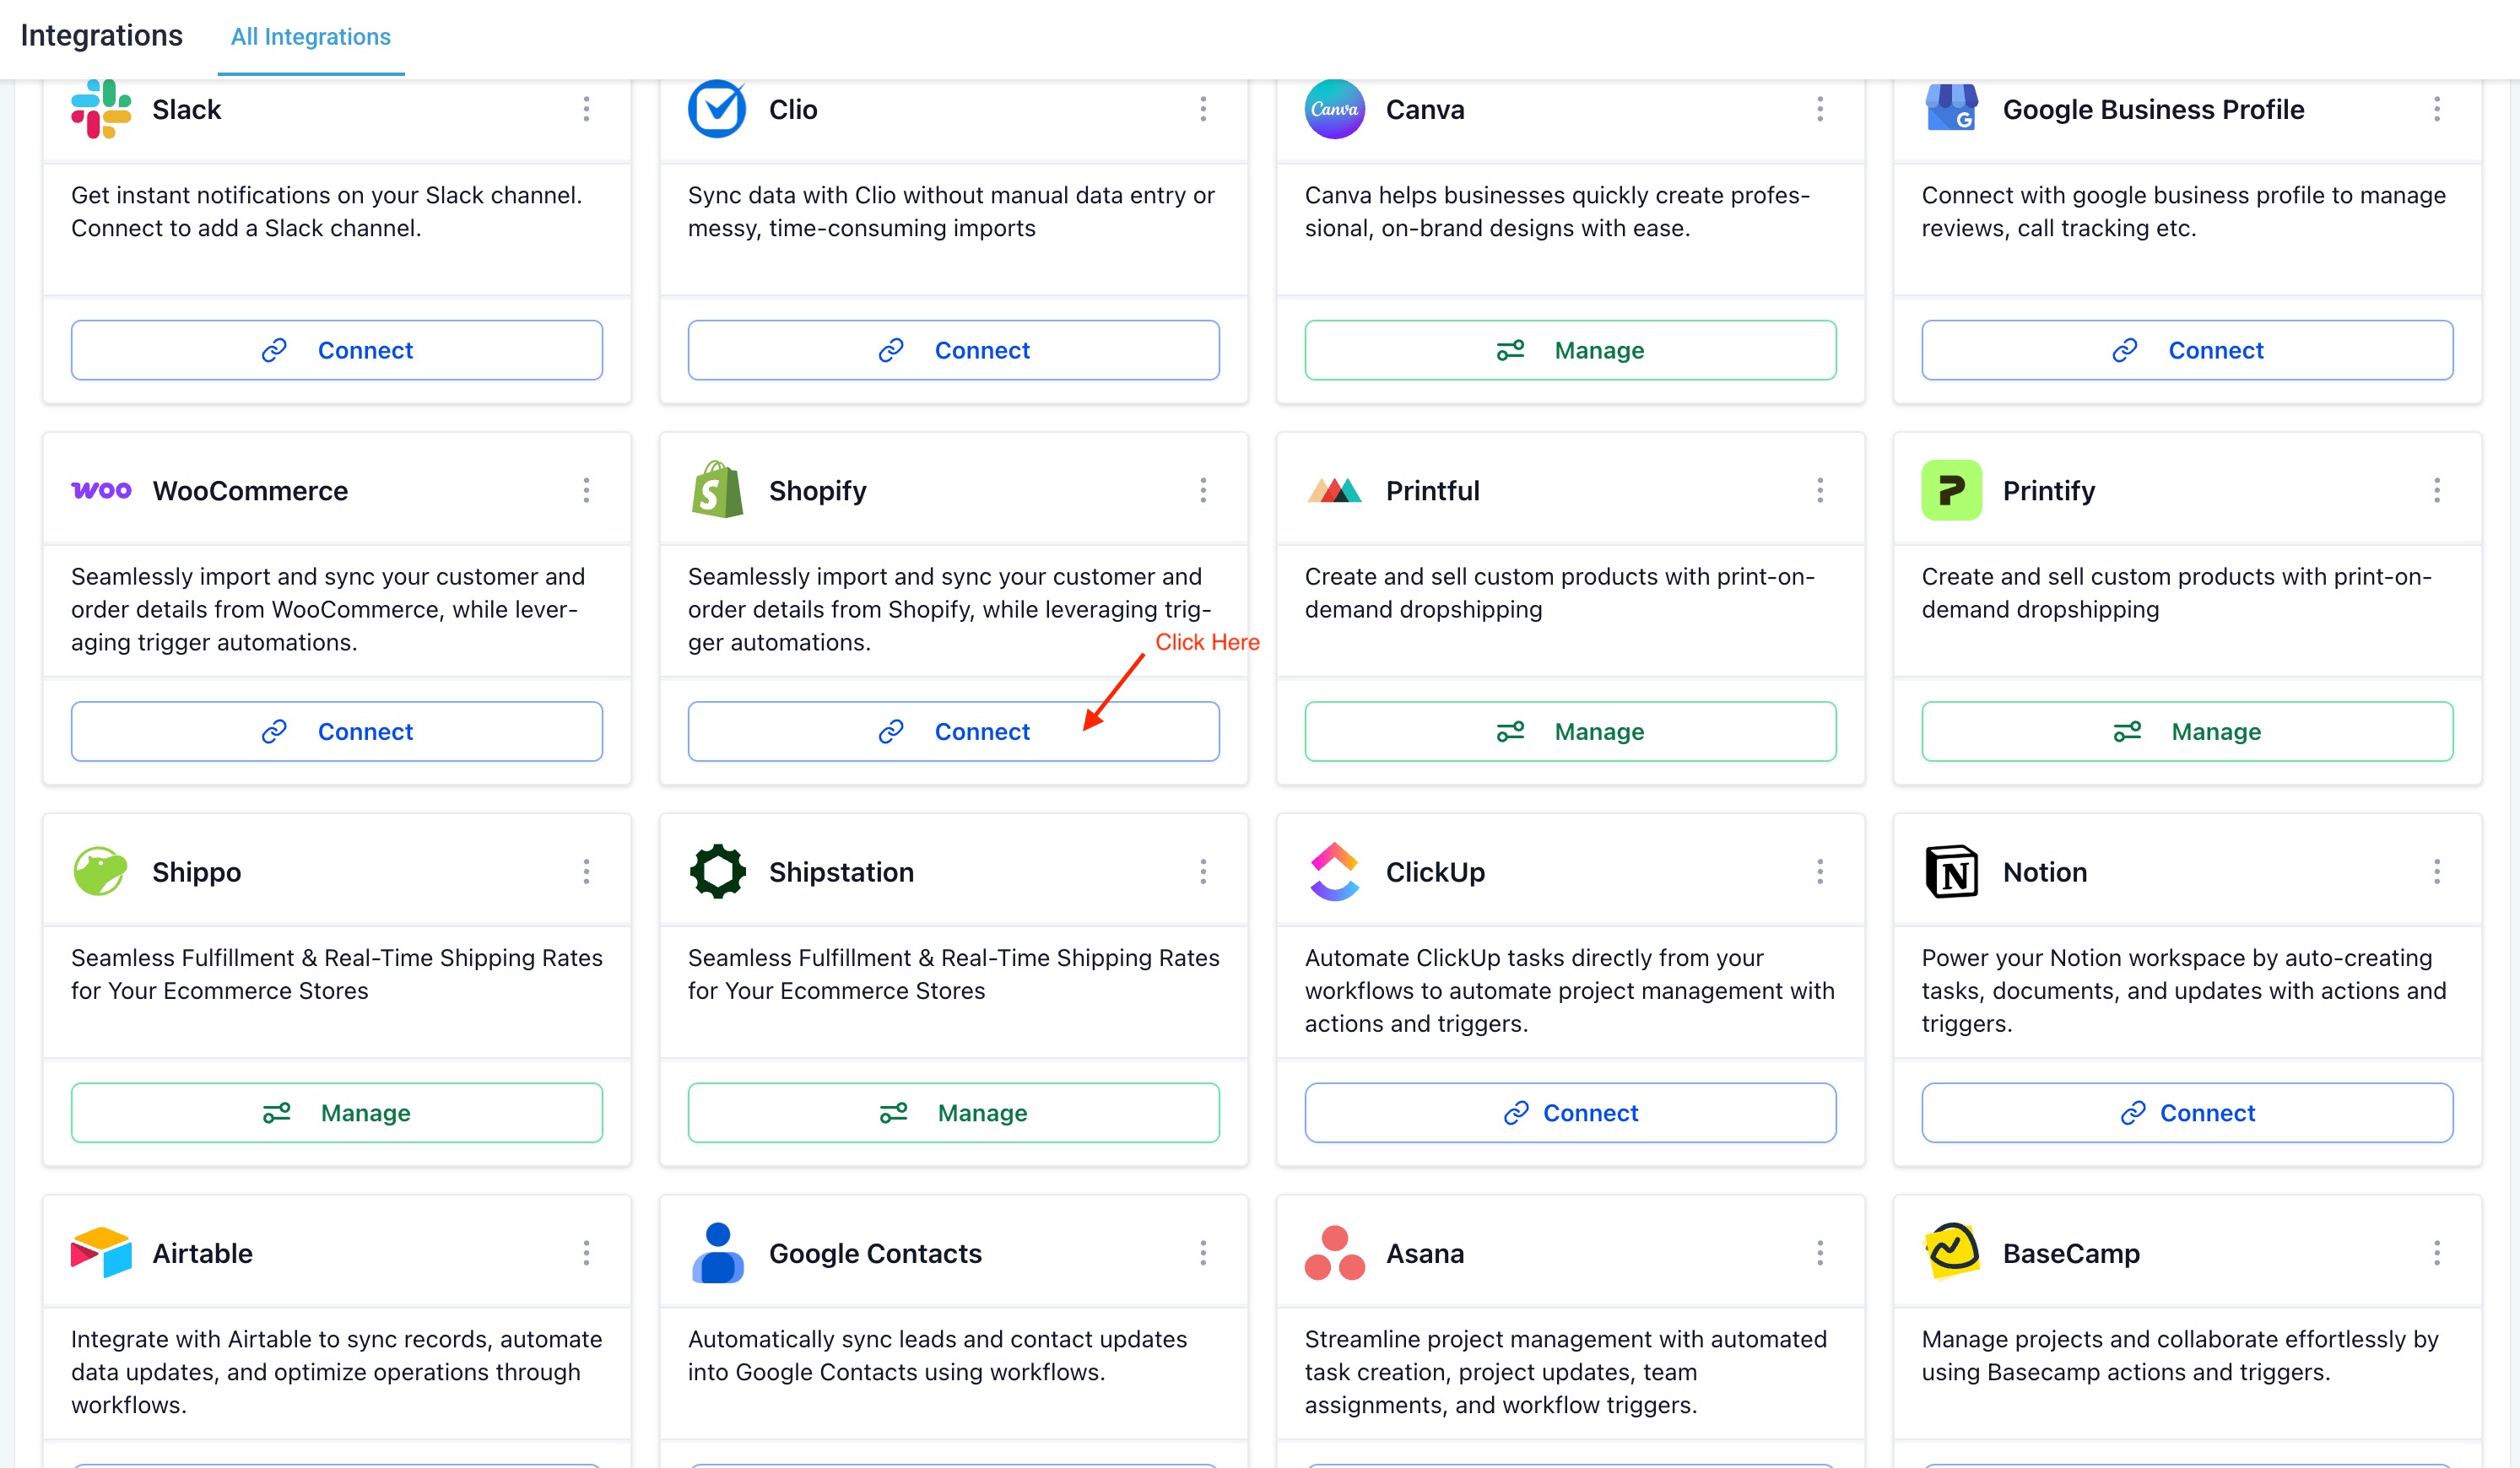
- Open the sub-account and go to Settings > Integrations > Shopify.
- Click Connect.
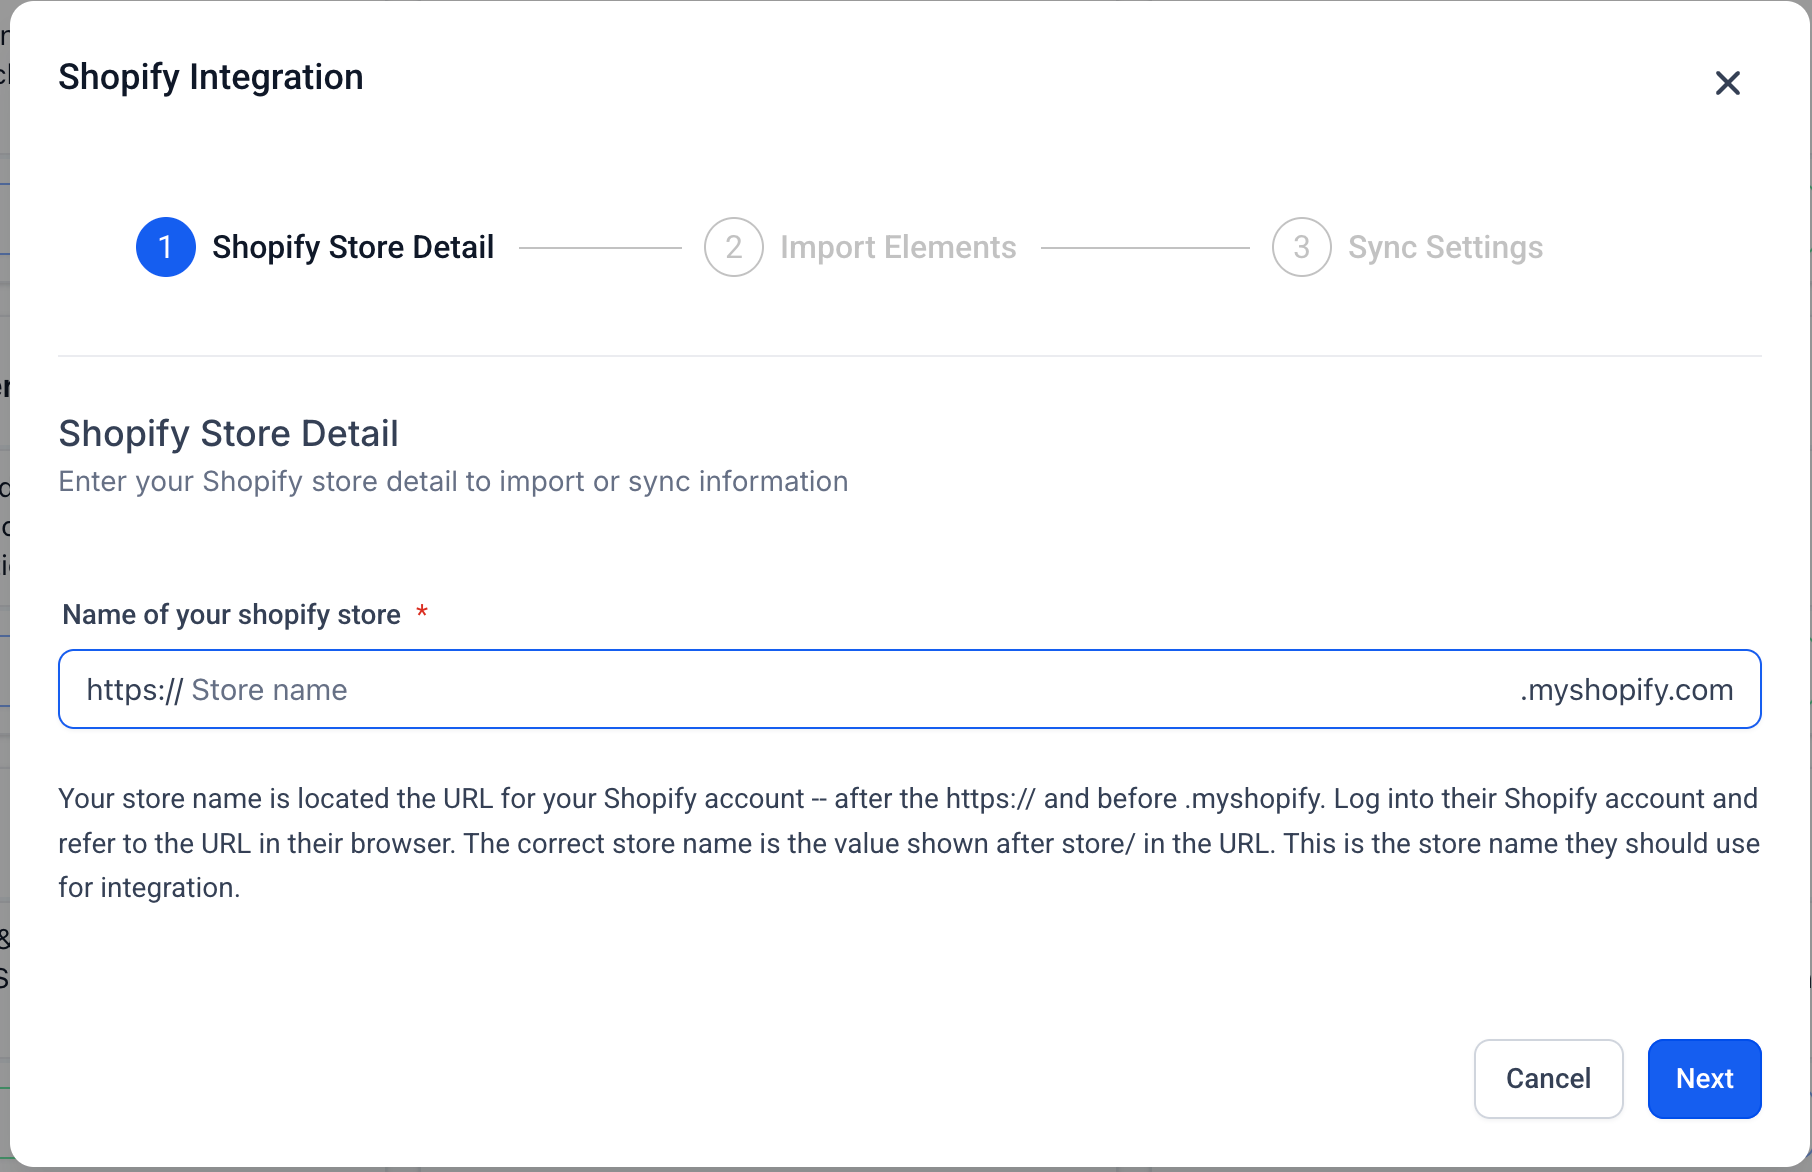
- Enter your Shopify store URL or store name and click Next.
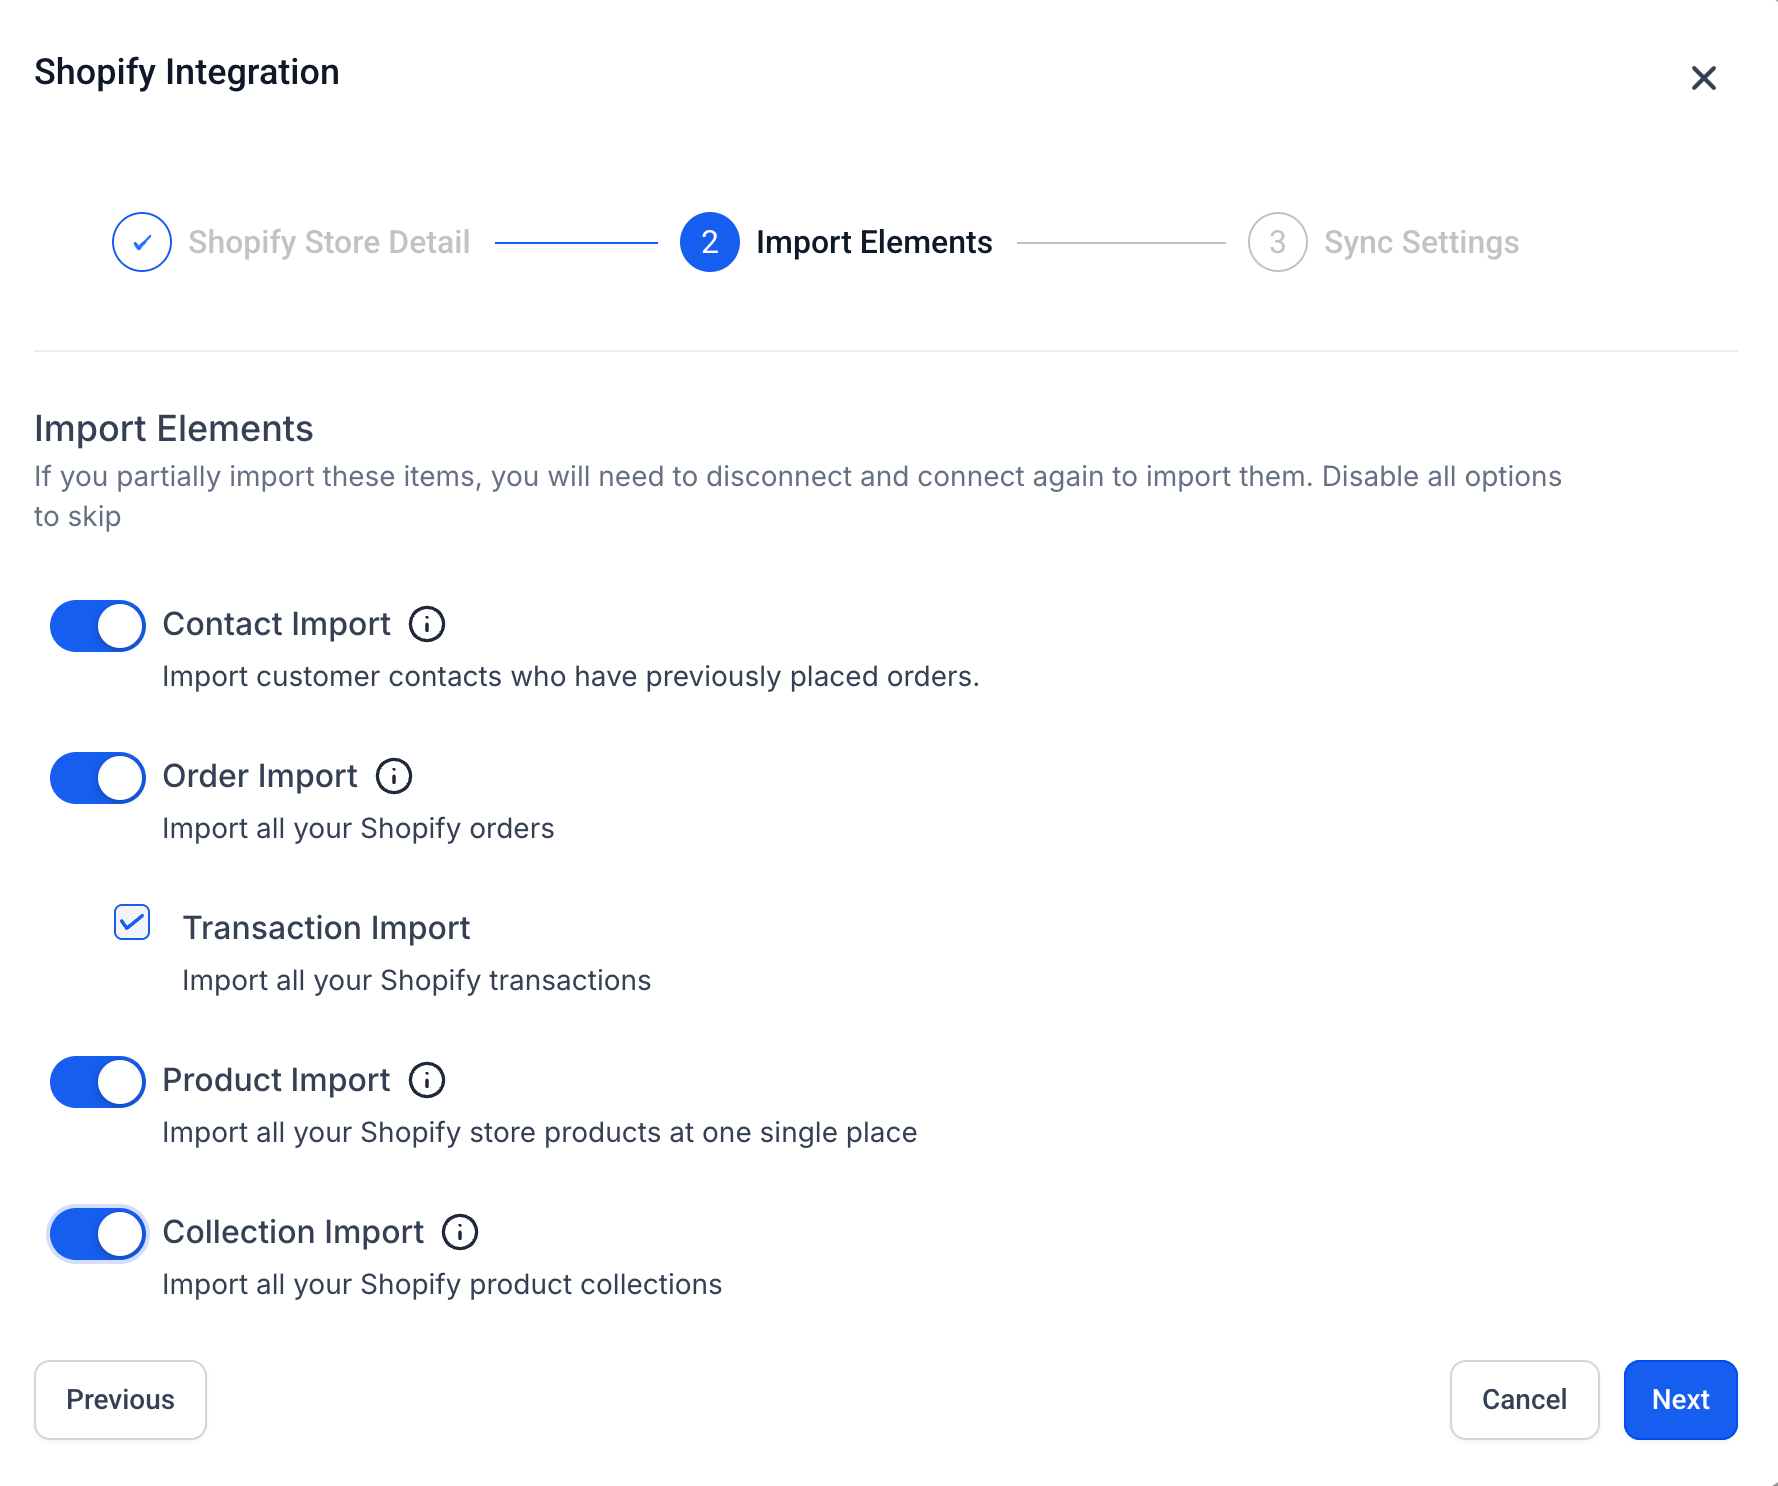
- On the Import Elements screen, select the Shopify data you want to import as a one-time historical import:
- Contact Import
- Order Import
- Transaction Import
- Product Import
- Collection Import
- Click Next to proceed to the Sync Settings screen. Select the data and triggers you want to keep syncing going forward:
- Contact Sync
- Order Sync
- Order Received Trigger
- Transaction Sync
- Payment Received Trigger
- Product Sync
- Collection Sync
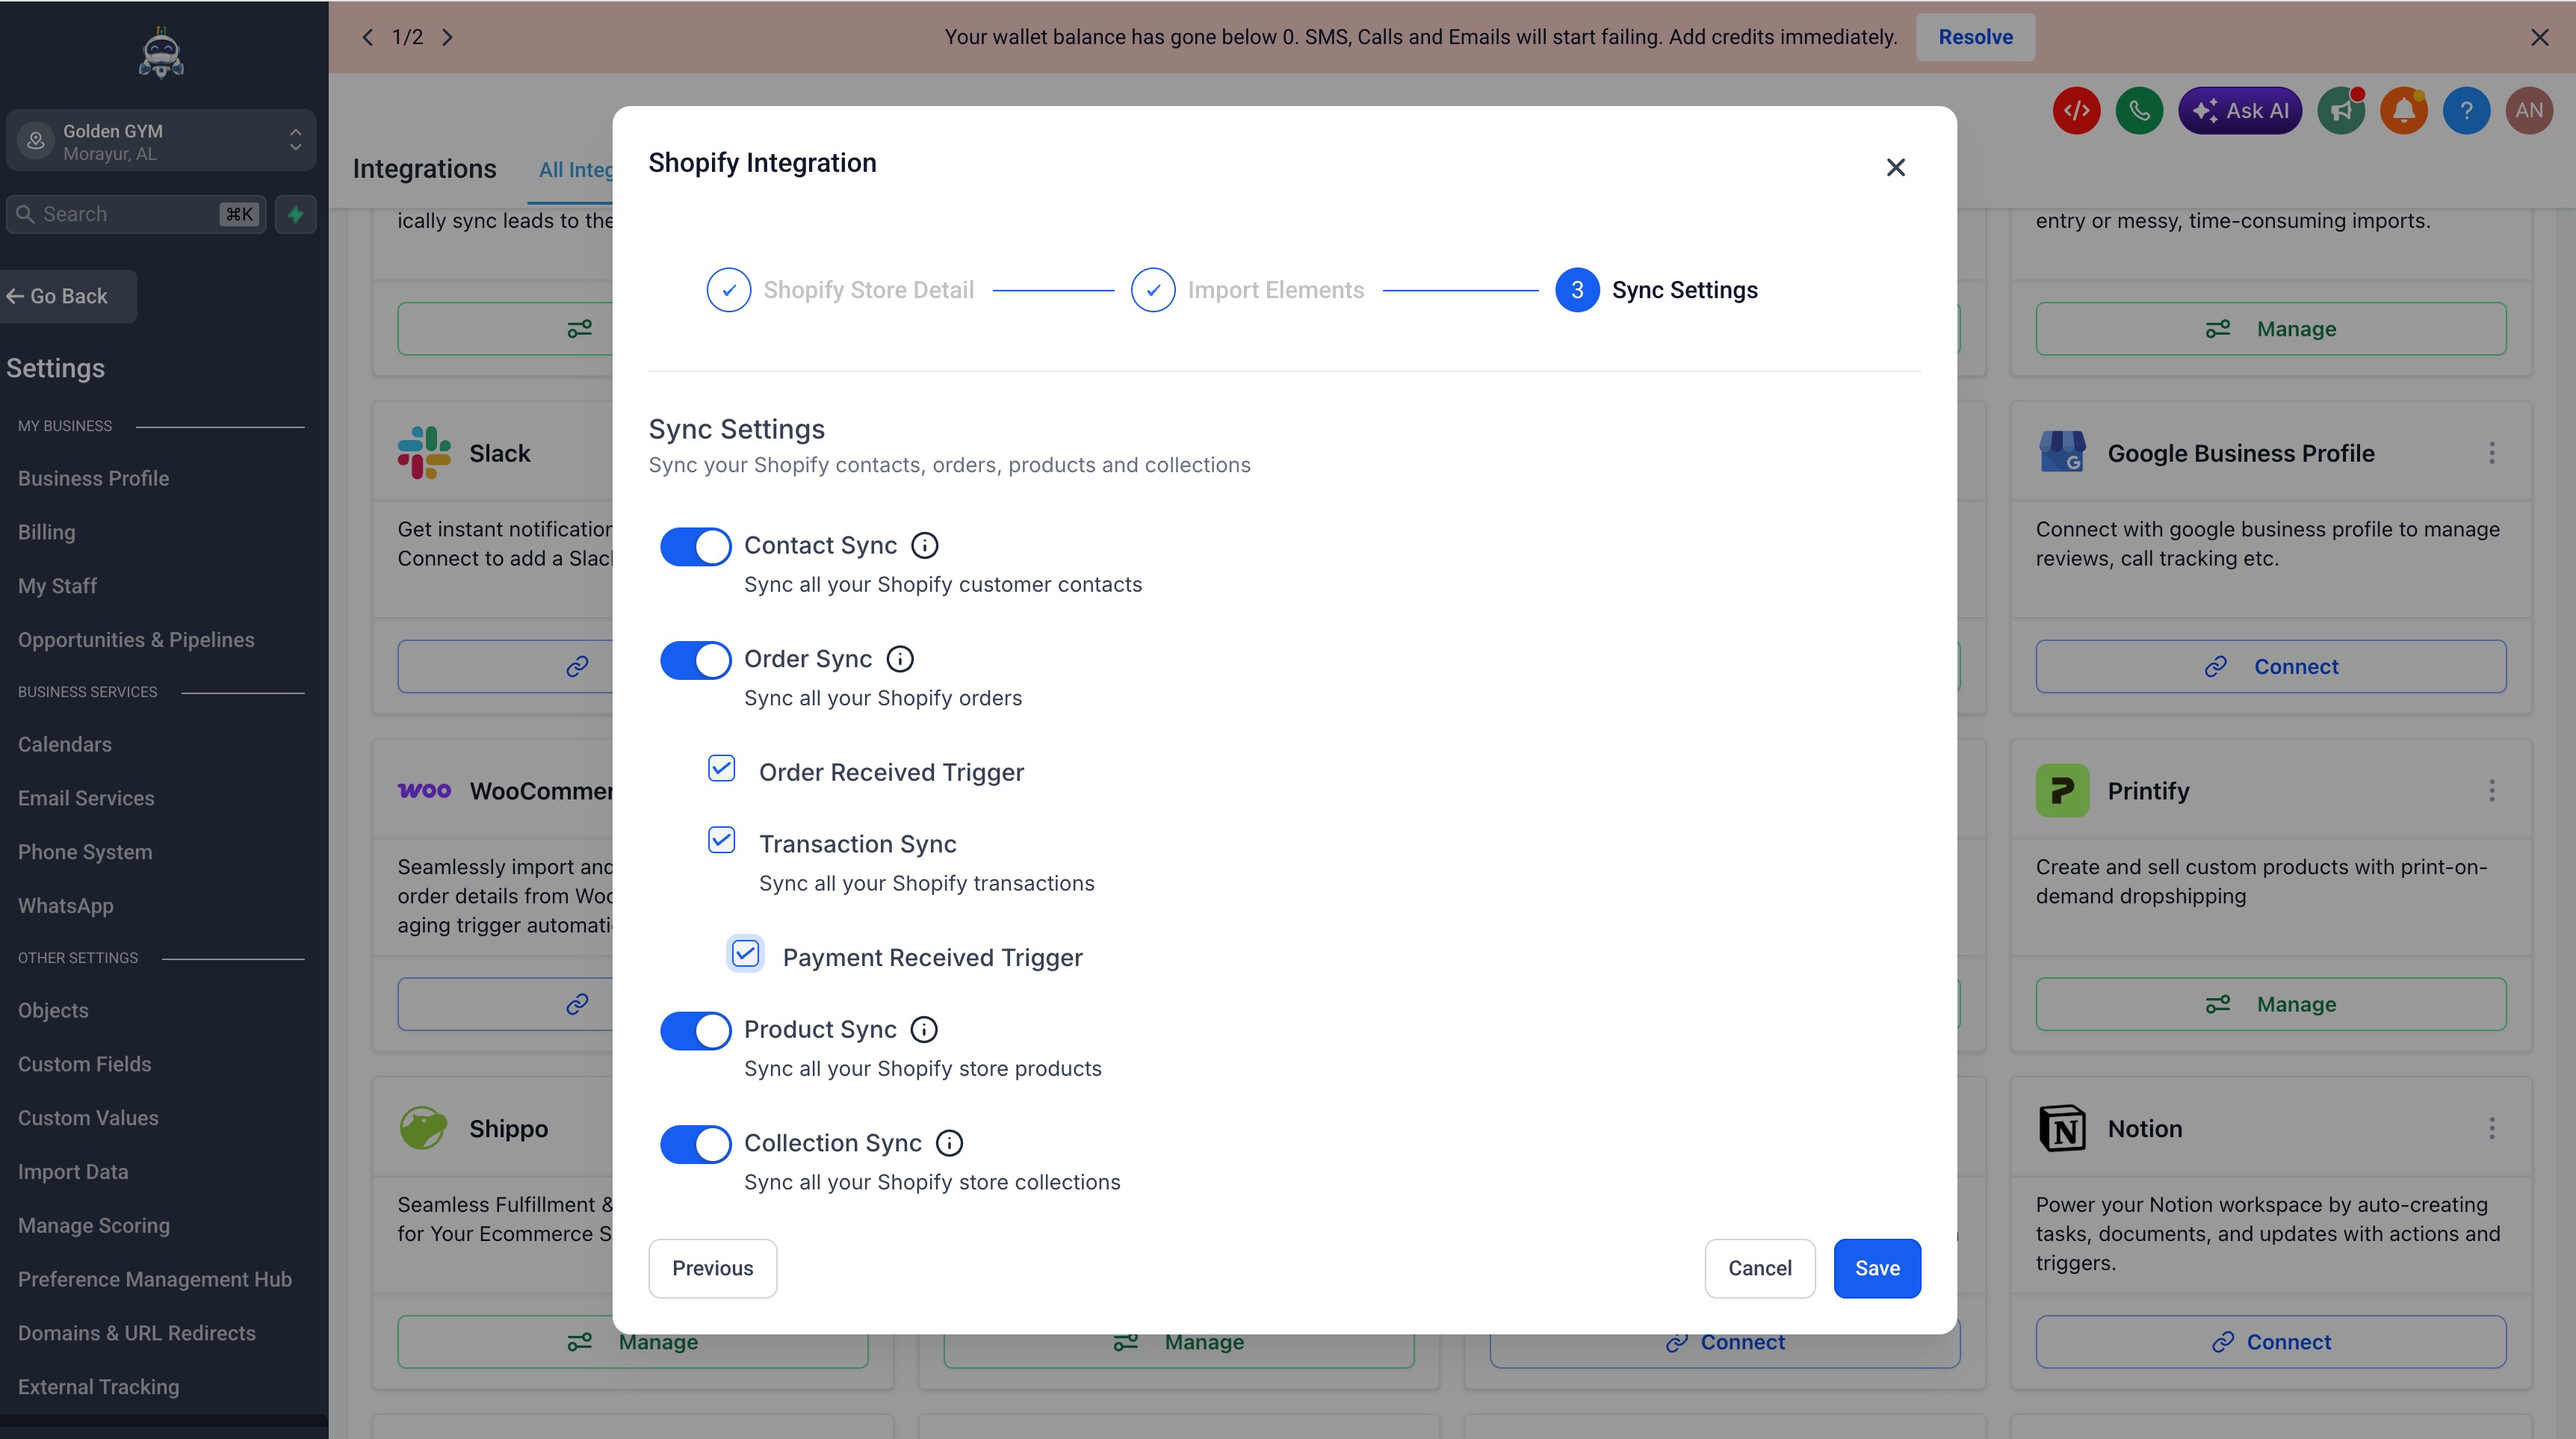
- Click Save. This will initiate the OAuth authorization flow and redirect you to Shopify.
- On the Shopify Install app screen, review the permissions requested and click Install.
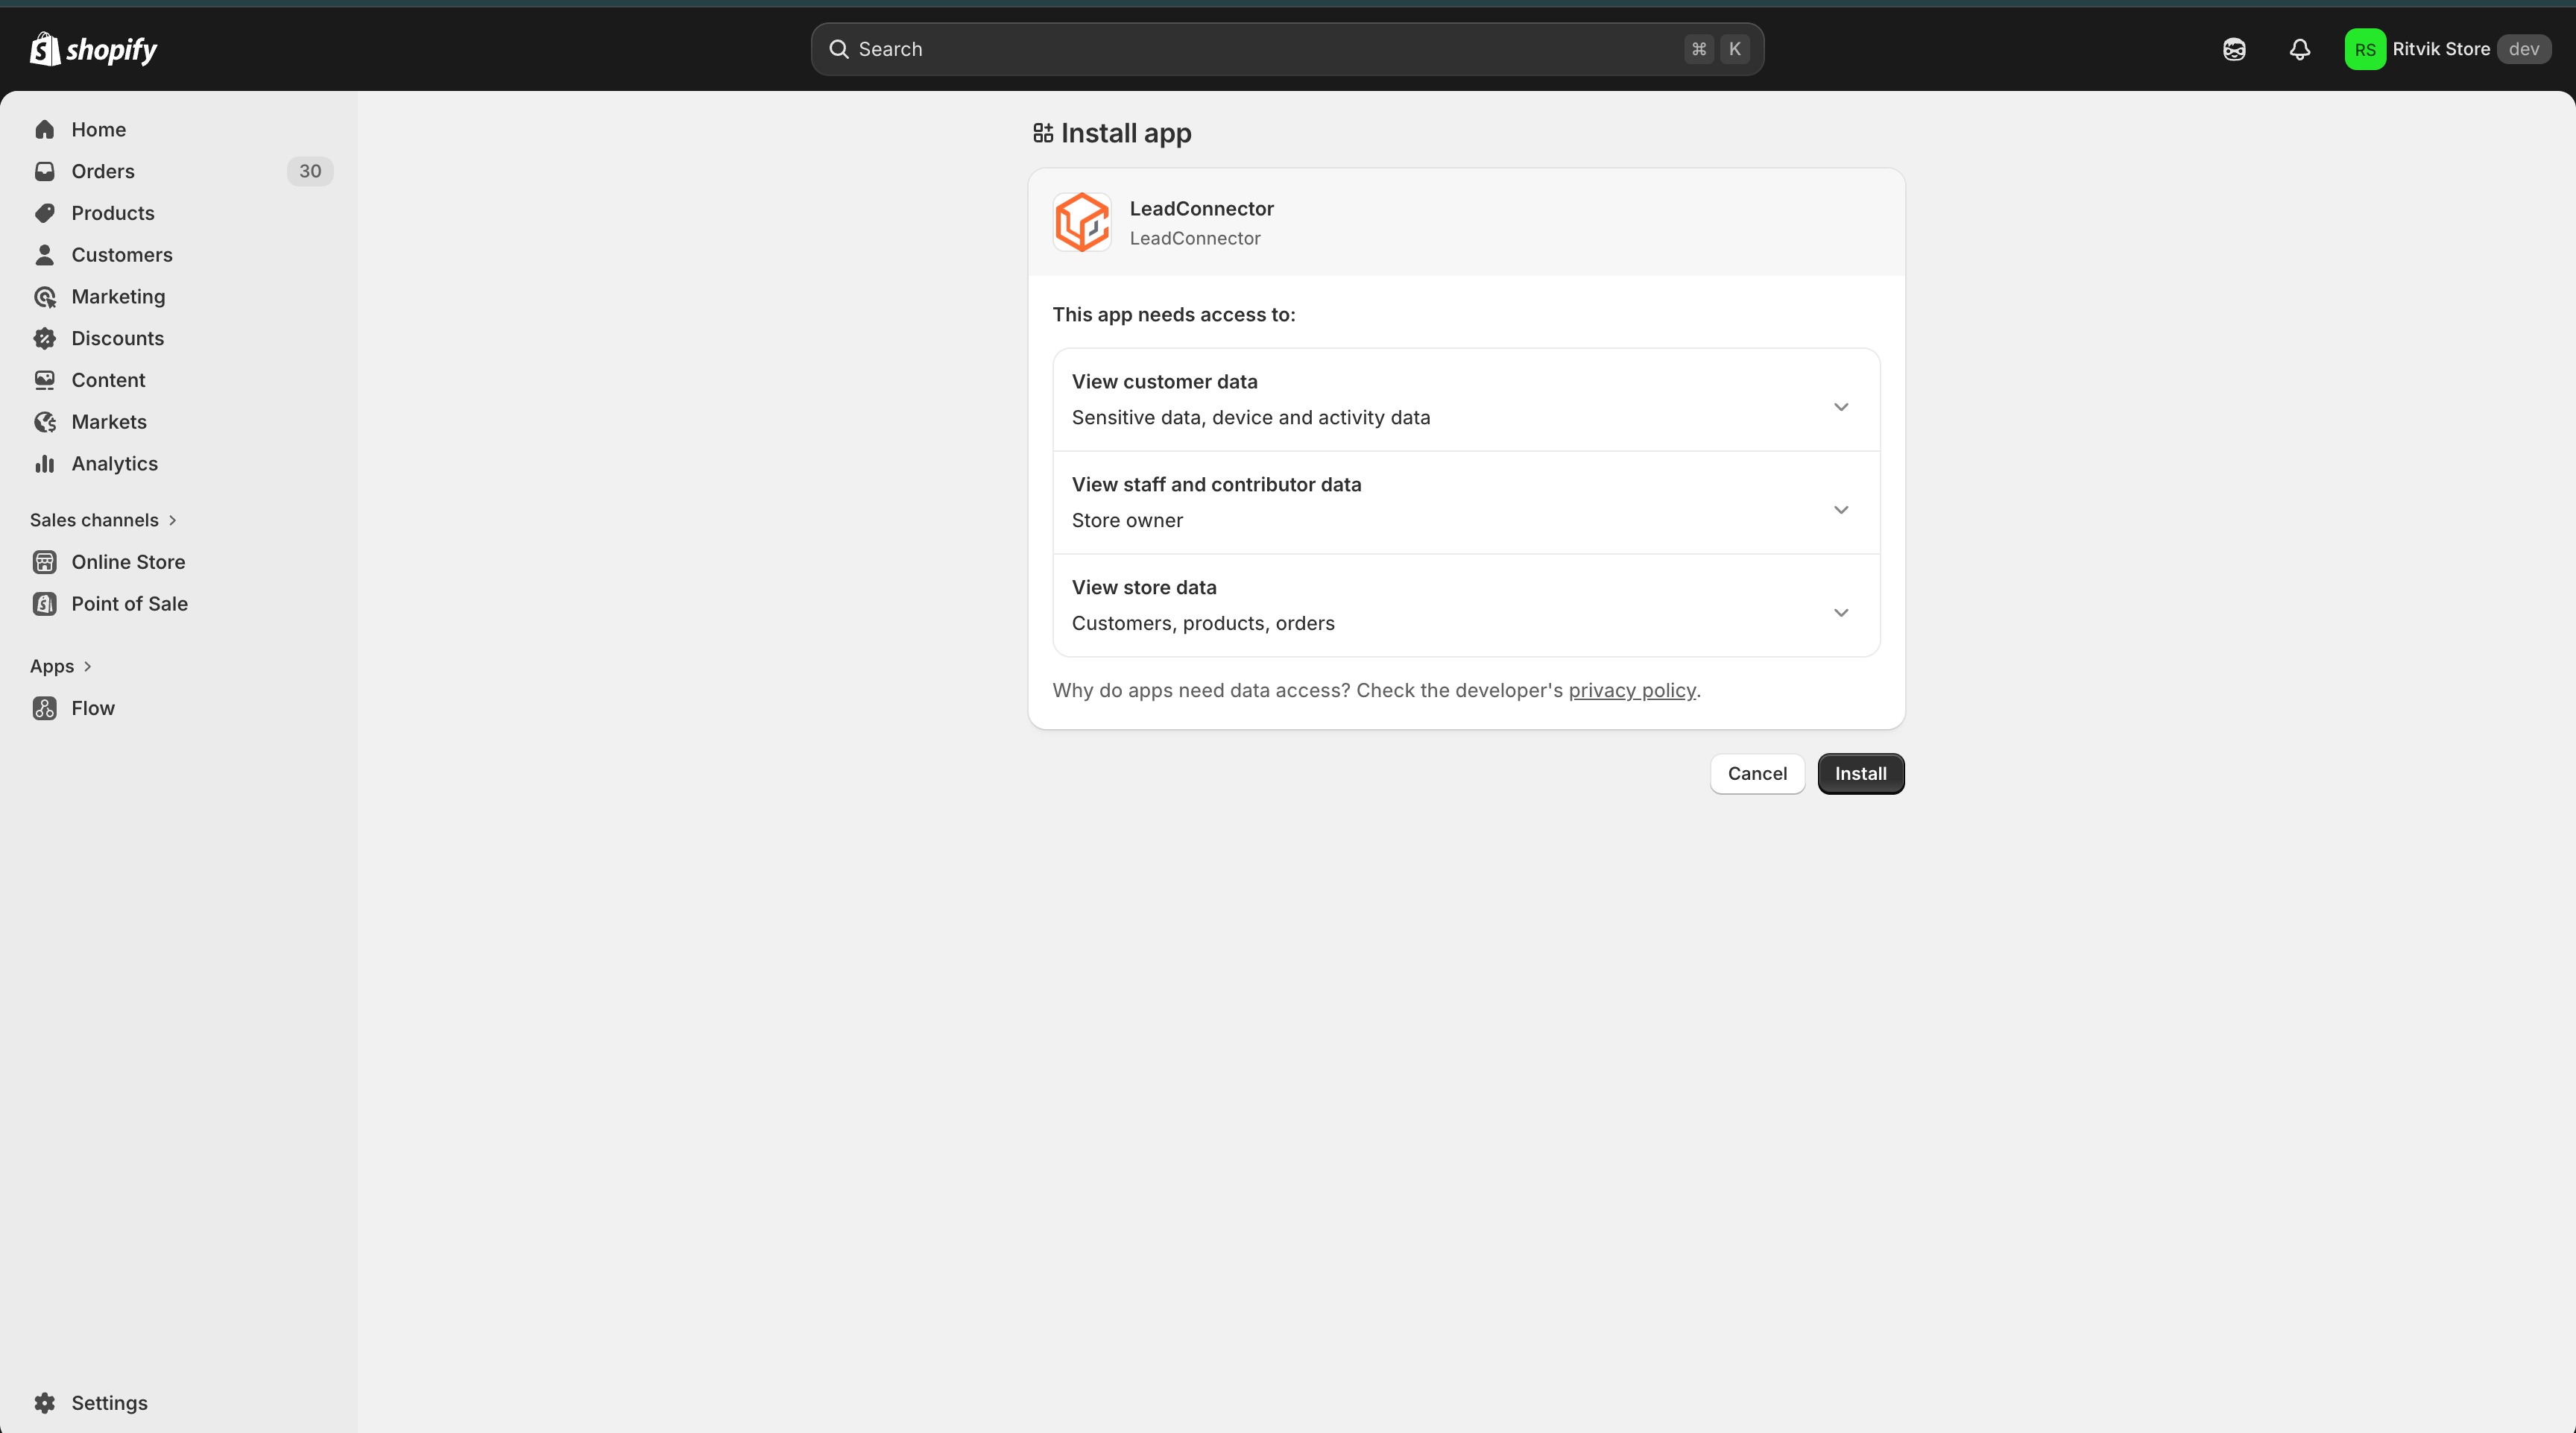
- Once approved, you will be redirected back and your Shopify store will be connected.
Tip: For a full Shopify store migration, select all available import and sync options unless your migration plan requires only specific data types. This helps ensure supported historical data is imported and future Shopify activity continues syncing.
Review Imported Products and Collections
Products and collections are core parts of the Shopify migration because they determine how your ecommerce catalog is organized in HighLevel. Reviewing imported catalog data helps ensure your store setup, checkout flow, and customer experience are accurate before going live.
After the import completes:
- Review imported products under Payments > Products > Products.
- Review imported collections under Payments > Products > Product Collections.
- Confirm product names, descriptions, images, prices, and inventory details.
- Confirm products are assigned to the expected collections.
- Check whether SEO fields imported as expected.
- Update any product or collection details that require manual cleanup.
Important product and collection notes:
- Taxes are not mapped to products while importing or syncing products.
- If Shopify SEO details are still using default settings and have not been changed, the SEO data may be received as
nullin HighLevel.


Rebuild Ecommerce Operations and Automations in HighLevel
The Shopify integration helps move supported data, but some business operations still need to be recreated or reviewed manually in HighLevel. Rebuilding these items ensures your team can continue selling, communicating, and following up after the migration.
| Area to Review | What to Rebuild or Confirm |
|---|---|
| Ecommerce store pages | Confirm your store pages are created and organized in HighLevel. |
| Checkout pages | Rebuild checkout pages and confirm the purchase flow works as expected. |
| Thank-you pages | Create or update post-purchase thank-you pages. |
| Payment gateway settings | Connect and verify payment processing settings in HighLevel. |
| Shipping and delivery settings | Recreate shipping, delivery, or fulfillment-related settings as needed. |
| Order confirmation communication | Rebuild emails, SMS messages, or notifications sent after purchase. |
| Abandoned checkout recovery | Configure abandoned checkout follow-up to recover missed sales. |
| Customer follow-up workflows | Recreate post-purchase, win-back, review request, or upsell workflows. |
| Internal notifications | Set up team alerts for new orders, payments, or fulfillment tasks. |
| Tags, segments, and customer lists | Recreate customer organization rules for segmentation and reporting. |
| Invoices, documents, and templates | Rebuild reusable templates needed for customer or internal processes. |
| Team SOPs and operational processes | Update internal documentation so your team knows how to manage ecommerce operations in HighLevel. |
For ecommerce workflows, go to Automations > Workflows and recreate the Shopify workflows you still need in HighLevel. Use ecommerce triggers such as Order Submitted and Payment Received where applicable.
Use the following resources to rebuild key ecommerce operations in HighLevel:
- How to Set Up an E-Commerce Online Store Websites
Use this article to set up your HighLevel ecommerce store, including store pages, checkout pages, thank-you pages, products, order tracking, and fulfillment settings. - Recover Lost Sales with Automatic Abandoned Checkout Emails
Use this article to configure abandoned checkout emails and recover customers who leave before completing their purchase. - Manual Payment Method in E-commerce Stores & Order Forms
Use this article if your ecommerce process includes manual payment options, offline payments, or orders that need to be marked as paid manually.
Manage Sync Settings After Migration
After Shopify is connected, sync settings can be adjusted to control which supported Shopify data continues updating in HighLevel. Managing these settings helps keep your HighLevel account aligned with Shopify during the transition period.
After the integration is connected:
- Return to Settings > Integrations > Shopify.
- Review the enabled sync elements.
- Enable or disable future sync options based on your migration plan.
- Monitor imported records for accuracy.
- Review workflow behavior after new synced Shopify activity appears in HighLevel.
To reimport missed data, disconnect and reconnect the Shopify integration, then select the data you want to import again. Review records carefully after reimporting to confirm the expected data was added or updated.
Decommission Shopify After Validation
Decommissioning Shopify should happen only after your team confirms that data, checkout operations, customer communication, and internal processes are working correctly in HighLevel. A careful shutdown prevents lost records, interrupted sales, and missed customer follow-up.
Before canceling Shopify:
- Complete a final export of Shopify products, customers, and orders.
- Confirm critical data exists in HighLevel.
- Confirm HighLevel checkout, payments, shipping, and notifications are configured.
- Confirm workflows and follow-up automations have been tested.
- Train team members on the new HighLevel process.
- Save SOPs and migration notes for future reference.
- Cancel Shopify only after your team is confident the migration is complete.
Frequently Asked Questions
Q: Which Shopify customers are imported as contacts?
A: Contact import includes Shopify customers who have placed an order in the past. Customers who have not placed an order may not be included in the Shopify contact import.
Q: Can I choose only certain Shopify data to import?
Yes. During setup, you can select which supported data types to import, including contacts, orders, transactions, products, and collections. For a full store migration, select all available import and sync options unless your migration plan requires only specific data types.
Q: What is the difference between import and sync?
Import brings selected existing Shopify data into HighLevel during setup. Sync controls which supported Shopify data and events continue updating in HighLevel after the connection is saved.
Q: Where can I confirm that my Shopify products and collections imported successfully?
Review imported products under Payments > Products > Products and imported collections under Payments > Products > Product Collections.
Q: Are Shopify taxes imported with products?
Taxes are not mapped to products during Shopify product import or sync.
Q: How are Shopify order statuses handled in HighLevel?
Synced Shopify order statuses are marked as either Completed or Cancelled in HighLevel.
Q: Does HighLevel create multiple transactions for a Shopify order?
No. HighLevel creates one transaction for each synced Shopify order.
Q: Why aren’t my contacts syncing from Shopify?
Shopify Basic may no longer provide access to customer PII through Shopify’s updated Admin API. Customer PII includes details such as customer names, email addresses, phone numbers, and addresses. HighLevel needs this information to create or update contacts.
Note: To sync Shopify contacts into HighLevel, you may need to upgrade to Shopify Grow, Advanced, or Plus.
Q: What Shopify data can sync on the Basic plan?
On Shopify Basic, you can still import and sync:
- Products
- Collections
You may not be able to sync:
- Contacts
- Orders
- Transactions
This is because contacts, orders, and transactions rely on customer PII, which may not be available through Shopify’s updated API on the Basic plan.
Q: It used to work before. Why did my Shopify contact, order, or transaction sync stop working?
Shopify updated its API access rules, and the older Shopify API version that previously allowed customer PII access on all plans is being deprecated. As HighLevel moves to Shopify’s updated API, these Shopify plan-based restrictions may apply.
This can affect both Admin API access and webhook data. If Shopify does not return customer data through the API or webhook event, HighLevel cannot create the related contact, order, or transaction record.
Q: Where can I check or manage Shopify app permissions?
You can manage app permissions from your Shopify admin. Read here for more details.
Q: Where can I find my Shopify store name?
Log in to your Shopify admin and look at the URL in your browser. Your store name is the value that appears after /store/ in the Shopify admin URL.
For example, if the URL contains:
admin.shopify.com/store/ef760-ef
Then the Shopify store name is:
ef760-ef

Related Articles
- How to migrate Shopify stores to HighLevel, including products, collections, orders, contacts, and transactions
- Shopify to HighLevel Migration Guide
- How To Integrate Shopify With HighLevel
- How to Set Up an E-Commerce Online Store Websites
- Recover Lost Sales with Automatic Abandoned Checkout Emails
- Manual Payment Method in E-commerce Stores & Order Forms
Was this article helpful?
That’s Great!
Thank you for your feedback
Sorry! We couldn't be helpful
Thank you for your feedback
Feedback sent
We appreciate your effort and will try to fix the article
