TABLE OF CONTENTS
- Overview
- How to Set Up Recurring Appointments in a Calendar
- Recurrence Settings
- Handling Unavailable Slots
- Creating Recurring Appointments via the In-App Appointment Modal
- Steps to Create a Recurring Appointment
- Limitations
Overview
Recurring appointments are appointments that repeat based on the recurrence settings configured. You have two methods to create a recurring appointment:
- Set Up Recurrence in Calendar Settings
- Custom Recurrence in the Appointment Modal
Set Up Recurrence in Calendar Settings:
- Configure the recurrence rules in your calendar settings. This setup applies when someone books an appointment through the booking widget or scheduling link, or when creating an appointment using the DEFAULT Date & Time tab in the in app appointment modal.
Custom Recurrence in the Appointment Modal:
- When creating an appointment using the CUSTOM Date & Time tab in the in app appointment modal, you can set a specific recurrence rule for that appointment series. This custom recurrence will override the calendar configuration.
Please Note: For appointments with custom recurrence rules, your availability is not considered. The system will book slots based on the recurrence rules you set, regardless of your actual availability.

How to Set Up Recurring Appointments in a Calendar
1. Navigate to Calendar Settings: Go to Calendar Settings and select the calendar you want to configure.

2. Ensure Basic Setup: Make sure no date-specific hours are added and only one team member is assigned to the calendar.
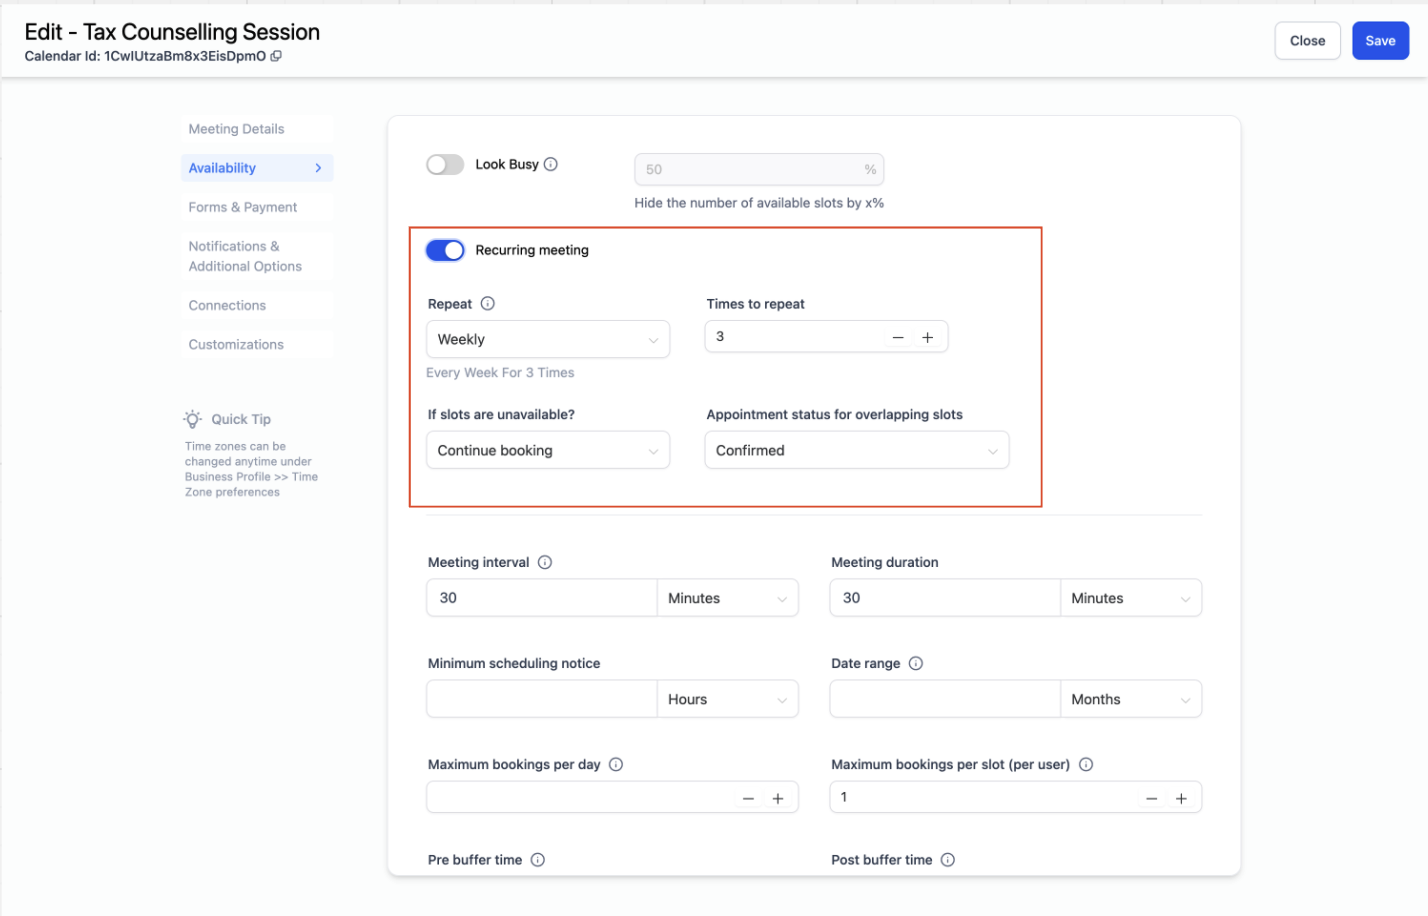
3. Enable Recurring Meetings: Go to the Availability tab and toggle on Recurring Meeting.

4. Configure Recurrence Settings: Set the recurrence according to your needs and click Save.
Recurrence Settings
Repeat: Choose the frequency of the recurrence (Daily, Weekly, Monthly, Custom).
Times to Repeat: Specify how many times the recurring appointment should occur. For example:
- Daily: Repeats every day for the specified number of times.
- Weekly: Repeats every week on the same day for the specified number of times.
- Monthly: Repeats every month on the same date for the specified number of times.
- Custom: Allows for a custom recurrence pattern.
Note: Maximum number of recurrences allowed is 24. These settings will apply when appointments are booked through the booking widget or the default date and time settings in the in-app appointment modal.
Handling Unavailable Slots:
Skip Booking Unavailable Slots:
- Unavailable slots are skipped, and only available slots are booked. For example, if you need 10 appointments and 3 slots are unavailable, only 7 appointments will be booked.
Continue Booking:
- Appointments are booked even if the slot is unavailable. You can decide whether the status of these overlapping slots should be Confirmed or Unconfirmed.
Book Next Available Slot:
- Unavailable slots are skipped, and the system will find the next available slot to meet the recurrence rule. For example, if you need 10 appointments and 3 slots are unavailable, the system will find 3 additional available slots to meet the recurrence rule and book 10 appointments in total. This would mean unavailable slots in between would be skipped and next available slot would be booked.
- Note : If three consecutive slots are not available, the system stops checking for any further available slot.

Creating Recurring Appointments via the In-App Appointment Modal
You have two options for setting up recurring appointments in the in-app appointment modal:
Using the Default Tab:
- This tab will adhere to the recurrence settings already configured in the calendar. If the calendar is set up for recurring appointments, it will display the available recurring slots. If it's a standard calendar, only a single slot will be shown.


2. Using the Custom Tab:
- This tab allows you to define a custom recurring rule specifically for the appointment you're creating. This custom rule will apply only to that particular series of appointments and will not affect any other appointments or calendar settings.
- Irrespective of whether recurring is set up in a calendar or not, a custom recurrence can always be created directly from the in-app appointment modal (not supported for class booking and service calendars).
Note: Custom recurring appointments will override all default rules and availability checks.
Note: Custom Recurring and Bulk Edit / Delete enhancements to the Recurring Appointments feature are available exclusively for custom appointments created via the in-app appointment modal.
Steps to Create a Recurring Appointment
1. Create New Appointment:
- Go to Create New Appointment, select the calendar, team member, and contact.

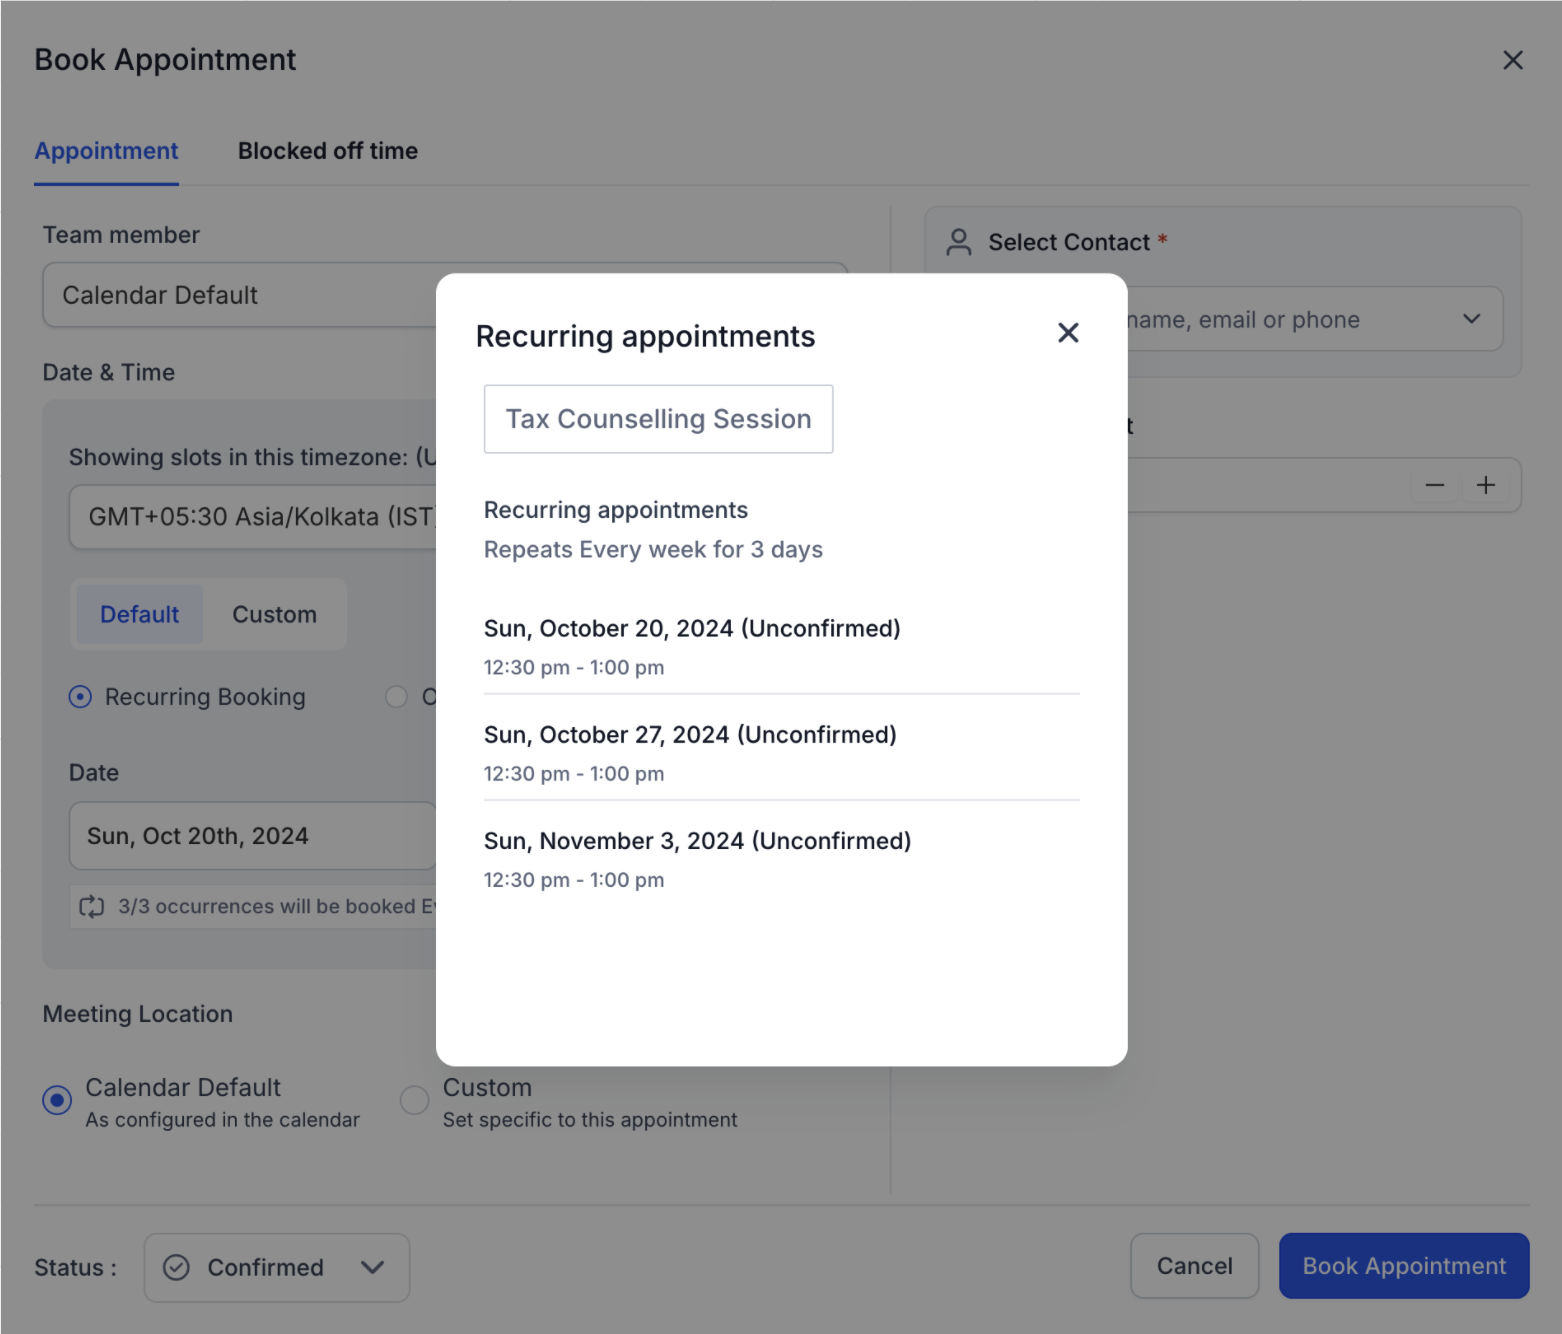
2. Configure Recurrence:
- Navigate to the Date and Time section and choose Custom.
- Check the Recurring Event checkbox.
- Select your recurrence pattern from the dropdown or click on Custom to define a specific recurrence rule.

3. Set Recurrence End:
- Decide when the recurring appointments should end:
- Never: The recurrence will continue indefinitely.
- On a Specific Date: Set an end date for the recurrence.
- After X Number of Occurrences: Specify after how many times should the recurrence end.

4. Save and Create:
- Configure the settings as needed and click on Create Appointment to create the appointment.
Your custom recurring appointment is now set up according to the specified rules.
With this setup, all recurring instances are linked to the single appointment. You can choose to:
- Edit or Delete All Occurrences: Modify or remove all instances of the recurring appointment.
- Edit or Delete a Specific Occurrence: Make changes or delete only a specific instance of the recurring appointment.
- Edit or Delete Future Occurrences: Adjust or remove only the upcoming instances of the recurring appointment, leaving past occurrences unchanged.

Limitations
- When a Custom Recurring Appointment is created using the in-app appointment modal, only the first appointment in the series will appear in the following views: Appointment List View, Contacts Tab and Conversations Tab. Subsequent appointments in the recurring series will not be individually displayed in these sections.
- Workflows are currently triggered only for the first custom recurring appointment in a series. Subsequent custom recurring appointments in the series are not supported for workflow triggers.
- Calendar notifications are not sent for custom recurring appointments at this time.
- Service and class booking calendars do not support custom recurring appointments.
- Canceling or rescheduling a custom recurring appointment using the cancellation/reschedule link or through the Contacts/Conversations tab will affect the entire series.
- Only one meeting link (Zoom, Google Meet, or Microsoft Teams) will be generated for the entire series of appointments.
- Outlook Sync Limitations:
- Appointments created in the system and synced to Outlook will not sync back if any changes are made in Outlook.
- Frequently deleting appointments in the system may affect the syncing experience with Outlook.
Was this article helpful?
That’s Great!
Thank you for your feedback
Sorry! We couldn't be helpful
Thank you for your feedback
Feedback sent
We appreciate your effort and will try to fix the article