The Affiliate Enrolled In Campaign workflow trigger starts a workflow when an affiliate is added to an affiliate campaign in HighLevel. You can use it to send onboarding messages, notify your team, apply tags, and use affiliate-related custom values in later workflow steps.
TABLE OF CONTENTS
- What is Affiliate Enrolled In Campaign Workflow Trigger?
- Key Benefits of Affiliate Enrolled In Campaign Workflow Trigger
- How to configure Affiliate Enrolled In Campaign Trigger
- Frequently Asked Questions
What is Affiliate Enrolled In Campaign Workflow Trigger?
The Affiliate Enrolled In Campaign trigger starts a workflow when an affiliate is added to an affiliate campaign. The enrollment can happen manually or through an automation such as the Add To Affiliate Campaign workflow action, and the trigger is especially useful for streamlining affiliate onboarding and internal team communication. When activated, it unlocks access to detailed affiliate data,The trigger provides affiliate-related custom values that can be used in later workflow steps, including affiliate contact information, campaign details, referral and portal links, and other available affiliate data.. These custom values can then be used in emails, SMS messages, internal notifications, or CRM updates—making it easy to personalize outreach, track affiliate performance, and improve the overall onboarding experience. This trigger only appears if the Affiliate Manager is enabled and at least one affiliate campaign exists in the sub-account.
Key Benefits of Affiliate Enrolled In Campaign Workflow Trigger
This trigger unlocks automation opportunities that enhance affiliate onboarding, internal tracking, and campaign engagement. Below are five core benefits of using this workflow trigger effectively.
- Seamless Affiliate Onboarding: Automatically welcome new affiliates with personalized emails or SMS messages that include login links, campaign details, and expectations—eliminating manual setup and confusion.
- Access to Dynamic Affiliate Data: Gain instant access to custom values such as affiliate name, contact info, revenue earned, and portal links. These dynamic fields can be inserted directly into your automated messages.
- Improved Internal Communication: Use internal notifications to alert your team whenever a new affiliate joins a campaign. This ensures your staff can follow up or support new partners without delay.
- Campaign-Level Segmentation: Apply tags to affiliates based on the campaign they’re enrolled in. This allows for more targeted messaging, better reporting, and tailored follow-up sequences across campaigns.
- Scalable Affiliate Program Management: Automating these onboarding and notification steps makes it easier to manage affiliate growth at scale—without sacrificing quality or personalization.
How to configure Affiliate Enrolled In Campaign Trigger
Open the Workflow Builder
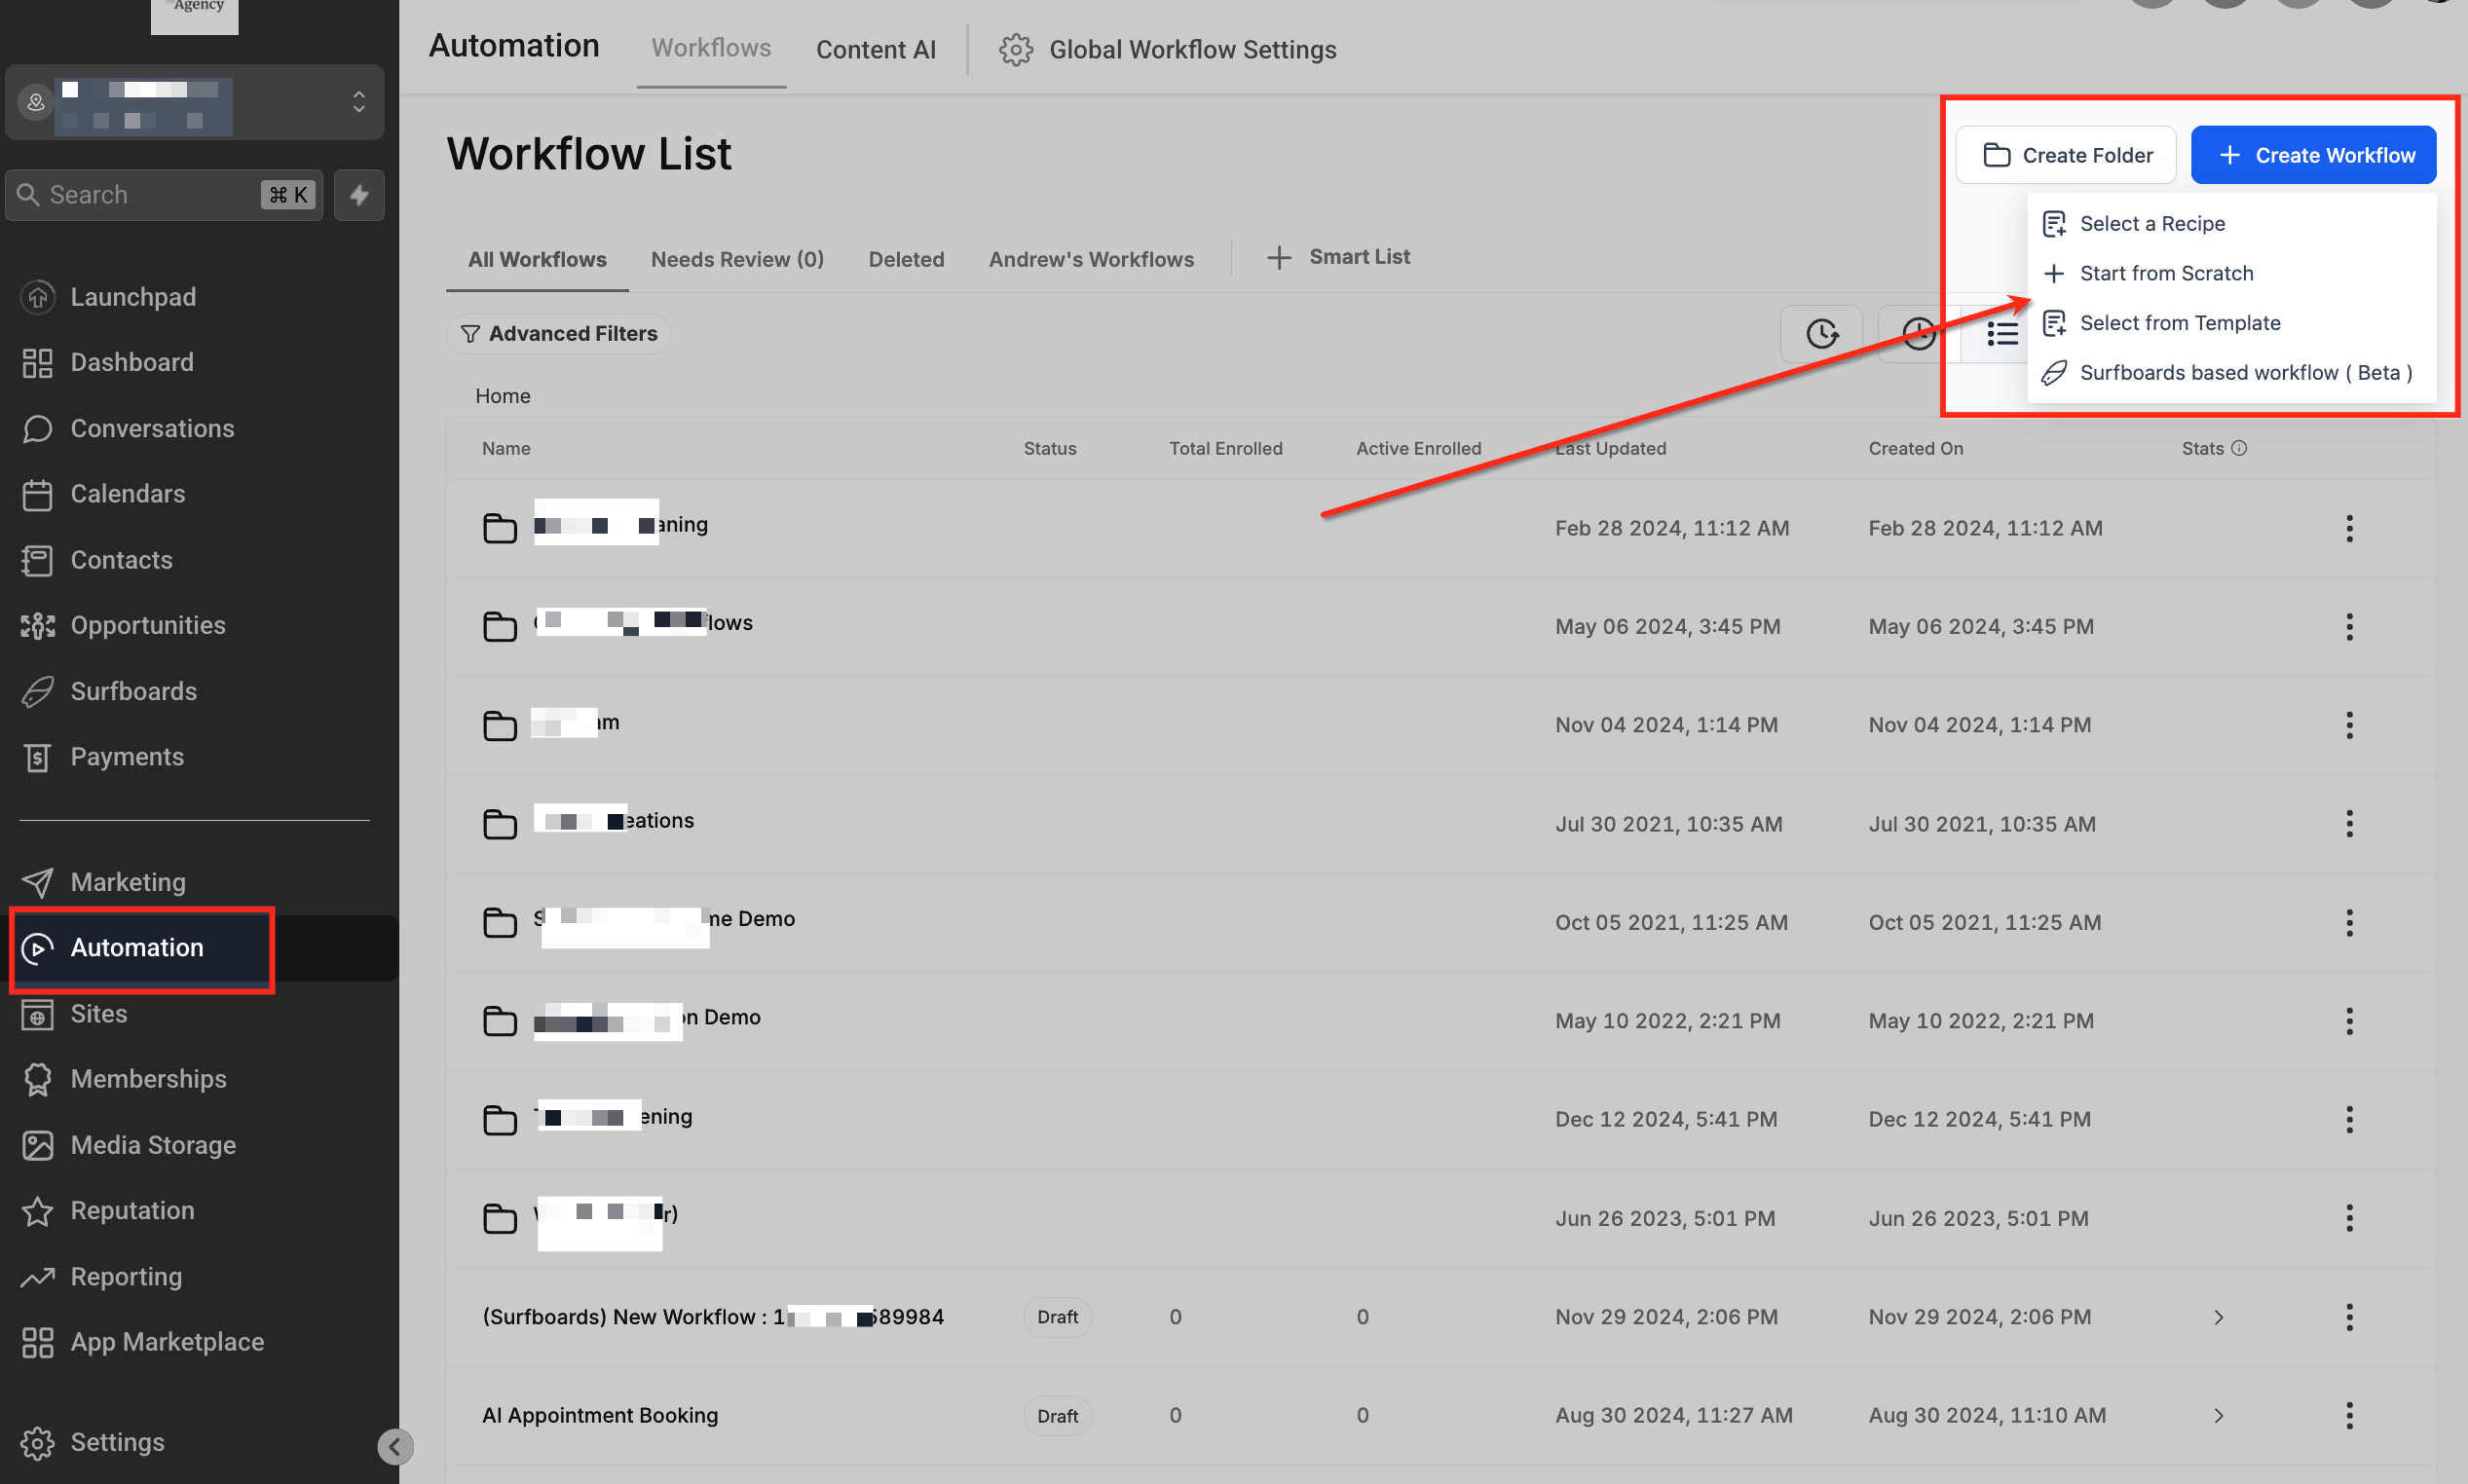
Navigate to Automation > Workflows in the left-hand menu of your HighLevel dashboard. Once inside the Workflow List, click the blue + Create Workflow button in the top right and select Start from Scratch from the dropdown menu to begin creating a new custom workflow.
Add the Affiliate Campaign Trigger
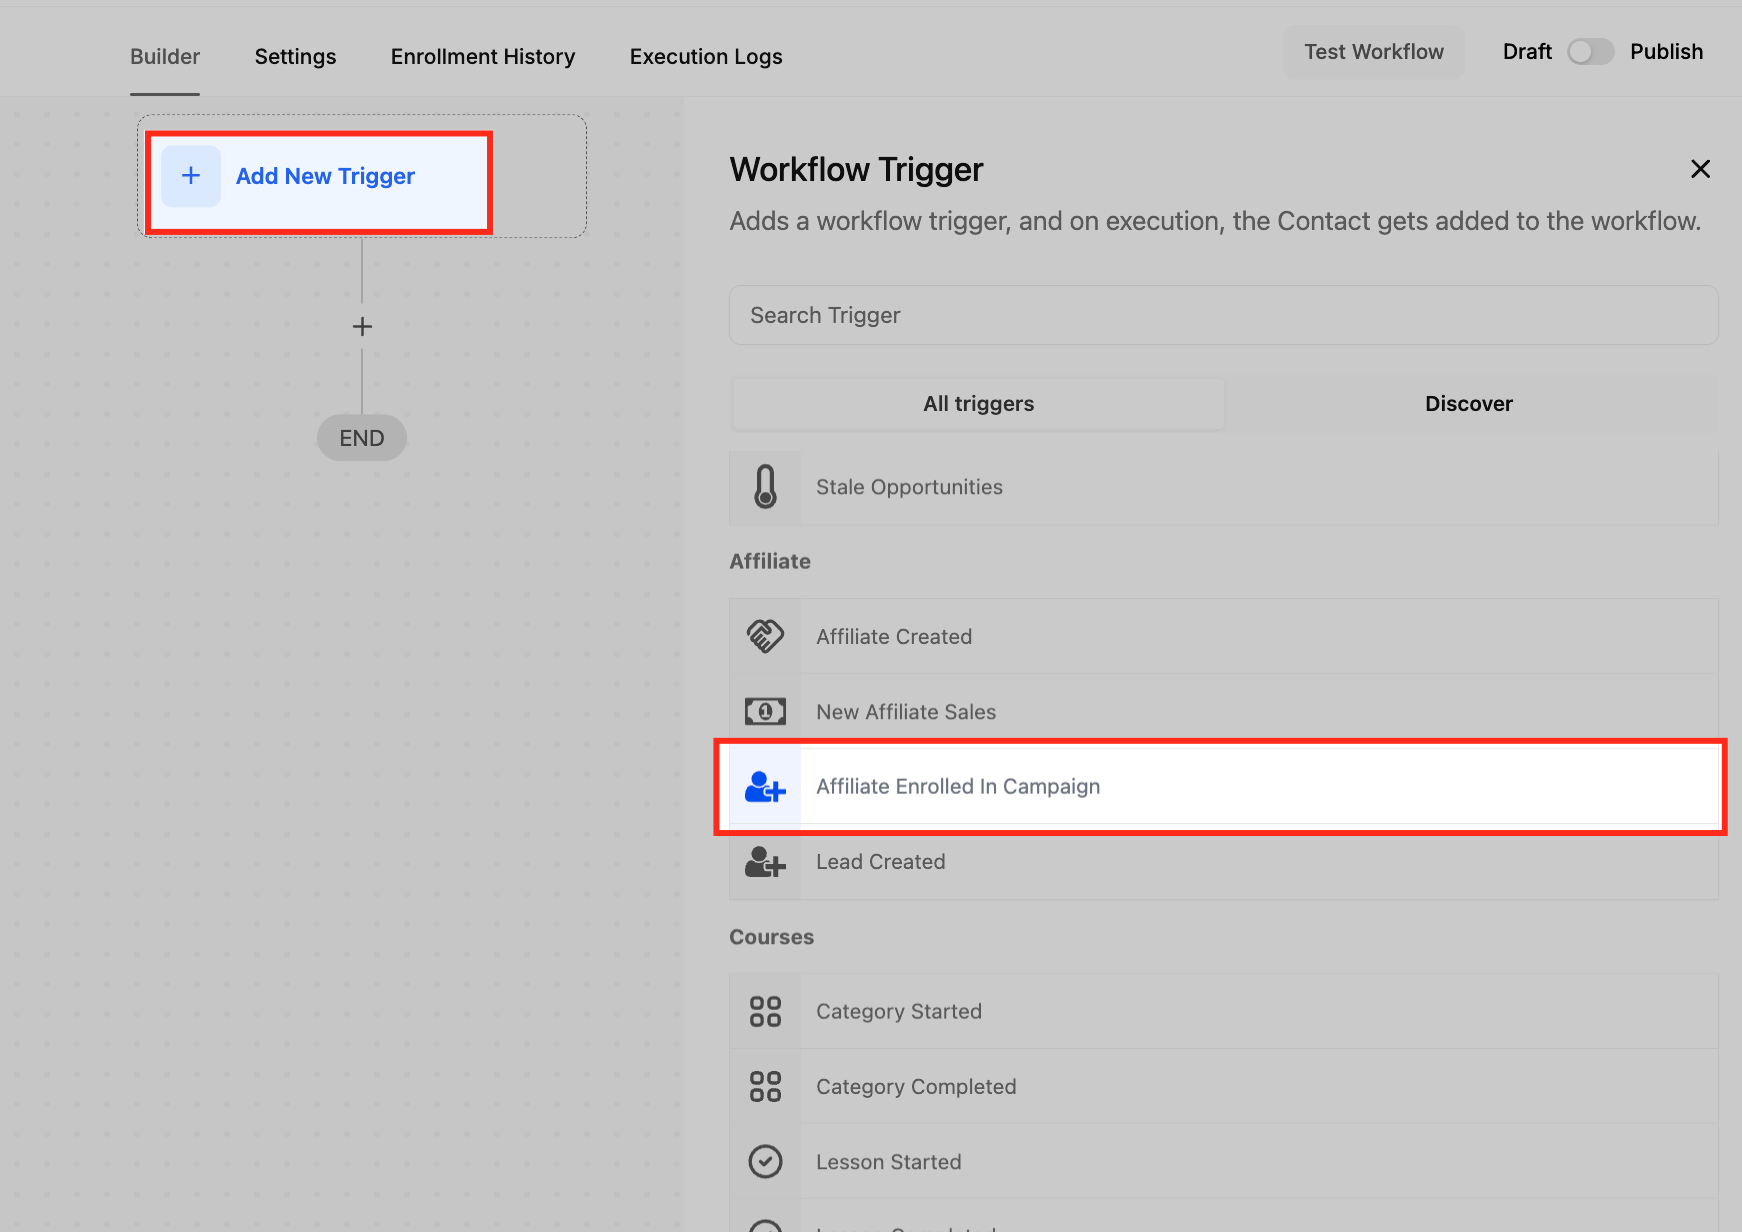
Click + Add New Trigger inside your workflow builder. From the trigger list, scroll to the Affiliate section and select Affiliate Enrolled In Campaign. This trigger activates the workflow when an affiliate joins a specific campaign.
Name the Trigger
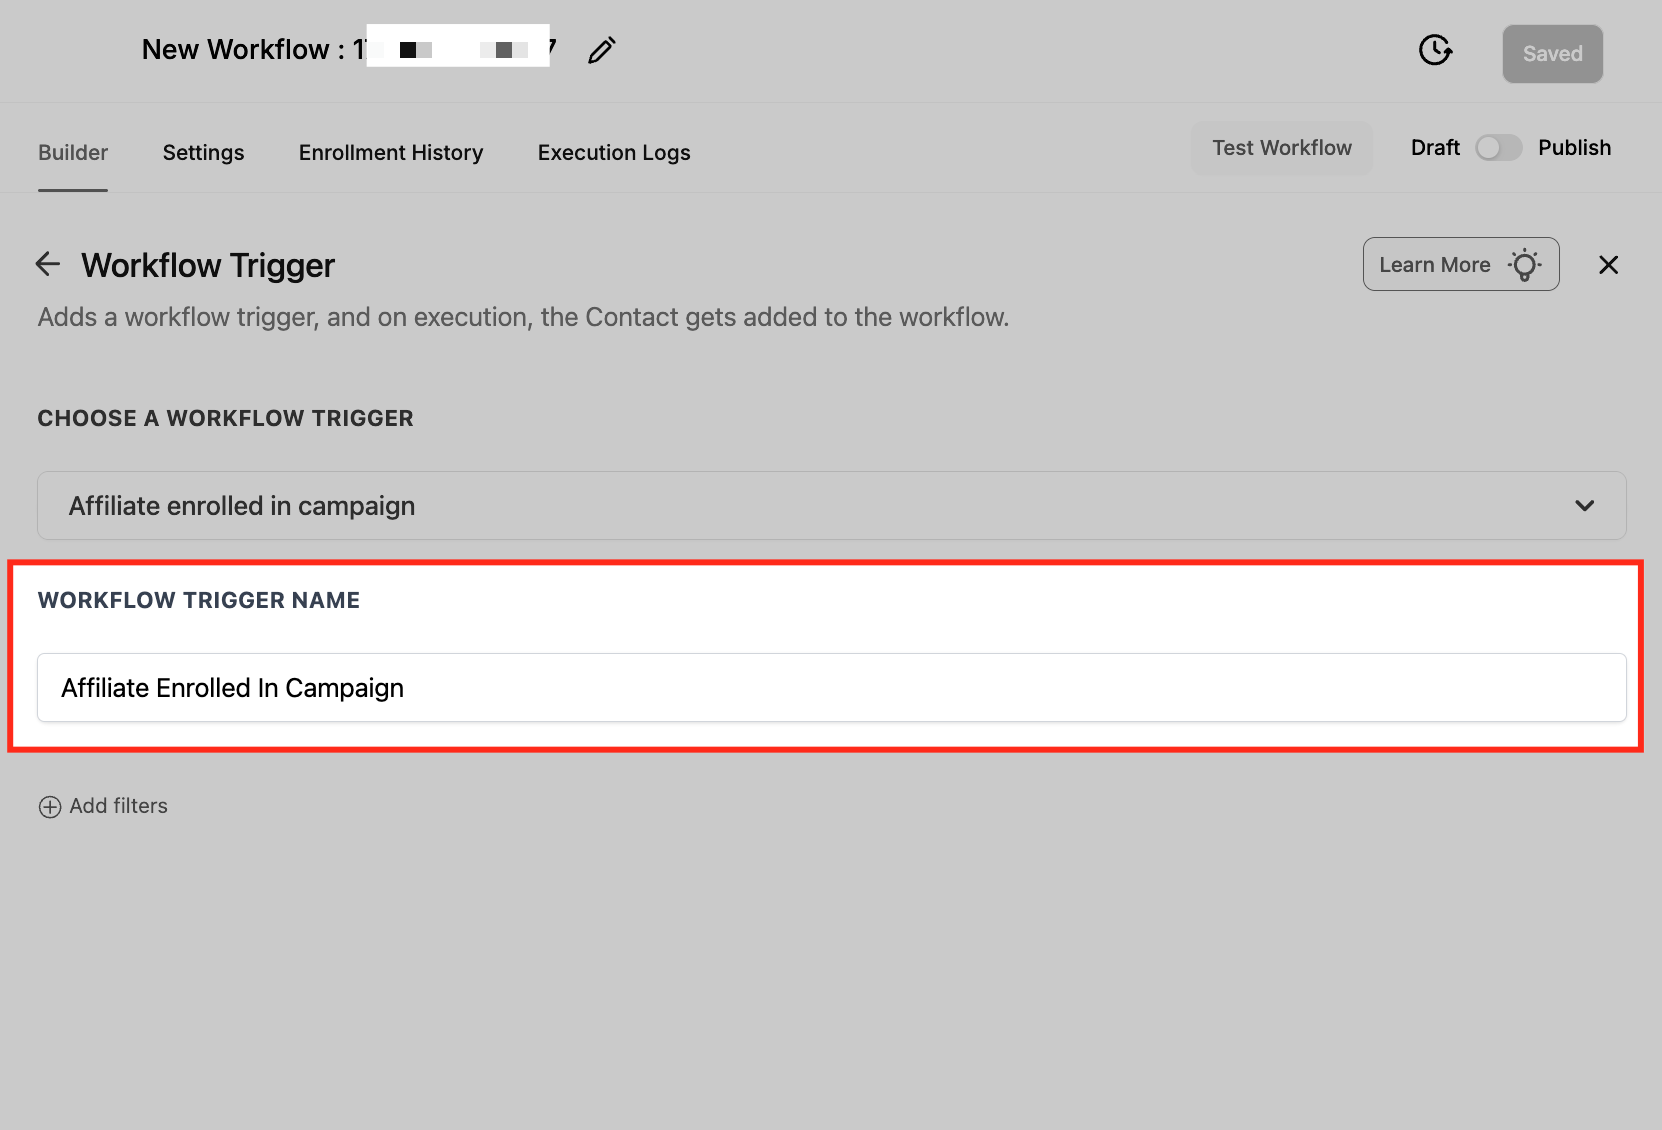
Give your trigger a clear and relevant name such as “Affiliate Enrolled In Campaign.” Naming helps keep your workflow organized and makes it easier to identify its purpose later.
Add Filters
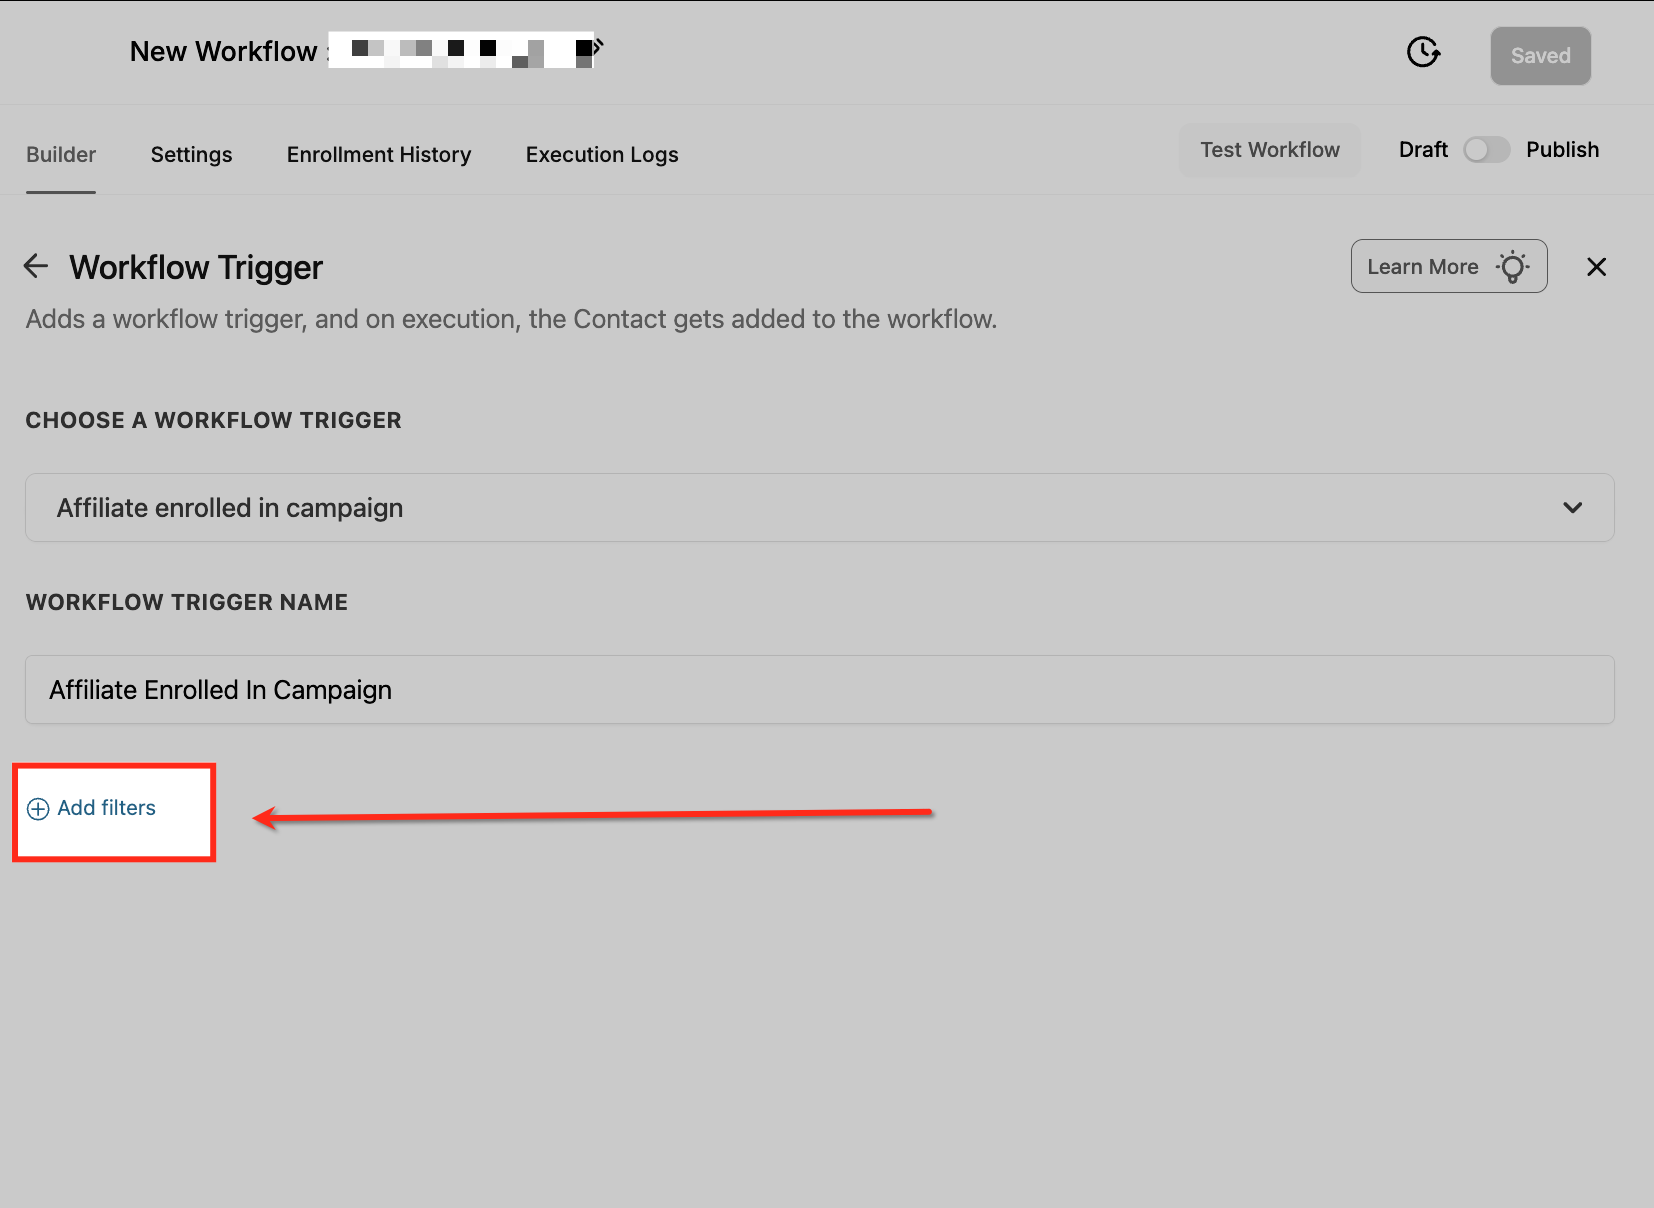
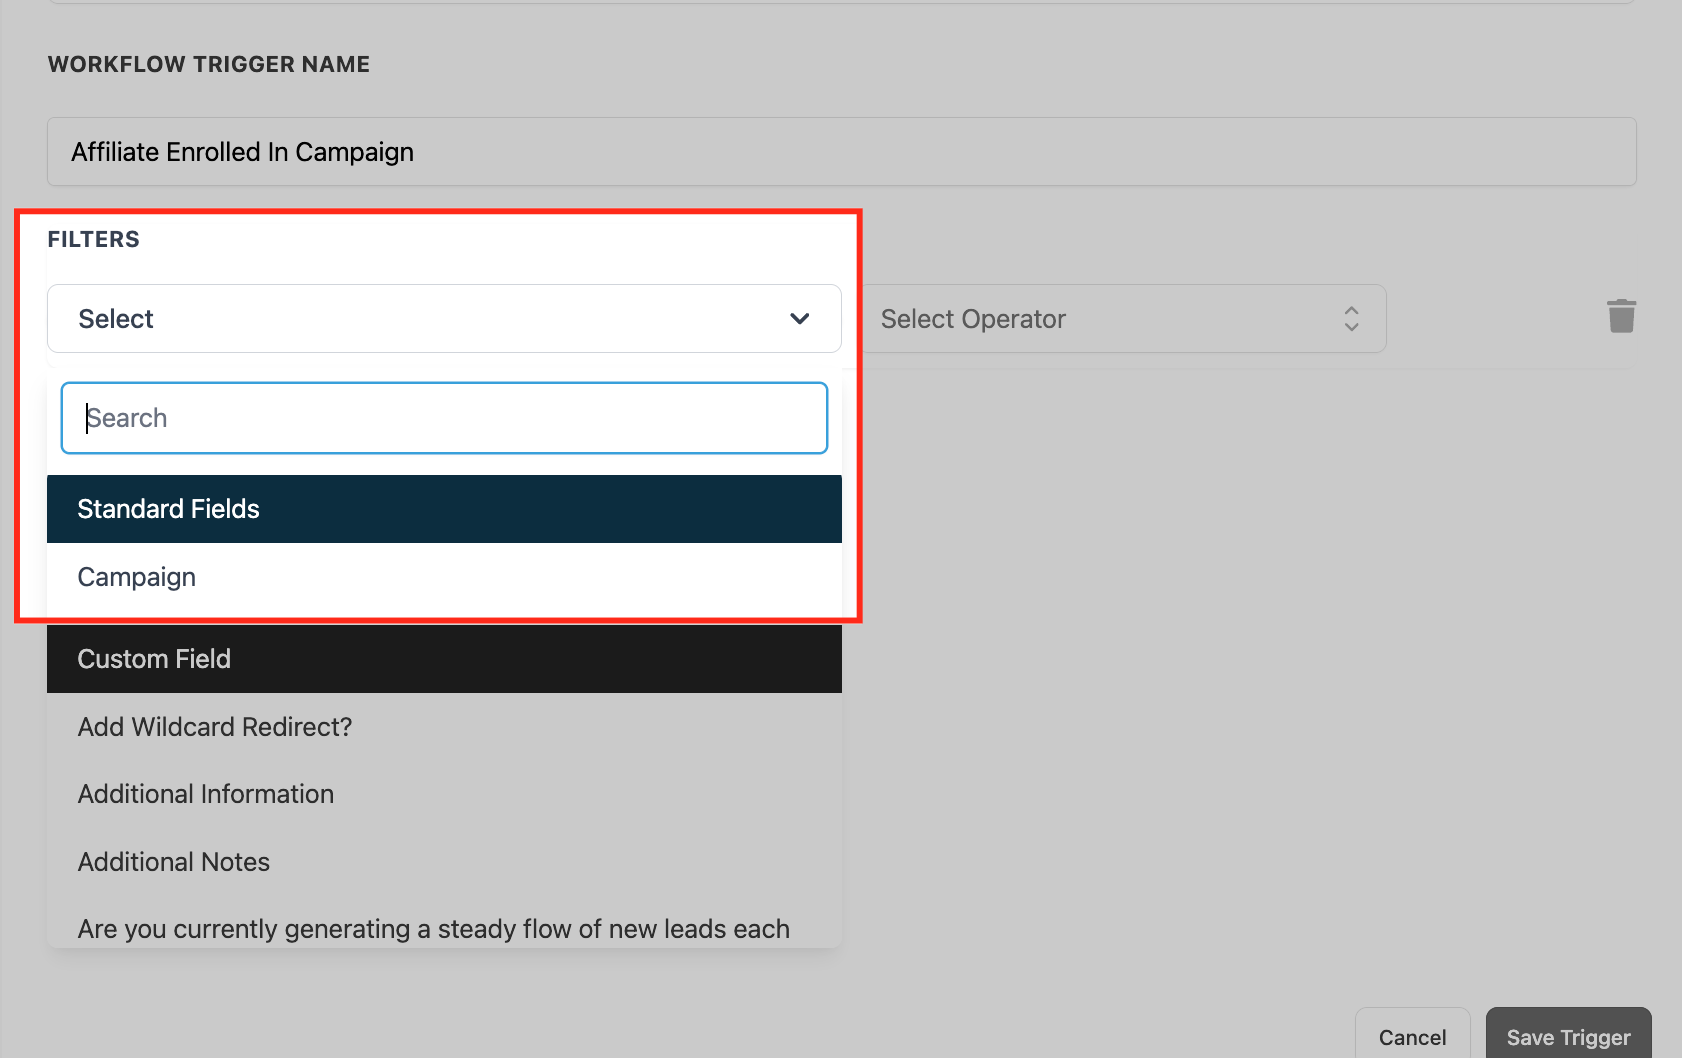
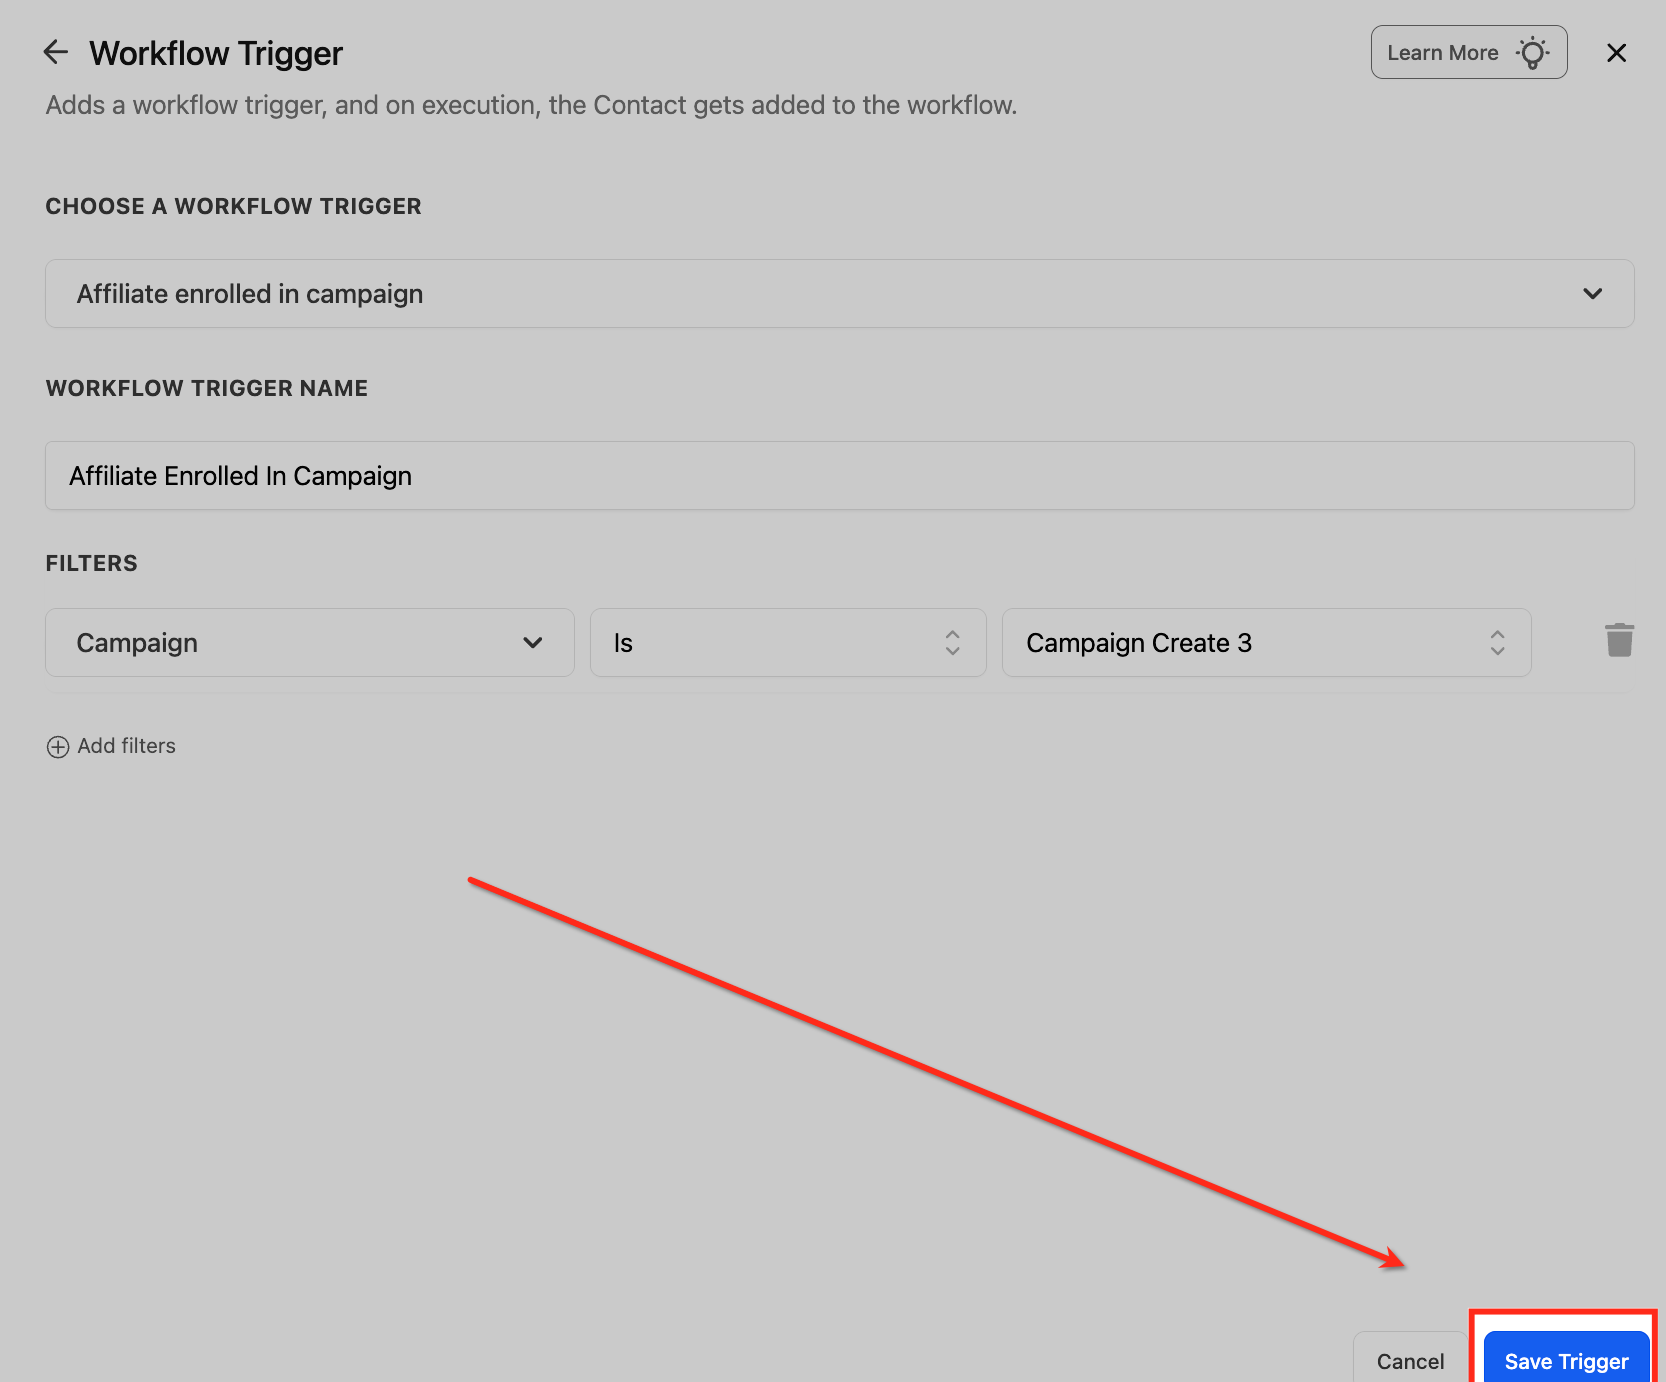
Click Add filters to narrow the trigger to a specific affiliate campaign. Select the campaign condition and choose the campaign you want the workflow to monitor.
Choose a Filter Type
Use the dropdown to select a filter type. You can choose from Standard Fields, like campaign or custom attributes, to define when the trigger should activate. This ensures your workflow responds only to the specific affiliate enrollments you care about.
Save the Trigger Settings
Once you’ve selected the campaign and defined your filter conditions, click Save Trigger to activate the configuration. This finalizes the setup and ensures the workflow is triggered only when affiliates are enrolled in the specific campaign you selected.
How to Use Custom Values in the Affiliate Enrolled In Campaign Trigger
Custom values allow you to personalize communication and streamline internal processes using affiliate-specific data. Once the workflow trigger is configured, you can pull in key data fields automatically—making your onboarding process more dynamic and informative for both affiliates and your team.
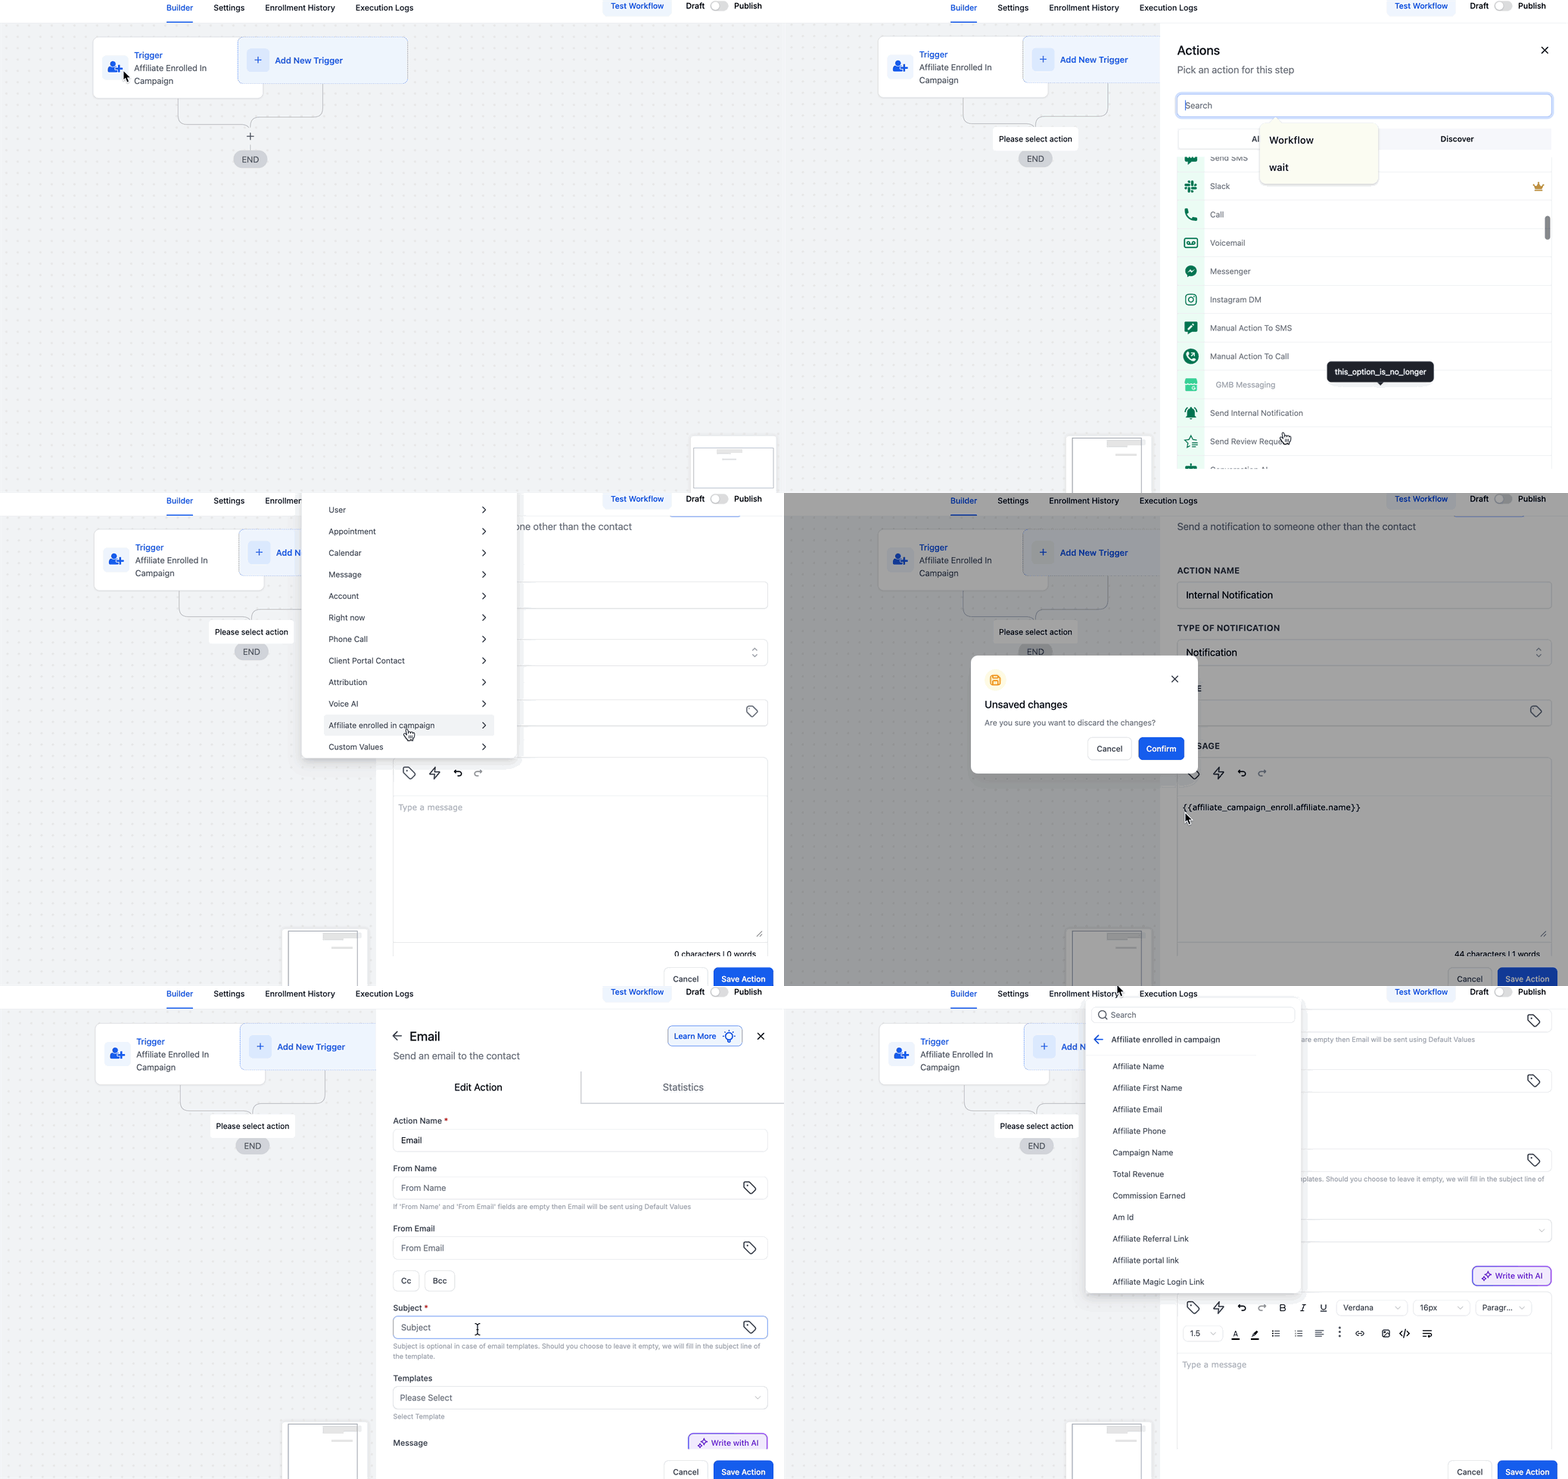
After setting the Affiliate Enrolled In Campaign trigger and applying the necessary filters (such as campaign name), you can begin using custom values in your workflow steps, such as emails, SMS, or internal notifications. These values include details like the affiliate’s name, contact information, revenue, commissions, and login links—enabling you to deliver context-rich, personalized content.
- Add an Internal Notification Step: Create an internal notification to alert your team when an affiliate joins a specific campaign. Use custom values like Affiliate Name, Affiliate Email, Affiliate Phone, and Campaign Name to provide full context for the enrollment event.
- Send a Personalized SMS to the Affiliate: Add a step to send a welcome SMS using the affiliate’s name and campaign details. Include the Magic Login Link so the affiliate can access their portal instantly. This ensures they’re ready to promote your offer without delays.
- Send a Welcome Email: Create a welcome email using values such as the affiliate’s name, campaign name, referral link, portal link, or magic login link. You can also hyperlink the Client Portal Link and attach Terms & Conditions or Program Guidelines for clarity.
- Use Tags for Campaign Segmentation: Apply a unique tag during the workflow (e.g., “Luggage Campaign Affiliate”) using the campaign name. This allows you to segment affiliates for future workflows or promotional content based on the campaign they belong to.
Frequently Asked Questions
Q: Why is the “Affiliate Enrolled In Campaign” trigger not showing up in my workflow options?
The trigger will only appear if Affiliate Manager is enabled and at least one affiliate campaign has been created in the sub-account. Make sure Affiliate Manager is available in the sub-account and that at least one affiliate campaign has been created. Then, create a campaign under the Affiliate Manager tab. Once both are active, you’ll be able to see the trigger inside the workflow builder under the “Affiliate” category.
Q: Can I use this trigger to onboard affiliates differently depending on which campaign they joined?
Yes! You can apply filters by campaign when setting up the trigger. This allows you to run different workflows or branches of logic depending on which campaign the affiliate joined. For example, you might send one welcome email for your “Course Affiliate Program” and a different one for a “Product Launch Campaign.” You can also add conditional steps or use tags for segment-based actions.
Q: Why do my affiliate custom values (e.g., referral link or magic login link) appear empty in the email/SMS step?
Affiliate custom values tied to this trigger populate only when the workflow runs from a real Affiliate Enrolled In Campaign event. If values such as referral or portal links are blank, confirm that:
- the workflow uses the Affiliate Enrolled In Campaign trigger,
- the trigger is saved correctly, and
- the test affiliate was actually enrolled in the campaign.
Q: What happens if I enroll an affiliate manually—will the trigger still fire?
Absolutely. The trigger is activated whether the affiliate is enrolled automatically (via forms, funnels, or sign-up links) or manually (added directly by your team inside the Affiliate Manager). As long as the enrollment happens and matches the filter criteria (if set), the workflow will trigger and execute the steps you’ve configured.
Was this article helpful?
That’s Great!
Thank you for your feedback
Sorry! We couldn't be helpful
Thank you for your feedback
Feedback sent
We appreciate your effort and will try to fix the article