TABLE OF CONTENTS
Overview
Usage
RSS Header

RSS Header Block
This will dynamically populate <channel> tags from your RSS Feed (learn more about the <channel> tag here). The RSS Header Element supports the following RSS channel tags - use their respective Custom Value to populate the email with the corresponding tag value:
| RSS Tags | Custom Value For HL |
| <title> | {{rss_feed.title}} |
| <description> | {{rss_feed.description}} |
| <link> | {{rss_feed.url}} |
| <lastBuildDate> | {{rss_feed.date}} |
Basic Vs Custom in RSS Header

- Basic: adds the following non-editable text in Text Editor
<h1 class="h1">{{rss_feed.title}}</h1> {{rss_feed.description}}<br /> <br />- Custom: adds the following editable text in Text Editor
Updates from {{rss_feed.url}} <h1>{{rss_feed.title}}</h1> <strong>{{rss_feed.description}}</strong><br /> <br /> <strong>In the {{rss_feed.date}} edition:</strong><br />
RSS Items
RSS Items Block
The RSS Items block accepts the following Custom Values and will dynamically insert their corresponding RSS Tags:
| RSS Tags | Custom Values | Description |
| <title/> | {{rss_item.title}} | The title of the RSS item, usually a blog post. title |
| <description/> | {{rss_item.content}} | A summary of the RSS item in HTML format, which includes information inside the <description> tag. If there is no <description> tag in your feed, it will display the information in the <content:encoded> tag |
| <link/> | {{rss_item.url}} | The text link to the RSS item online, which can be displayed as text or used in a hyperlink. content:encoded |
| <content:encoded/> | {{rss_item.content_full} | The full content of the information inside the <content:encoded> tag for an RSS item, in HTML format. If there is no <content:encoded> tag, it will display the information in the <description> tag. |
| pubDate | {{rss_item.date}} | The date the RSS item was published, in format `MMM DD, YYYY hh:mm A`. We will provide support for custom formatting in the future. |
| <dc:creator> | {{rss_item.author}} | The author of the RSS item media:content |
| <media:content> | {{rss_item.imageUrl }} | This will provide the src URL of image as text in order to render it as image, use {{rss_img}} {{rss_img alt="alt_text" src=rss_item.imageUrl height="200" width="200"}} |
| <item> | {{#rss_items rss_items}} | This tag doesn't display anything. It's used to open the customized formatting for individual RSS items. |
| </item> | {{/rss_items}} | This tag doesn't display anything. It's used to close the customized formatting for individual RSS items. |
Basic Vs Custom in RSS Items

- Basic : adds the following non editable formatted text in Text Editor
{{#rss_items rss_items}} <h2 class="mc-toc-title"><a href="{{rss_item.url}}" target="_blank"> {{rss_item.title}} </a> </h2> {{rss_item.content}} <br /> <a href="{{rss_item.url}}" target="_blank">Read on »</a><br /> <br /> {{/rss_items}}- Custom: adds the following formatted text and Text editor will become editable
{{#rss_items rss_items}} <h2 class="mc-toc-title"><a href="{{rss_item.url}}" target="_blank">{{rss_item.title}}</a></h2> <em>By {{rss_item.author}} on {{rss_item.date}}</em><br /> {{rss_item.content_full}}<br /> <a href="{{rss_item.url}}" target="_blank">Read in browser »</a><br /> <br /> {{/rss_items}}<br /> <br /> <br /> <h3 class="h3">Recent Articles:</h3> {{#rss_items rss_items}}HTML Based RSS Feed
{{rss_item.title}} are HTML-escaped. For example, if the expression contains &, then the returned HTML-escaped output is generated as & or if your RSS Feed has HTML-based text instead of plain text then it will be rendered as plain text.{{{:

{{{rss_item.content}}} it will render like this
Scheduling:
- navigate to the "Send or Schedule" tab
- select the "RSS Email Campaign" sending option
- give your campaign a name in the "Campaign Name" field
- paste your RSS feed url in the "RSS Feed URL" field.
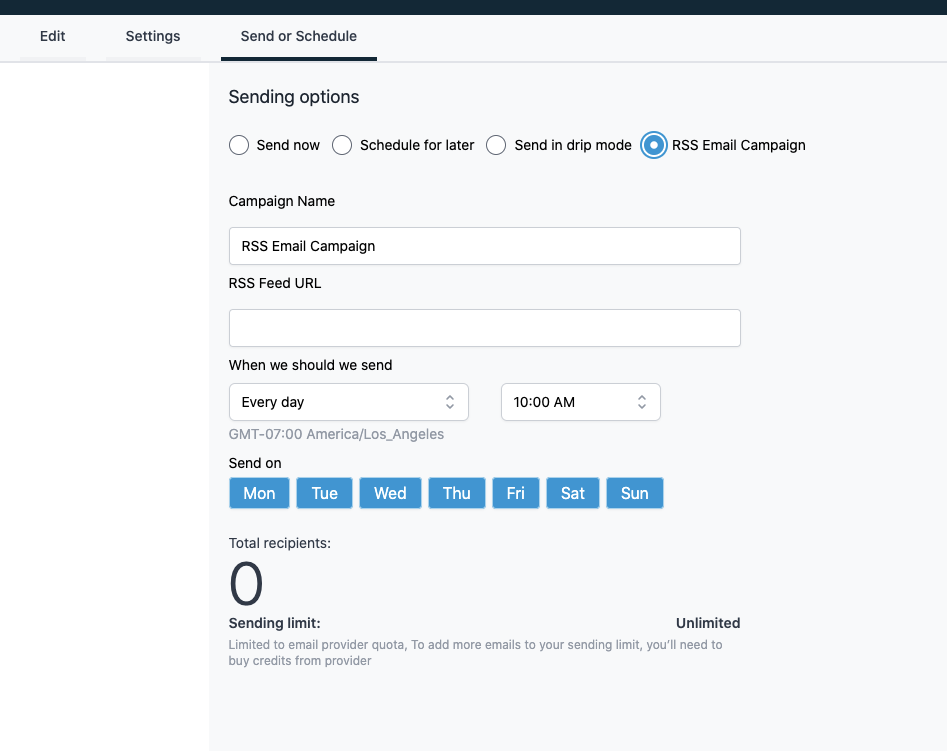
Sending Options:
- "When we should send": Here you can determine whether RSS Emails should go out Daily, Weekly, or Monthly as well as at what time the emails should go out.
- Send on: Here you can choose the Day(s) of the week on which you want to send the campaign
- Email type
- RSS Feed URL
- Repeat After

Testing RSS Emails
When using the "Send Test Email" functionality with an email that has RSS Elements, you will see a new "RSS Feed URL" field where you'll need to provide the RSS Feed URL from where you want to pull the content. Without this, all RSS tag based custom variables will replace by empty text.

View and Edit RSS Campaign:

Actions:
- Edit: If you click the pencil icon to edit, you will see a confirmation modal asking you to confirm that you would like to cancel the currently scheduled email and re-schedule a new one.

- Once you click Confirm, it will cancel the current scheduling and open up a Email Builder with RSS Scheduling options pre-filled with the current cancelled scheduling information

- Pause/Resume: You can also pause and resume the execution through the Pause/Resume actions
- Delete: You can also delete the RSS scheduling. Deleting will first cancel the scheduling then delete it permanently from the system
Was this article helpful?
That’s Great!
Thank you for your feedback
Sorry! We couldn't be helpful
Thank you for your feedback
Feedback sent
We appreciate your effort and will try to fix the article