HighLevel Ad Manager supports multiple ad groups and ads inside a Google Search campaign. You can create up to 10 ad groups per campaign and up to 3 ads in each ad group, giving you more control over keyword organization, ad variations, and reporting.
This article explains the campaign hierarchy, current limits, keyword and URL requirements, campaign setup, management controls, review process, and detailed performance reporting.
This guide covers the multiple-ad-group workflow for Google responsive search campaigns created in HighLevel Ad Manager. Google Demand Gen and Meta campaign builders use separate setup flows.
What is Google Ads Multiple Ad Groups and Ads?
Multiple ad groups let you organize one Google Search campaign into separate keyword and messaging themes. Each ad group contains its own base website URL, positive and negative keywords, keyword match types, and up to three responsive search ads.
HighLevel displays this structure as Campaign → Ad Group → Ad. Campaign-level settings control the overall budget and audience, ad-group settings define keyword targeting and the common base URL, and ad-level settings control headlines, descriptions, final URLs, and display paths.
Key Benefits of Multiple Ad Groups and Ads
A multi-level campaign structure helps keep keywords, landing pages, and ad messaging aligned. It also gives teams a clearer way to compare performance without creating a separate campaign for every product, service, or audience theme.
- Flexible Campaign Structure: Organize one campaign into distinct ad groups for different offers, services, locations, or keyword themes.
- Creative Variation: Add up to three ads in an ad group to compare different headlines, descriptions, and display paths.
- Focused Keyword Control: Manage positive keywords, negative keywords, and Broad, Phrase, or Exact match types at the ad-group level.
- Consistent Landing-Page Structure: Apply a common base URL to ads in the same ad group while allowing different display paths.
- Faster Campaign Building: Create, duplicate, and delete ad groups or ads from the campaign hierarchy.
- Pre-Publish Review: Verify campaign settings and the full hierarchy before sending the campaign to Google.
- Granular Reporting: Review performance at the campaign, ad-group, ad, and keyword levels.
Before You Start
Preparing the account connection and campaign assets before entering the builder reduces interruptions during setup. Confirm that the correct Google Ads account is connected and that you have the landing pages, keyword themes, and ad copy needed for each ad group.
- Confirm that Ad Manager is enabled for the sub-account and available to the user creating the campaign.
- Connect the correct Google account and eligible Google Ads account in Ad Manager.
- Confirm that the connected Google Ads account has the payment method used for advertising spend.
- Prepare one landing-page base URL for each planned ad group.
- Group related positive and negative keywords by product, service, location, or intent.
- Prepare responsive search ad headlines and descriptions that accurately match the selected keywords and landing page.
For account connection steps, see Connect Google with Ad Manager.
Campaign Structure and Current Limits
Each level of the campaign builder controls a different part of delivery. Understanding where a setting belongs helps prevent mismatched URLs, duplicate keyword themes, and incomplete campaigns.
| Level | What You Configure | Current Limit or Requirement |
|---|---|---|
| Campaign | Campaign name, bid strategy, daily budget, schedule, networks, audience controls, and supported campaign-level assets. | At least 1 ad group is required. |
| Ad Group | Ad-group name, base website URL, positive keywords, negative keywords, and keyword match types. | The previous limit of 40 positive and 40 negative keywords has been removed. Each keyword can contain up to 80 characters. |
| Ad | Final URL, display paths, headlines, descriptions, and responsive search ad preview. | Up to 3 ads per ad group, with at least 1 ad required in each group. |
Required campaign structure: A campaign cannot be published without at least one ad group and at least one ad inside every included ad group.
Keywords, URLs, and Ad Creative
Keywords determine which searches can be associated with an ad group, while the URL and creative fields determine what the searcher sees and where the click leads. Keeping these elements closely related improves campaign organization and makes reporting easier to interpret.
Keyword Match Types
Each positive or negative keyword can use a supported match type. Select the match type that reflects how closely a search should relate to the keyword.
| Match Type | How It Appears |
|---|---|
| Broad | keyword |
| Phrase | "keyword" |
| Exact | [keyword] |
Base URL and Display Paths
The base website URL is established for the ad group and is used to generate keyword suggestions. Ads in that ad group must use the same base URL, but each ad can use its own optional display paths. Two display-path segments are supported, with up to 15 characters in each segment.
Responsive Search Ad Fields
Each ad can include up to 15 headlines with a 30-character limit per headline and up to 4 descriptions with a 90-character limit per description. Complete every field marked as required in the builder before opening the Review screen.
How To Setup Multiple Ad Groups and Ads
Build the campaign from the highest level down so that every ad group inherits the correct campaign settings and every ad aligns with the right keyword theme. Review each level before creating additional groups or moving to publication.
Step 1: Start a Google Search Campaign
Begin from Ad Manager and choose the Google campaign flow that supports responsive search ads. You can start with a blank campaign or use an available Ad Manager template.
- Go to Marketing → Ad Manager.
- Click Create Campaign.
- Select Google, then click Next.
- Select Start from Scratch or choose an available Ad Manager template.
Step 2: Configure Campaign-Level Settings
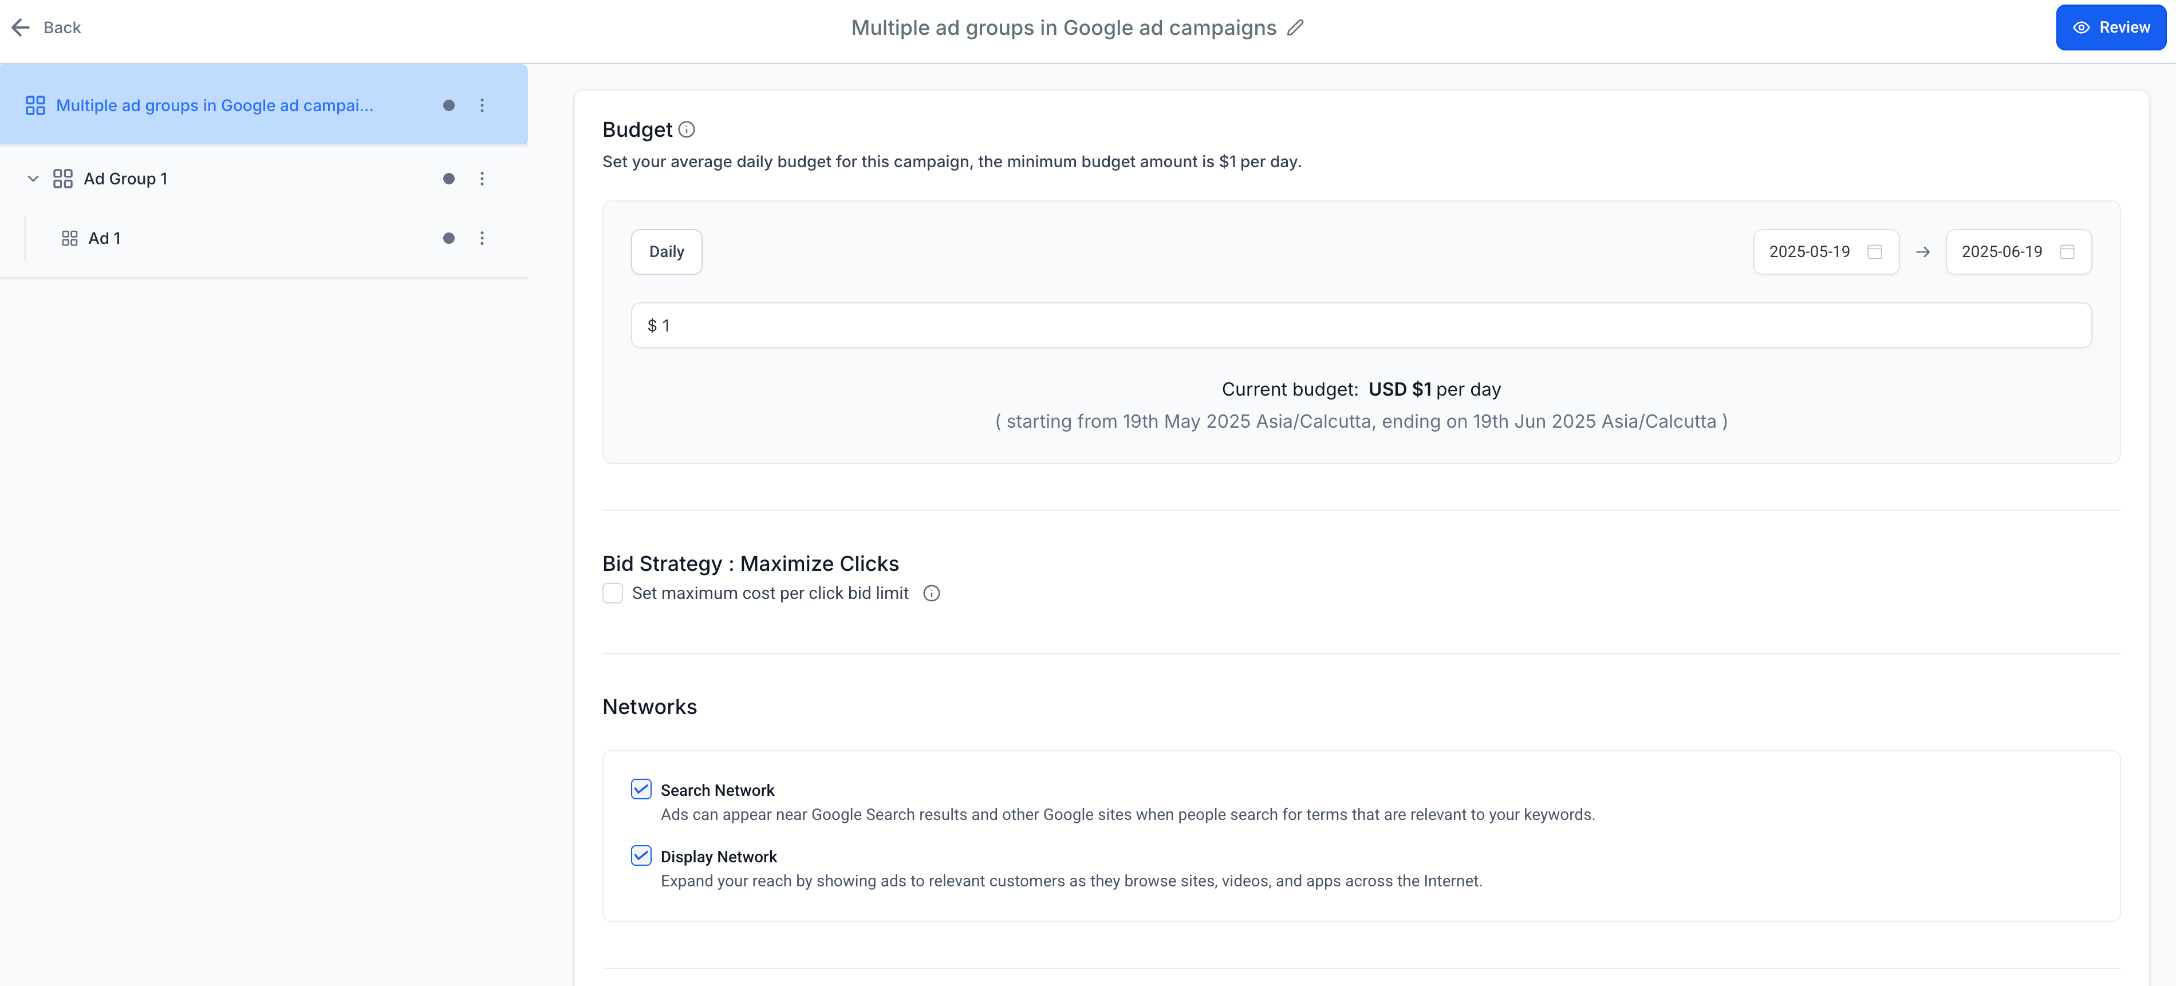
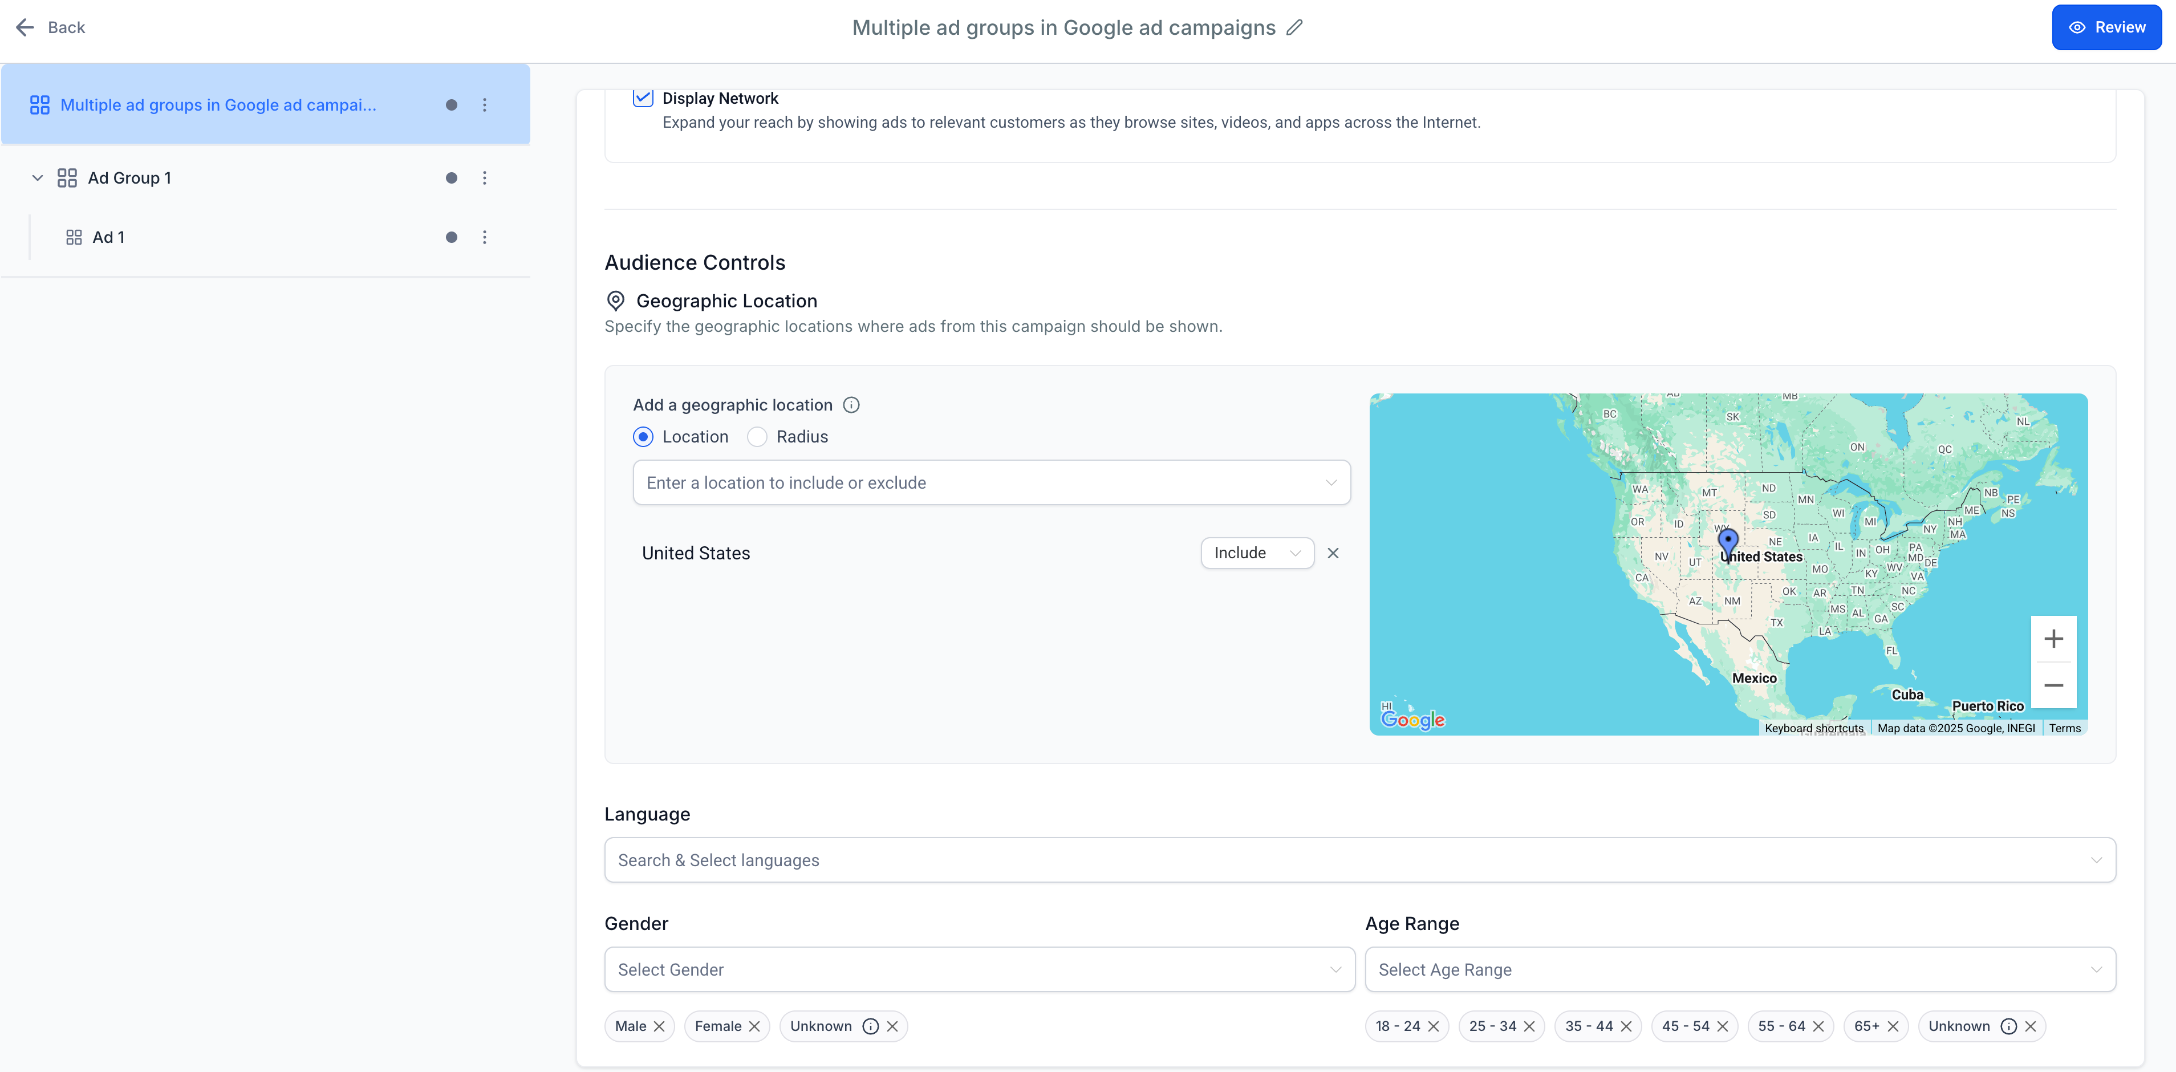
Campaign-level settings define the budget, delivery method, and audience shared by every ad group in the campaign. Confirm these values before building ad-group keywords and ads.
- Enter a clear campaign name.
- Review the Maximize Clicks bid strategy and set a maximum CPC limit when appropriate.
- Enter the daily budget and campaign date range.
- Choose the available network settings.
- Configure geographic locations, languages, and optional age or gender selections.
- Complete any other required campaign-level declarations or assets shown in the current builder.
Step 3: Configure the First Ad Group
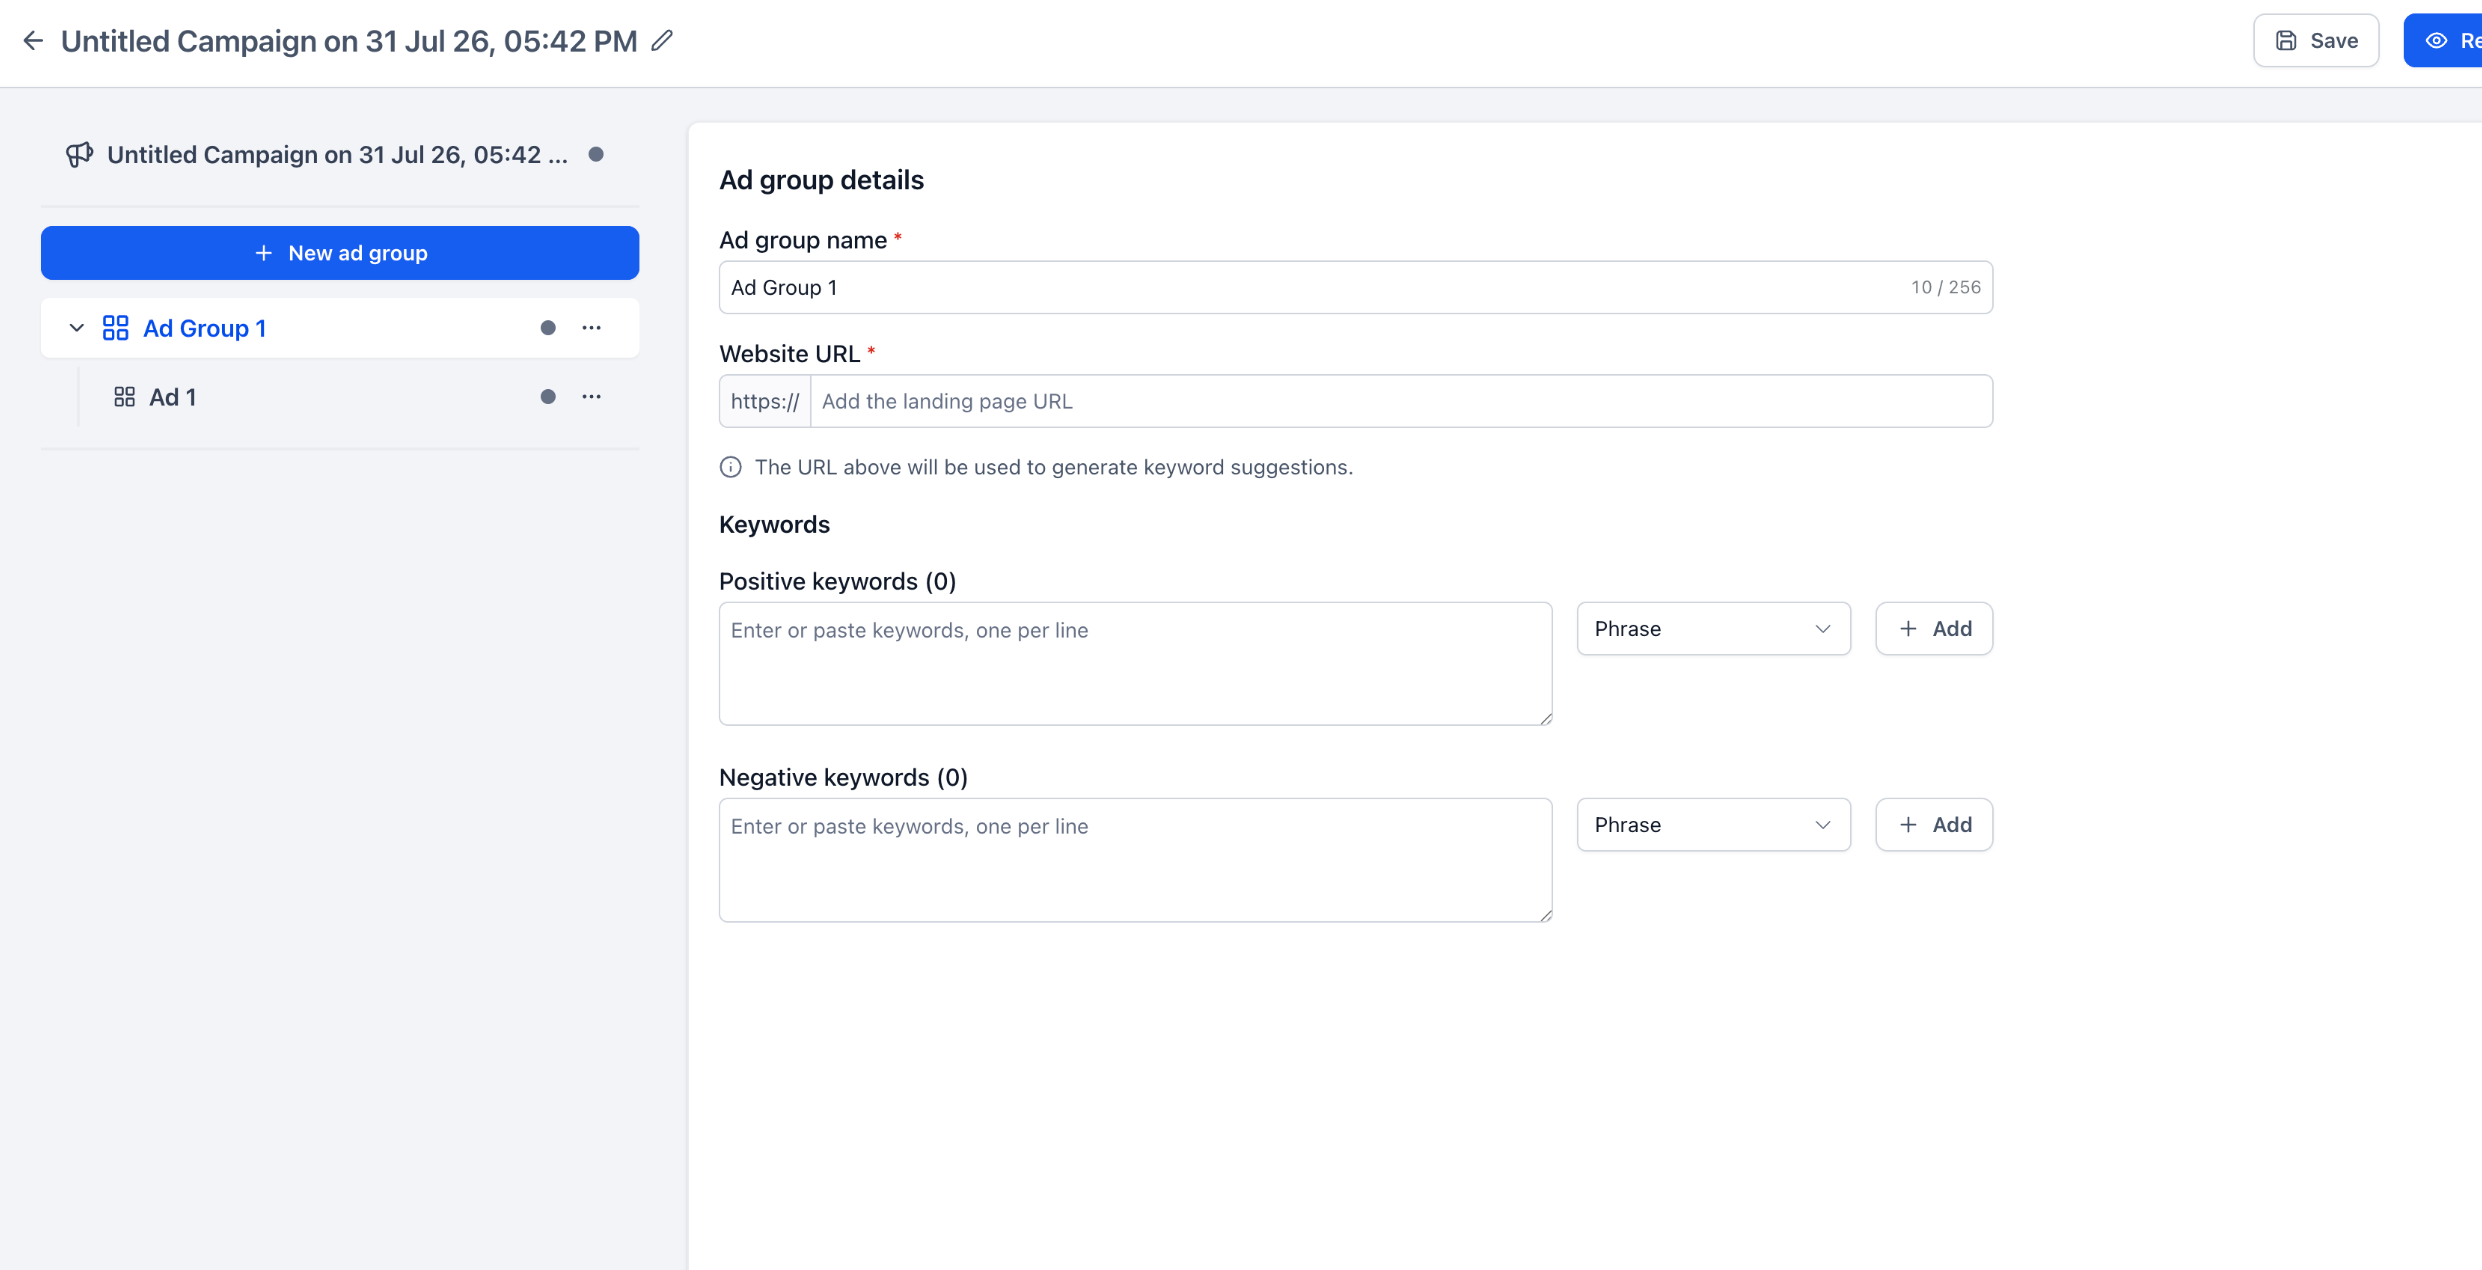
An ad group should represent one closely related keyword and landing-page theme. Give the group a descriptive name, enter its base URL, and add the keywords that should be associated with that theme.
- Select the ad group in the campaign hierarchy.
- Enter the Ad Group Name.
- Enter the landing page in Website URL.
In Positive Keywords, enter or paste multiple keywords separated by commas or new lines. You can also use available keyword suggestions.
Select the required match type (Broad, Phrase, or Exact) and click Add to add the keywords together.
To exclude irrelevant searches, repeat the process in Negative Keywords. Duplicate keywords and empty entries are automatically removed during bulk entry.
Step 4: Create the Ad
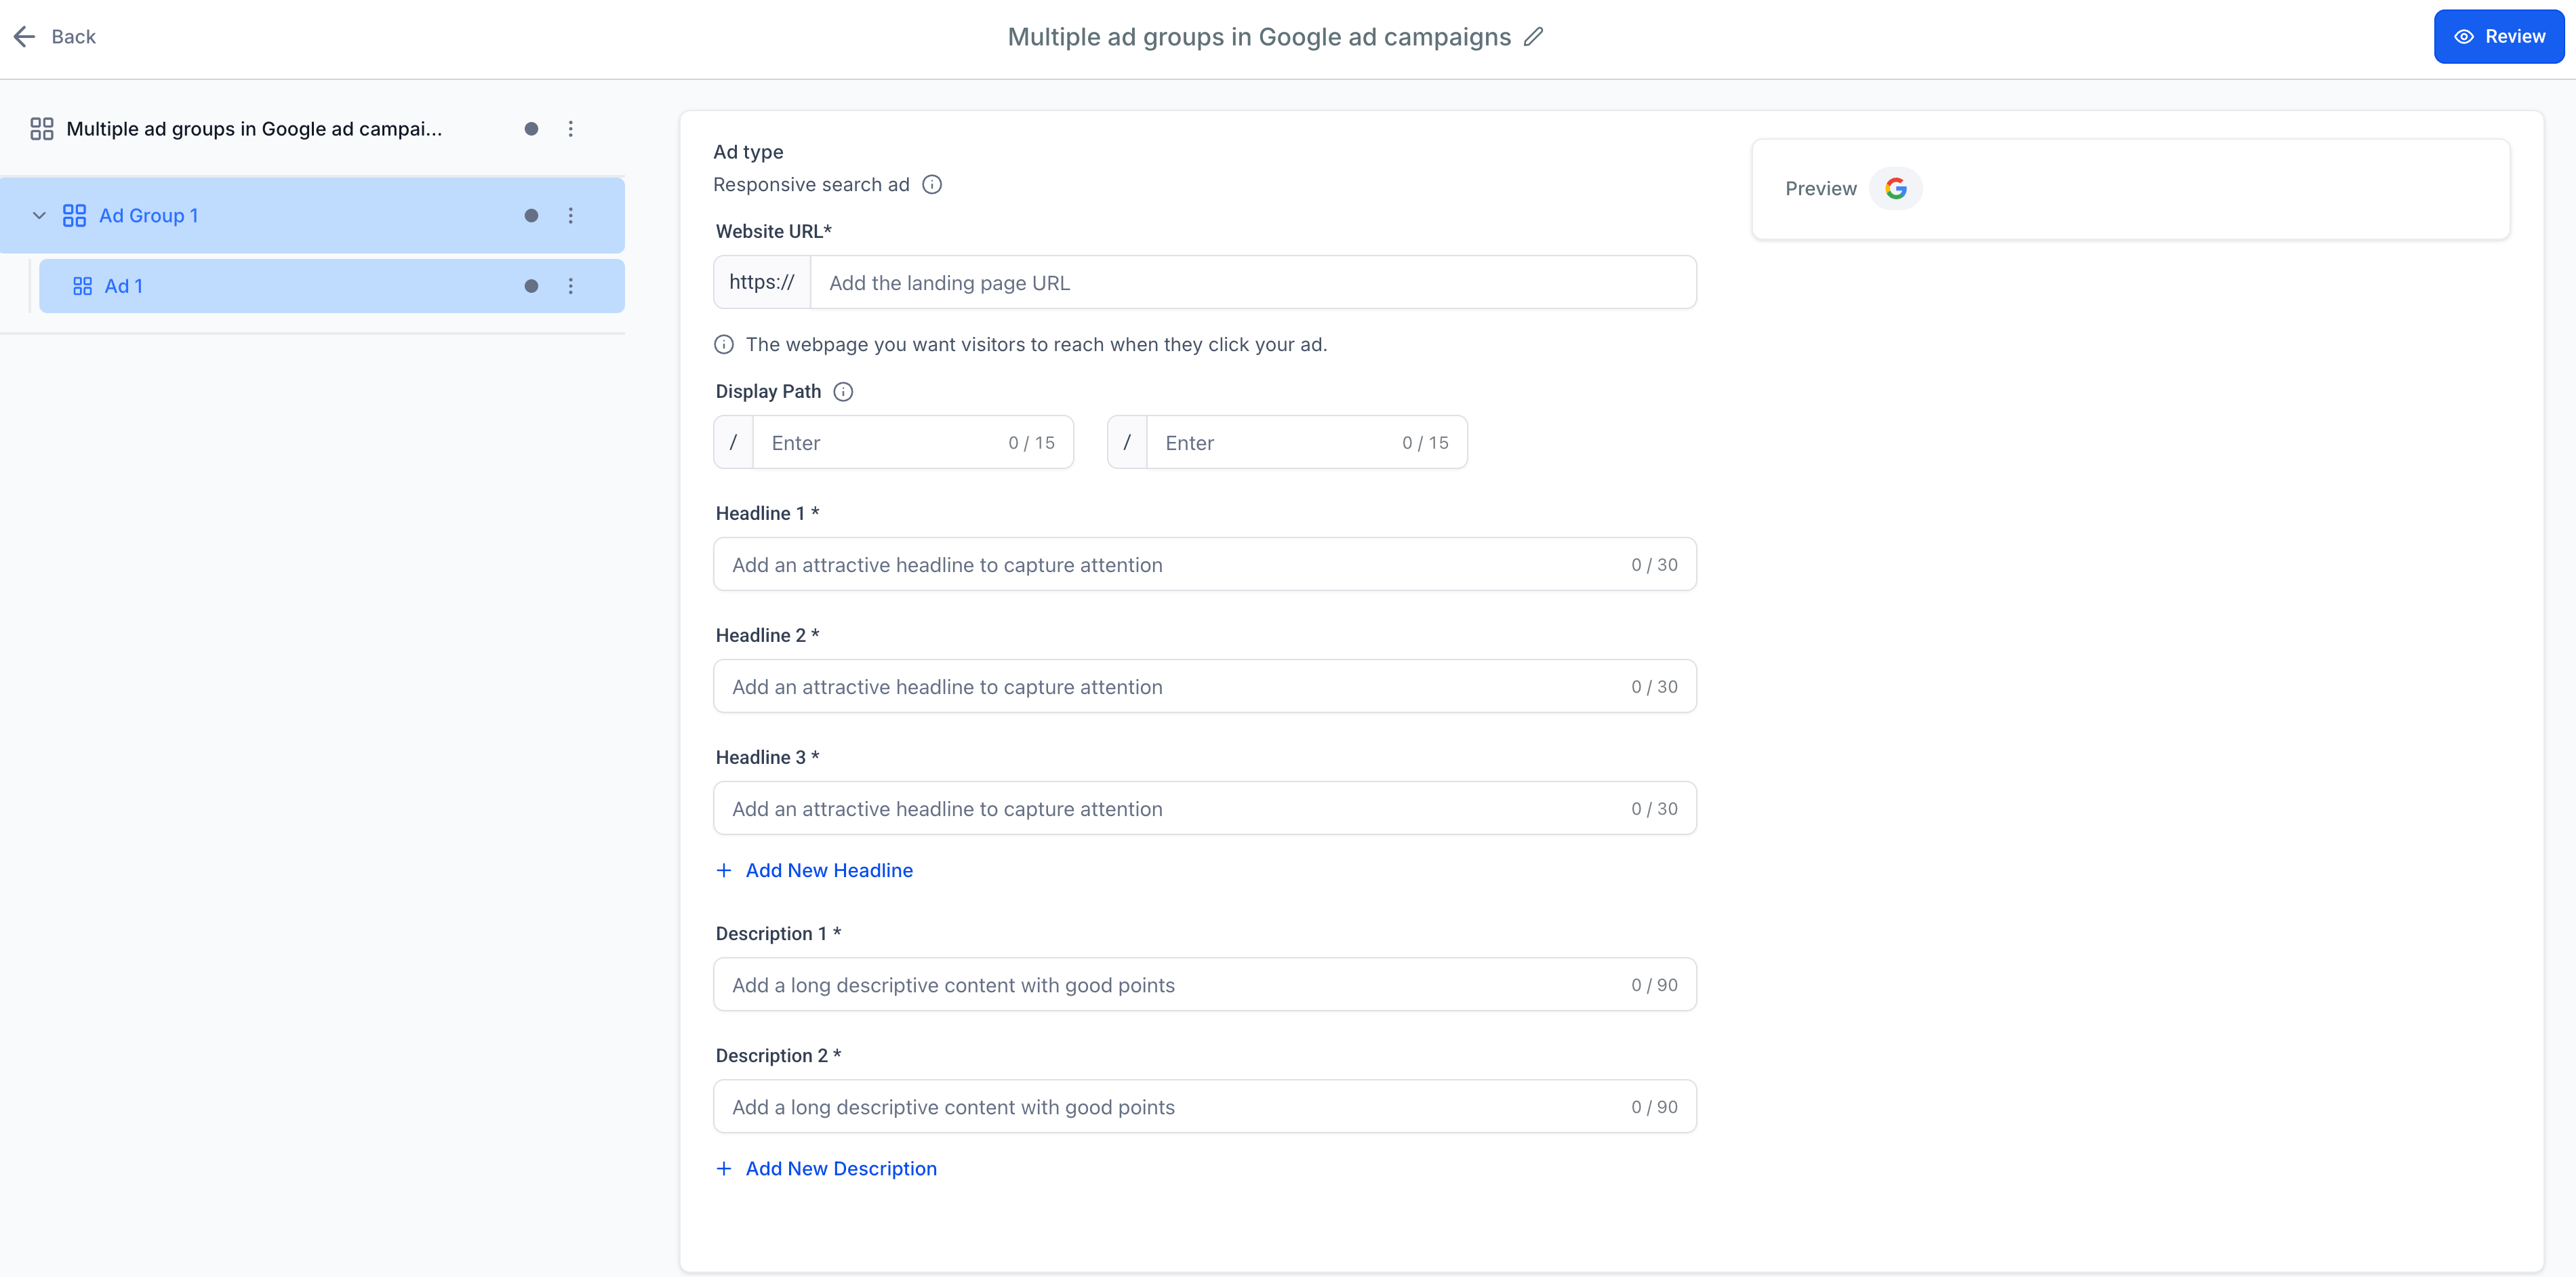
The ad should match the search intent represented by the ad group and direct visitors to a page on the same base URL. Use several accurate headlines and descriptions so the responsive search ad has multiple content variations.
- Select the ad beneath the applicable ad group.
- Enter the final website URL using the ad group’s common base URL.
- Add optional display paths.
- Complete the required headline fields, then add more headlines as needed, up to the supported limit.
- Complete the required description fields, then add more descriptions as needed, up to the supported limit.
- Review the available ad preview.
Manage Ad Groups and Ads
The campaign hierarchy provides quick management controls at the campaign, ad-group, and ad levels. Use these controls to expand the campaign, reuse an existing configuration, or remove draft elements while preserving the minimum required structure.
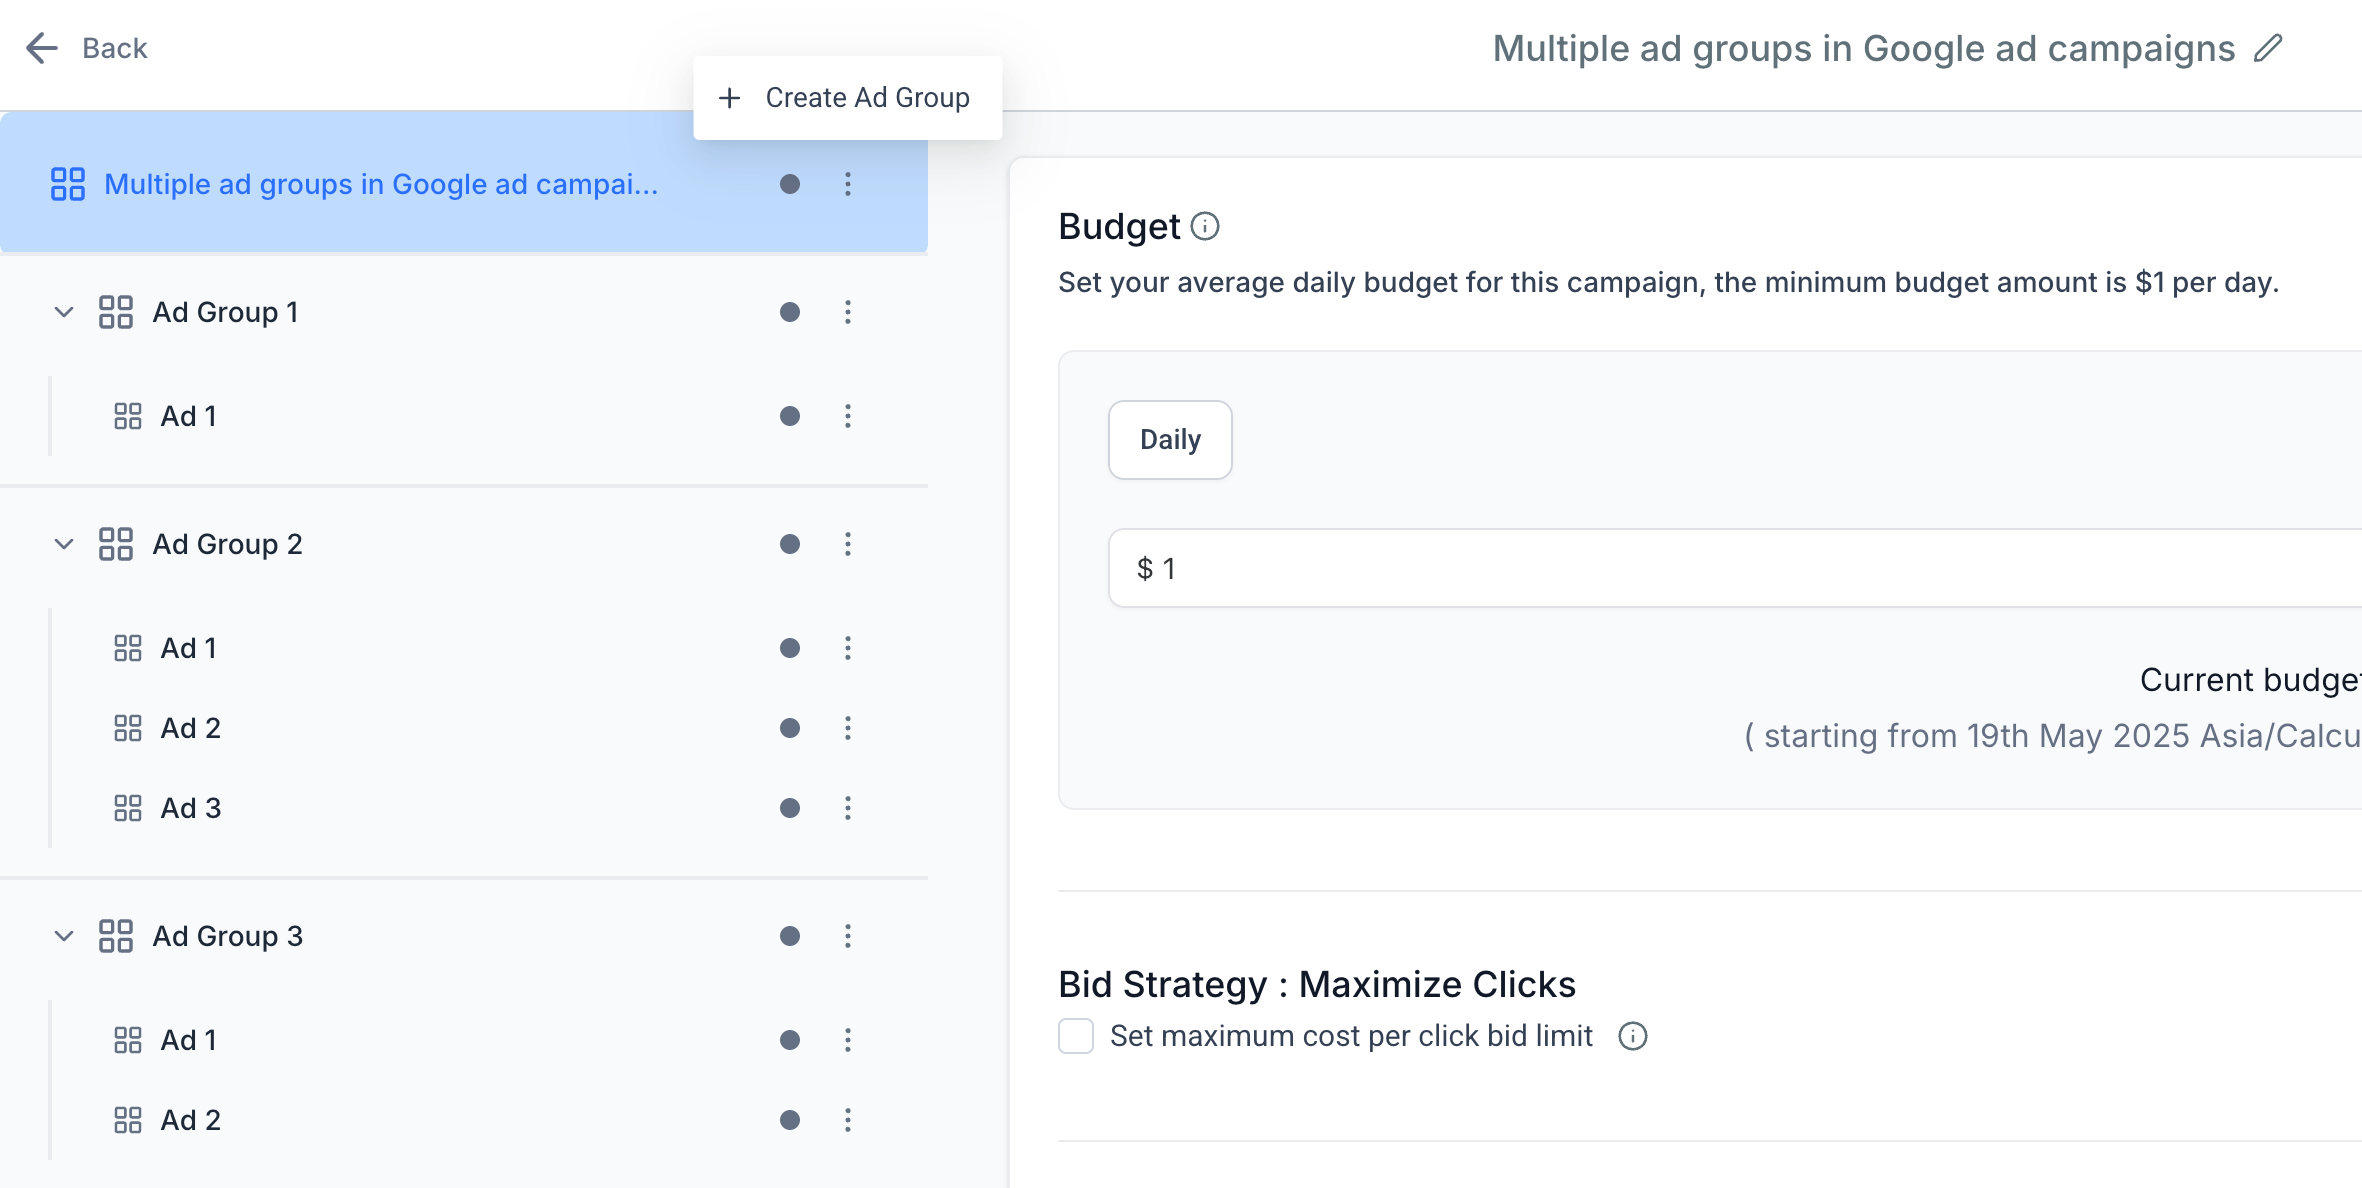
Create Another Ad Group
Add another ad group when the new keywords, landing page, or messaging represent a distinct theme. Open the campaign-level ellipsis menu and select Create Ad Group.
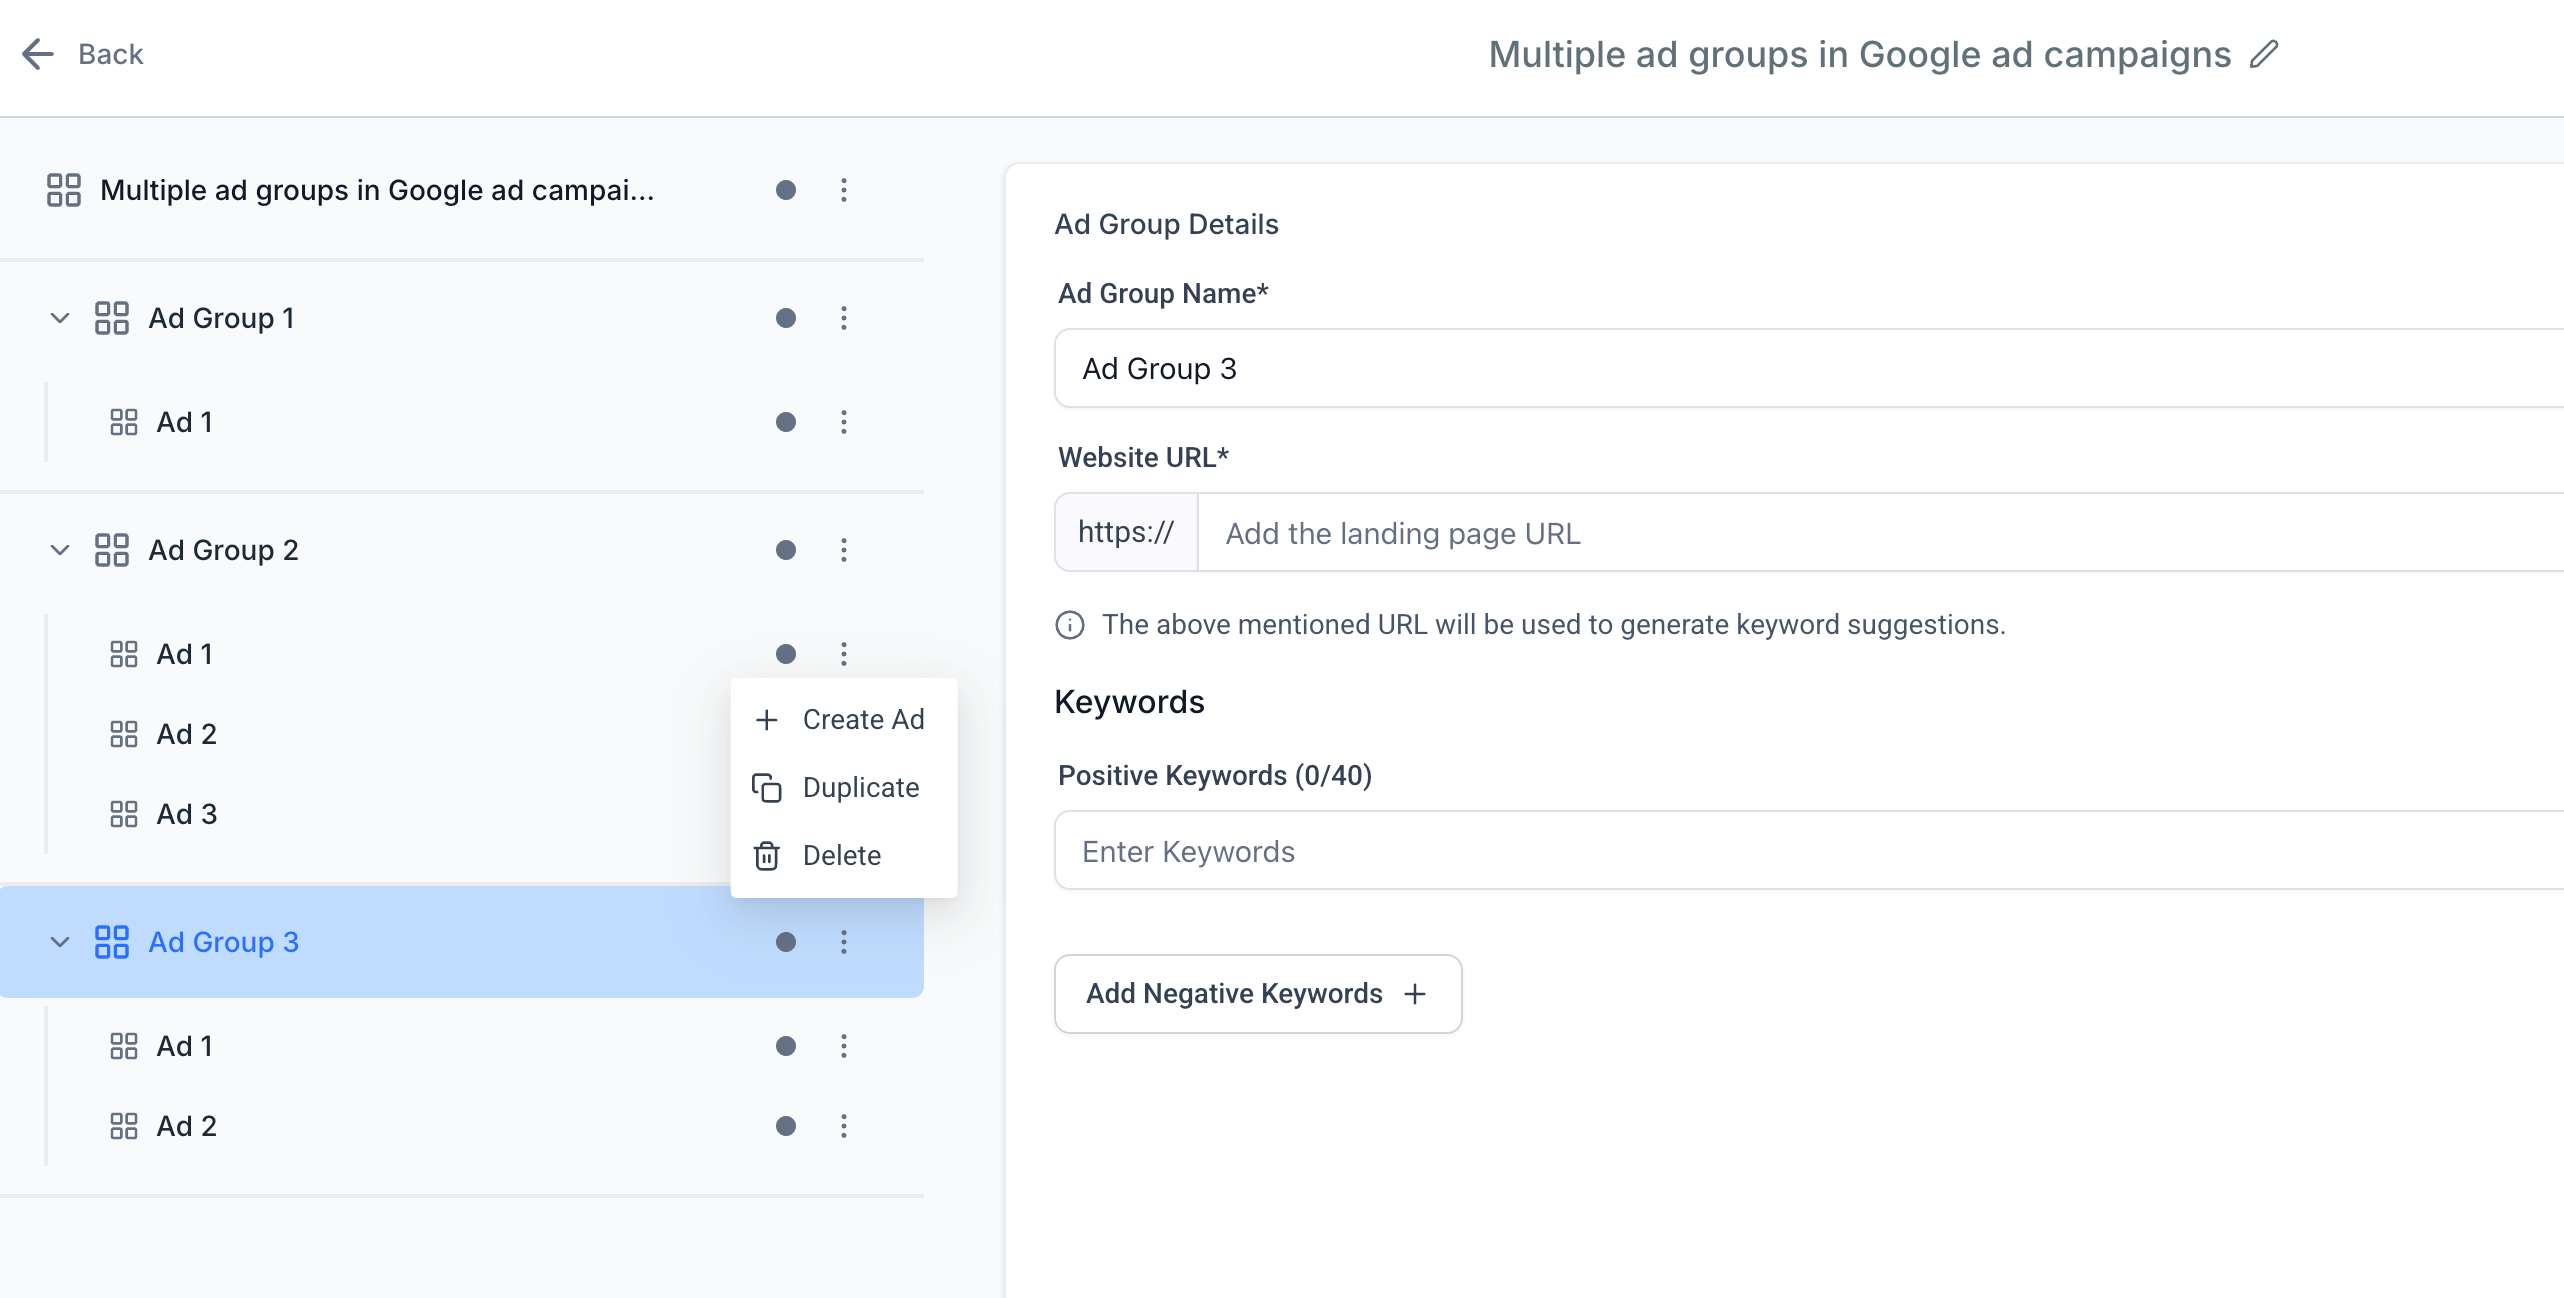
Manage an Ad Group
The ad-group menu can create a new ad, duplicate the selected ad group, or delete the selected group. The only remaining ad group cannot be deleted because every campaign requires at least one.
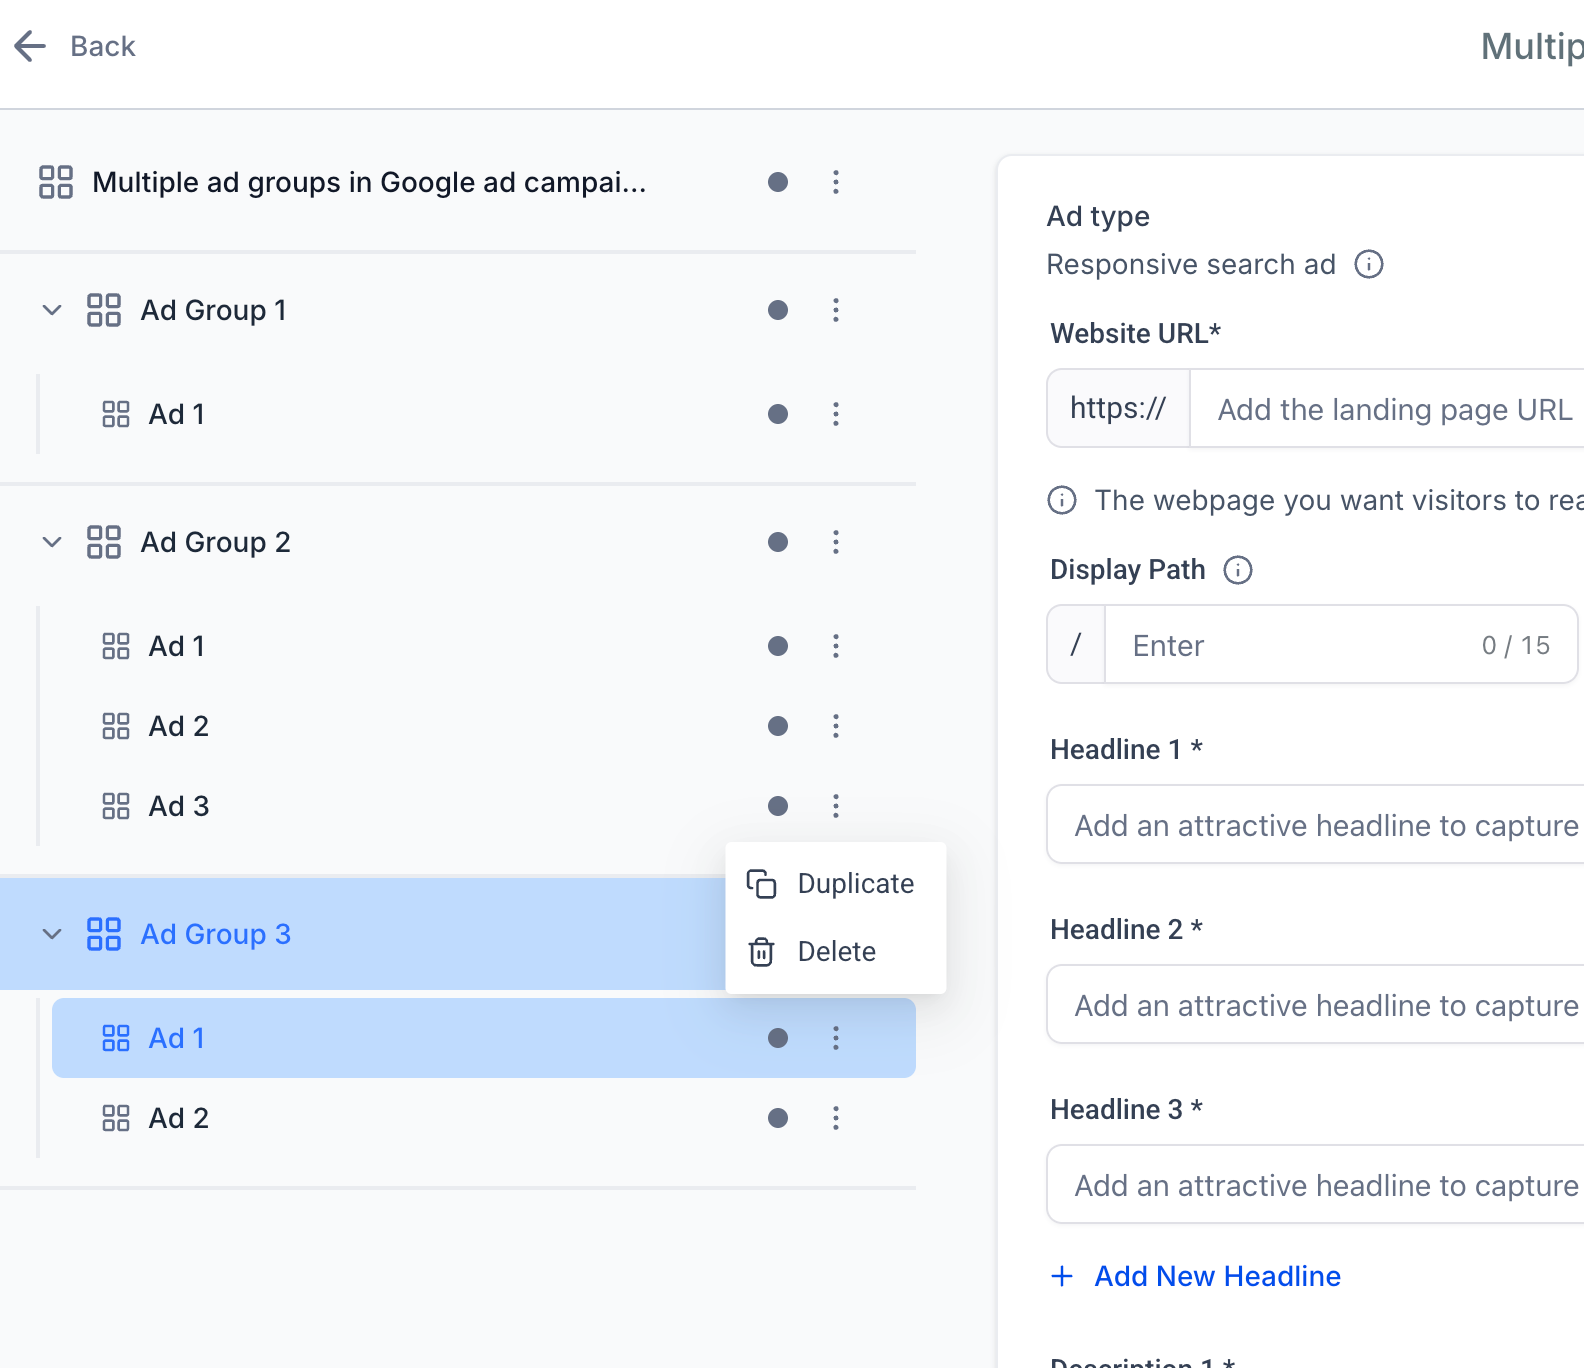
Manage an Individual Ad
The ad-level menu can duplicate or delete the selected ad. At least one ad must remain in every ad group, so the only remaining ad cannot be deleted.
Review and Publish the Campaign
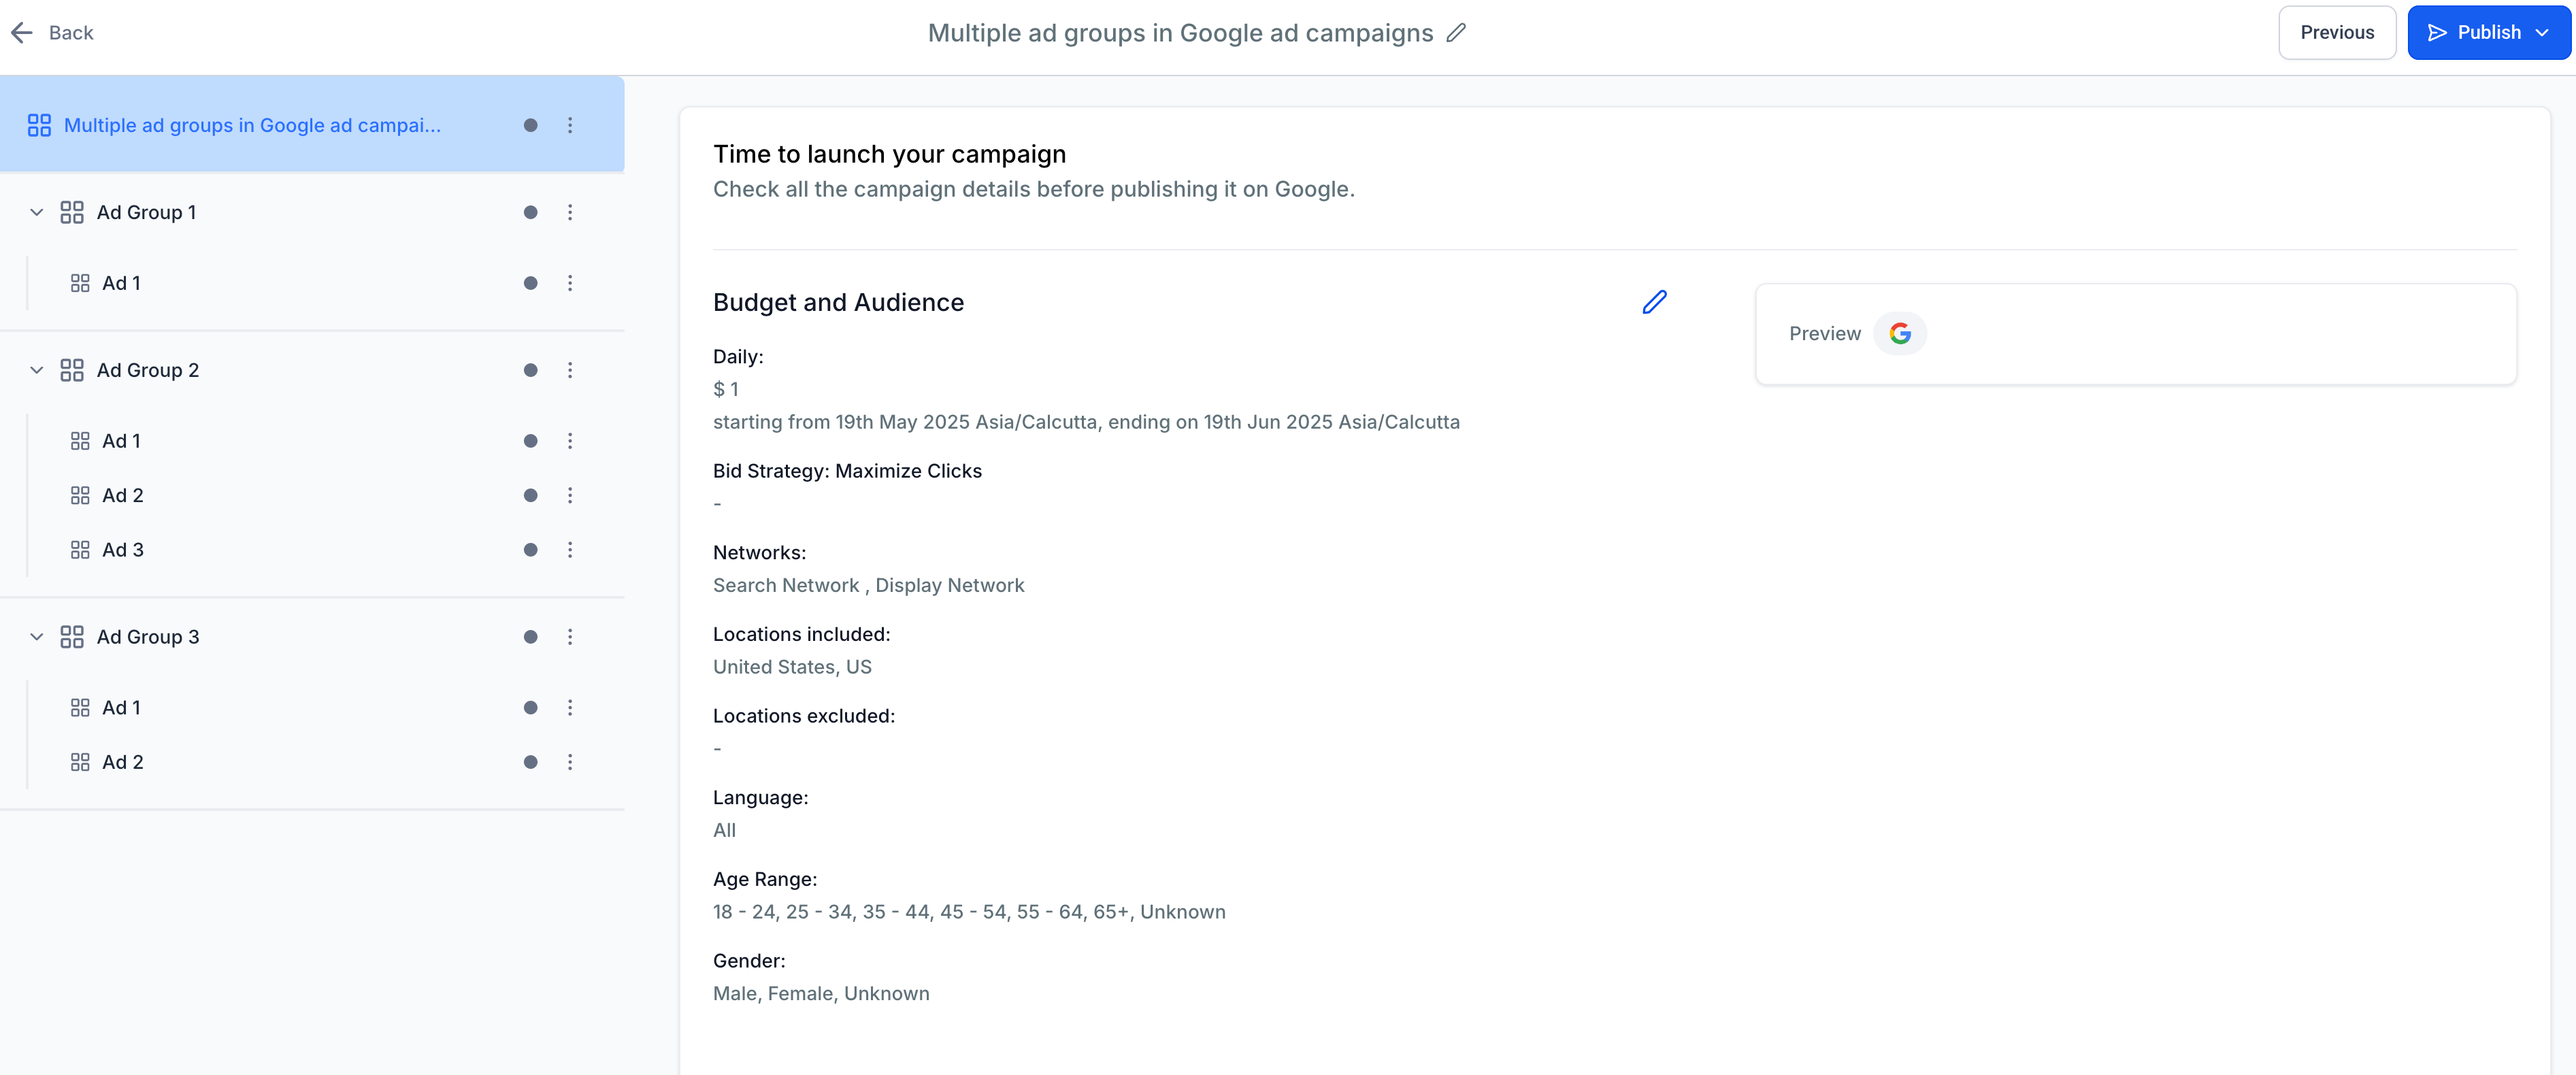
The Review screen gives you one final opportunity to verify campaign-level settings and the complete ad-group hierarchy. Confirm that each group contains the intended keywords, landing-page base, and at least one complete ad before publishing.
- Click Review in the campaign builder.
- Review the budget, schedule, bid strategy, networks, locations, language, age range, and gender settings.
- Use the hierarchy to inspect every ad group and ad.
- Return to the applicable level and correct any missing or inaccurate information.
- Click Publish when the campaign is complete.
Billing reminder: Advertising spend is charged through the payment method associated with the connected Google Ads account. Publishing also submits the campaign to Google’s review and delivery systems.
Monitor Performance by Campaign Level
Granular reporting helps identify whether performance differences are coming from an entire campaign, a specific ad group, an individual ad, or a keyword. Use a consistent date range when comparing results so each level is evaluated over the same period.
- Go to Marketing → Ad Manager.
- Open Statistics.
- Select Google and choose a date range.
- Click the applicable campaign name.
- Use the Ads, Ad Groups, and Keywords tabs to review available metrics.
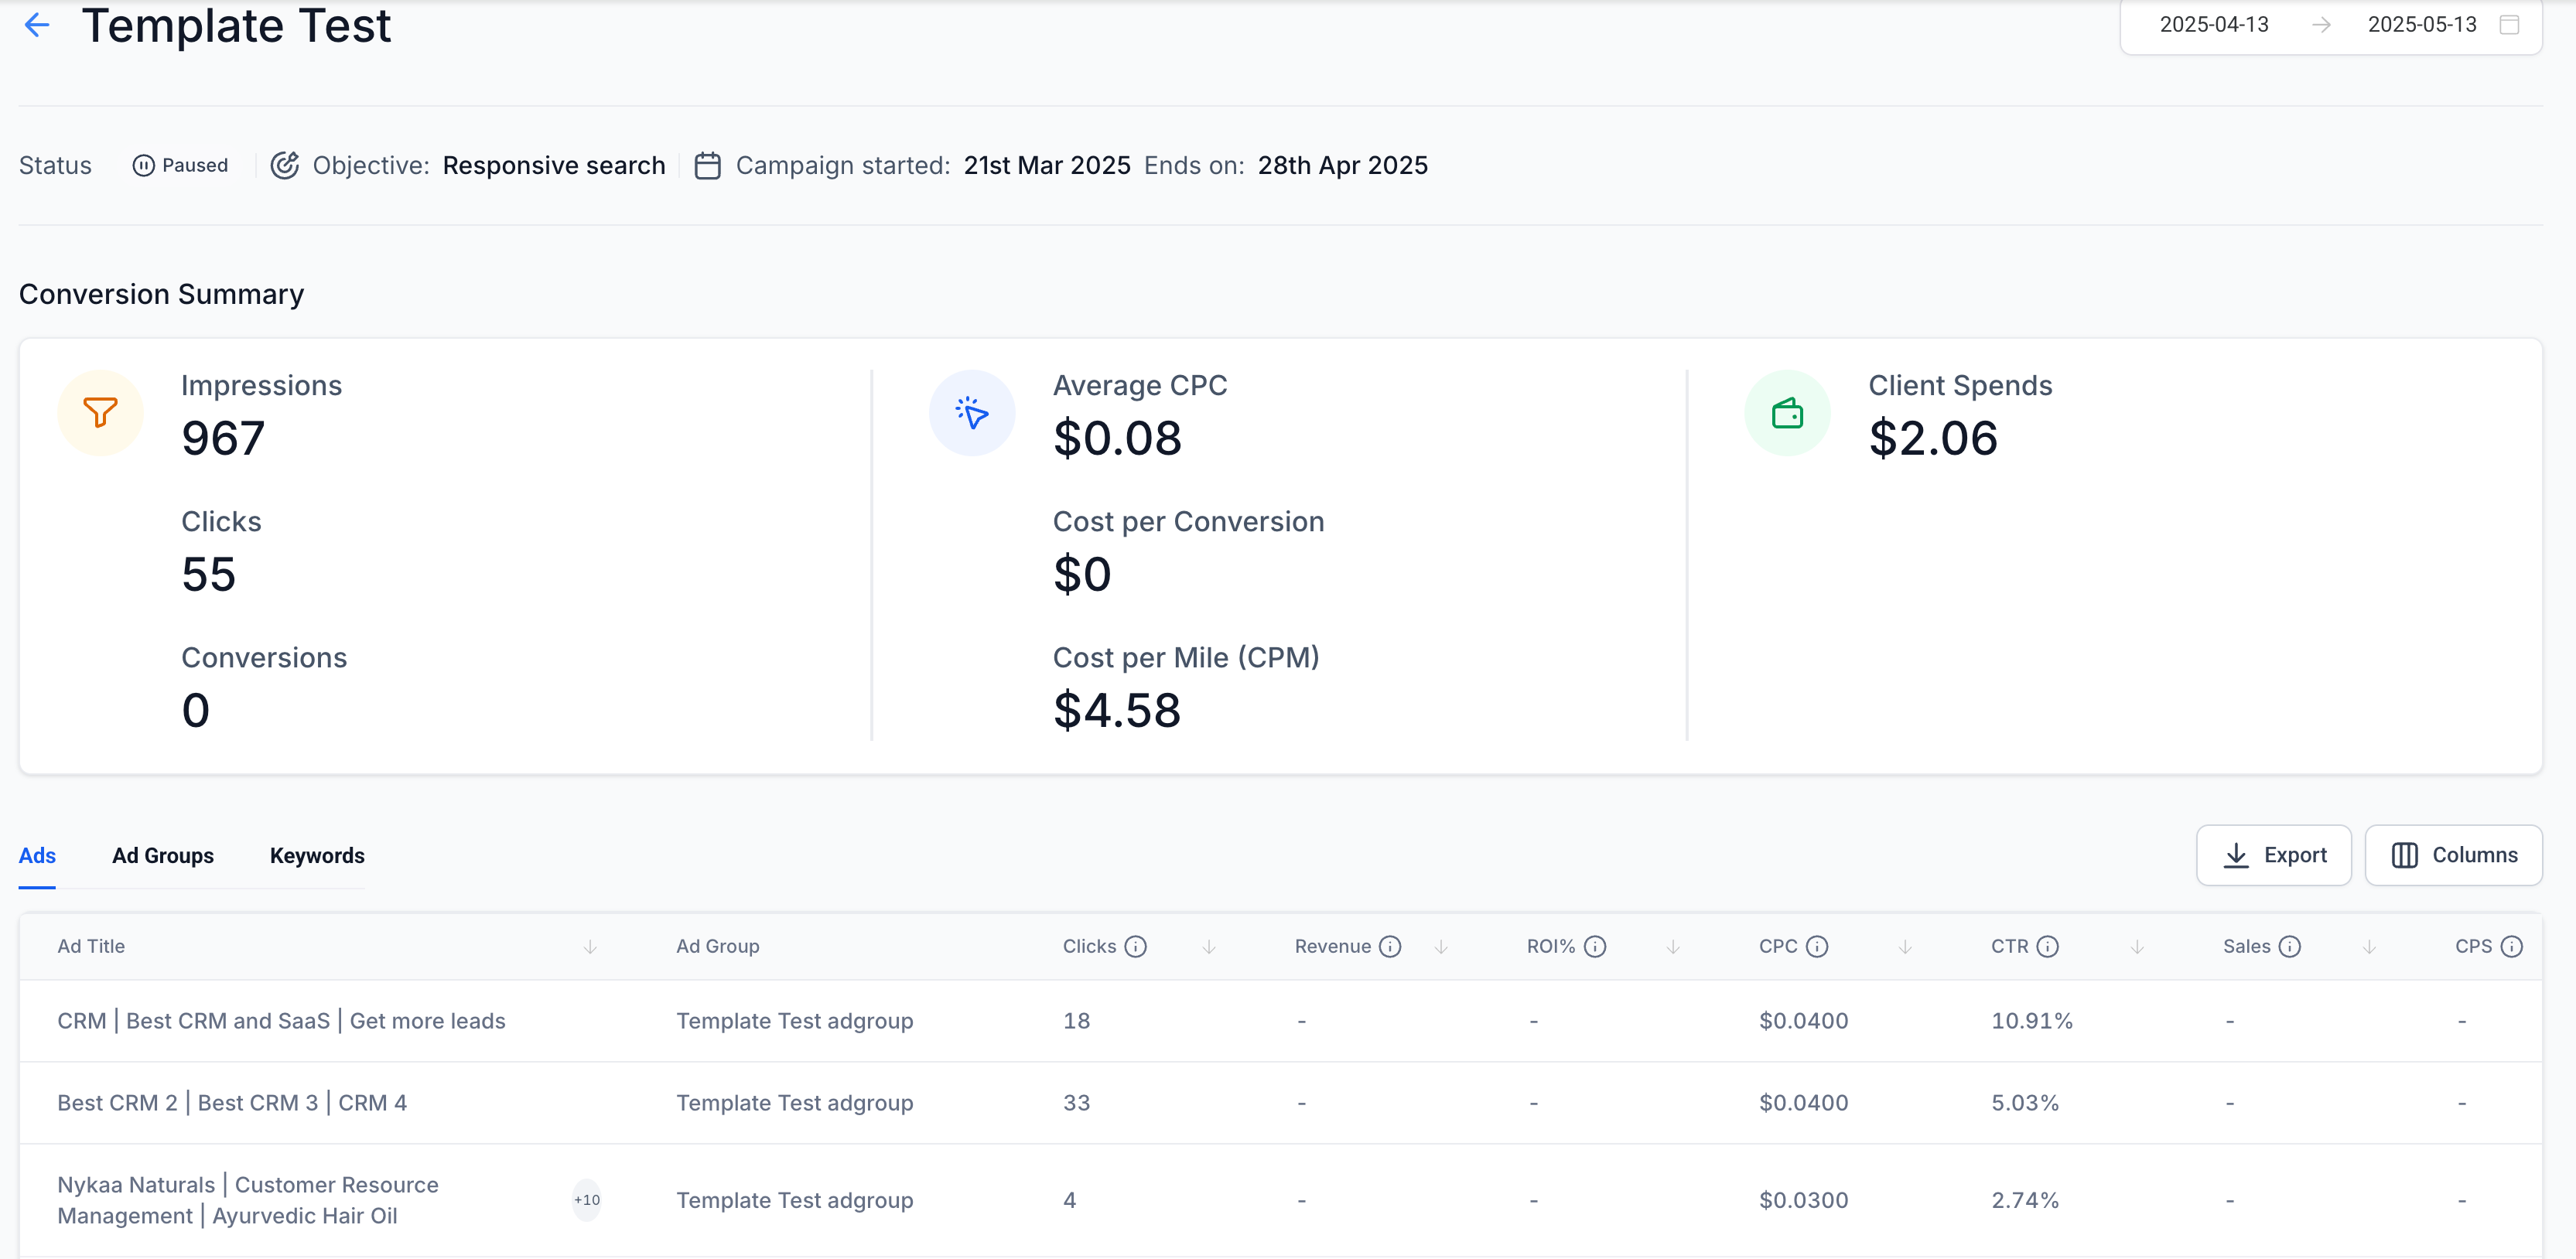
For a full explanation of the available metrics, see How to View Google Ad Campaign Statistics in Ad Manager.
Troubleshooting Multiple Ad Groups and Ads
Most campaign-builder issues can be traced to account access, missing required fields, an invalid hierarchy, or a mismatch between an ad group’s base URL and an ad’s final URL. Review the applicable level before rebuilding the campaign.
| Issue | What to Check |
|---|---|
| Google is unavailable during campaign creation | Confirm Ad Manager access, the Google connection, required permissions, and selection of an eligible Google Ads account. |
| Keyword suggestions do not appear | Confirm that a complete, accessible website URL has been entered for the ad group. You can still enter keywords manually. |
| An ad URL is rejected | Confirm the ad uses the same base URL established for its ad group and that the final landing page is valid. |
| Delete is unavailable or blocked | A campaign must keep at least one ad group, and every ad group must keep at least one ad. |
| The Review screen shows incomplete information | Open the highlighted campaign, ad-group, or ad level and complete every required field before publishing. |
| Statistics are empty after publishing | Confirm the campaign and date range, then allow time for Google campaign delivery and reporting data to populate. |
Frequently Asked Questions
Was this article helpful?
That’s Great!
Thank you for your feedback
Sorry! We couldn't be helpful
Thank you for your feedback
Feedback sent
We appreciate your effort and will try to fix the article